Leaderboard


Popular Content
Showing content with the highest reputation on 04/22/2021 in all areas
-
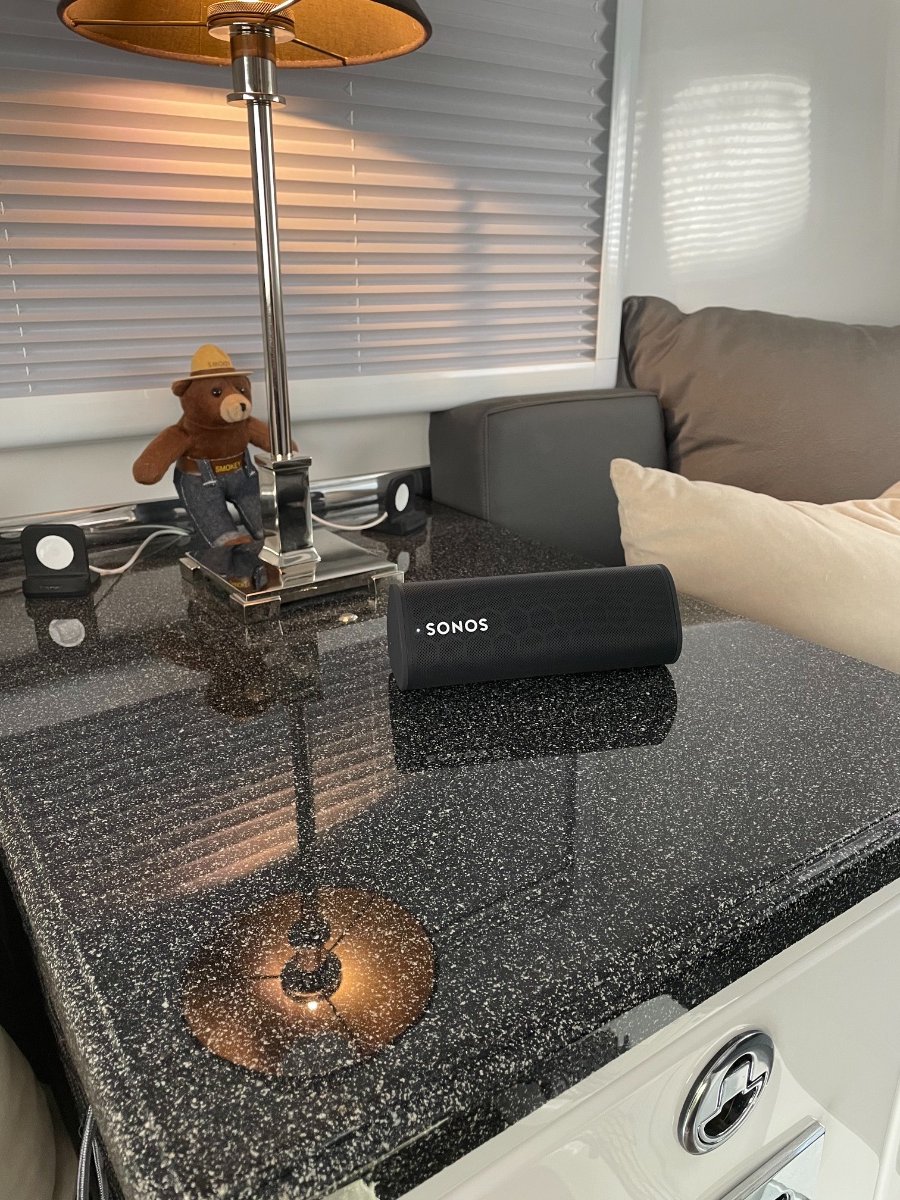
I've posted in other threads here and there about my experiments with speakers in the Ollie, but thought I'd make a separate topic. I don't think we have one for Sonos stuff, through I know we've talked about them in three or four other speaker threads. Anyway, any excuse to talk music. Background for those who don't know: We got our Ollie back when Oliver allowed customer modifications, and one of our mods was to eliminate the entertainment system completely. So no TV, radio, or speakers at all. My idea at the time was that we'd have a car stereo place do a really nice system for us. The cost of that though was prohibitive, and at the same time I was starting to look at wireless speakers for the house, so I decided that was the route to go with the trailer as well. Apple had just come out with their HomePod, so I figured I'd try one, use it in the kitchen when at home and move it to the Ollie when we travelled. I won't review the HomePod since they've discontinued it, but suffice to say that I think they had good reason to do so. I wasn't impressed, and it was kind of a pain both in and out of the trailer, so it went onto craigslist. But the idea behind it wasn't bad. My next experiment was a Sonos Beam, which did impress me, and is still in the trailer. It's a different philosophy than the HomePod was, since it's permanently mounted, but I decided on it since it would fit perfectly under the attic. In my opinion, it's not a bad solution especially if you have a TV and want a soundbar for it. It certainly sounds much better than the HomePod - even though it's still a single speaker, and fixed at the end of the trailer, it has a much broader sound than you'd expect. Though one of the drawbacks is definitely that it doesn't really immerse you in the music, at least not the way I like. There are two other drawbacks to mention: one, it's 120 volt so you've got to be plugged in or on your inverter for it to work; and two, it requires a wifi network for your trailer (which I think is included in the latest Ollies?). Overall though, thumbs up. The sound is really nice, and one of the things Sonos does well is in the way they have you tune their speakers to the space when setting them up. Basically, you walk around the space waving your phone around like a nut while the speaker plays tones, and at the end, they recalibrate the EQ of the speakers to give you the best sound and eliminate any boominess. For a small space like the Ollie, that can make a big difference. So we've been pretty happy with it. But of course shortly after I installed the Beam, Sonos came out with the Move, which has a similar form factor to the HomePod. But instead of plugging in, it's battery powered and so is truly portable. In fact it's waterproof to boot, and has a rugged rubber base so you can rest easy taking it outside and using it around the campfire. Plus it can be charged via USB and has Bluetooth audio in addition to WiFi, which means you don't need a WiFi system in the trailer, and don't need to use your inverter to power it. So sure I had to get one, took it with us on our last trip, and REALLY like it. It's easily the best sounding Sonos we have - it's larger than the Sonos Ones that I've been populating the house with, but smaller than the Sonos Five, so the sound is predictably somewhere in between. It just has a really nice resonant quality to it. As a single speaker, it has the same drawback as the beam, but AirPlaying to both simultaneously gives you a really great, immersive sound all through the trailer. With the bonus being that you can grab it and carry it outside. But like the Beam, there are three drawbacks: one, it's a bit big and cumbersome, so kind of difficult to find a spot in the closet or wherever to stow it while traveling; two, you can't do a stereo pair with the Beam (though if you have two Moves, you can pair those); and three, it costs over $300. But to justify the cost, the speaker isn't dedicated to the trailer like the Beam is. Ours has its home in the house, gets taken out to the patio, front porch, etc. Drawbacks aside, had you asked me yesterday what I thought the best system was for your Ollie, I'd have said buy a Move. Or two, if you want stereo or the ability to have music both inside and out at the same time. But ... in the mail today came the tiny Sonos Roam. It's a portable speaker like the Move, but small enough to fit in your hand, and I have to tell you that for such a small speaker, it really packs a punch. Not as good as the Move, of course, but inside the trailer, it actually comes surprisingly close, thanks to the trailer itself adding a great deal of resonance to the sound. Outside, the Move crushes it, but inside the trailer, it's difficult for my somewhat older ears to distinguish them once you've got the volume levels even and fiddled with the EQ (Sonos allows you to set a separate EQ for each speaker, and since the setting is held in the speakers themselves, they'll have the same sound whether you're playing through their app or through iTunes, Spotify, etc.). In fact, in the trailer I think the sound from the Roam is pretty much on par with the Beam, if not a bit better. Daddy bear, momma bear, baby bear, and a shy smokey bear: The size! This little guy could go anywhere - the versatility is fantastic. Bluetooth or wifi, so like the Move it will work without dedicated wifi in the trailer. It has a better waterproof rating than the Move, so you could actually drop it in a lake, if you need to do that. It's half the price, has USB charging (plus wireless charging), and you can stereo pair two of them together. Add velcro to the back, and you could mount them wherever you want, inside or out. Move them around the trailer depending on where you're sitting, etc., then grab one off the wall and take it out to the campfire. Drawbacks? None, really. The Move sounds better, but the versatility of the Roam trumps that, imo. So today if you ask me what I'd recommend for sound in or around the trailer, by all means get yourself a pair of Sonos Roams. They come in white, too, though I don't know if their white is color matched to the Ollie.
 3 points
 -
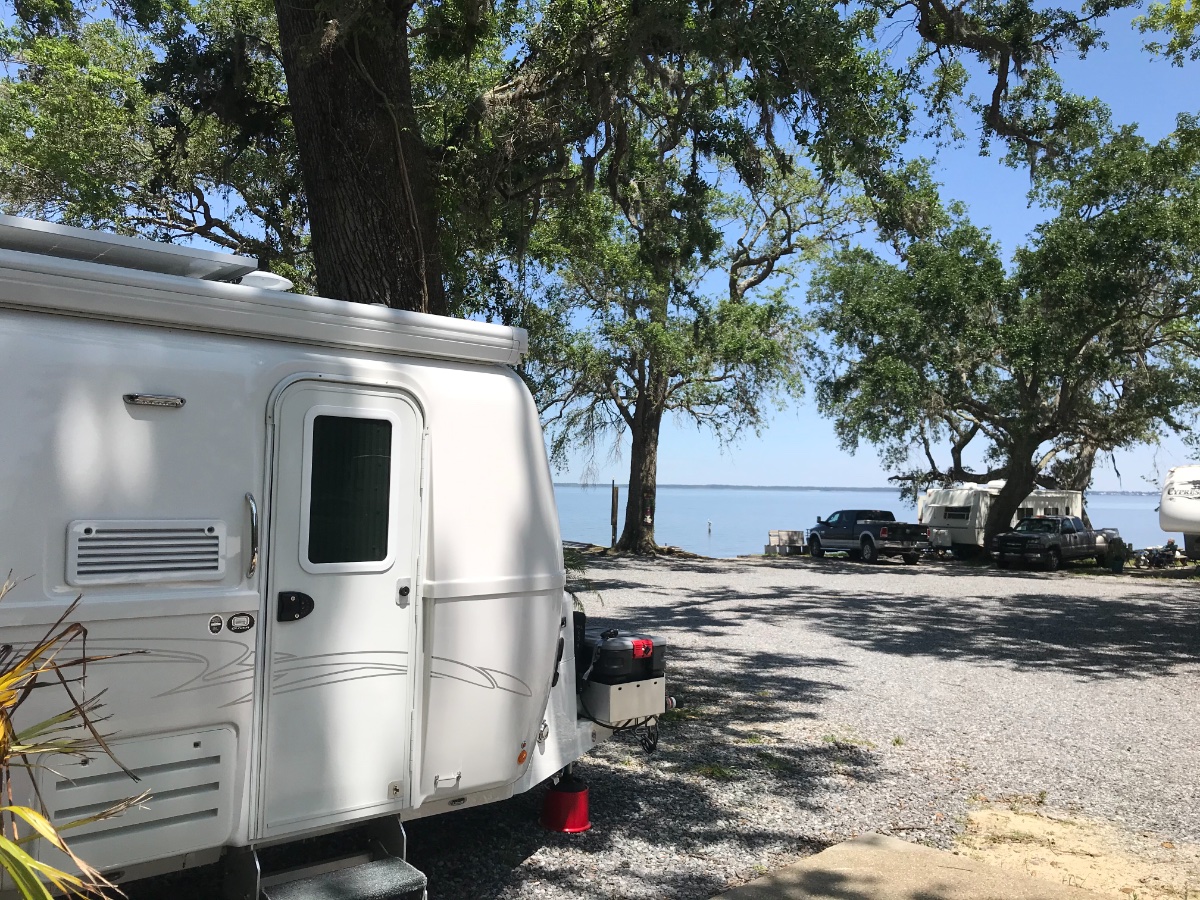
That is ours. Hull #520. We just got back from a 3 month trip in the southwest. Both the truck and Ollie get a bath next week.
3 points
-
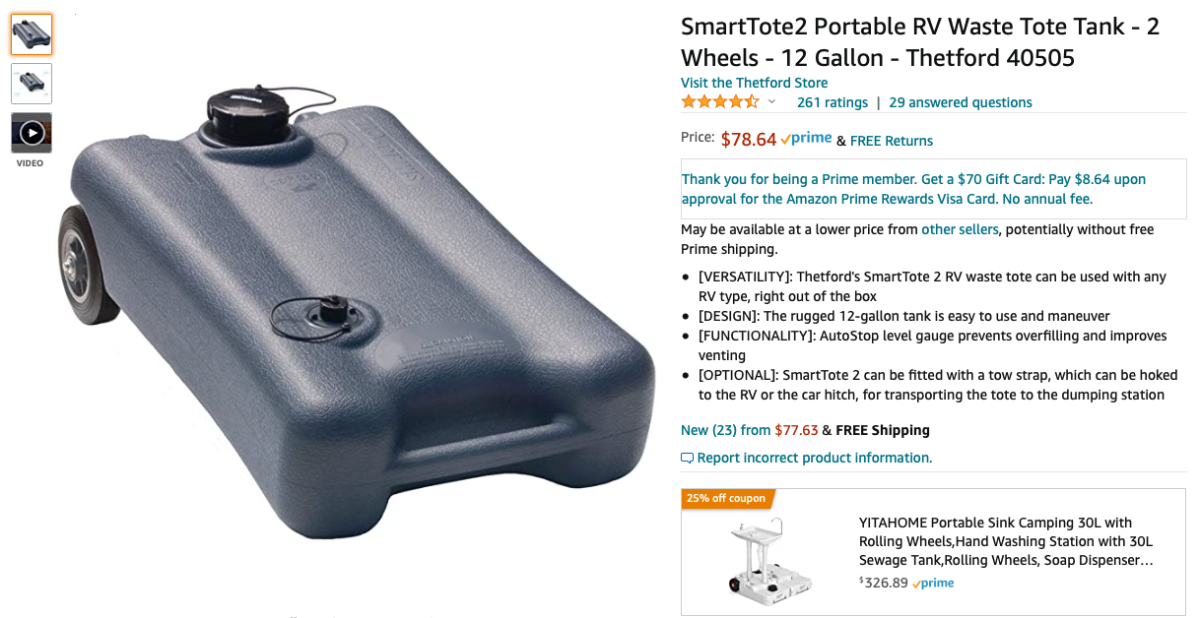
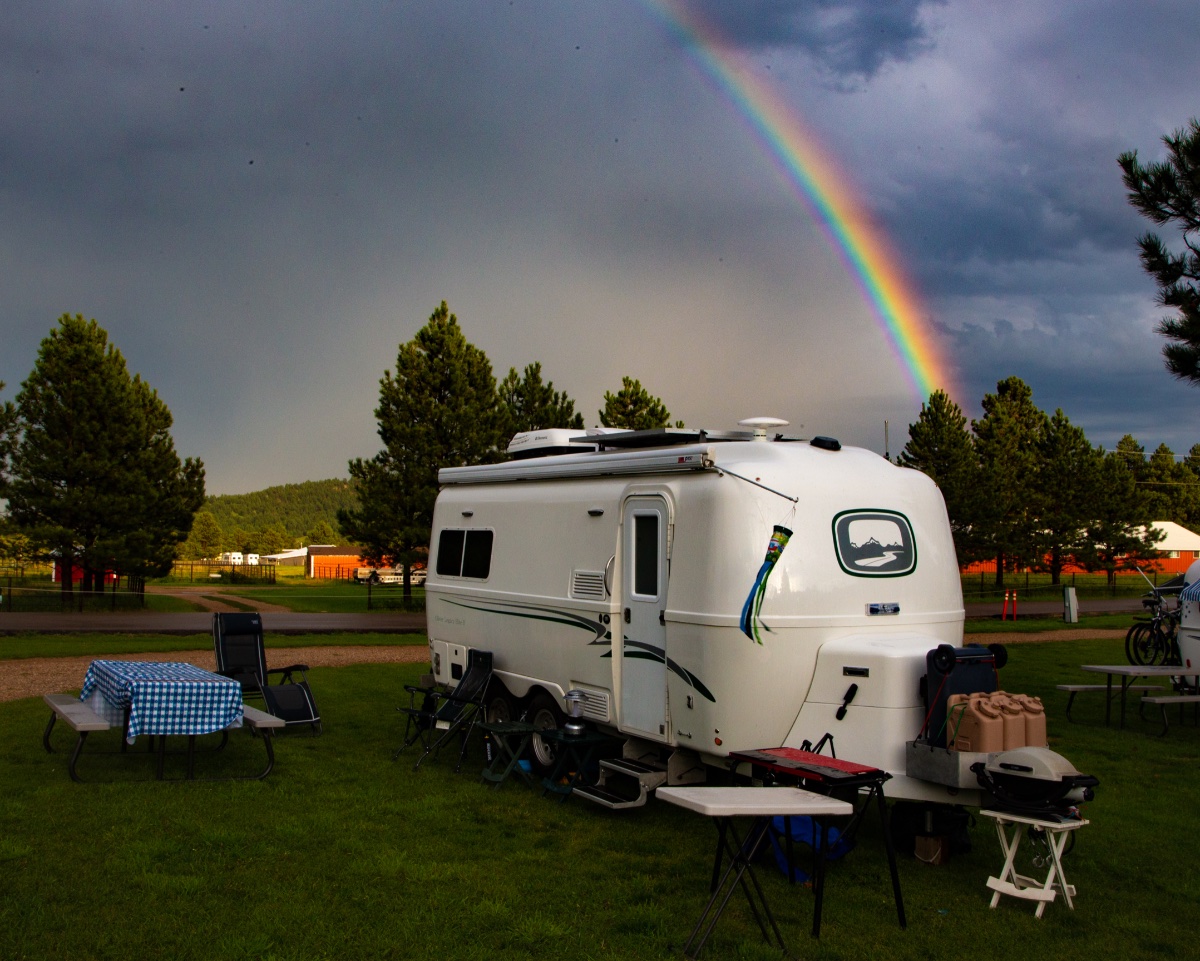
I recently posted on a thread about storage boxes that fit into the basket on the Ollie tongue. One photo showed a grey water waste tote that I sometimes carry on top of the storage tote. I got a PM from @stlipa asking what kind of tote I bought, and why I chose that one. I decided to post my answer here on the forum. I started researching totes and discovered that they come in various sizes, 6 gallon, 10 gallon, 11 gallon, 12 gallon, 15 gallon, 18 gallon. I just looked on Amazon and I even find 25 gallon and 38 gallon models. One gallon of water weighs 8.34 lbs, so you can do the math. The smallest ones have no wheels, some have two wheels, and the larger ones have four wheels. The larger models allow you to off-load more grey water at any one time, but the weight increases proportionally. The higher volume models are also proportionally larger in their dimensions, taking up more room in the tow vehicle. I did not want to carry the tote in my tow vehicle, an SUV, and I wanted to get a tote model that would conveniently fit into the storage basket. I made a list of all the models, with their volume, the weight when full of water, and the length, width and depth dimensions for each. I decided on the 12 gallon Thetford 40505 SmartTote, which I purchased a local RV supply store. Amazon has it for $79. I chose the 12 gallon Thetford 40505 SmartTote primarily because it would conveniently fit into the Ollie storage basket along with three of these five-gallon water jugs. BTW, the jugs have “Property of US Government” stamped into them. As you can see from these photos, the waste tote and the three water jugs all fit into the storage basket. When we are boondocking, we can go and get 15 gallons of fresh water, and we can offload up to 12 gallons of grey water. I leave the water jugs at home when we are going to a campground with water hookups, and put the yellow storage box and the tote on the tongue as shown in the earlier post. I had wanted to get the largest tote that could fit in the basket, but I soon learned that bigger is not always better. A better aphorism is that bigger is always heavier! My 12 gallon tote weighs 100 lbs when full. While I can walk it short distances when full on its two wheels, the weight becomes prohibitive if going a long distance. Imagine wheeling a 100 pound suitcase through an airport! My guess is that the larger totes with four wheels are easier to pull by hand. I do find that I can pull the tote fairly easily when it is 2/3 full (approx. 65 lbs), so I will often make two trips with 6-8 gallons each to dump the grey water, rather than one trip with 12 gallons. I bought one of the recommended accessories, a tow strap, that allows me attach the tote to the ball hitch on the tow vehicle. I have done that when the dump is more distant, with the tote filled to capacity, and it works fine. Just drive slowly. But if possible I prefer walking the tote over. At one campground the dump was too far for me to feel comfortable pulling the tote behind the car, and I was able to heft the partially filled tote (65 lbs?) into the tow vehicle. A larger tote would not be of greater benefit in this situation. A couple of other points for those considering getting a waste tote. The stuff I read online suggested getting hoses and connectors. (Some of the larger four wheeled totes have hoses that store in a built-in compartment.) I got a five foot sewer hose, and a sewer fitting. With these, it is easy to dump my grey water into a standard sewer fitting, moving the tote from horizontal to vertical and letting gravity do the rest. I later discovered that some campgrounds have a different type grey water disposal sites, and my sewer connection hose did not work well. These disposal sites look like they are designed for campers to pour in a dishpan of soapy water; these can be elevated off the ground, and thus difficult to lift a heavy tote. To circumvent this problem I bought a bayonet hook waste cap with a garden hose thread connector, and I got a short length of garden hose with the female end intact. Starting with the tote in a horizontal position, I open the air entry valve, hold the hose end above the sink for grey water, and then raise the tote into a vertical position. Water pressure forces the grey water though the hose into the waste water receptacle. When the tote is mostly empty, I can lift it off the ground and get the remaining water to drain out. I use this tote only for grey water. No black water in the tote for this camper! Finally, the pictures of the tote and the three five gallon water jugs in the Oliver basket were taken from other pictures, below. One is a picture of Ollie at Devil’s Tower, and the other is Ollie in front of a rainbow in South Dakota.
2 points
-
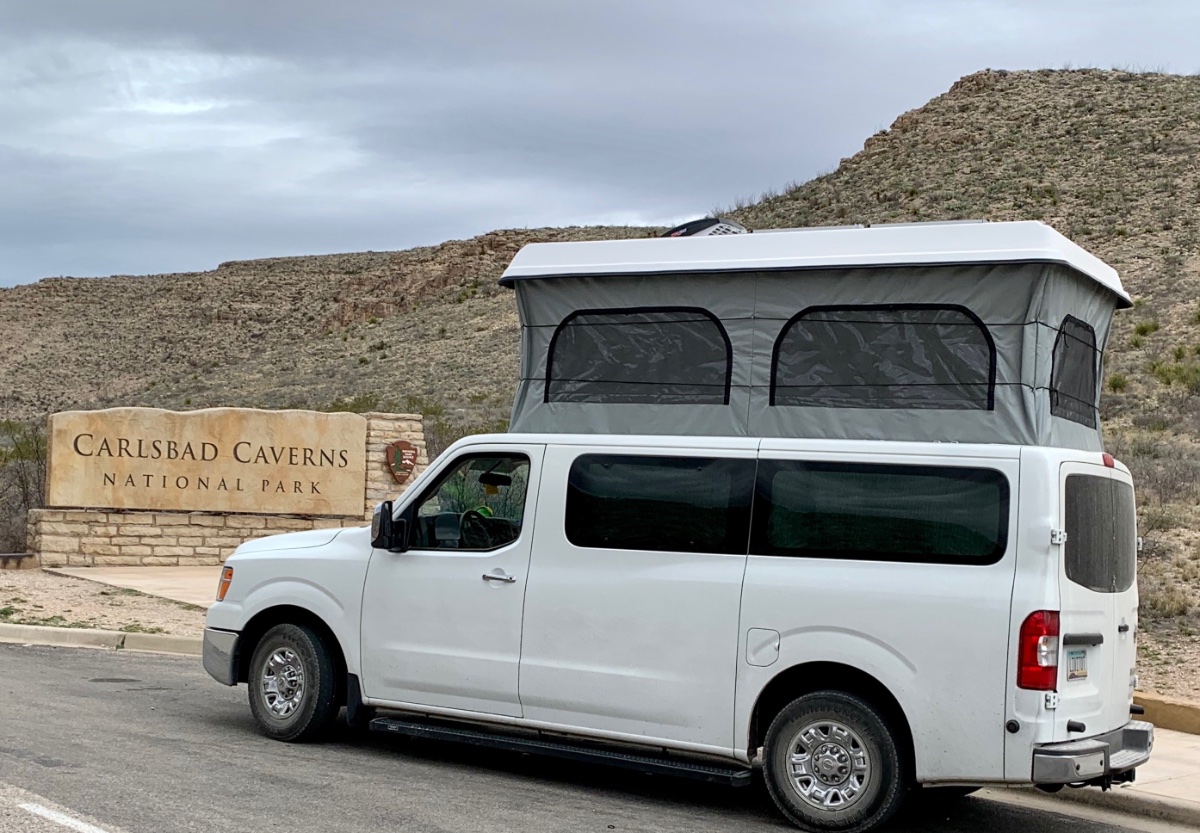
Hello everyone! We did it! Just put our deposit down on an Elite ll. We'll pick it up in Feb. We will be stopping to tour the facility the first week in May on our way to the Red river gorge. After spending 5 months traveling in our class A 30 ft we decided to go smaller. We will be towing it with our 2018 nv 3500 4x4. Has the pop top so still room for when the grandkids come along. Really excited about this forum and hoping to learn alot here. Looking forward to a western states rally in the future! We are a bit new to the forum and social media thing.... hope the picture is allowed.
2 points
-
Overland, Started looking through threads about working on the sink because my furnace supply hose slipped off of the bathroom heat outlet when I found this thread. WOW! Beautiful sink & faucet installation! 👍 I want Debbie to see this!2 points
-
Hey Kevin and Theresa Welcome - We will be in the Flag area memorial week and on - perhaps we can meet and say hi - we will have Ollie in tow. RB2 points
-
I saw my first in two years the other day in Ocala Florida I 75 south almost as rare as UFO sighting.2 points
-
I like the Drivin’ and Vibin’ videos and Kyle makes some good points on why not to get solar. I disagree with his first point... we’ve found that camping in National Parks is usually a dry camping experience. Having electrical hookups is the exception rather than the rule, especially in the west. I agree that if you like campgrounds with hook ups then solar is not necessary. That’s what we thought we would do when we got our Oliver 5 years ago, I got the solar package “just in case”. As it turns out, we camp a lot in BLM and FS campgrounds, so I’m glad we opted for the solar. Mike2 points
-
I have just noticed some suspension creaking noise. My last suspension was at Oliver last September and have certainly traveled over 3000 miles since then so it is time to buy a grease gun and figure out what to do. You Tube to the rescue.1 point
-
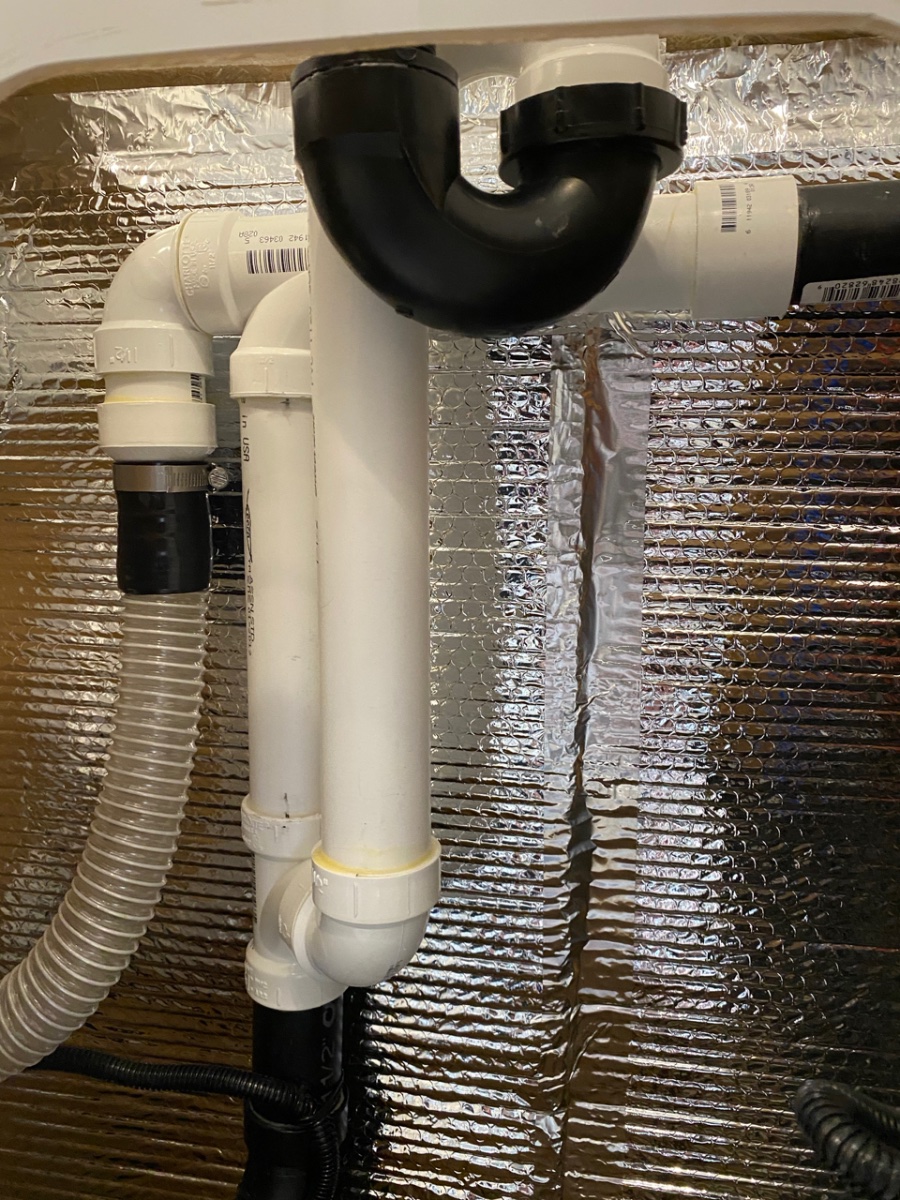
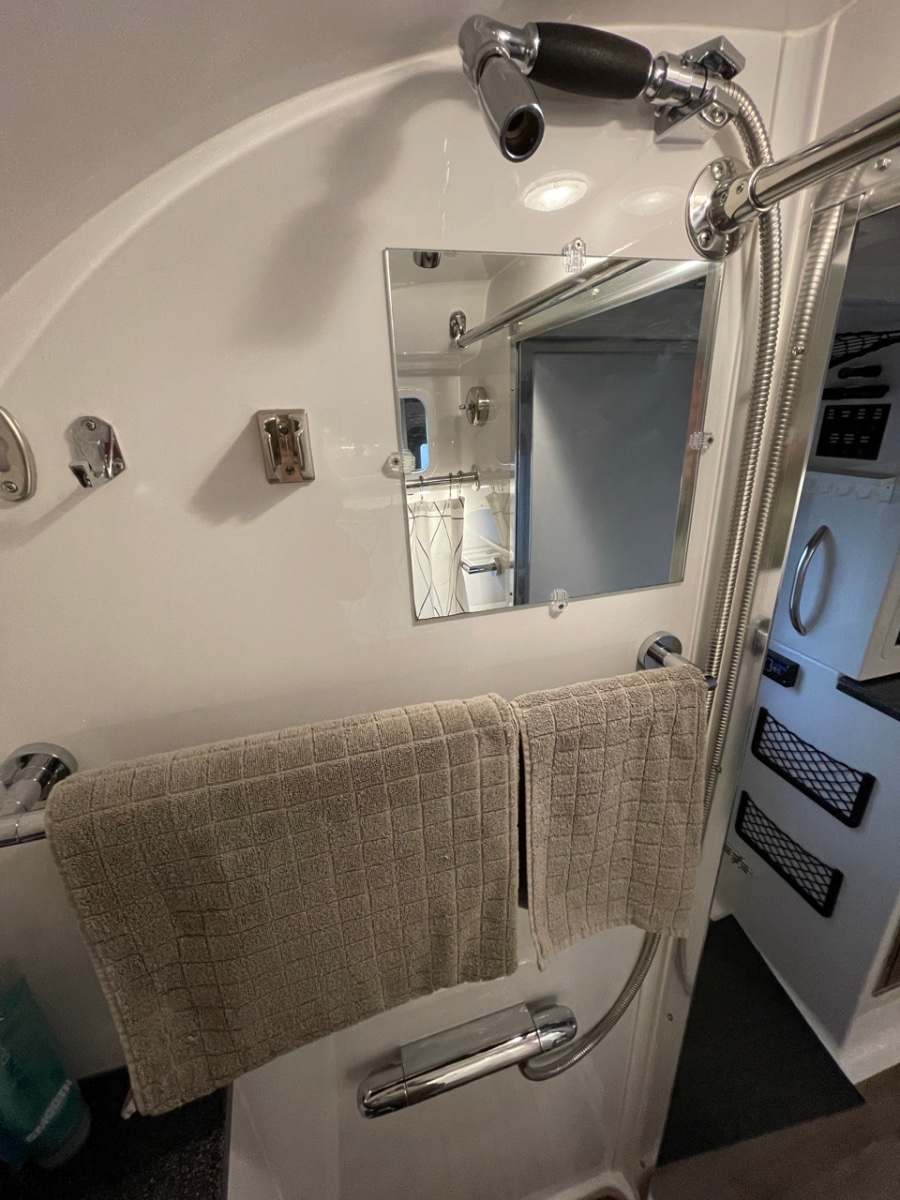
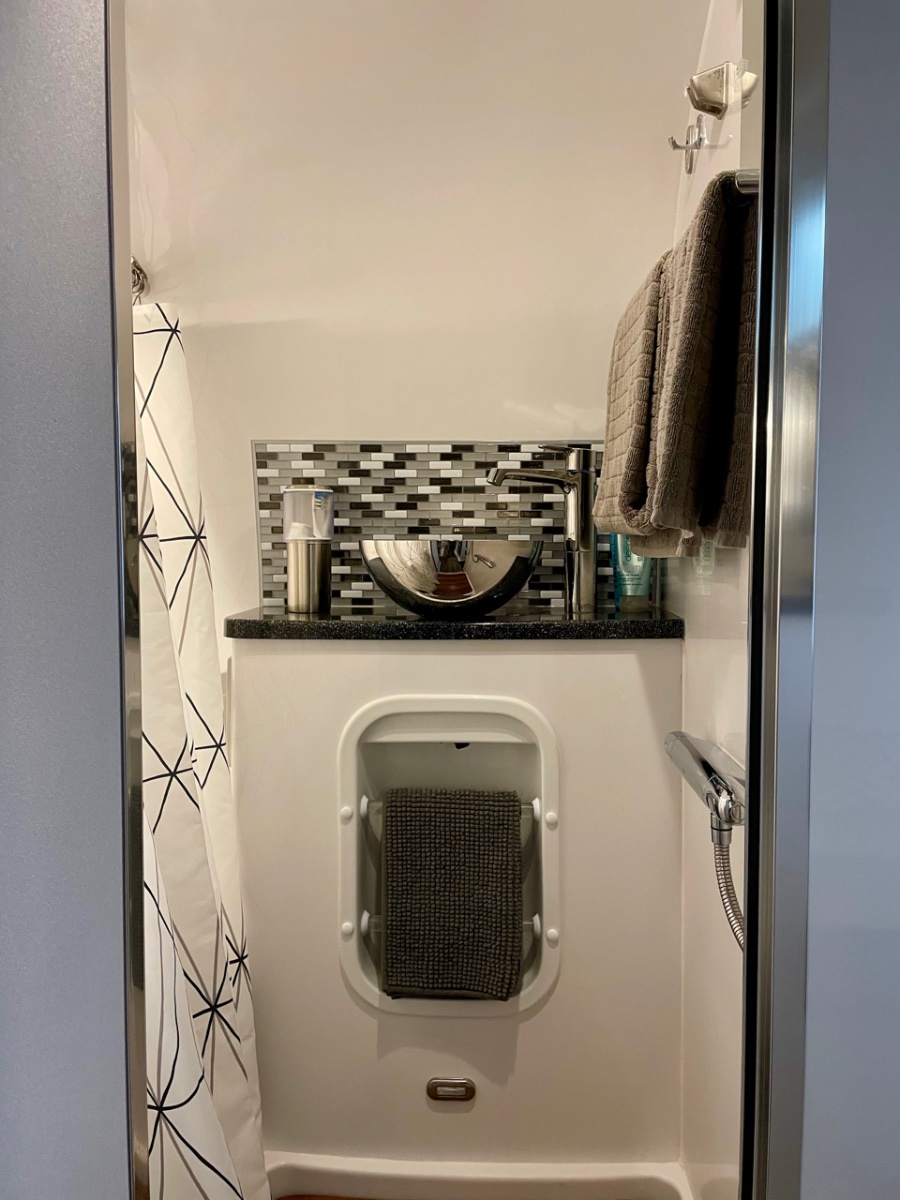
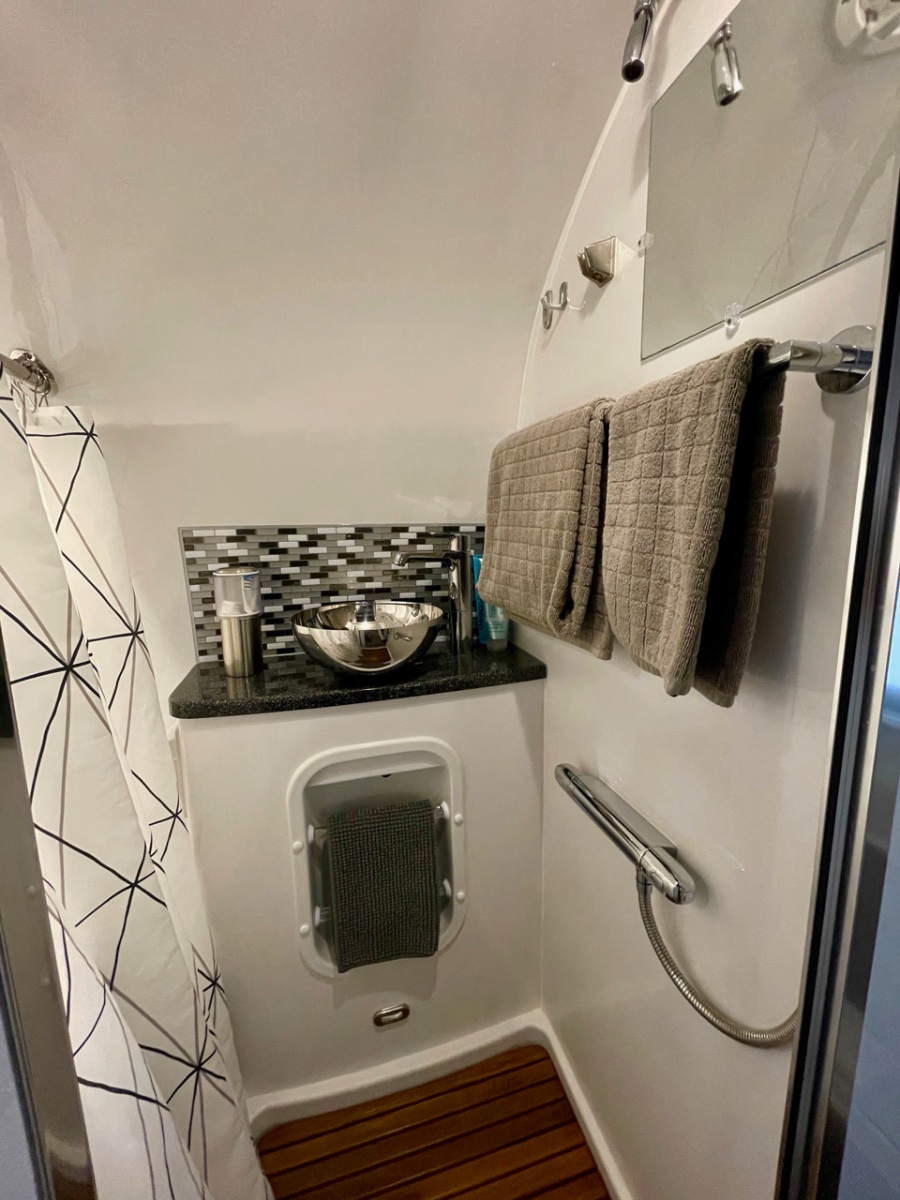
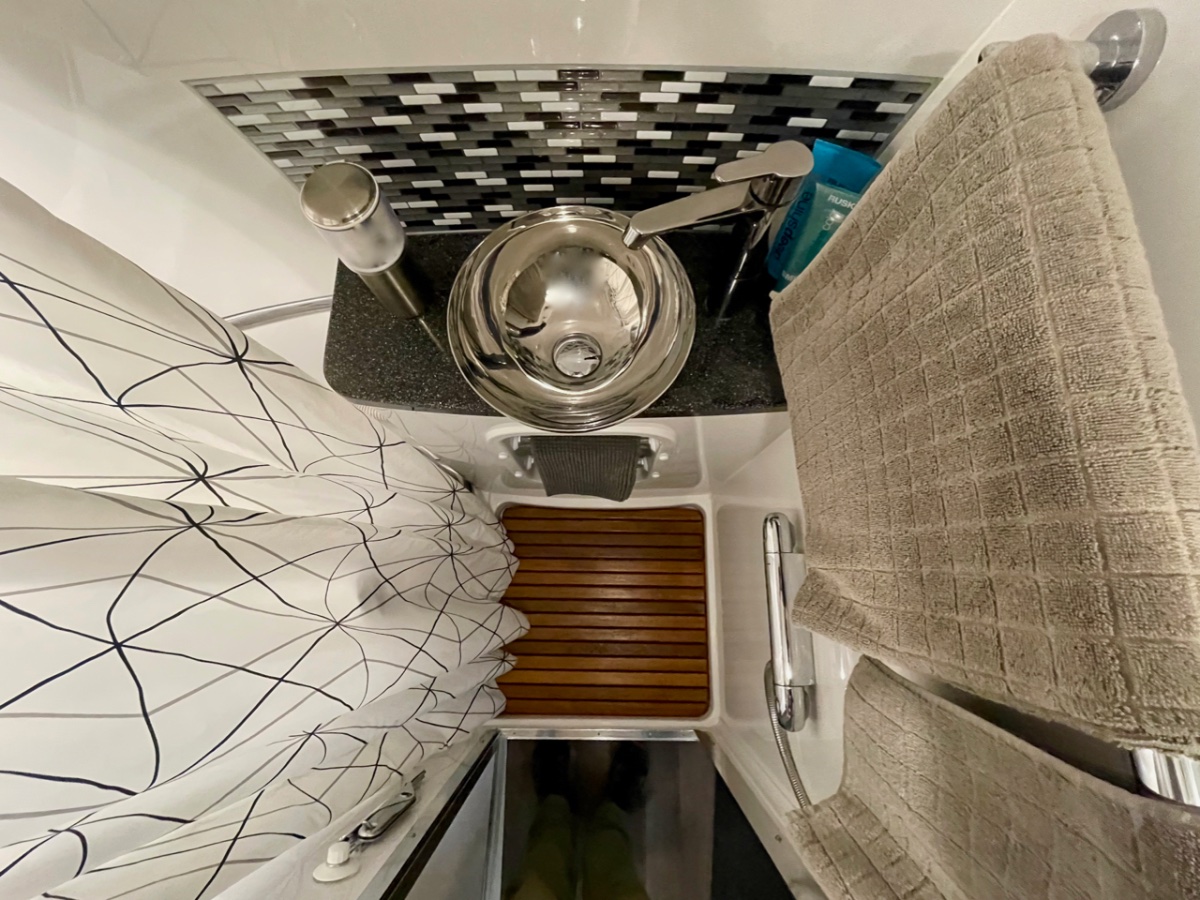
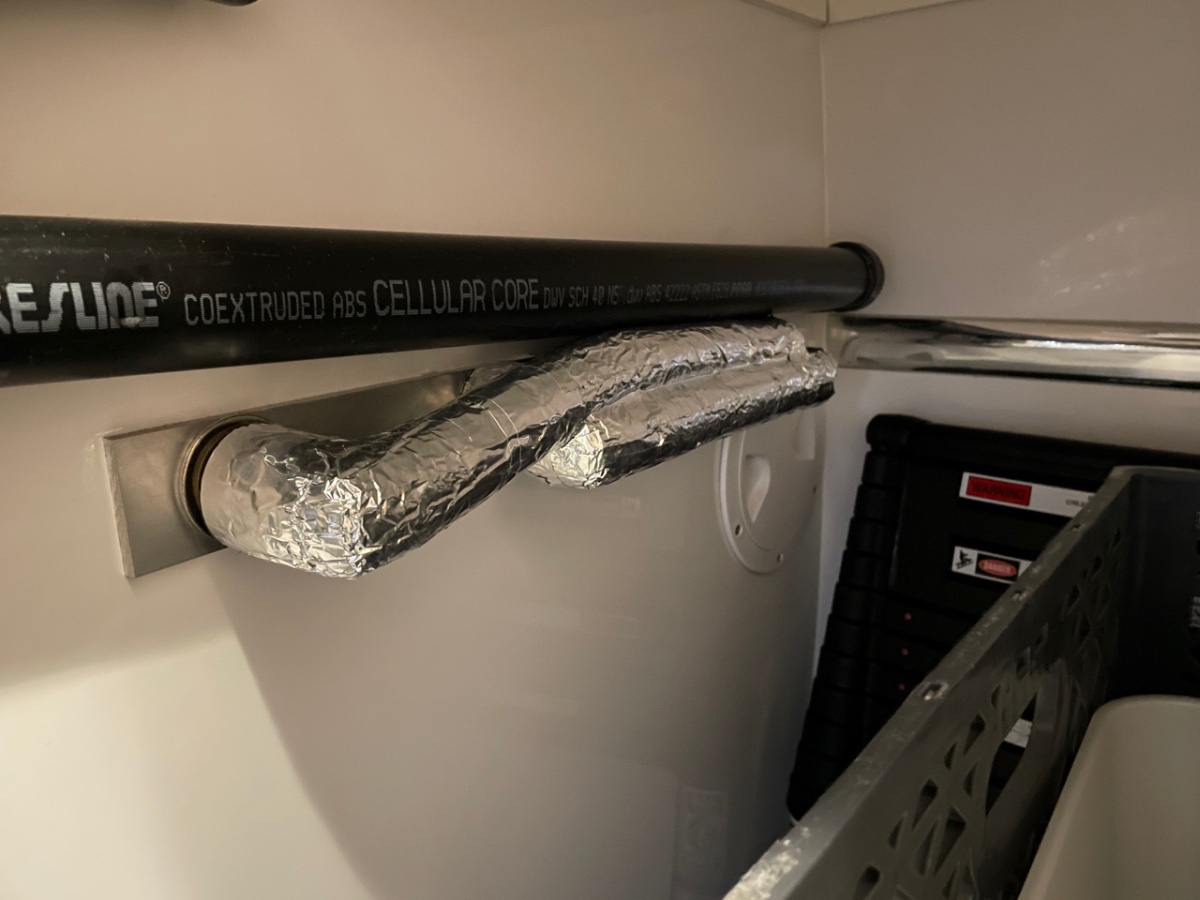
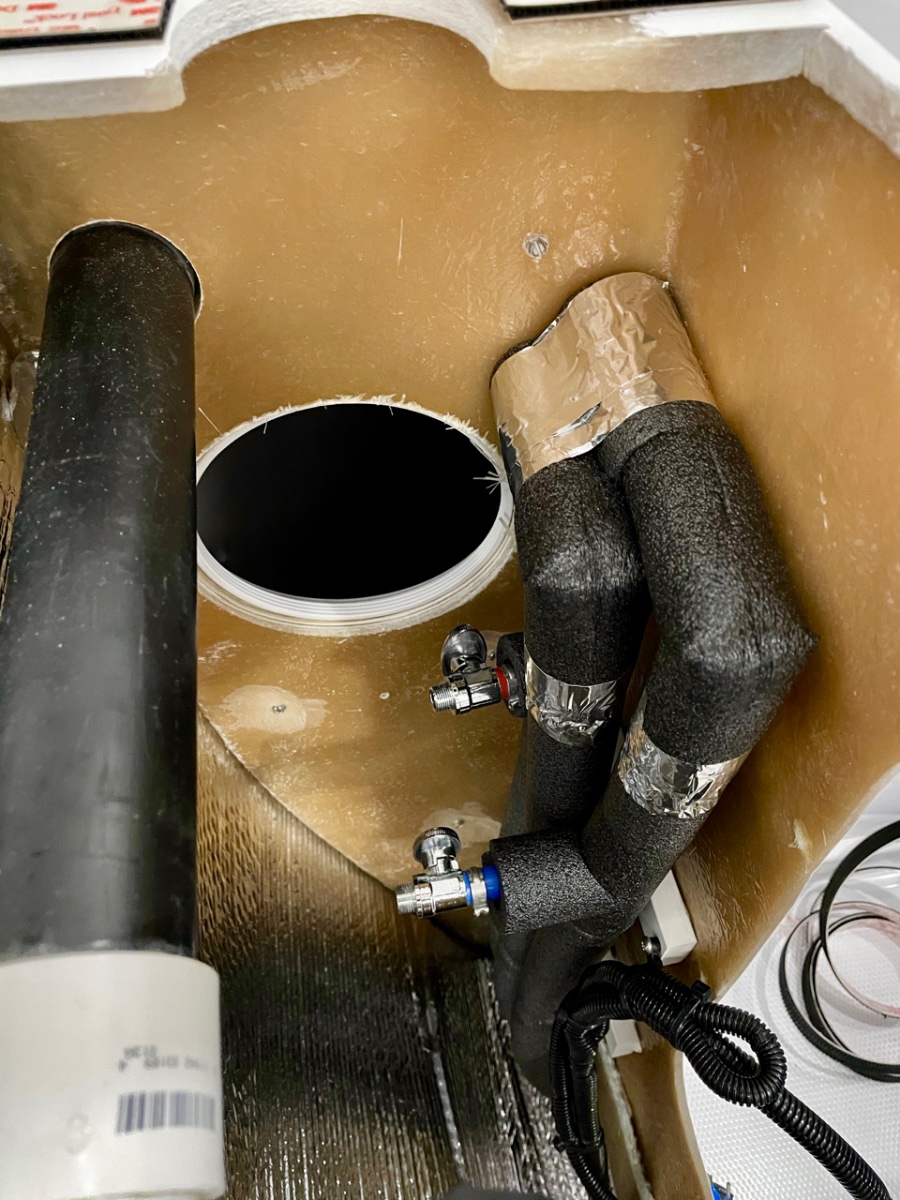
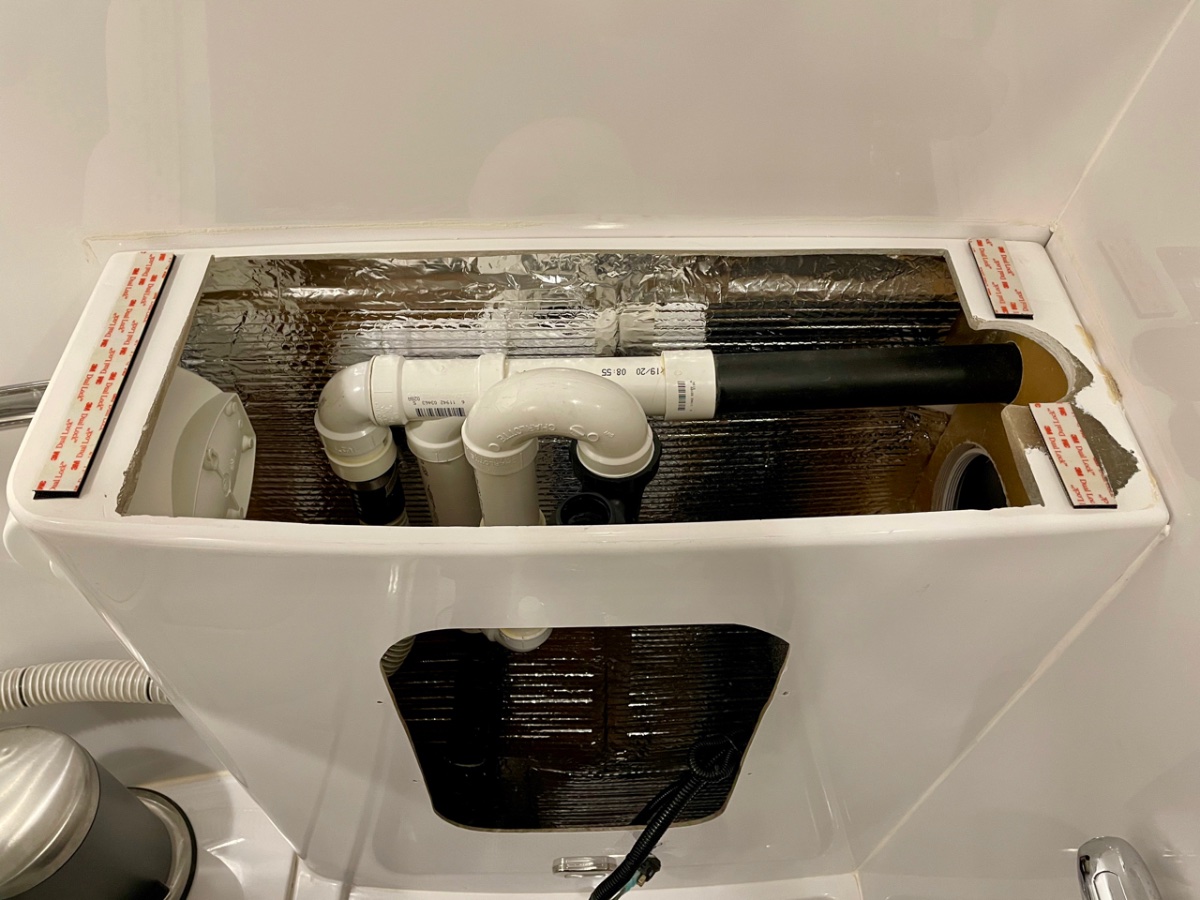
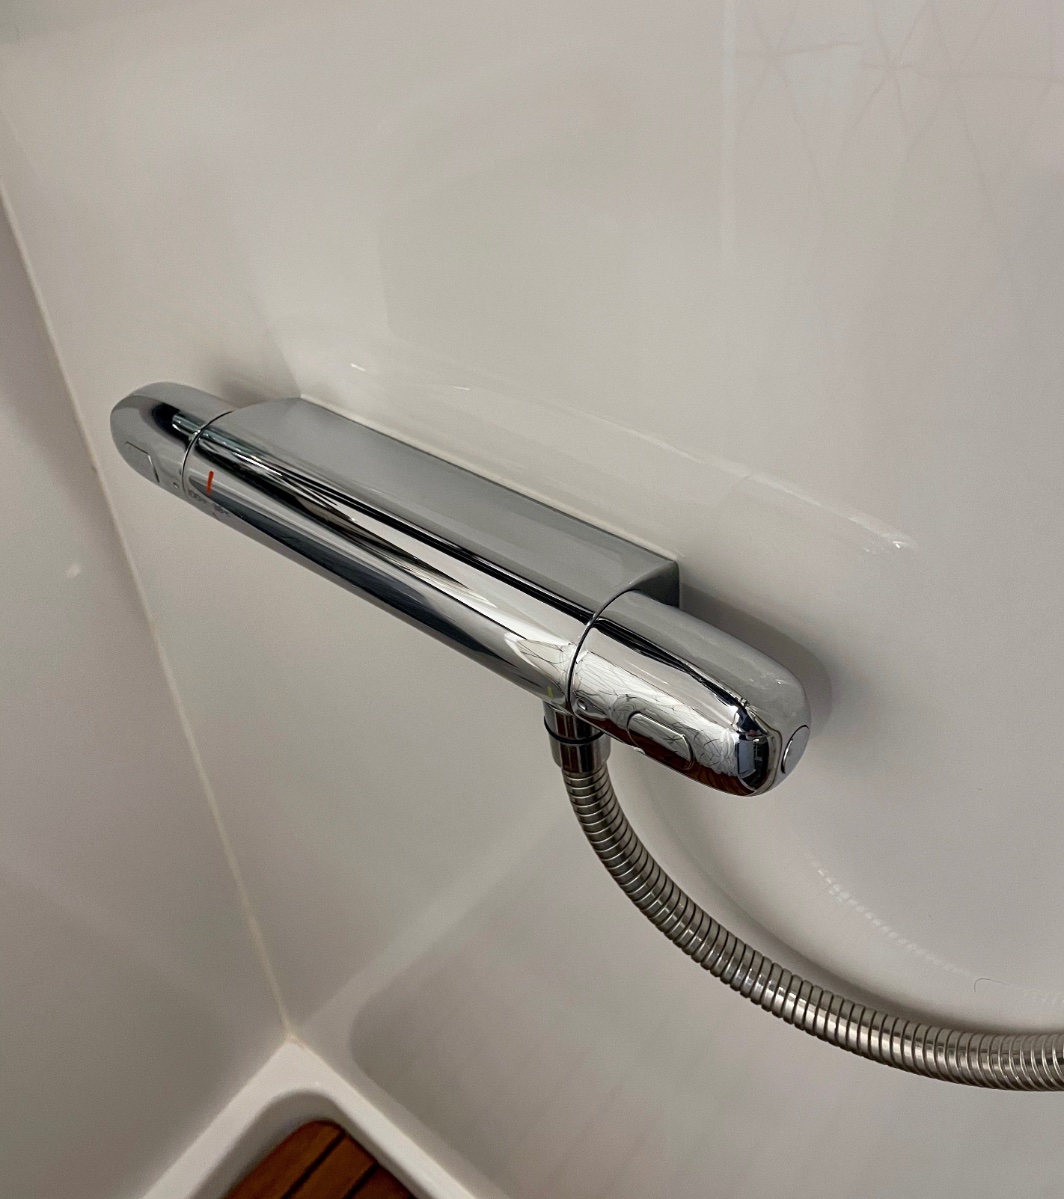
Many of you know that this has been a long, drawn out project. I think I started talking about it to a few people at the 2019 rally - so it's been well over a year in the making, almost two. Not that it was particularly difficult (though certainly a more major mod), but because of laziness and indecision on all the components it ended up being a start and stop project, with months sometimes between fits of activity. And then it snowballed into a complete plumbing overhaul, which was unnecessary - but then that's how the trailer got its name, after all. I'll post about all the plumbing stuff later, but since there have been a few recent posts about shower and bath mods, I figured I'd go ahead and toss this one into the mix. This project started for a few reasons. One, I've always found the bath sink to be mostly useless. It's fine for washing hands, but for most anything else, you've got to crane your neck around with the front wall curving in to hit your head. And trying to use a tiny little sink for washing your face just leaves water everywhere. So we found that were using the kitchen sink almost exclusively. That was fine - no big deal - but with the bigger sink, I was getting tired of wasting water cleaning toothpaste residue out of the sink, and it seemed silly to have a bath sink that got little to no use. The second reason for the upgrade is that after we redid the kitchen sink, the bath sink just looked sad. In addition to functionality, the bath needed some sexy. So the obvious solution was a vessel sink of some sort. Since a vessel sink sits on top of the counter, I'd have much more leeway in size and placement. I could pull it forward as much as I wanted, plus it had the added benefit of raising the sink to a more comfortable height for us. Some experimentation with kitchen bowls of different sized showed that I could get a fairly generous sink that didn't take up too much shower space. I settled on something in the 11" to 12" range; which proved to be a little difficult to source, especially after deciding on the material. I had bookmarks for dozens of sinks of different materials, but I couldn't find one that I really liked. I almost picked a glass one off Amazon, but in the end I thought that was going to be too heavy. What I really wanted - since I had already swapped out almost all of the brushed chrome fixtures in the bath for polished - was a simple polished stainless sink. There were a few out there, but nothing in the right size, nor at a reasonable price. So the project bogged down a bit at that point; but I was confident that I'd find something eventually, and so I went ahead and ordered a new vanity top from Oliver, without any cutouts for the sink or faucet. I’m glad I did, since Oliver has apparently now stopped offering our countertop color And sure enough, a few months later I came across a discontinued sink on Overstock.com that was exactly right. 11.25", polished inside and out. It's the Acquaio sink from WS Bath, if you can find one. I know that other sizes are still available. It was still pricy even on discount, but by that point I didn't care. To make up for the splurge, I got a faucet from Ikea, which is actually pretty nice. The colors from chrome to stainless don't exactly match, but they're close enough and it doesn't bother me. Since I was swapping out the faucet, I needed to find a separate shower valve, which was another lengthy quest. I thought at first that I'd put one to the right of the bath caddy, like @mountainoliver has in his trailer. But most everything I found was just a bit too big to fit (I didn't know about mountainoliver's mod and the mixer valve he used until later). Then I found the Grohe Grohtherm valve, which was interesting in a couple of respects - it didn't recess into the vanity at all (which eliminated a potential issue with the plumbing), it matched the Grohe faucet that I had already installed in the kitchen, and since it was linear, I thought that it might actually fit in the space above the caddy, between it and the vanity top. And it did fit, but looked squished in place, plus I didn't think until trying to place both it and the sink that the the sink drain and trap was going to be difficult to work the plumbing around. Plus putting it there meant that the shower hose was going to be strung across the vanity and generally look bad and be in the way. The problem with this realization was that I'd ordered the valve and the sink before one of my 3-month breaks in the project and now neither was returnable - so I had to make it work. This meant that the shower valve was going on the closet wall. I also realized during the test fitting that when I pulled the sink forward, the drain trap was going to hit the top of the bath caddy, meaning that I couldn't get it far enough forward to work. Small disaster. But I realized though that the bath caddy wasn't symmetrical, and if I turned it upside down, everything fit. I'd lose the flat shelf on the bottom, but we only use the caddy to hold the bath mat, so not a problem. Small problem with the water pump switch placement, though, since it would be on the bottom - but a quick email to Oliver had a new caddy that hadn’t been drilled for the switch on the way. At that point, all the pieces were here, all the logistics worked out, and I was ready to go. Time for another couple months off while I built up the courage to drill through the closet wall. Then finally... First step was to remove the existing vanity top, which is possibly one of the most firmly attached things in the trailer. It's glued in place, so the only way I could find to get it off without completely destroying the vanity was to cut through the joint with an oscillating saw. That's a slow, tiring, dusty endeavor; and it generates a great deal of heat, so you've got to work in spurts to keep the fiberglass resin from burning - which is fine really, since working through the caddy access, your shoulders will welcome the rest. I had to do a tiny bit of trimming on the new top to get it to fit as snuggly as the old one; and once in place, I sealed it with silicone like the original. Top off, new drain lines in place, and I decided to attach the new top with industrial velcro to make it easier to remove in the future (works well). Next, shower lines teed off the existing plumbing, line to the nonexistent toilet removed, and some insulation added to both the plumbing lines and the outside wall behind the vanity. (I have a circulating pump on the hot water, hence the extra line.) I also glued a small PVC block to the back side of the vanity wall to tie down the water lines and prevent them from vibrating too much. And as always, cleaned out as much fiberglass dust as possible, cleaned up and wrapped wiring, etc. The access port on the closet side is something that Oliver gave me in the original build. The sink valves and drain trap are accessible from that port, and since I used velcro for the top, I have the option now of cutting the silicone on the top and pulling that off for access, in addition to taking out the caddy. New plumbing in the closet for the shower. I drilled out a short piece of aluminum as a backing plate for the shower valve. The plumbing is protected somewhat in the closet by the ABS vent, and we really don't keep much in there that could bump around and damage the plumbing. But a few layers of aluminum tape should help protect the insulation from getting beat up and gives a bit of a spaceship vibe. The valve is supposed to stand out from the wall about an inch or so, but I decided to recess it so that it attaches flush and as out of the way as possible. I caulked around the valve and it ended up making a nice little shelf for a razor, and I placed it low enough that my wife can use it to prop a foot while shaving her legs. You can also hang a bar of soap on one of the handles to drip dry. The faucet has a neat feature with stops on both valves, which can be custom set to whatever temperature and flow you prefer. The little buttons on the handles allow you to go past the stops when you want. And that's really it. Installing the sink and faucet is just drilling two holes and following the directions. The only change I made is that the sink came with a short stainless ring to mount between the sink and counter, but I didn't like the look and so just used one of the black rubber gaskets that was inside the ring. That way the sink looks like it’s sitting right on the counter instead of a pedestal. We tested everything out on our last trip and functionally, it all works as expected. The sink isn't in the way at all while showering, and really is so much more usable. Plus I think it looks great. The shower functions just as nicely, with the valve not being obtrusive. I added a second holder for the shower head up high, which works better for me, though my wife prefers the original one. I still need to swap that one out, since I think it's the only bit of brushed chrome left in the trailer. I added the same backsplash material that a few other owners have recommended. I wanted to order a new, wider mirror; but the original one is glued on and so I didn’t want to go through the trouble of trying to get it off. I suppose I could just place one on top of the other, so maybe that’ll be a future project. Glamor shots -
1 point
-
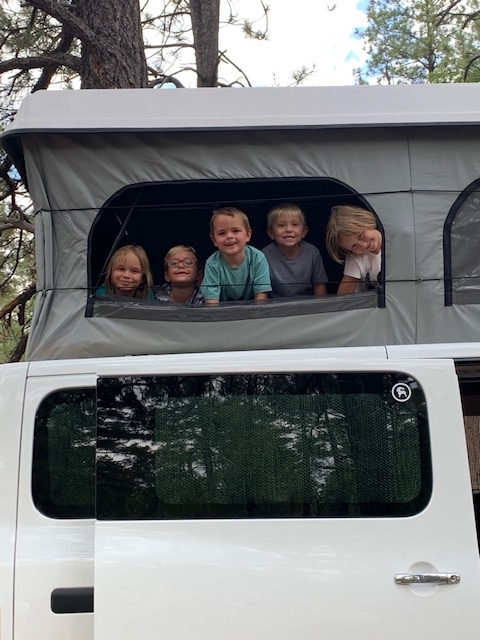
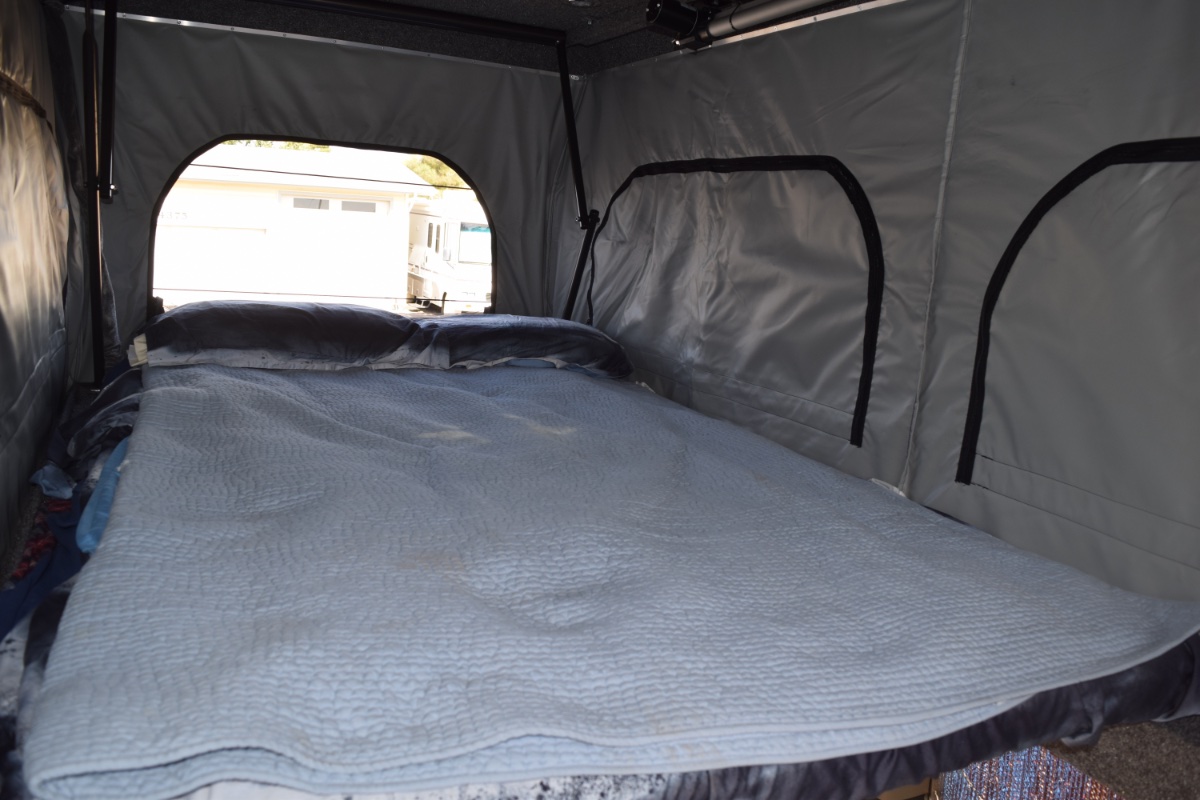
Okay, I figured out how to answer directly. Of course, we bought from Tim Dahle Nissan. It came with the 4x4 installed. Nissan parts and covered under factory warranty. I'll have to get some of the more recent pictures. We have installed a 3" titan lift and Avatar metal works front bumper with winch. We sent the van to Colorado Camper Van for the pop top. What sold us was he was able to redirect the rear air! We love it! It's automatic. So much room and your bedding can stay up there when the top is down. 6 windows, 4 season canvas. There are 3 panels that you can stack in the back if you want walk around room. Max air fan and 2 solar panels on the roof. The top is great. We did have some warranty issues and had to send it back up , but the issues are resolved now. Our 5 Grandchildren love it! Hope I answered everything
1 point
-
Hey Kevin and Theresa Welcome - We will be in the Flag area memorial week and on - perhaps we can meet and say hi - we will have Ollie in tow. RB Hello and Thank you! That would be lovely. We will be in Kingman but would gladly come up to Flag or have you here.1 point
-
Its a towel rack I made for when there is no place to put up a clothes line. I bought a double handle suction cup used for glass. Cut it in half and added a piece of PVC pipe. Works like a champ.1 point
-
If you don't mind sharing, how was your factory tune up experience? We are scheduled for the factory tune up the first week in December before we head to Florida and then west to AZ and UT. We picked up our 2019 in October of 2019 drove it back to Maine and winterized it until the first week of February 2020. We got to the FL Keys and were heading west when Covid kicked in. We were out for 45 days. We returned home like many folks did at that time. We have not been out since. We are going out for a few days in June. We will then put the Ollie up until we head South for our tune up and a 5 month trip. It is so nice here, we hate leaving coastal Maine in the summer and fall. Feedback on the tune up would be greatly appreciated. Thanks1 point
-
simplistically, a proper antenna is one-half wavelength of the radio frequency. CB has an 11 meter wavelength-the radio wave from peak-to-peak is 11 meters. The frequency is how many entire wave cycles are completed per second (a cycle is called a Hertz). Therefore, the antenna should be about 5.5 meters, cut in half. The center of the coax would be connected to one half with the outer braid connected to the other half, each side one-quarter of a wavelength. That is too long and unreasonable for a car, or handheld, so the two halves are electrically shortened. Wherein comes the magmount. The vertical whip is attached to the center conductor of the coax, one-quarter of the antenna. The other quarter of the antenna is the magnet-magmount that is connected to the coaxial braid. The magmount is inductively connected to the metal car body, or whatever is used, creating the so-called ground plane, or other half of the antenna. The inductive connection is usually poor, which creates a poor radiator and even poorer receiver. So to make a car mounted antenna to work better, use a section of copper braid to connect the base of the antenna directly to the metal car body. And use an antenna analyzer to "tune" the antenna to the desired frequency. I almost always have an antenna analyzer in my truck, along with a portable antenna(s). Easy to use. Available for use. The Oliver hull makes a terrible groundplane. The bike rack makes a great antenna support. The aluminum frame is a pretty good antenna ground.1 point
-
Another thing about dumping on the ground. Even with the cleanest grey water after a couple of days grey water takes on a smell of its own. If its bad enough you and everyone around you will know you dumped on the ground. As stated the fines are large .1 point
-
The only way I ever make the connection to the tee is shut off the tank valve first for safety. Attach your hose then attach the hose to what ever appliance you are using turn the tank valve back on. Make sure your appliance is also turned off before you turn the tank valve back on When your done with the appliance keep it running turn off the tank valve this will empty any propane left in the line, Diconnect the hose and turn the propane back on. Very simple steps. I think you have to do the same for the quick connect you turn off the valve at the connection before attaching your hose and appliance in stead of turning off the tank valve same steps. Hope this helps. The tee valve you can get on amazon best price $20.001 point
-
Seen one in mountain home Arkansas Last week. Besides mine 1st one I've seen. On the road.1 point
-
John, I like the the Furrion port and wish it was rated for 20A, but when purchased all I could find was a 10A Furrion port. Last time I checked 1 1/2 years ago Oliver installed Zamp ports. I installed the Furrion port, still have the plug on my desk drilled out of Ollie, looking at it right now. Had to be sure where I was drilling! 🙂 I'm not an electrical expert either. 🙂 Zamp website shows connecting your controller directly connected to batteries. Zamp installation Page 4: https://cdn.shopify.com/s/files/1/0344/2973/0953/files/ZS-10AW_15AW.pdf?v=16170512981 point
-
I have left the vent open - but it was in error - and your right it doesn't make much difference on the inside temp's. However, I have thought about a cool looking deflector - AKA - the roof mounted bike racks- mounted to the solar panels - Say a blue tinted plastic - with some graphics matching the Ollie. Not sure what good it would add - but hey - then I would have something - JD would have to catch up........😀😄 ( I am so far behind on his new improvements to Ollie)
1 point
-
I don't understand! What is all the fuss. I use a heavy thick black grease - just goop it on, smear it around real well - and then use a torque wrench with Loong bar with a special tool end to tighten and take off. Works beery beery well. 😵 NO wait - that was a dream/nightmare - neverminded. Still recovering from that Russian pop music fiasco......1 point
-
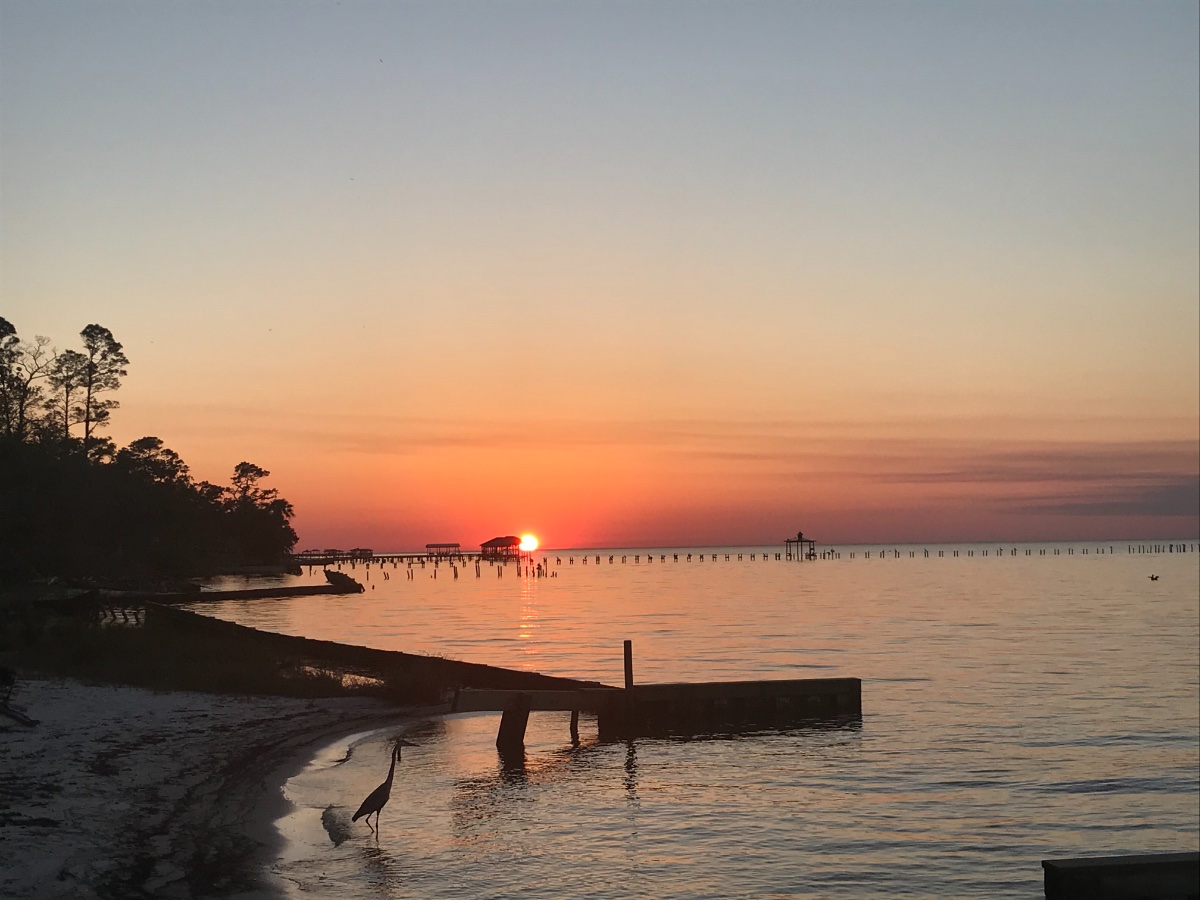
We are staying at a great little RV resort in Gulf Shores Alabama called Bay Breeze. The staff Is friendly and it’s very neat, clean and well run. The local fresh seafood is excellent! Time to go explore Fort Morgan. We were originally headed to Fort Pickens and discovered it was closed due to flooding of the main road leading to the park. Naturally. We did well landing our Ollie here. Adventures Onward!
1 point
-
Once again - I'm jealous! Bill1 point
-
No problem and you're welcome. For what its worth, over the winter I purchased one of THESE for the couch. I got mine at the local WalMart for under $16.00. I'm thinking that I can eliminate a throw pillow or two and get a touch more comfortable for reading and/or lounging. Bill1 point
-
David, Great shots, looks like a fine place for a camping adventure!1 point
-
Good news for Vets. “Entrance fees for the National Park Service and the U.S. Fish and Wildlife Service and standard amenity recreation fees for the Bureau of Land Management and the Bureau of Reclamation sites will be waived for Veterans and Gold Star Families. They will have free access to approximately 2,000 public locations spread out across more than 400 million acres of public lands, which host activities to fit any lifestyle, from serene to high octane, including hiking, fishing, paddling, biking, hunting, stargazing and climbing. Many Department managed lands have direct connections to the American military, such as frontier forts, Cold War sites, battlefields, national cemeteries, and memorials. These special places pay tribute to our veterans and serve as reminders of their courage and sacrifice throughout the history of our nation, from Minuteman National Historic Park where colonists stood in defense of their rights, to Yellowstone National Park, which was protected from vandalism and poaching by the 1st U.S. Cavalry before the National Park Service was established, to Mount Rushmore where modern warriors attend reenlistment ceremonies.” https://www.blogs.va.gov/VAntage/80547/veterans-gold-star-families-get-free-entrance-national-parks-refuges-public-lands/ John Davies Spokane WA1 point
-
I think many times about a cover for out trailer, the cedar built type is about the only type that would work where we live, yes that cost is high, but that's the only way to go for our property to look in place with the home and the rest of the area. I do get out the portable scaffolding, set it up once a year, I light buff and wax, yes it's a pain in the you know what, but being a little over picky about stuff (A.D.D.) that's what I do. Covers are out for me, they rub on the surfaces, collect moisture under them, are a pain to get on an off, plus opening the trailer for access to get in an out for routine whatever and to air it out is also not so easy. Fiberglass is a very durable product, I personally know of 30 year old boats that look new today, yes they are buffed and waxed on a regular bases, it's just what you do if you like your stuff nice. Do note when I say buff and wax I'm also including things like, the A/C cover, window frames, awing cover, air vents, and anything else that needs it. Do what works for you, I do. trainman1 point


.JPG.ba0edfe0497ddcc0ab3074a5ba05552d.JPG)


-
Recent Achievements
-


.thumb.png.fbbde3486e933f990ff511bff8d6bda0.png)