Leaderboard


Popular Content
Showing content with the highest reputation on 10/22/2022 in all areas
-
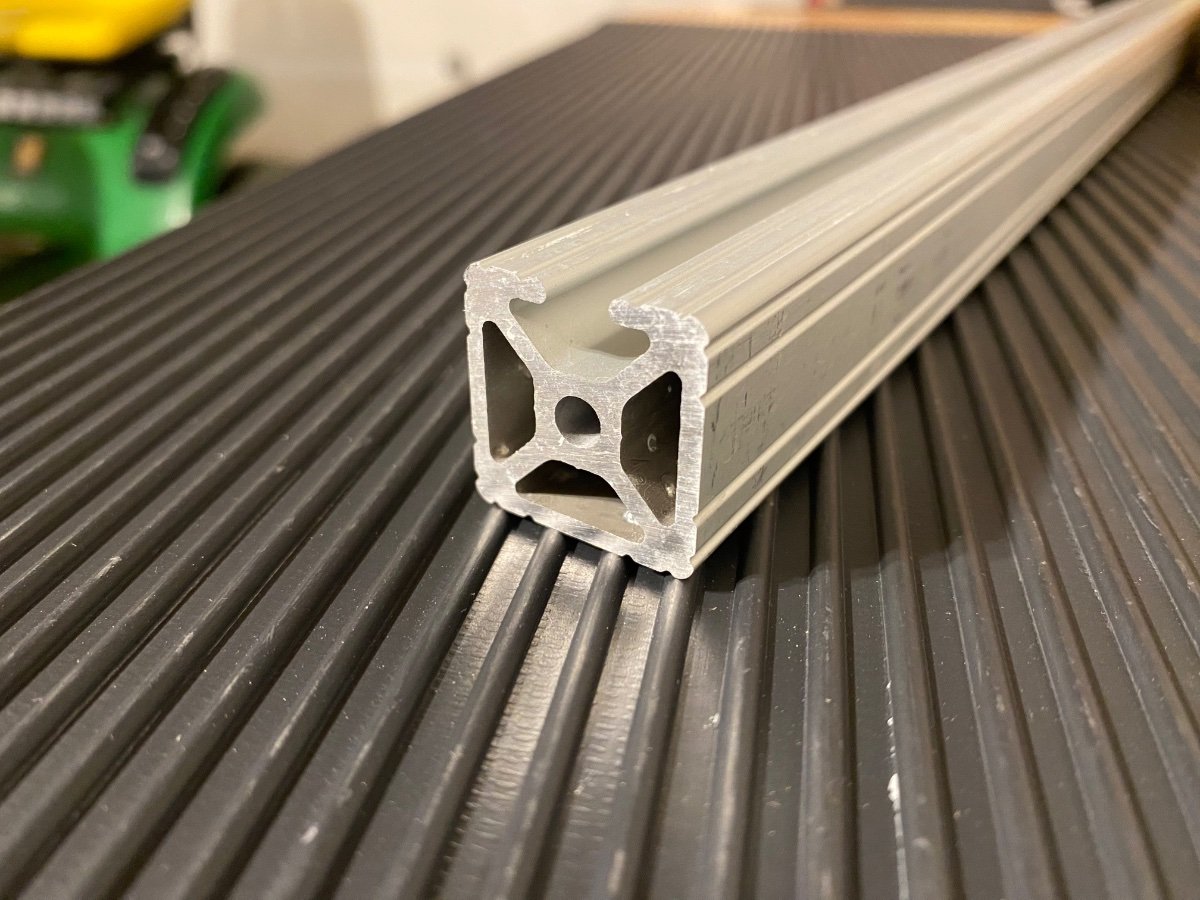
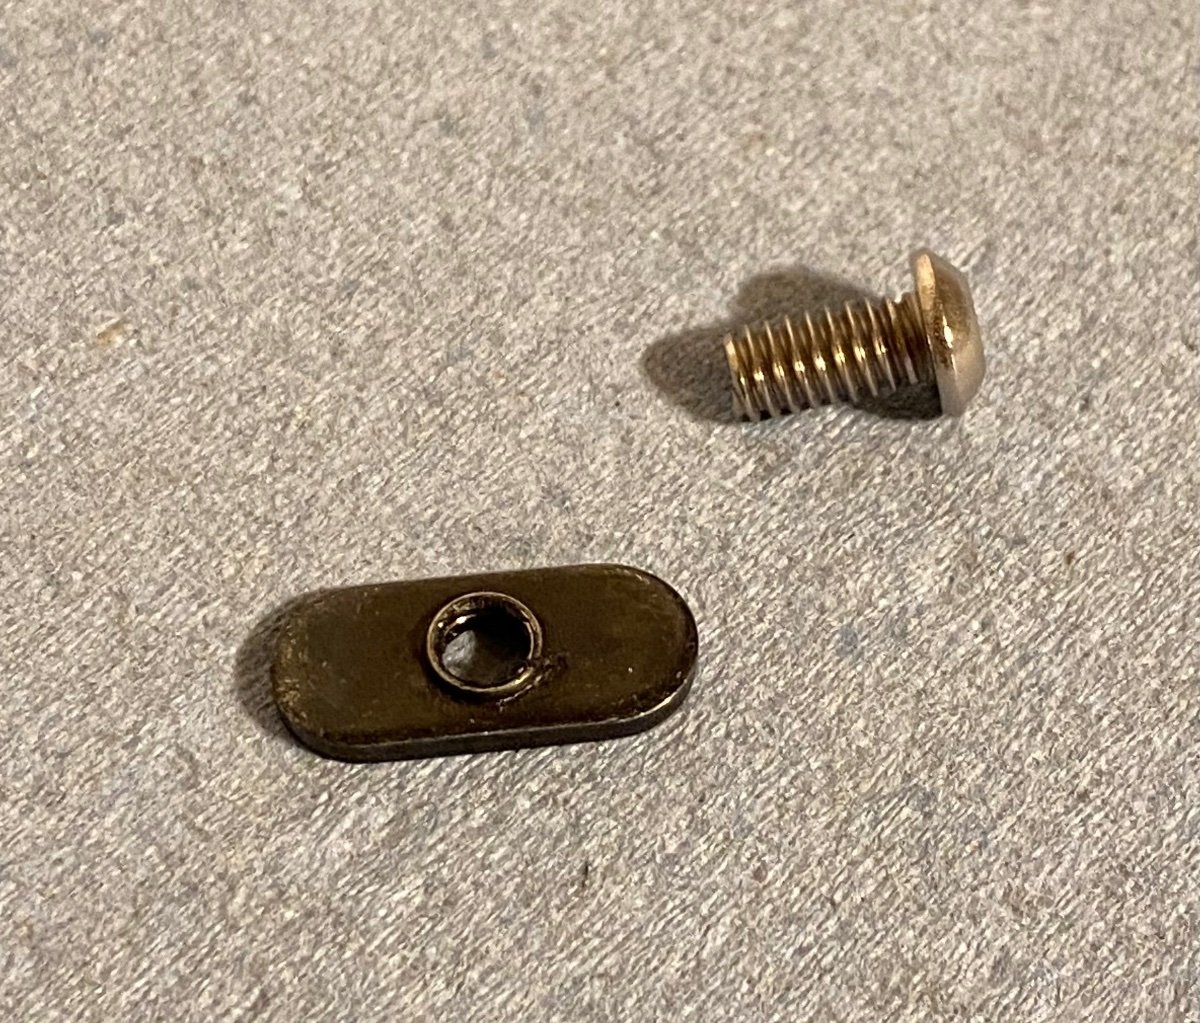
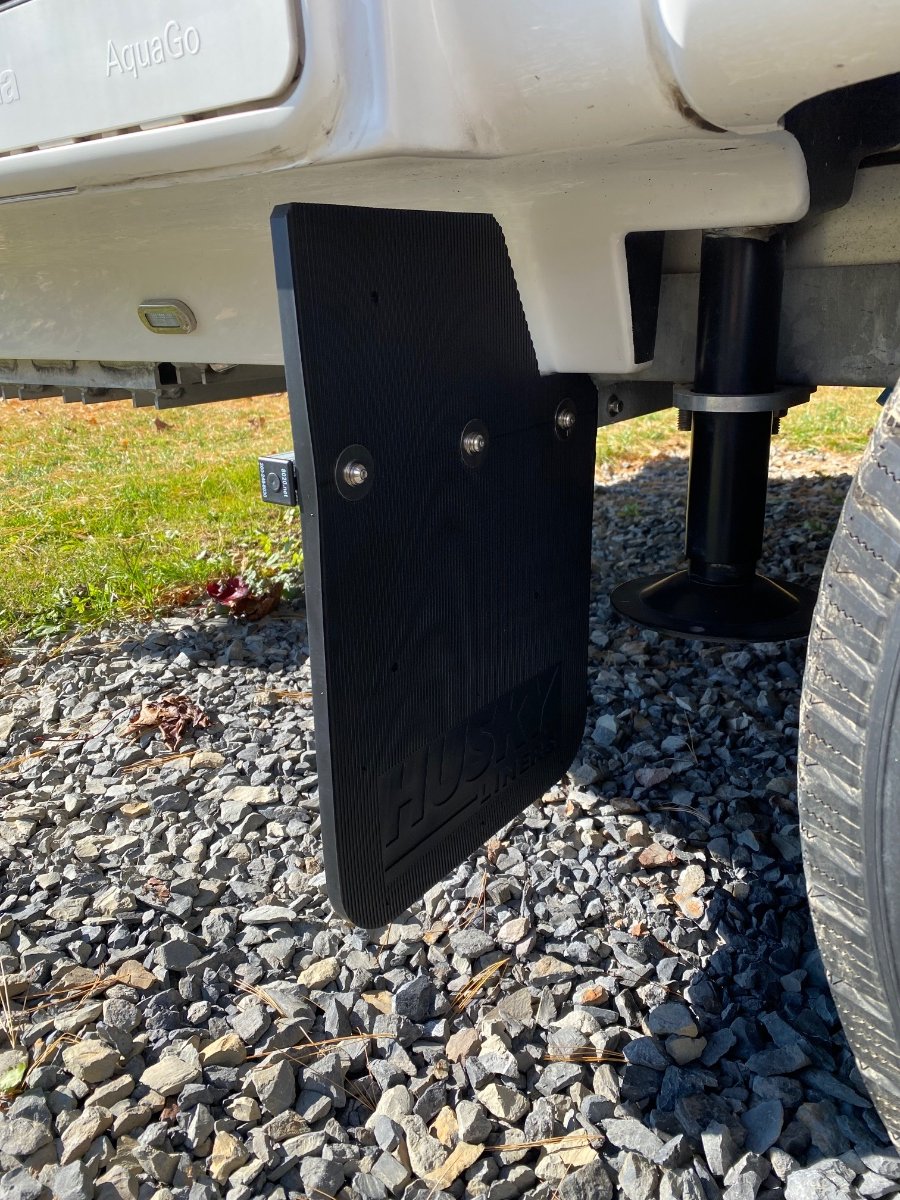
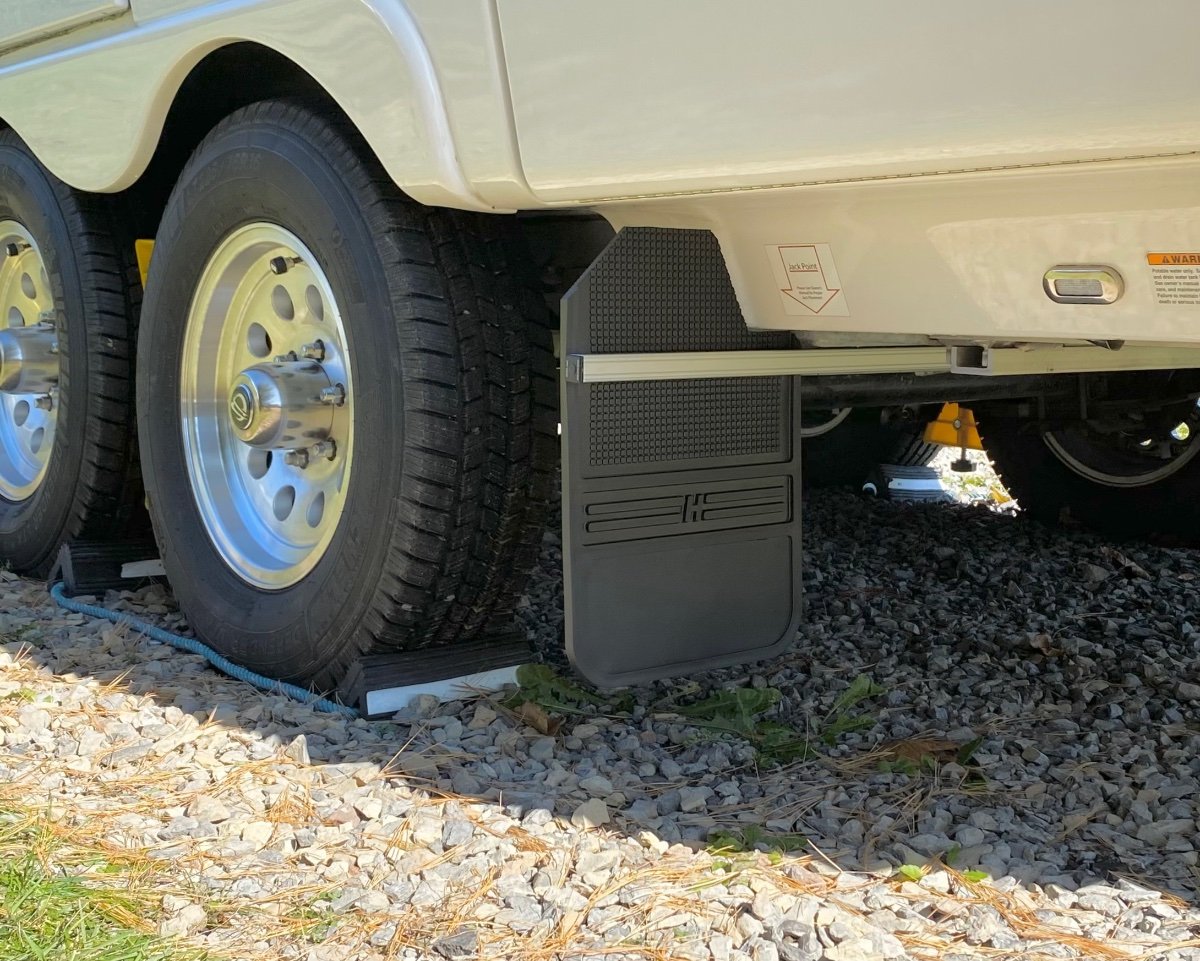
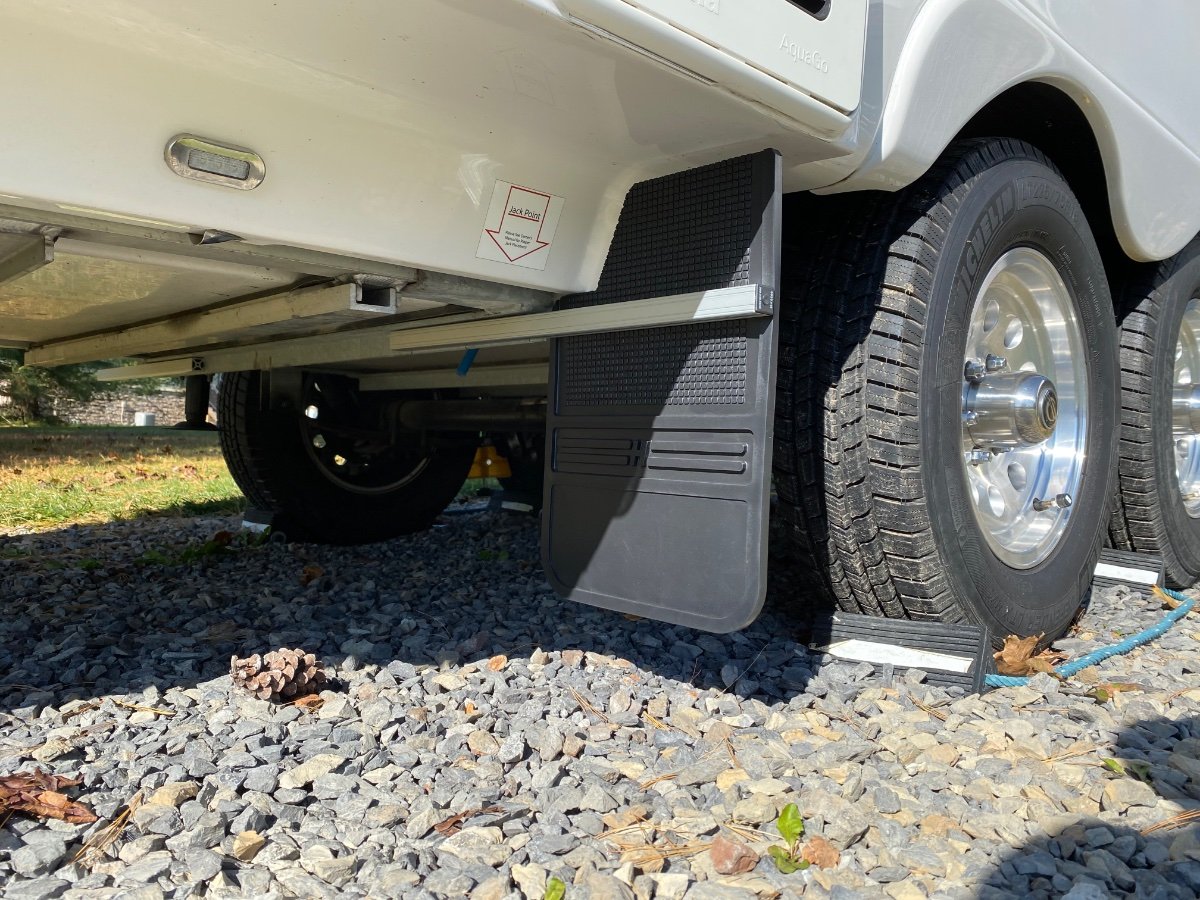
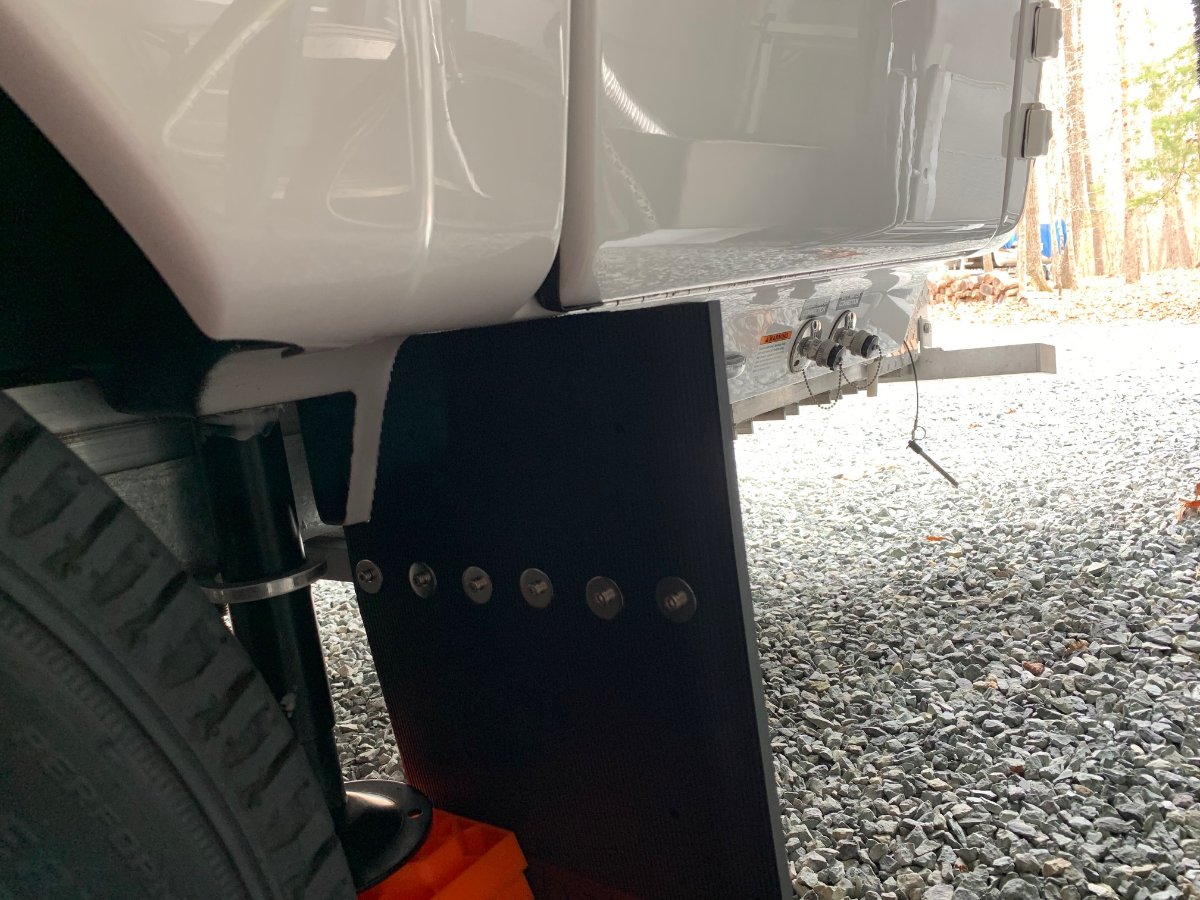
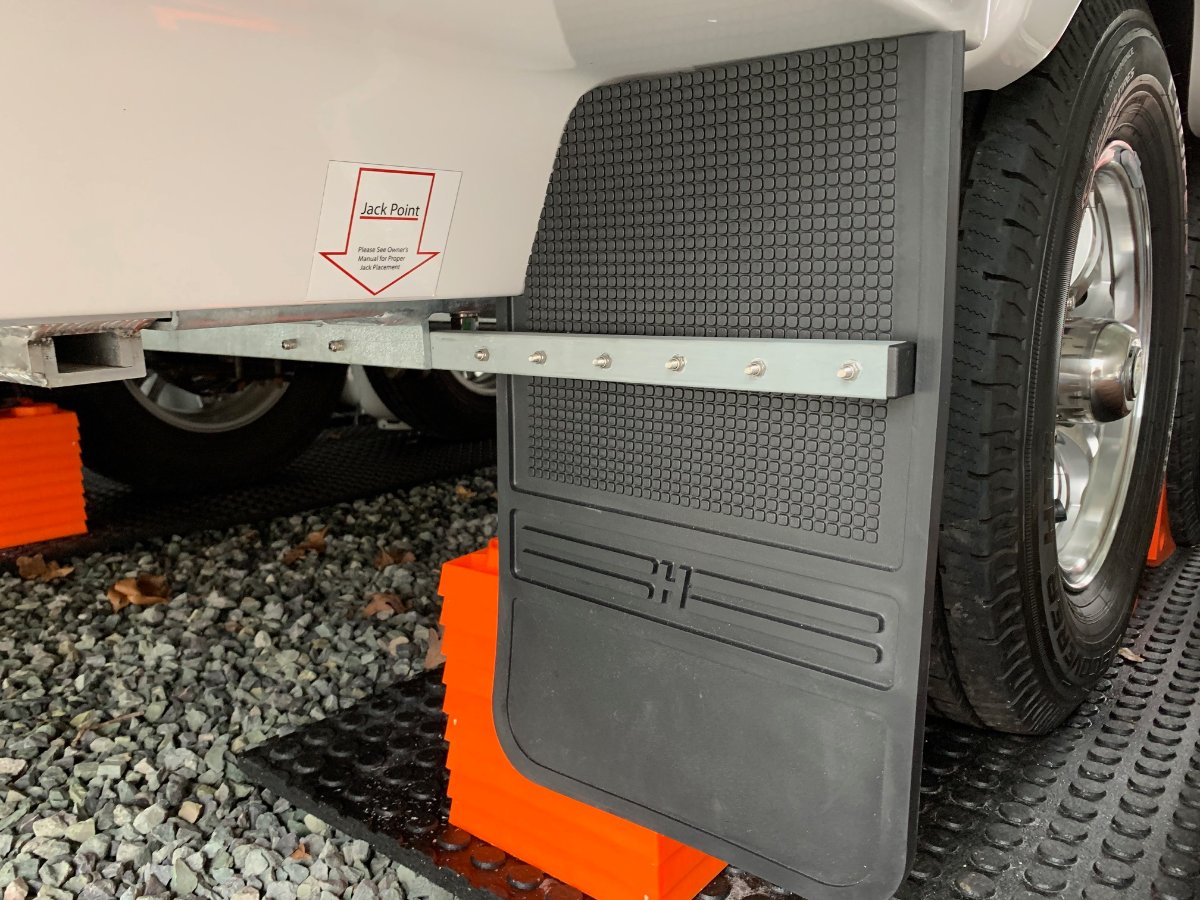
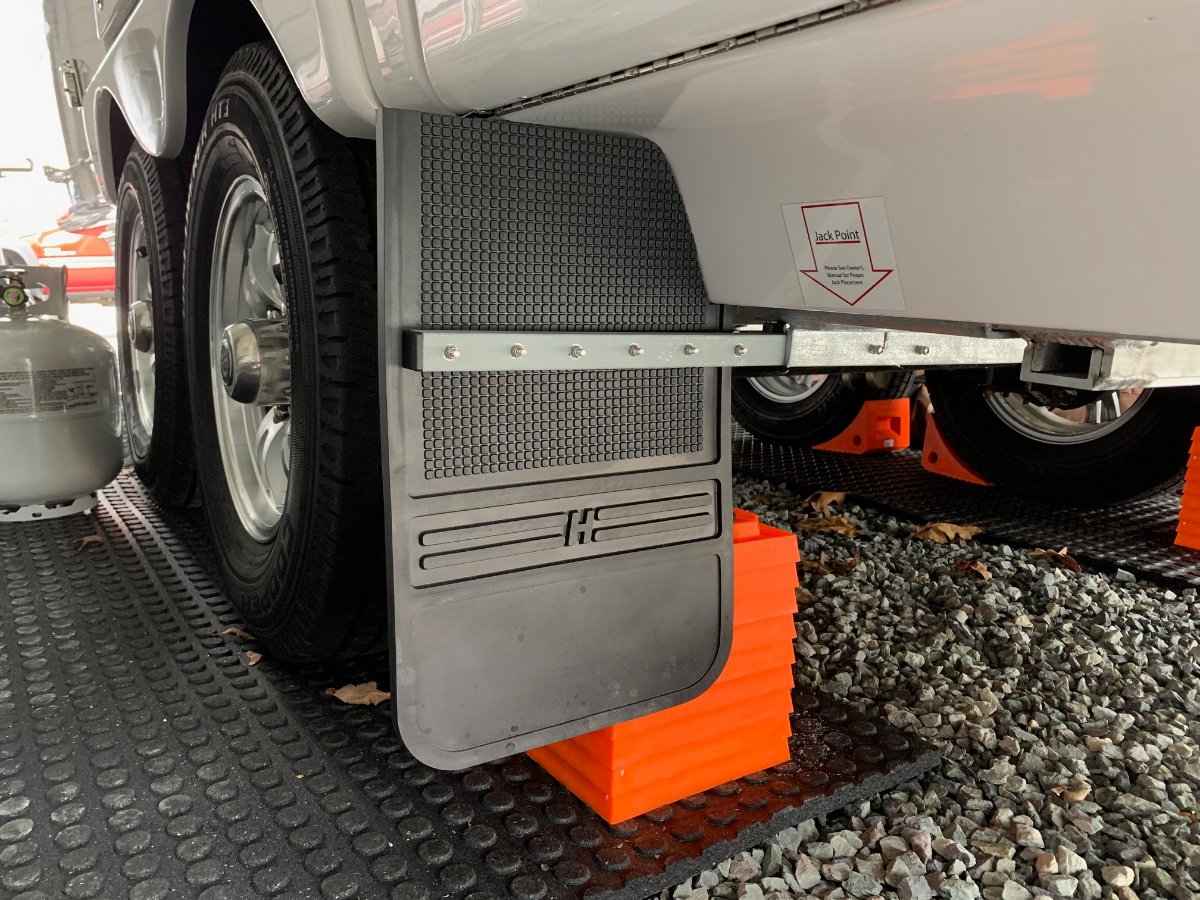
Finally got around to doing my mud flap project. I used 1” square single slot aluminum T slot rail and 1/4”-20 T slot nuts (from McMaster Carr) with 1/4”-20 stainless screws & washers. A 2’ long section of T slot rail on each side of the trailer, with 12” wide mud flaps (from Husky, very nice quality thick molded mud flaps) cut to the Oliver trailer hull profile. The T slot rails come with a hard anodized finish so no issue with galvanic corrosion when mounted in contact with the steel subframe. The T slot nuts hide a lot of the mounting hardware for a clean appearance. And the street side flap needed the upper corner cut away to allow the basement door to open fully. Thanks to John and others for the inspiration for this project.
 7 points
 -
I use TST TPMS and use rubber valve stems with zero issues. 👍🏻 Roll with whatever works best for your application. 😊3 points
-
A bit un-nerving when passing a semi-car carrier going the other way, but not a problem. Don't exceed the speed limit2 points
-
Take out the unit completely (disconnect battery power first!!!) I sanded the surfaces with rough paper, cleaned the board and wall surfaces with alcohol, and reattached with JB Weld. You should be able to figure out a way to brace the panel overnight, wedging in a trimmed piece of wood will work, or a large adjustable clamp, if if is deep enough to reach. That will get you back to where the factory did it. Do you trust that heavy inverter to stay on with those tiny short screws? Not me. https://www.homedepot.com/p/J-B-Weld-10-oz-Pro-Blister-Epoxy-8281/308472730 Drill out all the holes clear through the wall, install appropriately sized stainless machine screws, washers and locking nuts. Place the heads where they are visible (put the nuts inside). Slot (cut) the lower holes in the inverter so that you can preinstall those lower washers and nuts and simply lower the unit down onto them (they are kind of hard to reach). Reinstall the inverter. Now it cannot possibly fall off. Open a service ticket, Oliver needs to know that this is a problem! Please add your TV and trailer info to your signature so we know what we are talking about…. and please start a new thread with pics. John Davies Spokane WA2 points
-
Recently, my inverter stopped working and wouldn't power on. Here is what I found so far (long story, feel free to skip and go to installation section below) The trailer was parked in at my property with shore power and the inverter was working when we were back from camping trip a few weeks ago. Over the weekend we found that the breaker was tripped and narrow it down to problem with the inverter. When on shore power, either the breaker at the shore power or main breaker underneath the dinette seats would trip unless switched the breaker of the inverter to off. The inverter screens didn't show anything for both remote and on the inverter itself located under the street side bed. When not on shore power, inverter didn't power on. Checked the voltage at the DC positive and negative terminal at the inverter using digital multi-meter and confirmed that there's ~13V at the terminal. Tried to reset the inverter by cutting DC power using the 2 red button switches near the inverter and confirmed using digital multi-meter that there was no DC at the terminal. This also didn't work. The inverter wouldn't power on when restoring power to it. I decided to submit a ticket and Jason and I agreed that there's an issue with the inverter itself and I had to contact Xantrex. After submit a ticket to Xantrex, the technician recommended updating firmware and that didn't help. Xantrex agreed to send me a new one because it's still under 2 year warranty. Installation I got most of the information below from Oliver and it's specific to my 2021 LE2, please contact Oliver to confirm if you have a different model year. Disconnect Shore Power from the camper. Flip the 30A Main Breaker to the OFF position (located in the AC Breaker box under the Dinette) Flip the 25A Breaker for the Inverter to the OFF position. Trip the 200 or 300A Inverter Breaker located under the street side bed access panel area. The breaker is located up & under next to the side of the battery box. Remove the inverter cover in order to gain access to the wire connections. The 120V wires on located on the left with the 12V connections on the right, pictured below. Once the cover is removed you will need to disconnect all 4 wiring connections inside the inverter. As a precautionary measure, do not let the wires contact each other. With shore power removed & the Inverter breaker tripped there shouldn't be any power but it is best to be safe just in case you got in a hurry and skipped or missed a step. Make note of the 120V Wires once you disconnect for which one is the AC In and which one is the AC Out Disconnect the ground wire located on the top edge of the inverter. Remove the screws securing the inverter to the white AP1 board. There are two screws located on the bottom and two located on the top. You may see other screws that are securing the wires to the white board but it is not necessary to remove them when replacing the inverter unless you are installing new wires. See screws pictured below as reference. Follow the steps in reverse to install the new inverter. Mount the inverter on the white board & secure with the 4 screws Connect the ground wire Connect the 12V Wires. Red is positive & Black is Negative. Connect the 120V Wires. Be sure to connect the AC In & AC Out wires correctly. Reinstall the cover Reset the Inverter Breaker by pressing the leg by in. Turn inverter on at the inverter itself (not the remote display) and verify 12V to 120V operation through the inverter. Turn the inverter off at the inverter Flip the 30A Main & 25A Inverter breakers back to the ON position. Connect shore power to the camper and verify charge state through the charger to the batteries. It may take a minute or two for it to engage. Once the inverter has been installed you will need to check the settings and set it based on your battery type The only settings that are changed by the Oliver factory are: #02 ,#05, #20, #24 & #28, based on your options, and are in bold font below Xantrex Customer Support: 800-670-0707 Oliver Service Department: 888-526-39781 point
-
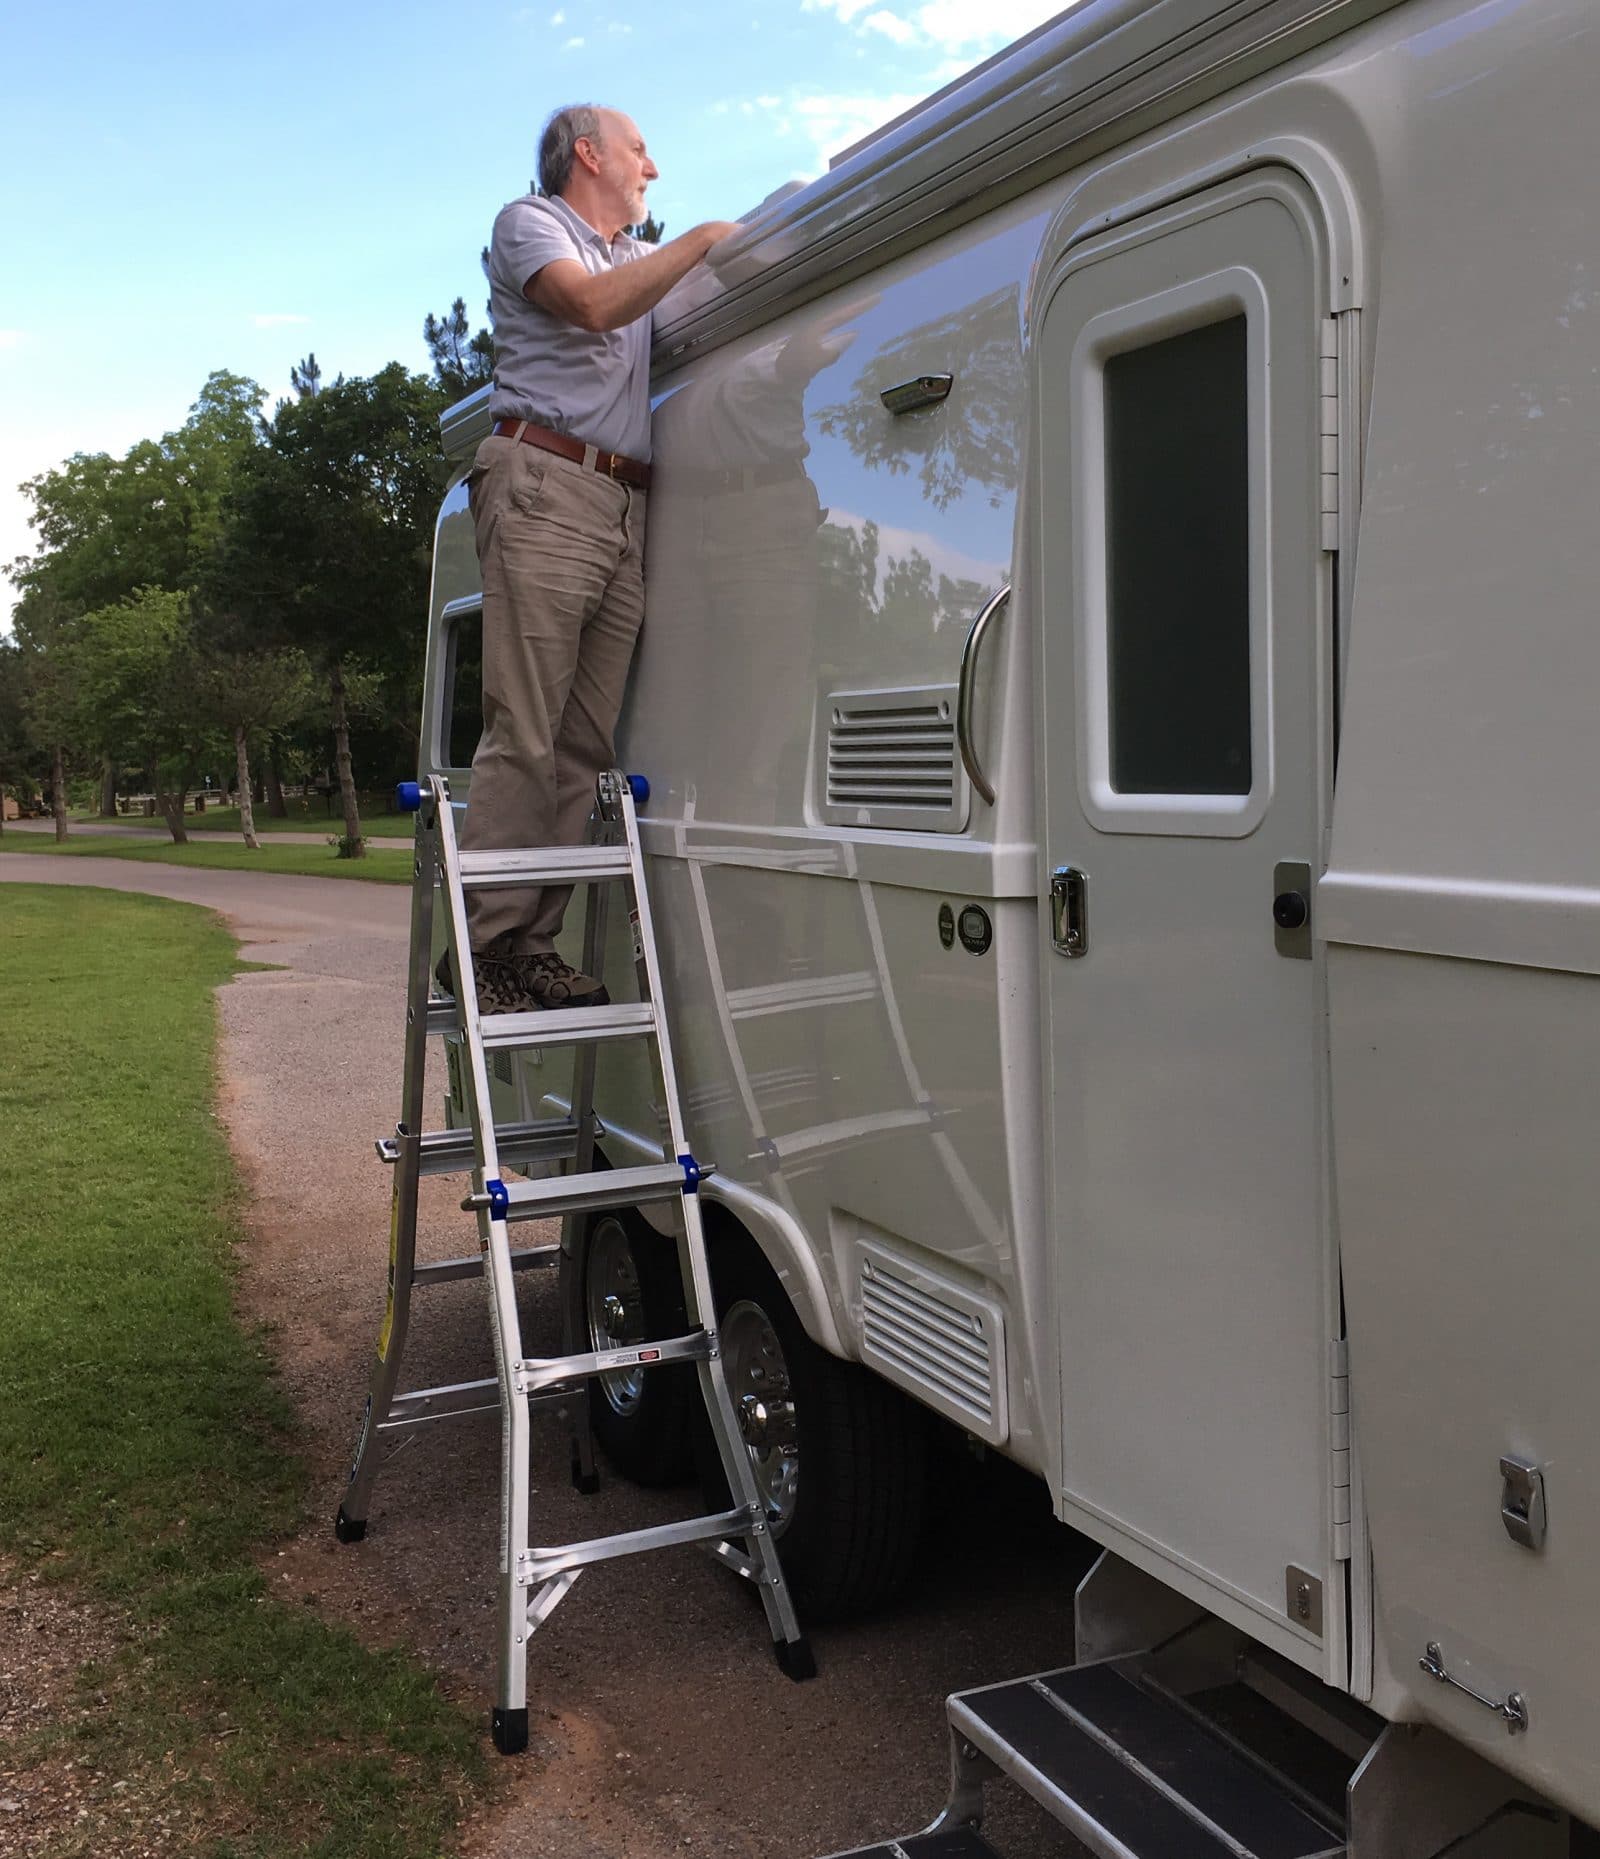
Three days after we took delivery of Mouse, I climbed up my ladder for a check of the roof. Everything looked fine, except for the solar panels. Three knobs were slightly loose, perhaps a 1/16th of a turn. One was a full half turn loose. This is dangerous since a loose or lost knob could wreck the panel and possibly the vent and AC unit behind it, especially if you are towing into a stiff and gusting headwind. I got out my Dewalt driver drill and modified the knobs so that I could secure them tight. I can't recall the hole size, probably 1/4 inch, big enough for a standard sized nylon wire tie. This is just like safety wiring a bolt using steel wire, but the advantage is that the big white ties are highly visible from the ground, so you can include a visual check of all four as you do your final walk around before leaving. You must route the tie so that all the forces are acting to tighten the knob. I think this should be done at the factory, but in the meantime I strongly recommend that everyone with panels on the roof secure the knobs. A better fix would be to drill out the threaded inserts and install through bolts with self locking nuts, but this would make it very hard to reposition the panels for cleaning the roof underneath.... Here is a question: have you ever checked them? If not, then please do so before your next trip. They may be loose.... Be safe. Here is my Werner convertible ladder in action. It is good to have access to your roof, always. John Davies Spokane WA
1 point
-
If a power surge is strong enough, the protection module with the MOVs will be destroyed and the EMS will display an error code 10. At this point you'll need to replace the MOV protection module, which isn't difficult or expensive. I'm not sure if this can be done in the field with a pedestal protector. These may need to be sent it in or replaced completely.1 point
-
We’ve only gone from Silverton to Ouray, not the opposite direction. I don’t if Tali would go for that as she would be riding on the edge looking down.1 point
-
If I'd known the LEII tank would only hold 14.75 gallons, I might not have considered it.1 point
-
Any heat gun hotter than a hair dry will definitely damage the gelcoat. Be very careful using this method. Better to use a solvent, pressure, and patients.1 point
-
Easily doable, just look where you want to go, not where you don’t. I was a bit desensitized after doing Black Bear Pass to Telluride with a Land Cruiser group, without the trailer. I was happy Oliver is only 7’ wide.1 point
-
The Goodyear Endurance tires are well regarded in the towable RV field. I'd be ok with them on my Oliver. ST tires have strengthened sidewalls to handle the sideways scrubbing trailer tires endure in tight turns. @bugeyedriver We've had Maxxis on our previous 3 trailers with absolutely no issues at all. Very nice tires, too.1 point
-
Well, the first attempt by Truma to replace the Domestic AC in an Oliver was a big fail...for the simplest of non-Truma reasons. After we got the interior box removed, along with the mounting bolts, the external unit should have just lifted off. It would not move, I mean two guys pushing from the external edge and from the inside pushing up. Called Oliver Service, they said it was mounted with butyl tape and may be tight. From what we could see the rear had a 1/2" thick rubberized molding piece supporting it. It wasn't butyl. Even using body shop plastic wedges we could get no play in trying to separate the unit from the 'tape' or the tape from the trailer. We debated taking the AC apart to separate it, but that could have still been a dead end as you really need that piece and whatever is up front to come off the fiberglass and we didn't want to damage the gelcoat by try to cut between the 'tape' and the surface. So, we put it back together and will see what Truma and Oliver can come up with. It's possible in my May 2020 delivery cycle they were using something different than butyl tape, because it was locked in. The unit set in the Alabama sun for its first year, but has been covered the rest of it's storage life..so not sure if sun really made much difference. Almost like the difference in LocTite Red vs Blue. If it was in a shop you could use a fork lift to ease the unit up, but you still have the issue of whether the tape will come with it and/or damage the gel coat. I don't know how often Oliver Service has had to replace an AC on older units, but I'm guessing not many. If you are having yours done, you'll have to remove the interior hold-down bolts to determine how hard/easy it comes off. If they can work out a non-destructive way to remove the mounting 'tape', we'll give it another try. This is an issue, irrespective of whether replacing with a Truma, Houghton or something else. More to come, I hope....1 point
-
I agree with the other posts here to see what other people have said about this subject.. It has been discussed many times in the past. Read them so you can make your up your own mind. We have the compost toilet (do not do much boondocking) and am glad we have it instead of the regular toilet. It is not that hard or difficult to empty and it is a lot better than dumping the black (poop) tank. It is a great ecological way to go.1 point
-
Thanks John, I was dismayed to discover Oliver would attach such a heavy unit with what looks like liquid nails! And thanks for the link to Home Depot. We don't do too much off road camping with the trailer but we do drive on plenty of lousy roads in the west. Sunbaked, washboard, gravel, dusty, wavy, cracked, filled with potholes. Up and down mountain passes, narrow, steep grades, cold and hot weather. I wonder if the unit fell off the wall when we camped out during a recent cold spell and the temp fell to 26 degrees? Anyway, thanks again, and I'm going to send a service ticket as you suggested. It's a total pain to have to re-install this unit because of cheap installation. Doris and Bill Santa Fe, New Mexico1 point
-
I agree with Steve here and with JD’s advice. Our AGMs lasted almost 5 years. We’re almost at 2 years with our 3 Battle Borns. If your trailer is a 2017 I assume you have the Blue Sky controller. The base 100aH BB lithiums were about $800 each. The updated PD 4045 was a little over $100, also from BB. There is some reprogramming of the Blue Sky but BB provides the parameters and it is not difficult. The PD (Progressive Dynamics) 4045 is what charges your batteries when on shore power. The old model did not support lithium, the new one does. It is part of your fuse box under the dinette seat. Check to see if yours has a little lithium toggle on the front. Not difficult to swap out. The folks at Battle Born are very helpful answering questions and giving guidance. Mike1 point
-
Ken, it is far better to plug the gennie 120 VAC output into your shore power connection. That will give you 45 amps through your onboard converter. It should be fine as long as you don’t try to draw any extra power while charging. Flip off all those other breakers. FYI the 8 amps DC is unregulated. You really don’t need to worry with a large battery bank, but it will fry a small battery since the current never tapers off. Good luck. John Davies Spokane WA1 point
-
Although I wouldn’t do it, if you want to go cheaper than lithiums, you could just go to AGM’s. But for less than $3K, you can replace the four T-105’s with 3x100 amp hour Battle Born lithium batteries and a new PD charger that’s plug and play. There’s no need to spend $15K. And you’ll end with an extra 100 amp hours over what you currently have.1 point
-
Even though Mainiac poked a bit of fun at himself in his original post above - this is no joke. Serious injury could result from this "anode plug" given the force behind it. As John Davies mentions above - bad things can (and do) happen, Bill1 point
-
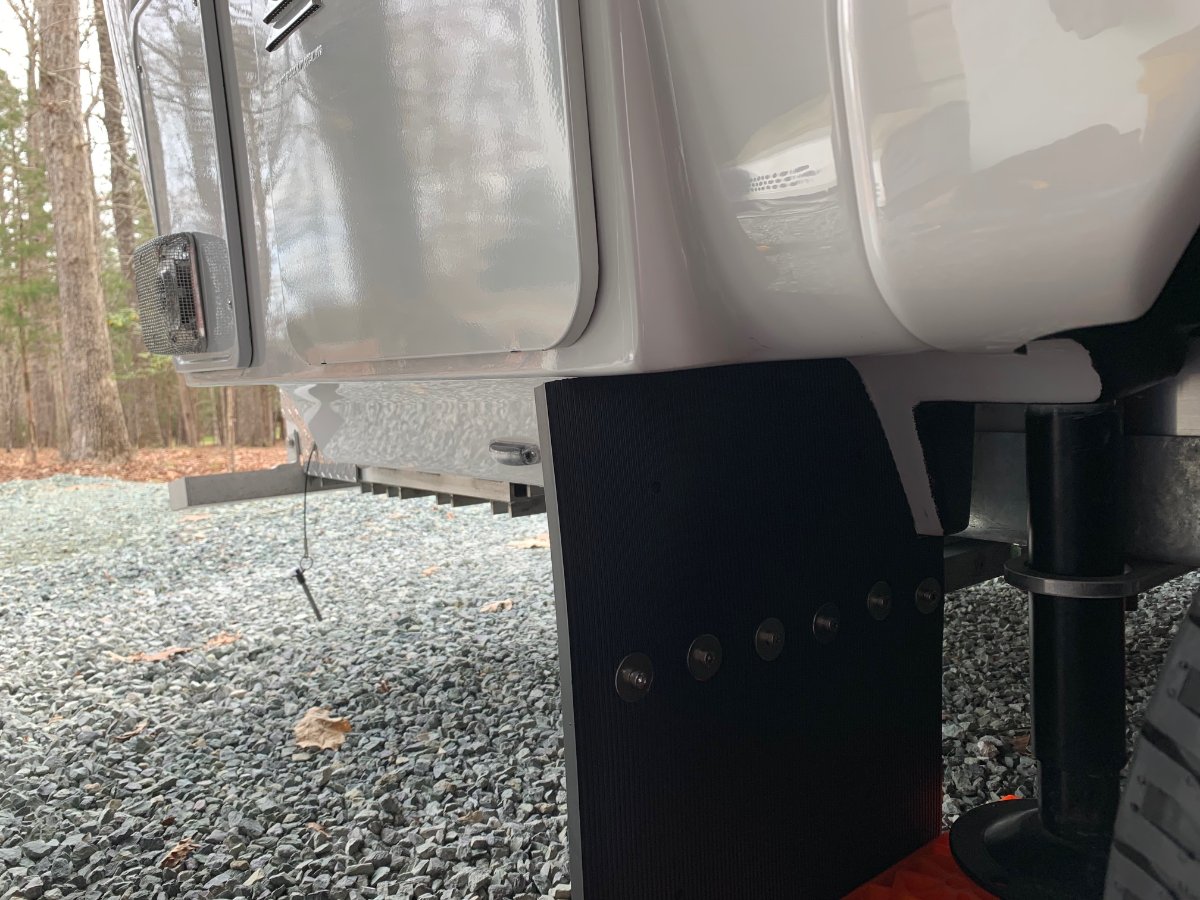
I did end up using the 1"x1" steel since it's galvanized, I plan on towing in winter / salt, and needed to find something useful for it. I "galvanized" it again after cutting and drilling. I'm going to keep a close eye on it and if it starts to rust, I'll take it off and replace it with aluminum. I used M5-0.8 Socket Head Cap Screws for everything. I did not use washers on the 2 bolts / screws that attach the bar to the frame. The screw / bolt head diameters are not much larger than the threaded portion of the bolt so l "hope" that's my "fuse" to protect the frame if there's a solid strike on the bar. I sure wish OTT had mud flaps standard or as an option. I already had a few "dings" in the gelcoat from driving it home after delivery that could/would have been prevented with flaps. 😞 Numerous owners have done this mod, so I'm not adding anything innovative or new here, but I know pictures are worth thousands of words and maybe will help someone thinking of doing this mod, so here they are:
1 point


-
Recent Achievements
-


")


")


")


