Leaderboard


Popular Content
Showing content with the highest reputation on 04/05/2023 in all areas
-
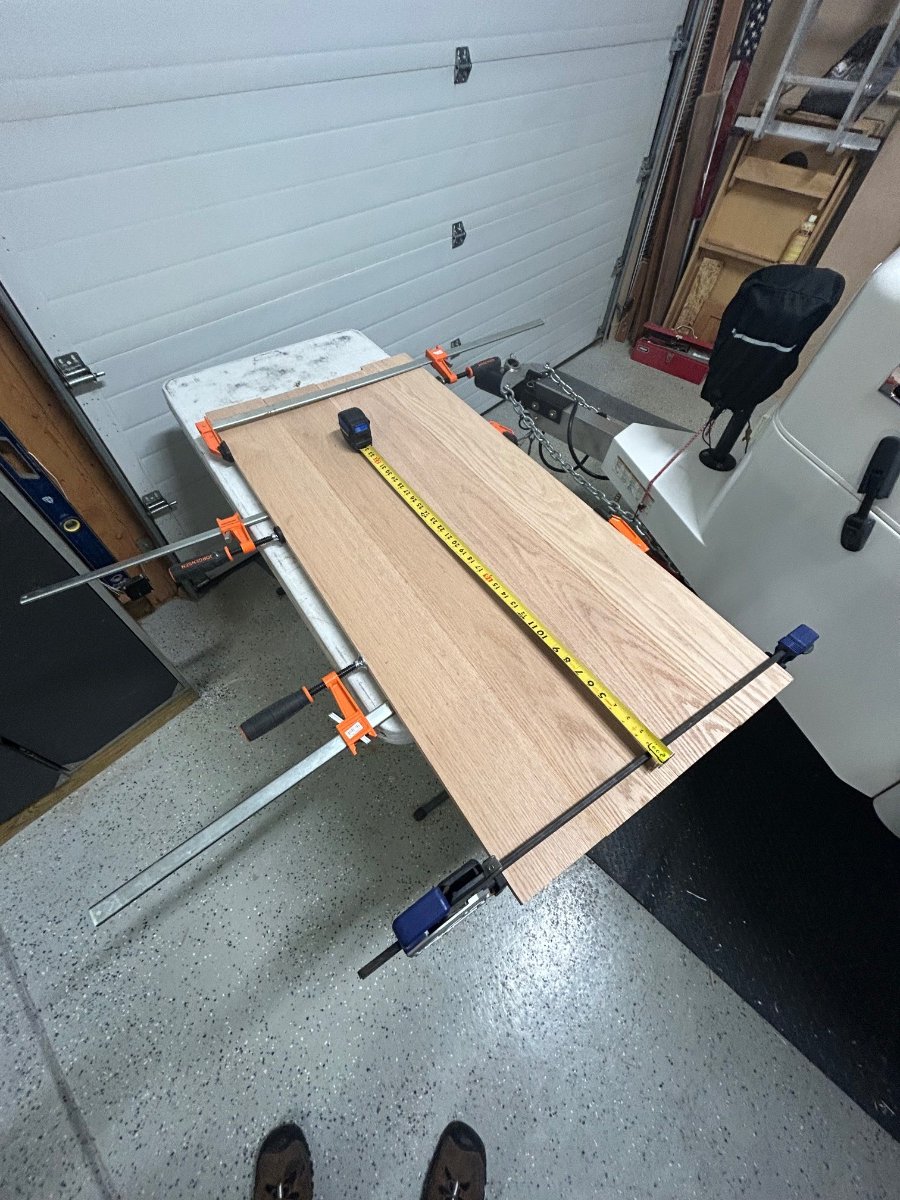
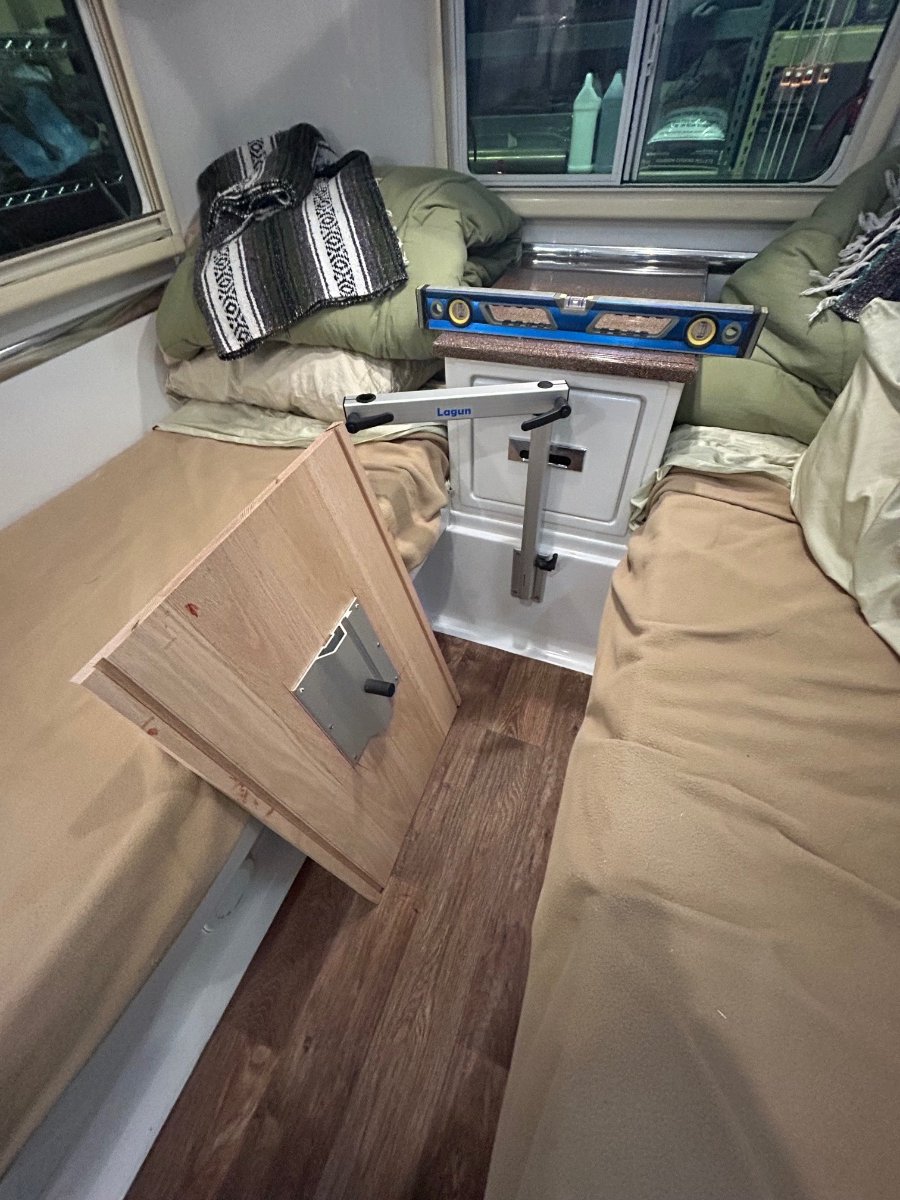
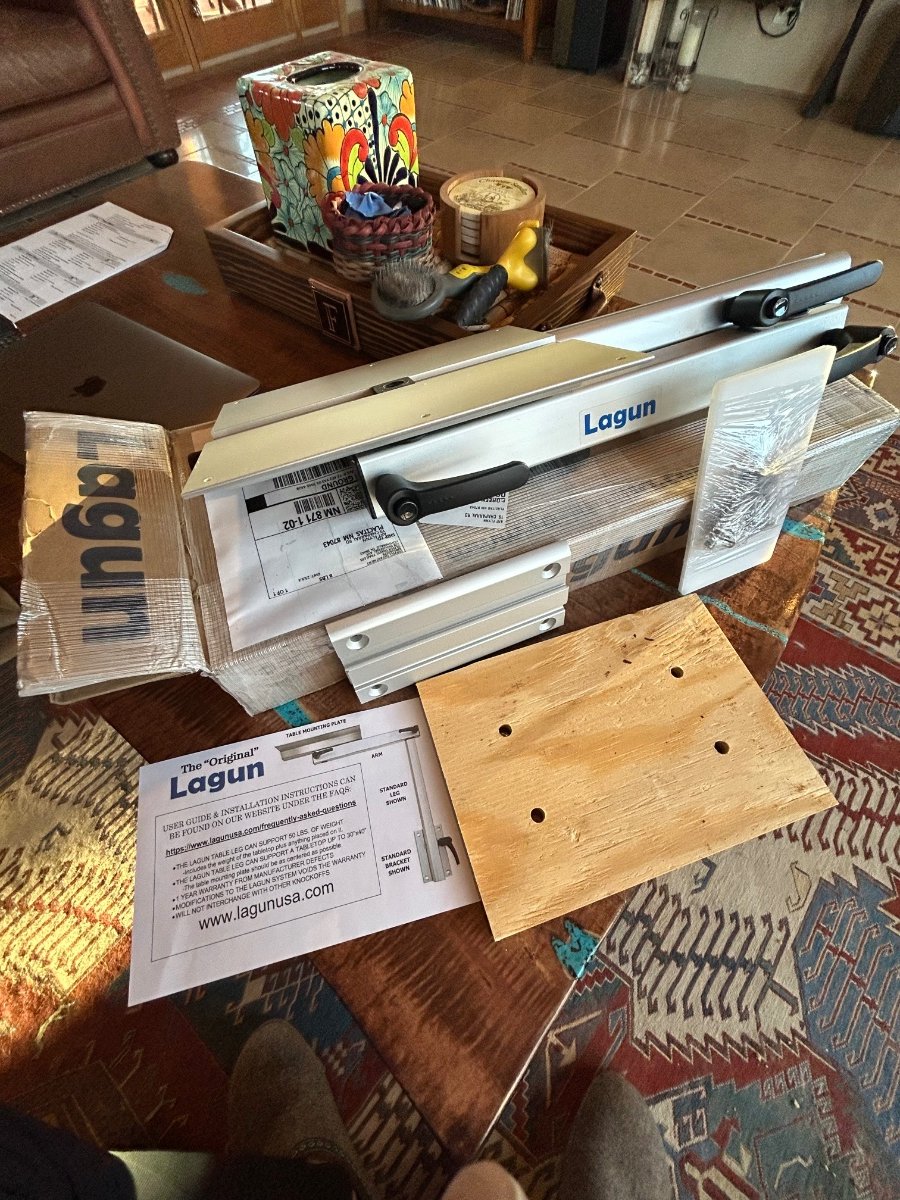
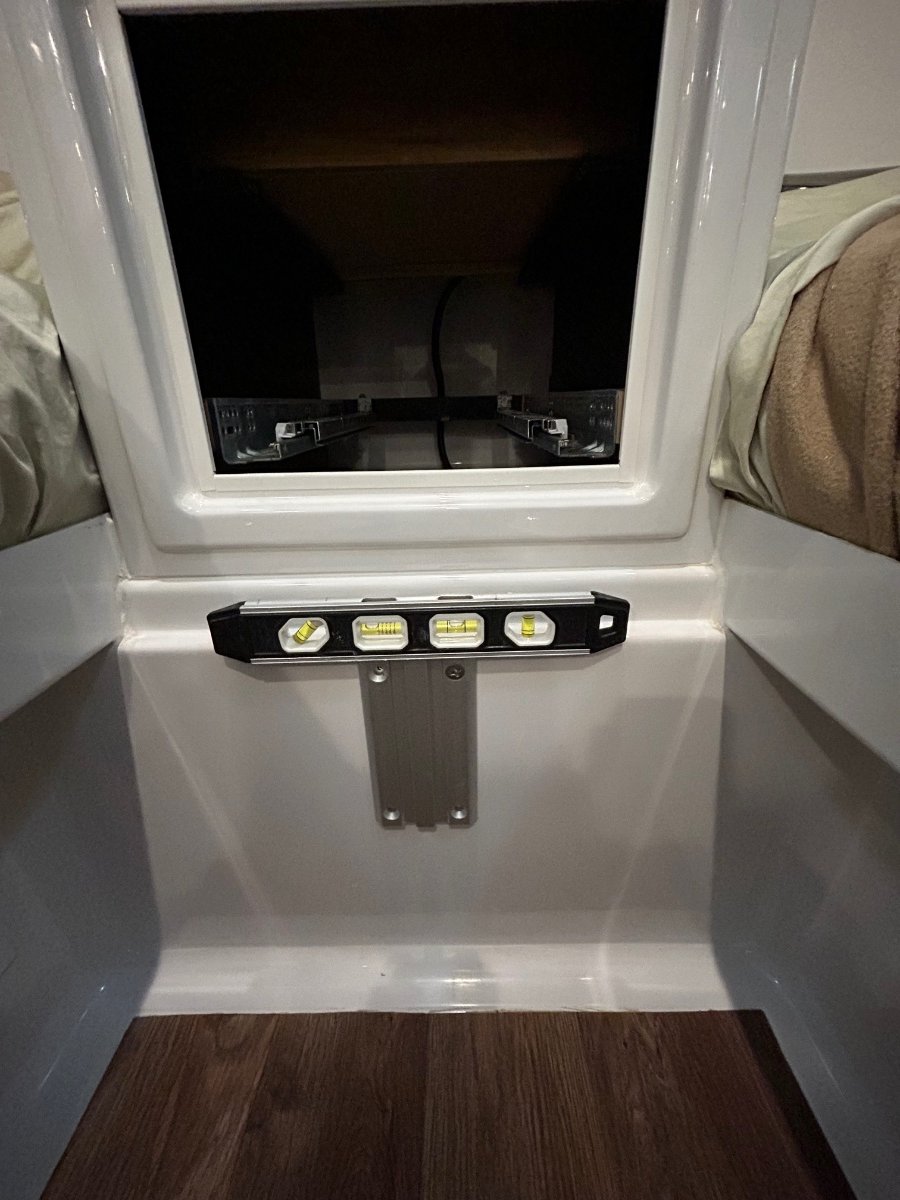
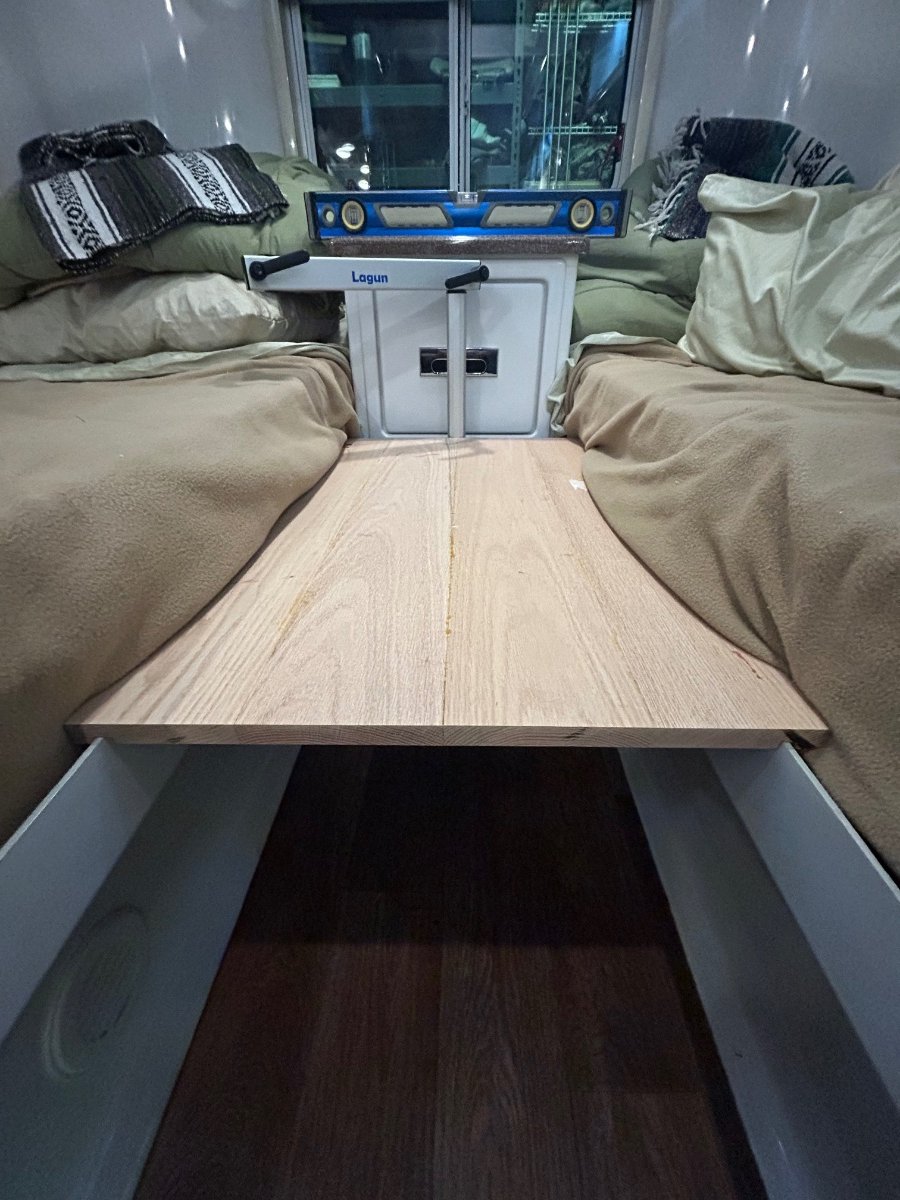
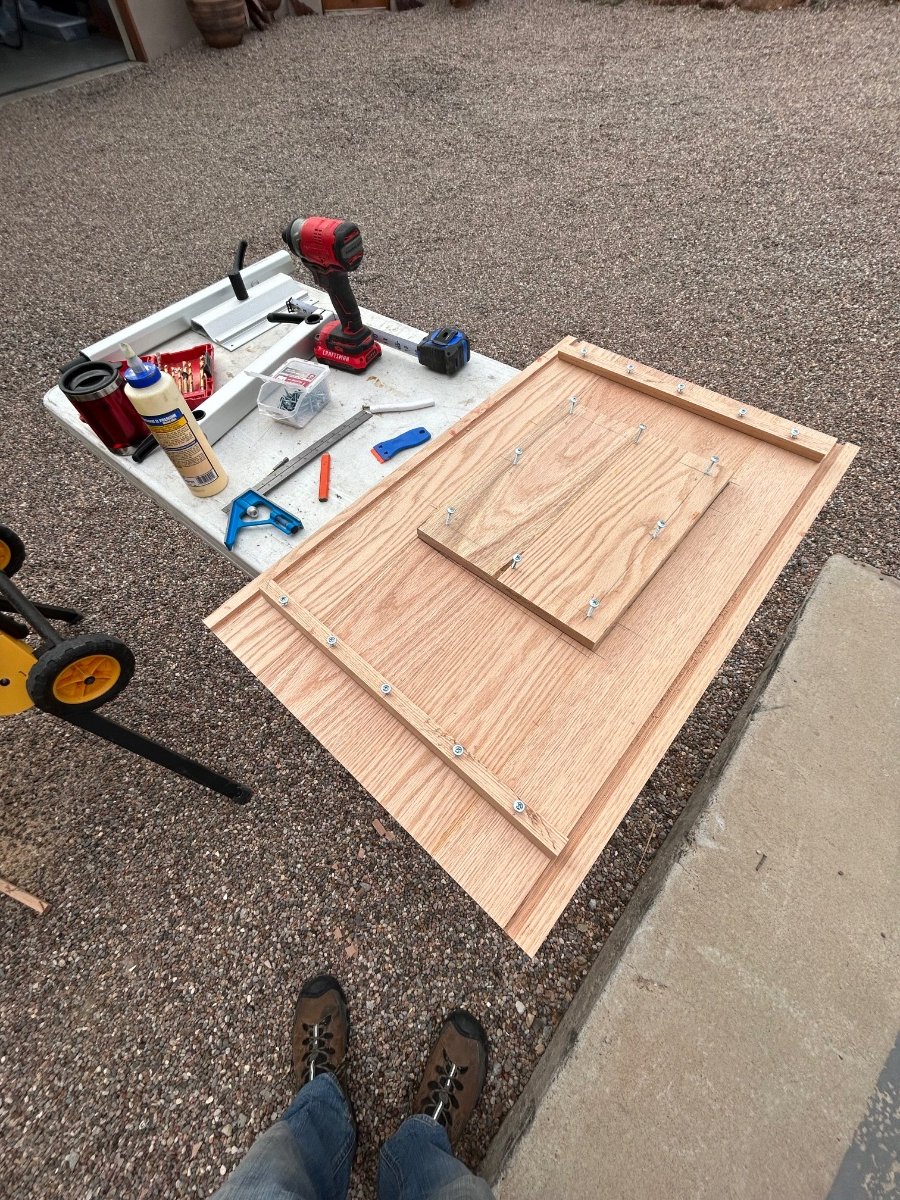
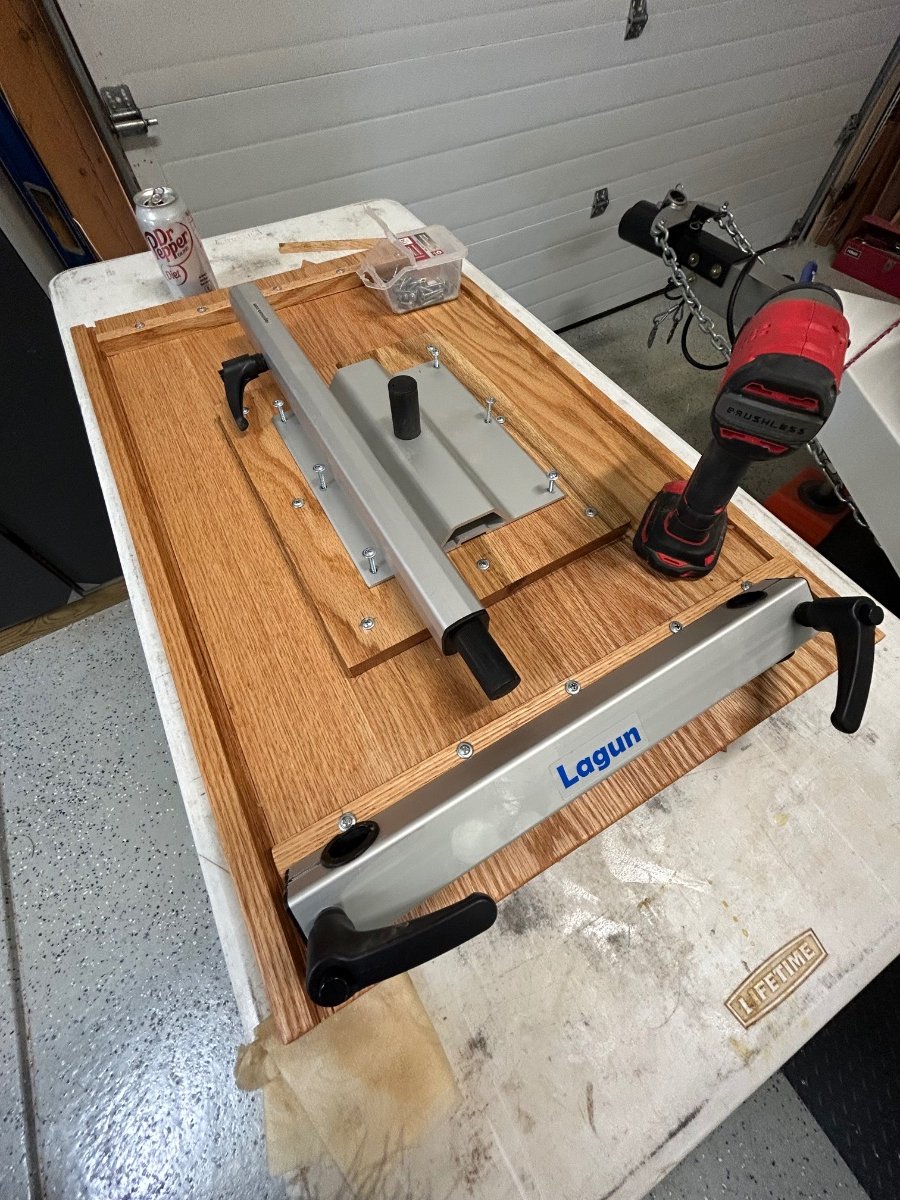
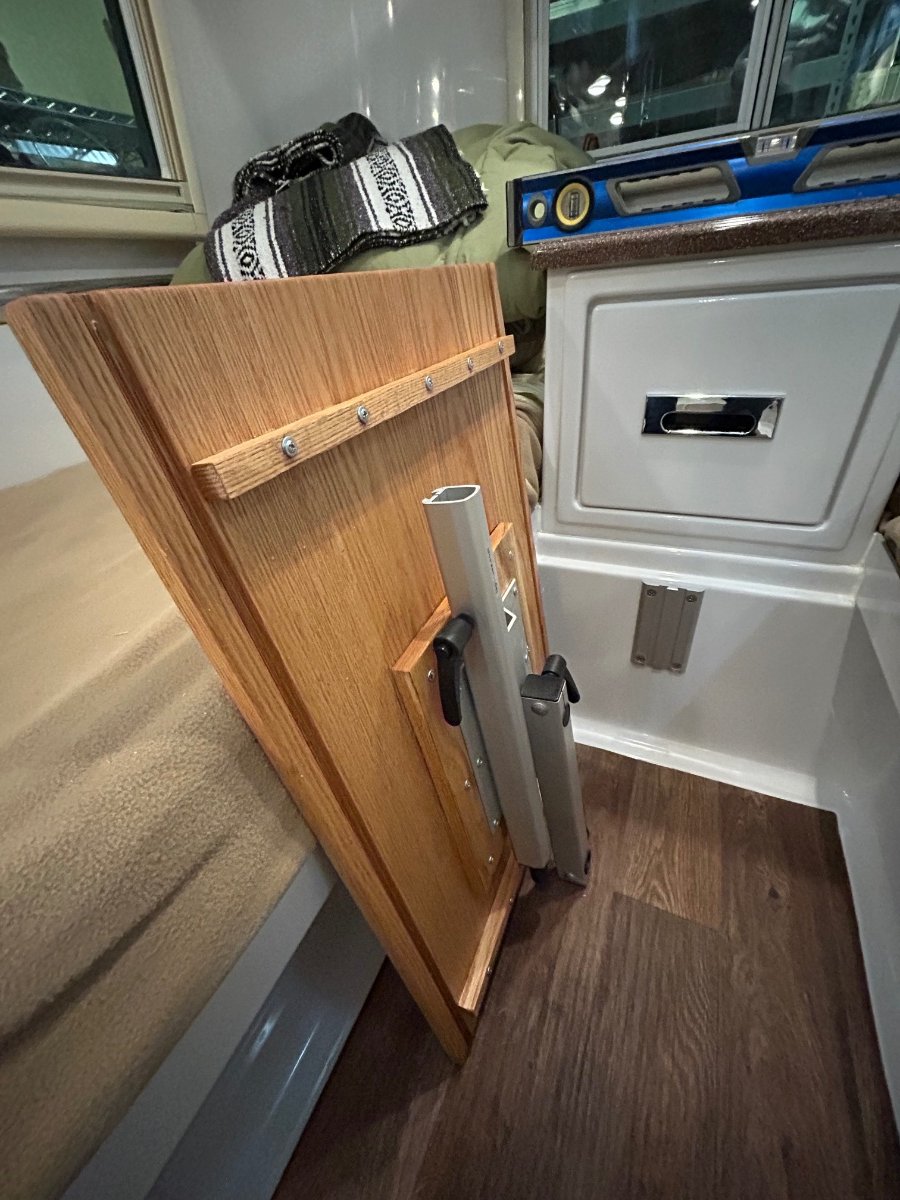
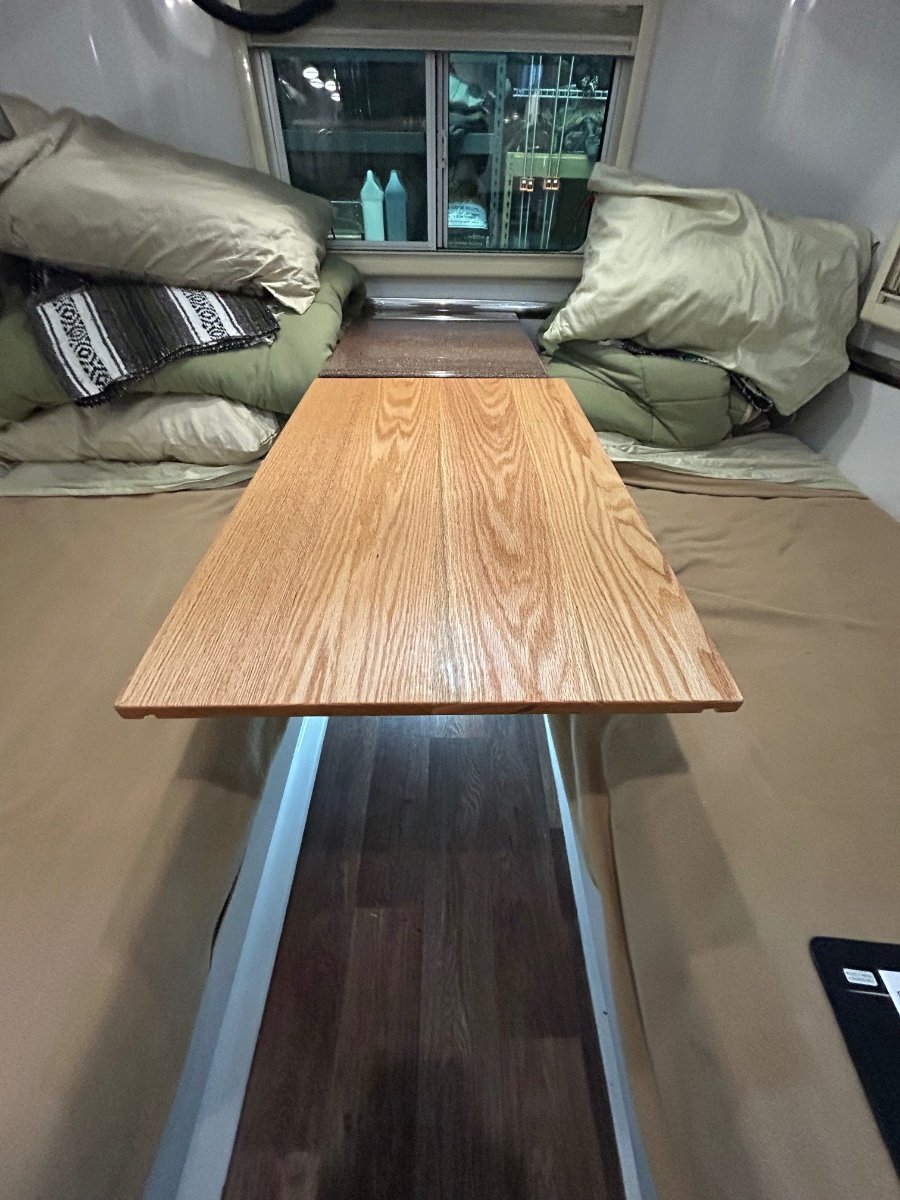
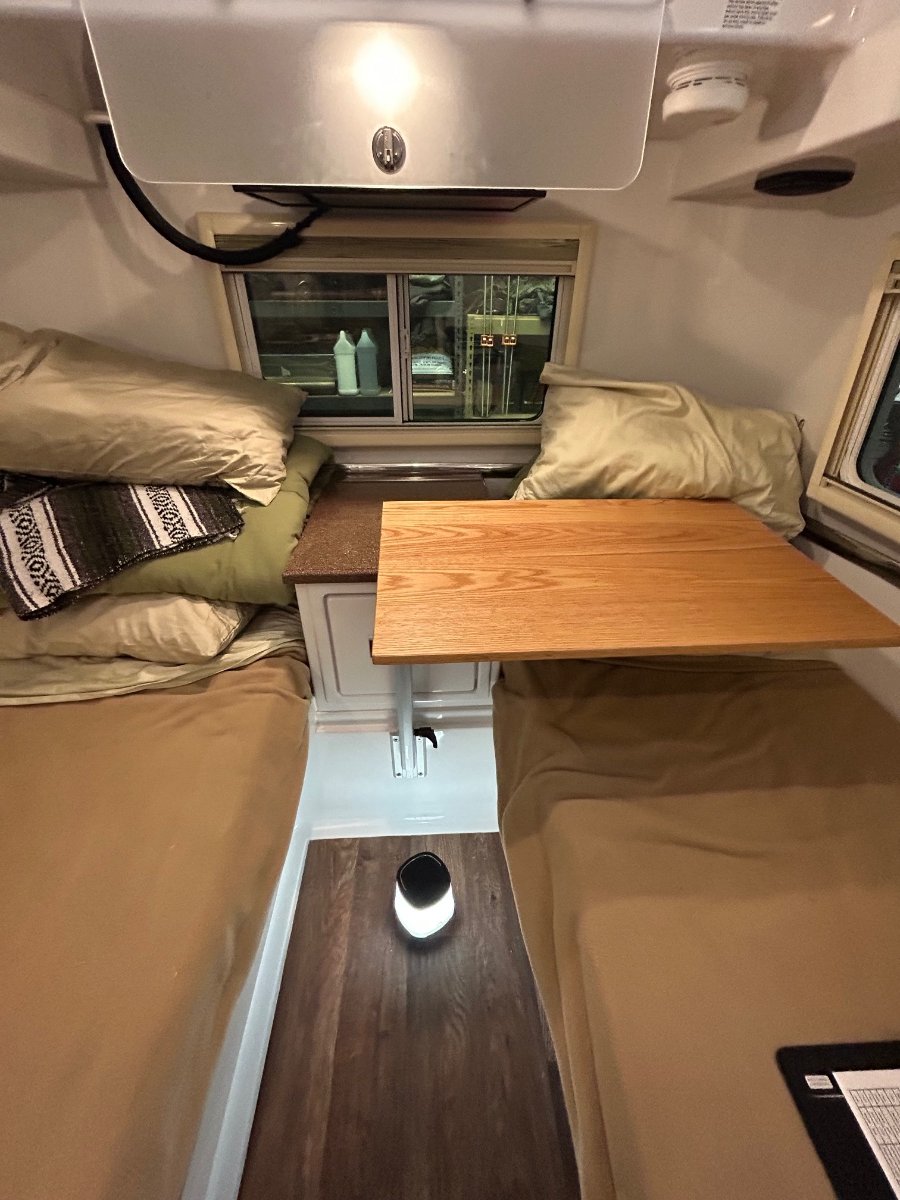
I'm hoping the order of the pix stays intact after posting. If so, each pic has a description below it, FYI. The Lagun hardware arrived here when I was on travel last week. We ordered it from Lagunusa.com directly. OK, so I started the Lagun Table installation a couple days ago. I installed the main leg mounting bracket first. Leveled rig fore/aft and port/starboard to get a good level on the bracket. My hardwood lumber supplier here was totally out of mahogany, so I decided to go with American red oak instead, I know - heavier and not as interesting as mahogany, but we've scheduled a long weekend camping trip this Friday and I wanted to get this table knocked out. We'll call the oak version a temporary bookmark for the time being. I glued/dowelled 4 pieces of 1/2" x 5.5" x 48" oak to get a tabletop dimension of 20" x 32", FYI. I used the extra wood for the table mount plate and cross spars (shown in later pix). The second pic above, shows the grooves on either side of the underneath portion of the table - the grooves are for when the table is in the "Puppy Mode." They fit over the twin bed lips to hold it in position when either towing or when Magnus is sleeping on it. This stage was for fitting purposes. This one illustrates how the grooves fit over the twin bed lip. Above shows fitting cross spars and mounting plate on underneath side of tabletop. Spars and plate are glued and screwed to keep table flat and reduce cupping as humidity cycles up and down. After a few coats of Watco natural oil/sealer, this shows the fitment of the Lagun hardware (in storage/Puppy mode). Ready to set up... In tabletop dining mode - height is adjustable to well above nightstand so tabletop can be swiveled either direction... If it turns out that we need more access to the nightstand drawer, we'll re-mount to the street side twin bed rail as described in earlier posts in this thread. The drawer is accessible in the Puppy Mode - so it can be opened at night for whatever is needed inside. I initially wanted to construct the tabletop with folding sides as described in another earlier post, but that wouldn't have allowed for the Puppy Mode. For now, the table configuration will get us thru this coming weekend trip! HA!
 4 points
 -
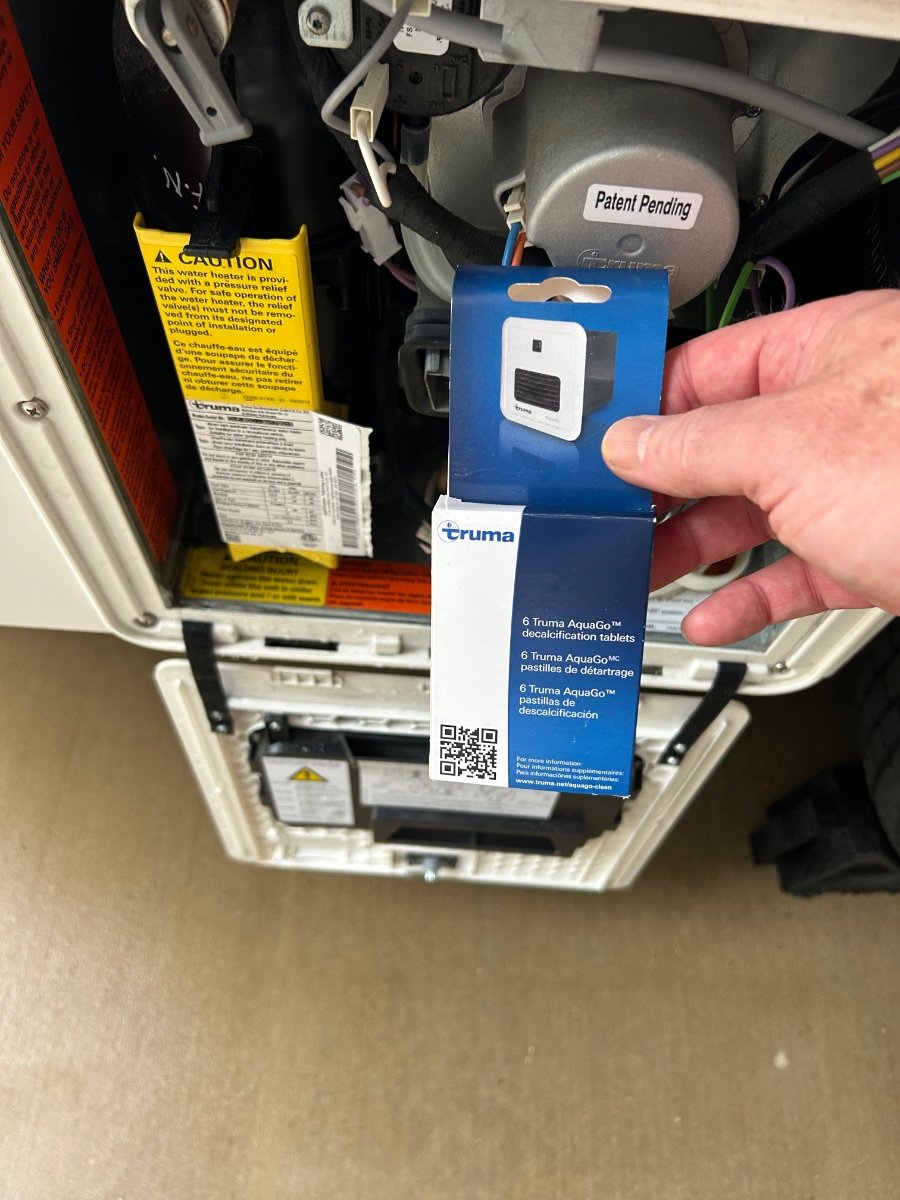
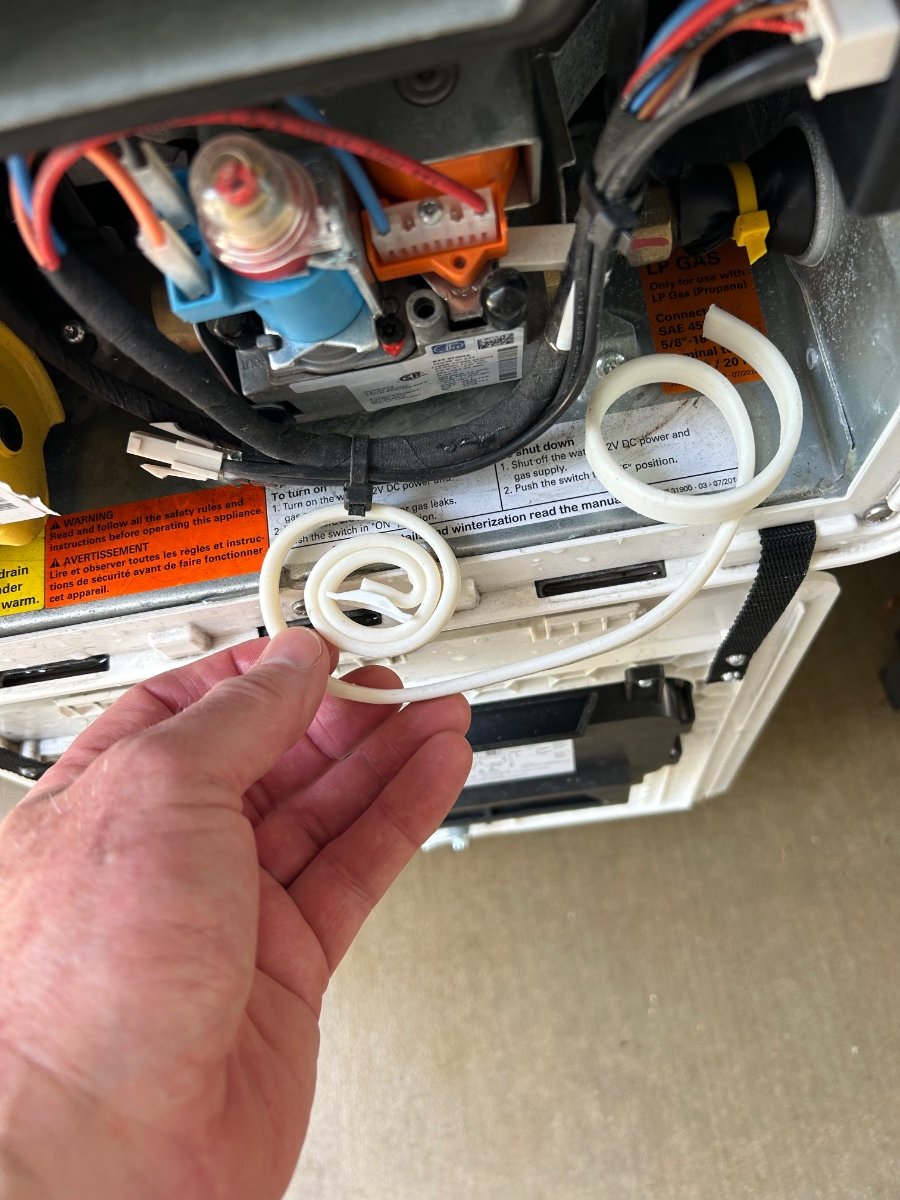
Camping Prep reminders! Hull #634 is offically dewinterized. Woot! 😄I think it took my wife and I about 15 minutes to dewinterize our OLEll. A special thanks to Service Manager Jason Essary for his excellent video tutorials. It really makes this task seamlessly easy. We also did the annual decalcification process of our Truma which takes approx 2:15 hrs after installing the decalcification tablets. Super easy with the Truma. Pro tip - 😎 we place a dog flea collar in the Truma (pic) and refrigerator compartments. Along with screens this mod really does help keep unwanted insects out of these areas. We will soon sanitize our fresh tank, go though all of our systems checklists check all fasteners and get ready to roll! Happy Camping Oliver family! The white coiled up plastic strip is a flea collar. Along with mesh screens It has proven to keep spiders 🕷️ 🐜 and other flying insects out of our Truma and frig compartments. Happy Trails! Patriot🇺🇸
3 points
-
Spot on. Impact during difficult times will be that OTT and other OEM's will be scouting for batteries and the price for their product will be higher than Winnebago's making the Winnebago travel trailers/campers less expensive by comparison. Would behoove OTT to set up a preferred supplier with companies like Battleborn and Victron. GJ2 points
-
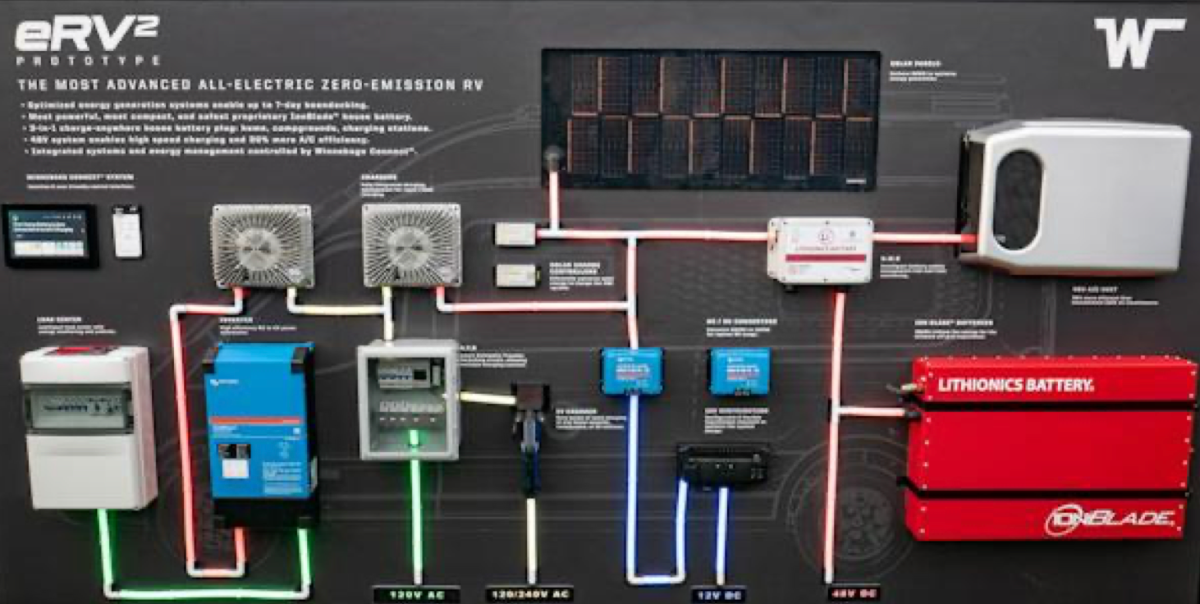
We look at the press release for WHY and HOW phrases: Winnebago is likely pitching this to the board and investors as something that not only Pays for Itself, but is an accretive move that generates incremental revenues and strengthens Winnebago's market position for the future. What type of acquisition is this: 1) Technology Boost for Winnebago Engineering 2) Secure the critical technology as a supply chain vertical integration move. WHY Statement from Press Release: "The addition of Lithionics will provide Winnebago Industries with enhanced technological and engineering capabilities to offer consumers more differentiated products with innovative electrical solutions, as well as bring strategic sourcing benefits and secure a critical area of its supply chain. " HOW will this be integrated and paid for in the long run from press release: A key phrase is: "Lithionics will operate as a wholly owned subsidiary of Winnebago Industries." Unwinding that means that Winnebago's business strategy likely had several elements at play: 1) Supply Chain Stability ...the current sagging sales in the industry could take out one of their key small but strategic suppliers. Often it's way cheaper to acquire a private company with key technology than to invest to build it yourself or seek a replacement supplier. 2) Existing revenue from OEM sales by Lithionics is immediately accretive to Winnebago. It makes their overall $ revenue higher This new revenue helps Winnebago offset the acquisition cost. 3) Strong signs that the eRV market along with auxiliary device market which require high quality batteries exist and is growing fast. Winnebago has tagged this the eRV2 market. They've got several cool prototypes running now. They all feature an all electric van chassis for driving...and of course Lithionics for the house batteries. This is an opportunity for Winnebago to capture a new segment of the OEM High Energy Density Battery market. ( If Winnebago was facing a BUILD NEW CAPABILITY or BUY OUR WAY IN decision ...this one clearly came out BUY.) All 3 of these strategic elements have immediate and lasting value to Winnebago. Result: A guess on how things will play out.... Short term - 1 YEAR Lithionics will be left to run the show as is for at least a year as Winnebago figures out how work with Lithionics management to segment the market, and then define Winnebago In House Brands vs. Ongoing Lithionics external brand. The longer term goal would be to create differentiated branded offerings in the market and continue to support and sell to other RV and Trailer Manufactures who can't afford to invent new battery technology. This could play out as an exceedingly good strategic move by Winnebago. Look at the 14:20 second point on the video below for Steve from Lithionics describing the new battery and charging system they designed "for Winnebago" as a proprietary design.
2 points
-
Congratulations! It was wonderful to spend the evening with you, and thanks for the Yeungling!2 points
-
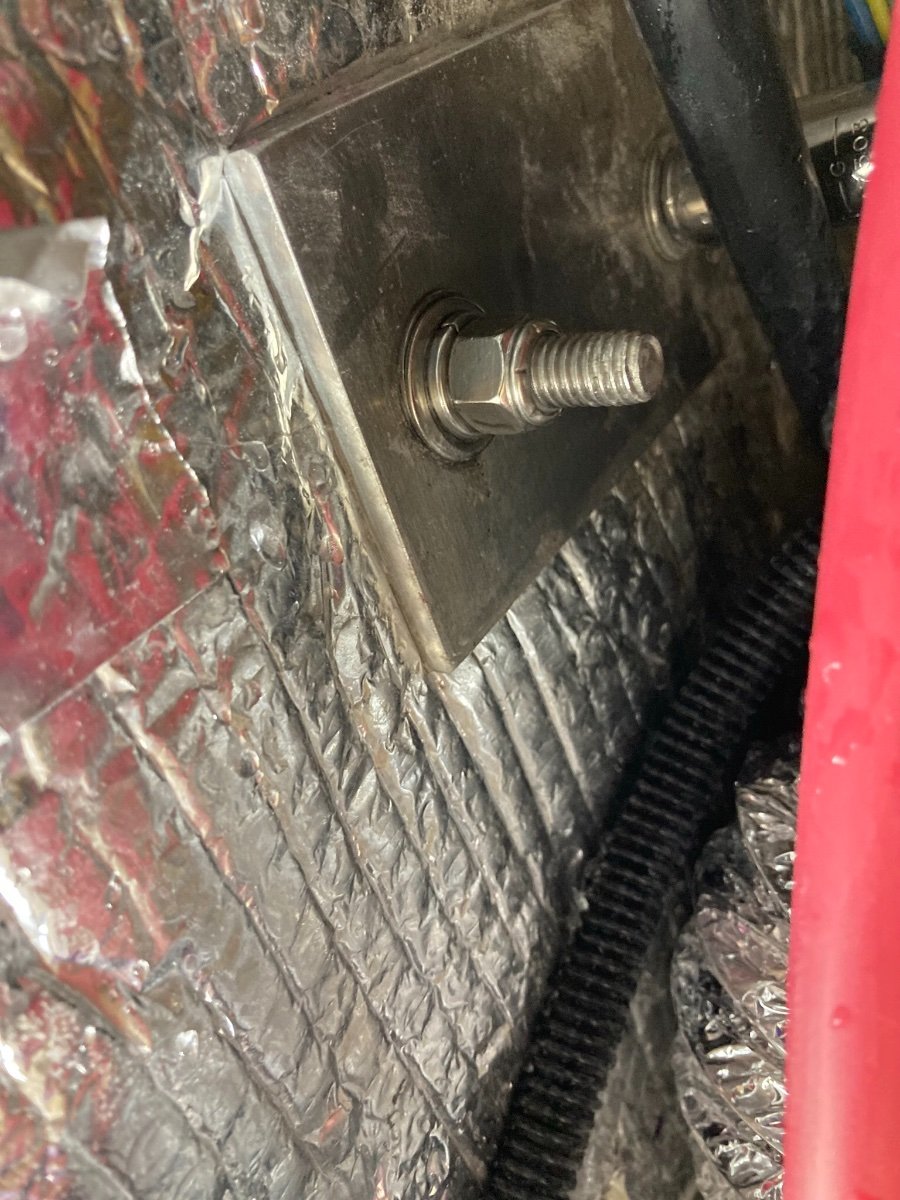
While scooting around underneath my Oliver on my creeper greasing the chassis, I did a quick inspection of everything I could see. I noticed one of the the two 3/8” stainless steel bolts that secure the propane tank enclosure to the hull was loose, had backed out about 1/2”. Both of the bolt heads could be turned by hand, but could not be tightened externally, there are nuts on the other end that were spinning. I turned in a service ticket and asked for DIY instructions. Jason got back to me right away with 2 local RV repair centers that would fix it under warranty. He also gave me step-by -step DIY instructions, which were easy to follow. I prefer to do it myself, it was an easy task. It involved removing the bath vanity to get to the nuts on the ends of the bolts. The SS nuts had flat & lock washers, but obviously had not been tightened during production. I replaced the 3/8” SS nuts with SS nylon lock nuts, and all is well. While I was in there, I removed the toilet water supply line and valve, and capped off the tee it was connected to. I have the NH composting toilet. I also removed the black tank flush lines and back flow preventer, will save for a future owner that might want a flush toilet. I opened up the black tank drain and found it had quite a bit of RV antifreeze inside. Apparently the factory had added it to the black tank during the winterizing process. This was obviously not needed, but perhaps they do them all the same, regardless. So if you are underneath your trailer, you might give those bolts a quick check.
1 point
-
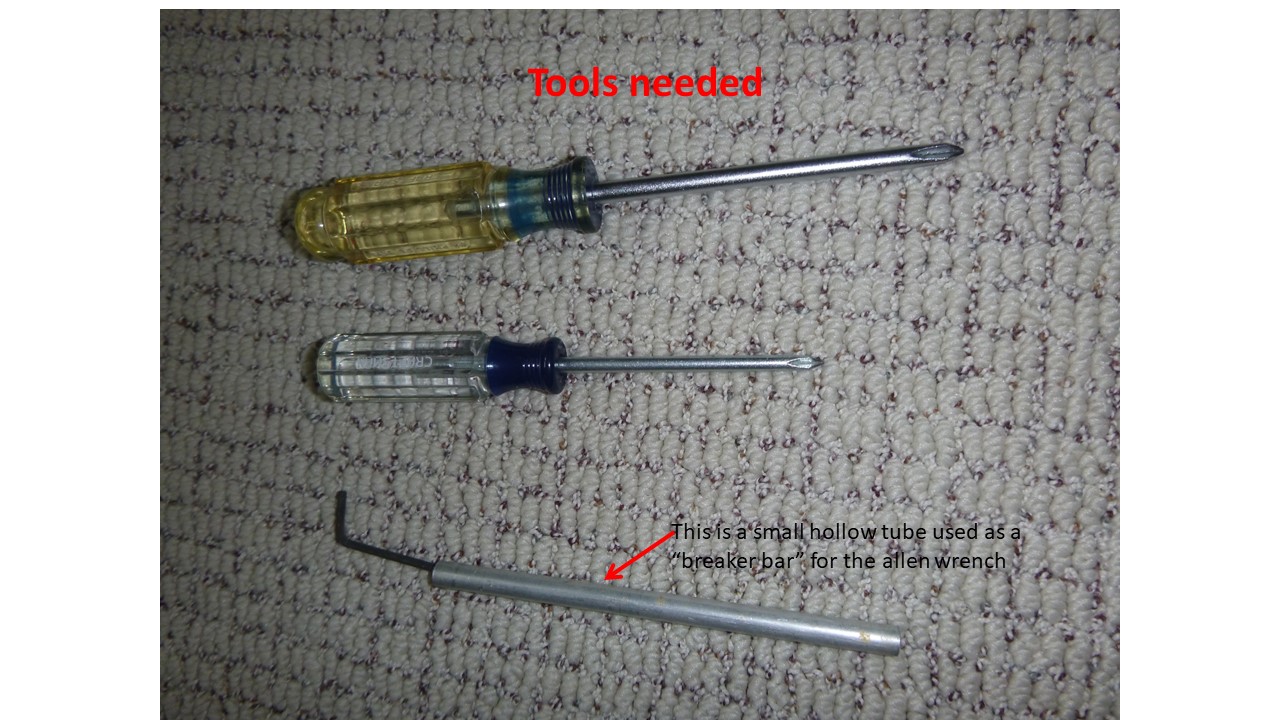
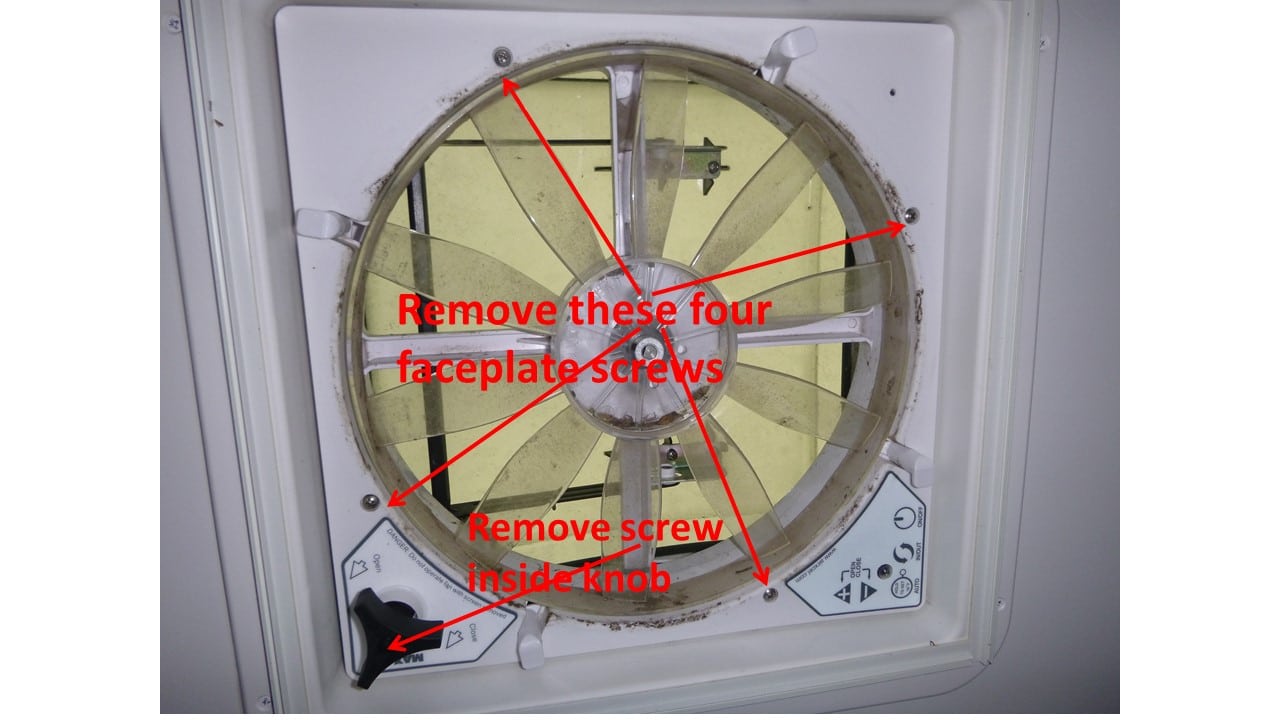
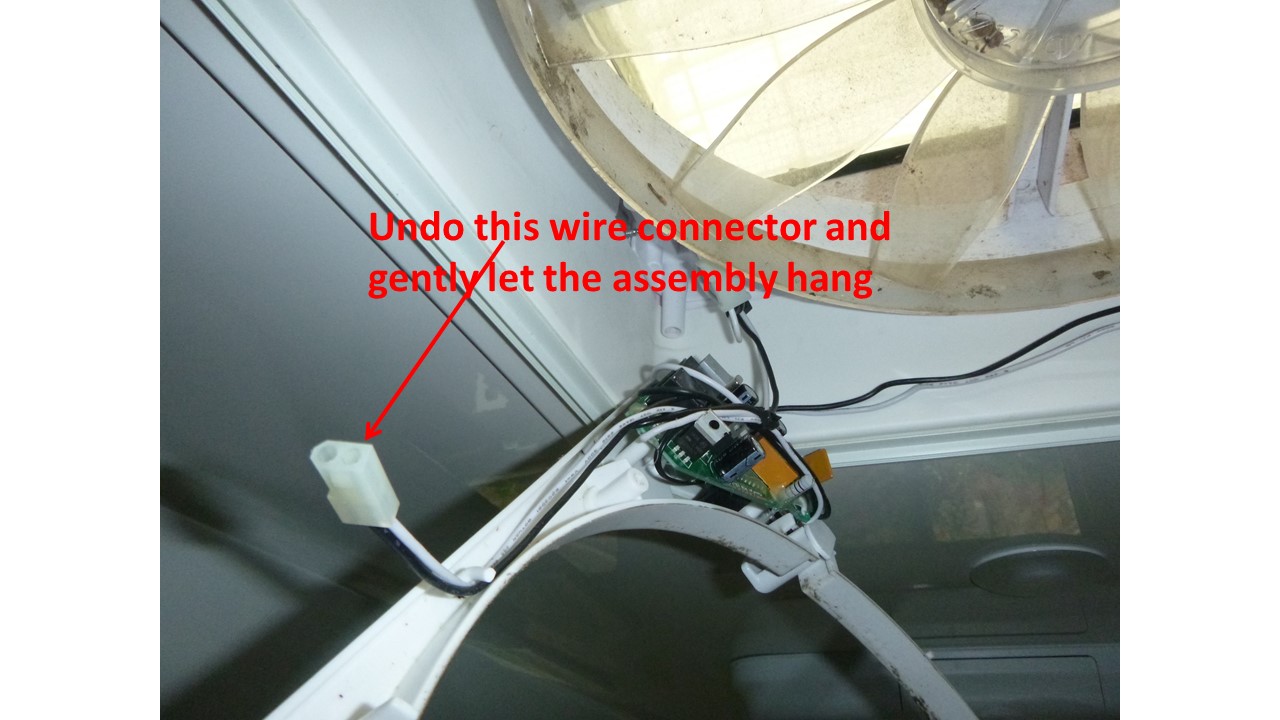
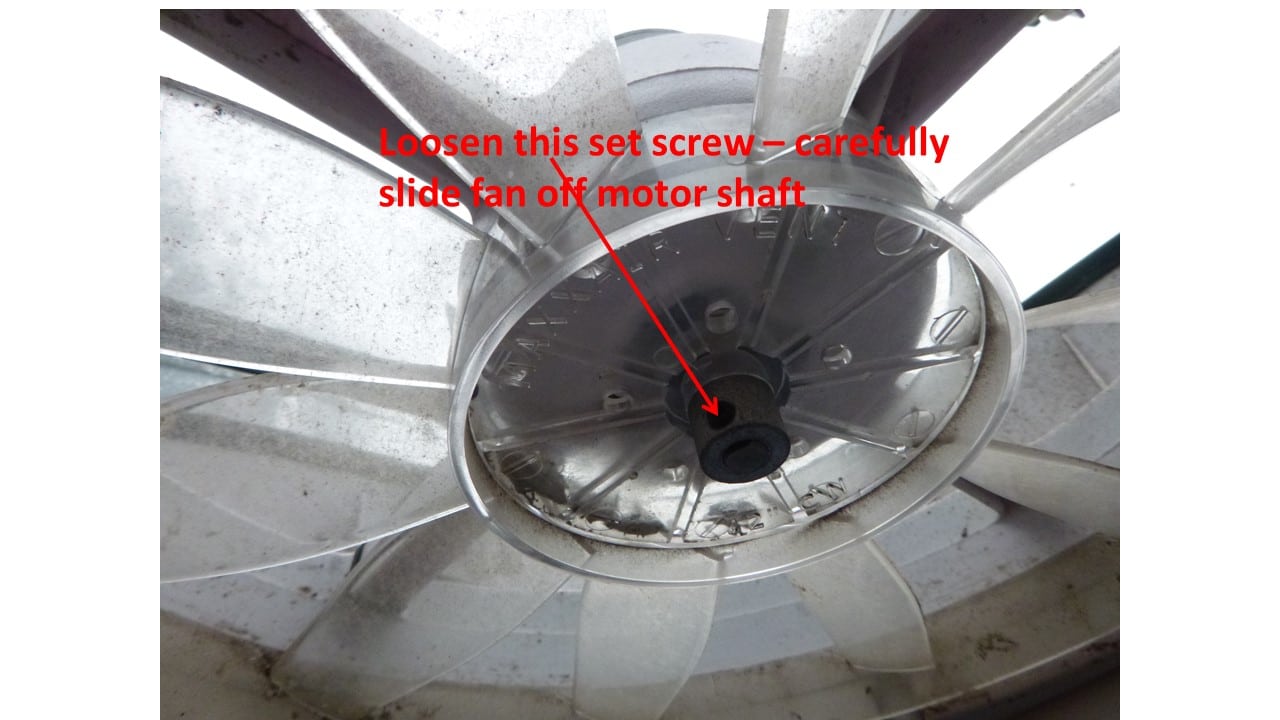
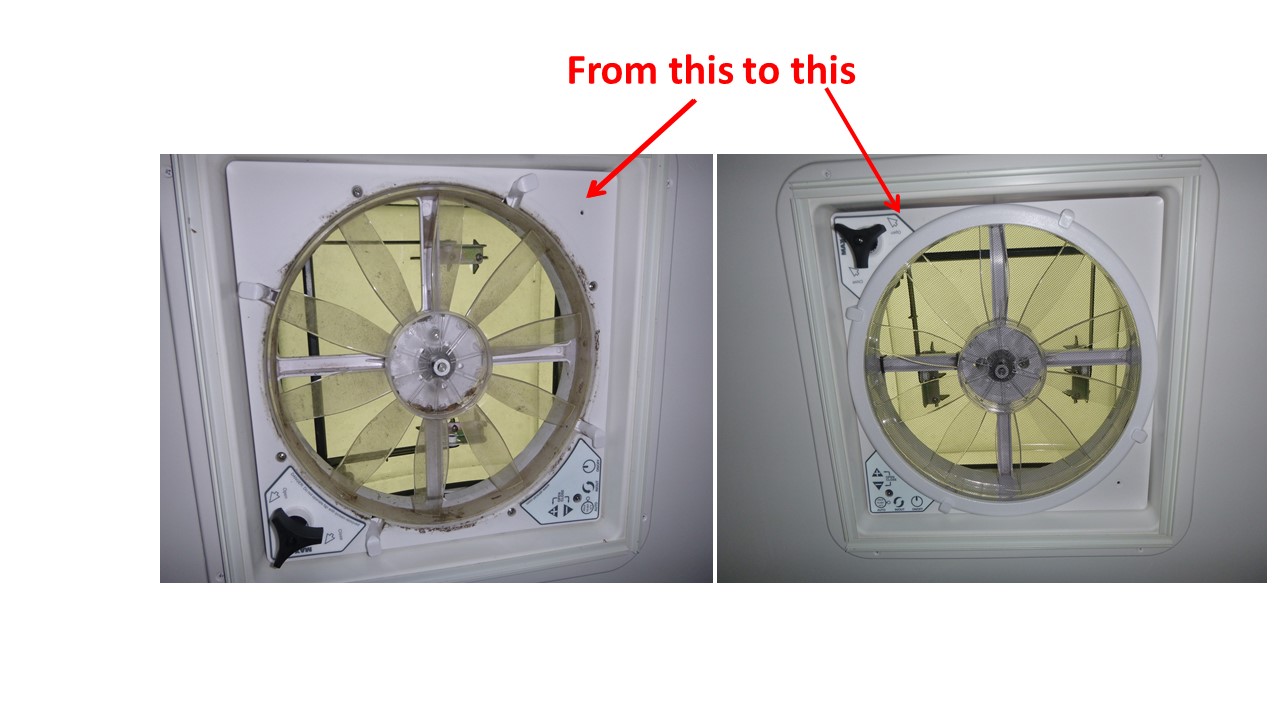
Sometime ago I presented a Mod where I installed a black filter material on the MaxxAir Fan in order to reduce light transmission into the interior of my Oliver. I thought an added benefit of this mod was that the filter material would keep the fan somewhat cleaner than it would have been otherwise since normally I only use the fan on the exhaust setting. While in Montana this year I noted a "couple" of insects that were trapped on the other side of the filter material and a few days before heading home the fan developed a ticking sound - particularly at slow speeds. So, I figured I'd remove the filter, fix that ticking sound and clean the interior of the fan for the first time in four years. Upon removing the filter material, I was totally surprised with the number of dead bugs and the nastiness of the fan. Since the MaxxAir frame is caulked into place (along with four screws) onto the inside shell of my Oliver, I proceeded to remove what I could of the fan without a total removal. Here is how I did it: 1 – Remove the screen by turning the four plastic “tabs” 180 degrees either to the right or left. 2 – Remove the inner face plate – the one with the controls and knob that is used to manually open the exterior cover (see picture) by removing four screws plus the screw in the center of the black knob. Disconnect the electrical connection noted in the picture and gently let the faceplate hang in place. 3 - Remove the fan using an allen wrench (3/32 I believe). In my case the set screw holding the fan to the motor shaft was either put on by a gorilla or had a bit of corrosion which caused the set screw to be difficult to loosen. I put a couple of drops of “Liquid Wrench” on the threads of the set screw, let it set for a few minutes and then used a small piece of tubing as a breaker bar as a help with the small allen wrench. Be a bit careful here with the force applied - you do not want to strip the inside of this set screw. Also be careful with all plastic parts in that they are easy to break. 4 – Clean and dry screen and fan. I used “Simple Green” cleaner and a soft brush to clean both the screen and the fan. The fan was then wiped down with the same mixture I use on the interior of the Oliver – 4 parts Duragloss detailer with 1 part Duragloss liquid wax – in order to give it a nice clean shine. 5 – Clean the inner face plate and clean all other interior surfaces of the MaxxAir. Again, I used this Duragloss mixture. 6 – Re-assemble all parts in the reverse order. Note that when re-installing the fan on the motor shaft, the fan set screw should be tightened against the “flat” surface on the motor shaft. Do not over-tighten any of the screws that go into plastic! Snug is sufficient. Don’t forget to re-connect that electrical connection that was disconnected in step 2 above. When re-installing the screen, if the four plastic “tabs” were originally turned 180 degrees then the screen should easily slip back into place. These four tabs can then be turned back to the original position into the indent on the face of the plastic on the screen. Do not force these plastic tabs, they are snug but finger pressure is all that is necessary if they and the screen are positioned correctly. 7 – Turn the fan on to make sure that all is well. For what its worth, the “ticking” sound was caused by a little label (serial number and model of fan) becoming partially un-stuck from the interior side of the fan housing. As the fan would rotate, the blades would hit this label causing the noise.
1 point
-
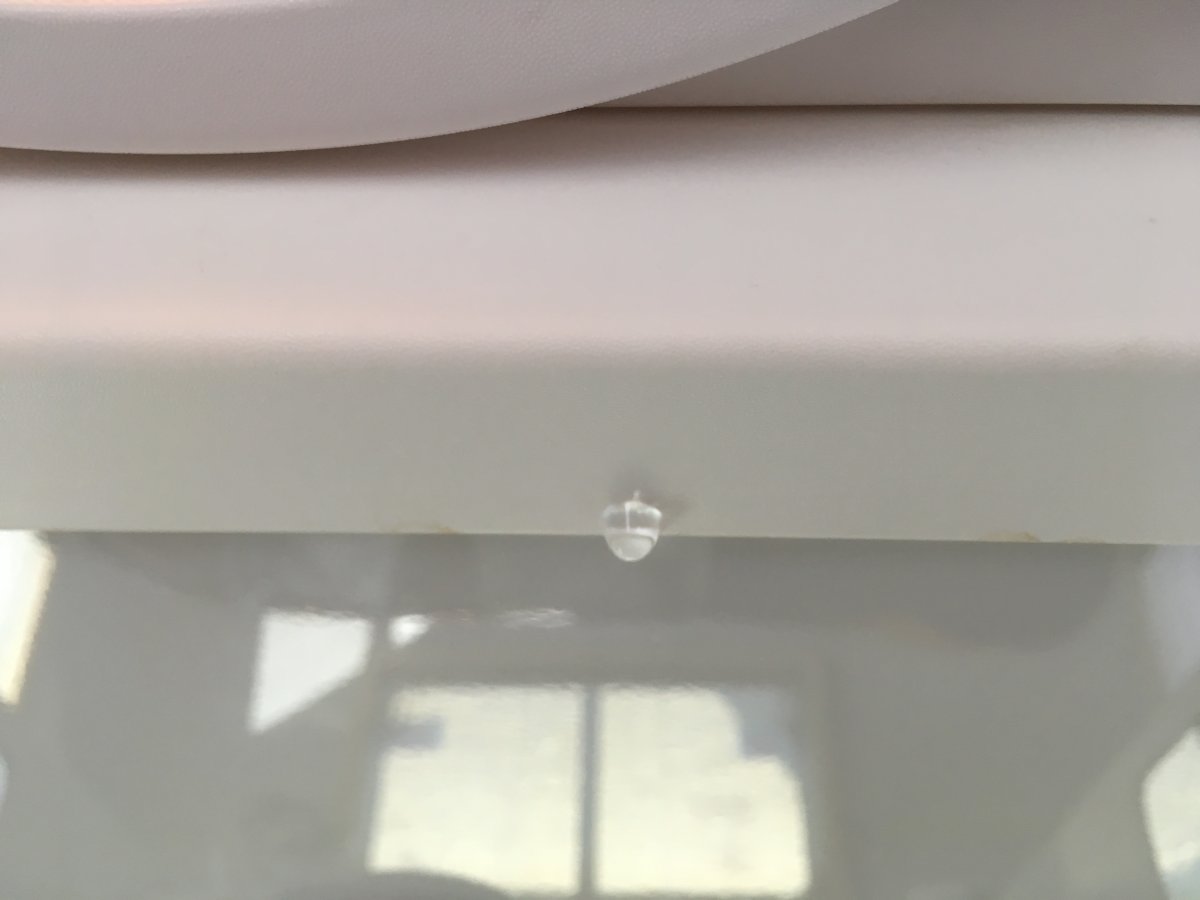
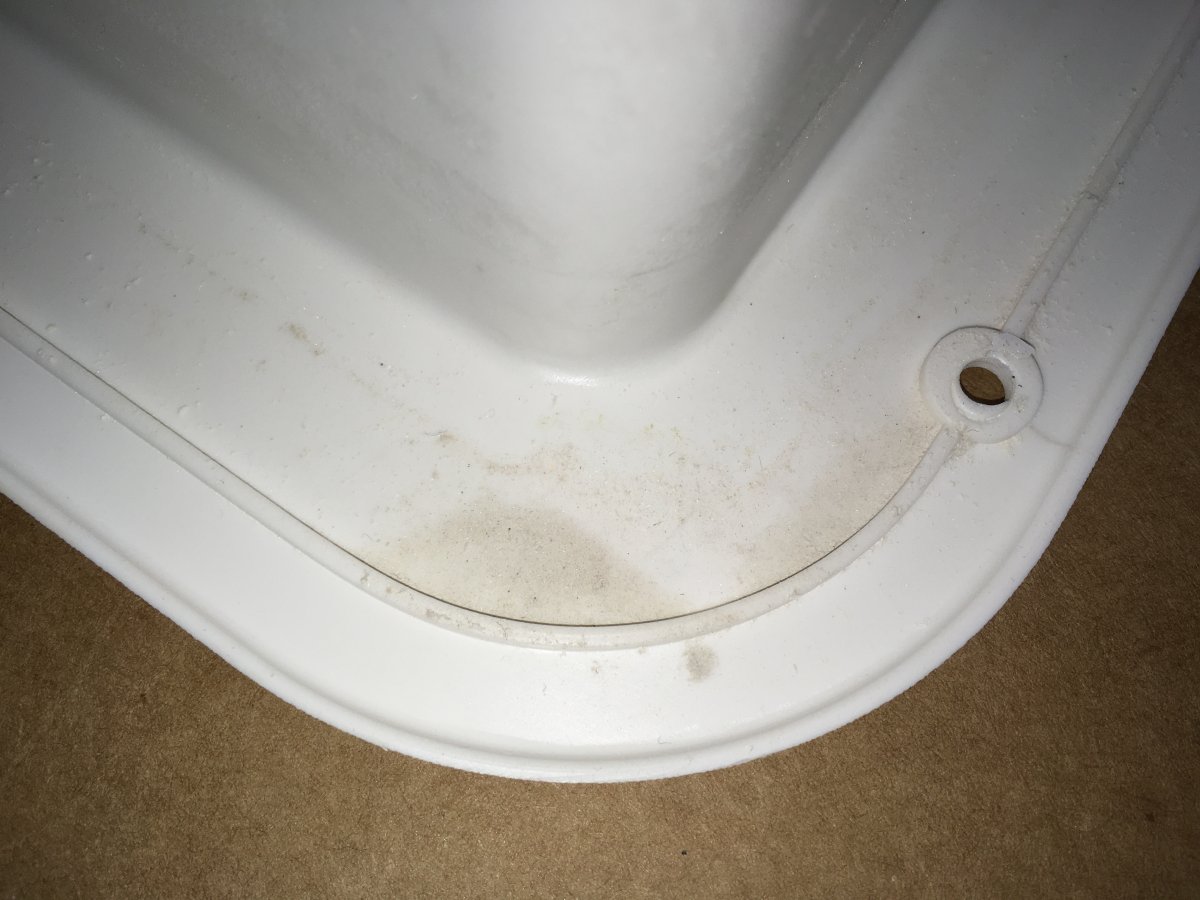
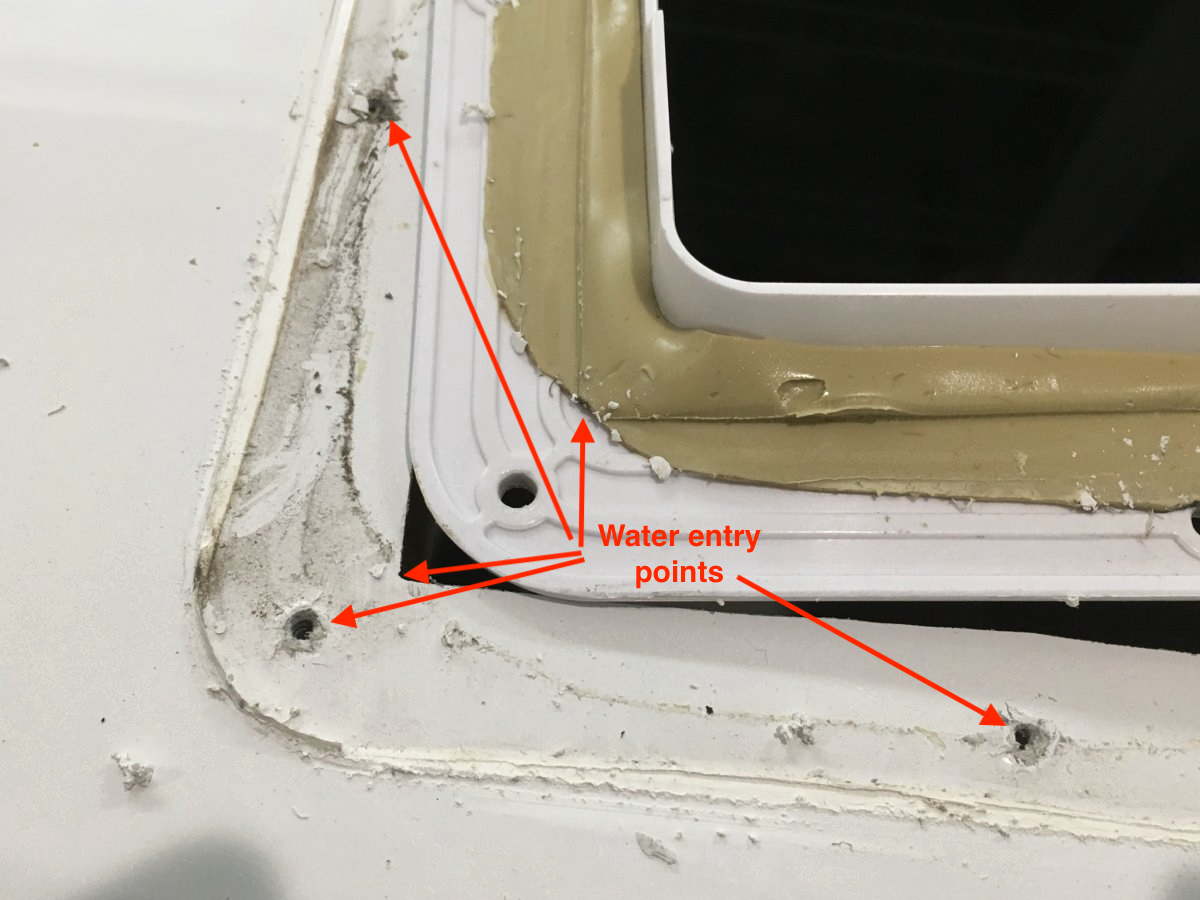
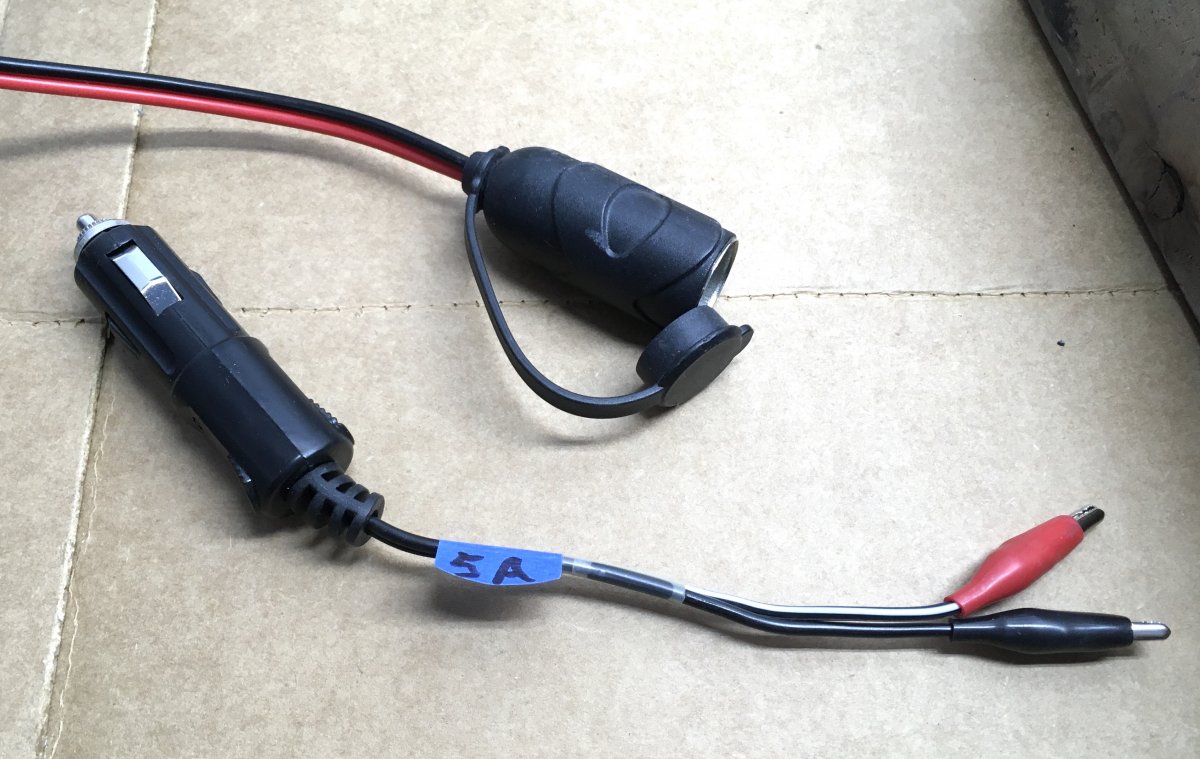
My fan was getting erratic in the opening/ closing modes. The upper lid would jerk and chatter. Also, I noticed a small nuisance water leak inside the cabin, even when the rain hood was fully closed. FYI: Oliver SEALS the visible edges of the inside trim panel, for a pretty appearance. I had removed mine previously and did not reseal it. Otherwise the water leak would not have been seen - the water would accumulate Inside of the trim until it eventually seeped out around the screws, Trim ring showing where water was pooling: After removing the outside flange assembly, this is what I saw: A really shoddy installation. I wanted to run the fan on my workbench, so I could get to everything, inspect all the hidden parts and make sure I got it fixed before reinstalling it on the roof. If you want to service yours, then you can leave it up top if you like, but removing it is not hard at all. I made an adapter to power the fan using an existing DC cable for my external solar panel port. It's a standard plug, internally fused. More to come. John Davies Spokane WA
1 point
-
I have ordered the twin-bed LE2 with a Lagun table. It occurs to me now that the Lagun table will block opening the nightstand drawer. I was wondering if it was possible to mount the Lagun table on one of the sides rather than in the center. I plan on keeping one side made up permanently as a bed and the other side with some pillows to use as a couch. Curious if it would be possible to add it myself or would Oliver do it and instead get the basement access...1 point
-
2021 was the last year the cutout was under the nightstand top. It has now been eliminated and a taller drawer installed. Brian1 point
-
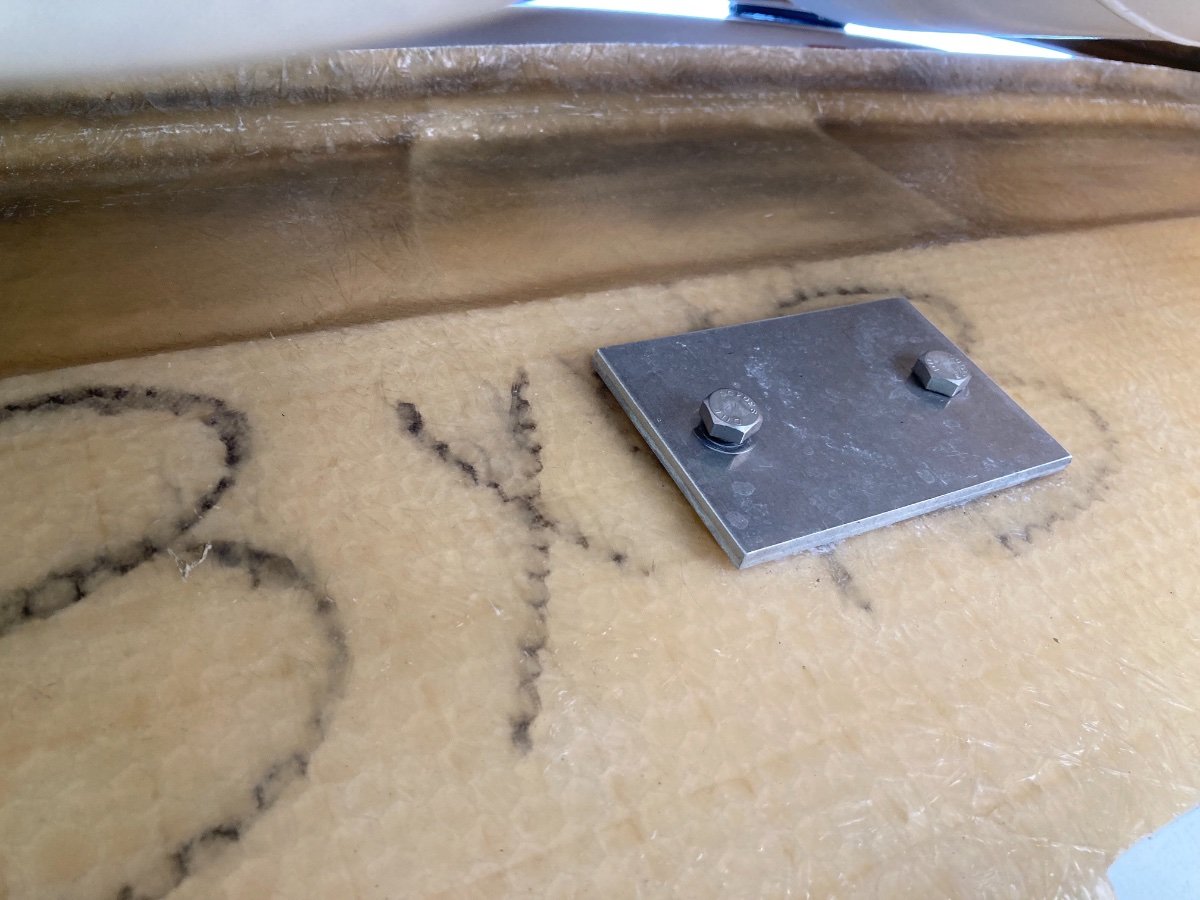
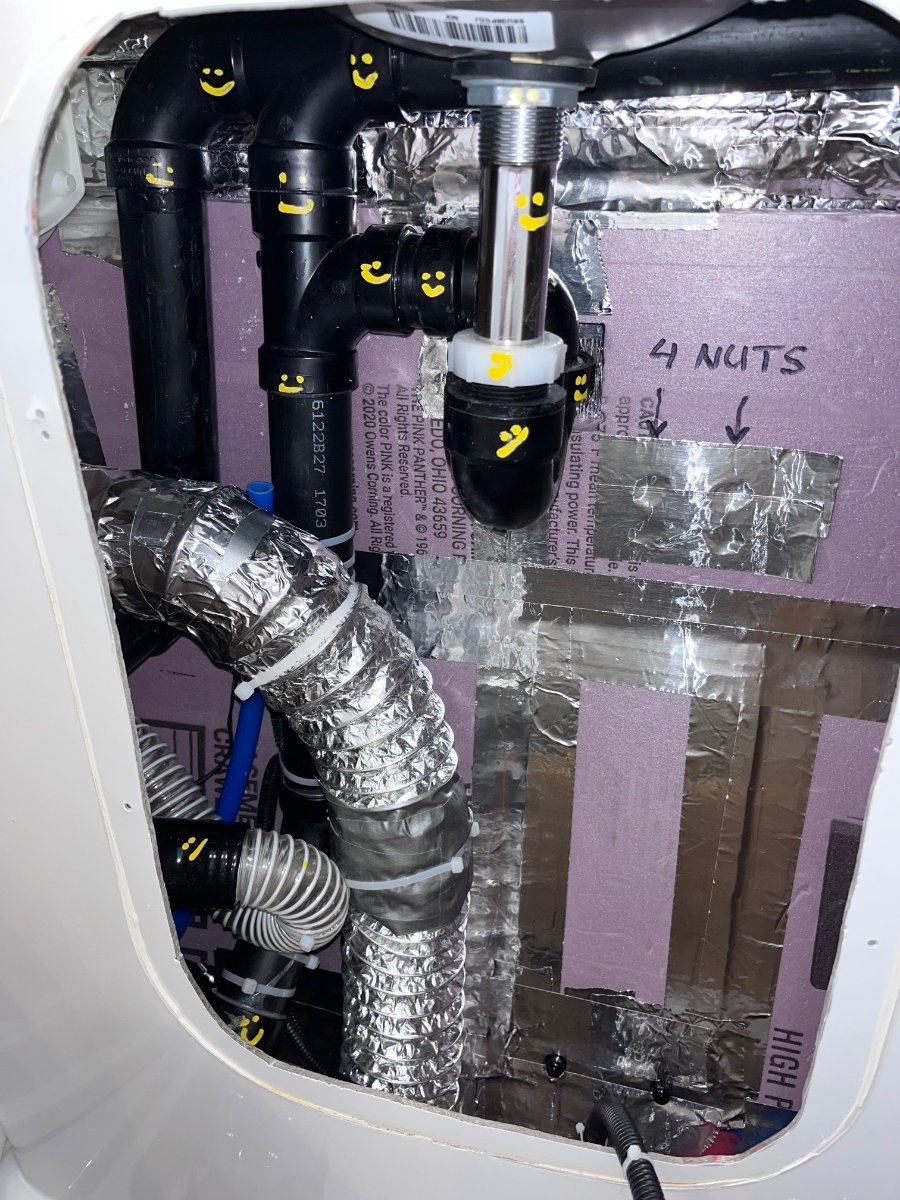
Just buy four self locking stainless nuts at the hardware store, they can’t ever just fall off or loosen on their own…. If you feel ambitious, buy some 2’x2’ square project boards of the Dow Corning R5 (1” thick) foam board insulation and add some much needed barrier there. Note that I left holes for those nuts, and taped over them. I also cut off about four feed of duct and added an adjustable 3” steel elbow, much neater and cleaner than the factory installation. And if you don’t have the flush toilet, disconnect that unneeded water line. John Davies Spokane WA
1 point
-
Yes, just inside the outside access panel to the fridge. Mud dobbers especially don’t like what ever repellent that is used on the collars. It has worked well in our experience.1 point
-
Very nice summation of the acquisition process. Strategic sourcing is a valuable part of this decision. Many lithium batteries are coming from overseas and this will help them as an on-shore source as well as the valuation of the company. That being said, just because Lithionics will operate as a wholly owned subsidiary, doesn’t mean Winnebago won’t have priority in terms of delivery commitments. These M&A’s (mergers and acquisitions) are happening all across the RV segment. Even some of the suppliers, like Dometic, are acquiring any company that shows promise in their particular line of business. All very interesting to watch from the sidelines. Regards and again, thank you for the insight your provided. Brian1 point
-
That's an interesting idea I've not seen before. Not in the fridge, though, right? Just inside the access?1 point
-
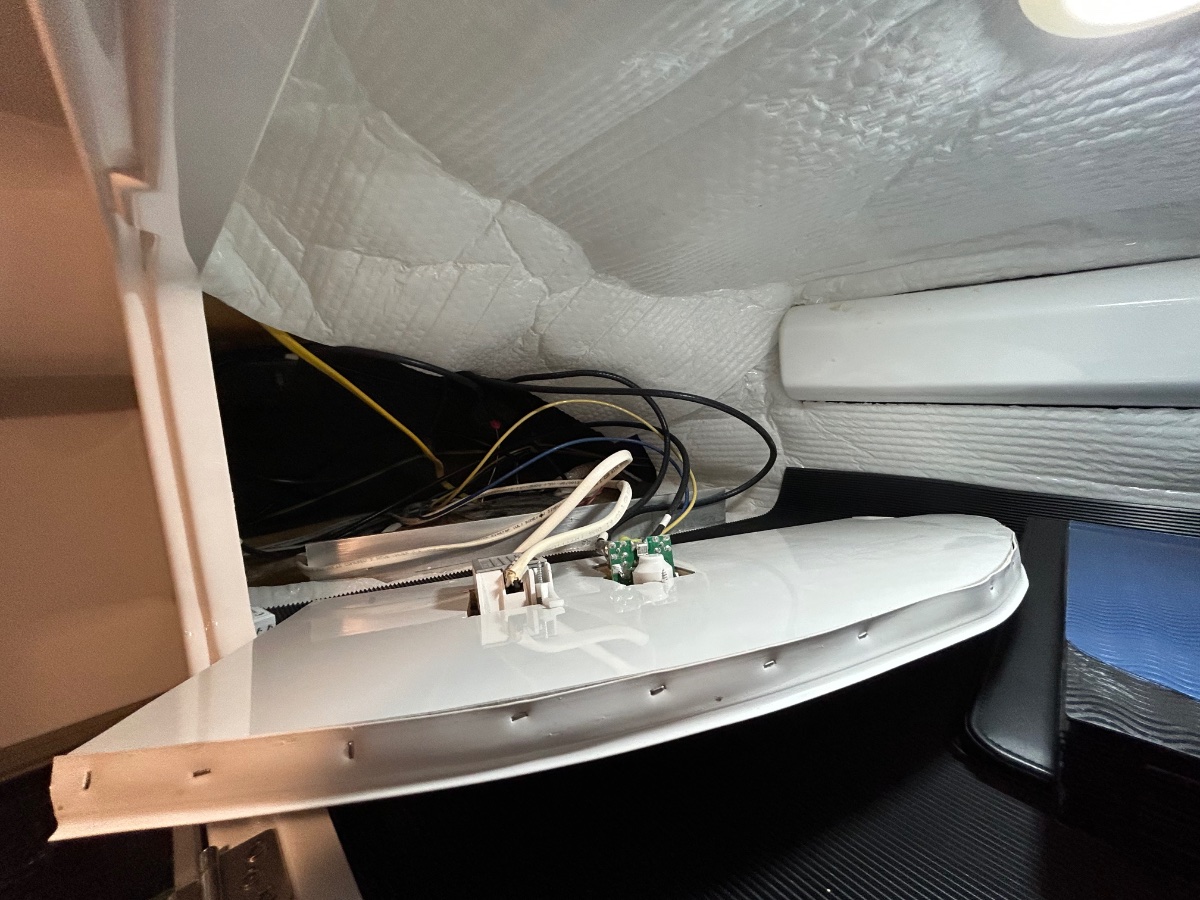
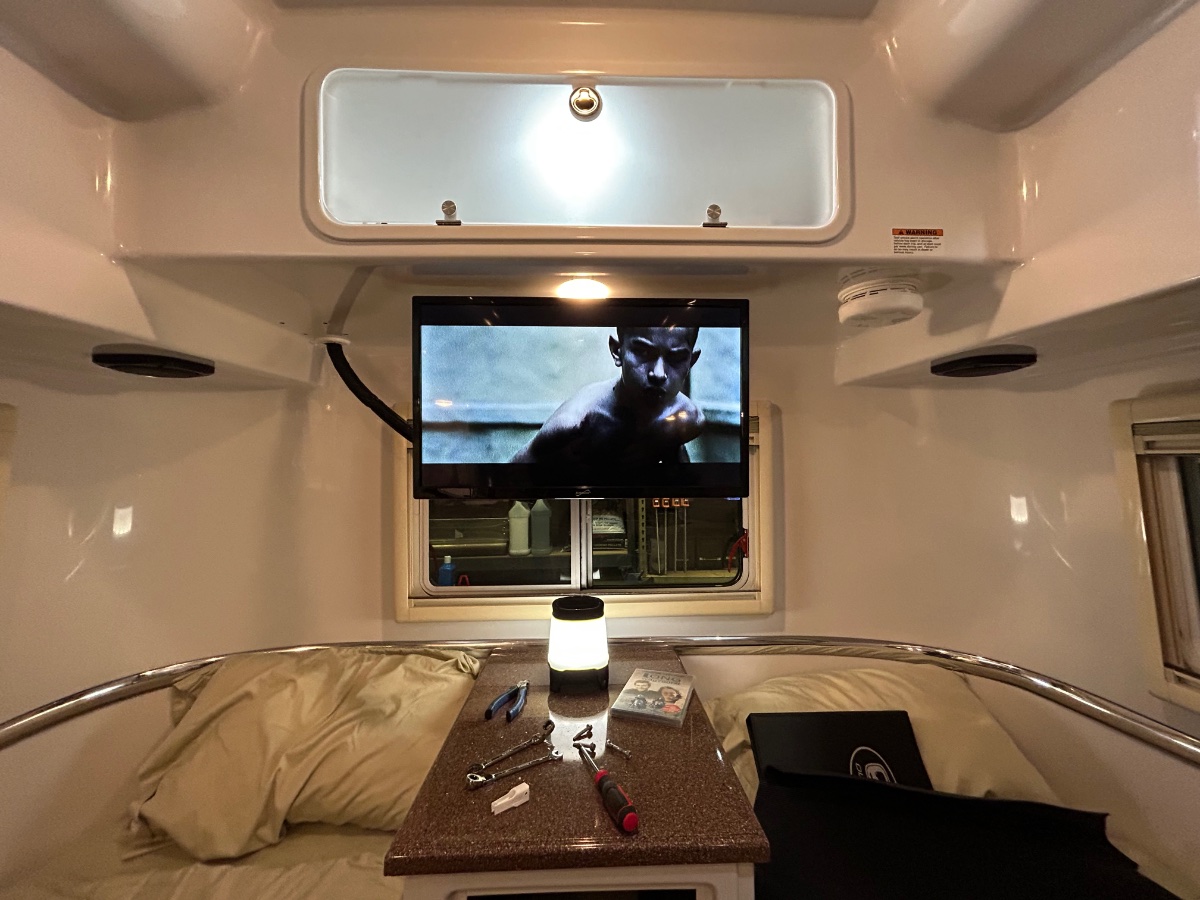
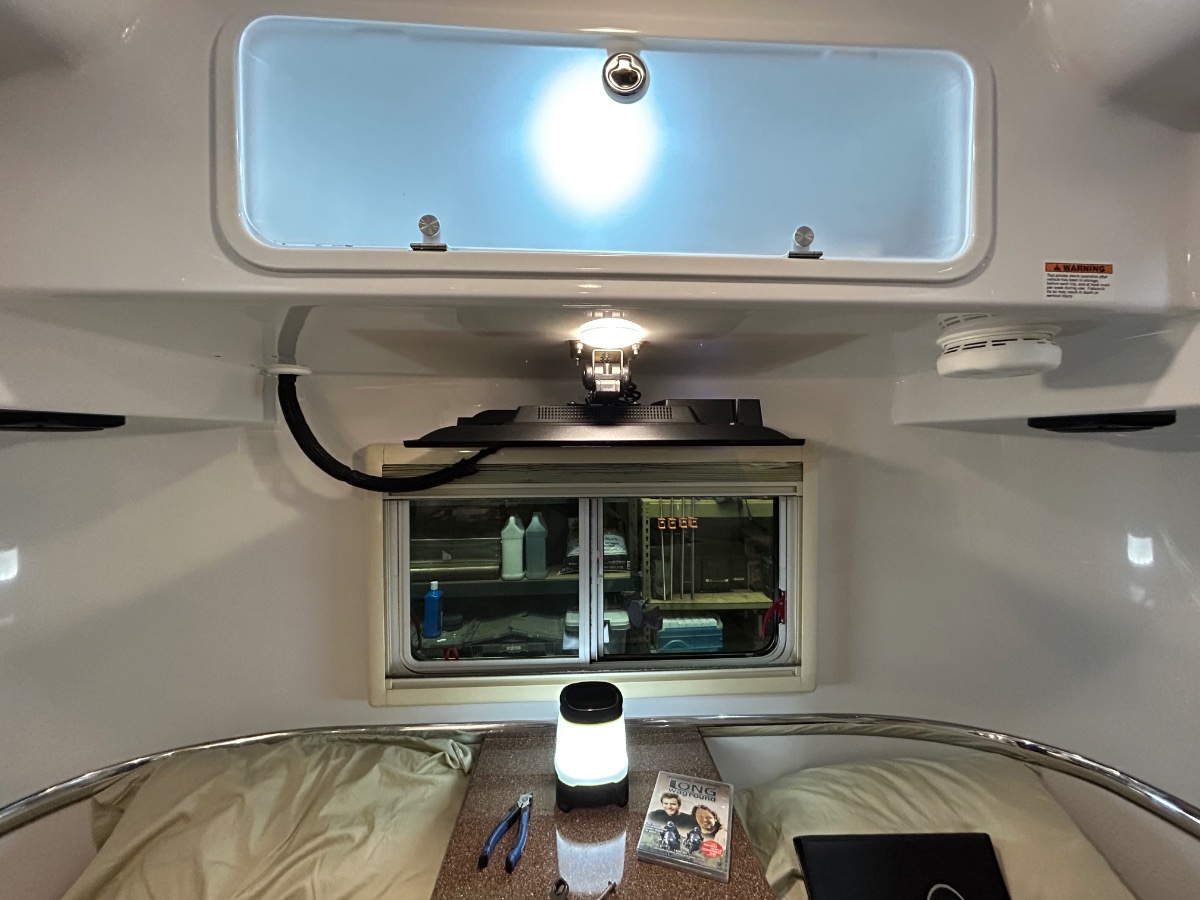
The "center mount" TV hardware arrived from Oliver (thanks to Ryder!) last week. So, we removed the curbside/aft corner vertical TV mount on our rig a couple days ago. We mounted the new hardware just aft of the LED light over the nightstand. I've still got the power & HDMI cables routed through the original hole, but thanks to mossimi, I'll cut a new hole aft of the TV mount (less conspicuous) and use moss' 2" plug that he sent me to cover the original cable hole. I was amazed how random the wiring was behind the bulkhead in the aft storage compartment. Cleaned a lot of that up. Also, the wiring set up had 2 massive (L, R, Video) cables from the TV through the original hole - one of which ran back to the Furrion controller - we removed them both, not needed. Quite a mess back there. We ordered a new 27" viewing size "Smart TV" to replace the original Furrion model (which the DVD player was INOP). Tucked up nice and neatly. I've got some white wire/cable loom ordered to replace the black mesh that Oliver uses. I think the white loom will look more appealing than the black stuff... IMHO. We've also ordered a 12VDC Furrion subwoofer which can connect to the Furrion AV/Radio Controller which should liven up the tunes a bit whilst sipping on a nice chilled margarita...
1 point
-
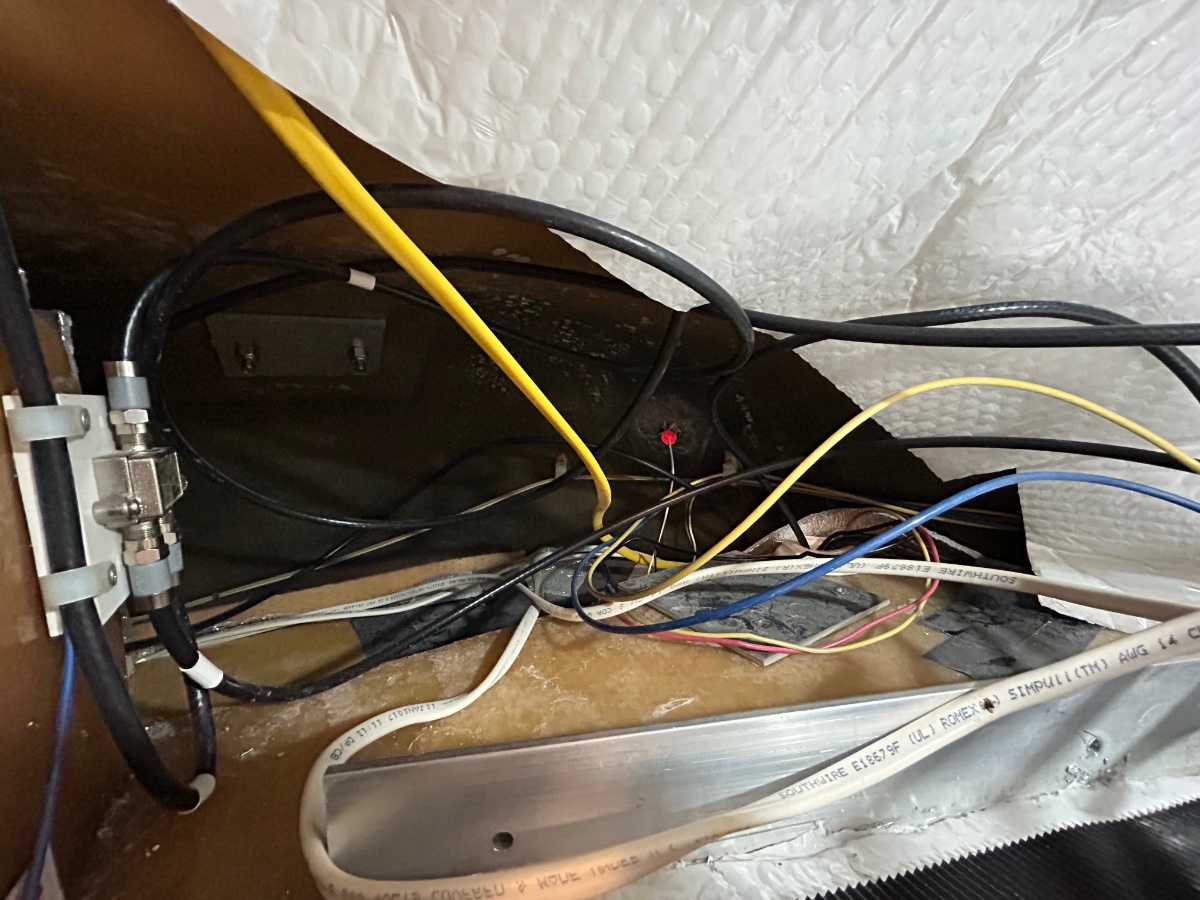
What are you asking? I wanted to reroute the 12 volt power and ground wires for my new Isotherm, not add two additional splices. Plus it was easy to do with everything above it removed, it would have been a true pain afterwards. John Davies Spokane WA1 point
-
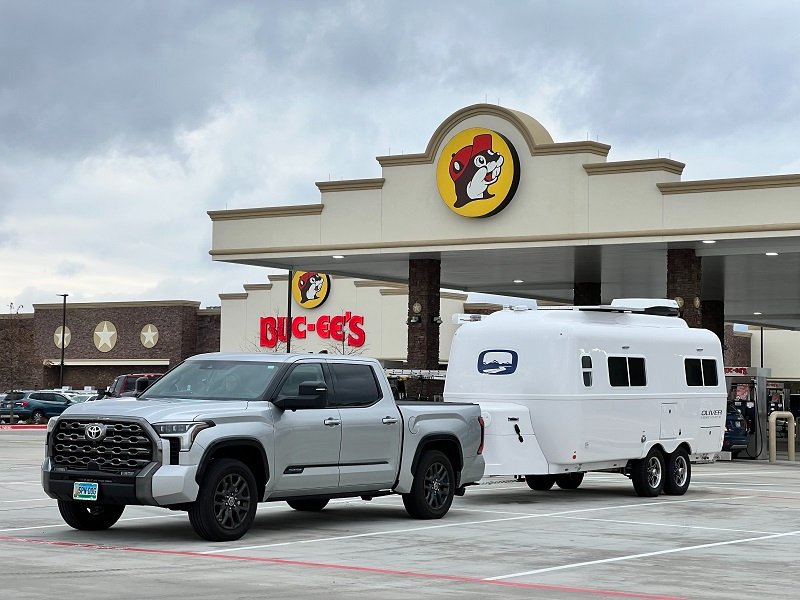
We go to Buc-ee’s whenever we can. I agree that folks are inconsiderate, thinking the gas pump is a parking space. But, we’ve seen that at other fuel stops as well. We go for the pumps furthest from the store, gas (diesel) up then park before we go in for our pound of brisket…. Mike1 point
-
Congratulations from Hull #1321! The Olly does track and tow very well. We were first-timers at Buc-ee's as well.
1 point
-
Lagun Table Package.pdfLagun Table Package.pdfFYI: We've received our Lagun hardware this week and I'm looking forward to installing it onto the nightstand base below the drawer (because we don't have the storage hatch option). Should we decide in the future that we "need/want" the hatch I'll build the side mount designed by Overland that moves the table/assembly to the street side by attaching to the underneath surface of the bed lip and the vertical bulkhead just below it. So, to answer your question: NO. You don't have access to the nightstand drawer (or the storage hatch, if so configured), but this is only when the vertical Lagun table is positioned in the mounting bracket. The side mount option allows the entire assembly to swing around to the street side giving access to the drawer (and the hatch). I know it's obvious but, if the table/assembly is stowed your drawer/hatch is accessible (DUH). The plus side to either table mount position, at least for us, is that should you have another person or couple over for entertainment, it allows for up to a 4-person seating arrangement. The side mount is definitely a DYI project. I'm planning to post a thread of my step-by-step Lagun retrofit project milestones later this week. I'll be making a mahogany folding tabletop that will function in either a narrow or "unfolded" wider mode as an earlier member posted, FYI. It will also serve as a gap filler between the twin mattresses with a puppy pad for Magnus' bed at night (WOOF!). Ha! Anyhow, hope this helps out some... Cheers!1 point
-
I’ve been looking for something similar to this to put around the upper interior cabinets, I’ve gouged my fingers so many times on the fiberglass edge taking things in and out of the cabinets. I think this would be too thick for the doors to close??….. but I’m going to definitely grab some for around the bed rails, dog house and spare tire cover.1 point
-
I think you misunderstood this post. No bolts were buggered or replaced, just tightened. 🙂1 point
-
John, I have no issue using thread locker on a SS fastener that I never plan on removing. If it were something critical that I still wanted to be able to remove if necessary sometime down the road, I would use anti-seize and double nut it. I agree with you that 3/8" and smaller stainless bolts snap pretty easily. However, I don't think that I would attempt that if the fastener was sandwiching a fiberglass component that I did not want to damage. I would use a cutoff wheel instead.1 point
-
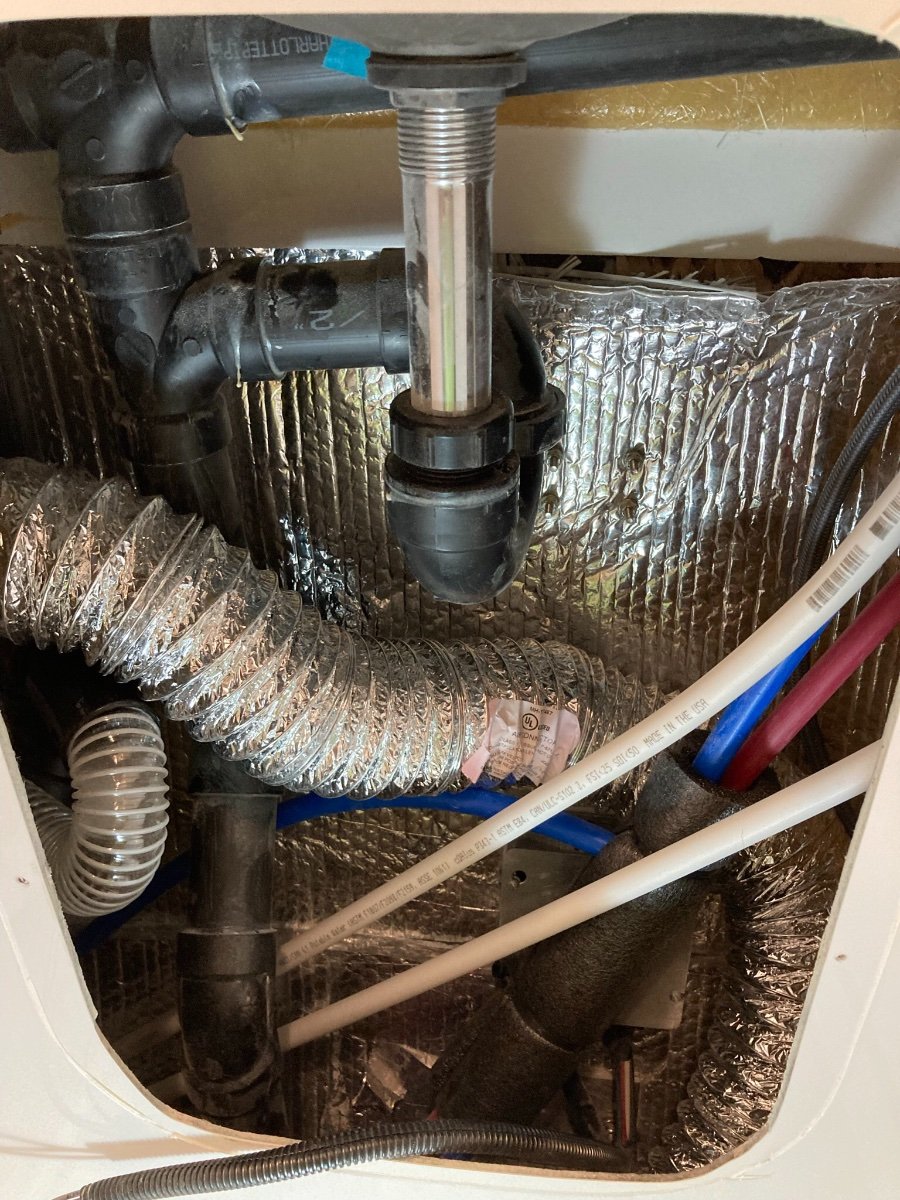
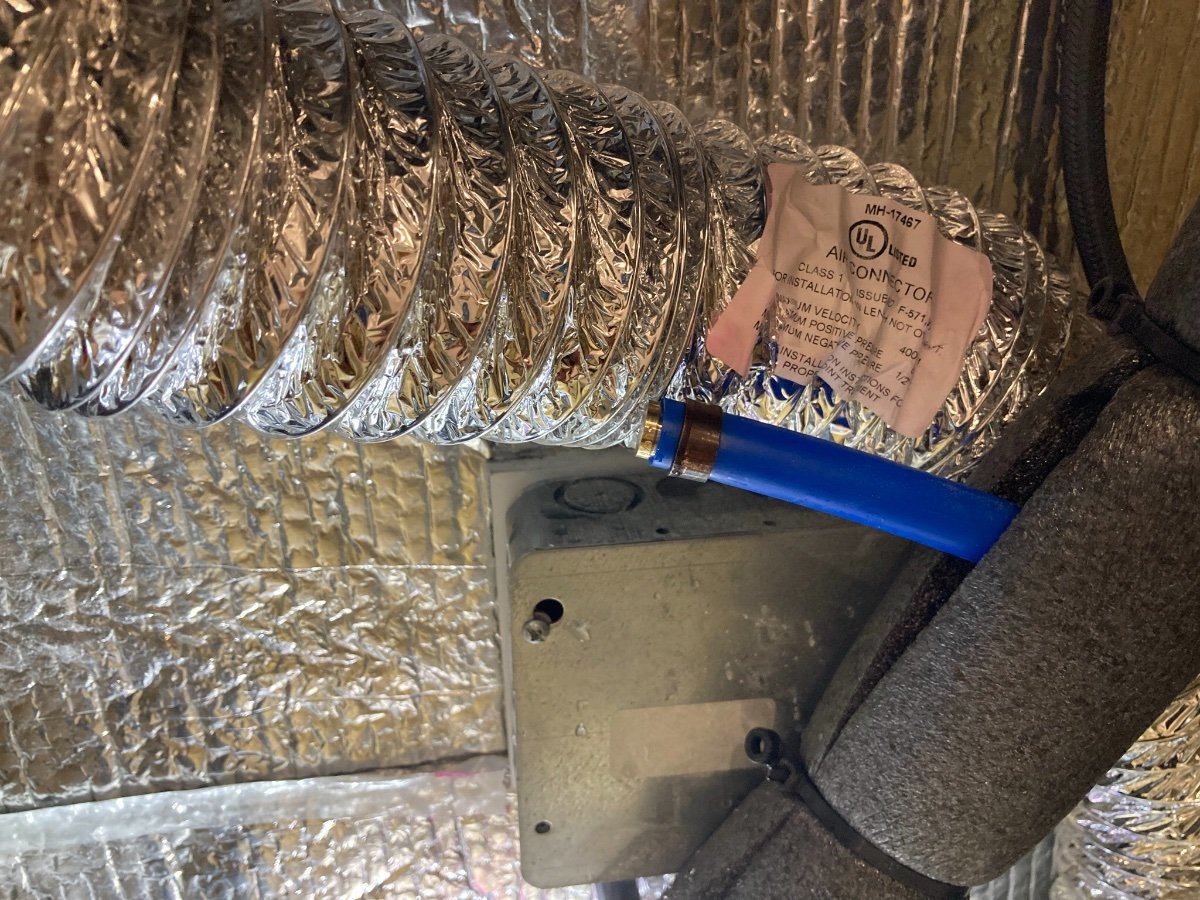
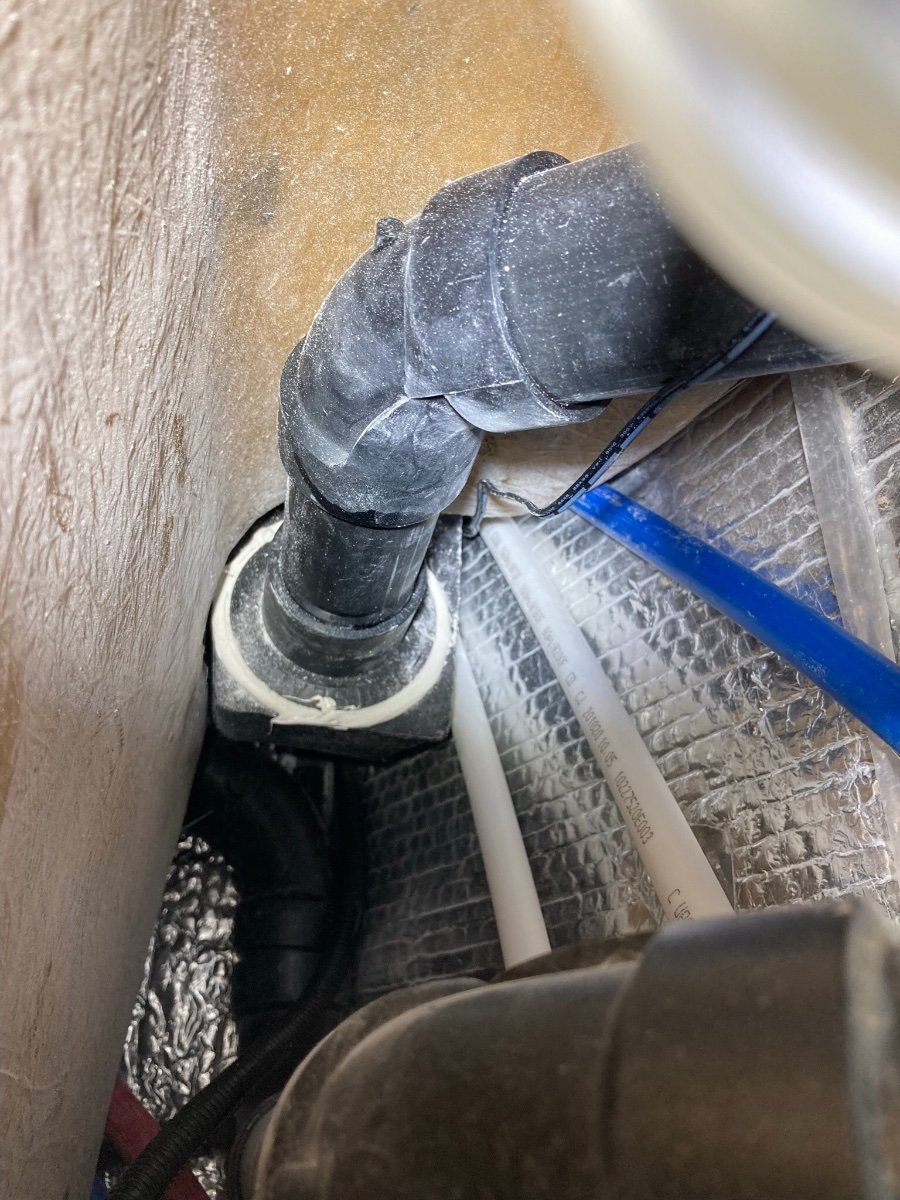
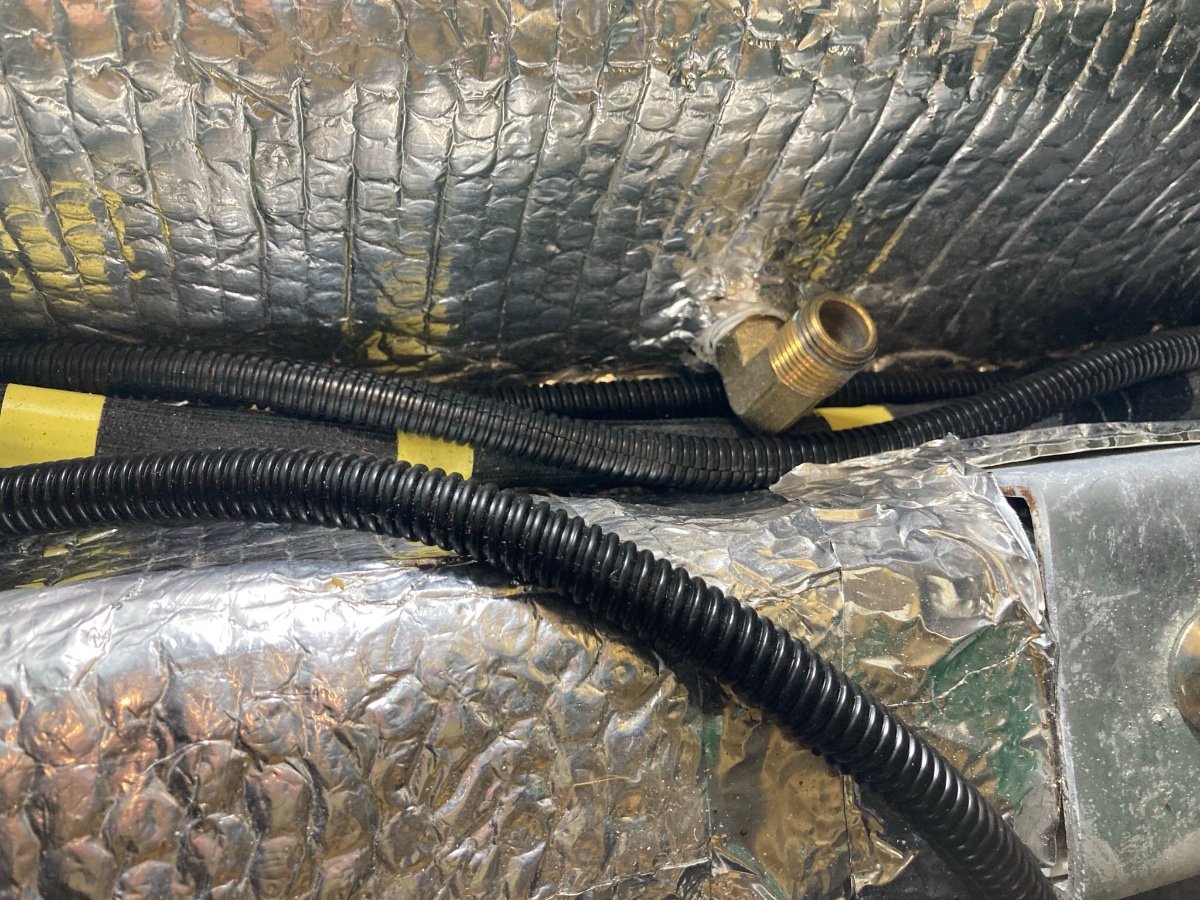
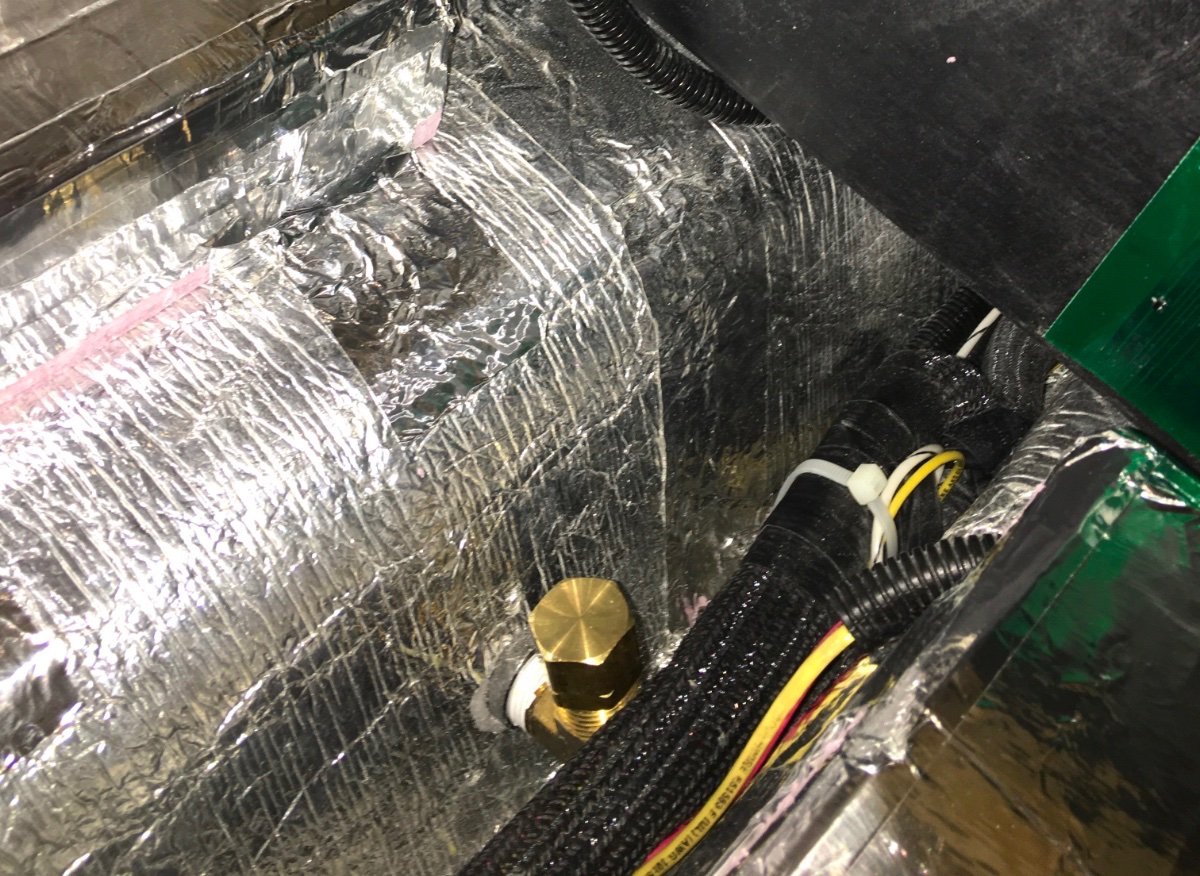
I cut the blue PEX tube several inches after the tee into the water supply line to the sink. Then I put a brass 1/2” PEX plug and crimped it with a copper ring. I snipped off the toilet supply valve, and pushed the line thru the hole in the fiberglass, and a 4’ section of blue PEX line slid right out. Yes, I will cap off that outside connection to avoid user error. I didn’t have a cap on hand, need to go to store. By the way, the two white PEX lines you see in the photos are the flush lines, the same ones you already disconnected from the flush inlet and the other one on the black tank. They lead to a brass backflow preventer underneath the countertop. I pulled those out too, came right out easily. You can also see the black tank vent line, it’s a 1.5” abs pipe that connects to the vent line going to the roof, right next to the composting toilet vent hose.
1 point
-
Thanks for posting, did you take any pics of the flush toilet water line that you can share? I plan to disconnect mine eventually, but so far I never had a need to go digging around under that sink. If you did not already cap the black tank rinse through-hull fitting, do so, in case somebody tries to hook a garden hose up to it and floods the interior! That could be quite a geyser! John Davies Spokane WA
1 point
-
Hello all, As you know, Lithionics is the brand of choice for lithium batteries for OTT factory orders. It was recently announced that Winnebago has acquired Lithionics primarily to address issues in their supply chain. Click HERE to read about the acquisition. I guess the question to ask is, if this is to primarily solve Winnebago’s battery supply chain issues, are these batteries going to be more difficult to acquire by other brands? I am very pleased with Lithionics, some of the best RV’s, Boats, and Homes use them and they have a great customer service model. What are YOUR thoughts on the topic? Brian0 points


-
Recent Achievements
-


")


