Leaderboard


Popular Content
Showing content with the highest reputation on 10/22/2023 in all areas
-
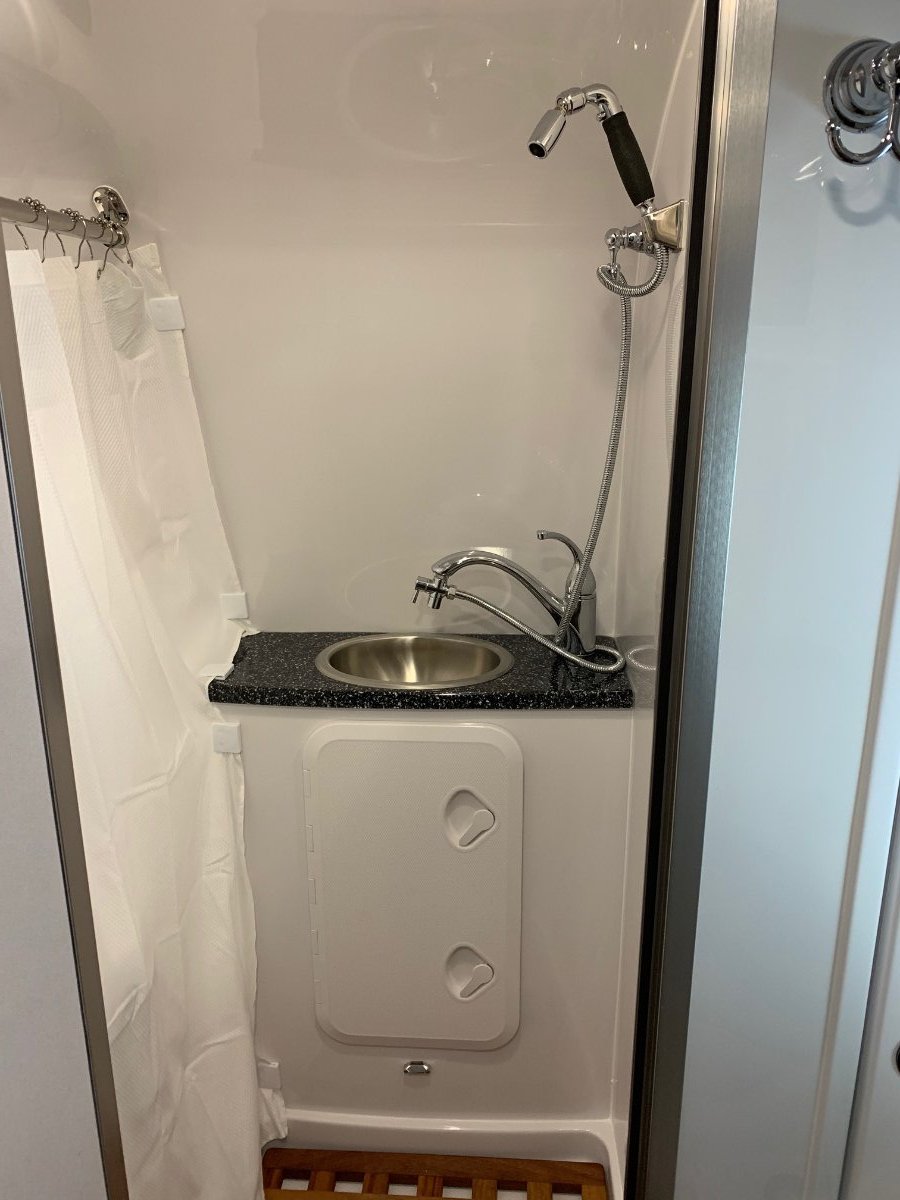
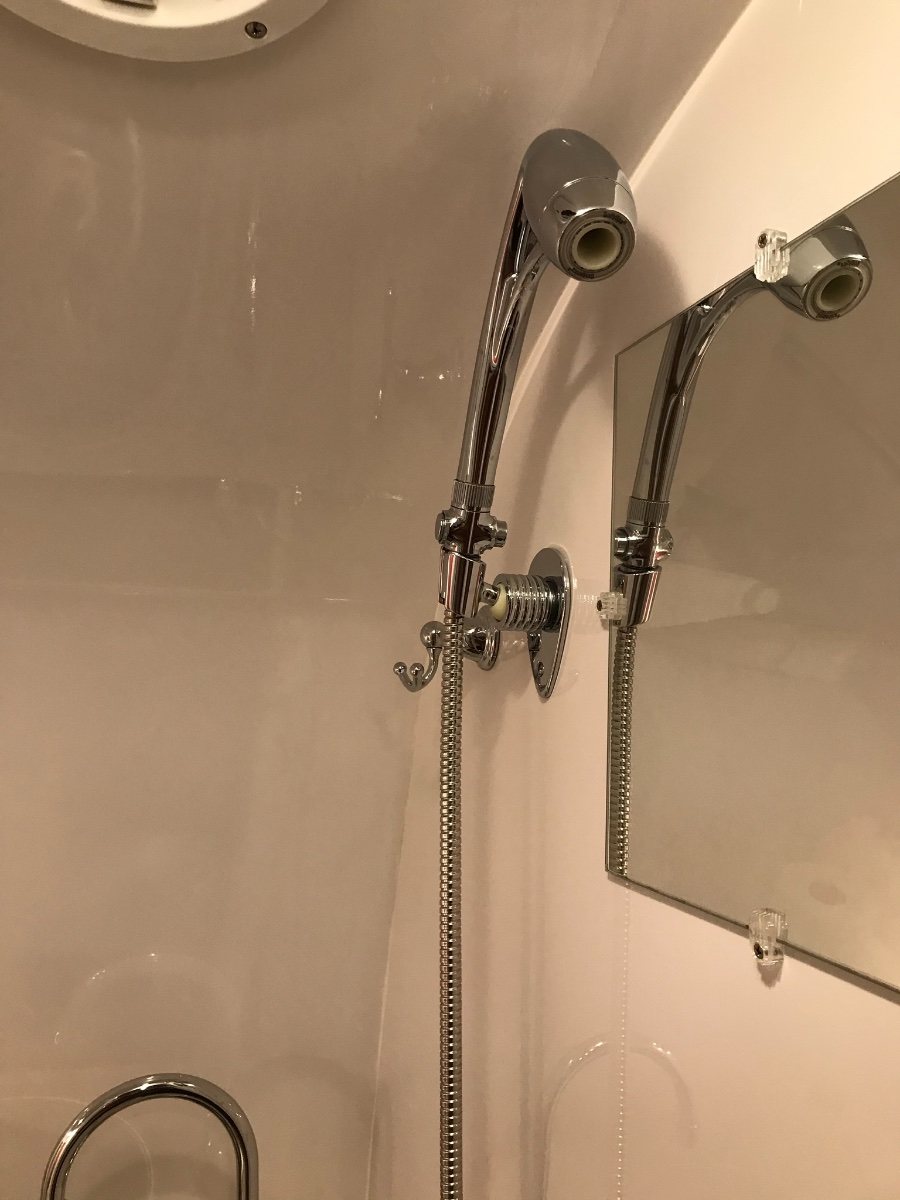
There is no diverter valve used. The shower valve is tee’d into the main hot and cold lines under the vanity just before the sink valve. So basically one set of supply lines (hot and cold) and two independent sets of control valves.3 points
-
We add some Calgon and a detergent pod after dumping. Unless we’re at a dump station with a line, we rinse the black tank until clear. When we get back from a trip we add Happy Camper and a gallon or two of water into both the gray and black tanks. I don’t like the smell of Pine-sol, not sure I like that recommendation. Mike3 points
-
An interesting article on methods to keep black tanks clean.2 points
-
I’m a carnivore, well more like an omnivore, but I can’t imagine wanting to share my Ollie with a freezer of those proportions. Have you considered something like an Engel or National Luna that resides in the tow vehicle?2 points
-
That's a huge, (though small) home size freezer, 140 to 150 liters, 5 cubic feet. That's the size of an Ollie fridge. You may have to look at multiple smaller danfoss/secop freezer units. Or, convert your existing fridge to a freezer (multiple secop/ danfoss units available) and use a portable unit, instead, for refrigeration. Virtually NOTHING that i know of, 5 cubic ft will fit thru the door, AND fit under the dinette table. Look around, and you'll see. Multiple units can. But, added amp hours. Are you full timing? Do you actually "need" to carry that much frozen product? Ps, I fixed some of your typos, since your edit time as a new member us limited. You're welcome.2 points
-
I would be interested in hearing how this turns out.2 points
-
Currently, for me the friction, foil tape and the grid that you see in the picture. I started this really intending to put in the new Freshjet. When I saw the flexible ducting, then I decided to see if there was a way to make it quieter. I did not actually think it would make as much difference as it did. Now I am thinking, maybe as others toss out ideas it might just work to go this route. I probably will rework it some and improve upon what I did. Or maybe I will go back to the Freshjet option. The improvement is very discernable, but not nearly as quiet as some of the newer A/C models.2 points
-
We have just returned from our month long trip out West and was beginning to put together a list of what I wanted to order to replace our Dometic Penguin II A/C with the Dometic Freshjet (see following article:) I pulled down the interior plastic air distribution panel to get a picture of the exact model number and verify that mine could be replaced before I put together a list to order. My son-in-law and I were going to do it. What I discovered was some flexible ducting that the jetstream of air was being routed through that had to be vibrating, rattling, creating all sorts of air disturbance. So I decided before ordering maybe it would be worth it to try and see if I could do anything to make a difference. The worst I could do would be to break something, then I would have another excuse to order the Freshjet. Anyway, I left the tubing in place and lined it with styrofoam blocks I cut out on my table saw and band saw (they work so much better than trying to cut with a box knife). My goal was to seal any cracks and make the path for the air to be as straight and clear as possible to prevent air turbulence. I included pictures of before and after below. So the results are not as great as what I expect you would get from the Freshjet, Houghton, or Truma, but I was surprised what a difference it made. Now I am at least going to wait another year and see how this works out. I forgot to get a picture of my phone of the sound before, but it was averaging between 74&75 dB. Afterwards under the same conditions (vent openings the same, phone in same location and orientation, and no background noise) the sound level had dropped to 67 dB which you could easily tell an audible difference. I am not sure how my phone app would compare to a real dB meter, but I suspect the 7 dB drop is not that far off. The other thing that was eliminated was the vibration the A/C seemed to have. If you have questions, feel free to ask, and if you have other suggestions, please do so. I am not a sound engineer and I started this just playing around so I am very open to other suggestions.
 1 point
 -
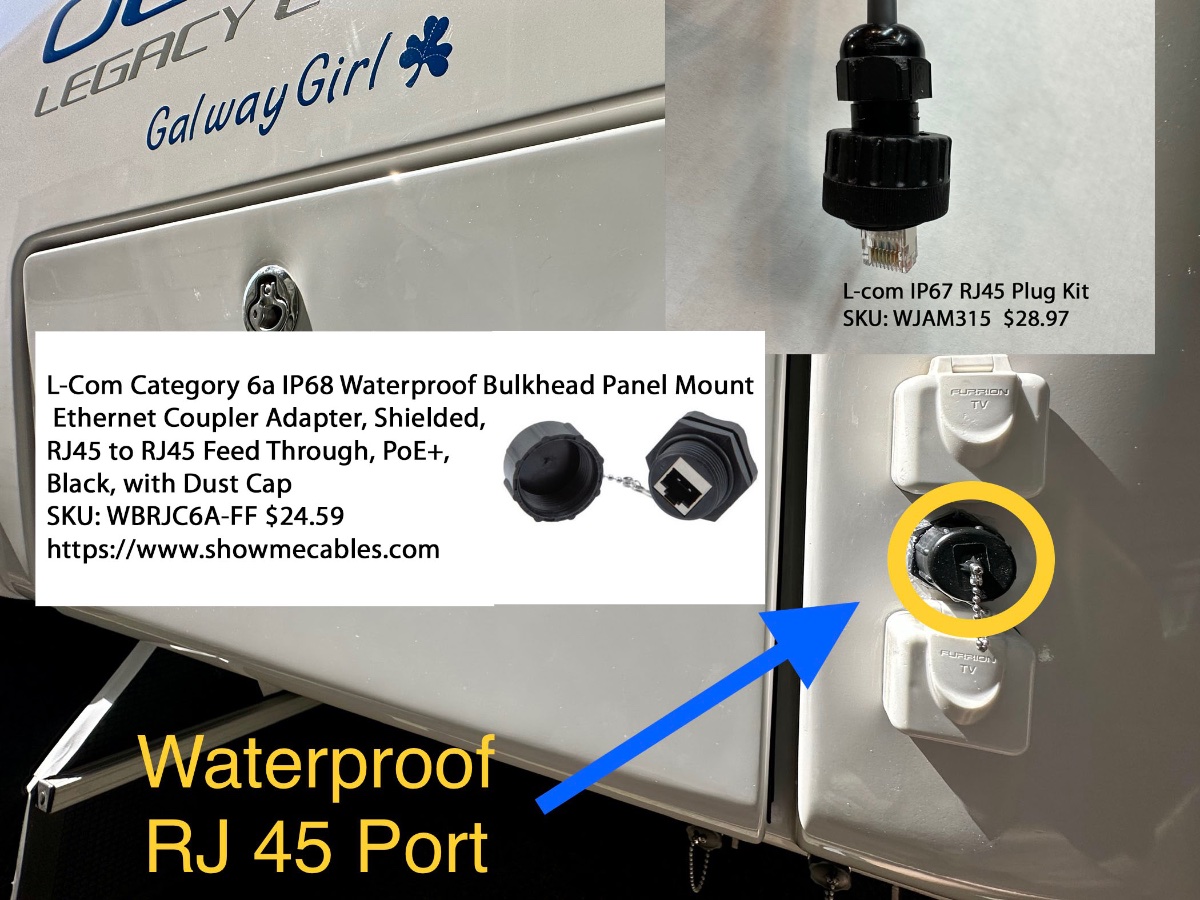
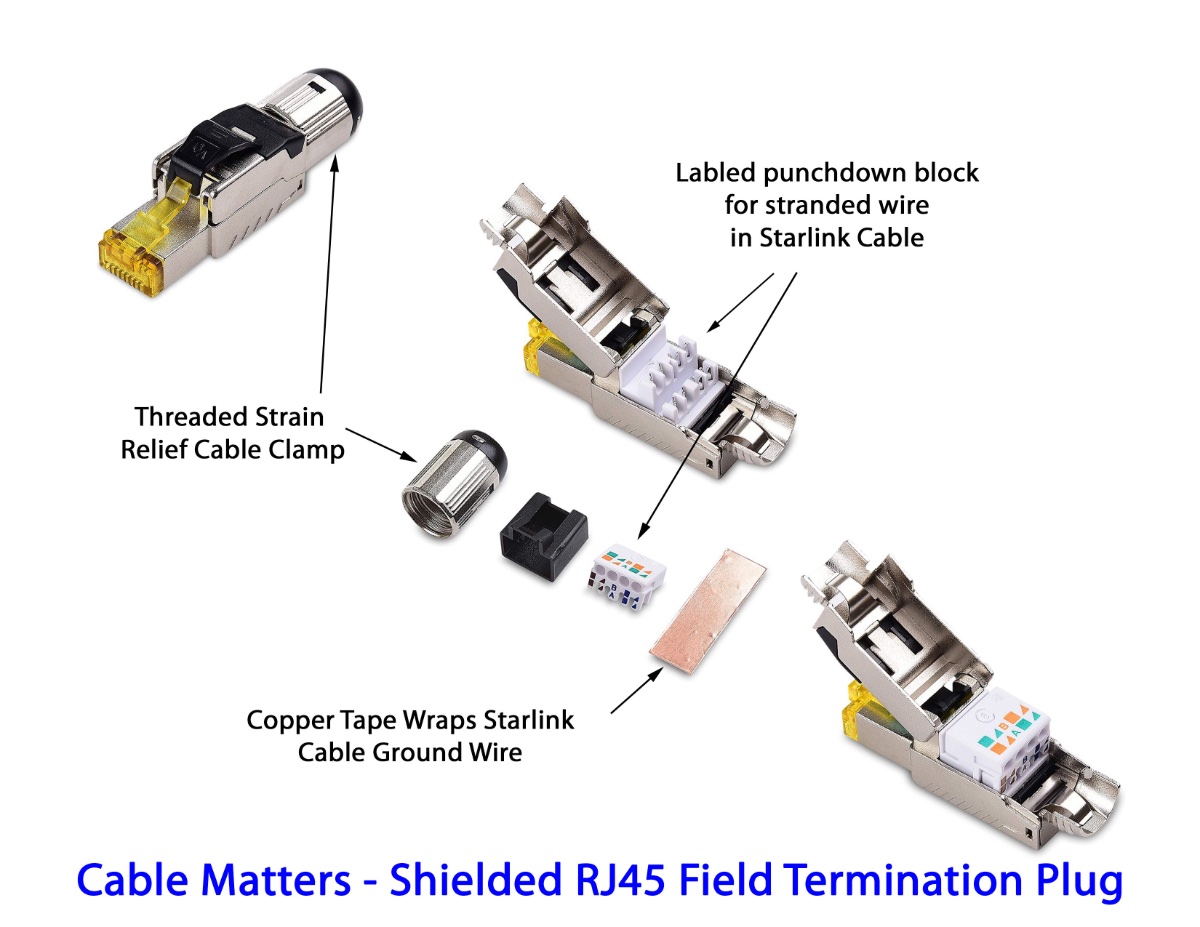
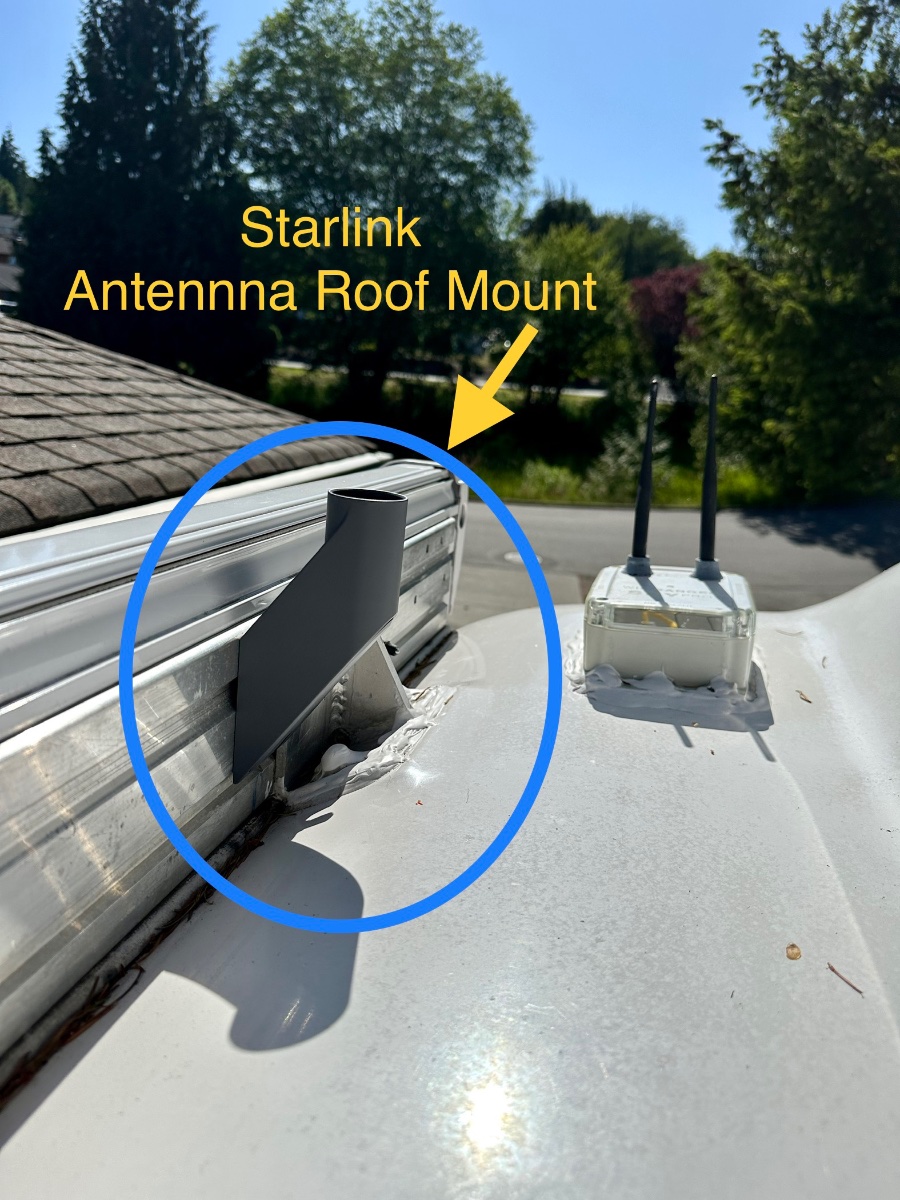
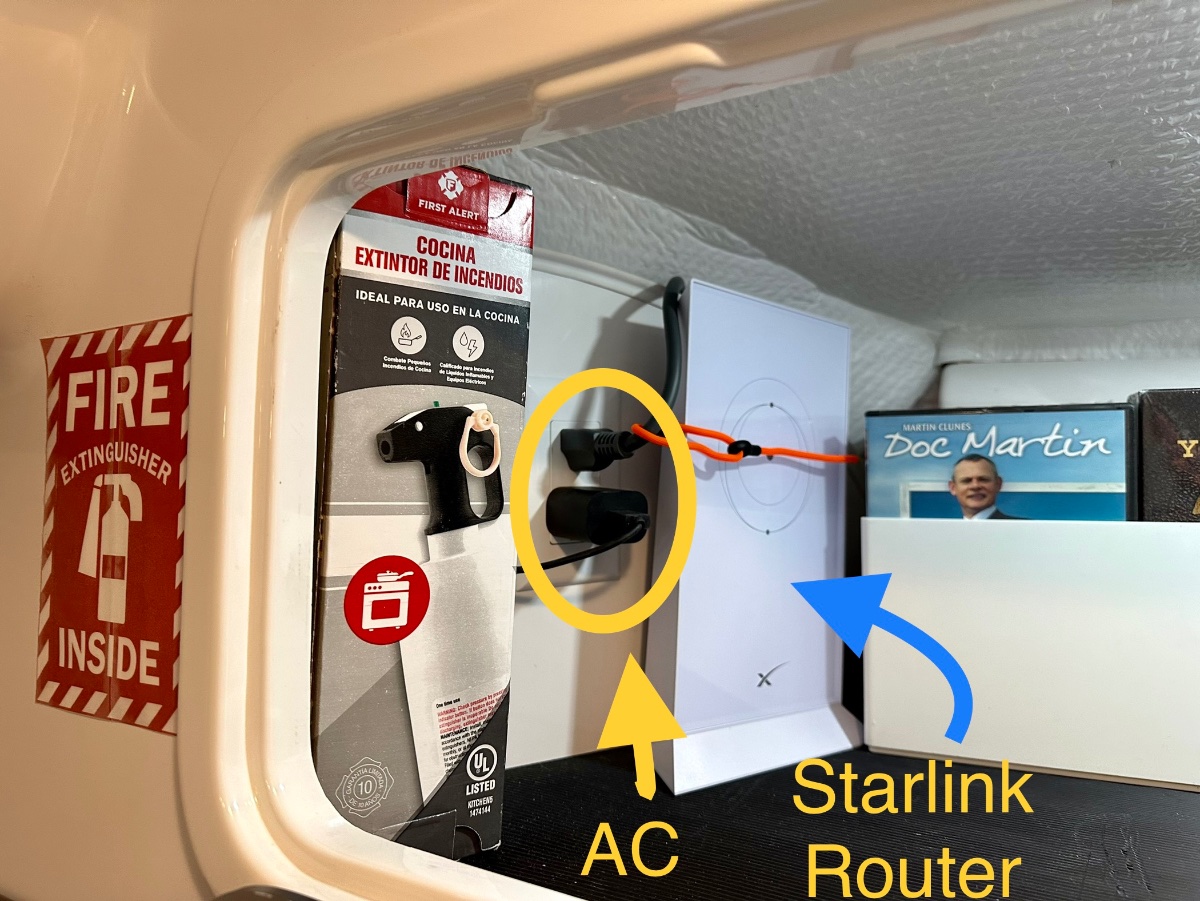
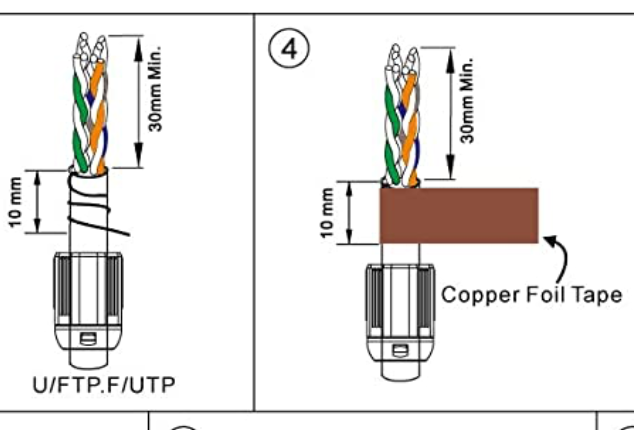
After looking at the forum I found a couple posts on installing Starlink. I decided to add another to the mix. Pre-Installation Starlink Test: In testing the system before a full installation I found that the Starlink Router could be plugged into curb side Oliver outlets and then the router could sit on it's back on top of the tire under the wheel well. This provided 58dB of signal outside the trailer and about 78 dB inside. So if you don't want to hassle with mounting the router, drilling holes etc. you could just find a weatherproof box/cover for the router and leave it outside. (Signal strength and bandwidth drops a bit but not really very much.) Read on if you want to do a more complete installation. 1) Roof Mount: (This is just a way to mount the antenna up high.) I bought the Starlink short roof mount adapter. Our hull 505 had the Dometic Awning, so I could not simply bolt directly to the mounting bolts from the awning brackets as they are at odd angles. I used 1/2" long x 3/8" diameter Self Tapping Bolts. I drilled holes, then drove in the self tappers into the mounting rail making sure to use washer/spacers to keep it from penetrating the back of the awning box. I used blue loctite on those tapped bolts. This mounting position will be perfect in those cases where we have clear sky and want the antenna up high. I'll continue to carry the ground mount for portability uses. I don't plan to drive with the antenna on the roof. 2) Mounting the Router - In the Rear Attic and Running Cable into Basement I mounted the router inside the rear attic cabinet. It's held in place by a simple orange strapping tie that feeds through a hook-eye behind the router. This is a good spot for the Router as it's close to a 110V outlet, and easy to run the cables under and behind the back of the cabinet over to the right side then down to the basement area. To make the cable run to the basement I needed to remove a couple panels: (NOTE: DISCONNECT FROM CURB POWER and make sure Inverters are OFFLINE BEFORE ATTEMPTING) 1) Street side attic panel (2 bolts) tip it down flat to gain access to the street side rear of the cabinet. 2) Basement rear dress panel covering the back the basement. (2 phillips screws). For my installation I ran the cable beside the existing AC drain tube on the street side rear of the trailer. I pushed the cable snake down beside that tube, and then at the bottom in the basement attached and I pulled up a length of pull line from the basement area. I attached the pull line to the end of the Starlink cable (the end that plugs onto the dish) and then pulled the Starlink Cable down into the basement. I tested the Starlink at this point before cutting the cable to get a baseline of speed for comparison after I cut the cable and attached RJ45 network connectors and the thru hull port. After testing I looped up about 3 extra feet of cable in the basement and then cut the cable for installation of the RJ 45 connector that would feed the back side of the thru-hull RJ45 plug. 3) Install new RJ45 male plug on cable in basement: Pro TIP: Use metal field termination plugs for the Starlink cable cut ends if possible/ Trying to use the typical plastic RJ45 connectors is a real hassle as the conductors in the starlink cable which stranded and thicker than normal. I spent well over an hour trying to get my shielded/plastic RJ45's to work. I finally said let's try a real metal coupler. In the picture below is the plug I bought from "Cable Matters" on Amazon $6 ea. They feature a clearly labeled punch down block, a threaded strain relief clamp and copper foil tape that is used to wrap the ground (or drain) wire around the cable shaft where it enters the connector. This is the connector I used on the inside of the trailer connecting the Router to the Thru Hull plug. 4) Install the Thru Hull Connector and connector for Cable to Dish I purchased an L-Com IP68 (waterproof) through hull connector specifically designed for shielded PoE Connections. I also purchased a matching L-Com connector kit for the cut end of the Starlink cable. This matching plug screws onto the outside connector for a waterproof sealed connection. I placed the connector mid line between the two existing connectors leaving both the Cable and Satellite COAX's in place. The new bulkhead coupler fits exactly between those two connectors, but I would suggest shifting UP 3/16" from center to allow the bottom door to fully open. (It's the 'satellite coax' in my case which I never use.) Hope this is useful to any new Starlink owners. More detail is in our blog here: Adding Starlink to Galway Girl Craig Hull 505 - Galway Girl
1 point
-
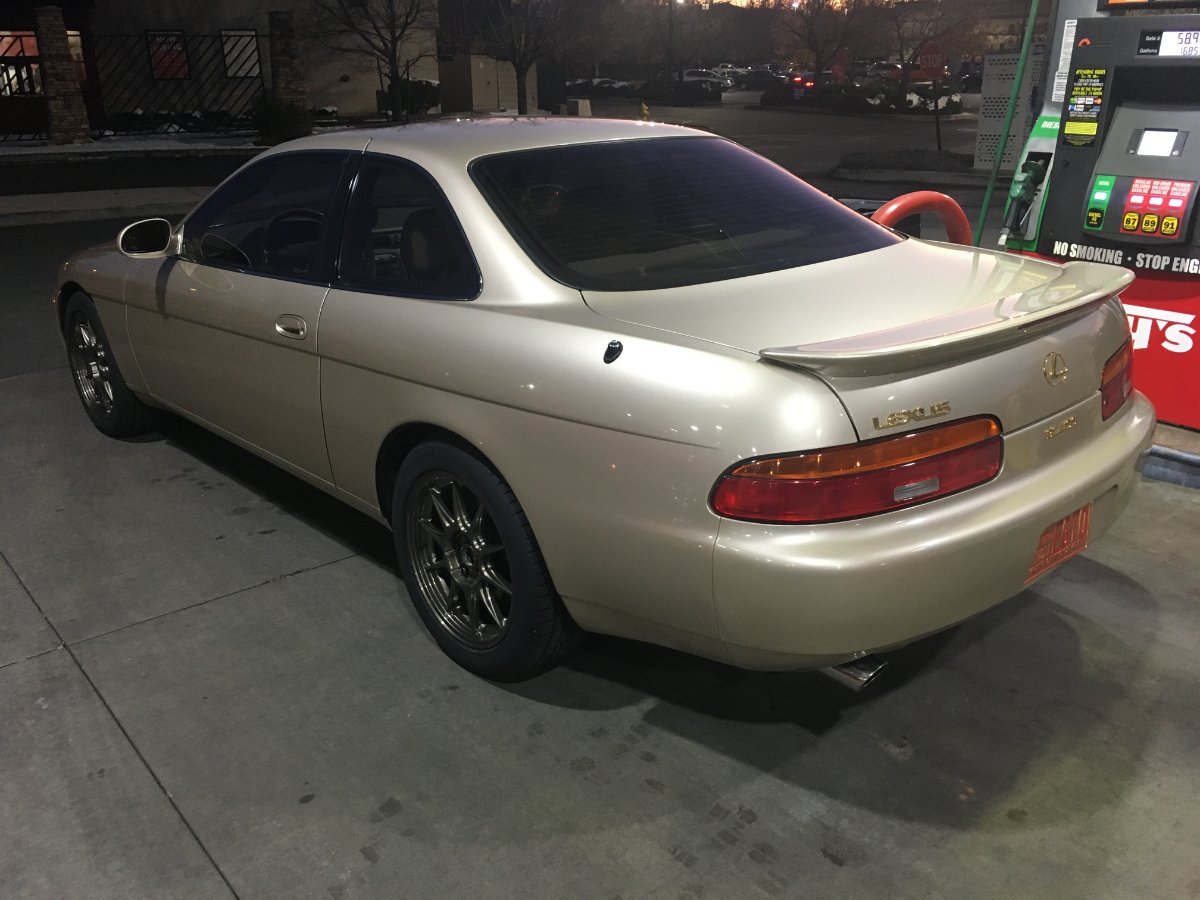
John, I should have bought yours! The 1998 has the higher HP engine, variable timing, etc. Mine is the first year 1992, 90K miles for $12,500 in Phoenix. I love driving 2DR HT rear-wheel drive cars and trucks, won't buy a FWD car. We also have a 2000 Lincoln LS, a 4DR but also v8 with RWD (found it up in Gillette WY 3 years ago with only 11,600 miles). Need AWD, then we drive the GX470! Had more in the past, but currently are a 2-car, 3-truck family (got an old T100 on the lot too). Pretty copperish color with good maintenance history, was dealer exec owned. No issues yet, but will keep you in mind, thanks. In one year, only changed the oil, flushed brake fluid, new wiper blades, hood struts and a beautiful set of wheels and tires!
1 point
-
ugh. so glad i have the composting toilet.1 point
-
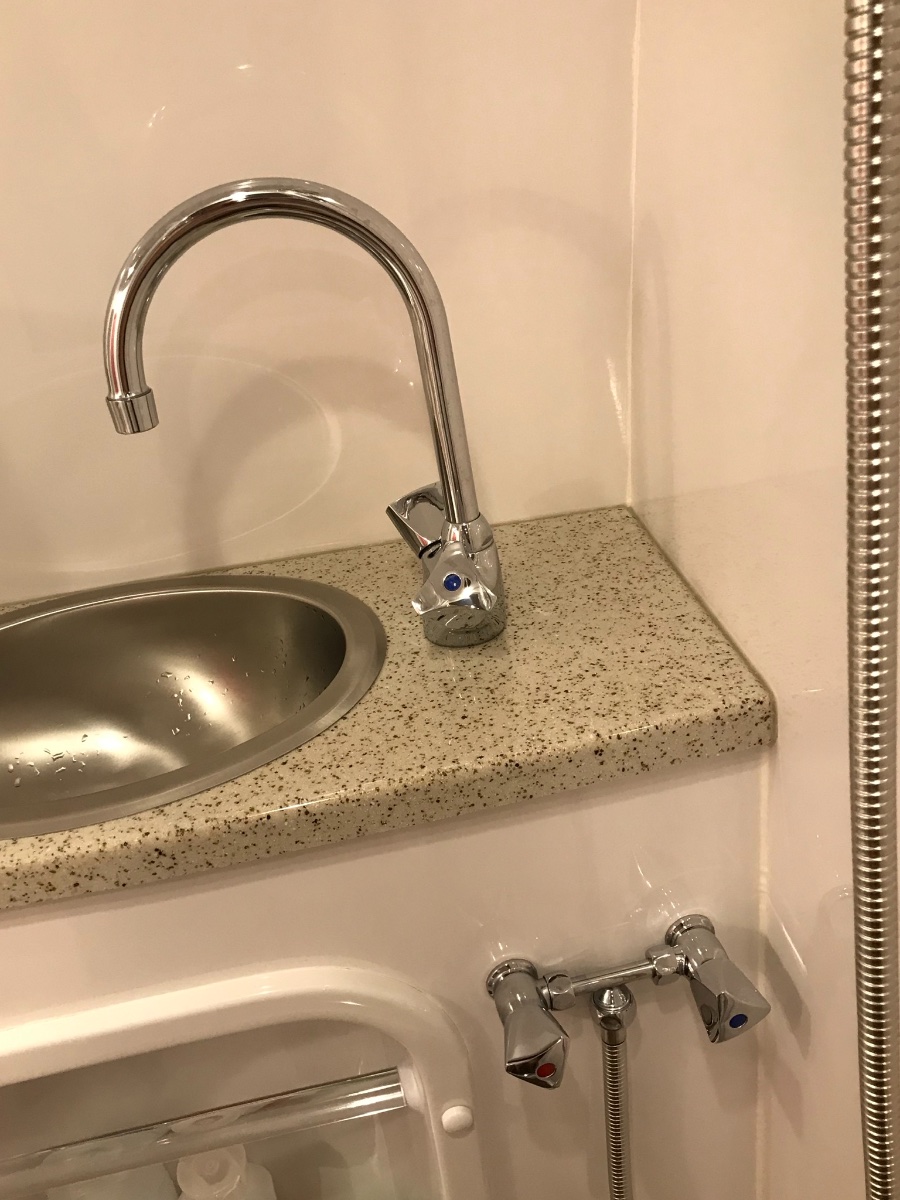
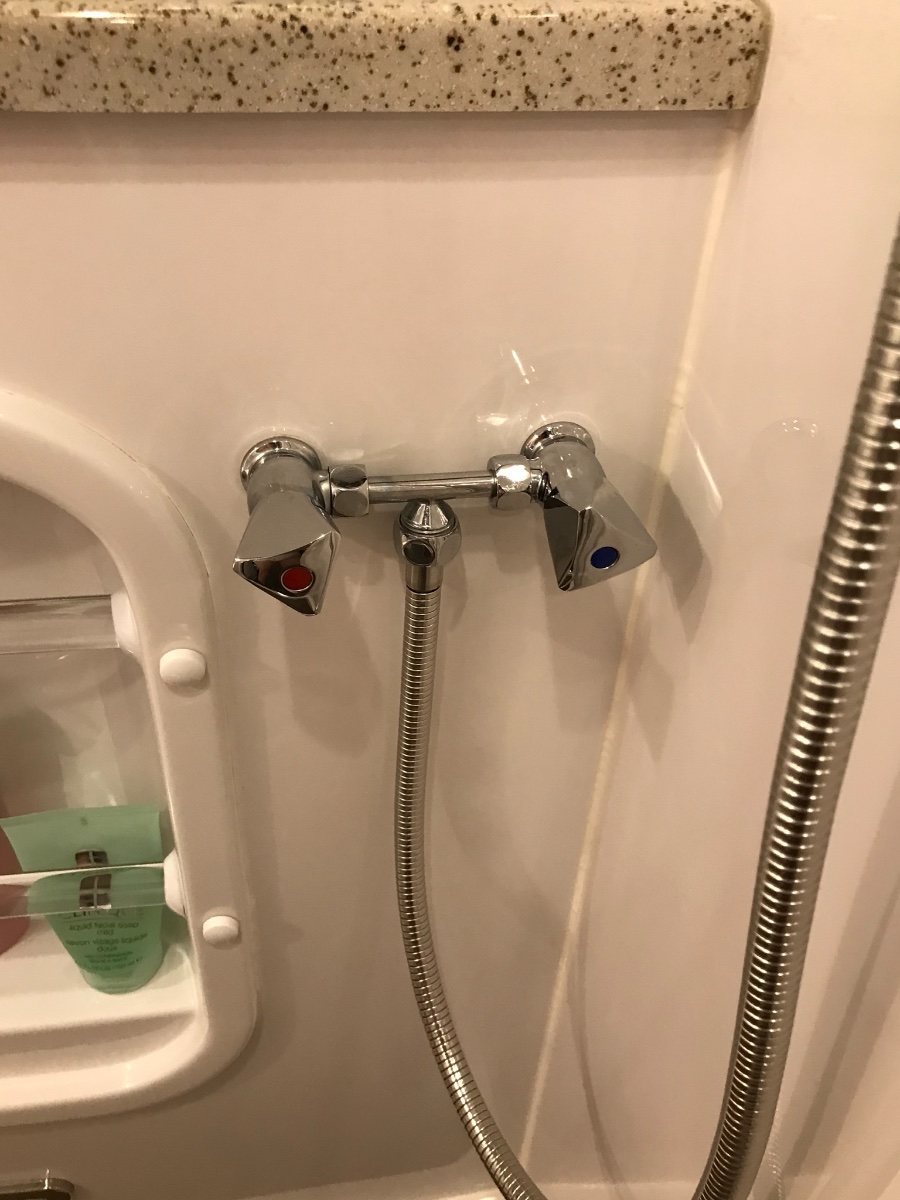
I think/thought that the sink faucet and the shower faucet were on "separate supply lines" - therefore, no diverter is necessary. Of course, there is a "shut-off" valve at the top of the shower head that can be seen in the photo for temporarily shutting off the water flow while taking "Navy" showers. But, assuming that the additional faucets that are shown on the front of the bath vanity have been plumbed by tapping into the supply lines that supply the sink faucets then no diverter would be necessary. Bill1 point
-
I'd have to imagine that it is quieter on the outside too - quieter is quieter - unless you are simply sealing off the "noise" from one area and not the other. From what Ray is telling us it would seem that the reduced noise level he is sensing is the result of cleaner air flow (i.e. not the compressor and/or associated parts). Can't wait to hear more! Bil1 point
-
Hello to all! I'm looking for recommendations for a 5 or 7 cubic feet chest freezer that would fit through the doorway. I am a carnivore, so I order my meat in bulk and I will place this freezer in the dinette area or at one of the twin bed areas. It is a challenge finding widths that will fit through the entrance opening. Thanks!1 point
-
As Sherry points out, a 5 cubic foot freezer is a ton of frozen meat storage. A rule of thumb is one cubic foot of freezer space will store 35-40 pounds. So it's actually only about 175 pounds, but still. I know you are looking at an Oliver to buy, but unless you're planning to travel with a fully grown timber wolf, it's going to be hard for you to consume that much meat in a reasonable time. I'm all about overkill and no one will ever accuse me of being a minimalist, but while I think your idea is sound it may be perhaps a bit unrealistic about what you really need. We travel with a 75 Liter Dometic dual zone freezer/fridge combo. Either or both sides can be fridge or freezer. It equates to about 2.6 cubic feet of storage. The great thing about going in this direction is that it will run off either 12 VDC or 120 VAC. It lives in the bed of our truck with its own Lithium battery and solar panels set up on the roof of the camper top. It will easily store enough fresh meat to keep that wolf happy for a couple of weeks.1 point
-
1/2 ton trucks can be purchased that have more than enough power and brakes to handle virtually anything that North America can throw their way without adding "all sorts of accessories". The main issue that can cause people "problems" with 1/2 ton trucks is relative to how much "stuff" can be carried on or in these trucks. Owners who can be classified as "minimalists" have no problems and owners that generally travel alone should have no problems. But, if you add another person, plus a pet, plus a fire pit, plus bikes, plus, plus, plus, etc. the carrying capacity of a 1/2 ton can soon be reached and/or exceeded. Bill1 point
-
We changed from a suburban 6 gallon to a girard instantaneous. It required changing the door, as vent(s) are in a different place. 6 gallons take up a bit more space than the Truma or girard. When / If anything happens to our girard, we're going back to a standard 6 gallon .1 point
-
I remember telling someone my sad story about shower mats (see post above) and they suggested that I shower while sitting on the toilet. Somehow that suggestion struck me as being somewhere between taking a bath and being so sick that I could not stand. But, I still tried it out. Yep - somewhere between ......😁 Bill1 point
-
Yep - After spending several hours making my own shower mat during the first winter I owned my Ollie I finally got the chance to actually take it out to the storage yard and see how it fit in the shower. It looked great, the fit was perfect (including the curve of the shower pan) and I was in total awe of my abilities to actually create such a thing of beauty with only my original cardboard template as a guide. Until ------ I decided to step into the shower and quickly realized I was too tall (I'm right at 6 foot) with the beautiful shower mat in place!😒 So, from that point on I simply use a "shower rug" similar to THIS ONE. Bill1 point
-
Oliver #117 takes offense at being called "Older"! I'm not exactly sure what question you are asking. My solar system still works just like the day I took delivery and there have never been ANY issues with it. Its a little hard to tell exactly from your picture - but - is the battery terminal at the upper right as tight as it should be? Is the wire/spade on the second terminal from the left tight? I would not trust a bungee cord on the batteries but would contact Oliver Service and ask them to send you a new battery strap. Or, make one yourself. Bill1 point
-
By the way....truck pricing is nuts right now!!!!1 point
-
I've towed my LEII with two different 1/2 ton trucks both here in the East and through out the Rockies out West. Absolutely no problems . However, you will need the Andersen weight distribution hitch AND you will need to pay particular attention to your payload capacity. Bill p.s. picking up a new Ollie in October is fantastic! You've got the better part of two months to do some serious camping and then you have the winter to do your mods plus get all those things you've learned that you want for that new baby. Welcome to the family!1 point
-
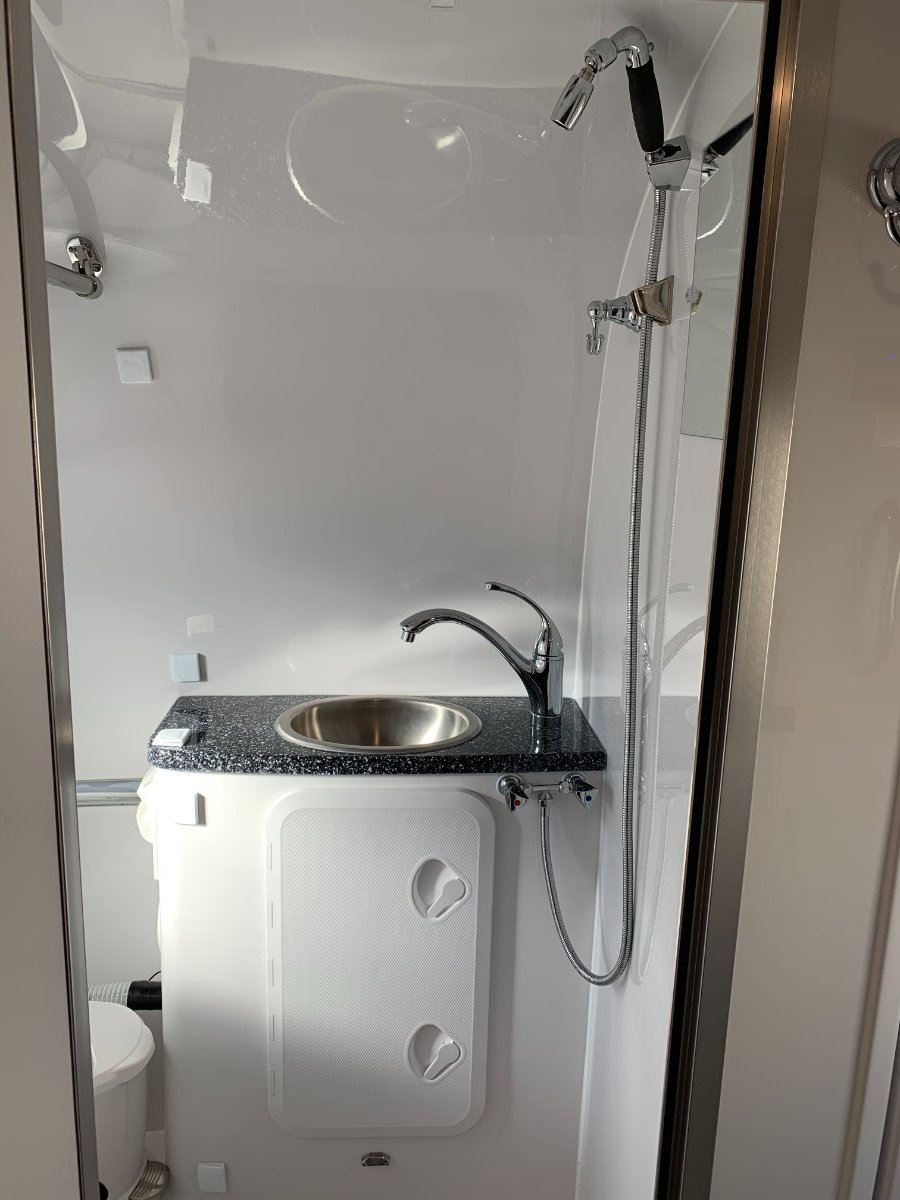
And now with the same shower mixer as Mountainoliver... Mountainoliver, the check's in the mail! But... I don't know how to get anything delivered by the post office these days. 😉 So glad I didn't have to rip the caddy out again - sure made this addition easy!
1 point
-
Seeing the shower head changes reminded me that when I ordered our trailer I wasn’t real fond of the shower arrangement so had Oliver make a modification for me. I liked the idea of being able to select the shower head that I wanted and be able to replace it whenever. I used Shurflo brand “Trinidad” model shower diverter valve. Both bath/kitchen faucets are the same design for fewer parts inventory and are the Shurflo “Trinidad” type as well.
1 point
-
Hopped into the truck yesterday afternoon to go to the market and it burst into flames. When I started it, smoke started rolling out from under the hood. I told my wife to get out, move away from the truck and call 911. When I got out of the truck there were flames in the drivers side wheel well and my driveway was on fire under the engine bay. I ran to the house and grabbed a fire extinguisher. I killed the flames under the truck and then the flames in the wheel well. I stepped back and it burst into flames again. I gave it another shot and put it out (or so I thought). I opened the hood and there were still flames so I attacked it from above and finally extinguished it. Fire dept. showed up and made certain that the fire was out. My truck is a 2020 with less than 8,000 miles on it. Not happy. Not a good time to buy a new truck if they total it. Even if they can repair it I don't think I want to keep it after it suffered a fire like that. Who knows what hidden damage it caused in addition to the obvious.0 points


-
Recent Achievements
-


")


")


