Leaderboard


Popular Content
Showing content with the highest reputation on 12/04/2023 in all areas
-
I suspect that (as I think GJ alluded to earlier) one would have to get the person that set up/manufactured each component of the system to sit down together with all the others and have a discussion as to exactly how each was programed or at least the way that piece was supposed to work. Perhaps a flow chart of sorts for each would help. Without that I don't see that it would be possible to fully understand each without reverse engineering it. Bill5 points
-
John, without digging into the schematics, my understanding is that the auxiliary solar port Oliver installs on our campers is directly wired to the batteries. This is the reason a separate charge controller is required on the portable panel. At this level it's not a highly technical process. The charge controller on the panel reads the battery SOC and controls the output to the batteries based on that reading. Adding an aux solar port to a camper that didn't already have one is pretty straight forward based on Oliver's method. The portable panel you buy must have its own charge controller. Now if I'm at a SOC of say 50%, I haven't spent much time yet analyzing the output level of the portable panel to the output of the onboard 400w panel on the camper. And of course another variable to observe would be the effect of plugging in the shore power and how that effects the output of the two solar power sources. Again an experiment yet to play with next summer for me.4 points
-
John - While there are some good suggestions in the replies above, part of your question (I assume) is asking about an "official" presentation at the Rally giving information of the subject being discussed here in this thread on the Forum. If that is the case, I'd suggest that you send Rodney Lomax an email requesting a session at the Rally in which this topic is discussed. I know that (at least in the past) Oliver has been looking for suggestions exactly like this. Bill p.s. Rodney's email address is: rlomax@olivertraveltrail3 points
-
Great fly-fishing just out side of Hobart... We love Tasmania!2 points
-
When I was at Oliver they referred me to you and you've been very helpful. Thank you!2 points
-
Correct. I knew I could see the aggregate charge from both solar sources on the Victron display, just didn’t know how to explain it so simply as you did. I like that because the Zamp control on the portable panel shows it’s output and the Victron shows the total going to the batteries.2 points
-
True statement, @Ollie-Haus: However, the only slight exception would be those that run a Victron Smart Shunt 712, in those cases, the negative lead from the aux solar connection goes to the SS (then to the battery bank) so the shunt can keep track of the current generated by the suitcase solar modules.2 points
-
It's electron magic, I guess. We don't have the same system (we're blue sky solar, 400 watts fixed, 200 watts portable, pd charger /inverter, and agm natteries) but all these systems are pretty much set up with limits and rules so that everybody follows kindergarten protocols... play well together. What we do is use genset in the morning, when most empty, and get the biggest bang for our fossil fuel buck, if boondocking. Let the solar take up the slower high end of the charge curve. I actually have asked this question a number of times, to various manufacturers. All the charging devices have limits programmed in, so, you can't "overcharge". (Though, as we all know, lifepo4 like to be charged only infrequently to 100 per cent. They're not happy with constant float charge to full capacity, opposite of lead acid. ) So, we've run with that advice. Over seven years on current agms, approaching seven on flas on the boat, and 4 or 5 on house lithium powerwalls. I may not understand it all , but we follow their charts and settings, and so far, so good.2 points
-
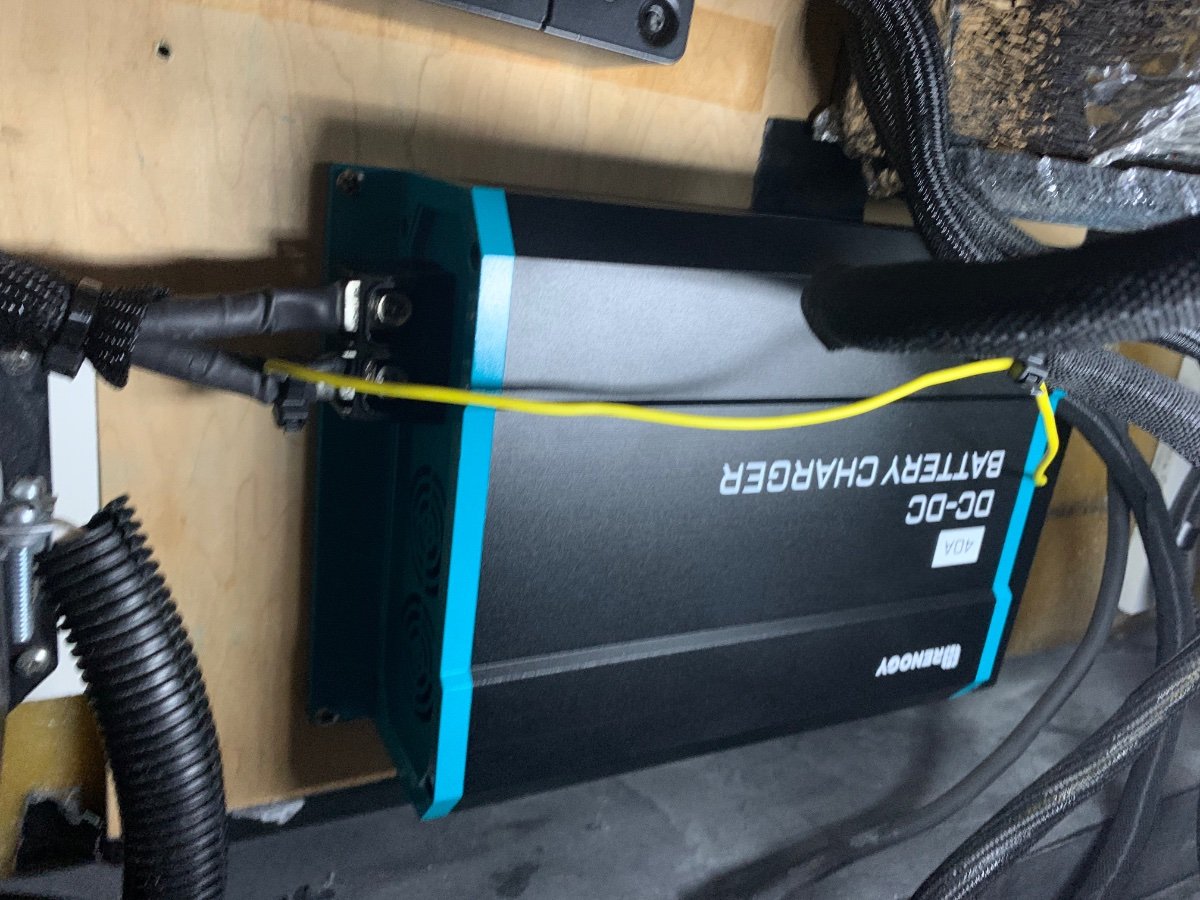
I have since upgraded to a 40A DC-DC charger.
 2 points
 -
Bill, Do they cover some of these questions at the rally? I don't have a good grasp of the electrical systems and how to integrate a portable solar panel if I had one available. John2 points
-
I felt like I was adrift in the pacific several entries back. 😵 I'm going to wait and see and then scratch my head and go "oh, I didn't expect that"! 🤔 Or just maybe I'll be saying, "wow that's exactly what I hoped it would do". 😍2 points
-
There you go, gj.2 points
-
That's typically called a spring upswing hinge, I think. (We have super heavy duty ones supporting heavy hatches on our boat. Replacements for ours are really tough to find. ) You may or may not find something suitable on hafele or rockler, for light doors, with a "frameless" installation. Without the wood frame cabinet, you'd have to add epoxied blocks, or wood cabinet dividers (that's a pita to construct, with the curved hull) to support them. I'd also be concerned if you tried to use only one, because of the "twist" in the lightweight door. Most of those hinges have a lot if strength/force . I have to use both arms to bring down the hatches on spring hinges. Proud of you for tackling this when Oliver never did. Keep us posted!2 points
-
If we assume that it IS voltage that controls the individual charge controllers output, then we could adjust their system to shut down in the order that makes most sense to charge time reduction. Maybe to do that we would want the lowest charging power system to have a lower full charge cut off point, and exit the field first. Then the next lowest power charge controller set at a slightly higher full charge cut off point. So basically the team on the field would be reduced sequentially leaving the most powerful one in play the longest. Thereby reducing total charge control Time. This may work so long as all the team players are playing the same game... But if some are rugby, some are soccer, and at least one is football all bets are off. Again way beyond anything I am qualified to think about.....2 points
-
I agree with Mossemi. My understanding of the Victron 712 Smart is that it simply is a reporting tool. it does not change or modify any power flows. It simply measures voltage, current, and in some cases battery temperature. It does not have any control features. Precisely stated. I have no doubt that as the Litho's SOC approaches 100% that all the connected charging systems will see the voltage and either shut down or go to maintenance. So we are not at the "She canna take any more, Cap'n! She's gonna blow!" situation. I agree with your premis that one of the systems will assume the role of "Big Boy" and rule the roost. For an older set up like ours (Hull 342 See Above List), the PD 4060 is the big boy in the fight. This is in line with Ollie-Haus that the more powerful system will prevail. But on the other hand we don't really know at this point which system and why it will act like the big boy regardless of it's power output ranking. If we really understand "how they play together", it would be productive to only turn on the systems that will maximize the charge process, especially when we are at low SOC. No point in having other systems connected and at risk if the one acting like the big boy has them sitting on the bench. So, I'm thinking it is not necessarily which system is the most powerful, but rather more likely which system is operating at the highest voltage at the time that becomes the bully to the other charge controllers. Any PHD Electrical guys out there? This is WAY over my Mechanical Engineer's pea brain. GJ2 points
-
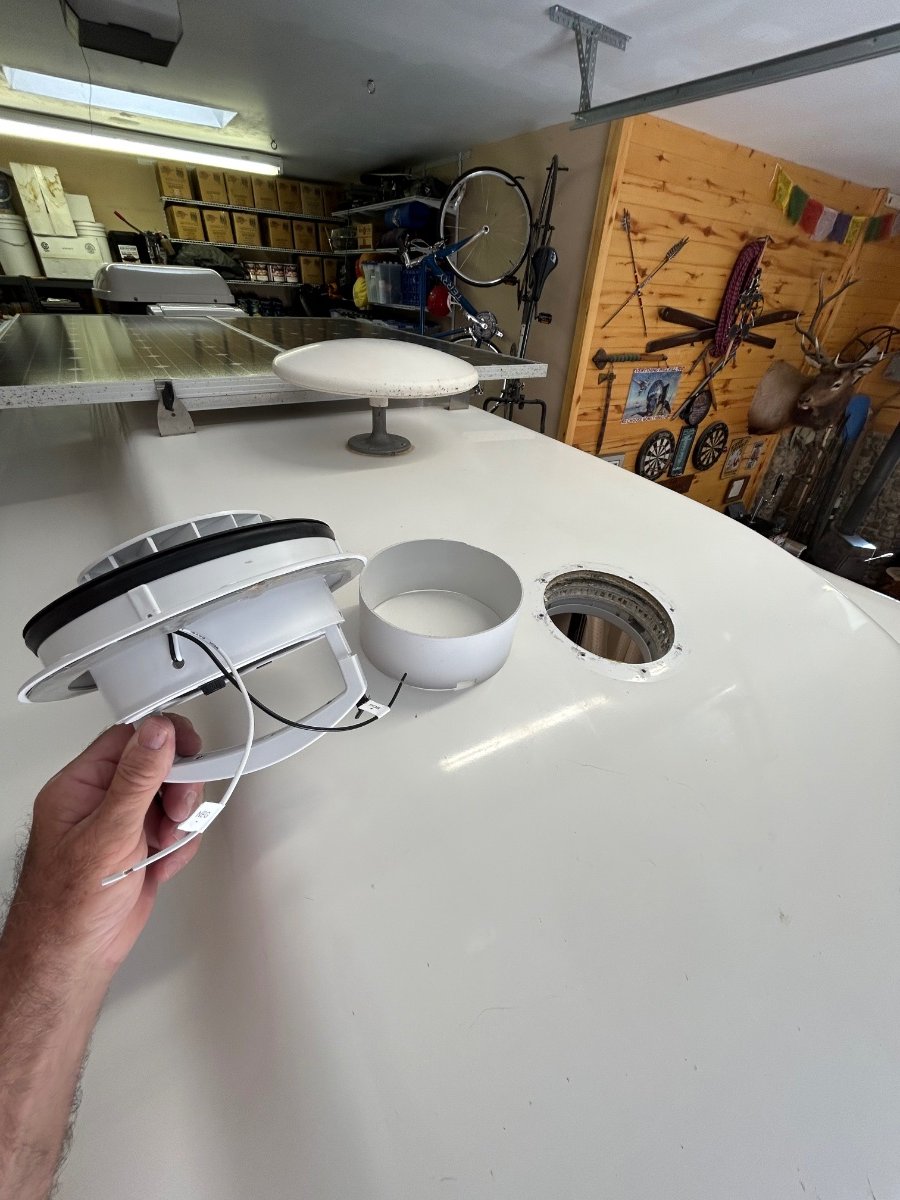
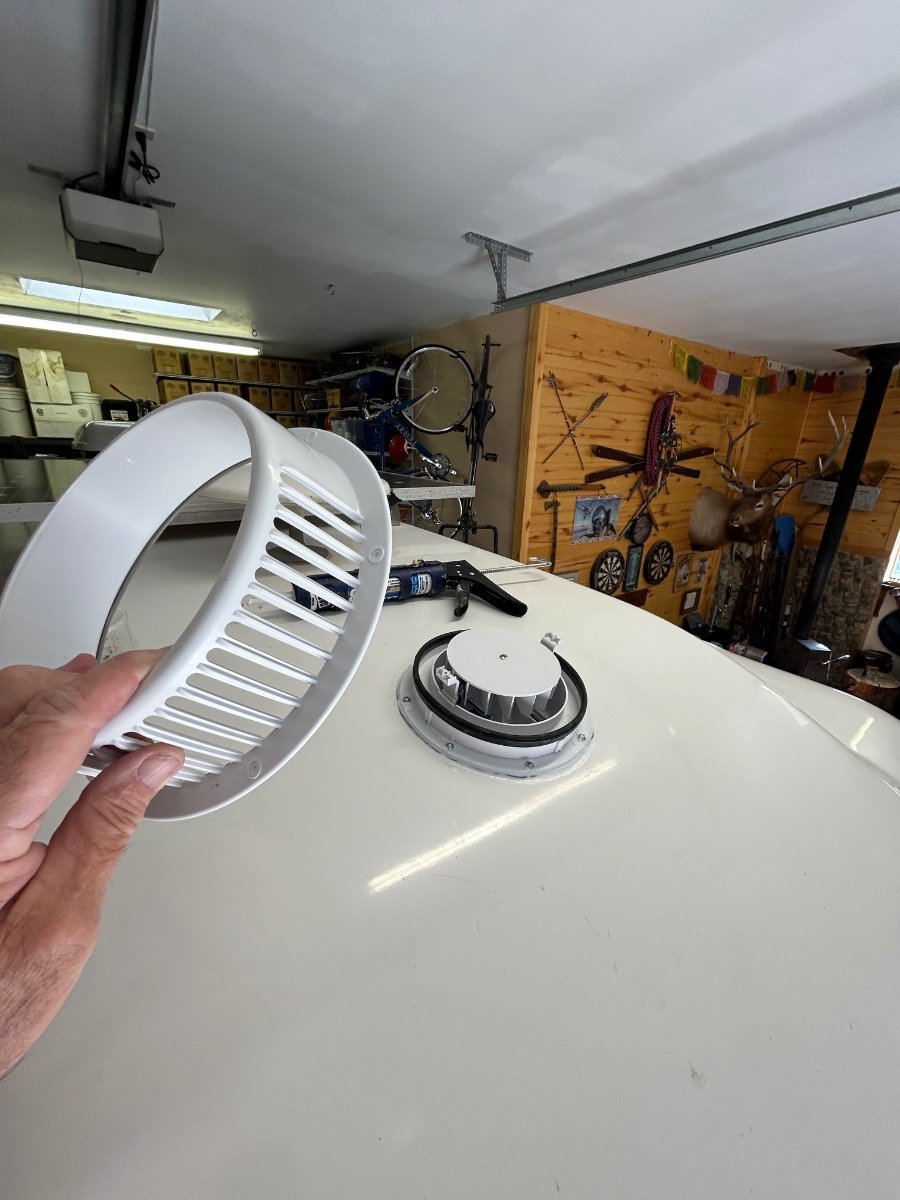
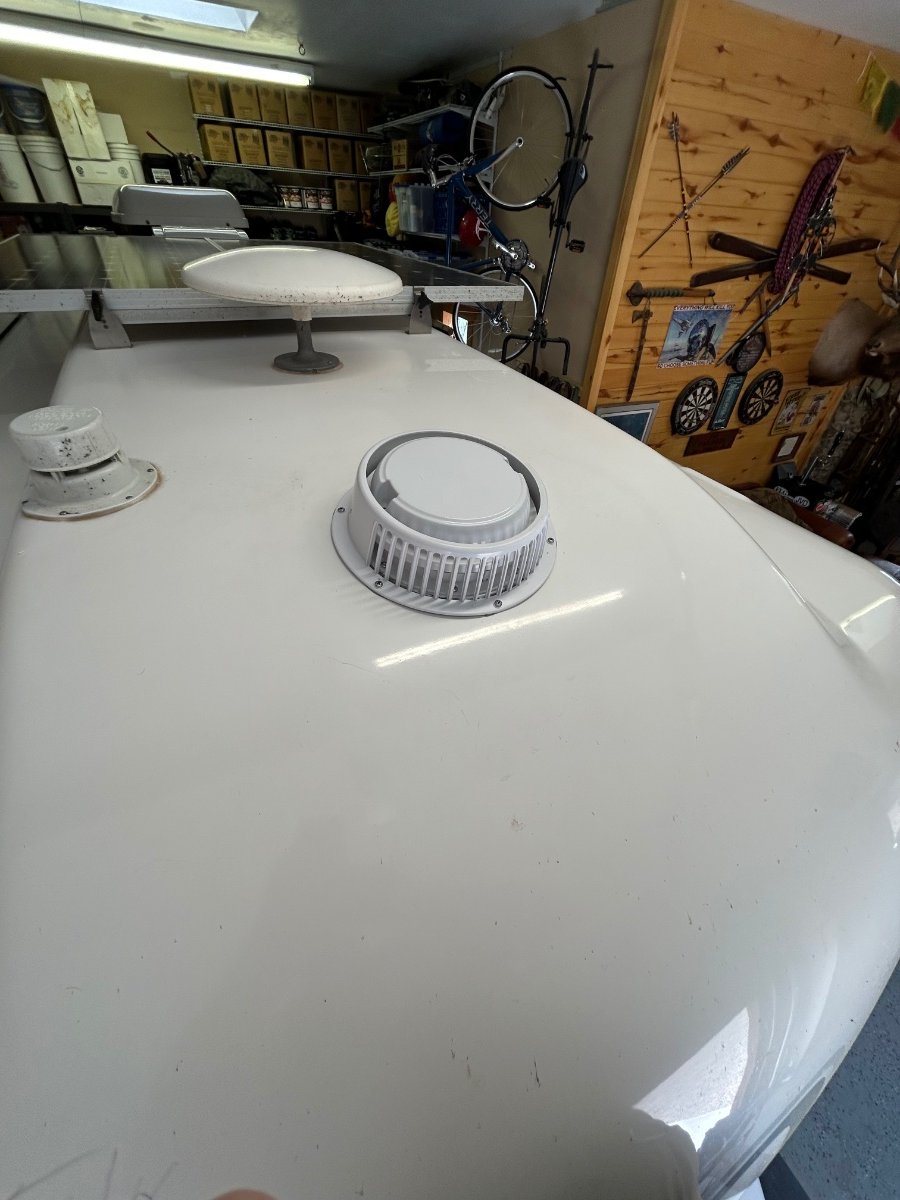
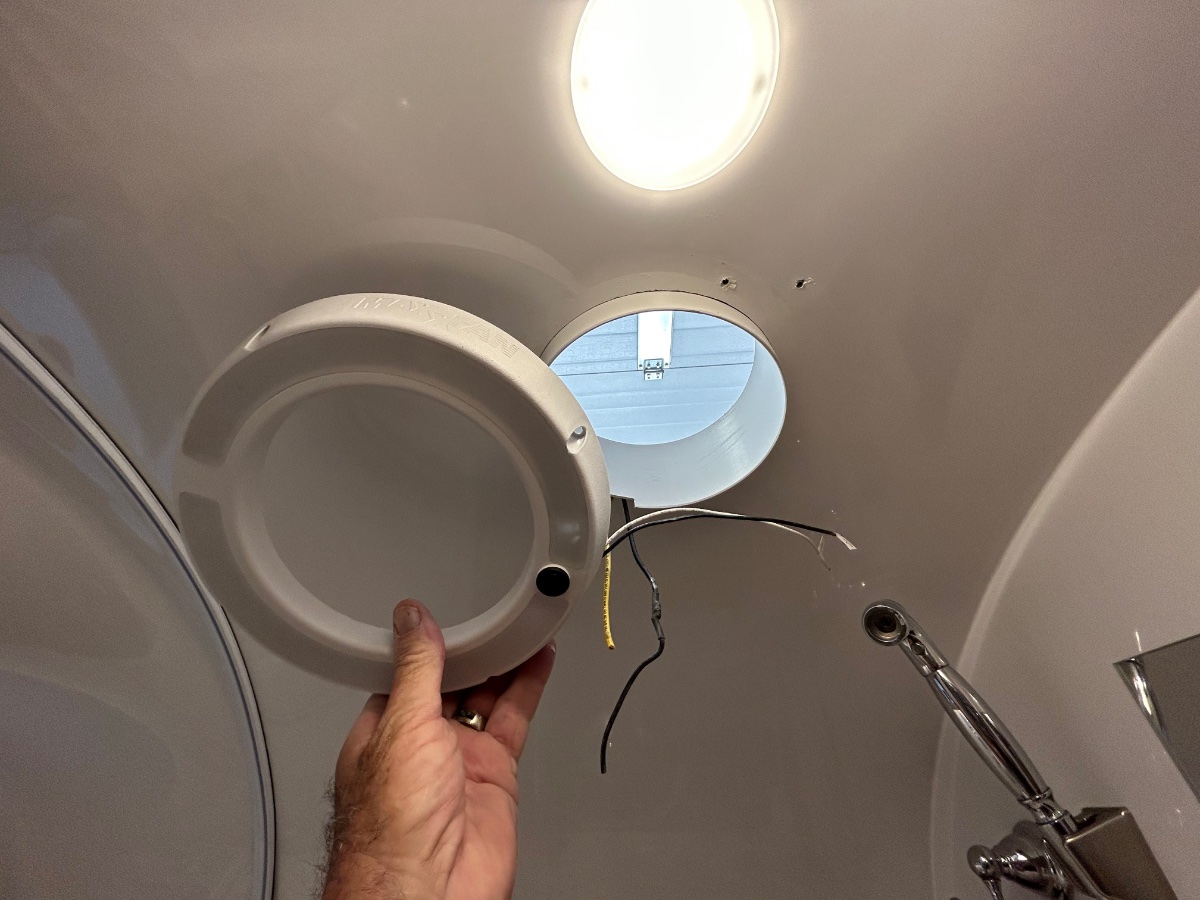
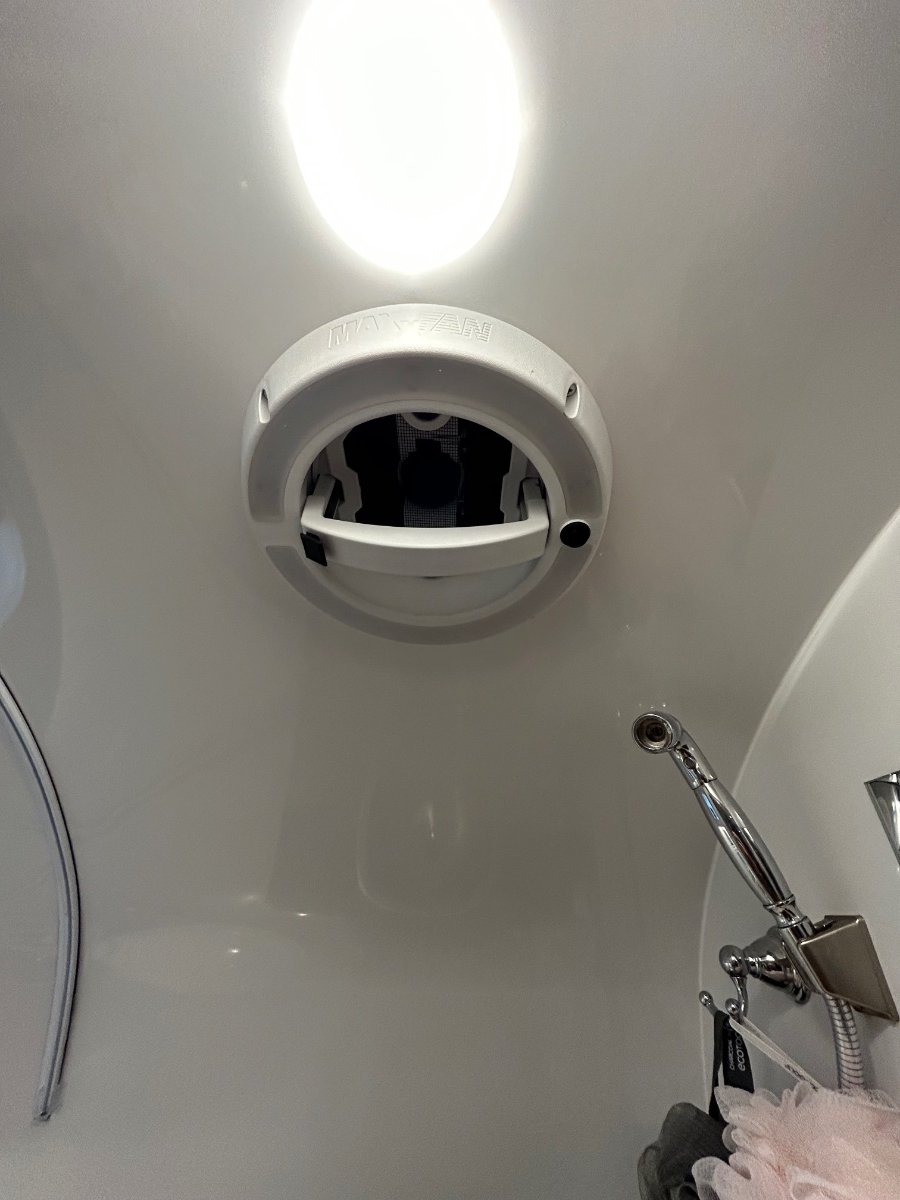
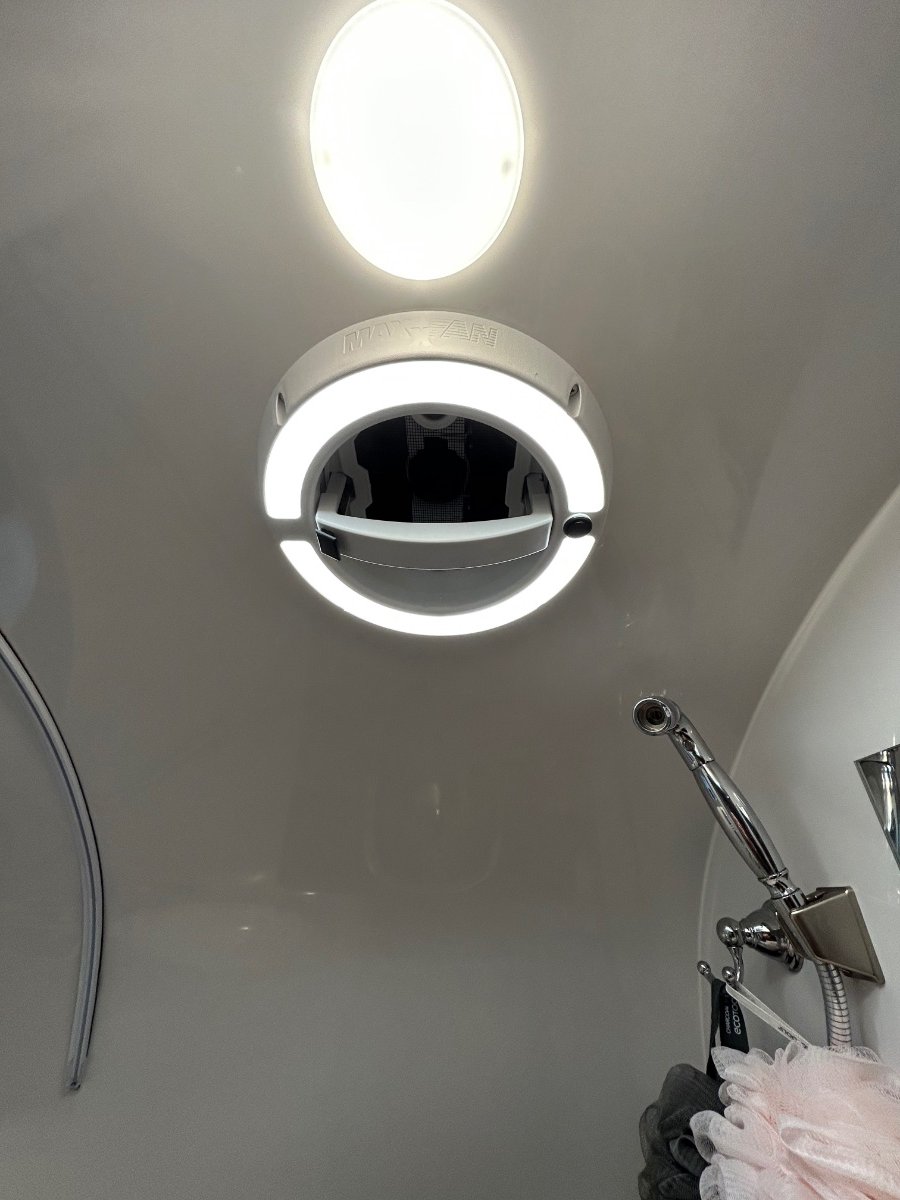
Ok... I love these forums! Nothing like great ideas shared by a group of common minded OTT owners. I'm thinking I stole this one from a comment that @SeaDawg mentioned a while back regarding his "LED-lit" Shower Fan. Well, Diane read his post and thought it would be a good upgrade - so, the new MAXXAIR w/LED unit arrived yesterday via Amazon (Happy Wife - Happy Life category). This would be the short story of its installation... First off, the original VANAIR Ventline fan assembly operated perfectly - no leaks, no bearing wobble, smooth actuation, but alas, no LED. It's the exact unit we had in our previous SOBs. BTW: Its up for grabs - a "freebee", I'll cover any CONUS shipping costs for anyone needing a Ventline. There was major brain cramping involved to plot-out a list of instructions for the R&R drill, especially the Removal phase. The first "R" was straight forward - using a plastic "razor" scrapper to remove the butyl tape from the gelcoat. Cleaned gelcoat with a fresh microfiber cloth doused with an ounce of rubbing alcohol. 2. Filled original mounting holes with clear silicone, they will be further sealed with the butyl tape attached to the new fan housing. 3. Cut-to-fit the included plastic sleeve that fits between the top flange and bottom (shower side) trim piece. Applied clear silicone around circumference of plastic sleeve and upper gelcoat. BTW - the OTT factory fan hole was exactly the correct diameter - no additional cutting was needed (WHEW!). 4. Mounted new assembly up top, carefully pre-drilled/chamfered 8 new holes in exterior gelcoat. Lightly torqued-in stainless screws enough to "push" butyl tape out from flange. Trimmed tape and applied clear silicone around perimeter of flange. 5. Rain guard: The new unit included a "rain-guard" which may be helpful if operating the fan in a heavy downpour. Applied butyl tape on the RG flange and carefully pre-drilled/chamfered 6 new holes for the RG. Trimmed tape after torquing screws in and then applied clear silicone around perimeter of RG. Attached fan cap with the provided 2 white screws. 6. Applied clear silicone to the trim piece groove where plastic sleeve seats. Carefully pre-drilled/chamfered 4 new holes for the trim. Connected 12vDC power to fan motor and LED - used solder and heat-shrink for connections. Tucked wires inside trim piece and mounted it with 4 screws. 7. Unlike the Ventline unit, the MAXXAIR has a locking mechanism when depressed allows the fan lid to open/raise. Its raises/lowers smoothly. Fan and LED each have separate switches. And as, I believe, @Patriot has recently said, "Let there be light!" One and done... Happy Wife.
1 point
-
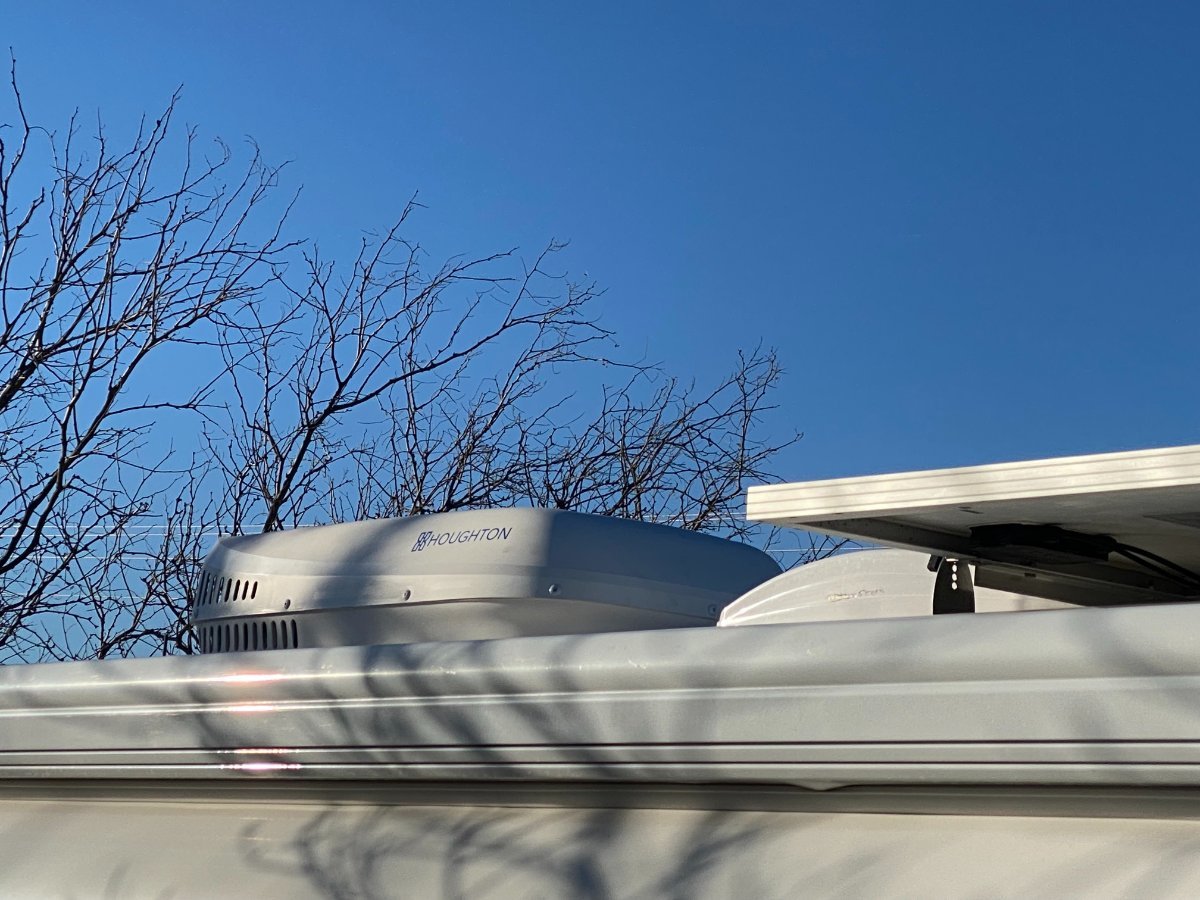
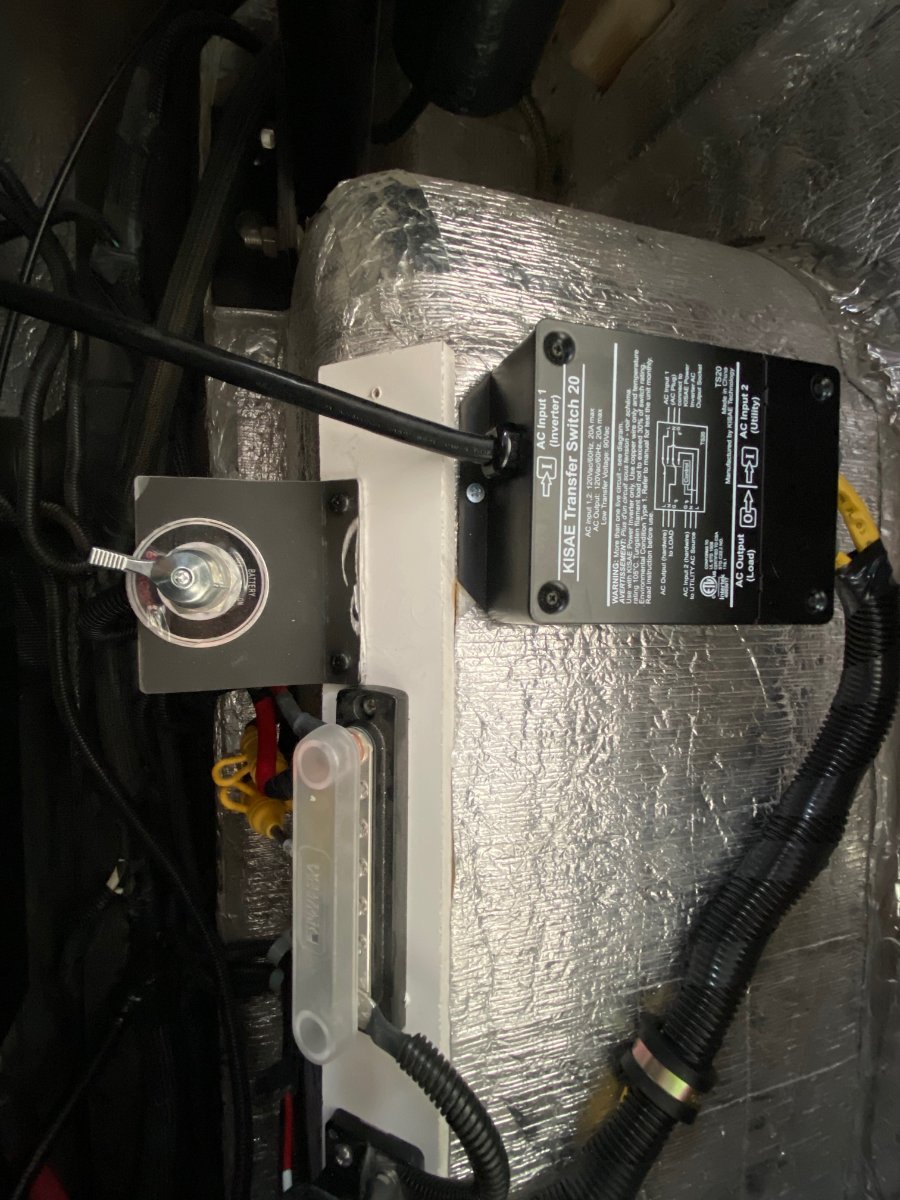
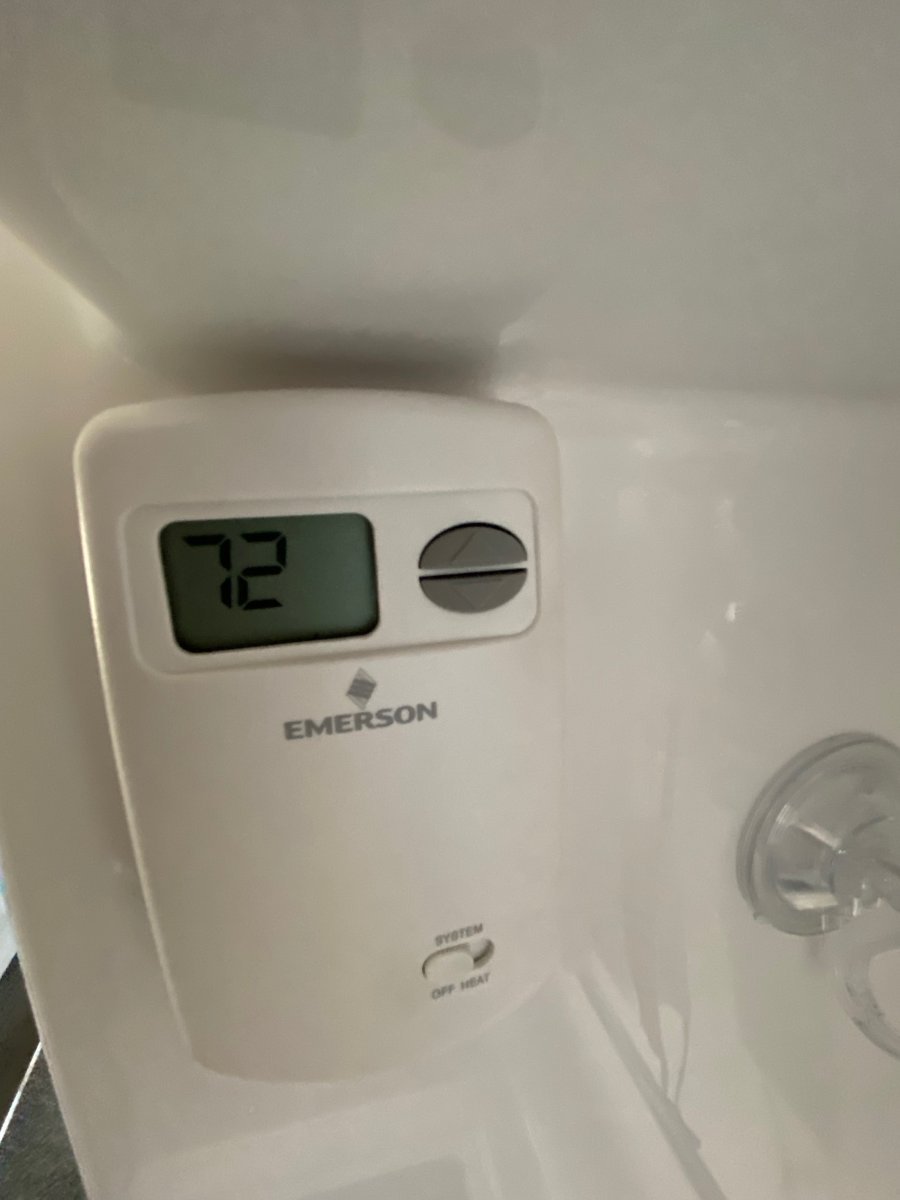
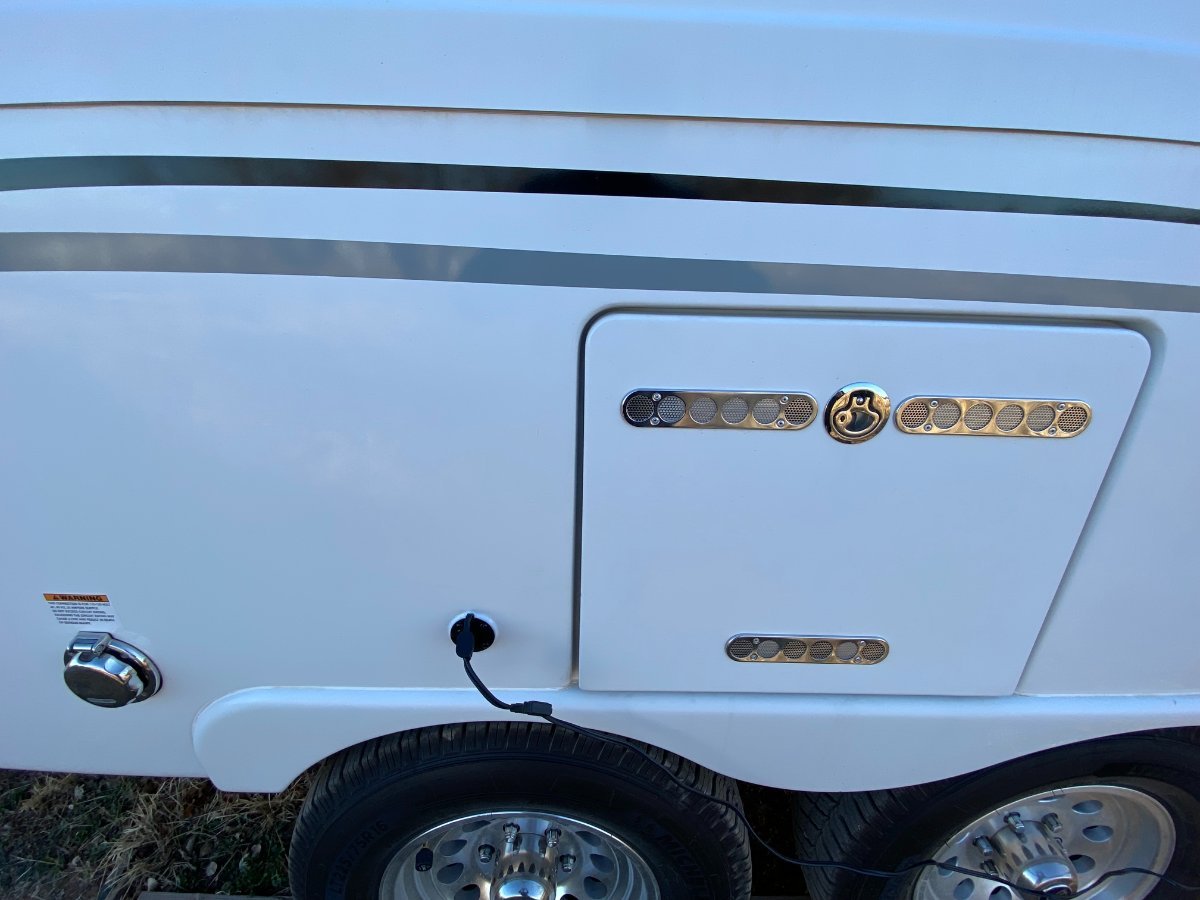
With the help of a number of good folks on this forum and my great RV Tech, Mathew Gonzales, who has worked on my 2017 Elite II since I brought in home to SE AZ, I finally achieved my goal of being able to run my AC off of my 2000-watt inverter and my new battery bank: 4 100ah Battle Born lithium batteries. After asking for, and getting, advice from folks on the forum about a number of issues that Mat and I ran encountered when attempting this upgrade, I made these decisions and Mat did this work: I first made the decision to purchase the Houghton 9.5K Low Profile Air Conditioner from RecPro--due mainly to how much quieter it runs compared to the Dometic Penguin that came with my Ollie, and to its lower amp draw (10 vs. the 16 for the Dometic). I learned that the Houghton could be run off of the 2000-watt inverter that came with my Ollie, using a transfer switch plugged into it running to the AC. I asked Mat to move the Micro-Air soft start previously installed in the Dometic to the Houghton. We discovered that he needed to reprogram the soft start to coordinate with the new AC. Since, unlike the Dometic set-up that came with my 2017 Ollie, the Houghton did not have a way to control the furnace, Mat installed and wired an Emerson non-programable thermostat--once again using information gleaned from folks on this forum--to control the furnace. I figured it was a good idea to supplement the 320-watt solar panels that came with my Ollie with a 180-watt Zamp solar panel kit. I also purchased a Zamp solar port that Mat installed near the shore power input. When my AGM batteries overheated last fall, I found I had no way to easily disconnect the battery bank. (This, I suspect, is something that is an original defect in the electrical system of my Oliver. Is it for all Olivers still?) So, while Mat was doing all of the other work, I had him install a battery disconnect switch near the inverter. I don't want this to appear as a straightforward process. It took a lot of back and forth between Mat and me trying to come up with solutions to problems encountered along the way. This back-and-forth involved a lot of advice from folks on this forum, some of whom I have not thanked by name. I would like to give special mention and thanks, however, to CnC and Minnesota Oli, who spent a good deal of time with me exchanging private messages. Man, were they patient with this technical novice! The outcome is that I now have a much quieter AC that runs off of my solar, batteries, and 2000-watt inverter. One can read elsewhere about the advantages of the Houghton. Mat told me, before I took my camper home, that he ran the Houghton for about four hours, supplementing the roof-top solar with the Zamp portable kit, and the voltage never dropped below 13 volts. I ran it when I brought the camper home, and verified that the system seemed to run the AC flawlessly AND much more quietly than before. I am delighted, as I have been wanting for a long time to be able to boondock in climes needing cooling of the cabin without having to resort to the hassle and noise of a generator. I will follow up with another post if I run into any issues. Disclaimer: I still have very little technical understanding about how this system functions and how the components and wiring fit together, so I will not be the one to answer many, if any, technical questions, but I know that on this forum, if you ask, you receive. There are some good posts on this forum involving the Houghton AC and related issues, so take a look around, and don't hesitate to submit your questions on this forum. Doing so paid off big time for me! Here is the interior view of my newly installed Houghton 9.5K Low Profile Air Conditioner: Here is an exterior view (birds won't be able to nest in this one!): Here is a photo of how Mat secured and wired the transfer switch and battery disconnect switch: Here is a photo of the Emerson non-programable thermostat to control the furnace (thanks go to John Davies who suggested the purchase): Here is a photo of the Zamp solar port with cord leading to the Zamp 180-watt portable solar panel kit: Here is a photo of the charge controller on my Zamp 180-watt portable solar panel kit, showing the voltage just after I plugged it in. (In less than 10 minutes, this controller and the interior Zamp showed the voltage up to 14.6 before dropping back into the floating voltage range.):
1 point
-
It will be our first time there. They live north of Hobart in Rosetta, close to the river. I am looking forward to having summer in February and March.1 point
-
FYI: IMO, the Anderson connectors are superior to SAE types. They "clean" themselves with each connect/disconnect action - better connectivity. Victron and Renogy components are our "go-to" off-grid power manufacturers, so far, they play well together.... Zamp is a known quantity - but we've not had 100% confidence in their products from our experience. Take that for what its worth, but I don't think you'll be disappointed with either Victron or Renogy gear. Cheers...1 point
-
Now - that's interesting. I thought that Oliver wired these external ports directly to the batteries. From what I can see in the pics above it appears to me that the external port wires are being spliced into others that are coming off a circuit breaker which in turn goes to the batteries. If I'm correct then what I'd do is take the Zamp port off, test the wires (just to make absolutely sure) for "positive" and negative" with a multi-meter and then attach the wires to the appropriate terminals on the Anderson. Bill1 point
-
Tough life - but - someone simply has to do it! Either way, I'd still suggest that email. If it is too late to get it on the schedule for 2024, it will be on the list for 2025. If it happens in 2024 and you can't be there, I'll be sure to take notes for you and/or (sometimes) Oliver makes recordings of some of the presentations that you could see at a later time. Bill1 point
-
Thanks Bill, we haven't decided yet whether we're going to the rally. I would like to go, but we will have just returned from two months in Australia just before the rally starts. Our son lives in Tasmania. Thanks for your comment. John1 point
-
Acetone and/or Goo-Gone will clean up the fiberglass. FYI for everyone…There is nobody currently working at Oliver that was there when these early OEII’s were built. Jason has referred several folks to me for help in the last few years. I still have contact information for several former employees that were there when the trailer line resumed in 2013 and worked on for the next 5-6 years. They have provided valuable information to me in some instances.1 point
-
The command strip would absolutely be suited to hang the door from. I already have a hook that I'll use, or at least start out with. It's one of those suction things. Bigger and more intrusive to the eye than a command strip, but on hand.1 point
-
When I asked if I could just leave my lithium batteries plugged in 24/7 I was told it was ok. That means they are always at 100%. OTT gave me that advice. John1 point
-
John W: Even if they don't make it a formal topic, you'll likely have more than a few DYI owners there that would proud to walk you through their way of doing it. Very valuable seeing various solutions first hand. GJ1 point
-
At least better rope. 😌1 point
-
I think we'll need more rope. 🙂 GJ1 point
-
You may be able to soften that caulk with a hair dryer on low. Don't use a heat gun. You could deform the fiberglass. You could also try mineral spirits (without the hair dryer, obviously. ) . Run the overhead fan on exhaust, and open the windows. Where is the caulk you are still attempting to remove? I'm assuming the stuff in your first photo is what you've already taken out with plastic razor blades,?1 point
-
Somebody throw me a rope, I'm way too deep in this rabbet hole!1 point
-
GJ - And, I repeat - I like the way you think.🤔 Bill1 point
-
Bumping an older thread, look at this one too: https://olivertraveltrailers.com/forums/topic/9807-manual-leveler-device/ John Davies Spokane WA1 point
-
Possible source for a square (aka 4-point) socket, Grainger carries these in various standard SAE sizes, I do NOT know what size the jack driveshaft is, probably metric. If somebody figures this out, please start a new thread about it. My gut feeling is that you won't find 4-point sockets on Amazon... 😉 One from this set might possibly fit: .... Stanley Proto J52109 3/8-inch Drive 5-piece Socket Set- 8-point ... you could return the set at no charge if you don't like it. I researched this years ago, before I eventually decided that the cost effective solution was to just to lengthen the handle shaft. John Davies Spokane WA
1 point
-
DO NOT USE THIS TOOL!!!! *****It will DESTROY the gearbox; with 100% certainty, it will eventually weaken and maybe shatter the teeth! ****** It is intended to loosen tight or frozen hardware like lug nuts. It uses an internal "hammer" to smash the part free. BRRRRRRPPPPPPP! I carry one with my screw gun/ driver for the truck lugs, but I wouldn't ever consider using it to turn a screw (or gear!) of any kind. Video - Inside an Impact Driver in Slow Motion Use a LIGHT duty screwgun Use one of these 1/4" HEX to 3/8" drive socket adapters. Add a 3/8" dr to 1/4" dr adapter if needed for the 4 point or 8-point socket you have. Don't use a hex or 12 point socket, it will damage the shaft! (I don't know the size for this application) Your tool will then have several speeds and a reverse setting too, and it probably won't harm the gearbox. But it might, so use it with great care and with close attention. The problem with hooking any power tool up in a situation like this is that you completely lose any "feel" for what is happening. So IF the gearbox starts to bind up because of an internal fault, you might never notice until YOU break something inside. Always set the tool's clutch to a half way point Screw setting so that it will slip if binding occurs, don't leave it on the Drill/ Lock setting... Those jack gears are very fragile, the reason they can lift your Ollie clear off the ground is due to the high speed motor and very low gearing, not from any inherent strength. The jacks are made from cheap, low grade steel on a Chinese mass production line, and they are assembled with no care whatsoever, but with very great haste 😉 John Davies Spokane WA
1 point
-
While you’re chewing your cud remember that good quality stainless steel has very little attraction to a magnet.1 point
-
If you had access to the inside of the FG ceiling, you could attach a (STRONG) magnet inside that was aligned to the cabinet latch, and it would hold like magic. (I will now go out and look at 'SNY SD UP' to see if that ceiling area is accessible from the upper inside of the cabinet area) ruminating on this for a while. We did this to hold the bathroom mirror door open against the exterior of the front dinette cabinet. One magnet on the door the other aligned with one magnet on the inside of the access area under front dinette cushion. Bryan Remember with (2) magnets, if you want them to attract, make sure N-S are reversed, if you want them to repel align N-N... Don't ask me how I know. "Hey Bryan, the bathroom door is not holding like it should"...1 point
-
Also, a standard 6 point socket will not work. You will need either a 8 point or a 12 point socket of the correct size. You can use your impact driver rather than doing it manually.1 point
-
I like the idea of keeping the camper cool during hot weather while traveling to the next stop. With the DC-DC charging the bats from the truck, we can leave the inverter on and run the AC on low while driving and when we get to our destination, the camper is cool and the batteries will likely be 100%. No sense letting that alternator capacity go to waste.1 point
-
Hi Steve and welcome to the forum. Although the company designs the campers to withstand colder temps, they are by no means designed for arctic temperatures. But if you are in temps in the teens or above, the camper is going to do fine with a few precautions. Of course that's providing you run the furnace continually and are prepared for the unexpected. Propane supply would be critical and a back up generator and space heater would be a smart idea. There are some slightly vulnerable points in the basement utility space on the street side that need to be monitored. Other than that, they actually do pretty good. Of course if you choose a composting toilet and winterize your water system, you can actually do just fine in colder temps without worry. One thing you will learn with research is that there's very few if any mass produced RVs on the market that are designed for continuous use in frigid temps. And even the opposite weather conditions can be a challenge for many RVs on the market. We camped in north Texas late this summer and temps were in the 100+ range each day. Most of the campers in the park were struggling to maintain comfortable temps inside their RVs, many of which had 2 or three AC units on the roof. Our LE2 with the Truma Aventa stayed comfortable inside regardless and the AC compressor would cycle like normal when it reached temperature. We have yet to need the higher fan speeds to maintain comfortable temps inside the camper. A nice thing about the Elite 2 with the Lithium Platinum package is that with the large battery capacity and the 3000 watt inverter, you can still run the AC for an hour or two before bed to sleep in comfort even when dry camping, provided you have good sunshine during the day to recharge. We've experimented with this several times this summer and the system works great in that way. Few other campers have a factory available system that compares. Anyway you're in the right place to get honest feedback from owners regarding their experiences. Most of us are just ahead of you on the same path. We wanted one good camper that would fulfill our needs with as little trouble as possible and not look back. Stacie and I are convinced we made the right choice. Good luck in your research.1 point
-
Solar panels need to have space between the roof and bottom of the solar panel to allow air flow. Flexible panels will not last if they are adhered directly to the roof. Not only did people have panels fail prematurely, the 3M adhesive made it almost impossible to remove the panel and many had extensive damage to their RV roof. I would consult the panel mfg. to make sure adhering directly to the surface is an approved method.1 point
-
We installed flexpanels on the hardtop Bimini of our boat in 2017. Only 6 years old, and they're beginning to craze. Of course, they're in Florida sun. If we did it again, we'd want a little bit of air circulation under the panels.1 point
-
I was confused when reading that the ‘quieter’ a/c replacements draw 10 amps compared to the stock Dometic Penguin ll at 16 amps. I too have a 100+ amp DC draw on battery and understand now that the 10 and 16 values cited are AC amps, thus resolving the confusion. It’s also worth noting the aforementioned 100+ amp DC draw is with the compressor running, otherwise the draw is in the 30+ amp range. Also, when the 20 amp DC/DC charger is activated my draw values drop accordingly. I recently completed my transfer switch install with the information you provided and all is good running the a/c on batteries now. Thanks for the assistance, much appreciated!1 point
-
When I first got my Ollie I thought that those little lights under the camper were simply a cute gimmick that simply shouted - hey, look at me, I'm an Oliver. Fortunately, I changed my mind on this subject when later that very first summer I was preparing for bed in a nice boondocking spot and thought that I'd take a quick trip outside to ..... Anyway, I flipped the switch to turn those little lights on and made that first step out the door when I noticed a fairly large timber rattler curled up at the bottom of the second step! I sure did appreciate the indoor plumbing that night! Bill1 point
-
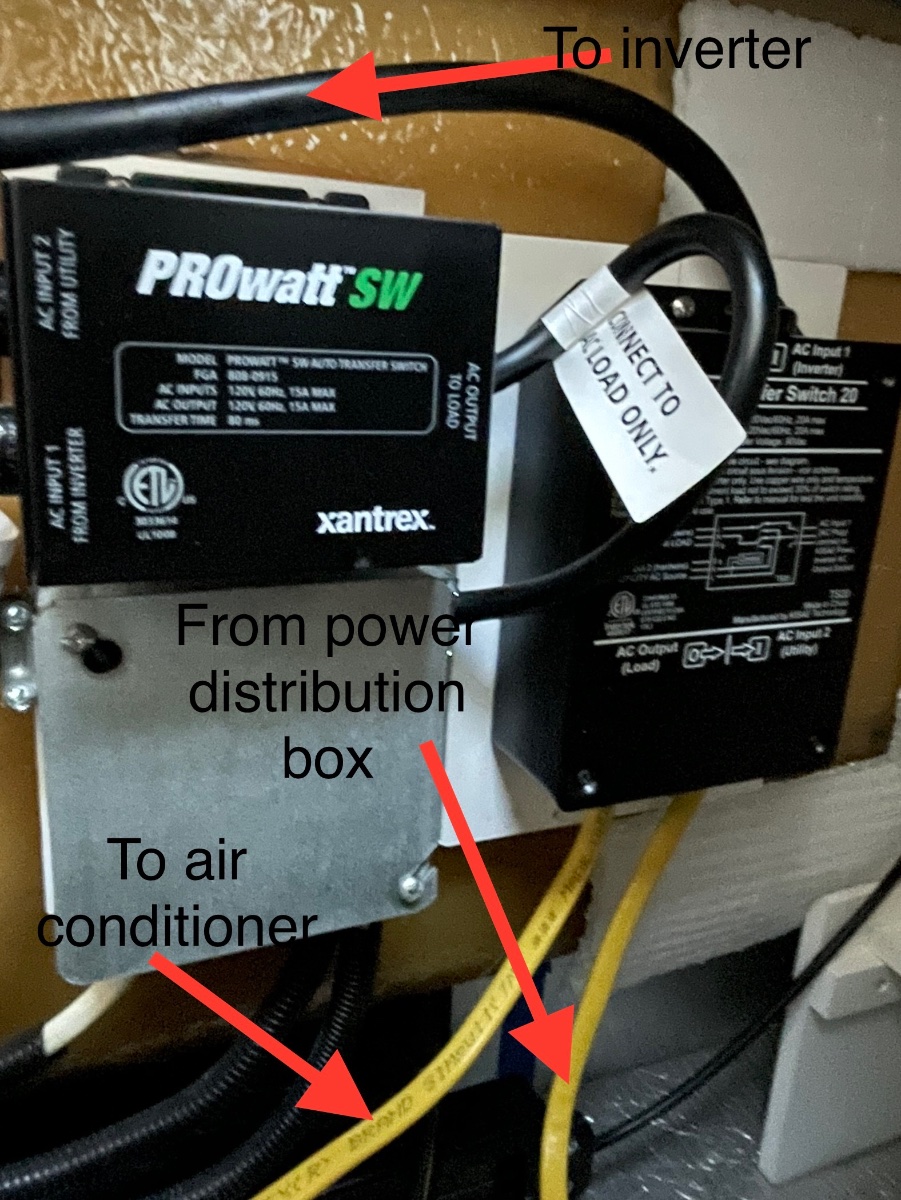
When I upgraded my batteries from flooded cell lead acid batteries to three Battle Born batteries a few years ago, I also made a few electrical upgrades as well. One upgrade was to clean up/simplify the DC wiring and the other was to add a new 20 amp transfer switch to allow me to run the air conditioner on the batteries by way of the inverter. In the photo the new 20 amp Kisae brand transfer switch needed is on the right and the various wires are labeled. The black wire has a 20 amp plug on it and just simply plugs into the inverter. The two yellow wires (12 gauge wires) are the ones that you’ll need to cut. The one on the right comes from the air conditioner breaker in the power distribution panel and the wire on the left goes up to the air conditioner. The correct diagram is printed on the transfer switch cover. I hope this helps.
1 point
-
We replace our Ventline bath fan with the Maxxair/LED model as described above. Expecting that the holes weren't going to line up (because of the two different manufacturers) either with the exterior assembly or the interior trim piece, we prepared ourselves to fill the existing holes and make new ones in the gelcoat to make this install happen. It wasn't a big deal drilling into the gelcoat and fiberglass material beneath - we applied blue painter's tape, marked/spring-punched the hole locations, and used the proper bit to drill them. FYI: We definitely used modern gray-colored butyl tape between the exterior pieces and the hull, just as @SeaDawgdescribes. It's a very straight forward mod and gives you a nice additional LED in the head which D really loves a lot... HWHL! Above pic with vent closed/light on. ...vent open/light on. Exterior view of the vent and vent guard. @Steve and Cindy: If you've got any specific questions, you can PM us anytime and we'll try to answer any questions you may have. In any case, good luck with your mod! Best regards, A & D
1 point
-
We've had the maxxair for a few years now, with the led light ring. Best upgrade. (Our decade old ventline was leaking.) We installed the maxxair with butyl tape. Trimmed the outside with marine caulk. Love it, as you do. Love, love the light. Our handle release is more difficult than the old ventline, but we can live with that. It's a two hand operation. The fan is higher cfm. And very, very quiet. Highly recommend it.1 point
-
This may be of interest: I just estimated the weight reduction by replacing my 4 6-volt AGM batteries with the Battle Borns, and replacing the Dometic AC with the Houghton. Our Ollie may have lost about 300 lbs (along with about 1 inch of height).1 point
-
My RV tech, Mat, did the install, but I think that it was no sweat for him. Other aspects of the upgrade did pose some bigger challenges. As I stated in my original post, "I still have very little technical understanding about how this system functions and how the components and wiring fit together, so I will not be the one to answer many, if any, technical questions, but I know that on this forum, if you ask, you receive. There are some good posts on this forum involving the Houghton AC and related issues, so take a look around, and don't hesitate to submit your questions on this forum. Doing so paid off big time for me!"1 point


-
Recent Achievements
-


")


")


