Leaderboard


Popular Content
Showing content with the highest reputation on 06/25/2024 in Posts
-
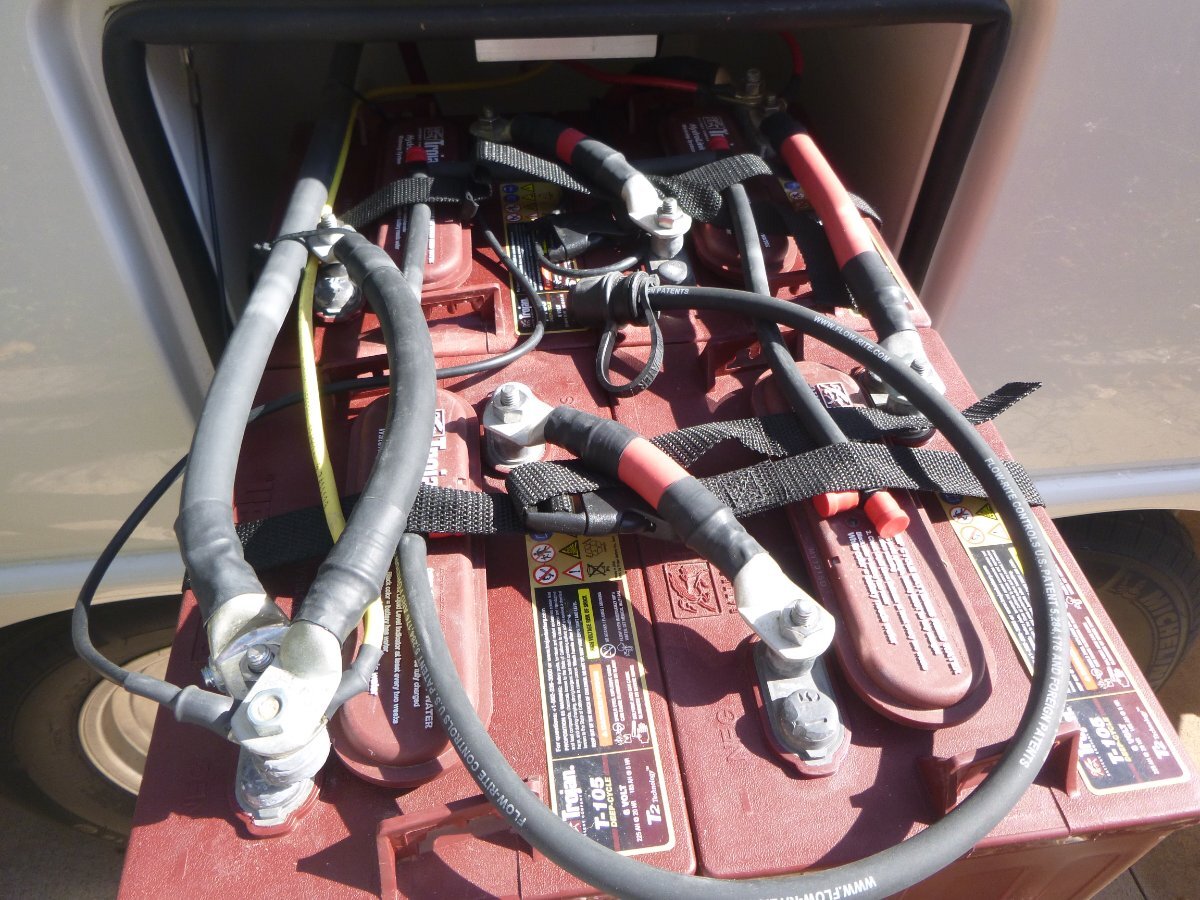
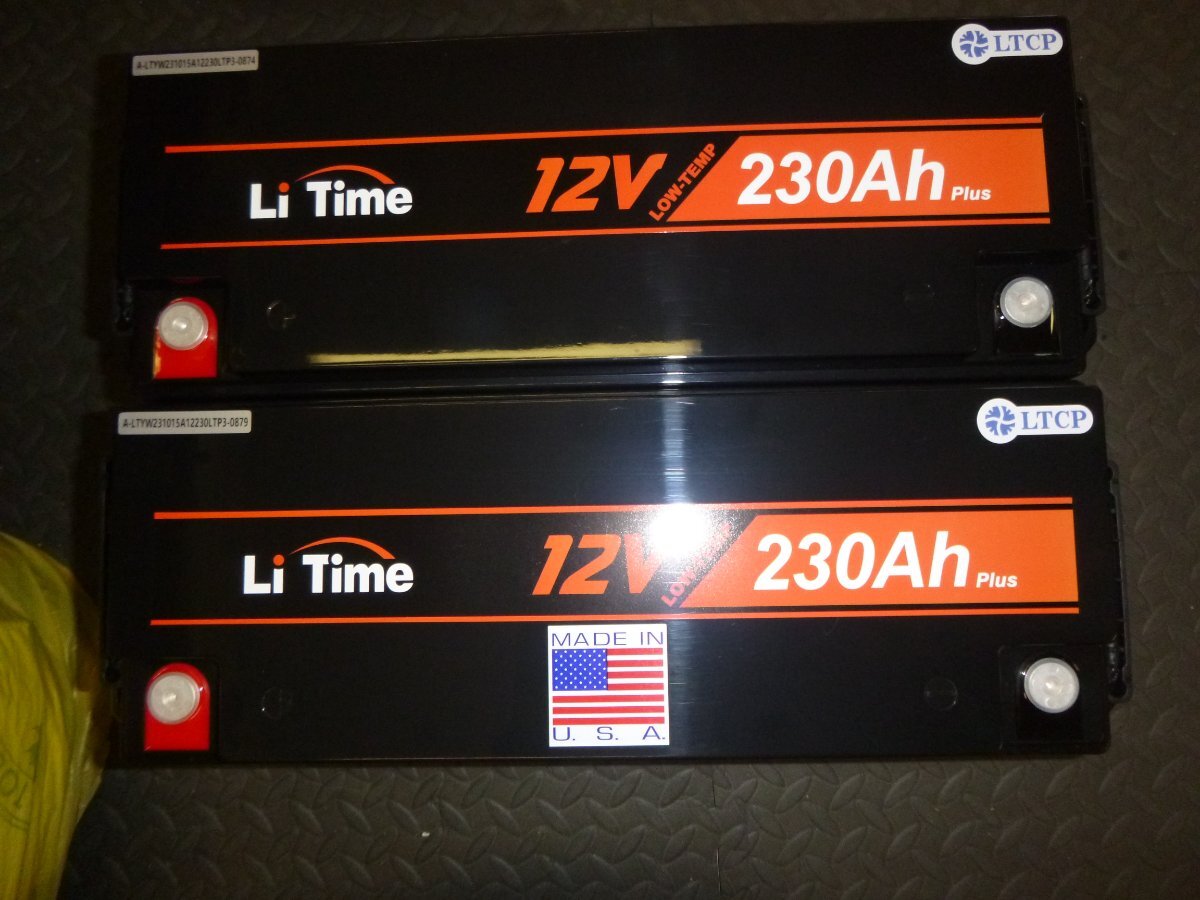
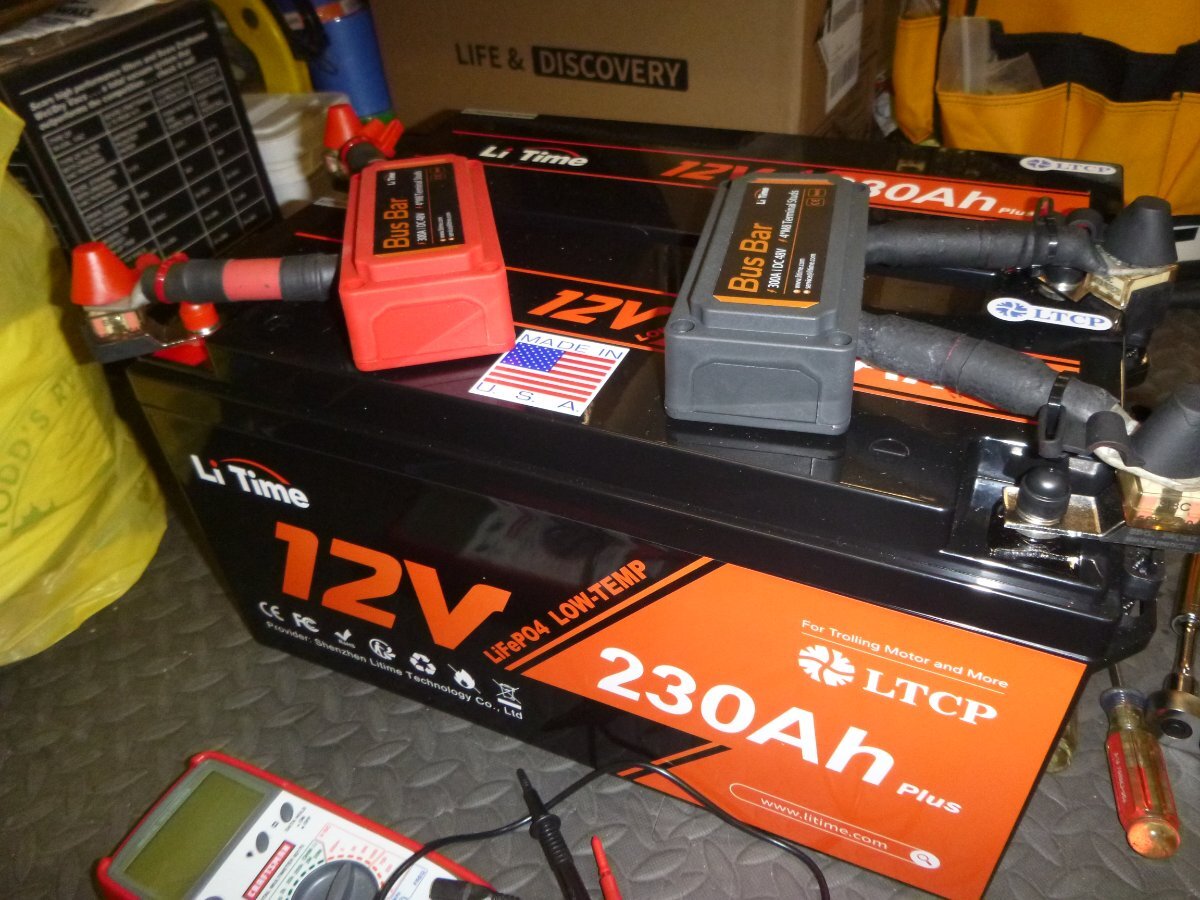
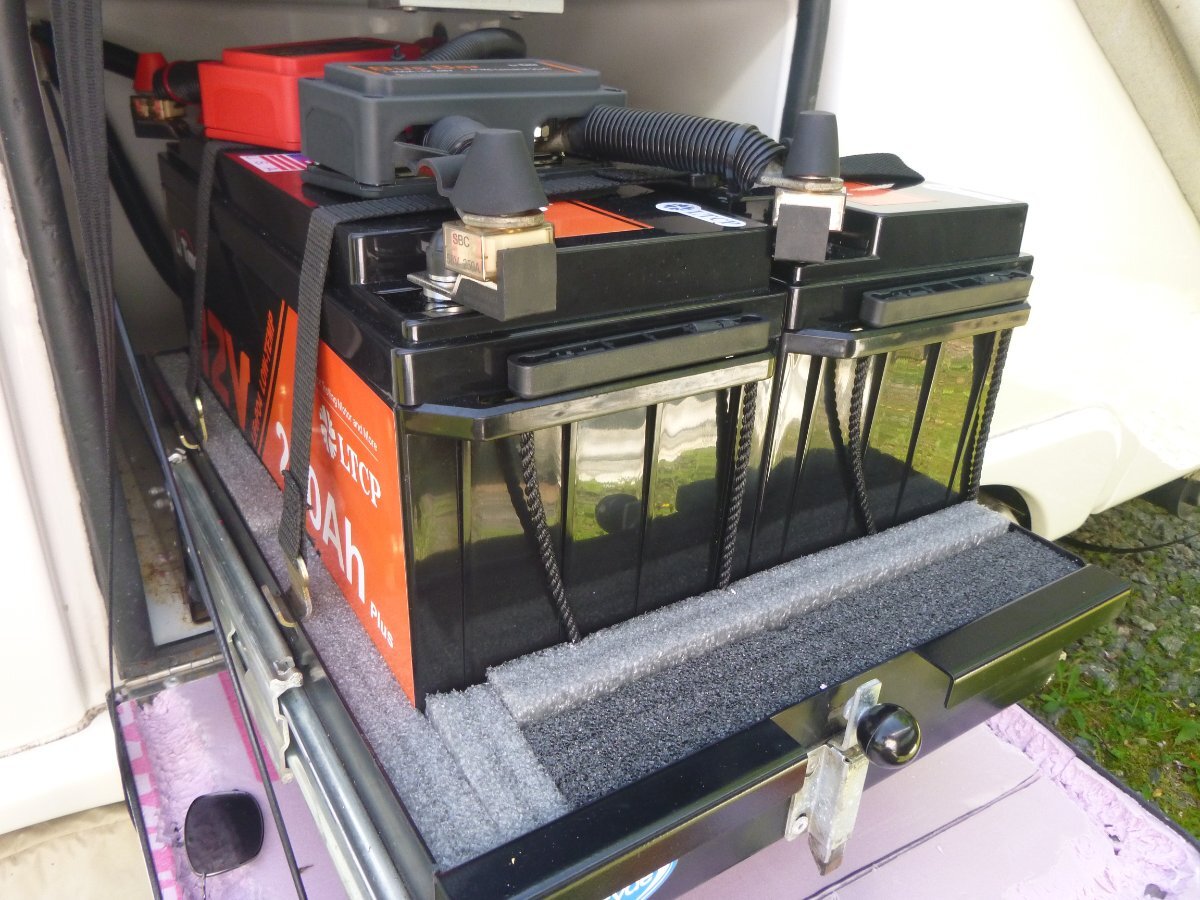
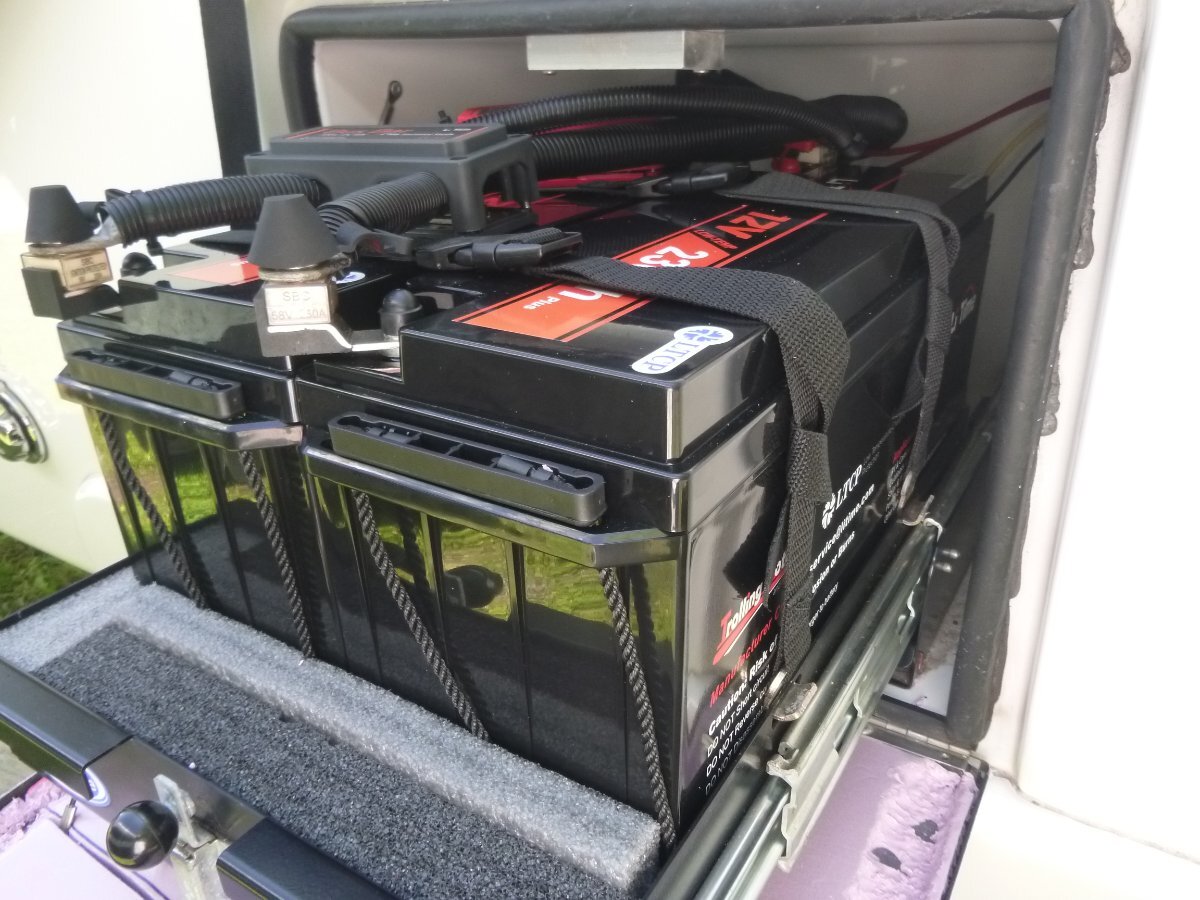
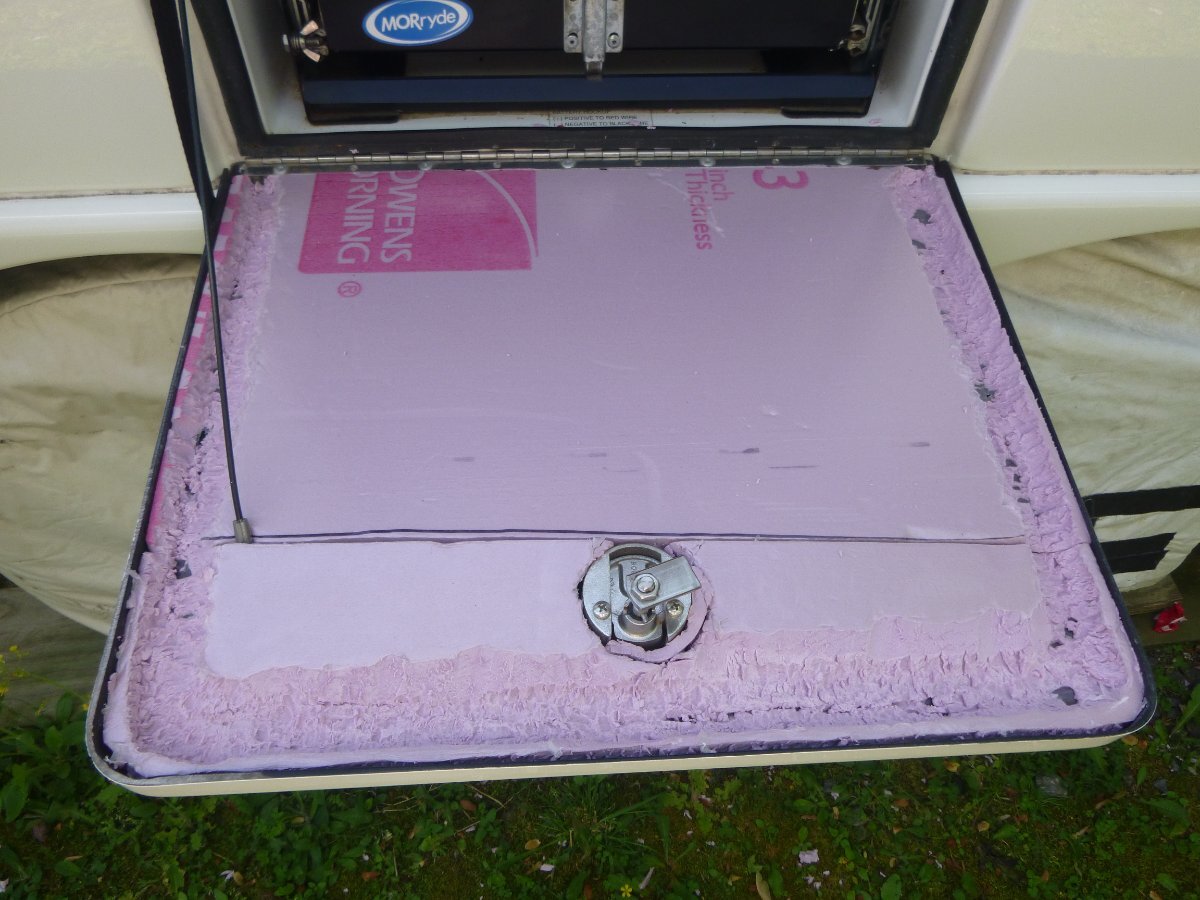
My Oliver Elite II is a 2016 model that I purchased from the factory with factory solar and 4 T-105 Trojan lead acid batteries. Over the 8 years with the lead acid batteries I never saw the charge level of the batteries below 83% full! Mind you that I'm very conservative regarding energy usage to include having only actually run the furnace twice over this time. I also never have the inverter on unless I'm actually using it and even then it was seldom used for more than 6 minutes at a time (a good sized baked potato in the microwave). However, even though the batteries were still performing as they should, I simply thought that as I approached my 9th year, I was simply taking too much of a risk that these batteries would leave me stranded while out in the middle of nowhere. So, in late 2023 I began my search for replacements. Since I do not live under a rock, I was reasonably aware of the "long-term" benefits of switching to lithium batteries. But, in the short-term, the expense of this kind of upgrade was a bit difficult to justify. Note here that I live in the mountains of North Carolina and do most of my camping in the summer at altitude in the Rockies where sleeping at night is usually a question of how many blankets versus will I be cool enough. Yes, the driving trip from NC to the Rockies each year can be a bit warm (think 100 degrees going across TN, IL, MO, KS and the eastern plains of the Rockies) and, yes, it would be nice to power the a/c via the batteries on rare occasion. But, I made the decision that until my current 2000 watt inverter dies, I would not spend the extra money to upgrade which would certainly add to the overall cost of the project. In addition, I'm not a big cell phone user and prefer a simpler life. Given the energy usage noted above plus I do not need to let anyone know that I'm presently on isle #5 at my local WalMart, and, I don't want or see the need to be attached at the hip with a cell phone. So, going into this replacement of the lead acids I simply assumed that I'd purchase something that I could "drop in", use the same wiring that came from the factory along with the same Blue Sky MPPT solar controller, IPN remote (shows typical shunt readings), existing cables, and not change a thing (or at least very little) from what has worked very well over the past 8 years. The price of lithium batteries was/is still coming down but was still too high to justify the extra expense versus the alternatives. OK - this is the base from which I started and certainly I recognize that my situation does not apply to everyone - nor should it. After looking at several alternatives I had almost decided on purchasing 4 VMAX XTR6-235 AGM batteries at $1370. Of course, another possible alternative would have been the Brightway Group EVGC-220A-AGM batteries at 4 for $995.00. But, I saw a YouTube video by Will Prowse that highlighted the LiTime 230 amp hour lithium batteries. Next it was the Christmas holidays and I saw that the LiTimes were discounted plus I could get an additional 8% off my order since I had served in the military. So, with 2 of the 230-amp hour batteries plus 2 bus bars, my total for 460 amp hours was near $1,075* – well within the cost of non-lithium batteries. Yes, I was aware that the LiTimes "only" had a warranty of 5 years versus the 10 years for Battle Borns or the 11 years for the Epoch. But, since most (if not all) of these lithium battery cells are made in China (with some assembled into the batteries we see in the USA) I figured that since the LiTimes are about half the cost, if they died at 5 years I would still break even versus the Battle Born's. The "final straw" was seeing Ronbrink's post** on his install of the LiTimes! Upon receiving the 2 batteries*** (3 days after order) I found that the battery terminals were recessed relative to the tops of the batteries. Therefore, I purchased 4 terminal blocks with 250-amp fuses at a cost of $68 on Amazon. So, I was just about set for the install at a total price of just under $1,150. Next, I took a hard look at the wiring necessary for the install. My original intention was to install the bus bars either inside the Oliver (near the solar controller) or on the wall inside the battery box. But, for the "quick and easy" install that I was hoping for it appeared that I could use the two 4/0 cables (each about 7 inches long - end of lug to end of lug) plus two additional cables of this length that (hopefully) I could get from a fellow Ollie owner. Indeed, Mossemi came to my rescue and supply me with those two cables that he no longer needed after his Lithium conversion. Putting this all together resulted in what appeared to be a nice tight package that I could simply "drop into " the existing space in the battery compartment. I "bench" tested the batteries in my workshop and even performed what is called a "top balance" on the two batteries just to make sure that they were ready to go (i.e. a "top balance" is performed by charging each battery to 100% and then connecting the two batteries together and letting them adjust to each other for 4 to 24 hours). Indeed, the 2 LiTime batteries easily fit into the existing space and I had some foam blocks that I used to make sure that the fit was snug. Also, the original Oliver tie-down straps could be used to hold the new batteries in place. When connecting the cables from the Oliver I found that I needed to slightly alter the openings into the bus bars so that the “tops” of the bus bars would seat nicely onto their bases. This was simply done using a Dremel tool. And, even though the LiTimes have “low temperature charging protection” (lithium batteries should not be charged when they reach a temperature of below approximately 32 degrees) I decided to insulate the battery compartment door with some ½ inch foam board. Finally, my original intent was to keep my original converter which did not have a lithium battery setting. These old converters will charge a lithium battery, but, it would not charge it to 100% full. However, upon resetting the Blue Sky solar controller from the Lead Acid parameters to the Lithium parameters, the solar panels would take care of getting the total charge in the new batteries to 100%. But, I saw a lithium capable converter on Amazon Warehouse for $147 and could not resist****. With a total cost of now just under $1,300 I was in the lithium world with (hopefully) longer lasting batteries and considerably more usable amp hours than the T-105's I started with. In addition, should the inverter decide to fail, I can now replace it with a 3,000 watt inverter and be in a position to run the a/c off the batteries for a short period of time. During the Owner's Rally and in the weeks after the Rally, the batteries, solar, and converter have all been working as they should. I would still prefer to install a battery cut-off switch but that will have to wait until the summer camping season is over. In a nutshell, here is what I did: 1. Disconnected the solar panels via the cutoff switch (street side bed) and opened fuses near the negative bus bar (also street side bed) and do not be connected to shore power. 2. Removed the old Trojan batteries (disconnect negative terminals first and take pics of wiring configuration prior to disconnect). 3. Cleaned all wiring connections. 4. Cleaned battery box and repainted tray. 5. Inserted new LiTime batteries and connected the two battery cables to the first and third bus bar posts, the main negative from the Oliver to the second post and the other negative cables to the fourth post. Performed the same procedure with the positive cables. 6. Closed the two cutoff fuses near the solar controller. 7. Reprogrammed the MPPT controller via the IPN Remote using setting provided by LiTime. 8. Disconnected the charge wire from my tow vehicle – actually I removed fuse #17 in my 2023 F-150. 9. Verified that the dip switch inside the solar charge controller was turned off – you do not want to “equalize” lithium batteries. 10. Verified that the solar system and the new converter were operating correctly and were charging as appropriate. Bill Notes *As of 6-24-2024 the price of 2 LiTime 230 amp hour batteries is $1048. **Part of Ronbrink’s install can be found at: https://olivertraveltrailers.com/forums/topic/3333-battle-born-lithium-ion-12-volt-batteries-in-an-oliver/page/3/#comment-98774 AND https://olivertraveltrailers.com/forums/topic/9395-prime-deals-on-battleborn-and-renogy-suitcase-solar/#comment-99676 *** I wanted 2 batteries to protect myself in the event one of the 2 developed a problem. ****Installation of the lithium capable converter can be found at https://olivertraveltrailers.com/forums/topic/4812-how-to-progressive-dynamics-pd4045-lithium-upgrade/
 6 points
 -
Pretty simple setup if you have a Victron system. I got the new SeeLevel display that has extra 4 pin connection for sending information to the Ekrano/Cerbo from https://www.vanlifeoutfitters.com/store/seelevel-709-n2k-pm-tank-monitor-kit-for-cerbo-gx/ You do not need new tank sensors.
5 points
-
I also have never run my air conditioner on the inverter if the trailer is on shore power. In fact I never turn on the inverter if the trailer is already on shore power. I’ve never had a reason to, either the trailer is on shore power or not. I know some folks leave the inverter on all the time and that really shouldn’t hurt anything but I don’t.4 points
-
jd1923, maybe a couple of reasons to want a separate charger/inverter. My older hull number trailer has separate units already and it all works well so I’ll probably just leave well enough alone. Also, seems like the newer trailers with the combined units are having issues with both. If one unit goes down nothing works. I seldom ever turn on the charger anyway, I let the sun do its thing. Seldom use my generator as well. We’ll plug in if it’s available, sometimes. Really the only thing that must be plugged in is the air conditioner, everything else can run comfortably on either DC directly or on the inverter. The only situation that we would have had a problem is when we were caught in the Texas deep freeze about four years ago. Several days with little sun and highs in the twenties and lows in the single digits. Fortunately we had shore power the whole time. It’s a blessing to be able to own a trailer that is set up so that it really doesn’t matter if we have power or not and can easily allow us to camp most anywhere. I love it when a campground apologizes for not having a site with water or electricity and being able to say that it doesn’t matter we’ll be comfortable anywhere.3 points
-
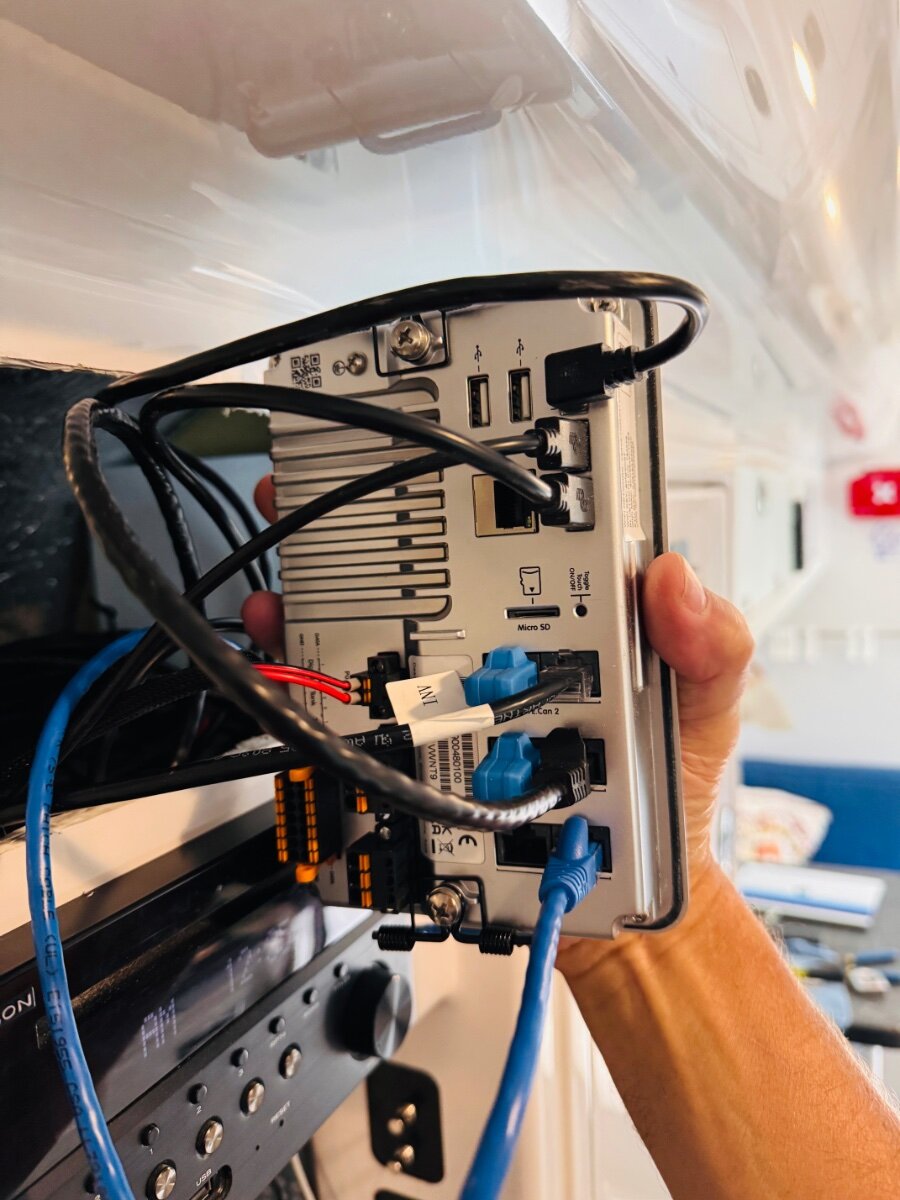
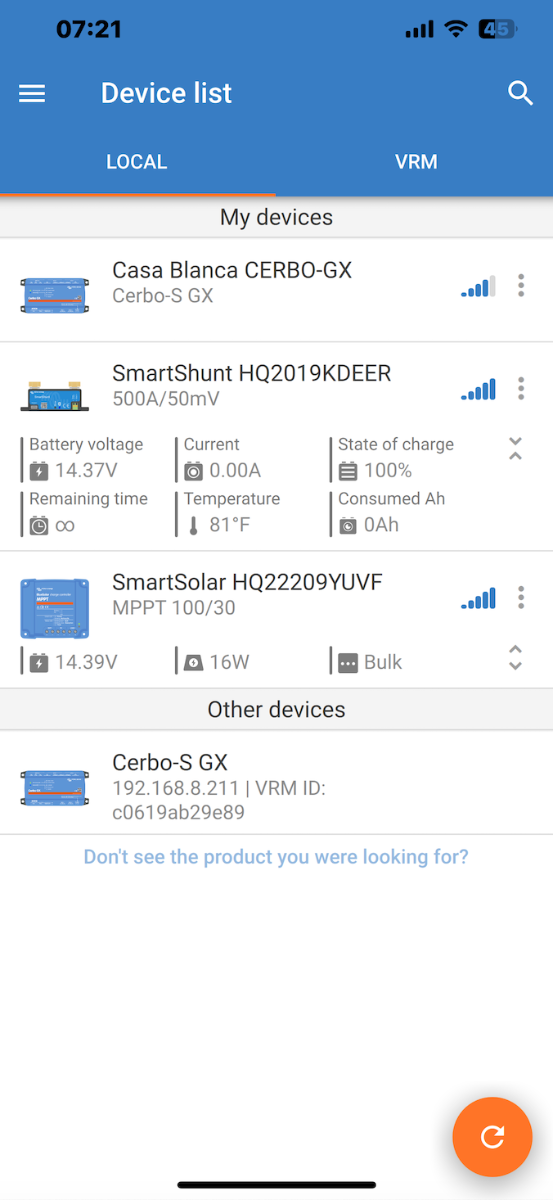
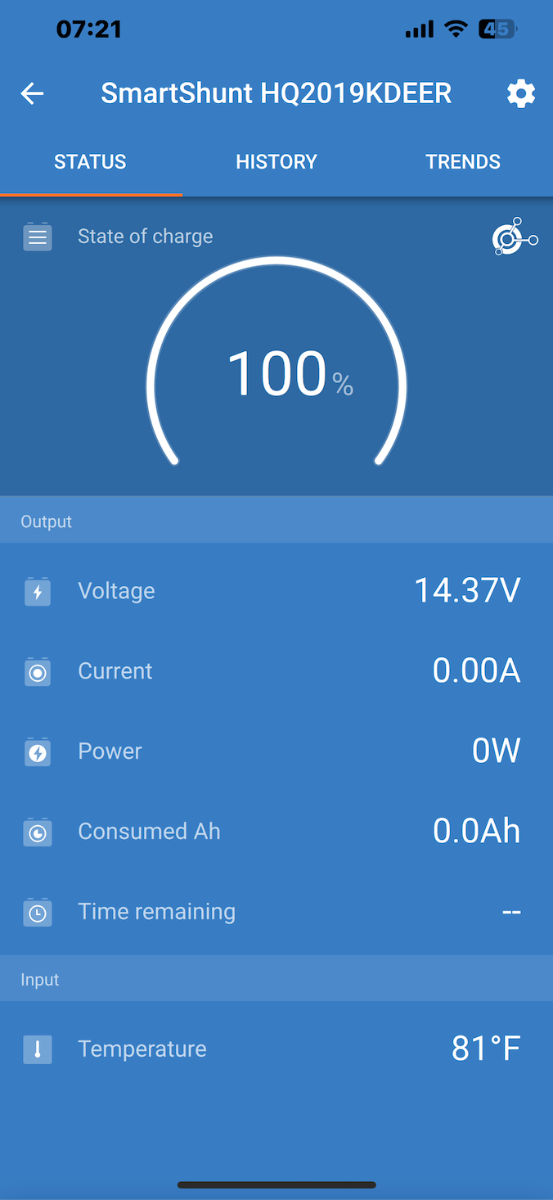
Hey, Chris: So, what @topgun2 Bill explained above is dead nuts on. At a high level, here's a description of the Smart Shunt: The SS continuously monitors multiple elements of the electro-motive force going through your DC circuitry - these elements include, current voltage, current, SOC%, useful battery time remaining, battery temperature, etc. Our's is mounted under the aft dinette seat where I'm pointing with my left index finger: The key here is to wire all your DC devices' negative connections through a "NEG Buss Bar." If you miss one and connect a DC device directly to the battery bypassing the SmartShunt, it will not be detected. So, the right lug of the SS jumps over to the negative buss bar and the left lug jumps directly to the battery bank. It's called, "Smart", because it's Blue Tooth-enabled allowing it to communicate to its corresponding mobile app. Here's what the Victron app's Home Screen looks like on my phone: At the top it shows the Victron "Cerbo unit" data block - this is sort of the central nervous system of both your AC and DC circuitry. The Cerbo unit tells the user graphically where AC and DC power is going at any point in time - either via the app or by the touch screen. This device is not required unless you desire it for extended boondocking or for your particular style of camping. Going down, the app next displays the SS status, turns out the SS's BlueTooth signal isn't very strong - but we can monitor this screen from the TV while under tow and track SOC status. After the SS data block is the Smart Solar MPPT Charge Controller data coming into the system. If we were connect to the TV when I took this screen shot (and the engine running) the app would also show the DC/DC Charger data - since we're not connected w/engine running the charger is OFF and therefore, no data block is displayed for it on the app. The next screen shot is specific to the SS: This gives the user a different graphic of the Home Screen that's specific to the SS. If your "Phase 1" includes Lithiums, suggest you consider including a SS at the same time. You'll be making rather large custom battery cables anyway, so with those tools (cable cutters, lugs, lug crimper, heat shrink, and heat gun) out and ready, it will be a straight forward process to make your SS/Bus Bar cables as part of this first phase. A note on the NEG Bus Bar: On our hull, the factory negative bus was a "pole type" bus that's grounded to the frame right under aft dinette seat. It wasn't robust enough to handle the additional negative connections, so that explains why we decided to upgrade to a Blue Sea Systems multiple lug bus bar. We used the same grounding point on the frame as was used for the factory pole bus. Hope this helps out, Chris. Good luck and keep us posted on your upgrade! Cheers!
3 points
-
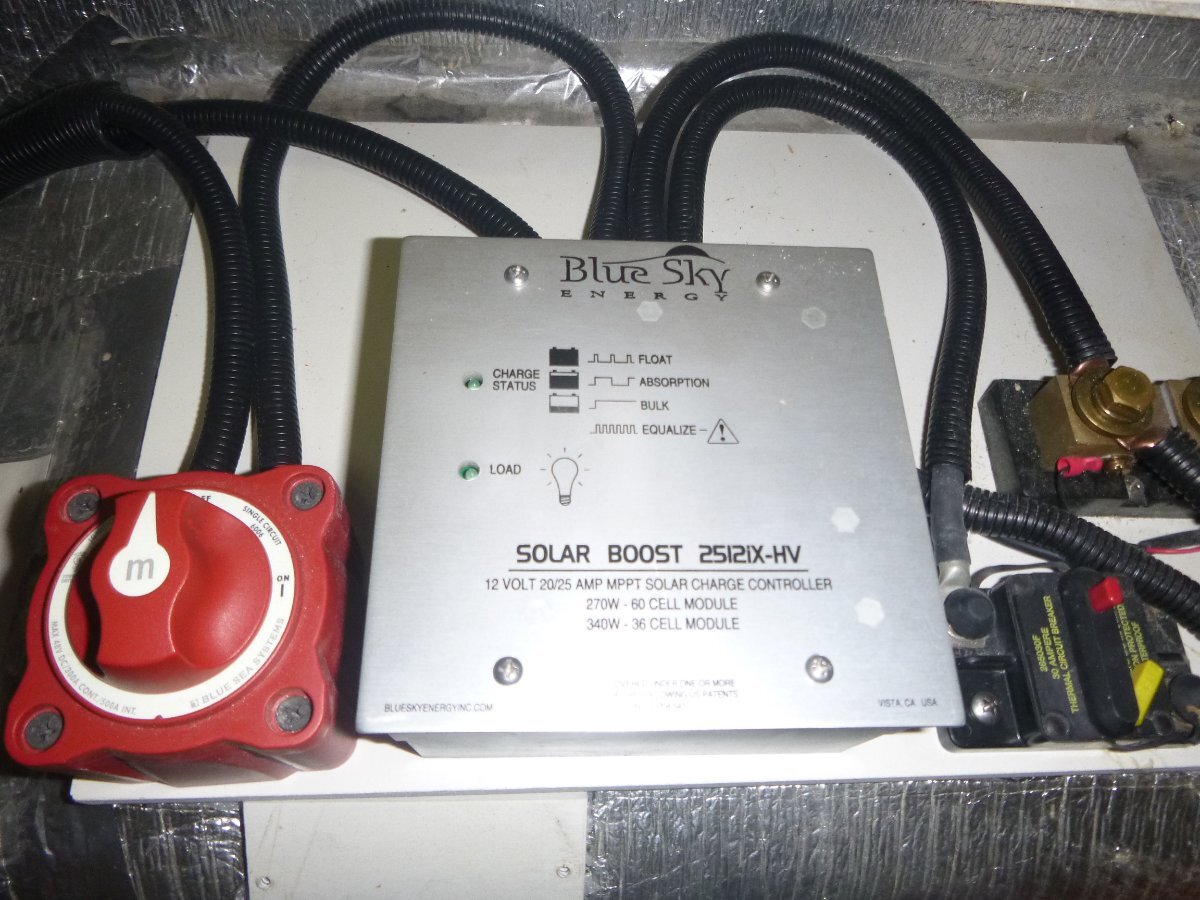
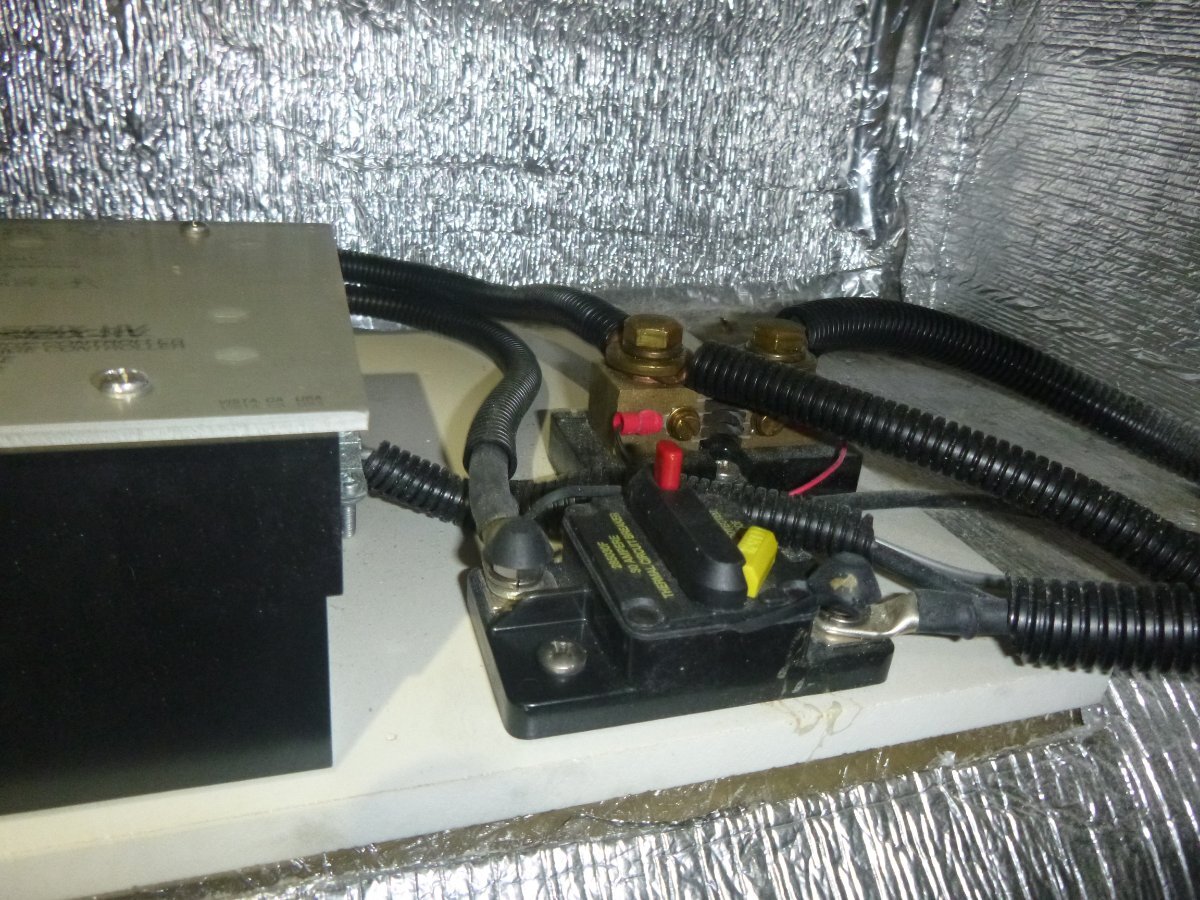
#1 - sends the information to your IPN remote where you see information similar to that info you will see with the Victron you bought. #2 - this "switchable breaker" can be used to interrupt solar power from getting to the batteries. #3 - this "switchable breaker" can be used to interrupt dc power from the batteries to the rest of the Oliver. note - both #'s 2 and 3 should be "tripped" prior to working on your batteries. Bill3 points
-
My Dometic 11,000 BTU A/C with Micro-Air EasyStart works fine with the Xantrex 2000 in my unit. The max run time thus far on inverter is 2 hours.2 points
-
OK... You're boon docking in a remote area on BLM/Public land and you experience a critical medical emergency requiring local EMS response. A call to EMS on your commo device (either via local cell net, Starlink, PEPWave, SATPhone, HAM radio, or whatever) will require a hasty report with specific location information as accurately and efficient as possible. You may not have an accurate street address or may not know your grid/GPS coordinates. Even if grid/GPS coordinates are known, this data is a lengthy alphanumeric string of up to 17 characters which could easily be jumbled up or miscommunicated in the heat of the emergency, sending responders to the wrong location. Using the first 6 lines in a military-style "9-Line MEDEVAC" report is a good start to communicate for your EMS request. Line 1 of the 9-Line MEDEVAC format contains the most important data in the report - your location, expressed using either grid or GPS coordinates or a simple street address. Clearly, this critically important data should be quickly and accurately conveyed to the response team in a life-saving scenario. The problem is making this happen accurately from a remote location. An available free application has solved the problem - it's called, "what3words". While attending an amateur radio campout last week, "QuartzFest 2024", one of the EMS presentations introduced this application and how it can be used to more effectively vector-in a response team. At https://what3words.com/products/what3words-app you can learn what this app can do to accurately describe your location to an EMS team using only 3 random words. The developers of "what3words" have mapped the planet into discrete 3-meter grids, each of these grids is assigned 3 random words that never change. For example, sitting here in my living room, my "what3word" address is: "seamlessly.gossips.bottle". Should an emergency response be needed here, we could contact response personnel and pass along these 3 words to describe the location of the emergency. Provided the local EMS has access to the free app, many do, they'll be able to navigate their way to my living room. Responders across the country are using this app, as are companies like Amazon, Uber, and food delivery services, to bring their resources to a precise location without grid/GPS coordinates or inaccurate street addresses. The "what3words" address is compatible with many navigation apps and can be shared via text. Turns out, last year during the QuartzFest, an attendee experienced cardiac arrest. One of the HAMs contacted Quartzsite EMS, quickly communicated the specific "what3words" address of the patient's location and EMS deployed to that grid square using the app's navigation feature. We've got our family members up to speed on the "what3words" capabilities and would like to get the "word" out to the OTT RV community to consider using as part of their boon docking regimen. Stay safe out there! Cheers!2 points
-
Messed that up when 'proof reading'. The Agilis (Michelins). I edit while typing and prior to posting... missed that. I have five Agilis Cross Climate Michelins on the Airstream. 2019 Airstream 27/28 foot: Agilis Cross Climate LT225/75/R16 Michelins. 2019 Oliver Elite II: Defender LTX M/S 225/75/R16 Michelins. 2016 F 350 4x4 Diesel Tow Vehicle: LTX AT2 - LT275/70/R18 Michelins. "Agilis...sell them"... When editing it was intended for another... brand to sell... now gone from memory. Probably ST tire's which I do not use or want on any travel trailer I own. Thanks for catching that.2 points
-
Thank you guys for all the great info. I'm making new documents with pics and explanations not only for me, but the next owner, if ever. These docs will be updated as the camper gets updates. I also keep fairly extensive maintenance & parts logs.2 points
-
Back in the day, several couples, with pets, full timed in the original Elite I. Is it possible? Sure. They all upscale at one point, years in. For us, the Elite I has been our summer home, sometimes 6 months, for 16 years. But, we have a nice sticks and bricks to come home to. I don't think I could full time, without a home base. Now, with grandchildren, I'm sure I want to be home, more than away, and not moochdocking in pur daughters driveway. Our cousins have had at least a dozen different rvs, from big buses (prevost) to bumper pulls and class cs. It's all an adventure. Some people figure out their camping style quickly. (At least, less than a dozen.) We're still good with the little Ollie. Part time, full time. I've figured out, over the years, that I don't want to full time, 24/7/365. Neither boat, nor trailer. But, that's me. Not you. Follow your heart, with reason.2 points
-
Brides are great.2 points
-
I came to say something, but Mike said everything I had planned on putting into my post and he did it better than I would have done. I will pull out the one sentence that means the most, "There are Pros and Cons to every class of RV." Match your style of camping to the trailer/MH you want.2 points
-
I've been planning to throw together a "tool kit" for my Oliver. I have a lot of tools, but I don't want to load up an entire professional automotive set when I will just need a few certain size wrenches, screw drivers, etc. So, I will start inventory on most of the nuts and bolts and select sockets that work. For the other stuff, I have a Kobalt screwdriver set with extension rods and multiple bits. I have never used a torque wrench on electrical connections. I just use the @jd1923 good-nuff technique and I have never had problems. However, if you want to get some tools, I suggest Harbor Freight. I have Snap-on, Matco, and the old Craftsman tool sets before China took them over. They have worked well and lasted about 35 years. They still look new. However, if you don't plan to use these tools professionally, Harbor Freight tools will be fine.2 points
-
I agree with this. I do not rotate trailer tires. My cattle trailer, horse trailer, cargo trailer, camper trailers and heavy-duty equipment trailer never had their tires rotated and I never had an issue with uneven wear. Now my vehicle tires are another matter altogether.2 points
-
Yes, mine too. When the spare is of smaller size, you cannot work the 5-tire rotation that @MAX Burner has described. I got to tell you that tire rotation on a trailer is not all that important. Trailer tires merely follow the TV .They do not steer and have much in lateral forces. PLEASE do NOT allow the Maintenance Gods of the OTT forum strike me down in blasphemy! 🤣 I'll just run mine until they need replacing, and life is good. All y'all with strong adherence to dedicated tire rotation will get more miles on the lot. And if you tow >15.000 miles per year, it can make a small difference. My tires will wear out more quickly due to climate, vs. miles. I did rotate mine when I serviced the trailer bearings/brakes but will likely not worry again. "What me worry?" (Alfred E. Neuman)2 points
-
There are numerous other "holes" in the basement for air infiltration, but the worst offender is the one right where the dog lays down. Thanks for the idea.2 points
-
Hey, Chris - we met at the owner's rally last month. Wish we could've talked more about this then and exchange a ton of info... Anyhow, I'm thinking you're right on track with your approach. Breaking this down a bit, IMO - the battery upgrade (whatever AH storage you choose) and the Victron SmartShunt is what I would call Phase-1. Your 4/0 connections between the batteries and inverter are spot on. Depending on the distance to your negative and positive bus bars - you may consider at least 4 AWG, but that's just me. We upgraded with 2 BB's for a 300AH storage and its suited us very well for our style of camping and boondocking. We'd love to have 640AH or more so we could run the AC for extended periods - that's on our radar, for sure. Don't worry about the "custom" battery connections because you'll be making them yourself with the proper tools - several posts regarding this are found in these forums. The new 45W PD converter board with the Lithium switch is another spot on move on your part. We did the exact same thing last year with the BB upgrade. We've had ZERO issues (knocking on my head) with the PD converter/charger. Regarding the Blue Sky charge controller - this is a great piece of kit. We ran an MPPT BS CC on our AS with 4 AGMs with no issues. The key is if yours is a PWM or MPPT controller. You'll get way better efficiency with the MPPT version - just something to consider. We chose to go with Victron's MPPT 30A CC - very happy with its performance with the 340W worth of modules on the roof. OK, Victron. Great devices, IMO. Except for our Renogy 200W portable modules - everything so far has been a Victron upgrade for our style of boondocking. Game-changer? Maybe. But your Phase-2 might be to get your Victron DC/DC charger. There's a new 50A model available - ours is the 30A unit, but it's plenty of current to get the SOC to max-out by the end of a tow-day. These chargers are real happy running off new smart alternators in TVs manufactured since roughly 2015. @Geronimo John has a wonderful LOI (list of instructions) for this modification, TV and OTT. Phase-3: Victron's GSX monitoring system with either the 5" or 7" touch screen. The screen graphically indicates the status of your charging/load conditions with just a touch. It's a sweet addition to any Oliver owner intend on extended boondocking operations - again, this upgrade is based on your particular style of camping/boondocking. Phase-4/5: Timing of this could easily be based on when your Xantrex 2kW inverter goes Tango Uniform. When ours goes down we'll go for the Victron 3k inverter/charger. Then crank in Phase-5 - this consists of upgrading to an "efficient and quiet" 13.5kBTU HVAC unit with appropriate auto transfer switches that can operate from the battery bank for extended periods. As you've probably already experienced, this path is a very deep and broad RABBIT HOLE! What you're contemplating is not a trivial endeavor - it's like trying to eat an elephant. It's doable, but you have to take it one bite at a time... PM anytime specific challenges arise - we'd be happy to help out, brother! My $0.022 points
-
I think my spare on #110 is smaller than my current, and original Michelins. Not sure I can get one of the main tires into the spare cover. I've kinda tried once. Seemed like it would be too tight. Anyone else seen that before?2 points
-
@MAX Burner Pre delivery, we had Oliver custom cut a hole in the shower ceiling directly above my head and then add a water tight automatic rain locker “moon roof” for that little extra 1” of clearance. This is a one off mod and Oliver wanted me to keep it low key. 🤣🤣 In all seriousness, it has not been an issue for me at all at 6’3. I can’t stand completely straight up, but it all works out, a total non shower 🚿 issue here. 😊 Onward!2 points
-
Same here, Mike. We like the Arctic Fox - both their slide in and travel trailer. Same here... We like how the bathhouses make our holding tanks happier! I'm thinking 2 months max road time for us... @rideadeuce - All good points, Mike. Concur, 100%.2 points
-
This was Hull # 0252 points
-
For me, the Oliver is the perfect do anything in for any amount of time for 1-2 people. My wife would never spend more than a couple weeks in it but I would in a second. Easy to pull, park, pack, and polish! Excellent durability. I see it as the best means of travel to destination and then unhitch to go explore when you arrive at interesting places. The biggest difference between the Ollie and an Airstream (2nd only to the fiberglass vs aluminum) is the 7ft vs 8ft wide aspect which makes the Oliver easier to pull and maneuver IMO. Fiberglass is more durable and easier and cheaper to repair. Sometimes I think about a Class C motorhome but it has drawbacks for me that make it not appealing. (Having to tow a vehicle is one for destination transportation.) It’s such a personal decision depending on where you want go, etc. The last thing I would ever want to do at this point in my life is to have a very expensive tow vehicle to pull a massive 5th wheel or a fancy Class A that I couldn’t take to a state/federal park (27ft max length in some) or want to drive on the ALCAN highway. There or Pros and Cons to every class of RV. Now, if I had the means and it was going to sit mostly on some acreage in WY or MO it might be the Living Vehicle RV. And if I was dreaming of something it would be an Oliver with a massive solar array on top and battery bank below, bigger windows, 5-10 feet longer than EII with a separate bed and dry bath. Oh, and redesigned bumper for a Class III hitch and more outside accessible storage. Having had the Oliver almost 7 years now, there is nothing at this moment that I would trade it for at any price point for what I like and want to do. Now, I might buy something else to do some other things in other places. Life seems to take on new meaning every 10 years or so. Ha, so who knows! Best, Mike2 points
-
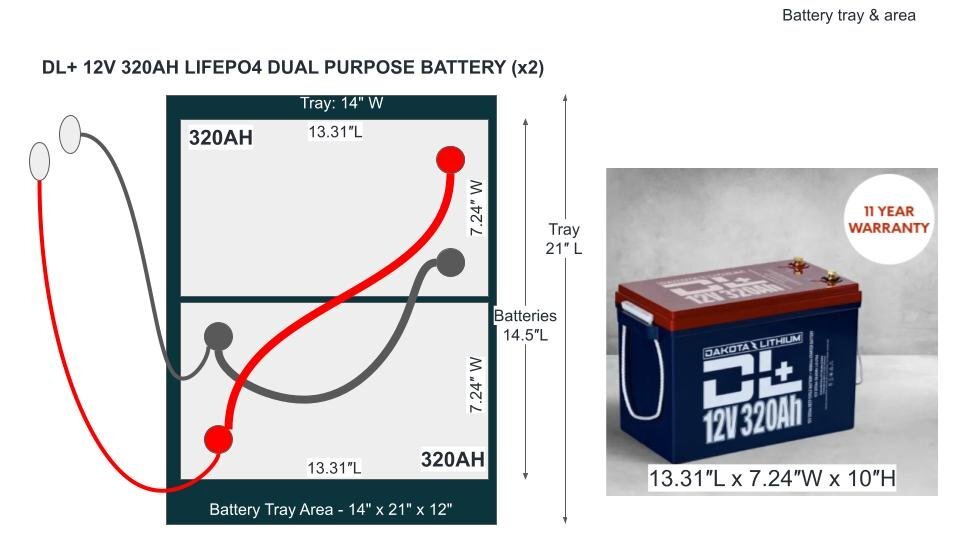
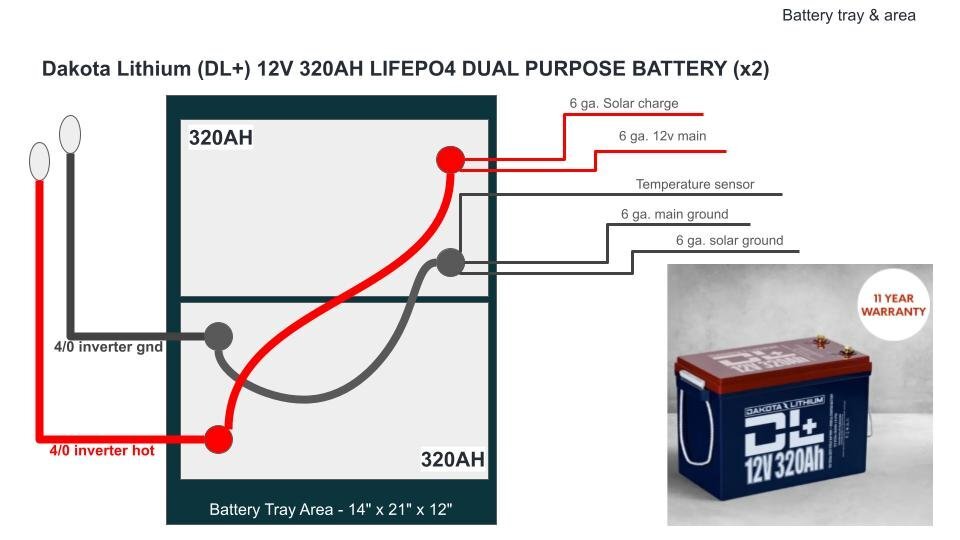
@SeaDawg again, thanks for all the good advice. @topgun2 I'm starting a clean thread on this as not to drive SeaDawg crazier. LOL I was hoping to do a systems upgrade in pieces, if possible. First converter (in the mail), then batteries, etc - if that makes sense. Right now with hull #110 (2016), I have all original equipment, except batteries. Currently Flooded lead-acid. I have the Xantrex 2000W inverter with the BlueSky Solar controller and ProRemote. I did just pick up a new Victron Smartshunt, but holding off installing it until I choose new batteries. I'm an IT guy of 30 years, so not a complete dumb monkey, but maybe a bit slow at first. LOL. I'm always scared to try new things by myself, failing with someone else is not that bad. Also just ordered the new Progressive Industries converter (PD4045CSV) to allow for Lithium charging. Great threads on these forums for all that stuff! I was wondering if the Bluesky Solar controller can be configured to properly charge most Lithiums. I can always call Ryan, if he's still at BlueSky. He showed me how to configure the controller using the ProRemote panel. I'm okay with it. Naturally, I'd love all Victron stuff, if it would fit nicely. And again, I want some hand-holding by a qualified person. Maybe I'll seek out a pro who would allow me to work with them to learn. Some do, especially in the Van community. I'm not yet looking at running the A/C off of batteries. That'll take a newer A/C unit. Not a priority at the moment and keeping it as simple as possible. Realizing I'm just learning and dreaming, and there are MANY paths from which to choose, here's just one idea I was recently considering, due to battery form-factor in the current battery box & tray area. I'm sure there are negatives I'm not thinking about yet. Can I, or should I, do this in stages? Naturally money will be a factor, and I'm a working stiff, so time can be an issue. One thought is to install two 320AH Dakota DL+ batteries to make for a simple and clean wiring setup with redundancy built-in. I was briefly considering a single 320AH battery from Dakota, or any good battery, however, that does not give me any redundancy if one battery fails on a long trip. I'm okay with Battleborns, 12v 100AH, but I'd want very clean connections, maybe a custom bus bar to connect all the batteries with shrink tubing and covers to protect connector bars. At best, I currently only have 160 Ah useable in my old crappy lead-acids. Likely less due to age. Pics are not to scale. I am subject to all the things I have not yet considered, that you will teach me. LOL Thanks!
1 point
-
My only real dilemma is when in storage on shore power and I want to run the A/C when doing maintenance or cleaning, which the facility’s 15A shore power will not allow. Before LFPs, I would run a generator on propane to enable use of the A/C, now the process is much simpler! When needed, I generally just unplug the power cable and run the A/C via the inverter. Away from storage I always have 30A service, either at home or a campsite, and can run the A/C on shore power. The above described scenario is only one reason for wanting to be able to run the A/C on battery, but the primary reason was for use when underway during stops for rests and/or meals. You know the gig!1 point
-
Chris, the measurements shown here are for the Dakota 280AH battery. The 320AH battery is 15.06" long. Two times 280 = 560AH is not a bad number either, if the sliding tray is important to you. Given the battery comparison doc @topgun2 shared yesterday in another thread, there are other good options. The best value is Epoch, two 300AH batteries at $1,099 each, will fit in the OEM battery tray. The downside is they are likely manufactured in China, though deemed dependable. It appears Dakota and Battleborn are Made in USA. However, a 100AH BB makes no sense today, as it might have just a couple years ago. Not when you can get 300AH in one battery at a slightly larger footprint. When I upgrade to LiFePO4, I'm removing the OEM tray for sure! I want more AH to fit the 24x18" size vs. the 21x14" tray size. It also gives 3" more in height w/o the tray, so you can physically get your arms in above the batteries. The true purpose of the tray is for watering LA batteries and after a LI install you can just forget about them for years and you're not going to use the sliding tray. I'm going for ~900AH when we upgrade. Without the battery tray you can fit 3 of the Dakota 320s, three of the Epoch 300s (for way less $$$), or you can three of these. Love this new Texas company that I just learned of yesterday, at $2K per 300AH (vs. $2400 for the Dakota 320AH). Two will not fit in the tray, but 3 will fit w/o the tray! Big Beard Battery 12-Volt 300AH 3600 Watt Lithium Battery | Big Beard Batteries1 point
-
jd1923 I agree 💯. I basically did the same thing. I added the automatic transfer switch for the air conditioner and several months later switched to lithium batteries. However, I have not had any issues with running the Dometic air conditioner on the inverter. It does get warm but as long as my total watt load does not exceed 1,800 watts the Zantrex inverter should handle it. The specs say it is capable of handling 1,800 watts continuously and 3,000 watts intermittently. I have run the air conditioner for about a half hour and the inverter was very warm but I wouldn’t say that it was hot. It does have an overheating shut down sensor and it has never shut itself off for any reason. At some point in the future I plan on getting a 3,000 watt inverter but I’m not interested in one that also incorporates a charger as well. As of now I only use the air conditioner to cool down the trailer in the evening then open windows overnight unless we’re on shore power, then the air conditioner stays on if necessary.1 point
-
Ours too and it will sit back there, hopefully never needed.1 point
-
If you want to run it via inverter, say for testing purposes, you merely have to trip the 20A breaker for the air conditioner. The KISEA will sense no shore power voltage and connect the inverter to the A/C load wiring.1 point
-
Agreed, the way the KISEA ATS works is when shore power voltage is sensed it will use that source regardless of whether your inverter is on or not. In the past, I had often kept the inverter on. Let's say you want to keep 120V circuits on when breaking camp or changing location (keep the TV on, run the microwave, etc.). Another reason is for power backup. If you lose shore power (a black or brown-out) the inverter will seamlessly kick in and keep all your 120V appliances running! We've often parked at campsites without connecting to shore power. When A/C is not required and you have ample solar/batteries/inverter, why bother? Now that this ATS is wired, you must realize the A/C can also come on which is a very different consideration. The penguin is too much pull on a 2KW inverter. Given good AH capacity in LiFePO4 batteries and a more efficient A/C system, all should be good. If you do not want the A/C to run while on inverter, you must turn off the A/C via the thermostat or trip the breaker. I did this installation in advance, for when I upgrade batteries and A/C. Until these upgrades are implemented in our Oliver, this ATS has no true purpose. Now that I have this experience, I believe I should have waited. What if the Xantrex fails, or I decide to upgrade the inverter? If so, this was a waste of time and $84 (but a good learning experience). A modern 3KW inverter/charger would of course replace the Xantrex 2KW inverter, and the PD charger (built into the power panel, and ours is the old version, not LI capable). It would also replace the KISAE ATS. For example, the Victron 3KW inverter/charger (given a viable location can be found, since it's much larger) has a built in 50A Automatic Transfer Switch (ATS) which can easily power the 30A 120V AC panel in the Oliver. I did not realize all this just a few days ago.1 point
-
I agree, JD, in my pea brain I'm thinking we might get another 10-12% more miles out of this set of sneakers by rotating them. Last year we logged 8,597 miles and the new Coopers didn't even show wear. So far, in the first 6 months of this year, we're sitting at 7,841 and the Discoverers show wear around the outer edges, but the main ribs are looking strong and the grooves are deep. We may hit 15k for the year... Definitely concur that the environmental factors will wear them out more so than being towed. I just hate to think of a pristine spare sitting back there doing nut'n! Put him to work, I say! HA!1 point
-
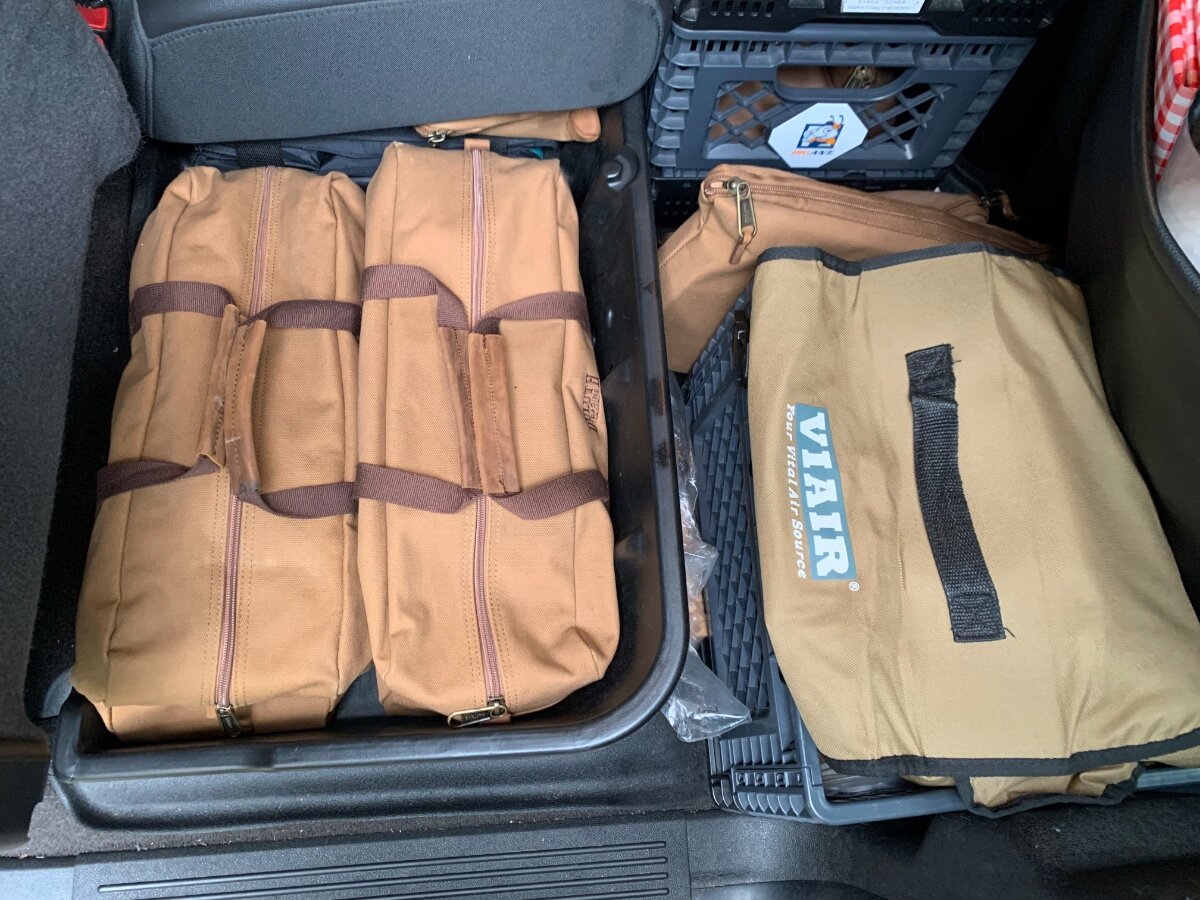
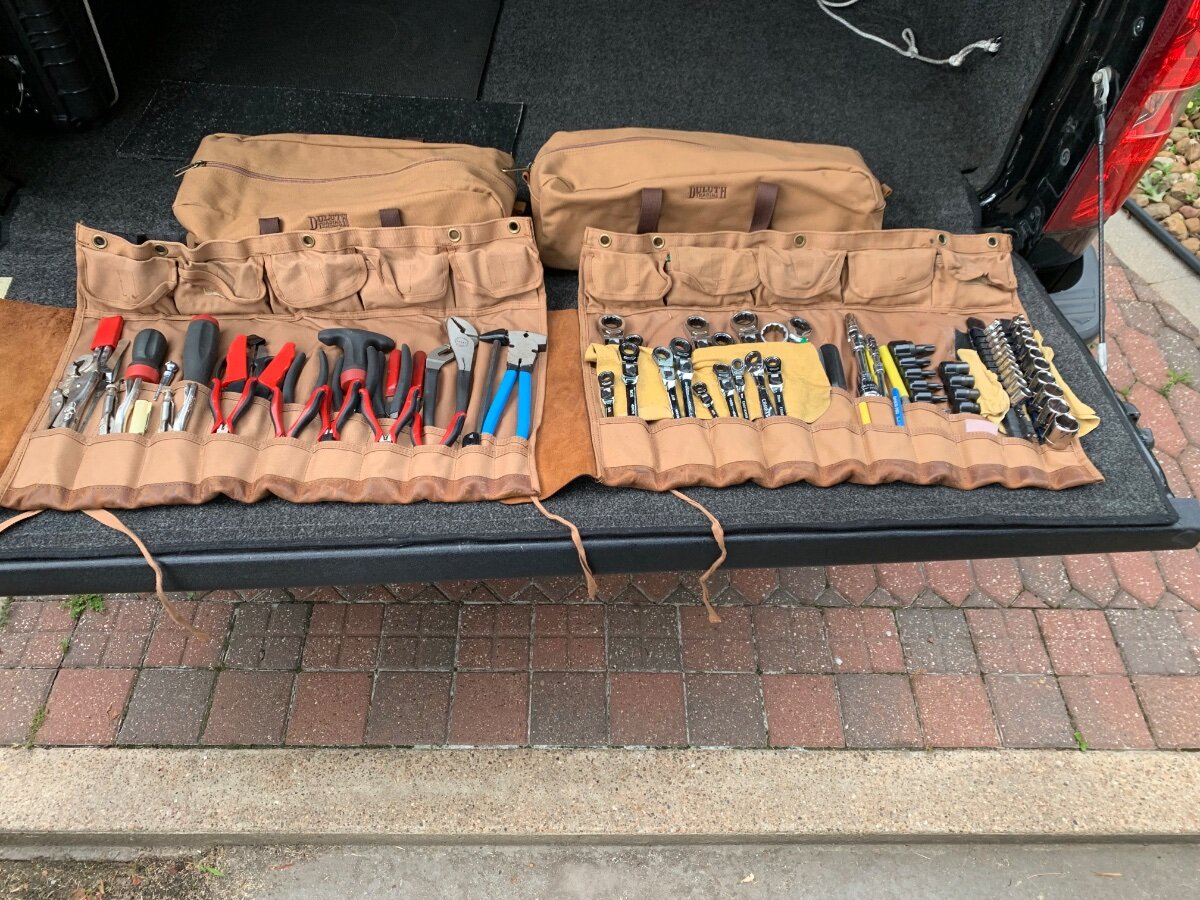
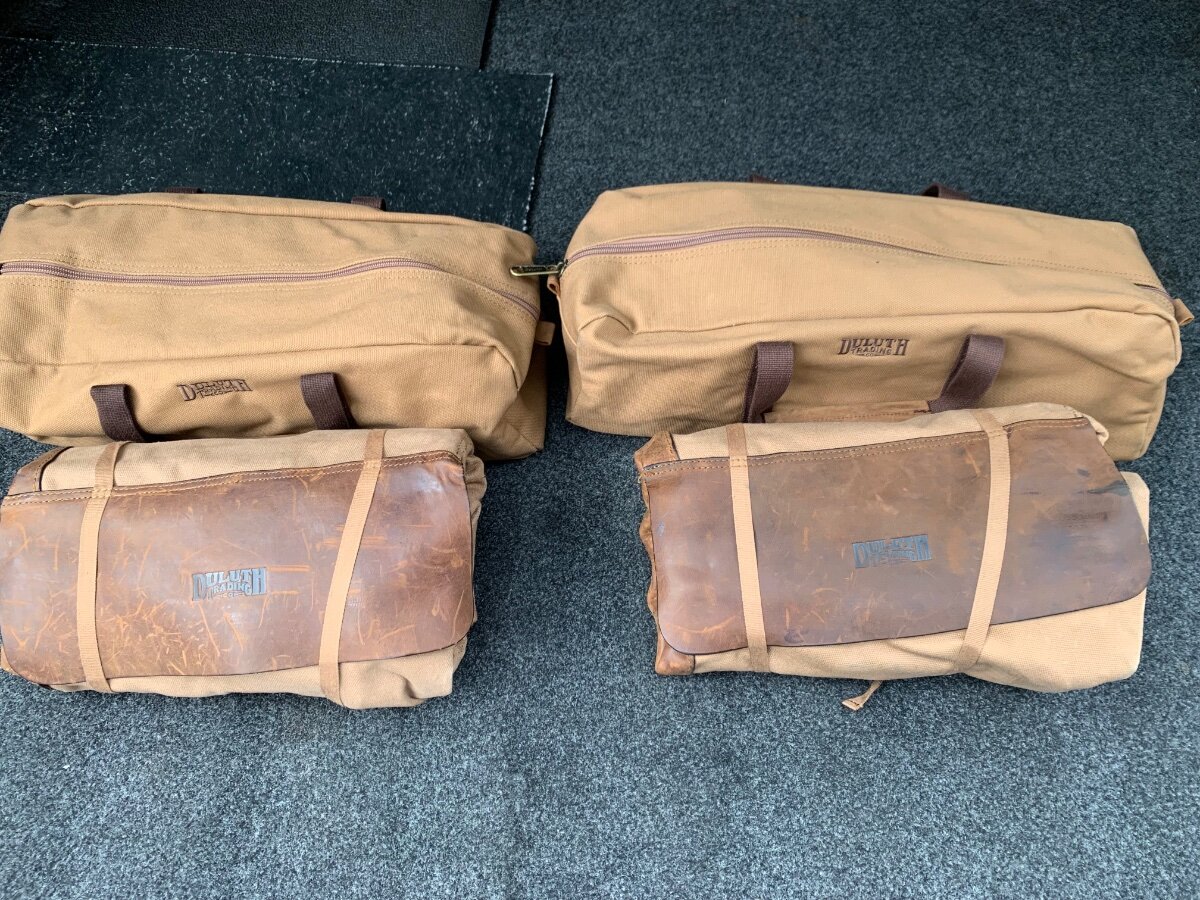
I put these tool kits together soon after buying my 2012 Chevy 1500 4x4, which now serves as my current TV; where the Oliver goes, they go! The small individual pockets have assorted sockets and driver bits, as well as other accessories.
1 point
-
I am 6'3" and at 240 lbs, I fit fine. Laying on my back, my head is clear by about an inch or so and the balls of my feet touch the cabinets. This is likely because I am not lying flat, head on pillow and butt sinking into the mattress. It doesn't bother me since I rarely stretch out on the bed. I sleep on my side and 30 inches wide is just about right. The bathroom is cramped but I don't spend much time in there anyway, so I don't care.1 point
-
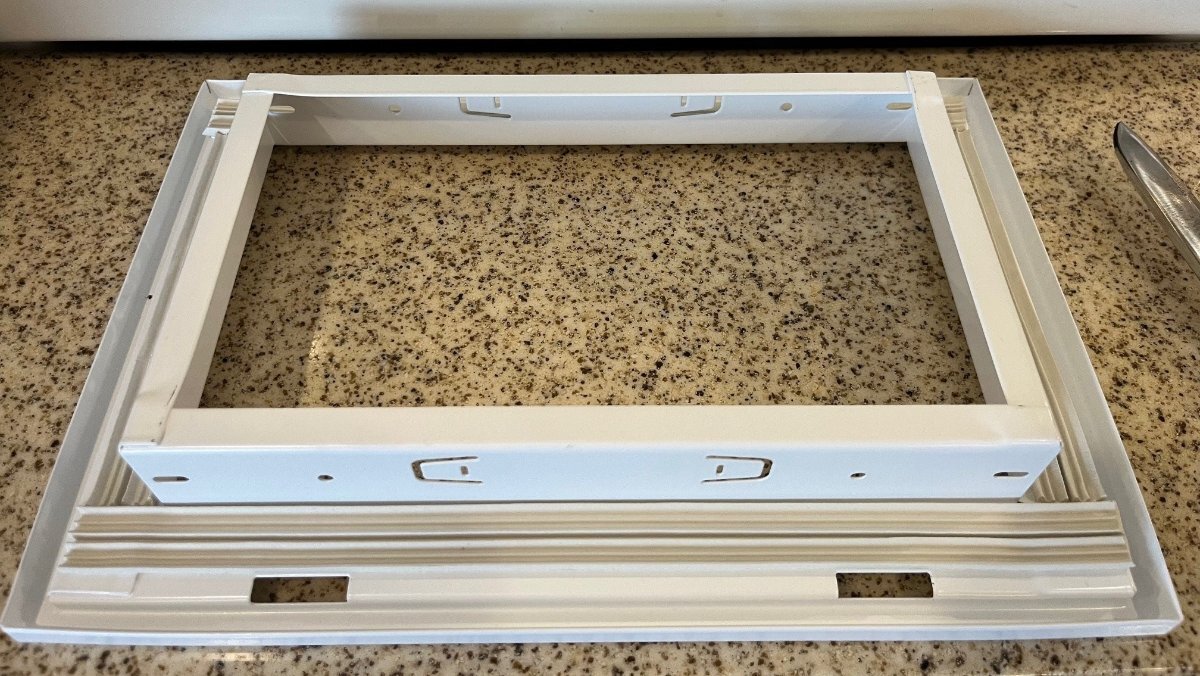
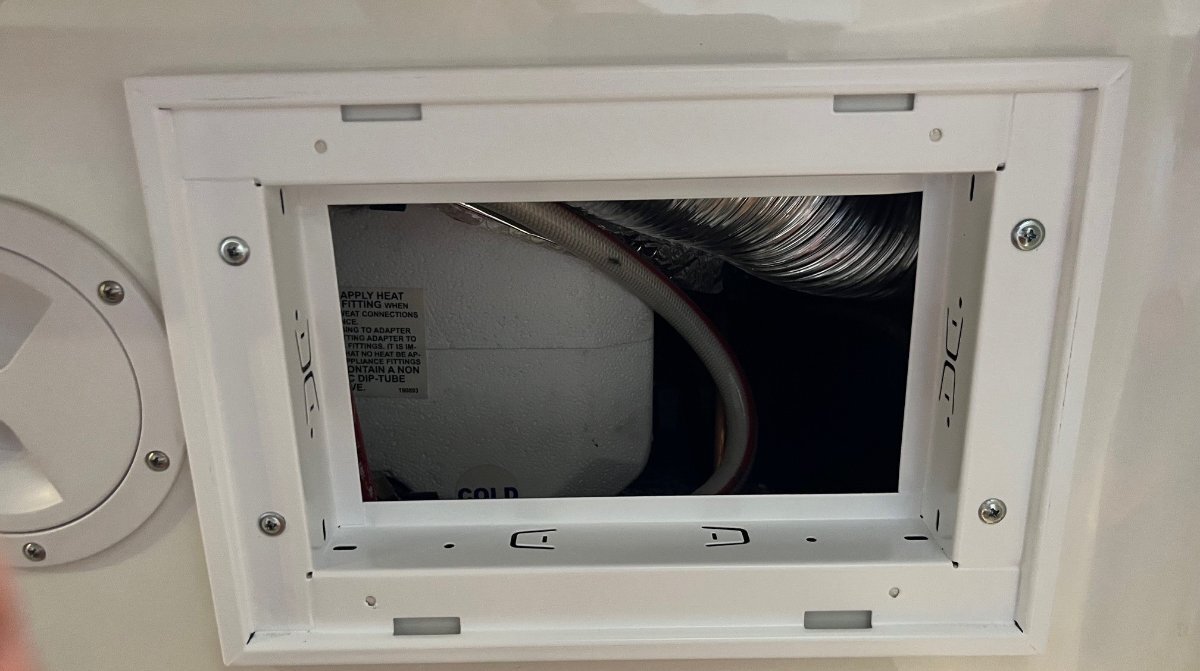
See this post for a complete installation, my simple mod: Furnace Duct Modification for Improved Air Flow and Circulation - Ollie Modifications - Oliver Owner Forums (olivertraveltrailers.com)1 point
-
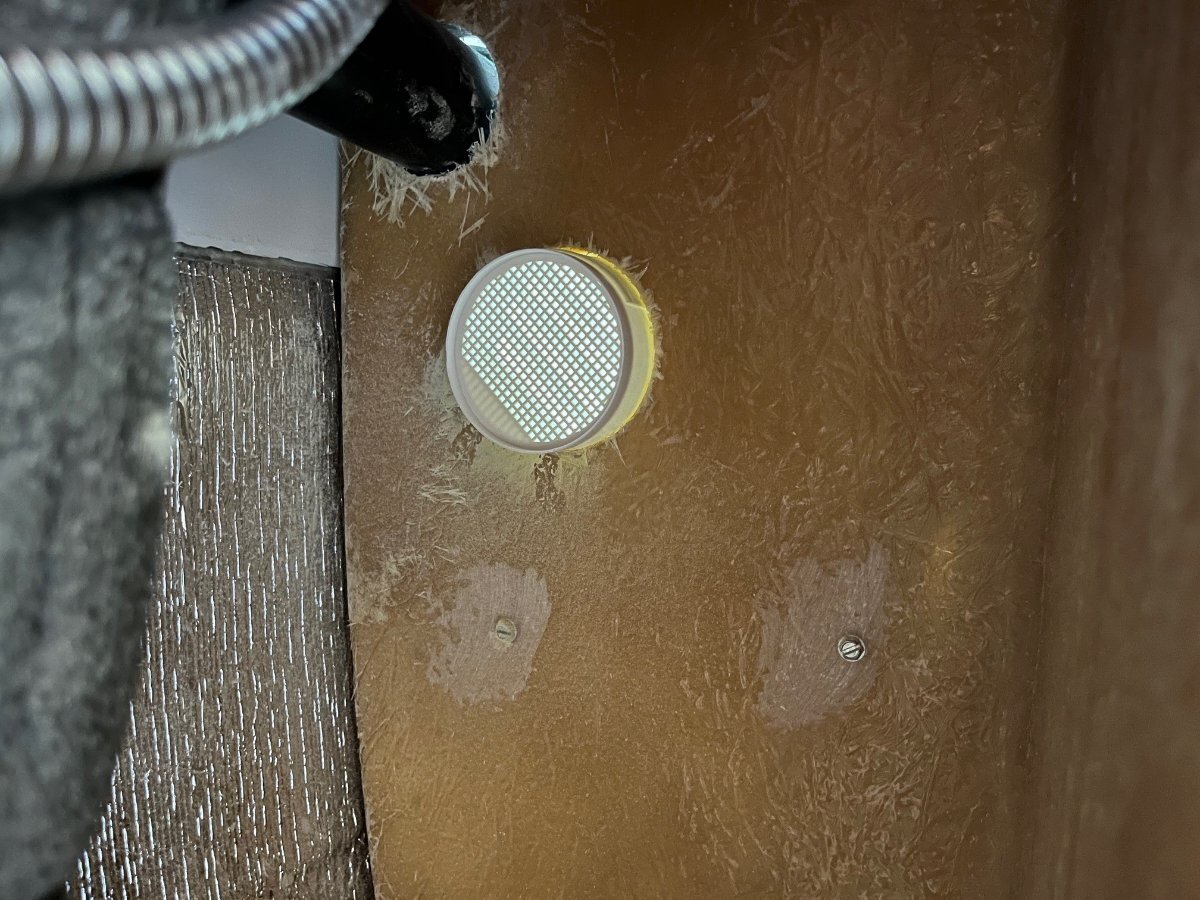
BTW, I added some white rubber tape, I had on hand, for a good seal on the return air duct, just to be anal (see first pic above). So, today I'm working @Rivernerd's suggestion next in adding vents in the closet and around the basement area. I'm NOT adding one that was suggested at the base of the dinette, since I believe that one would keep the basement return airflow from circling around and back to the furnace. I have not sealed the outlet covers yet. Wish I had circles of 3M tape but will likely go to da Depot for some kind of sealant in a tube, no hurry, suggestions? I had purchased one 4" vent suggested on another thread (installed above the closet), and then bought 3 of these, installed without the center black insert: https://www.amazon.com/dp/B077HJC5T9?psc=1&ref=product_details I'm thinking I'm done, unless I install an inverter charger in the streetside basement which may require more airflow! Almost done here, wadda ya think?
1 point
-
Would a household system have return air duct(s) without a filter? My next thought was to add one, to keep the camp/road dust and dog hair out of the basement furnace area. I purchased this part: 10" X 6 Steel Return Air Filter Grille for 1" Filter - Removable Face/Door - HVAC Duct Cover - Flat Stamped Face - White [Outer Dimensions: 12.5 X 7.75] - Amazon.com This is an amazing addition for just $30 plus annual filter replacement. And think about the fact that with a filter in this location is would first impede airflow here, pulling more air from the basement AND it would result in less noise (dB) when sleeping! I was hoping, yes hoping, the idealist I am 🤣, for it to be a plug-n-play install! The OEM cover has a 10x6" opening, but not exactly go figure. OTT Service, if you are reading this, do your future owners a solid by either installing such filter as standard equipment, or at least cut a true 10x6" hole (measure twice, cut once). Turns out it was actually 10" wide, but closer to 5 3/4" tall. Thank goodness for a high-end Dewalt cordless jigsaw, so smooth. Cut the opening to the proper size and cut the other imperfections. Measuring, taping and cutting was just another 20 minutes labor, NP!
1 point
-
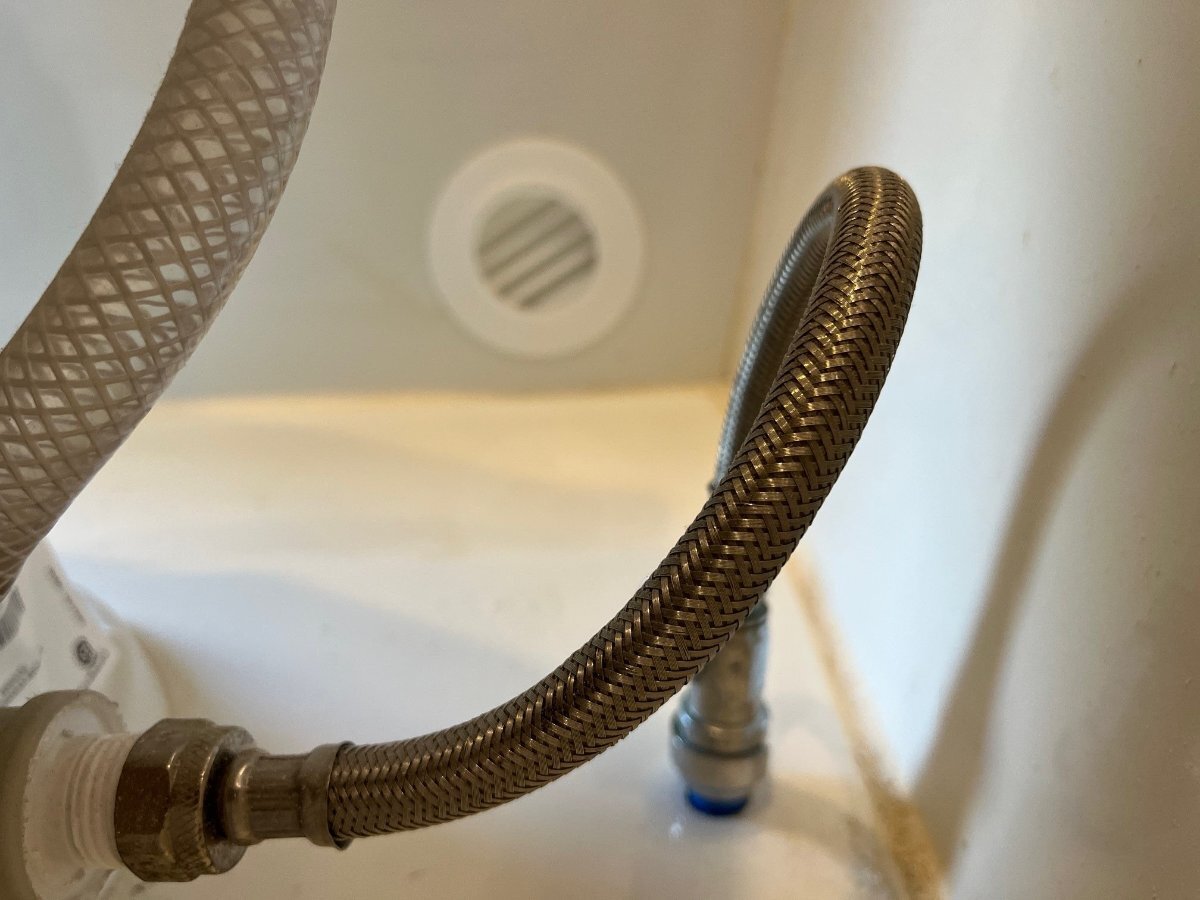
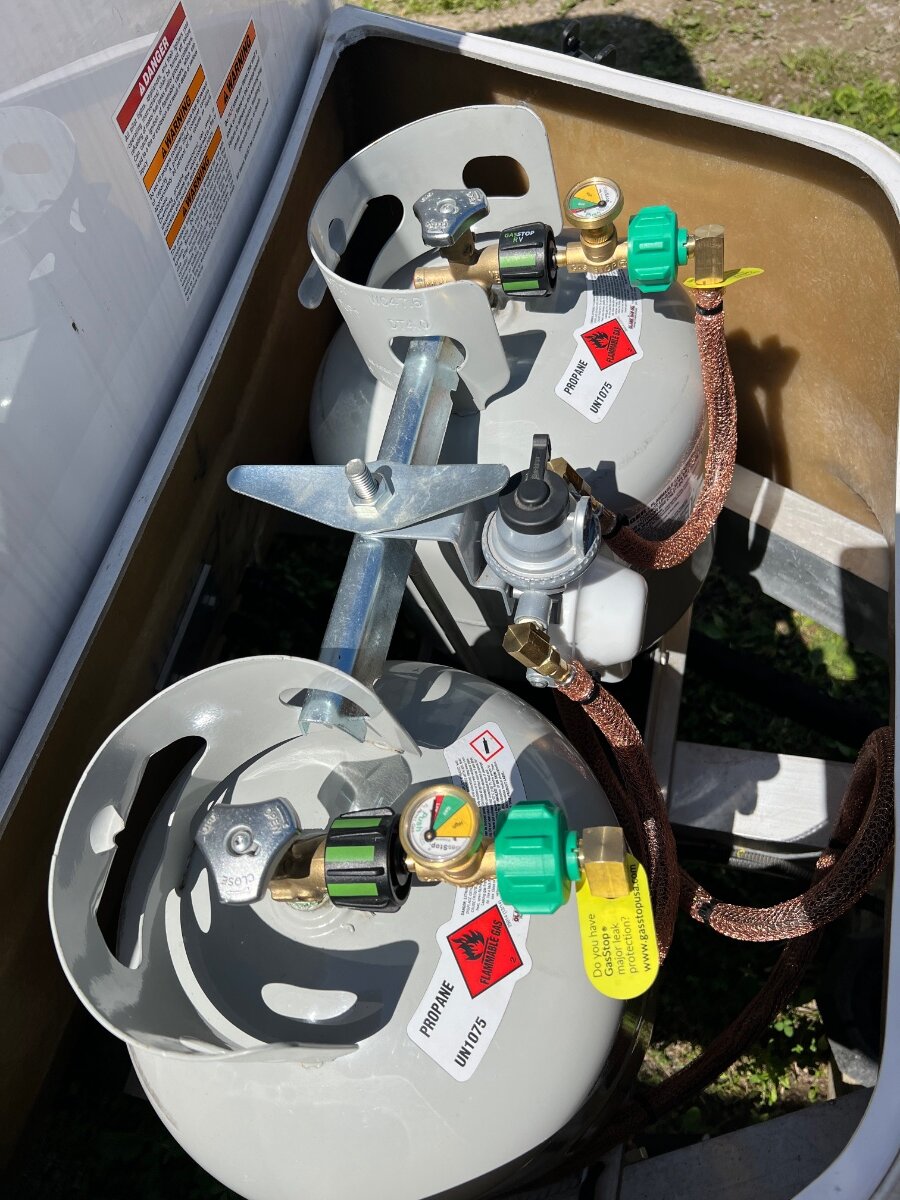
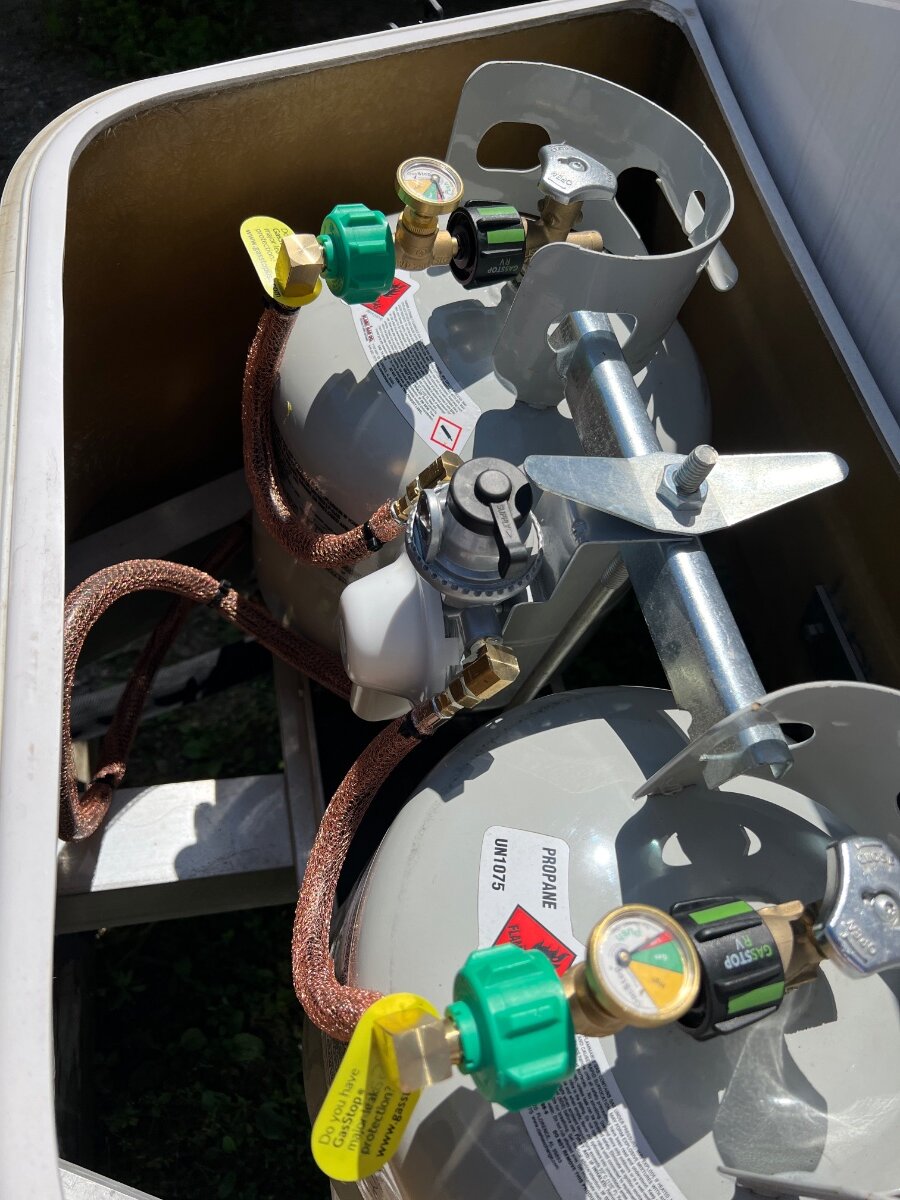
I saw this mod a couple month or so ago somewhere on this forum, or maybe an Oliver Facebook post. It is to avoid critters chewing up the propane hoses. Can’t remember who posted it, but we’re planning to do a lot of boondocking so I copied it.
1 point
-
Yes. We reversed the shade at our dinette. Just pop off, turn it over and pop it back on. Mike1 point
-
On our 2022 the shade just clips onto the wall. A firm tug on the bottom to release it, then remove it from the top clips. Snap it back in upside down to have the blackout on the bottom.1 point
-
1 point
-
I greatly appreciate everyones help and will try all suggestions. For the record, the second sentence in my post stated I had a 2022 Oliver Elite II Hull #1069.1 point
-
We have the same 22" Black Stone rig as @John Dorrer describes above with quick disconnect for the OTT gas outlet. We keep the grease catch with its aluminum liners under the lid with the BS steam cover, a couple lodge plates, and a can of olive oil spray. The whole enchilada fits into the BS carry bag which is the last item loaded into the Tundra's bed. My bride awarded me with a folding BS cooking table for Father's Day and this current trip is its "Shake-Down" cruise - so to speak. So far, I'm loving this cooking table!1 point
-
I understand that the factory started putting less psi in the tires some time ago. Bill1 point
-
Next trip is planned, Colorado and Utah, leaving in two weeks! Adios Texas heat!!1 point
-
Decided to submit another thread on my complete mod!1 point
-
Ron, Thanks for the post. It is a good reminder for all of us (especially single axle Elite owners) to use a TPMS system to monitor the pressure of our tires. Question: Did you have a metal valve stem? The centrifugal forces exerted on the valve stems by the mass of the monitor can result in over stressing a rubber valve stem, so metal stems are preferred with TPMS. So glad your system alerted you to the loss of pressure in time for you to safely get off the road. Pete1 point
-
I have been using what3words for a while now, and it is really high resolution, down to a 3 meter area. I have a Motorola Defy, which uses a satellite, but I'm not sure how quick the response would be vs. having cell service and using 911. But would highly recommend what3words.1 point
-
My 2016 manual doesn’t have a diagram either. There was no diagram anywhere in the trailer. I’ve just had to figure it out over the years.1 point
-
Something that should be mentioned in running the air conditioner on the batteries is that the older inverter is 2,000 watt capacity and according to the manufacturer it will safely handle 1,800 watts continuously. FOLLOW THE MANUFACTURER SPECS! Something else that should be noted here and may have already been mentioned is that the air conditioner should have the easy start module installed and really no other DC loads or AC loads can be running. Especially no other AC loads as the 2,000 watt inverter will be very close to maximum capacity running the original Dometic unit. Additionally, all of the high amperage DC lugs and connections should be checked to make sure that they are tight. I found one factory crimped lug to very warm while running the air conditioner on the batteries so I needed to re-crimp it. My air conditioner draws on average over 100 amps DC and that is dependent on cabin temperature. As the trailer cools down the DC amp draw goes down a bit (less compressor head pressure).1 point
-
Your lights are 12v and run off the batteries, even when you are on shore power. The inverter changes 12v from your batteries to 110v for your 110v outlets, it does not power your lights. Solar charges your batteries and doesn’t directly run anything. I don’t know what could be causing your issue, I’m not sure I hear it in your video. I’m sure someone will have an idea. Mike1 point


-
Recent Achievements
-


")


")


")


