Leaderboard


Popular Content
Showing content with the highest reputation on 01/16/2025 in all areas
-
There is now a recall from Oliver on this burner assembly. Effected hull numbers should be getting Oliver issued recall letters. ***** text from letter showing SN range of effective water heaters (full letter below) ***** Dear Valued Customer, This notice is sent to you in accordance with the National Highway Traffic and Motor Vehicle Safety Act. Oliver Travel Trailers has decided that a defect which relates to motor vehicle safety exists in certain 2016 – 2024 Legacy Elite I and Legacy Elite II travel trailers manufactured between April 25, 2016, and February 8, 2023. WHAT IS THE DEFECT? The Truma water heater burner bracket assembly may become loose. **NOTE by Craig - The effected burner assembly tubes were not ALL crimped in place during manufacture, only the ones on each end were crimped. The TRUMA Mfg line has made a mfg line change and now ALL tubes are crimped in place. New burners for the recall will meet this standard.** EVALUATION OF THE RISK TO THE VEHICLE AND OPERATOR(S) RELATED TO THE RECALL. Legacy Elite I and Legacy Elite II equipped with a Truma water heater with a loose burner bracket assembly may allow ignition failures, wire damage, and risk of a brief flame discharge, increasing the risk of a fire. HOW DO I KNOW IF MY TRAVEL TRAILER IS PART OF THE 24V876 RECALL? 1. Find the water heater serial number located on the front cover. (see below) The water heater with serial number less than DLE60C-33096055 is nonconforming. 2. If you are unsure, call 1-888-526-3978 or email us at ottwarranty@olivertraveltrailers.com to confirm that your Truma water heater is one in the population of recalled units for Recall 24V876. WHAT IS THE REMEDY? Your Legacy Elite I or Legacy Elite II was manufactured within the affected period using this component. Your unit must be inspected to ensure the Truma water heater is not within the recall population as identified by the Truma model-serial number. The remedy will be the replacement of the water heater burner assembly, free of charge. The replacement water heater burner assembly will be sent with instructions to complete the installation by a qualified RV technician. The replacement should take approximately one-half hour to complete. Oliver Travel Trailers will cover the cost for the remedy repair. Water heater burner assemblies can be replaced at an authorized service center. WHAT IF YOU HAVE PREVIOUSLY PAID FOR REPAIRS FOR THIS PARTICULAR CONDITION? If you have already paid for a repair that is within the scope of this defect under recall, you still need to have this recall inspected and/or performed to ensure the correct parts and procedures were utilized. Additionally, you may be eligible for a refund of previously paid repairs. Refunds will only be provided for repairs performed within the scope of the defect under recall. Please send the service invoice to the following address: Oliver Travel Trailers Atten: OTT QUALITY MANAGER 609 Swan Ave. Hohenwald, TN 38462 Phone: 1-888-526-3978 Email: OTTWarranty@olivertraveltrailers.com Below is attached it the NhTSA report on the topic. RCLRPT-24V876-7998.PDF Below attached is the generic recall letter from Oliver...when mailed to you it has your VIN # inserted. RCONL-24V876-1556.pdfRCONL-24V876-1556.pdf Hope this is useful info. I'm still waiting on a reply from Oliver on when/how I can get the parts for repair.5 points
-
Also ---- here is our post on the 3rd failure we had with Truma ...this one is the exact problem outlined in the recall. (The lack of burner tubes crimping.) SO for Truma two issues so far: 1) The first issue was that the BURNER assembly feed tube connection wasn't properly torqued at the factory. This would cause the feet tube nut to back off and eventually spray out fuel like crazy. This was fixed by a tooling change at the truma factory. In our case that repair process is to remove the burner assembly and tighten the nut. 2) The second issue is that the burner assembly tubes were not crimped on all 8 burners only the end 2. That's been fixed by Truma and all new units meet this spec.2 points
-
For those not able to read the NHTSA report here's an excerpt of the timeline of events leading to the recall. All new burner units are shipped from Truma with all 8 burner tube tabs crimped. (Ours literally fell apart on the road at one point so I did a self repair of the assembly.) ******* NHTSA Recorded Chronology : 2/17/22 Truma (Steve Bayne) reported during a OEM Baseline review approximately over the scope of 300 units, 8 units (2.5%) have experienced burner issues. Two warranty units with burners coming apart were| picked up during this onsite visit for return to Germany for evaluation. 2/17/22 - 12/31/22 Additional 4 customers reported burner failures. 7/18/22 Oliver request Truma's investigation reports from two units evaluated in Germany. 11/21/22 Truma (Mark Howlett) notified Oliver Travel Trailers (Paul Cameron) Germany made a design|| change to the burner assembly February 2022. Revision included the burner assembly tabs changed from two to all eight tabs folded. Truma concluded the safety features incorporated into the system, risk and severity is low. Safety factors include a) flame recognition sensor b) burner over temp switch and c) the housing contains a thermal event. 11/28/22 Oliver modified the support for the water heater and installed water heaters with only two of the eight tabs folded. On 4-Apr-24 these two units were reported in warrany for burner bracket assembly failures. 2/8/23 - present Oliver has installed Truma water heaters with modified burner bracket assemblies with eight tabs folded, no failures for the burner assembly has been reported to date. 1/3/24 - 7/17/24 Customers with water heaters containing burner bracket assemblies with two tabs folded replaced under warranty experienced repeat burner bracket failures. 11/13/24 Oliver Travel Trailers determined to replace all Truma water heater burner assemblies with two tabs folded to the confirmed eight tabs folded retention feature. ******2 points
-
My recall letter arrived in the mail yesterday. This will be our 5th year using our Truma and happy to report, we have never experience any problems. Its been reliable and has served us well. We will have Oliver perform the recall and motor on.2 points
-
A follow-up now that we’re in Florida at the 9th Annual Eggs ‘n S’mores rally, and can actually test the modification. 1) Someone appears to have connected the hot and cold feed lines on the bathroom backwards… Back in November I’d already had the water heater drained and bypassed, so I had only tested for leaks and function. Guess I should have checked to see if it worked as designed!! 🤪 I’ll swap the feed lines tomorrow. B) Something I didn’t anticipate, and need to look at @mossemi’s drawings again. Everything works fine other than the above notable exception while feeding from the fresh water tank. But when feeding the system via the city water inlet, it is somehow filling the fresh water tank and eventually overflowing. I’m guessing Mike had a one-way valve in the recirculating line that I missed. More to follow!
 2 points
 -
JD, After changing the setting I disconnected shore power and this time all worked fine. Last (and only) time the inverter came on for a few seconds and shut off. Maybe something else was going on...but for now it's ok. Will check again at the "Q". Thanks for the help :) John2 points
-
I like using my Garman RV satellite GPS for that. There are several different models depending what you need or can afford. That said, I don't use a Satellite Navigator to navigate our Ollie into the barn for storage. But I do back it in and out very carefully. the barn floor is about a foot above outside area grade. So I had to move a bunch of dirt and gravel to create a compacted 20 foot long flat spot in front of the 10 foot AFF clearance beam at the entry. Something to keep in mind if you think the storage facility could give your Ollie A/C or antennas a BUZZZ hair cut. JD: I didn't know your picture was on the cover of Mad Magazine. You are famous!! GJ2 points
-
Thanks for the tips and questions. Here's a good overview video on the topic.2 points
-
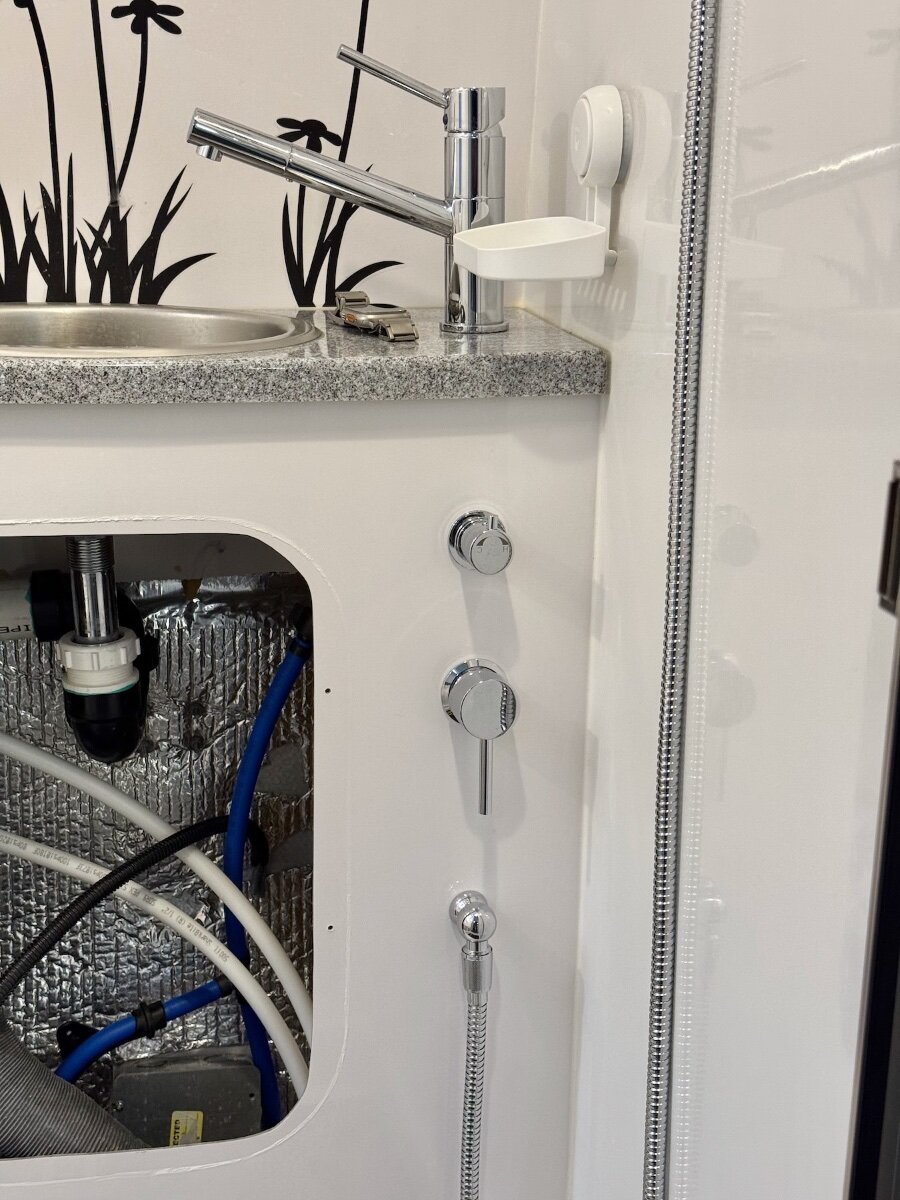
2022 LEII #1029 here. been using our Oliver pretty steadily - on our 4th multi-month outing. Currently in Manatee Springs (Chiefland) Florida. Starting having an issue with our Truma AquaGo Comfort water heater. It heated fine, but was noisy with a “thumping” or banging noise when the burner lit. Searching the forums, we found Galway Girl’s post about burner tubes shaking loose, and her description of “popping” sounded pretty close to our symptoms. Luckily, I travel with a lot of tools, so I investigated looking for the loose burner tubes. Nope, all tight and in place. What I did find was a little scary. (See the attached photo.) the nut holding the main gas line to the burner manifold was quite loose. You can see by the soot on the bottom of the burner assembly and nut that a lot of gas was escaping and burning in the wrong place. I tightened the nut up as much as I dared - not wanting to twist the fitting out of the manifold and put the whole thing back together. It now works fine. That said, I’m sure this nut will vibrate loose again, so between now and then I’ll have to think of a fix. Pipe dope suitable for LP is a possibility. Between this and the problem Galway Girl posted - and more than one incident of fires - it seems Truma had (has?) a QC or design problem that could lead to so serious consequences.
1 point
-
As John noted, the check valve was apparently stuck. All good now. The hot and cold are still reversed, because I was wandering around talking all day instead of opening under the sink. It's supposed to rain much of Saturday, so maybe I'll do it then. There are 236 fiberglass trailers here at the rally, including many familiar Oliver faces.1 point
-
We resolved the issue with the Vizio television. Rather than mess around with trying to fit a 32” set where the old 24” one was, I just opted for a different 24” set. Figured that we didn’t really -need- a bigger screen. (Trailer’s not that big.) And it was more just the aggravating behaviour of the Vizio set that irked me so much. Went to Walmart and bought an “Onn” Roku set for the princely sum of $78. The mounting hole pattern is the same as the Vizio, so it was an easy swap out. If anybody loves the 24” Vizio and wants a spare, we’re traveling through Florida now and I’ll gift it to you.1 point
-
https://www.facebook.com/share/p/1ArZugmZS4/ This happened to Ruth. I also sent this in a text. Part of Ruth's post is linked back to the Forum. Hope this helps.1 point
-
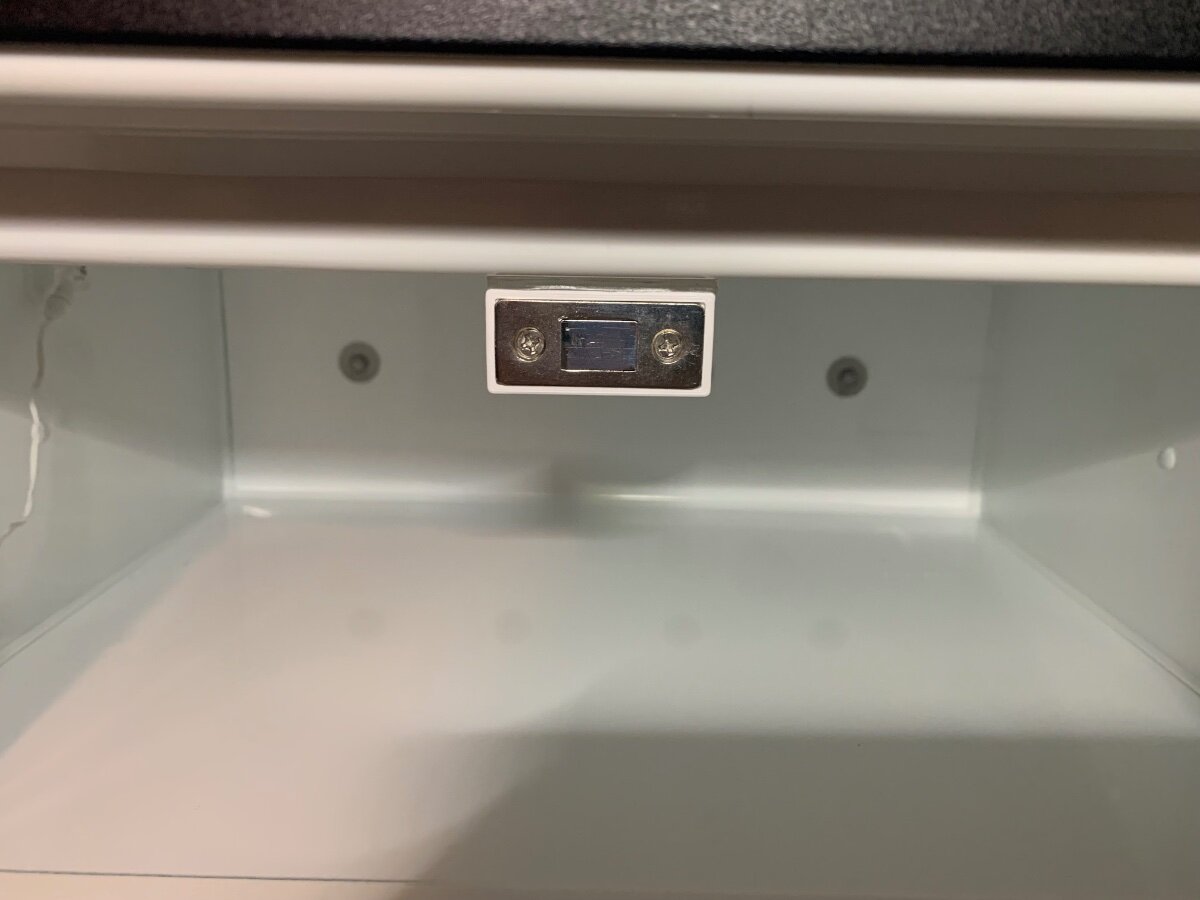
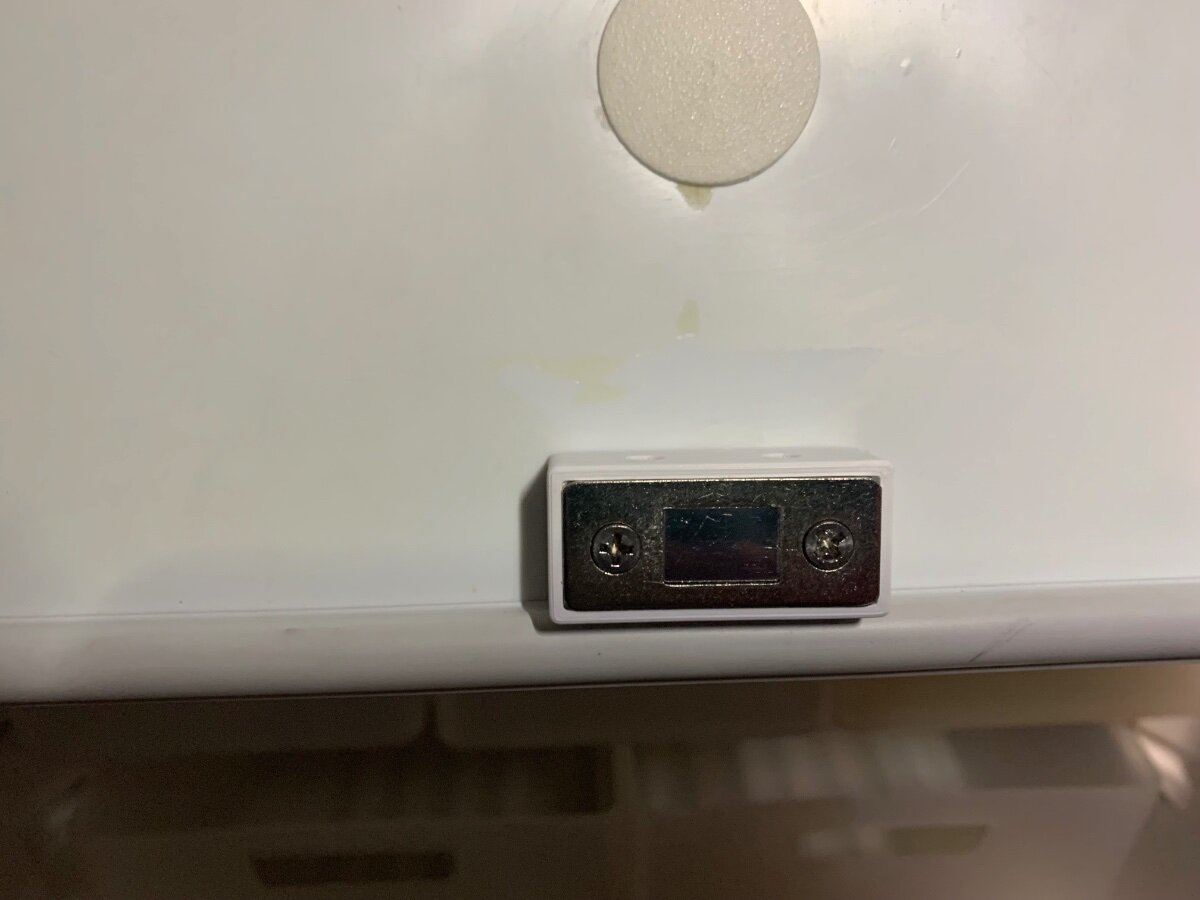
Yes, thanks for the inspiration! I purchased some magnetic catches (set of four) for $7, and asked my Son to design and 3D print a couple of mounting blocks. I decided to use the magnetic halves from two paired sets for a stronger, single catch. Here is what I did: Mounting blocks with recess for flush fitment of magnetic catch components, shown here as a pair. View of optional mounting holes and longer screws for vertical attachment. Catch components screw-mounted into block recess, shown as a pair. Center interior door attachment, horizontal mount using screws. Center interior freezer attachment, vertical mount using Alien Tape rather than screws as a preliminary precaution. Completed install. I’m very pleased with the holding power of the dual magnet approach, now for some field testing!
1 point
-
Thanks, rich.dev I think problem may be solved :)1 point
-
OUCH!1 point
-
I replaced a leaking LP pigtail. The tank connector on the original was light green while the replacement I found while on the road happened to be a dark green. Later while at a campground making my repairs, a fellow camper said that he once replaced a leaking light green tank connector with one that was dark green and then began to have various propane flow problems. He said that he switched his dark green out with a light green fitting and solved his problems. He didn’t provide any details of his problems. I did not know that there were color codes on LP tank connectors. Evidently different colors have different internal spring tensions for managing different flow rates. According to Etrailer the light green connectors are rated for 200,000 Btu per hour. The black are rated for 70,000-100,000 Btu per hour. The dark green are rated for 450,000-500,000 Btu per hour. The Red connector is the strongest spring and is often used for high pressure adapters and T-fittings. The question that I can’t seem to find a specific answer to is: Do the higher btu or flow rated dark green fittings work fine in our application. In other words, even though the dark green are rated for higher flow rates than I will ever need in my camper, do they perform just as well when they are used for lower flow rates as those of the light green ratings?1 point
-
What me worry? 🤣 According to OTT specs the Oliver Elite II is "Outside Height to Top of A/C is 9' 8." This is not an Oliver consideration. We had a Class A RV well over 12 FT, still not a highway consideration. ALL RVs are of lower height than the common 18-wheeler truck. Are you worried about your garage height? Talk to @Geronimo John!🤣 From what I understand he has a storage unit at right about 10 FT!
1 point
-
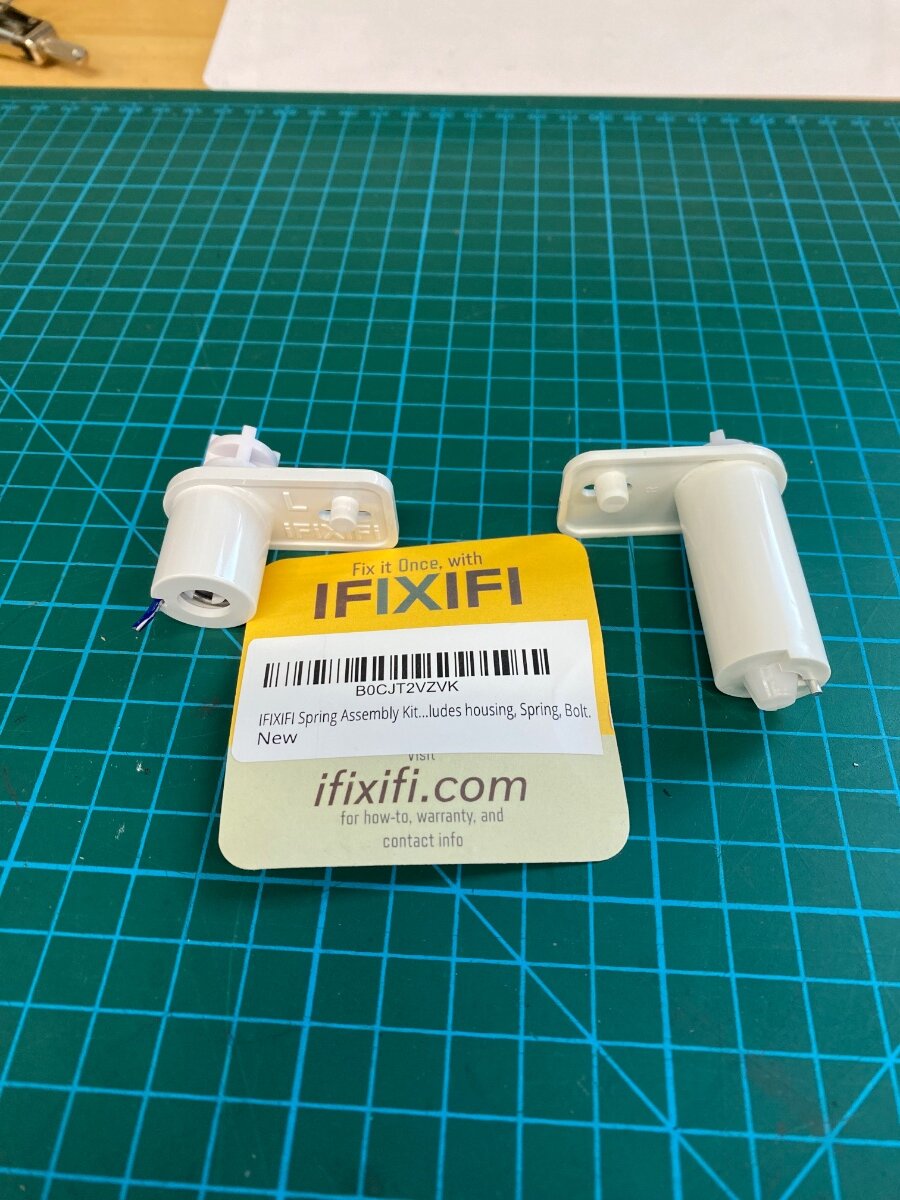
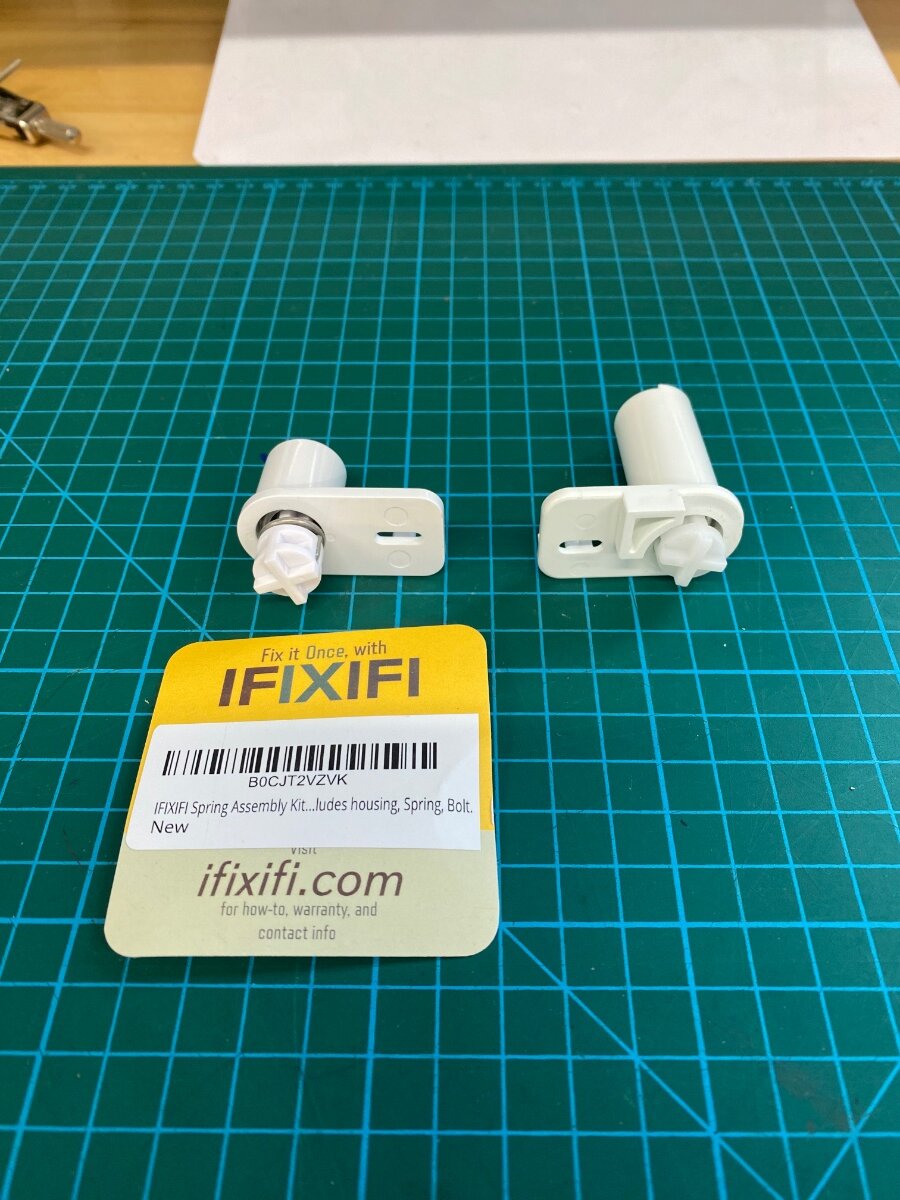
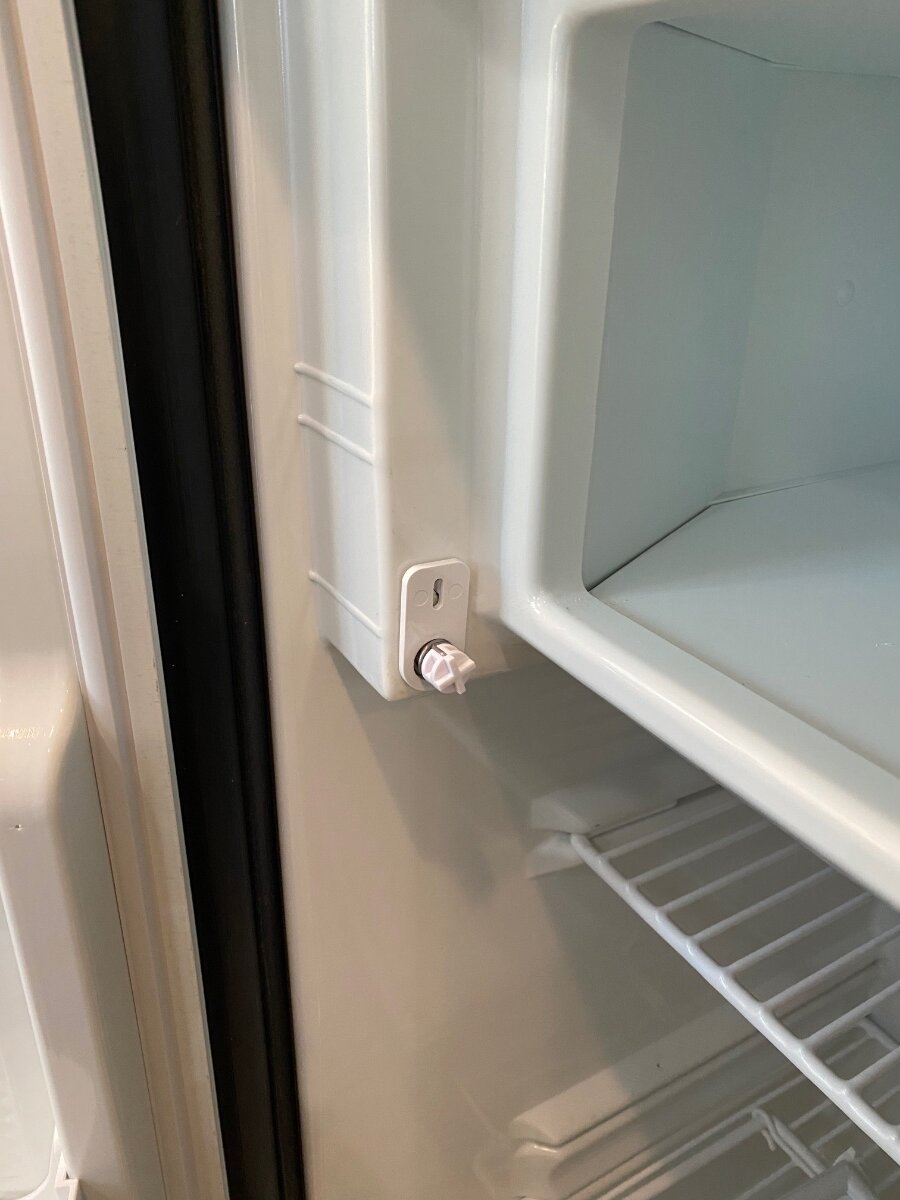
Hurray! Dometic freezer hinges work in the Norcold! Although I repaired my old broken Norcold hinges, I had also ordered a replacement right-hand hinge while they were still available. It was then I noticed that Dometic freezer hinges looked very similar. The major dimensions were the same, only the spring barrel was shorter, so I ordered a left one from a family owned Oregon company called iFiXiFi, and it works perfectly. It's so nice to have that door snap firmly closed again! There are actually several aftermarket Dometic hinges on Amazon, but the iFiXiFi brand seemed better and they also have Youtube videos that cover the design and quality of their parts and installation methods. It was about $35 for the Left hinge including the shorter spring and hinge pin. You may notice from the photos that the Dometic style hinge does not have the "90 degree open stop" as does the Norcold. This is to prevent the main door from bending the freezer door past 90 degrees to the point where it could break. The Dometic refrigerators have stops moulded into the frame for this purpose. You can retain this feature by using a Norcold right hinge, which are still available, with the Dometic left hinge. Otherwise just be mindful of it. Amazon https://a.co/d/fftOAMe IFiXiFi installation videos: https://youtu.be/fXQCQgKwjGo?si=ES5rrbr0vK1UJB2N I also recommend this video, it was the method I used. https://youtu.be/8Ae0ncOSu9U?si=wBuMTqLK6erE5Jqi I should mention that AliExpress also carries a Dometic hinge kit that comes with the left and right hinges including springs and pins for $29, but I can’t vouch for the quality. Cheers! Geoff
1 point
-
UPDATE ON FIRE IN THE HOLE As previously reported we had the problem resolved after a local mobile RV service person (GBoyz Mobile RV Repair LLC Key West, Vern (cell) 269-370-3905) in Key West discovered and fixed the problem. We've been on site at an RV park from Jan-April without any further problems. We got an appointment at the Truma Service Center in Lakeland FL (Tampa) and brought the Olli there on our way home last week. The Truma Service tech was happy with the repair done in the field but out of an abundance of caution he replaced the burner assembly at no cost. We were at the service center for less than an hour.1 point
-
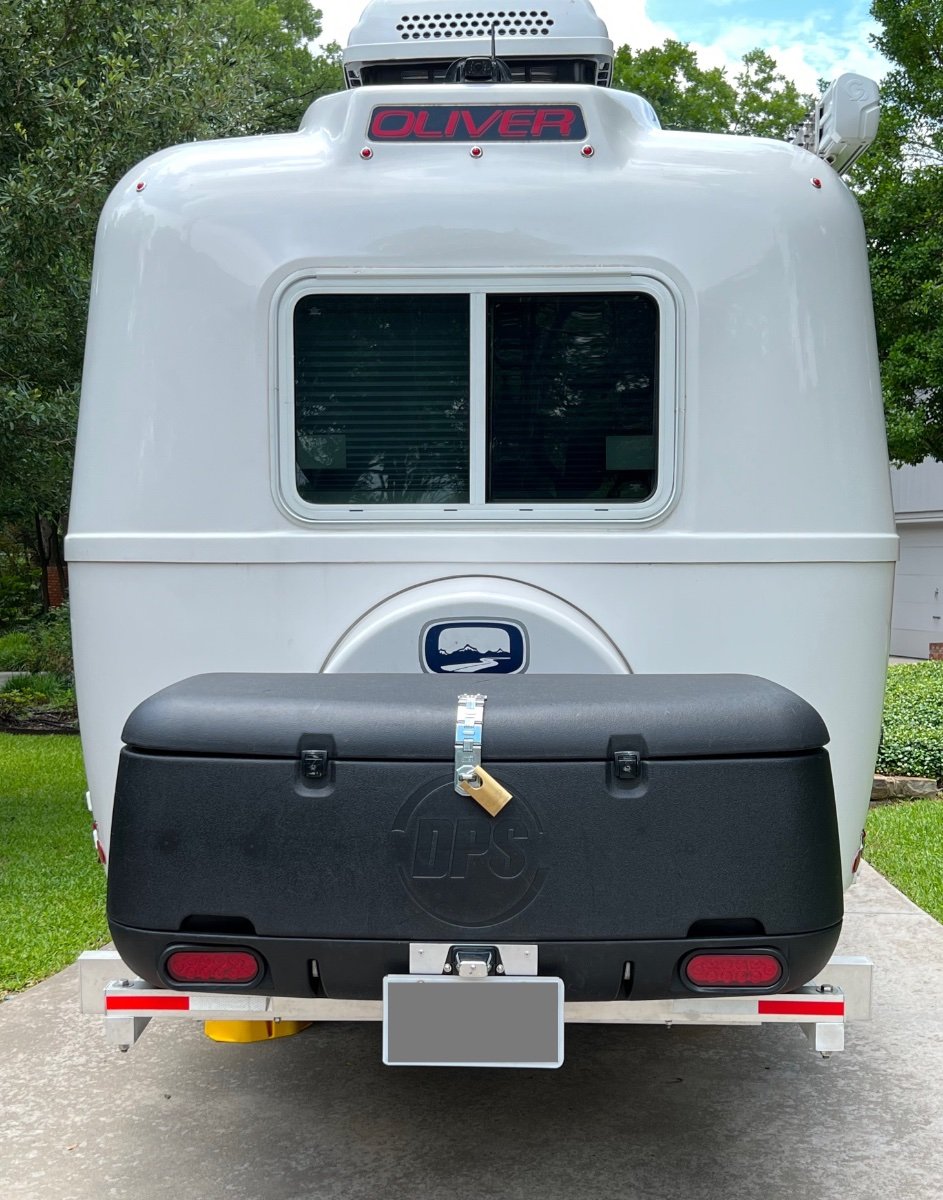
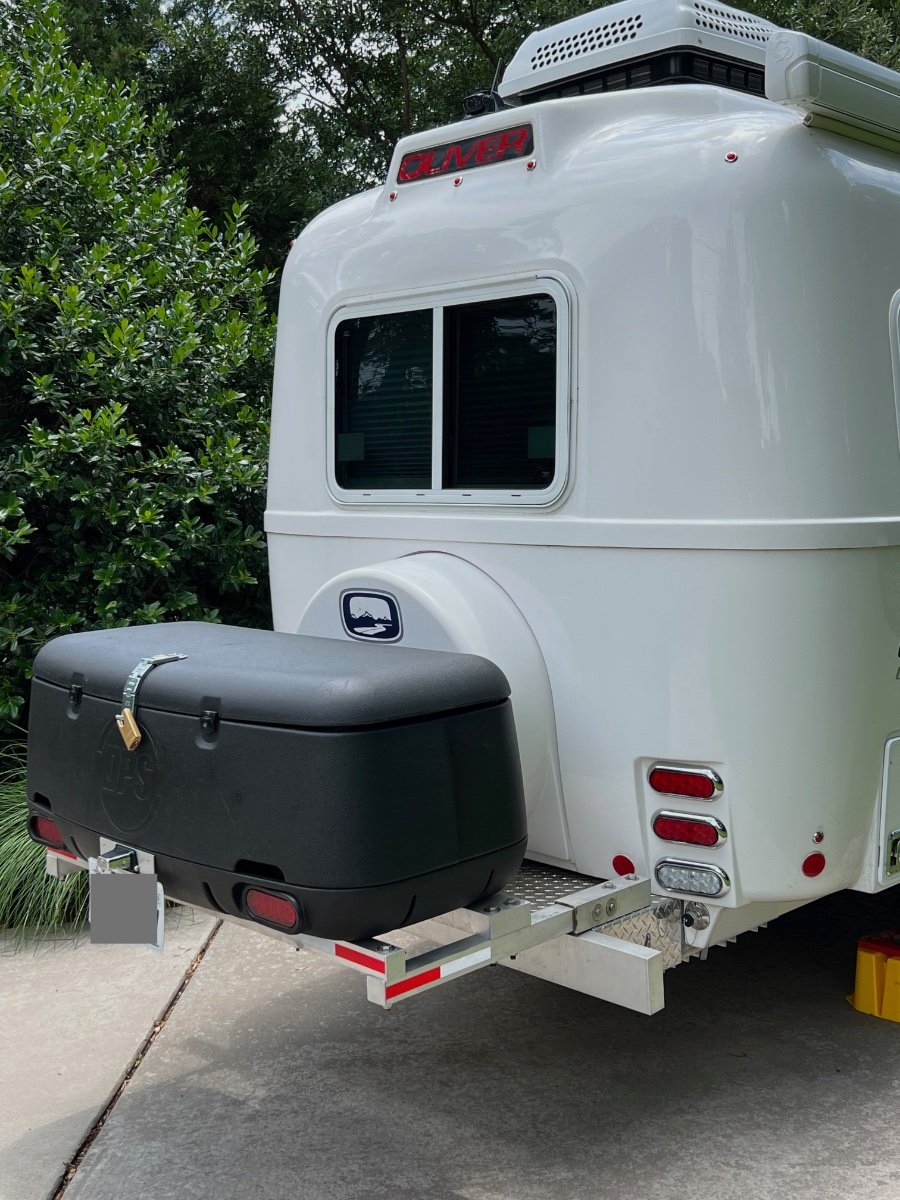
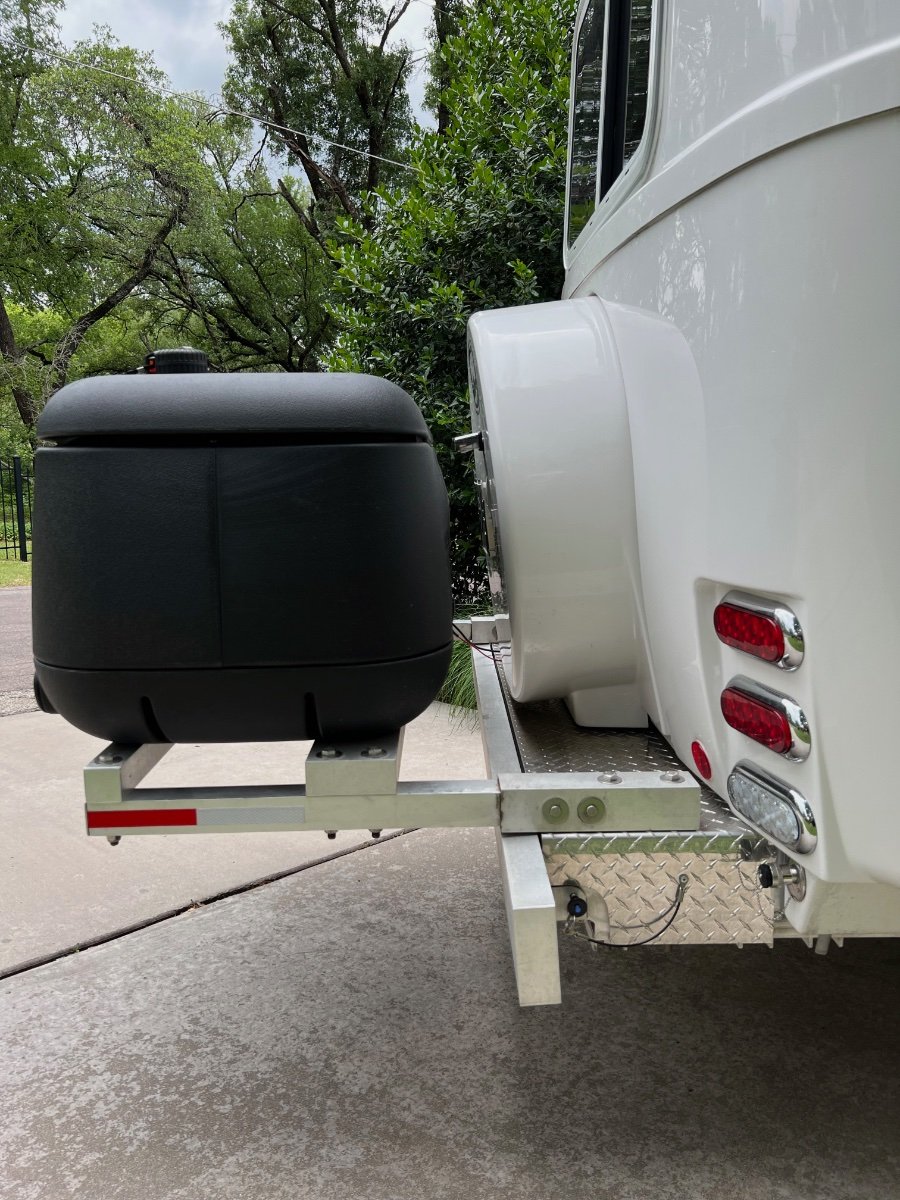
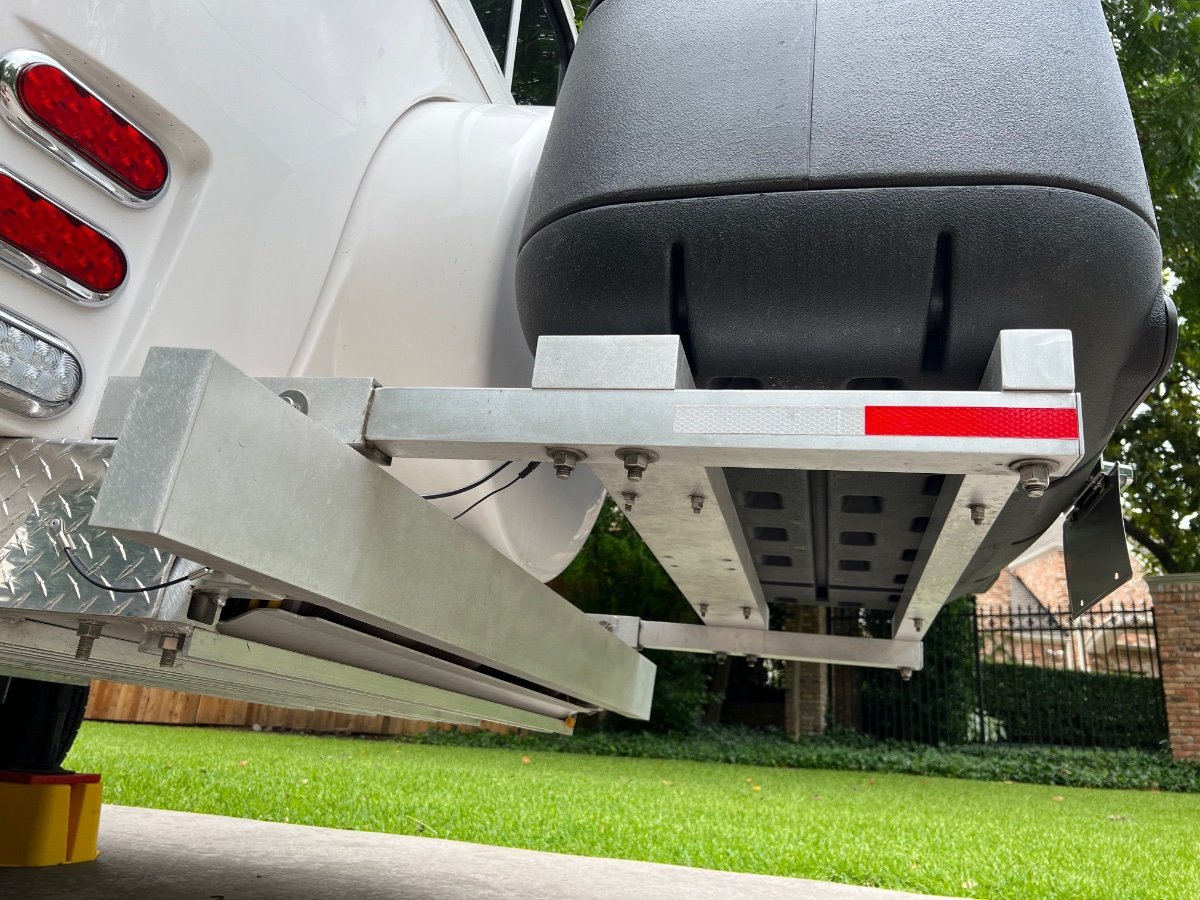
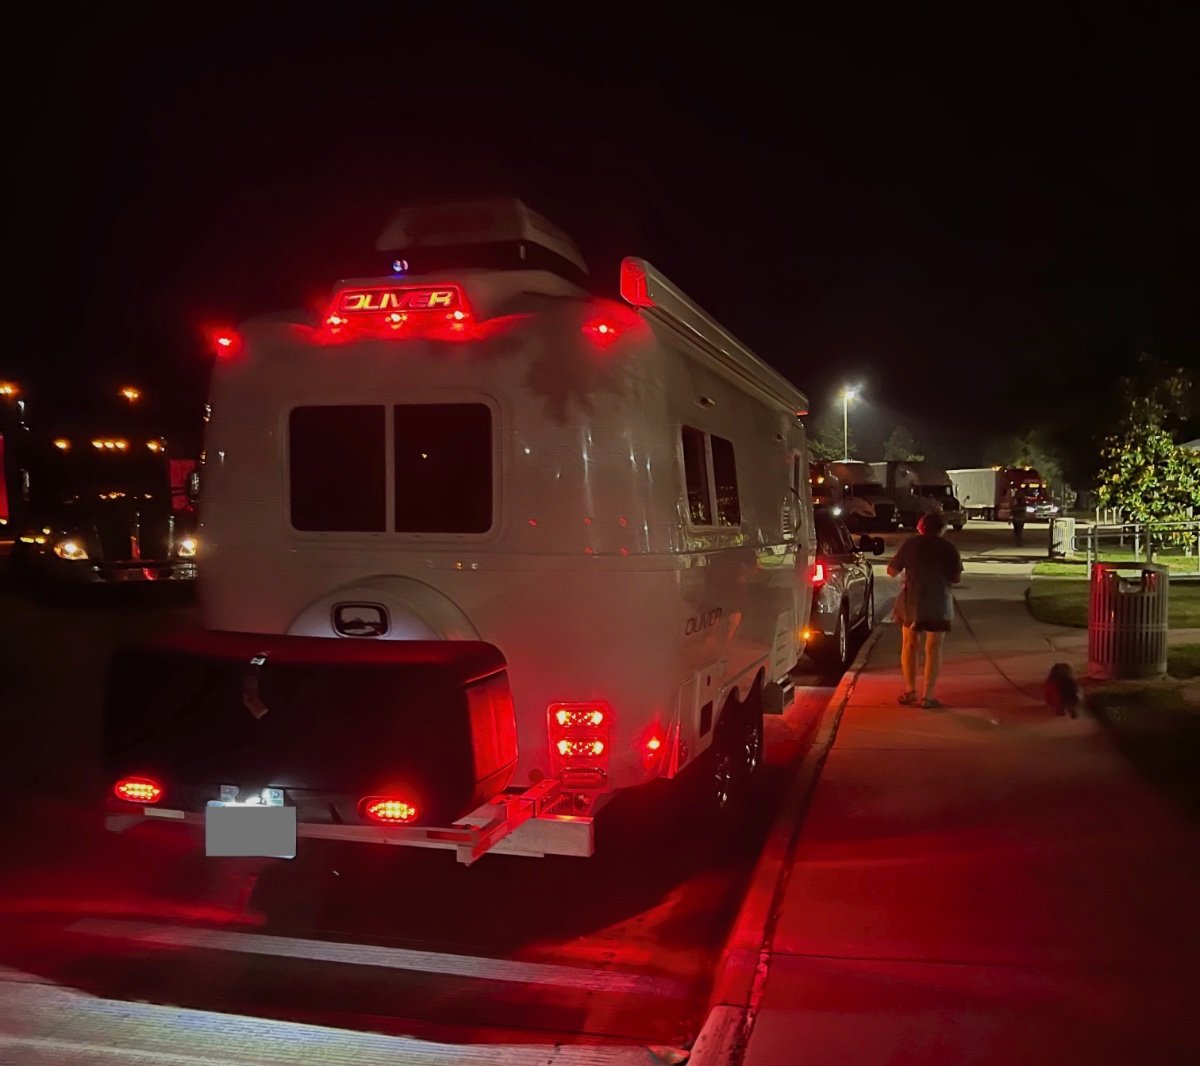
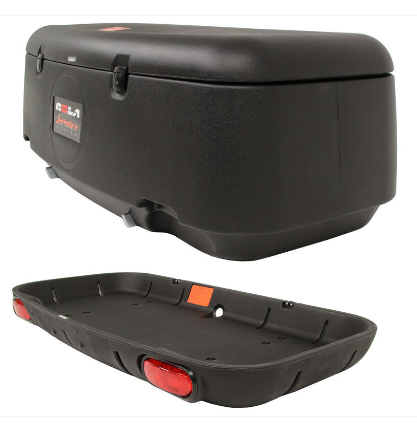
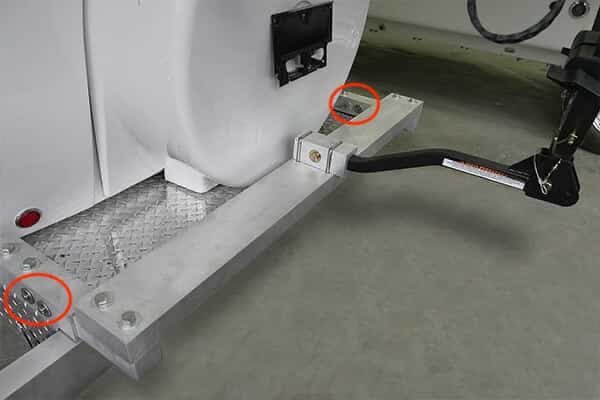
Summary I have installed a rear mounted cargo carrier, with lights, to our 2022 Oliver Legacy Elite II (LEII) travel trailer. We recently completed a two week, ~2000 mile trip, using the cargo carrier, which performed flawlessly. Below are photos of the installed cargo carrier, which are followed by a detailed description of its installation. Storage Constraints Prior to ordering our Oliver Legacy Elite II (LEII) travel trailer I knew we would need additional storage space on the trailer. We are using a 2014 BMW X5 35d (diesel) as our tow vehicle, rather than a pickup truck. Thus, we could not plan to use the pickup bed for supplemental storage. We also needed to stay within the tow vehicle's cargo capacity of 1100 lbs and maximum tongue weight of 600 lbs.. Expecting a tongue weight of approximately 500 lbs. plus two occupants at approximately 300 lbs, we could only accommodate a maximum of 300 lbs. of other cargo. The available payload will be partially used by our camera gear, which must be protected from exposure to moisture. A tongue mounted cargo carrier was not viable, given the tongue weight limit for the tow vehicle. Storage Requirements I anticipated needing additional storage space for the following items: Champion Dual Fuel Generator- 2500 watt (~45 lbs.) (too large for basement storage) Napoleon TravelQ™ 285 Portable Propane Gas Grill and hose (~35 lbs.) (too large for basement storage) Anderson Ultimate Leveling kit (~25 lbs) Harbor Freight rubber chocks (4) (~20 lbs.) Camco Stabilizer Jack Supports (3) (~10 lbs.) Miscellaneous accessories All of these items can tolerate some exposure to moisture, which is likely when stored in any external cargo carrier. A closed and reasonably secure cargo carrier was needed. Searching the owners' forum, I found examples of rear cargo carriers/bike racks and found several examples, including: Oliver's original bike rack design using twin receivers and extending approximately 3 feet beyond the rear bumper; Various rear mounted metal cargo boxes, including custom designs; Rear mounting of an Oliver tongue cargo box by John E. Davies. I also looked extensively at aluminum cargo boxes from various manufacturers, trying to find options which could accommodate the cargo items listed above. I already owned a cargo carrier which we had used on the BMW X5 tow vehicle. This carrier has a heavy steel swing-away frame which mounts to a standard 2" receiver. Mounted on the steel frame are a polypropylene tray and an enclosed container with 13.5 cubic foot capacity. The tray and enclosed container interlock. This cargo carrier also is equipped with fully functional lights (running, brake, turn, flasher). Interlocking pins on the enclosed container mate with the tray. Locking latches secure the container to the tray. Solution Approach I decided to re-use the polypropylene tray and enclosed cargo container, but not the heavy steel frame. Instead, I would use a design similar to the original Oliver bike rack. I ordered the current optional Oliver bike rack when we placed our LEII order, planning to utilize some, but not all, of its components. The current Oliver rear hitch (photo below) utilizes twin receivers that are 11" long, constructed to receive 2" x 2" X 0.25" (wall thickness) T6061 aluminum square tube support arms, which are 17 inches long. The receivers are each mounted to the LEII frame by two long 0.5" diameter stainless steel bolts and nuts. The other components of the rack are a 2" x 5" x 0.25" T6061 aluminum cross-member, 51-1/8" long (with end caps), and a 1-1/4" receiver for connecting a bike rack. I planned to use the twin receivers, and the cross-member, but not the support arms, nor the 1-1/4" receiver. Instead, I would replace the 17" long original support arms with longer equivalents, whose length was to be determined. I would utilize the original 2" x 5" x 0.25" T6061 aluminum cross-member and add another cross member, this one 2" x 2" x 0.25" T6061 aluminum, also 51-1/8" inches long with end caps. The cross members would be bolted to the support arms, in the same manner as on the Oliver rear hitch. The tray and enclosed container from my existing cargo carrier would be mounted to the cross-members. Note the clevis pins circled in the photo below, there are two 0.50" diameter horizontal clevis pins securing the support arms in their receivers. Each clevis pin has a washer on either side of the receiver. Removing the clevis pins permits the support arms to be pulled to the rear, enabling removal of the spare tire cover and spare tire without dismount the support arms. Solution Model A critical dimension to be determined was the length of the 2" x 2" x 0.25" support arms. The new support arms need to be long enough to: Support the polypropylene tray and enclosed cargo box and attach using the molded mounting holes in the tray; Allow the lid of the enclosed cargo box to open without striking the spare tire cover; Permit removal of the spare tire cover and spare tire without removing the cargo carrier and support frame; Permit access to waste water hoses stored behind the bumper; Minimize the additional length of the cargo carrier and support frame to the LEII's length. I fabricated 2" x 2" wooden support arms, approximately 40" long. Using woodworking equipment, I cut slots into one end of each support arm to fit around the bolts holding the twin receivers to the frame. I also drilled horizontal holes for the clevis pins which retain the support arms in the receivers. Positioning the Cargo Carrier on the Cross-members The wooden support arms were inserted into the twin receivers and secured with the clevis pins. Then the 2" x 5" x 51.125" T6061 cross-member was placed across the support arms near the bumper. The additional 2" x 2" x 51.125" wooden cross-member, was also placed across the support arms, but further from the bumper. Clamps were used to hold the cross-members in place on the support arms. The polypropylene tray and enclosed container, latched together, were positioned on the cross-members, centering both to the trailer's width. I opened the lid of the enclosed container and adjusted the spacing (fore and aft) between the lid and the spare tire cover to ensure they did not contact each other. Once I had located the joined tray and enclosed container in what appeared to be a desirable position, I adjusted the positions of the cross-members fore and aft to establish alignment with the mounting holes in the tray. The 2" x 5" cross-member engages two mounting holes on each side of the tray. The 2" x 2" cross- member engages only one mounting hole on each side of the base of the tray. Six 5/16" carriage bolts will fasten the tray to the cross-members. Only four carriage bolts attached the tray to its original steel support frame. I used a mason's string stretched across the width of the tray with weights on either end to aid in aligning the mounting holes in the tray with the positions of the cross-members. I also used carpenter's squares to verify the cross-members were perpendicular to the support arms. Another check of squareness was made by measuring the distance from the trailer bumper to the cross-members. Once I was satisfied with the position of the tray and enclosed container on the support structure, I marked the locations for the holes to be drilled for the six mounting bolts to secure the tray to the cross-members. The tray overhangs the rear cross-member at the rear. With the cargo carrier tray and enclosed container in place on the clamped cross-members, I wanted to determine if the spare tire cover could be removed without removing the entire cargo carrier and support assembly. I found I could remove the clevis pins and pull the support arms aft approximately 7 inches out of the twin receivers and enable removal of the spare tire cover. With the tray and enclosed container positioned on the cross-members, I could now determine the required length of the support arms, which is 33.75 inches. The location of the rear cross-member determines the length of the support arms. After locating the mounting position of the tray and enclosed container I marked all key positions and hole locations on the wooden support arms and wooden rear cross-member. I cut the wooden support arms to the desired final length. Material Sourcing and Machining The required T6061 aluminum components required are: 2" x 2" x 0.25" x 33.75", square tube, quantity 2 (support arms), cost= $110.18 2" x 2" x 0.25" x 51.125", square tube, quantity 1 (cross-member), cost= to $99.08 2" x 12" x 0.125", flat bar, quantity 1 (to be cut into 2" squares for end caps on the support arms and rear cross-member), cost= $6.86 Sales tax= $17.83 No shipping charge. I picked up the materials at the local Metal Supermarkets warehouse Total cost= a $233.95 The above T6061 aluminum components, cut to specified length, were obtained from: Stainless steel bolts and nyloc nuts were obtained from: I was referred by Metal Supermarkets to a local machine shop: When I received the materials I took them and my wooden mockups of the support arms and cross-member to Air & Earth. I also took one of the original support arms. I discussed the machining needed: to cut the slots in one end of the support arms and to drill the needed 0.50 diameter holes for the clevis pins and mounting bolts. I also asked them to cut the 2" x 0.125" flat bar into 2" x 2" squares. I did not ask them to drill the smaller holes for mounting the cargo tray to the cross-members. I was quoted $220 and turnaround of the job within a week. They did an excellent job within the promised timeframe. Finishing and Assembly of the Support Structure After Air & Earth completed the requested machining, I performed the following finishing steps, which included: Rounding the edges of the 2" x 2" square tubing on the slotted end to be inserted into the receivers. I used a 3" wide belt sander with 100 grit sanding belts to round the corners of approximately 12" of the tube which would be inserted into the receivers . The original Oliver support arms also had the corners rounded to more easily slide within the receivers. Several trial fittings were required to verify smooth insertion and removal to/from the receivers. The support arms and the rear cross-member were sanded with an orbital sander using 200 grit disks. This sanding removed markings on the tubes and made the surface textured, similar to the Oliver rear hitch components. The support arms were inserted into their receivers and fastened with the clevis pins. The cross members were aligned with the mounting holes on the support arms and bolted into place. The cargo tray was positioned on the 2" x 5" cross-member at the previously determined mounting position and holes drilled to mount the cargo tray. Holes were then drilled in the 2" x 2" rear cross-member. Carriage bolts, flat washers and double jamb nuts were used to secure the cargo tray to the cross-members. Once all test fittings of the support assembly were completed, lithium grease was applied to the ends of the support arms which are inserted into the receivers. 2" x 2" x 0.125" caps were attached to the open ends of the support arms and the rear cross-member, similar to the end caps used by Oliver. These were attached to the square tubing using JB Weld epoxy. Cargo Carrier Lighting The cargo carrier partially blocks visibility to the taillights of the trailer, which is most noticeable when viewed from close behind the trailer. At a distance the taillights are largely visible. The cargo tray is fitted with two LED light fixtures and a wiring harness with a 4-pin flat connector. A corresponding 4-pin flat connector was installed on the LEII to integrate the lighting on the cargo carrier with the trailer lighting. Details of the installation of the 4-pin connector in the trailer are covered in a separate article. The lights on the cargo carrier ensure the trailer is quite visible from behind. A license plate mount was added to the cargo carrier tray, since the license plate mount on the spare tire cover is blocked by the cargo carrier. Lighting for the license plate mount is provided by adding a Y connector to the license plate light cable under the spare tire cover and adding an extension cable routed to the cargo tray mounted license plate mount. I also added reflective tape to the support frame members. I used the following reflective tape: https://www.amazon.com/gp/your-account/order-history/ref=ppx_yo2ov_dt_b_search?opt=ab&search=reflective Conclusion This addition to our trailer provides significant benefits, with no significant disadvantages. It does add approximately two feet to the length of the trailer. Besides the additional storage space, the cargo carrier and its load slightly reduces the tongue weight. I measured the tongue weight, using a Sherline scale, at 450 lbs., with no water onboard. Tongue weight seems sufficient, as no swaying or other handling issues have been observed. This project had a successful outcome due largely to the information I was able to glean from the Oliver Owners Forum. I hope this information is useful to others on the forum. Comments and suggestions welcome. Regards, Don
1 point


-
Recent Achievements
-


")


")


")


