Leaderboard


.thumb.jpg.e34bf01ef7f7d5e99ad31856d45afbeb.jpg)
Popular Content
Showing content with the highest reputation on 03/31/2025 in Posts
-
I am not familiar with your specific setup, but in general there would be no limit on the size of the battery bank that your charger would be able to charge. We usually get about 130-150 Amps of charge from our Xantrex inverter/charger depending on the settings of the Xantrex. As you mentioned, a larger battery bank will take longer to reach full charge. Generally Zamp external solar charge ports connect directly to the positive and ground bus bars, assuming the wiring has not been modified to connect to an internal mounted solar charge controller. I think most if not all zamp freestanding solar panels have a built in charge controller. If so, no other charge controller is needed. If your trailer doesn’t have rooftop solar, it likely doesn’t have a solar charge controller.4 points
-
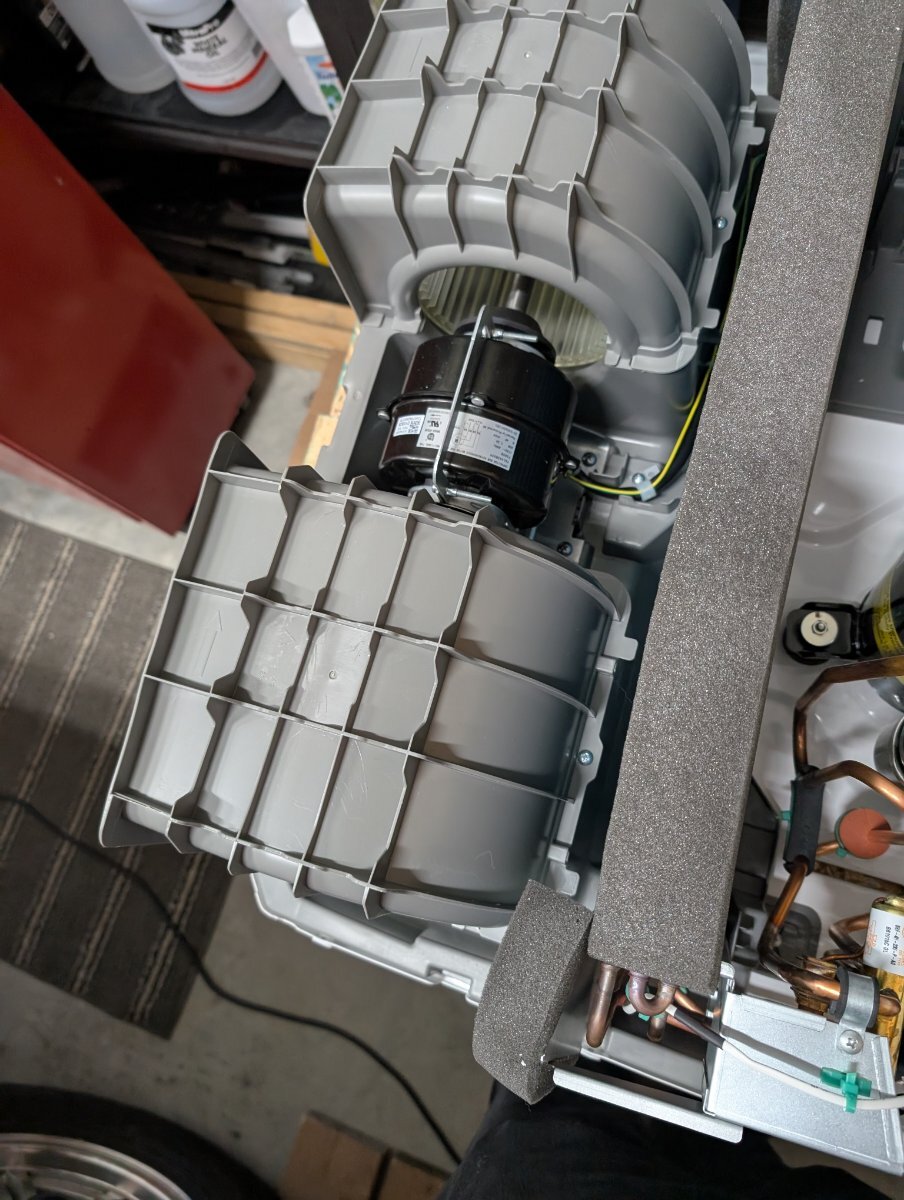
I did a brief search of Dreiha Atmos 4.4 specific information, but found no formal references regarding actual CFM or EER ratings. I did however, find this statement on the Sprinter forum, not conclusive but remember reading this when I was considering the Atmos. I will say this unit will blow my hair when standing at the wet bath doorway, not so with the former DPll! I also recalled wherein @rideadeuce included this unit sticker in his writeup on the SDG install. Interesting enough, it shows ‘SANZ DREIHA GMBH - GERMANY’; when researched the location is Bremen, Germany. Another fact I remember reading, the Atmos was German engineered. Furthermore, Page 7of7 of the Dreiha Atmos 4.4 brochure also shows other ‘SANZ’ affiliates; SANZ Kenway and SANZ Clima, headquartered in Fairmount, Minnesota and Madrid, Spain, respectively. SANZ Kenway “custom designs and manufactures mobile air conditioning and heating components and systems…”; SANZ Clima has factories in Spain, USA (Fairmont, MN), Germany, Brazil and Poland. Could this be the origin of the Atmos 4.4 and not China (think GREE branded knockoff products), perhaps even Made in the USA? I know, another ‘can of worms’! Where was the ATMOS designed an where manufactured? @Geronimo John once asked. Maybe getting closer to a definitive answer, but then….
 2 points
 -
THIS is a YouTube video by a fairly well respected person that covers the issues with a lithium conversion. Bill2 points
-
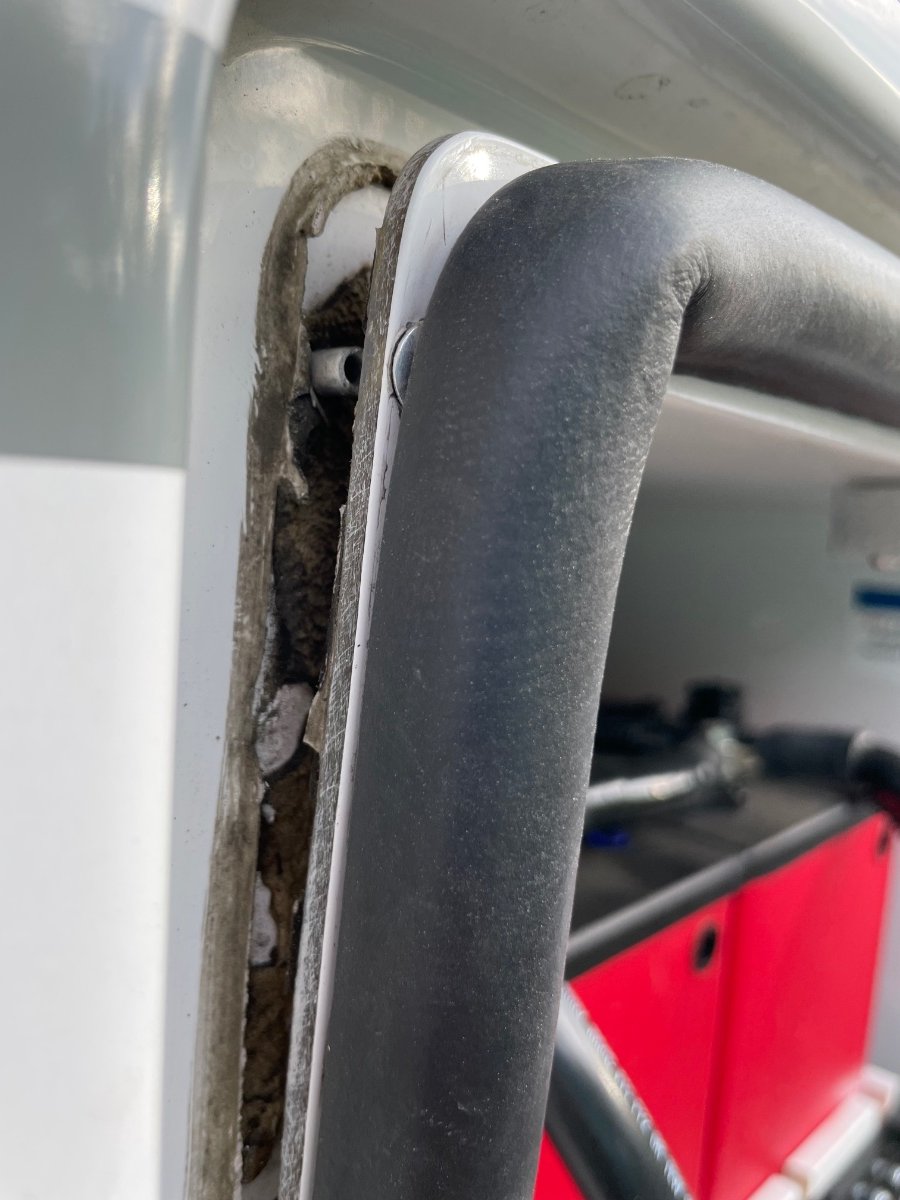
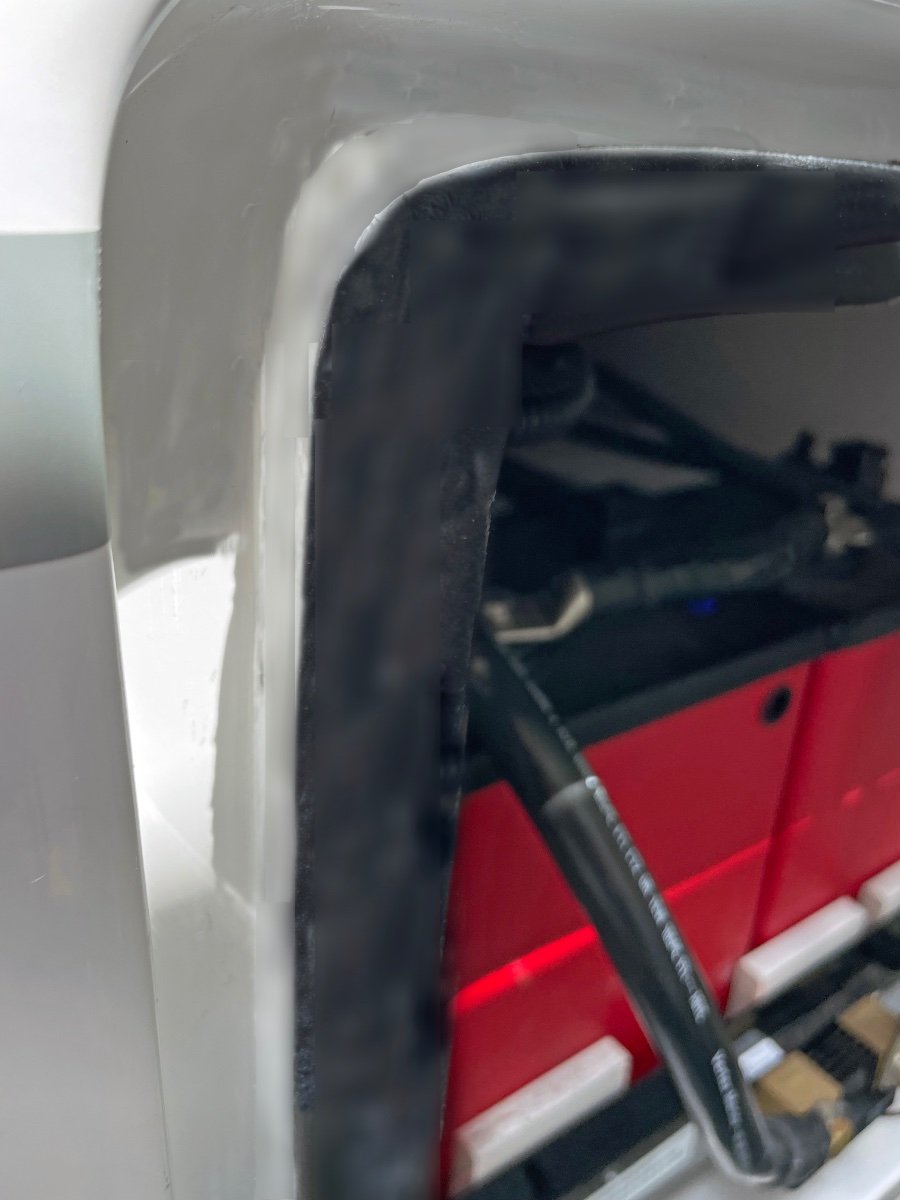
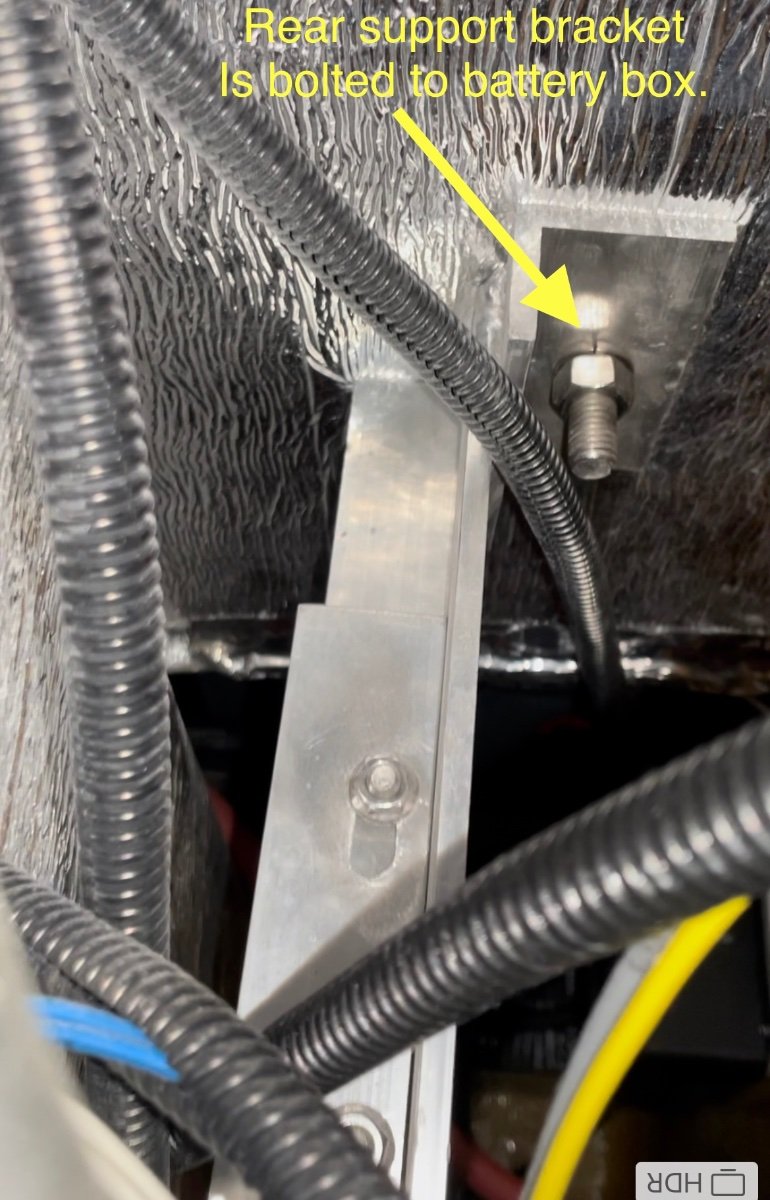
This spring as we were prepping for a new road trip, I noticed the battery box door seemed to be sticking out further than normal. I thought I would adjust the latch to pull the door in a bit tighter. What I found was that the battery box had started to tip forward away from the main hull as shown the pix below. All the rivets up both sides and all across the top of the box had sheared and the box was tipped out about 1/2". I contacted Oliver Support to understand how the box was designed, mounted etc. They cleared me for travel after having me check the support strut inside the trailer (under the pantry area) . After some further consultation I was able to perform a repair. Here's a sketch of how the battery box is installed in our Hull 505 (2019 Elite II) trailer. The repair steps I took following Oliver instructions were: 1) Remove the batteries from the slide tray to get weight off the box. 2) Drill out all sheared rivets. (3/16" bit) 3) Release the 2 support bracket bolts inside the trailer under the pantry (one of which is adjustable). (This step is a pain and requires some long extensions for the ratchet wrench to make reaching nuts possible.) 4) Tip box back into position. (Check that the box base still has a slight outward tip for water drainage.) 5) Re-tighten support bolts. 6) Re-rivet all around the perimeter. 7) Clean seams and add a bead of boat life white sealant around the battery box seam. (See pix below). Repaired Box Above: Door closes with a good seal all around and the box sealed to the body. We are going to keep an eye on this as we travel this next year, and make a trip to the Oliver factory for them to inspect and repair if necessary. I'm not sure of the root cause or mechanism by which the box tipped out in the first place. One concern would be that the box is putting too much pressure on the outer hull while bouncing down the highway. I don't see any indications of cracking in the glass hull or box at this point. Hope this helps if anyone else see's an issue. Craig Hull 505
1 point
-
One of my friends carries his own shower head in his luggage.1 point
-
Sorry, tried to edit my original post and reposted by mistake. Changed "I would" to "I wouldn't"1 point
-
Personally, I would worry about how high the CFM's are since any 15k unit is going to give you as much or more than needed inside the small space of an Ollie. I'm more concerned with how low the CFM's can go at it's lowest setting for controlling humidity and I couldn't get that info on the Atmos when I was researching it.1 point
-
ZLarryb, the plastic connector/tee fitting nut is the red notation. the black plastic tie-down is the yellow notation. the green arrow is pointing to the green "witness marks". Witness marks are sometimes used to mark a 2 part connection like a nut and bolt or in this case it marks both sides of the water pipe connection. It is marked during installation on both sides of the connection and it is a quick visual confirmation of a connector being in the original position or not. Due to the angle of your picture, I can’t verify its position because I can’t see both side of the mark, but you can do a quick verification. Mossey
1 point
-
Always nice to pass along a quick fix! Thanks!1 point
-
We also experienced this on a trip in 2017. Both wires were loose and I had to feel around the bottom of the pump to figure out where they were supposed to attach. Crimping has prevented this from happening since. Mike1 point
-
@ZLarryb I could be wrong...but in your photo it appears that your plastic twist connector fitting on your water line has loosened with vibration. This has been a reoccuring issue with my trailer and I periodically check all the twist fittings for tightness. In your photo, it's the line toward you with the black plastic tie-down that is out of place. I have loosened the black plastic tie downs, placed a thin piece of rubber or silicone (even a piece of a rubber band) between it and the twist fitting and then re-secured it. This has helped prevent loosening of those fittings. Just something to check....?1 point
-
GREE manufactures several like units including your Tosot, they are all seemingly the same as the Atmos. You got a very good deal and current pricing on Amazon is now $100 higher, but still a value buy. Others may be interested in knowing what added costs there may be, specifically tax and shipping if applicable. The TURBRO soft start is interesting and value priced, as well, however I would be concerned with its quality. And yes, you are better off having a soft start device if running on LFPs, good move and install! You may want to add an informational ‘Signature’, go to Account Settings.1 point
-
My former a/c was the 11K DPll and I would run the LFPs to 50% SOC, never had a reason for a longer period of discharge. Last September a more efficient Dreiha Atmos 4.4 (15K/12K heat pump) was installed and looking forward to a hot summer test for run duration. In general, I run on inverter for lengthy periods at the Cow Barn when performing maintenance, cleanup, travel prep or just hanging out. Upon departure, shore power then provides 80A charge via the Xantrex 2000, however if the SOC was dropped below 75% an auxiliary onboard 30A Victron Blue Smart charger kicks in via a Cerbo for a combined 110A of rapid charge. When traveling, the a/c is run on inverter during various stops to eat, shop, rest etc., as necessary, and when back underway a 40A DC-DC charger then restores the SOC until a destination is reached. If the night’s stay is off grid and a/c is needed, a small dual fuel genny on propane is deployed, which also brings the LFPs to 100% SOC. This is how we roll given our style of camping; lack of solar has never been an issue, nor thoughts of a larger Ah battery bank.1 point
-
Tosot A/C installed this winter just finished also. Looks similiar to Greer. Very similiar to Atmos. Caught amazon at weak moment Prime day (900.00) and just finished install. Pretty simple if you have a good back mine is not had most of my friends help get a/c on roof with painters scafolding. Has great reviews on dehumidifying. Not needed up here in mt but maybe able to retire someday and head south. Picture below of unit on top is not mounted(FYI) Just set on top. Hardest part was leveling a/c because of factory bump. Could not modify drain lines to get them to work without ton of modifications. Here is a few pics. I installed with 100.00 dollar tosot soft start. I was told really did not need, but decided to install for running on my lithium. Heater works great. (Slow warm Heat 850watts not warm enough to test a/c quite yet. Pulling 900 watts on high but still cold up here in Montana. Great job on Atmos.
1 point
-
No, you will still get the full 45 amps of charging, it's just that it's split between two batteries when wired parallel, sending 22.5 amps to each.1 point
-
@Teaney Hull 292 there are 3 ongoing post on the forum right now about lithium up grades and I must admit I have gotten confused on what was said in each one. What I haven’t seen in your post is mention of disconnecting the charge wire for you 7 pin connection. Just want to make sure you don’t miss that requirement when going to lithium. It was discussed recently @tallmandan thread below, https://olivertraveltrailers.com/forums/topic/10748-epoc-lithium-keep-it-simple-upgrade-advice/1 point
-
I've been amplifying the hi-jack but I imagine @Teaney Hull 292 got what they needed in 2 pages and we're all here for more questions from any and all members! I would not worry about the 104F heat issue unless you plan to exterior mount your inverter in the sun! 🤣 Ours is under the streetside bed. It did get up to 104 during testing August afternoons where we get pretty hot, when sitting in the sun. I installed the dual Beech Lane fan, like the one I installed in the fridge cavity. It pulls air from the streetside basement, all the way from vents I added in the bath, closet, etc. With the fan on 104F drops to about 88F, with A/C on and the interior about 74F. Reason you want the Victron is you can run your A/C on generator with the Victron supplementing extra power from your batteries when the compressor is running and when the compressor shuts off your generator would be back to charging batteries. You likely know this already. Victron calls the feature Power-Assist. Re your other comments, she may learn to like boondocking. We love where we can go where there are paved roads and campgrounds. More opportunities west than east. Oct we plan to park the Oliver on the edge of the North Rim! If at a point where we truly want to run A/C on batteries, after we replace the Dometic with something efficient, a third 300AH could be in our future. Given you have the Honda, I do NOT suggest the suitcase addition. We rarely use ours and wish I had saved the $800+ for the suitcase, the Victron 30A MPPT, cabling, connectors, etc. I would certainly suggest adding 400W or as much as you can get on your rooftop. Our 2x 160W panels are now 10 years old. I wonder how efficient they could be. Given that and the flat mounting we usually only get +10 to 12A net charging rates (winter afternoon sun). The 400W Renogy suitcase will double those numbers, from a combination of newer panels and being angled towards the sun. I'm looking forward to reading about your upgrade when you get to it! 😂1 point
-
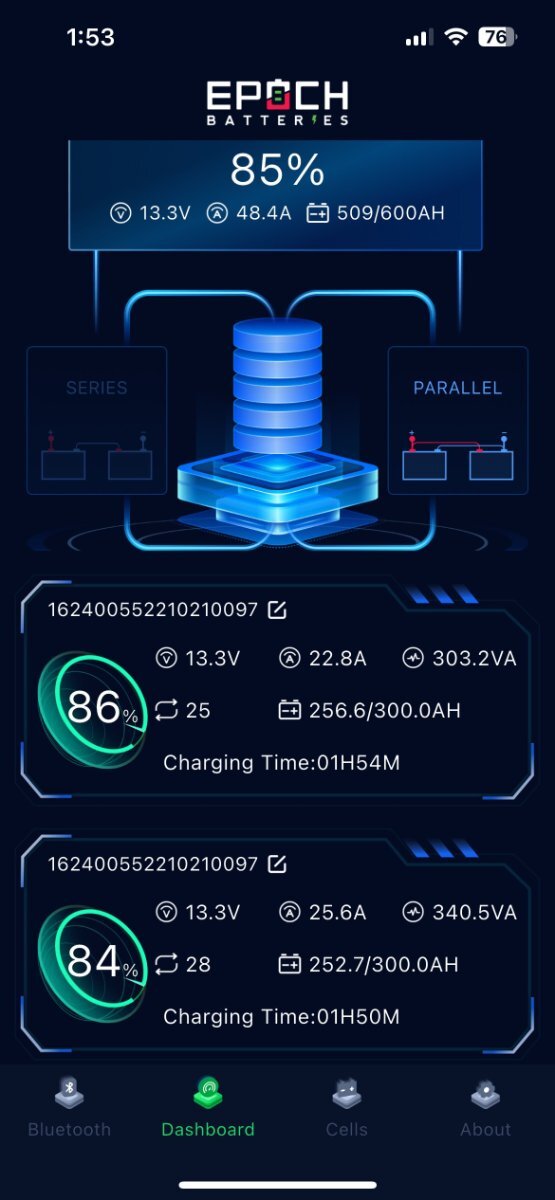
I'm an engineer, certainly a numbers geek, and OMG! I never added this up before. 🤣 Yes, you are absolutely correct. The Epoch app displays total amps +/- and amps to each battery. This was taken on a recent winter day, snow on the solar panels and I plugged in after several days of this weather. You can see +48.4A net charge to the batteries, with individual batteries receiving 22.8A and 25.6A (see pic). I should set our Victron to 100A charging and next time I'm down to 20% SOC we can recover in under 5 hours.
1 point
-
You may get some takers! I would, but I have a conflict and cannot make the Rally. 🙁 And btw, you don't have to reconfigure both chargers on day 1 of your new battery installation. You will want to to optimize charging to the manufacture's spec, but charging on LA or AGM specs will not hurt LiFePO4 batteries in the short-term.1 point
-
Back in 2020 Battleborn was a favored alternative. They have good product quality and many loyal followers. Over the last few years, they market their quality position hard but have not reduced prices relative to other manufacturers. Want an inexpensive solution, what Ron showed above is great (nice installation also)! The 460AH of LiTime batteries should cost about $900 about the list price of only one 100AH Battleborn. If I remember correctly, Bill @topgun2 did a similar install more recently. A 300AH Epoch Essential battery lists for $999 (sorry last week it pwas 15% OFF). On sale, you'd need to spend $2,250 in Battleborn batteries (and a lot more space) to get the same 300AH. https://battlebornbatteries.com/shop/applications/towable-rv/1 point
-
Gen11 - Great looking Ollie! And, welcome to the Forum along with your new baby! Did you report those 4 UFO's in the sky of the middle pic?😉 Bill1 point
-
We do the same with the inside switch. More to conserve propane though. I probably only use hot water once a day - usually less. We generally take our showers at the campground facilities, or at a health club depending upon how long we stay in a given place. I haven’t been turning off the switch on the outside. I guess I never thought about it. Nobody addressed it during our delivery process. I guess I’ll have to read the manual!1 point
-
It’s really quite simple and well within the skill set of anybody who can change their engine oil or a set of spark plugs. You WILL need a couple of Torx wrenches. I forget the size, but both/all were included in a small Elkind folding set, I’d guess a T-10 is one of them. Two open end wrenches to remove the gas fitting. (I don’t think there’s room to use flare nut or “line” wrenches.) About 5/8 or 11/16” I think. Also the big wrench for the nut holding the gas line to the manifold. Other than having to ease it out and caress it back in is to pull out the black control box at the top right of the heater enclosure when you open the access door. Easier than removing the ignition and flame sensor leads and less likely to break them. DO take the picture as Galway Girl suggested to put the disconnected leads back in the right place. Turn off the LP first of course. Once you overcome any trepidation about working on an unfamiliar piece of equipment, it’s a pretty simple job. As others have pointed out - if you fiddle with it, you likely void your warranty.1 point
-
If you are correct, it is a remarkably poor business decision by Truma. The sooner the product failure is resolved, the sooner it fades from the public consciousness, and Truma's quality reputation can be rebuilt.1 point
-
Can confirm. Spoke with Jason today regarding service on March 11-12. He has a burner set aside for me.1 point
-
Not trying to add fuel to the Truma fire, but we had problems with our Truma last spring after 4 1/2 years and the symptom, delayed ignition and the smell outside adjacent to the Truma. I was directed by Oliver to reach out to Truma, as I recollect and that wasn't unexpected. When I open the case with Truma support, an Elkhart based engineer reached out to me and said they didn't want me to use the Truma anymore. They made me promise as they felt it was a health and safety risk. I naturally agreed, particularly when they said they would have a certified technician of my choice replace the unit for free and document the installation of the Truma with pictures. We went with out hot water in the Oliver for a week at the Maine Rally. I reached out to Tim's RV in Erving, MA and explained to Tim and Brandon that Truma would be shipping a unit to them and compensating them for doing the pictures and installation. We arranged for a late June for the 1/2 day installation. Truma requires certified and trained technicians and extended a courtesy approval after discussing Brandon's experience and in light of our needs. Truma sent the brand new unit to Tim's. We were notified when they received it. Brandon confirmed the delivery too before I made the trip from Concord, NH to Erving. Tim and Brandon were very gracious and Brandon did an outstanding job on the install.1 point
-
As always, post your hull number and model in a signature in every post…. preferably your tow vehicle info too. Do not assume that we all know what you own. Otherwise we have to look at your profile page to see if it is there… These trailers change constantly from year to year, and you are very correct, the technology is not at all intuitive if something does not work correctly. Once we know what systems you have, somebody can assist. Off the top of my bald head, I suspect there is a problem with the transfer switch, which is supposed to seamlessly bring your batteries online as soon as you unplug from shore power. EDIT - The latest Xantrex inverter has a built in transfer switch. (My five year old one is a separate relay.) So either that inverter function failed (a defective unit):, or the batteries are not in fact charged (check the voltage with a hand volt meter.) That is far as I can go with this problem because I don’t have this system…. Good luck. John Davies Spokane WA1 point
-
FYI - Found this attachment for Lithionics specific storage procedure for the batteries now being sold with Oliver's. It's attached as a PDF bud also at the bottom of this Service Article page: Path: https://support.olivertraveltrailers.com/portal/en/kb/articles/lithionics-battery Lithionics Storage_Procedure_Rev_03.pdf CS1 point
-
When replacing my AGM batteries with Lithium’s I also put in a battery cut off switch. THen, in storage I shut off the batteries entirely. Even with everything off you will have some small power draws that add up over time. Also, I wouldn’t store at only 35%. The Battle Born tech told me to be at least at 50% before storing. I’m usually at 90% or higher when I park the trailer in our storage area. Then I shut off the batteries. If you don’t have a shut off switch, disconnect one of the ground cables on you batteries. Mike1 point
-
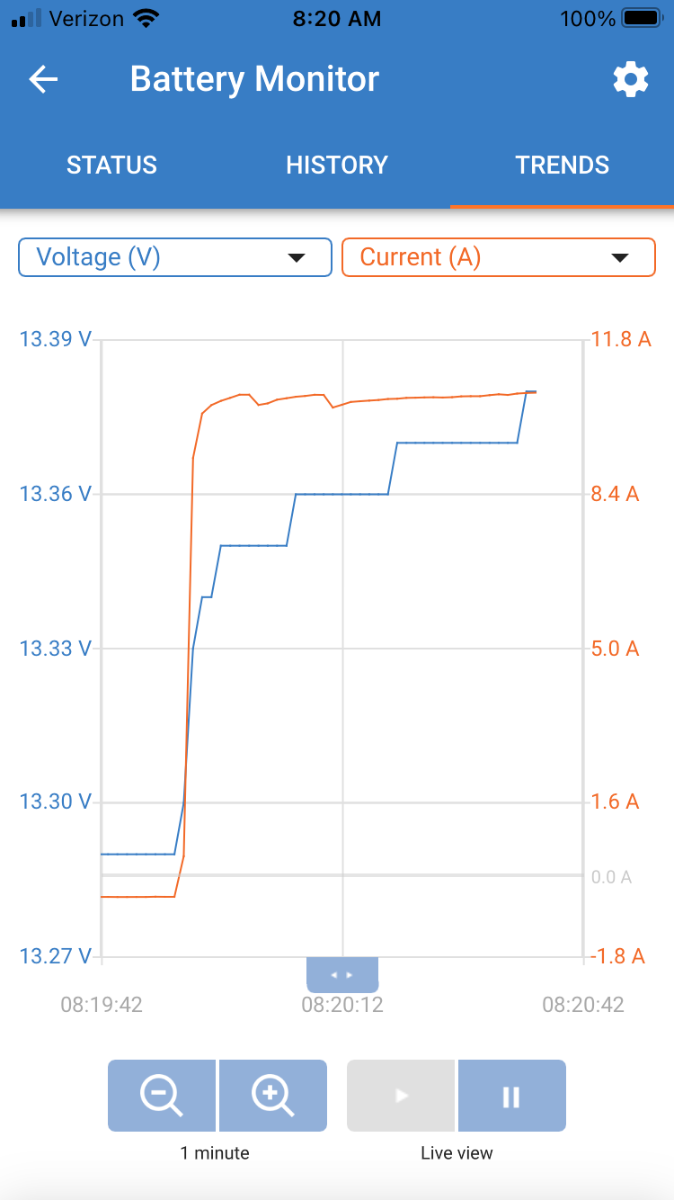
My Land Cruiser 200 charging voltage is 13.6 volts with the trailer hooked up (using a digital OBD2 Scan Gauge).It never gets above 14 volts, regardless. Here is the history using my VictronConnect app, showing the initial parasitic load (propane detector and stereo mostly) of about minus 0.3 amps, then the engine starts and the trailer battery voltage and current shoot up nicely, to just under 11 amps. It maintains that charge rate right up until the batteries are close to full. , The only fly in the ointment is that the wiring needs to be 12AWG or larger, all the way from tongue to charger. My Hull # 218 had a splice from 12 AWG down to 14 AWG, so I had to rewire the entire 7 wire harness, essentially. That is another thread. ... https://olivertraveltrailers.com/forums/topic/5271-how-to-junction-box-for-the-7-wire-trailer-harness-under-the-front-dinette-seat/?tab=comments#comment-54709 I went on a 90 minute, 40 mile test drive yesterday, it worked flawlessly, I can monitor the Victron app inside the truck, the sky was hazy high clouds, not ideal solar conditions, but the total charge current kept around 16 amps, going up to 22 when the sun broke through a little. Total cost was about $312, not including all my labor! Questions are welcome. John Davies Spokane WA
1 point


-
Recent Achievements
-
")

")


.thumb.png.eff4d7fbcbf1eb34d62e5c88cf70a0ee.png)


