Leaderboard


Popular Content
Showing content with the highest reputation on 08/10/2025 in Posts
-
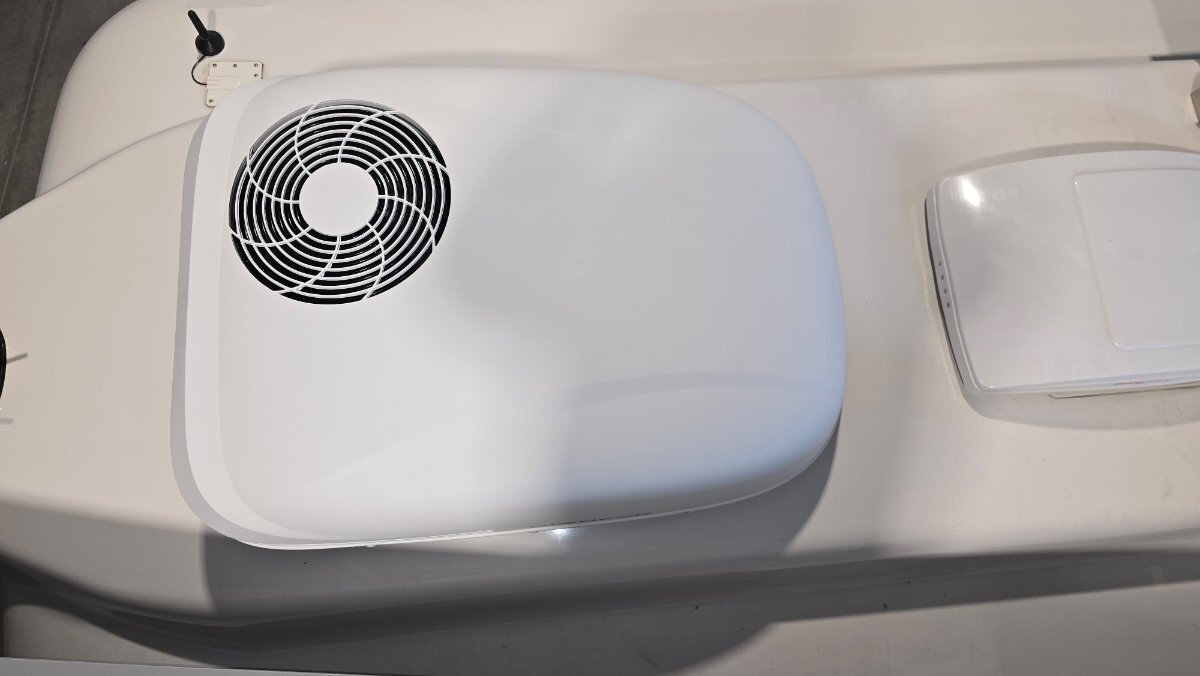
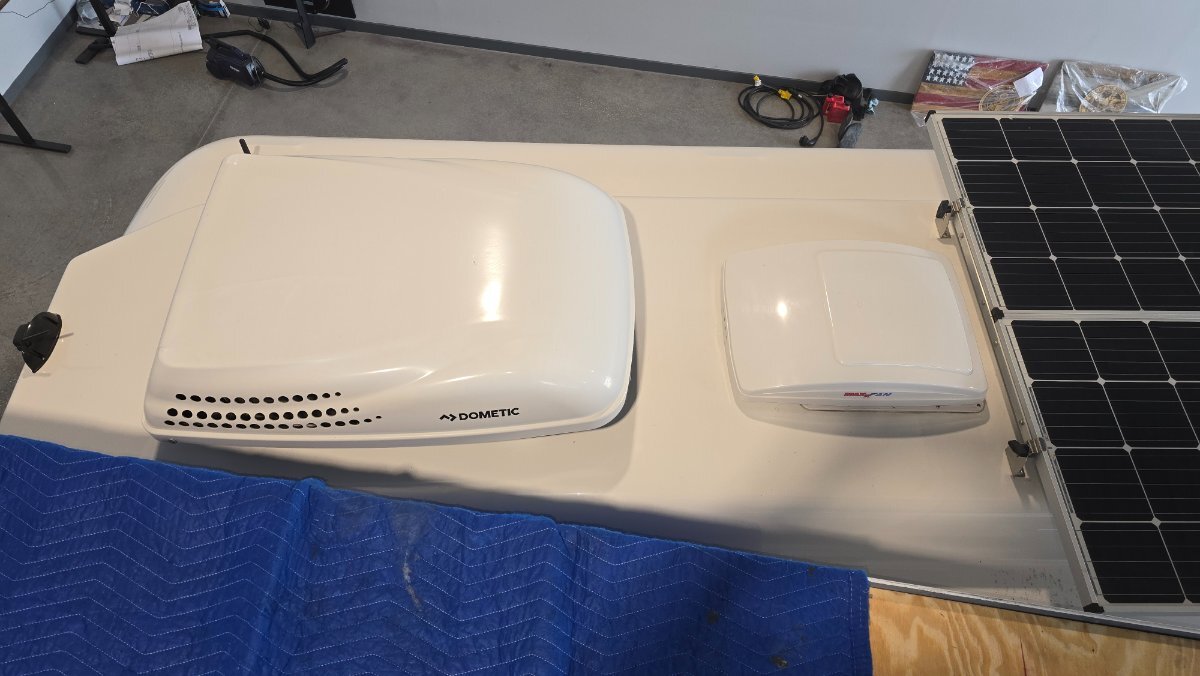
After 8 years of use it was time to retire the Dometic air conditioner. I have looked at several brands and for one reason or another I decided on the Tosot brand which is the same as the Atmos brand and probably others as well. Since last summer the Dometic has been making fan bearing noises off and on and I’ve grown tired of climbing on the roof to oil the motor. After eight years I really didn’t want to replace the motor only to have something else fail so this was an excellent excuse to replace it with a higher efficiency quiet unit. We’ve been traveling out west for the past three and a half months and were passing “close” to Elkhart Indiana so decided to drop in and visit the SDG folks. The entire replacement process was perfectly coordinated and our installer Joe knew exactly what needed to be done. We’ve camped out in their parking lot the night before with 30 amp shore power available. The next morning at 8:00 AM I backed our trailer into their shop and about two hours later the job was done. They even printed a custom cover plate to cover up the holes from the old Dometic thermostat. We were able to sleep through the night with the air conditioner running for the first time in 8 years without having to use earplugs, and to watch television at half volume instead of full volume! The air registers force air towards the front of the trailer instead of most all of the cold air being forced onto the bed area. We’re parked in central Ohio for a few days and it’s very hot and humid but the air conditioner is keeping the Oliver very dry and comfortable. On low fan the unit draws about 9 ac amps. Running from the inverter the inverter draws 94 dc amps. The Dometic on inverter would draw between 130 - 140 dc amps under similar conditions. We are extremely pleased with the work that SDG provided and with the comfort and efficiency of the Tosot unit. I strongly recommend the folks at SDG for the air conditioner replacement. They have done several Oliver air conditioner replacements and have experience in replacing/installing air conditioners on many different rv types.5 points
-
Rob, just our 6.7 diesel 1 ton, and we absolutely loved the Million Dollar Highway. We let our diesel engine brake do all the work. We would drive it again in a min.🤩
 3 points
 -
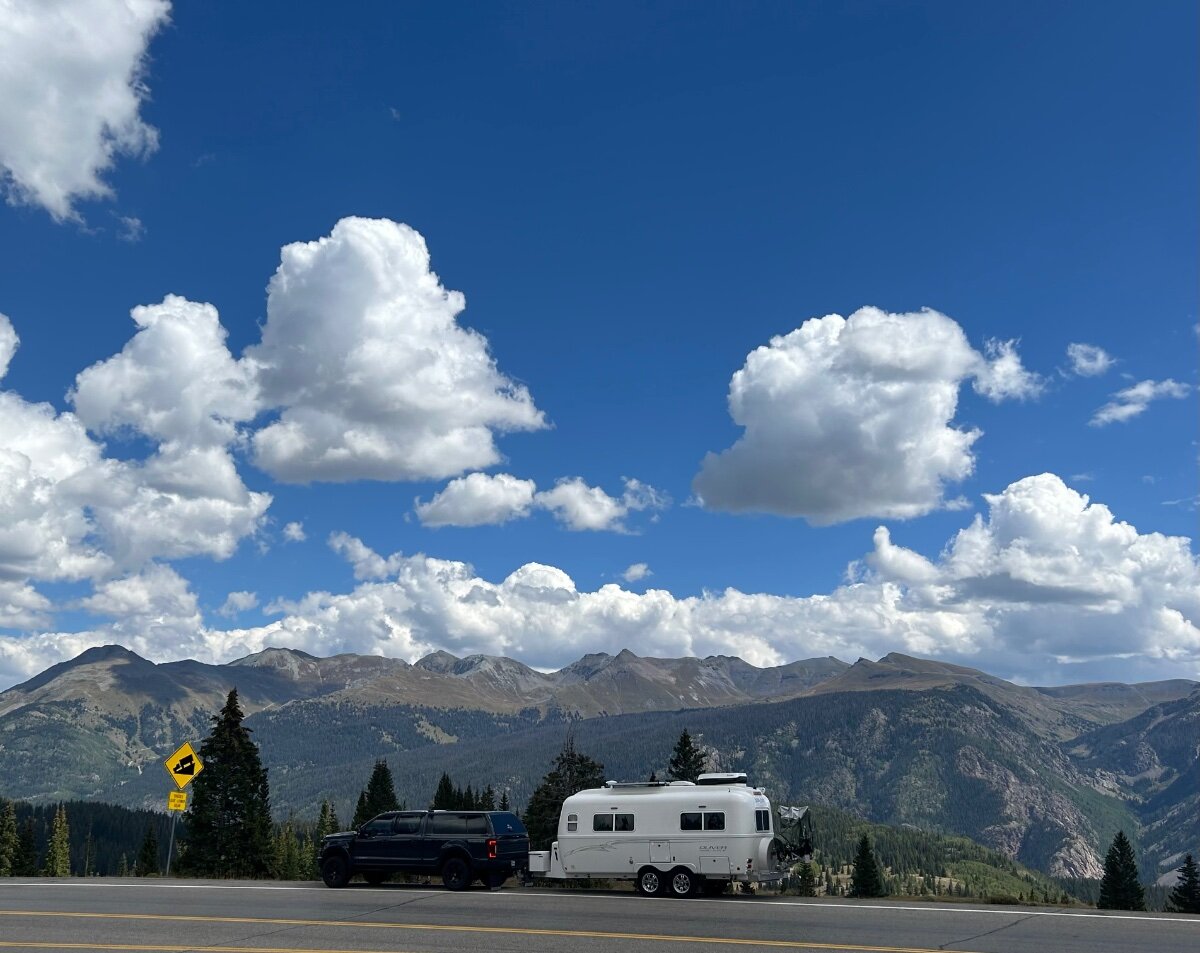
We have done 550 several times each way with our previous Ram 1500’s. The grades up and down were not a big issue. Traffic moves at a leisurely pace and almost everyone drives cautiously and at a reasonable speed. You have to respect the road. We’ve also done the drive between Durango and Ridgway many times towing with our 2500, braking is mostly taken care of by the engine brake. We’ve also done the trip west through Delores and Rico on 160 and 145 that takes you by Telluride. It’s scenic in a different way, a little longer but a nice way to go. We’re currently camping in Durango visiting our son and family on our way to the PNW. He commuted up 550 weekly to Grand Junction for a year when he was working there. He said it was closed a few times due to heavy snow, but other than that he never had an issue. Mike3 points
-
Because of tariffs on imported goods and other variables it would be best to contact SDG in Elkhart directly for a quote. The Tosot air conditioners that I have seen online lately range from just under 2,000 to just over 2,000 plus shipping. There may be some dealers that offer the units for well below the above listed prices.3 points
-
Thanks for sharing your A/C replacement experience. The Tosot unit looks very attractive compared to the Dometic. Would you care to share the cost of the new unit plus installation? Thanks. Don3 points
-
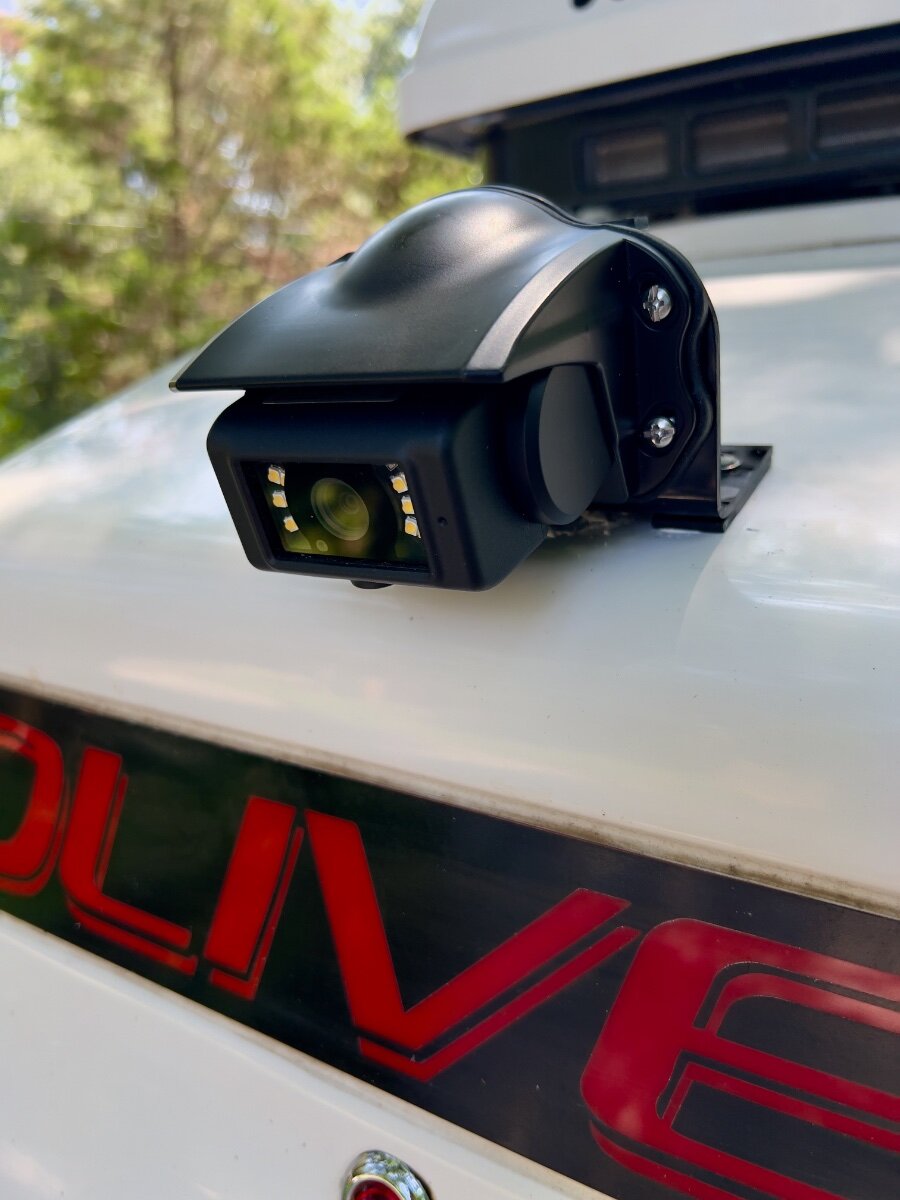
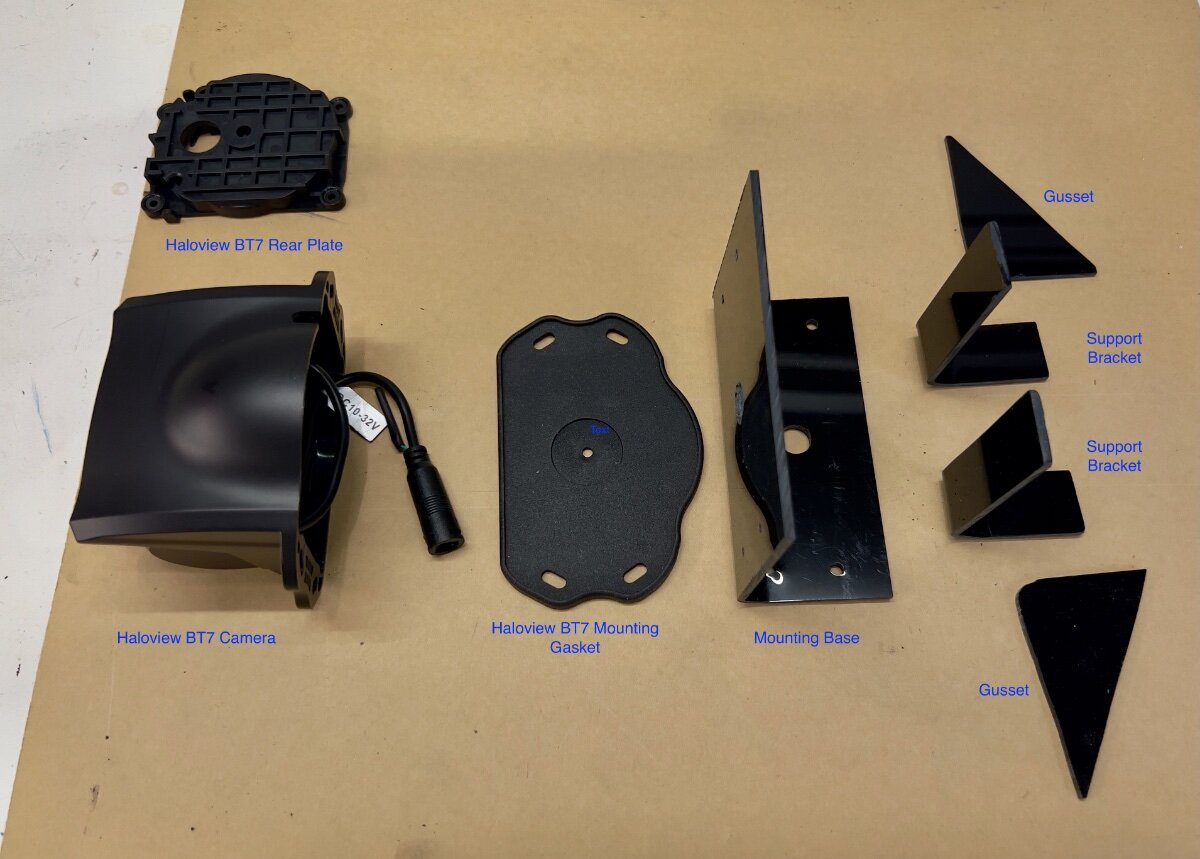
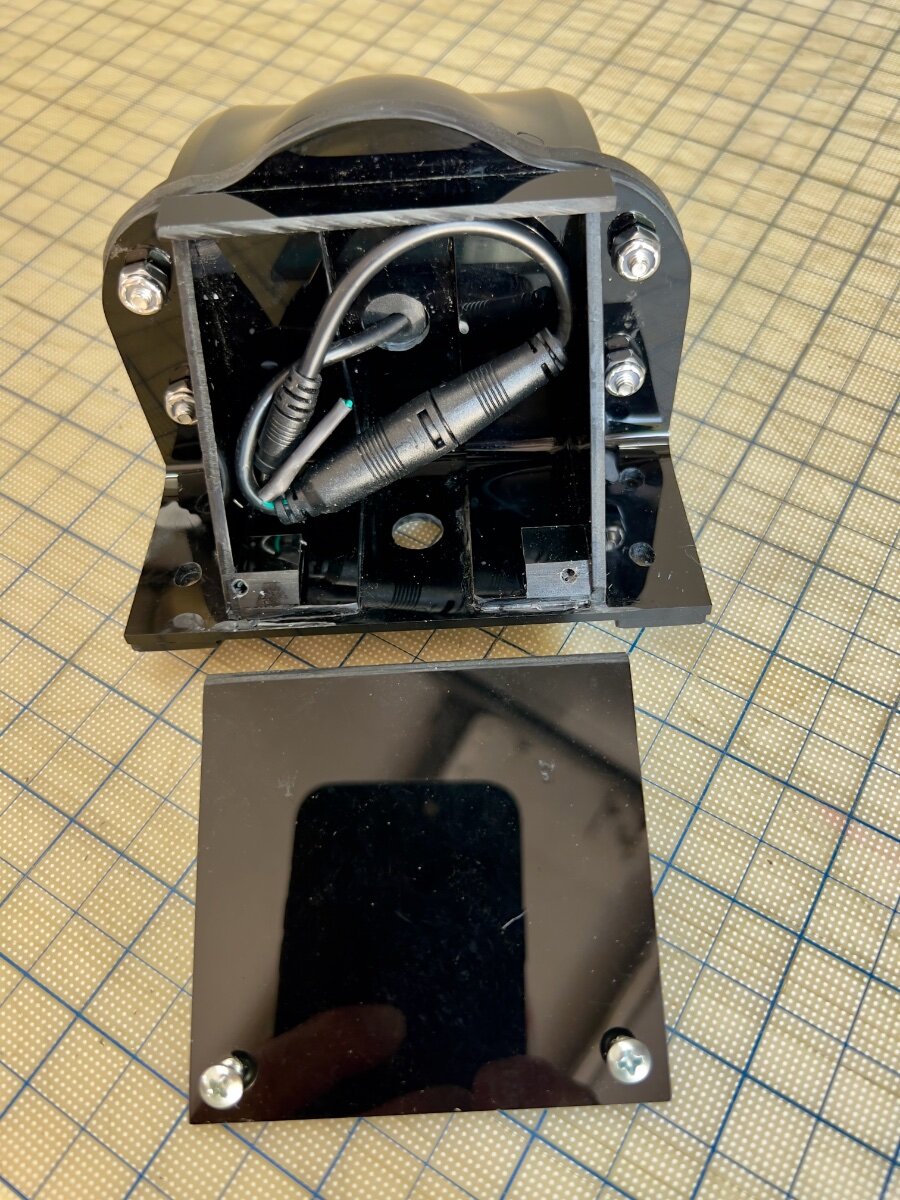
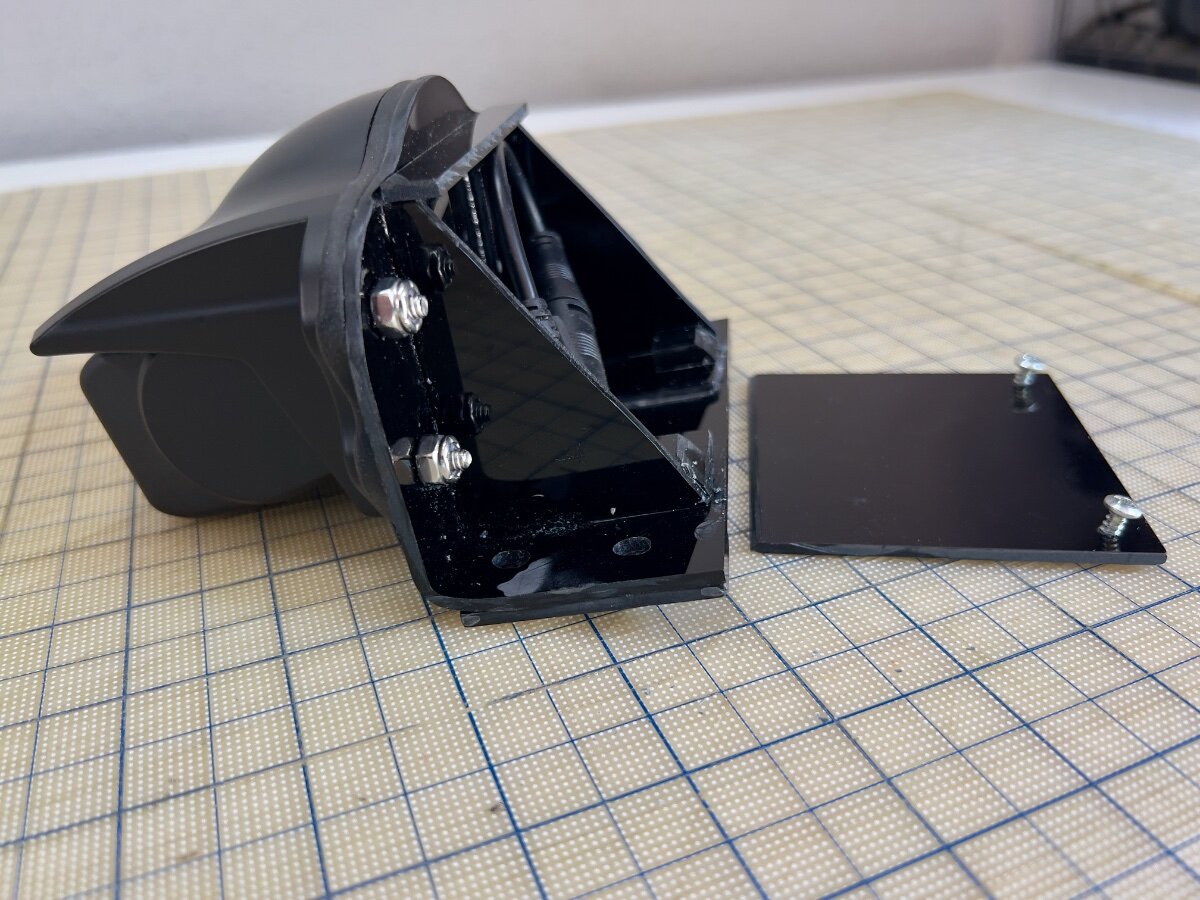
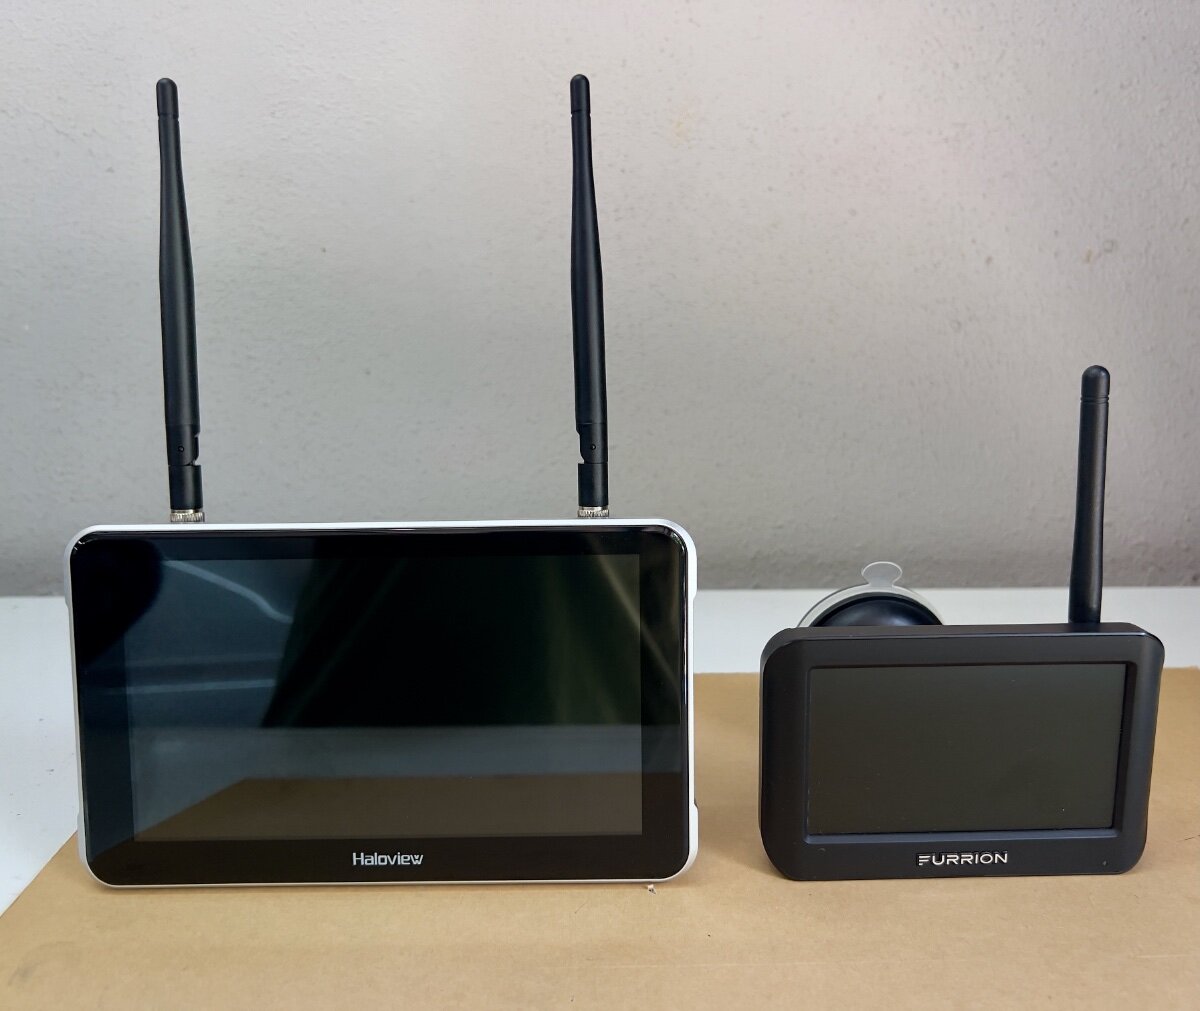
I recently purchased a Haloview BT7 Touch Rear Camera to replace the Furrion Vision S Camera System (Model F0S43TADS) we purchased as an accessory option on our 2022 LEII. Following delivery of our trailer in February, 2022, it was quickly evident the Furrion camera was largely useless. I continued to use the Furrion camera, with increasing frustration. The very limited view to the rear was a safety issue. I began to research RV rear cameras and after reading many reviews selected the Haloview BT7 Touch. I was impressed by the specs and favorable reviews, but failed to note the camera is designed to mount to a vertical rear wall, not the sloping rear roof of an LEII. I could have returned the Haloview camera, but I did not see a good second choice. Thus, I decided to fabricate a mount to be installed in the same position as the Furrion camera. The result is the custom mount below: Fabrication Process I had some black acrylic sheet, .010" thick, from a prior project (See: Window Vent Mod- Louvered Ventilators), which seemed suitable material for a camera mount. I had some thicker acrylic sheet, but decided to first use the thinner sheet to create a mockup by bending the acrylic sheet. Initially, I had concerns the thinner sheet would not be sufficiently rigid to hold the camera steady, but I was not sure I could bend the thicker sheet. The Furrion camera and its mounting gasket were removed from the roof of our LEII and used to begin the layout of the base for the new mount. I wanted to use the four existing holes in the roof which held the Furrion camera in place. I had a scrap piece of acrylic about 7" wide and 20" long. I used 2" blue painter's tape applied to the acrylic and, with a fine point mechanical pencil, began marking out the mounting hole pattern from the Furrion gasket. Next, I flipped the scrap sheet of acrylic over, applied blue tape and began positioning the Haloview camera on the tape. My initial concept was to have the main part of the mount be a single piece of acrylic bent to an angle of approximately 80 degrees. When mounted to the sloped roof of the trailer, the face of the mount would be approximately vertical for mounting the Haloview camera. The layout of the mounting base resulted in the base being approximately 2.0" wide, and the nearly vertical mounting face approximately 3.5" tall. I also allowed about 0.75" for the bend radius. So, before bending the rectangular sheet of acrylic was approximately 6.25" x 7.0". I cut this piece from the end of the 20" long scrap. Before bending, I drilled all needed holes in the mount base, as marked during the layout process. NOTE: See YouTube for many useful videos on bending acrylic sheets. To bend the mounting base, I sandwiched the rectangular piece of acrylic between two pieces of scrap wood approximately 12" x 3", with the acrylic area to be bent aligned on the long side of the wood scraps. I extended the acrylic from the wood scrap approximately 2.5" to 3.0" in preparation for bending. I clamped the sandwiched pieces to my workbench to ensure it would not move during the bending process. Using a heat gun, I began to heat the area to be bent, moving back and forth. Wearing gloves, I held two other pieces of wood, each approximately 2" x 5". As the acrylic became heated, I applied gentle pressure to the extended portion of the acrylic, using the pieces of wood in my hand. I continued to move the heat gun along the bend area until I could begin to bend the acrylic. As the acrylic began to bend, I used care to keep the bend straight and at 90 degrees to the sides. I used a steel carpenter's square to test the acrylic as I bent it. As I approached the desired finished bend angle, I released the acrylic to check the angle. Satisfied with the bend angle I trimmed the top of the mounting base to the contour of the Haloview mounting gasket with a scroll saw. Having the mounting base bent as desired, I began to plan how I would make it sufficiently rigid to hold the camera steady. The photo below shows the other parts which would comprise the rear support area. Also at the rear I wanted to enclose the wiring connecting the camera to the 12VDC power from the trailer. Haloview BT7 Camera and mount parts Once the mounting base was bent as desired, I cut two pieces approximately 1" wide from either end of the mounting base using a table saw. These two pieces became the support brackets. Being bent at the same angle as the mounting base, they fit well to backup the mounting face. The triangular gussets also add rigidity, being bonded to the mounting base and the support brackets. The photo below shows the mounting base (face down) with the support brackets and gussets attached at the rear. Acrylic cement was used to weld all parts together. Mounting base face down with support brackets and gussets in place Side view of mounting base with support brackets and gussets in place To protect the power supply wiring from UV exposure and squirrels, I added a cover and a top piece across the gussets. The rear compartment does not need to be watertight, since the wiring connectors are watertight. Haloview includes a short adapter which connects to the existing Furrion connector protruding from the roof. The photos below show the camera on the mounting base and cover from the rear and side views. Mounting base and cover (Rear) Mounting base and cover (Side) Mounting the Camera to the LEII When I removed the Furrion camera from the roof of the trailer, I noticed several things: The 12VDC power supply wiring passes through a hole in the trailer and was effectively sealed with the white caulking used throughout the trailer. This was not visible before removing the Furrion mounting gasket. The sealant was in good condition, however, it formed a small mound on the roof of the trailer. The base of Furrion camera was hollow and the mounting gasket conformed to the mound, allowing the outer shell of the camera to meet the trailer roof. The holes for the screws holding the camera to the trailer roof are NOT through holes, reducing the risk of water leaks into the trailer. The Furrion camera was not mounted at the lateral center point of the trailer, but not so far off that I had noticed in over three years using the trailer. The Furrion camera was also not quite parallel to the Oliver sign just below its mounting position. From the ground this was not perceptible. There were multiple trial fittings of the new mount as the fabrication process proceeded. From these fittings the following adjustments were made: The mounting holes for the new base were elongated (using a Dremel tool) to permit the new mount to be swiveled slightly in azimuth to have the front face of the camera parallel with the top edge of the Oliver sign. Two acrylic "runners" approximately 0.5" wide and 2.0" long, were attached to the bottom of the mounting base to straddle the mound of caulk where the power supply wire passes through the roof. I reused the mounting screws, putting fresh caulk into the screw holes and around the screws. The new mount covers the same area where the power supply wire passes through the roof. It is protected from UV by the new mount, but water can run under the new mount. The Results The Haloview BT7 comes with two mounts, one with a suction cup for windshield mounting, the other a 3M VHB bonded disk for attachment to the upper dashboard. I prefer the windshield mount, which is substantial and widely adjustable. It is very stable, with no vibration. The signal strength indicated on the monitor showed a 5 bar strong connection to the rear camera. Monitor comparison- Haloview 7" vs. Furrion 4.3" (diagonals) Yesterday, I took a 35 mile shakedown cruise for the camera on the way to the storage facility. The Haloview camera and monitor have met all my expectations. The visibility to the rear is vastly improved. I now see vehicles approaching in the same lane and in lanes on either side. I was particularly impressed to see merging traffic entering the highway on my right, before I could see them in my mirrors. Overtaking traffic is now seen well before they come abreast of the trailer. In bright Texas sun, the video on the monitor is clear and not washed out. There is no jitter in video from the camera, and the signal was always strong, even with the antennas folded horizontally across the top of the monitor. The touch screen controls work well and are easily used while driving. Also, my custom mount proved to be very solid, with no vibration of the video due to camera movement. I recommend the Haloview BT7 Touch camera to anyone considering replacing their Furrion rear camera. Unfortunately, Haloview does not appear to have a roof mount adapter available. I had sent an email query to Haloview Support and received a reply indicating they did have such a mount and provided the following URL: https://www.haloview.com/bt-series-camera-peaked-cap-bracket-compatible-with-furrion-and-voyager-pre-wired-rvs.html. Nothing on this page convinced me it was a roof mount. It does say the Furrion hole pattern is matched for mounting to the trailer. But only if the Furrion camera was mounted to a vertical surface. I have not yet received a reply to my email pointing out they sent me a link to a vertical mount. I hope this is useful to other OTT owners with Furrion cameras. Regards, Don
2 points
-
2 years ago on our way back from Glacier we traveled the Million Dollar Highway in our 2019 1/2 ton Silverado, 8 cylinder 5.3 L, 8 speed automatic, with tow package. A couple of stretches had me gear down to 2nd gear at 30mph to keep engine below 4000 rpm. As we are full timers we were just below 7000 lbs on the trailer and about 100 lbs below max weight for the truck. Didn't mind going uphill, but downhill we still needed the brakes more than I would have liked. It was a beautiful drive but once is enough. With 140,000 miles on the truck now I don't need to push my luck. Back then we probably had 80,000 miles on the truck. BTW we had our 1 and only flat tire on that highway and we didn't even know it. Another motorist tried to get us to pull over for several miles. I finally found a place to pull over and sure enough the tire was shredded...luckily no damage other than needing a new tire and rim. The next week I installed a TPMS.2 points
-
Rob, going north on 550 keeps you mostly in the inside lane against the mountain. Going south you’re mostly on the outside lane which can seem more intimidating. This is all between Silverton and Ouray. The western route takes a little longer but we enjoy it too. Ditto on Durango, we love it here. Mike2 points
-
Check for loose connection to motor , also that unit has a 2 yr. Warrenty. Check your manual.. your unit is only 1 1/2 yr old..good luck..stay safe out there…2 points
-
You are not the only ones who have opted for the alternate route via 145 for the same reason. I have been to Delores in the past but don't recall the market but will certainly look for it if there again. Have an old forest service friend who lives there too. I understand CO 145 is also very pretty as well.2 points
-
@Mike and Carol Mike wrote he towed the Million Dollar Highway with a half ton truck (when in another thread I wrote I was too chicken for that route)! We went to Ouray then back out to Ridgway, south to Telluride and took CO 145 down through Rico and to Delores. We're heading back up there for a few weeks late Sept to mid Oct. Love the area! If you're ever in Delores go to the Delores Market. It's an amazing market with onsite butcher, fresh local produce and amazing baked goods! It will be our first stop on the way up and last stop on the way back! 😂2 points
-
Good on you for your perseverance and skill at getting the Norcold fixed! Thanks for providing part numbers and giving hope that problems with these, now obsolete, refrigerators can still be repaired. I think it would be great if you explained how to remove the front panel right here on the forum. I'm sure others would benefit . . if not now, then later. Congrats! Geoff2 points
-
After trying to get our Norcold 3 way refrigerator repaired and having Oliver service center look at it twice. The service center quoted us a price of $4800.00 to replace the Norcold with a Dometic 12 volt compressor unit. I decided to try to repair it myself. The power board is easy to change it is the one accessible from the out side lower panel. That didn’t fix it. So I changed the optical display board next part number 628663. This board is located behind the front panel of the refrigerator. This board didn’t fix it either. Next I replaced the front button control panel part number 630619. The fridge is working properly now. I purchased these items on eBay. The removal of the front panel was the most difficult of this process. Message me if you would like an explanation of how to remove the front panel.2 points
-
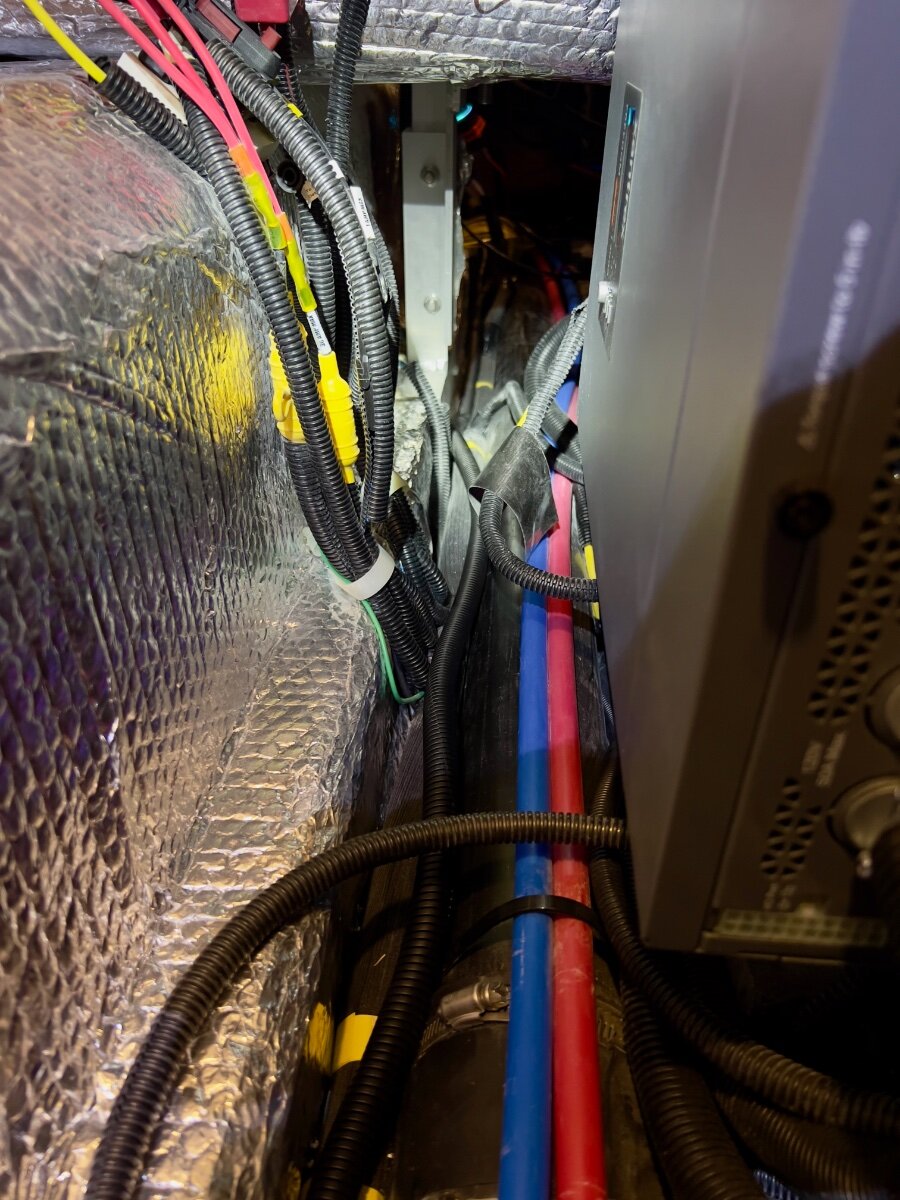
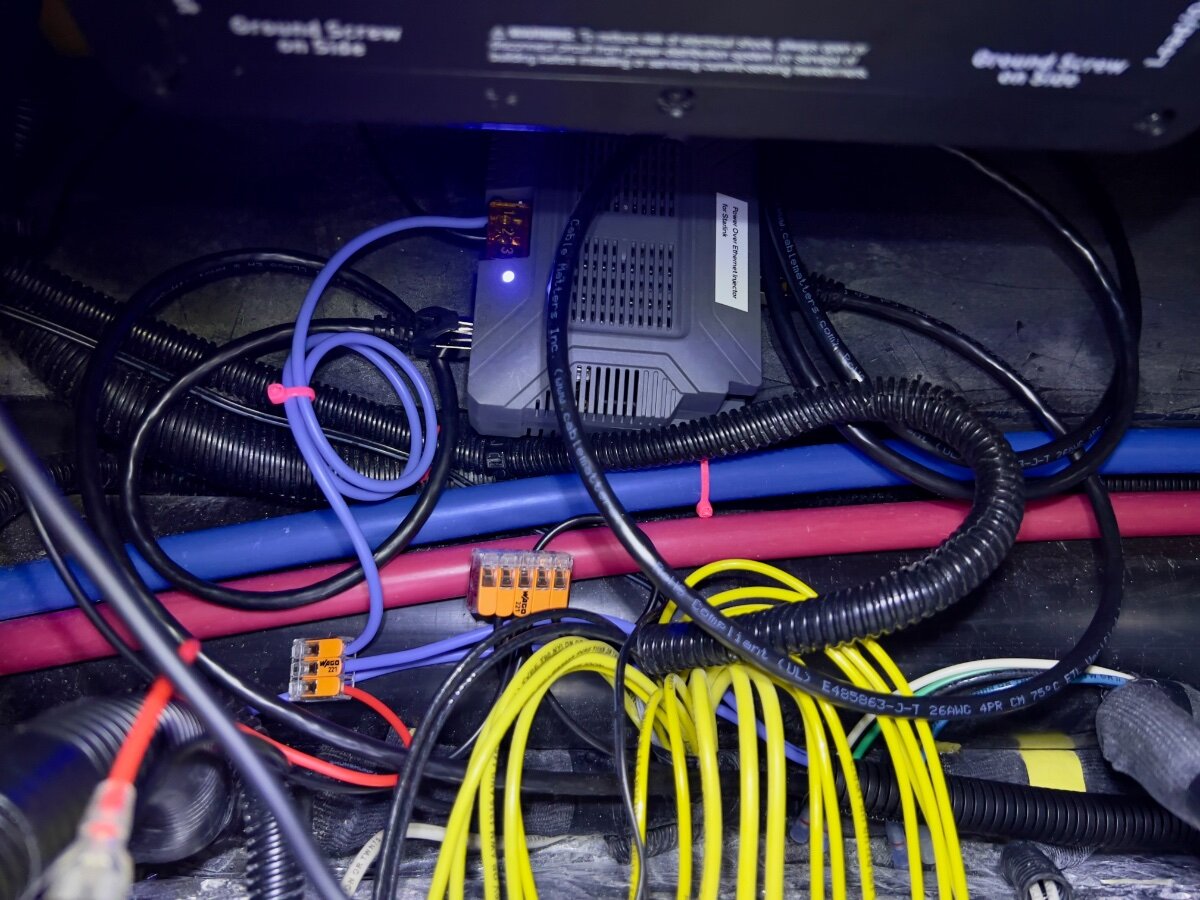
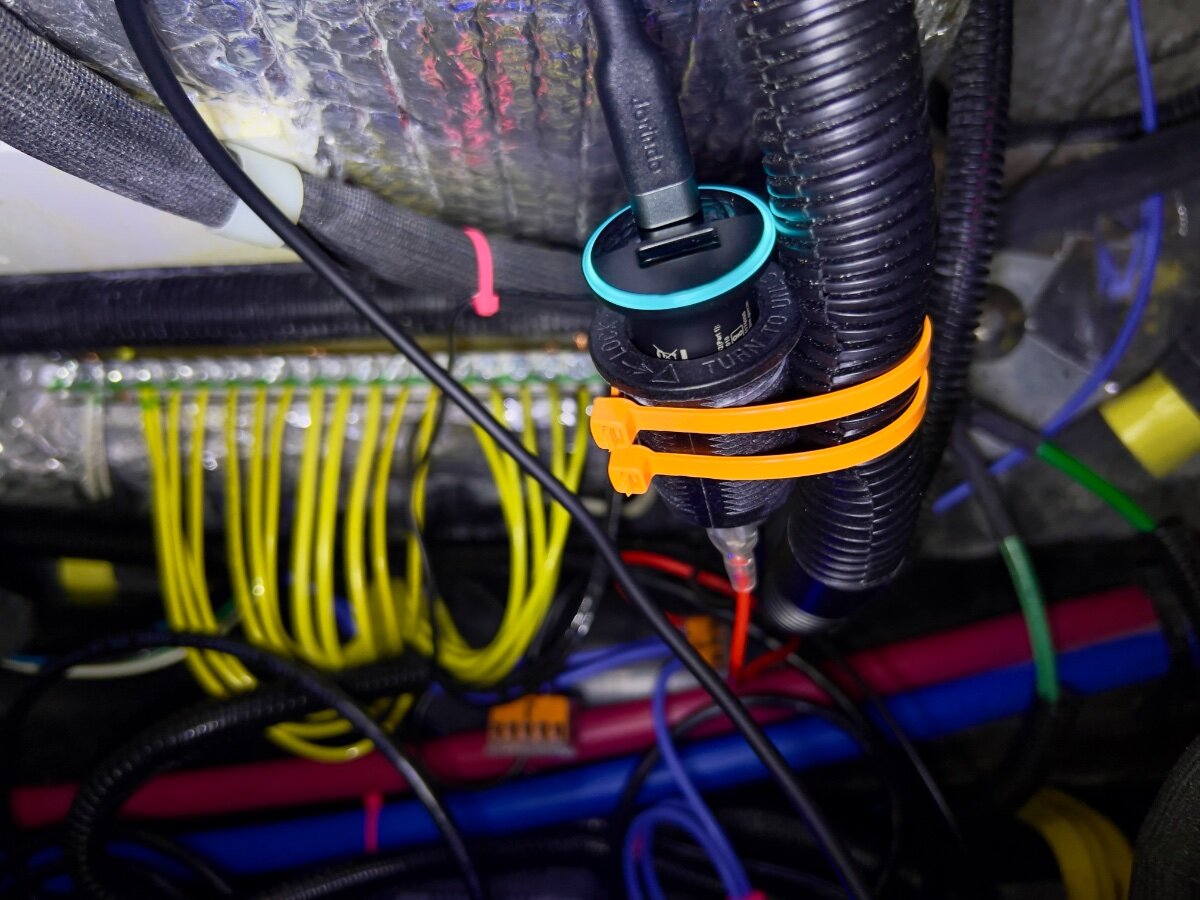
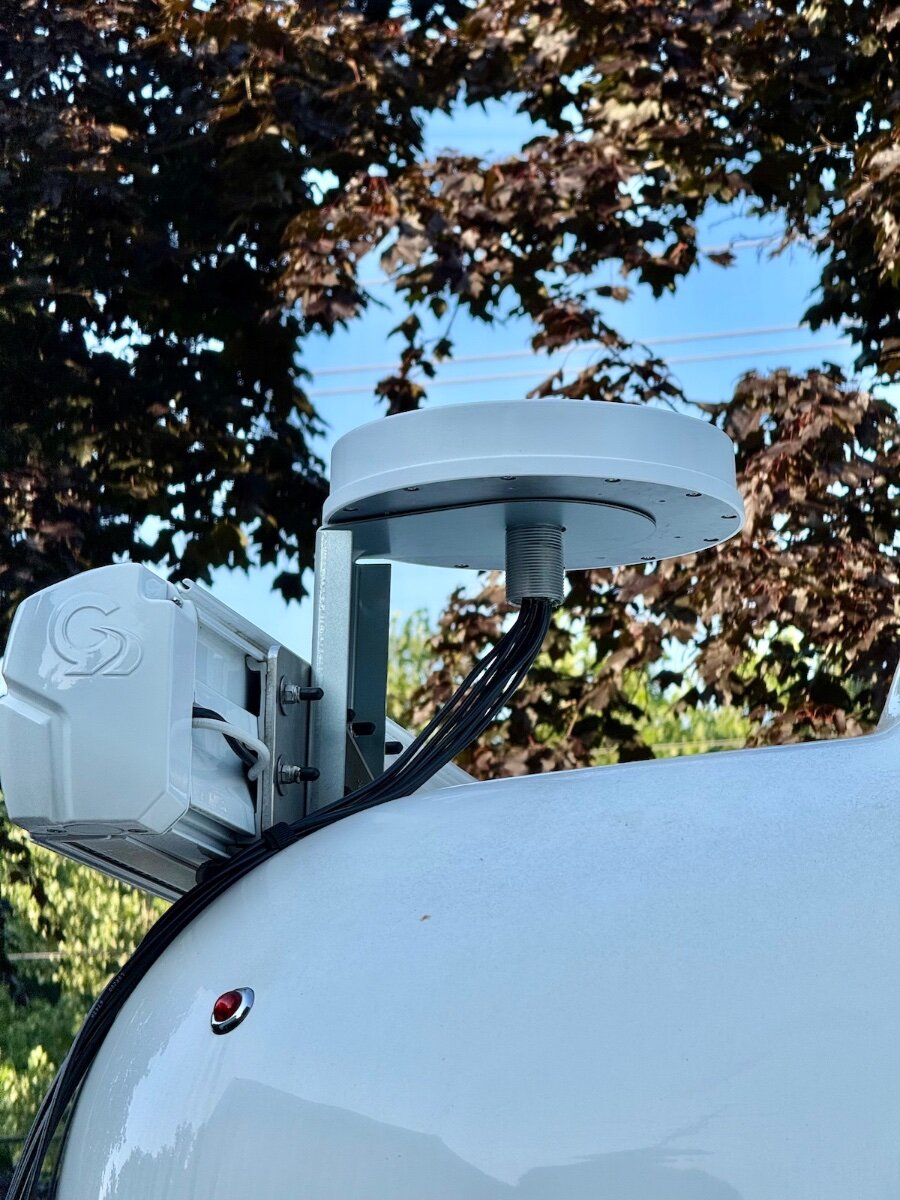
On a recent trip from Dallas to South Carolina we stayed in multiple locations with no (or very limited) communications capabilities (cell phone or WiFi). Over the three years we have owned our LEII, there have been many other occasions with no ability to communicate. As a result, we decided to order a Starlink Mini and a Starlink Router Mini to use on our trailer trips. I have been following Starlink related postings on the OTT Owners Forum, especially since the release of the Starlink Mini. I have found the postings by @Snackchaser particularly helpful in planning the installation of our Starlink system. I especially liked the use of a Power over Ethernet (PoE) injector to power the Starlink Mini and to provide an Ethernet connection from the built-in router back to the trailer, using a single cable. Installing the PoE injector and a DC powered router in the attic of the LEII seemed a reasonable location, being nearly directly above the exterior Furrion ports for connecting satellite and cable TV. So I planned to install in a similar location in the attic of our LEII, assembling a list of the components required. I ordered a PoE injector from MobileMustHave.com and the rest from Amazon. Once all the key components had been delivered, I began the installation, with the first step being to replace the Furrion Satellite coax port with an RJ45 pass-through connector and to fish an Ethernet cable from the basement to the attic. Replacing the Furrion coax connector with the RJ45 pass-through connector was no problem, even though enlarging the hole through fiberglass exterior shell was required. However, fishing an Ethernet cable from the basement to the attic proved to be a major obstacle. Although I have prior experience fishing wires through difficult spaces, I was unsuccessful getting a fish tape (or rods) from the attic to the basement. I could get the end of the fish tape rods down near the ceiling of the basement, where the interior shell ends and multiple cables run up to the attic area at the rear of the trailer, but not into the basement. As suggested, I tried following the A/C drain line and multiple other locations but could not get past the bottom of the inner shell into the basement. I tried running the fish tape/rods in both directions. No luck. Consequently, I began to ponder other installation locations inside the trailer for the PoE injector and Starlink Router Mini. After a couple of days, I had an Aha! moment- install the PoE Injector and Router Mini under the rear dinette seat. I inspected the space between the basement and the rear dinette seat, nearly all of which is readily accessible from the two rear street side hatches and the rear dinette seat hatch. Only the space under the battery compartment is not accessible from directly above, but is easily accessed from either side. I looked for any obstacles to using this location and found none. I could easily route the Ethernet cable from the Furrion/RJ45 pass-through connector forward to beneath the rear dinette seat. I located the PoE Injector atop the trailer frame member, just below the Progressive surge protector box, which is mounted on the aisle wall of the rear dinette seat. The PoE jack and the power terminals of the PoE Injector are positioned toward the front of the trailer. I connected a 20 foot shielded Cat 6 cable from the inner side of the Furrion/ RJ45 port, then routed it under the floor of the basement, around the street side rear stabilizer, then following the waste water line, forward to the area under the rear dinette hatch. About 3 feet of excess cable are coiled in the basement, concealed by the rear wall of the basement. I installed a lighted rocker switch through the forward basement wall, mounted high, almost directly above the side-to-side bubble level on the left side of the basement entry. This switch is to control 12VDC power to the PoE Injector and the Starlink Router Mini. Using 14 AWG silicone coated wire, I ran two purple colored wires from the space beneath the rear dinette hatch back to the rocker switch on the forward basement wall. A third, 14 AWG black wire was also run along the same route to the rocker switch. The switch has two terminals with red lead wires,: one to the DC power source and one to the load. The third terminal has a black wire, which connects to ground (the bus bar). The ground wire enables the light on the switch to operate when DC power is ON. On the DC power panel, position 15, I installed a 15 amp fuse. One of the purple wires connects to the 12VDC positive terminal on the PoE Injector. The other purple wire connects to position 15 on the rear of the DC power panel, using a crimp on connector. The single black wire from the switch connects to the ground bus located under the rear dinette seat. Another 14 AWG wire connects the PoE Injector negative terminal with the other end connecting to the bus bar. All wire-to-wire connections were made using Wago lever lock connectors. I also added a 12VDC auxiliary power outlet (cigarette lighter type) which is connected to the same circuit as that which powers the PoE Injector. An Anker 323 USB-C Car Charger Adapter (USB Power Delivery (PD) capable) plugs into the auxiliary power outlet. A USB-C to Male to DC 3.5 x 1.35mm Male Power Jack is used to power the Starlink Router Mini from the Anker charger. I found the Starlink Router Mini conveniently fits on top of the Progressive Surge Protector box. I later secured it with a releasable zip tie around the surge protector. The 20 foot Cat 6 Ethernet cable from the rear connects to the PoE jack of the PoE Injector. A 5 foot Cat 6 Ethernet cable connects to the LAN jack of the PoE Injector and to the WAN/Satellite port of the Starlink Router Mini. All Cat 6 Ethernet cables used are shielded. I believe this installation location approach has several advantages over an attic installation: Access is MUCH easier. Fishing wires is no challenge. A dedicated circuit from the DC power panel provides power to all Starlink related components. A lighted switch for the PoE Injector and Starlink Router Mini is located in the basement, near the exterior pass-through Ethernet jack. The PoE Injector is located where it cannot be covered by clothing or other cargo stored in the attic which might cause overheating. The VERY bright blue light on the PoE Injector is not visible in the cabin (always ON if power to the PoE Injector is ON). The Starlink Router Mini is located centrally in the trailer and should provide uniform WiFi coverage within the trailer. We have not yet taken the Starlink on a shakedown trip, but plan to do so at the end of August. Regards, Don
1 point
-
Ah the beauty of a big diesel engine when it comes to engine braking. All that compression truly becomes helpful on these steep descents. A definite disadvantage for gas engines especially the 6 cylinders, turbo boost or not. A couple of years ago I learned this lesson all too well while going over Teton Pass dropping down to Jackson. By the time I was halfway down my then 2013 Ecoboost and Ollie brakes were all smoking. Even 2nd gear was not much use on a 10% grade that runs for about 10 miles. Not something I would ever like to repeat. We were not the only ones that day smoking brakes either. A fifth wheel just in front of us being pulled by a 3/4 ton truck was also in trouble and had to make an emergency pull over. Thus my caution on the Million Dollar Highway.1 point
-
Just an FYI. If the digital rear view fails, it still acts like a normal mirror. It has to, because the camera doesn't work well in the dark.1 point
-
@Dennis and Melissa Yes to what @Golfnut says! Put a work ticket in with Oliver so that you’re on the books for warranty. No need to give etrailer any money. Also suggest a quick phone call to Oliver to get help to trouble shoot. You are surely not the first with this issue. Post up when you learn the fix! 👍🏻😊1 point
-
Though our 2025 Sierra does interface nicely to Apple CarPlay, I find that I have to pick up my phone to kick off certain apps. That’s something I’m pretty rabid about not doing. Our 2021 GMC Canyon had apps for The Weather Channel, and Audio Books. Seems I can’t get those any more as GMC ended their contract with TWC - so now - not even a basic Weather app that’s native to the truck. If I’m spending $50-$80K on a truck, I -don’t- expect to have to bring my own phone to get the most utility out of it. As it is, by the time I pay the monthly OnStar subscription - and the additional $$$ for data, I honestly shouldn’t need to involve my phone. Digital rear view mirror was an option, but I figured one more thing to go wrong and leave me without a rear view at all. There are a dozen cameras on the Denali anyway, so parking is already pretty easy. My side mirrors do fine for driving straight ahead. I'm debating paying another $3-$500 for the “transparent trailer” camera that uses the infotainment system display. Though we do have the Furrion back-up camera on the Ollie (“electronics package”) I’ve only used it once and put it aside. That display and cable are just too much clutter in the TV cab for 45 seconds use once every few days or weeks. I’ve gotten pretty good at backing this beast into sites, and if I need eyes - I have my better half and copilot to provide intel. As for the Ollie Electrinics package - the only thing I find useful is the keyless door lock. (Though I’ve already had to replace it.) the cell booster does nothing, and I’ve already mentioned the backup camera.1 point
-
Thanks @Mike and Carol all helpful info. When I get down that way just might try both routes just to experience it all. Surprised CO actually plows this route in the winter. Our roughly equivalent Beartooth Highway up in this neck of the woods certainly doesn’t. It’s closed for over half the year. Love Durango, nice town.1 point
-
When using the Cielo Breez Max phone app, the actual a/c remote ‘must’ be turned off. However, the touch screen can also be used in the absence of Wi-Fi, but many of the advanced features (think Comfy Mode) are unusable. When using the unit’s remote, it is suggested to aim it at the Cielo rather than the a/c’s distribution/control panel. Regardless of the control method, the Cielo will display room temp, set temp and humidity level.1 point
-
We’re camping in Durango now, only at 6,400’ but it was 52 degrees this morning. Late sept through mid Oct will be cold, and expect Some snow. Some campgrounds between here and Telluride close at the end of September or sometime in October! Mike1 point
-
If I remember correctly from 40 years ago when I read it, the best thing you can do is start a list of names with short notes identifying who they are. 🤣1 point
-
Not one for audiobooks. Recently finished a fun science fiction series named “Backyard Starship” and decided to delve into something a bit deeper. I’m now enjoying the psychological family drama The Brothers Karamazov, by Fyodor Dostoevsky. Although written in the 1800’s, the strong interpersonal family relationships are lessons still applicable to today’s society.1 point
-
Likely the electric lift motor is fried. You can unplug it and supply 12V to test it. This should be the motor but check the part number on yours to be certain: https://www.etrailer.com/Accessories-and-Parts/MAXXAIR/MA10-20270.html https://www.amazon.com/Maxx-Air-1020270-Maxxair-Motor/dp/B01MTUWAMK/1 point
-
Is you outdoor shower knobs closed tight? Open outdoor faucets have caused similar issues. Update: I was replying to the original post and didn't see the complete thread🙃1 point
-
O Ring size: 9/16 x 3/4 x 3/32 seems to work fine....... Just thought I would throw that out there in case any one runs into the same issue......1 point
-
Wow! Can’t do this basic task? He shouldn’t be responsible for towing anything! 😲1 point
-
That's what I said last year! 🤣 But you are correct. Just hope the Greenland, $1275 now with sale price and promo code, is priced as good or better next year. Or maybe an improved version 2 of these inverter A/C models gets released! We don't travel much in summer temps, but had more heat than expected in northern MN, SD, WY and CO this June where we had to put up with our Dometic A/C. Our next trip is SW Colorado late-Sept through mid-Oct. Starting at Delores CO at 7K ft elevation, to points north, 9500 ft at Sunshine Campground near Telluride, so I'm hoping to run our Atwood furnace for a couple hours before dawn vs. needing the Dometic A/C at all in the afternoons!1 point
-
If you are going to keep the remote nearby to make adjustments just act like the phone is your remote? The app has a Ton more features. It's very convenient. And you are connected to the AC from anywhere to make adjustments if you have Wi-Fi.1 point
-
The Pioneer and Turbro Greenland A/C units are remote or phone controlled. The OEM Dometic thermostat shows set temp but not actual temp, so I often have my phone open to the Ruuvi Sensors App to check cabin temp and fridge/freezer and basement temps. Also, I need my phone to level the trailer and check propane tank levels. I'm happy for these Bluetooth apps for so many things. I check battery stats and all Victron devices via the VictronConnect App. Many Oliver owners have installed Victron BMV-712 or Cerbo GX displays, not me! I can see all the same specs, turn our inverter off when needed and all from my phone. Why spend the extra money for a display that can only be used when standing in front of it? Why cut openings in fiberglass walls and complicate the simple interior design of the Oliver? What happens when technology advances and the installed display is no longer usable? I would not purchase the Cielo Breez Max until after a new A/C installation, determine whether we truly need another device. Take another look at the Cielo Breez Max. It appears it can be operated by touch controls on the device itself or by phone app. Likely control by the phone app is not needed on a daily basis after initial configuration setup.1 point
-
Don, Excellent timing on this post! After two years, I'm finally mounting the cellular/wifi antenna on my roof rather than rely on the stubby antennas on my Pepwave cellular router. At the same time, I'm adding the Mobile Must Have POE injector for the Starlink Mini, and converting the exterior port to RJ45. I'll be mounting the POE injector similar to your setup, and adding the power switch in the basement is a great idea, as you're already there plugin in the Ethernet cable. Nicely done. I'd really like to move the router to the same area, but there's no way I could route the seven antenna cables down there! Plus, they are not long enough. So I'll run a short Ethernet cable from the port to the POE injector, and then a longer Ethernet cable to the back of the basement, up along the nightstand somewhere, and then up behind the rear window shade and into the television port. Only a couple inches of the cable would be visible, which I can live with. It will then go into the WAN port on the Peplink to feed the Apple TV and security camera hub connected to the LAN ports. Any more, and I'm going to need a network switch! When I ordered the POE injector, I also added the optional Pepwave 12V connector, eliminating needing to power both devices separately. With the POE injector in the bilges, I won't be needing that connector, but gain the feature of the exterior switch to power the POE injector separately. That's even better! Thanks for the details. Switch and RJ45 port are on order now.
1 point
-
We’re very happy with the electronics in our 2020 Ram 2500. The CarPlay works everytime, the camera views are great and the other electronic gizmo’s are nice. The big center screen for media and maps makes the driving experience enjoyable. I bet the new Rams are even better. Mike1 point
-
We want to take a moment to address a recent change regarding our dealer network in Texas, and what it means for both new and existing Oliver owners in the area. No Current Dealers in Texas At this time, Oliver Travel Trailers no longer has any active dealer sales representation in the state of Texas. We understand this may come as a surprise—especially to those who purchased through our former Texas dealers. This was a business decision, and we sincerely apologize that a formal update was not sent to affected customers when this change occurred just a few weeks ago. Continued Service Support in Texas The good news is that warranty and service support remains strong in Texas. While there are no current Oliver dealers operating under our network in the state, both of our former dealer partners—Princess Craft and United RV—have confirmed they are continuing to service Oliver Travel Trailers, including warranty repairs, for owners in their respective areas. Additionally: Our factory-based Technical Support remains your go-to resource for any questions, approvals, or coordination related to warranty service. We also work with other reputable service centers where needed to ensure coverage in areas not directly served by Princess Craft or United RV. For those who prefer factory service, our Hohenwald-based Service Department is readily available to assist with scheduling and support.1 point
-
I suspect the “numbers” will increase somewhat as the compressor will work harder to reach and maintain temp in ambient conditions. However, likely less than what is typically seen with conventional units.1 point
-
I suspect that's where it's really going to shine, especially in controlling humidity once set temp is reached.1 point
-
Glad you discovered the problem. Regarding the water filter o-ring, I like to lube it with a small amount of silicone based plumber's grease. It helps with the seal and keeps the o-ring in good shape. Also, don't over tighten the filter screen housing. Firm hand tight is all that is needed. No tools! Cheers, Dave1 point
-
Just to follow up on post. What I found ...... No oring, where screen housing connects to pump. Flexible line attached to screen housing did seem a little loose, snugged it up. One of the "quest fittings (unsure if that is the brand) was loose enough to allow air to draw in ....... After correcting these issues, all works great. Small issues easily remedied..... Thanks for the conversations. All tips used and helpful......1 point
-
We've had this problem repeatedly in the exact scenario you describe. The "solution" was to open the hot and cold outside shower until the air purged from the system, which could take a couple of minutes. (Don't worry to much about the 2 minute limit. I once accidentally left the pump on for 20 minutes after draining the water from an old trailer and there was no harm done. 3 or 4 minutes is probably OK.) After that we'd be fine until the next stop when we'd have to do it again. Seemed like an air leak on the pump intake side, but I couldn't find one. I recently replaced the pump. One thing I noticed while doing that was that the pump filter didn't seem very tightly screwed onto the pump, something I had never thought to check, so look at that. Now the new pump is in. We'll see what happens next. Also, can you include your Oliver model and model year in your signature line? Makes it easier to help people sometimes.1 point
-
Try opening a faucet for a few seconds...usually you can hear a change of the pump sound as it primes. Then close the faucet and see if the pressure builds. You may have lost the prime as you traveled.1 point
-
I think it is purposely designed to run continuously the majority of the time and to keep a steady temp / humidity level which is exactly what I've been looking for. The mostly steady state running at a MUCH lower watts *should* equate to less stress on the unit as compared to the typical non-invertor AC's frequent start/stop of the compressor and the surge amps encountered each time. Being fairly new there's really no way to know the reliability yet for sure, but a 3 year warranty makes the gamble worth it to me. Personally, I also don't worry about the unit testing a little low on BTU's at max since I'm running a Coleman Mach 9600 BTU unit that has no problem keeping our LE2 cool and humidity low. It also tested higher than the Dometic that he replaced.1 point
-
Your watt numbers closely match those seen in this test of the Turbro unit (which I assume is the same as the Pioneer) when it is throttled down into the 8000 BTU range. It has a crazy good EER of 18 at that BTU range and I bet it will run at that lower level in an LE2 in most situations once set temperature is met. They only recorded a max watt draw of 1100 watts while running at full capacity which is also a crazy good number. Thanks for sharing this info... I'm just waiting and hoping for a sale on one now.1 point
-
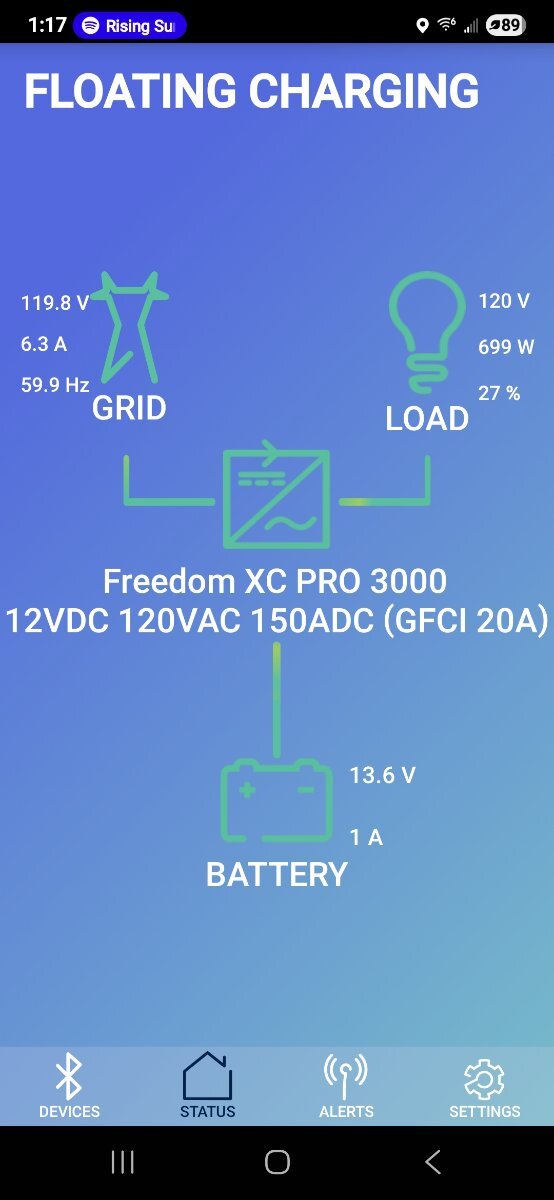
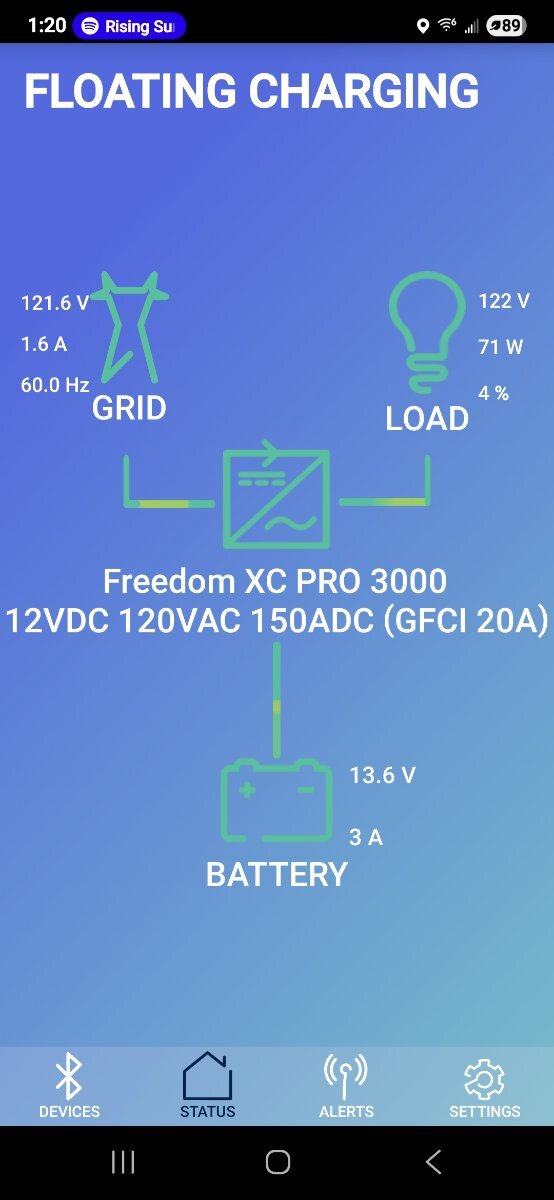
I have the Xantrex XC 3000 as shown in pics and 2 LifeBlue 200 AH Batteries. Here is with AC Compressor running and the lower wattage is compressor cycled off and fan running. It will drop down to near 500 watts as it cycles. It starts up around 200 watts and ramps up to 720 and settles in a few seconds just under 700 watts on start.
1 point
-
Wow, that's a pretty low draw and I'm now leaning even harder towards purchasing one of these myself. If you ever get the chance to run it on a lower temp night (in the 70's or so with humidity on the high side) I'd love to know how it manages controlling the humidity. I'm hoping the invertor compressor will able to throttle down low enough to continue running and remove humidity without cycling the compressor on and off.1 point
-
I installed the Pioneer A/C. Went very smooth. They make it easy. All the foam insulating collar and vibration pads are adhered to the unit. Just clean up the residue from the old unit and install it. Much quieter than the Dometic. Draws anywhere from 64 watts on fan and 500 to 700 watts when the compressor kicks on. Runs effortlessly on my inverter with no shore power.
1 point
-
A friend of ours rented a private trailer this summer, but he had not slid his receiver hitch fully in, and the retainer pin missed the hole in the shank. A dip in the road caused the receiver to slide out, and both safety chains broke. The violent snap caused the propane to break free and hit the windshield of a following car, causing a minor eye injury from glass particles. He said the chains were "hefty." It would be hard to determine the force put on those safety chains, but it must have been considerable! Just sayin, a chain is only as strong as the weakest link!0 points

.jpeg.bc5410dca345743218c7cdd61cd7a837.jpeg)
.jpeg.db24308a47698837a565fc55eec3a655.jpeg)
.jpeg.b601f1e7eac4638423f2297d1cfed3e5.jpeg)


.jpeg.799f3cf194b3b21d05b2a7bb19f728b1.jpeg)
.jpeg.dd379fc2e5087fa6910ce21b437441ad.jpeg)
forPoEInjector.jpeg.2ff4c7b3725adaf25e5bdfc30965ceff.jpeg)
atopProgressiveSurgeProtector.jpeg.5c03a313182d5fdb47bf1a254dec329d.jpeg)


.thumb.jpg.e34bf01ef7f7d5e99ad31856d45afbeb.jpg)


-
Recent Achievements
-


.thumb.png.fbbde3486e933f990ff511bff8d6bda0.png)


")


")


