Leaderboard



Popular Content
Showing content with the highest reputation on 09/14/2026 in Posts
-
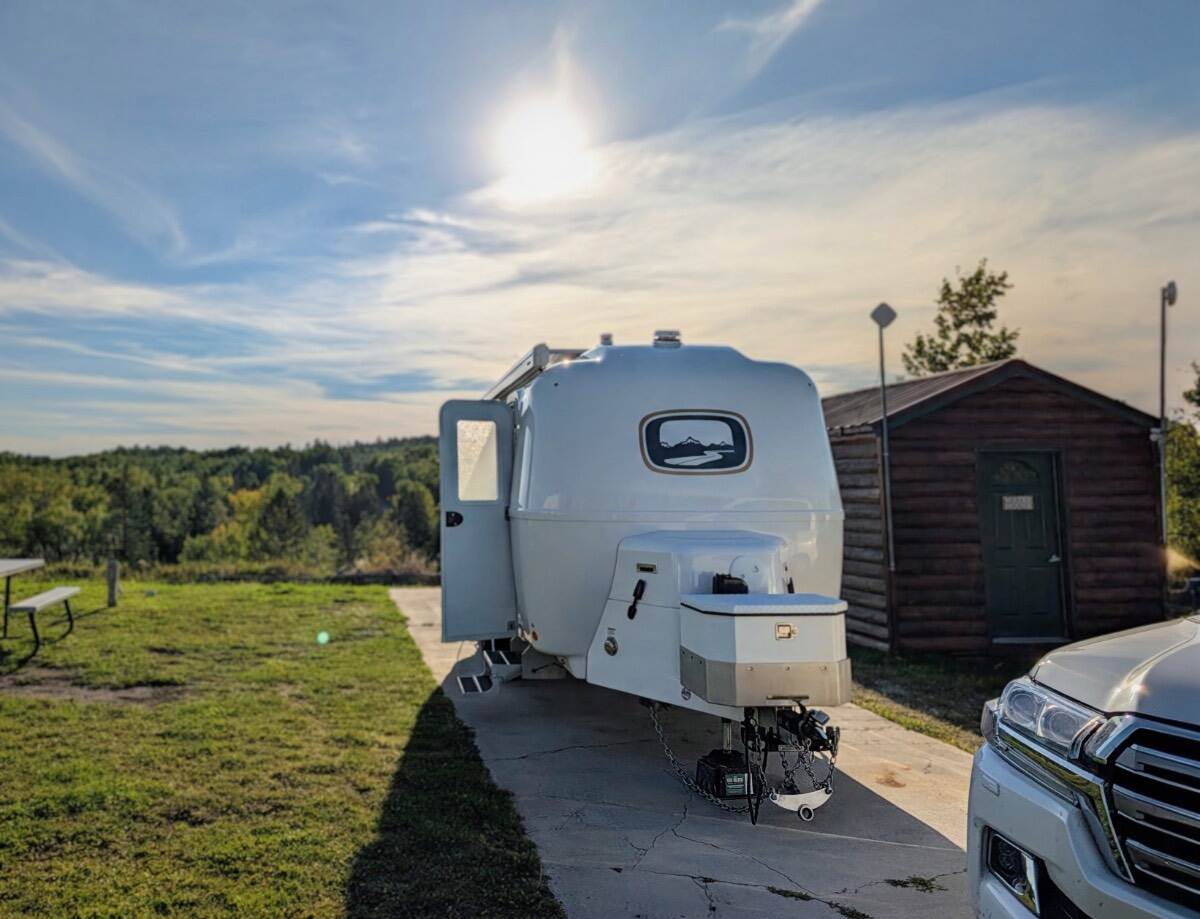
The Pines of Kabetogama! The other Oliver! Charlie 1607 2025 LEII 2021 Landcruiser 200
 4 points
 -
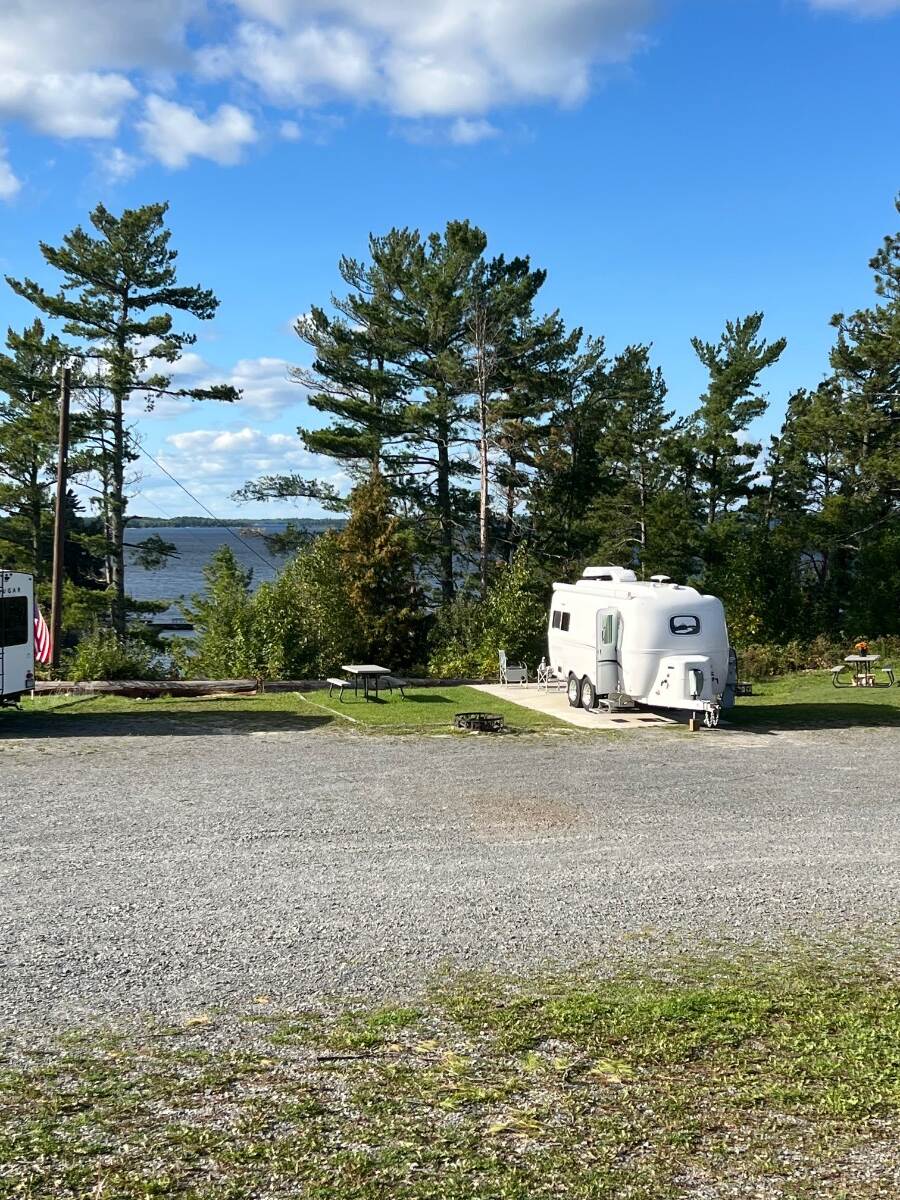
The Pines of Kabetogama, Kabetogama MN. We were surprised to see another Oliver here when we pulled in. Bill 313
3 points
-
Hi all. Finally signed up in the forum. Looking forward to traveling more and meeting Oliver owners. 😃 Hope everyone had a wonderful day. 😃 Tim & Courtney. East Albany Vermont.3 points
-
It has been a long time since I have been on the forum. We had 359, 2018, and went a lot of places, really enjoyed the experience but other life choices got in the way, and we let it go to some good folks that were sure to enjoy it. One of the key reasons for selling was the crowds that seemed to be everywhere we went. A few questions for the forum - has the crowding subsided at all, and Wow, the prices now - seems $100k is the entry price for a II, - do the newer owners feel the value is still there from a quality and feature standpoint. I'm really liking most of the changes - and am actually looking at the smaller Elite - but not sure the price differential is worth the downsizing Thanks for any feedback..1 point
-
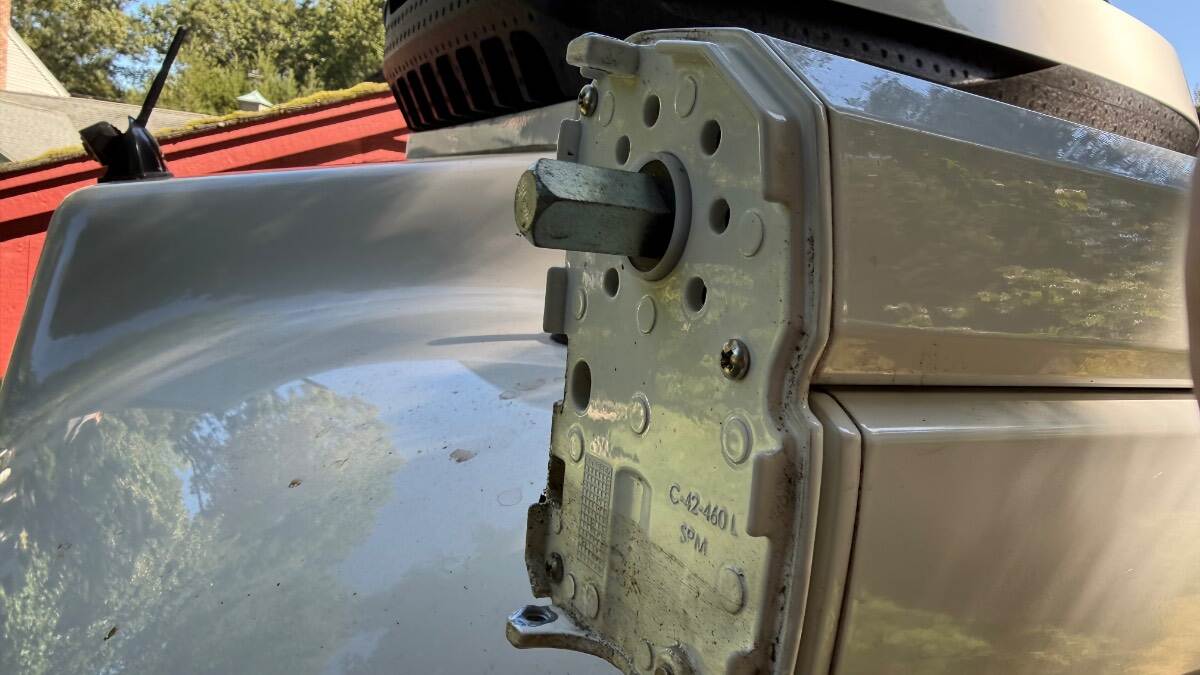
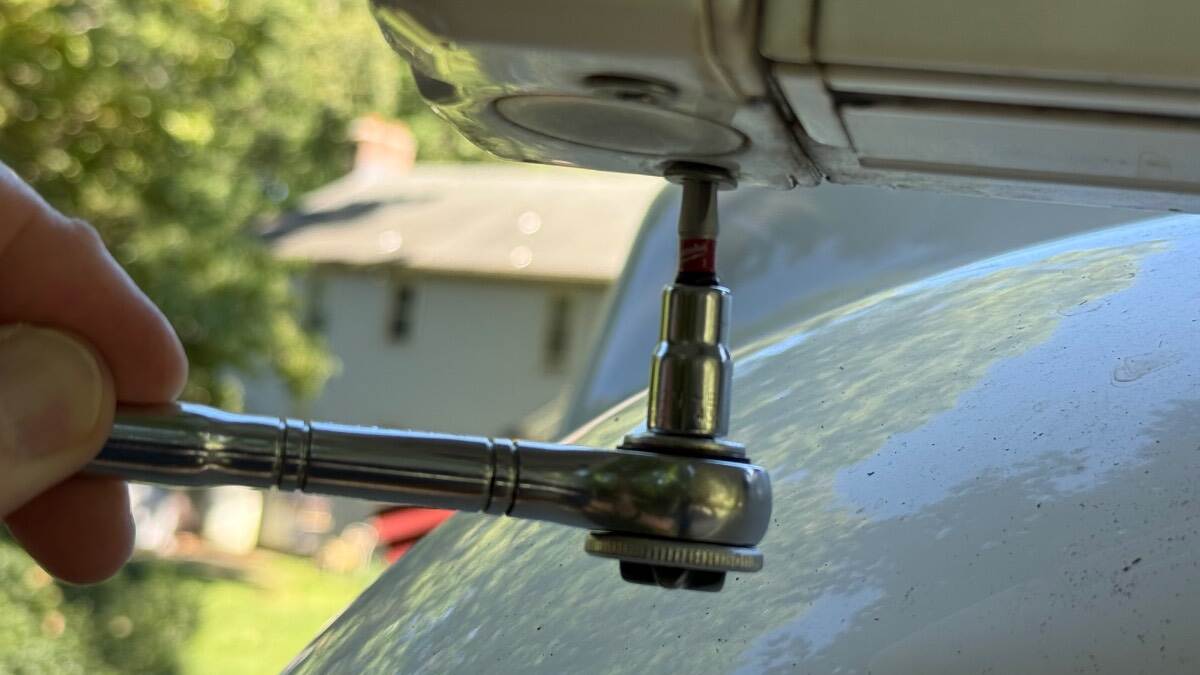
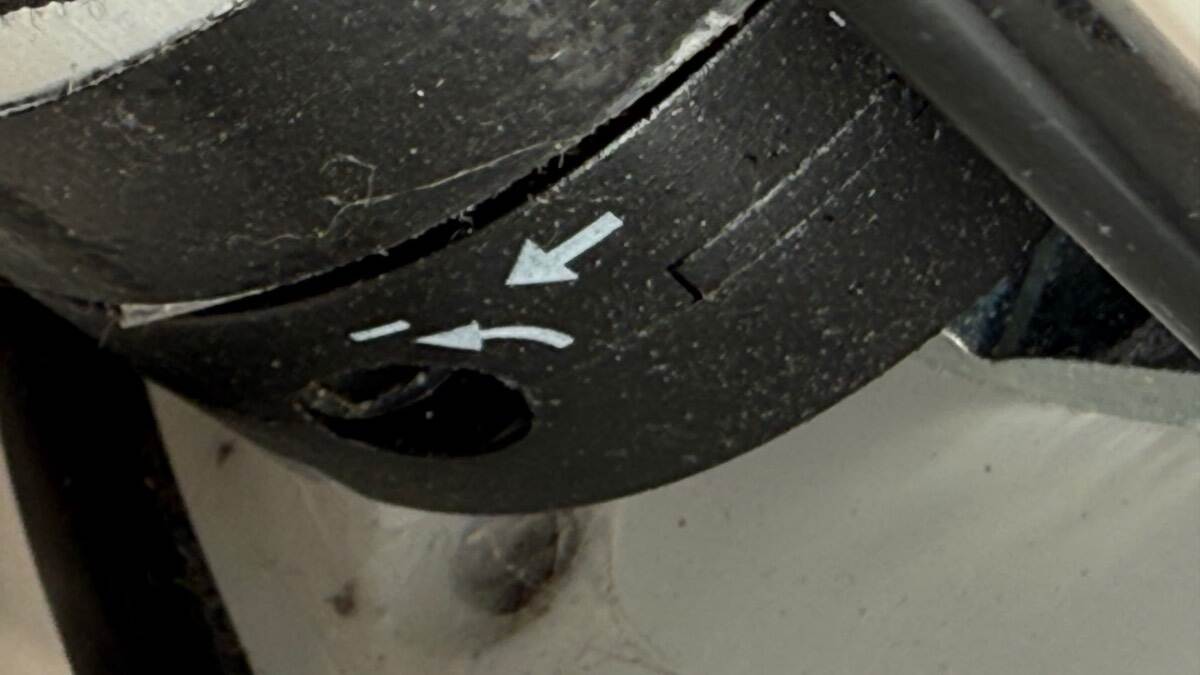
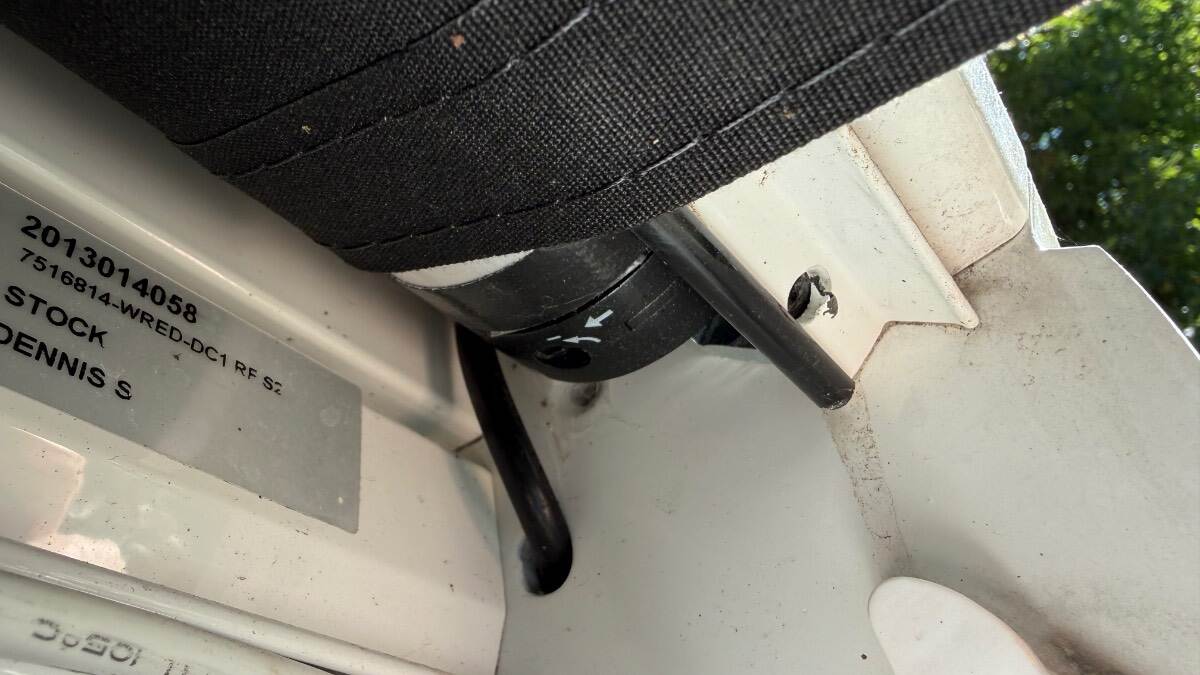
Girard uses #3 Phillips screws to secure the end caps to the awning, over time these screws can oxidize and become difficult to remove which may result in cam-out of the screws. Additionally the location of the bottom end cap screw closest to the hull prevents a normal sized screwdriver from positively engaging the screw head due to its proximity to hull roof. To aide in removing the screws a short right-angle screw driver or a #3 Phillips bit with a 1/4" socket wrench allows sufficient force to be applied and clearance to break the screws loose. Once out a coating of anti-seize on the screws will prevent future problems. My awning has only a single limit adjustment screw which is quite different than the illustration included in my Girard manual. I'll include a picture for reference. A little prevention goes a long way when your batteries in the remote go dead or the remote fails and you have no other choice than to pull the end cap off the awning and manually retract the awning. Notes: The limit screw requires a 4mm Allen wrench ( 1/4 turn = 1" of travel ) The retraction bolt requires a 13mm wrench
1 point
-
This video will give you a basic outline to some of the upgrades we had done earlier this summer on the Outlaw Oliver.1 point
-
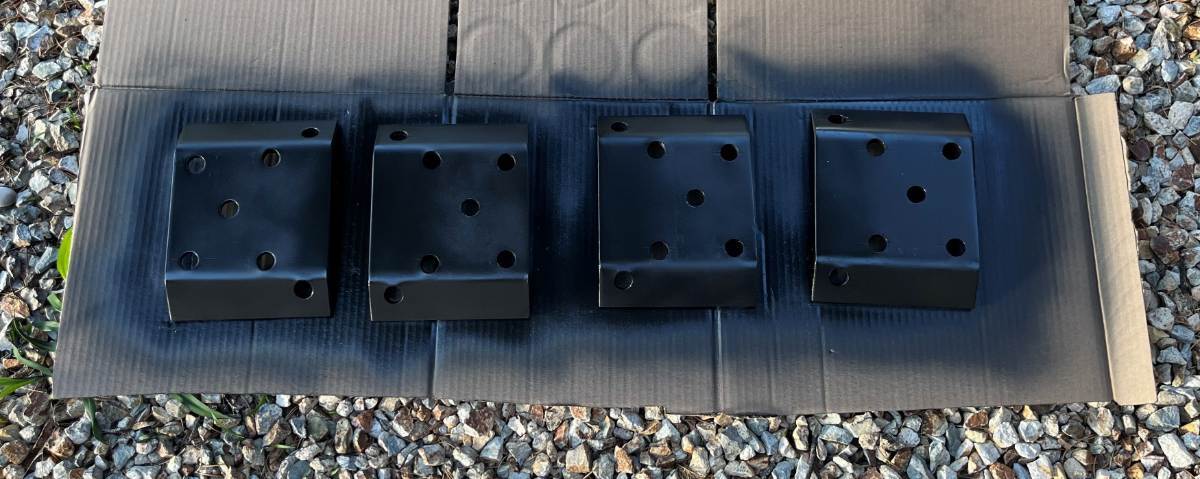
I pride myself on being the engineer/mathematician! Obviously not this time! 🤣 You're right it's only a 1/16" diff which may be negligible. Drill to 9/16" and you may have to use a Dremel or something on the outside arc if it doesn't quite fit. I didn't need to do anything, except I steel-brushed and painted them, LOL! I had 9/16" U-bolts installed on D35 axles installed 10 years ago by OTT. I replaced them with new U-bolts of the same size. Did OTT really cheap out on this part?!? They upgraded from D35 to D52 axles while they downgraded from 9/16" to 1/2" U-bolts. This doesn't make sense at all! Dan, make sure you didn't miss the meaning of this statement.
1 point
-
I replaced the entire Oliver suspension: https://olivertraveltrailers.com/forums/topic/11055-full-suspension-replacement-alcan-spring-and-dexter-d52-axles/ The original D35 axles and the new D52 axles both were 3" dia. Also the OEM D35 axles had 9/16" U-bolts and wet bolts. So, no leaf plate modification was necessary. To be certain, I just measured. The old U-bolts measured .55" at the threads and .52" at the top of the U. If they were 1/2" bolts these numbers would be closer to .49". Here's what I mean. Given your leaf plates have 1/2" holes with a 3" spacing between the holes, when you drill out the 1/2" holes to be 9/16" the spacing between will then be 2 7/8". You have to create a 9/16" hole keeping the 3" spacing between. A simple hand drill cannot do this. Also CAUTION! In your picture, I see light between the leaf stack and your U-bolts. When you replace these with the 9/16" bolts, make sure the U-bolts are positioned straight up at 90 degrees and they must be touching the leaf springs when torqued.1 point
-
Yep!1 point
-
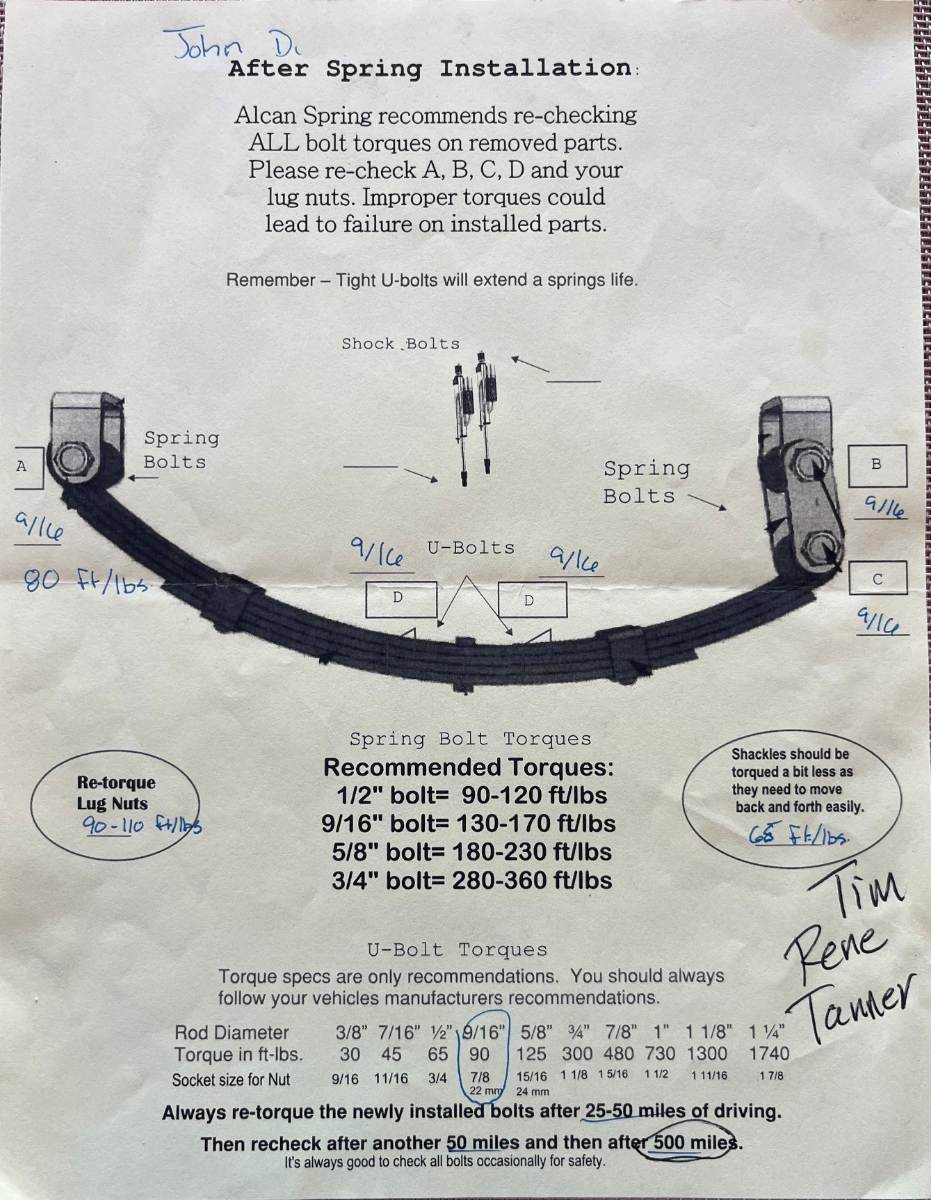
Hey Dan, wow 1/2" U-bolts, really? I don't remember modifying the leaf plates! If this is true, you cannot merely drill 9/16" over the 1/2" hole because the space between the holes needs to be equal to the axle diameter. You'd have to have a decent drill press, clamp the plate down and drill the new holes off-center to the original holes. You could drill 5/8" holes instead, but that would be sloppy and I don't know about you but I have a couple 9/16" bits on hand but not 5/8" which would be an expensive bit to purchase these days. When I'm out at my shed this afternoon, I'm going to see what was on our hull OEM. I kept all the old parts to sell the suspension used if possible (figure there's got to be some guy in the neighborhood building a homemade ATV trailer). Cheap Dexter 1750 leafs and 3500 LB axles are not enough to carry the Oliver, but would be great for an ATV trailer (upgraded with Timken bearings)! 🤣 Here's the spec sheet Alcan gave me when I purchased my package in person. 90 ft-lbs for the 9/16" U-bolts, 80 for the end wet bolts and 65 for the shackle wet bolts.
1 point
-
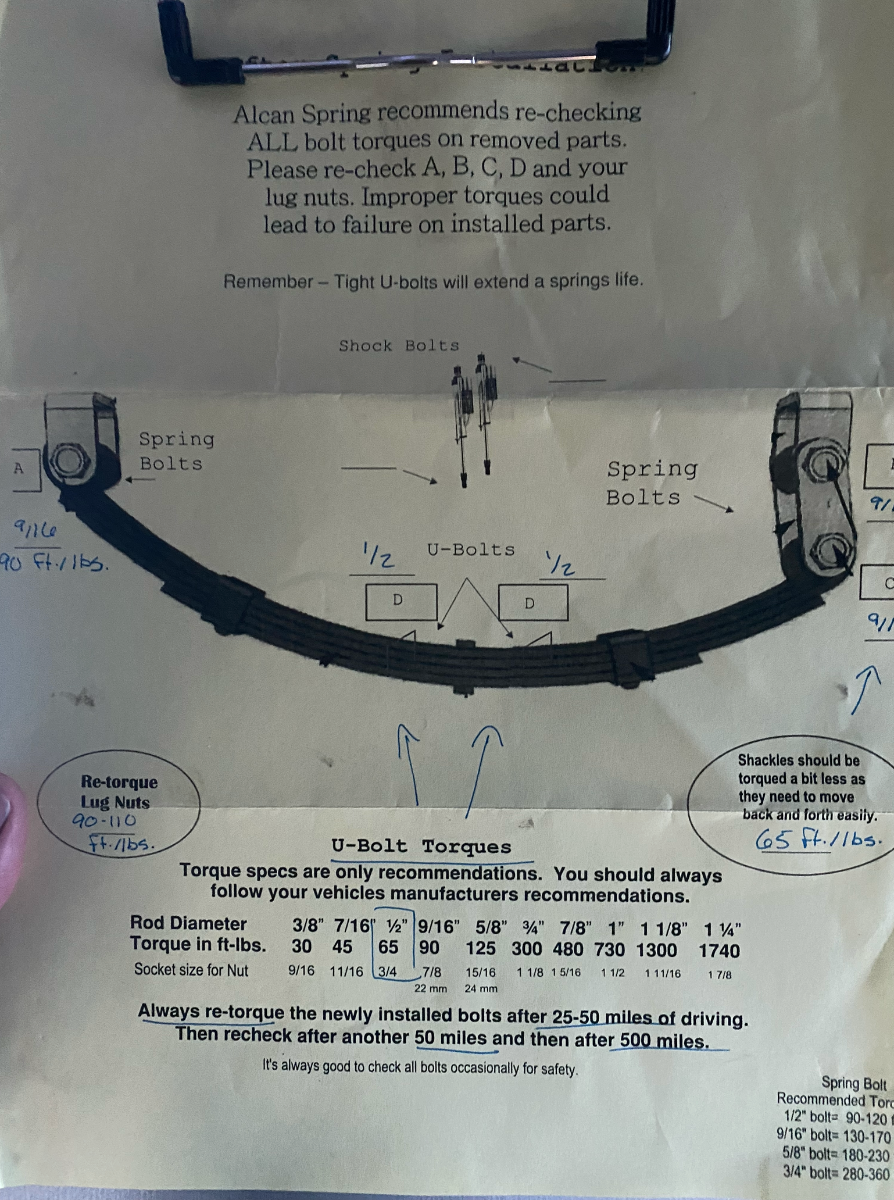
Aiieeeeeeee!!!! Just called Alcan for a quick ship of eight new 9/16” bolts. OTT is still going on the low side with these suspensions and installing 1/2” on a 3” 5200 which is specced to 1750. I’ve got five leaf Alcan’s on the the same 5200 axels so should have gone 9/16” but it got lost in translation. Yeah I kept looking at those bolts against the springs/axels and especially that torque setting feels way too low. Anyhow they are helpful as usual, he thought I was right on to upgrade the bolts. He mentioned by the way that Oliver is only using Alcan on the Apex - the others are business as usual. He also warned me that the plate will need to be widened a bit to accept the larger bolts. I asked about how much work this would be - should I disassemble? He suggested just doing one bolt at a time. Told him that’s what I wanted to do but worried it was too much redneck mechanic - to which he said “well that must be what we are because that’s what we do!” 😅 So easy upgrade Thanks @jd1923 for helping on that, wouldn’t have caught it without checking your torque number1 point
-
Wut? Here’s my spec sheet My U-Bolts are 1/2” on 5200 axels. They had said most Olivers use 7/16” u-bolts but checking mine turned out to be the 1/2 which is 65 ft-lbs. 90 would be 9/16” - is that what you got? Ahhhhh dang - yup, looking over my emails that’s what Alcan recommended, 9/16. But OTT installed 1/2” and so that’s what we went with. I’d feel a more comfortable with the 9/16, 65 on 1/2 is too low. I’ll call them and order a new set, grrrrr ….
1 point
-
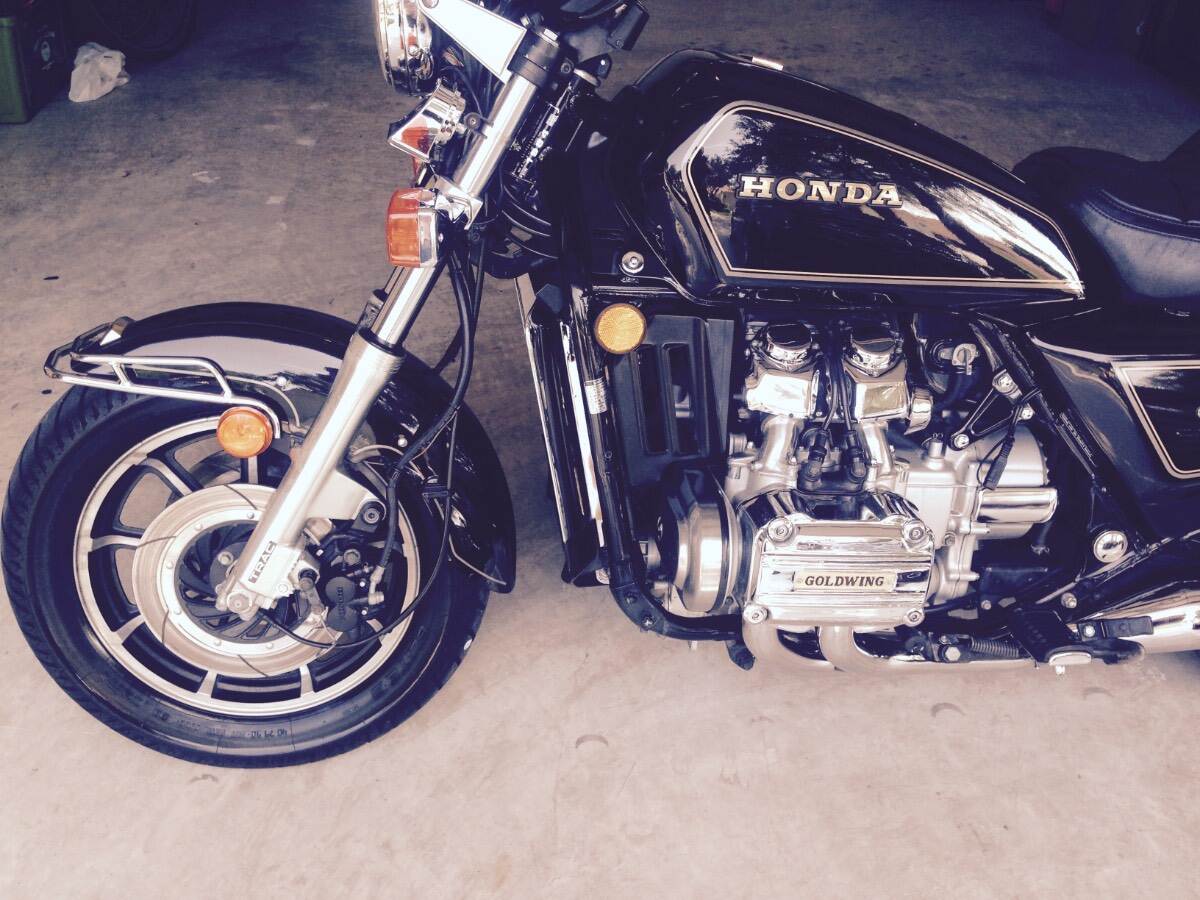
I’m on the Cummins forum, several Toyo forums for our Lexus vehicles, was in the Bigfoot Forum before OTT, the “Steve Saunders” Goldwing forum for many years (40 years with my classic 1984 GL1200 Standard), a forum for everything I’m working on or have worked on for years! (90% on the OTT Forum the last 3 years)! All the bragging guys write, “did it in 2 hours!” My answer is “BS!” If it went so quickly, you didn’t do it right!
1 point
-
U-bolts or wet bolts? The U-bolts MUST be 90 ft-lbs MIN, 100 would be good, but not more. IMHO, the Alcan torque numbers for wet bolts are more than high enough, I went about 10 ft-lbs less on these. The original wet bolts were shoulder bolts where regardless of torque, the shoulder allows play on the leafs so the suspension can move nicely up and down. Certainly do not over torque these or the leafs may bind on the bolts which could cause the tires to skip and bounce. Before I did our major suspension install, I had no idea! Our OEM suspension was barely hanging on! Like it was never torqued in so many years! 🤣1 point
-
I Good because that’s where I’m headed! 😅 Agree with all your points, and also I like the self reliance. That’s the idea with this for me, having independence. And now instead of being a mystery I’m confident and aware of what the suspension is doing and know what to look out for.1 point
-
I spent a lot of time making sure the leafs were in line, square / plumb front to back, before mounting the wet bolts. Actually, I did this on my garage floor prior to mounting new axles, but you’re doing springs only. If you feel they’re not square, what I would do after you’re finished is get somewhere on a big flat level parking lot, loosen all U-bolts (somewhat) and the wet bolts with no torque at all, drive 100 ft or more steering wheel straight ahead! Then re-tighten the U-bolts first, then torque the wet bolts. Ya think the “Professional”installers would worry about this? I love Alcan and everybody I met who works there. But when you get this job done in 2-3 hours, you get what you got! 🤣 I spent 3-4 days fussing over our new axle and leaf spring installation. Was watching the tires over speed bumps the other day. This suspension is a moving work of art! Back home, time to torque again! 🤣1 point
-
Thanks for the info to Run route off of DC. Since we are in the PNW we camp with a lot of tree cover (Canopy). Usually close to the roads/pavement will have less trees overhead. Like you said You really do not need the router.... until you do. I think you have convinced that router is a great "what if" backup. Thanks for the heads up, just checked my AT&T plan, and treat Canada just like the US. No roaming charges. Secondly, Crossing the border(s) with food stuff/ETOH. I know going into Canada they charge for ETOH over a very small limit, and their regulation about beef, chicken, most produce. If you have already cooked meat/vegges, is that a problem. Going back into the US we haven't looked anything up. So we not only have to travel the mainland US/Canadian borders, but we plan on going to Skagway and back by highway. that is another crossing back and forth. Then we do the AlCan Highway back and forth. Aree all 6 crossing going to be like this? Not taking produce/ meat/Etoh across the border could be a pain. We like to eat fresh fruit. Eat a fair amount of cook fresh veggies, and some meat. I would also like to pick up a bottle of wine in Washington, wine and whiskey in Canada, Spruce pine needle beer in Skagway if they got it. Have not thought about what we will buy in Alaska yet. This could really become a Pain in the..... We bought a fair amount of ETOH on our trip last year to Kentucky/Tennessee and up to the great lake and back west across highway 2. We had planned to jump across the border to the Hope BC Egg rally and then see Vancouver then back home. With all of the ETOH we accumulated seeing so many states and staying at harvest host breweries, Wineries and Distilleries we decided we would forfiet Hope and Vancouver because of the steep fees for the ETOH. If fact we still have not drank everything we bought last year crossing most of the USA.1 point
-
Glad I didn’t disappoint 😅 Not a problem anymore but we’ve been over that. But it’s all good, whatever rocks your boat. Actually that too - 2024/25 Silverado EV’s (same platform different front end) are coming off lease and rentals, people are getting them at great prices. But yeah apples to apples you’ll pay an extra 4-6k or something. You’ll save in fuel/service total cost of ownership pretty quickly with gas prices as they are, but granted people tend to be more sensitive to sticker price.1 point
-
Ya, I like the cord is 3.2 ft (1meter). I did find 1 couple of Dewalt adapters that have Low Volt Cutoff they cut off around 15V. That might help to not torch a battery. Some adapters also have other features as SOC or voltage display, and on/off switch alarm, etc.... That might help to not torch a battery. I just looked at prices they are little pricy, but you're paying for twice the Ah. Just read some complaint with the Dewalt 10Ah batteries shipped with their mowers. Very short life. one guy dropped back to the 6Ah batteries and liked those had a better longevity they just have to spend more time charging to get lawn mowed.1 point
-
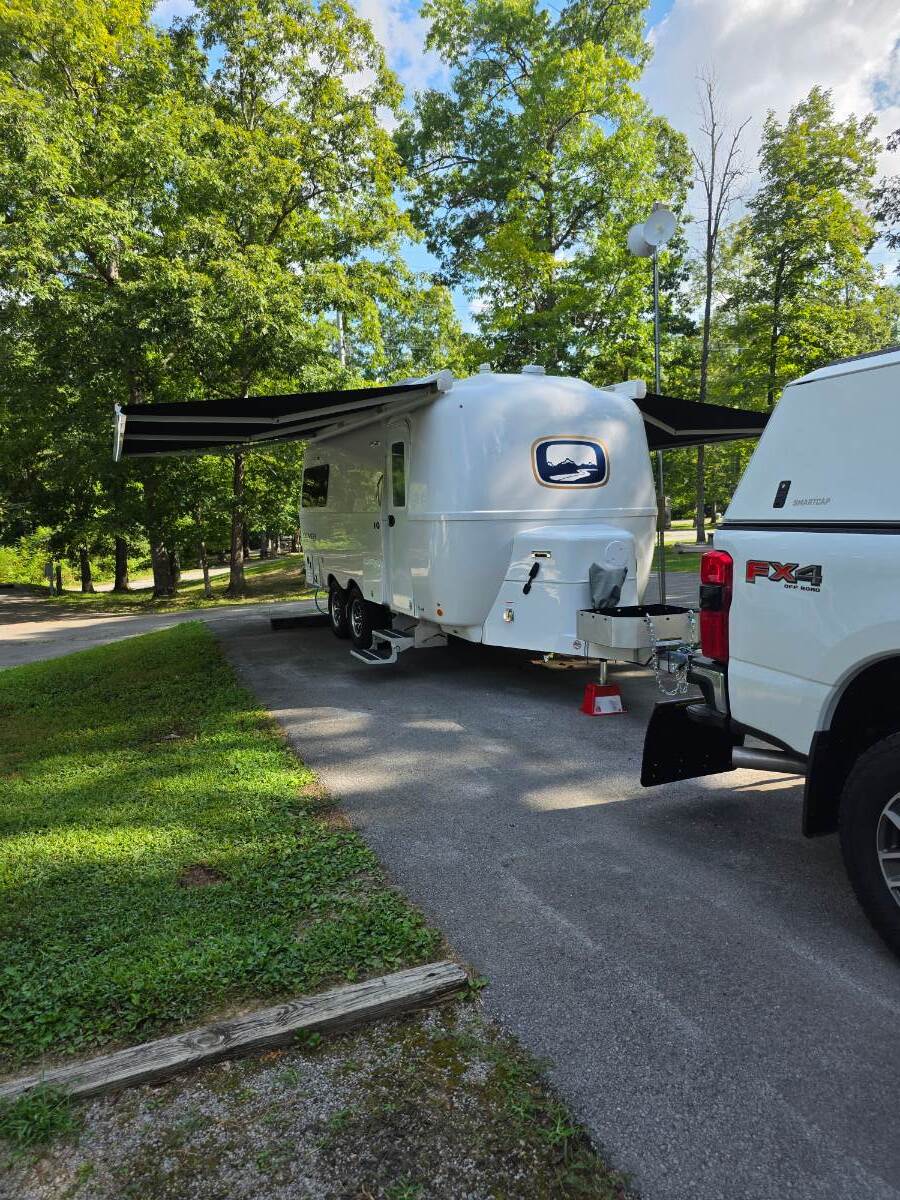
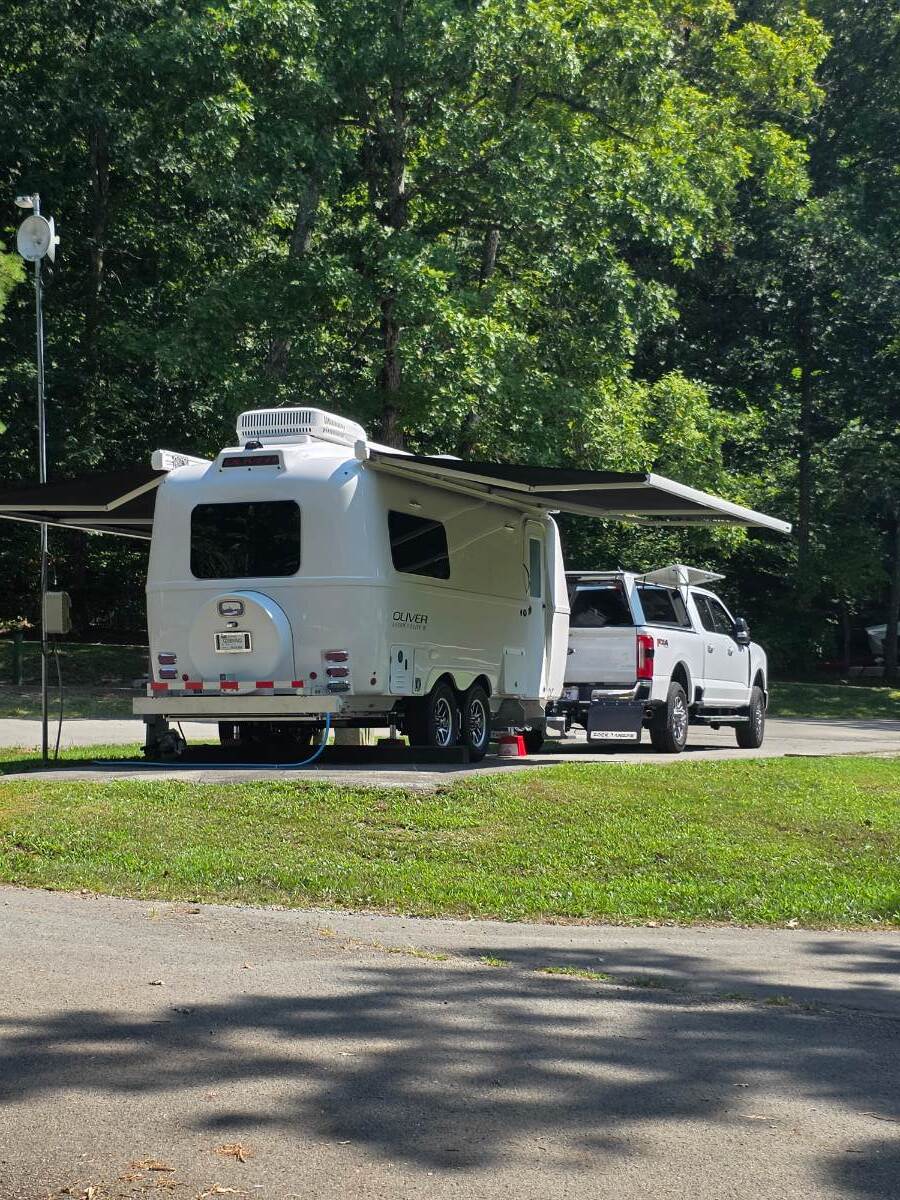
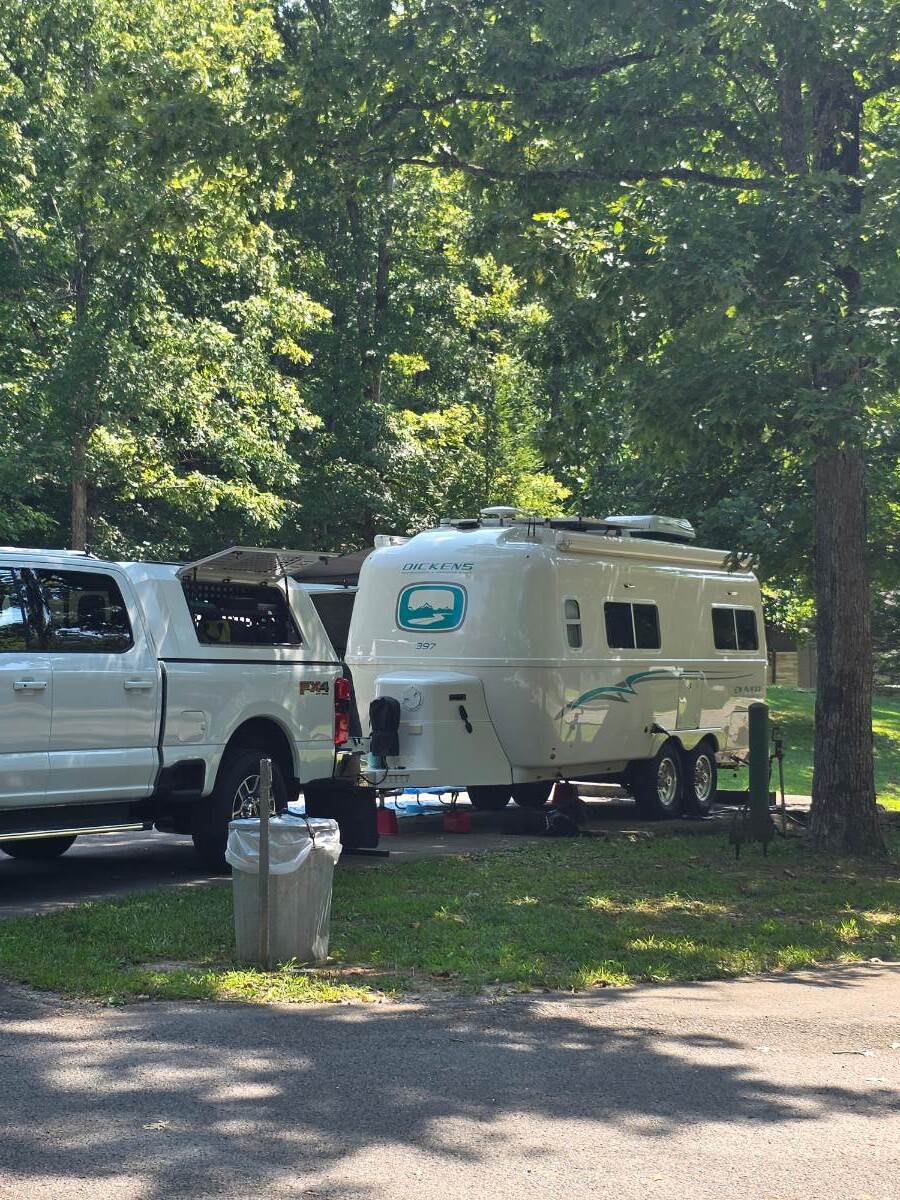
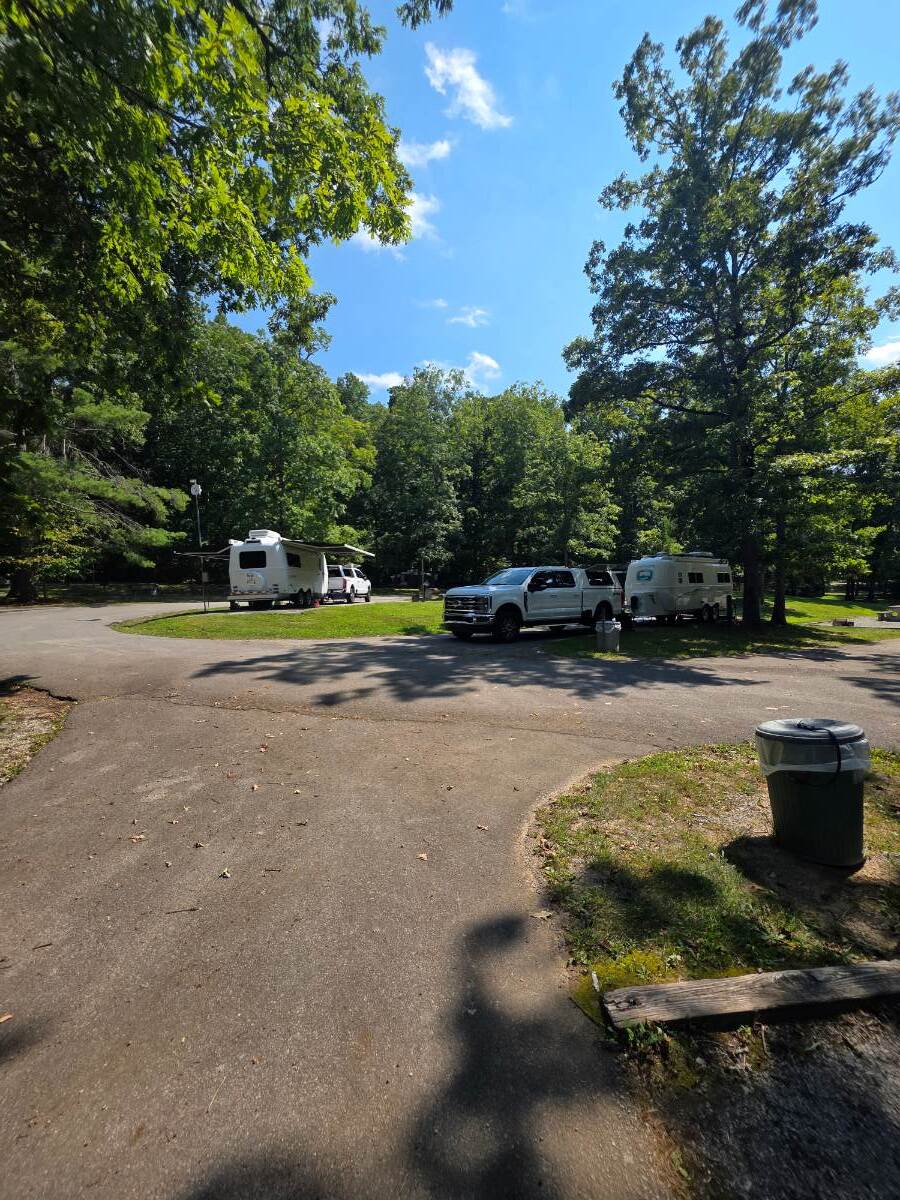
We took delivery on August 20, 2026 spent the night and had a planned meet-up "Dickens" at the Cumberland Mountain State Park in Crossville, TN for our first trip. Looking forward to more trips like this!
1 point
-
I see you opted for the dual awnings. We love ours. Happy travels.1 point
-
Yes, yes, yes. We have a composting toilet and actually carry 35 gallons of extra water. Preferred camping times are spring before school is out and fall after school is in session. We do about 7 trips per year now but are rarely out more than 5 nights. Short trips keep it simple.1 point
-
I’ve been using Starlink in the Northwest for years, since being a beta tester for the first generation round dishy. Iv’e found that a pole mounted dish often get better sky-view angle over trees. I have a simple pole mount using a 10' stick of Electrical Metallic Tubing (EMT) that I carry under the trailer frame (see Tacky Starlink Dishy Mast). It was an easy and inexpensive mod, quick to set up, and it doubles as a flagpole if you're feeling patriotic. I stopped using a tripod stand a long time ago. When not using the pole, I just lay the Mini on whatever is near by, or even on the ground. A permanent mount is not optimal in tree county. We don’t use a dedicated carry case either, we just toss it on the bed or on the back seat. I’m all for having less stuff to pack up and carry. The Mini is watertight and robust, and you would be hard pressed to damage it. I prefer running the Mini from DC power over using the inverter for AC power. It's more power-efficient, especially if you leave it on 24/7 like us. The wattage losses from converting DC to AC, then back to DC add up. So I use a Victron DC voltage booster and it’s been a popular solution that has worked flawlessly for years. See: Starlink Mini installation, cracking the 12 Vdc barrier . . . or not! It’s nice having a portable battery pack for backup at times when there is no sky-view at camp, or to share internet with your buddies. I made a bunch of the “Everlanders” designed rechargeable slim packs that last several hours, but commercial options are also available. We depend on the internet for cell service, so battery packs or inverter AC power is not a good permanent solution for us. The bargain priced Mini router is usually not needed... until it is. Keep in mind that the farther you get from the dish, the weaker the WiFi signal, and the slower the internet. Weak WiFi can be mistaken for poor satellite reception, so try the router if you're seeing the spinning wheel of frustration! These can also be powered by 12 volts DC. See: The new Starlink Mini Router, for what ails you! for power options. So anyway, that's my two cents. Have fun in BC, but watch out for cell phone roaming charges, and don’t bring any produce back! We just got detained on the USA side last week because we declared a couple ears of BC of corn. They could have just taken the corn, but instead they made us maneuver the trailer into the humiliation parking area, then kept us waiting in the detention facility for an hour while they searched our stuff and freaked out the dog! But I have to say, the lab did a nice job at de-lousing and folding our shopping bag! Cheers! Geoff1 point
-
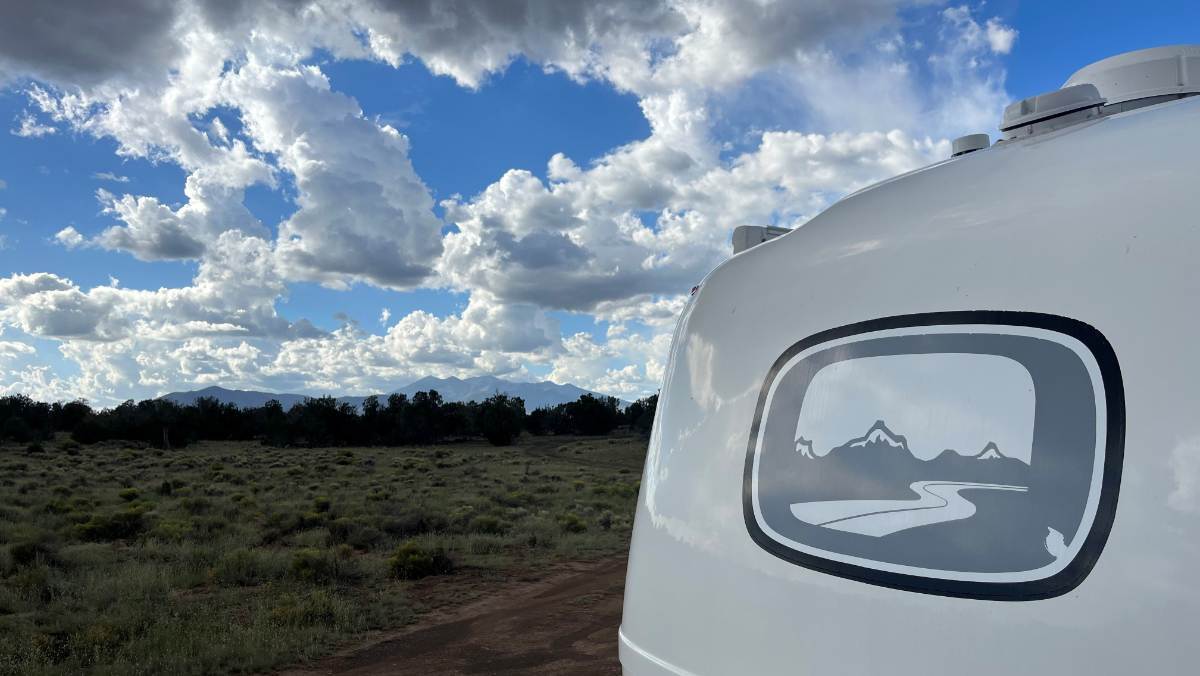
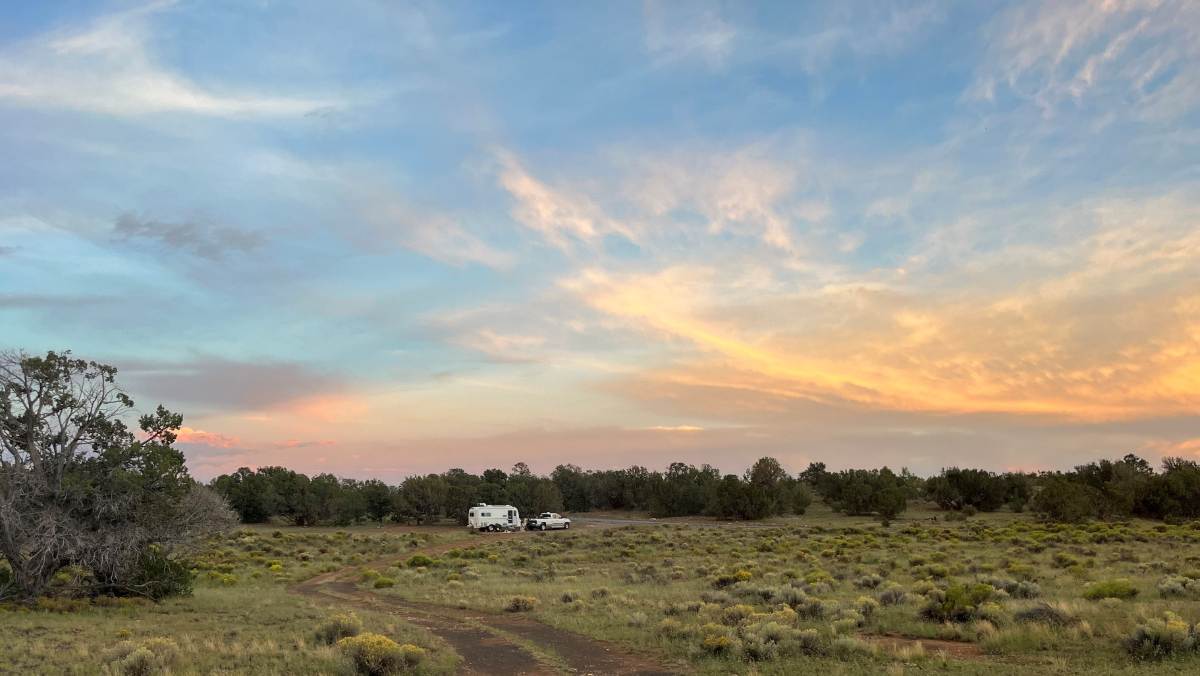
First thing I would do is call up the new owners of hull #359 and get her back! A quick search on RV trader shows 7 Olivers for sale from $46.5K to $74K. Buy at the low range if you are the DIY type to have money left over for your upgrades. This was my plan and with a whole lot of work hull #113 is more capable than most of them out there. If you’re not the DIY type or not wanting to do the work to upgrade, RV labor cost a lot, and “professional installations” are rarely what they’re cracked up to be! 😉 If so, then get one at the high range in EC with options you could live with. Or just dive in and buy new! Yes, they’re now $100K min plus new vehicle sales taxes. I've fought to avoid crowds most of my life, being raised in Chicagoland when my heart was always in the mountains. I don't wait in lines, period. You won't find me at a theme park, my last stadium concert was back in the 80s, gave up on airports, I could go on and on! Prescott is the Yavapai County AZ seat. It’s the size of New Jersey in area with only 250K people. Why did we move here? Think about that (though people are moving here in droves). There was recently a Where's Ollie post on Glacier. Yes, it’s truly a one-of-a-kind beautiful place! It's so unique that almost everybody wants to go there, like Yellowstone, the Tetons and Yosemite to name just one of the great NPs in CA. I went to Glacier in 1986, the 100th anniversary of the state of Montana. There were so many tour buses, Chinese tourists many and others, after a quick chase up a trail to try to catch up to a mountain goat, we left asap and tent-camped after hiking into the Bob Marshall Wilderness. There we didn’t observe another human all week. The NF and Lake Flathead were great! I lived East most of my life, besides IL 10 years in VA (both Tidewater and NoVa). Eastern Tennessee is beautiful but the entire east coast is so highly populated. It's certainly more difficult to boondock somewhere East vs. West. BLM land is only in western states and I believe there are about 8 National Forests in Arizona alone. Then we have Utah and SW CO within a days drive. Just finishing a 10 day trip to SW Colorado. Last night we arrived at a boondocking site off I-40 in Winona AZ, two hours from home. I found it using the Motor Vehicle Use Map (MVUM) for the Coconino NF and then I use OnX Offroad to navigate the FS roads. We are on a ranch road, so there’s ranch traffic which I mind less than tourist traffic. You can tell when at 5 PM 6-8 work trucks were heading out and this morning at 4:45 AM they all returned to work. I got back to sleep. Take a look at our campsite, not bad with views of the San Francisco Peaks! Last night I walked down the short dirt road next to us. There was a Casita pull by a Honda SUV. They are 200 yards behind us but we haven’t talked, each keeping to ourselves (behind where I took the second picture). After a few nights boondocking in another great spot north of Dolores CO, we tried some locations east of Mancos, west of Durango. We found too many modern homeless types. Those who camp in their vans, trucks or cars. It was Labor Day weekend making campsites busier. Not feeling good about camping there, we stayed at Target Tree a US FS campgrounds. Check in on Labor Day and the grounds were about 2/3 full. The next morning everybody left except us, the very nice host and one other. Yeah, a view of the Grand Tetons would be great, but don’t go in season unless you want the traffic and the lines. This place is not bad to have to ourselves. What a site the Casita guy has, far enough off the road. We’ll come back here again. There is a huge network of roads with literally 100s of boondocking sites. If you want this kind of experience don’t cheap out on batteries/inverter/solar and install a new efficient A/C (yay Chill Cube)! We just finished 10 days without hookups. Our 900 Ah batteries are now down to 30% SOC. We ran the A/C for 2 full days plus lunches on the road and a couple days just late afternoon. We ran the fridge and hot water heater on LP when camped. Our DC-DC charger is always attached when towing. By the time we get home, SOC should be up to 45%. Keep in mind that these numbers are % of 900 and if they are to get done to 25% our reserve would be equal to 4 large AGMs. Yeah, for us having an Oliver is worth it. It’s what you make it to be. We love ours!
1 point
-
If you already have several 5Ah Dewalt batteries, bring 2-3 with you. I had two 6s that were 3 years old. Burnt one leaving it attached to Starlink overnight. While sleeping it went to zero, no lights, wouldn’t recharge. Gave the other 6 to my son after I bought two 10 Ah which stay in the Oliver. Mounted one of my chargers in the Attic. The two 10s will last a full 24 hr cycle, each will run the Mini for about 8 hours. Figure the 5 Ah Dewalts to last 3-4 hours each. You’ll need something like this: https://a.co/d/0boBnuD4 I like the cost and simplicity of the 1 1/2” PVC but the umbrella stand is really too big. Wish I had a good place to store it but lately I stopped bringing it and one campsite this trip we were back to laying it on a milk crate 10 ft behind the Oliver. 90% of the time, I can use my truck mount, move the truck a few feet over to clear trees when needed. Love our complete setup of truck-based 5G Cell/Starlink/Wi-Fi! Pull the Mini and PVC section out of my truck toolbox and we’re ready in one minute, all devices already Wi-Fi connected to our “Home” network. 😎 I’m also big about using what you have. Perhaps you can adapt one of your tripods to work effectively. I do suggest eventually to get something truck mounted. The TV can often be moved some. When parking the Oliver, the level spot, sun/wind orientation, the direction of your view, are all more important than clear sky to the north.1 point
-
I totally agree I had the same problem. Having the opposite side down I noticed that the axles were slanted side to side, but also skewed a little front to back. If I had to do it over I would have raise the whole trailer up and level with no pressure on all 4 hubs/tires. I did buy 2 cheap scissor jacks from Amazon to fine tune the height of the axle I was working on helped a lot. I could adjust the height of the scissor jack by hand and get things exactly where I needed them. here is the jack I bought https://www.amazon.com/TCE-AST10202SU-Torin-Cross-Scissor/dp/B0CP78MZMK/ref=sr_1_1?crid=2H17OYSVYKERR&dib=eyJ2IjoiMSJ9.bwqlOzBbCSEQIvYLwTJphg.4A7CLcc1r9OBfO4aqVO_k8xMRyWPESElnwC8J8uQsm4&dib_tag=se&keywords=TCE%2BAST10202SU%2BTorin%2BWide%2BBase%2BCross%2BCar%2BScissor&nsdOptOutParam=true&qid=1789315759&s=automotive&sprefix=tce%2Bast10202su%2Btorin%2Bwide%2Bbase%2Bcross%2Bcar%2Bscissor%2Cautomotive%2C238&sr=1-1&th=11 point
-
Life events have put our travel on hold this past year, but on our last long trip to the PNW last fall we did see lots of crowds at most of the 7 national parks we visited. Less crowding durning the week, but weekends were busy. We stayed at some really nice state parks in WA, OR, ID and UT that were not crowded at all. $100K is a lot for an Oliver, we’d be stretched if we needed to buy one now. Like Bill, ours seemed like a lot of money in 2016 ($51K) but not as scary as 100K. There have been some significant changes and upgrades, windows, shades, bathroom door, convection, and more. Not to mention batteries/power options. We thought 4 AGMs was a big deal 10 years ago! Welcome back! Mike1 point
-
That's a tricky part of the job for sure. I remember using a bottle jack under the axle and also under the spring pack to help center the pin in the hole. I also jacked the other side of the trailer up a bit to allow the axle to be manipulated a little. It's tricky doing it by yourself. The important thing is to make sure the pin is aligned in the hole all around, any remaining gap will be taken care of when you tighten the U-bolts. It also helps to put a bit of grease on the pin.1 point
-
55k in 2016 is around 76-77k in today's dollars. Though as you say- there more standard options these days.1 point
-
We have a 2022 Elite 2. I don't think the quality of our particular unit is as good as ones from earlier years. Maybe it was the rapid expansion of production due to COVID, or maybe ours was just built on a Monday, can't say, but we've had quite a few issues. OTOH, there are things missing on the current models that we enjoy on ours. We like the rear window that can open, the built-in sound system, the larger freezer in our fridge, the reading lights on both ends of the beds, and a few other details not present on the new units. I don't think we would buy another new Oliver at the current price points. (If we were buying today, we'd be looking at a Wingamm mini-motorhome.)1 point
-
I took 5-6 years to make a choice. Started Oliver, went through the Airstreams, Escapes to Bigfoot, and almost last minute fortunately went back to Oliver which was the absolute right choice. I’ve only become happier with it as times gone on. But unfortunately during that period the price got seriously jacked up. Originally I think it was running in the 60’s which was fine but now is over 100k. On the good side it was worth the wait, the only two features I wanted in the trailer was an induction stove and frameless windows - both which happened to drop in 2026 when we were buying. More luck, the ‘27’s dropped the valances, roller shades and single control windows which I prefer. So it was the right time for us regardless of the price. As for value the nearest competitor is Airstreams which are roughly the same price. But there you get (crummy IMO) manual awnings, no battery with little upgrade options, 2kW inverter IIRC, no compost option (LOVE THE COMPOST TOILET lol …) and a trailer which leaks. As many Airstreamers have said “it WILL leak”. As for pizzaz the Airstreams are awfully cool to look at, but so is the Oliver. Not a lot in the West and I constantly get compliments “that’s the prettiest little trailer I’ve seen”. Under the hood the Oliver is just superior in every way too. Not looking down my nose on Airstream - I wanted to buy at one point, but being an engineer I looked deep into them and they’re consumer grade honestly.1 point
-
$100,000 has a BUNCH of sticker shock value. However, - roughly speaking - the value of a dollar declines around 50% every seven to ten years or so. So, I bought my Oliver is 2016 for about $55,000 and to the degree that inflation statistics are true then my Oliver would "normally" be priced at around $110,000 in today's dollars. And, today's Oliver has a number of what used to be options already included in the price plus a few things that have been improved over the past ten plus years. Finally, I look at the value of my net worth compared to ten + years ago and realize that I'm in better financial shape today then I was in 2016. Come on back to the Family! We're waiting for you. Bill1 point
-
I don't yet have the mini, but I still use the Starlink Gen 3. I had purchased a tri-pod mount adaptor from Bantha Overland on Etsy. I just checked and he has a few 3D printed items for the mini as well. I'll use him again as the first mount was a good solid solution for my heavy-duty camera tri-pod. I like having items that are multi-purpose, to save weight & gear, i.e. a camera AND Starlink Tri-Pod, etc. Also with the mini, I want to check out all the cool cases/mounts available. Veritas Vans seems to have an interesting solution for the mini. I'm also thinking 3M tape magnets so I could put the mini on top of the Ollie, or on top of truck cap. Which ever works best at the time. Lastly, I think this is more true for the mini, but recently I took a chance and started pointing my Starlink Gen 3 in any direction in the opening of trees (within South Georgia). I was amazed that I did not see any speed test reduction compared to pointing dish North. Try that out. It sounds like the mini pretty much can point anywhere too these days.1 point
-
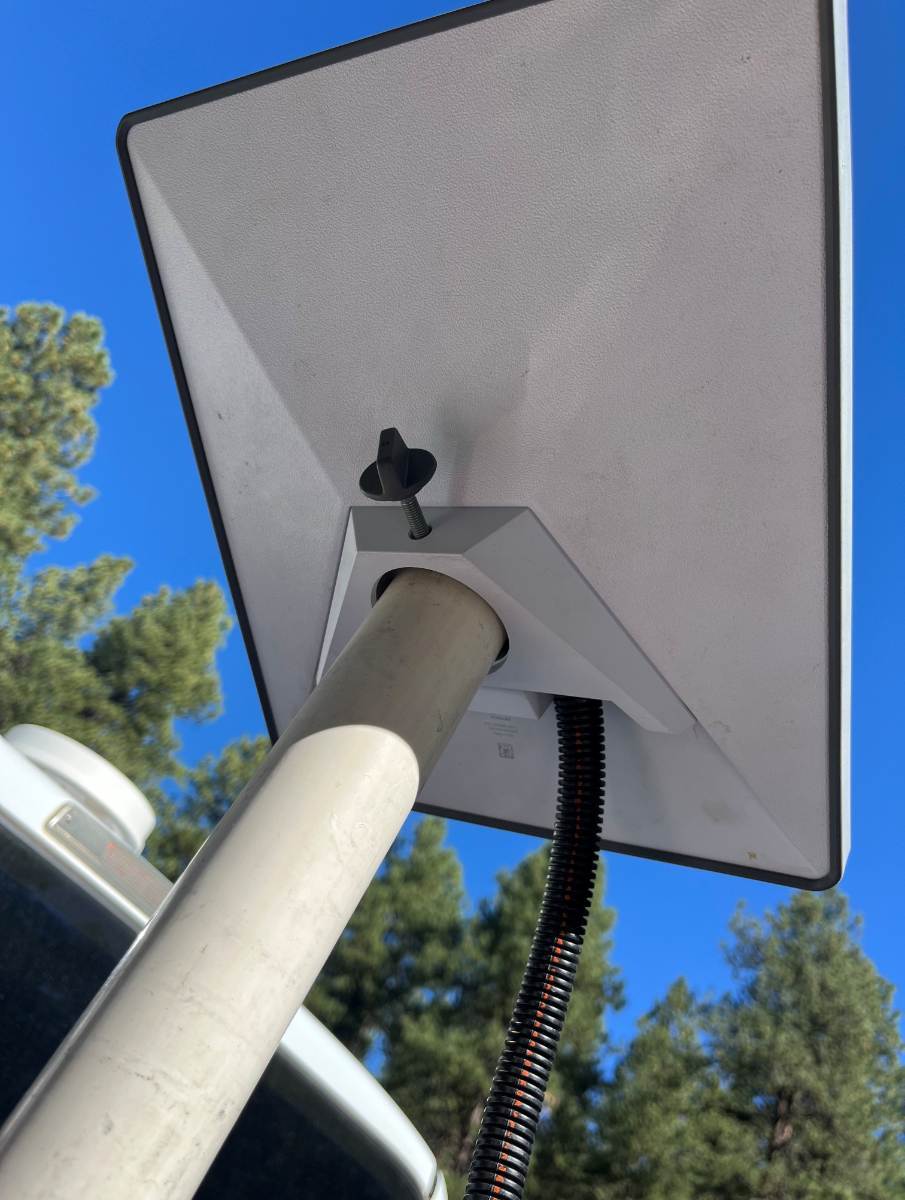
Hello again Bob, and thanks! I merely purchased a 4 ft piece of 1 1/2" PVC (2" OD) and a coupler from Lowes. Sawed the PVC in two 2 ft sections and the coupler will join the two only in the truck installation (pic1). The lower 2 ft section is permanently mounted to our extra fresh water tank. This works in an open bed but the lower section could be bumper mounted or to the side of a truck cap or the Oliver front basket. For the "umbrella stand" option the set screws from the stand fit into the drill holes. There is also a 3rd drill hole up top (cannot be seen in pic) to hold the Starlink set screw. Half fill the umbrella stand with water and it's not going anywhere! Good sale price on this today at $27! https://www.lowes.com/pd/Patio-Premier-Patio-Premier-Square-Blow-Mold-Umbrella-Base-Black/1002629278 Starlink includes two mounts. Mike mentioned he would merely lay the Mini on a flat surface. He's using the simple base mount that has a kickstand to produce the correct angle. I started the same way but found often in the woods finding a flat spot to support the dish is difficult. Starlink includes a second mounting plate (pic2) which comes with the 2" mounting hole with set screw. Notice the two drill holes in the upper post. If I'm using the umbrella stand, these line up with those set screws. I love the 1 1/2" PVC mount and would not stray from this. If I was to buy a stand again, instead of the umbrella stand which is large to store, a folding tripod would be OK, if I could find one that would hold the 2" pipe. I wouldn't want to get into camera stands, 1/4-20 screw mounts with adapters. IMHO, a soft 1/4" screw should not be the only thing holding the dish, not in heavy weather. No skinny stands, no long poles, no suction cups, nothing fancy for me. Just open your compass phone app, mount the dish pointed north, check alignment on the Starlink app, just a one minute installation required with this setup! 😎 Sorry, acronym from eBay sales, means "New in Box."
1 point
-
That stand looks pretty cool. What parts did you use to make it work. Also the battery looks like a Dewalt 20V battery. How did you wire into the battery. I like the idea of not using cables if possible and if I use a cable I only what to use one. Either RJ45 or Power. I have a tonneau cover so placing it on the cover when needed would be great, when not possible I would like the stand instead of just sitting it on the ground, and the stand had weight in the base it would be even more stable on the Tonneau. Thanks for letting me know that you arrived at your current setup through a process. I liked to know that. I know your setup is more complex than I want now, though it works great for your needs and you arrived at that over testing and growth. Sorry but what is NIB"🤔 I have a question for you and @Todd B how can you mount the mini on a pole or a tripod, Most tripods are 1/4-20 threads and I have know idea what the pole size @jd1923 uses. Special Addapters or does the mini come with all of those mounting options? Sorry for basic questions, When I was a machinist/ automated equipment tech, and then IT, I usually tried to wrap my head around a situation before I would implement. I am kind of anal retentive at times. I like seeing things from different angles before I purchase something. I do not mind fabricating/ buy adapters to make things work, but it nice to have an idea which way I will move before I purchase something. Sometimes it works and sometimes it is working through a problem/situation to come up with a solution. If someone else has a good solution that works, I do not mind leveraging those solutions. Why reinvent the wheel if someone else has already done it. (Off topic) I built a 42' x 16' free standing awning off the back porch with plastic corrugated roof special ordered from the east coast( my wife's idea), I want a plywood with metal roof. The awning roof cantilevers over the roof on the house . Living in Oregon in with many trees and 90+ humidity in the winter I needed a way to clean the awning roof, because of the debris, moss and lichen growth. When I first tried to do this I made a 3 nozzle sprayer on rollers to hook to my pressure washer. It failed miserably. I ended up recruiting my son, and we both stood on our metal roof, one sprayed the roof with water as the other used a micro fiber mop head on a 16 ft paint roller pole to clean the roof. This worked but it was very labor intensive. I found an old high end pressure washer at an estate sale this year. My son and I made the base so I could tow it with the mower and put a removable hose real on the base. I went over every part of the sprayer. It looks like brand new accept for the dented Honda gas tank. It took a 3 iterations with the old 3 nozzle sprayer, but I got it working great, and at half throttle. Had some fun at full throttle where the sprayer was floating 4ft above the roof because of the spray pressure. When I got it dialed in it took 1.5hrs by my self without getting any over spray on the metal roof, as compared to 4hrs for 2 people and both of us getting wet on a metal roof. The point of the story I may be slow and with limited resources, but I never gave up on finding a solution.1 point










.thumb.jpg.e34bf01ef7f7d5e99ad31856d45afbeb.jpg)



-
Recent Achievements
-