Rivernerd
-
Posts
963 -
Joined
-
Last visited
-
Days Won
18
Everything posted by Rivernerd
-
I would pull out all of the drawers and look for water damage to the wood framing under the sink with a headlamp. Even with the plumbing leak repaired, there may be residual water damage that has allowed mold or mildew to grow. Also, remove the plywood panel under the sink, on the floor of the cabinet, that enables access to the receptacle that powers the fridge. You may find the source of the odor there. Also, ensure that your gray and black water tanks are empty. Even standing gray water can stink, especially during the summer months.
-
I live in the Idaho mountains, and I tow our Elite II with a 2019 Tundra with the 5.7L engine and tow package. I agree that it is "sufficient," with an Andersen weight distribution hitch. But, I definitely know that I am pulling a heavy trailer, which has quite a different feel that my lighter raft trailer, even when the raft trailer is heavily loaded. So, when I need to replace the Tundra, even though I am a Toyota fan, I plan to carefully evaluate the marginal cost of a Tundra vs. 2500-level Chevy or Dodge, or a Ford F250. Based on posts on this forum from owners of 3/4-ton and 1-ton pickups, I expect the towing experience with an Elite II behind such a truck to be less stressful.
-
 Our Truma AC was one of the first installed by Oliver last fall. At that time, Oliver was not yet sealing the screw wells. After we twice had water leakage through those screw wells, we were instructed by Truma and Oliver to seal the wells with silicone caulk. Before I did so, however, I removed the cover to see if I could examine the sealing where the unit penetrates the roof of the trailer. The cover lifted off easily once those 8 screws were withdrawn. It was also easy to get the cover back in place, and to reinstall the screws. In your shoes, I would remove the cover, carefully inspect the condenser fins, then reinstall the cover.
 -
A quick question on using shore power and air conditioning
Rivernerd replied to Steve Morris's topic in General Discussion
My Xantrex Freedom XC Pro 3000 watt inverter will charge my 390 Ah of Lithionics batteries from a 15A/120V receptacle, so long as no appliances are running at the same time. -
I am a low-key Civil War buff. If I had a day or two available in Tennessee, I'd make the drive to the Chicamauga and Chatanooga National Military Park.
-
My how-to video for cleaning the weep holes and tracks
Rivernerd replied to Wayfinder's topic in Mechanical & Technical Tips
https://www.pellandent.com/RV-Window-Seal Match the profile of your window seal to a profile on the Pelland Enterprises web page, link above. -
No personal experience, but yours is not the first post on this forum recounting this type of run-around from Truma. That is why I own, and am not afraid to use, a combustible gas detector. If I encounter issues with the Truma tankless water heater in our Elite II that I can't diagnose or repair myself, my plan is to simply replace it with a Fogatti/Rec Pro, available from Amazon.
-
Xantrex Inverter Issues? Try a Hard Reboot
Rivernerd replied to Rivernerd's topic in Mechanical & Technical Tips
You don't have a DC master switch. You have on/off buttons on each of your three Lithionics 130Ah batteries. That said, if you need to do a "hard reboot," just turning off the batteries did not work for me. Only physically removing the battery cables from the inverter resulting (twice) in a hard reboot. -
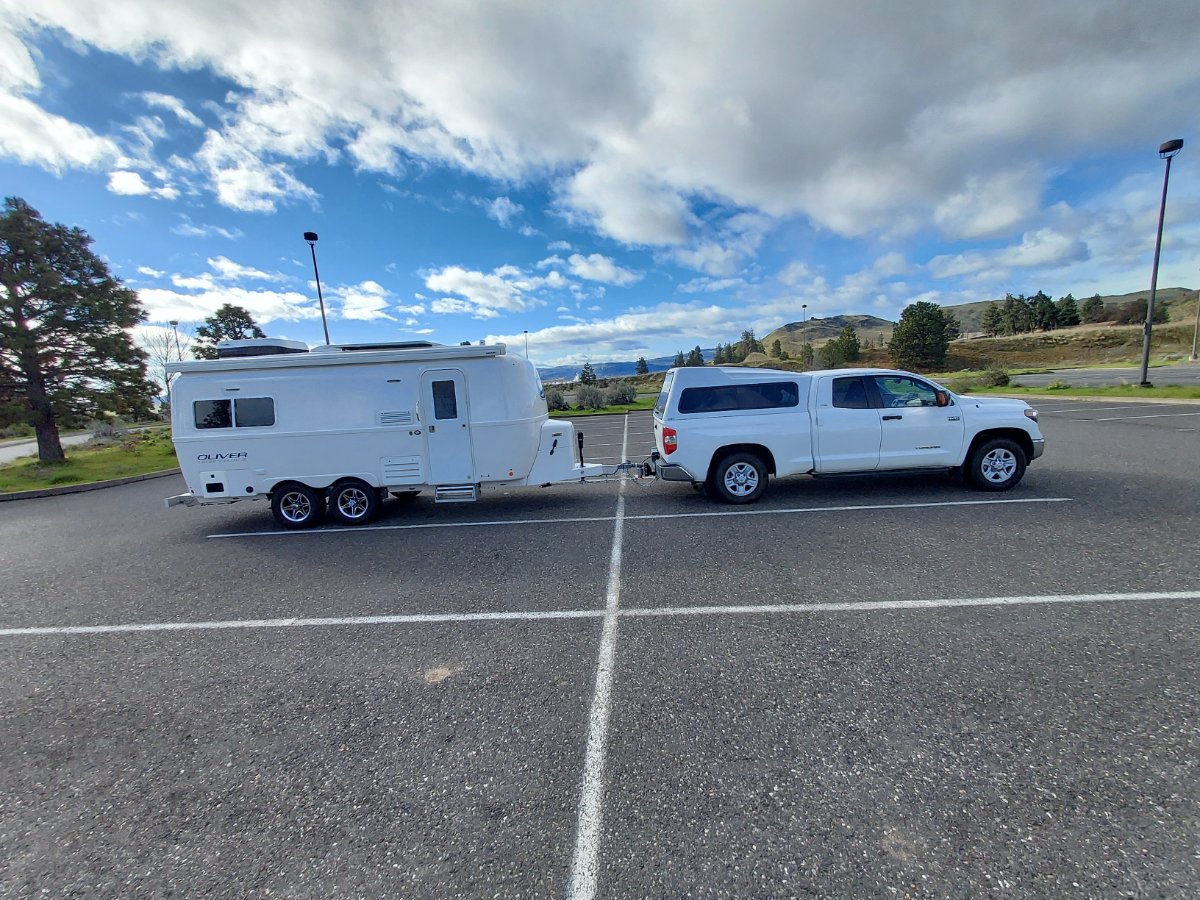
Oliver Service is right. The tow vehicle for my 2022 Elite II is a 2019 Tundra, 5.7L V8 with tow package. The top of my Andersen hitch ball sits precisely 23-1/2" from the ground, on a level concrete surface, without the trailer attached. Of course, when the trailer is attached the truck squats a bit, which then results in a level towing position. I am quite particular about ensuring that the trailers I tow sit level when towed. Placing the top of the Andersen hitch ball at 23-1/2" off a level floor, with a Tundra, will result in a level towing position for an Elite II, if both the truck and trailer are properly loaded. See photo below.

-
"Any other suggestions for keeping the little critters out. Are others using screens or ?. " It is recommended to spray peppermint oil in areas where you want to deter mud dauber nest building: "Repel Them With Peppermint Oil With only a few drops of peppermint oil in warm water, you can stop mud daubers from making their nests around your home. Pour the mixture into a sizeable spray bottle, and spray it on spots where you don't want the insects to visit. Peppermint odor is very active in keeping mud daubers away. However, you may need to apply this mixture frequently. This is because you could have an infestation as soon as the odor wears off." From: https://www.imperialpestprevent.com/post/rid-your-home-of-mud-daubers
-
They are called combustible gas detectors. The best ones have both visual and audible alerts. I like this one, available from Amazon for $32, if you can get it delivered where you are: https://www.amazon.com/Natural-Detector-Portable-Combustible-Explosive/dp/B07FSVCSSL/ref=asc_df_B07FSVCSSL/?tag=hyprod-20&linkCode=df0&hvadid=343320284310&hvpos=&hvnetw=g&hvrand=1399517356399337030&hvpone=&hvptwo=&hvqmt=&hvdev=c&hvdvcmdl=&hvlocint=&hvlocphy=9029558&hvtargid=pla-656039150139&psc=1&tag=&ref=&adgrpid=68608912305&hvpone=&hvptwo=&hvadid=343320284310&hvpos=&hvnetw=g&hvrand=1399517356399337030&hvqmt=&hvdev=c&hvdvcmdl=&hvlocint=&hvlocphy=9029558&hvtargid=pla-656039150139 Combustible gas detectors can enable you to find leaks in places you can' reach with a soap+H2O solution. The closer you get to the leak, the louder the alarm (if properly calibrated), and the greater the number of LEDs lit on the visual display. Yes. The propane line that feeds the water heater runs from the forward propane tanks to the aft location of the water heater. The leak could be at the water heater, but you might smell it along the path of the propane line. Also, the water heater is easier to access (from the outside) than the interior area under the stove. I would try a soap and water solution now to try and rule that out, even before you get a combustible gas detector. It could be as simple as a loose flare fitting at the Truma water heater. I would also daub a 50/50 dish soap+H2O solution along the path of the copper propane line as it runs underneath the trailer to the water heater, and to the rear quick connect fitting, with the line pressurized (by having the propane tank valves open). You may find a leak along that line. Good luck, and please report what you find!
-
Xantrex Inverter Issues? Try a Hard Reboot
Rivernerd replied to Rivernerd's topic in Mechanical & Technical Tips
Yes. I have thoroughly checked all DC and AC connections, and they are secure. -
Xantrex Inverter Issues? Try a Hard Reboot
Rivernerd replied to Rivernerd's topic in Mechanical & Technical Tips
My LBCO is set at 12.0V, per Oliver's recommendation. And yet I still get a 1.0 to 1.1 differential between actual and Xantrex reported battery voltage, and inverter shutdown when under a 1500 watt+ load, except right after a hard reboot. After a hard reboot, the reported voltage difference is in the .03 to .06V range. -
Xantrex Inverter Issues? Try a Hard Reboot
Rivernerd replied to Rivernerd's topic in Mechanical & Technical Tips
Following my first hard reboot in May, our Xantrex Freedom XC Pro 3000 Watt inverter once again shut down when asked to handle loads over 1400 watts at less that 100% State of Charge. So I tried just turning off all three batteries, as suggested by Geronimo John. Although I left the batteries off for a couple of days before turning them back on, the inverter still shut down when asked to handle loads over 1400 watts. So, I did a second hard reboot by physically disconnecting both the positive and negative battery cables from the inverter, and waiting 3 days. For reasons I do not understand, physically disconnecting the battery cables enabled the inverter to once again handle loads over 1400 watts, while just turning off the batteries did not. How long the effects of that second hard reboot will last remains to be seen. Tom and Doreen: have you done a hard reboot on your Xantrex inverter? If so, what were the results? -
Need help with propane generator setup
Rivernerd replied to Happy Camper's topic in Mechanical & Technical Tips
That is why I ultimately invested in a second Champion Dual Fuel 2200 watt generator and a splitter so I could run both from one 5-gallon propane tank. The lower output on propane requires the second inverter/generator to run our Truma AC (which has no easy start installed). -
Need help with propane generator setup
Rivernerd replied to Happy Camper's topic in Mechanical & Technical Tips
To avoid precisely the problems you are encountering, I carry a spare 5-gallon propane tank in the bed of my pickup tow vehicle, and run my two Champion Dual Fuel 2200 watt generators with a splitter from that tank with the OEM regulators. That spare tank also provides backup in case my two primary 5-gallon tanks run low. For me, an easier solution. -
Please submit a service ticket, even though you apparently fixed the oversight yourself so your pump would function as it should. Oliver needs to be advised of this obvious quality control failure. Based on my experience with Hull #1291, and review of dozens of reports like yours on this forum, Oliver's attention to detail and quality control during production is, at best, inconsistent. Very sad given the premium price charged.
-
has anyone tried the new Dometic fresh jet 2200?
Rivernerd replied to Roadlotus's topic in Ollie Modifications
Mobilejoy: We deferred our delivery date last year, and paid the premium, to get the Truma Aventa AC. It works well. But, I have no basis for comparing the Truma to a Dometic Freshjet. At this point, the Truma Aventa is a known performer. The Freshjet is not. And, it is a "Demonic" product, from a company that has been known to cut corners to improve the bottom line. In your shoes, I would keep my appointment with Oliver and pay the Truma premium. Once the Freshjet has a significant track record, my analysis may be different. That said, in Roadlotus' shoes, I would also keep the appointment for installation of a Freshjet. The travel to Hohenwald for a retrofit would be a "deal breaker" for me as well. -
Discount Tire refuses to sell me LT tires for my trailer
Rivernerd replied to John E Davies's topic in General Discussion
I'll bet Les Schwab will sell you LT tires for your Oliver. But, I wonder why you so strongly prefer LT tires. Do the ST tires offered have fewer plies or less aggressive tread (for your gravel road adventures)? -
That is one reason I placed ours in the closet. It is not real attractive, but we never see it unless we are looking for it, mounted above door height, on the interior closet wall. You raise a good point about securing it with screws, rather than Velcro or double-stick tape, to avoid having to re-level the trailer.
-
Low voltage at the cigaret lighter
Rivernerd replied to Bill and Nancy's topic in General Discussion
Please forgive my ignorance, but what is the "EMS" under the rear dinette seat? Are you referring to the 12V fuse block? Or the main 12V grounding bar? -
Never disconnect the trailer from your tow vehicle unless the trailer wheels are well chocked first. We use rubber chocks on the downhill side of the trailer tires, as well as X-chocks, before removing the trailer coupler from the hitch ball. Don't ask me why this became such an important rule for us...
-
No photos visible to me.
-
Your coupler will work better if you spray it with WD40 at least twice per year, then open/close the coupler several times to work it in to the mechanism. WD40 is also a good rust inhibitor.
-
Xantrex Inverter Issues? Try a Hard Reboot
Rivernerd replied to Rivernerd's topic in Mechanical & Technical Tips
Our Lithionics G31 130Ah batteries have on/off switches. Do you believe that just turning off all 3 of those batteries would perform a hard reboot?