
Rivernerd
-
Posts
973 -
Joined
-
Last visited
-
Days Won
18
Everything posted by Rivernerd
-

Newbies taking the plunge - Are we missing anything
Rivernerd replied to Dennis and Melissa's topic in General Discussion
Then plan to spend a few days during July or August in the Stanley Basin near Stanley, Idaho camping at Redfish Lake, or along the Main Salmon River in a Forest Service campground. The views of the Sawtooths are truly "breathtaking". -
What info? I don't see a post from Steve in this thread. Regardless of the reason, closing out the Oliver Classifieds is bad for customer relations. My opinion of Oliver Management just took a steep nosedive.
-
Newbies taking the plunge - Are we missing anything
Rivernerd replied to Dennis and Melissa's topic in General Discussion
Our reasons for purchasing an Elite II are similar. In our first year of ownership, we have yet to get to a national park with it, but have enjoyed some pleasant stays at state parks in Idaho and Oregon, along with some lovely days boondocking at Harvest Host locations, Forest Service campgrounds, and elsewhere. We opted for the Lithium Pro package, with 390 Ah of capacity. It has been more than adequate for us. We have found that even when boondocking for a few nights, the thing that has pushed us to pack up and find hookups or a dump station has not been battery life, but the size of the gray water tank. After 2+ days, it is nearly full, just from 2 short showers per day and dish washing. So, for us, the extra expense for the Platinum package did not make sense. Had a larger gray water tank been an upgrade option, we would have gladly paid for that! Given your plans, I recommend you save the difference between the Lithium Pro and Platinum packages, and opt to spend that savings staying one out of every 3 nights or so at an RV park close to the national park you are visiting, so you can dump your gray tank (and black tank, if you don't have the composting toilet), recharge your batteries, if needed, from shore power, and refill your fresh water tank. Then go back to the park, if desired, for another visit. That was our choice last year, and given our use of the trailer, our initial year of ownership has left us quite comfortable with that decision. -
Plumbing upgrades with SharkBite fittings
Rivernerd replied to Nick R.'s topic in Mechanical & Technical Tips
Not a lot of plumbers in rural Central Idaho use Uponor/Wirsbo Pex-A either. I also designed and built the manifolds, and did all of the plumbing in our home. After 4 years, no leaks in the Pex. -
Sadly, this is why I don't use RV service centers. I choose to do the work myself.
-
Plumbing upgrades with SharkBite fittings
Rivernerd replied to Nick R.'s topic in Mechanical & Technical Tips
Uponor Pex is the same as Pex-A. -
Plumbing upgrades with SharkBite fittings
Rivernerd replied to Nick R.'s topic in Mechanical & Technical Tips
Agreed. But, for a travel trailer subjected to bumps on the road, the issue is not brass vs. plastic, it is the strength and durability of the pipe-to-fitting connection. Oliver uses some brass crimp-ring style and some plastic compression-style Pex fittings. Crimp-style fittings depend on the diligence of the person doing the crimping to ensure a secure connection when subjected to the bumps on the road. I suspect the person doing the crimping in your Oliver let you down. The most secure method for Pex connections, which has been on the market more for a decade, is the expansion ring type. Instead of crimping a brass ring around the pipe, a special tool temporarily expands a plastic ring that is then quickly slipped over the pipe and fitting before it shrinks back to its original size. Where the brass crimp ring is applying outward force, always trying to enlarge back to its pre-crimped size, the plastic expansion ring is applying inward force, trying to shrink back to its pre-expanded size. It is this outward vs. inward force of the clamping ring over time, and particularly when bumped around, that makes the plastic expansion ring type much stronger and more durable. I plumbed our entire home with the expansion ring Pex-A system. That is what I wish Oliver had used on our trailer. It is the system that, in my judgment, Oliver would be well-advised to use going forward. It produces plumbing joints that are even more resistant to the abuse delivered by bad roads than the much more expensive brass Sharkbite fittings. -
This post is offered in the hope it will help someone else avoid my dumb mistake. It has been my practice to flush the black tank after dumping using the black tank flush inlet port below the bathroom window. I carry a separate black-colored hose just for this purpose. In the past, I have always left the black tank drain valve open when flushing. At the conclusion of our most recent camping trip, after a first flush with the drain valve open, it occurred to me that I might get a more complete flush if I mostly filled the black tank with clean water through the flush port first (which required that I close the black tank drain valve) then let gravity force the contents of the mostly full tank out the drain. To avoid overflowing the black tank, I carefully watched the Seelevel monitor, then ran outside to turn off the hose bib when the Seelevel black tank monitor hit 90%. I then opened the black tank drain valve to drain the black tank contents. Out of an abundance of caution, I decided to verify that this process had caused no overflow from the black tank. I removed the access cover from the front dinette seat so I could see the aft part of the black tank. Good thing I checked! When I saw a few tablespoons of water in the bottom of the trailer just aft of the black tank, I realized that our Seelevel monitor is not 100% accurate, and that even though I turned off the hose bib when it read 90%, the black tank was actually full of water! Fortunately, the overflow was limited to a few tablespoons, which were quickly mopped up. When I got home, I sprayed that area, twice, with Lysol disinfectant spray, in case that bit of water leakage was contaminated. The moral of the story: when flushing the black tank, always leave the drain valve open. Fortunately, my momentary lapse of judgment (it seemed like a good idea at the time...) occurred after a complete drain, then a first flush with the drain valve open. So, the minimal overflow should have been mostly clean water, which was easily dealt with. I expect it would never occur to most people to leave the black tank drain valve closed to mostly fill the black tank when flushing, just to get a more complete cleaning. But if any of you folks, like me, ever think of trying that method: don't! It's not worth the risk of an overflow.
-
Jacks grease type and application process
Rivernerd replied to Gliddenwoods's topic in Mechanical & Technical Tips
The procedure is the same for the rear jacks as for the front. The rear jacks are accessed through the lift-out panels under the bed or beds. -
Jacks grease type and application process
Rivernerd replied to Gliddenwoods's topic in Mechanical & Technical Tips
-
Norcold refrigerator when not level
Rivernerd replied to John and Debbie's topic in General Discussion
The two of you like to live dangerously! A reminder that absorption fridges use an open flame to heat the refrigerant when in propane mode. The potentially catastrophic consequences of an open flame parked anywhere near a gas pump are enough to persuade me to use DC mode when on the road. John, as I recall you have solar panels and a 390 Ah Lithionics battery bank. For what it 's worth, we always use DC mode when on the road, with the solar turned on. Each time, when we arrive at camp, we switch to propane if boondocking, or to AC if we have hookups. I then check battery State of Charge to determine how much the fridge in DC mode has drawn down our 390 Ah Lithionics battery bank, given the offset from the solar panels. I have yet to find the SOC below 90% when we arrive at camp. That 10% deficit is quickly replenished by the solar panels after a few daylight hours when boondocking. My brother died 6 years ago after he ignited a slash pile doused with gasoline. My son quips that "Uncle Larry went down in flames...." -
Water not draining from sink or shower / no hot water
Rivernerd replied to Cort's topic in Mechanical & Technical Tips
And, don't make the same mistake I did when sanitizing: don't drain the bleach water onto concrete, if you can avoid it! I did this earlier this year, thinking that it would do no harm to the concrete pad in front our our garage. The error in that thinking became apparent the next time it rained. Six months later, whenever it rains, you can still see a light-colored pattern where the bleach water drained onto the concrete and then flowed off of it. Fortunately, once the concrete pad dries up the splotches disappear. But, the next time I sanitize my tank, I will take the extra effort to move the Oliver and drain the bleach water onto our gravel parking area beyond the concrete pad! -
Also available from Amazon if, like us, you live a 1+ hour drive from the nearest Walmart. The one linked below is 1/2" thick, the size I prefer to work with. https://www.amazon.com/Winco-CBWT-1218-Cutting-Board-2-Inch/dp/B001D3LQVA/ref=asc_df_B001D3LQVA/?tag=hyprod-20&linkCode=df0&hvadid=459434780851&hvpos=&hvnetw=g&hvrand=17772694070414201680&hvpone=&hvptwo=&hvqmt=&hvdev=c&hvdvcmdl=&hvlocint=&hvlocphy=9029558&hvtargid=pla-448665261987&th=1
-
Like this?

-
I don't plan to close off the main return air grill under the street side bed, because it serves two important functions in that location: (1) avoiding creation of low pressure in the area around the furnace, and (2) providing a supply of free-flowing air to the furnace intake. 1. Creating Low Pressure Around the Furnace A couple years ago, John Davies noted: "But if you relocate the furnace grill to the far side of the cabin, you are essentially creating a slight vacuum under the floor with the furnace fan, so air is going to be pulled inside through those [scupper] holes [in the bottom of the hull]. A little air infiltration isn’t bad, but on a really frigid day it will also suck in trickles of freezing cold outside air right where you don’t want it, under the tanks and plumbing. With the existing location there is no suction created under the floor, instead the cabin air enters directly. So maybe [the Oliver engineers] really did choose this spot for a good reason." See this thread: 2. Providing Free-Flowing Air Supply to the Furnace. I tried installing a homemade furnace filter over the air intake of our Truma Varioheat furnace a few months ago. The furnace began throwing error codes, I suspect because it sensed that the supply air intake was partially blocked by the filter. Removing the filter solved the problem. That furnace air intake sits directly behind that return air vent. It appears to me that the Varioheat furnace is designed to have the large, free-flowing air supply provided by that return vent directly in front of the air intake. I do not plan to block it.
-
Newbies taking the plunge - Are we missing anything
Rivernerd replied to Dennis and Melissa's topic in General Discussion
I expect yours is an absorption fridge. The 2023s come with compressor fridges. This is another reason to consider solar and lithium: a compressor fridge requires a fair amount of power, and very few RVers get along without a fridge. Also, many campgrounds limit the hours you can use a generator. If you plan to rely on a generator, I hope we don't end up camping next to you! (with all due respect) Yes, the lithium upgrade is pricey. But, unless used nearly full time, Lithionics LiFePO4 batteries should last at least 10 years, likely more like 15. Wet cell or AGM batteries must be replaced every 3-5 years regardless of use. Over time, the marginal cost differential between lithiums and lead/acids is not that great. -
Newbies taking the plunge - Are we missing anything
Rivernerd replied to Dennis and Melissa's topic in General Discussion
We didn't get the electric door lock on our 2022 Elite II, because some folks on this forum noted issues with them. One poster got locked in the trailer when it malfunctioned and had to crawl out the rear window! We have not regretted saving $$$$ by going with the standard key lock. We keep the key in the center console of our truck. -
Yes.
-
The "basement" is comprised of the area between the inner and outer hulls at the bottom of the trailer. Although there are scupper holes for drainage, there are also lots of places where water could pool, in between and under plumbing lines, duct runs, etc. If you can, I would also place fans in the open hatches for several hours to accelerate evaporation.
-
We just switched our auto policies, which include coverage for our Elite II, to Safeco (a subsidiary of Liberty Mutual). Our auto coverage includes roadside assistance, although I carry lots of tools and prefer to address on-the-road issues myself.
-
We spent 3 days at David Crockett State Park after picking up our Elite II last November. When we drove back to Hohenwald the following Monday morning, the Oliver Service staff jumped right on the few issues we had discovered during my thorough 3-day inspection and testing. Their commitment to ensuring that all issues were promptly, and properly, resolved before we took the trailer home to Idaho was exemplary.
-
Lithionics Storage Procedure Rev.7-1.pdf Attached is the most recent Lithionics Storage Procedure memo. When reducing charge to 50% SOC, removing the batteries and storing them in a temperature-controlled environment (as recommended in that document), I see no mention of using an "external charger" to perform the discharge/recharge cycle after 6 months. I would just reinstall the batteries next spring, run them down to the reserve charge level, and let the trailer's internal inverter/charger do the recharge for you.
-
We live in a pine forest in central Idaho. After I installed a sign on a tree two years ago, long trails of pine sap ran down over the sign in several places. I found that WD40 sprayed onto the sap trails, and left to soak overnight, emulsified the sap and made it much easier to remove with a plastic scraper, without damage to the sign. When pine sap gets onto our Elite II, I plan to use WD40 to help with removal.
-
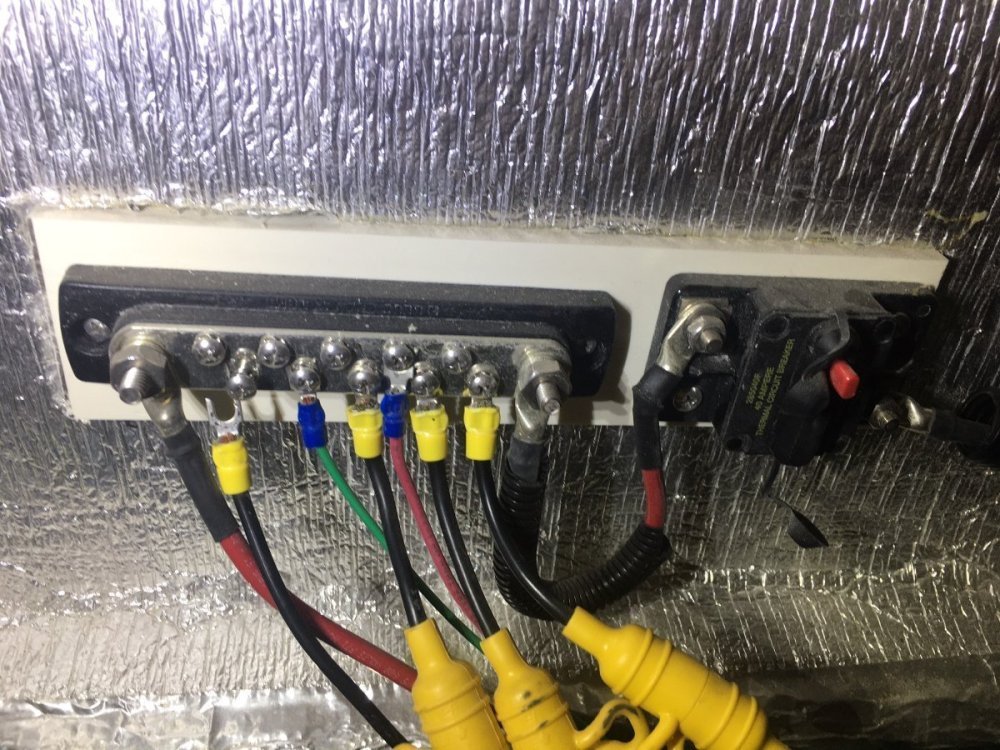
I note that the spade terminal on one of the black wires is not connected to the screw above it. Is this intentional?
-
My poor word choice. Yes, the new bus bar has high resistance, so less DC power is getting to the appliance.