

topgun2
-
Posts
7,645 -
Joined
-
Last visited
-
Days Won
462
Everything posted by topgun2
-
Sure - try SOMETHING LIKE THIS Bill
-
 1 - take the four screws that hold the remote panel off and gently remove the panel. There should be a phone style connector in that back of that panel - unplug it and re-plug it in three of four times - and - do the same thing where the other end of the wire goes into the inverter. 2 - Check to make sure that the wires (both ground and positive) going into the inverter are tight. 3 - now re-try the remote switch. If it works you are done. If it doesn't work - do what they said. New remote panels are not all that expensive on Amazon but, hopefully, you don't have to go that route. Bill
 -
Good luck! The diaphragms on those carbs are generally fragile and since most people use regular ethanol gas it just destroys them. You can always try regular carb cleaner but letting that stuff sit long enough to do its job is probably long enough to destroy what's left inside (if anything). Bill
-
Updated (Again). It’s fixed. If the toilet’s a-rockin’…..🎶
topgun2 replied to Frank C's topic in Mechanical & Technical Tips
I believe that Mossemi has been down the same road but I do not remember exactly what he did or how he did it. You might want to send him a PM or, hopefully, he will see this and reply here. Good luck! Bill -
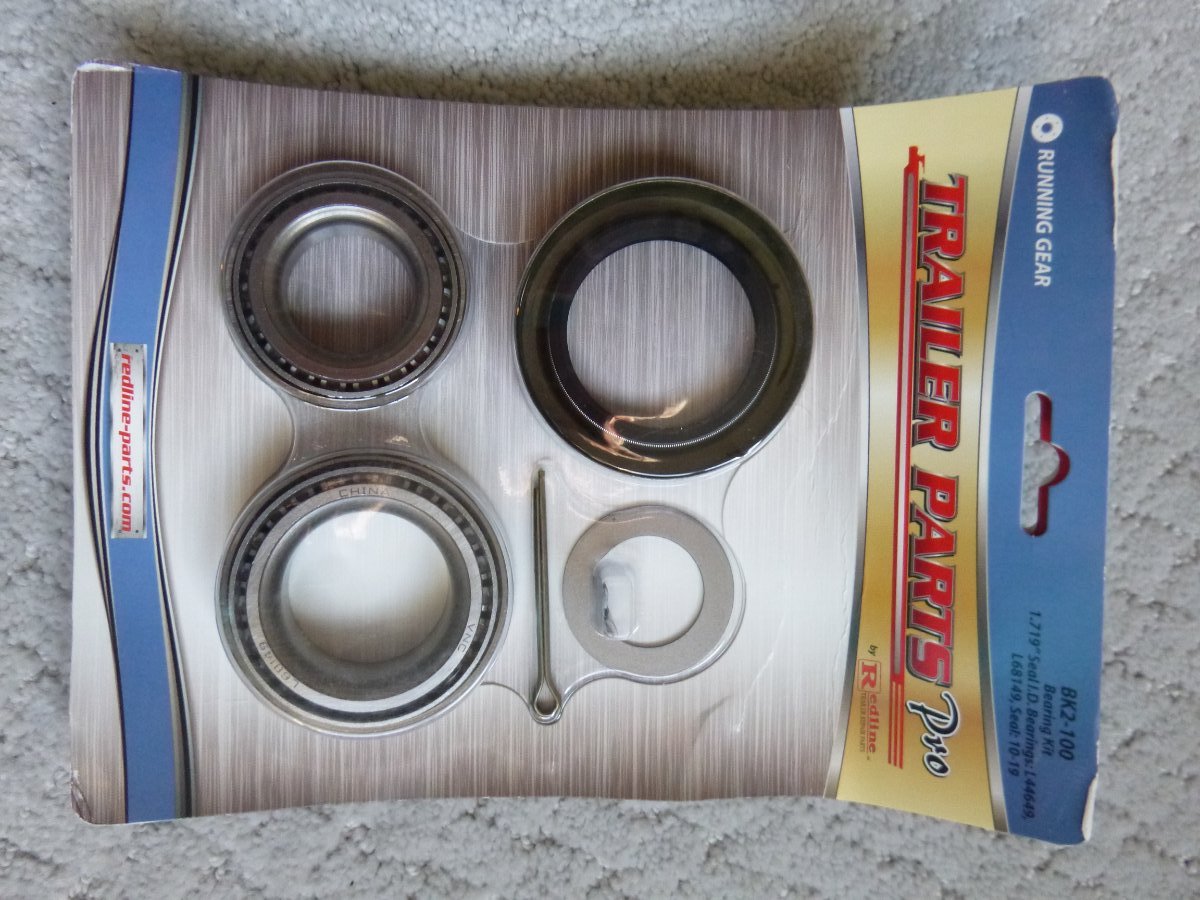
Flat tire - I carry a "plug" kit that I can get in WalMart. I've always carried one of these kits - with or without the Ollie in tow. Wheel bearing issue - I carry a set of bearings like this: While I could change out the bearings with this set, that is NOT my intent. It is fairly easy to get the drum off the axle and carry that to virtually any gas station or tire shop that has a mechanic. The issue is not doing the job on the side of the road where it could be fairly dangerous, but, getting to a safe place and NOT having to wait for them to order the bearings. Yes, these bearings are fairly standard, but, I don't want to hear, "I'm sorry, we just sold our last set this morning". I've been carrying two of these sets around for the past seven years - just in case. And, before you ask - yes, they are made in China. However, I figure that they will last long enough to get me home where I can do a proper job with good bearings and good grease. Bill

-
Me too!
-
The only way I know that you can reduce the size posted would be to use your own photo editing software to reduce the size before you attach the photo to the post. perhaps like this?
-
I'm confused! At the Rally - do I look for the white Oliver or the white truck or the white legs?😆 Seriously - THAT is one good looking rig. Glad that everything went well and that the weather was good to you - at least until you got home. Hope to meet both of you at the Rally! Bill
-
And, many smaller towns too. Asheville North Carolina has one as does the even smaller Hendersonville, North Carolina. Neither of these are "large" by any means. Possibly try a welding shop or fabrication/machine shop. Even if they don't have it they can probably tell you where to get it. Good luck! Bill
-
If you can afford replacing your Ollie out of your own pocket and/or you enjoy taking the risk, then, you certainly can cancel your "collision insurance". But, in today's world I trust that you would not consider cancelling your liability insurance on the Oliver. Bill
-
May 2022 Rally - Specific Information Coming other than the schedule?
topgun2 replied to Nancy K.'s topic in Events & Rallies
I too got business cards a few years ago - unfortunately without the hull #. Vista Print had them for $10/100 at the time but now I see that the lowest cost ones they offer are $16.50/100 (HERE). There may be less expensive offers out there and certainly shopping local helps the little guy.🙂 Bill -
May 2022 Rally - Specific Information Coming other than the schedule?
topgun2 replied to Nancy K.'s topic in Events & Rallies
I don't know for certain but I suspect that the only additional information will be handed out at registration. For any first timers out there - consider bringing: 1 - camera - to take pictures of the park, other Olivers and the mods that have been done to them and other people, dogs and critters 2 - note book - to make notes of names, addresses, locations, mod instructions, vendor details and presentation notes. 3 - good walking and/or hiking shoes - there are a number of hiking trails in the park. 4 - bathing suit if you like getting in the water - it will probably still be a bit cool this time of year but there is a nice beach by the lake 5 - bicycle(s) - Except for the Lodge virtually all other venues are within walking distance of the campground. However, if you prefer, there is also plenty of parking space near the beach pavilion and the vendor areas 6 - plan on driving VERY carefully if you are out after dark - the park is FULL of critters 7 - canoe or kayak - there is the beach mentioned above and there is plenty of dock space. AND, certainly there is plenty of water. 8 - any groceries and/or beverages that you think you will need for the stay. There is a camp store with limited stock and there are grocery stores in town (also an Ace Hardware) but it is a fair drive to town from the campground. 9 - golf clubs and/or tennis racquets if that is your thing. 10 - a big heart and smile for the great sunsets best viewed from the Lodge deck or right down by the water 11 - casual clothing is acceptable virtually anywhere in the area but be sure to have a sweater/jacket handy 12 - even if you have one of those fancy "automatic" awnings be sure to reel it in before you leave camp for virtually any reason. A couple of Oliver owners found out this lesson the hard way when a very sudden storm and wind hit the campground. Note that the Lodge sits at the top of a fairly steep hill. Most campers will want to drive up there for any activities scheduled in the Lodge. Be sure to allow yourself plenty of time to get up there , find parking and get into the Lodge. In years past presentations have been held in the ballroom which is located at the back right hand side. Bill -
Battery maintenance for 4.5 month storage
topgun2 replied to Citrus breeze's topic in Mechanical & Technical Tips
And, hopefully that is way before deer season starts!🙄 -
Foy & Mirna - As usual your "stuff" is absolutely beautiful. Certainly the wood you use is very nice in and of itself. But, how you treat it really brings out its best qualities. Bill
-
Exactly. The only downside that I have thought of with these caps is that a person with ill intent could always fairly easily get those rubber plugs out. But - given the other things that this kind of person could mess with I'm not at all worried. Bill
-
Deb & Wink - It looks like you will have good weather for your delivery. A front is moving through today into tomorrow (Monday into Tuesday) that might cause some brief heavy weather but after it is through the temps will be in the low to mid 70's and plenty of sun. If you stop at Steve's site during the rally remember that Steve is the old one, Tali is the nice one and Reacher is the large four legged one!😁 Ask for a tour of the interior in that it is one of the few with bed risers and Steve has switches for the switches! Hope to see you there! Bill p.s. a warm welcome to the Family too!
-
E.51 displayed on Xantrex pro SW 2000
topgun2 replied to Liana's topic in Mechanical & Technical Tips
Have you tried your toaster again? Possibly that was what tripped the GFI. I assume that the reading on your batteries has not changed? I thought that those error codes only went from 0 to 10. If that is true then even the 12.3 doesn't make sense unless that is your battery voltage? I guess what I'm saying is that I'm not certain that you found the issue that caused the problem even though it is good that you are back up and running.. Bill -
E.51 displayed on Xantrex pro SW 2000
topgun2 replied to Liana's topic in Mechanical & Technical Tips
OK - I don't have manuals here nor is my Oliver here but having said that the first thing I'd do would be to unplug from shore power and turn off and unplug my inverter and turn off my solar panels. Then I'd check to make sure the wires into and out of the inverter were not loose. Finally, I'd plug the inverter back in and turn it on - if the batteries were full the inverter should come on at this point. If all is well then I'd turn the solar panels back on followed by the shore power. Hopefully this gets you back up. Bill -
Battery maintenance for 4.5 month storage
topgun2 replied to Citrus breeze's topic in Mechanical & Technical Tips
That "red" switch that Mike D pictures above just may not be in that same location. For a long time this switch was placed under the street side bed. Look around - if you see that switch it is your ticket to happiness.🙂 Bill -
Battery maintenance for 4.5 month storage
topgun2 replied to Citrus breeze's topic in Mechanical & Technical Tips
By using the word "hot" in this context it means that the wires have current flowing through them. Yes, you are correct - but - there STILL could be current flowing through them. In the event that the leads to the batteries are possibly handled incorrectly then they could cause a shock or could cause a short that possibly could start a fire. -
And - While you're at it and if you haven't already done it - you might want to consider a "handle" something like THIS or THIS in order to give you something to grab either when the wind catches the door or simply when you want to close the door from the inside. Bill
-
Pollen city? Certainly there is Spring in the air (wind). It doesn't take too much practice until one gets to be a real fan of boondocking!😁 Have a bunch of fun! Bill
-
Got the Ollie, Got the Wife, Got the pup, Got the plants in the kitchen, Got the wine - life is certainly good! Congrats! Bill
-
I've heard of a couple of owner's that had issues with a light or two either not turning on or off and the fix for that was replacement of the offending unit. But, I've not heard of this problem before which sounds more like an issue with a "central control box" versus individual lights. I'd open a Service ticket. Good luck! Bill
-
Yes - I didn't think about that being the door and not the body of the camper. There's not much behind that thin door fiberglass besides Styrofoam. JD's suggestion of filling and then simply placing a slightly bigger piece of aluminum there is a good fix that shouldn't cost too much in either time or money and will look OK. Good luck! Bill


.jpg.9098a3efe8dc597e8a1487a1a8f0197e.jpg)
