Leaderboard


Popular Content
Showing content with the highest reputation on 07/15/2017 in all areas
-
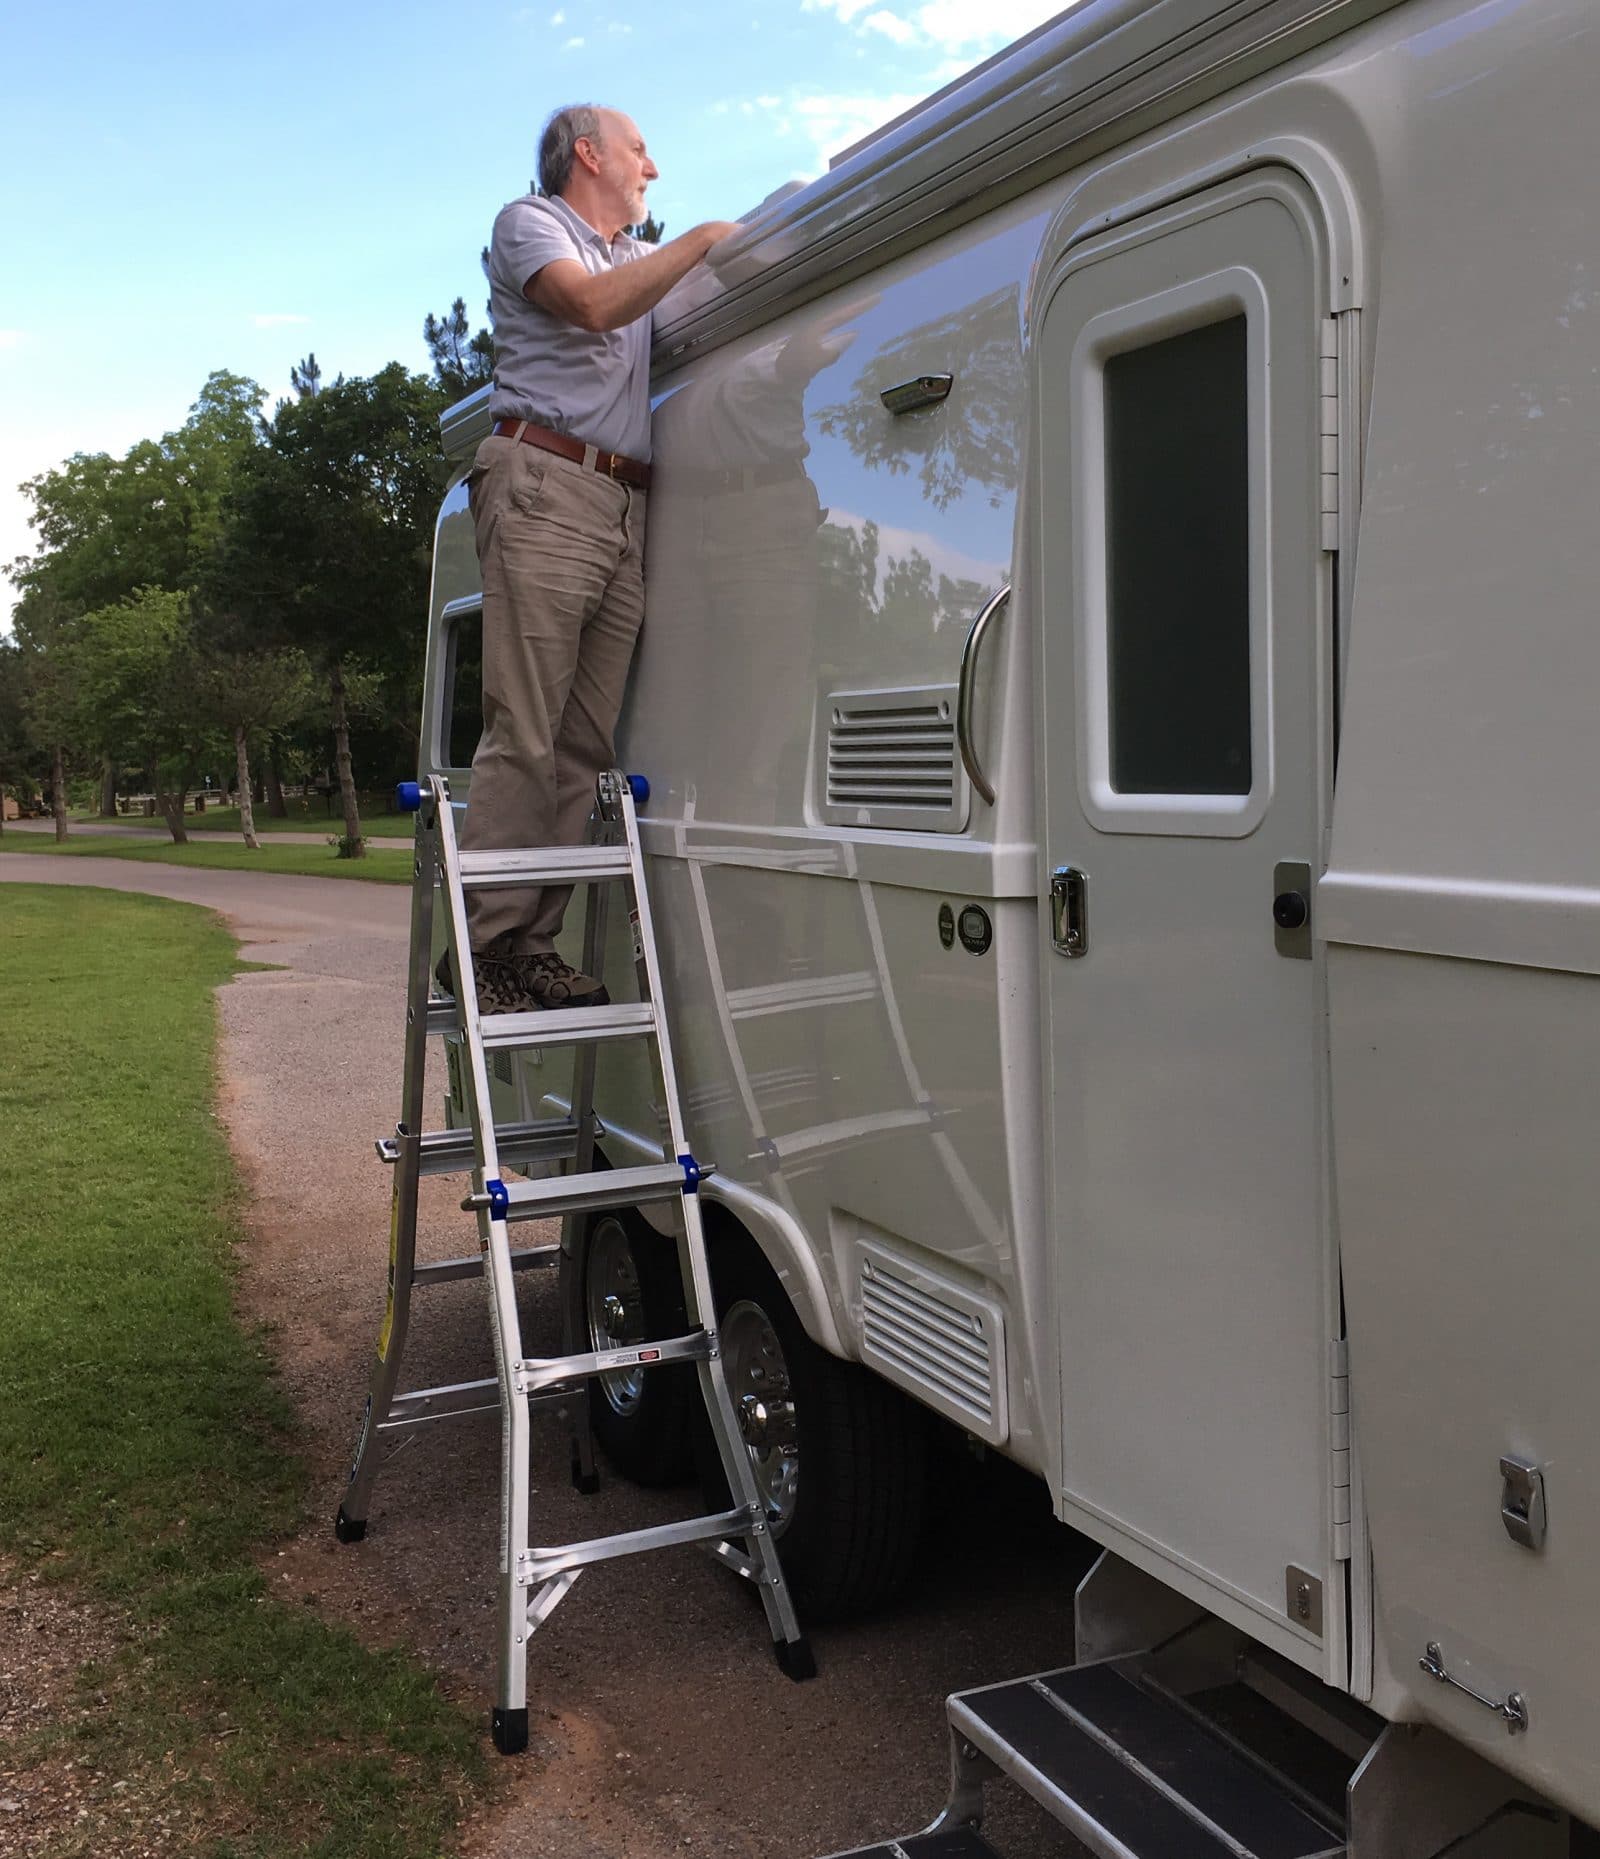
Three days after we took delivery of Mouse, I climbed up my ladder for a check of the roof. Everything looked fine, except for the solar panels. Three knobs were slightly loose, perhaps a 1/16th of a turn. One was a full half turn loose. This is dangerous since a loose or lost knob could wreck the panel and possibly the vent and AC unit behind it, especially if you are towing into a stiff and gusting headwind. I got out my Dewalt driver drill and modified the knobs so that I could secure them tight. I can't recall the hole size, probably 1/4 inch, big enough for a standard sized nylon wire tie. This is just like safety wiring a bolt using steel wire, but the advantage is that the big white ties are highly visible from the ground, so you can include a visual check of all four as you do your final walk around before leaving. You must route the tie so that all the forces are acting to tighten the knob. I think this should be done at the factory, but in the meantime I strongly recommend that everyone with panels on the roof secure the knobs. A better fix would be to drill out the threaded inserts and install through bolts with self locking nuts, but this would make it very hard to reposition the panels for cleaning the roof underneath.... Here is a question: have you ever checked them? If not, then please do so before your next trip. They may be loose.... Be safe. Here is my Werner convertible ladder in action. It is good to have access to your roof, always. John Davies Spokane WA
 5 points
 -
Thought I would put this up here in case anyone else is having the same issue I had. Soon after leaving the factory, the plastic strip that lines the bottom edge of the tank cover started to come off. It was a very cheap piece of 'L' plastic kind of glued on here and there. Really, it was pretty ugly even when new. So I finally found this very nice 'U' channel on Amazon that fits perfectly. These trims come in a vast variety of sizes and colors. It appears to be a very high quality vinyl compound and has internal fins that grab the cover on both sides, so no gluing is involved. I just set it in the sun to warm up and gently tapped it on with a rubber mallet. Before doing this, I carefully scraped off all the old glue residue with MEK and a plastic razor blade, followed by a light scrub with a 3M WHITE scotch brite pad (love these for tough cleanup jobs on the trailer, no scratching) Then I filed all the edges to make sure there were no sharp edges or bumps in the fiberglass. Then a good wash. Here's the product: https://www.amazon.com/gp/product/B01F9FXQLU/ref=oh_aui_detailpage_o01_s00?ie=UTF8&psc=1 This looks so much better to me, and the fit is great, better than with the stock plastic trim. It's supposed to be marine grade, so hopefully it will last. My Elite took 5 feet to do. Those with the Elite 2 will need to measure, but the stuff is available in different lengths. It's all in the details! Dave
2 points
-
Auto and truck alternators are regulated internally and put out, at their terminals, 14.1-14.4 volts. Truck alternators are often over 100 amp output. I don't see why you couldn't run a large set of + and - cables to the rear of the TV. Then have a plug that connected directly to the trailer batteries with another set of wires. No additional charger would be needed. You'd need a high amp connector of some sort, maybe welding cable plugs. This would charge the trailer batteries up to the truck battery voltage while the engine was running, or 14.1 volts, and do it quickly. It would also pull the truck batteries down with the trailer batteries if left connected while not running. It might prove to be more practical than carrying a small generator as the truck could idle for 1/2 hour and do more than the genny in 1-2 hours, or so. You could also run the inverter while the truck was running with no battery problems.2 points
-
First of all, it is 8 feet wide and the Ollies are 7 feet wide, so..... this one won't work. A narrower one might possibly. Your stuff inside the drawers would get really trashed if you towed in inclement weather or on unpaved roads. The "sturdy steel frame" will rust quickly due to road debris and rock strikes, and it will be a seriously horrible PITA to keep it nice. If you want extra space consider the rear cargo platform that is an unlisted option. It is engineered for your trailer and is made of the same high quality aluminum. Or add a cargo pod of some sort on your tow vehicle's roof. Did that help? John Davies Spokane WA2 points
-
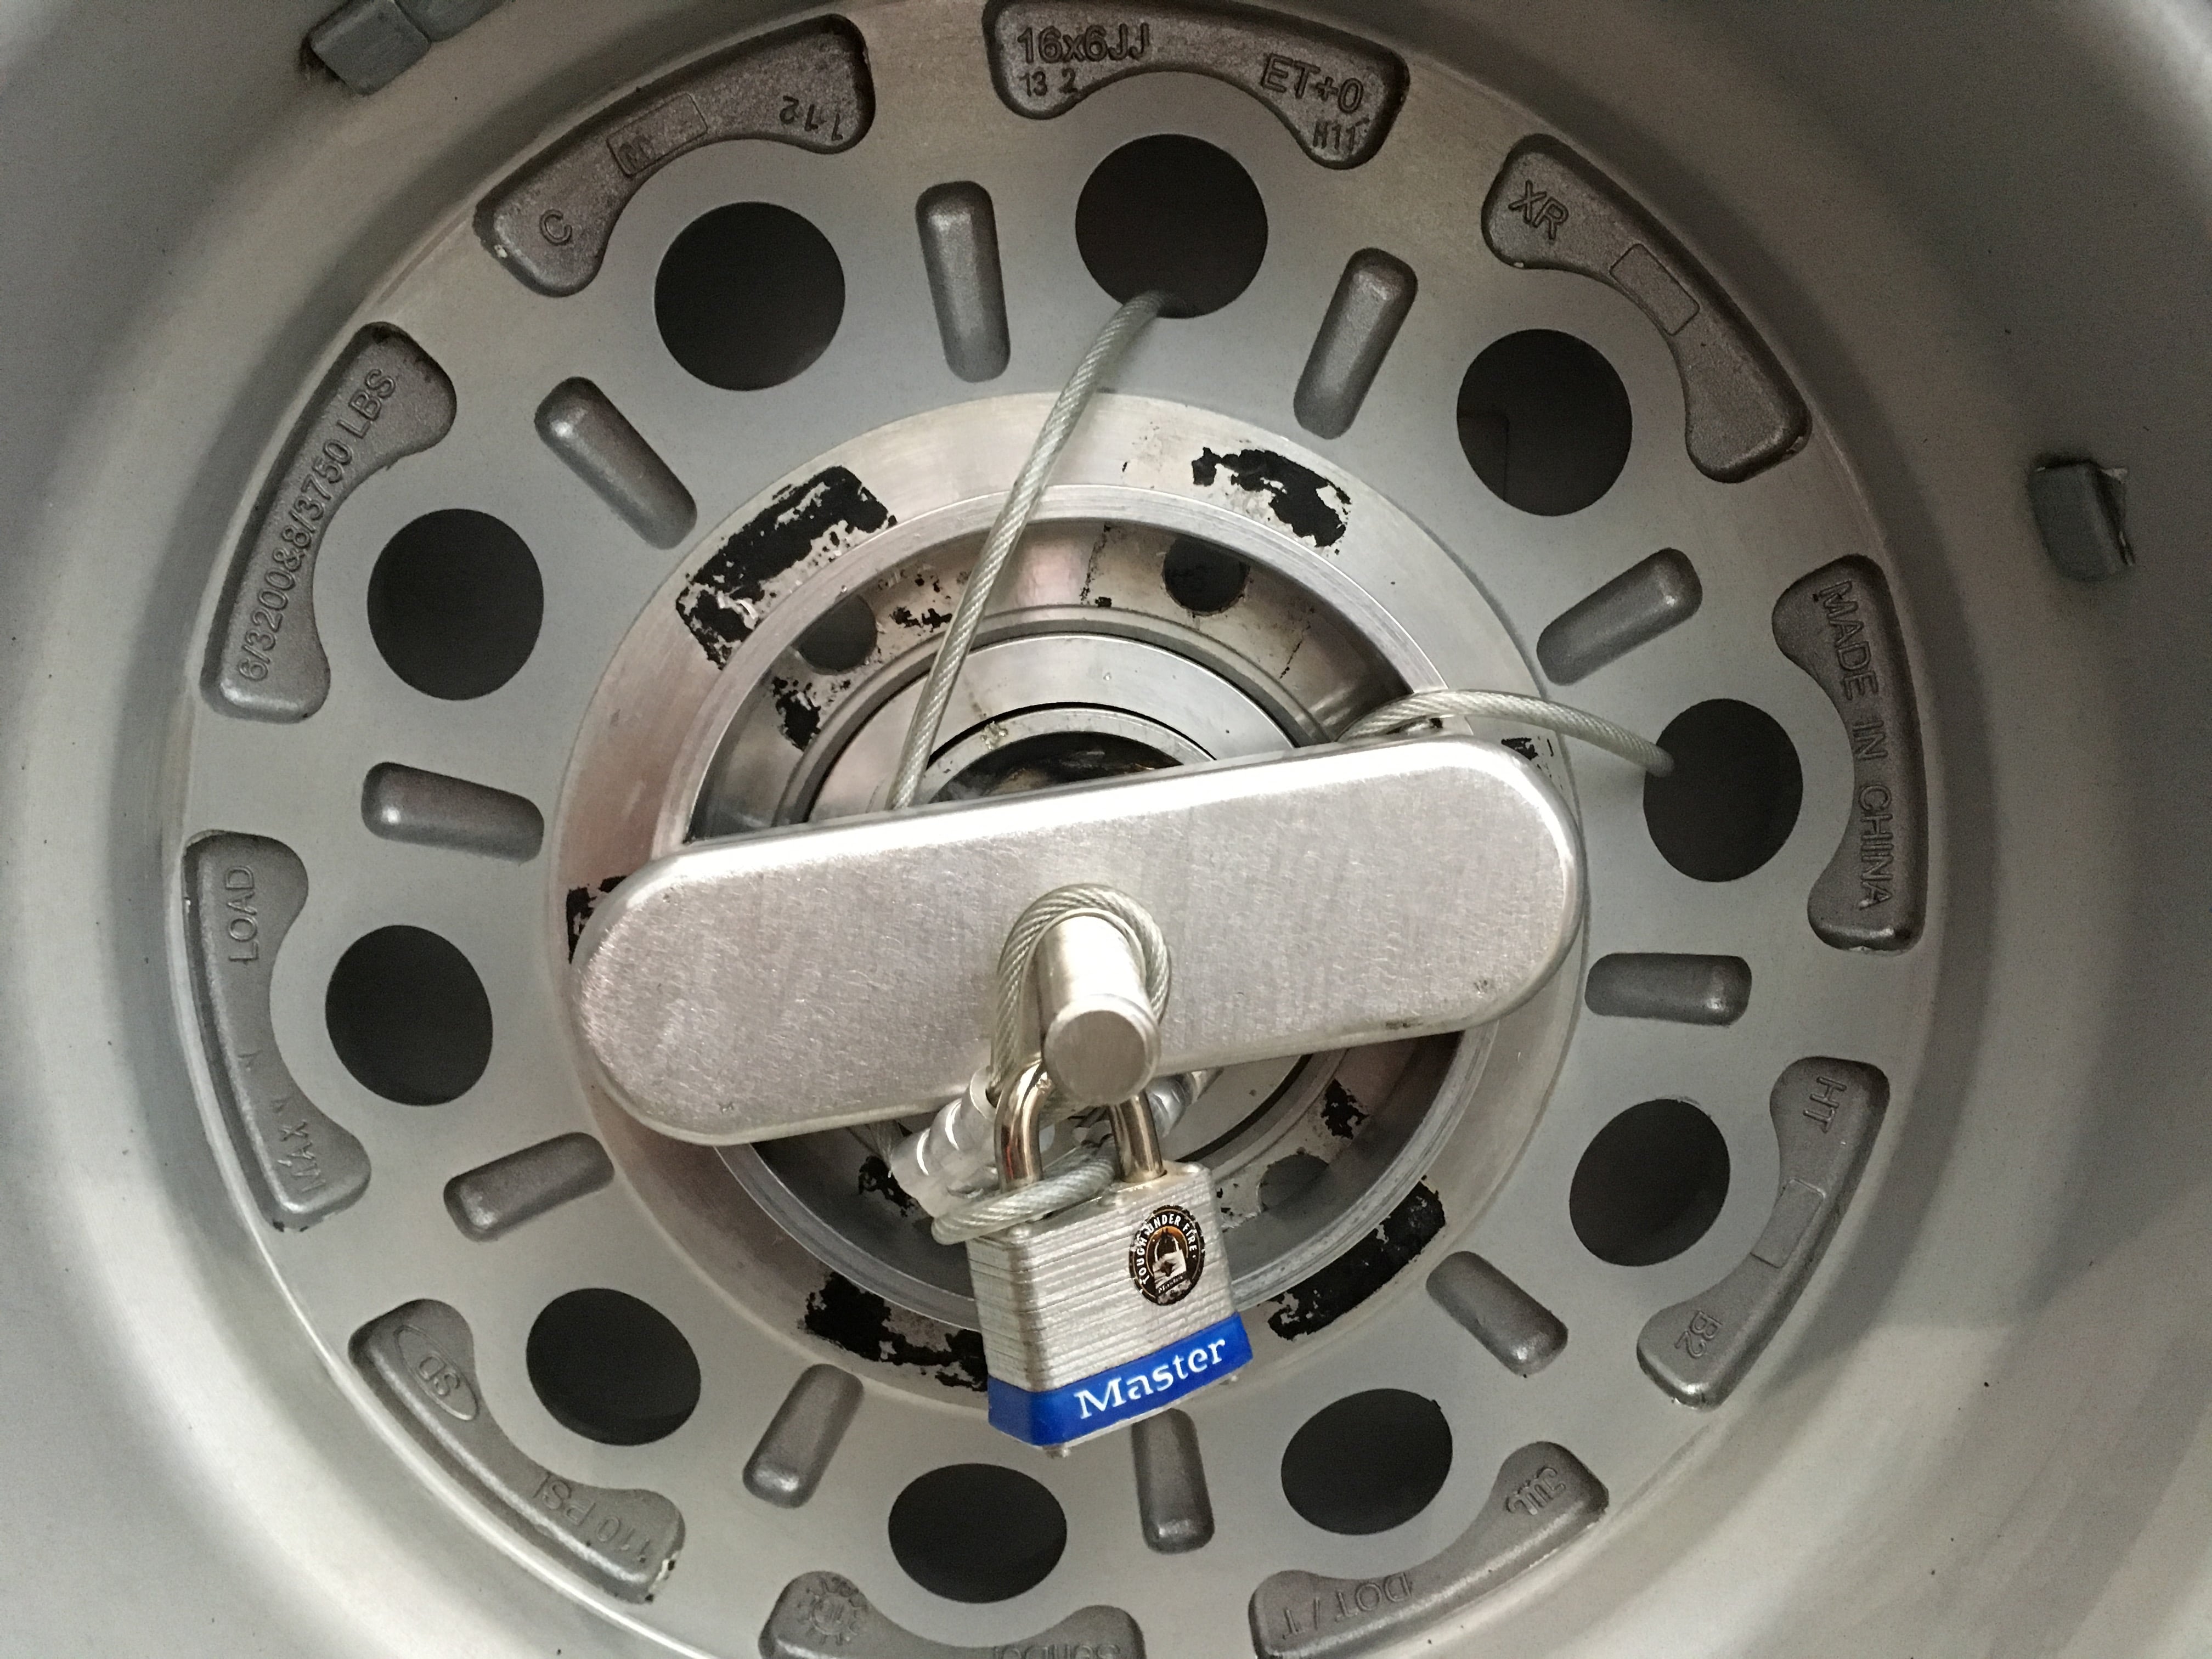
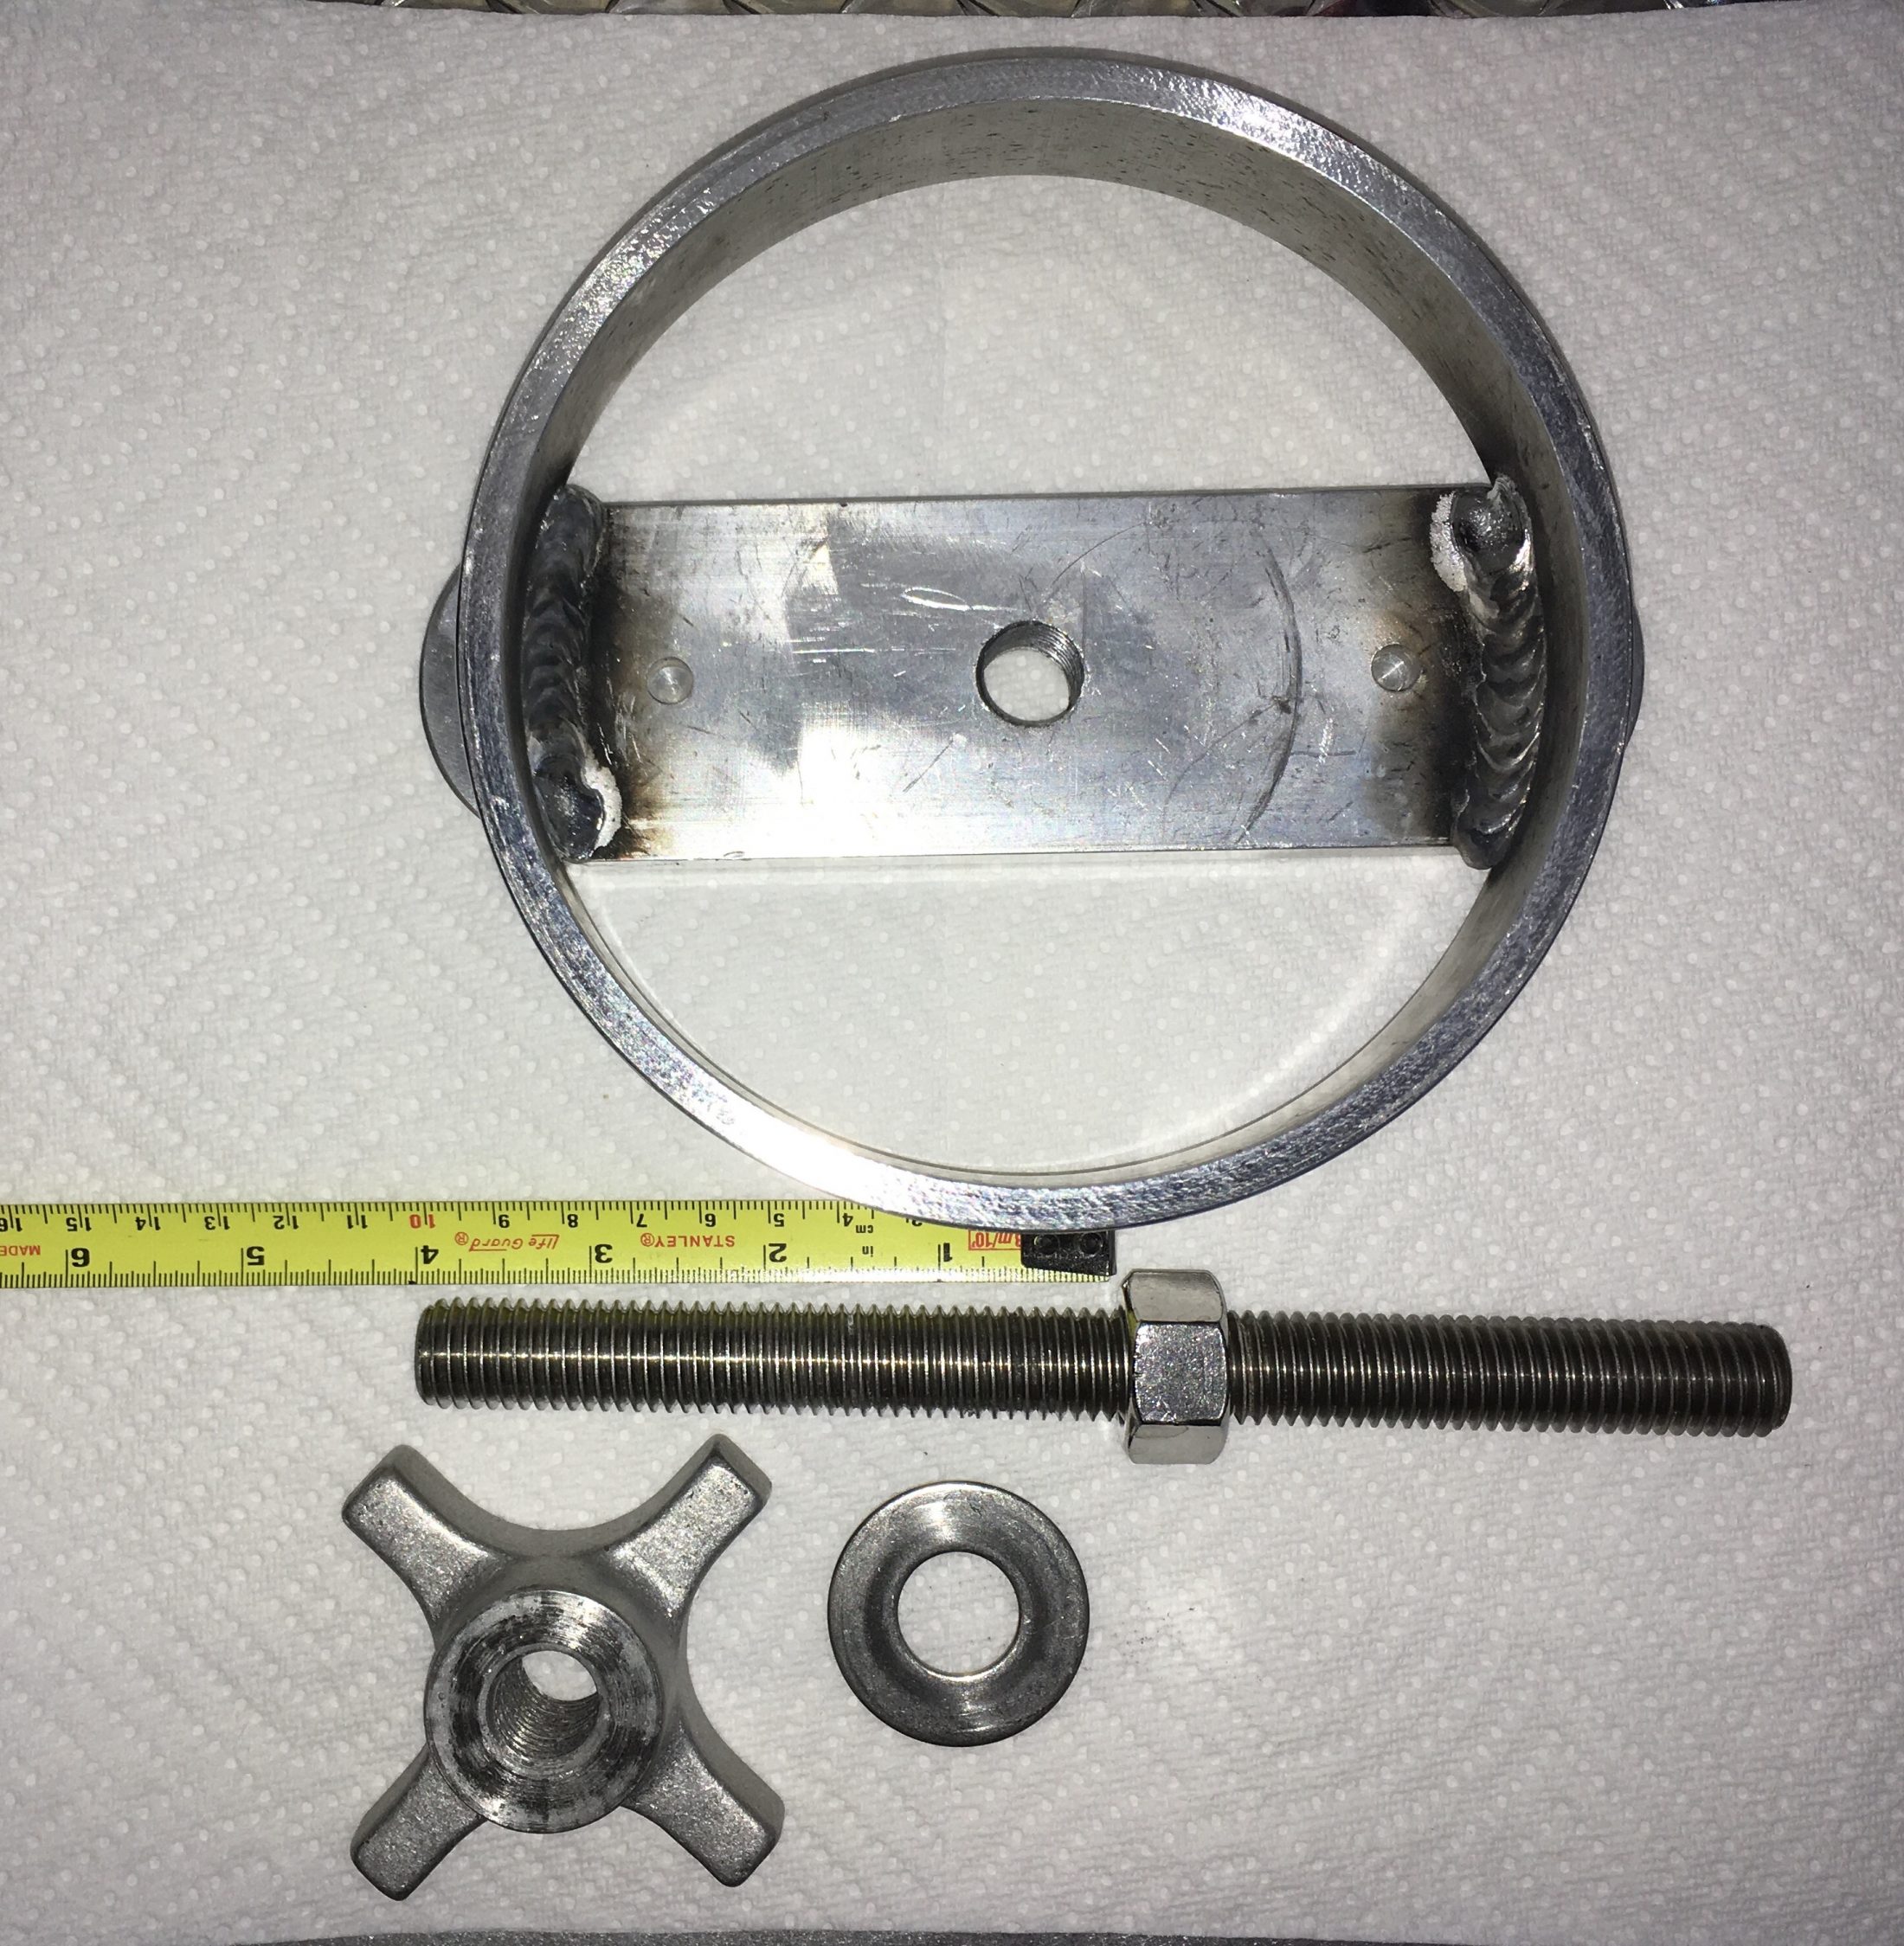
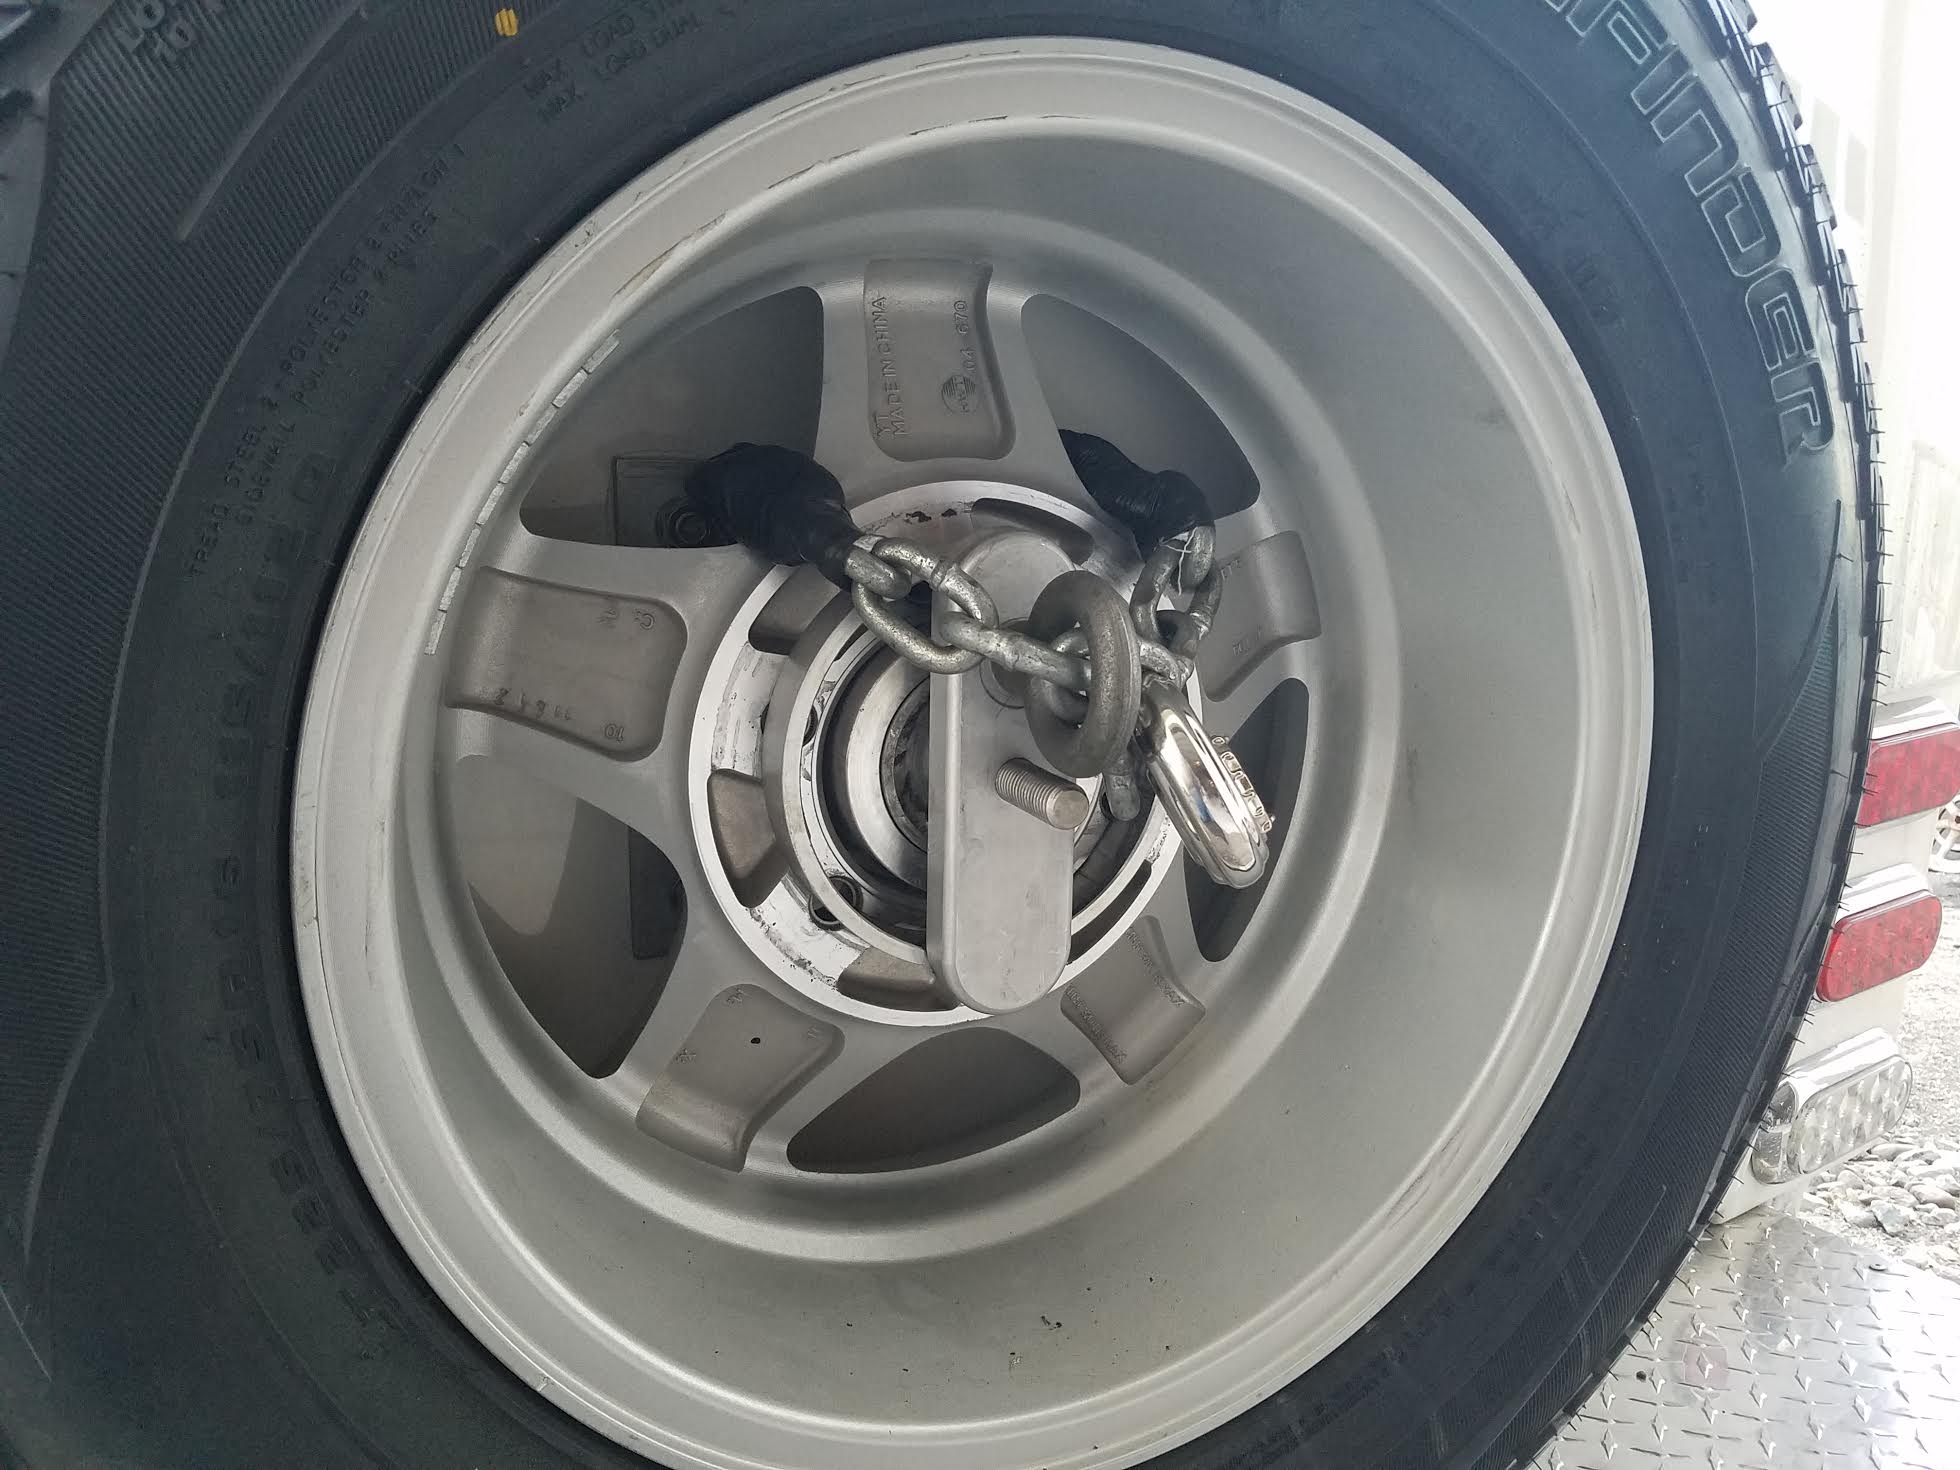
There is nothing securing the spare under the fiberglass cover, and because there are no studs like on the hubs, you can't use a conventional Gorilla or other threaded wheel lock. I considered drilling a 5/16" hole in the threaded rod for a padlock, but I decided instead to use a steel cable looped through the wheel itself. The cable is 1/8 plastic coated, 24 inches overall length, the "wire rope sleeves"are aluminum. I used a big old hand crimping tool to secure the loops. None of the parts will scratch the wheel or mount. Anything bigger would be hard to get through the openings between the mount and the wheel. I wanted to try going naked - no cover installed - so I used the star nut that secures the cover to run the flat washer down tight on the loops, to keep them and the lock from moving. If you wanted to install the cover, you would need to thread the cable in a different configuration, so that the lock and loops are hanging down and keeping the flat part of the wheel retainer free and clear. It is secure enough, IMHO. Anybody who was really determined to steal it could get through it pretty fast with a bolt cutter, but it is much better than nothing at all, and it is a very good visual deterrent. I had all the parts on hand in my garage, so it took only half an hour. It's an easy mod if you have the tools. EDIT: Thanks to Raspy for this tip. I screwed the threaded rod into the mount another 1.25 inches, so the exposed part was not a hazard or eyesore. More better! One thing I don't like about this design is that the ring scrapes badly on the inside of the wheel face as you tighten it hard, shedding aluminum particles. This is not good, but anything added there to act as a pad needs to not trap moisture. John Davies Spokane WA
1 point
-
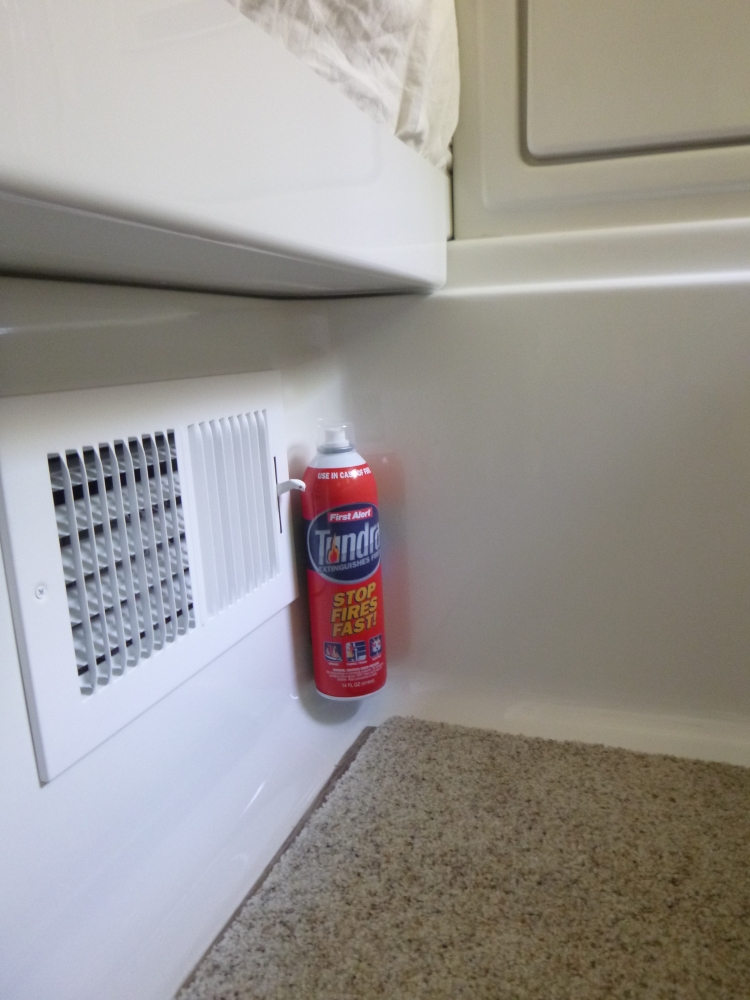
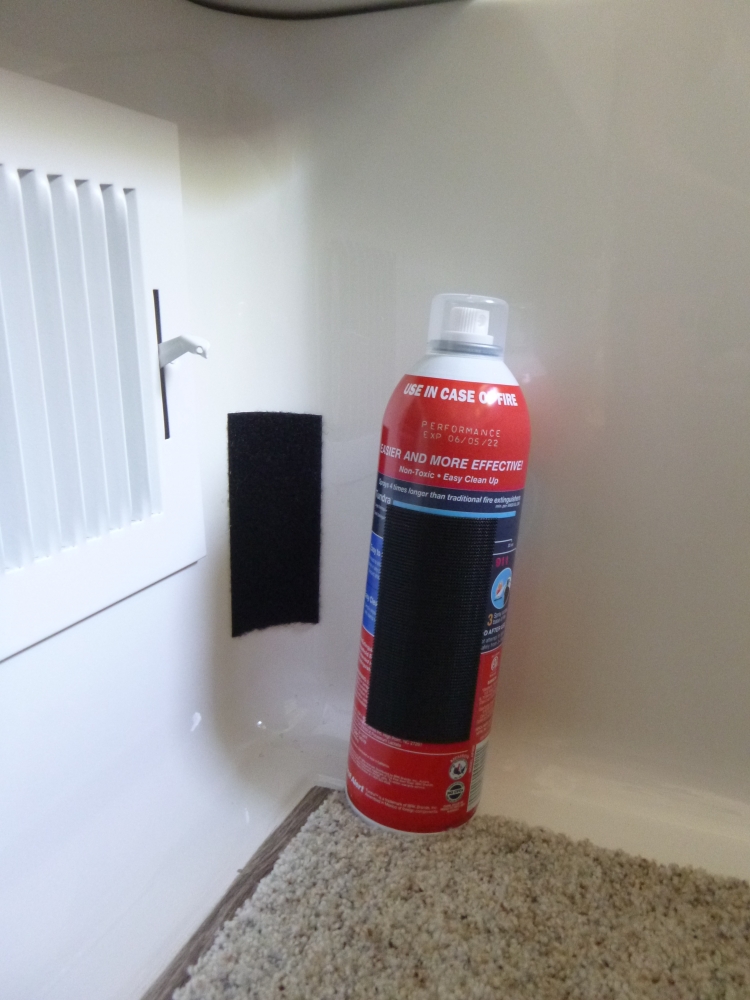
Recently I was told about a fairly simple one time use fire extinguisher - Tundra by First Alert. I know that there is an extinguisher by the Oliver entrance, but, what if a fire happens in the kitchen and I'm back in the bed? Amazon had a two pack of these for $22.49 and I ordered them. https://www.amazon.com/First-Alert-AF400-Extinguisher-Aerosol/dp/B001229JCU/ref=sr_1_1?ie=UTF8&qid=1499709044&sr=8-1-spons&keywords=tundra+fire+extinguisher&psc=1 Since they don't come with any kind of mount, I took a piece of 2 inch wide "industrial" Velcro I had in the workshop and figured that it would work nicely in the corner below the nightstand. Hopefully I'll never have to use it. Bill
1 point
-
Also reading discussions on Air Forums. Folks there are starting to replace lead/acid batteries with Battle Born BB10012 Lithium Ion LiFePO4 Battery 12V 100Ah batteries with built in battery management system. Contacted Battle Born about using the 100watt Renogy Portable Suitcase Solar Panel system to charge the Battle Born batteries. They said the Viewstar VS1024BN controller's settings are not compatible with their batteries. Working to resolve this issue. We have an original equipment Progressive Dynamics PD4045 power control in our 2015 Ollie. After reading Battle Born site information, the existing power control will charge Battle Born batteries, but for faster charges the 14.4V boost mode would charge faster. After talking to Progressive Dynamics, my power control boost mode comes on when battery voltage drops to 12V or every 21 hours for 15 minutes to prevent battery stratification. Could replace the existing PD 4045 convertor section, located above the fan in existing power control, with a Progressive Dynamics # PD4045LICSV convertor section, for Lithium battery charging. The folks at solar-electric.com said to give the original Progressive Dynamics charger a try first, it may work fine without upgrading the convertor section.1 point
-
Just FYI, Battle Born and Dragonfly are the same company - no idea why they sell them under two names. In fact, I ordered Dragonflies and was sent Battleborns. But battleborn triggers my autocorrect so I go with Dragonfly. Anyway, they did confirm for me that their batteries work out of the box with either the Zamp or Blue Sky controller and also the progressive dynamics charger. Like I've mentioned elsewhere, the disadvantage is that since the BMS is in each battery, you don't get the size benefit of other LFPs. In fact they're actually a bit longer than the T-105 - to get them to fit the Oliver's battery tray, you'll need to install them on end. They may fit normally without the tray - it would be tight. The size also limits you to four batteries and 400 Ah unless you can find another spot for them. Still, that's 320 useable so still a good improvement. And they'll charge a good bit faster. Because of the size I'm not 100% that I made the right choice getting them but I'll give it a go anyway. If I change my mind someone here might get a sweet deal on some lightly used LFPs.1 point
-
Reed, I'm thinking that before you change over to an MPPT controller, you should run an accurate test with absolutely full sun on the panels for a full day and monitor the results. While it's true that the MPPT controller advertises up to 30% more charge, it's the nature of that difference that is important here. As I understand it, the difference in total amp hours delivered is at the top end of the collector voltage and amperage curve, or the Maximum Power Point, which is at voltages over 14.1 in full sun at relatively low temperatures with a normal angle of orientation. With PWM, or pulse width modulation, the controller cannot control the charging voltage, only the battery charged voltage, so it pulses power with varying band width to protect the batter from going higher than 14 volts. The affect of PWM is that there is a lot of off time in the pulses to keep the battery voltage under control. Whereas the MPPT controller is a DC transformer that can take the entire collector current and adjust its voltage to 14 so that you get full amps to the battery until it reaches 14 volts. This means no off time compared to the PWM pulses. This is where the overall difference begins to show up between the two. Then it goes into absorption mode and reduces the amps, while maintaining the voltage, until the amps reach a pre-determined minimum amount that triggers the Float stage. So the battery really does get charged fully instead of giving a false high voltage reading that increases the "off" width of the pulses in PWM. So, the real difference is during direct sun at higher collector voltages and, possibly, at higher states of charge. But at lower states of charge, in full sun, the difference may be small or none. Direct sun is the key here. Any shading drastically reduces the output of a particular collector being shaded, or just shuts it off. This can be as little as a tree branch shadowing one panel. Since the difference between the MPPT and the PWM overall amp hour delivery is at the top end of the voltage scale, and especially in cooler weather, any loss of collector output through partial shading can easily make up the difference between the two. In your case, you are needing a strong bulk charge to make up for the night's use, but you may be getting far less than the rated array output because of partial shading. Shading percentage is not equal to the percentage loss of output. Output loss is far more than shading percentage. Another factor to consider is the rated array output adjustment due to imperfect orientation. You may have to give up 10-20% right off the top of Oliver's rating because of that alone. I'm bringing an MPPT controller with me to Bandon. Maybe we can run some tests to compare results to your PWM controller. John1 point
-
I may end up doing that since I want to run cables to the back of the truck for a portable winch. I figure that I might as well make a plug for the trailer at the same time. I need to do a bit more research though, since I'm installing LFP batteries and believe that I need a regulator between them and the alternator to keep the alternator from burning itself up trying to charge them. I don't have any spare brain cells to devote to that just yet, but sometime in the next month or two I'll get back at it. I'd love a link to that discussion...1 point
-
This is off topic but still Germaine to battery charging. There is a thread on AirForums about using the truck alternator to charge batteries while traveling. This is not the same as the charge wire from the umbilical plug...but large cables (4/0) run straight from the alternator through a charger . I don't know much about truck alternators but apparently they can produce a lot of charging amps. Any electrical experts want to contribute their ideas?1 point
-
Wow, you really scare me, I'm thinking I might have to decide to never retire, just so I can keep all the free time having to work provides...1 point
-
Here's using 2X6 on the low side. Going to cut shorter 2X6 planks to place under the rear jacks when backed over a curb. Jack blocks normally used were too tall to fit between the jack pads and curb:1 point
-
I just wanted to know if one of the Elite options was no longer available. I am going to go with the assumption that it is because it is no longer mentioned as on option here on the site. I never intended my question to become a mean spirited debate on mattress sizes. Thank you.1 point
-
I'm glad some of you found this useful, and hope the trim works for your cover. I'm hoping that Oliver makes them all about the same thickness. The thickness of my cover fell within the specs of the trim. Filing really helped to smooth out that edge and even thing out. To me, it has made a huge visual difference for the better. My wife didn't notice..! LOL. Oh well, we all see things differently, that's for sure. Happy camping! Dave1 point
-
I was disappointed when I tried taking a BATH, turns out it was too shallow for me. :(1 point
-
I don't think it was ever Oliver's intention to represent the trailers with "twin beds" as anything further than meaning it was equipped with two individual beds rather than one.1 point
-
Good point. Maybe the twin bed model should be called the two half queen model. We weren't surprised at the 30" width having seen one before ordering. I had also done some quick math knowing the trailer was 7' wide, about 84". Two 39" twins would be about 78", leaving about 6" in between. I figured the space in between the beds should be about a couple of feet leaving about 60" for the beds, the width of a queen. I know Airstream has a 48" mattress they call a double, a little short of a 53" normal double. Anyway, some of our best sleep has been on these two half queens.... Mike1 point
-
Think half a queen bed.1 point
-
For the convenience of customers and prospective customers alike, we have created a Measurement Index for the Legacy Elite II travel trailer. You may find it on our Oliver University page http://olivertraveltrailers.com/oliver-university/. This will help if you have any questions on measurements throughout the interior and exterior of the travel trailer. Coming soon: Legacy Elite I Measurement Index. Thank you1 point
-
We are always on the lookout on ways to improve quality. I am going to refer to our team about this. Thanks for sharing Dave!1 point
-
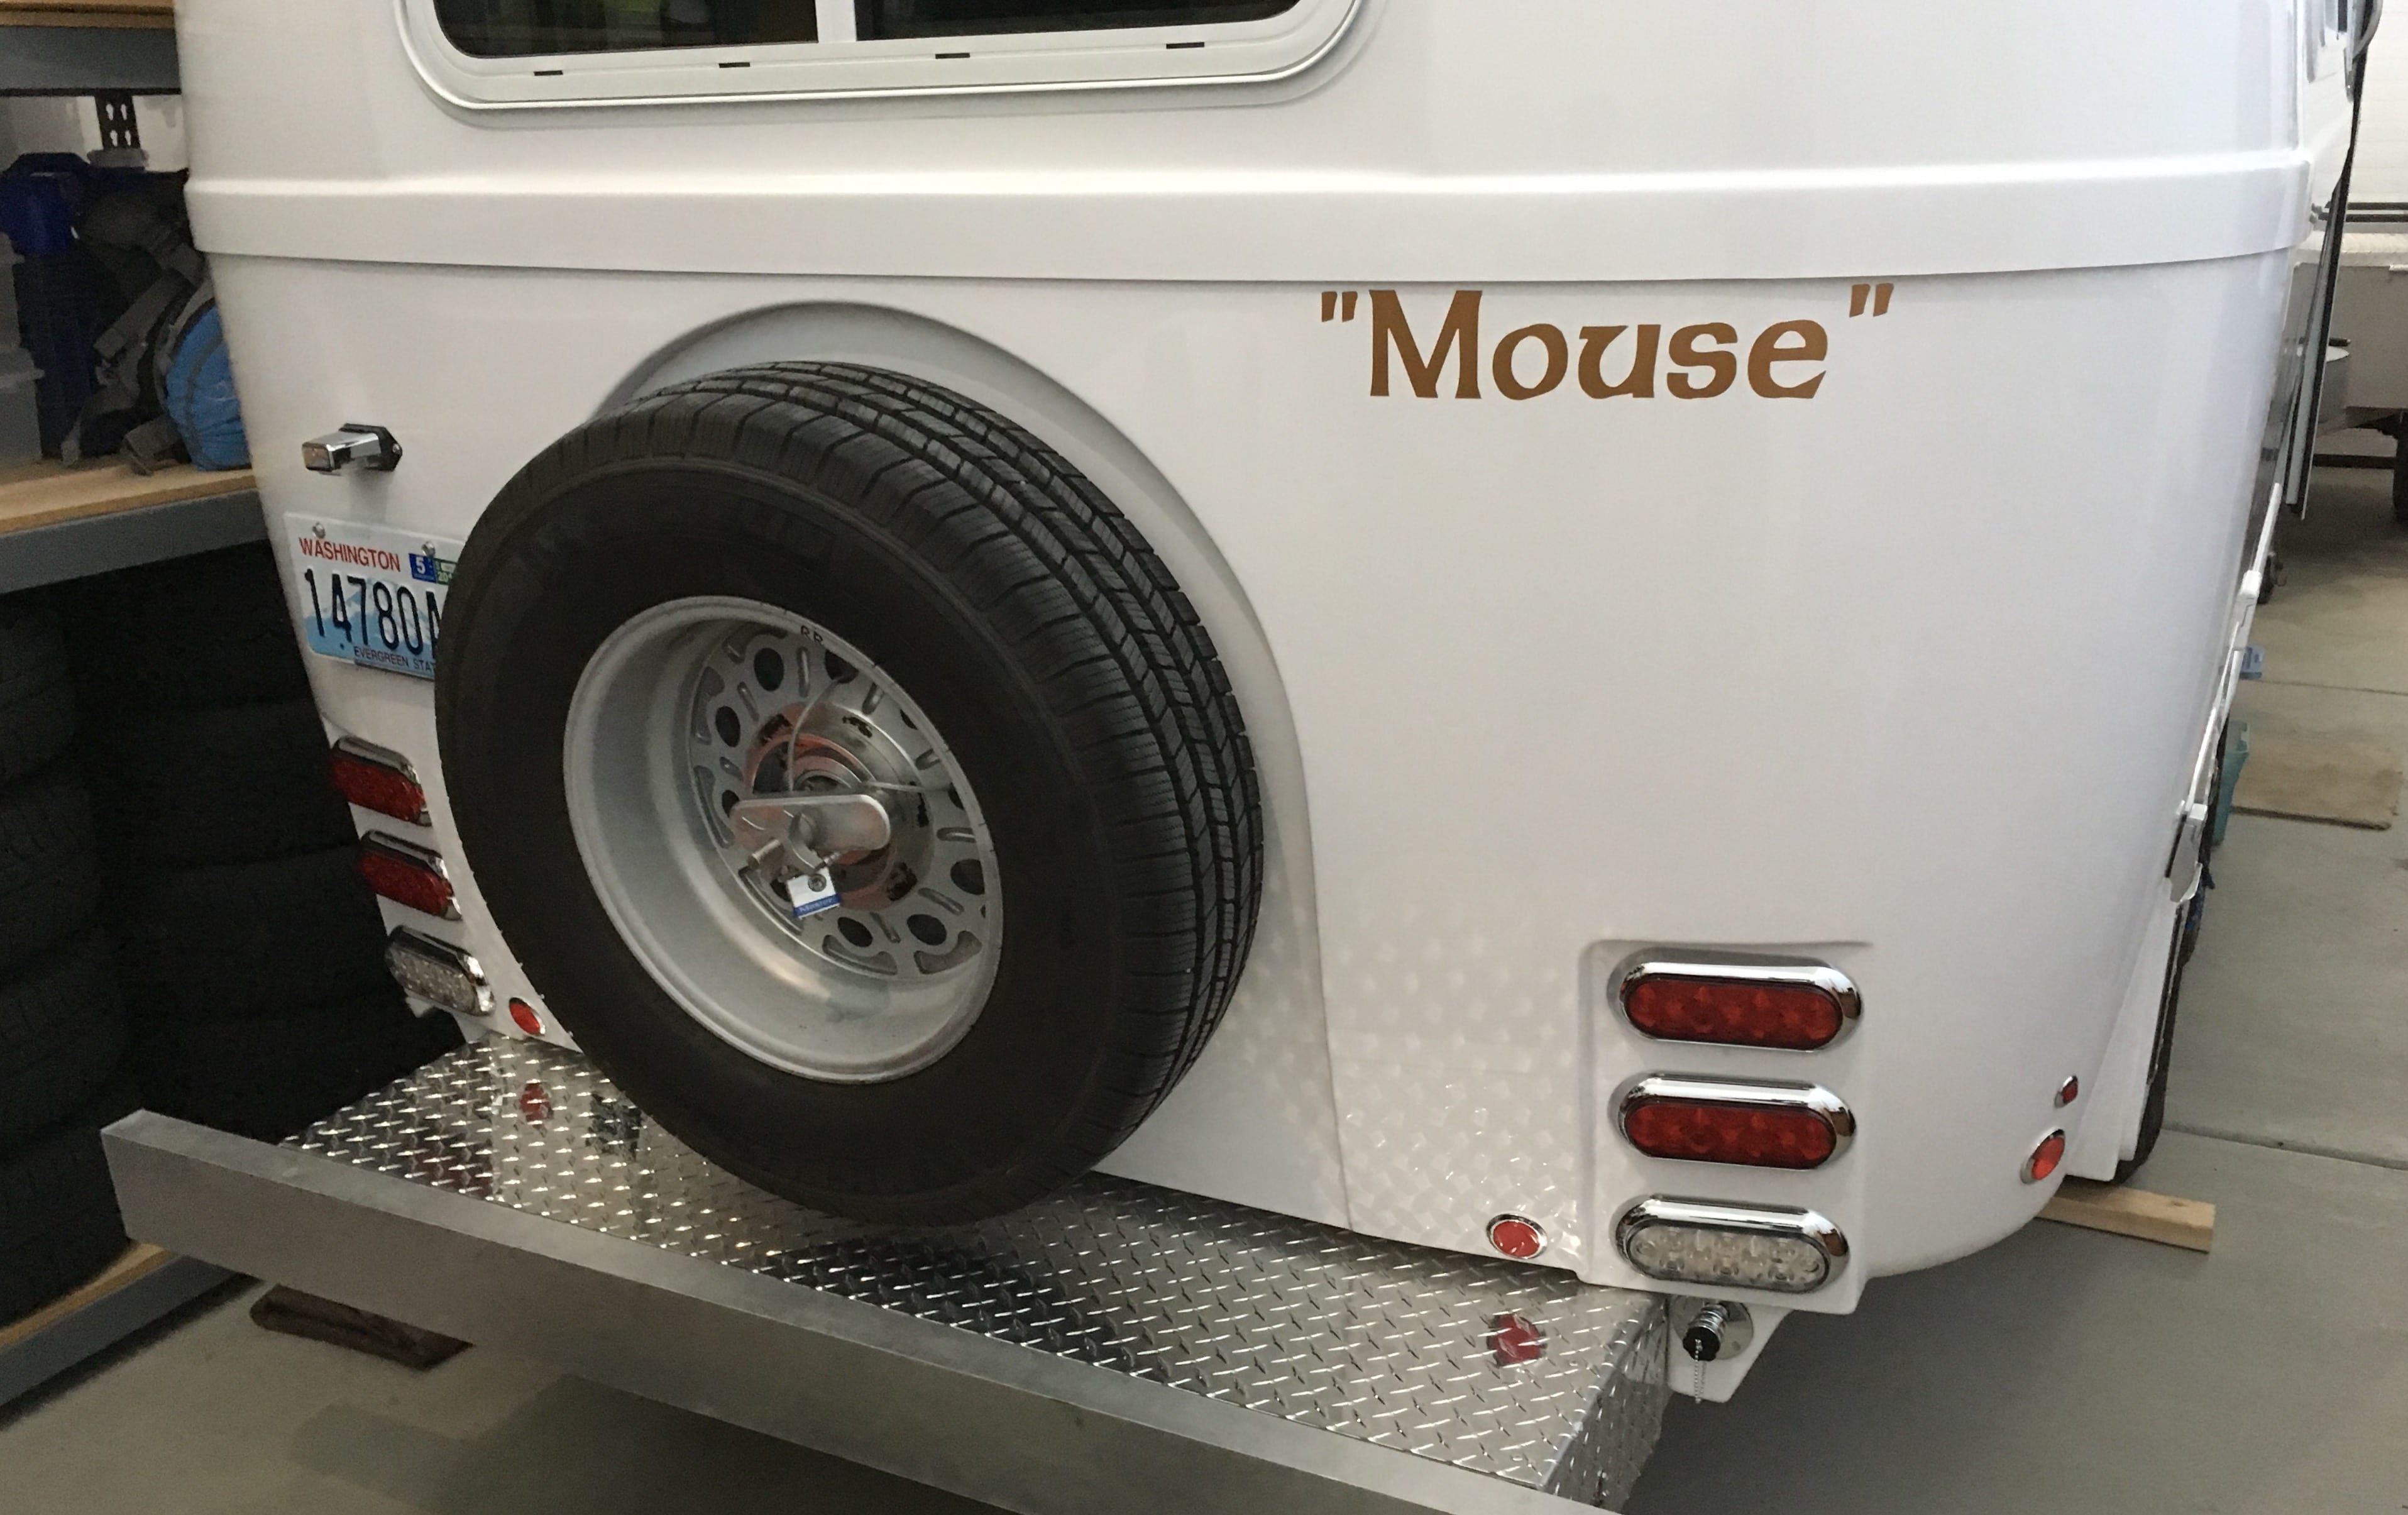
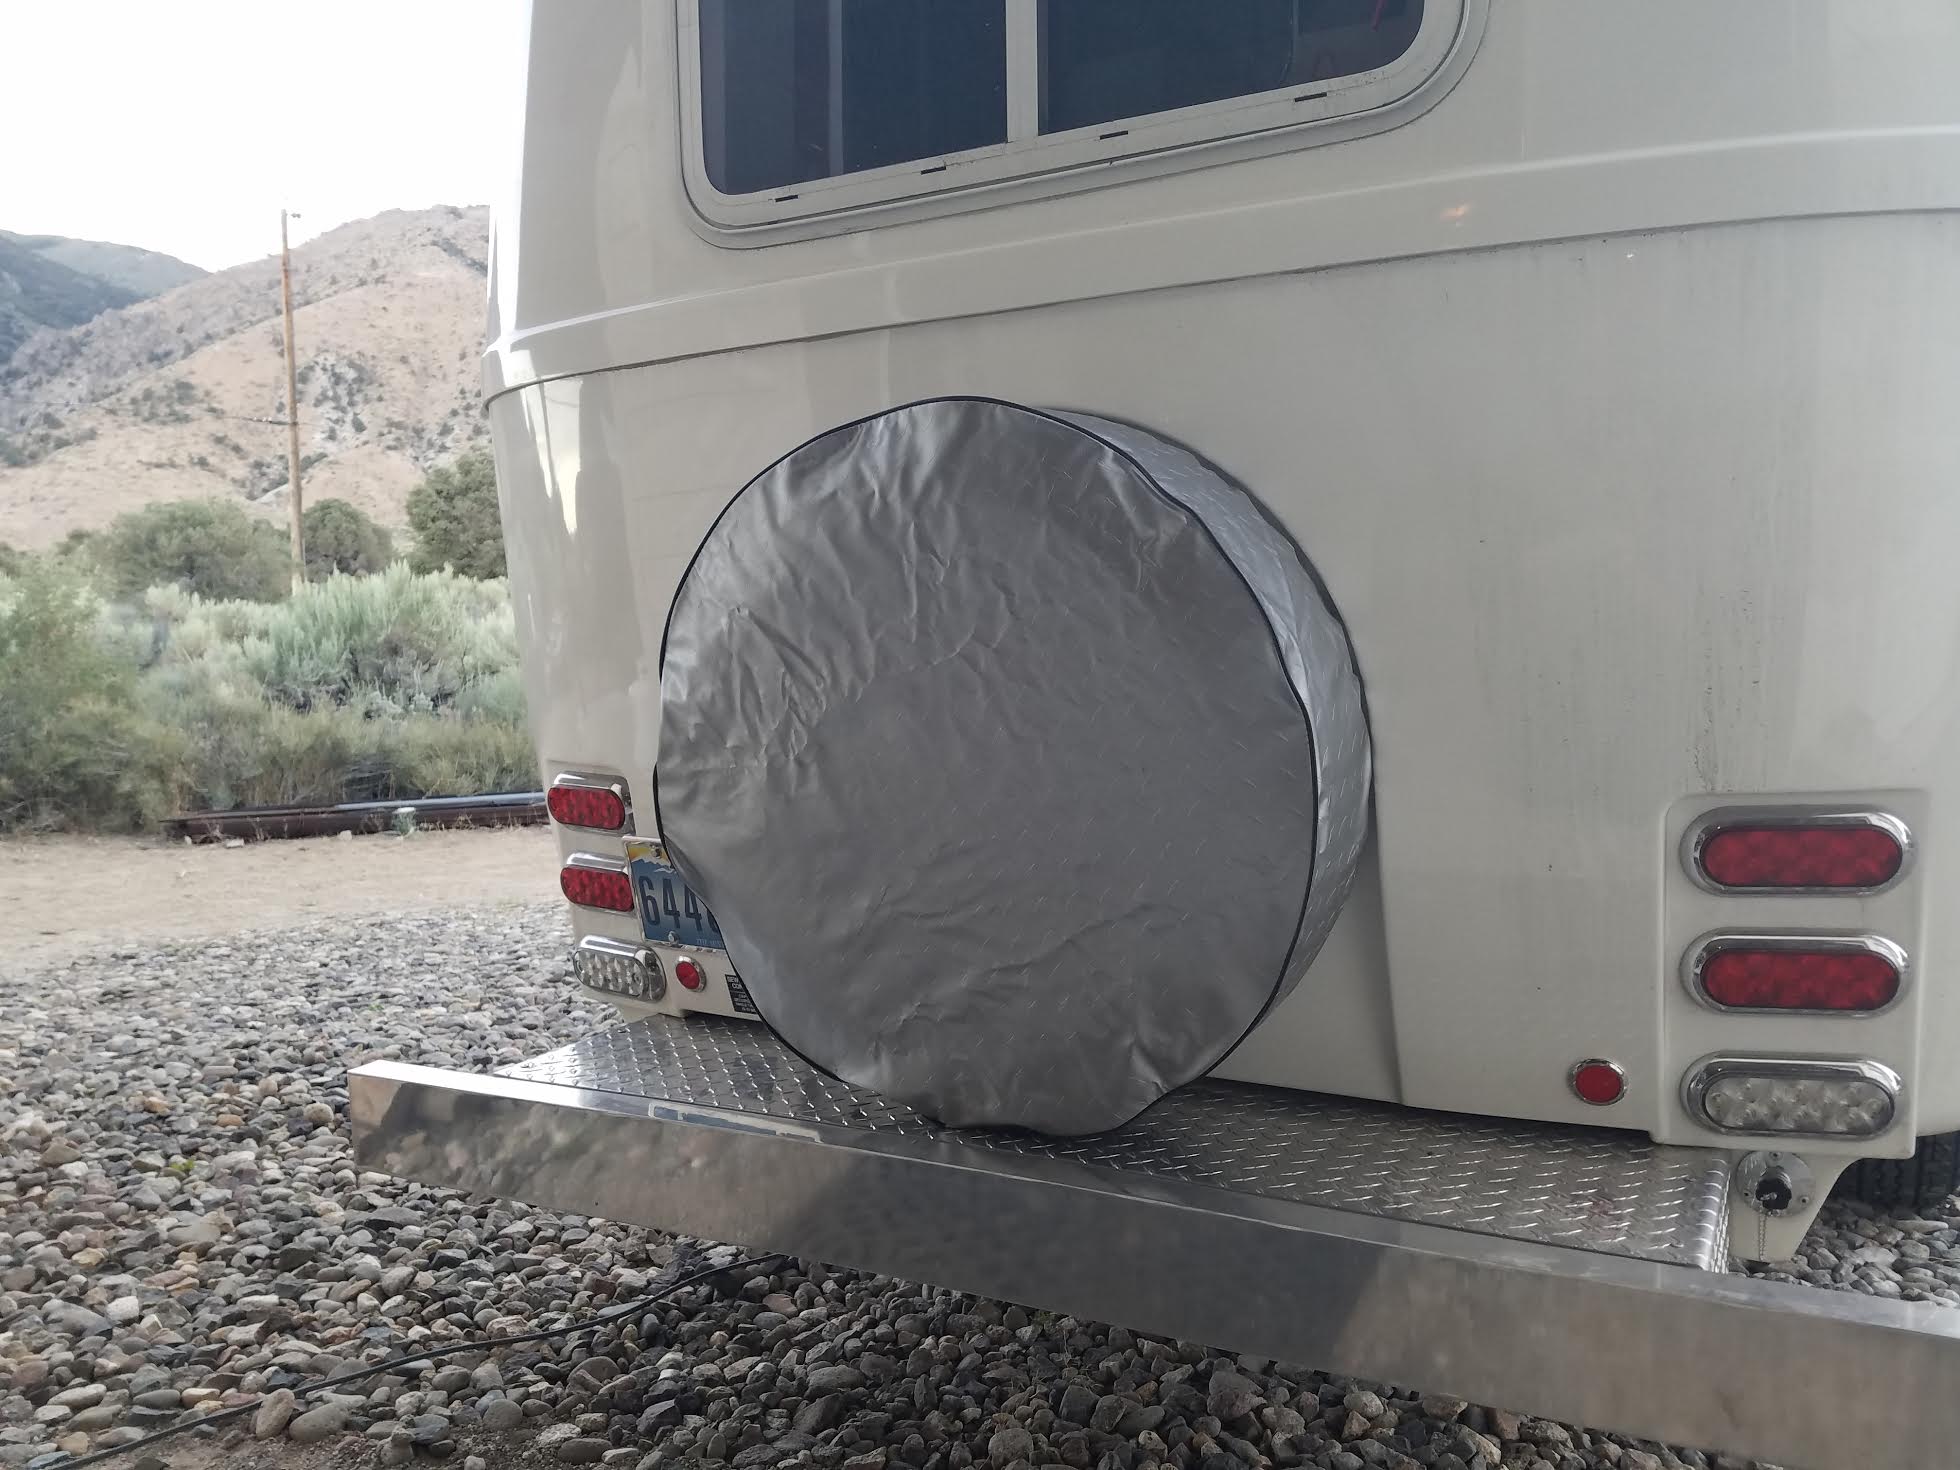
I finally got some pictures of my spare tire modification. Since my trailer had the small sized spare tire and cover, I can not run the fiberglass cover over the full sized spare I now have. There is just enough room under the full sized tire to slip on the cloth tire cover. One slight advantage of the soft cover is that it doesn't stick out beyond the bumper like the fiberglass one does. I also upgraded all five wheels to the star wheel design in the pictures. The locking chain is fixed to the bracket behind the tire and goes through an eye bolt in front that will not allow the wing nut to be removed. If the tire is turned around, the wing nut and locking setup will stick out beyond the tire and the wing nut piece won't tighten up against the wheel to hold it securely. It might be better to change this whole bracket to a more conventional spare tire bracket that would mount the tire with the front out. This would allow for easy tire pressure checks and easier installation of the soft cover.
1 point
-
overland, It is the oem Dometic2454 3 way that came with it. I ran it for a day on each mode. It was already cold and not opened very often with a low load (beer and juice etc). I had read that they can be energy hogs as well. I installed remote thermo/sensors and have been maintaining 35 degree F with -2 in the freezer for the last 5 days in our roughly 76-88 ambient temps. Keep in mind all this equipment is brand new and I am new to trailers. Cheers, Terry 2017 LE1 #2401 point
-
We aren't camping right now but we've spent a lot of time in the Oliver. We had three showings this week, two requested through Oliver and one just a drive by who left a note on our trailer door. We also spent the better part of a day with some new owners who had some questions before they left on their first long trip. All interesting people; a custom home builder, a physician, a clinical pastoral care provider and a State Dept person who travels in the middle east a lot but can't give any details about what he does! While it is fun to show our Oliver it's also fun meeting the interesting people who are interested in our interesting trailers. Mike1 point
-
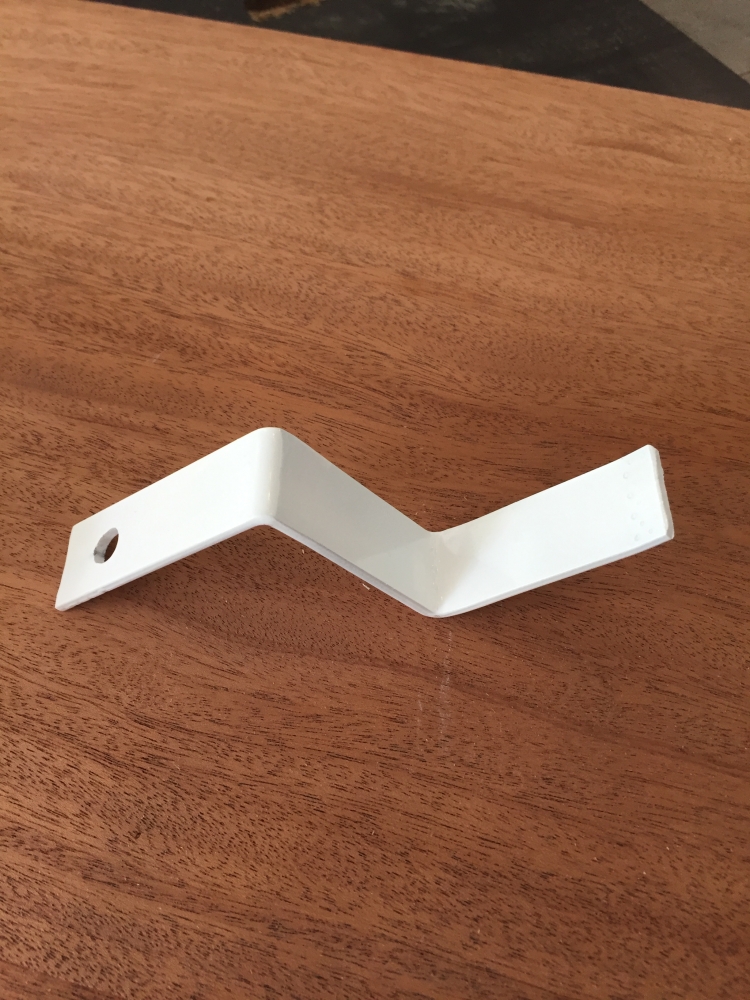
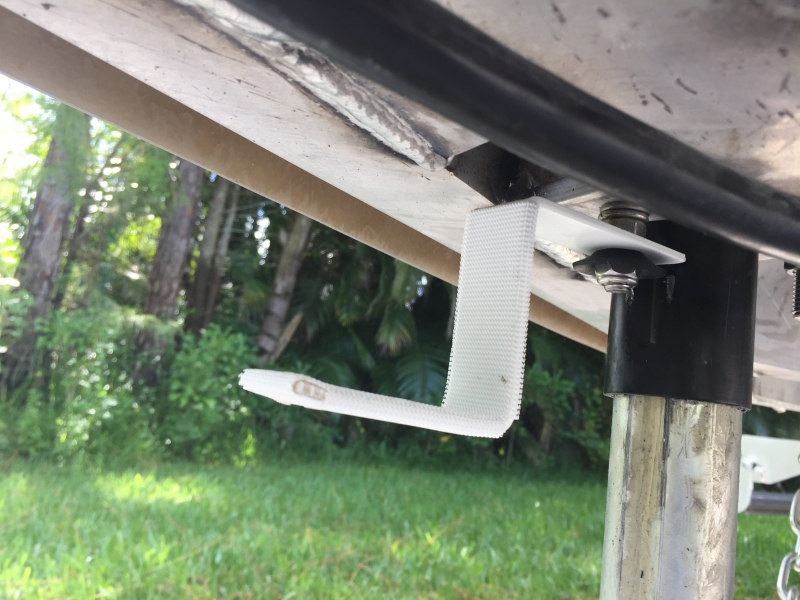
With Bill's lead, I used a piece of 3/4" flat steel and bend it into "Z" shape. Drilled a 3/8" hole to use the existing front jack bolt. Powder coated the hook and lined it with Velcro as a wear guard. Used stainless steel lock nut with rubber washer between nut and steel. Holds the Anderson wing and chains off the ground.
1 point
-
An Open letter from Oliver Travel Trailers Dear Members of The Oliver Travel Trailer Online Forum Community, Over the last two weeks we have seen an increase in people addressing quality and build concerns on our online forum. First off, we want you to know that when we fall short of your expectations, then we fall short of ours. We are dedicated to producing a quality product that can be passed down from generation to generation. Oliver Travel Trailers is different in many ways from other manufacturers. One of these ways is our transparency with our customers and potential customers. This is why we have our own forum. We would like to thank you all for your feedback. New and potential customers may not be aware that we monitor the forum and listen in an attempt to learn from the members. We are always striving to make improvements and take care of any and all issues that arise. We are far from perfect but will continue to get better, always working to build the highest quality travel trailer available. With that being said we want all of you to know we have heard your concerns and recently implemented a new 3 stage quality control inspection to our build process. This is just one of the ways we are aiming to be the best in the industry. Tanks have been a recent hot topic on the forum and we want all of you to know we are currently working with an expert in the industry to see what we can do to improve current designs. We will update you as we learn more. Wiring appearance has been another topic that we are addressing by working with component manufacturers to improve quality of appearance and function on all wiring harnesses. As we improve and implement changes we will share these improvements from time to time with our customers and on this forum. We have always gone above and beyond to fix any issues our customers are having with their trailers and will continue with your help to make Oliver Travel Trailers the very best. Again, we would like to thank you for your feedback. In the future, we kindly ask that if you have a problem or concern with your Ollie, please call us directly so we can help you. This will provide us the details we need in a timely fashion and expedite our course of action. Of course, if you ever feel we have not done enough to fix or improve your issues once you have brought them to our attention then by all means feel free to address it on the forum. We are confident you will find that given the opportunity Oliver will take care of you and improve our product at the same time. We will never be too big or too busy to do the right thing. Sincerely, The Oliver Family1 point


-
Recent Achievements
-


")


")


")
