Leaderboard


Popular Content
Showing content with the highest reputation on 08/12/2018 in Posts
-
Oh where to start... This thread had me laughing for 10 minutes! A special thanks to our comedians and to say "I asked for it" is an understatement. However; we do have a winner! RnA your right, it was off the Spare Tire. I took it off to check air pressure and must have missed it when it fell to the ground. Thanks again for being some of the most support people I know and with NEW added humor. Foy2 points
-
The optional 2000 watt onboard inverter is a great option to have if you like to get off-grid or even if you have a lengthy drive to get where you are going. The way the optional on-board inverter works is by taking battery (DC) power and converting it over to (AC) 110 power. It is tied to the campers 110 receptacles and microwave to provide power for use when a shore connection isn’t available. However, the inverter does depend on the battery power and it can only provide up to about 15 – 16 amps of power at a single time. This means that if the battery power is too low then some of the more high power consuming devices/appliances may not work properly or simply overload the inverter and cause it to shut down. There are many different appliances out on the market that range from low power consumption to high power consumption and this is important when purchasing these items for use with the inverter option. Hair dryers are a great example of an appliance that demands a lot of power, but also have a broad range of rating. They typically range from 800-1800 watts. While an 1800 watt hair dryer might be the best choice for your house, it will likely require more power than you might want in your camper, especially when running on the inverter. Another example of high power consumption is the microwave. It uses 12 amps, which is getting close to the 15-16 amp max for the inverter. Just keep this in mind when running the microwave as turning on another appliance at the same time might cause the inverter to shut down. What does the inverter need to work properly? The inverter is 100% dependent on the battery bank power, so be sure that the batteries are always charged up and ready for use if you plan to use the inverter. When purchasing the inverter option it is crucial that you also get the solar package or some form of charging solution so it can keep the batteries charged up and ready to go. The battery bank on the camper also needs to be able to hold enough power to supply the power demand from the inverter and appliances connected. The optional 6V AGM batteries can provide about 200-250 amp hours which is a substantial increase from the standard 12v batteries. The lower the battery voltage, the less likely the inverter will be able to sustain the power needs of the appliances in use. Also keep in mind that over time your batteries age and lose the ability to hold as much power as they did when they were new. This will also start to impact what you can run on the inverter as well as how long it will run on the inverter. The conversion rate from DC power to AC power is also important to know as this will change the rate at which the batteries can provide power to the inverter and the rest of the camper. If the microwave pulls 12 amps of AC power then it will use about 122 amps when using the inverter and battery bank. What this means is that it is draining your 200 useful battery bank amps rather quickly. However, most people don’t run their microwave but for short periods of time so this high power consumption shouldn’t create a problem. What might cause a problem would be running an appliance like a space heater on the inverter as you might leave it running over a longer period of time and it would eventually drain the battery bank down low enough where the inverter would shut down. The inverter is a great option to have if you think you will be camping off-grid with the solar panel package and without shore power or even if you just want to pull over for a quick break to heat up something in the microwave while traveling to your next camping destination!1 point
-
Hi All, Just wanted to share our experience getting a 30A power pedestal installed at home. Wanted a hookup to run everything at home to check all systems, cool down the fridge, and run the AC while working and prepping to leave for trips from home. Electrician came out and installed 2 RV style boxes with the correct receptacles. BUT, wired them @ 240V! We did not realize this, and upon connecting the Ollie to power and starting the AC.... POP! Very loud, breakers tripped on both ends. It took us a while to realize, and we feared the worst. The Progressive Industries surge protector absolutely saved us... that was the pop we heard. Upon rewiring the hookup to 120V, all systems functioned properly... except the tank monitor. Was not getting anything out of that. Felt lucky that was the only thing we blew up, but upon taking the monitor off and unplugging and plugging back in the connector, it lit right back up. There's some kind of reset on it. Not even any fuses blown... we got lucky. Moral of the story is, if you're thinking about getting hooked up at home, be sure you walk the electrician through the specs- 30A, 120V ONLY. The oversight almost cost us the whole electrical system, or at least all of the devices attached to it. This is not how most electricians would wire this hookup, they are thinking of it like a dryer hookup, which is 240V. Also be sure the polarity is correct. The Oliver wants to see white as the hot wire, not black. Most electricians will wire it the other way around. The polarity will not hurt anything, but you will get an error code on your surge protector.1 point
-
I found my notes. I considered a combined circuit tester and voltmeter. This is currently $32. My notes include a digital model, similar to the one you found, for $9.60. The analog model I chose was $12 at that time, and my notes point out the very good price and the very good reviews. Why did I choose the analog model over the digital? Don't know. Could have been the very good reviews. The web site that suggested this setup used an analog gauge, and that could be one reason. Maybe because I am an analog type of guy. I dislike digital watches....1 point
-
The TV has multiple direct inputs. You do not have to go through the Furrion. You may have to buy an adaptor to go from your phone to the hdmi input. Apple has one for the iphone but I don't know about Android phones.1 point
-
Hey David, thanks. Is there a reason you picked a dial type gauge over a digital one like this? https://www.amazon.com/dp/B017AVBIVG/?coliid=ID1HJKRPE2S5B&colid=1X5H11EH41351&psc=0&ref_=lv_ov_lig_dp_it They are the same dimensions, I suspect the analog one would not survive a fall, the digital one “might” survive. John Davies Spokane WA1 point
-
Thanks, David, for this tip. I already have and use the circuit tester. Now I have ordered the other items to assemble the combined circuit-voltage tester. I DO have a question for David and others who have discovered problems with improper circuits and/or voltage in different campgrounds: What was your next step? Did you leave the campground? Get the campground manager to make adjustments? I'd like to know the stories and, most important, any suggestions for dealing with the issues. Thanks.1 point
-
You guys are Electric! I plan to have an electrician wire my 30amp service very soon so this information is quite timely. Also, thank you DavidS for your circuit and voltage testing gadget - I checked out your recipe and ordered the stuff from Amazon Prime right away. This will be a simple and inexpensive pre-hookup check at every camp ground. Once again, thanks to all for this great information. As an aside, before I ever heard of Oliver, I was researching Airstream and spent much time monitoring the Airstream forum. What a negative, complaining, poor-mouthing forum. In fact, it was the frequent quality complaints that led me to Oliver. One Airstream commenter suggested "Airstream quality is so poor it might be best to get an Oliver", so, I checked out Oliver and the rest is history (I pickup in April 2019). And this Oliver forum - no one complains and gripes about quality, but offers helpful information and suggestions for improvement. I am so very pleased to have found Oliver owners - looking forward to being one(I did make my 15% down payment, so, I am a partial owner).1 point
-
I,too, would be a bit concerned about using window screen. 1/8 inch hardware cloth cuts the airflow to 70 to 80 per cent, depending on the size of the wire.. Fine mesh screen could be as much as 50 per cent... What it really means is, you would be reducing flow over the fridge working components by a big margin. That can result in higher temps in the fridge, and possible warranty issues. Just something to keep in mind. I suspect that the Camco vent screens are somewhere around 1/8. Small enough to keep out mud daubers and mice, hopefully big enough to allow sufficient airflow to the fridge intake and exhaust. Back in the day, it was recommended to remove any screens installed before asking for warranty service. I'm sure this is why screens are not standard on any trailer.... Sherry1 point
-
Issue 1: Fan inoperative Issue 2: Fruit Flies or Gnats in toilet Models Impacted: All models delivered before 8/8/2018 Information: Nature's Head recommends using a 2-5 amp fuse for the composting toilet fan. Many models may have been produced with a 1 amp fuse in the converter for the fan and may result in it blowing. Fruit flies and/or Gnats may become a problem in the composting toilet gaining access via the top roof plumbing vent. Resolution 1: Replace the 1 amp fuse with a 5 amp fuse. You can use a 2, 3, or 4 amp fuse as well just as long as it is within Nature's Head recommended size of 2-5amps. Resolution 2: *Place a mesh screen, like the material used in the window screens, over the top plumbing vent pipe. You can also use products such as Diatomaceous Earth or Gnatrol as well. You would need to refer to the Nature's Head Compost Toilet manual for the recommended process for adding these products to your toilet. Please see attached manual. *By placing a mesh screen over the vent pipe you will need to periodically clean this to keep it from becoming clogged and causing a plumbing issue. Natures-Head-Composting-Toilet-Manual.pdf1 point
-
Dave: Over the 50 years that we have been camping, I have found numerous campgrounds with electrical issues. I always check their facilities before connection my equipment.1 point
-
As you know, using an inverter takes our on board 12 VDC, changes it to 120 VAC, into which a wall brick is plugged to convert it back to 12 VDC. As is obvious, this is a very inefficient way to use a 12 VDC piece of equipment. The 12 VDC plugs for our machines were over $50.00 each and we needed two. I solved that problem by making my own. The problem was that the wall converters had a proprietary plug that I could not find/buy. I went down to my local respiratory care place and asked if they had any old nonworking power supply's. She brought a box of them out and let me take two for free. I cut the cords off, put a $3.00 12 VDC male plug on the end and voilà, a (relatively) free power cord.1 point
-
To all, I apologize for my frivolity and thread obfuscations, obviously I had not thought through my reply, as childish as it was (It wasn't my fault - to be current and fashionable) Although, I must admit it was a fun diversion. As far as the washer, my first thought was the bike carrier attachment - it looked similar. Otherwise the underpinnings of the Oliver are very clean and provide little in the way of parts falling off. The older I get, the less I try to fit in and behave. I will try harder - but don't wager any coin on it. Russell1 point
-
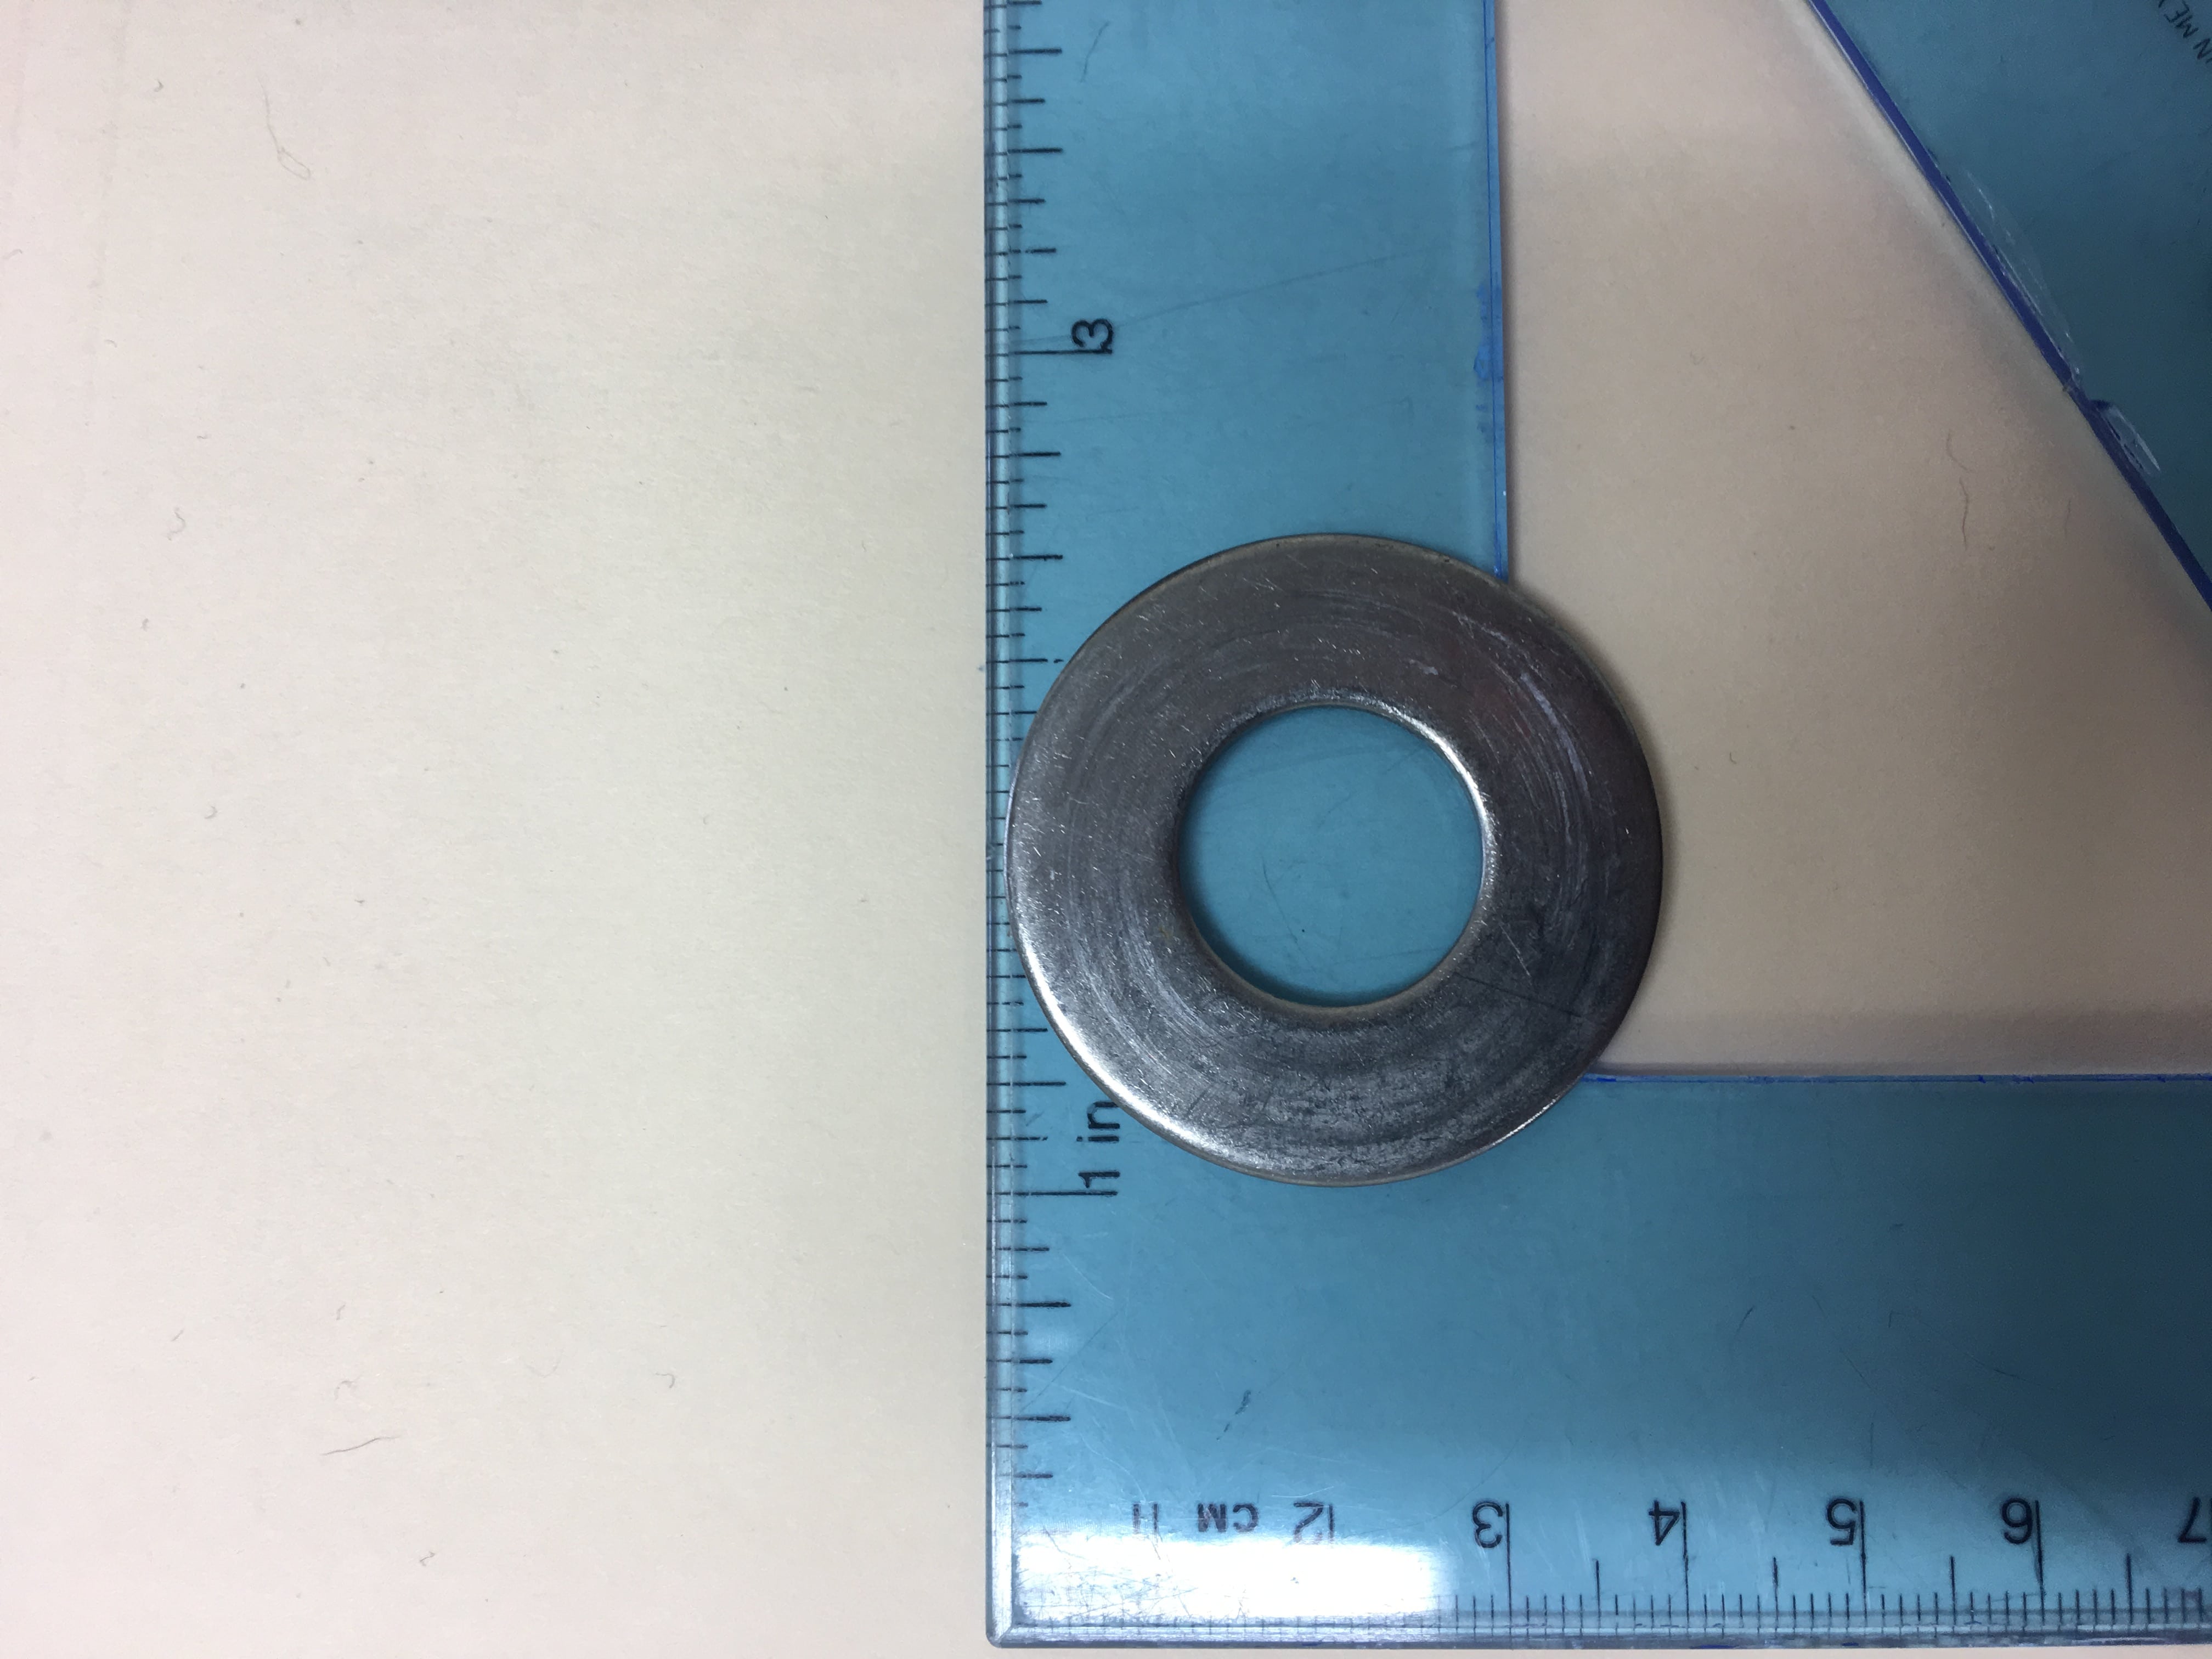
10th grade, thank you. Foy, agree with the other comedians, sorry for the hijack. I don’t know where that washer is from, although when I first read your post the first thing that popped into my head was a washer from the red bushing on the Andersen. Mike1 point
-
Foy, Steve is correct. I do apologize for the unwarranted comment. Since purchasing our Oliver in 2017 I have found a couple of screws, a plastic connector of some sort and even a 4 inch stainless U-bolt in the back storage compartment. I agree with Steve and have not worried about these findings.1 point
-
Foy, I (and I’m sure my well meaning friends) need to apologize to you for blatantly hi jacking your thread. I actually have no idea where the washer could have come from. Without a spare nut to go with it, I probably wouldn’t worry too much. When we all start back to school this fall in the ninth grade maybe we can learn how to behave.1 point
-
You guys are talking gibberish and confusing everyone. The fix is simple to reinstall. Simply, insert it into the source from which it immenated before the release mechanism had been depressed. Malcolm1 point
-
I was going to say left side sprocket, but now that I look at it more closely it does look like the right side. Mike1 point
-
At factorty for pickup with Phil Andrews. Check spare tire cover washer. If not that then check bike rack if you have one. - Randy
 1 point
 -
Perhaps Scuba, but according the build documents located remotely, in the cloud, stored on a solar powered processing unit,located in a dimly lit warehouse, hiding in a nondescript city, tucked away in northern outer Mongolia, guarded by well trained blind attack lizards, what appears to be a metal washer, is not listed in the build documentation. I suspect it fell off a lesser unit - some sort of ilk, say Airstream. But I'm just guessing here.1 point
-
That looks like a washer from the right side sprocket on the mucket mill transducer located just aft of the Gbic expansion module on the port side. You'll need a metric left handed wind-up wrench to properly reinstall it. Make sure the back side of the washer is facing out and don't over tighten the retaining ring.1 point
-
Foy, Another thought, did Oliver take anything apart to evaluate your axle position issue or have they corrected the problem? May want to look at the undercarriage again. If you don't find where it came from, check other vehicles that have driven over that area, too.1 point
-
Rear jack mounting bolt?1 point
-
Do both of your Anderson adjustment nuts have the washer behind them that protects the bushing?1 point
-
Come join Oliver Travel Trailers from August 15th -19th as we attend the Boler 50th Anniversary gathering at Red River Exhibition Park, Winnipeg, Manitoba. Boler was the first fiberglass travel trailer invented in 1968 and made approximately 10,000 units before stopping production in 1988. Join us as we pay homage to the pioneer of fiberglass travel trailers! The event is limited to the first 1000 trailers. Daily activities include trailer showcases, workshops, entertainment and much more. All campsites have asphalt parking and electric hookups. There is also fresh water and dump locations inside the park. For more information about the rally, visit their website at http://myboler.com/ or their Facebook group at https://www.facebook.com/groups/888471907908283/. If you own an Oliver Travel Trailer, there is a “Camp Ollie” with limited space that will allow you to camp next to other Oliver owners. If you are an Oliver owner and plan to attend, contact “Camp Ollie” directors, owner Coy Gayle (hardrock) or Phil Andrews of Oliver Travel Trailers. For any prospective owners, the event will be open to the public on Saturday August 18th if you do not plan to attend the entire event. If you would like a chance get up close and personal with an Oliver Travel Trailer come on by and take a tour of either our Legacy Elite or Legacy Elite II trailer models.1 point
-
The Dexter EZ Flex system adds another layer of protection to your camper. The EZ Flex equalizer comes with a rubber dampener to lower the impact from cracks, potholes and other imperfections in the roads from causing unwanted stress on the camper shell. This system also replaces the standard bolt & plastic bushings inside each leaf spring eye with wet bolts and bronze bushings allowing you to keep them greased for longevity and less noise from heat and resistance. For this system to operate properly it is recommended that the bushings are greased every 3 months or 3,000 miles with a good high quality Hi-Temp grease. We use Citgo Mystik Hi-Temp at the factory but there are several other approved greases from Dexter. *2018 Elite I models utilize bronze bushings and wet bolts but does not have the equalizer as it is used on the dual axle only. The Dexter Axles used on the Oliver Elite and Elite II models are the 5,000 lb and 3500 lb axles. The Elite models have a single 5,000 lb axle with 12” brakes while the Elite II models have dual 3500 lb. axles with 10” braking. These axles and brakes do have a break-in period as they are Nev-R-Adjust braking and adjust automatically as you brake while pulling forward or backwards. The break-in period may vary slightly but usually adjusts to 100% somewhere between *50 brake applications from the brake controller only or over a period of about 500-700 miles with normal vehicle braking. *Please make sure that you do not overheat your brakes by trying to achieve the break-in too quickly. If you do choose to utilize the brake controller over 50 braking applications it should be done over a 75 mile trip at low speeds allowing the brakes to cool in between and not putting too much stress at high speeds on the trailer brakes to stop the tow vehicle. Both the 3500lb. and 5,000lb axles have serviceable bearings that require maintenance every 12 months or 12,000 miles. The same grease that is used for the EZ Flex will work with the bearings. Both the inner and outer bearings should be cleaned thoroughly and inspected for any imperfections or improper wear. This is also a great time to inspect your trailer brake components as well. These maintenances can be performed by most RV service centers or if you prefer, you can perform your own maintenance. For more information on how to repack your wheel bearings see the Dexter Bearing Maintenance Video.1 point


-
Recent Achievements
-
")


")


")

