Leaderboard


Popular Content
Showing content with the highest reputation on 05/22/2019 in all areas
-
And just think, not an ounce of liability was incurred. That's what helping family (be it personal or extended) is all about. Never turn your back on a person in need, for it may well be you sometime down some lonely forest road...12 points
-
Update: Our fellow Forum member has been discharged from the hospital, they have obtained a campsite in Chattanooga and are presently resting in their Ollie. A huge THANKS goes out to Rick & Vickie, KountryKamper, and, Oliver Service Department for all the help in marshalling resources and generating options for this situation. It truly is a great "Oliver Family" we all belong to. Bill12 points
-
Try this for the lights: https://www.sailorsams.com/ITC-RV-LED-Porch-Light_p_14885.html and this for the switches: [attachment file=Round Rocker Switch .png] Good luck,
 4 points
 -
Just wanted to show both amber and white lights for comparison. [attachment file=Grenada Lake North Abutment COE 05202019.jpg]
3 points
-
We travel with 2 dogs, so we are in and out several times a night after dark. Being from Florida we are familiar with most types of flying bugs. So the general routine is to kill about 50 bugs inside the trailer before going to bed. The good news was that they are easy to see on the white walls. My initial intent was to install a dimmer on the porch lights and that did not work with the dimmer I purchased. I know there are dimmers that control a single light and others that control multiple lights. The one I bought would not control both entry porch lights, but would control a single one. It is fairly easy to dim an entire 12v circuit if you wanted to, but a little harder to do a specific set of lights. So I decided to take a different approach and install amber lights. The are made by the same company that brought us the black streaks most are familiar with, ITC. These lights do not have a black gasket. They are direct contact with a sealant of your choice and 2 screws. They have a little larger footprint so they need new mounting holes. They also have both white and amber lights so another power wire is necessary as well as a new 3 way switch. I only did the curbside lights due to the cost being about $120 for lights and a switch and my uncertainty in their function. My test at home were positive but last light camping by the water in 85 degrees sealed the deal. The bathroom window was covered with bugs outside and the porch lights had a couple. More importantly, I only had to get ride of 2 bugs before bed. I'll order 2 more lights and complete the street side lights and I’ll reuse some of the old lights in the basement which will make me feel better about replacing things before they break. And if I can get off my lazy butt, I’ll document my MOP and post it.2 points
-
<p style="text-align: left;">A huge thanks to all of the Oliver employees who were able to be at this years rally! So much of the behind the scenes work was done by them. The service folks were here and worked nearly non stop performing repairs for several days during the rally. For the new Oliver owners or the soon to be owners you experienced just a small sampling of the Oliver team dedication. A dedication that starts at the very top and extends throughout the organization! Thanks to you all.</p>2 points
-
Try changing the Furrion stero input to AV IN and turn up the volume and it should work.2 points
-
Tomar - A quick call to Jason in Oliver Service will get you fixed right up. They can be reached at - 1-866-205-2621 Bill2 points
-
John, I checked the specs on the Zamp website and found no amperage capacity mentioned. My solar suitcase came with a port compatible connector and has an in line 30 amp fuse. The port is equipped with 10awg wire pigtails so I believe it should have a max ampacity of 30 amps if I remember my code correctly. I installed the 15amp fuse just in case Oliver used smaller wires after the pigtail. I have a call in to Jason just to make sure I'm not missing something obvious. It didn't make sense to me to fuse 10awg wire at 10amp when my Uglies Pocket Reference says it can handle 30amp with even the lowest rated insulation.2 points
-
Bill I sent you a PM.2 points
-
Great - I'll let Jason know. Bill2 points
-
John nothing looks the same now. As the day went on the temps went up and most of the show melted. I guess in Colorado if the snow stays it has to be really cold.2 points
-
I've watched many of the TFLTruck videos and I really like there road test on the ike Gauntlet. OK, I watched the video on the Gladiator and it preformed as I thought it would, this trailer is too heavy for towing with a Gladiator. Now a trailer like a Casita will probably be ok, maybe even the Elite trailer will work, but the Elite II I would think not. I can understand why owners of Jeep Wranglers and Gladiators would want to be able to pull there travel trailer camping, they now have an excellent vehicle for off-roading to play with when they get to there camp site. Being a 2017 Wrangler owner and maybe someday a Gladiator I like it, but not for towing. trainman2 points
-
My Messaging seems to be working now. John Davies Spokane WA2 points
-
Everything looks to be going well. Going to have a local semi-truck axle, trailer outfit fix the axles and, just like you suggest, it is most likely going back to Oliver to be gone over. Jason and the Oliver crew have been good in this matter, just a bit delayed insurance (normal) and being occupied by the rally, which is just a timing thing. I look forward to it being back to mint condition and am glad that it looks like Oliver will do the fiberglass work and check over any other work. Appreciate all the good advice from everyone.2 points
-
Indeed, indeed! From the Rally volunteers to the Oliver service staff (Richie, Justin, Jason E) to the Marketing and AV Oliver staff (Matt, Izzy and Jason W), the Rally chairs and co-chairs (Coy, Foy, Mary Kay, etc), Oliver Sales staff, the State Park staff (campground, lodge, and security) and, of course, our vendors - you people really got it together. Thanks! Bill2 points
-
Agree 100%. Thanks to Matt for all the audio visual work and support to make the presentations happen! Mike2 points
-
Owing a 2017 Jeep Willys for a toy, I would never consider a Jeep Wrangler, or Gladiator as a tow vehicle. It would be nice to have a Jeep to run around to and from the campsite, but that's about it. Hooked behind a diesel pusher Jeeps look great. trainman2 points
-
I have researched the threads on this subject and have decided to get the Proven Industrustries lock for our trailer while it's parked/stored. However, is there a general consensus on what type of lock to put on the tongue while traveling down the road? Thanks, Hobo2 points
-
LOL, that’s a good one..... there is no consensus whatsoever, but I really like this combo. https://smile.amazon.com/gp/product/B00HL2NM0K/ref=oh_aui_search_asin_title?ie=UTF8&psc=1 https://smile.amazon.com/gp/product/B001V5IYT2/ref=oh_aui_search_asin_title?ie=UTF8&psc=1 The collar is forged 304 stainless steel and plenty strong, and the padlock is “high enough” security for travel. It is a snug fit in the hole with no extra movement. It would be tricky to get cutters around it. If you research padlocks, you will find that ones secure enough for long term storage are super expensive. This one is big, intimidating and has a good shielded lock mechanism. After two seasons of use I see no need to change it. If you want to leave the Proven one at home you can add a $20 layer of protection while away from the trailer by inserting a 2” steel ball in the coupler so nobody can drop it onto a smaller hitch ball. https://smile.amazon.com/Inch-Chrome-Steel-Bearing-Balls/dp/B007B2A3VQ/ref=sr_1_3?crid=1CCOSY9FGE1J&keywords=2+steel+ball+bearing&qid=1553432022&s=gateway&sprefix=2”+steel+ball+beain%2Caps%2C229&sr=8-3 If you don’t already have your hitch setup, we can talk about what works on a Ram 3500.... the truck in the pic had 33 inch tires and the trailer was dead level. John Davies Spokane WA
2 points
-
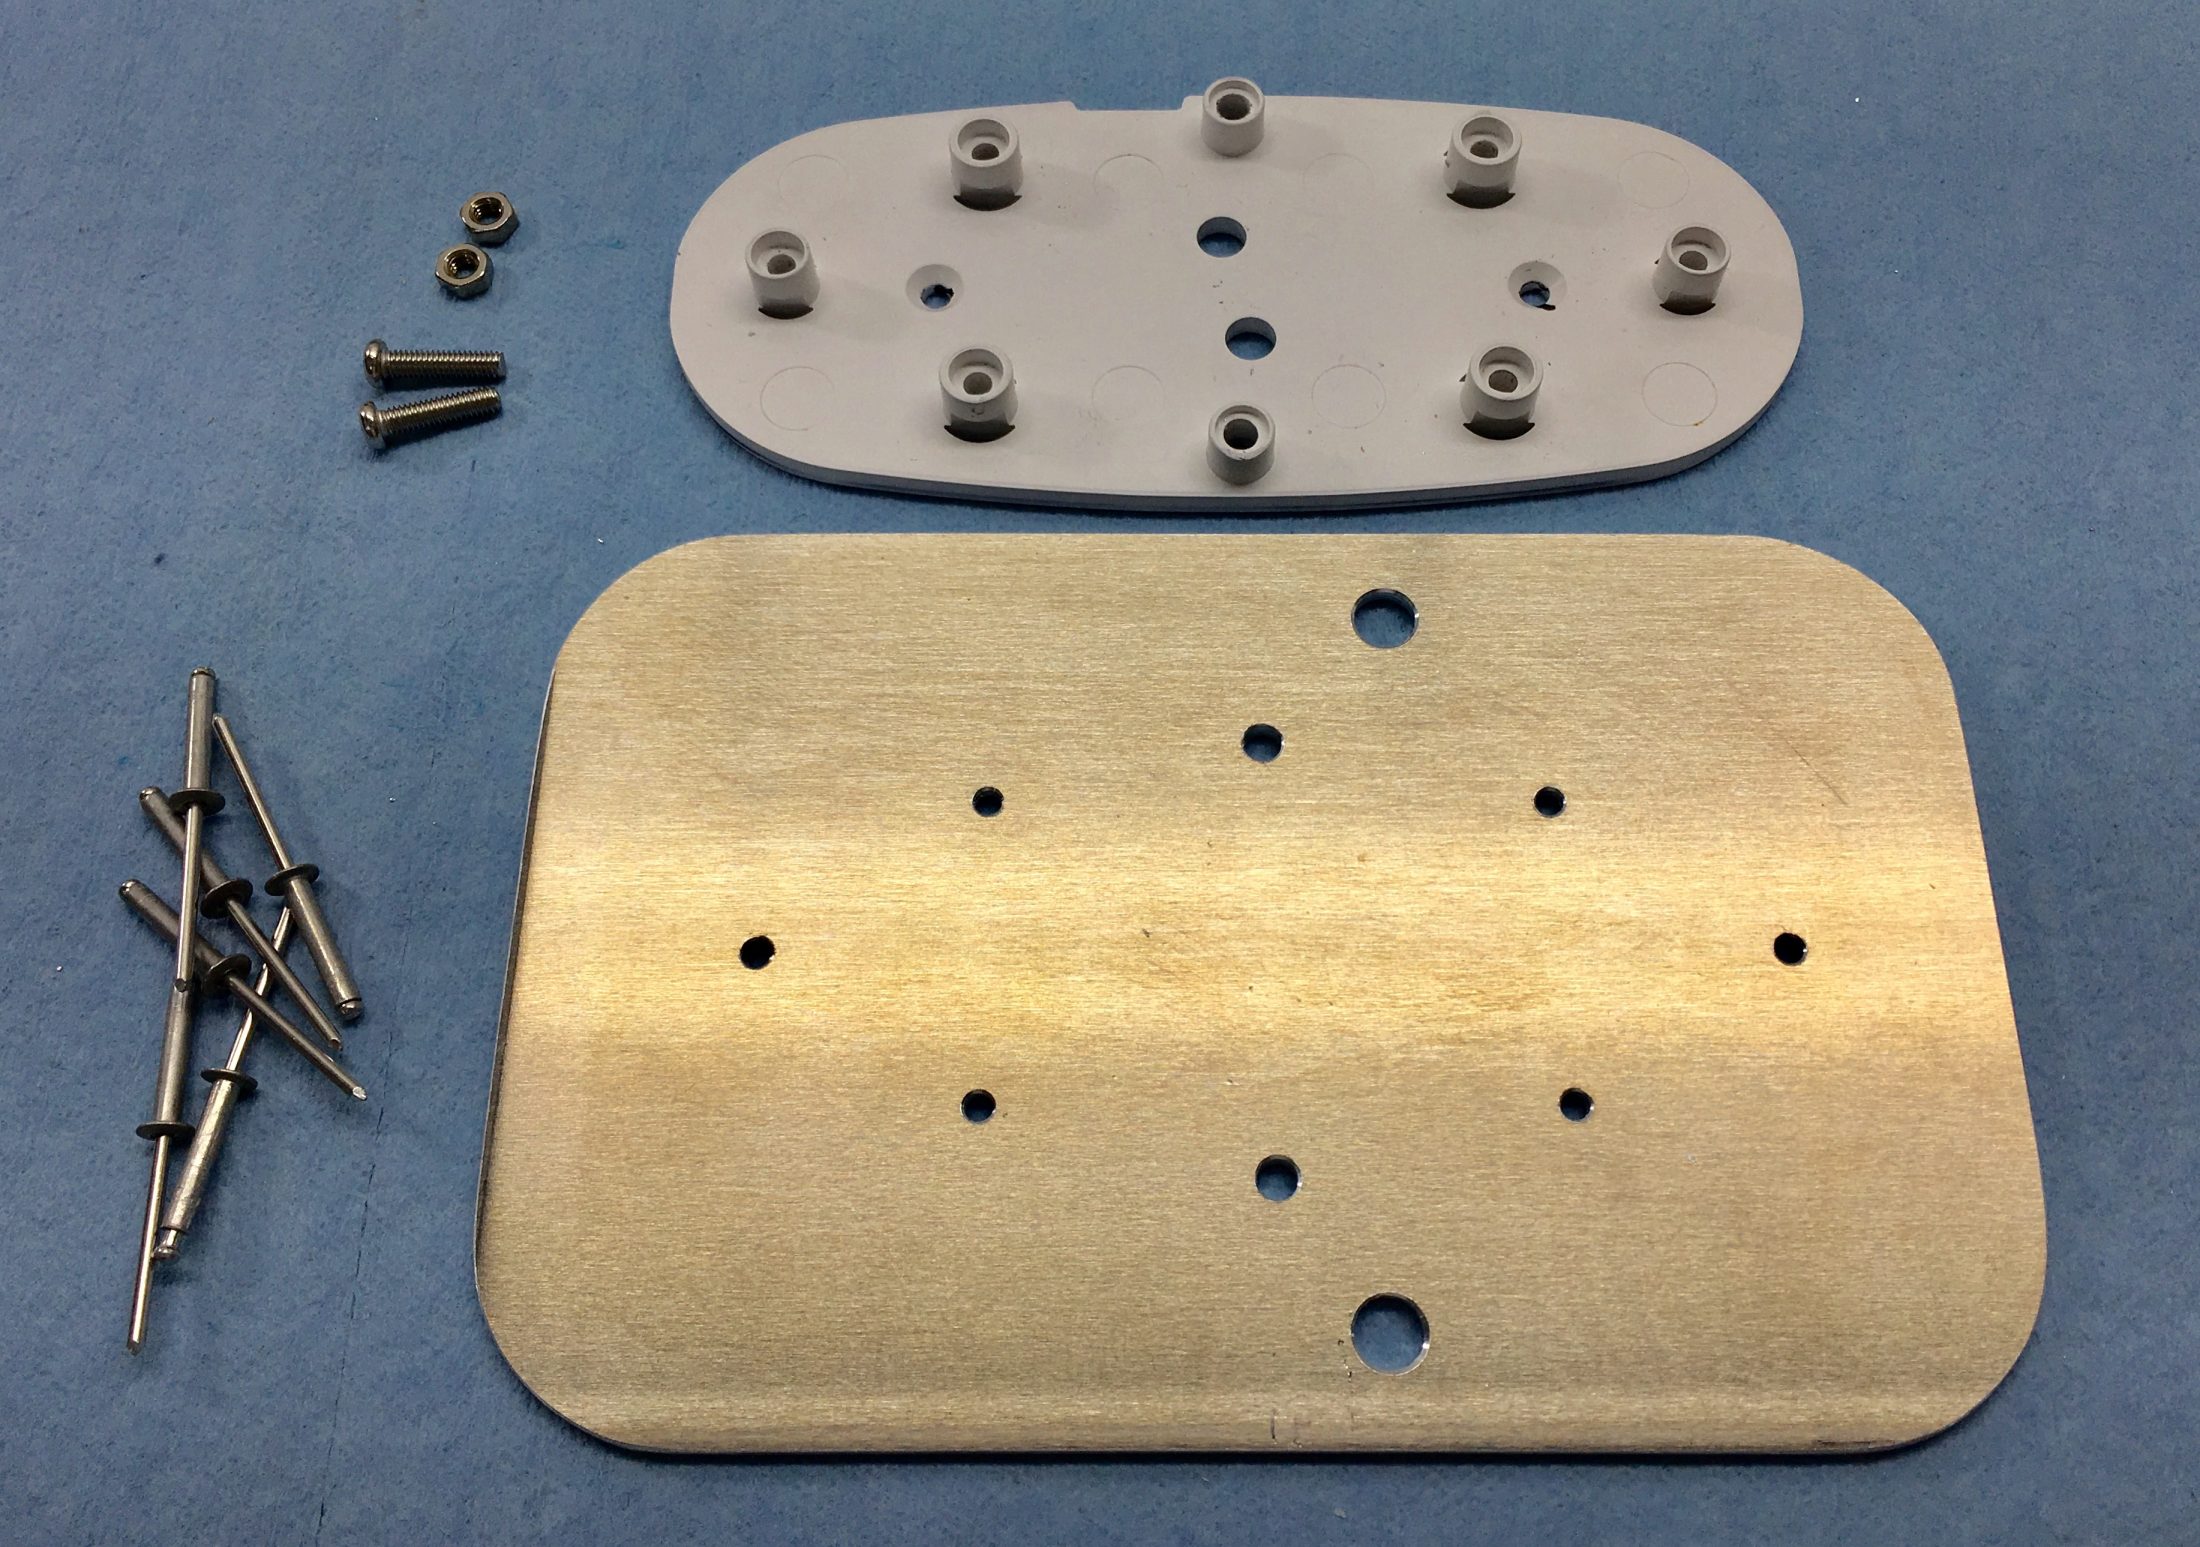
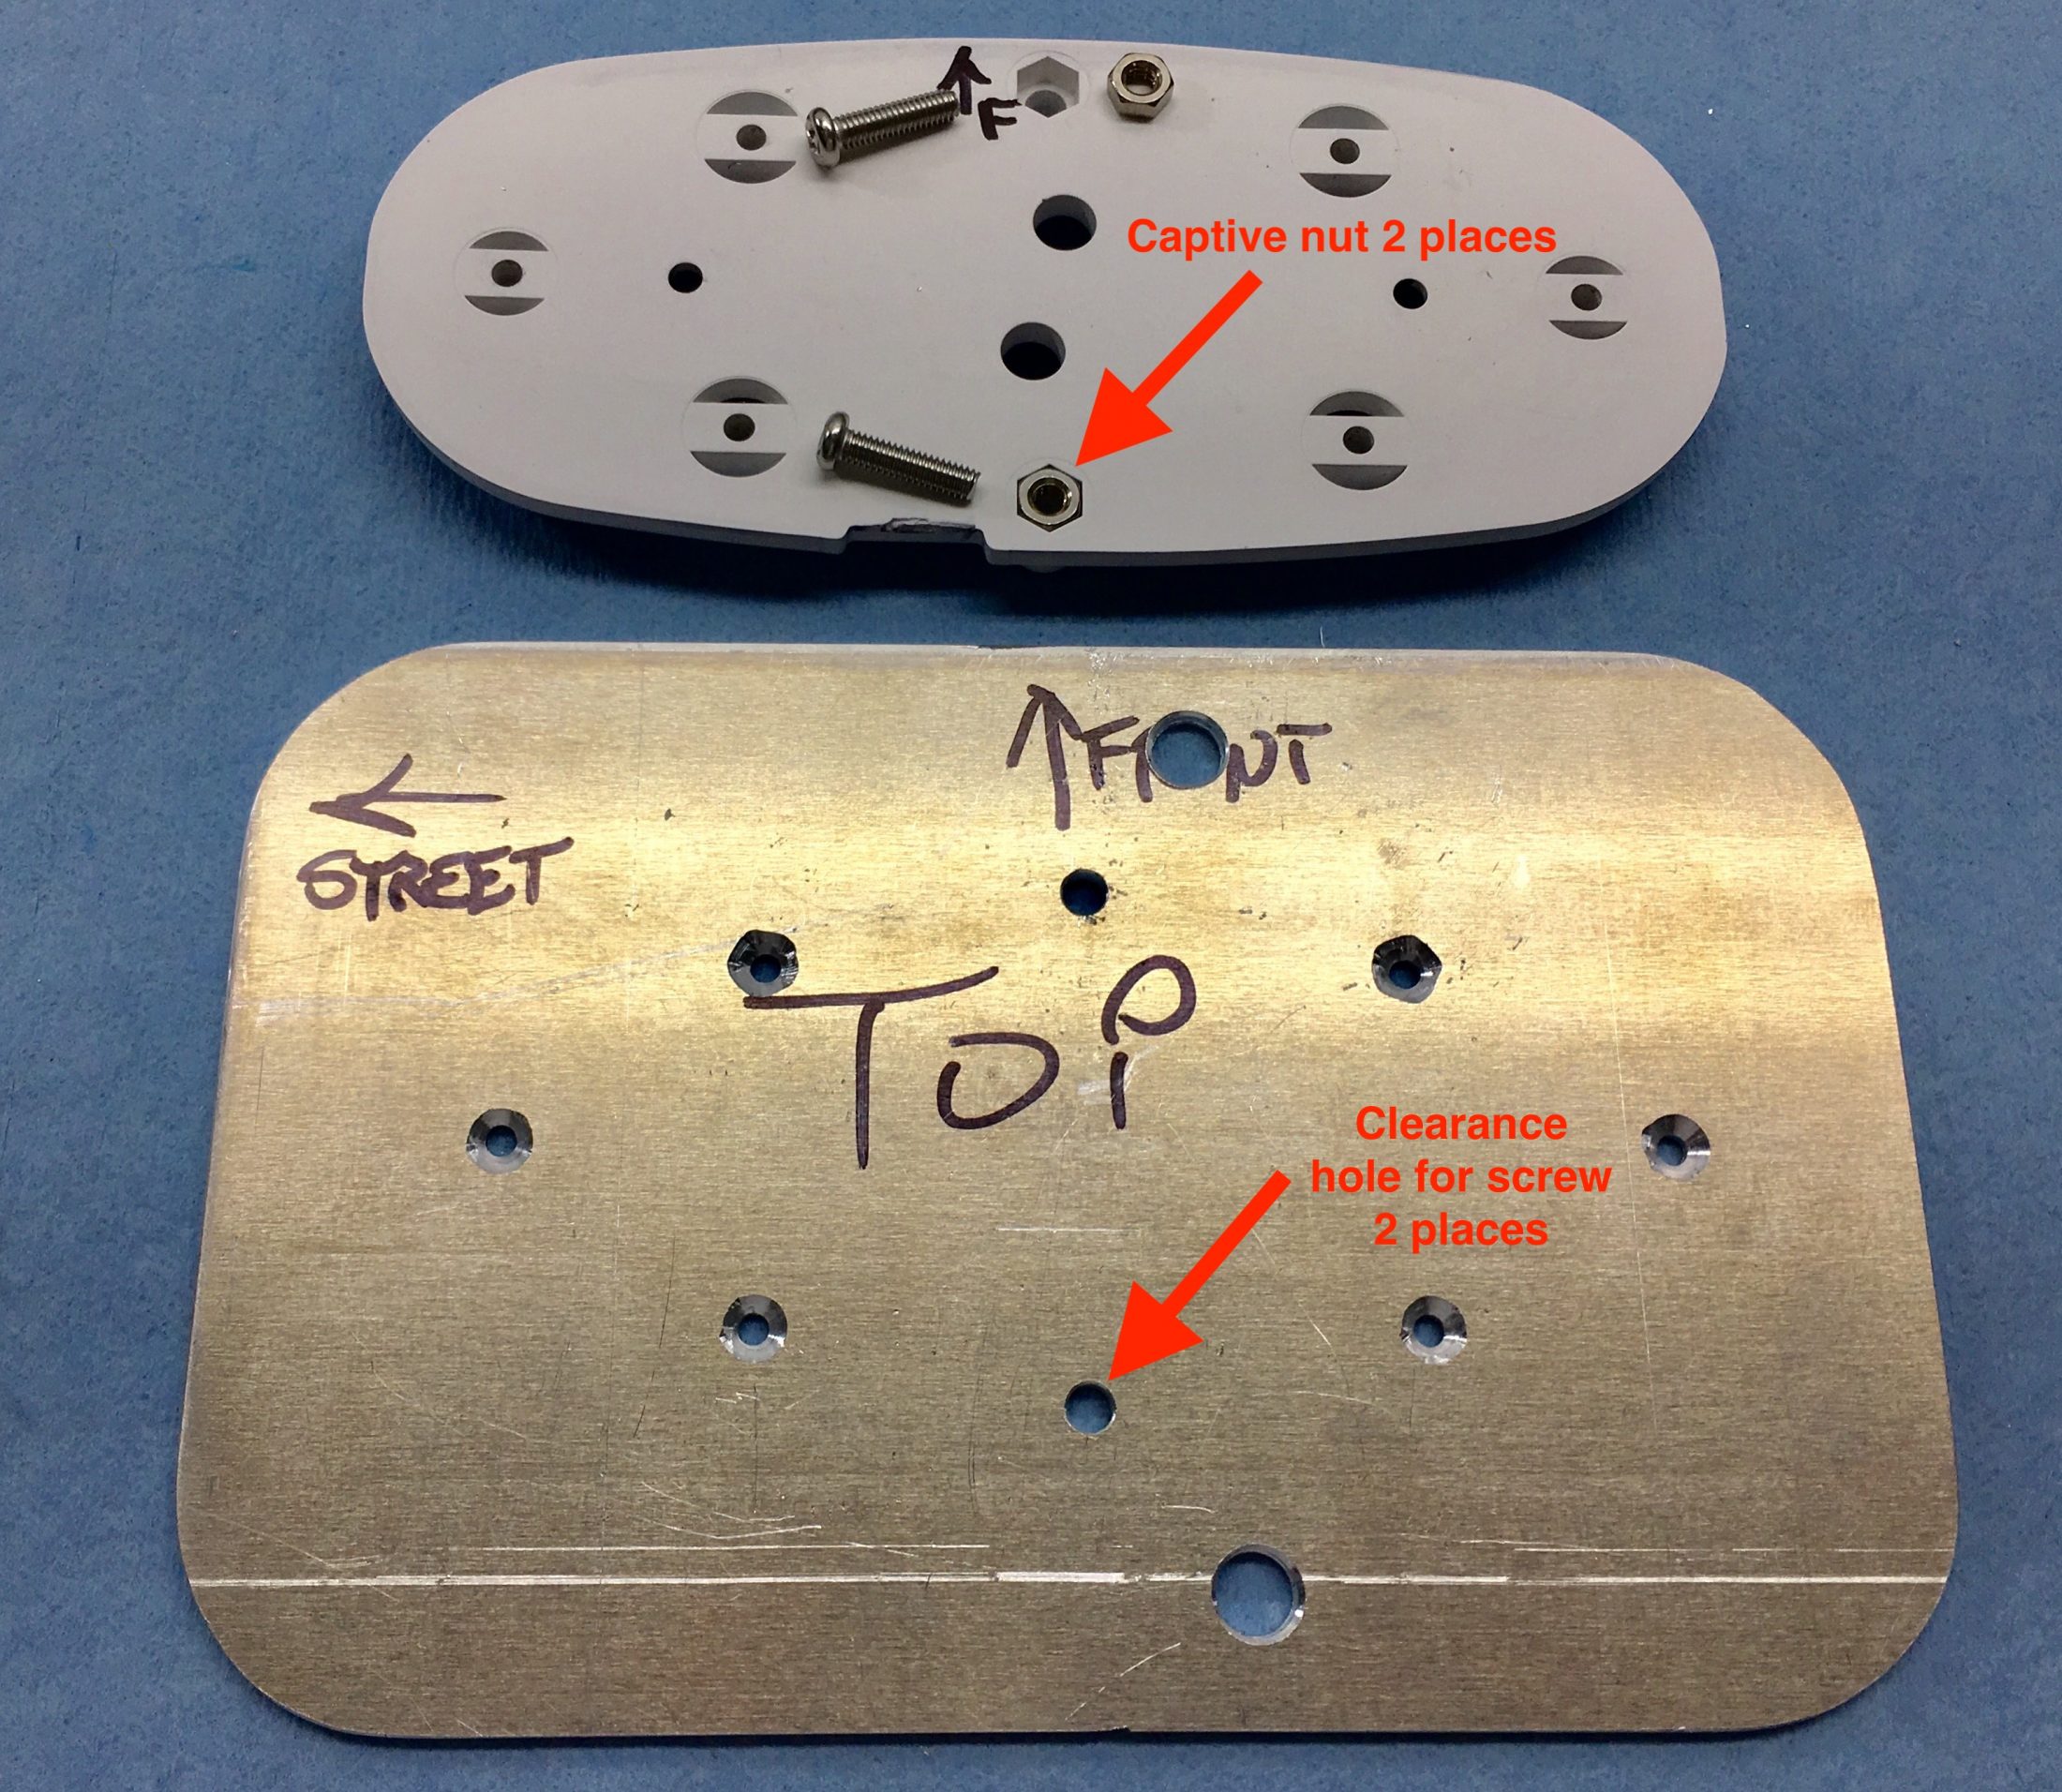
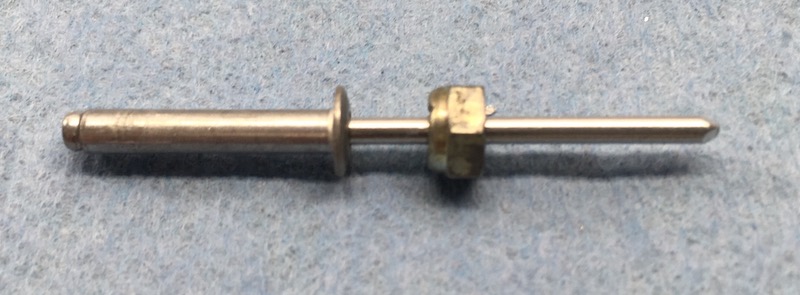
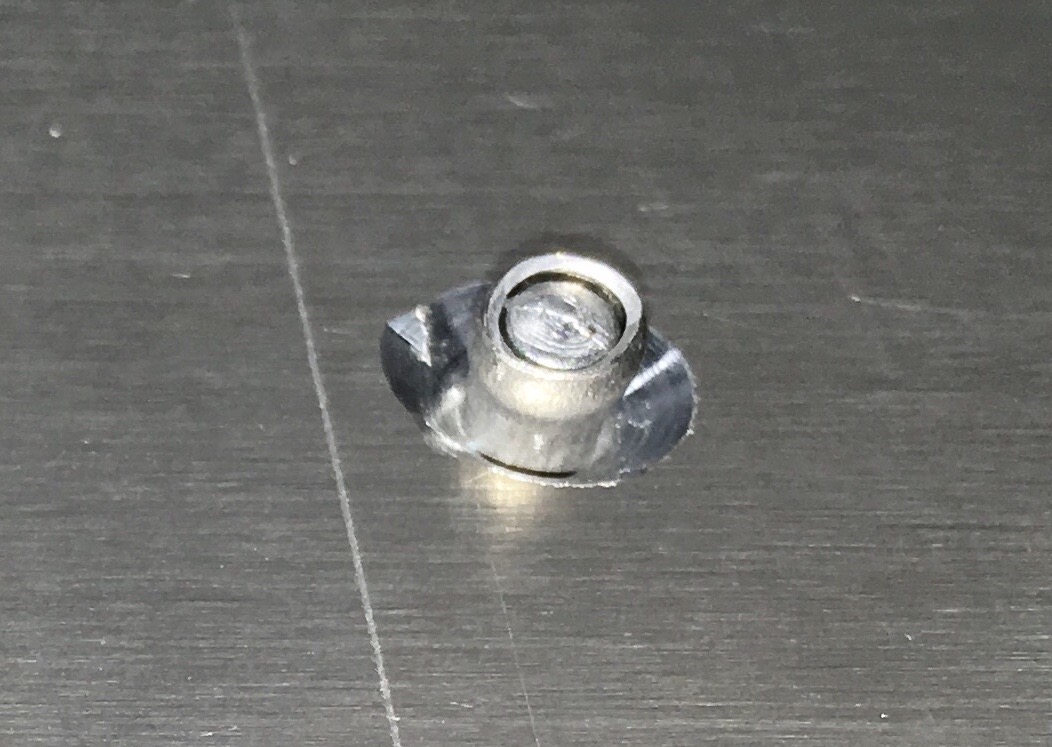
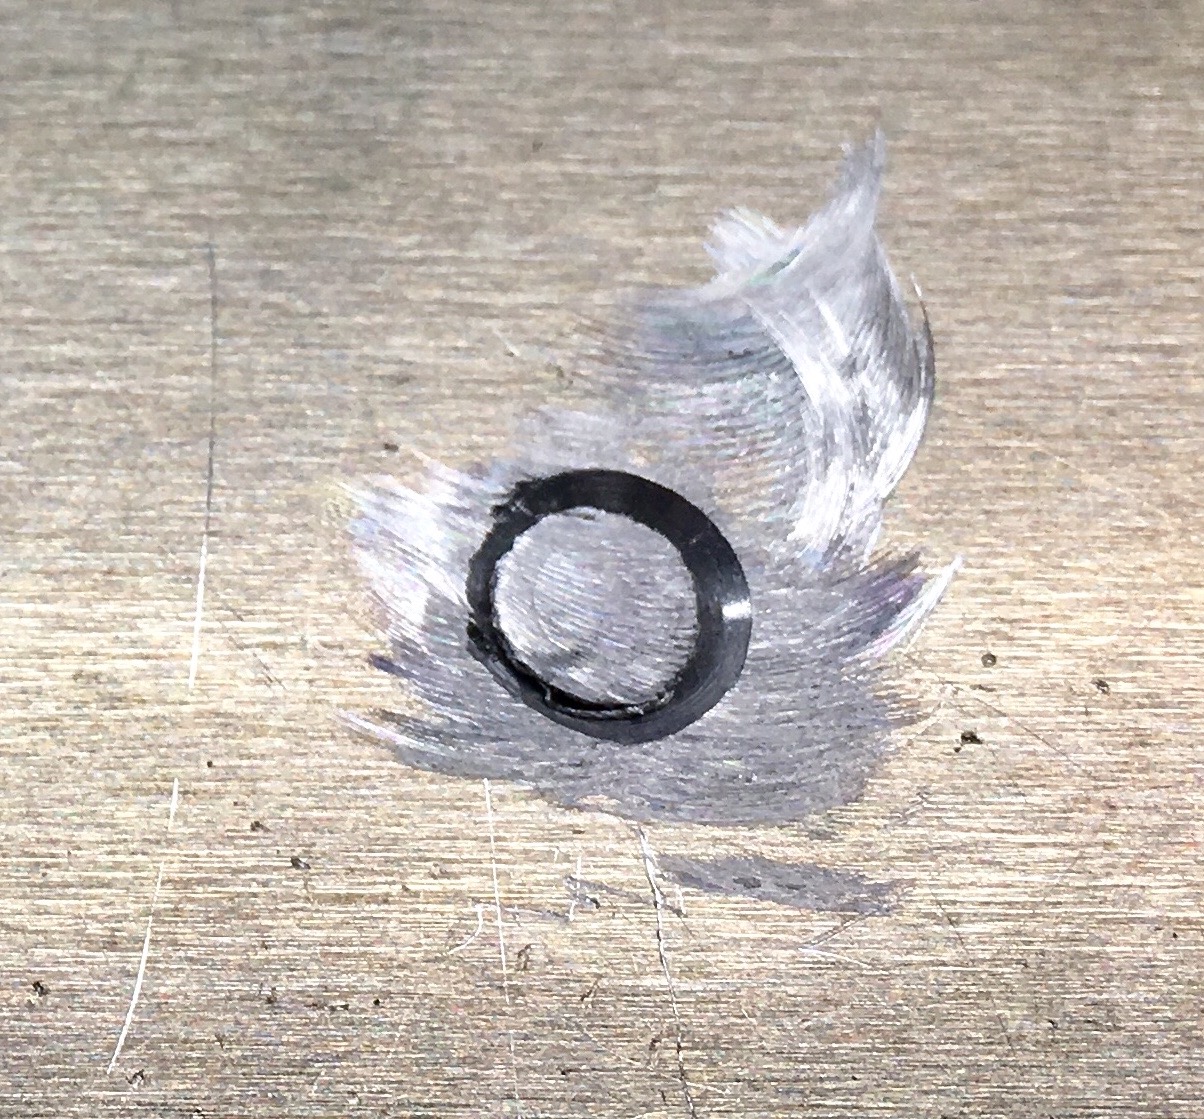
I had been using a 120 volt desk top Vornado fan (which was very effective, though a little bulky) but I wanted a built-in one that used less power and did not require continually running the inverter. This is the well regarded Caframo Sirocco II, made in Canada. The price varies a little, I bought it when it got down to $100. https://smile.amazon.com/gp/product/B01LDY4TE4/ref=ppx_yo_dt_b_asin_title_o04_s00?ie=UTF8&psc=1 It has three speeds and a "time delay off" function. Amp draw from the small DC motor is very minimal: Low: 0.12 amp, Medium: 0.22 amp, High: 0.35 amp (at 12 volts). Max airflow is 140 cubic feet per minute on High. That is not nearly as much as the Vornado on Low, but it is plenty adequate. I had already removed the fixed TV and mount from the back curbside corner, so I mounted the fan there. Since there were already 4 big holes, plugged by the original screws, I did not want to drill any extras. I made a plate out of 6061-T6 1/8" thick aluminum plate, attached the fan mounting plate to that with rivets, and bolted the plate to the bottom of the cabinet using two of those big screws.A future owner could remove the fan without leaving behind any extra cavities... and the location is good for sleepers and does not get in the way when folded up. The fan mounting bracket is designed to mount to a flat surface, then you slide the fan sideways onto the plastic studs and secure it with two long machine screws. I used common long 1/8" diameter aluminum pop rivets. Because each rivet head was down inside a cavity, I added a teeny nut to the shank before pulling it. The back side of each rivet hole was countersunk most of the way through the material: I used a small flat pin punch in the vise and a bigger one on top of the tail to drive it into the countersunk part: And ground each tail flush using a little Dremel grinder with a sanding disc: By grinding the tails flush, they would not damage the nice gelcoat of the overhead cabinet. Here is the assembly screwed in place: John Davies Spokane WA
1 point
-
[attachment file=170538] Santa and Mrs. are safe from our return from Howenwald! ❤️??
1 point
-
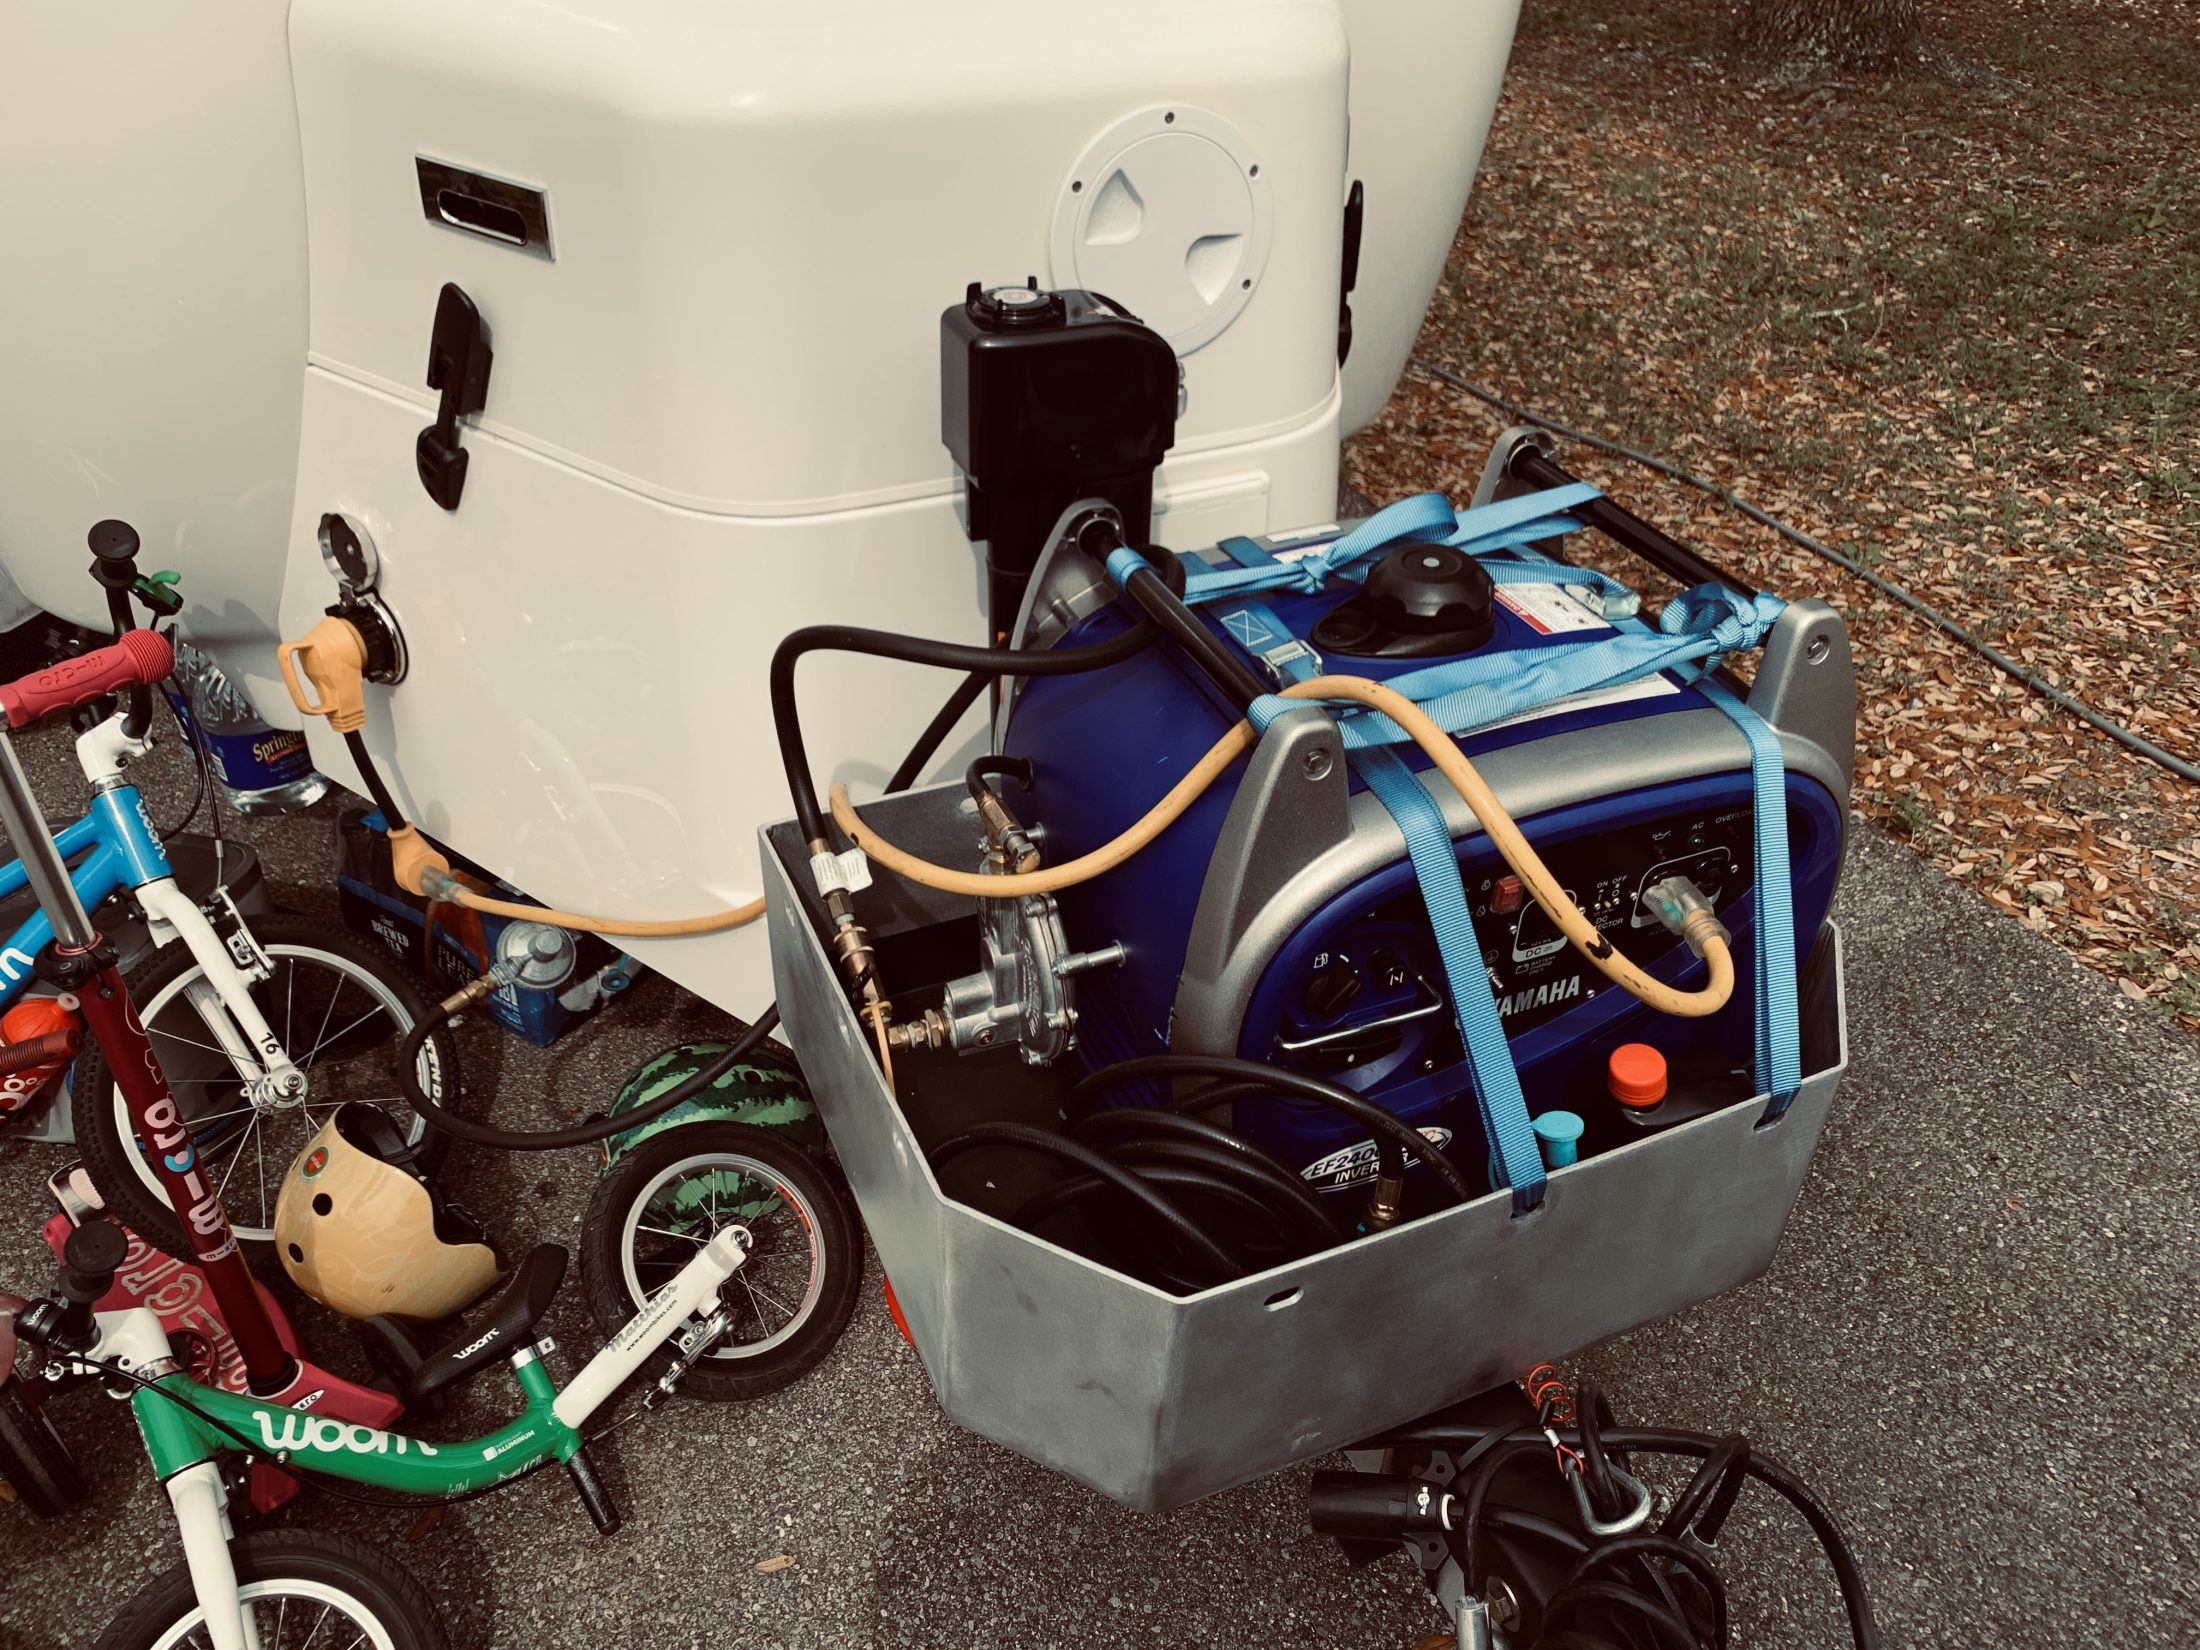
Best mod that I didn’t even know existed till I met a fellow future Ollie owner during my last factory tour. Works great! Some links: https://www.motorsnorkel.com Porch Shield 100% Waterproof Universal Generator Cover 32 x 24 x 24 inch, for Most Generators 5000-10000 Watt, Gray https://www.amazon.com/dp/B077MZ2JQ9/ref=cm_sw_r_cp_api_i_rhC4Cb4WPRFAX 10/3 6ft SJTW Lighted End Extension Cord 15 Amp, 125 Volt, 1875 Watt, Super Heavy Duty Outdoor Jacket (6 Feet) by LifeSupplyUSA https://www.amazon.com/dp/B071XXN81B/ref=cm_sw_r_cp_api_i_0iC4Cb9866N9T Camco Heavy Duty RV Dogbone Electrical Adapter with Innovative 180 Degree Bend Design and Easy PowerGrip Handle - 15 Amp Male to 30 Amp Female, 12" (55165) https://www.amazon.com/dp/B000BUU5YA/ref=cm_sw_r_cp_api_i_nkC4CbYYZTB8Q
1 point
-
Forgot to include the axle u-bolts. Use the same 3/4" deep socket as for the lug nuts. Dexter says 70 ft lb.1 point
-
Don: Here’s a list of what you’ll need for each fastener. The coupler, spring shackles, and EZ-Flex pivot will require two wrenches. A socket on the torque wrench for the nuts, and some other type to apply opposing torque to the bolt heads so they don’t rotate. This is critical for tightening the shackles and EZ-Flex pivot. I’d recommend standard chrome (non-impact) 6 point sockets as specified for each fastener. Bulldog Coupler: 3/4” socket and a 3/4” combination wrench. OTT says 80 ft lb. Lug nuts: 3/4” DEEP socket with a short (3-6”) extension. Dexter says 90-120 ft lb. Spring shackles: 11/16” socket for nuts. Use a 13/16” socket with a breaker bar close to the same length as your torque wrench to hold the heads. You may need a deep socket to clear the grease fitting. Dexter says 30-50 ft lb. EZ-FLEX center pivot (assumes at least one wheel removed): 7/8” socket with the short extension for the nut. The same 13/16” wrench you used for the shackles to hold the bolt head. Dexter says 65-75 ft lb. The chain hardware, auto, big box home, or farm supply stores all carry decent quality tools at competitive prices.1 point
-
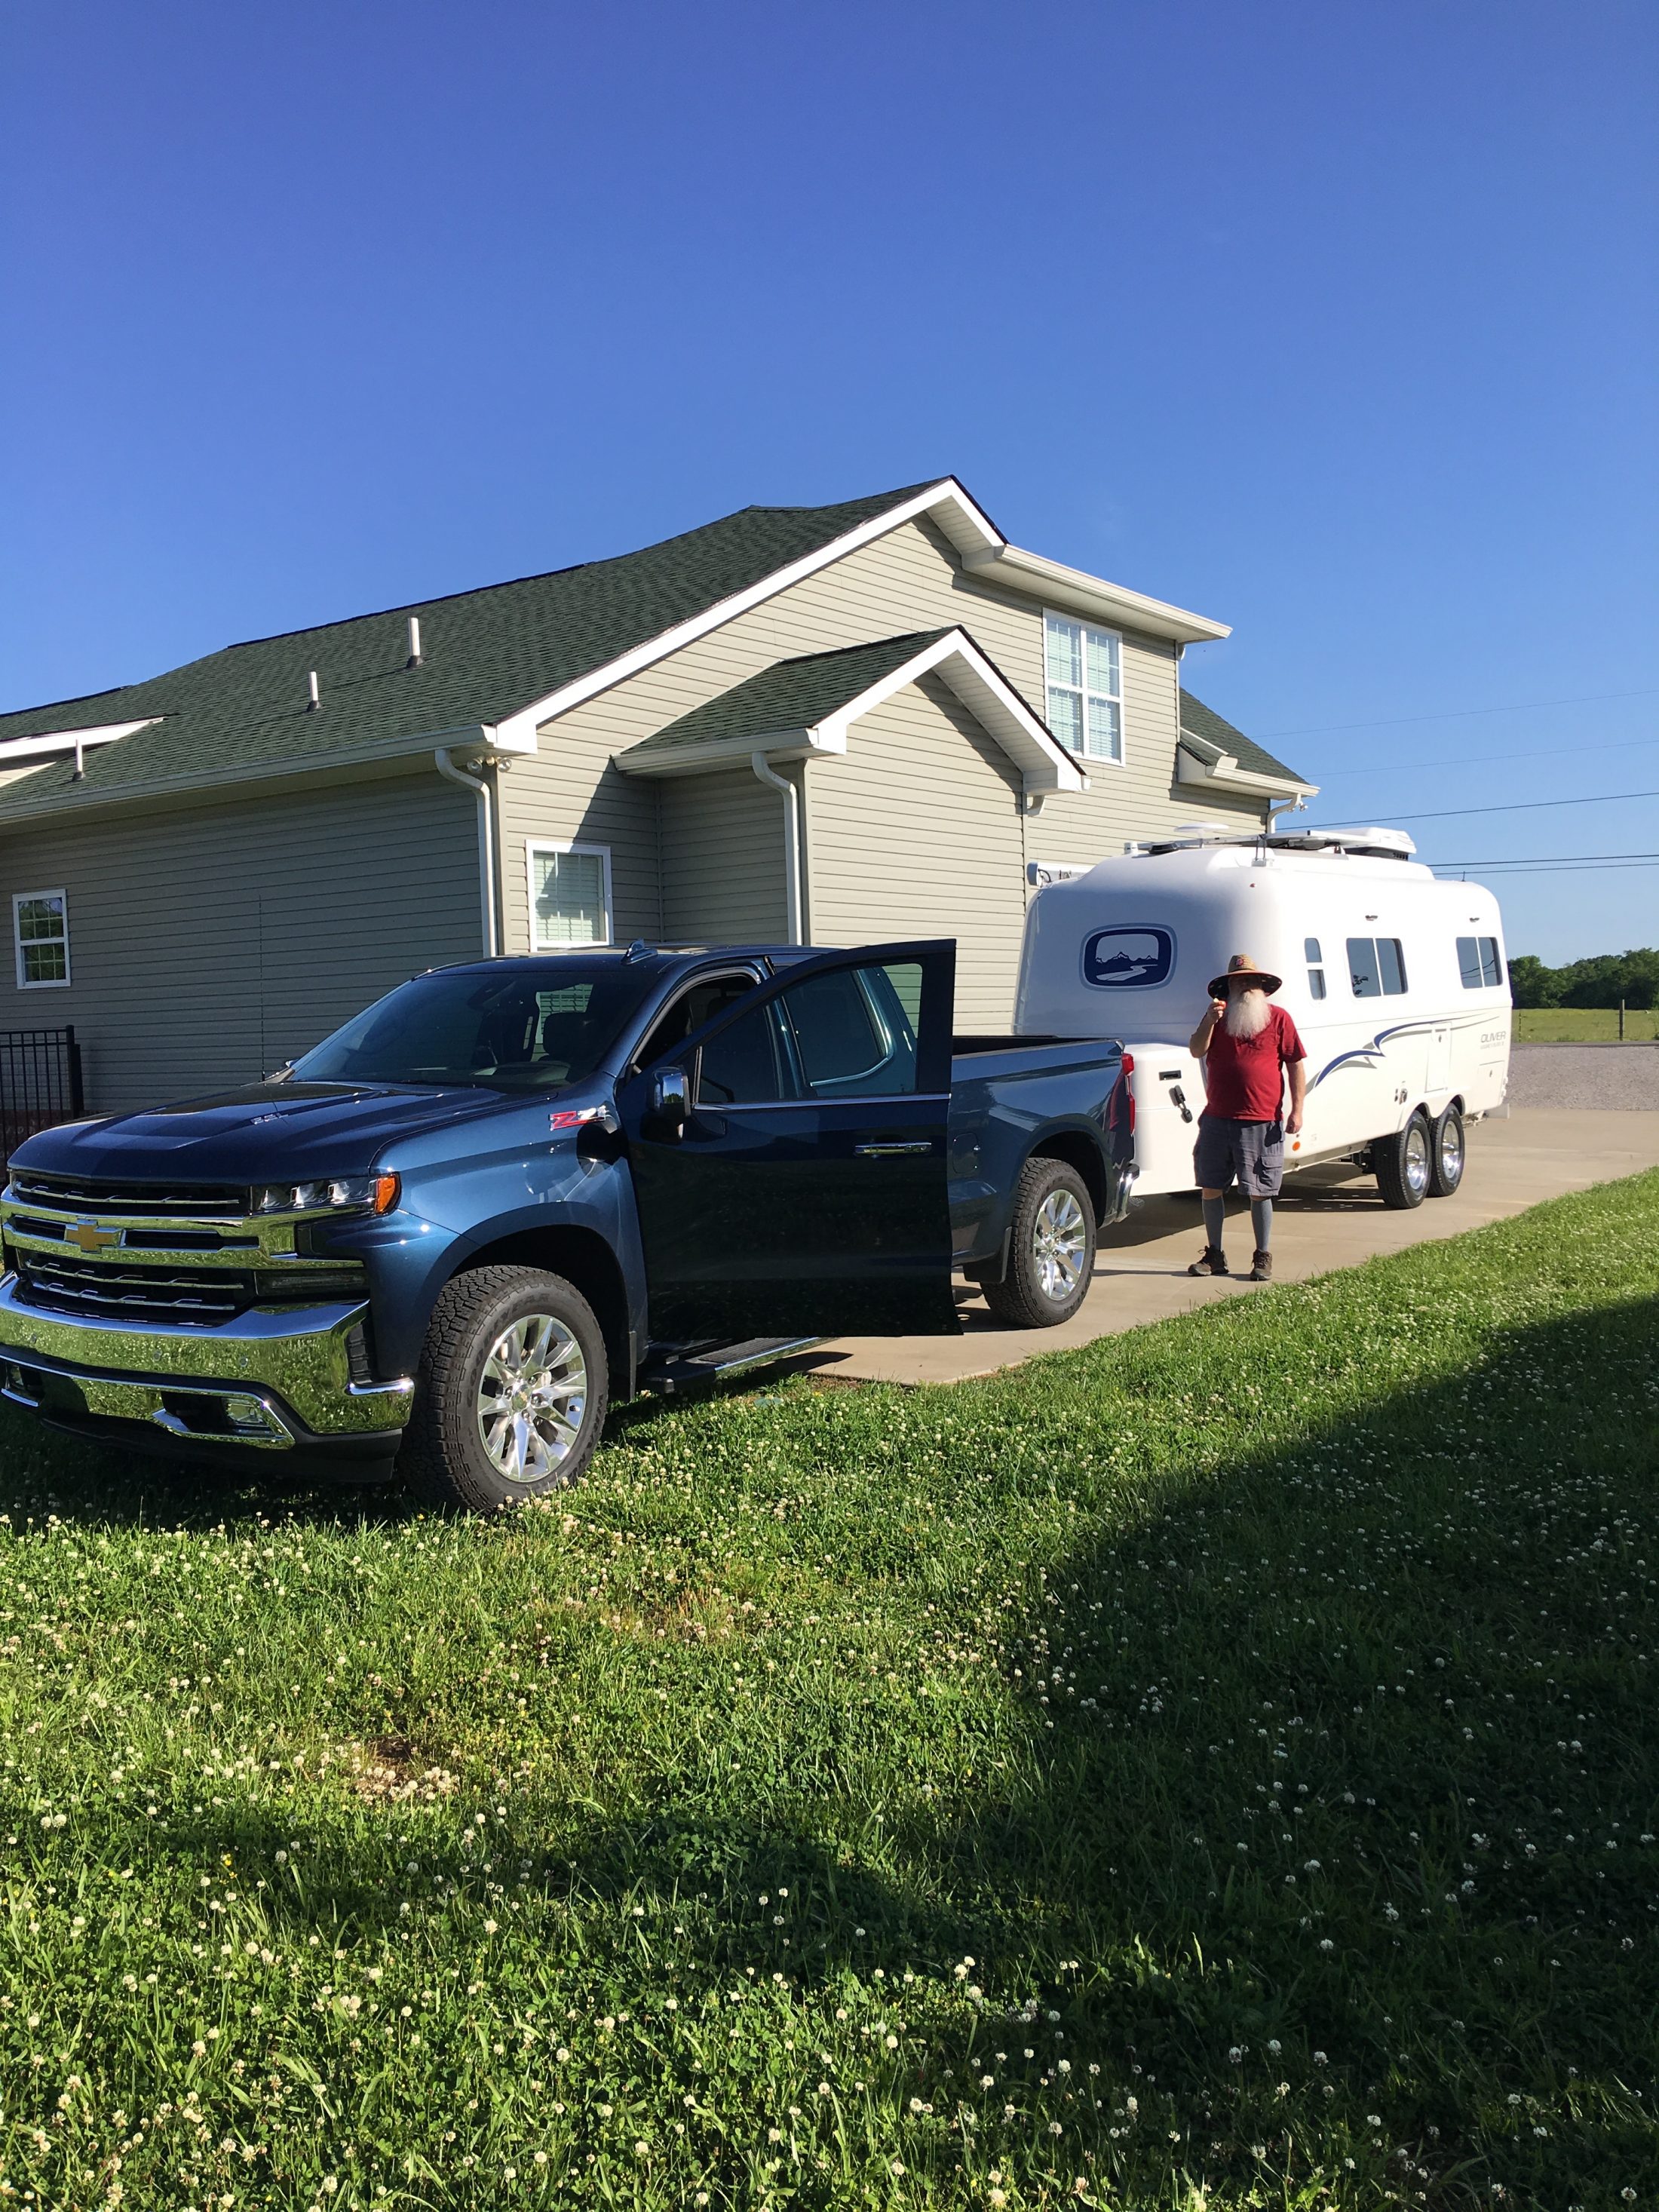
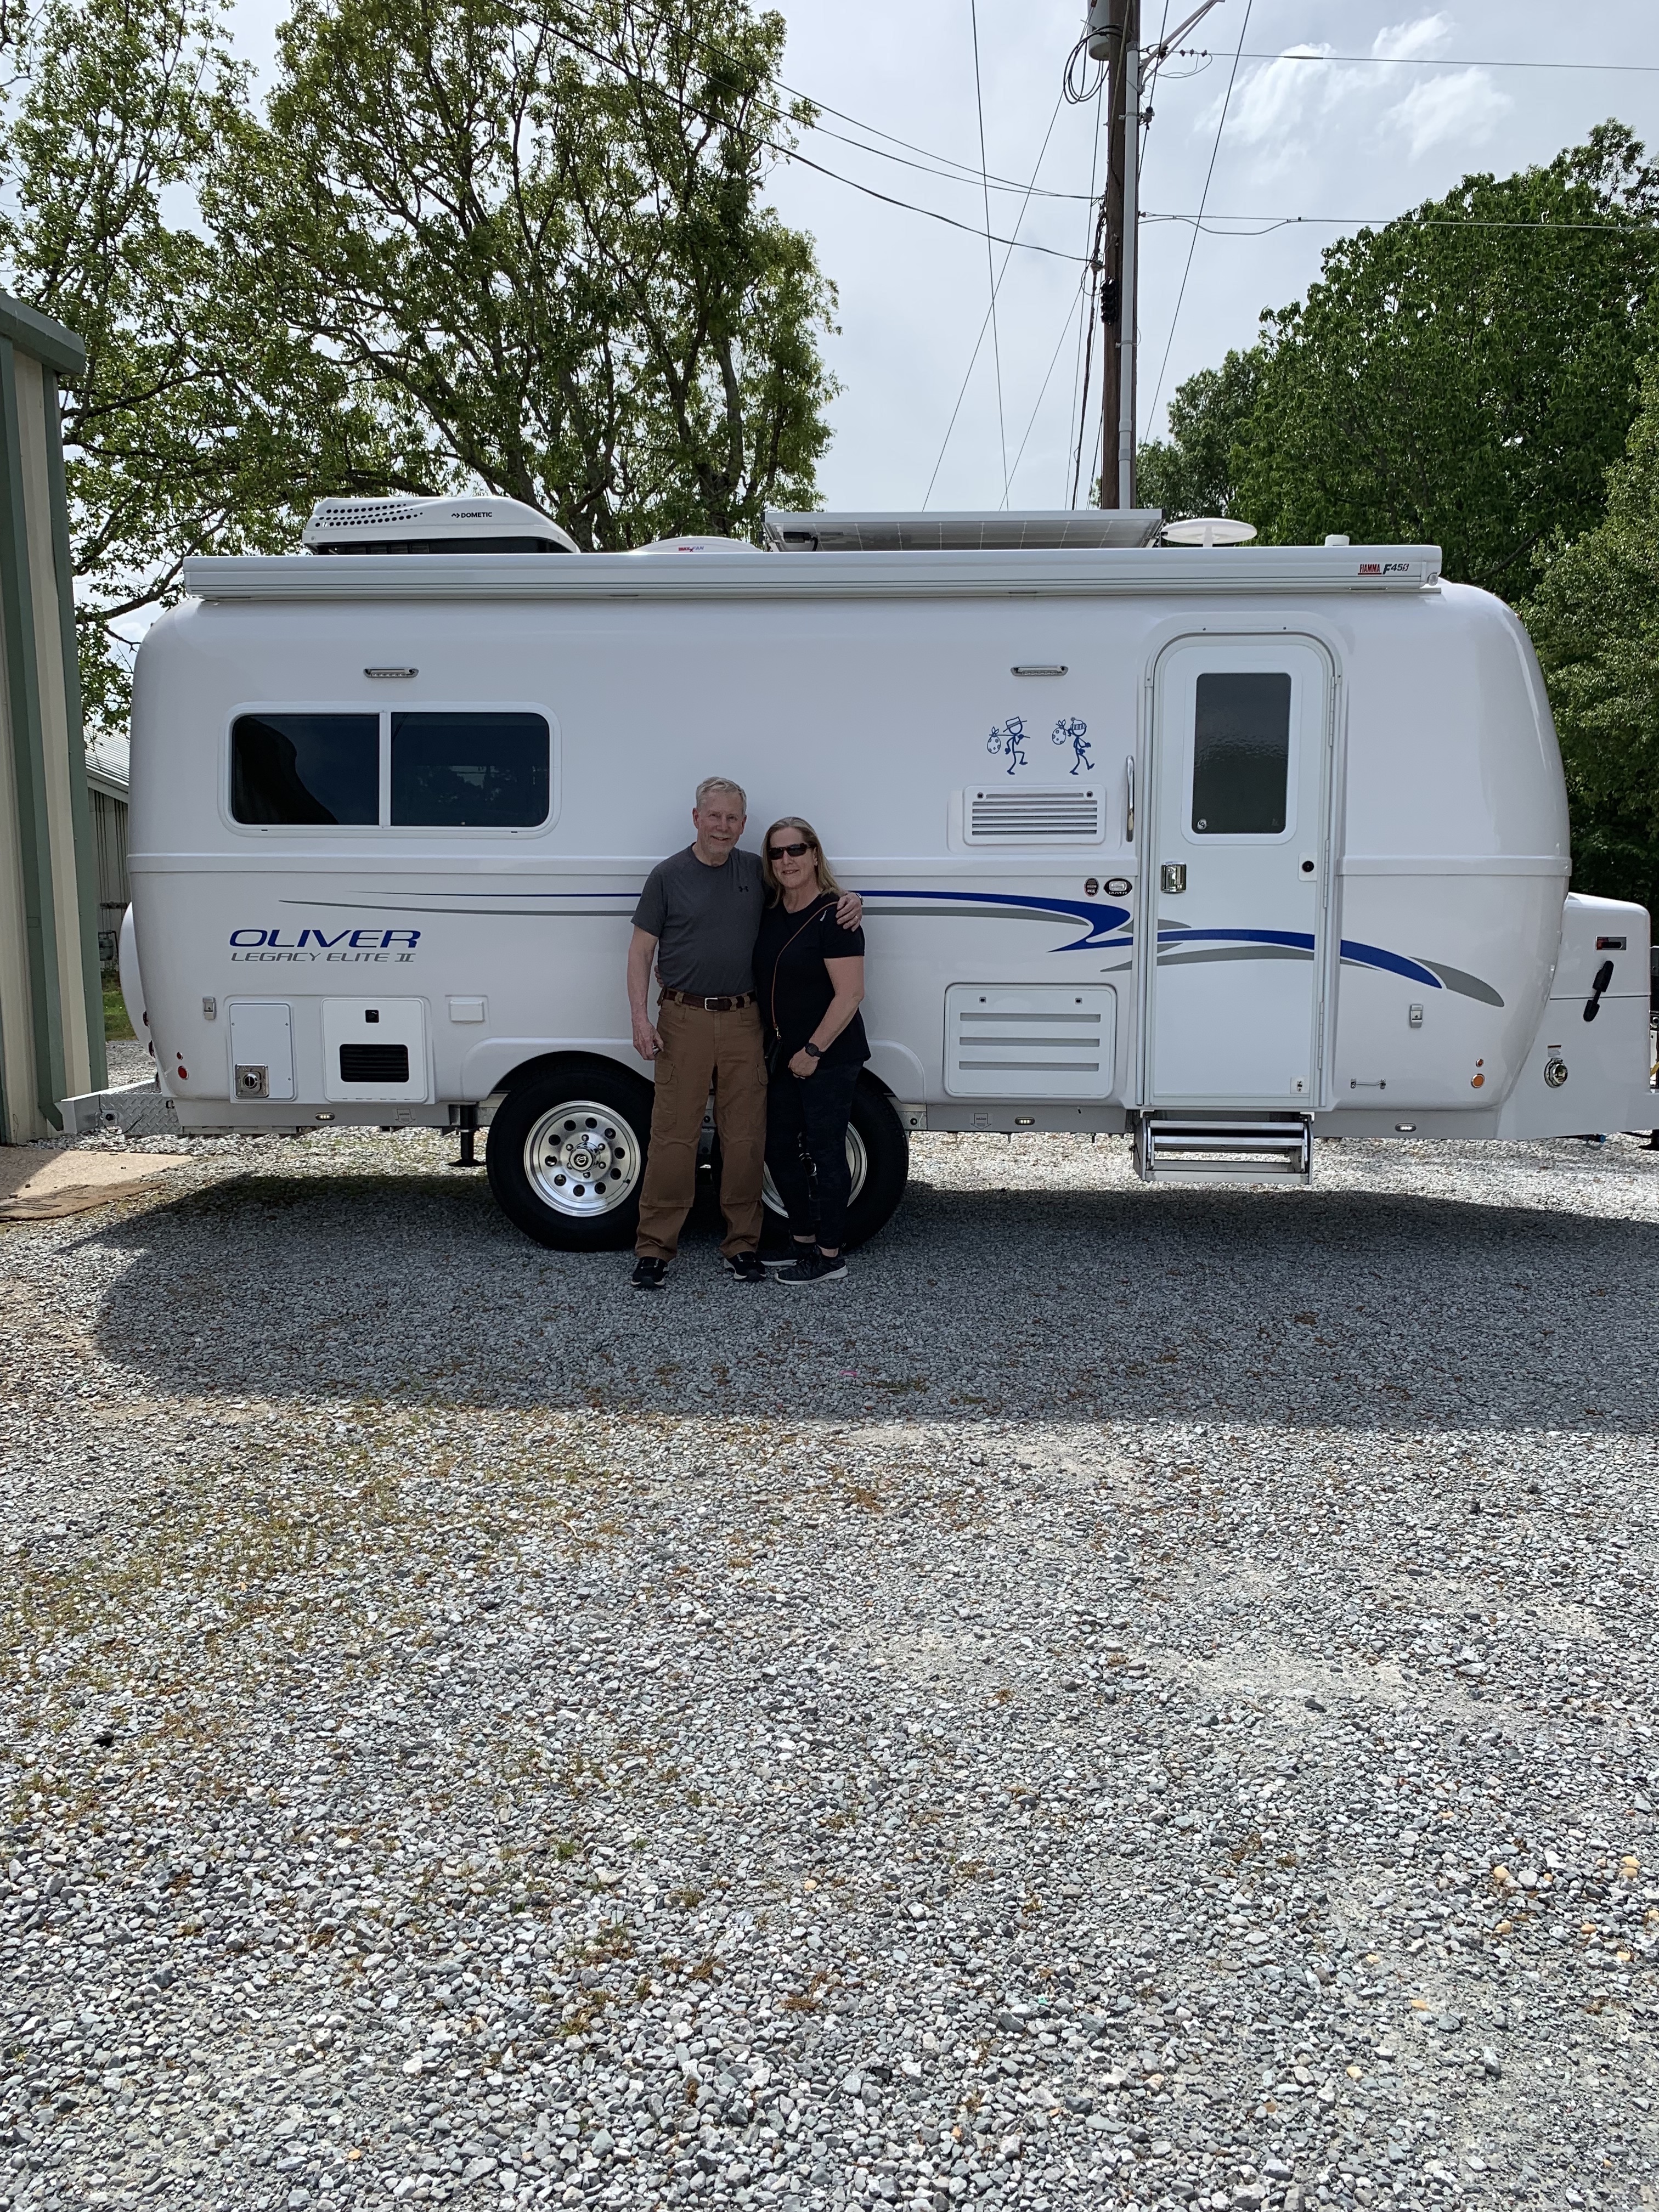
It's been a long wait but we finally picked up hull #414. It was produced in Dec and was in fact the last 2018 made. The delay was at our request due to the need for a hip replacement combined with winter weather; forcing us to wait till now to take advantage of our new home on wheels. Here are a couple of pics and we look beat but I think everyone does by the time they spend all day going over their units but it was well worth the wait. We camped at David Crockett State Park for three nights and then headed back to VA stopping in Christiansburg at a winery to spend the night, taking her home on Monday. Looking forward to seeing everyone at the rally and expect to learn a lot more while there. (Not sure why the one pic is turned sideways. It was that way when I imported it.) Can't find the rotate option either. Paul & Donna
1 point


-
Recent Achievements
-


")


")


")


