
Leaderboard




Popular Content
Showing content with the highest reputation on 06/23/2019 in all areas
-
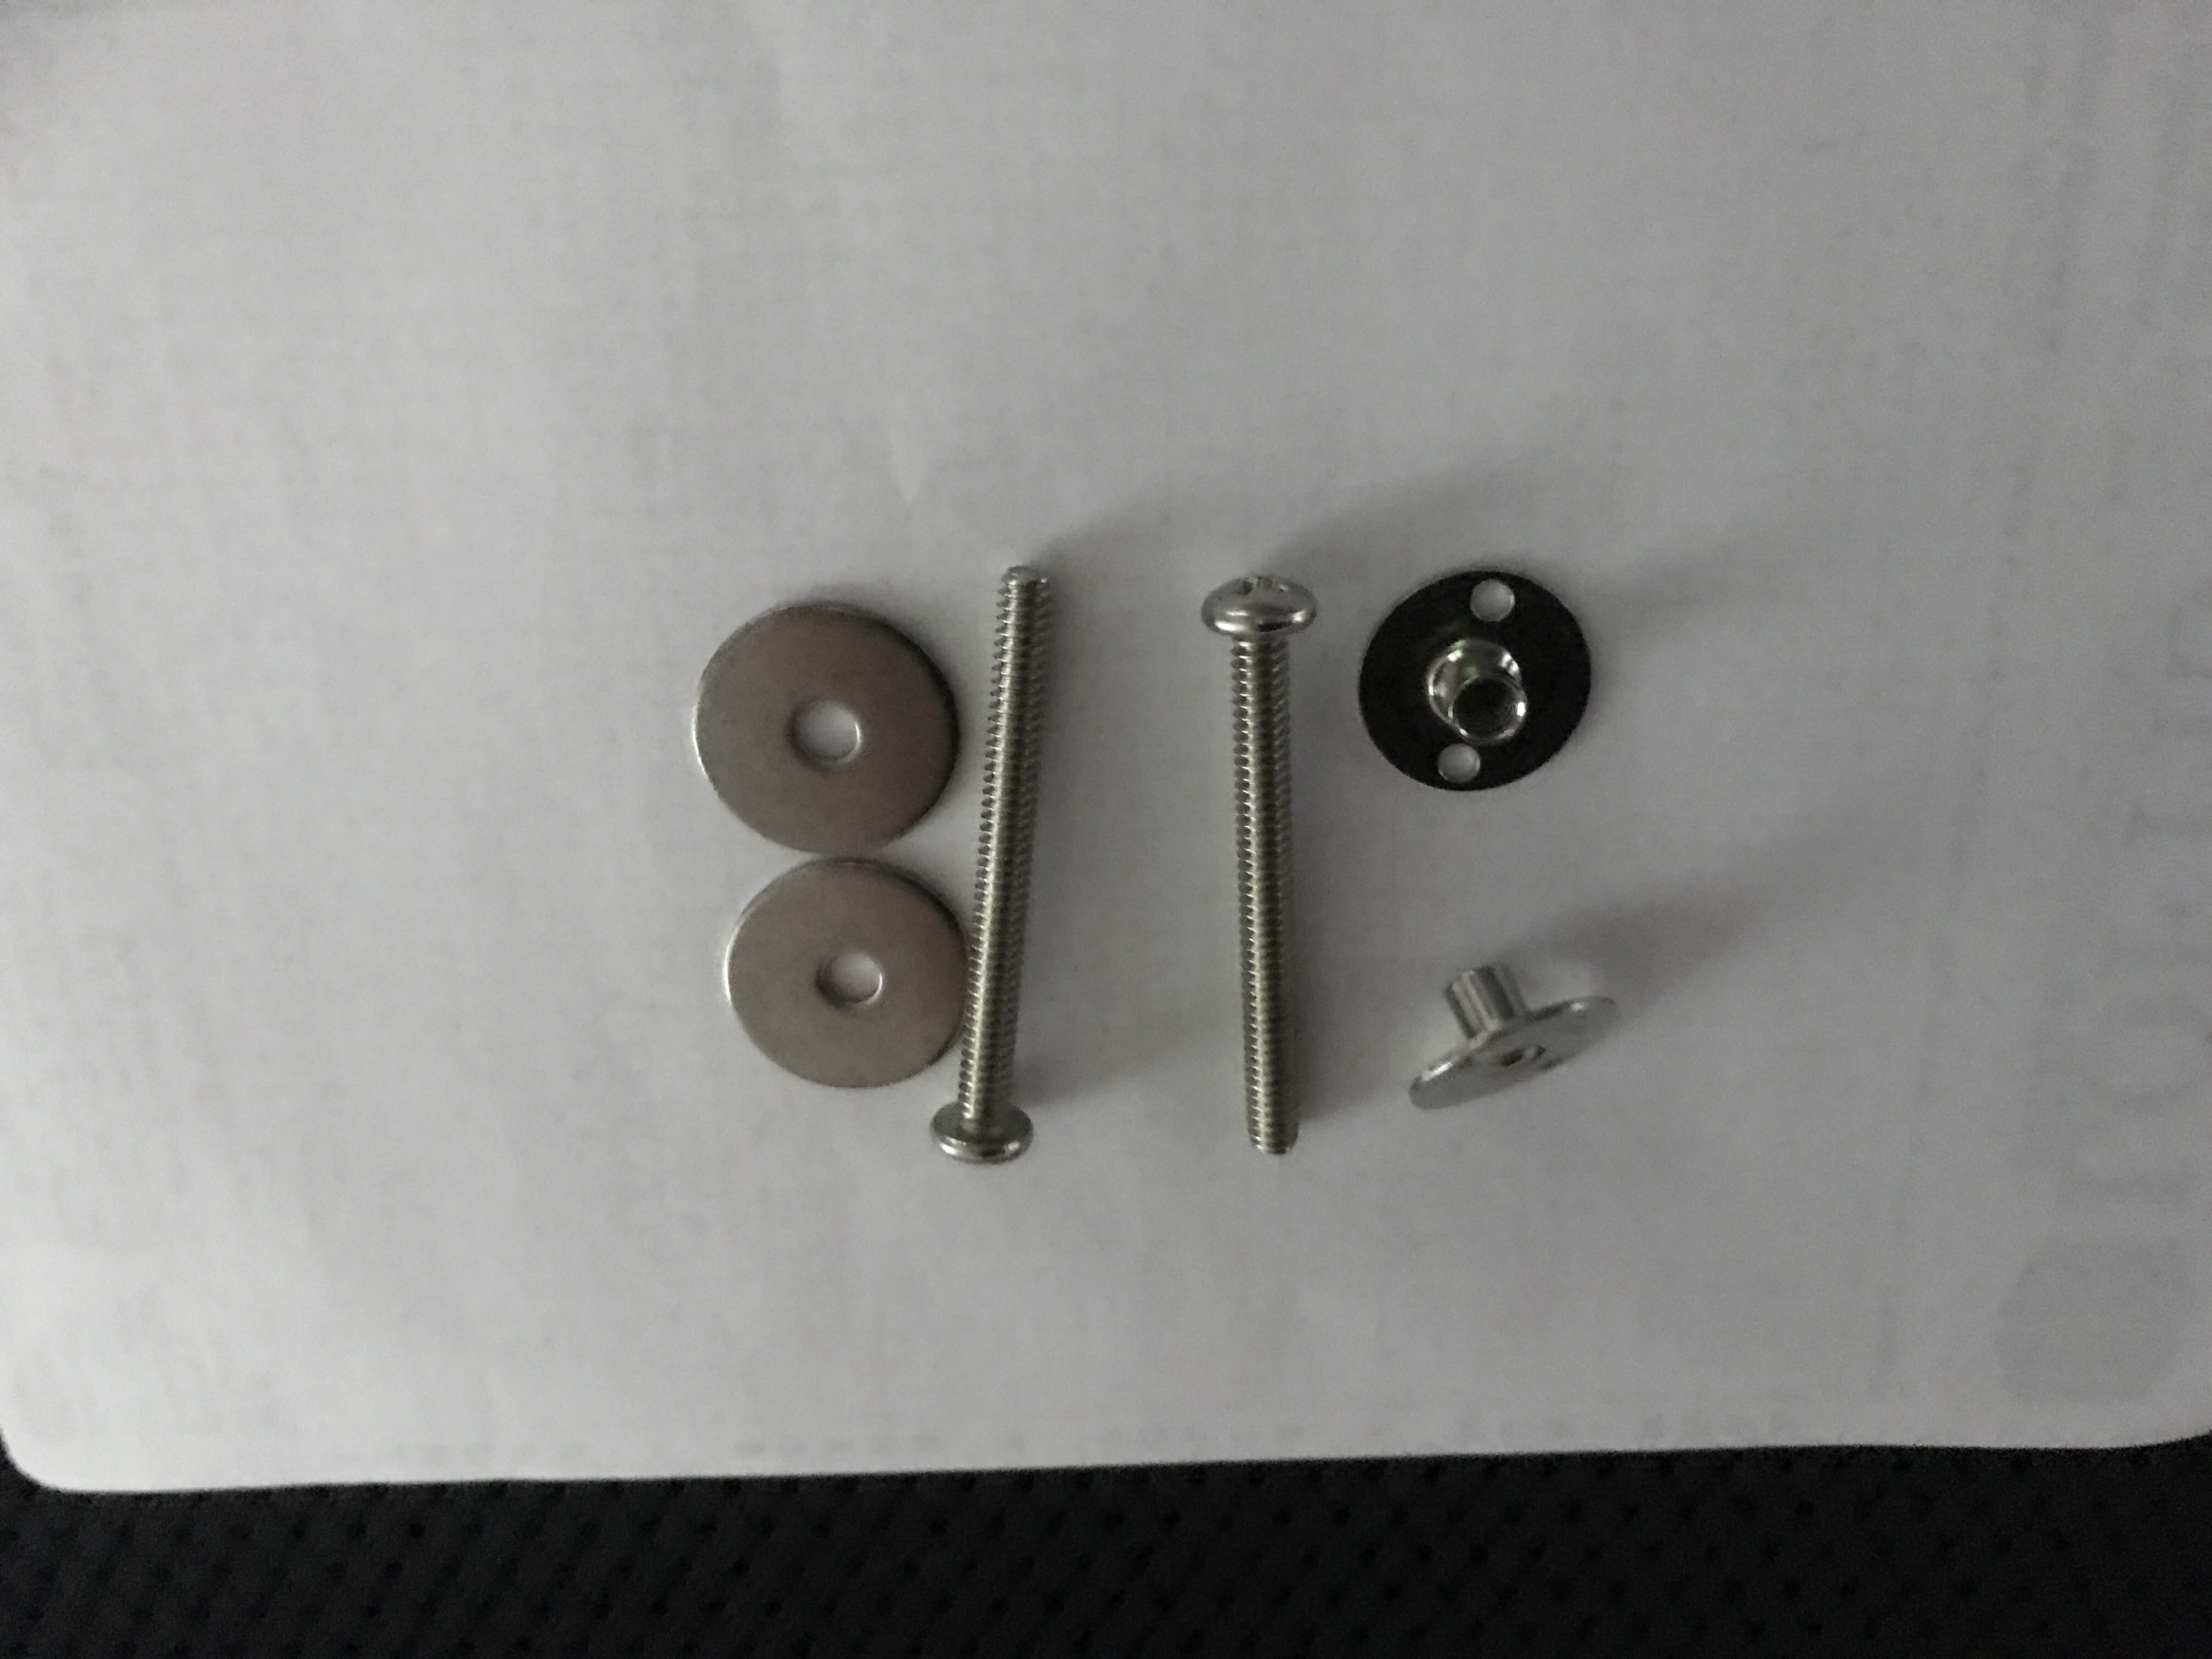
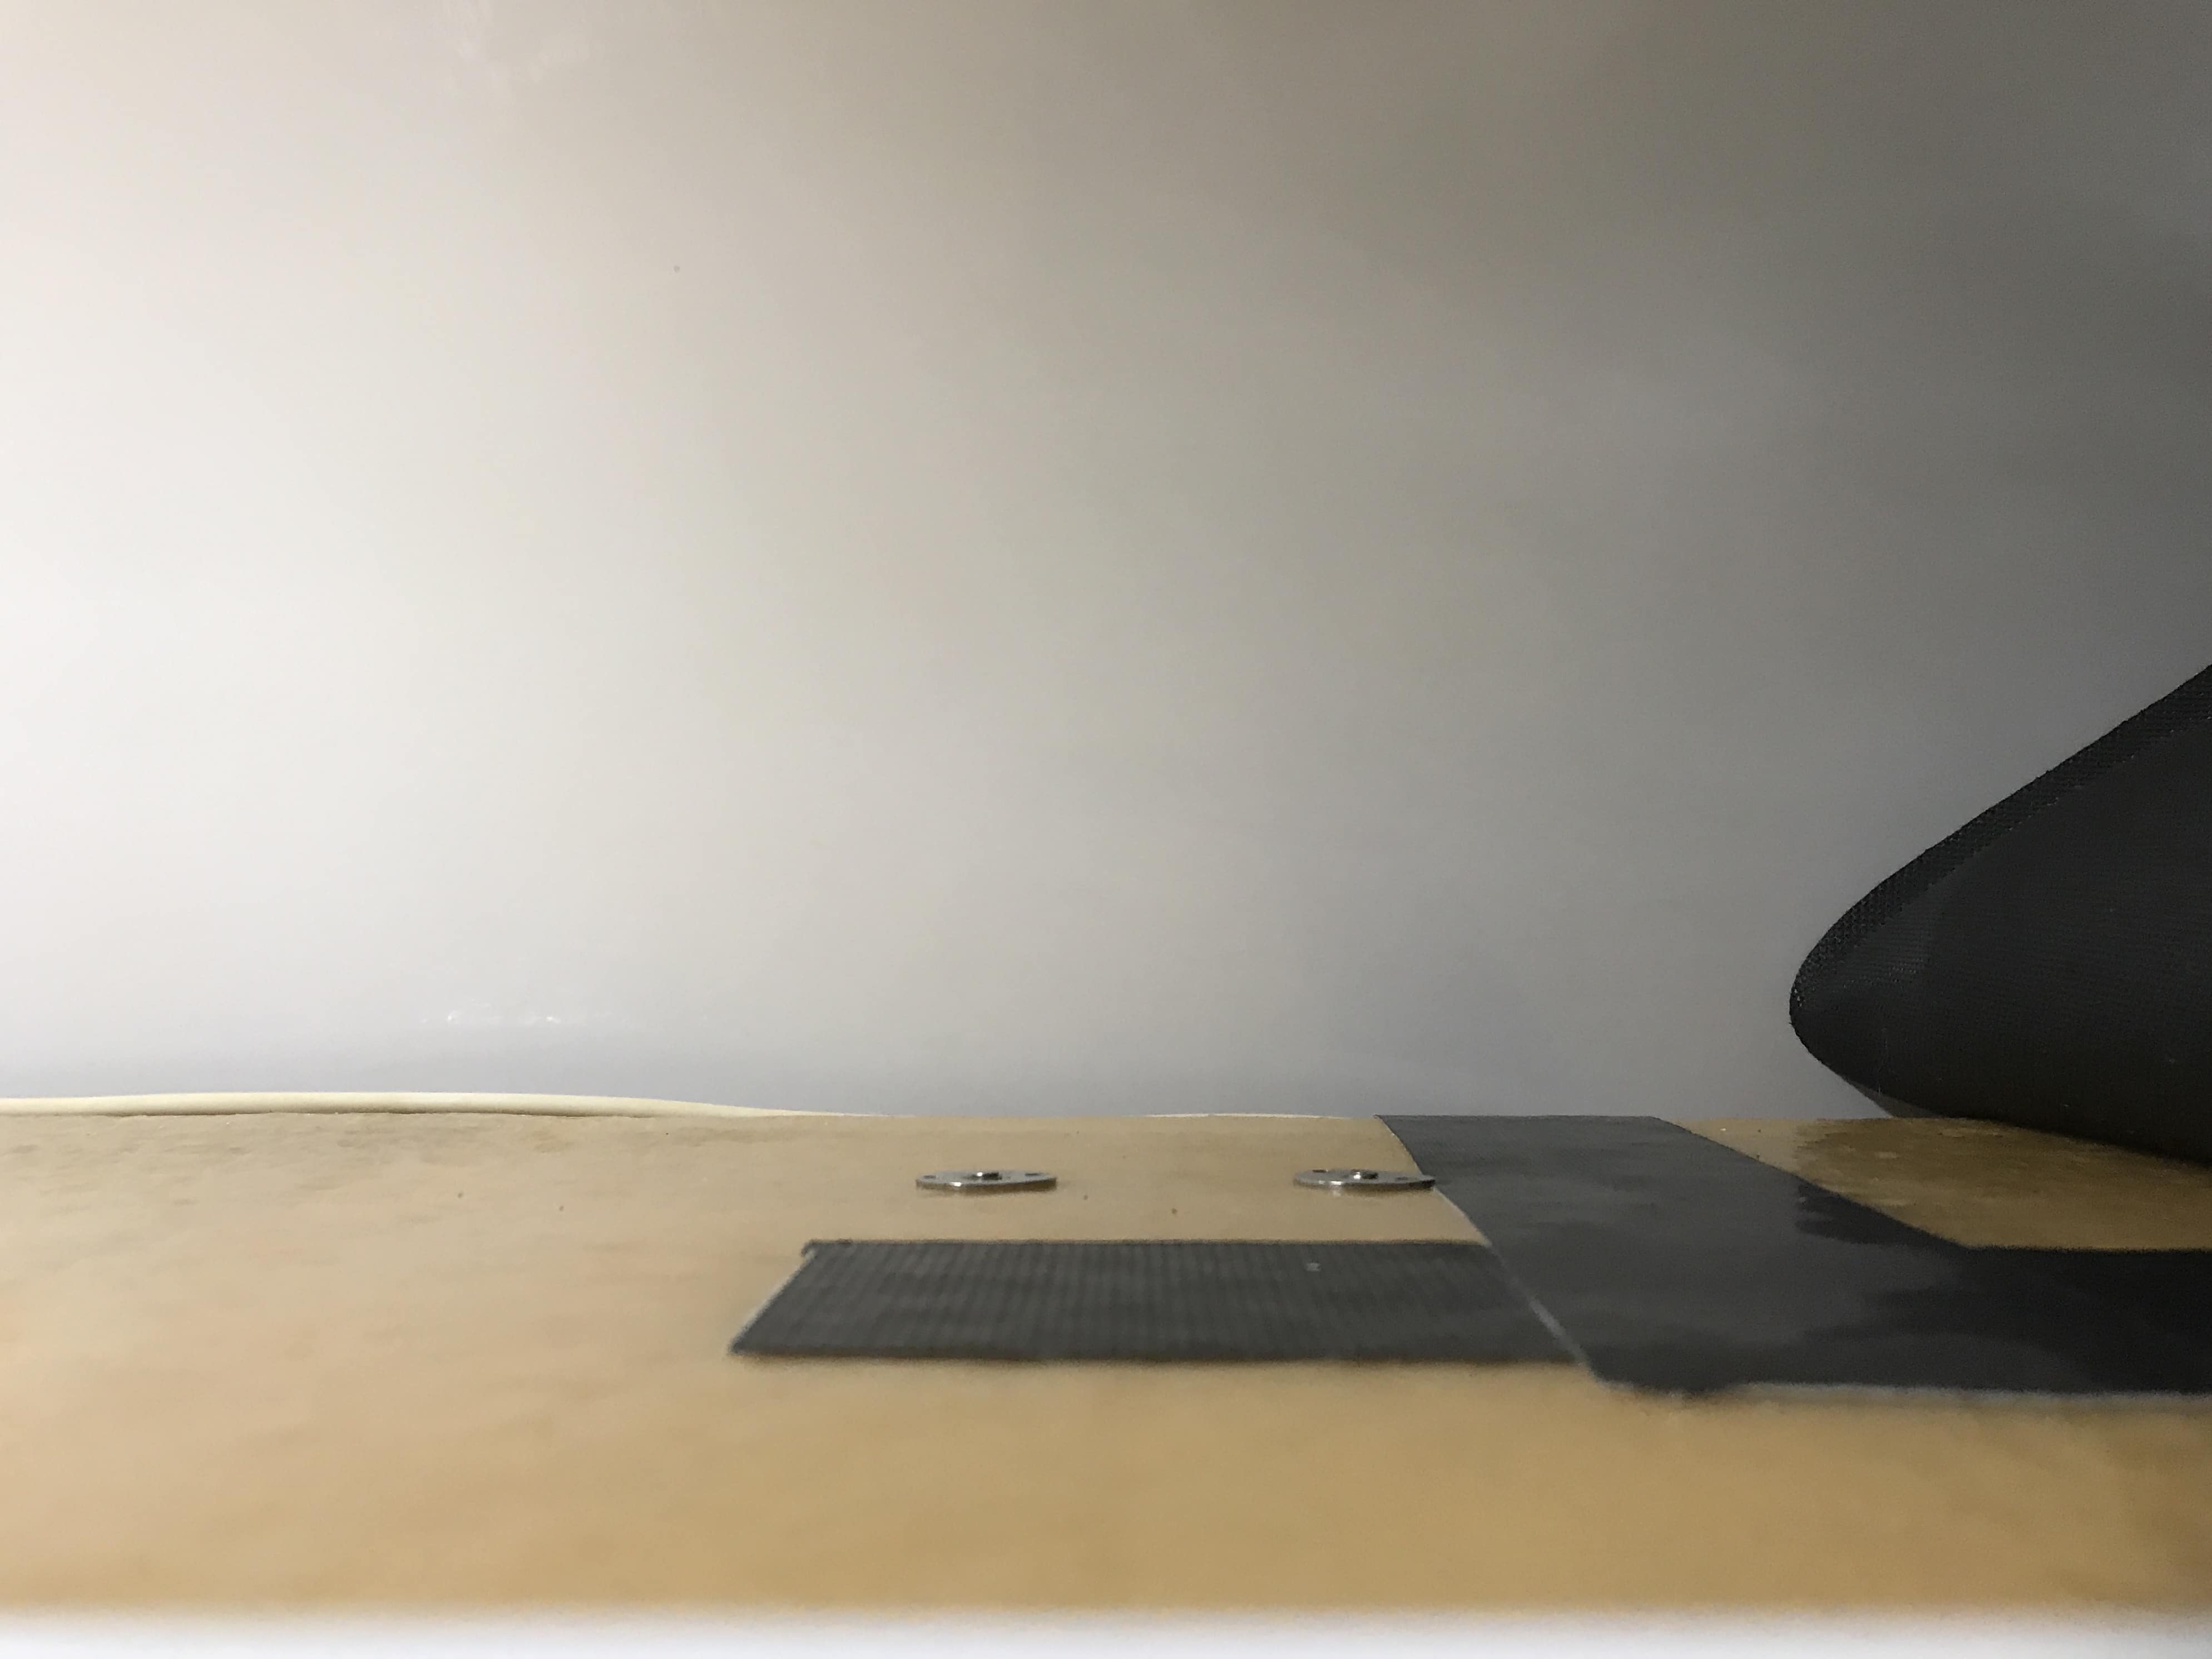
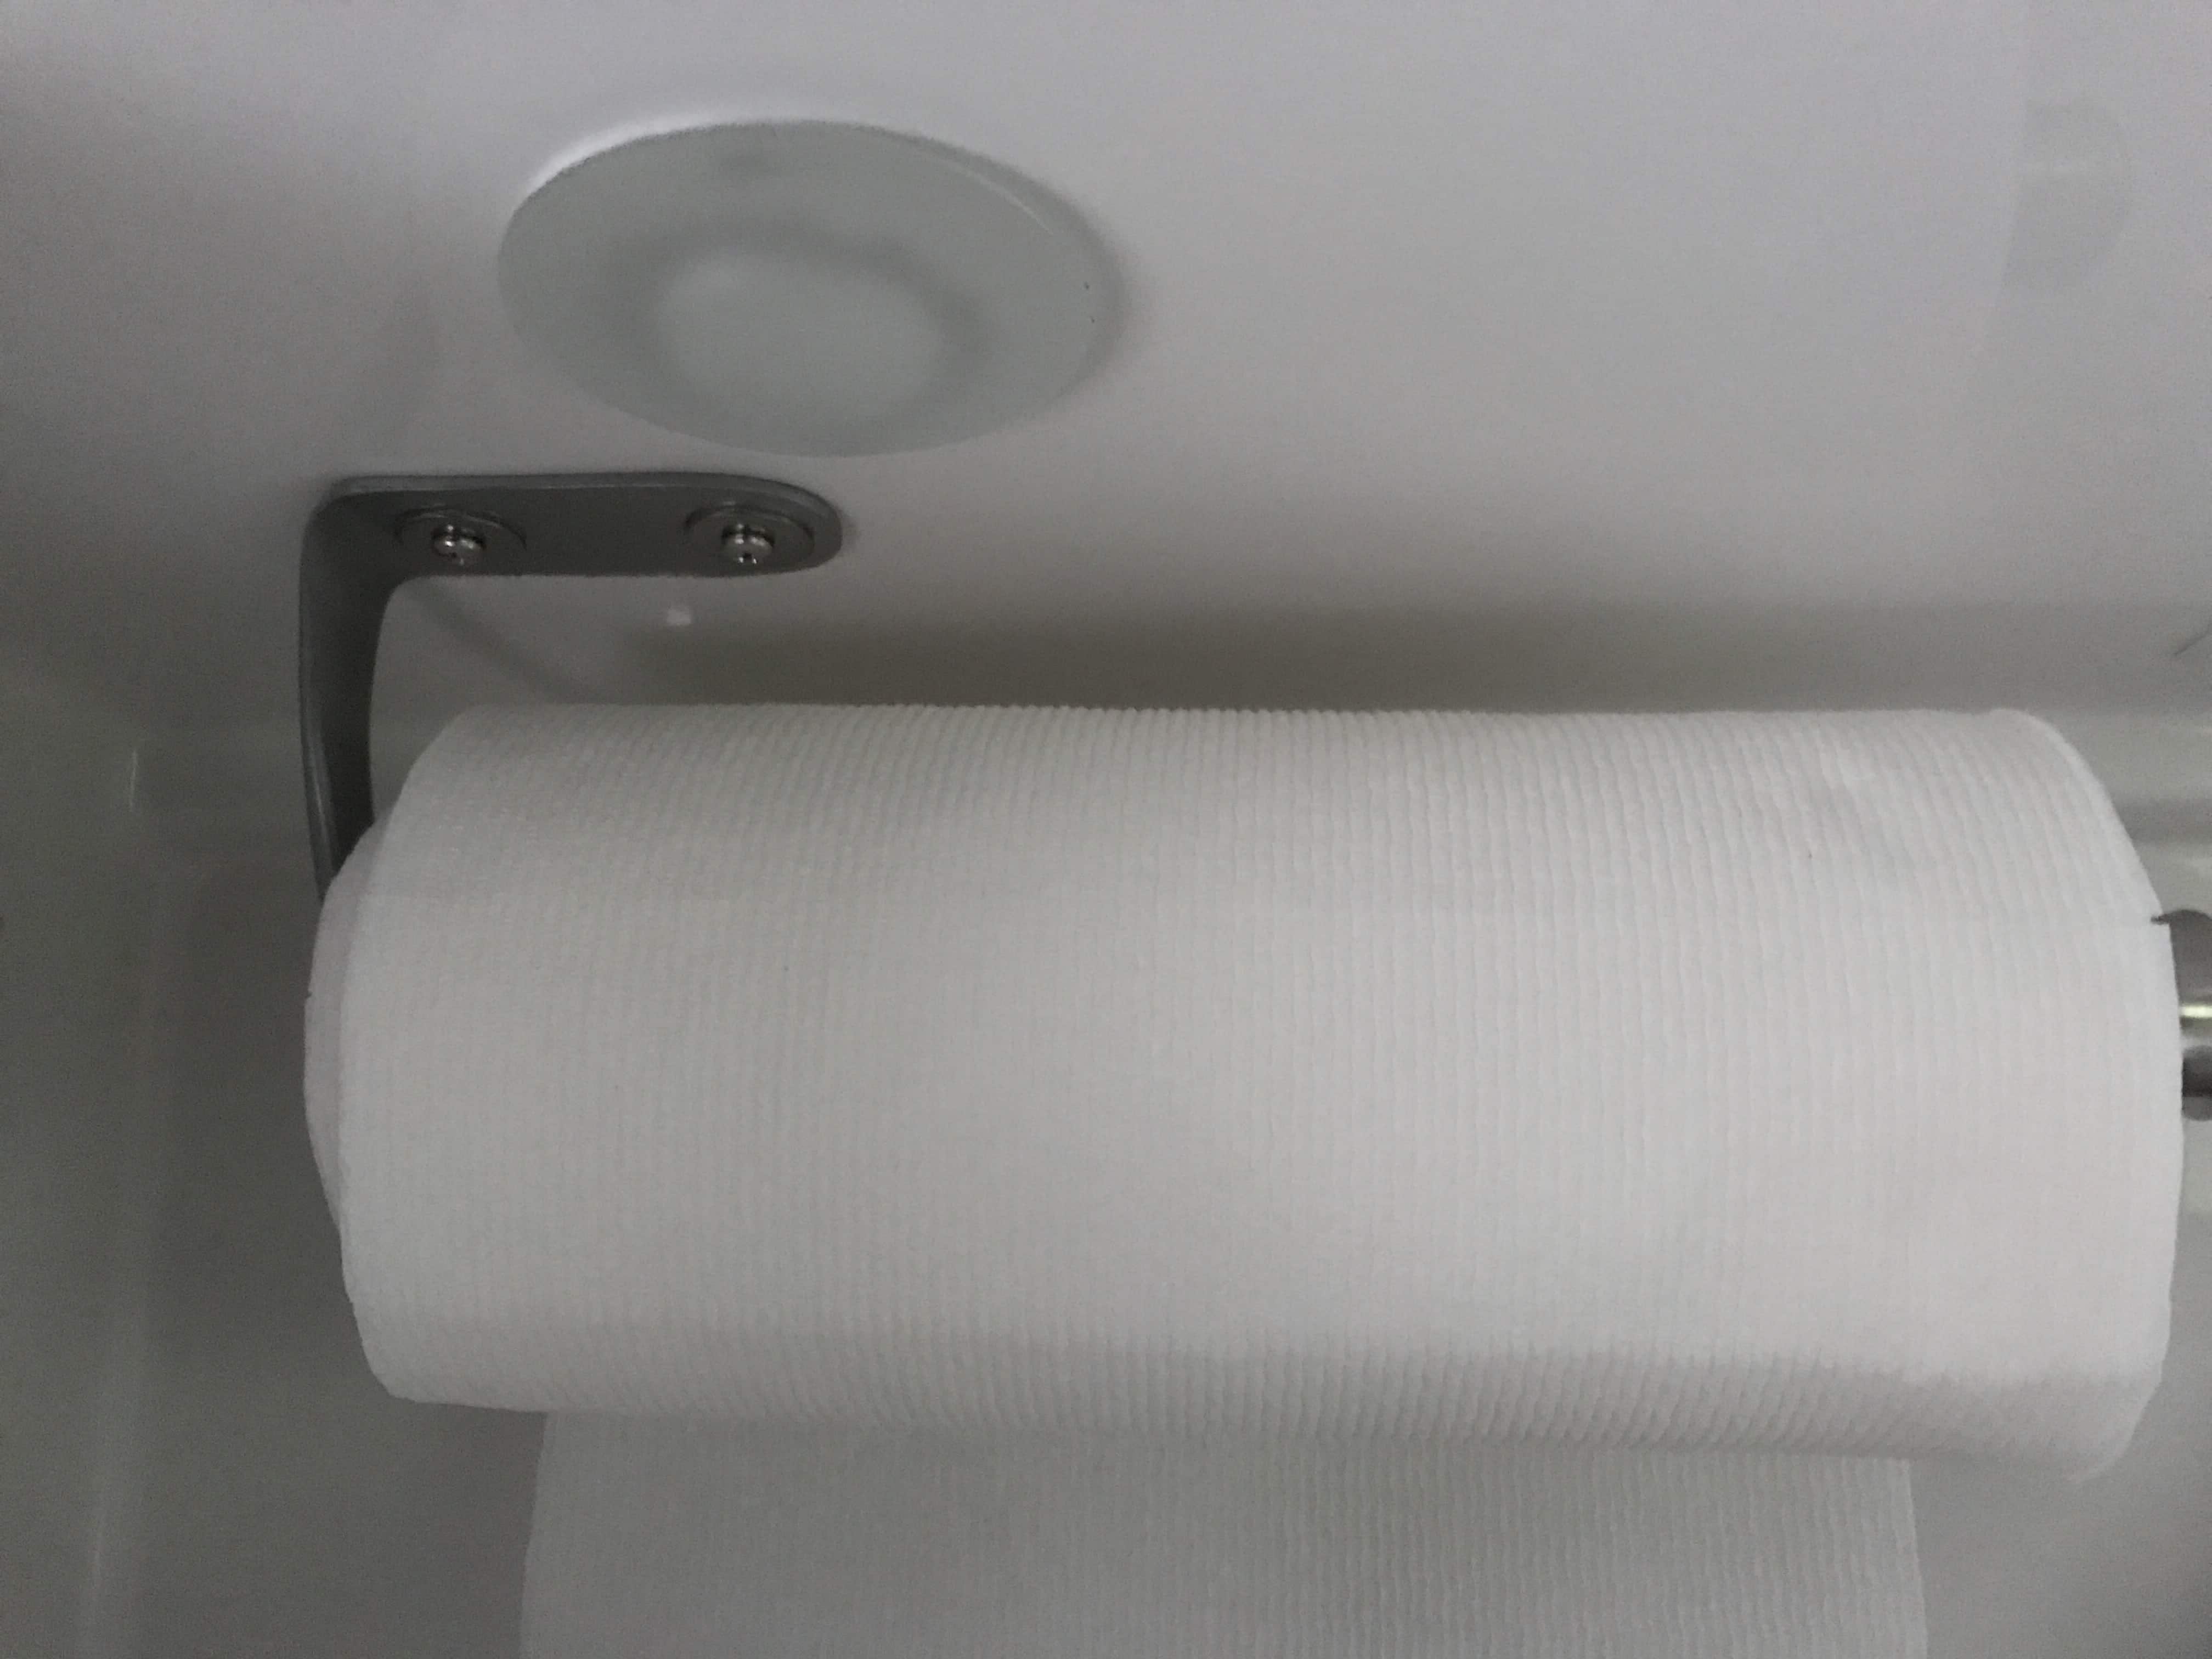
Paper Towel Holder Like many OTTO’s, I have had misgivings about drilling holes in our Ollie but I have slowly gotten over it. I have changed out my curb side porch lights and they required new mounting holes. Then I moved my television to the center position and as DavidS mentioned, that job was a big step in getting over the trepidation of drilling holes in fiberglass. So during our trip to the rally and Mississippi and Arkansas we camped without disconnecting the TV several times and since I had less to do setting up, I was often the first into the Ollie and I noticed paper towels unraveled and in the sink or on the floor. When I whined about it, Krunch said suck it up, it happens all the time. Little did I know living in the dark as I do. So the suction cup mounted paper towel holder had to go and I remembered Overland’s posting about the countertop extension and the subsequent postings about paper towel holders. Overland used this one and DavidS used this. I chose the Kamenstein because of DavidS's endorsement. It has a bottom that is pretty flat and it might work with VHB tape, but I was going to screw mount mine. There is a lot of good information in the forum about drilling fiberglass and using fasteners like this post. I have followed the advice of other OTTO's and I am using masking tape to mark my hole location and to minimize gelcoat damage. I mounted my new paper towel holder above the sink where the old suction cup mounted one was located. I started with an 1/8” pilot hole then used a countersink bit. Then used a 3/16” bit and the countersink bit again. And I finished with a 1/4” bit and the countersink bit again. Then I was off to the neighborhood Ace hardware store where I picked up 2- 2 1/2” #10 pan head bolts, 2-#10 fender washers and 2-#10 nylok nuts, all in stainless. And then I found the holy grail, stainless t-nuts. If those would work I wouldn’t need the nylok nuts, but I would need shorter bolts, so I picked up 2- 2" bolts. I was planning to use the pan head bolts inside the upper cabinets and the nylok nuts underneath the paper towel holder to reduce the rubber mat distortion inside the cabinet. With the t-nuts inside the cabinets there is barely a ripple. I did use the fender washers between the bolt head and the paper towel holder base to minimize the bolt penetration and thread lock on the bolts. Hope someone finds this useful. Mike
 5 points
 -
OLIVER FORUM GUIDELINES Welcome to the Oliver Forum, a great place for Oliver Travel Trailer owners and future owners to interact, share knowledge, solve problems, and most importantly, to develop friendships. Respectful and considerate responses help build this community. You’ll find a wealth of experiences here, and many owners willing to share their experiences. Have fun, but please keep others’ viewpoints in mind. Respectfully state your point, share your information, or ask your question. Keep it casual and friendly. Reread your post before you hit submit. Is it helpful? Thoughtful? Please try to stay on the original topic of the thread. Confusing the issue may cause the member’s original question to go unanswered. Start a new topic if you have a new question. It’s important for all members to have the environment and opportunity to contribute in a considerate manner, and to learn. Inflammatory and trolling comments shall be removed by a volunteer moderator. We encourage members to use the “REPORT” function (bottom right corner of each post) to help us, as we’re not reading every post, 24/7. If your post is removed, you’ll receive a PM about it. If there is a continuing problem, further action may be taken, up to and including your removal from the forum. Some inflammatory topics to avoid include religion and politics. We’re all about camping, and Oliver campers. Over the years, we’ve seen a few simple topics turn into heated debates. It’s natural to want to jump in, but honestly, it’s often better to let it go, and hit the report button, instead. We moderators are avid campers. Even as we write this, we are all out camping, some with limited bandwidth. We respond as quickly as we can, and the sooner we know, the better. Some have asked why our forum is linked to the Oliver website. Valid question. Since the beginning of our forum in 2008, Oliver Travel Trailers (OTT) has paid for our Oliver “sandbox”, including our web space and an administrator who knows way more than we do about maintaining the software, for which we are very grateful. OTT DOES NOT CENSOR OR INTERFERE with the moderators’ management of the forum content. Moderators are not employees of OTT. We are Ollie owners, and receive no remuneration. OTT does have a employee designated to read the forum for the purpose of improving the “Ollie Experience” for all, but that’s a few minutes a day in a busy job description. If you should ever have an issue or a warranty claim, call tech support. Your post might not be seen on the forum by an Oliver employee. With that in mind, we moderators ask you to communicate directly with the company and afford them an opportunity to satisfy any serious needs before flaming OTT on the forum. We are not asking that anything to be swept under the rug. Just, please, let Oliver Travel Trailers have the first shot to meet and exceed your expectations. Sometimes, communications here may be misinterpreted, because the written word just doesn’t carry the visual clues of face to face conversations. Should you believe a post is a little ill-mannered, consider the poster might be trying to be helpful, but isn’t able to put his or her words together the way you might. Forums work best when our skin tends to be a bit on the thicker side. Remember as well, whatever you post will likely be permanent, and picked up by automated internet software programs. Though this is our forum, it’s still on the world wide web. Our words may very well outlive us. Please, be especially patient with newbies. Our search feature is still being tweaked, and they may not have found an answer by simply using “Search”. You may remember your own newbie questions . . . of many years ago. If you have already answered the same newbie question as many times as you care to, relax and allow someone else to step up and reply. Help foster a community of teachers. We recommend all phone numbers and email addresses be sent in private messages and NOT posted. If you must post personal data, we suggest you post in a manner so trolling automated internet programs will not grab your personal information and use it nefariously. For instance, a phone number might be “8ThreeZero, 5one5, 9 2 eight seven”, or for an email address, something like “Bill DOT Fisher at flyboy DOT com”. Please reread this, and help us continue to make our forum a great place for everyone. We hope you enjoy our forum. Thank you, bugeyedriver, SeaDawg, ScubaRx, Mike and Carol, topgun2 , Mossemi Oliver Owner Moderator Team1 point
-
You probably could not find a better Oliver than John's. I have no doubt it was meticulously and thoughtfully maintained. It is the layout you want, and the price is REALLY good. I'd be on the phone to John ASAP, it won't be around long. Dave1 point
-
I passed on the front tongue basket upon our ordered unit, I may go with a tongue toolbox which I can keep the trailer setup stuff in as the side compartment on the trailer is not that user friendly for quick to get to items. I just need to look at the trailer tongue area and see how I can manufacture brackets that will fit over the fiberglass front panel, I'd rather not cut the fiberglass panel if possible. https://www.northerntool.com/shop/tools/product_200620947_200620947 I've seen this box on sale for $219.00, I've checked them out in the store and all seems to be done nicely, plus it does match the rear bumper somewhat. trainman1 point
-
Welcome! Check the classifieds, Raspy has your trailer.1 point
-
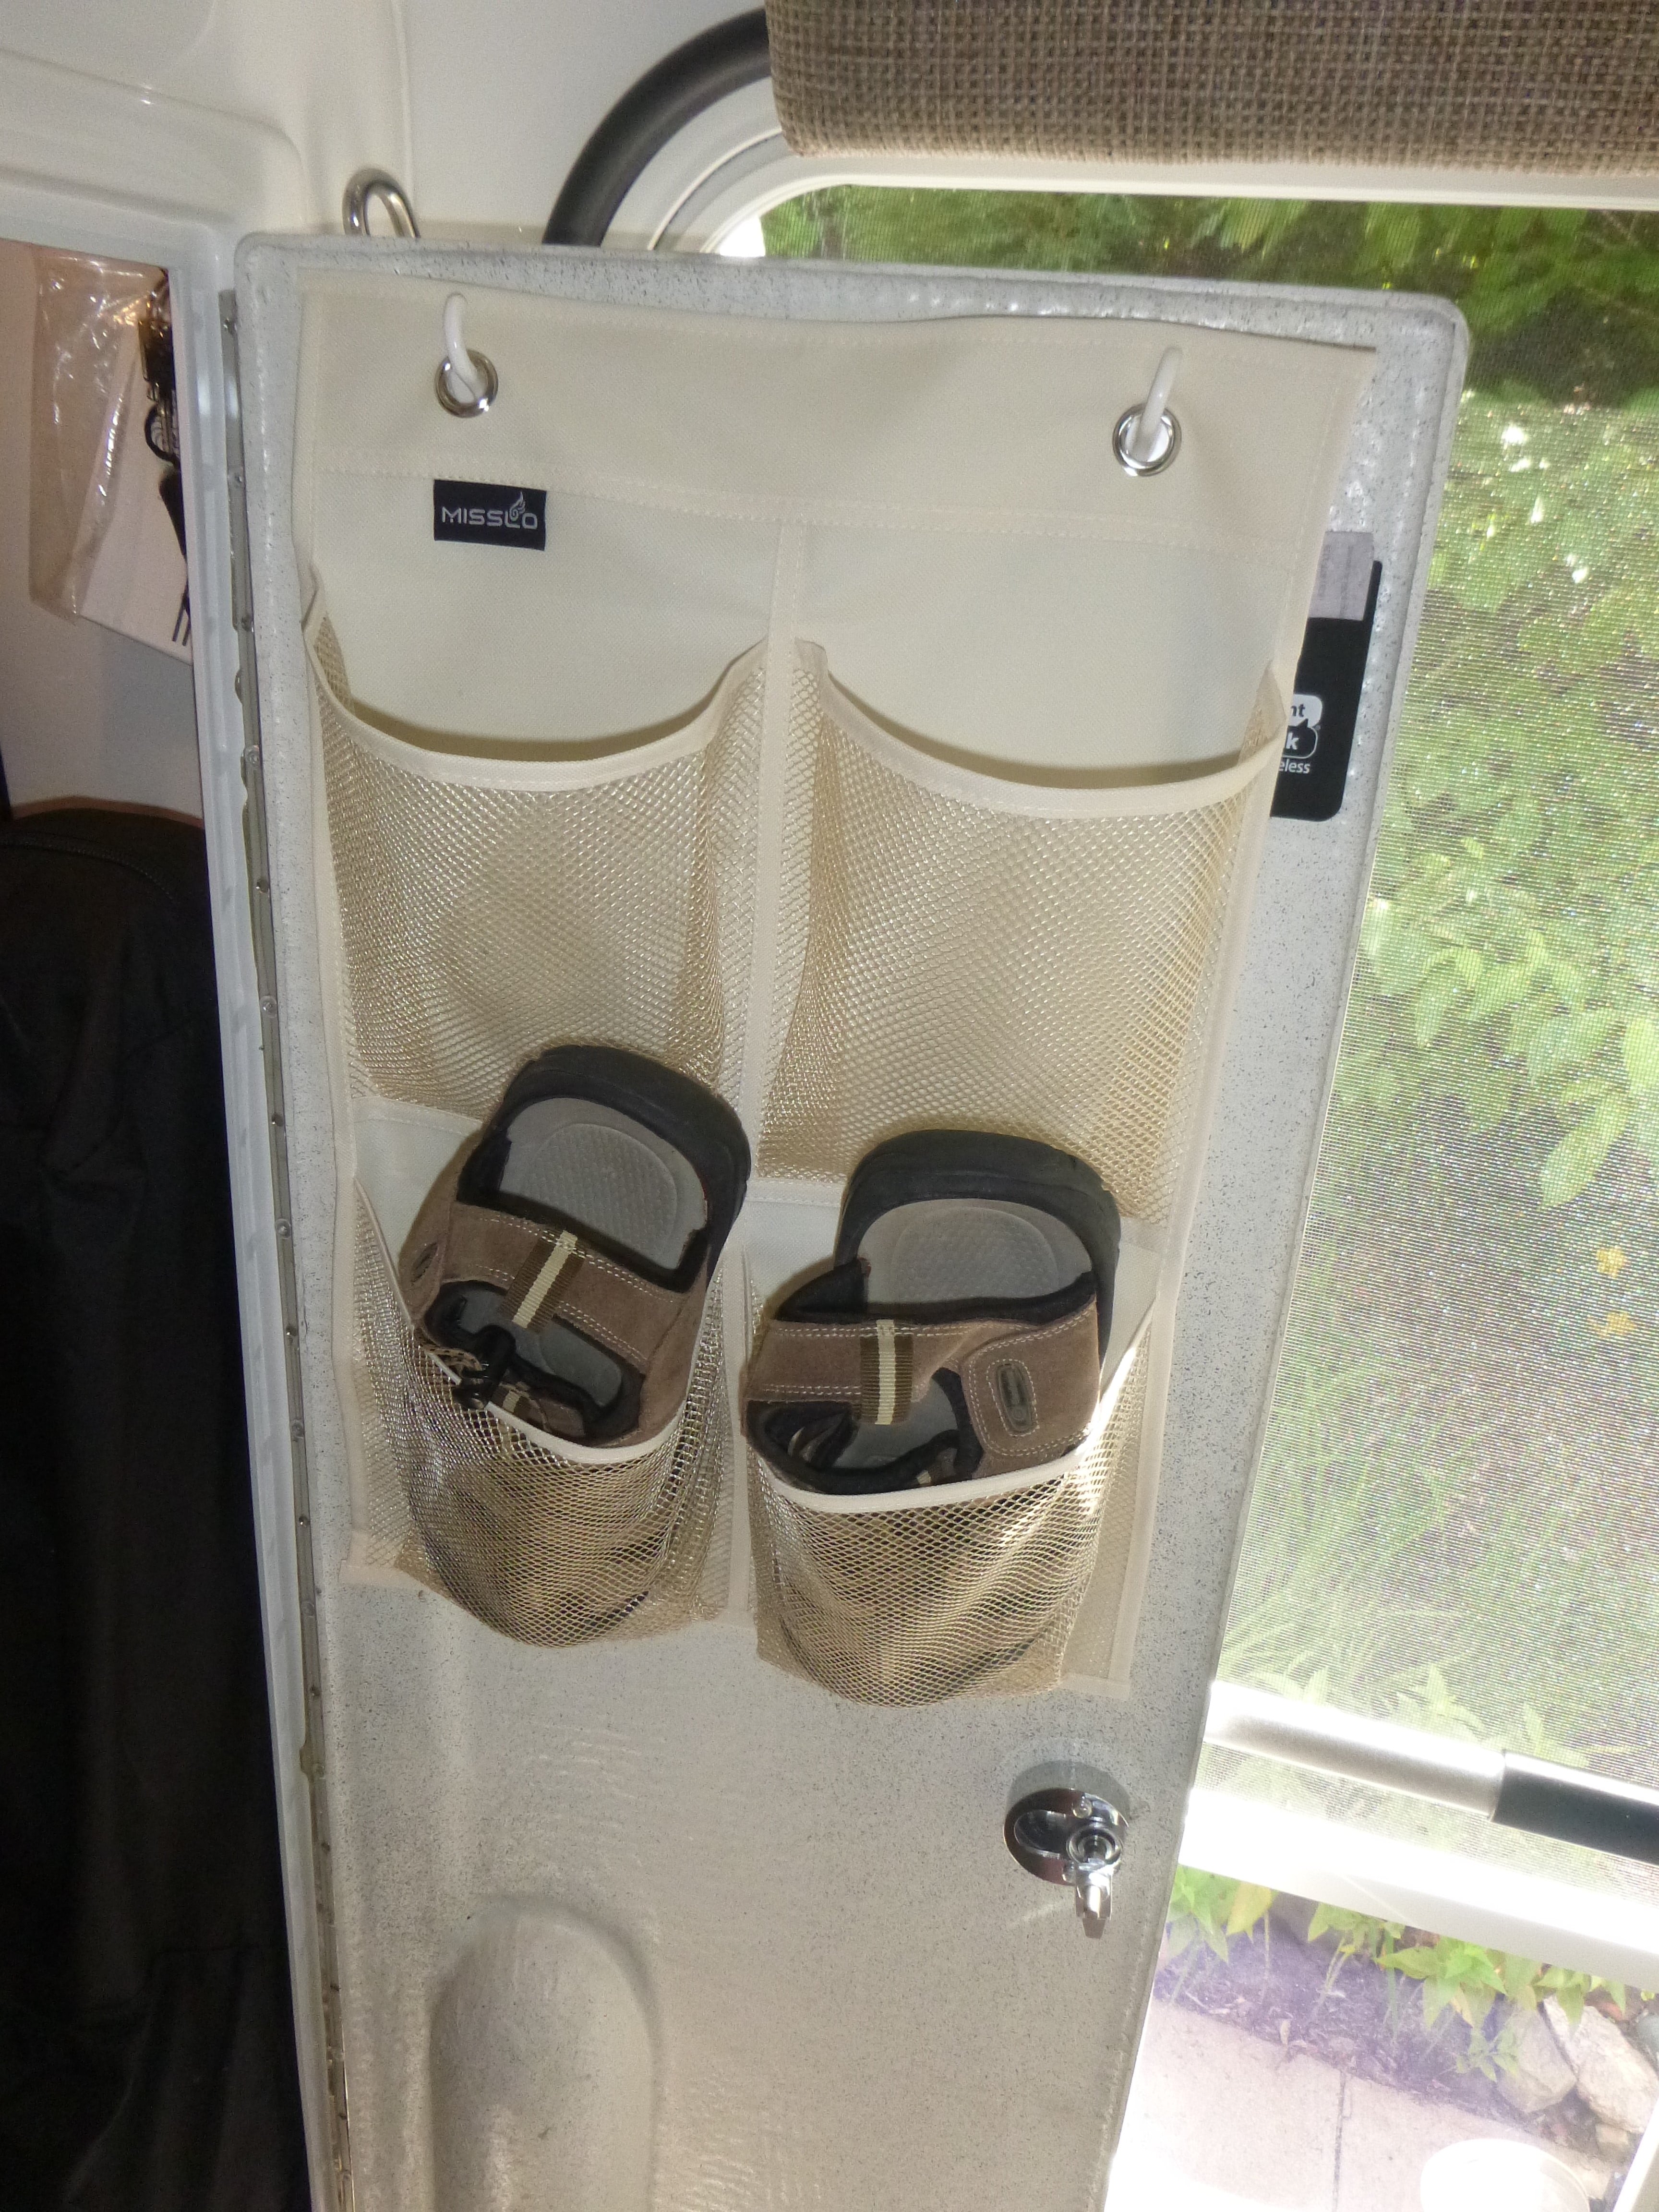
As promised, here is a picture of the closet shoe rack. If you decide to do this mod, be a bit careful to not interfere with the door latch and if your shoes are as big as mine ((or bigger), mine are size 11)) make sure that the shoes do not get caught in the door when it is shut - particularly at the top. Bill p.s. Note that the little black envelope at the upper right behind the shoe rack holds "business cards".
1 point
-
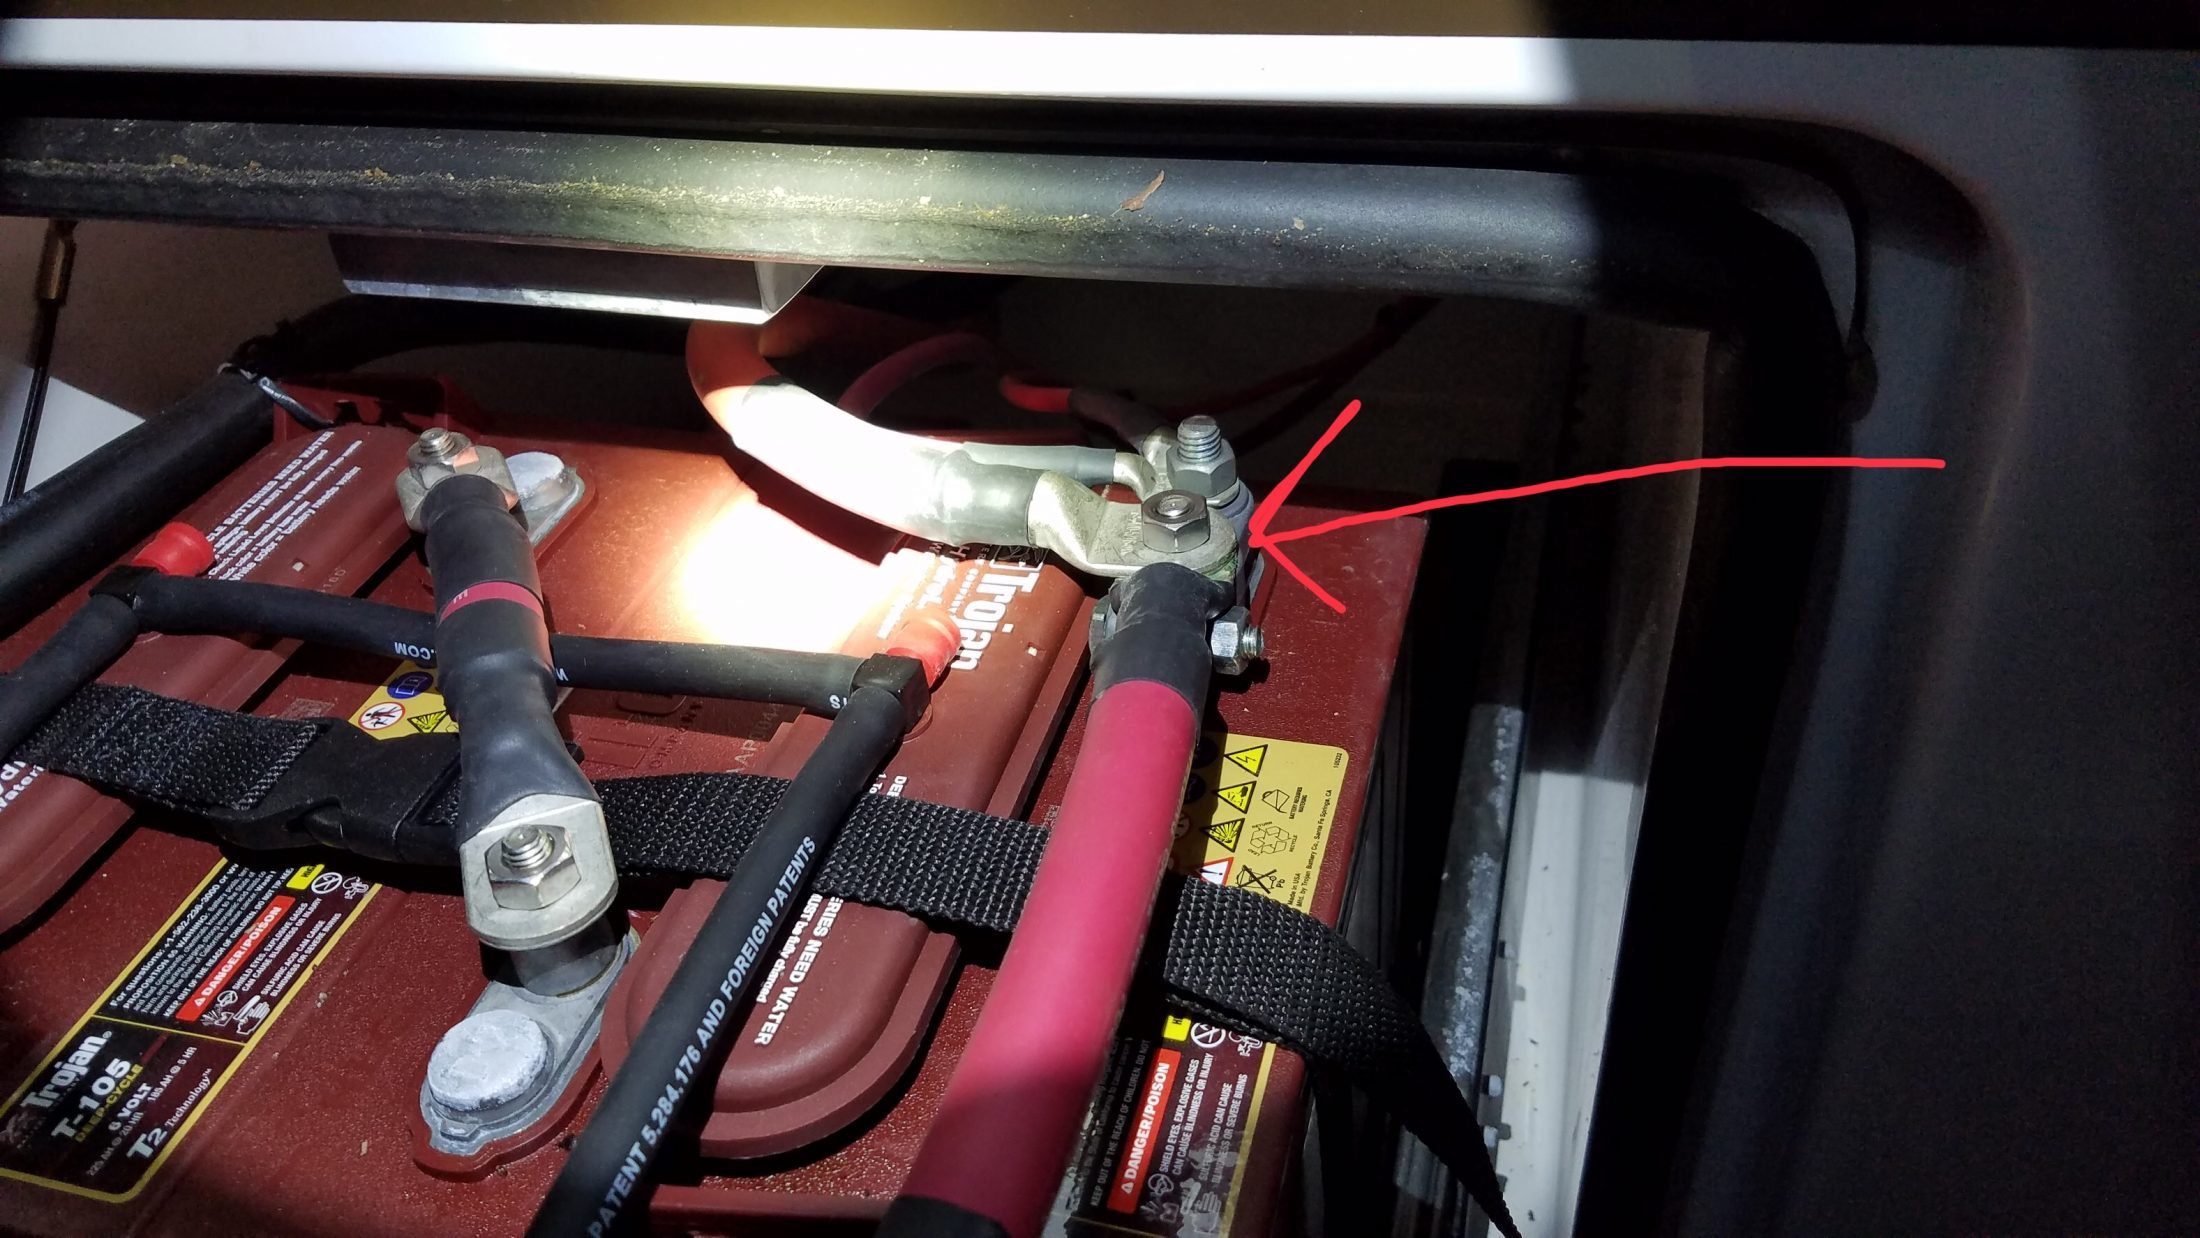
One last for the night. It might have been attached to the inner battery terminal at the other end of the jumper. Same electrically. However, that jumper should be flipped over, or reversed end for end, so the upside-down lug is on the inner battery. Then your loose cable goes on top of that lug.1 point
-
Jitters - we boondocked or overnighted at the Walmart in Gillette, WY on way thru. There is an old Walmart next to the new one there. Huge vacant parking lot with lots of rvs stopped for night. It was great for overnight plus a bonus thunderstorm and excellent pizza at Pizza Carrello (wood fired) which we would make a detour for next time. Prior night we did a Sams parking lot in Omaha. We were at RV parks most of the rest of the time but tend so far to boondock some when en route. We got very tired of the mountains and with construction here and there they really slow you down (Montana, Idaho was the worst). So if you are only passing thru and not there as destination I would also pick whatever routes avoid them. Super pretty through there though. Bellingham is a great town for sure. Right at the gateway to everything - Vancouver, Mt. Baker, the San Juan’s, Seattle. John Davies we buzzed right thru Spokane last night. Stupidly we decided to drive all the way in from Gillette to Bellingham. Otherwise we should have looked you up and compared Ollie’s. We are paying the price today for the endless night of driving. Not doing that ever again.1 point
-
Yes, the whole inverter is under the bed. Check for 12v between the two large cables connected to the inverter. Also, check for 12v on either side of the main fuse (150A I think) which is under the rear most dinette seat. Open the seat hatch and look to your left. You’ll see the red No. 4 welding cables, follow them to the main fuse. I think the others are correct in that the unattached red cable in the battery compartment should be attached, but check the above voltages first.1 point
-
Looks like bhncb has you covered so I’m stepping out.1 point
-
This is a picture of my lead acid batteries. The arrow point to where that cable is connected on my battery bank.
1 point
-
Sorry for the post overlap. I see in your latest picture that they are AGMs. The cable should be on top of the short jumper going to the rear inner battery. Who worked on this last and why?1 point
-
I think that cable with the loop is actually the battery watering hose. You said you fooled with the GFCI switches. Does that mean the one on the inverter and the one under the dinette? From the looks of the terminal on the red cable, it has been connected to something. Can you take a picture with the battery tray pulled out so we can see all of the battery terminals?1 point
-
Can you check the input voltage to the inverter? If input voltage is good then I’d say your inverter has failed. I had an output from the inverter problem and it turned out to be the GFCI internal to the inverter. My inverter was fine but couldn’t get power past the GFCI. I replaced the inverter, bought it through the Xantrex factory outlet. As for your other spare wire, that is troubling to me and I’d say Jason at Oliver should be consulted.1 point
-
Spike - I had a similar problem but I could always turn on the inverter with the button located on the main unit. As it turned out, the problem was as simple as tightening all the connections and unplugging then re-plugging in the remote cable (the one that looks like a telephone wire). Having said this, it is my gut feeling that your unit is fried. Also, I have no idea on that battery cable. Obviously it was attached to something at one time but it is not apparent to me from your pictures as to where. Bill1 point
-
We went to a dealer today to look at the HQ17 (No 19 available on the lot). Lots of cool and innovative features but to be honest, I thought the quality was lacking. All the cabinet facing seemed to be a stick-on material for that shiny look. I looked at the corners and cold see where it was not applied all the way. Maybe a veneer but looked like something else. Some of the ceiling material was bubbled and peeling in the rear corners. Not crazy about the all aluminum (thin) walls and front. Tapping on it made parts sound very hollow and you can see the skin give some. Any road damage (remember, off-road) seems possibly expensive to fix having to replace the entire panel. The handles to lock down the windows were very flimsy and I can see them breaking easily. Not sure about the smoked plastic windows...they don't seem to provide much insulation or very durable. Nice Cooper tires and suspension but what about service availability when on the road. Only 8 dealers in the US and this doesn't seem like something many RV places will work on. It does come with spare bearings. I read in another post somewhere that the suggested service interval on the axel bearings is 300 km. Seems crazy. I asked the salesman and he did not know. And for a trailer designed for boondocking it seemed weird to have only two 5gal propane tanks. I thought the separate water tanks for drinking and GP water was interesting. There's also a separate water tank for the toilet flushing. The larger fridge (thank Ollie) is nice. So is the control panel with circuit breakers rather than fuses. No accumulation tank with the water pump and the pump seemed small though I did not check the gpm rating. Excellent outside kitchen! Have a great evening! Greg1 point
-
Was washing the Hobo yesterday for a showing to a prospective couple coming this weekend and of course tightened up the four knobs for the solar panel while I was up there. But I also accidently bumped my rear camera with my wash mitt and noted that the antenna was fairly loose. It simply screws in so I just snugged it up (quite a bit). Just a heads up.1 point
-
[postquote quote=176265][/postquote] That’s a great question, I should have explained why my tires aren’t chocked - at this site we were just overnighting and I did not have to unhitch from the truck. You can see in the picture my Andersen chains are still tight. Before I unhitch at a site we always chock the tires. Both sides. Also, if I have to drive up on legos, the standard wedge type chocks aren’t as effective so I have one of those “between the tires” or x-chock devices. Some are quite expensive. I got the inexpensive Camco plastic one that works fine. Another Walmart item. You can see them in this photo:
1 point
-
The Dexter EZ Flex system adds another layer of protection to your camper. The EZ Flex equalizer comes with a rubber dampener to lower the impact from cracks, potholes and other imperfections in the roads from causing unwanted stress on the camper shell. This system also replaces the standard bolt & plastic bushings inside each leaf spring eye with wet bolts and bronze bushings allowing you to keep them greased for longevity and less noise from heat and resistance. For this system to operate properly it is recommended that the bushings are greased every 3 months or 3,000 miles with a good high quality Hi-Temp grease. We use Citgo Mystik Hi-Temp at the factory but there are several other approved greases from Dexter. *2018 Elite I models utilize bronze bushings and wet bolts but does not have the equalizer as it is used on the dual axle only. The Dexter Axles used on the Oliver Elite and Elite II models are the 5,000 lb and 3500 lb axles. The Elite models have a single 5,000 lb axle with 12” brakes while the Elite II models have dual 3500 lb. axles with 10” braking. These axles and brakes do have a break-in period as they are Nev-R-Adjust braking and adjust automatically as you brake while pulling forward or backwards. The break-in period may vary slightly but usually adjusts to 100% somewhere between *50 brake applications from the brake controller only or over a period of about 500-700 miles with normal vehicle braking. *Please make sure that you do not overheat your brakes by trying to achieve the break-in too quickly. If you do choose to utilize the brake controller over 50 braking applications it should be done over a 75 mile trip at low speeds allowing the brakes to cool in between and not putting too much stress at high speeds on the trailer brakes to stop the tow vehicle. Both the 3500lb. and 5,000lb axles have serviceable bearings that require maintenance every 12 months or 12,000 miles. The same grease that is used for the EZ Flex will work with the bearings. Both the inner and outer bearings should be cleaned thoroughly and inspected for any imperfections or improper wear. This is also a great time to inspect your trailer brake components as well. These maintenances can be performed by most RV service centers or if you prefer, you can perform your own maintenance. For more information on how to repack your wheel bearings see the Dexter Bearing Maintenance Video.1 point







-
Recent Achievements
-

















