Leaderboard


Popular Content
Showing content with the highest reputation on 12/09/2020 in Posts
-
When we were looking for the perfect "for us" travel trailer, our dinner conversations rambled on about the 30+ brands and models we'd looked at and read about. Toward the end of those days, our poor little dog (who happened to be named Oliver ) spent the dinner hour whipping his head back and forth as his "name" came up over and over again. I was afraid he'd get whiplash, frankly.😄 Evolution. Last week, we discussed wiring with Ryan at Blue Sky during dinner on speakerphone. Tonight, we two solar nerds chatted with each other again about wiring and dual controller setup (master/slave, fixed/portable) and watched a couple videos from the Blue Sky learning center. After dinner, more research. I guess it's a good thing that we feel we still have a great trailer to upgrade, and enjoy, 13 seasons later. And, that it's worth the time and effort (and $) to do the upgrades. And, that we enjoy it.9 points
-
The bulldog collar that Mike pictured is a great preventive mischief device. We've had that from pretty much day one. Some kind of device that fills the hitch ball space, like mike's, or even a 2" bearing that John Davies has used, or the proven lock, etc. All are fine. We have something similar, but inferior to Mike's. We have a good insurance policy, as well, and call it done .3 points
-
HERE and HERE are threads with various options for relocating the surge suppressor display. I followed @mountainoliver's suggestion HERE to move it under the dinette where it is visible from the door during campsite setup. As @topgun2 noted, in my trailer the surge suppressor display was under the streetside bed. You can snake the cable out through the electrical box, and no drilling is needed if you use command strips to attach the display to the trailer wall.3 points
-
The “older” trailers did use the Blue Sky solar controller. While probably not the best by today’s standards, the Blue Sky is an MPPT type unit. I ordered my trailer without the solar option because I didn’t know enough about solar at the time and the Zamp equipment was just beginning to be used. In later discussions with ScubaRx I found out that the Blue Sky equipment was probably the best at the time so he and I installed that brand. It is fully and easily programmed for any battery chemistry. Fast forward, last summer I installed three Battle Born batteries and did some wiring changes as well. The Blue Sky controller brings the batteries to 100% each day and the lithium speced shore power charger brings them to 100% very quickly. Also as a side, I plugged the battery box door vents and insulated the door with 1/2 inch thick closed cell neoprene foam. So far camping in freezing weather, the battery box has stayed comfortably warm without battery heaters.3 points
-
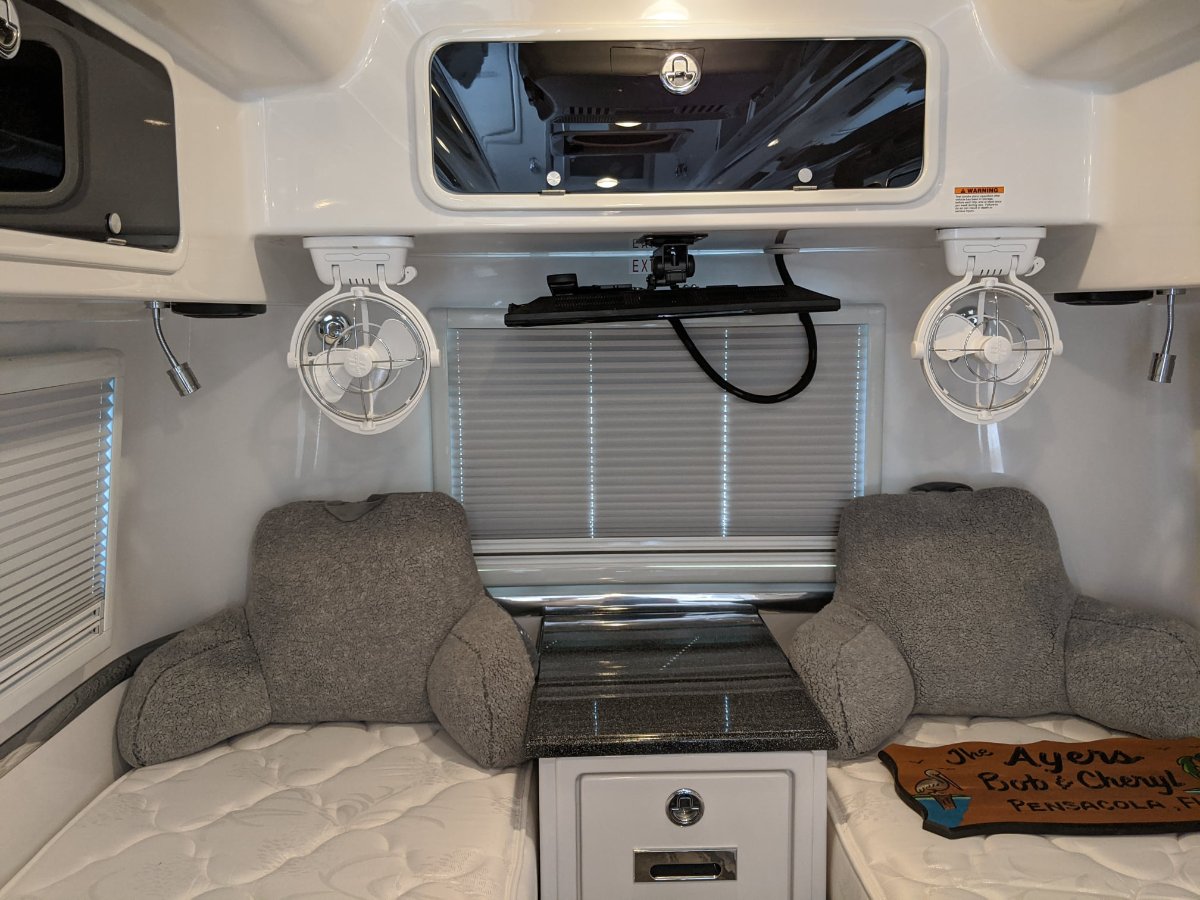
Thanks to everyone for the great fan feedback. Bonus points to @Calypso for providing the answer to a need I wasn't aware existed until I showed my wife the photo he included in his response showing the location of his fans. Evidently we need two of those armchair cushions too. David2 points
-
So if you think that a 2 awg cable is undersized for a 10' run, then what size cable do you recommend for the 25' to the trailer battery? My calculator says you'd need 4/0 to give a 0.2 amp drop at 100 amps. That's a very safe recommendation, since no one would do it. Just like adding a constant 100 amp load to my battery is a safe suggestion, since I'm not going to do that either.2 points
-
When my first water heater broke, I was told by Truma that they had no user serviceable parts and my only option was to go back to Oliver or a service center. Yet, they include schematics and a parts diagram in their manual, and you seem to be able to buy parts in other countries. Furthermore, this year they had no hesitation in sending me a new control board to install myself. So, mixed signals. As for any kind of limp home mode, my experience is that it either works or not. The pump itself isn't technically required for the unit to work, so you'd think that the ECU could just disable the pump related features, but that doesn't seem to be the case.2 points
-
And, the premiss behind smart alternator systems is that a vehicle's battery does not unnecessarily need to be maintained at 100% SOC, 100% of the time. A more practical SOC level reduces demand on the charging system, which save energy to drive it, which.......2 points
-
Exactly. Here’s a chart from a 30 minute trip I just made. This is from the battery monitor on an AGM house battery that I have under the back seat of my truck. It’s connected to the starter battery with 2 awg cables and a Victron Cyrix smart relay. I have a 12 volt fridge attached to the house battery, which is the amperage load that you see on the chart. I had auto start/stop disengaged. In this case, I had just made another short highway trip that had already fully charged my start battery, so you don’t see a prolonged period at 14.6+ volts are the start. The house battery was at about 85%. You can see that the voltage goes into the 14’s for just a brief period before settling in at 12.8 or so. The spikes at the beginning of the drive are in stop-go traffic. (The truck has electric assist on the brakes so those are the spikes.) You’ll see that it evens out for a bit once I get in the highway, but then jumps suddenly to around 13.4 volts. That’s when I turned on my headlights. (BTW, that’s been a GM owners trick for a while to get their voltage up to a charging level.) So you can see that modern electrical systems only provide the voltage that the truck needs at any given time. They do this regardless of what other load you add to the system. Unfortunately, while I may be able to trick the system into providing 13.4 volts, that isn’t enough to charge lithiums, since I’d probably only see 13.2 or less at the battery. So yes, a B2B charger is absolutely needed.
 2 points
 -
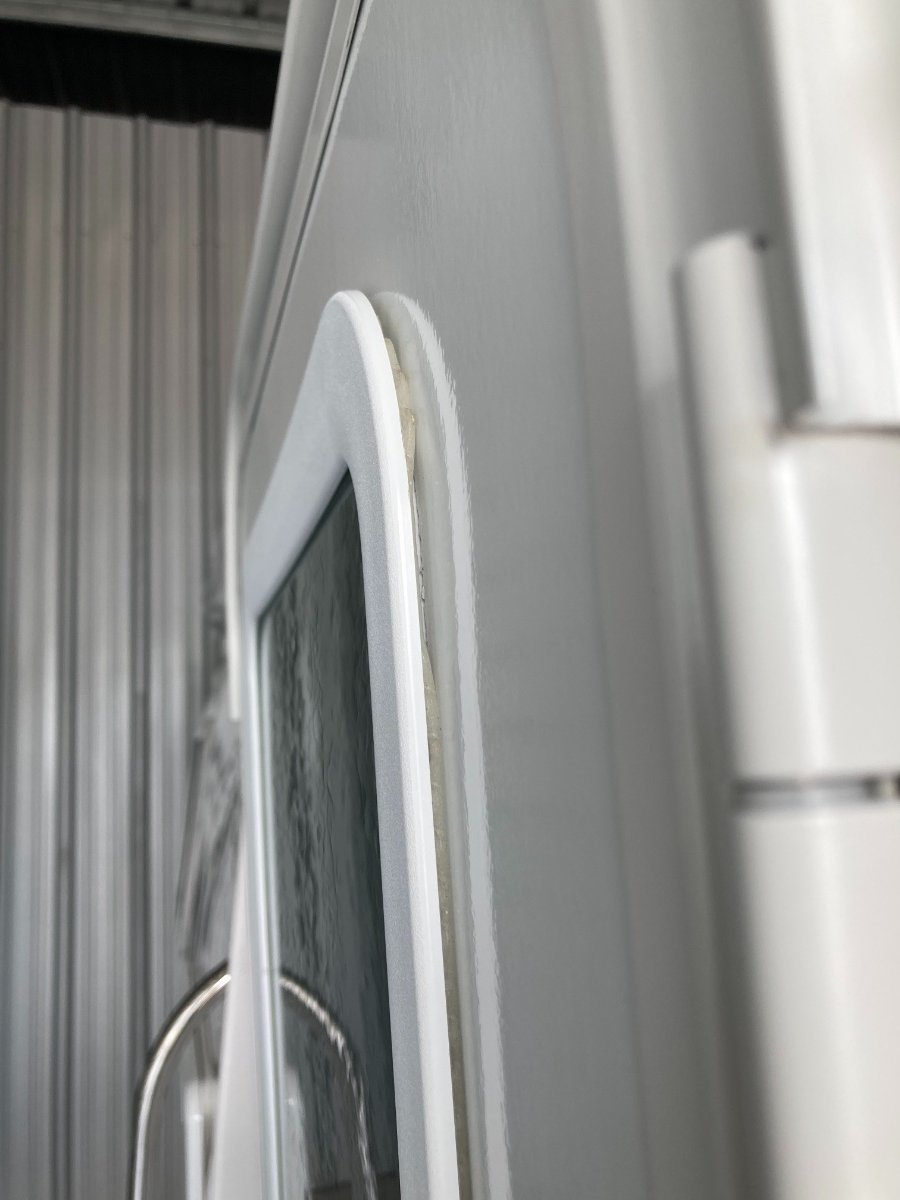
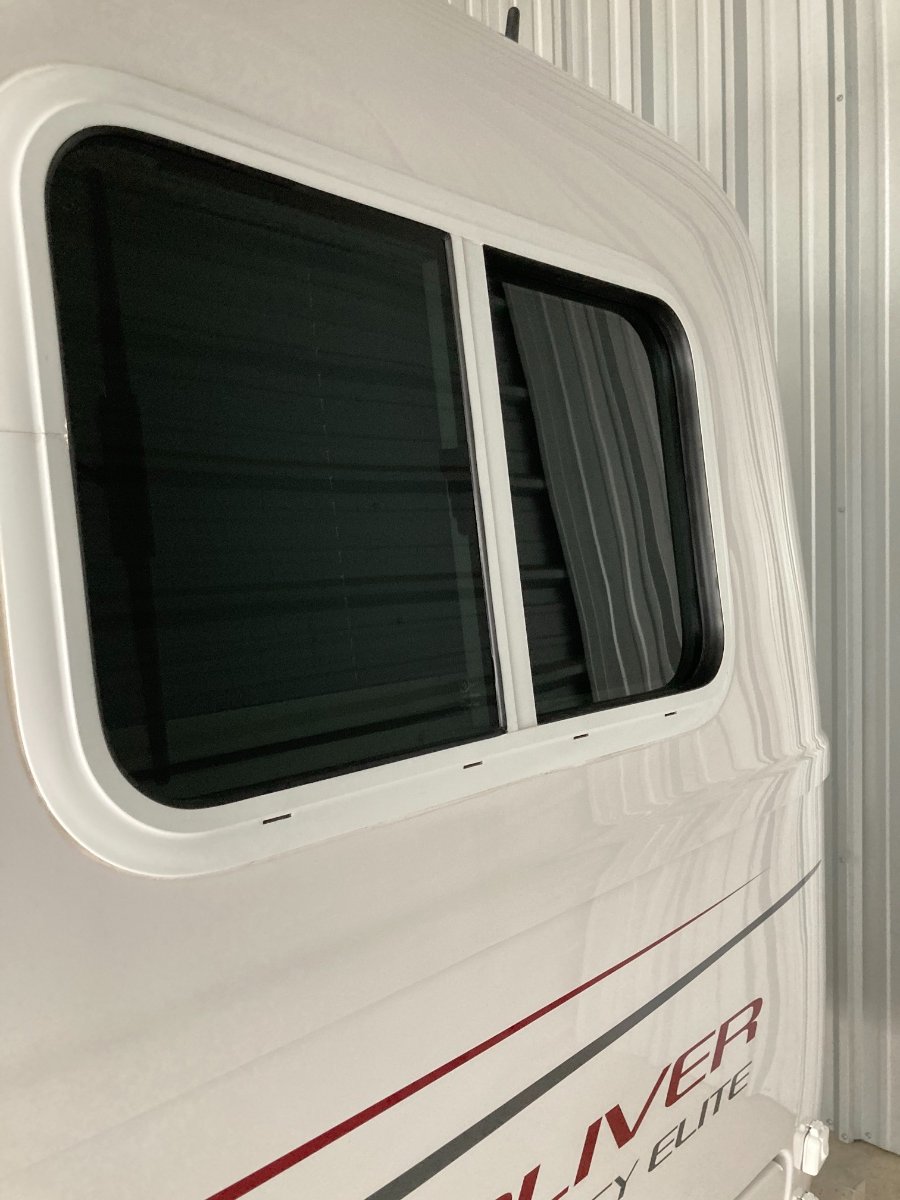
Oliver Owners, We picked up our new trailer (Legacy Elite I #664) on Sept 16, 2020 and have been using it on/off since this date. Overall, our experience has been wonderful and the quality of the trailer has been much better than what we have read about other manufacturers. In an attempt to help others with our recent learnings, I am listing some of the items were have learned about, fixed, and/or submitted a tickets for: Initial Pickup: - The bathroom interior window frame was bent due to being over tightened - Jason and the person showing us the trailer located a new frame and installed. - Window shade over the rear driver's side window had damage to the felt liner at the bottom of the night shade. - Orientation team replaced. First Night Camp @ Davy Crockett State Park: - Noticed that the propane alarm was not on. - Contacted Jason via telephone and he walked me through installing the 1A fuse that was included in the box of spare fuses provided. The fuse holder is located under the dinette seat and is somewhat hard to find as it is black and not easy to see. - Upon opening the rear compartment door, the bracket where the wire attaches to keep the door from swinging down came unglued. - Contacted Jason to let him know and he said they would send me some epoxy to fix. Ended up purchasing some a few weeks after getting back home as it never arrived. I let Jason know we no longer needed as I had fixed per his recommendation of Gorilla 2 part epoxy. - Shower floor squeaks a lot - Contacted Oliver Service and have a ticket for them to repair when we take the trailer back to TN for its annual checkup. According to Jason, the squeak is most likely from the shower tub not being cut correctly or the padding under it not installed correctly. No biggie for now as we have learned to live with it knowing that it will get fixed. If your spouse decides to use the bathroom at night, It will wake you up. No liquids right before bedtime. 🙁 First Long Drive from TN to AR: - Had someone flag us down and let us know that the rear compartment door had come open during travel. Upon pulling over and inspecting, we noticed that the screws had come loose on the latch and allowed the door to open with the latch locked close. I was lucky enough to have some blue lock-tight with me to use on the screws when retightening. No further issues experienced. We let Oliver know that this happened and they indicated that lock-tight should have been added to the screws at the factory. I am confident they put new procedures in place to keep this from happening again. First Time Back Home: - Spent time learning about the solar system, inverter, appliances, etc.... - Realized that both the Solar Controller and the Inverter were both set to flooded batteries vs. the AGMs we had installed. Changed both to AGM. No issues noted so not sure if it really mattered. Texas State Park Close to Home: - Noticed a small gap at the top of the external door window frame. - Contacted Oliver and was told that the frames are designed to click together but requires special plastic keys to take the frame off to inspect. From my reading this is a common thing from the door factories with the tabs getting broken. We tried several time to get the internal frame to snap together with the external frame. No luck. Contacted Oliver again and Jason said he would have a new frame (and plastic keys) sent to us so we can repair/replace. The suppliers are backed up, so it has now been two months with the door window frame and glass loose. I was successful in learning that there is a supplier zarcor.com that has the window frames (Lippert) in stock and can be purchased/delivered within a couple of days. We will most likely end up just ordering and replacing as they also offer a clear tinted glass and window shutter for the door. There is another post in this forum with pictures if you are interested. Being that this repair is taking a long time to get resolved, I would recommend anyone picking up their trailer inspect this and have it repaired before taking delivery. Arkansas State Park (Crater of Diamonds): - Upon arrival at the State Park we noticed that the trailer was squeaking loudly with every small bump in the park. Upon inspection, I did not notice any lose bolts, nuts, fittings on the suspension. We contacted Jason at Oliver and he had not heard of anyone having this problem before. We ducked our heads down and slowly made it to our campsite without disturbing the other campers throughout the park. We did get some stares tho with the squeaks. Once setup, I made a quick trip to the local hardware store to purchase a small grease gun/grease, 90-degree zerk fitting as the zerks are not accessible without having the pull the tire off, and some dry lube spray. Utilized to the stabilizers to take some weight off the trailer and utilized the grease gun. Fun fact - the top zerk fitting (wet bolt) that attaches to the frame bracket actually serves no purpose as the bolt is not contained within a bushing (Only on the single axle trailers). I would not recommend you go to town putting grease in this wet bolt as the grease will just exit the bolt and make a nice stream of grease falling on the lower spring eye. Not sure why dexter/oliver designed it with a wet bolt in this location. Sad part is that, the squeak we had was between the shackle and the trailer frame bracket and without the trailer bracket having a bushing there is no real way to get grease between the two. Only option at this point was to use the dry lube spray. Happy to say that this resolved most of the squeak until we could get back home (~400 miles). Upon getting home, I used a spray can of Fluid Film to spray down the area between the shackle and trailer bracket. No more annoying squeak! I have some pictures on another computer that I can attach at a later time if you are curious. Other trips - Nothing new to report beyond what has already been said above. Improvements - As recommended by others on this forum, we did go ahead and install the black window seals available on pellandent.com due to some of the white window seals had stains on them from the factory and were cut about 1" too short. I must say that the black seals look much better and should eliminate an excess amount of water needing to travel through the window drains due to them now being long enough. If you do a search on this forum for pellandent you will see some pictures posted by others. Once again, the point of this post is to inform others of our experience and to share some of the things we have learned. As with anything, enjoying life comes with opportunities to improve oneself and help others on their journey. Mark
1 point
-
After driving 2,500+ miles from Oregon, we are in Linden tonight . . . . picking up #699 - "Pearl" in the morning. Stay tuned for photos!1 point
-
We joined the forum about 3.5 months ago but have never introduced ourselves. We are Charlie & Cindy from the DFW area of Texas. We took a trip to Hohenwald in August after our 17 day trip to Europe for our 40th anniversary was canceled due to COVID. We are not new to camping. We have had two travel trailers in the past. A 24’ starter trailer for a couple of years and then we upsized to a 42’ fifth wheel which we had planned to retire in and travel the country. We had it 5 years and decided it was way too big to drag across the country. Charlie retired a few months ago but I have about 5 more years to work and then we’ll be doing some long distance trips. In the meantime there will be lots of local camping on weekends and a few occasional 1-2 week trips where we’ll do some boondocking out west. We had just put our 5th wheel up for sale before our trip to the factory. The weekend after we returned home it sold for full asking price so we placed our order for a May 2021 delivery. Not too long afterwards we got a call that someone cancelled and we were offered a February 2021 pick up date so we jumped on it. Our final selections were made just before Thanksgiving and we forked over half the balance. We’ve enjoyed reading and learning about the Ollie differences and been buying a few things for the trailer along the way. The majority of the camping stuff we already have. This past weekend we camped old school with our son’s family who tent camp. We used our new truck topper to sleep and had a great time. Can’t wait to take delivery of our Oliver Legacy II in just 2.5 months so we won’t have to rough it in the future. We are still working on a name for our trailer and what graphic we want for the front end. We are also anxiously waiting to find out our hull number when it goes in to production on 12.22.2020. We look forward to meeting other Oliver owners out on the road and hope to see you at the non-rally Rally in 2021. Cindy & Charlie1 point
-
2 gauge cable, less than 10' long? How many amps do you think I'm pushing through this?1 point
-
You mean this evolution thing never stops??1 point
-
Topgun2, Yes, I used a straight razor blade to cut off the excess once I applied a piece to the light fixture that was a little larger than the lens. Going forward, I think I will make a template to cut several of them to have on hand. We have traveled several times through various rain events after the application and the film still looks as good as the day it was applied so I am not sure I will ever have to replace.1 point
-
Honestly, Blue sky is a bit "old school," compared to Victron. They "probably " will have Bluetooth capability sometime soon. That said, the reliability and customer service from Blue Sky is second to none, imo. We did use victron on the boat, because of a better water resistance rating , and their dominant position in the marine market, for future proofing in integration. That decision was actually a really tough one, because of our excellent experience with Blue Sky .1 point
-
Mine used to throw various voltage errors all the time but they’d always clear by just turning the unit off and on again (using the switch at the unit, not the remote). A circuit board replacement fixed the problem. My only guess is that you’ve got a bad pump, which probably does mean taking it in for service. Service availability seems to be a real problem with the Trumas. Where are you located? I believe that they run a mobile repair service in the southwest - maybe elsewhere too?1 point
-
But the converter output voltage is regulator variable between 13.3 -14.7V, depending on temperature, and actual wattage is dependent by engine speed. This makes it equivalent to a smart alternator. Just running a bigger wire without a DC-DC changing control device at the end isn't going to overcome the low voltage issue.1 point
-
The clear coating I used is a spray. The name of the product is "Silicone Modified Conformal Coating" made by MG Chemicals.
1 point
-
BackofBeyond said it best. It is difficult to justify spending too much on a lock when the hitch can simply be removed. Insurance is the best form of protection. If you are looking for something better than the average lock, this is the best I've seen for bulldog style couplers: https://www.provenlocks.com/products/model-2178-b https://besttrailerlocks.com/ appears to sell blemished versions of the above lock but I can't vouch for the company1 point
-
Great idea... Continued from previous message... After getting the trailer home I charged the two Battleborns up for 90 minutes using shore power. The ZAMP showed 14.6 volts. Then I removed the batteries to prepare for a four battery retrofit. I charged the other two batteries up one at a time to 14.5 volts using the trailer (90 minutes roughly). I placed all four batteries in the tray and started measuring for bus bars and cable clearance. I concluded that it would be best to move all but the two main battery cables into the trailer before installing the four batteries. So I started planning that as my next project. I am still a bit confused by some of the Oliver wiring choices, but plan on making small improvements along the way. The original two batteries that I pulled out had voltages at 14.1 and 13.9 (measured several times over several hours), which is pretty close, but I felt I should balance them before reinstallation. I placed the two other batteries (previously un-used) into the trailer after verifying they were properly balanced (both read 14.2V). I returned the trailer to storage and have been planning the movement of the other cables into the trailer. I will post my plans in a new thread for feedback before I purchase anything else for this part of the project.1 point
-
The awning was the only color my wife let me pick on our recent order.😶Now I understand why.1 point
-
My understanding is that you can choose any awning color as long as it is black.1 point
-
It’s easy to sneak in with his lights off1 point
-
I’ve thought about a light strip for my awning. The ones I’ve looked at put out a lot of light. That’s my issue with the porch lights, they are too bright to use for anything except a temporary task. Walking around campgrounds, some of the trailers and campers with lots of built in and added on lights just seem to detract from the camping experience. Sometimes it’s like walking down a city street with all the colors, brightness, etc. Our solution is to use minimal outside lighting and camping where the neon buses and 5th wheels can’t or won’t go! Mike1 point
-
Back in the day, before led lights, it was possible to buy a replacement lens, and be done. We also replaced the bulb with an led equivalent in our 2008 , after changing the lens. The amber film in the new led one should do the trick, as. ?mark did. We did find fewer bugs attracted to the amber lens. The mosquitoes, not so much. They seem to be attracted more to a campfire that puts out more co2 than we do.1 point
-
Tom and Shari Allore from Palm City, Florida, we will be picking up our new Ollie on January 21st, 2021, can’t wait to post our pictures and start our new adventures1 point
-
Skalywag, Many thanks for taking the time to go out and get some photos. This is just another example of why the Oliver community is one of the best.1 point
-
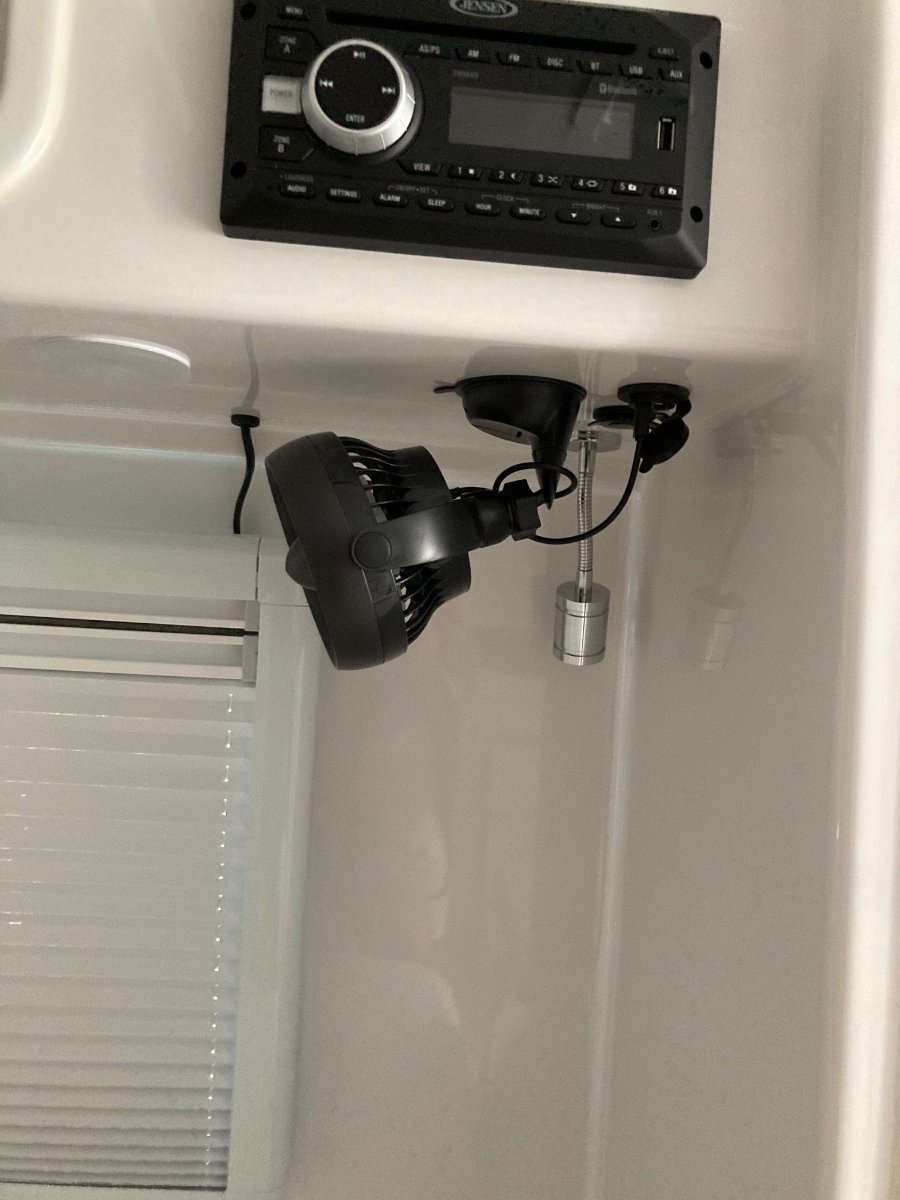
I agree wholeheartedly! My wife is quite sensitive to the temperature, and I wanted to try a fan to make her more comfortable. We sleep with our heads at the rear, and I thought @John E Davies's fan was too large for our needs. I found the Caframo Ultimate 747 12V 2-Speed 7" Fan w/Lighter Plug for $46. It has two mounting options. One mount is a suction cup. The other is a permanent mount that can be screwed into the underside of the overhead cabinet. The mount is about 3 inches tall, and the fan is easily removed from and reattached to the mount. My initial plan was to use the permanent mount, and I had plans to either tie it into the 12 V system, or to install a 12 V cigarette plug receptacle into the overhead cabinet using some of the guidance John Davies provided in this post. (Our trailer has only two cigarette lighter receptacles, one under the dinette and one above the kitchen. Susan sleeps on the street side bed, so they would not be closeby.) I decided to first use the suction cup mount to decide on an optimal location to place the fan. The fan power cord was not long enough to reach the dinette, so I used a 120 V plug--transformer--cigarette plug receptacle adaptor that we have for a 12V ice chest, as an extension cord. This fan worked really quite well, and Susan was pleased. She decided that she did not want the permanent mount, but preferred the suction cup option. The suction cup was plenty strong, and we even drove with the fan attached, without problems. So in the interest of domestic tranquility, we are not using the permanent mount. We also have much greater flexibility in where to place the fan using the suction cup. When removed from the underside of the cabinet, the fan is quite small and stores easily. In future we will use the suction cup mount, along with either the 120 V plug--transformer--cigarette plug receptacle adaptor. The extension cord traveled nicely behind the dinette cushions and below the pantry door. I have found extension cords on Amazon with cigarette plug and cigarette plug receptacle receptacle at each end, and we might try that instead.
1 point
-
We had these on our boat and were one of the first mods to the Oliver. They work great.
1 point
-
My single Caframo located in the rear curbside corner works extremely well and it sips power (0.35 amps on High). Normally it is pointed down a few degrees and rotated in a 45 degree angle toward the street bed, where my wife sleeps. We both sleep head to the front, so we get the air on our faces. Even on Low or Medium speed she gets plenty of air, I get enough leakage to stay comfortable. If I am camping alone I point it towards my side. I highly recommend this fan, you could always install two and both have full control, though as noted above they are not remote control. Yes they are pricey, but I look at expensive upgrades as “making it easier to resell the trailer” though you never ever get back your investment in the upgrade part and labor cost. If the labor is your own, it is easier to deal with. https://olivertraveltrailers.com/forums/topic/3305-how-to-caframo-sirocco-ii-12-volt-marine-cabin-fan/ These really are quite nice, and I think Oliver should offer a pair of them as factory options. John Davies Spokane WA1 point
-
I seem to remember that John Davies installed a caframo fan. I'll see if I can find the post for you. I'd probably recommend a pair of Caframo Sirocco II fans if I were in your situation. The Sirocco model has been around for decades, highly rated by users, and tested and recommended by Practical Sailor. The Sirocco fan does not have a remote, but it has a timer with three settings, and moves a lot of air for .38 amps on high. It can fold up and out of the way when not in use, and offes 360 degrees of directional airflow adjustment. Mounting hardware included. https://www.practical-sailor.com/boat-maintenance/product-update-facnor-fx-furler-caframo-scirocco-ii-and-more
1 point
-
David, We purchased two small Lemoistar USB powered suction cup fans that we have attached next to the USB/12V plugs, under the upper cabinets. They are very quite and have worked very well for us. They are not the best quality but I tried much more expensive options from Caframo and found the $10 fan on Amazon was the best for our purpose. They are not remote controlled but they use such little power, they can be left on low most of the time. Andrew
1 point
-
By asking questions I usually learn something new everyday. It usually is what I learned yesterday was wrong...1 point
-
Beyond the appropriate cable and lugs mentioned, you'll need: Cable cutter For clean square cuts use one like the Temco TH0002 Stripper/slitter The rotary style like in the photo work pretty good for larger diameter cables. There's a broad price and quality range. Crimper For battery cables I prefer a lever style like the Temco TH0020 over the hydraulic others have mentioned. Hydraulics typically require three hands for larger lugs and don't provide any tactical feed back making over or under crimps inevitable. Heat shrink tubing and heat source. Thick wall adhesive lined tubing specifically for battery cables is widely available in black and red. A decent heat gun can be expensive but a small butane torch is effective with practice. Recommended option for lowest resistance crimp connections: Rosin core 60/40 solder Use large diameter solder after crimping lugs. Watch how to video (first part)
1 point
-
One of the things I was told during delivery was to bleed the air out of the Truma when starting it up the first time after being drained. I think that the small reservoir in the unit won’t fill properly unless you open a faucet to let the air escape. The easiest way to do it is to use the pressure valve on the unit itself. I’ve gotten into the habit of releasing the valve for a second whenever I turn on the outside switch, just to make sure. You should probably test that valve once a year anyway, just to make sure that it’s working.1 point
-
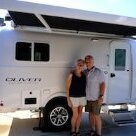
Michelle and I picked up hull 610 on our 30th wedding anniversary in early June and made our way north, up the Blue Ridge Parkway, staying in RV parks and with Harvest Hosts along the way. Ollie life has been everything that we had hoped. Since our return to Maine, we have been on a couple more outings (Acadia had record low numbers of people for July). We plan to visit Gulf Hagas next. We just had a bit of graphics added to the Ollie, as a final touch. We look forward to seeing other Ollie owners on the road! - Jamie-
1 point
-
Yes, our second just Finished, though no graduation! So we stopped and made the tour of Gettysburg when returning with our Ollie. Rode our bikes which we great. Almost no traffic.1 point


-
Recent Achievements
-


.thumb.png.fbbde3486e933f990ff511bff8d6bda0.png)