Leaderboard


Popular Content
Showing content with the highest reputation on 01/22/2021 in all areas
-
Confirmed that we are a cult? 😆3 points
-
Honestly for me a bigger issue with that level of heat is that the absorption/evaporation style fridges don't keep up well at all in such heat - certainly nothing like a compressor based fridge. It's a good time to evaluate whether it's time to replace any mayonnaise or meat etc.!2 points
-
1- The trailer is really well insulated, for an RV, so if it is closed up, the inside takes a loooong time to heat up, several hours or more. The other side of the coin is that as the sun sets it retains all that heat and is very slow to cool down inside, even with windows and the door open. You notice that especially when you open up a storage area under a cushion, it stays HOT under there. Same with the closet and pantry. If it is going to be hot enough for you to want AC it is best to start running it early to get ahead of the heat buildup. 4 - You are not supposed to run the generator while it is on the tongue. This is the lawyers speaking, they do not want you to gas everybody, and then have your heirs sue the company. You are supposed to put the generator at least 50 feet away. I don’t think ANYbody does that, but you must remain very aware of wind direction, and not keep any windows or vents open where exhaust gas could enter. Plus a running unit on the tongue will be felt inside, that isn’t so good if you want to nap. I think you will quickly learn that finding shade to park under in blistering weather is a big priority. if you have shade, you don’t need the AC for a brief stop, especially before the full heat of the day. At 4:00 pm, it’s going to be pretty darned uncomfortable inside. Hopefully you stopped and hooked up to external power long before that. You will also learn to look for a site with a tree on the southwest side, to provide shade as the sun gets past its zenith and the temperature soars. A site that is shaded in the afternoon is precious! If you will routinely be in 100 degree temps, do not buy the lithium batteries, that kills them. Go with cheap flooded batteries and plan to change them often as they die. John Davies Spokane WA2 points
-
We make it a point not to stop for any length of time in the heat of the day. If it is hot outside, it will be hot inside the trailer too. If we stop for a picnic lunch at a rest stop we sit at one of their picnic tables in the shade. Running the AC for a nap at a rest stop has never even been a consideration. We travel mid/late morning to early/mid afternoon. If it is very hot it’s because we are probably just moving through to get to cooler areas (think south Texas to Colorado!). There may be others who sleep in their trailer in the heat of the day, but just the AC noise is enough for us to avoid that.2 points
-
2 points
-
Steven, if you have a properly sized generator (ideally at least 2200 watts) hooked up for running the AC, it will also bring your batteries to full charge by the time you shut it down. If your generator is just barely adequate you may want to start it thirty minutes before you switch on the AC, so the converter (onboard battery charger) will have enough time to mostly charge them before the other load kicks in. Depleted batteries will make the converter draw more power. For your type of camping, in no shade, rooftop solar should be your very first choice!!! A portable panel is most useful for those times the roof isn’t exposed, like under a tree. If you don’t want the full solar package, with quad batteries and inverter, arrange for Service to install just the panels and a controller at delivery. That will work perfectly (and unobtrusively) to maintain your two wet batteries. You may not be aware that when the panels are in sunshine they will also supply all your normal daytime 12 volt needs like fans, device chargers, jacks, water pump, etc, so the batteries are not being used at all during that time. It allows them to be fully charged at sundown for running stuff in the dark. For marginal sun exposure (overcast, high latitudes, short winter days) there are much better controllers available. For your conditions the standard one is 100% fine. You will NOT regret the roof panels! You can always upgrade the batteries, or even the controller, at a later date. And be sure to get the side port for a portable solar panel, it is a minimal cost, and being able to supplement the roof panels is always a good feature, like for when you are in NY under some trees. That panel is also great attached to your truck, to run a DC fridge or 12 volt fans for the dogs... John Davies Spokane WA2 points
-
"Calculate depreciation at 1, 5 and 10 years" says the Huff's . Or just accept it.... An RV - is not an investment for appreciation. But then, in 10 years - Ollie will still be good as new - and that is something to appreciate. Happy Trails2 points
-
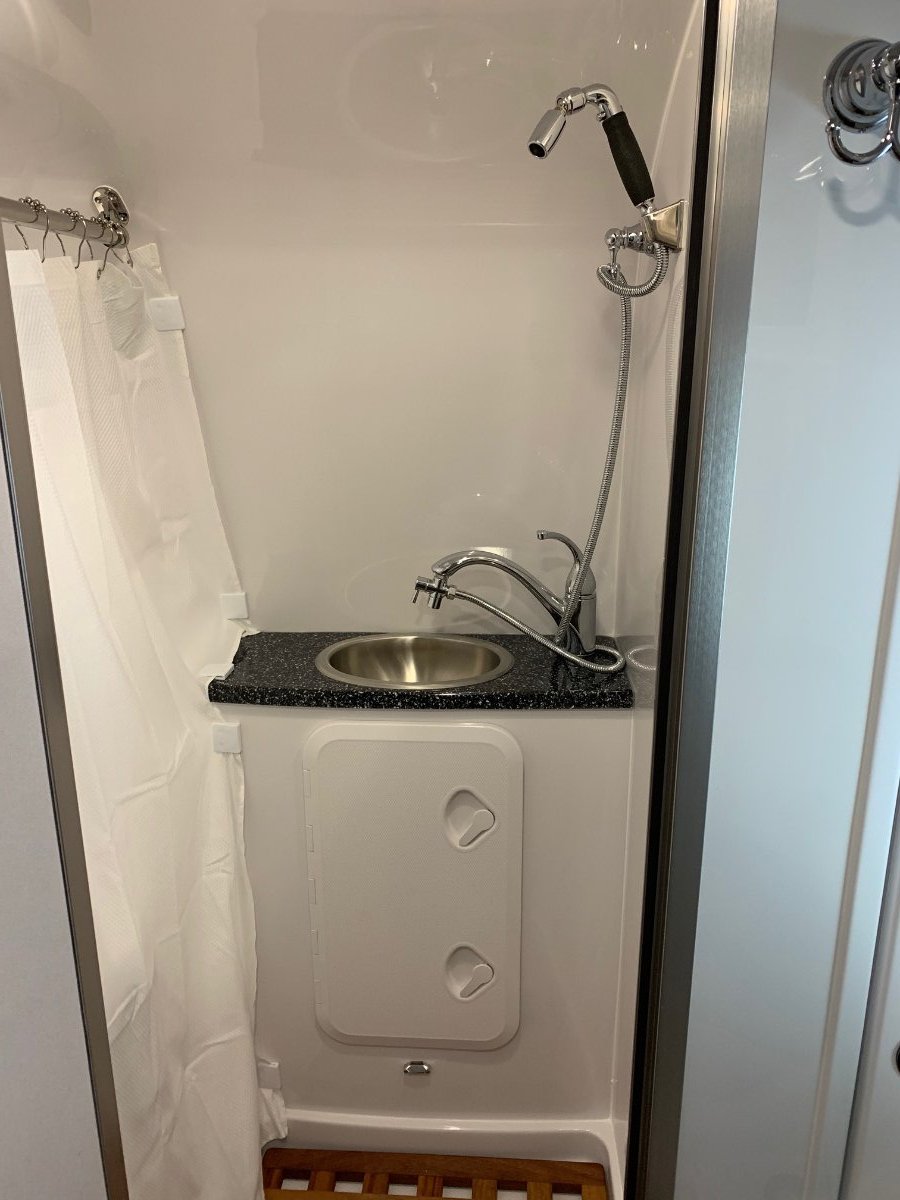
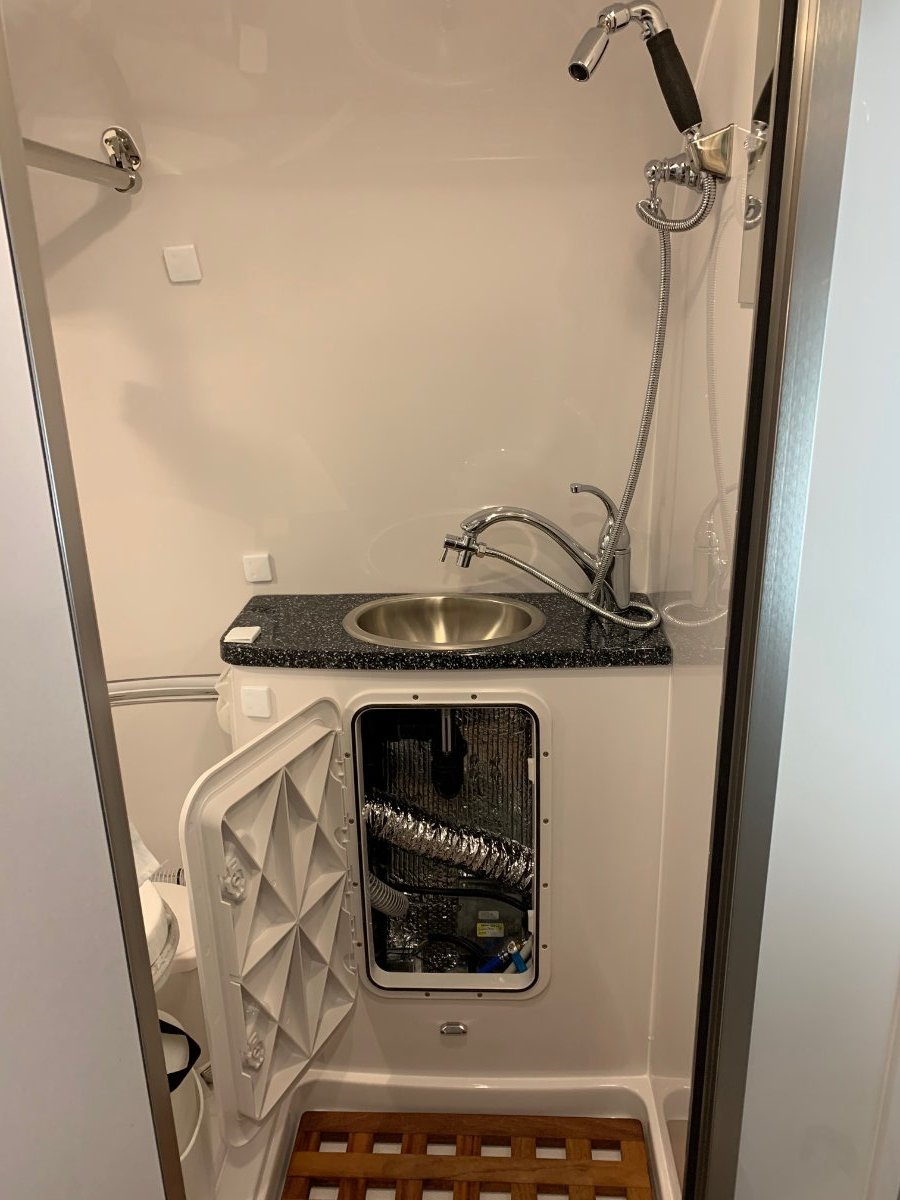
My mission after the first few camping trips was to install a better shower head in the Oliver. I especially didn't like the fact that I had to turn the water off at the faucet handle and lose the setting. Research turned up a highly regarded brand called High Sierra. I searched for those on this forum as well and found that at least one person (Overland) has also upgraded to a High Sierra. I chose the same ugly one with a nice new faucet but an even uglier diverter. 😄 I also hope my wife doesn't notice that her washcloth holder is gone now. 😬 I decided that a permanent access hatch (DasMarine Marine Deck Access Hatch & Lid with Lock, White, 24" Length X 14" Width (606MM. Length X 353MM. Width) in it's place was a better value (at least to me!). I can get at all my new valves now.
 1 point
 -
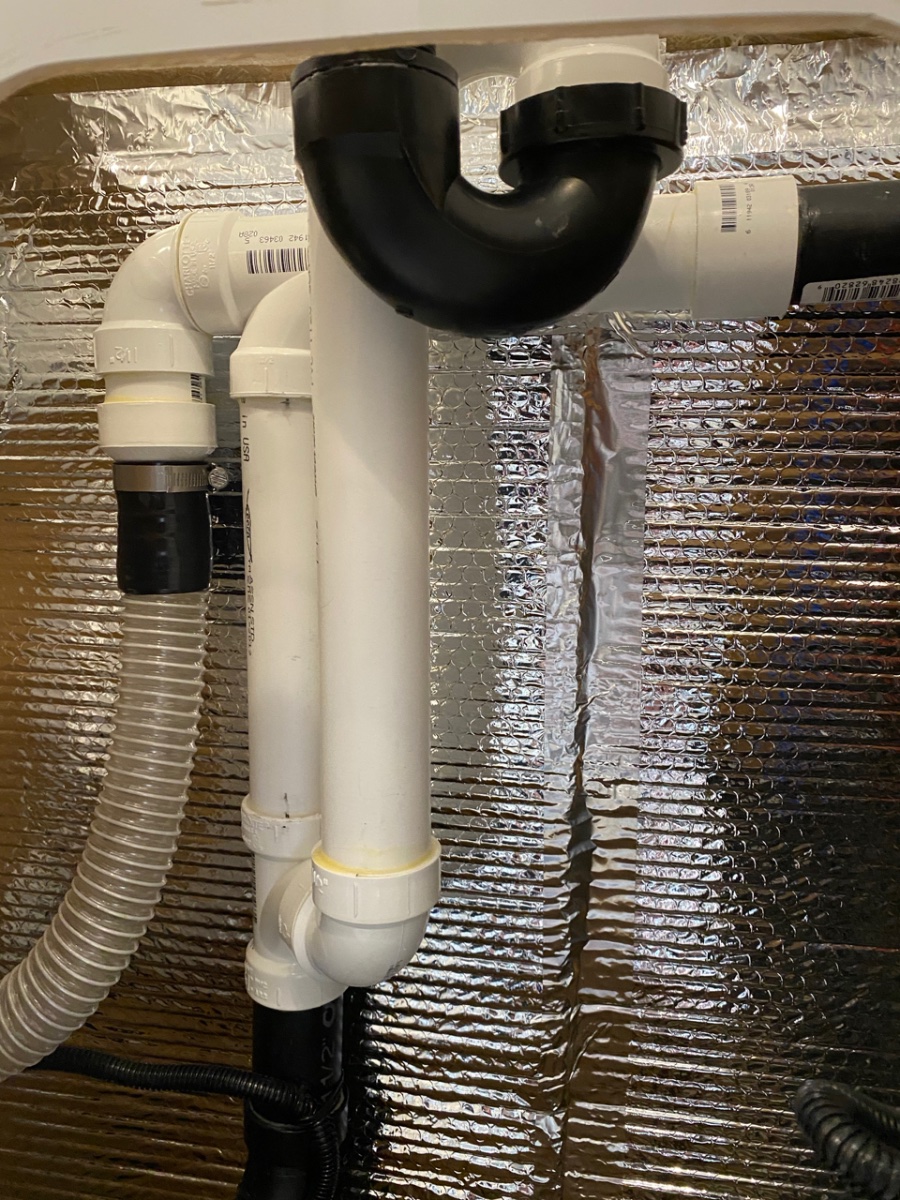
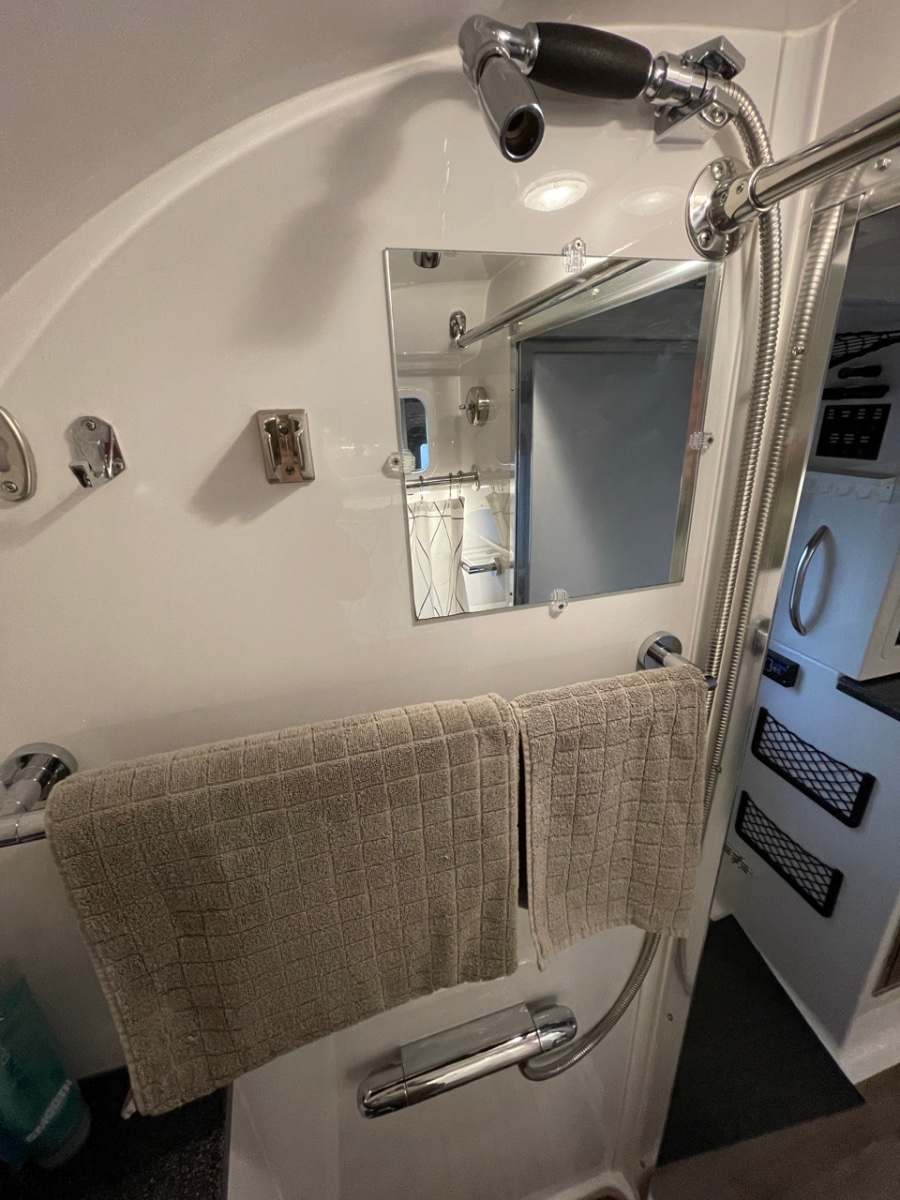
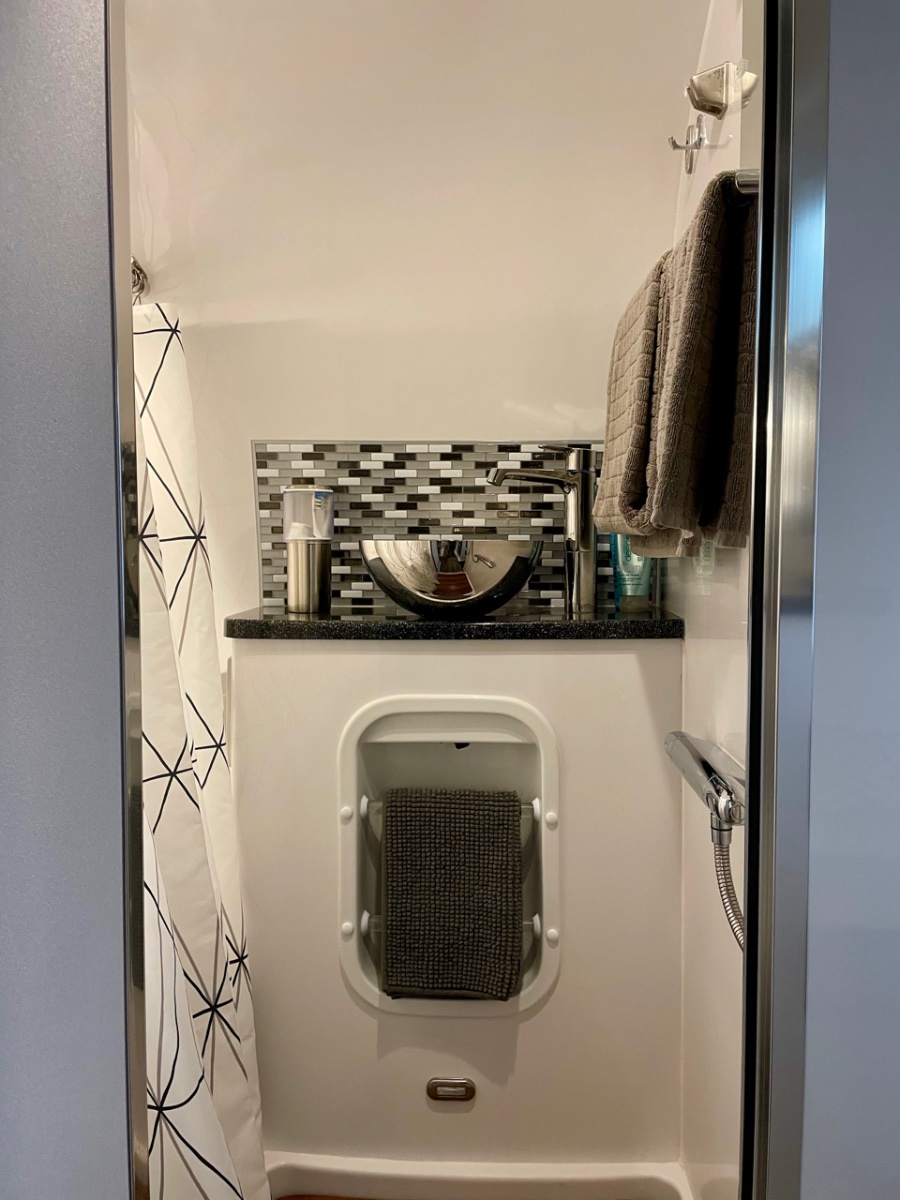
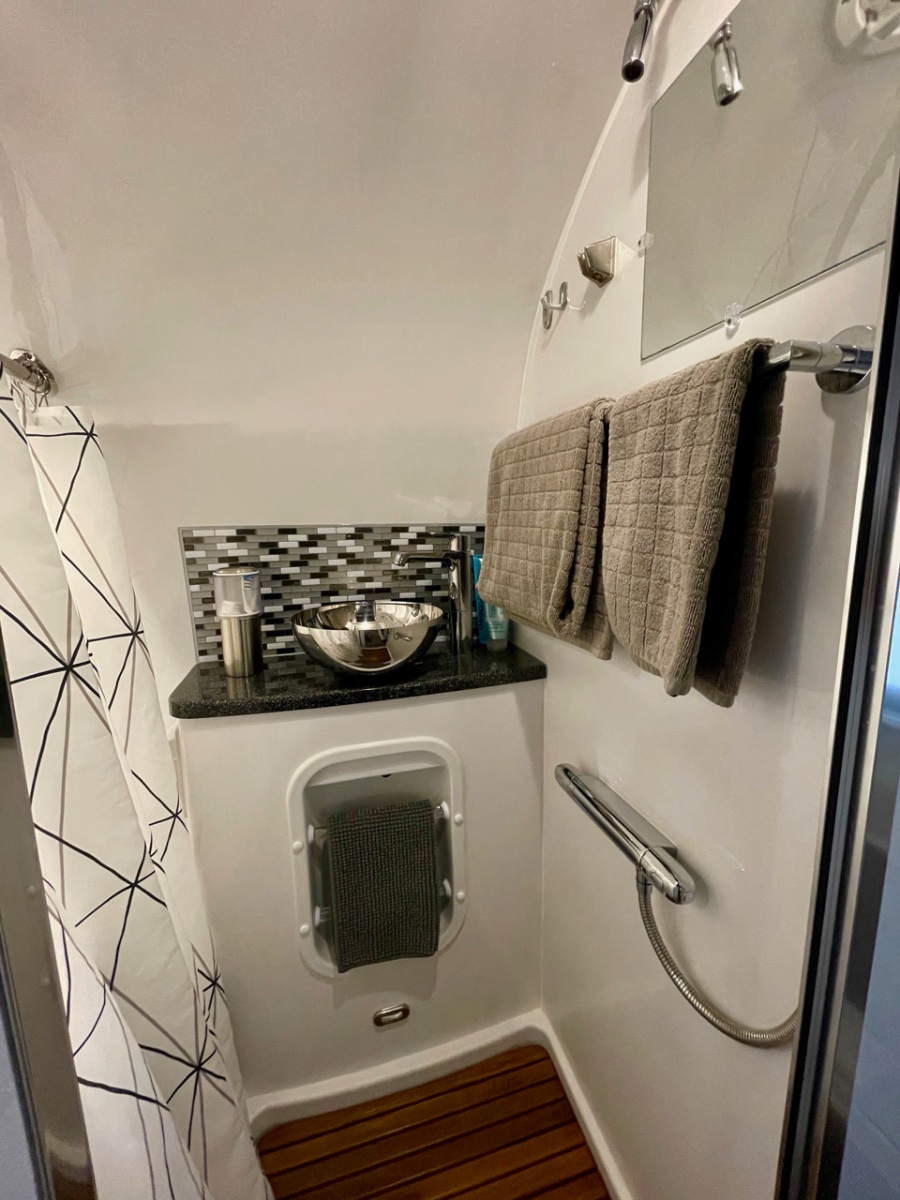
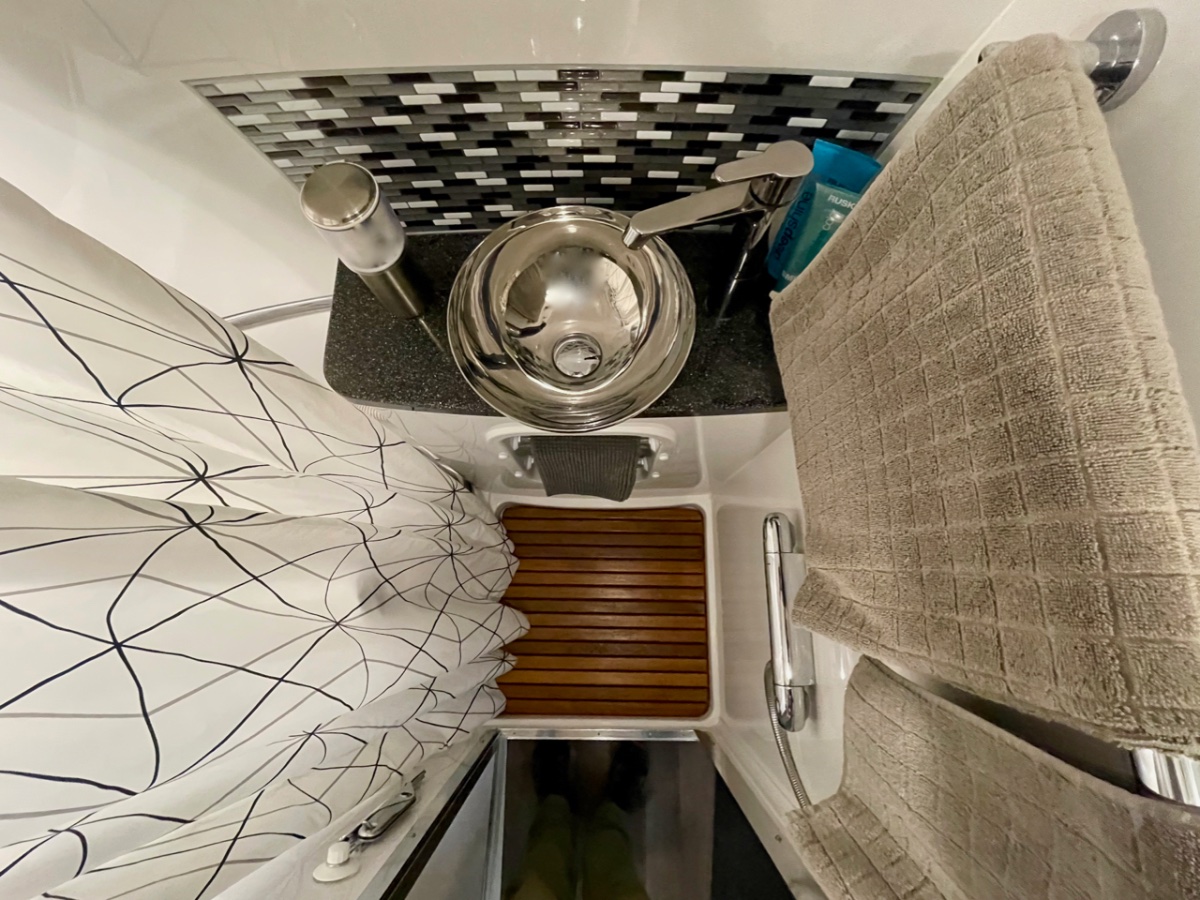
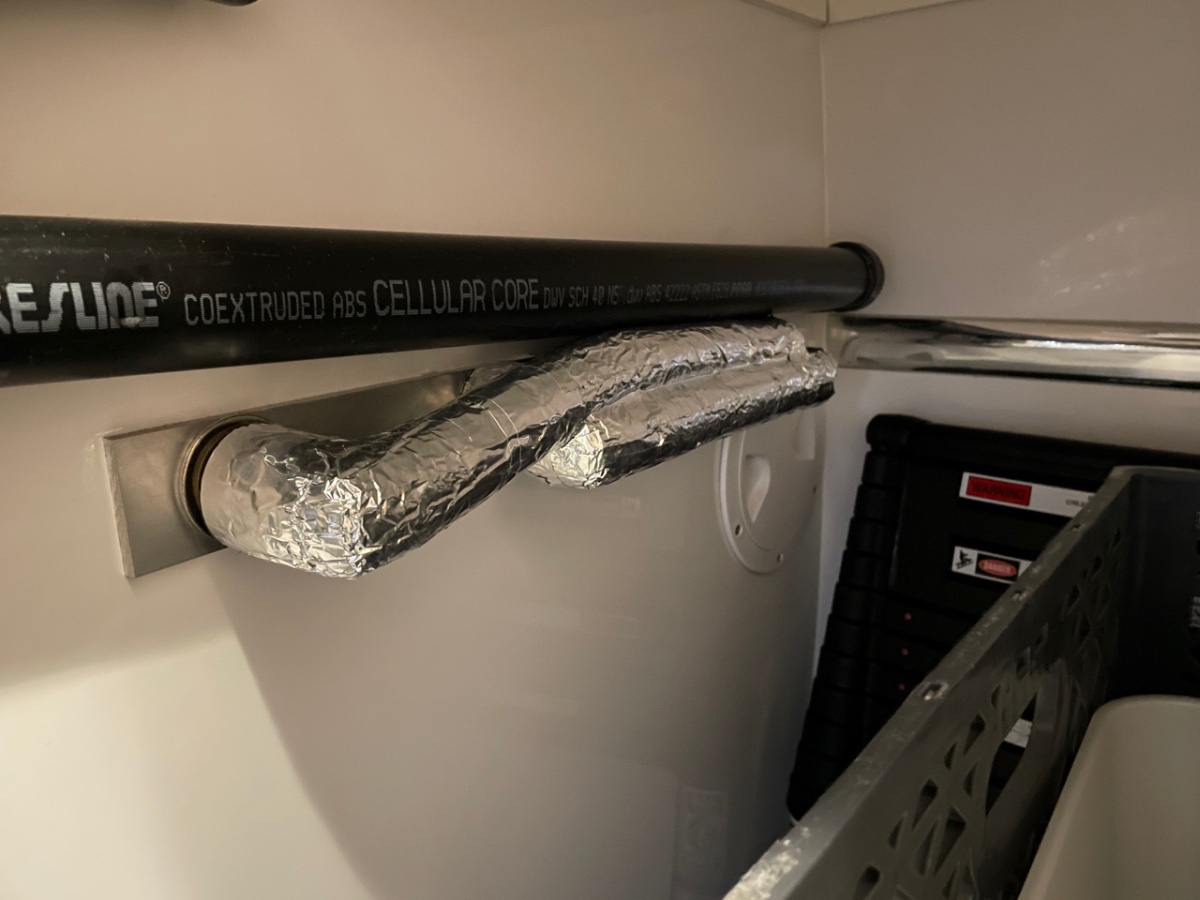
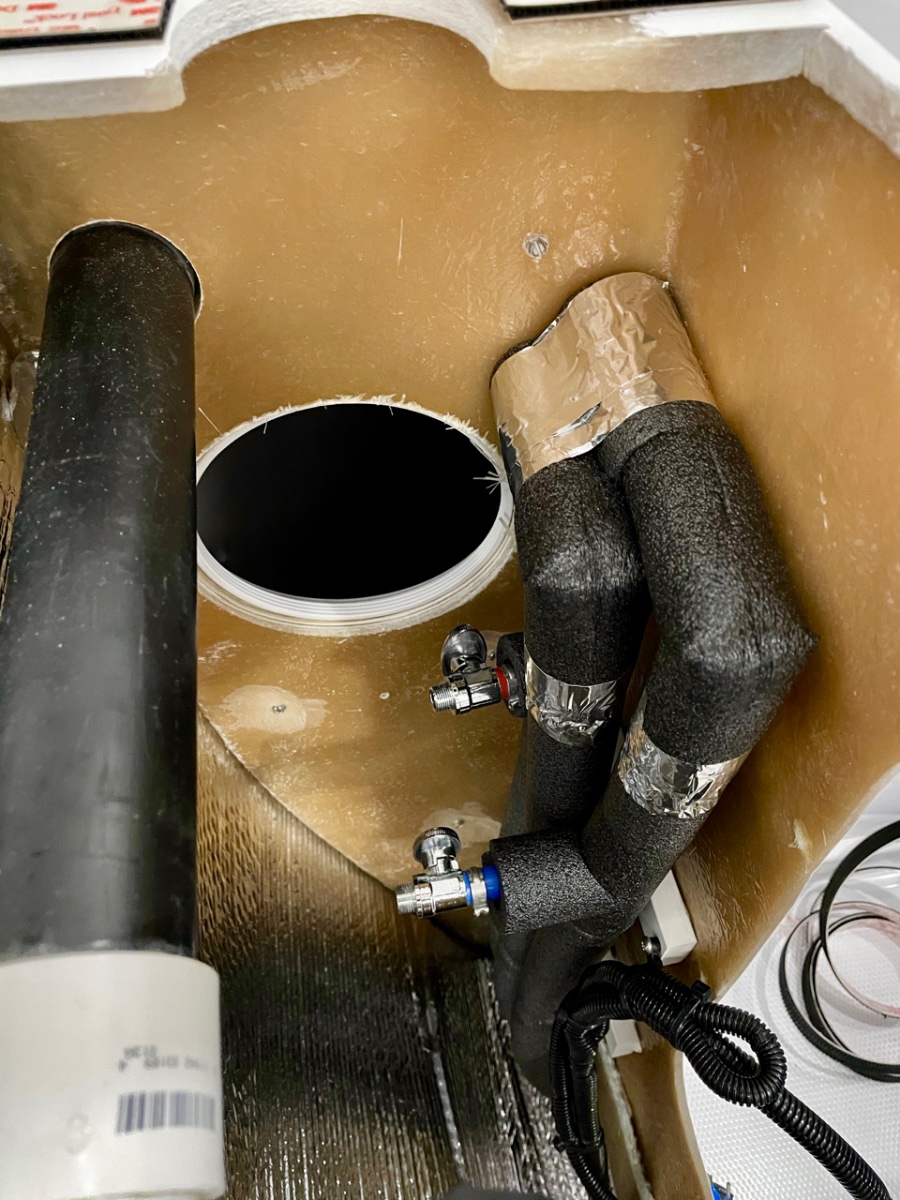
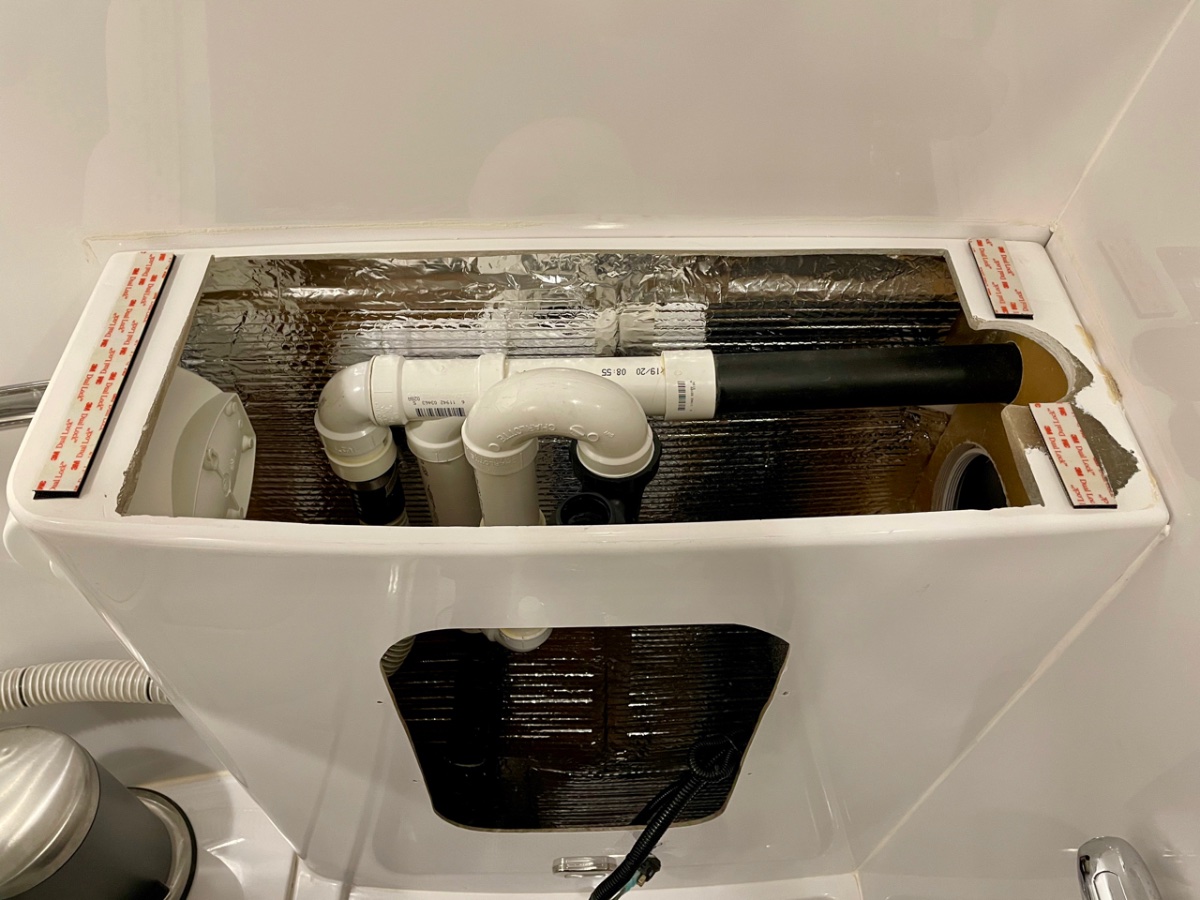
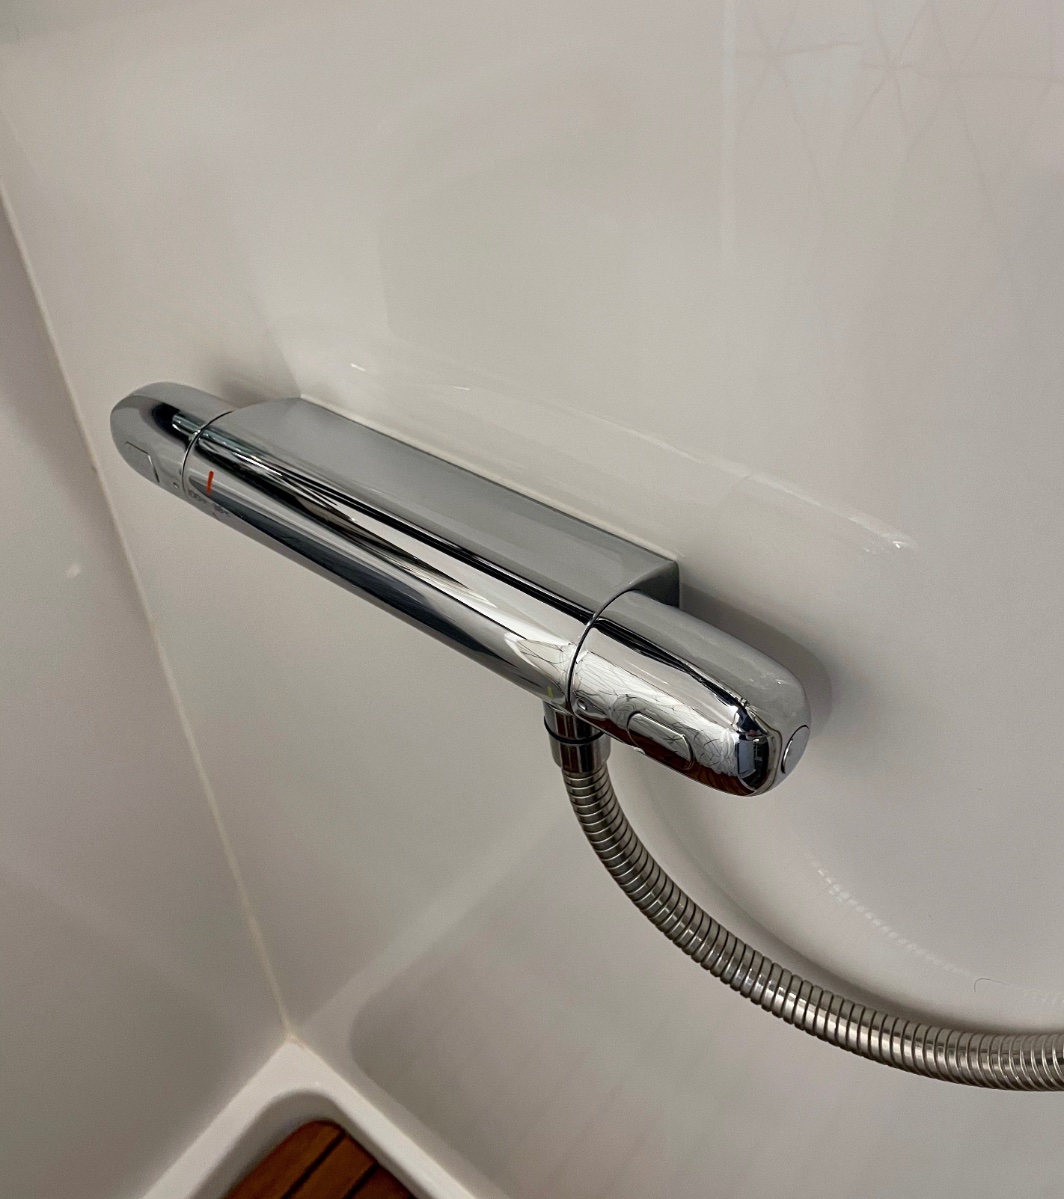
Many of you know that this has been a long, drawn out project. I think I started talking about it to a few people at the 2019 rally - so it's been well over a year in the making, almost two. Not that it was particularly difficult (though certainly a more major mod), but because of laziness and indecision on all the components it ended up being a start and stop project, with months sometimes between fits of activity. And then it snowballed into a complete plumbing overhaul, which was unnecessary - but then that's how the trailer got its name, after all. I'll post about all the plumbing stuff later, but since there have been a few recent posts about shower and bath mods, I figured I'd go ahead and toss this one into the mix. This project started for a few reasons. One, I've always found the bath sink to be mostly useless. It's fine for washing hands, but for most anything else, you've got to crane your neck around with the front wall curving in to hit your head. And trying to use a tiny little sink for washing your face just leaves water everywhere. So we found that were using the kitchen sink almost exclusively. That was fine - no big deal - but with the bigger sink, I was getting tired of wasting water cleaning toothpaste residue out of the sink, and it seemed silly to have a bath sink that got little to no use. The second reason for the upgrade is that after we redid the kitchen sink, the bath sink just looked sad. In addition to functionality, the bath needed some sexy. So the obvious solution was a vessel sink of some sort. Since a vessel sink sits on top of the counter, I'd have much more leeway in size and placement. I could pull it forward as much as I wanted, plus it had the added benefit of raising the sink to a more comfortable height for us. Some experimentation with kitchen bowls of different sized showed that I could get a fairly generous sink that didn't take up too much shower space. I settled on something in the 11" to 12" range; which proved to be a little difficult to source, especially after deciding on the material. I had bookmarks for dozens of sinks of different materials, but I couldn't find one that I really liked. I almost picked a glass one off Amazon, but in the end I thought that was going to be too heavy. What I really wanted - since I had already swapped out almost all of the brushed chrome fixtures in the bath for polished - was a simple polished stainless sink. There were a few out there, but nothing in the right size, nor at a reasonable price. So the project bogged down a bit at that point; but I was confident that I'd find something eventually, and so I went ahead and ordered a new vanity top from Oliver, without any cutouts for the sink or faucet. I’m glad I did, since Oliver has apparently now stopped offering our countertop color And sure enough, a few months later I came across a discontinued sink on Overstock.com that was exactly right. 11.25", polished inside and out. It's the Acquaio sink from WS Bath, if you can find one. I know that other sizes are still available. It was still pricy even on discount, but by that point I didn't care. To make up for the splurge, I got a faucet from Ikea, which is actually pretty nice. The colors from chrome to stainless don't exactly match, but they're close enough and it doesn't bother me. Since I was swapping out the faucet, I needed to find a separate shower valve, which was another lengthy quest. I thought at first that I'd put one to the right of the bath caddy, like @mountainoliver has in his trailer. But most everything I found was just a bit too big to fit (I didn't know about mountainoliver's mod and the mixer valve he used until later). Then I found the Grohe Grohtherm valve, which was interesting in a couple of respects - it didn't recess into the vanity at all (which eliminated a potential issue with the plumbing), it matched the Grohe faucet that I had already installed in the kitchen, and since it was linear, I thought that it might actually fit in the space above the caddy, between it and the vanity top. And it did fit, but looked squished in place, plus I didn't think until trying to place both it and the sink that the the sink drain and trap was going to be difficult to work the plumbing around. Plus putting it there meant that the shower hose was going to be strung across the vanity and generally look bad and be in the way. The problem with this realization was that I'd ordered the valve and the sink before one of my 3-month breaks in the project and now neither was returnable - so I had to make it work. This meant that the shower valve was going on the closet wall. I also realized during the test fitting that when I pulled the sink forward, the drain trap was going to hit the top of the bath caddy, meaning that I couldn't get it far enough forward to work. Small disaster. But I realized though that the bath caddy wasn't symmetrical, and if I turned it upside down, everything fit. I'd lose the flat shelf on the bottom, but we only use the caddy to hold the bath mat, so not a problem. Small problem with the water pump switch placement, though, since it would be on the bottom - but a quick email to Oliver had a new caddy that hadn’t been drilled for the switch on the way. At that point, all the pieces were here, all the logistics worked out, and I was ready to go. Time for another couple months off while I built up the courage to drill through the closet wall. Then finally... First step was to remove the existing vanity top, which is possibly one of the most firmly attached things in the trailer. It's glued in place, so the only way I could find to get it off without completely destroying the vanity was to cut through the joint with an oscillating saw. That's a slow, tiring, dusty endeavor; and it generates a great deal of heat, so you've got to work in spurts to keep the fiberglass resin from burning - which is fine really, since working through the caddy access, your shoulders will welcome the rest. I had to do a tiny bit of trimming on the new top to get it to fit as snuggly as the old one; and once in place, I sealed it with silicone like the original. Top off, new drain lines in place, and I decided to attach the new top with industrial velcro to make it easier to remove in the future (works well). Next, shower lines teed off the existing plumbing, line to the nonexistent toilet removed, and some insulation added to both the plumbing lines and the outside wall behind the vanity. (I have a circulating pump on the hot water, hence the extra line.) I also glued a small PVC block to the back side of the vanity wall to tie down the water lines and prevent them from vibrating too much. And as always, cleaned out as much fiberglass dust as possible, cleaned up and wrapped wiring, etc. The access port on the closet side is something that Oliver gave me in the original build. The sink valves and drain trap are accessible from that port, and since I used velcro for the top, I have the option now of cutting the silicone on the top and pulling that off for access, in addition to taking out the caddy. New plumbing in the closet for the shower. I drilled out a short piece of aluminum as a backing plate for the shower valve. The plumbing is protected somewhat in the closet by the ABS vent, and we really don't keep much in there that could bump around and damage the plumbing. But a few layers of aluminum tape should help protect the insulation from getting beat up and gives a bit of a spaceship vibe. The valve is supposed to stand out from the wall about an inch or so, but I decided to recess it so that it attaches flush and as out of the way as possible. I caulked around the valve and it ended up making a nice little shelf for a razor, and I placed it low enough that my wife can use it to prop a foot while shaving her legs. You can also hang a bar of soap on one of the handles to drip dry. The faucet has a neat feature with stops on both valves, which can be custom set to whatever temperature and flow you prefer. The little buttons on the handles allow you to go past the stops when you want. And that's really it. Installing the sink and faucet is just drilling two holes and following the directions. The only change I made is that the sink came with a short stainless ring to mount between the sink and counter, but I didn't like the look and so just used one of the black rubber gaskets that was inside the ring. That way the sink looks like it’s sitting right on the counter instead of a pedestal. We tested everything out on our last trip and functionally, it all works as expected. The sink isn't in the way at all while showering, and really is so much more usable. Plus I think it looks great. The shower functions just as nicely, with the valve not being obtrusive. I added a second holder for the shower head up high, which works better for me, though my wife prefers the original one. I still need to swap that one out, since I think it's the only bit of brushed chrome left in the trailer. I added the same backsplash material that a few other owners have recommended. I wanted to order a new, wider mirror; but the original one is glued on and so I didn’t want to go through the trouble of trying to get it off. I suppose I could just place one on top of the other, so maybe that’ll be a future project. Glamor shots -
1 point
-
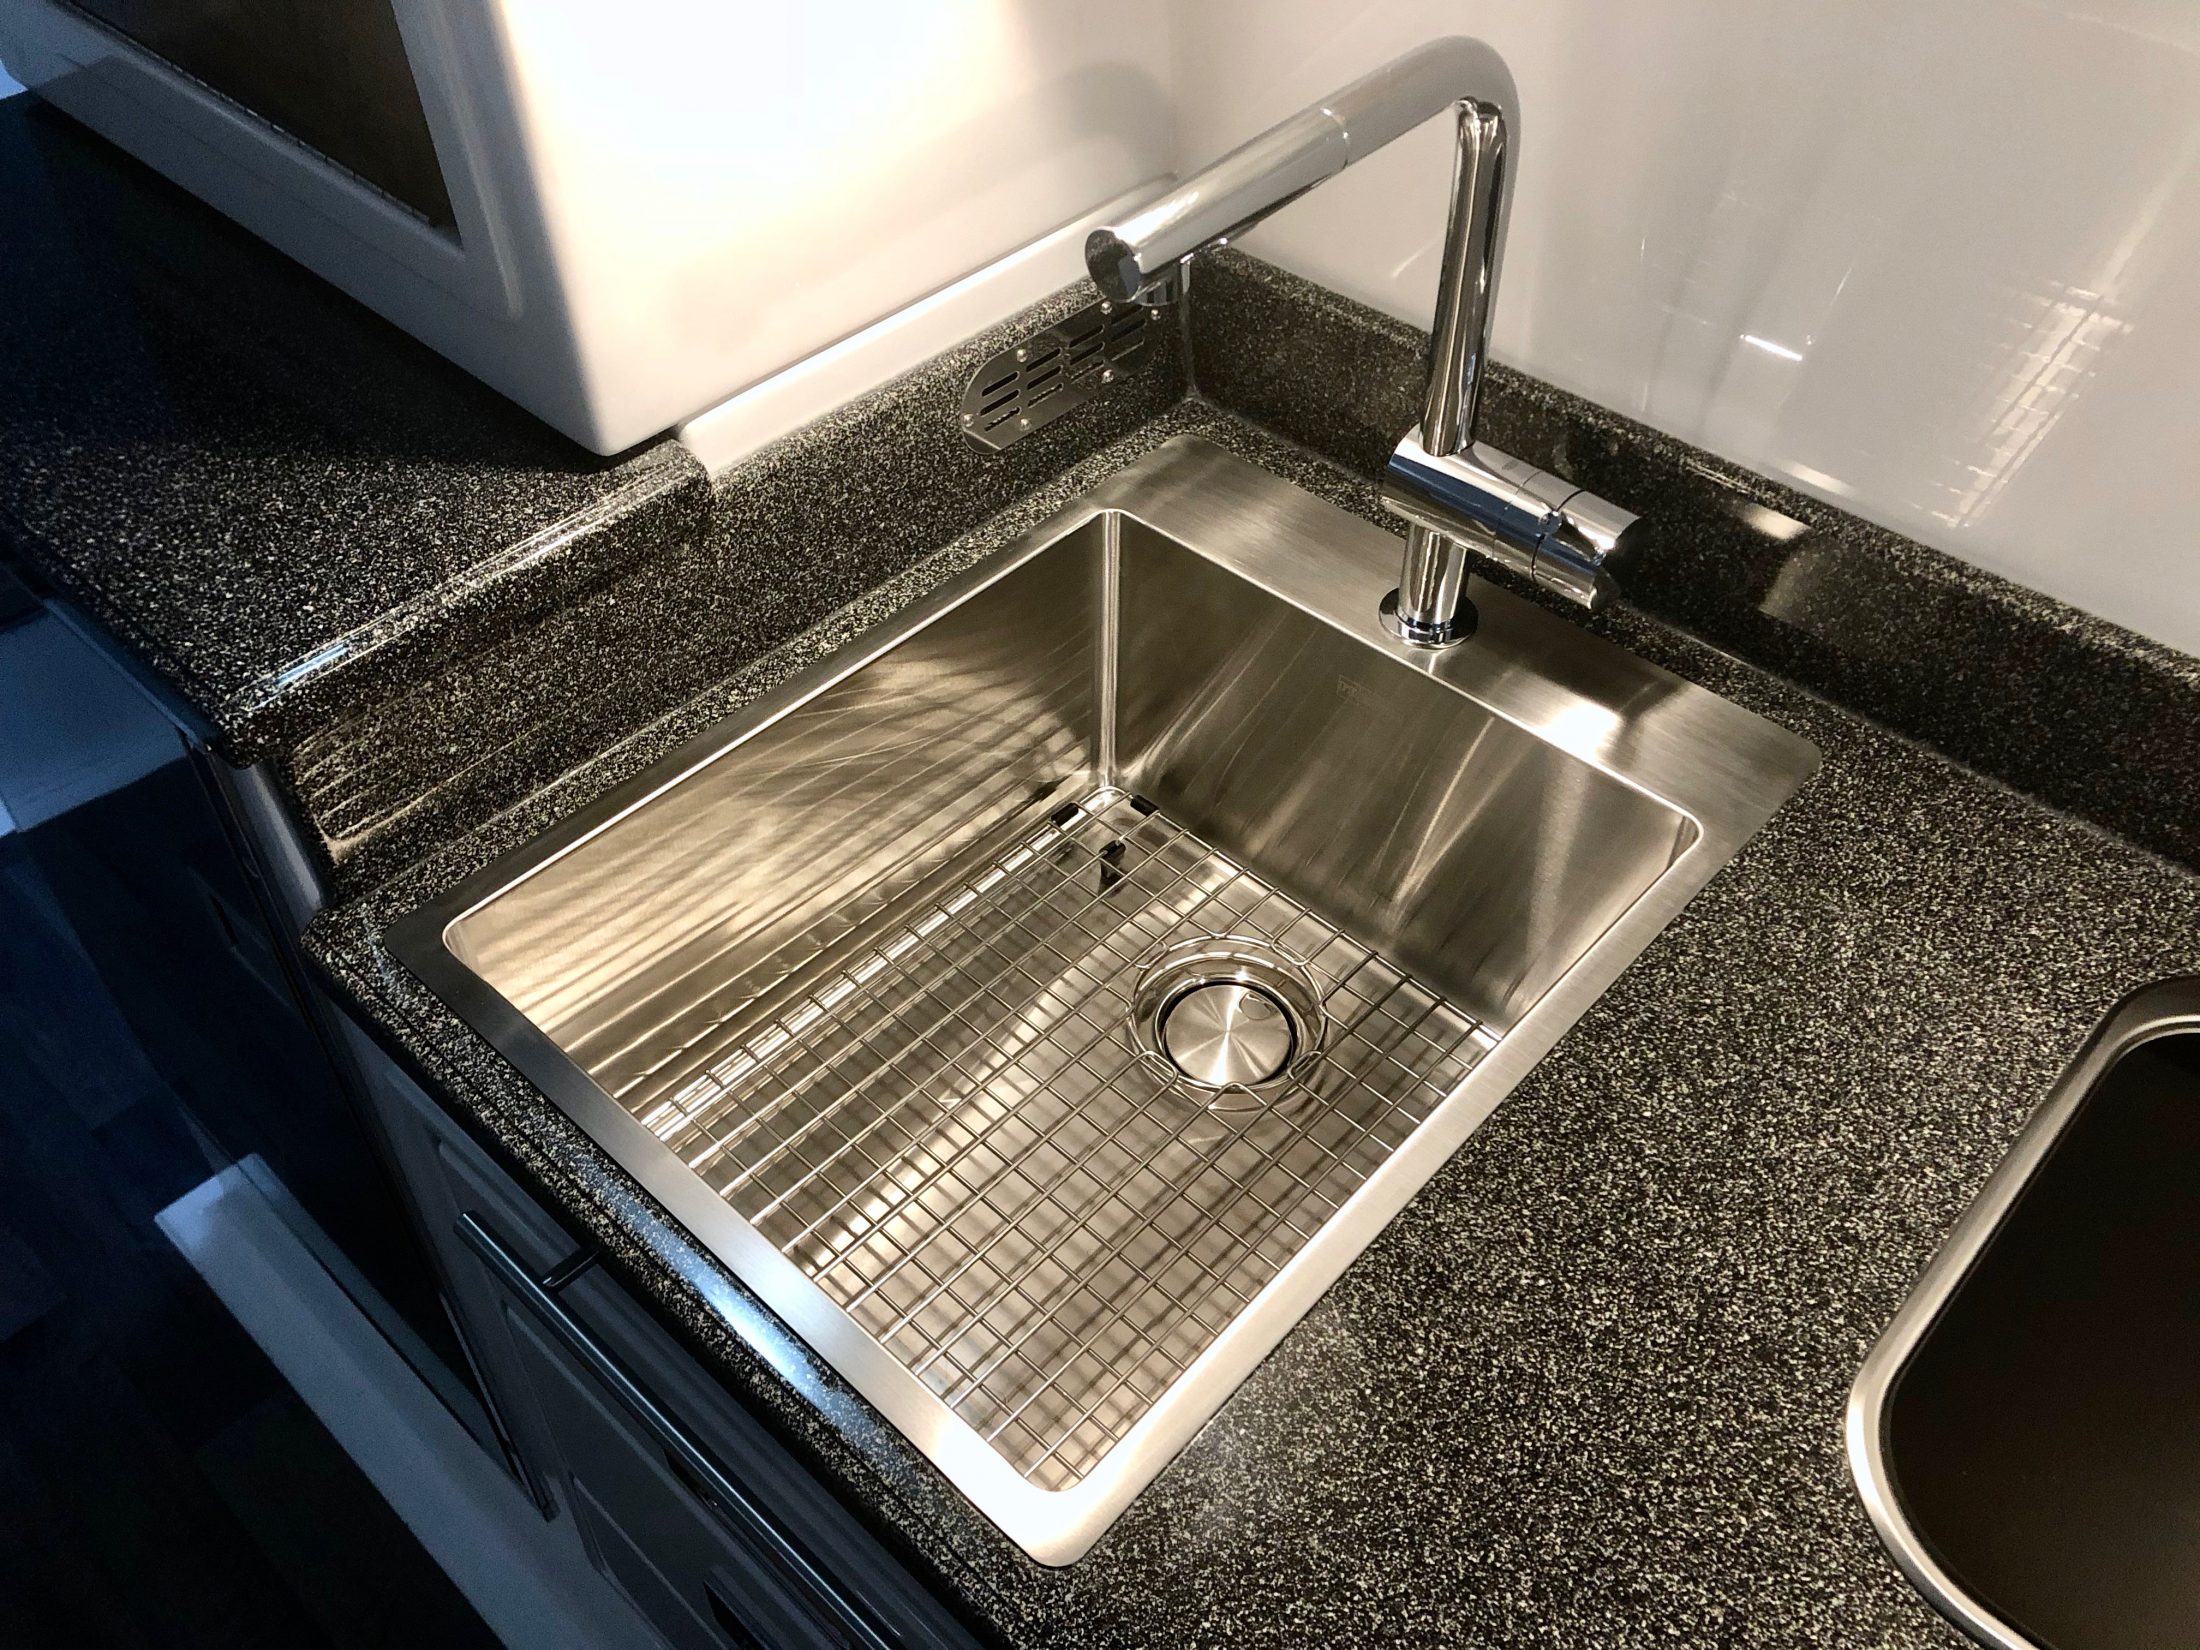
This, I like - I never cared much for Oliver's sink and faucet choices and I'd actually planned to supply them a sink and faucet to get installed on the line. Unfortunately the one I wanted wouldn't work and I was having trouble getting the proper dimensions from Oliver, so I just let it go and figured I'd replace it later. Well, that was a good idea until I realized that the cutout Oliver made for the sink was way too big for any of the bar sized sinks that I could find. And all of the full sized kitchen sinks were too big to fit. But finally I stumbled across this oversized bar sink from Franke. It's the 17" Franke Vector. Overall, it's the same width as the existing sink, but the lip is narrower, so the bowl itself is a bit wider. Mainly the sink is much longer and deeper. In overall volume, it's over twice as large as the original sink, but takes up no more counter space. Can't beat that. And because it's farther forward and 3" deeper, it doesn't splash all over the place like the original. In fact, I can even turn the faucet up all the way without it splashing over the front of the sink, which is novel. I like the Franke sinks in that they have the straight sides and look of a modern zero radius sink, but they do add a slight radius to the corners so that you can actually keep them clean. Installation wasn't too hard. I'd rate it 7/10. The difficulty was that I had to modify the base cabinet for it to fit. There's a wood brace running across the top front that is screwed to the fiberglass beneath the drawer trim, which had to be cut out, and also a portion of the left side of the cabinet. That sounds like a lot of structural support to remove, but the cabinets are mainly tied in at the bottom and I ran it past Jason beforehand to make sure I wasn't looking at it wrong. I have to say that the cabinets are stoutly built, and I'm not at all worried about it. The second problem I ran into was that my countertop wasn't perfectly flat. It bowed down in the middle slightly which wasn't apparent until I installed the sink. But I was able to temporarily shim the counter against the top of the cabinet while the silicone seal dried and then I glued PVC blocks around the perimeter of the sink to both hold it in place and to level the counter. The Franke sinks have an odd installation clip that wasn't designed with hollow core fiberglass in mind, so the blocks were necessary anyway. It's not going anywhere now. Of course I lost use of the flip out drawer but I hated that thing anyway. I glued a few ½" blocks to the front of the sink and then fixed the drawer front to the blocks with heavy duty velcro, just in case I ever need to remove it for some reason. The sink depth worked out perfectly with the existing cutout on the back of the middle drawer to clear the drain. I thought I was going to have to get a Hepvo trap to make it all clear but Oliver actually places the trap behind the cabinet, so no problem. I did have to get the narrowest profile elbow I could find to attach to the drain basket, so I had to go with cheap plastic rather than PVC, but such is life. At the end of the day, however, I decided to use a different drain basket that was a bit deeper, so I had to make the drawer cutout about a half inch deeper after all. The faucet is a Grohe that I found on sale at Home Depot for about half price, so that was a nice find. It has a really nice feel to it and unlike the sink, was a cinch to install. Grohe has a trick installation method that allows you to work from above so that one person can do it without crawling under the counter a hundred times. Oliver's hot and cold lines are convenient to get to and there's an access panel in the back of the cabinet that can be removed if you need more room to work. The only issue I ran into was that the counterweight for the sprayer was getting caught up on everything that's packed in the back of the cabinet. To fix it, I made a tube from some flexible plastic sheeting that I had lying around and just slid that over the sprayer hose. Now the hose slides easily inside the tube and as a benefit, the weight won't bang around inside the cabinet while traveling. So that's about it. I've learned that I don't have the patience or foresight to take progress pictures Like John does, so my description will have to do. But I'm happy to answer any questions.
1 point
-
I just took delivery of my used 2018 Oliver Elite II yesterday. It took me 5 months of research of trailers and 3 months of looking on the Oliver Forum to finally buy this Oliver. Three other Oliver trailers that I wanted to buy were sold prior to me "pulling the trigger". I was the first person to respond to the ad on the forum for my Hull # 354 which had all the options I wanted on it. The original trailer owner lived in Michigan and because of my worry of traveling with COVID virus, he was nice enough to deliver it to me in Maine. I can't wait for spring so I can wash and wax the outside and get the Ollie ready for its maiden trip with me. I plan to replace the front Oliver log with a outline of the State of Maine and a red lobster on top of the outline. If you see it in your travels be sure to say hi. I want to thank the Oliver Service people for all their help in pricing out options that I wanted on the other trailers I was looking at (and now do not need with my Oliver). Richard1 point
-
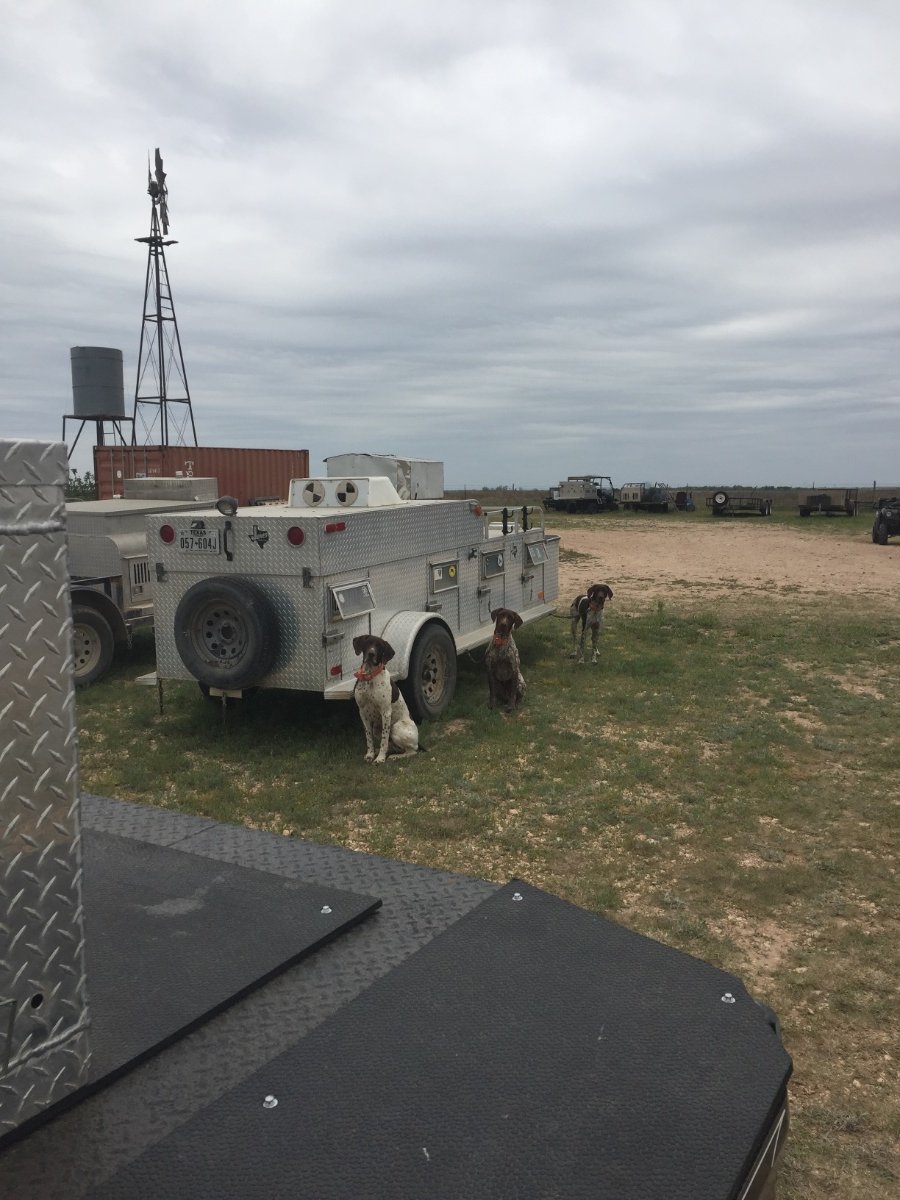
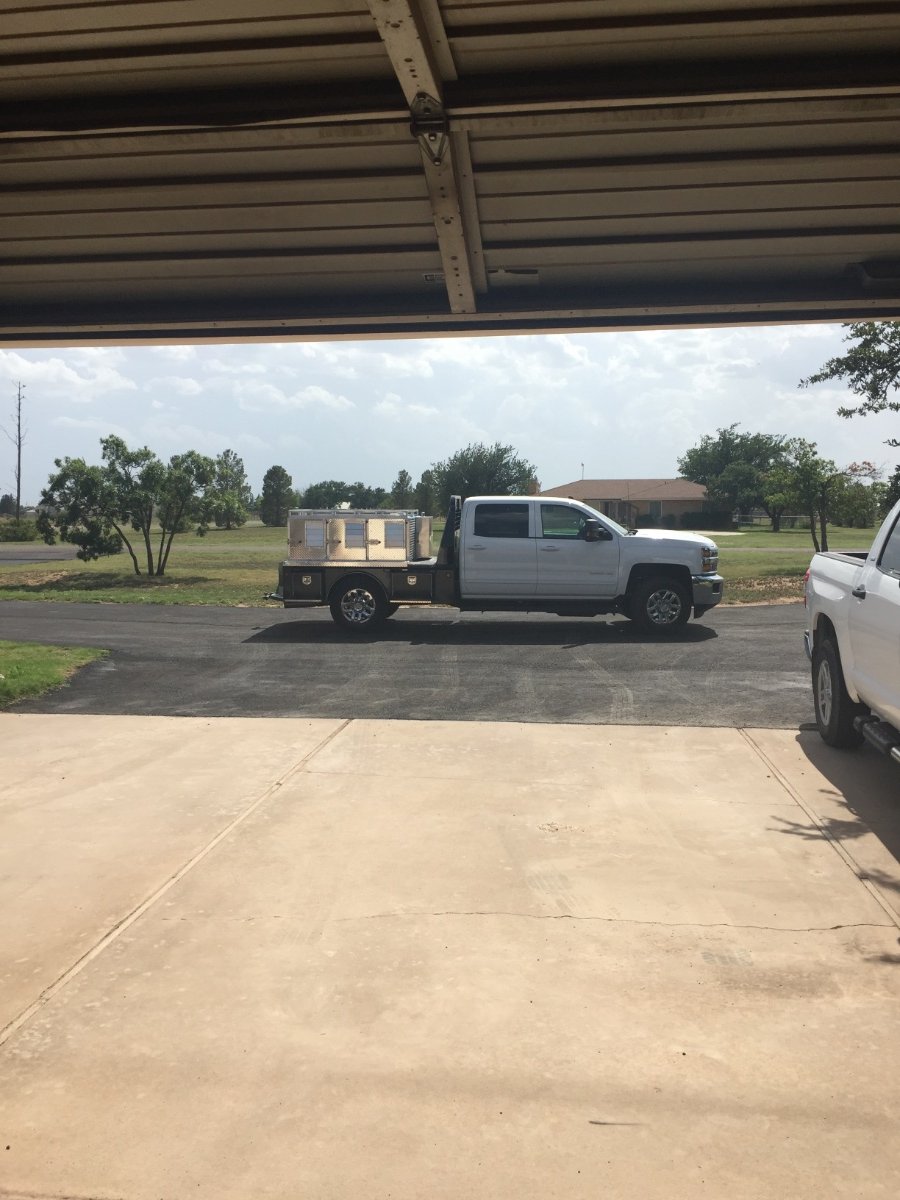
Hello sir. The box has 3/4 inch foam between outer and inner walls doors ceilings and floor. It is like a big cooler. Doors are vented as well as roof. Shading is necessary at times. Desert southwest generally has some wind so positioning vehicle is key. Ran in Sonoita Arizona last weekend. Was very nice weather. Just wished I had the ManCan! Will try to post photos of Jones box. Jones trailer out of Woodson Texas makes the best dog transport equipment I have found!1 point
-
As with a bunch of things, the answer to your question is - "it depends". In this case the "it depends" is - how much energy do you use? If you are conservative with your energy usage - don't leave lights on, don't use a bunch of fans, hair dryers, heat (the blower takes electricity), don't run the water pump too much, etc., etc., then you certainly should be OK for 3 days. Yes you can hook up a suitcase solar panel with clips - just be sure that the panels have a charge controller. Oliver does "allow" solar hookup without rooftop panels - simply have an exterior solar port installed either during production or by the Service Department after delivery. The key to the whole "solar thing" and "battery usage thing" is to know and/or manage your energy consumption. Bill1 point
-
One thing to keep in mind is that like everything else from 3M, Dual Lock isn’t a single product. I think there are 15 versions of varying combinations of adhesives, strengths and thicknesses. And you can combine strips of different types to change the strength. The best way to get the one you want is to get the product number from the 3M website and then search for that on Amazon.1 point
-
I wasn't suggesting an Oliver trailer appreciates, but I get what you're saying 😇 For the most part, an Oliver trailer depreciates much less than other RVs, with the exception (maybe) of today's market where demand is high and supply low (where the majority of RVs are rushed from factory to dealerships with less than stellar quality control to meet increased demand).1 point
-
Dwainkitchens: I did a lot of research over 3 or 4 months looking at four fiberglass RV manufacturer's as well as various airstream models. This research included comparing different options of each company. I also talked to various owners of each brand as well as reviewing the web site of each company to see what options each could provide. To compare each, I set up a spread sheet of the criteria I was investigating so I could easily make comparisions. One of my criteria items was ease of towing each trailer, where Oliver has the advantage. My research brought me to the conclusion that an Oliver Elite II was the RV for me. I was unsure if I wanted to purchase a new or used Oliver Elite II. I decided to try finding a used Oliver and over time this past fall I found 4 Oliver's on the Oliver classified forum only to lose out to other people who purchased them before I made my decision. (Many used Olivers on the forum are sold in less than a week, some in only 1 or 2 days). After losing out on buying these used Olivers, I was ready to place an order for a new Oliver and wait a full camping season for it to be manufactured with the options I wanted. Other manufacture's do not have the available options that Oliver has. About the same time as getting ready to place a new order, I found my used Oliver, that included all the options I wanted on my trailer, in the Oliver classified forum. I called the owner within 1 hour of it being posted on the forum and immediately agreed to his purchase price. Afterwood, I found out that I was the first of 6 people who contacted the owner on the first day it was advertised. Oliver travel trailers sell fast, which is proof of people knowing the quality of an Oliver trailer. I am happy to say that I now a proud owner of a 2018 Oliver Elite II trailer. Bring it to Maine from Michigan proved my research was valid. Dwainkitchens - If the size of the Oliver meets your needs, I am sure you would not regret buying an Oliver, a trailer that will certainly last a lifetime and then have a very good resale value afterward. I recommend that you go visit a Oliver owner and see for yourself the quality built into these trailers. Even though my Oliver is a 2018 unit, you would swear that it looks brand new. Oliver quality in their manufacturing can not be disputed. Go see one for yourself prior to deciding.1 point
-
Some of those manufacturers really need to reassess their supply models for the USA. I considered retrofitting an Alde heating system in my Ollie, but you cannot buy individual parts, it is for OEM RV builders only. How insanely stupid is that? I guess they are protecting their reputation and warranty. Too bad. John Davies Spokane WA1 point
-
I have the 3314850.000 Air Distribution Box on Hull 313. See if this document for installation of the Dometic Air Distribution Box 3314850.000 answers your questions. https://www.intechtrailers.com/images/info/PDF/Dometic/schematics-ac-diagrams.pdf
1 point
-
Mossey you stopped me from making a huge mistake! Will tackle the front /rear vents screws . Thank you1 point
-
I would like to add that a lot of folks may expect “Lexus quality” from an Ollie. That will never be the case. A modern car that is in large part fabricated and assembled by robots will inevitably be a much more precise and reliable machine for years to come. An Ollie is assembled over two months by a large number of individuals, who by their very human nature have strengths and weaknesses, good days and bad. They may get distracted, they may make mistakes. A good quality control program should, and usually does catch those, so they can be corrected. There may be a bad batch of sealant, or something similar that is beyond their control.... And most of the appliances and components like wheel bearings and seals are standard RV stuff, meaning they are cheaply built (“adequate”) and only vaguely efficient or reliable. To get a Lexus RV you have to spend a whole lot more money. But OTH the general Ollie build quality seems to be greatly improved over four years ago, when they were experiencing their first growth spurt, and having to adapt to a much more intense production schedule. A new owner expecting completely trouble free , low maintenance ownership is probably going to be very disappointed. The stellar follow up service and the feeling of being in a close family is very important. It’s a VERY nice RV, and I feel you cannot buy a better one for the money, but in the end it is still an RV. If you were buying a $500,000 Earthcruiser, you should expect close to perfection. But an Ollie’s bones, the hull and frame, are stellar. That is the bottom line. It is always fun to watch the look of stunned disbelief of somebody who really understands metal fabrication when he first squats down and looks at that wonderful frame. His eyes widen, then “Whoa!” John Davies Spokane WA1 point
-
Final verdict: the Buff Magic worked. I started out polishing by hand and could see it was working, but after my rotator cuff started aching I used my drill with a buffing pad on it. 👍 I figured I'd finish with my random orbital buffer but I probably won't bother as I can't see any swirl marks or blemishes up close from the first pass. Again, tough to see the real results without moving around and looking at it from different angles in the light, but I tried to capture the same lighting and reflection as the first picture. It does look like the rest of the interior now - new.
1 point
-
Most owners install these gutters a bit closer to the windows in a fashion similar to the picture below. Anyone that is interested in this mod should read and re-read the installation instructions and various owner's tips here on the Forum. Bill
1 point
-
A great big NO, do not transport one in any position but dead upright. You could maybe get away with a steep angle (not sideways) when it is completely stationary, but not in motion. Even if you drain the gas - and you should run the carb dry every time - the oil will maybe run out the breaher vent, and the engine mounting system is not designed to support weight in the “wrong” direction. If you don’t drain the gas, it will run out the carb, either into the cylinder head or through the paper air filter and onto the floor. At the very least a mess, at worst a fire hazard and it might maybe possibly screw up the generator. So, just forget this idea. John Davies Spokane WA1 point
-
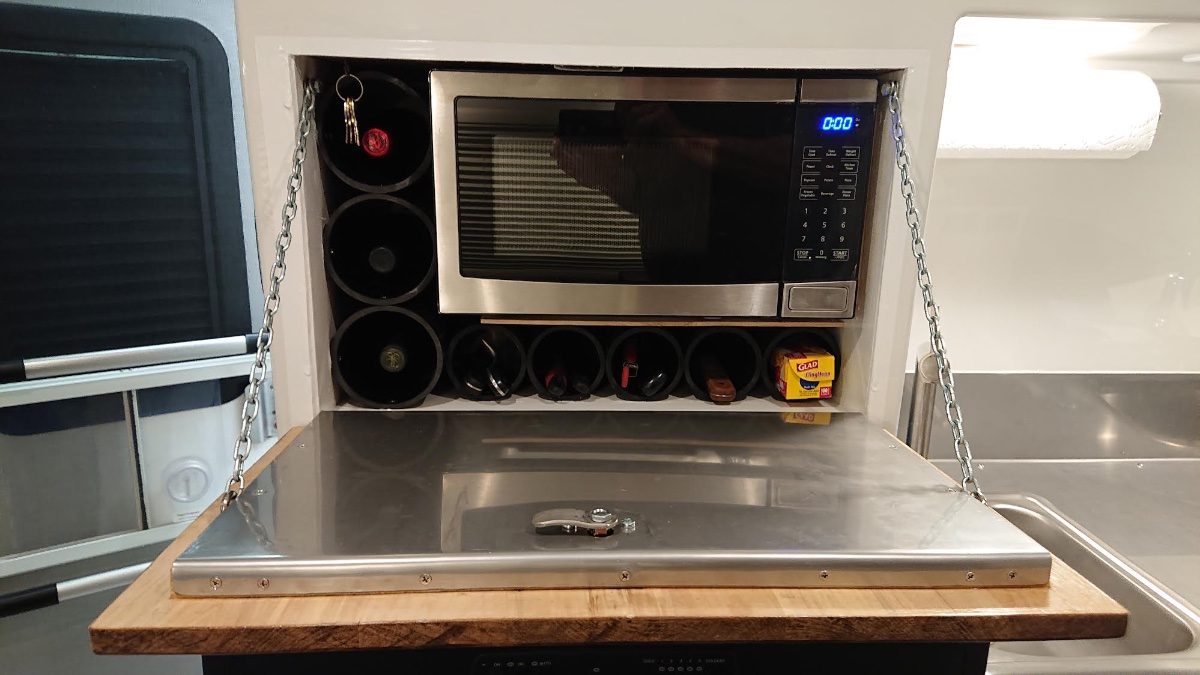
Here are few pix of my stainless counter top. It was upgraded after this pic with a barrier on the right side to prevent spills and a nicer faucet. The microwave cabinet was a very successful upgrade. It gave more counter space, a place for knives and utensils, a wine rack and a secure microwave that could not fall out of the cabinet. The microwave that came in my Ollie, tried to jump out of the cabinet twice.
1 point
-
We purchased the Yamaha 2400 Inverter Generator for our 2017 Oliver Elite II, it works great with power to spare. The only down side is it's weight but will put up with the additional weight as it is an outstanding generator.1 point
-
Wow, you should go into your own business customizing trailers. Given the space constraints you had to work around, the plumbing is amazing to me. The décor and final look are spectacular upgrades. 🙂1 point
-
We finally took Ollie on a camping trip out west and wanted to share a few photos. We visited Kodachrome Basin SP UT and it was raining, so will visit there again on our next trip. Have to say Ollie has great towing manners and very pleasant to camp in!!!!! Winslow AZ: Bryce NP: North Rim: Zion NP: Cedar Breaks NP area: Valley of Fire SP NV: Snow Canyon SP UT:1 point
-
That is on the south eastern corner of Moosehead Lake. Off of Lily Bay State Park. Actually I think the ice had only been out for about two days.
1 point
-
The solar controller is much like a regulator, insuring that your batteries are never getting too much "raw" power from the panels that will overcharge your batteries. It sends only the power you need, from your solar panels, to charge your battery bank. Like a charger, a solar controller will decrease power coming in, as necessary, and continue to step down as you leave bulk mode, accommodating other stages. Likewise, when it's dark or cloudy, your controller won't send power back to the panels. (Though modern panels have diodes to prevent this discharge, as well.) A solar charger is a necessary device between your solar panels and their fluctuating voltage input, and your batteries. Both our boat and our trailer have a solar controller, plus a charger for the rare times that we actually plug into shore power/ac current. That's where the charge controller steps in, doing a similar function, but from ac power, converting to dc to charge the batteries. Or, very simply, it's all electron magic...😀1 point
-
Well you don’t need all that, just the BMS. It’s Bluetooth and uses the same app as the shunt. It will give you what you're asking for - individual cell voltages, temps, etc. as well as keep track of charges, errors, etc. You get Victron quality and support, and a battery small enough that you can fit 600 Ah worth in your battery box with room to spare, and if something happens to the BMS, you don't have to replace the entire battery. For 200Ah, it would cost about $300 more than the lifeblue total, including the BMS. Each additional battery is only $100 more. Well worth it, IMO. For me, I wouldn’t even be thinking about LifeBlue. Battle born, yes, but lifeblue as far as I can tell is a mom and pop business that rebrands Chinese batteries. I don't mean to disparage them - I say good for them for their initiative, and from what I can tell, I think the batteries are fine. But, what happens if there's a problem? A mom and pop is going to have more pressure to deny warranty claims, less time to deal with customers, less expertise for dealing with technical questions or problems, less capacity and financial ability to deal with major problems like a recall, and an uncertain future if something were to happen to one of the owners. I hope they do well; but for most buyers, these batteries will be the most expensive individual component on their trailer by a factor of two, and for that I’d want expert support and a company that I know is going to be around for a while.1 point
-
Susan, We enjoy meeting Ollie owners everywhere we travel! 🙂 Met Ollie and Casita owners, they shared fine cobblers with us: 😋1 point
-
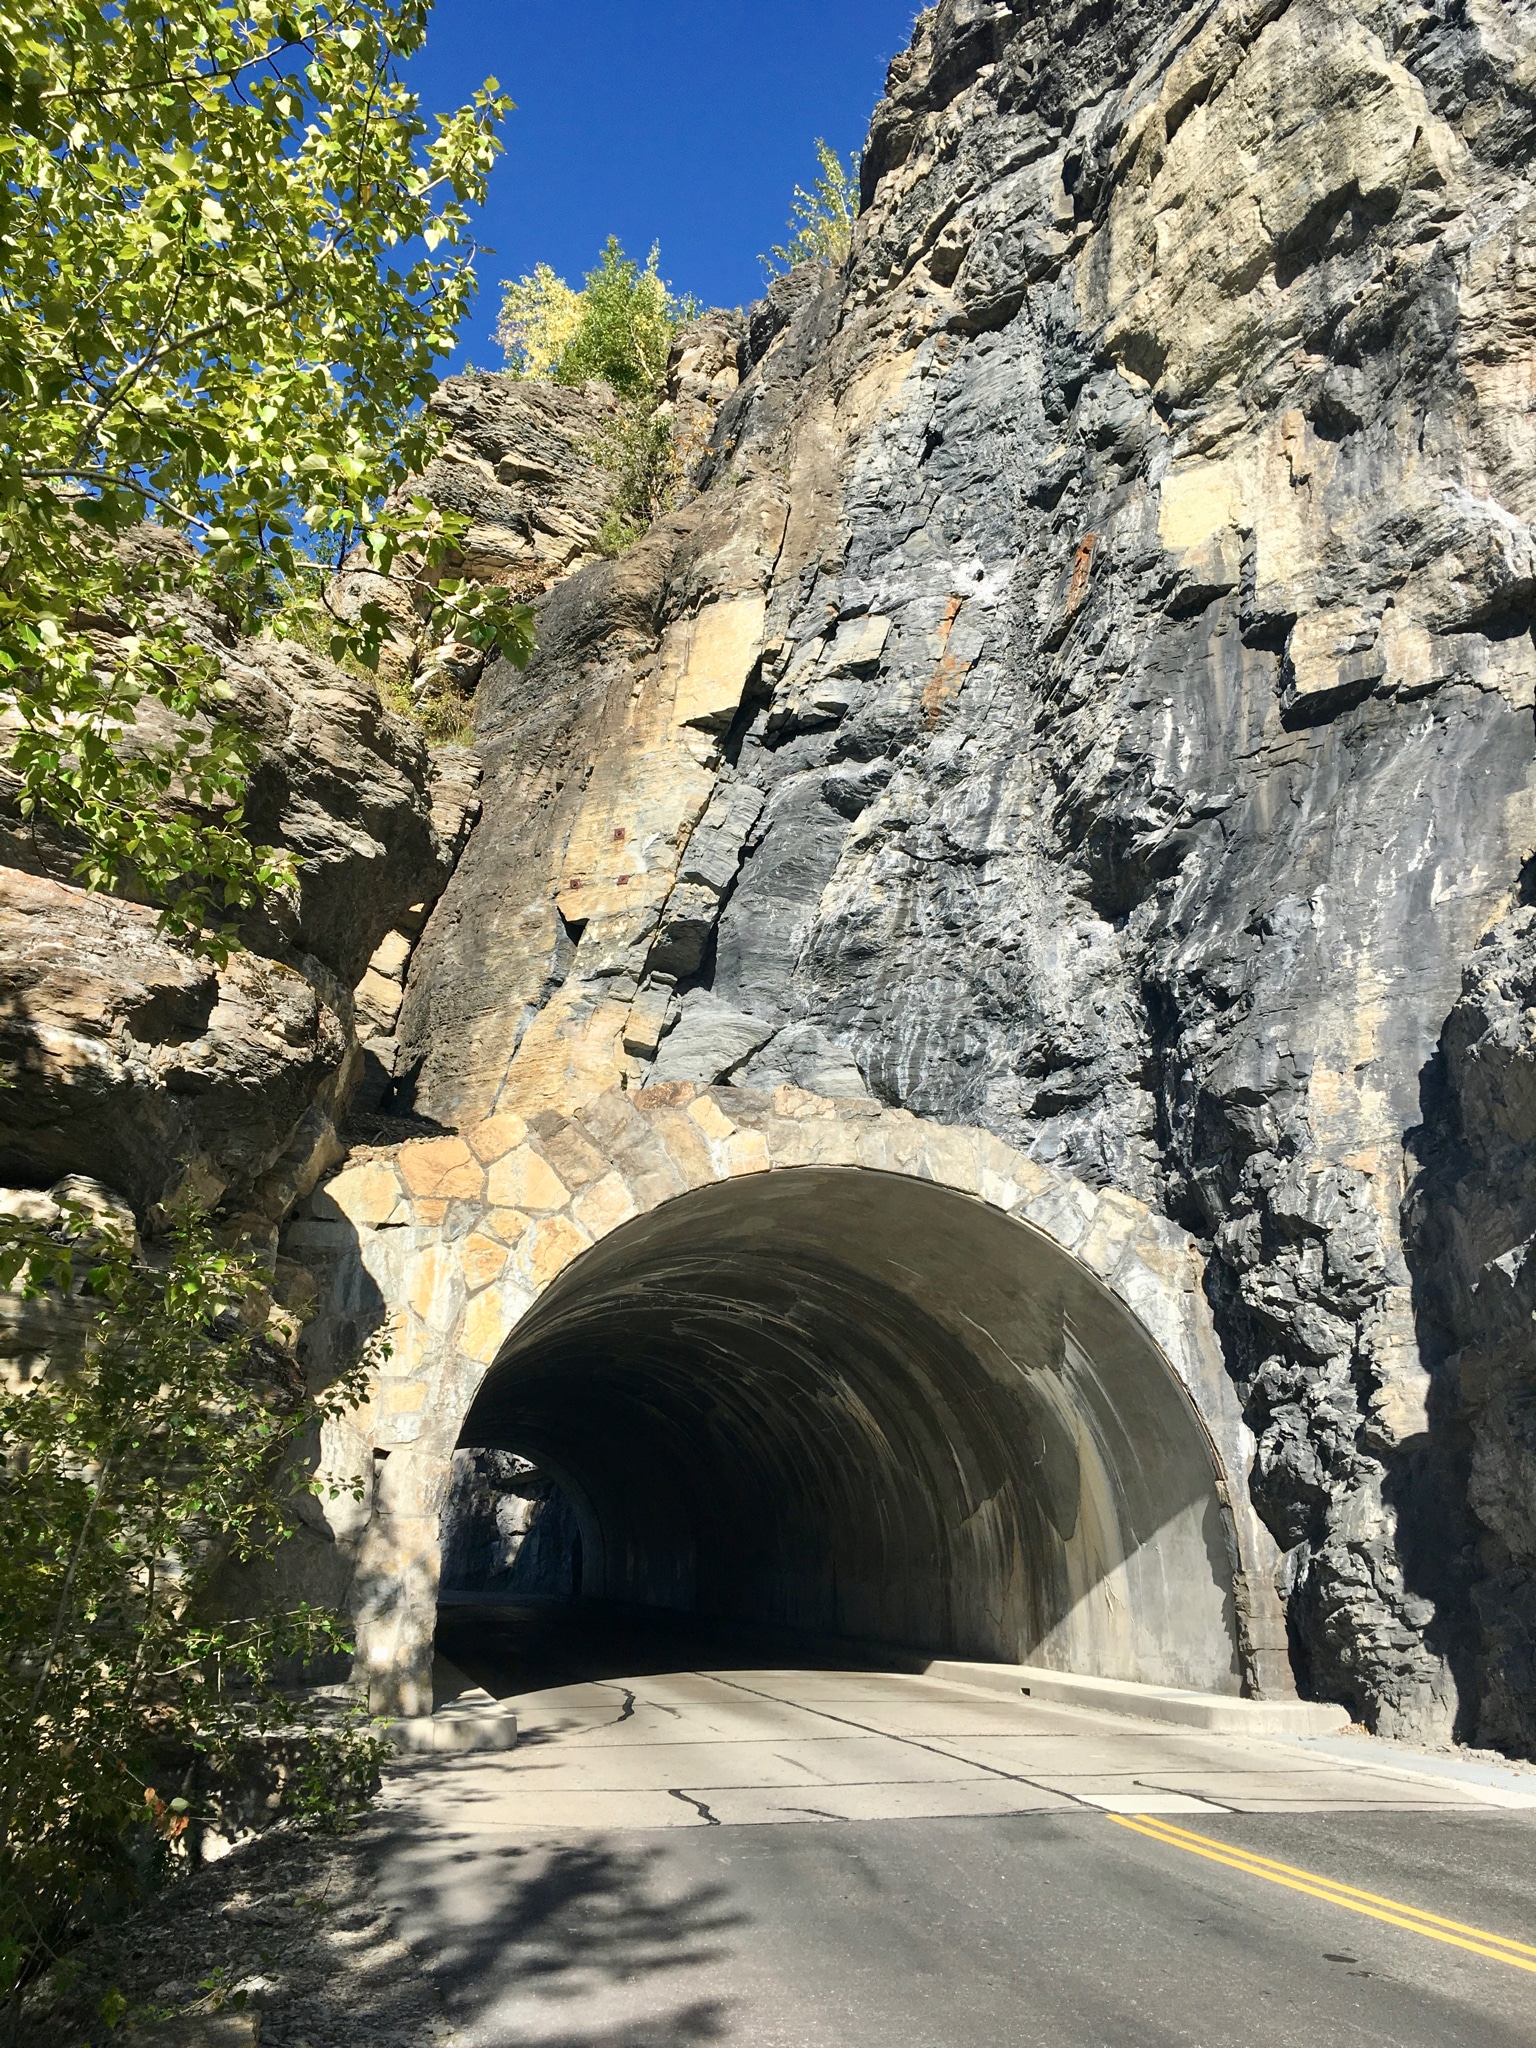
Going To The Sun area: The big red buses are cool. They have a soft top and the tourists pop up all together like meerkats when there is a photo stop. (Not my picture): John Davies Spokane WA
1 point
.thumb.JPG.dd838cdb3df463dab6a16861fa23a319.JPG)


-
Recent Achievements
-
")


")


")


