Leaderboard


Popular Content
Showing content with the highest reputation on 02/02/2021 in all areas
-
I've been lurking around these boards for a few months, and am thrilled to announce that we have put our deposit down on a Elite II Twin model. It'll be a model year 2022, with a delivery date of 11/29/21. Can't wait...now to pick out a truck color! MaryBeth3 points
-
California Highway Patrol will inspect large trailers, (big ones) as a class a driver license (same one as an 18-wheeler) is required. The checklist includes many points. One of them is to verify that there is NO fuse in the breakaway wiring. The wiring is also checked. the checklist does not provide a justification, but the assumption is that if needed, a problem causing the blown fuse may exist when the trailer is rolling away from the TV. (Also, the checklist includes for the breakaway cable to be connected directly to the TV, and not the safety chain.) John3 points
-
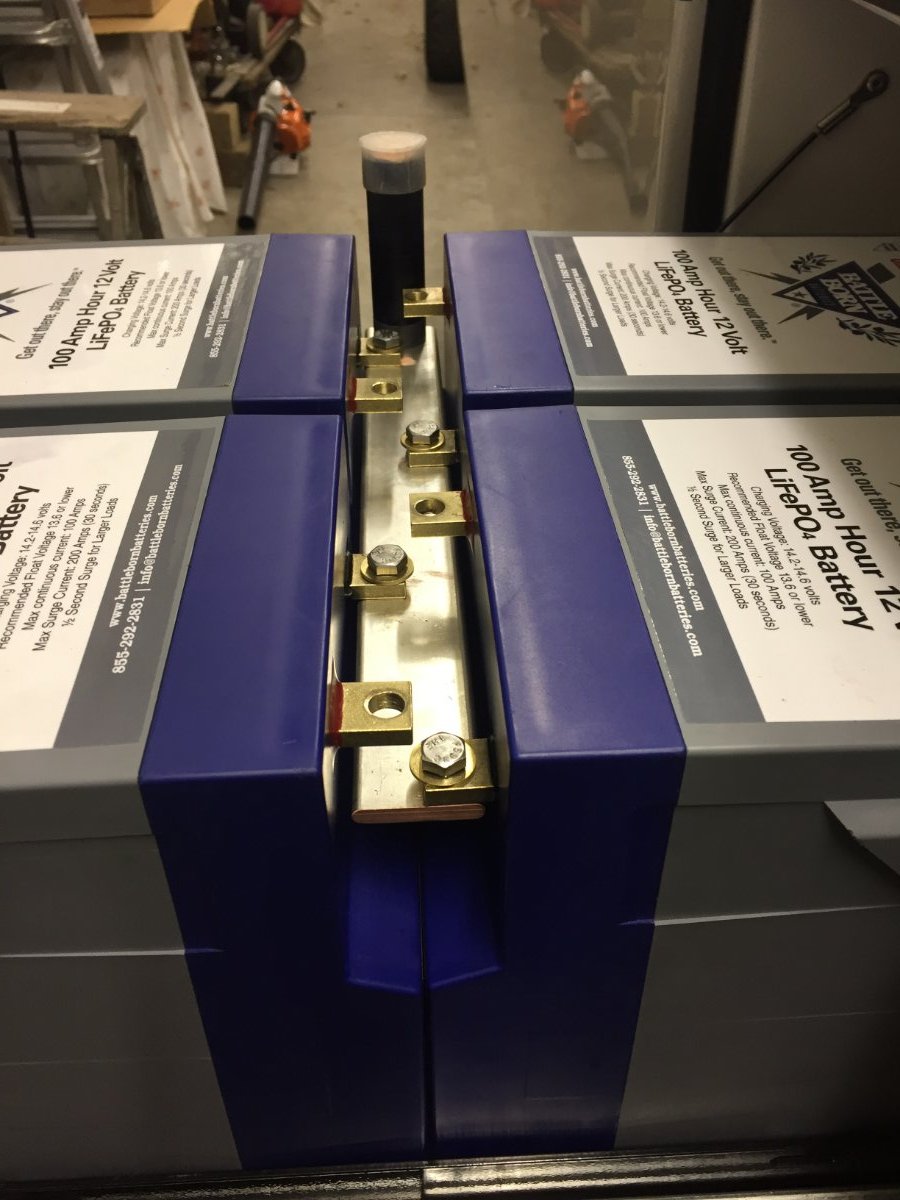
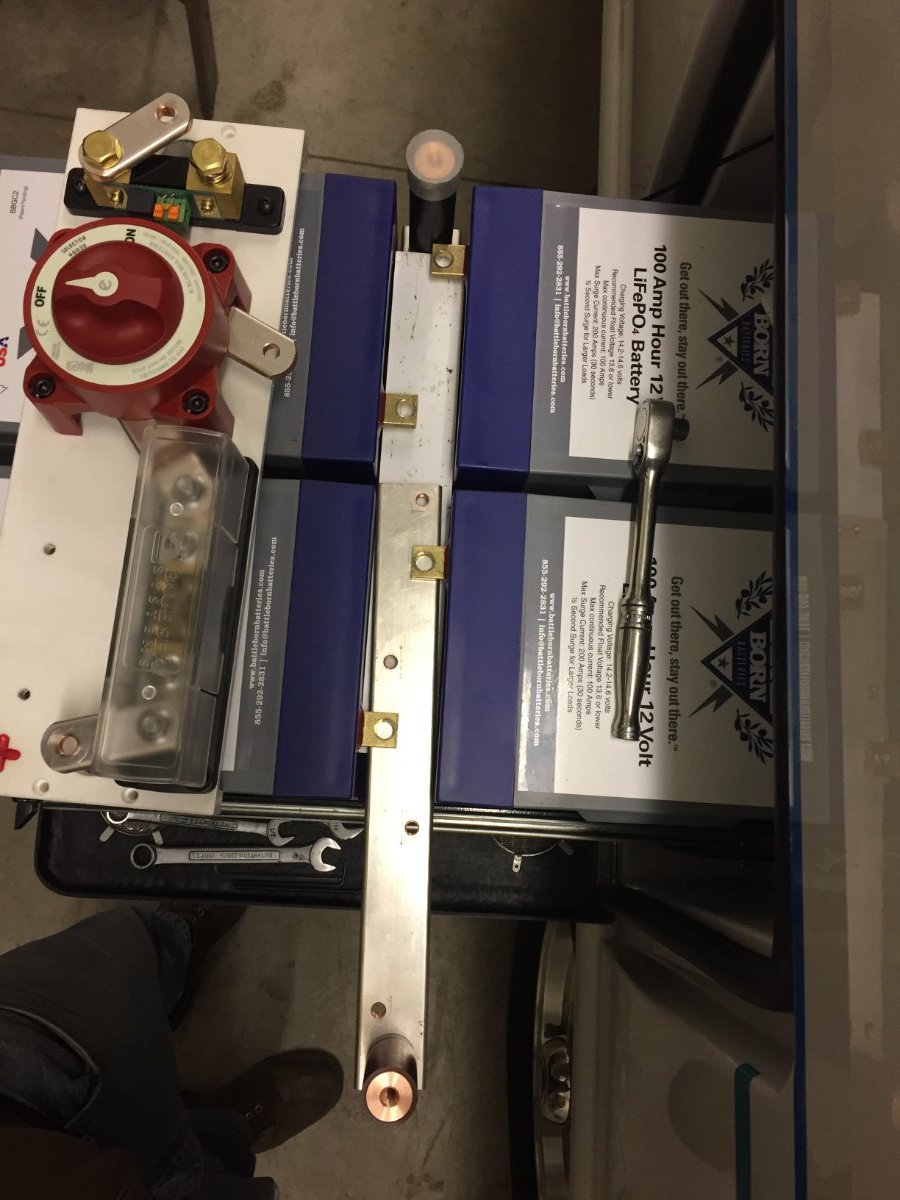
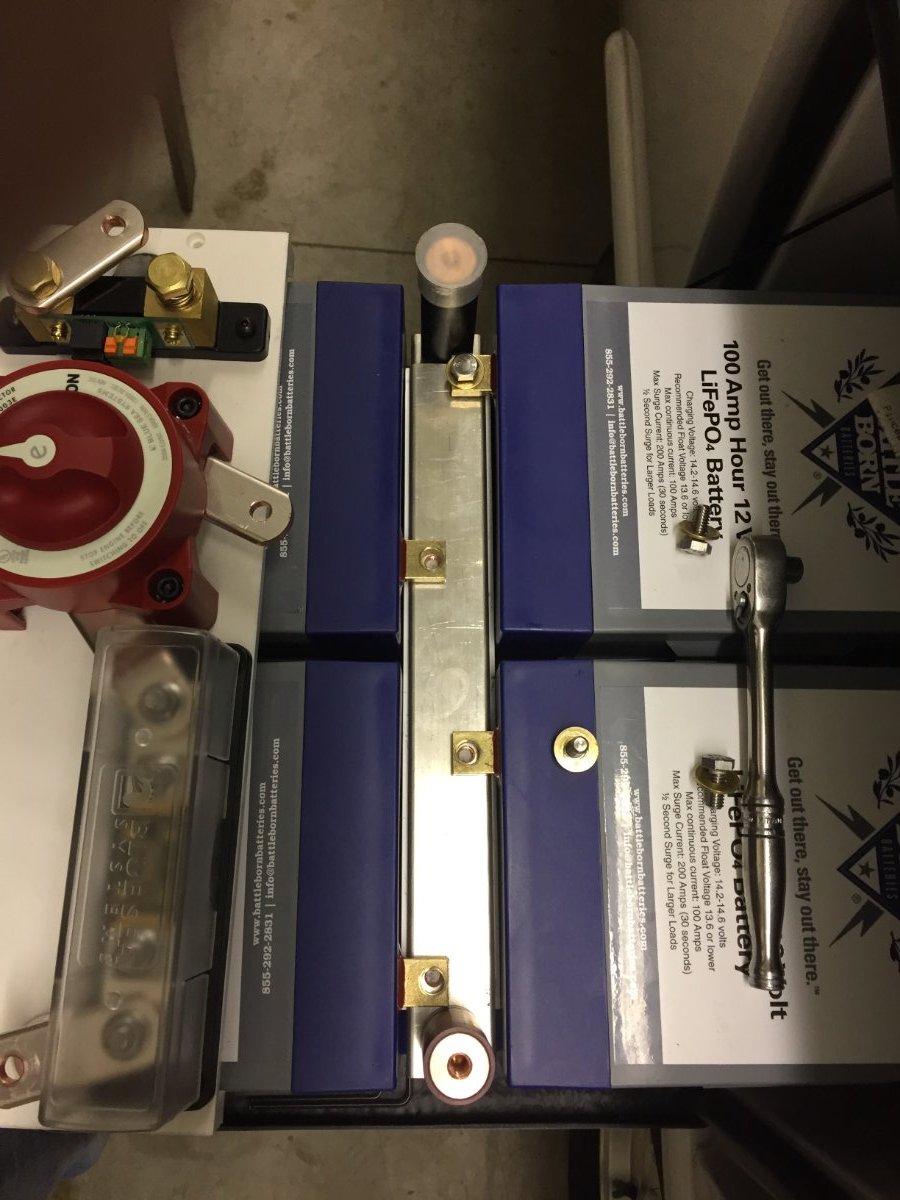
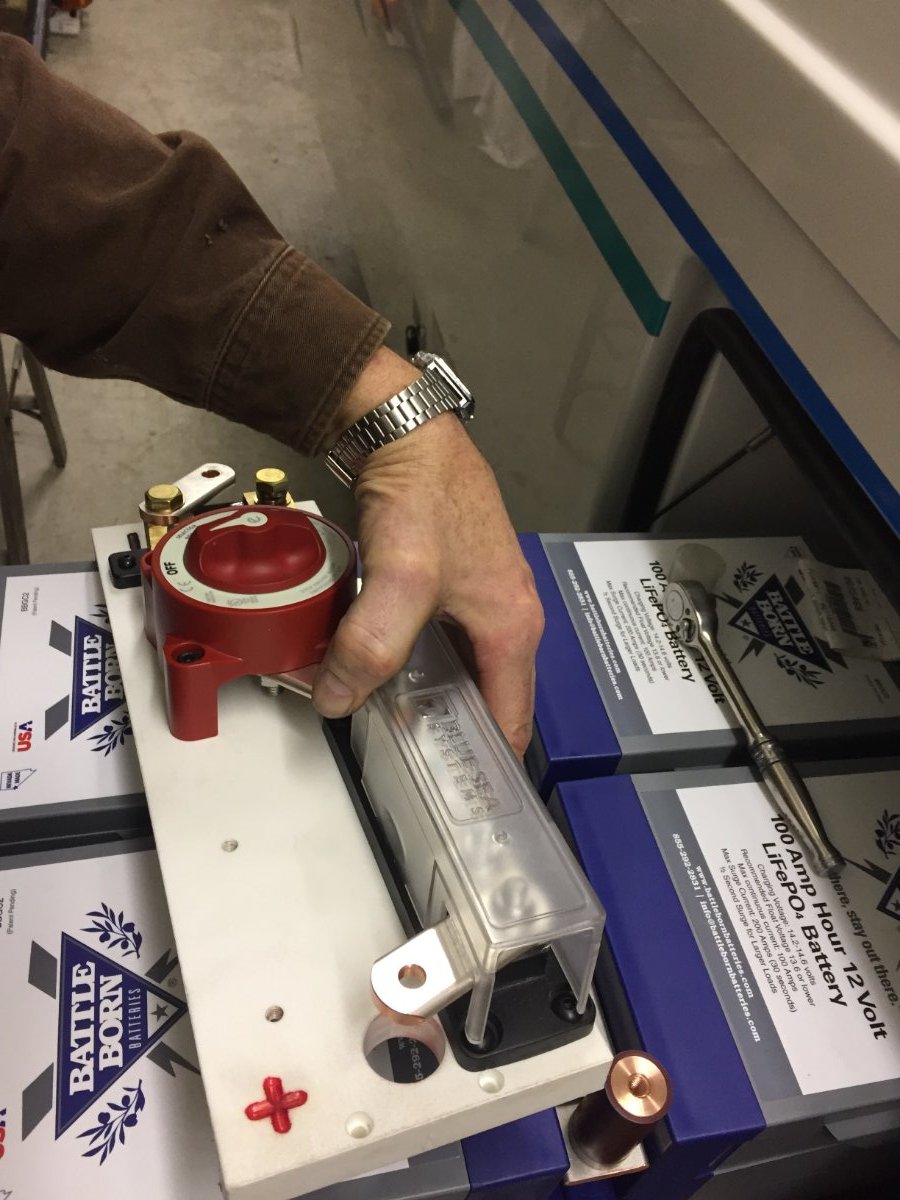
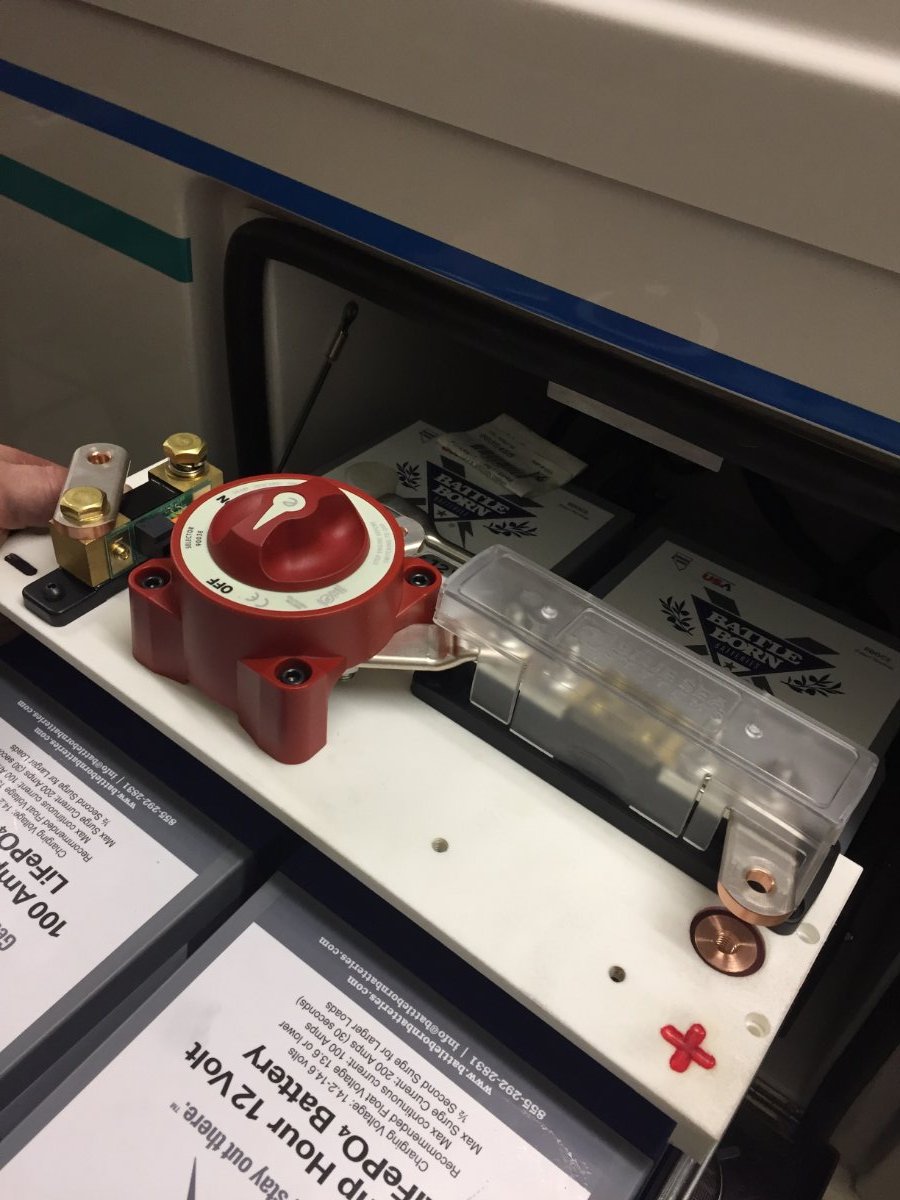
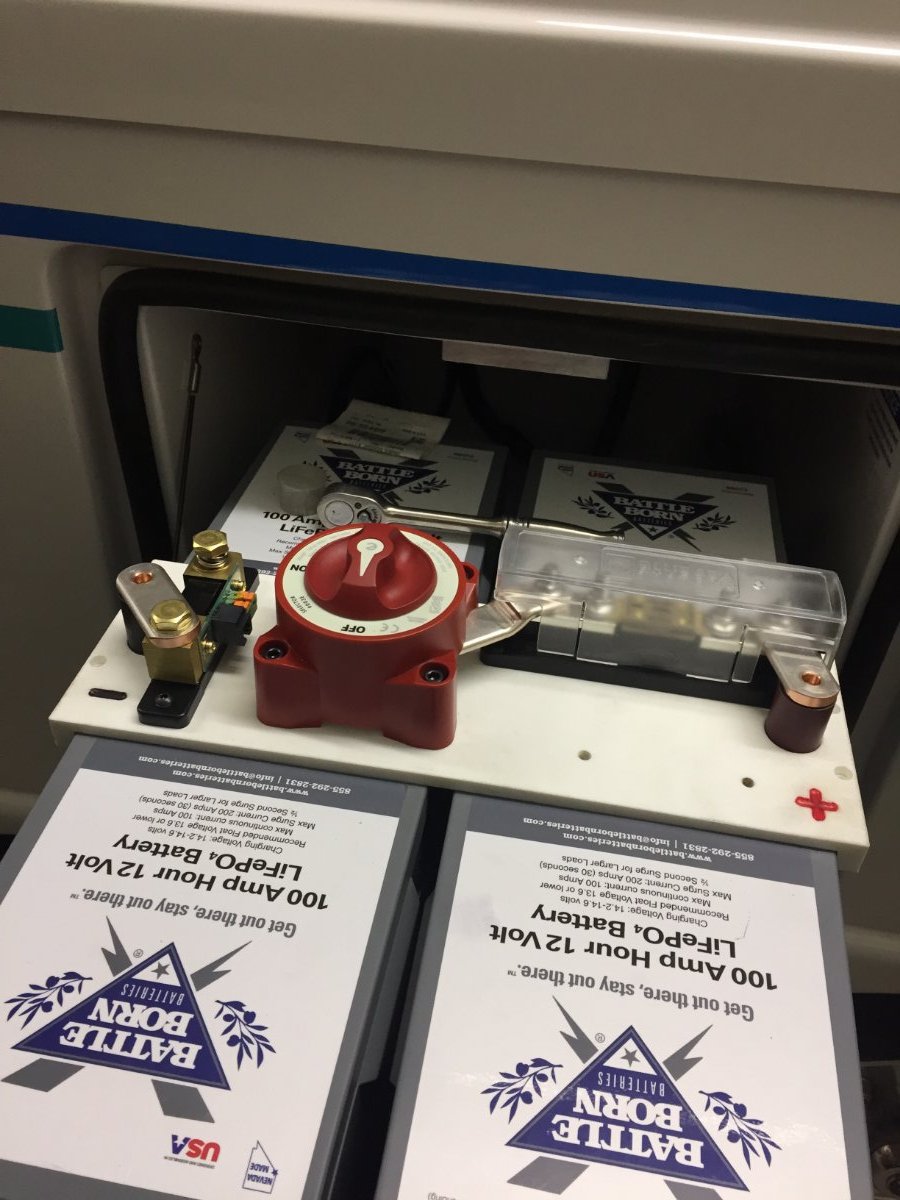
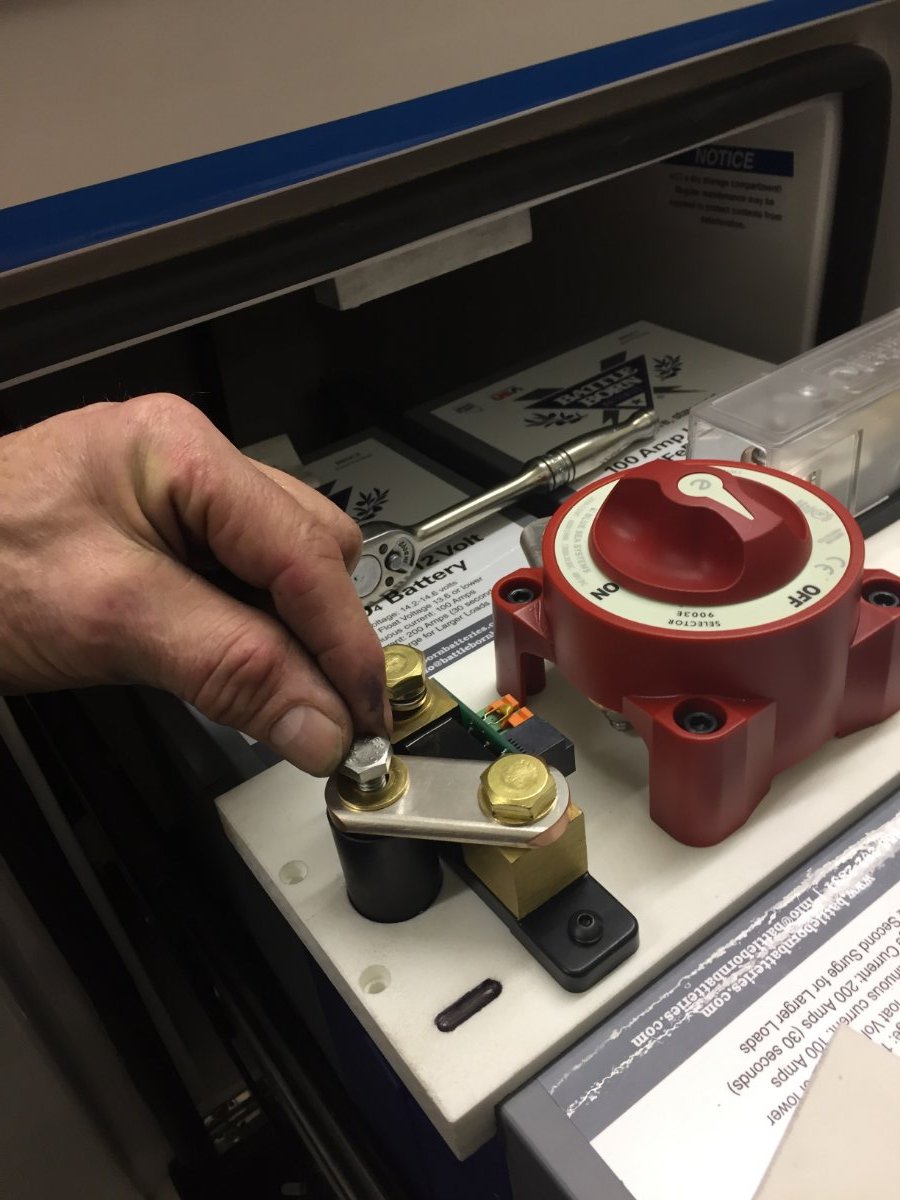
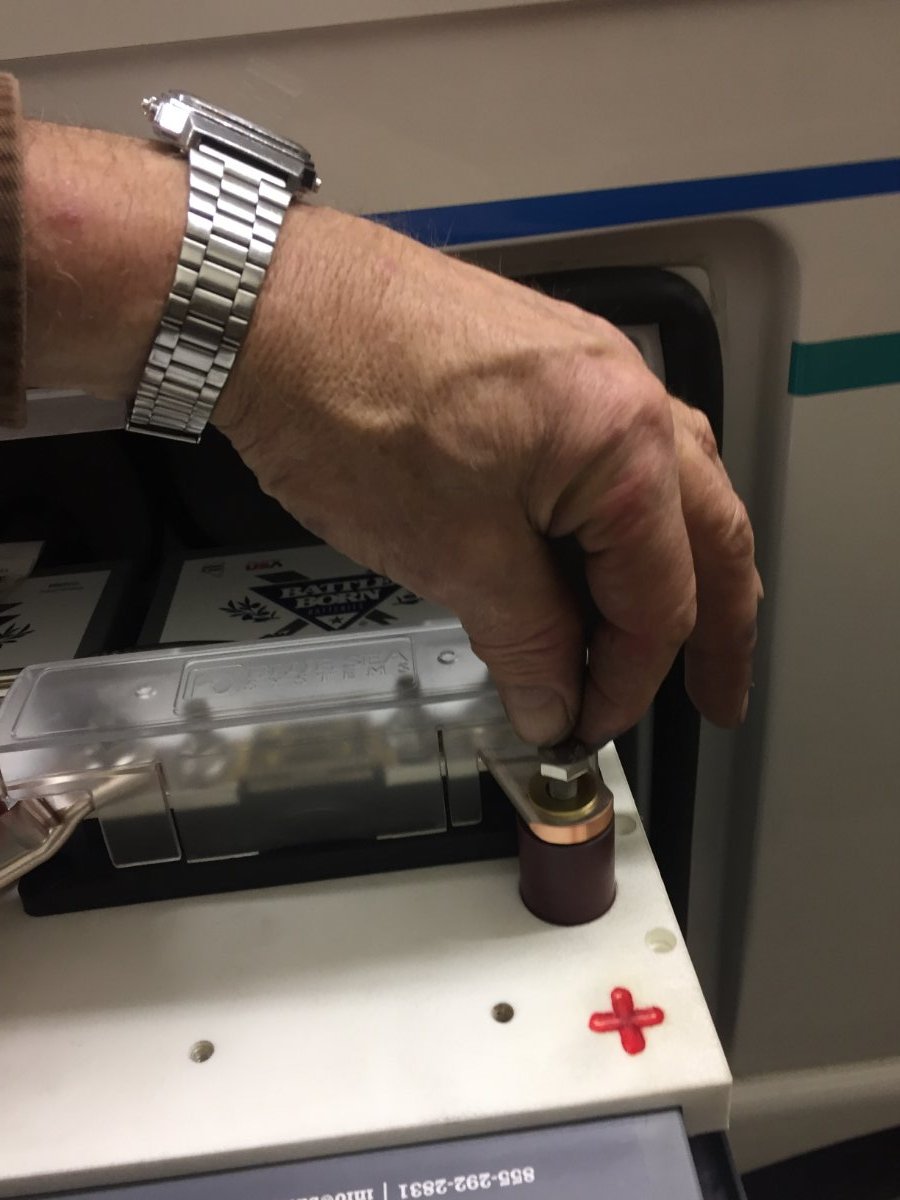
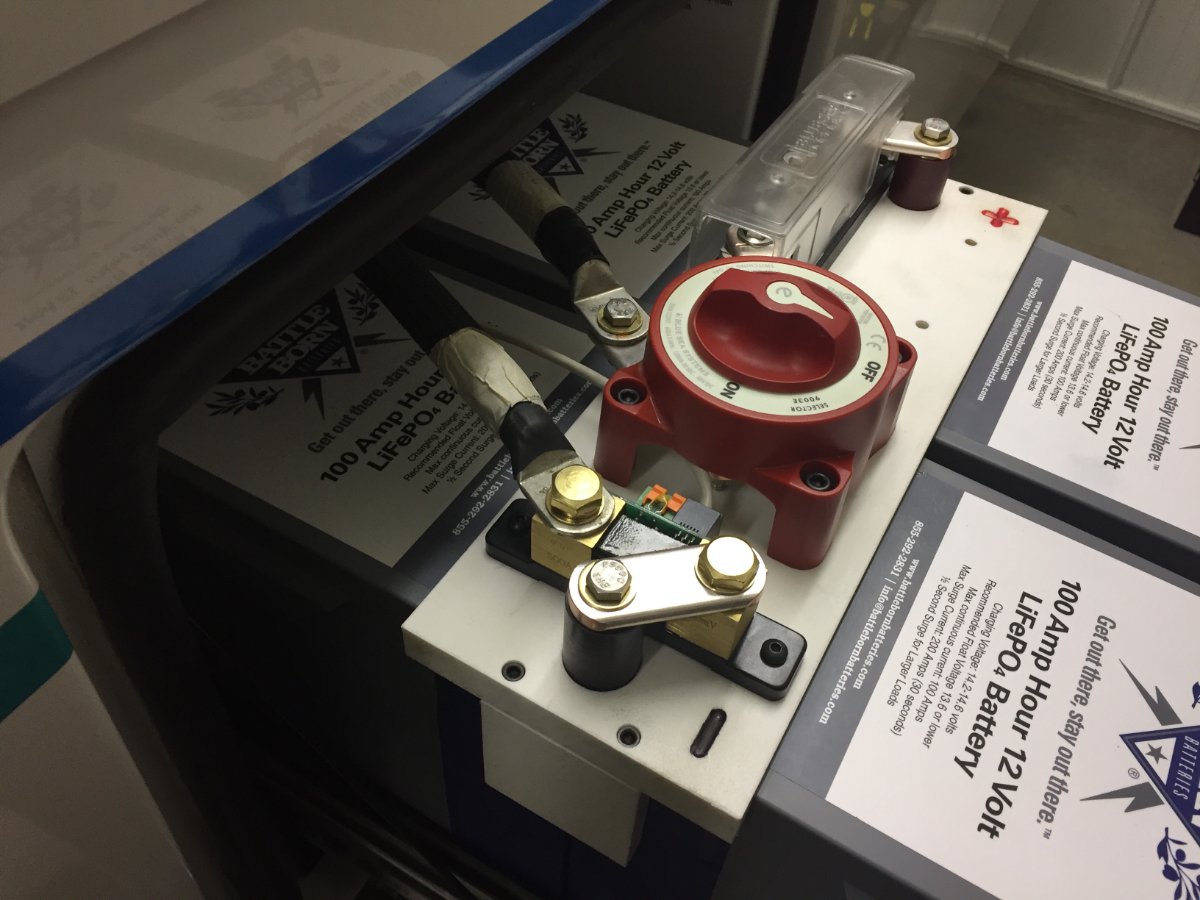
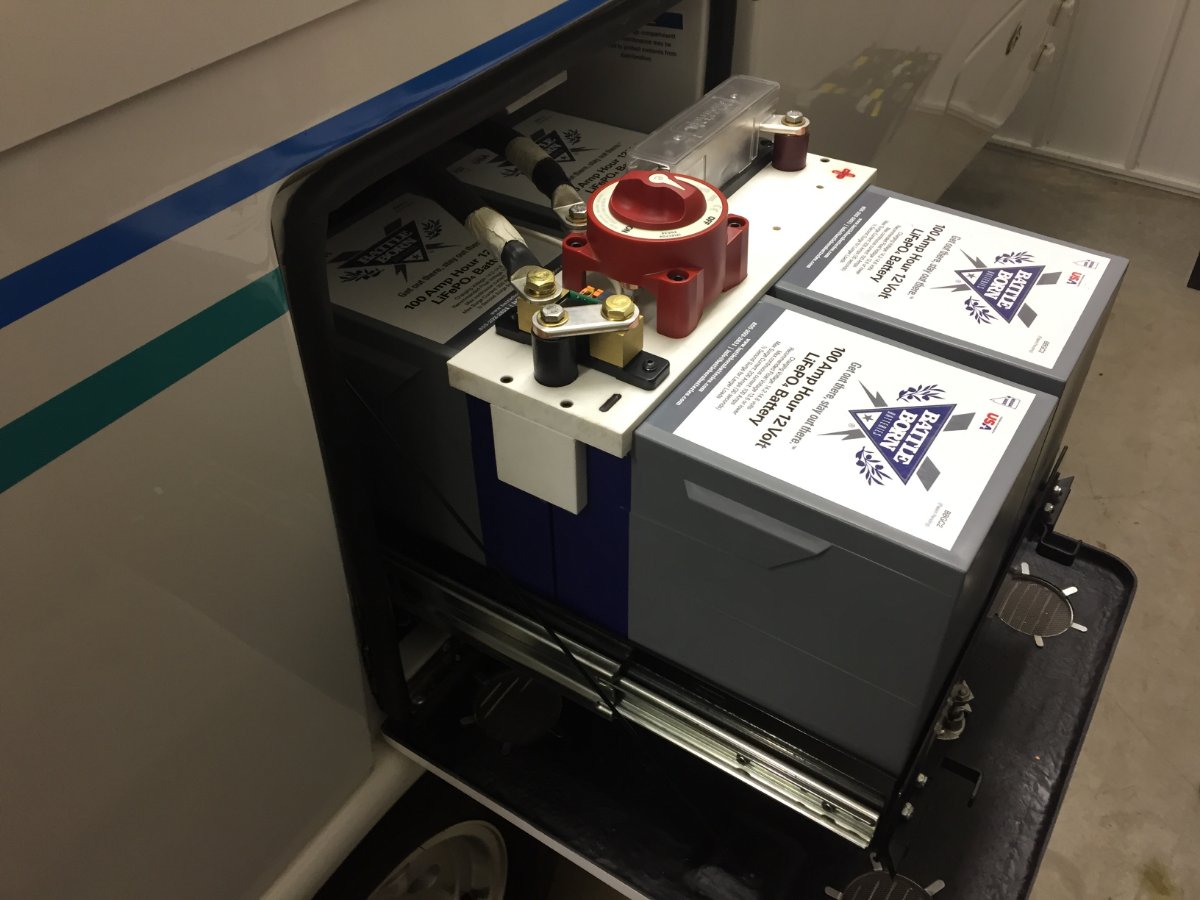
Went from 4 Trojan 6 Volt AGMs to 4 Battle Born 100Ah GC2s. Mounted a BMV-712 Victron in close proximity to the negative post of battery Mounted main fuse in close proximity to the positive post of battery Mounted main battery disconnect in close proximity to the positive post of battery Added a positive and negative bus bar and moved all cabling to inside the basement except for the 2 main 4/0 cables. (I was able to exchange main fuse with a positive bus bar using the same mounting area, then moved the fuse out to the positive post of the battery) I used bus bars to connect the 4 batteries in parallel A strip of flat PVC was used to insulate between bus bars
 2 points
 -
Hi Carl: 2020 Elite I Kitchen Drawers Interior/Usable space in inches Top 17 x 9 5/8 x 3 1/4 deep Middle 17 x 21 3/8 x 7 1/4 deep Bottom 7 3/4 x 21 3/8 x 7 1/4 deep We've been using the top drawer for standard-sized eating utensils and the like, kept in a regular-sized organizer (i.e. knives, forks and spoons holder). The middle and largest drawer holds our pots and pans with room for coffee mugs, hot pan holders, etc. The bottom drawer holds longer utensils (bbq tongs, spatula, etc) and our aluminum foil and cling wrap. I hope this helps. - Brian2 points
-
Sure - but do you like it?☺️2 points
-
"Sunbrella is breathable and can dry out" might apply to rain exposure followed by arid climate. For the Pacific NW rainforest type climate, I don't see how this would be favorable. On the other hand, the vinyl should retain less water and, in my opinion, be easier to clean. We chose the standard awning, but more for the fact that we didn't want the wind-sensing feature. The remote control of the Pro awning would be nice, but we like to keep things as simple as possible. Had the manual awning still been standard we probably would have chosen it, but for the Dometic branding. All in all, we just don't use an awning that much. Not sure I answered your question.2 points
-
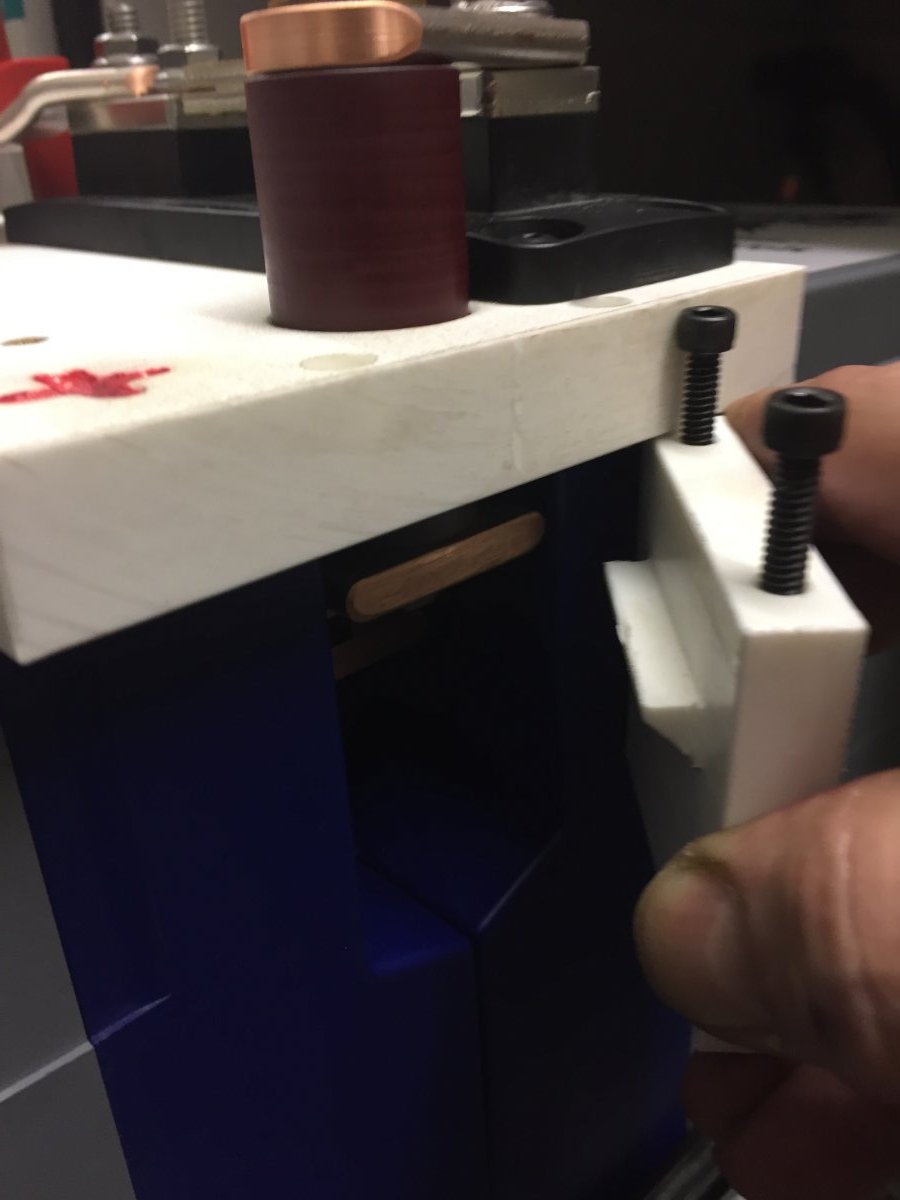
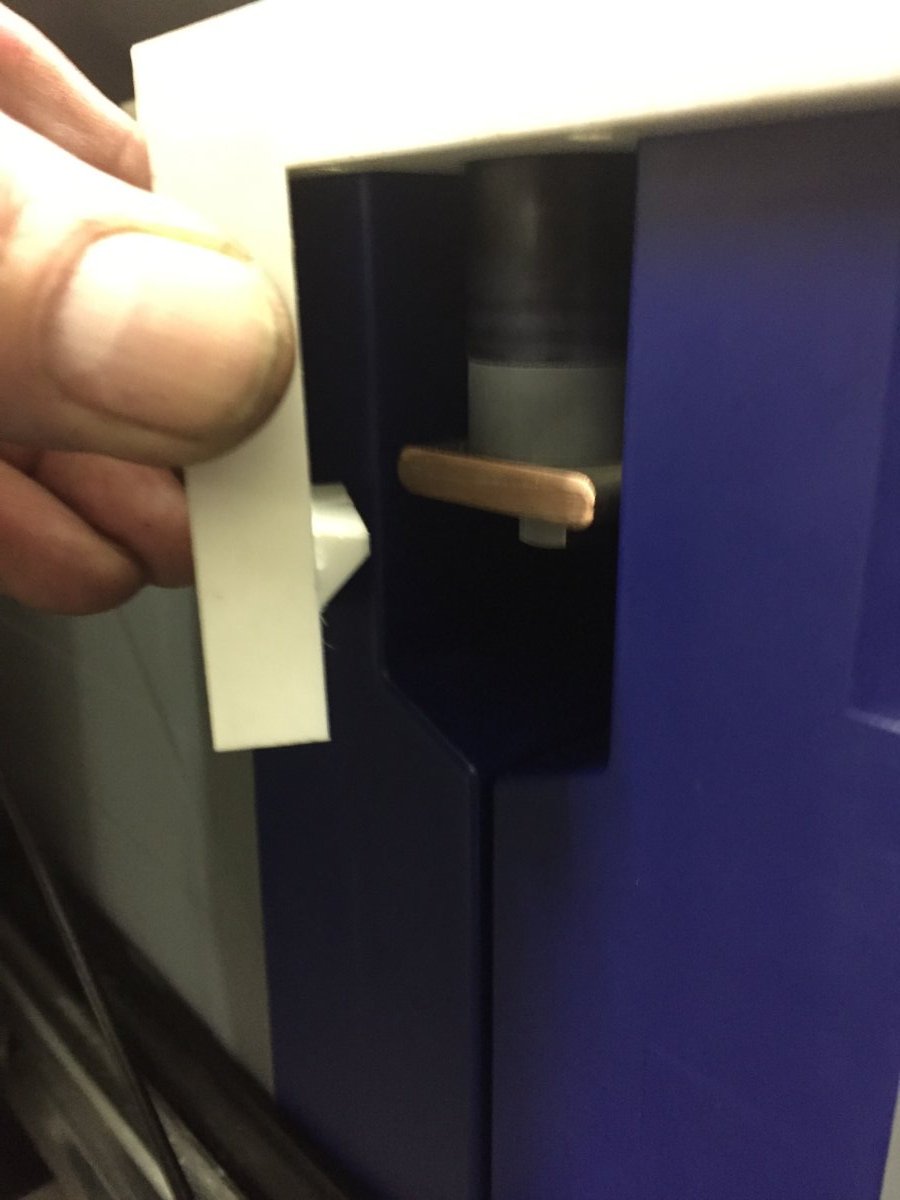
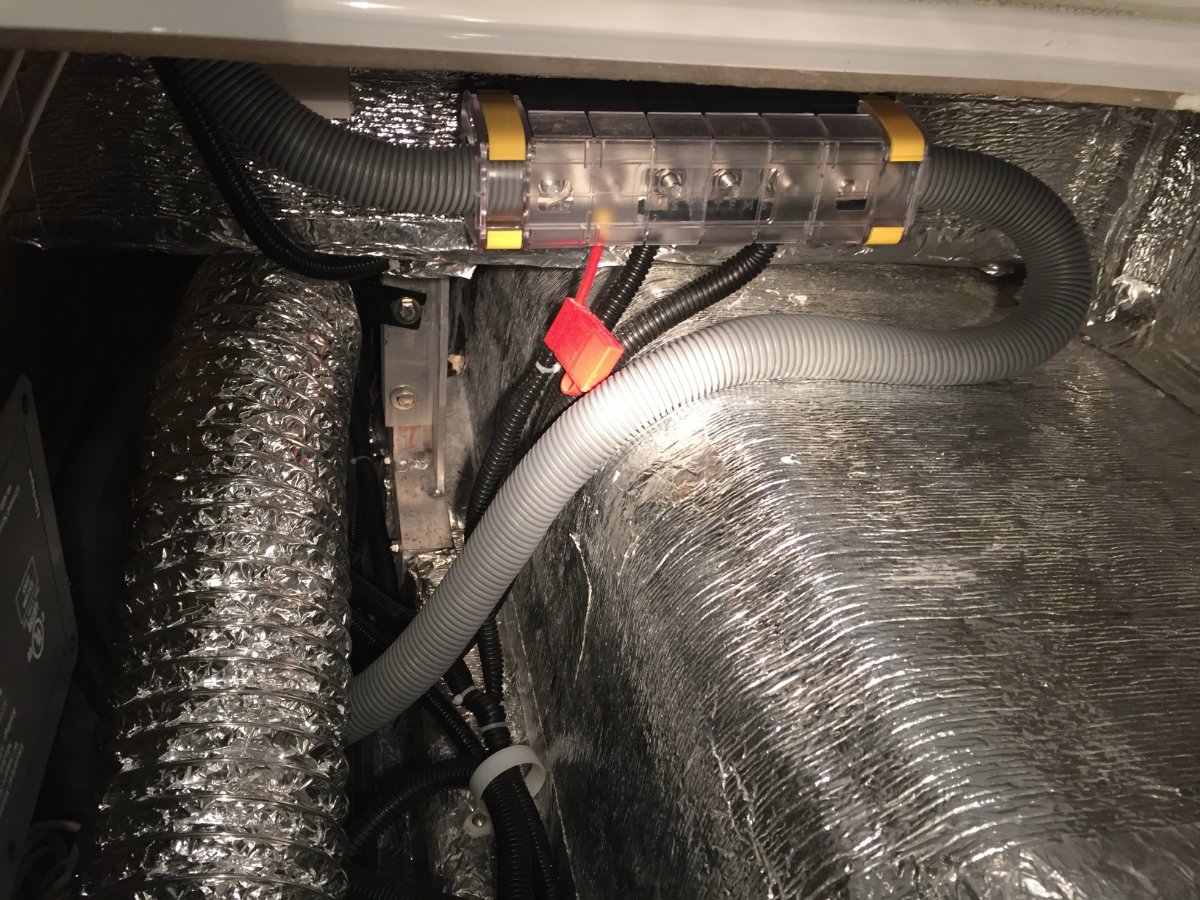
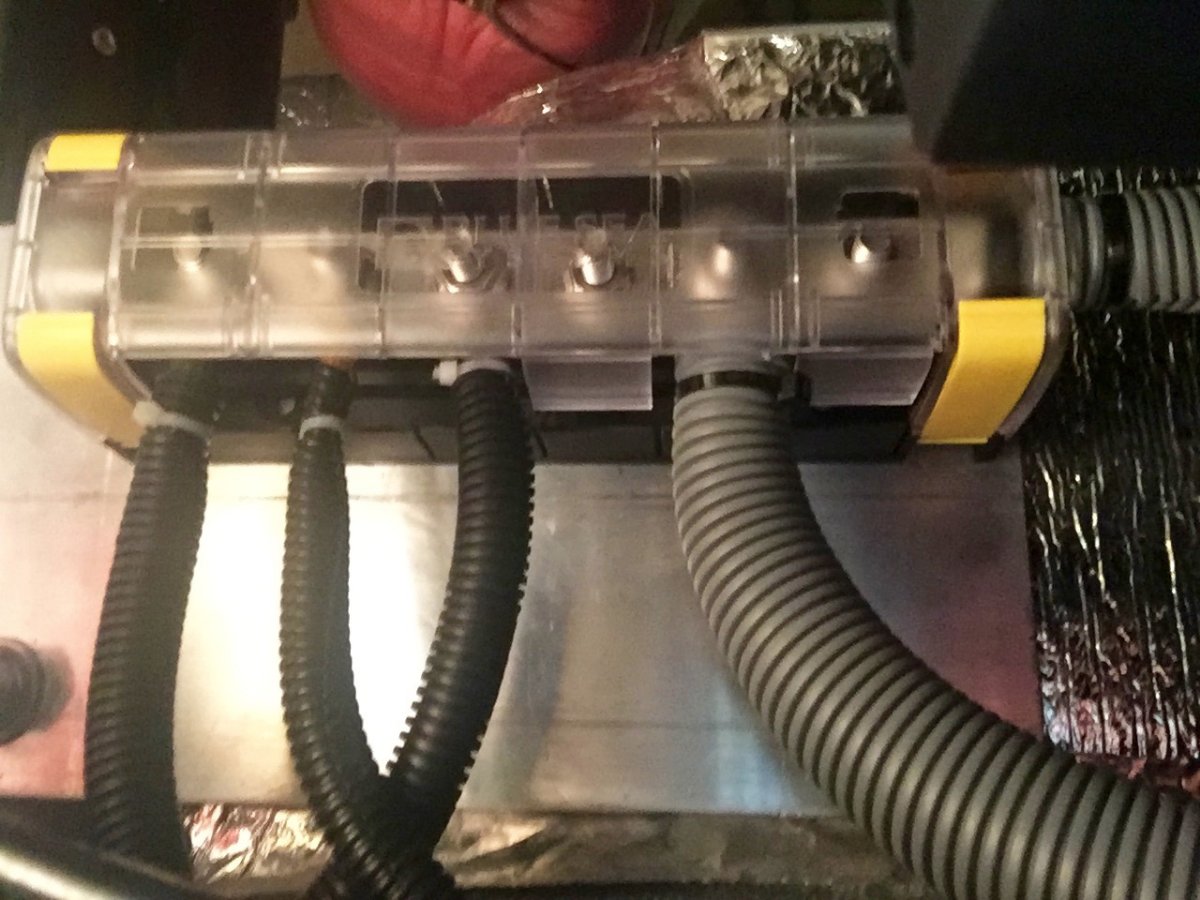
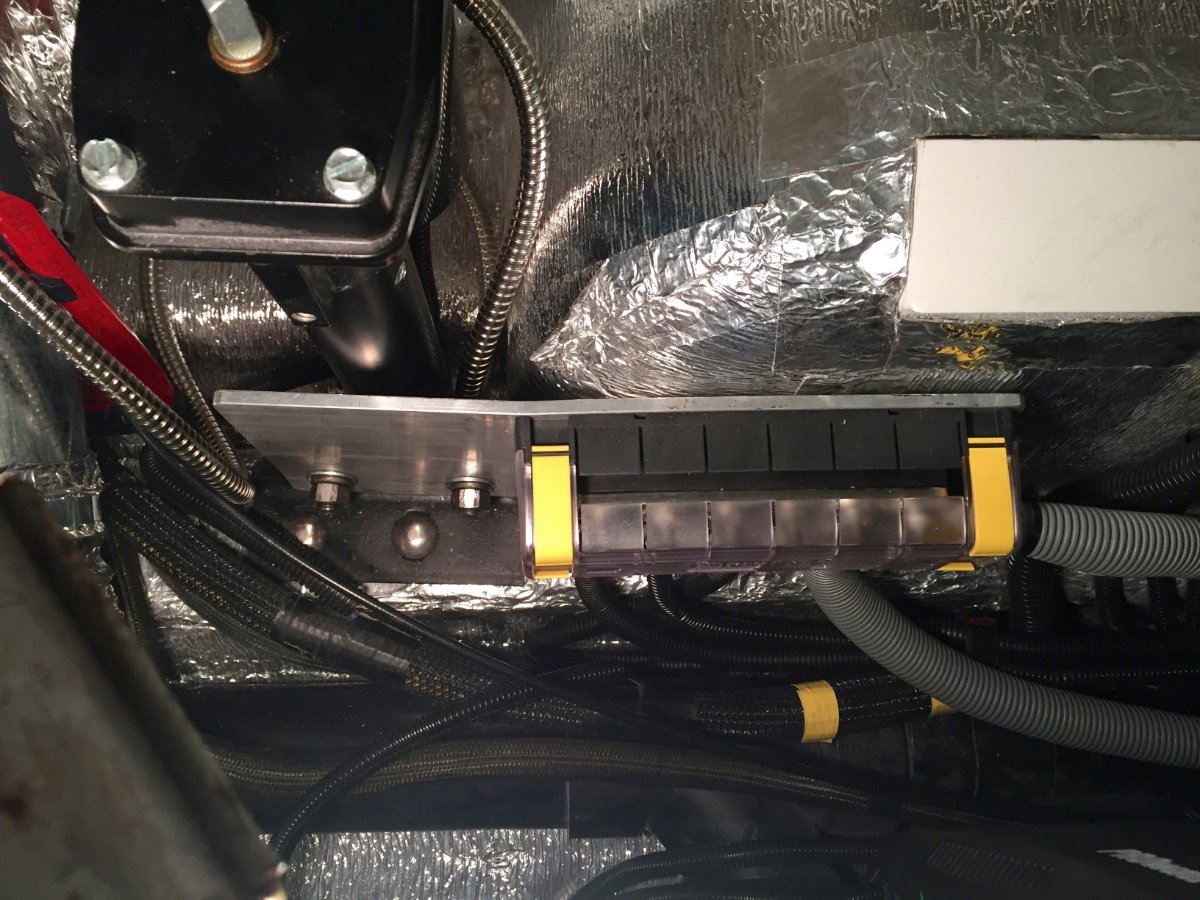
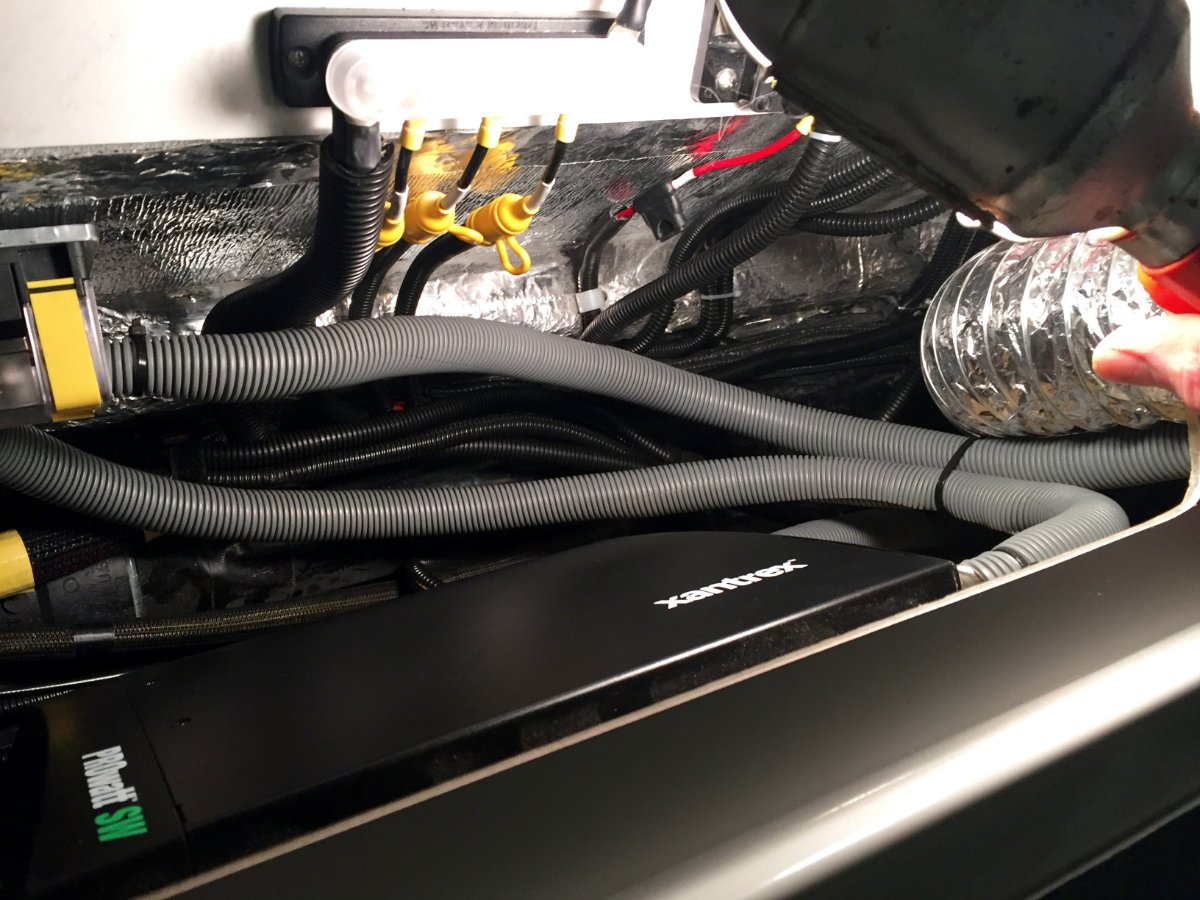
https://www.bluesea.com/products/2718/MaxiBus_Insulating_Cover_for_PN_2105_and_2126https://www.bluesea.com/products/2126/MaxiBus_250A_BusBar_-_Six_5_16in-18_Studshttps://www.amazon.com/Battery-Spartan-Power-Negative-Terminals/dp/B07MXQSNHR/ref=sr_1_5?dchild=1&hvadid=77859219137661&hvbmt=bb&hvdev=c&hvqmt=b&keywords=spartan%2Bcable&qid=1612200841&sr=8-5&tag=mh0b-20&th=1 Well I want to try to answer to this request. Its a project that requires you to cover a lot of ground so I decided to break it down to individual aspect of the project. So I am standing at the side of the Oliver looking at the open battery compartment. I see this maze of cables and I am thinking of a discussion on the Oliver Forum. It was suggesting that there could be a improvement to this maze of cables by installing bus bars, one positive and one negative inside the basement of the Oliver. This would allow the cables from the various components such as Zamp Solar Controller, Side wall solar Port, Progressive Dynamics Power Center, and the chassis ground to be routed to the relevant bus bar. With that done it would only leave the positive and the negative 4/0 cables leading to to the battery compartment from each perspective bus bar. With that said the only other cables that my set up has is the one that leads from the Victron BMV-712 battery monitor to the remote display. I also have a now unused wire that was for the temperature probe that was hook up to the Zamp solar controller. The service person at Battle Born advised to disconnect this at the Zamp solar controller, I did leave the unhooked wire in place for possible future use. I then went inside to determine the placement of the bus bars considering the number and lengths of cables that need to be relocated and how I was going to attach them in the Oliver basement. I was looking at the positive 4/0 cable coming in to the basement from the battery compartment then going to the main fuse block and then continuing on to the inverter. That is when I thought about swapping out the fuse block with the positive bus bar sense the 4/0 cable is already run and no need to make up positive 4/0 cables. It also had a mounting block already in place. This meant I could move the main fuse out to the battery compartment next to the positive battery post to better protect the wiring. This was another topic I remember following on the Oliver Forum, so much information to be had. I looked at how the various cables were run into both sides of the battery compartment and they had positive on one side and negative on the other. So it made sense with the wire lengths the way they were to try to find a spot to mount the negative bus bar in the compartment under the street side bed. I started looking for a place or a way to do it with out having to glue a block to the fiberglass. I noticed two 1/2" bolts that were used to mount the street side stabilizer to the frame. I used a 1/4" aluminum flat that was 6" X 14" long. I then drilled holes to match the stabilizer mount. I then had to put a slight bend about 5" from the end so the plate would run parallel to the wheel well. That is where I mounted the negative bus bar. When I pulled the cables back out of the battery compartment I was able to do it with out removing the terminal ends. Some I had to bend slightly to get them through the cable glands, but this saved me from having to mess around with installing new ones. All the wires turned out to be the right length except the positive wire from the remote solar port. I was able to shorten that wire where there was a inline fuse and add a ring terminal. The negative 4/0 cable that went from the battery to the inverter was then rerouted to the negative bus bar. The only cable I had to buy was a three foot 4/0 to go from the negative bus bar to the inverter.
2 points
-
Congratulations.1 point
-
I was able to talk to Battle Born and was told that buss bars is there prefer or recommended method for installing multiple batteries even in a mobile application. So that was good to hear.1 point
-
Thanks everyone! These dimensions are very helpful!!! Thank you for taking the time to do this!!! Carl1 point
-
I just want to share my experience that I had with the Yamaha EF22iS 2200 watt. I bought it for the same reasons you stated but was disappointed when I found that it could not start my easy start equipped AC unless it was left in full throttle mode. My older Honda 2000 watt had no problem doing it in eco mode. I went though all channels with Yamaha and they were of no help. What I understand is the Honda has a larger horse power engine even in the 2000 watt model. So the Yamaha lacks power to get the AC started from eco mode. So I bought the Honda 2200 and it works perfectly. Hope this help you with purchase of a generator.1 point
-
There are several Loops. B Loop is all lakeside sites with W/E. D and E Loops are in the pines back from the lake some have W/E and some (40) are FHU. Total of about 100 sites. The lake is Wright Patman Lake. It’s only about 25% full. It’s a COE campground so our senior pass resulted in 50% off. Nice and quiet! Mike1 point
-
Does anyone have the interior dimensions of the microwave-replacement cabinet? I've searched the forum, but couldn't find this (perhaps incorrect search terms?)... Thanks!1 point
-
That is very excellent from an installer’s point of view, but if it fails you are dead in the water for possibly a very long time. An installation where a failed battery can easily and quickly be removed for service, while maintaining full functionality at a reduced capacity, makes more sense to me. Several small ones connected by easily accessible cables, in other words. For an RV that gets jounced and jolted, this seems to be a prudent design. A fixed bus bar installation would be perfect for a home, but how long will it remain working in the rough world of a camper? Even if this one proves to be bullet proof, I personally would never stop worrying about it. Battle Born batteries have no way to read onboard cell voltages and their condition, so the only way you can test one to see if it is OK is to separate it from the others, fully charge it, then do a load test with a Battery Monitor to see if it is giving you the right amount of amp hours. Repeat for the next one.. And the next one.... until you find the bad one. If BB wil update their onboard BMS to allow individual cell monitoring, a solid bus installation will be more practical, but still fairly vulnerable to shaking damage. Which IMHO would NOT be covered by their excellent 10 year warranty. “This warranty does not cover negligence or misuse of the battery. If it is deemed that the battery was used improperly, you will be subject to a $150 an hour repair charge plus parts and shipping.” John Davies Spokane WA1 point
-
I agree with topgun 2. I believe the kitchens are the same in both the Elite I and Elite Ii. If you go to the Oliver web site and click on "Owners" tab at the top of the first screen, and then click on "University" there is a listing of O&M manuals and Other items. In the list is one called "Measurements". Click on that tab and on that page you will find the measurements of the kitchen cupboards.1 point
-
Hi John I have all the stock charge controllers, the Zamp ZS-30A solar charger does have as selectable battery type on the display panel with LiFePO4 as a option. Battle Born did advised me to disconnect the temperature probe from the Zamp solar controller. The Progressive Dynamics Power Center charger has a selectable jumper on the board that needs to be put LiFePO4. Paul1 point
-
Mine is 19.5”w x 14.5”h x 15.5”d, but I’d use that only as a rough guide since I’m pretty sure that the dimensions have changed over time. I was told a different set of dimensions by Oliver before I got mine and I seem to remember someone else posting a third set of dimensions at the time.1 point
-
TXLSUCajun As has been mentioned a ton of times before - with that October delivery you have time to read the Oliver University and much of this Forum. These readings should give you a good idea of what to expect, of what your Oliver will look and function like, and make you more comfortable with its systems. It will also probably spur questions - let um fly! Congrates on joining the family - welcome aboard! Bill1 point
-
Fritz - I'm no fabric expert by any means however here are my thoughts on the subject: The vinyl does not "breathe" while the "sunbrella" does breathe. So, the sunbrella will (in most situations) dry more quickly versus the vinyl. However, if both are left in the rolled position then neither can dry. In both, if they are not cleaned they will be more likely to develop mold/mildew issues due to the dirt. However, I'd bet that since the sunbrella has more surface area per square inch as compared to the vinyl - this is how sunbrella breathes by allowing air to circulate totally around each individual thread versus the vinyl that only allows air (and all other things like water) to circulate on the top and bottom of each thread. If this theory is true then vinyl should absolutely the choice in almost any circumstance. But, what happens when that vinyl coating becomes scratched or worn? What about colder weather when the vinyl is stiffer and could crack - I'm not even thinking winter camping here but I am very familiar with mountain camping where night temps are down in the high 20's while day temps are in the high 80's. All of these issues with vinyl lead to the internal structure of the "fabric" being exposed to and potentially trap both dirt and moisture which, in turn, leads to not only cosmetic issues but the very issues of mold/mildew that were being avoided in the first place. I would think that as long as each material was basically new then the vinyl would be better at deflecting rain. But, the clock is ticking on that advantage and in the longer run sunbrella would produce a better average result. Bill1 point
-
The pressure regulator Frank lists is a real pressure regulator. There are cheaper devices listed on ebay that claim they are pressure regulators, but really just restrict the flow volume, not the pressure. Make sure that the pressure regulator you use is really a pressure regulator. John1 point
-
Yes, the frame needs to be removed to be able to insert the anchors into the window frame. See the original post to see the pictures of the anchor location. Mossey1 point
-
http://www.zarcor.com/rv_products/rv-door-window-kit/ Bill, Just a quick note to say thank you for the info and the link. We ordered our Zarcor tinted window in the white frame and now they offer a white handle to slide the blinds open and closed. My experience with the Zarcor rep on the phone was excellent. He answered all of my questions and just made the purchase very seamless. Based on my purchase experience I would not hesitate to do business again with Zarcor. The price is $129 shipped. David1 point
-
We have re-stringed two of our shades. It looks scary but isn’t. We worked slowly, it took a couple of hours to do each. Ordered the string on Amazon. They do wear out! Mike1 point
-
That's a very nice install. I love it. How are you strapping down the batteries so that they aren't going to move separately? I was using ratchet straps on mine, but even so they seem to move around quite a bit, judging by the marks on the cases. That would be my biggest worry with using bus bars. I don't know the internal construction of that specific model; but on their standard ones, I think there's definitely a possibility of damaging them by stressing the terminals. (Or you might lose your warranty if the seal around the terminals gets cracked.) I'm sure you've considered all of that, but I'd be interested to hear your thoughts. Worst case, with the terminals being on the same side on those particular batteries, would be that they start to move enough that the bus bars contact - but I guess that strip of PVC between them would make me feel more comfortable? I don't know - I'm still a bit hesitant despite seeing your install. Despite that hesitancy, I'm impressed. It's so much cleaner than having big cables running everywhere. Maybe VHB tape between the batteries? That might be strong enough to make them move as a unit. What are you using for the terminals/risers at the ends of your bus bars? I assume that's something custom that you made?1 point
-
We ordered the end of August. Our trailer went into production on 12/21/20 and we have a pick up date of 02/15/21. It's getting close!1 point
-
Yup. Composters need not worry. Lol.1 point
-
O.K., got it. You black tankers are weird, lol. 💩1 point


-
Recent Achievements
-


")


")


")


