Leaderboard


Popular Content
Showing content with the highest reputation on 03/26/2021 in all areas
-
I wanted to share with you my recent battery replacement. My Ollie is a 2015 Elite II which originally came with Trojan T-105 AGM batteries in support of my solar system which utilizes the Blue Sky solar package (SB2512iX-HV MPPT controller and IPN-ProRemote). I replaced my Trojan AGM batteries with Bright Way Group Bright Way Group EVGC6 - 6V 220AH Deep Cycle Golf Cart Battery which OTT are currently installing on the Elite II as the AGM option. As part of this process, I contacted Bright Way Group technician in order to obtain the battery specification sheet (attached). I then provided it the Blue Sky Technician (Ryan Gurin, 760-208-2149). Ryan provided me with the settings needed to reprogram my Blue Sky MPPT Controller SB2512iX-HV via the IPN-ProRemote. Ryan is an excellent resource and was very helpful. I ended up talking to him multiple times. In a nutshell, here is what I did: 1. Disconnected the solar panel via the cutoff switch (street side bed) and opened fuses on the bus bars (also street side bed). 2. Removed the old Trojan Batteries (after taking pictures of the wiring configuration). 3. Cleaned all battery wiring connections. 4. Cleaned up the battery box and repainted the battery tray. 5. Inserted the new AGM batteries and made all appropriate connections (maintained the original wiring configuration). 6. Closed the fuses on the bus bars. 7. Reprogrammed the MPPT controller via the IPN-Remote using the new battery settings. (see attached sheet with adjusted settings) 8. Reconnected the solar panel via the cutoff switch. 9. Verified solar system was operating correctly and batteries were charging as appropriate. Additional Notes: 1. If changing to AGM from Wet Cells, you must ensure the equalization dip switch on the MPPT controller is off. You do not want to equalize AGM batteries. The dip switch will override the IPN-ProRemote settings. 2. Bright Way Group batteries have the same dimensions as the Trojan batteries so they fit in the tray (just as tight). 3. Recommend you review the Blue Sky Learning Center video on how to program the IPN-ProRemote. 4. IPN-Remote Programming instructions (attached) – please note I downloaded the menu sheet from the IPN-ProRemote manual and annotated the needed updates. I found it easier to utilize this menu sheet in order to understand where I was in the programming process (most parameters do not change). As you review, please note you should “restore default settings” first from the set-up menu. I have highlighted in yellow the menu options that you will need to perform an action on. The new settings are also highlighted in yellow next to the appropriate menu box. Hope this helps anyone considering replacing their AGM batteries. 1492893628_BlueSkyIPN-ProRemoteRe-programming.pdf BWG_Spec_Sheet_BW EVGC-220A-AM Final.pdf7 points
-
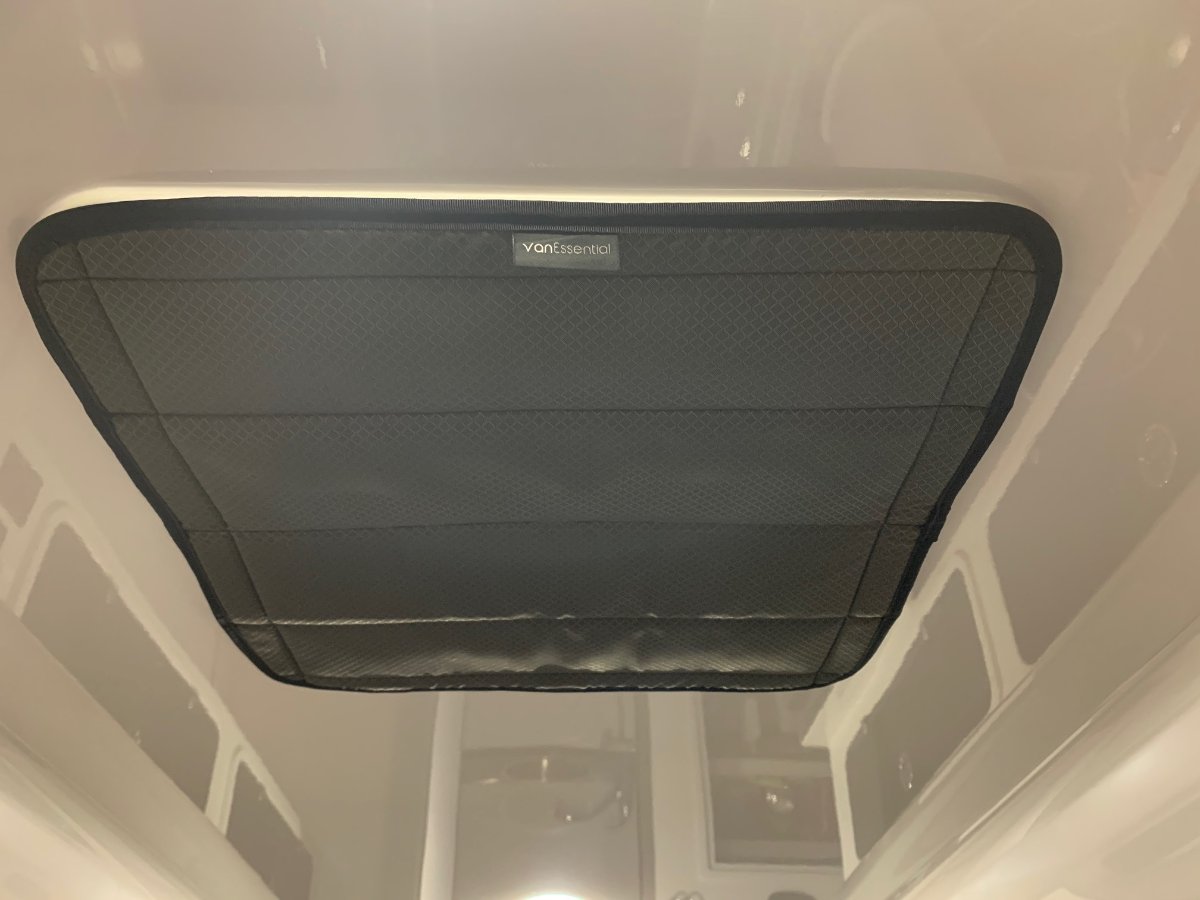
In order to insulate AND black out light that enters through the Maxxfan, I ordered this: VanEssential Magnetic Insulated Roof Vent Sun Cover for MaxxAir Fan, Fantastic Fan - Olive Gray It's not the cheapest one out there, but I like it because it completely blacks out the Fan, it's insulated and the installation is superior to other products I saw out there (hidden magnets vs velcro). This one takes a bit more work to install as you have to remove the inside trim on the fan (which is caulked), install / tape magnets to the inside of the trim, and replace the trim (and re-caulk). So all in all it took me about 2 hours. The magnets work great and reviews say that they work much better than velcro, which has a tendency to tear free from the trim and leave a glue mess behind, especially with heated trim. Here's a picture of the final product:
 7 points
 -
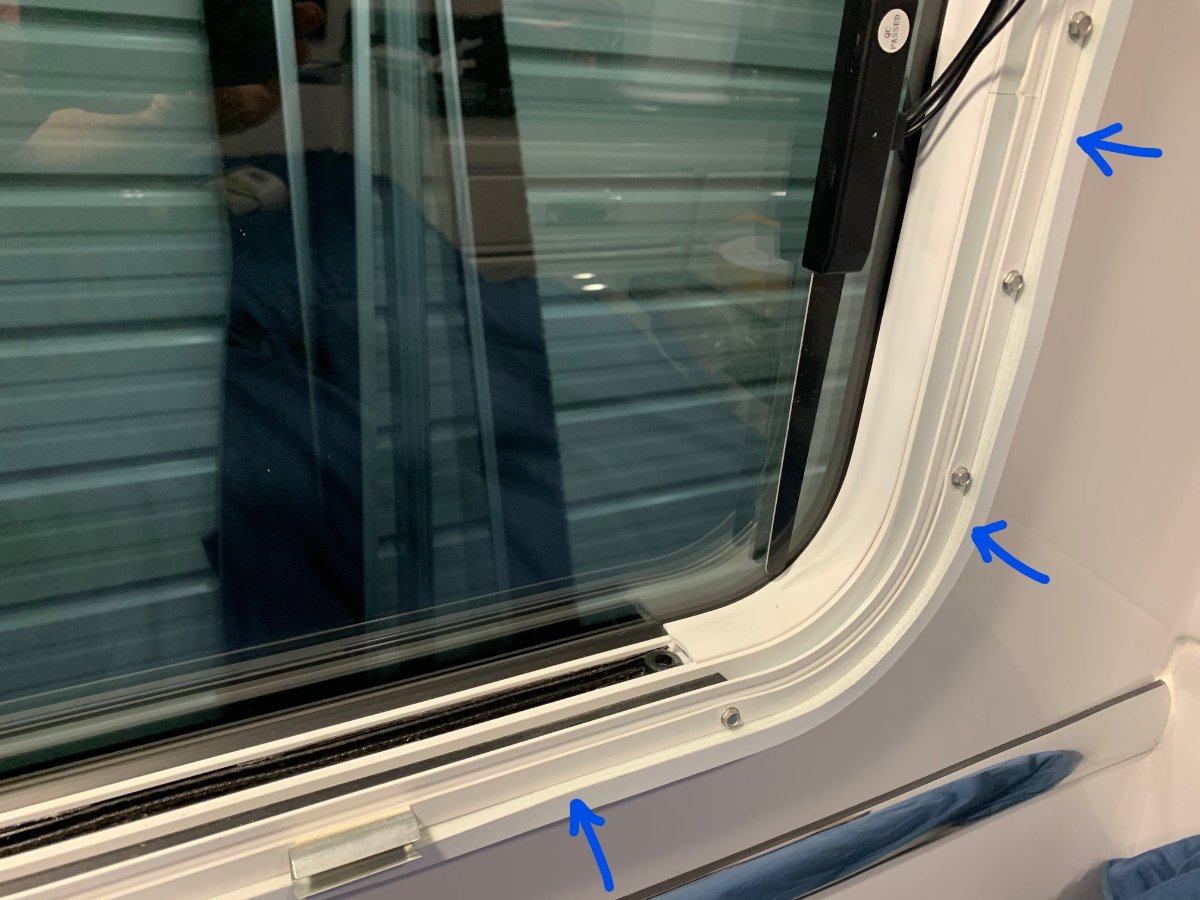
I'm guessing there are lots of owners out there who have figured out various methods to either insulate, black out or do both to their windows. I'll share what I did - it was pretty simple and fairly inexpensive. The materials I used were a roll of Reflectix BP48010 Double Pack Insulation, 48 in. x 10 ft and a pack of White Foam Strips with Adhesive - 2 rolls, 1/2" x 1/2" for each large window (I'll reply to this post with an update on the back window, which is a different design). I took my window frames out and measured and cut the reflectix to fit inside snugly, even a bit oversize to make sure it insulates well and blocks all light. With the reflectix only in the window, I could feel hot air coming up through the crack and I could also see light coming through when the cabin was dark. To fix both those issues I used the foam strip to go around the outside edge of the window, leaving 1/4" overhanging the ledge. This overhang will fill the small gap(s) that exist between the shade frame and the window frame. It took one pack of foam strip per "large" window (with a small amount left over), so 3 packs total if you want to do all of them. I also found that there was still a small gap in each corner where the shade frame is more square, so I used a small piece of foam on each corner: Then I put the window frame back in and reinstalled the reflectix to make sure everything fit nicely: And the blind will further secure and snug everything up: Voila... no more hot/cold air or light penetration from the windows if you don't want it. The stripping is "permanent" in that it won't be removed on purpose but the relectrix can be put in and taken out as needed. When not in use I roll it up and it stores nicely in the basement.
2 points
-
Good Question. Three primary reasons. First, I noticed OTT moved to Bright Way over Trojan and assumed they had a good reason for this - I did not, however, ask them. Second, I was able to purchase them from BatteryWholesale.com which is owned by Bright Way (Bright Way does not sale direct). I wanted to ensure I had fresh batteries manufactured together (no age difference). Third, does have to do with the price. I originally was thinking of moving to lithium batteries, however, this would not have been a plug and play solution for me. I read all the forum comments and actually talked to a few Ollie owners who had converted. Given the age of my Ollie, it would have cost me approximately $2,500 to move to lithium batteries as I would likely have to change my charge controller, etc. I was able to receive a 10% discount from BatteryWholesale.com which covered my LTL shipping and paid no tax for a total of $994. Additionally, not a good year for added expenses to as my son is graduating college and getting married. In terms of the Trojan batteries. I started there but could not get the price and shipping where I needed it to be. My sense is if I got over half the cost of moving to lithium I would have bitten the bullet and gone with Battle Born. Guess time will tell.2 points
-
I have not stayed at Plaskett Creek. Most other places in the Big Sur area, in a tent. You should have had good rock fish fishing. Western Outdoor News has good reports from Channel Islands. Getting ready for an Albacore trip in a couple of months, if I am able. I've spent a lot of time fishing, about your boys age and into teenage years, on the upper Kern river and Lake Isabella. My parents would take us to Limestone Campground. There was no water, so it was my job to fill water containers with dripping water from the wall that was across the road. And of course it was my job to clean the fish starting when I was about 10 or 11. I also had to start the fire to make breakfast. I say "had" to, but it was a pleasure to do all that "work".2 points
-
John - I'm amazed by what you've done to your Ollie in such a short time. I almost want you to go back to work for a few months just so I have a chance to catch up! I'm kidding of course....I'm sure that the work you've done has (mostly) been a labor of love or at least I hope so. It's awesome that you're dialing in your trailer for all of the different types of camping that you'll do. There are so many fantastic modifications that have been made by you, JD, Minnesota Oli, et al that I wish Oliver offered them...especially the really practical ones like mud flaps! Please keep posting - even the "small" mods - as they are very helpful and probably good stepping stones for the more challenging ones like the AC upgrade. In the next year I hope to get to half of what you've done in a few short months!2 points
-
WandR, Thanks! Excellent write up and very helpful. We have Hull 178, acquired in Oct. 2016. We have the Trogan AGM batteries and when they get replaced I will do as you did. So far our solar system has kept them in fine shape.2 points
-
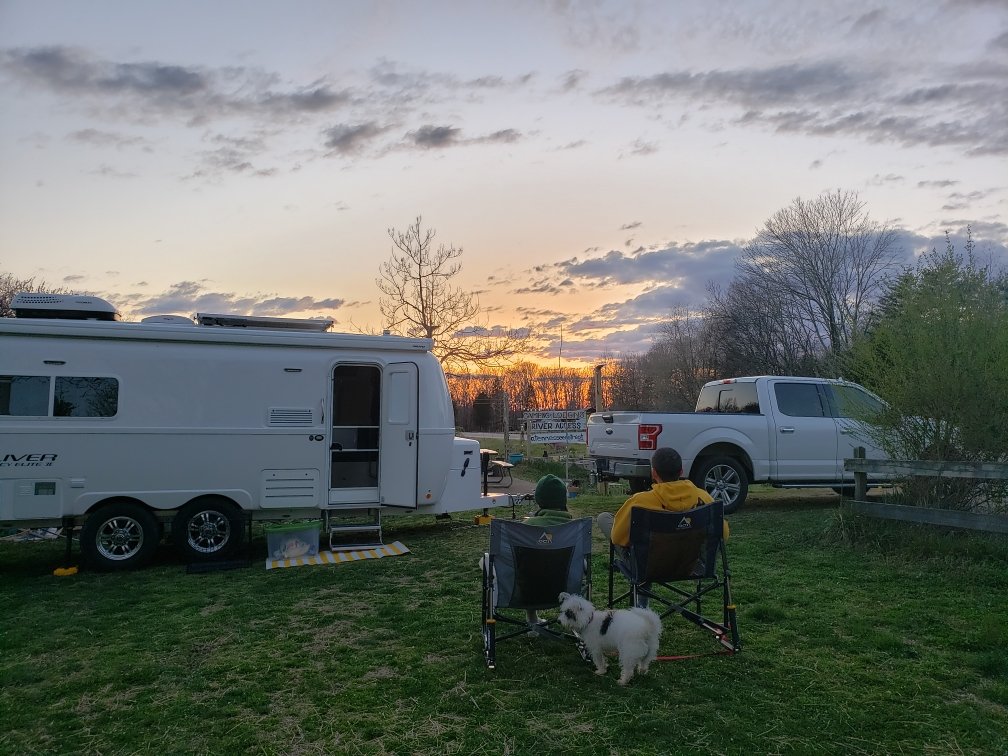
We picked up our camper on Friday of last week (March 19th 2021), and after a fairly long day of questions, tutorials, etc we set out on the Natchez Trace for our first night at Davey Crockett, followed by heading back north to where we are now, and will stay until Easter. Thanks to everyone who has answered my questions over the past year or so. Every one of your answers has helped my wife and I (and our dog valentine) get to this point and we love our camper so far.
1 point
-
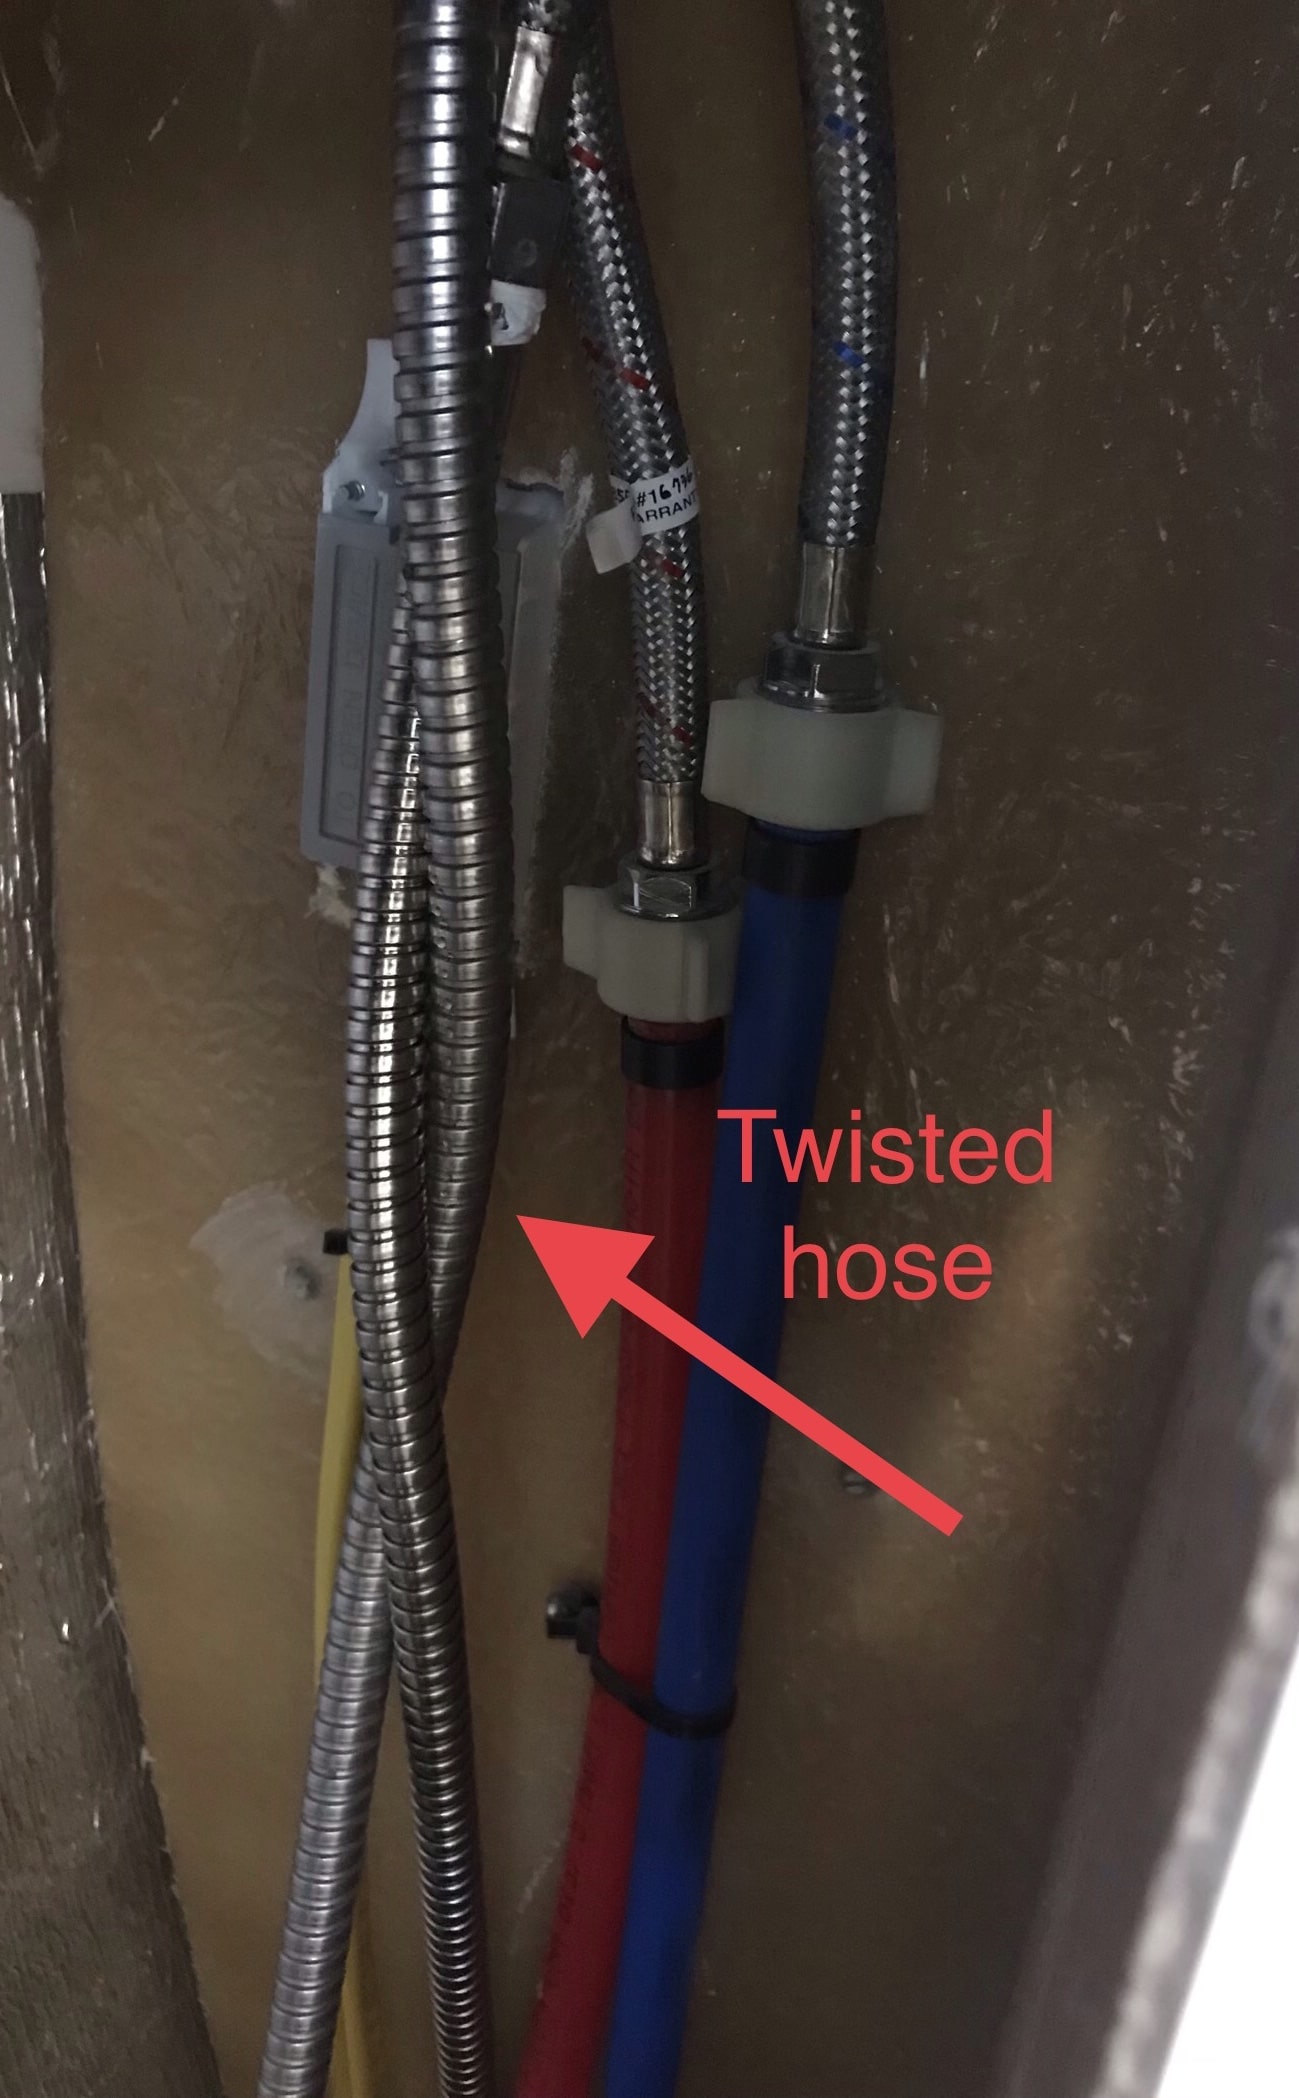
Thanks Bill, for the reference to this post. This will be helpful to untwist the hose. If I knew which way to turn it, or if it would be able to be untwisted without removing the front panel, I would do that. Maybe I should remove the front panel anyway to fix other issues, or to verify other issues are not there (or are). Not securing wiring or plumbing is a surprise. That is rather important for any use, but when in a moving vehicle subject to vibrations and bouncing, it is imperative. At delivery, I was told that the refrigerator plug is now secured with a tie wrap. It would fall out due to vibration and weight of the cord. I don't like using a tie wrap. A "space saver" plug would have helped a lot. But it should be better than it was, for a while. John1 point
-
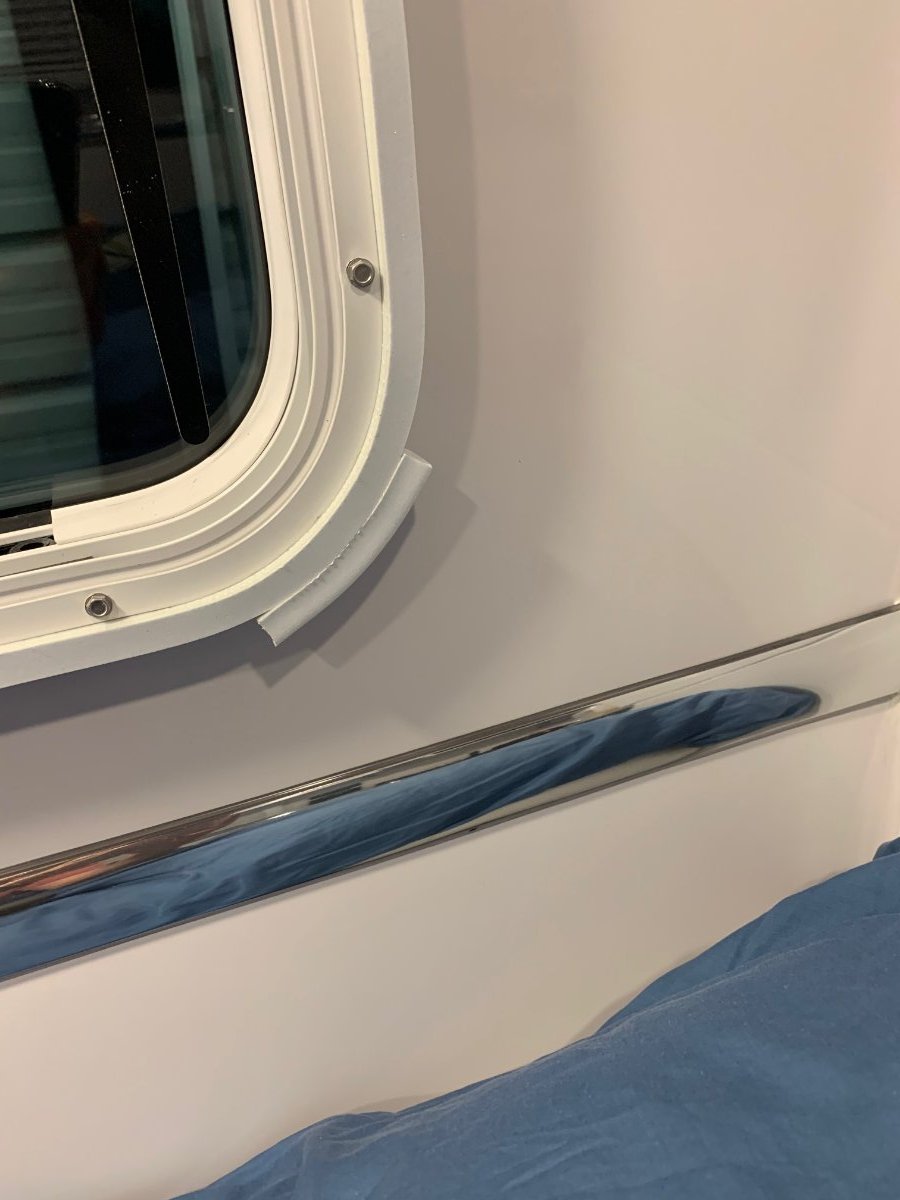
Hey John, thanks for the compliment! I do think that weatherstrip from Home Depot would work great. There's actually another 1/2" - 3/4" of space behind that 1/2" foam I used, so 3/4" wide will provide even better "grip". I had a totally different design in mind when I started or I would have probably chosen 3/4" or even 1" wide. Since you added this to your honey do list, something else you may want to consider is that each corner ended up with a tiny strip of sticky white tape there (the edge hanging over is sticky). It doesn't look bad because it's white - but it wouldn't be for long since it's sticky, so I took some 3M tape and cut strips to create a nice, white sticky free surface. It was easy to put the strips of white tape on those corners before putting the frame back up. Hopefully it won't collect dirt as easily. Here's a close up shot to describe what I'm talking about:
1 point
-
Thanks! All definitely a labor of love. It has kept me sane during my "early" retirement, especially with covid. I was just looking at my shrinking "ollie do" list and thinking how mad I would be if I had to start over for some reason! 😬 I couldn't agree with you more on all the awesome mods others have done and shared on the forum - It helped me tons and I've adopted many ideas and designs. We've also got our 4th camping trip planned for next month, so it's not all work and no play!! 😉1 point
-
The Silver version is also available on Amazon.1 point
-
I totally agree. The first time we noticed the shower didn't drain the grey tank showed 70. The next time, it was at 56. After a complete emptying, it sometimes reads 13 or 0. Very unreliable. I think the idea of using the fresh water + pump, and using the two readings in tandem is a good idea.1 point
-
Like the idea using a cover! Checked out their website and they also have additional colors. https://www.vanmadegear.com/product/roofvent/1 point
-
That is really cool, pun intended. Home Depot sells a similar foam but it is 3/4” wide and slightly lower at 7/16”, do you think it would work? It is way cheaper. https://www.homedepot.com/p/Frost-King-3-4-in-x-7-16-in-x-10-ft-White-High-Density-Rubber-Foam-Weatherstrip-Tape-R734WH/100151221 This is going onto my Honey Do list. John Davies Spokane WA1 point
-
in space siuts1 point
-
Agreed. For those of us with BlueSky equipment, Ryan is a wonderful resource. Very thorough, professional, and patient. Watching the videos in the learning center is a great start, giving you some background before you talk to Ryan.1 point
-
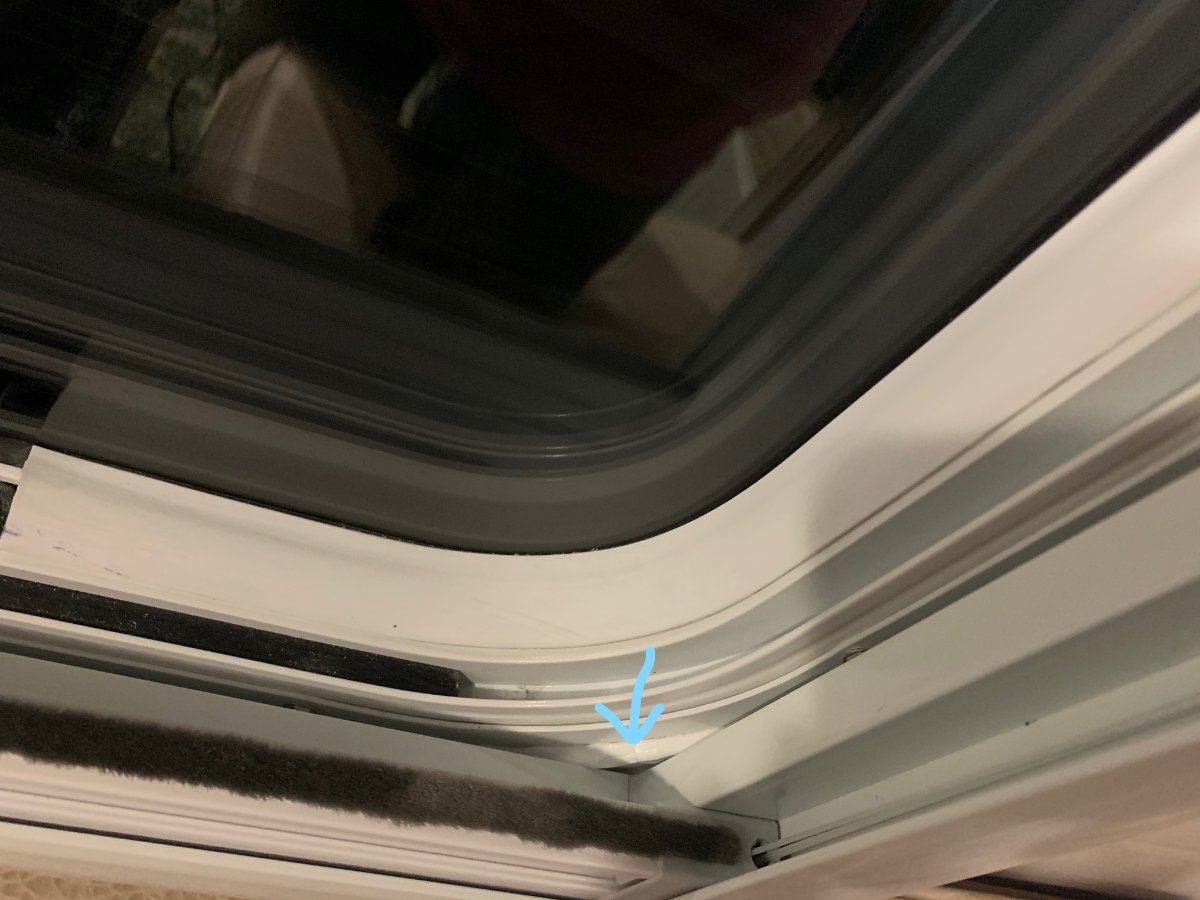
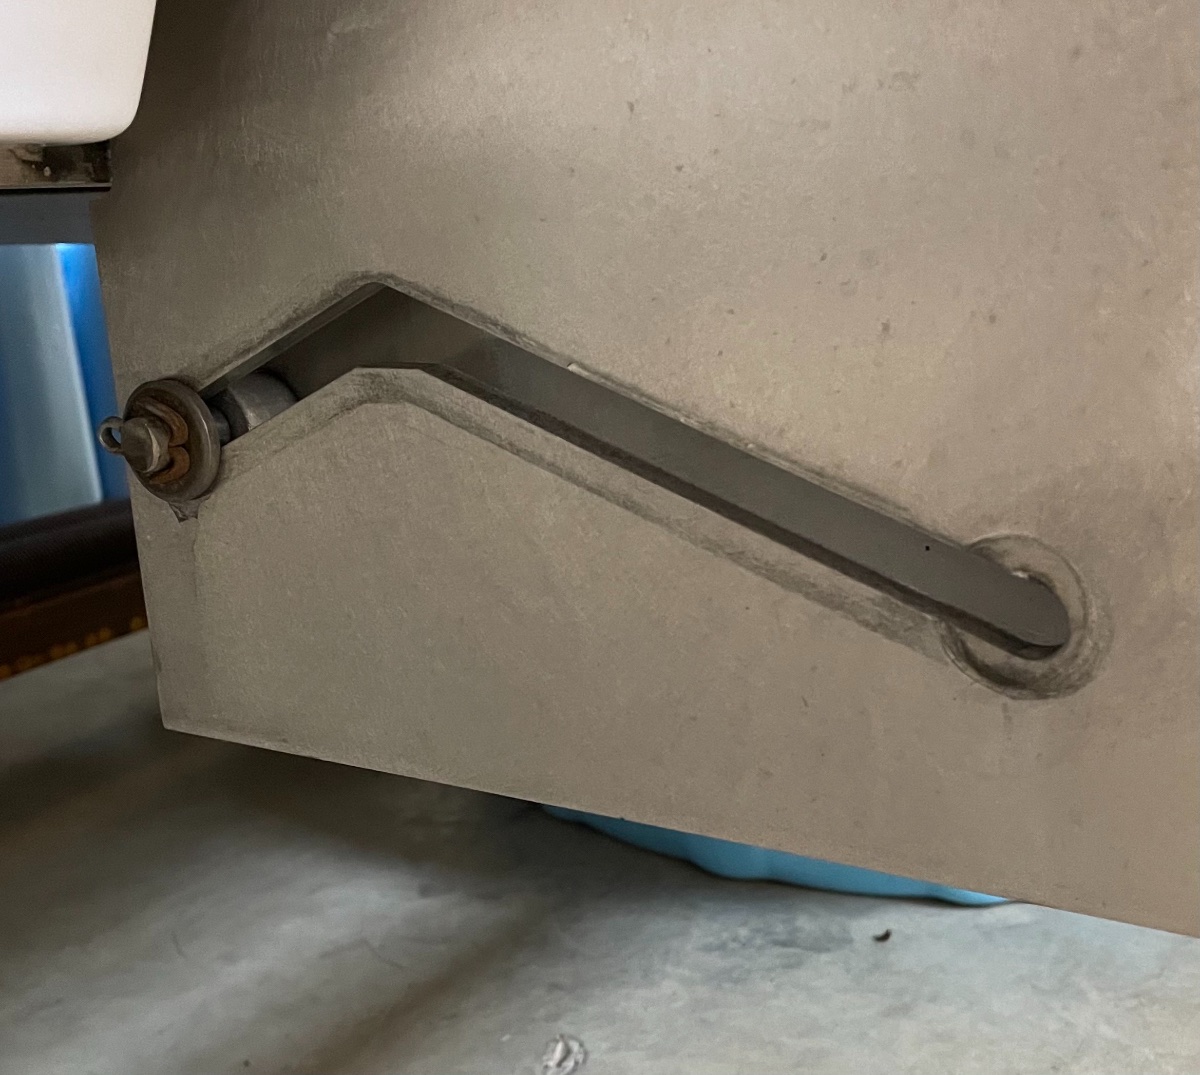
I’ve noticed something about my steps that I meant to work on but forgot about as we used our Oliver more. Use your finger to feel the top and bottom sides of the angled slot cut in the aluminum side plates. I found that one side of the slot was smooth and the other was rough. I think this was caused by the end mill making a “climb cut” on one side and a “conventional cut” on the other side of the slot. I intended to use a file and maybe emery cloth to smooth the rough side, then use a dry type lubricant on both sides of the slot. You might try this sometime to see if it helps. I also found that using both hands makes raising and lowering the steps easier.
1 point
-
Read my posts in this thread Pay particular attention to the picture of the twisted hose. You may be able to untwist it without removing the front panel.1 point
-
Very great job again! I'll look for the main post for the project when it arrives. I'm starting my designs for a Lithium Upgrade so I'm drafting behind you. Loved that you used what I assume are MBRF fuses on each lug. Great space saving safety feature. I can wait for the main posting but I'm curious, how did you mount those red and black through terminal studs? Is there room on the backside of the battery enclosure to reach up and put on backing plates for the hole down bolts etc? When I looked under the seat of the dinette (red stud side) inside it looks like you would need to reach a hand up inside quite a ways to be where your through studs are mounted. Haven't looked under the bed side yet. CS1 point
-
Look for WD 40 - Specialist Dry Lub with PTFE (which is teflon). That works great and is available at most parts stores, amazon etc. This also can work on the legs of the Electric Jacks without attracting dirt etc. It sprays on a bit like any other wd40 but drys to slick teflon clear finish.
1 point
-
I thought I read Oliver was aiming for 15 - 20 a month. Which given their process - seems doable. For comparison - Once upon a time I was responsible for ensuring 50+ Saturn's headed to the customer each hour - seconds were important in those days. RB1 point
-
I have found the grey and fresh tank SeeLevel indicators to be confusing for the most part (black tank sensor works much better). At first I thought they were good for "ballpark" estimates, but the readings are never consistent and repeatable so I've come to the conclusion that relying on them is risky. The tanks are just so "shallow" that the slightest difference in leveling can result in huge discrepancies in the SeeLevel readings. My strategy is going to be to fill the fresh tank and use the onboard pump rather than just city water pressure. By using the fresh and grey tank level indicators together I'll have a better "estimate" of how full / empty the tanks are.1 point
-
Jordanv Enjoy your travels!1 point
-
Congratulations! Beautiful sunset. Enjoy your travels!1 point
-
Very exciting and beautiful photo! We pick up our Elite I Wednesday March 25th (hull 765) and are staying at the Natchez Trace rv campground for 3 nights. Apparently Davey Crockett is full, some sort of convention is going on.1 point
-
Good too hear - a sound blast off!! Enjoy Happy Trails1 point
-
If Dometic's threshold for consumer satisfaction is "Does our product cause you physical pain?", then that would explain a lot.1 point
-
To be clear - at its newest, and best condition, my AC rivals a Harrier jet at vertical take -off. But hey, who's complaining - I'm just happy it cools.1 point
-
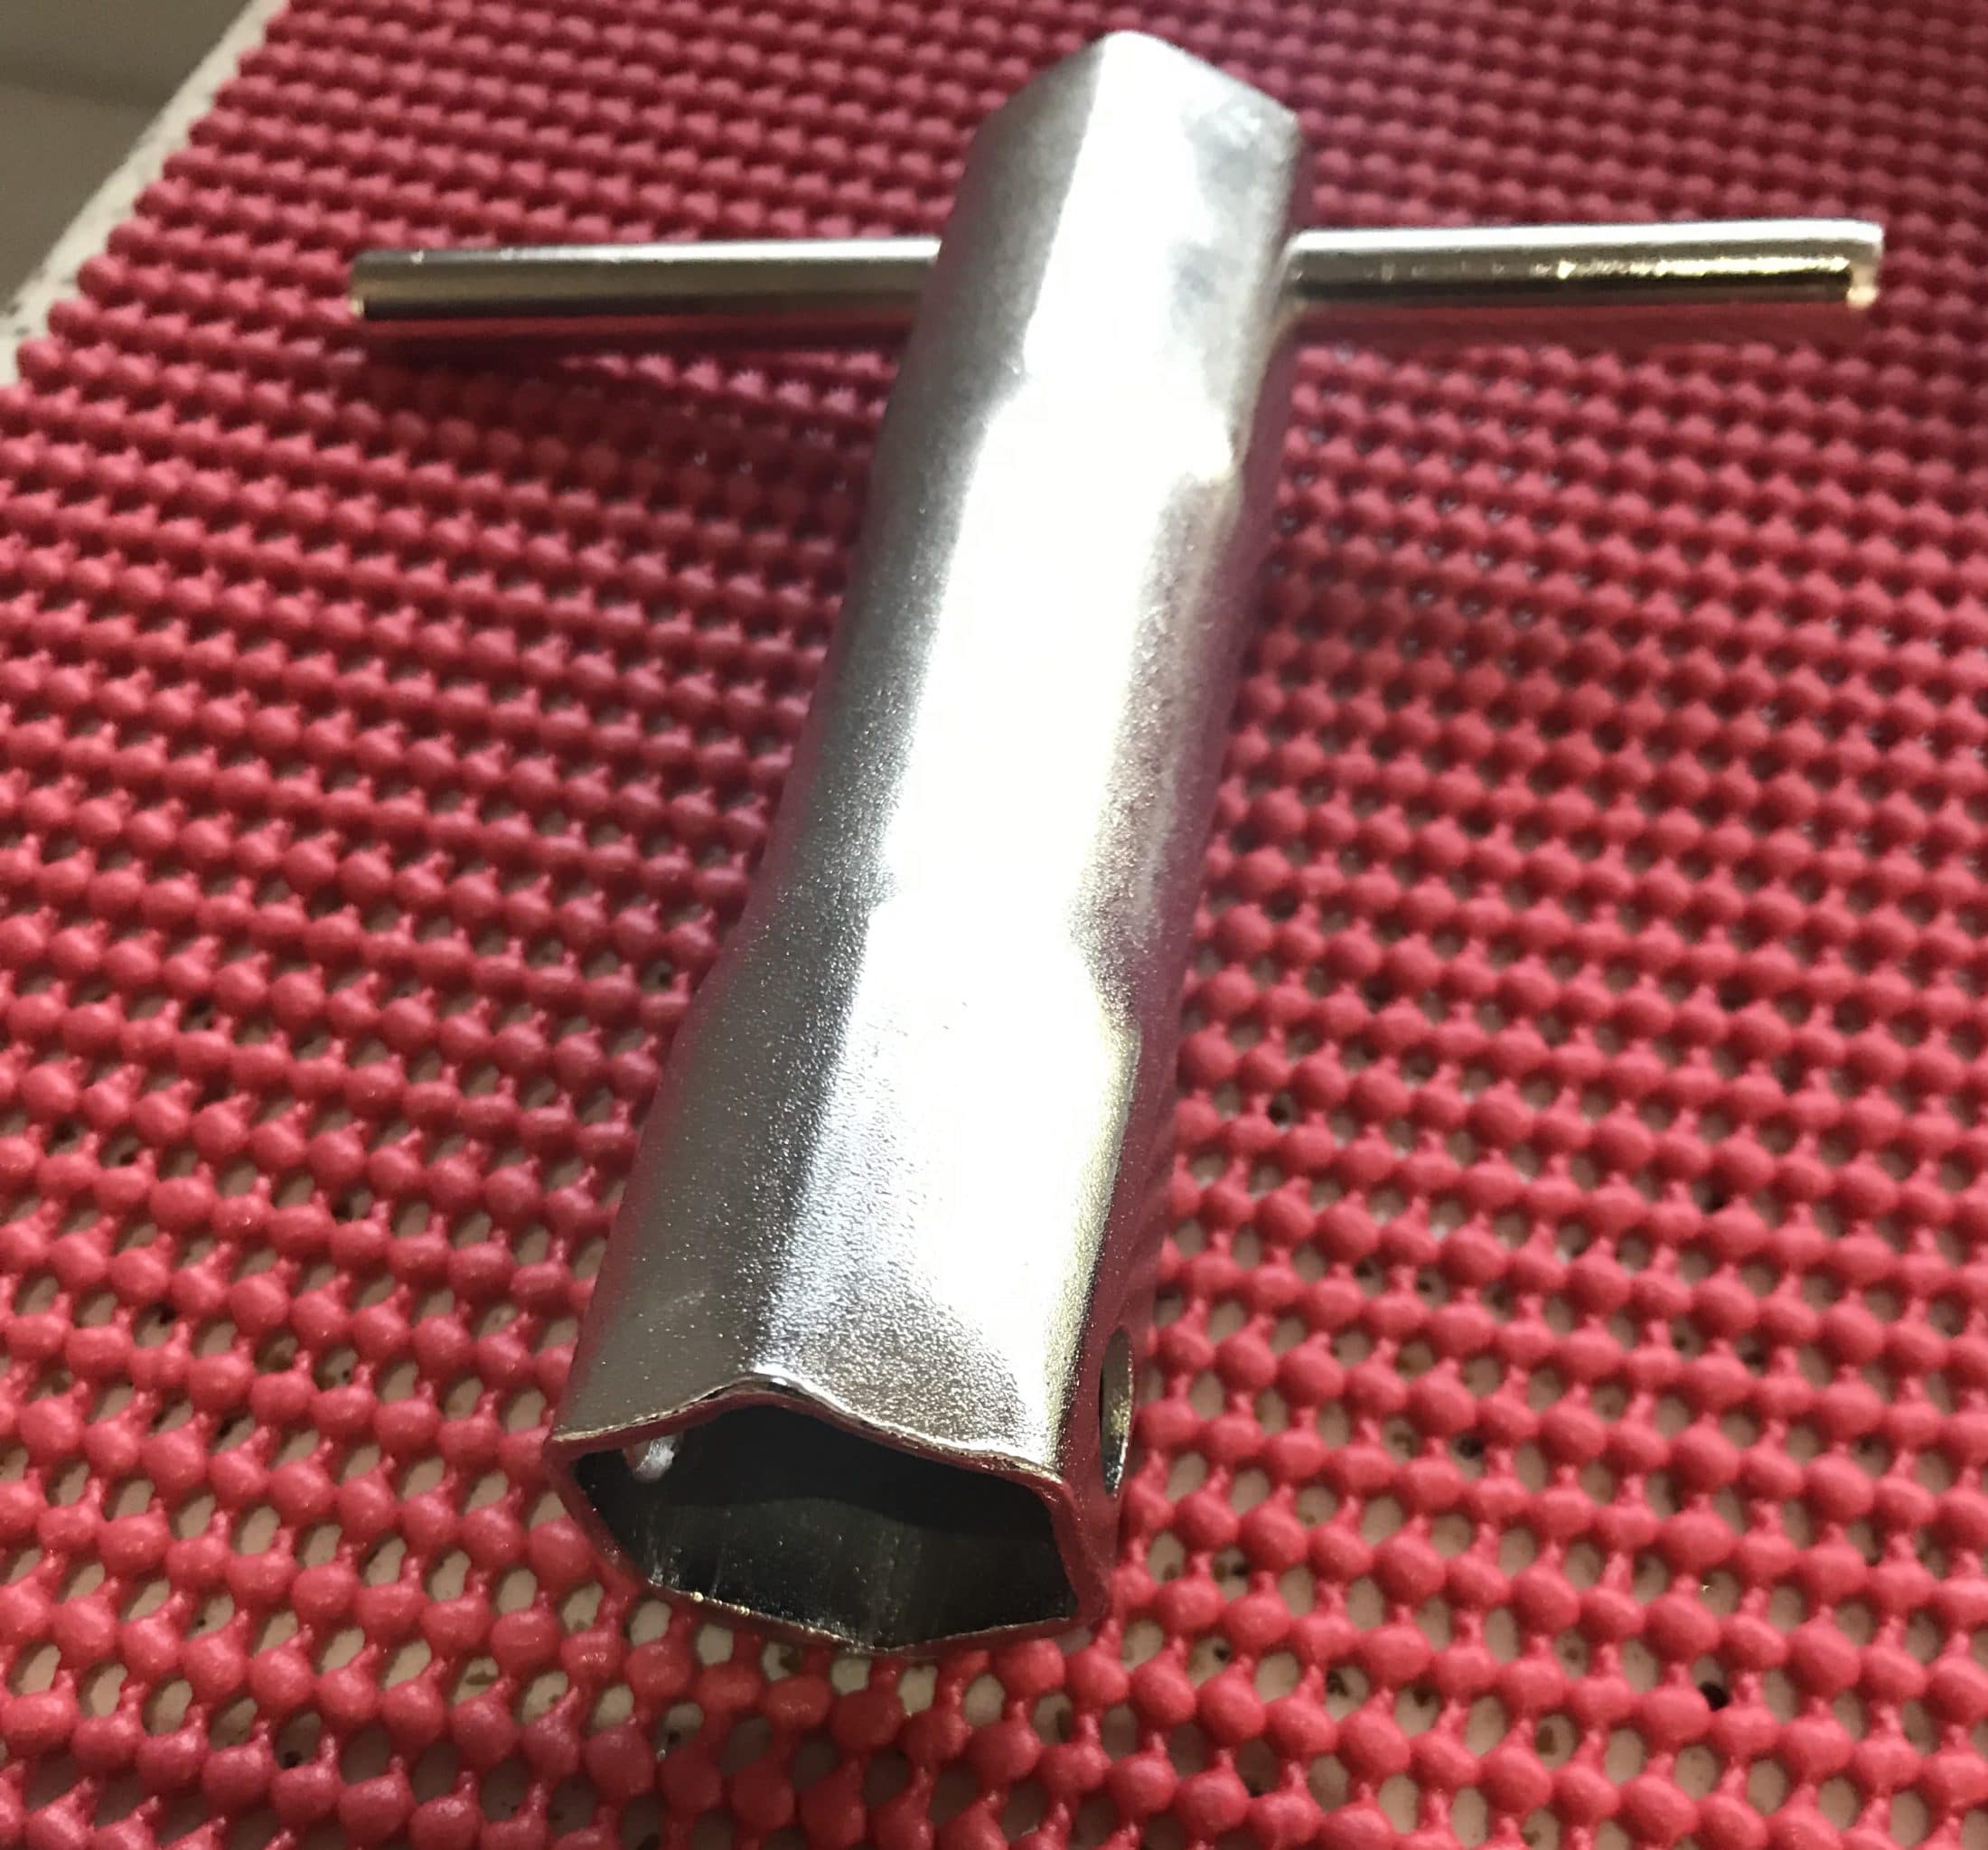
Bill, thanks very much for the great info and pretty pics. I have not been under there yet to cap off my toilet line, but this encourages me to do it. I like your annotations, looks like you use Photos in IOS. The notes really make the pictures more helpful. Where would one get a thin long socket tool? Home Depot? Is it a standard size? Thanks again. John Davies Spokane WA1 point
-
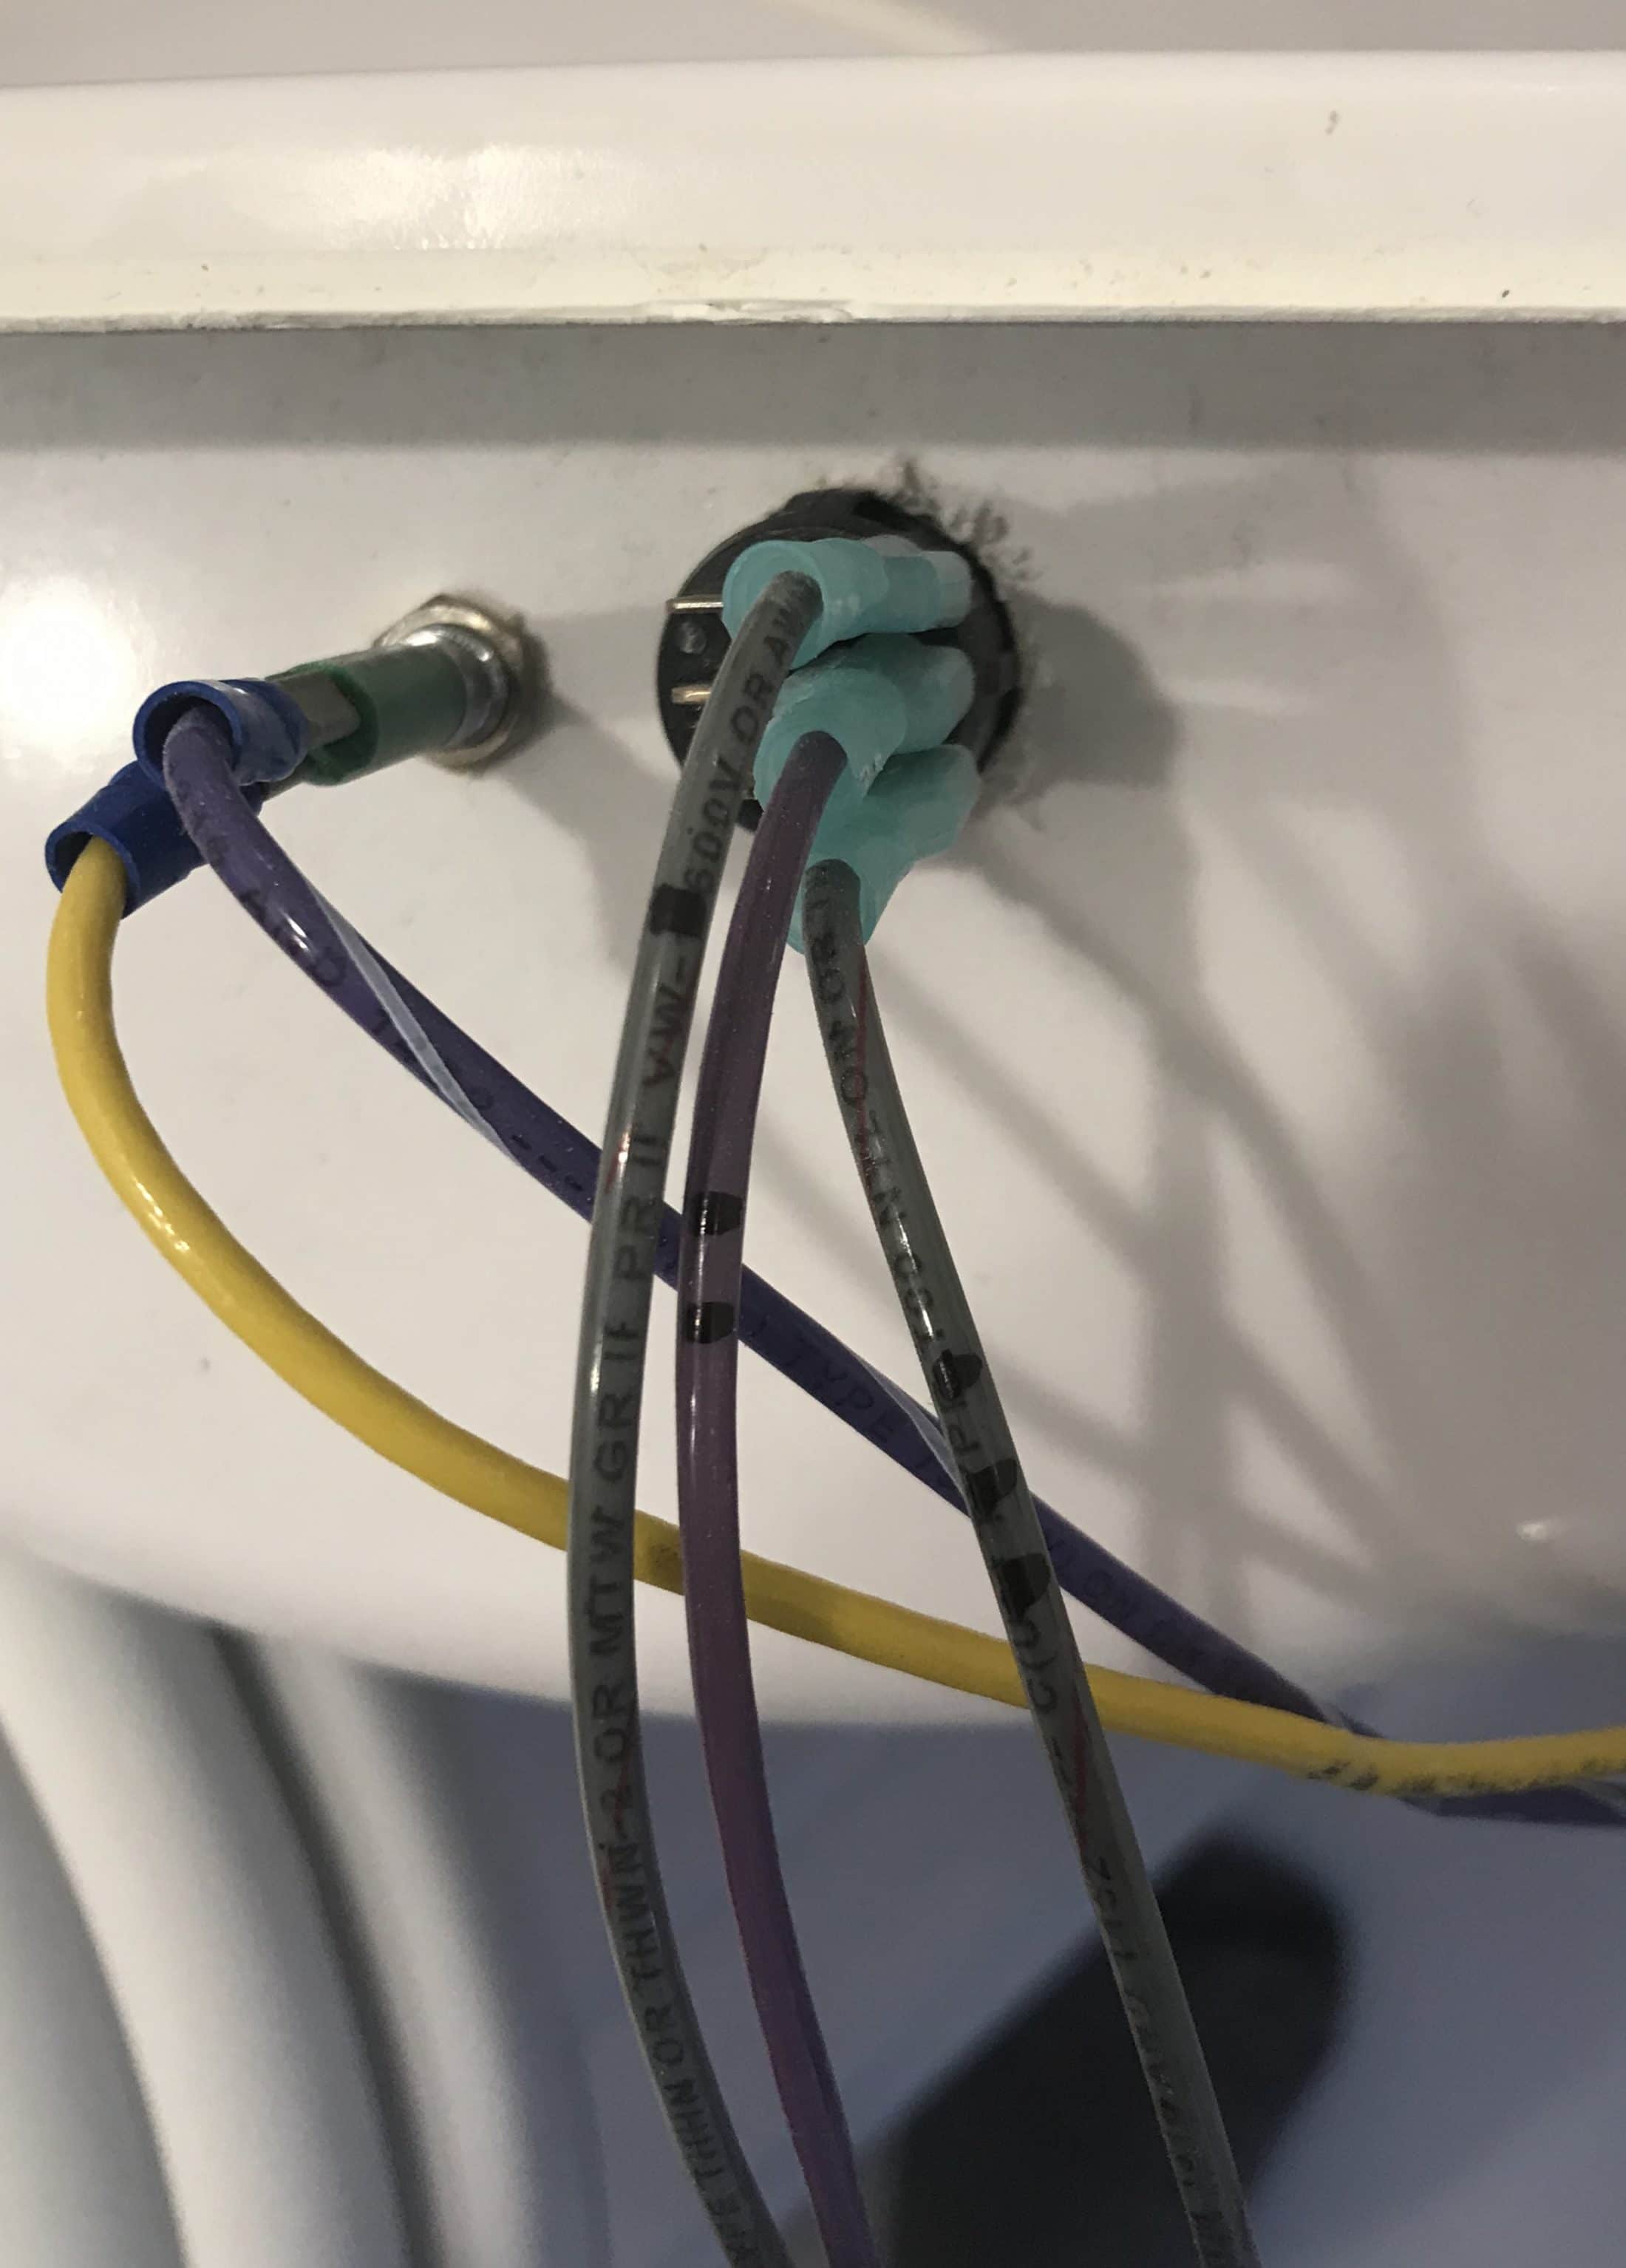
Make sure hose is not twisted. It will pull out and go back in much easier. Mark these wires before you unplug them
1 point
-
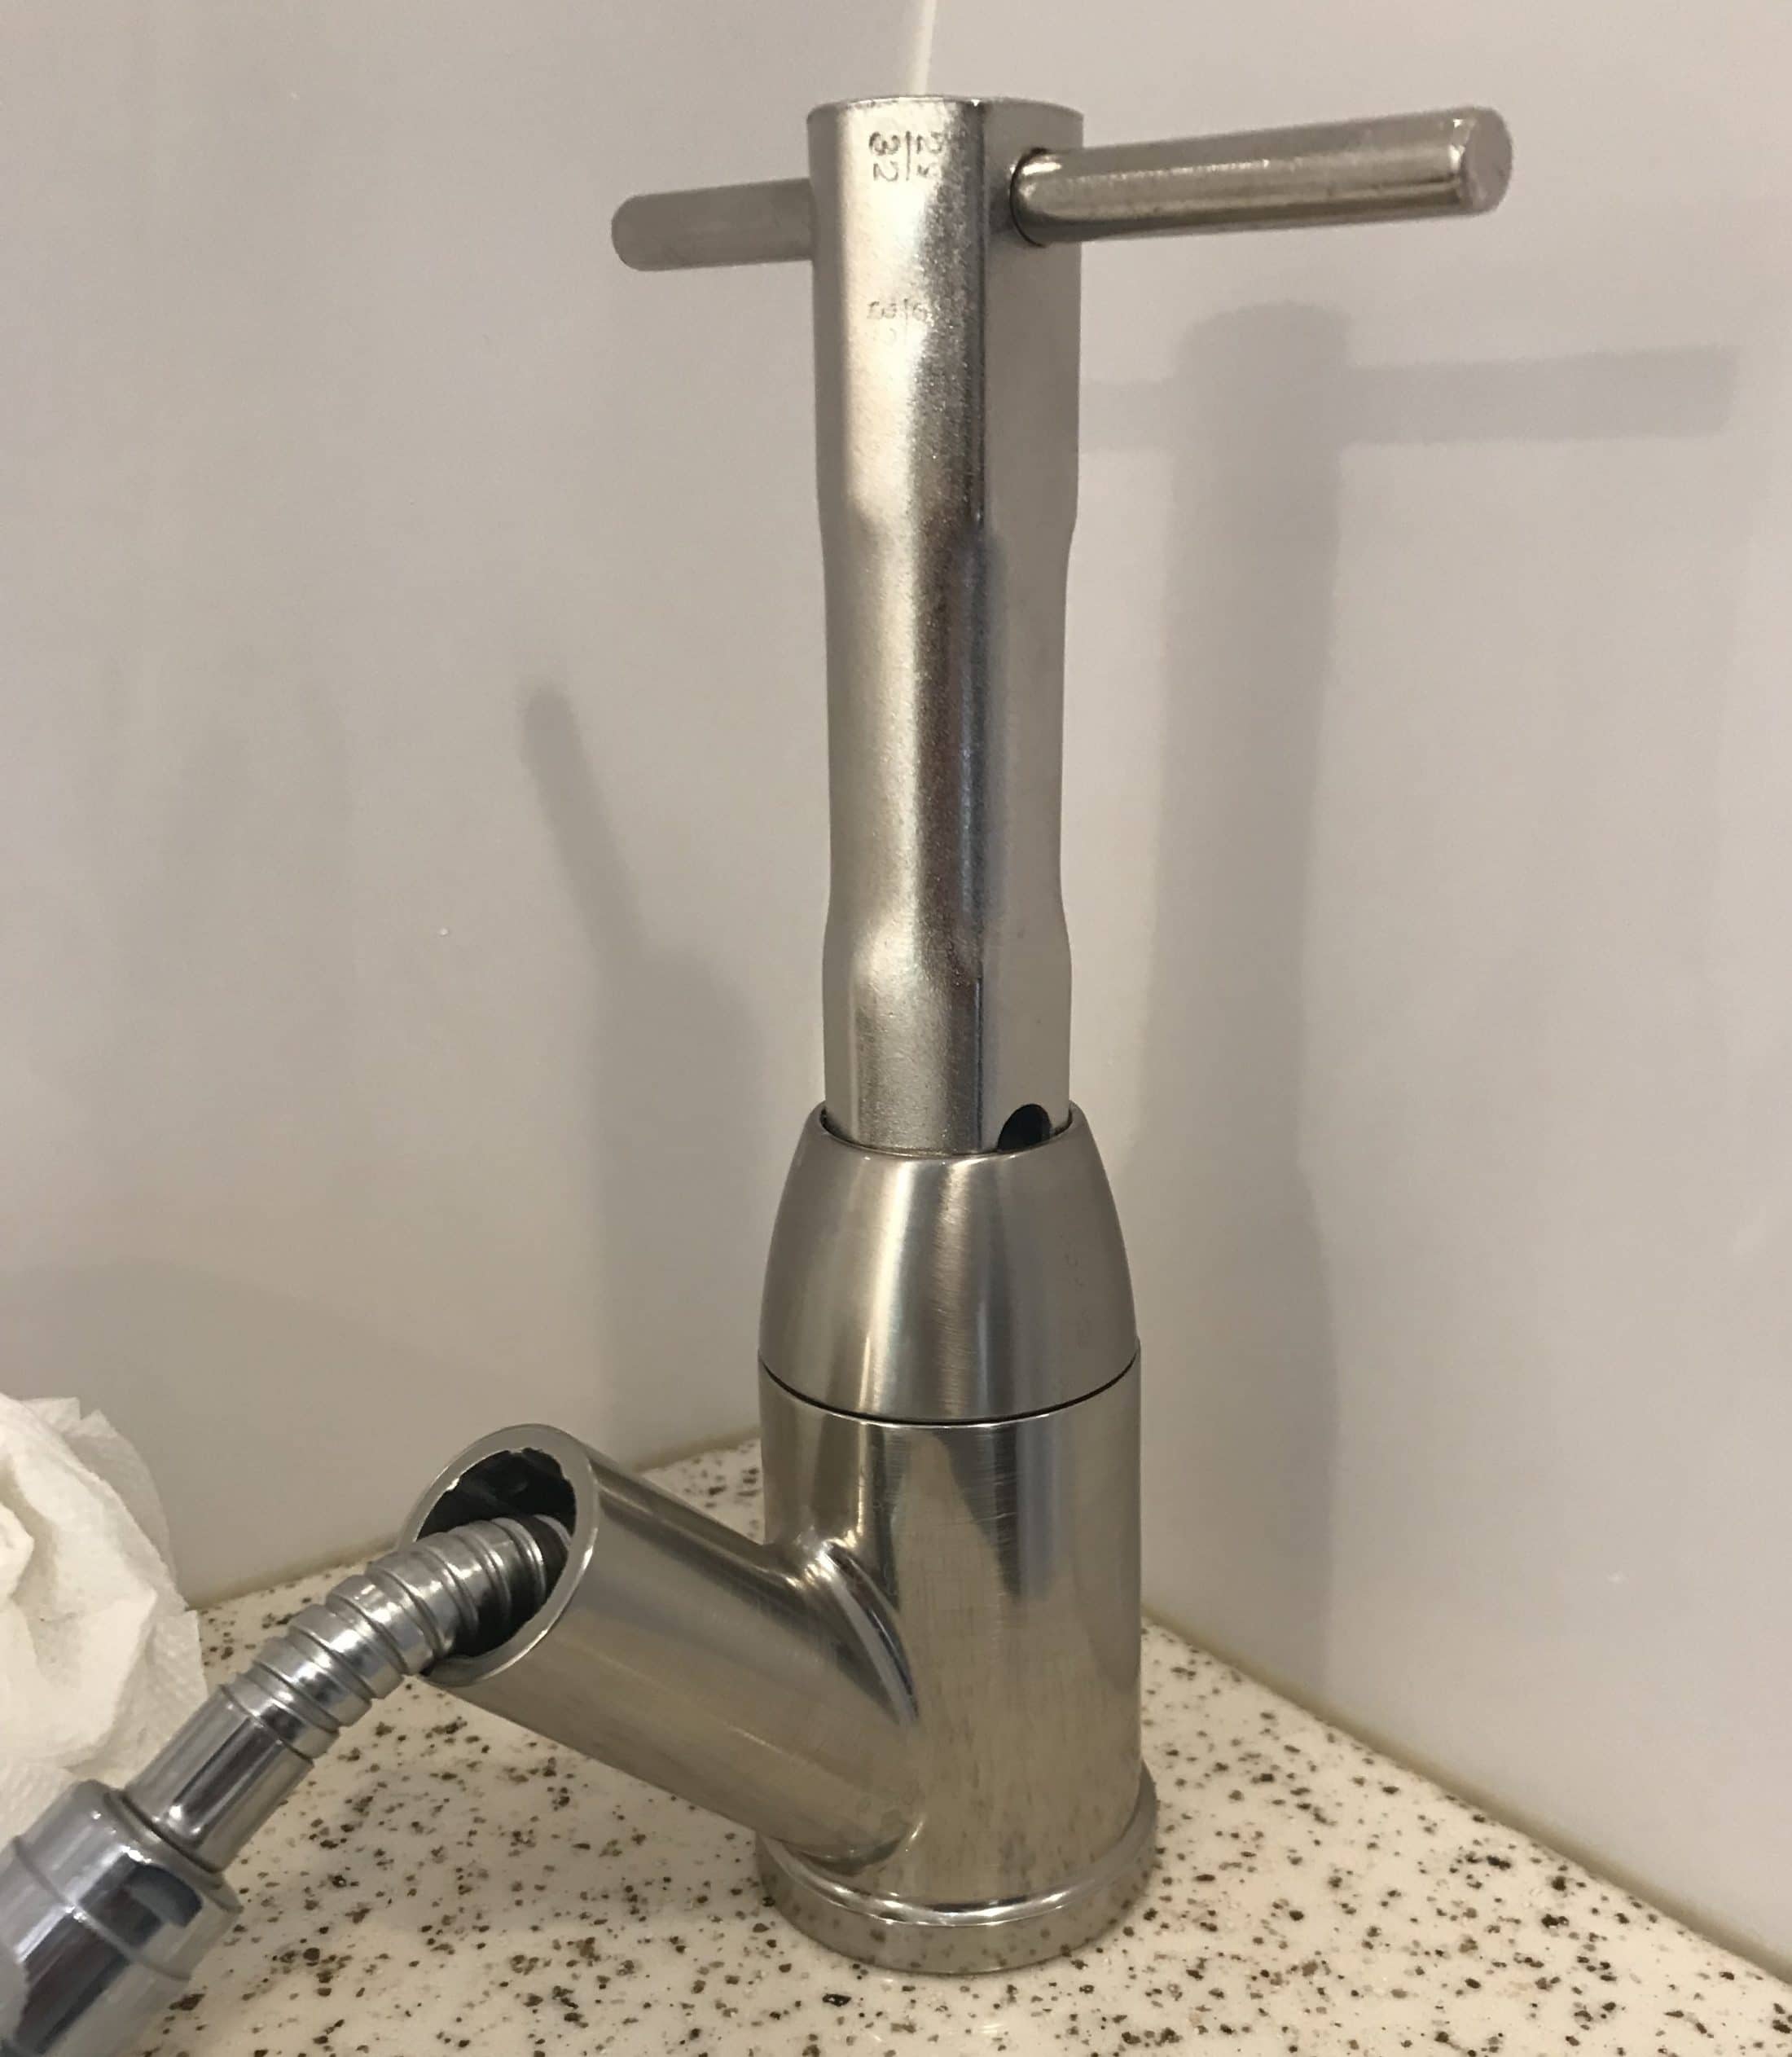
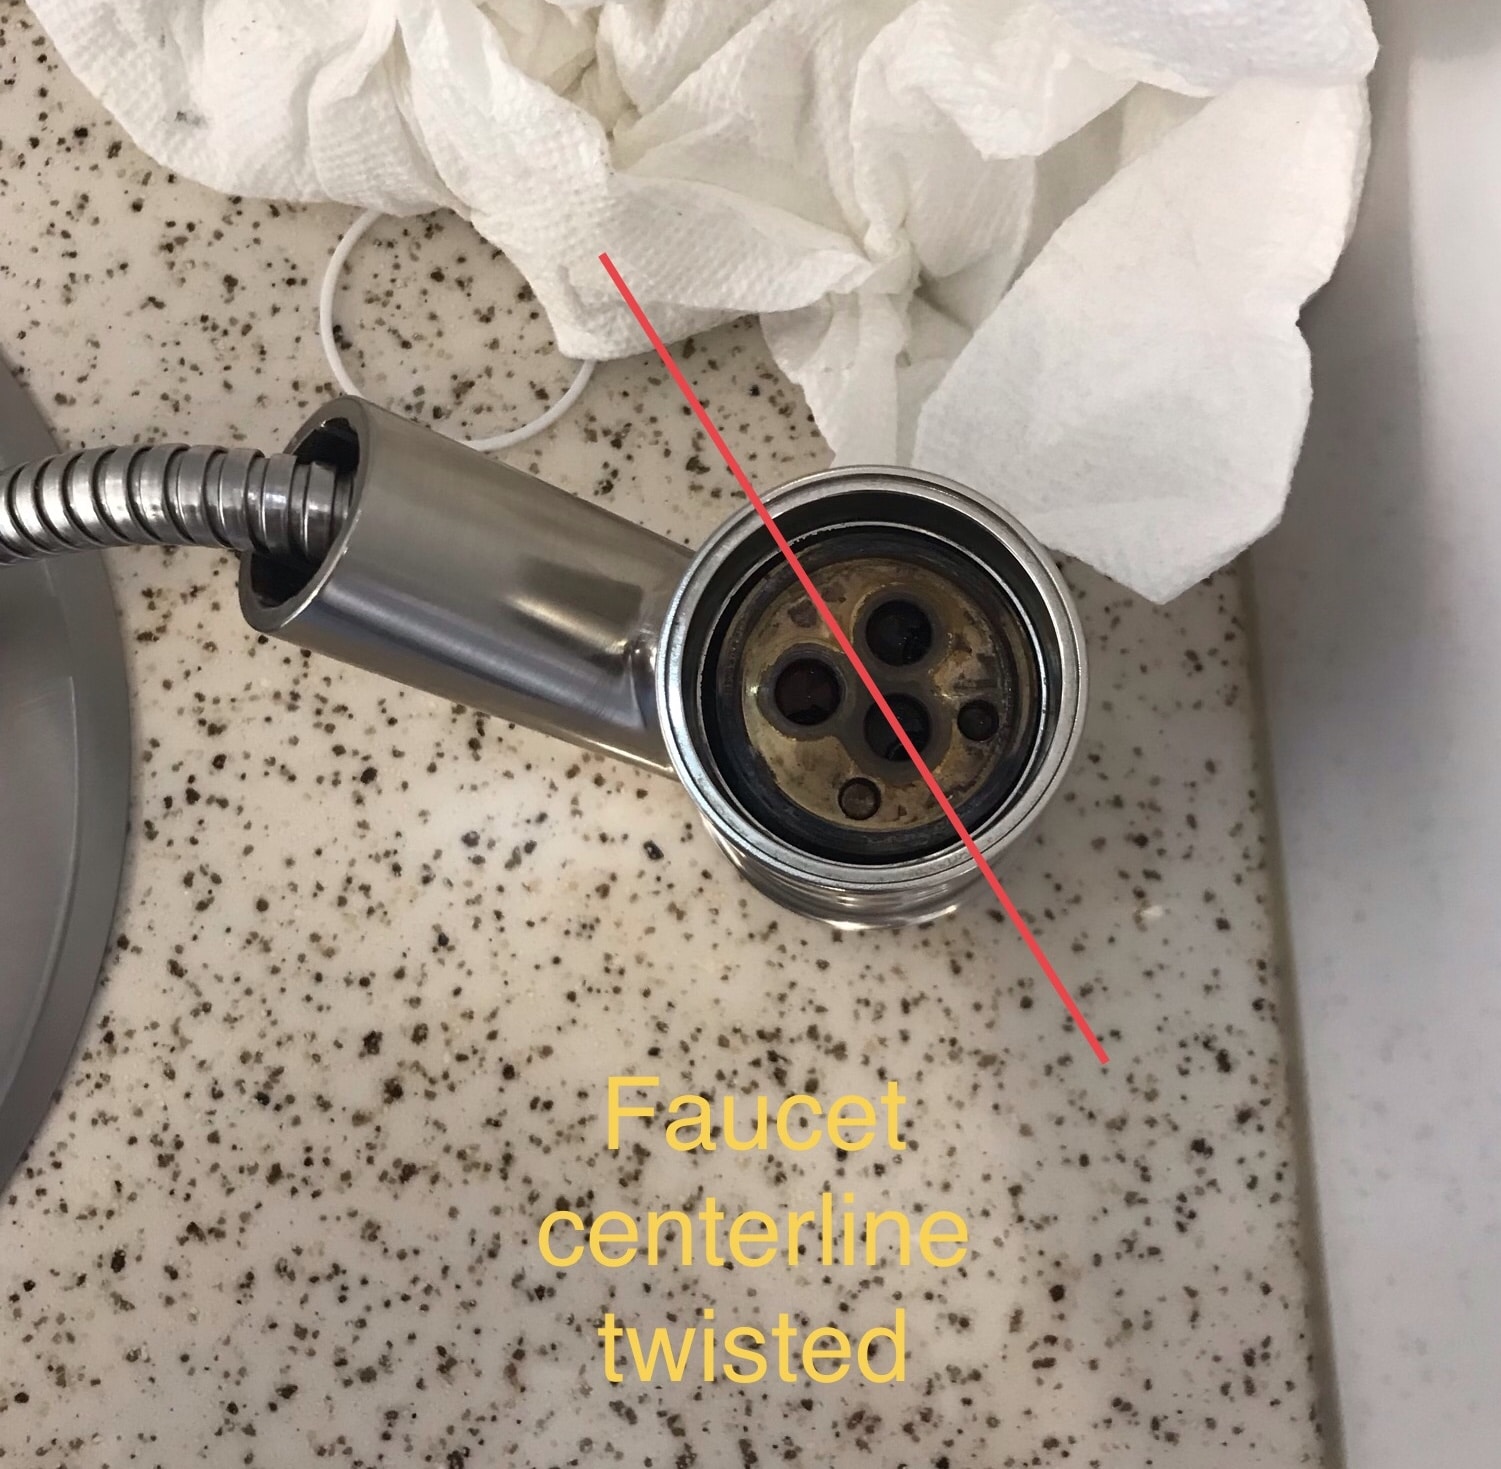
I’ve been under my sink to realign the faucet after replacing the cartridge. Use plastic razor blades to remove old caulk from the shelf and vanity. ASI 0240 works real well to remove old caulk. ASI 335 is what I just used to reseal my shower pan. I think you’ll need one of these wrenches to keep from having to use a pair of Channellock plies which will mar your new faucet Wrench in use What it looks like under there Be sure to “clock” the faucet centerline so that it is perpendicular to the wall otherwise the wand will either hit the wall or swivel out from above the sink and the hot vs. cold adjustment will be awkward.
1 point
-
I can’t add to that, but I do suggest, if you have the Natures Head toilet, to find the unused water line that goes to the small ball valve on the floor behind the toilet. Cut and plug the supply line under the sink close to where it tees off the faucet cold water line. That way you will no longer have to winterize that pesky section of unused plumbing. It really should have been done at the factory when the NH was installed. If you have a regular toilet, then never mind. Good luck. John Davies Spokane WA1 point
-
If you have a smartphone you can download an app. The one I have is appropriately named dB Meter. On low fan, I get 65dB- 70dB standing directly under the AC and 60dB-65dB at both bed height and the dinette. Add 5 dB to those numbers when the fan is on high. So, roughly the same level as a vacuum cleaner for reference. That’s with around 35dB background level without the AC running - the trailer is pretty quiet which makes the noise seem even worse. I believe the Honda generators are rated at under 50dB, so yes these suckers are really loud. The odd thing to me is that it’s the fan and not the compressor that makes most of the noise. Seems to me like Dometic could stand to do a bit more engineering.1 point
-
Given the quality of Oliver wiring at times, I think they'd be more worried about lawyers than competitors.0 points


.jpg.15f940f26c9f46b24aa4a720a90df607.jpg)


-
Recent Achievements
-
")


")


")


