Leaderboard


Popular Content
Showing content with the highest reputation on 04/26/2022 in all areas
-
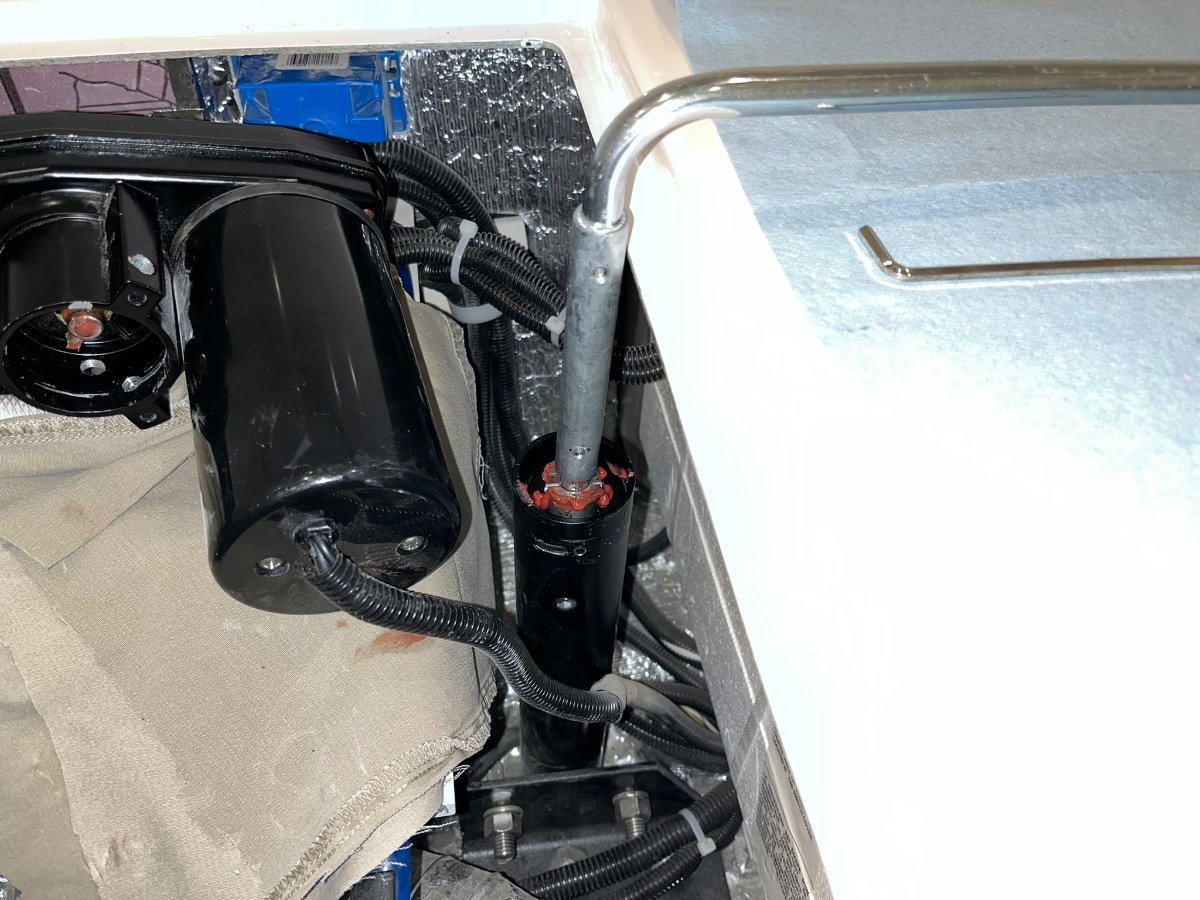
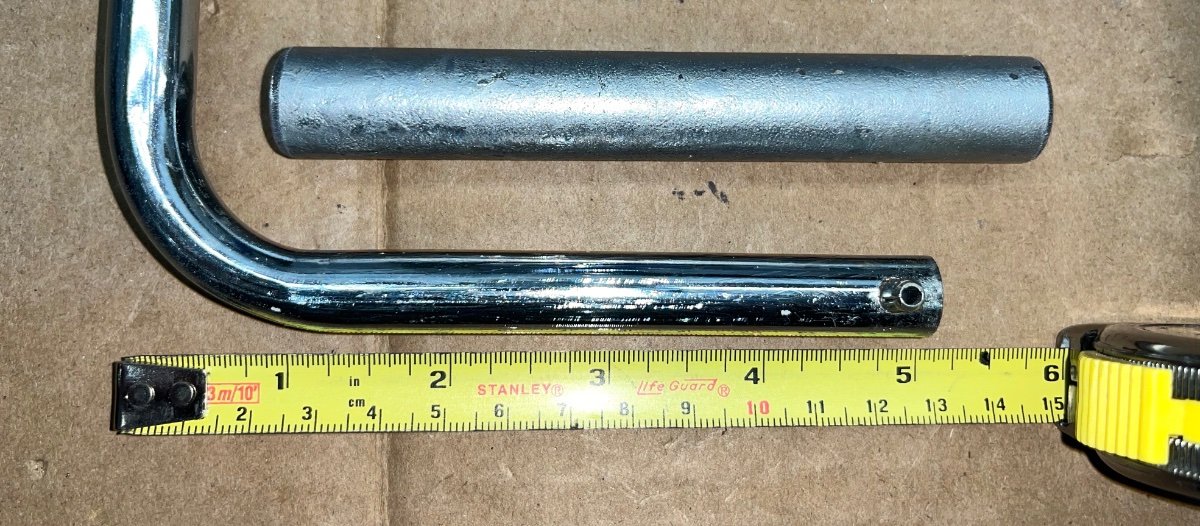
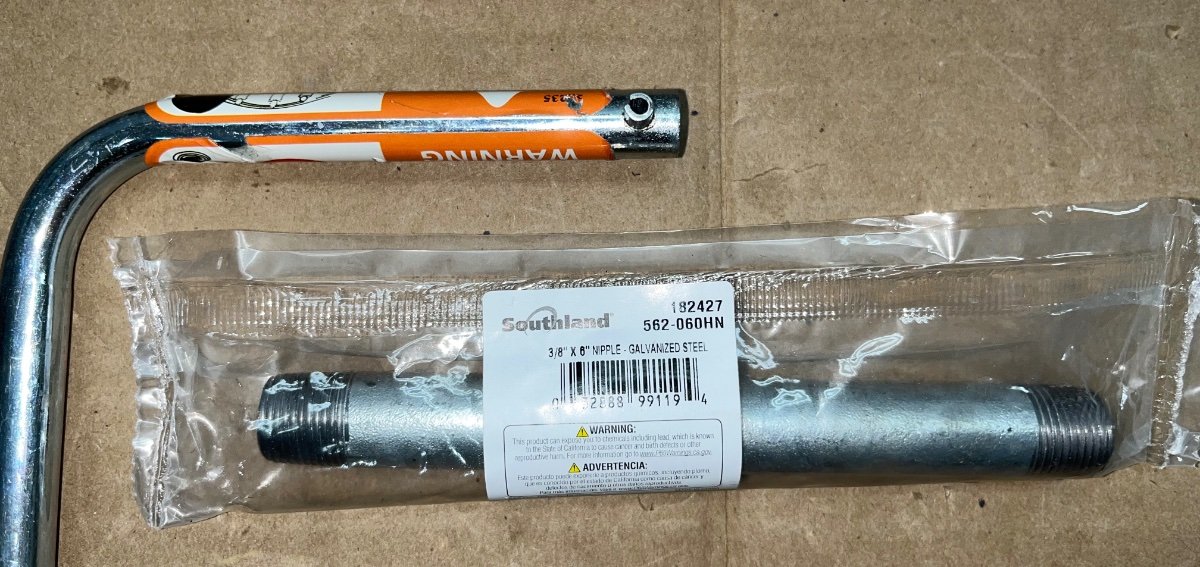
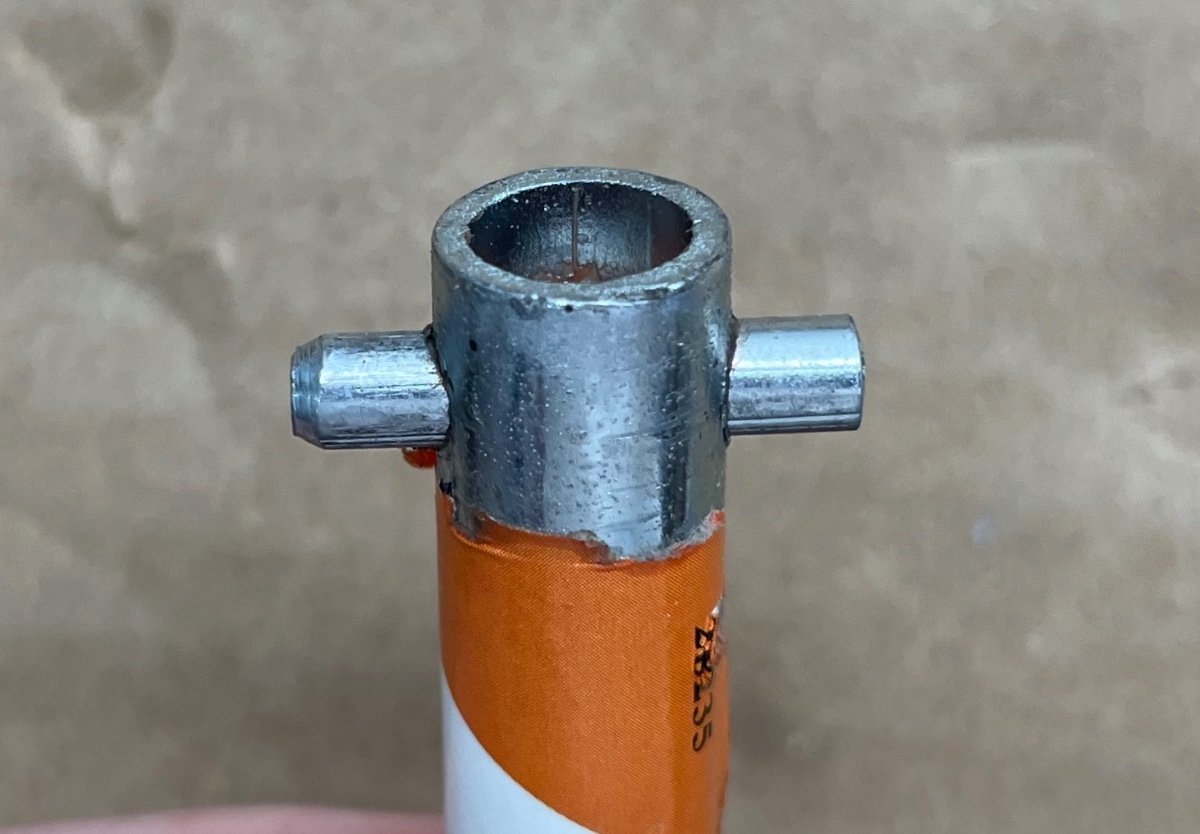
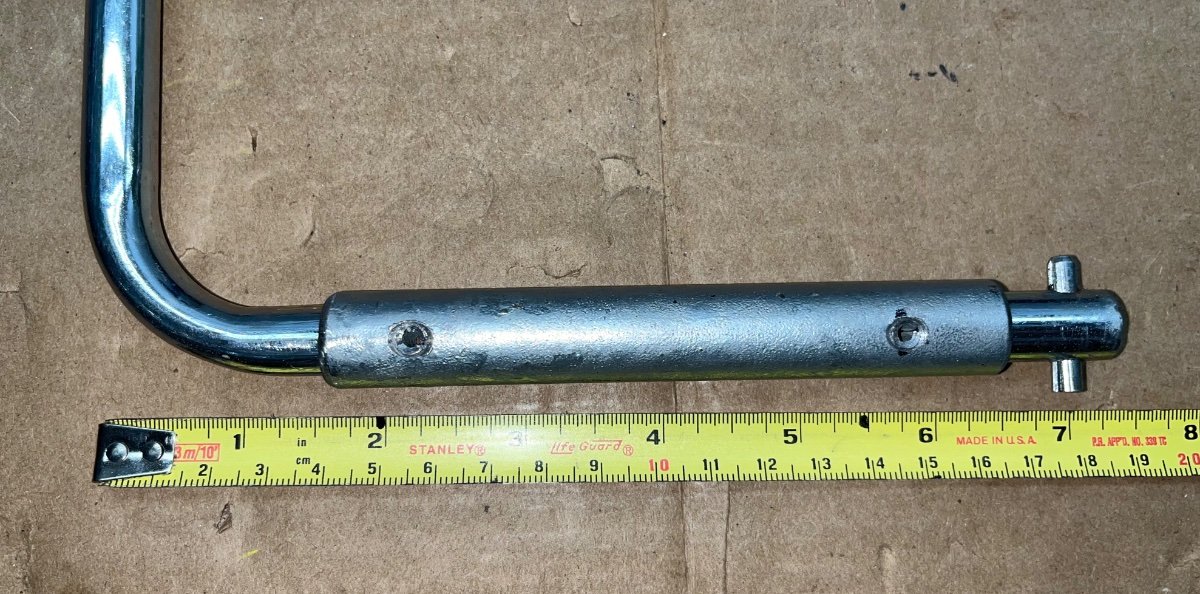
EDIT: see related thread - https://olivertraveltrailers.com/forums/topic/6812-check-your-rear-jack-mount-hardware-bottom-frame-bolts-were-1-turn-loose/ I serviced the two rear gearboxes and then to my dismay the right one refused to go up or down under a load - STUCK. I use the emergency crank tool to see what was going on, using the square shaft on top of the gearbox, and it was really really tight, something was binding for sure, so I removed the three Allen screws and lifted off the gearbox. And tried to turn the lower screw part using the other end of the tool. FAIL - it is too short to clear the surrounding fiberglass bed support, it would only move about 170 degrees. I said some very bad words, and I am glad I did not have to deal with a failed gearbox in the boonies, I would have been stuck. I needed a short length of heavy steel tubing with a 1/2” inside diameter so I could make an extension. I found that a 3/8” MPT pipe nipple works perfectly. Unfortunately that size is hard to find and about double the price of a more common 1/2” MPT nipple. Here is what the end of the tool looks like, the part that drives the lower jackscrew, under the motor unit. I used a 3/8” MPT x 6” nipple, the longest I could find at Home Depot. Drill out the internal burrs and the long seam weld using a 1/2” drill bit and cut off the threaded ends. Cut the tool in the center of the straight part and insert each piece into the nipple 1”. Drill and install two 5/16” roll pins and trm any excess material so you don’t cut yourself using the modified tool. It is a very snug fit, I considered adding epoxy but that isn’t needed. NOTE I turned the end 90 degrees from the original orientation, so the tool will lie completely flat in a galley drawer without gouging the drawer bottom. I was able to free up the lower part by turning it back and forth to get the jack working properly. THEN I found the true cause, the support bolts that go through the trailer frame were super loose. I turned all four (two per side) one full turn before they tightened to 43 ft lbs. Now both jacks run much better under a load. I started a service ticket and will make a new thread about the loose bolts. I hope a few owners will look at their tool and measure the part with the pin in it. If it is 5 inches, it will be useless in an emergency. I am curious to know if everybody has a disfunctional tool like mine. John Davies Spokane WA
 6 points
 -
Add you hull number to your signature so we know what you have. AGM batteries cannot be evaluated for their “health” other than through a load test. The resting voltage is not an indicator, plus with four, one can be bad and it will draw down the others when you apply a load. It is very typical for them to tank when using inverter power, especially the microwave (AKA the Battery Killer). Before pulling your hair out chasing phantom problems, make sure the AGMs are indeed fine. If yours are over three years old, the odds are high that at least one has gone tango uniform. There are cheap handheld battery load testers available but I am not convinced of their accuracy, nor am I aware of one that does 6 volt batteries. You could take your batteries, or the trailer, to a battery store like Batteries Plus Bulbs and they will test them for you at no charge. They need to be charged and the cables disconnected so they can be checked individually. Be prepared for bad news😬 FYI with the batteries disconnected your break away system won’t work, so drive carefully. John Davies Spokane WA4 points
-
I have had the same issue with the front jack. I am glad you mentioned this because I did not think to check the rear ones yet. I will do that tomorrow. Please let us know if you find get a torque value from Oliver. Thank you.3 points
-
I have never checked these before in five years, I guess that was a big mistake. My right jack bound up so hard that it would neither raise nor lower under a load. I was able to free it up - see this thread: https://olivertraveltrailers.com/forums/topic/6811-how-to-lengthen-your-emergency-jack-handle-so-it-will-fit-the-rear-jacks-with-the-gearbox-removed/ I discovered that the top of the jack would flop around with no weight in it, I am not sure how I could have missed that, I found the two lower bolts, that go through the frame, to be loose one full turn. Tightening all four (both the left and right jacks) to 43 ft lbs using a 3/4” deep socket removed the movement and both jacks run better now 😳 I started a service ticket, I need to know the specified torque. I used a standard value from a table. The two upper bolts on each side were fine. Does Oliver recommend a periodic inspection for these bolts? I don’t recall seeing one. Is 43 ft lbs OK? The front jack bolts loosen all the time. Thanks. John Davies Spokane WA2 points
-
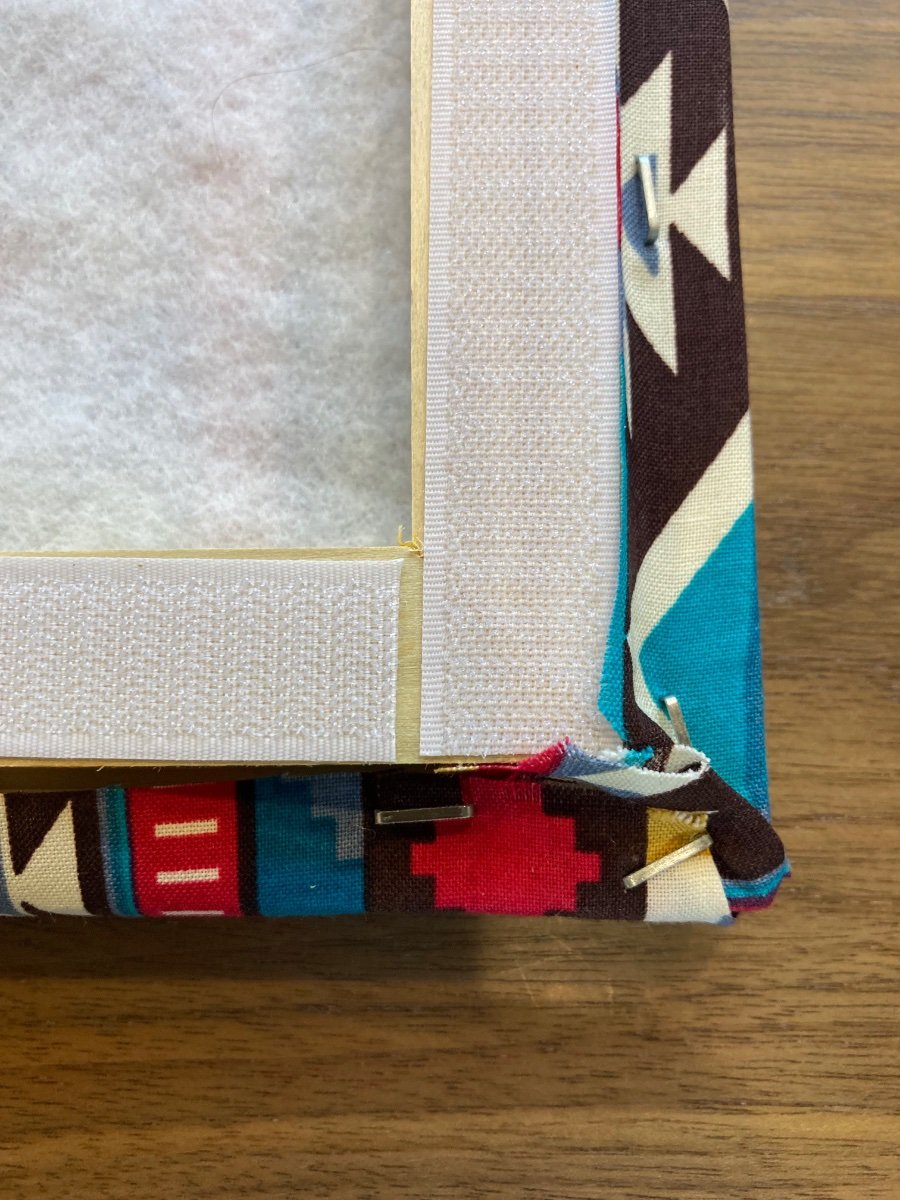
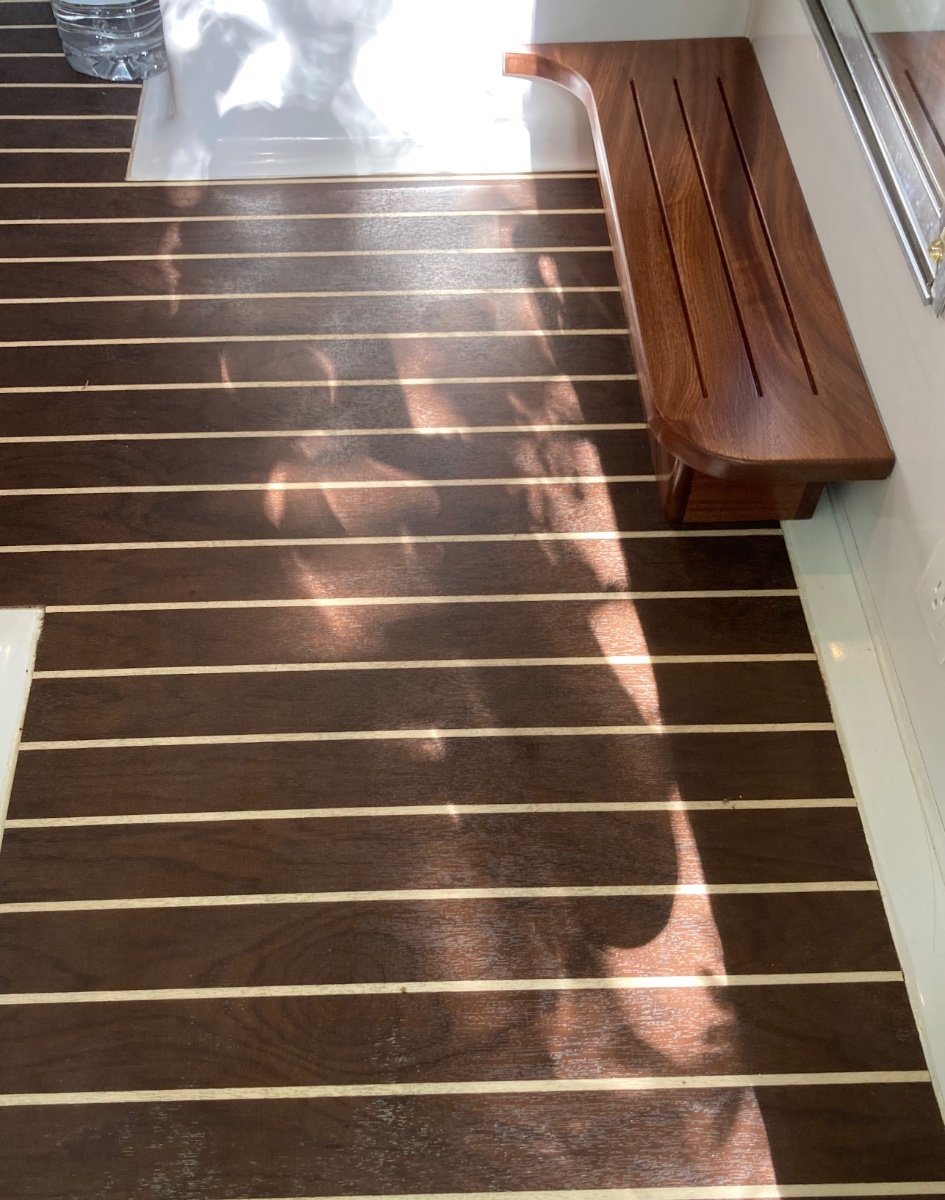
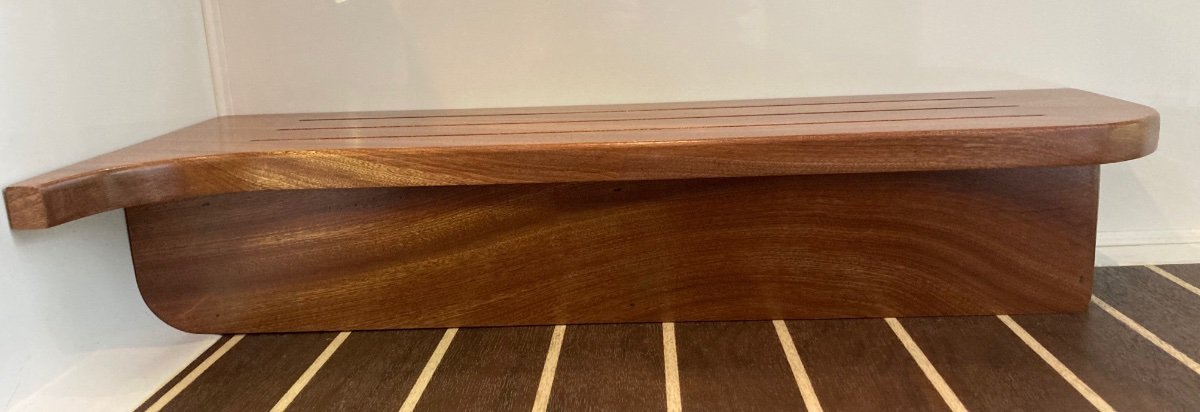
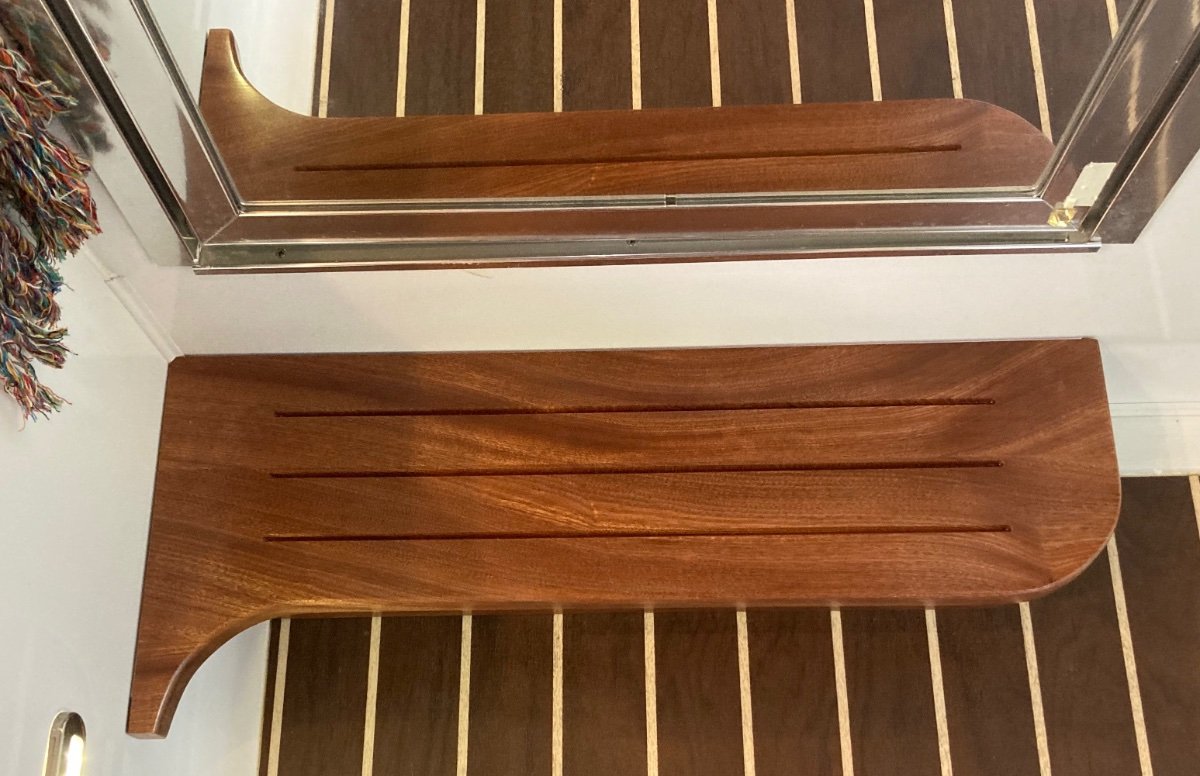
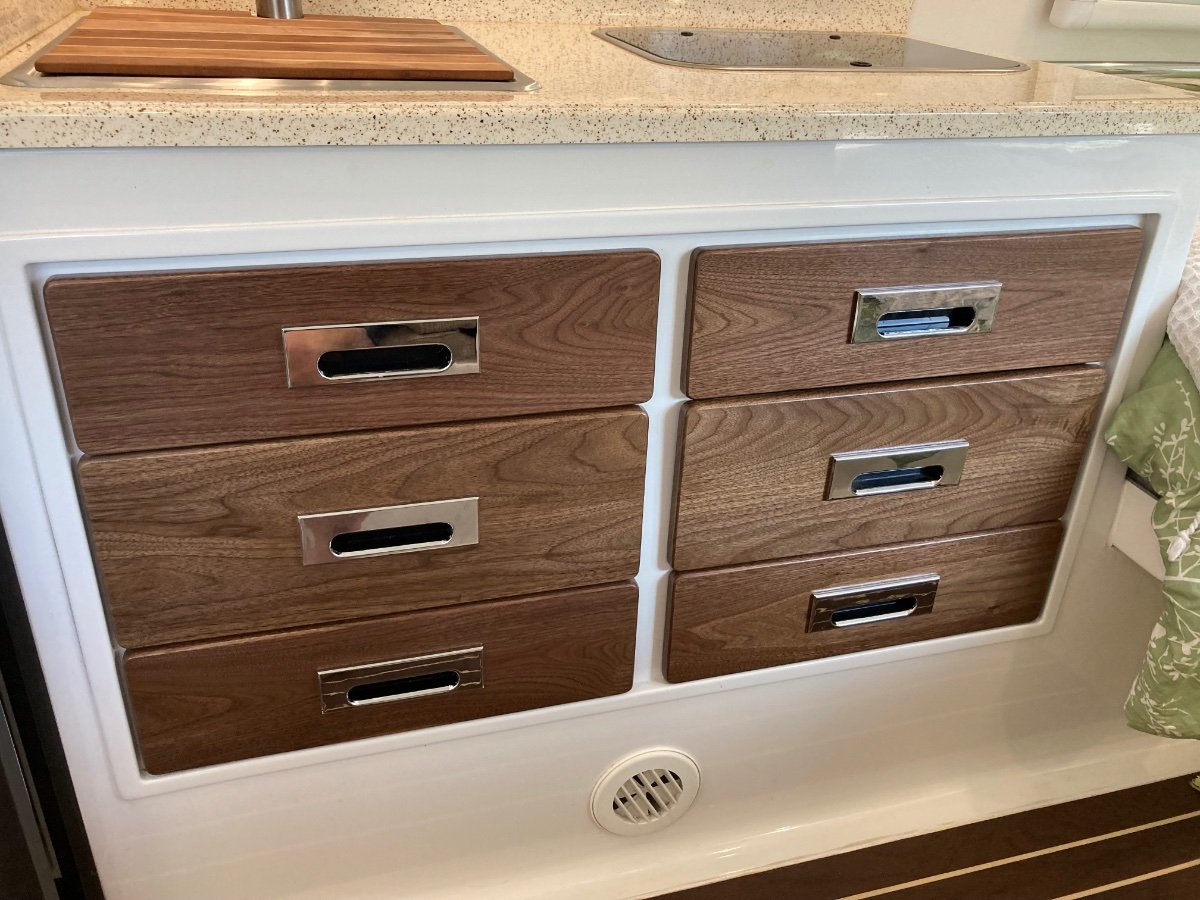
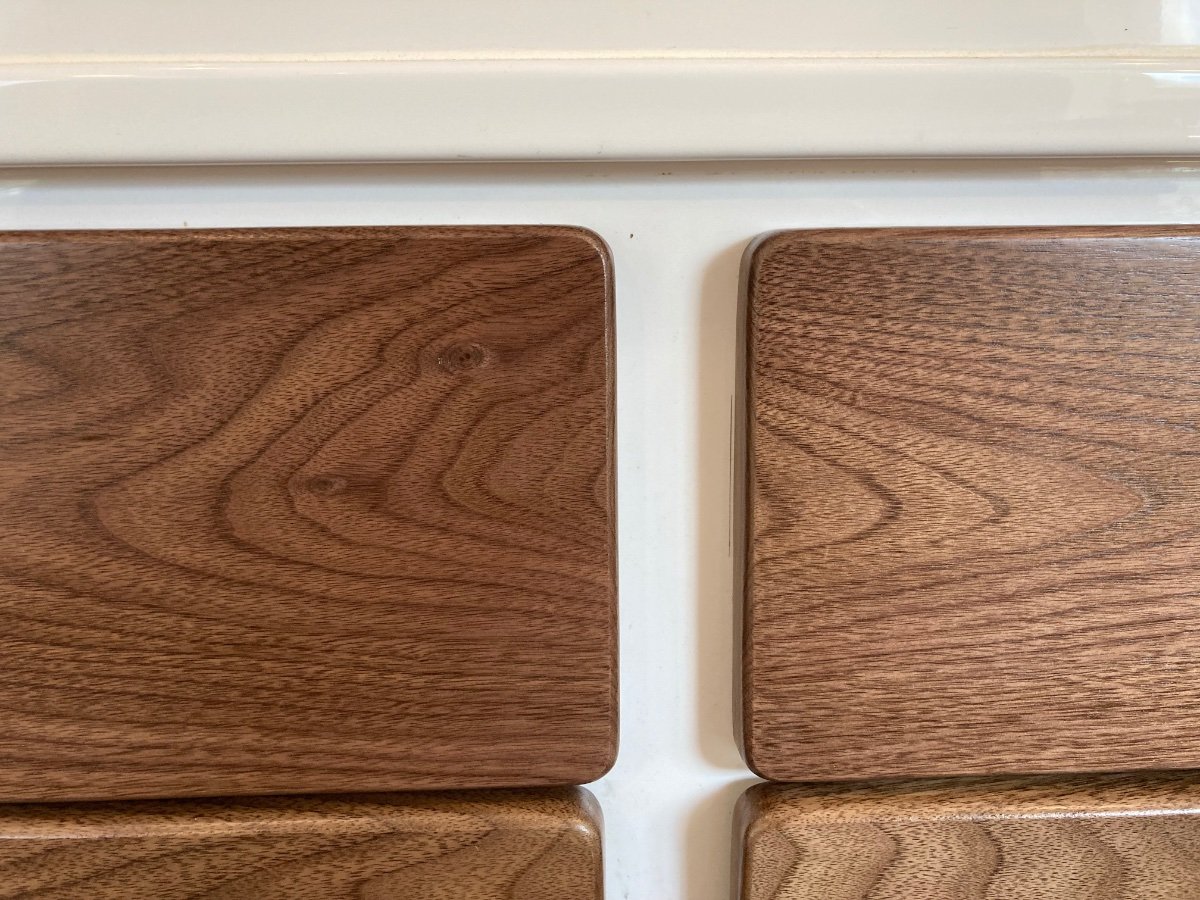
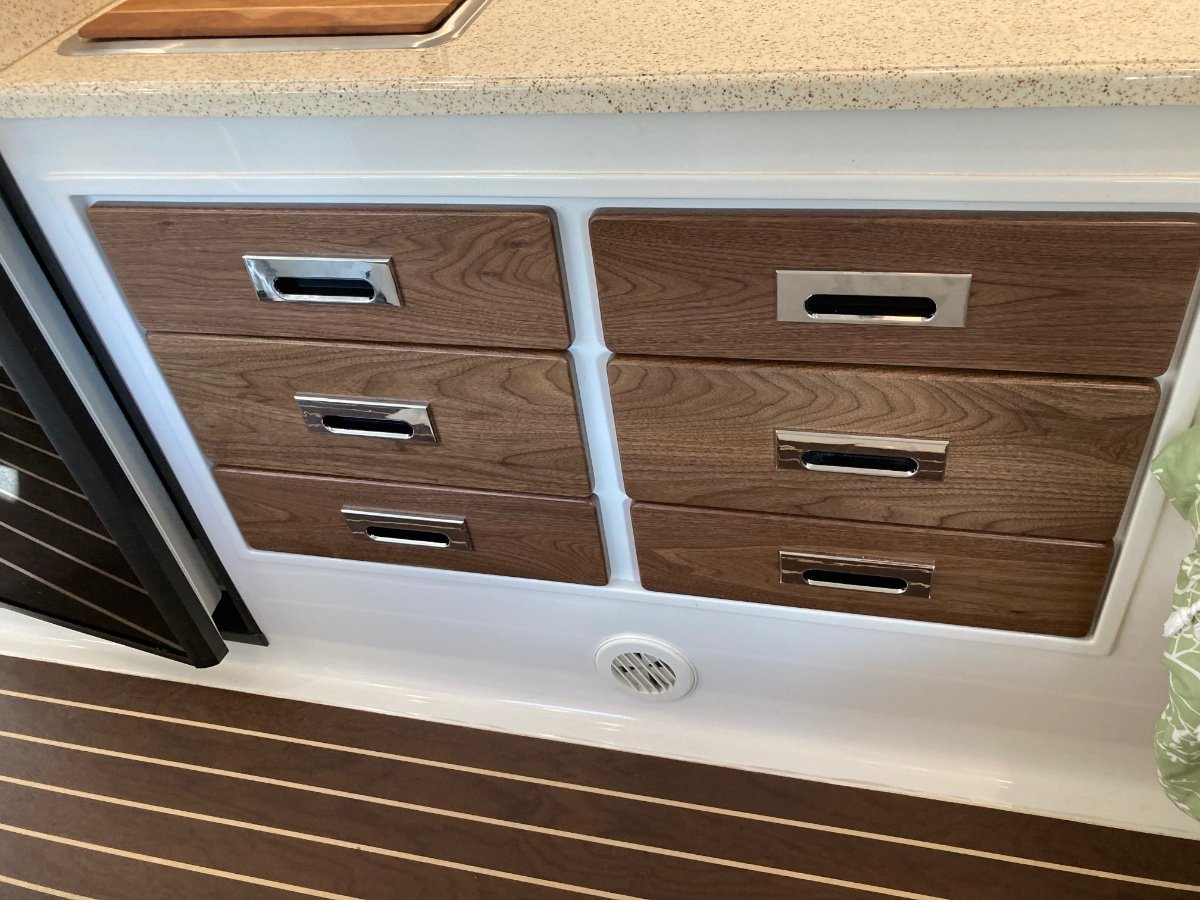
New Catalog. New Products. I have wanted to update my catalog for a few months and today is the day. I have three new products that I am very excited to show you. LINK TO PDF CATALOG First, up are my 7-piece Grain-Matched Drawer Front set. Whether on their own or combined with my wood countertops, they make a beautiful statement and are a distinguished upgrade for your trailer. Available in board match walnut or mahogany – meaning one board from left to right so all the wood grain lines up and matches across each drawer. Next, is my Bath Doorstep. Stepping into the Oliver bathroom can be a challenge for some of us. A normal step is 7” high yet, Oliver's step is 9.25” high. Added to this awkward height is that you must step down into the shower pan once your foot clears the opening. If you need a little help with this, my Bath Doorstep is a great option. And far from last, our 3-piece Acoustic Design Panel set creates a decorative opportunity that also reduces the reverberation and echoes in your Oliver. This improves the sound of your television/stereo and plain conversations, with the added benefit of making the ceiling all your own. Attached to the ceiling with Velcro. Change your décor, change your fabric. One Payment Note: I will no longer be using PayPal for payments. Their rates have gotten too high for the value they are providing in my opinion. Going forward I will accept Checks and Zella. If you have an order in process before today, you are grandfathered in to use PayPal.
2 points
-
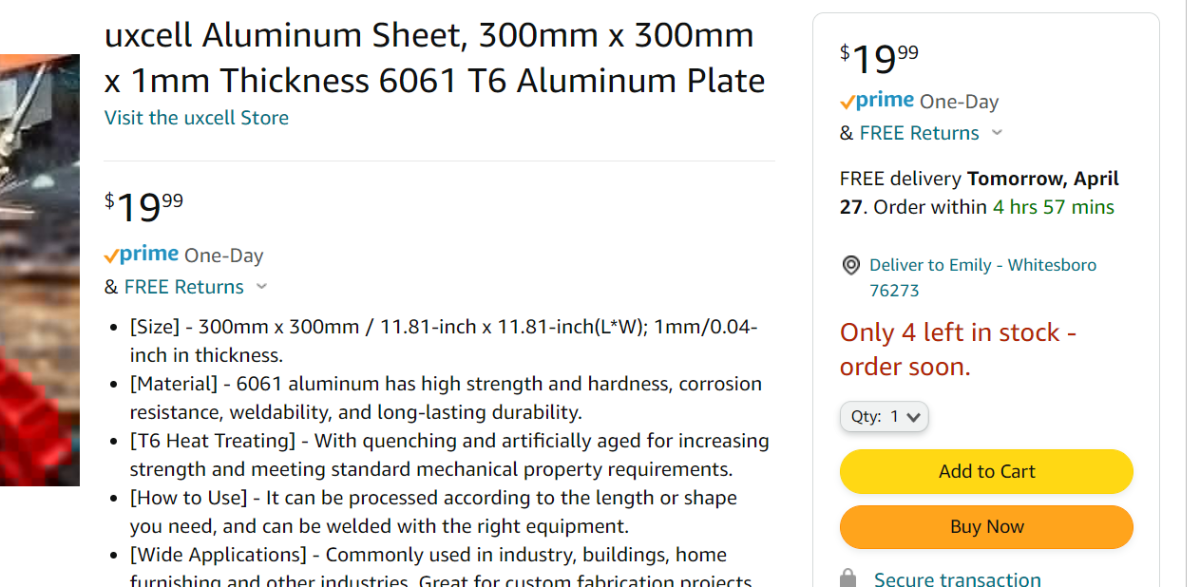
Any large city will have a “specialty metals” supplier (usually it is not also a steel supplier), I get all my materials from here, which is just five miles away. Very handy! https://alcobrametals.com/aluminum/sheet-plate/6061-t6-aluminum-sheet/ While you could order from them, you must buy a big piece and the shipping will kill you. If you can locate a supplier on Amazon Prime that will sell you a 12” x 12” square, that would be fine. I personally would go into the local store, tell them what you need, and they will either find you a cheap cutoff scrap, or cut it to the exact size you want for a dollar or two…It wouldn’t have any rounded corners, they use a big shear, but it would be close to finished. An alternative is if you happen to know a pilot or an aircraft tech, they could bring you a piece, it is super common in aviation. It doesn’t have to be 0.032”, you could go thicker to 0.040”, but the heavier stuff is harder to work with hand tools. I would not go thinner than 0.032”, it won’t be rigid enough. Do NOT use the cheap “dead soft” aluminum you find at the box store, it is not at all appropriate and it dents super easy. John Davies Spokane WA2 points
-
You pretty much know what's involved. Access is tight in there and it's hard to see what your doing, but you could splice into the wiring loom midway between were it comes up from below and the outlets. While unlikely if just one USB, adding another outlet could overload the existing circuit. Consider running an entirely new circuit from the 12 volt buss bar under the streetside bunk to eliminate this potential.2 points
-
Normally the tool end with the square drive works fine to turn the jackscrew, going straight though the gearbox parts. The square gearbox pin is tall enough that the tool clears the surrounding mattress support. Unfortunately, if a gear breaks, the gearbox could lock up completely, so using that top square shaft would be useless. So you would take off the gearbox, lay it aside, and turn the lower section, IF your tool isn’t too short, like mine was. In my case it was an important troubleshooting tool, I had to know if the lower parts were frozen…. John Davies Spokane WA2 points
-
We are in the process of locating qualified and reputable RV maintenance facilities across the country. The goal is to provide our owner's with outstanding service within reasonable distance. If you have had a good experience with a third-party maintenance shop, please let us know here so we can do additional research and add them to our database. Thanks!1 point
-
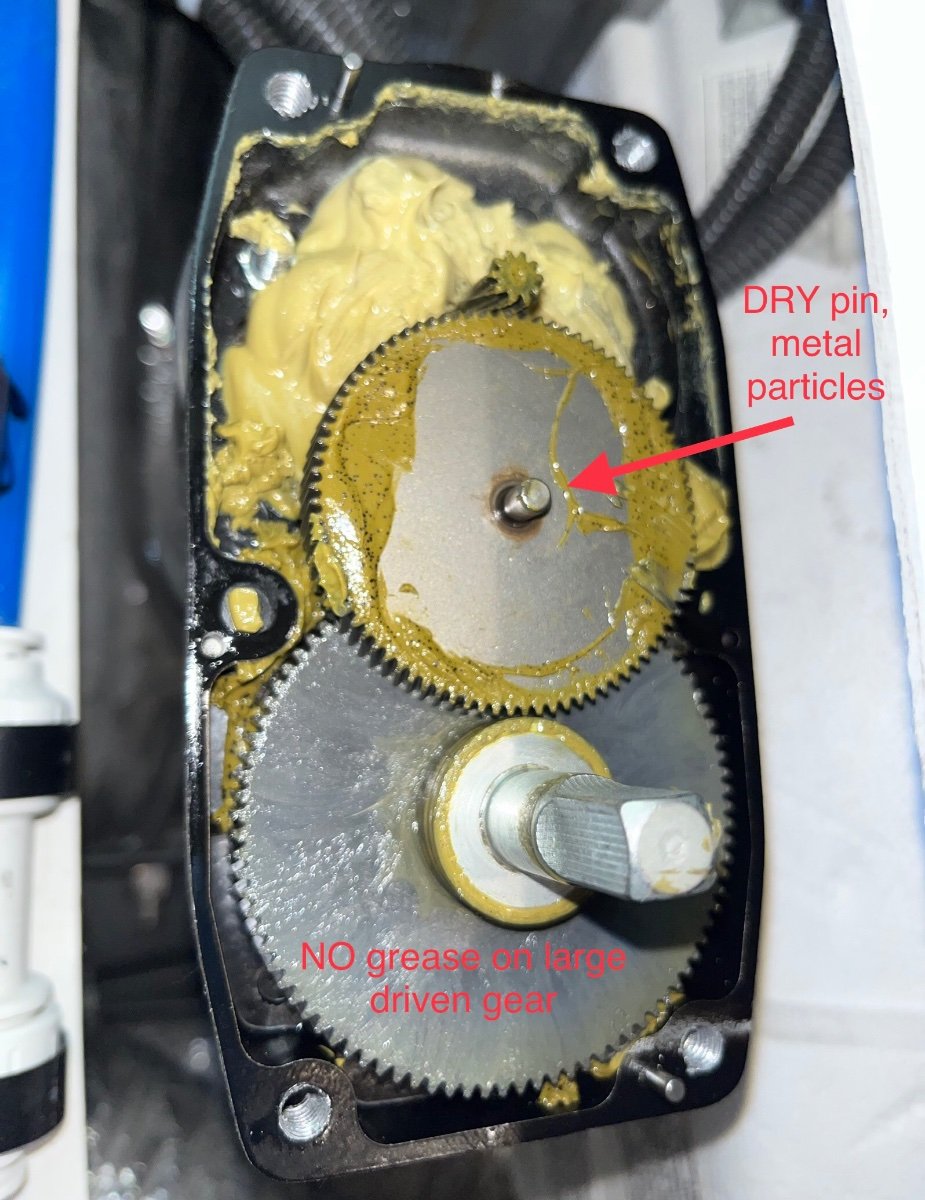
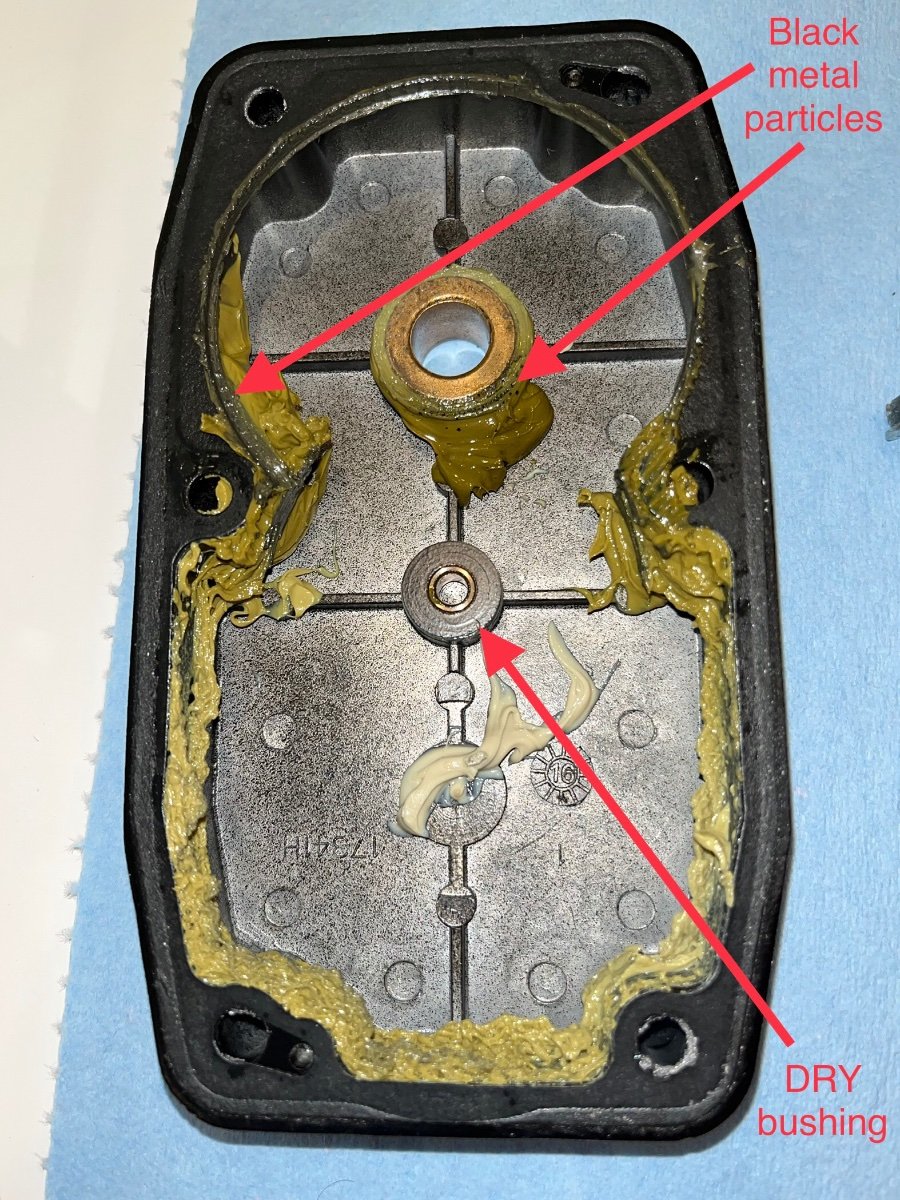
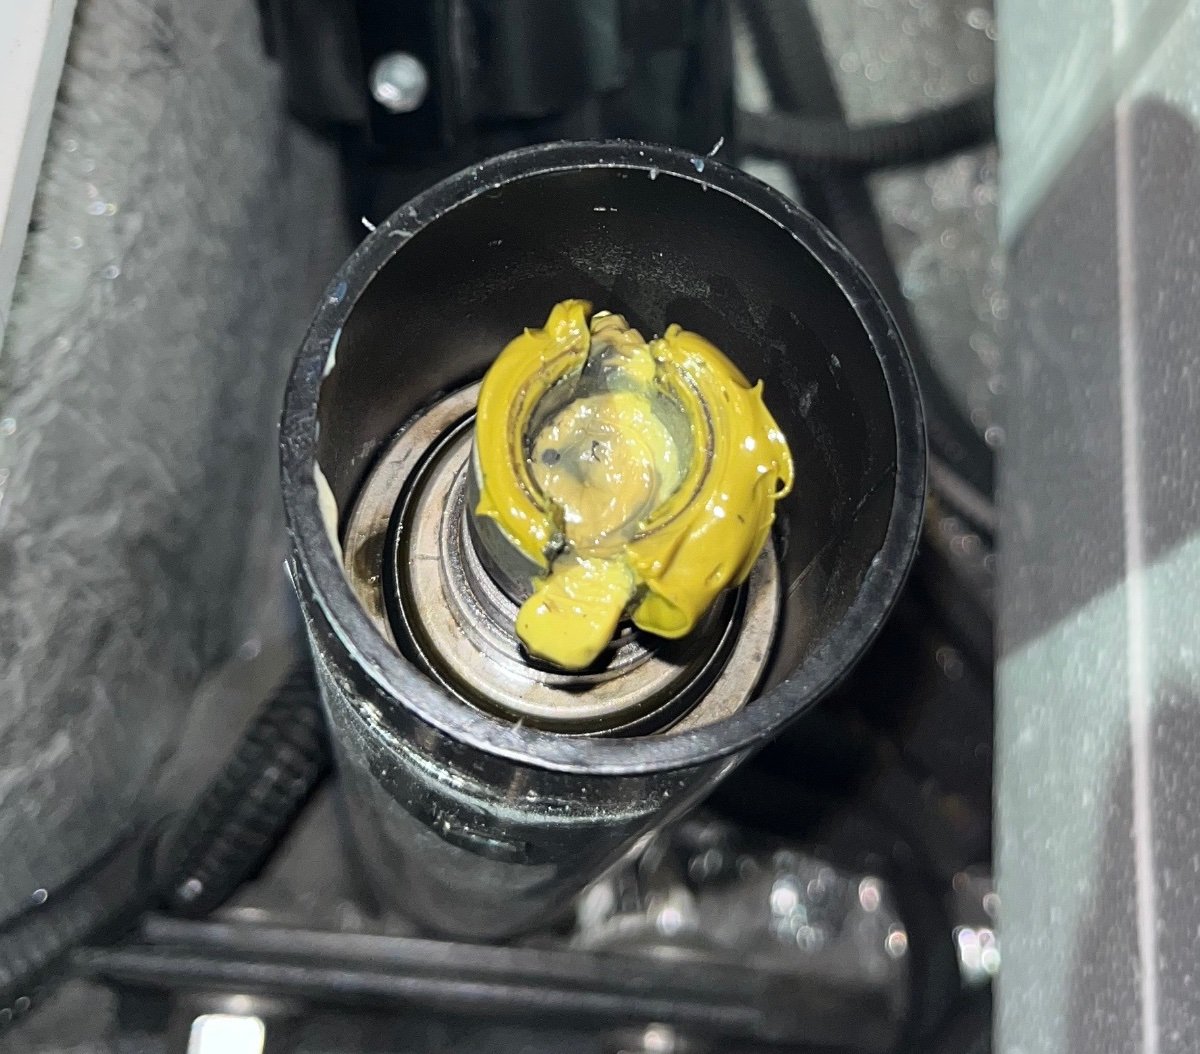
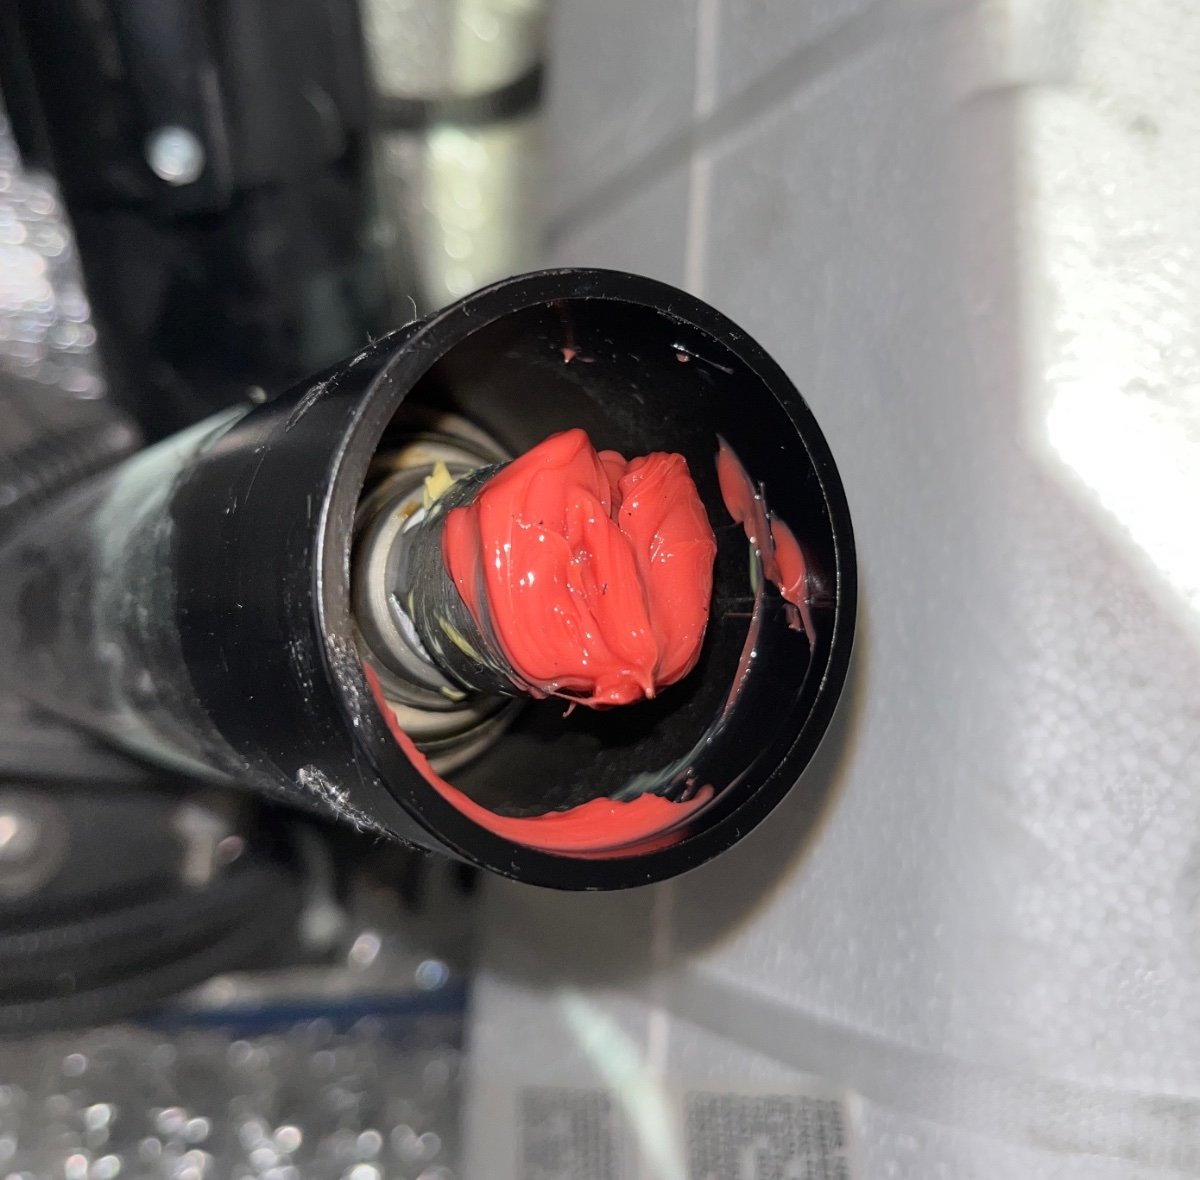
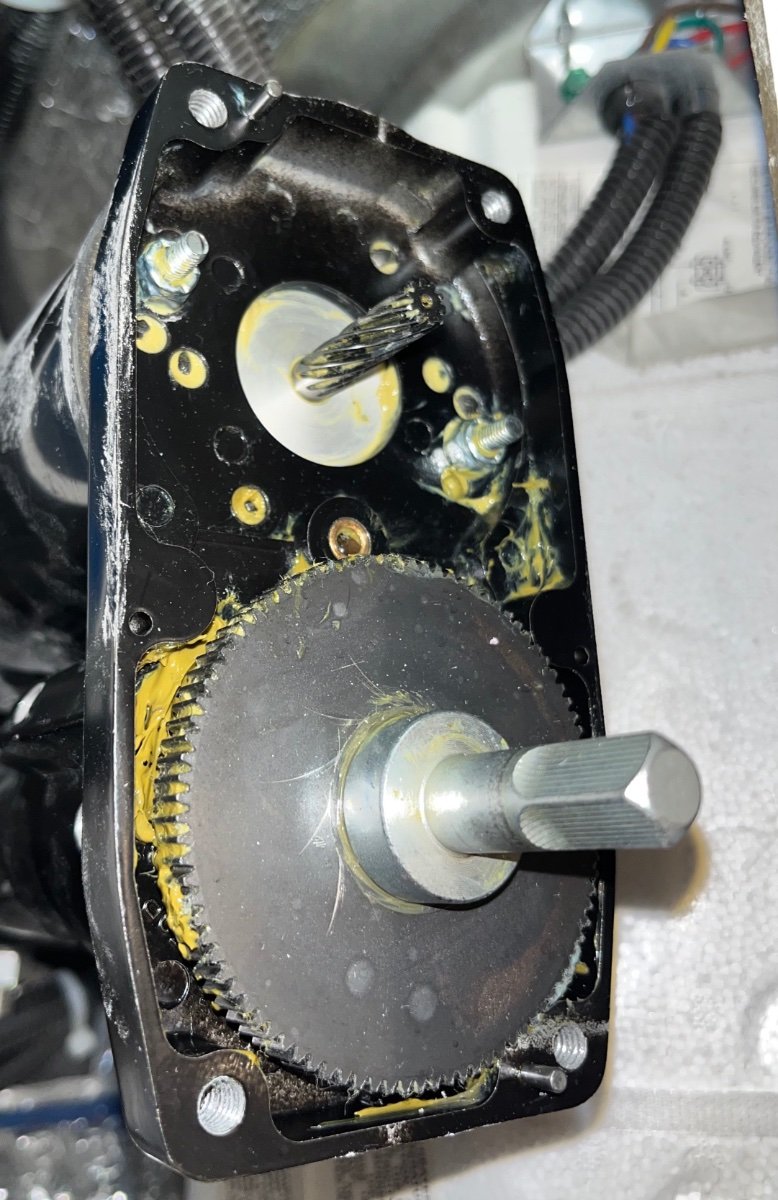
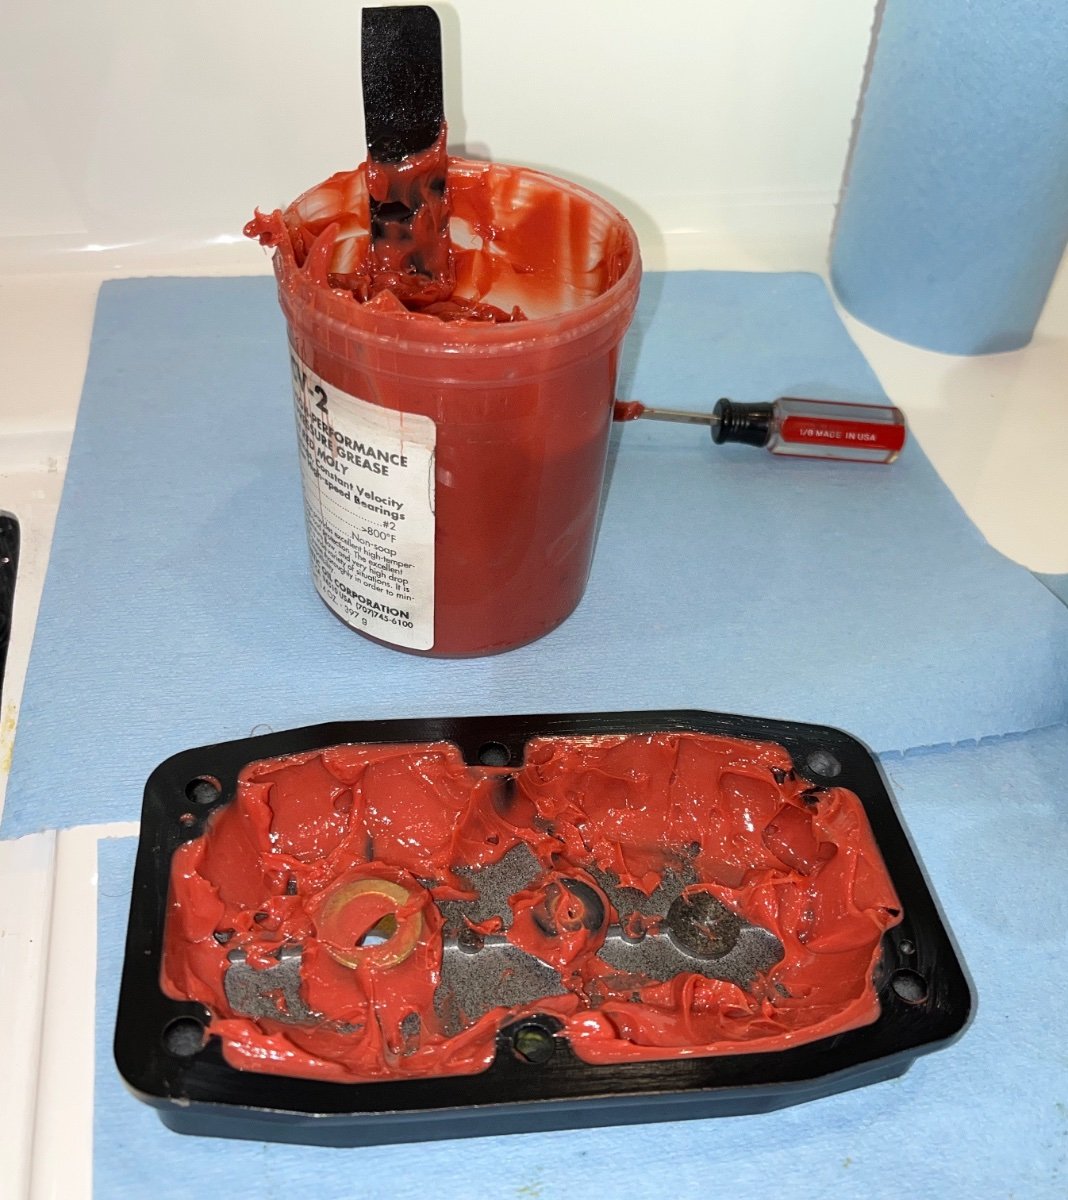
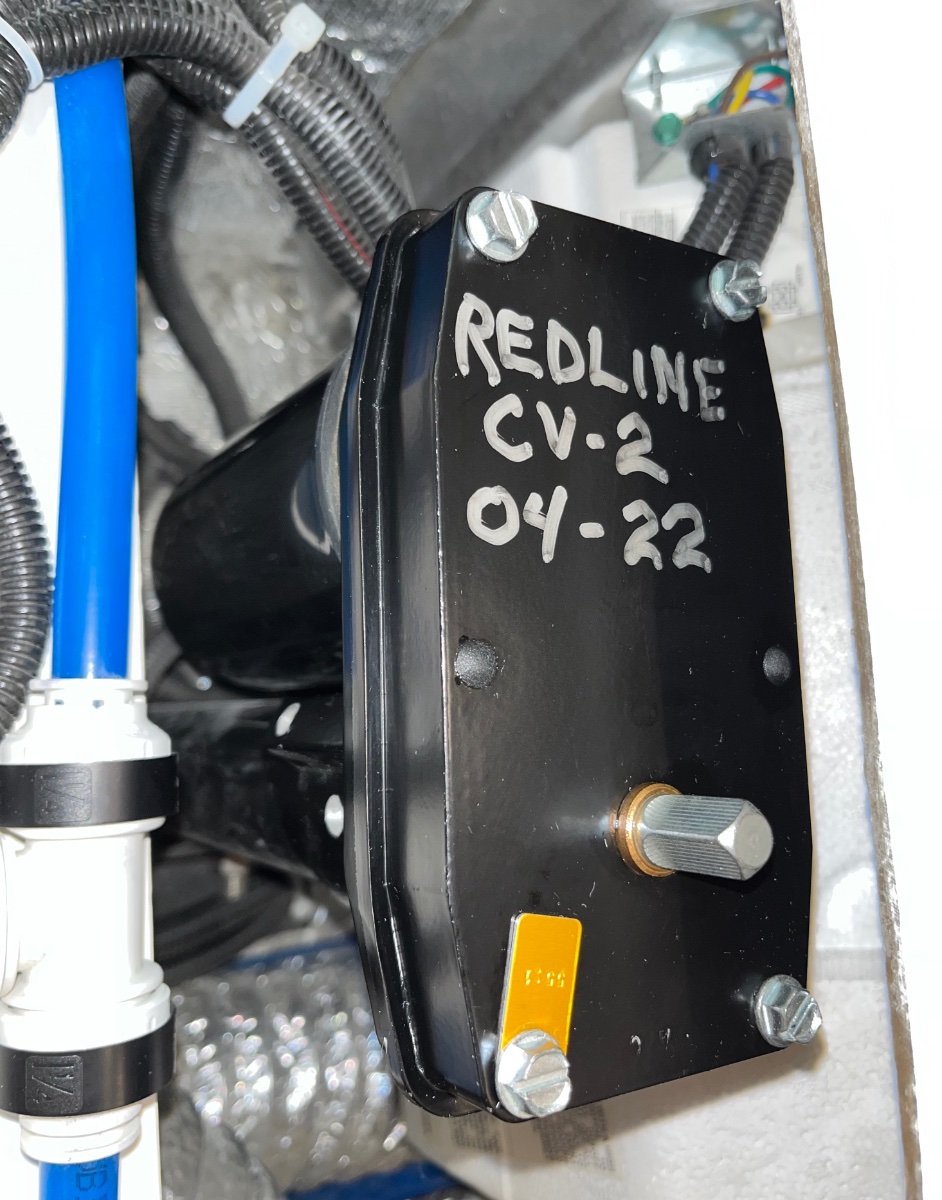
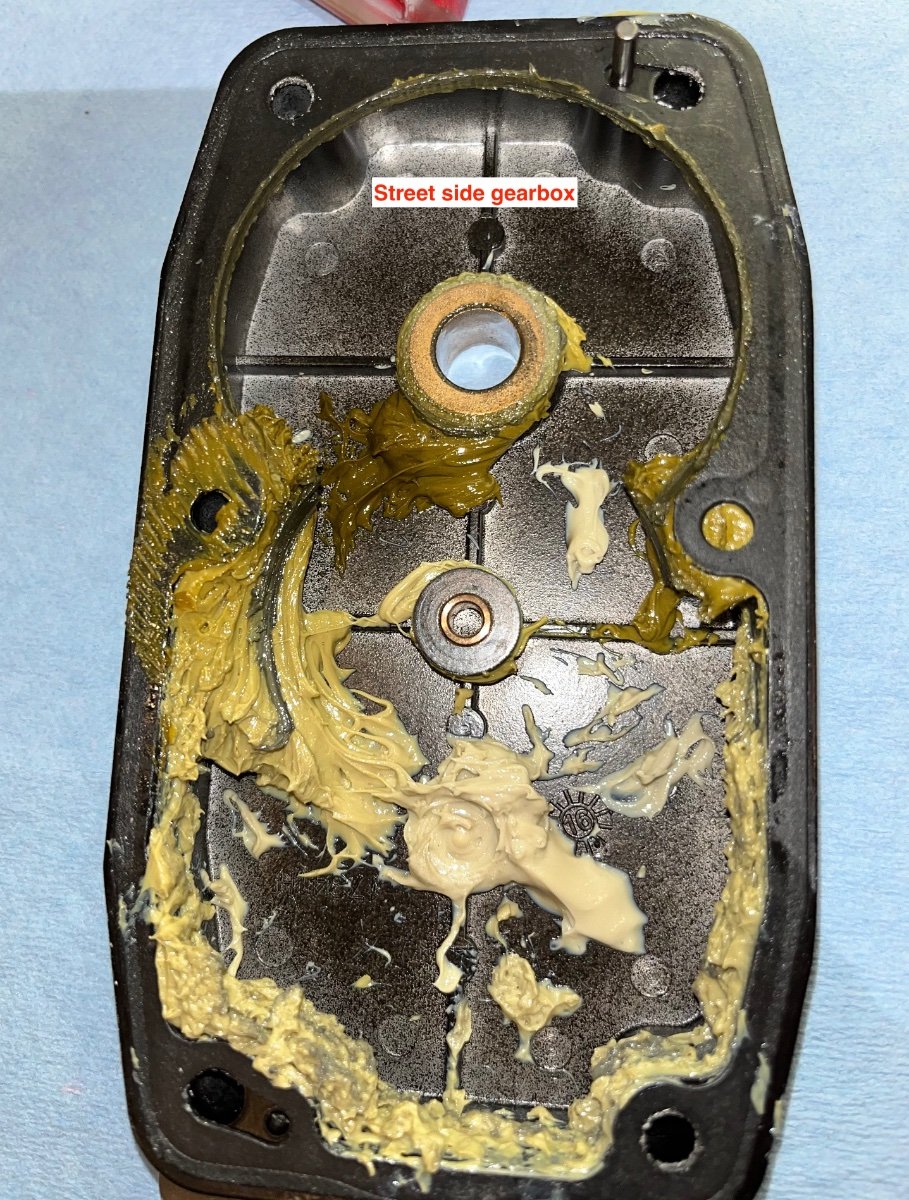
I covered a lot of info here, read this thread first please: https://olivertraveltrailers.com/forums/topic/4094-how-to-vip-3000-electric-stabilizer-jack-service/ FYI I used about 2/3 of a jar on two jacks, so a full one might be enough for all three. I finally got around to doing the rear ones, it is not especially hard but it is a little nasty. For the tongue jack, I removed the entire head unit and took it to the workbench. It is possible to remove the head on these rear ones, if you don't mind cutting and re-splicing the power wires. I chose to do the job in situ, with a couple of foam pads to cushion my knees. I wore a headlamp so I could see better. Loosen the three set screws a couple of turns, with a 3/16" Allen wrench. Once they are loose, the gearbox/ motor assembly can be swiveled around for better access to the top bolts; This is the CURB side one, the STREET side one has a lot more room around it: Remove the four bolts, tap the side of the upper cover carefully with a soft mallet to break loose the gasket. If it doesn't tear, you can reuse it, be careful. Both rear gearboxes looked a lot like the tongue one, except that the grease had not hardened in these. It was however contaminated with metal particles. There was not nearly enough grease installed at the factory, and there was some obvious wear from "dry spots". By lifting off the unit you can access the drive pin and the top of the jack screw. Clean off all the old stuff there with paper towels and a light dash of a solvent like brake cleaner. Lube with CV-2: Set the unit back in place and clean out the old glop. The top cover and big gear can be taken away and blasted hard with brake cleaner. Do NOT try that inside! Lube the bottom part. I used a small plastic piece as a trowel. Try to get the lube under the big gear and apply it liberally around the outside. Wipe off the gasket surface. Be VERY careful not to lose the little stainless shim that goes against the small gear face. When you reinstall the gear,use grease to capture the shim. John Davies Spokane WA
1 point
-
I can sometimes get small pieces left from a custom job at my local alro metals. They have operations in many cities. They're called alro steel in some locations, but they carry a lot more. Topgun's idea of asking a local fabricator or welder is also good. You don't need much, and they might have a bit of cutoff in a scrap bin.1 point
-
Just saw this on Amazon. Might do the job and I can cut it with a rotary cutter I have.
1 point
-
And, many smaller towns too. Asheville North Carolina has one as does the even smaller Hendersonville, North Carolina. Neither of these are "large" by any means. Possibly try a welding shop or fabrication/machine shop. Even if they don't have it they can probably tell you where to get it. Good luck! Bill1 point
-
I appreciate the graceful response. Some people have a math block, I seem to have an electricity block. I have zero confidence that I would know how to remove the batteries safely, OR replace them, despite so much good information that you all have shared in different threads on the subject. for example, when @topgun2 said, "turn off and unplug my inverter and turn off my solar panels" I looked under the bed at the inverter and couldn't see where one would unplug it. The transfer switch is plugged into the inverter, but I don't see any particular way to unplug it. I did check the wires to it, they seemed quite secure. I also couldn't figure out how to shut off the solar panels. That info must be on the zamp website somewhere, it's not intuitively obvious. I can certainly just go ahead with the BB upgrade (I was waiting til they went on sale, which is now), and the local shop was going to charge me way too much money to do this. I don't know any reason *I* should not be able to figure it out! Again, I'm grateful for the grace all of you have shown1 point
-
Agreed. We plan to have insurance coverage in place the very day we pick up our Elite II. We won't leave home without it.1 point
-
@Minnesota Oli did a nice install a while back…Link I’m probably going to go with three BB batteries or one of the 315ah lithionics units.1 point
-
FWIW I used to tap mine and sometimes they would work and sometimes they wouldn't. My wife said, "don't tap, just touch the center". Sometimes just putting my finger close to them will work. It looks as though there is a sensor in the middle of the lens that senses touch. John1 point
-
We just had a similar situation with our 2008 Elite. Streetwise jack would raise, but not lower. We had to reset many times, as the supplied tool was too big. Used a socket for awhile. Added a few blocks, dealt with it, with the manual jack adjustment. I think our issue is in the switch and wiring.. We'll see . Here for awhile. Project for another day. Thank @John E Davies for another timely and informative post.1 point
-
Question: Is there a risk of providing too much charging current to the batteries if you're hooked up to shore power and it's a sunny day with the solar panels on? Answer: No, the solar charger and inverter/charger can be operated at the same time. Each system will monitor the battery state and provide charge as required. Question: What if I am seeing a high voltage (above 14.8v) reading on the solar and/or seelevel system? Answer: Check to make sure your Lithium batteries are turned on1 point
-
FWIW, my raft trailer has the EZ Lube grease caps because it has an EZ Lube axle. I have never had one of the "huge rubber plugs" in the center get lost or fail, even though I take my raft trailer on much rougher roads, to wilderness rivers, than I ever plan to take my Oliver on. Given that experience, and the comments in this thread, I plan to buy a set of the EZ Lube grease caps to keep as spares for our Elite II once we pick it up.1 point
-
Congrats, Dave and Kimberly! Have much fun on your "shakedown" cruise. Looking forward to meeting you at the rally 🙂1 point
-
I would cut out a slightly larger backing plate from 0.032” 6061 T6 aluminum, say an inch bigger all around, the same stuff Oliver uses everywhere. Remove the old plate, fill the holes with epoxy, and bond the new plate in place. Use a white product like Marine Tex (not my favorite JB Weld, because that is dark grey)…. Reinstall the bumper. I don’t think you need to do any actual fiberglass repair, as long as there isn’t any ugly sideways displacement, it looks like it just pushed it inwards, crushing the core a little. This mod won’t stop that kind of sudden, unexpected damage, but it will prevent the chrome hold open from breaking or pulling out of the hull. https://olivertraveltrailers.com/forums/topic/5788-how-to-cabin-door-bungee-hold-open-strap/ John Davies Spokane WA1 point
-
The doors come to the Oliver factory preassembled with the screen door, hinges and attached to their frames. They are simply installed into a hole cut in the hull. The color of the door is what comes from the door manufacturer. Just paint the repaired door white and put it back in the hole.1 point
-
Just a quick follow up to let everyone know both Cyndi and I continue to do well with no hidden injuries from our rollover accident. In addition, we were successful in finding and purchasing a 2017 Oliver Legacy Elite II this past week and have just now returned to our home location after successfully making some of our originally planned stops from our interrupted vacation on Apr 2nd. It is truly amazing we were uninjured in the accident and able to get back on our feet with truck and trailer within the remaining two weeks of our scheduled vacation. Thanks again for all the support the Oliver community has given us these past few weeks. This alone should convince anyone on the fence about purchasing the best built travel trailer on the market. Mark and Cyndi
1 point
-
Grease the upper cover: Set the gear and shim down over the lower part, align the gasket and install the cover and the four bolts. Tighten the three set screws firmly, be careful they are steel in aluminum. Clean off the top and make a record of the service: Test the jack for proper operation and shift all your tools and stuff to the other side. My street side gearbox looked very similar - too little lube, some gear wear: Each jack took a couple of hours, most of that time was cleaning out the old contaminated grease. A future service might be a whole lot faster, you could just take a look and add some more CV-2 if needed. I do NOT recommend leaving the old white lithium grease in place, it will not mix well with the full synthetic, and you should get all those black metal particles out!. John Davies Spokane WA
1 point


-
Recent Achievements
-


")


")


")


