Leaderboard


Popular Content
Showing content with the highest reputation on 11/21/2022 in Posts
-
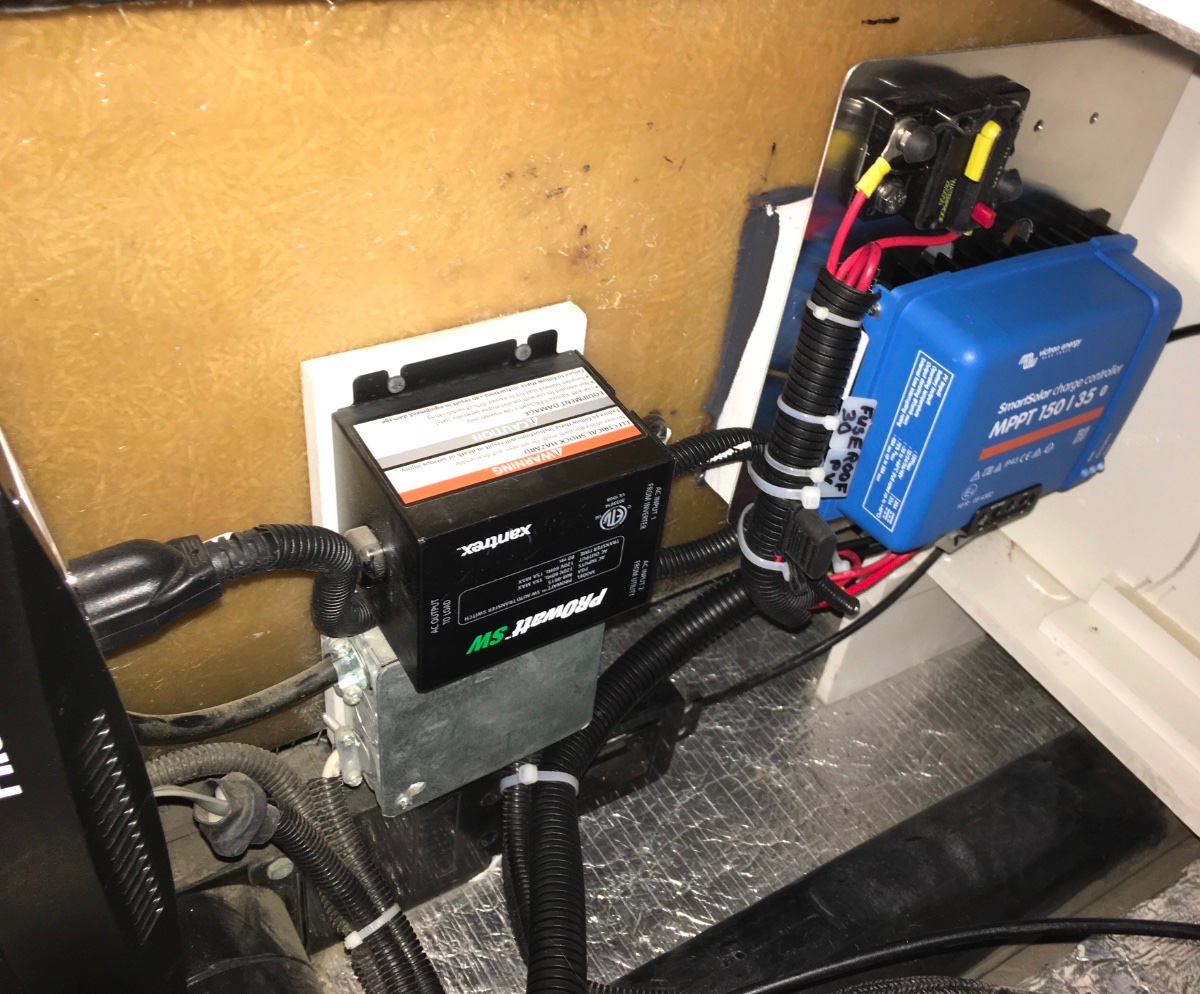
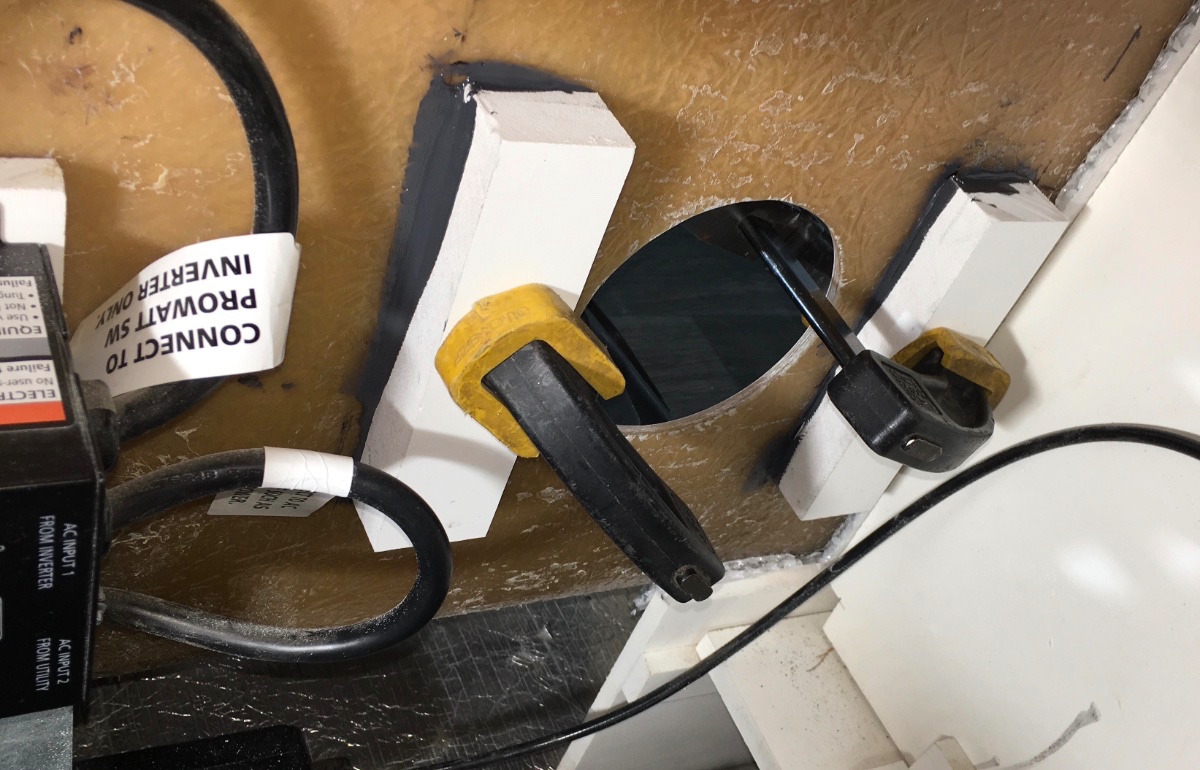
OLIVER HULL #1291 DELIVERY, INSPECTION AND WARRANTY SERVICE EXPERIENCE This very long post details our delivery, inspection and initial warranty service experience with our new Legacy Elite II travel trailer picked up on November 10, 2022. I begin with our overall impressions, for those who want just the “bottom line.” OVERALL IMPRESSIONS The Elite II is a quality trailer worth the price paid. We are glad we waited to get the Truma upgrade package including the AC, the CP Plus Varioheat wall control and the Varioheat furnace. Oliver does not lap seal all screw holes on the roof during production, but does lap seal as part of the first year’s annual maintenance. Oliver’s production staff continues to make some mistakes, but Oliver’s Service Department promptly and effectively addresses flaws for which service tickets are submitted. If you are interested in more detail, including how our delivery process went, the specific issues with our Hull #1291, and how they were resolved, keep reading. DELIVERY Ryan from Service did a generally good job with the delivery process. But, he failed to provide instructions for running the AC on battery power, which is one of the reasons we bought the Lithium Pro package. We had to figure out on our own that the AC remote must first be electronically paired with the CP Plus Varioheat wall control, and that the inverter must be switched on, or the AC unit will not be recognized by the CP Plus Varioheat wall control. Once we completed those steps, the AC worked well on inverted battery power. Our trailer has Goodyear Wrangler Workhorse LT tires mounted on 16” wheels. I was advised by Oliver Operations Manager Rodney Lomax that the ST tires on 15” wheels will not be installed on new trailers until March, 2023. I asked Ryan if the tires contained balance beads. He replied that after the balance bead/valve stem issue, Oliver determined to remove balance beads from all tires going forward, and leave them unbalanced. He asserted that trailer tires don’t need to be balanced. Jason Essary and Oliver Operations Manager Rodney Lomax also advised they are satisfied that trailer tires do not need balancing. Note Added After Towing 2000+ Miles Back to Idaho: I do not feel the need to get the trailer tires balanced. The trailer towed smoothly. SPECIFIC OBSERVATIONS ABOUT THE TRAILER Hull #1291 is the third trailer delivered with the new Truma package including Aventa AC, Varioheat furnace and CP-Plus integrated thermostat/control for heat/AC/water heater. We deferred our delivery from September to November 10 so we could get the Truma package in our 2022. #1291 is also the third trailer to get the Victron MPPT solar charge controller, which is standard with the 2023 solar package. I mistakenly presumed that since the Victron BMV-712 Smart Battery Monitor is mounted in the same place that the Zamp monitor was that it, too, reports solar panel charging data. It does not. It reports only the battery charge status. In trailers with both the solar and lithium packages, it is one of four ways to access battery charge data: (1) by reading the Smart Battery Monitor; (2) through the Lithionics app; (3) through the Victron Connect app and (4) by pressing “Batt” on the Seelevel monitor. Those who order wet cell or AGM batteries without a solar package have one way to check battery charge level: the Seelevel monitor. To check on solar charge data, there is only one option: you must access the Victron Connect App and click not on the Smart Battery Monitor icon, but on the Solar Charge Controller icon. You can then see real time solar charge data (if it’s night the charge data will be 0), and historical data for the past 30 days. The Truma AC is quiet. Although it produces 62 dB on high, the low and night settings logged in at 48 dB. It is easy to carry on a normal conversation at those levels. The Varioheat furnace includes much more substantial ducting than what I have seen in photos of Suburban furnace installs. It is not kinked or twisted, as some have reported with previous furnaces. Hull #1291 also includes a return air vent in the bathroom, which allows cold air to be returned to the furnace through the service area in the bottom of the trailer. This results in a much better balanced forced air heat system. Previous posters with the Suburban furnace noted that the “bilge” area under the street side bed where the external faucet is located stayed about 5 degrees above the outside ambient temperature on cold nights in the teens. We found that, with the Varioheat furnace set to heat the cabin to 70 degrees F, the “bilge” area stayed at 38 degrees F with outside temps at 11 degrees F. We did not then worry that the plumbing and tanks below the floor would freeze. The CP Plus Varioheat thermostat requires a learning curve, as it is not yet covered by any Oliver videos. It controls the Varioheat Furnace and the Aventa AC, as well as the Aquago water heater. AC control appears as an option on shore power, but not on battery power until the inverter is turned on. We were shown how to use it on shore power during the delivery process, but we were grateful that Oliver also provides a notebook containing owners manuals for the Truma products, as we had to study the owner’s manual later to really learn how to operate it, including when testing the AC on inverted battery power. The fit and finish inside and outside the trailer is improved over that reported by some on this forum. The interior caulking, such as in the shower, is nicely done. As an example, the plumbing vent hole in the closet is now sealed with a gasket, rather than just caulked (sometimes incompletely) as noted by earlier posts on this forum. INSPECTION AT DAVID CROCKETT STATE PARK From review of posts on this forum, I had compiled a long list of nearly 100 production defects noted by posters over the past several years. I spent most of the next 3 days at David Crockett State Park inspecting the trailer inside and out to determine if any of those defects were present in our trailer. None of those issues, ranging from improperly installed windows, to missing caulk around stabilizer jacks, to improper grounding of the inverter, were found in our trailer, save two: (1) there were no rubber plugs in the drum brake backing plates and (2) there was a roof leak. We found 5 significant issues, for which we submitted service tickets: 1. A leak appeared onto the standard bed area below the Truma Aventa air conditioner. It rained in Hohenwald the night we took delivery, then we found the leak the next day when we arrived at David Crockett State Park. As we had not used the AC, we suspected something on the roof needed to be resealed to prevent rainwater from penetrating the hull when on the road. This issue was on my list. 2. The Truma Aquago Antifreeze unit we purchased from Oliver did not yet communicate with the Truma CP Plus Varioheat wall control unit, so it could not be used. 3. The grey tank sensor gave erratic readings that did not correlate to water usage. 4. The bath fan vent and plumbing vent screws on the roof were not sealed, providing possible leak points; and 5. The one other item that was on my checklist: The drum brake backing pads do not have rubber plugs to protect the adjustment mechanism from road grit. When dumping the black and grey tanks before heading back to Hohenwald, the grey tank cable pull handle came out in my hand, preventing me from dumping the grey tank. When speaking with Mike Sharpe from Oliver Service, I also advised him of this issue that had come up that morning. RETURN VISIT TO HOHENWALD We delivered Hull #1291 to Oliver Service the late morning of Monday November 14, 2022. Later that afternoon, Jason Essary advised that his techs had verified the water leak and believed its origin was around the ventilation fan. They resealed that area, but then also applied sealant to all of the exposed screws on the roof (at no additional charge), because I had expressed concern that they were potential leak points. Operations and Sales manager Rodney Lomax advised that those screws are not sealed during production, but that the Service Department applies lap seal to them if annual maintenance is scheduled. I suggested that, like the screws that secure metal roofing to sheathing, those screws should be either gasketed or otherwise sealed as part of the manufacturing process. We were asked to leave the trailer overnight, so the sealant could cure before leak testing the next day. Because rain was forecast for that night, and because we asked to be able to sleep in the trailer, Operations Manager Rodney Lomax arranged for the trailer to be placed under a large awning/overhang at the Sales and Service facility to keep the roof dry. We noted when we slept in the trailer that night that all of the service ticket items had already been addressed except the water leak and the plugs for the drum brake backing plate. The grey water tank sensor was now reading consistently and the CP Plus wall unit was recognizing and controlling the antifreeze kit. The grey water tank pull handle had been reattached. [My later inspection suggested that the set screw, which secures the aluminum shaft (to which the grey tank drain handle is attached) to the guillotine valve under the street side bed, had come loose. I expect the handle with shaft simply needed to be reinserted and the set screw properly torqued.] We were advised that the brakes come from Dexter without plugs for the access holes, and Oliver does not supply them. So, I determined to cover the access holes with Gorilla tape until I could buy plugs online at home and install them. We yielded the trailer to the service team the next morning, expecting that after a leak test, we could be on our way home. But, we were advised a few hours later that when leak testing, it was discovered that our windows had not been installed according to a new protocol recently implemented by Oliver, so Jason had instructed his techs to pull and properly reinstall all windows, including re-caulking exterior flanges. That took the balance of the day. Jason and some of his staff stayed until after 6:00 p.m. that evening to complete the work and return the trailer to us, so we could camp another night at the Oliver campsite rather than find a motel. The process of addressing our multiple service tickets required us to hang out in Hohenwald for another two days, and delay our plans to return to Idaho. But, we had planned extra time for this purpose knowing that such a delay was possible. In total, we spent 6 days in Tennessee receiving delivery, inspecting and testing systems, and coordinating repairs. We appreciate Oliver lap sealing all of the screw heads and holes in the roof of our trailer, at no charge to us. We believe all Oliver trailers should have all roof screw holes lap sealed as part of the production process. Had that been done to our trailer before we took delivery, it would have saved us a day in Hohenwald. We also appreciate the Oliver service team for promptly addressing our service tickets right after we arrived back at their facility, and, even though it took an extra day, for ensuring that the windows were properly resealed though we had noted no issues with the windows. It is a concern that Oliver’s production staff overlooked the items for which we submitted service tickets during construction, and failed to follow the new protocol for window installation when building our trailer. But, we left (two days later than we had originally hoped) with what we believe is a high quality trailer that is worth the premium we paid for it. And we left with great respect for the integrity and commitment to quality of the Oliver service and management team. HELPFUL THINGS LEARNED FROM FORUM POSTERS I learned many things from posters on this forum which have made using the trailer much easier and safer. These include: Inserting turnbuckles into the chains of the Andersen WD hitch, with the extra chain links required to fit the Elite II. This has made it easier to attach and detach the Andersen by turning the turnbuckles to create slack. It also makes it much easier to get the “whale tail” back on if it was detached at an angle—just loosen the turnbuckle on the long side even more, and the whale tail can be installed at an angle. Then, of course, tighten the turnbuckles to tension the WD hitch. I use Robogrips to complete the tightening process. This is much easier for an old guy than crawling under the trailer to loosen the nut with the Andersen provided socket. Using a Camco water filter and a brass hose elbow when hooking up city water Installing a dash cam Using a PUR water filter pitcher Installing a Tire Minder TPMS system Using a squeegee to wipe down shower walls Installing X-Chocks between the wheels on the two axles. If you posted about these items, THANK YOU!5 points
-
When picking up our Elite II after repairs, I asked about adding a return air vent on the street side aft of the Xantrex inverter. Jason Essary advised that Truma "okayed" the idea, but he cautioned to place such a vent far enough aft of the inverter to ensure structural integrity of the fiberglass sidewall is not compromised. I plan to add that additional return air vent after we get back home next Tuesday, to further improve the performance of the Varioheat furnace system. I don't need to do it before then because testing during our return trip back to Idaho has confirmed that the Varioheat furnace, with the new return air duct in the bathroom, has improved air circulation enough to protect the "bilge" area of the trailer down to single digit temps. It got down to 11 degrees F last night in Cortez, Colorado. With the Varioheat furnace set at 70 degrees F it ran all night, but never raised the cabin temp above 68 degrees F. Yet, the monitors set on the "floor" near the Pex supply plumbing under the front dinette seat and the rear street-side bed never read lower than 38 degrees F. This 27-degree F positive differential between outside temp and bilge temp is a significant improvement for cold weather camping.5 points
-
I think John has hit it on the head. Addressing dead ends are an opportunity to address a few problems: 1) lack of heat in the belly - especially flowing back to the water lines backside of garage, 2) to bring warm air to compartments (primarily the bathroom and closet) where little to none now flows and 3) to fix problem with furnace short cycling. Oliver has recently addressed a piece of these issues by putting a return into the bathroom which serves to allow for air flow through bathroom and introduces warm air into the basement. Yea. As to the rest, my current plans are to decrease or eliminate the existing return vent under the curbside bed. I agree with previous statements in this chain that warm air from cabin flowing in there is the likely a cause of short cycling. Cutting back on that return vent will have the furnace looking for other source(s) of return air. Oliver has supplied some by adding a vent to bathroom. I'll add another by opening a vent under the street side bed to the basement. That wall is pretty tight but all other walls surrounding the garage are soooo leaky that the thirsty furnace should draw some air through there feeding it's need for return air and warming the rearmost water lines. I'll also cut and place a vent just above and to the left of the speaker over the closet door. Assuming the bottom of the bathroom cabinet is open to the basement (anyone know???), I'll add a small vent from closet into that cabinet which will open the dead end in closet. That circulation will allow wet ski/bike/kayak clothes to dry while hung which has always been a problem for me. My bet is that the air introduced through the bathroom and closet will be quite cooled down by the time it reaches the furnace so will fix the short cycling of the furnace. I'd also like to cover the drainage holes in the belly for the winter so as not to draw in a lot of frigid air. Will use cut pieces of thick yoga matt for that job (from the outside) making my cuts such that they would allow a little water to escape = a little fresh air to still get in and feed the furnace. If furnace still sounds like it would like more fresh air, I'll follow John's lead on adding a small vent from cabin to basement from under the street side bed. For what it is worth, you contributors on this forum have been an amazing resource for a techno boob such as myself. Thanks much for all for adding to this chain. That said, if this mad scientist experiment falls flat, I'll make sure to spread the blame. Ha.4 points
-
I remember reading that thread. We were in a cabin on the Magellan strait, outside Punta Arenas, (and actually had decent wifi for 18 hours or so). There was a lot of drama, but definitely not from you. Maybe you could start a new thread here on Black Friday deals for Ollies. I promise we won't shut you down....3 points
-
I wanted ventilation for that HOT compartment in warm weather. This also functions as another furnace return air path. https://olivertraveltrailers.com/forums/topic/5329-how-to-victron-mppt-solar-charge-controller-underneath-the-street-side-bed/ I think there are way too many dead end spaces in an Ollie, like the pantry and closet, and those electronics bays. There needs to be much better air transfer through all of them. John Davies Spokane WA
 3 points
 -
Read the posts that you want to read then hit “Mark site read” in the upper right hand corner then refresh by hitting “unread content” and the posts you don’t want to read will be gone and you will have a blank unread screen. Mike2 points
-
That’s really a shame 😞2 points
-
I'd caution eliminating that factory return as it's placed in the area of least airflow resistance. Put another way, you are playing with more than just a simple sail switch - you're literally playing with fire as most Ollie owners do not have the proper equipment needed to measure the required furnace manufacturer's airflows and static pressures created by altering the factory inflow/outflows. Charlie2 points
-
There are several threads discussing this. Here’s one: https://olivertraveltrailers.com/forums/topic/6249-window-weatherstrip-cleaning/#comment-661982 points
-
My wife and I purchased our 2020 E2 based, to a certain degree, on our enthusiasm for cold weather adventuring. We took a number of trips over the 21/22 winter season to check out limits and capacities. All were trips between 3 and 7 days, in northern New England with night time temps in the range of roughly 30-0 degrees Fahrenheit. We would note nightly exterior temps, kept the overnight cabin interior set to 60 and rotated 3 digital temp sensors around what we found to be the most vulnerable areas to cold we found (and could get to) between the shells that housed water lines and tanks: 1) under front dinette seat, under street side bed by the exterior shower, 2) the pex lines to exterior shower passing through the faux wall at very rear of basement and 3) the battery box. We could not get to but are curious about the cabinet housing containing the bathroom sink. Playing it safe, we kept the trailer winterized for the entire time relying on containerized water and our composting toilet. All of our sites were boondocky, with no shore power hookups so we relied entirely on the LP furnace and solar/lithiums. We found that the stock trailer could manage to keep all the areas listed from dipping below freezing down to 25 (exterior temp). The lines behind the faux wall and exterior shower would hover in the low 30s at that temp. We realized those pex lines will, realistically speaking, need to be always kept winterized by adding cut offs as heating the basement area would be an inefficient waster of LP. Side note that we asked Jason if that could be done during our build and he informed us that the shop could not find anywhere with enough space to add them. We're open to suggestions. A simple set of tweaks including adding two layers of Reflectix to cover the interior of both the basement and battery compartment doors got us down to 20 with similar results. Next project was more involved. The temperature difference between the areas under and wall along side the curbside bed versus the street side bed was resulting in heavy condensation on the streetside wall and window which would soak that bed. We also found that the battery compartment was dropping down into the 30s at exterior temps in the high teens. While there is a matte heater pad below the batteries, it seemed to us that the compartment was too cold to reflect the lithiums themselves being warm enough to run efficiently and we noticed anecdotally an increased need for more charging assist - be it solar or generator. Could haver been the drain of the heat pad or the lithiums running less efficiently in the cold (as validated by the manufacturer) but which one did not matter. We felt adding heat to the box would be of benefit. Our fix was to re-route some heating vent. We capped the rearward 4" vent and re-ran that line through the gap behind the water tank from the furnace to the street side, past the inverter, under the battery box to a new vent we placed as a mirror image to the existing one below the drawers in the galley. One vent grate is pointed fore and the other aft. Here we used semi rigid vent tube specifically because it sheds so much heat, allowing the areas it runs through to warm. Where the tube ran past electronics, we would shield the hot tube in a layer of reflectix. Measuring with an infrared thermometer, the reflextix surface was cooler than the surface of the OEM flexi vent tubing and quite cool to the touch. The heat exiting the new vent would run about 10 degrees warmer than the one on the other side of the isle even though it is a further distance from the source. We expected an increase in output from the vent in the bathroom but did not notice much of a change. As the bathroom is a bit of a "dead end" with air being forced in but nowhere for it to exit, we added a 4" eyebrow vent at the floor level below the towel rack to allow for circulation and share some heat passively with another problem cold area - under the front dinette seat. While there are no pex lines run there, there are drain pipes and tanks and it would otherwise fall to freezing if outside temps were in the teens. Not very scientific but the furnace did not sound like it was under further strain or seem to run more frequently given similar temps. Our rate of LP consumption is roughly the same now as it was before alterations which, in single degree night time temps, consumes a 30lb tank in just over 2 days. Not very good. To increase efficiency, we cut two layers of "double bubble"reflectix and taped the edges with silver foil vent tape - as suggested in a previous post. They fit tightly inside all windows and are held in place by closing the shade. Bought a camco 14" soft material vent cover which bunjied over the Maxair (when not cooking) and cut a piece of 2" open cell foam to fit the window in the door. Covered it with a layer of reflectix and taped the edges. This is held firmly in place by the screen door. As all including the fan cover have refectix sides facing inward, the add ons look good enough - not jury rigged. Our takeaway is that these tweaks have bought us 20 degrees of leeway so we have squeaked by to zero. The batteries box is running much warmer but the other areas are more iffy. There is less condensation around the streetside bed but the exterior shower, for it's entire run, will need to be somehow shut off and winterizede or will be subject to freezing. Someone had suggested cutting a block of memory foam to put in the box with the exterior shower nozzle and knobs which may work but would not help with the tubing behind the faux wall. As to factory options that would have really helped: The exterior shower really needs cut offs or could have had it's lines run through a heated area of the belly and it would be super helpful to insulate the basement walls, basement door and shower door. The walls of the trailer REALLY transmit a lot of cold into the interior. A layer of spray on insulation foam would have gone a long way to help with that. I am also eyeballing the sealed belly and thinking a layer of sprayed on insulation could really help there as well. Am going to contact an HVAC place to get some feedback on options there. Also looking for doable suggestions. We love our Oliver and appreciate the incredible quality of the build. We also realize that there are very few folks looking to use theirs in frigid conditions. We're hoping that those of you that do, pipe in with further feedback and refinement to increase both capacity and efficiency in these sort of conditions.1 point
-
Is OTT going to take down the University? That's the only reason I can think of for the recent posting of hundreds of the by year products used in our trailers. Did I miss the memo? At least one inquiring mind would like to know. GJ1 point
-
There's no PDF link like in the other blog posts Edit: I guess these are supposed to be videos, but nothing shows up on any of the posts containing videos, using Safari on a Mac desktop computer. I found them by going directly to the University1 point
-
Thank you @Rivernerd for the detailed delivery report. Having worked in manufacturing my whole life I understand the challenges in quality control and continuous improvement that Oliver like all companies goes through. Not to excuse issues that are obviously preventable, but it is refreshing to see the positive response and quick resolution provided by Oliver. That second part is rare in much of the RV industry today. We're months away from delivery day of our LEII, and much homework needs to be done for us to feel ready and confident in taking delivery. These are much more complex vehicles and systems than the RVs of our past. We are pretty savvy when it comes to tech and connected systems and devices, but there's still an obvious learning curve for each new system and app. On that note and in an effort to not reinvent the wheel, do you have a punch list of items you would be willing to share with folks to help us be prepared for delivery day? The search function is cumbersome at best on the forum and finding all the essential items to check may result in key items missed otherwise. Regardless I'm going to be digging deep in the weeks ahead but anything you have would be greatly appreciated. Chris1 point
-
Share and Enjoy !Shares View the 2015 All Jensen TV JE2412LED Manual by clicking the button below. View Share and Enjoy !Shares The post 2015 Jensen TV JE2412LED Manual appeared first on Oliver Travel Trailers. Read the Full Article1 point
-
Share and Enjoy !Shares View the 2015 All Furrion DV1200 Stereo Manual by clicking the button below. View Share and Enjoy !Shares The post 2015 Furrion DV1200 Stereo Manual appeared first on Oliver Travel Trailers. Read the Full Article1 point
-
Share and Enjoy !Shares View the 2015 All Coleman Mach Air Conditioner Thermostat Manual by clicking the button below. View Share and Enjoy !Shares The post 2015 Coleman Mach Air Conditioner Thermostat Manual appeared first on Oliver Travel Trailers. Read the Full Article1 point
-
Share and Enjoy !Shares View the 2015 All Coleman Mach Air Conditioner Manual by clicking the button below. View Share and Enjoy !Shares The post 2015 Coleman Mach Air Conditioner Manual appeared first on Oliver Travel Trailers. Read the Full Article1 point
-
Share and Enjoy !Shares View the 2015 All Winegard Roadstar Omni Antenna Manual by clicking the button below. View Share and Enjoy !Shares The post 2015 Winegard Roadstar Omni Antenna Manual appeared first on Oliver Travel Trailers. Read the Full Article1 point
-
Are you referring to caulking under the windows inside, or outside? As Mike mentioned above, the windows are already caulked outside. They need to be re-caulked periodically, Oliver has a video and detailed instructions as to when and how to do this. Do not caulk the windows inside. In fact, don’t implement any solution until you have determined the root cause. You previously reported window leaks in a post on August 8th (see link), due to rain. Patriot recommended you remove all your window seals and clean the weep holes, and provided additional info as to how. If the weep holes are plugged they can cause a leak inside, from condensation, just like you describe. Have you removed your window seals, cleaned your window tracks and confirmed that the weep holes are not obstructed? Margaret’s Window Leaks1 point
-
There is no plumbing around the windows. So leaking water is either rain or condensation. Your windows should already be caulked. That’s a lot of water if it is soaking your bed. Mike1 point
-
Sorry to hear about all of your issues. For the Colorado folks it would be helpful to know your location before recommending an RV tech. For your leaky windows, did you try putting some water on them with a hose since you’ve had no rain since cleaning the tracks? It sounds like a lot of condensation. We’ve not had any significant problem with condensation and we’ve camped all over to include many Colorado locations. Do you keep one or both of your ceiling vents open at night? Are you able to run an electric space heater? I’m surprised no RV techs have been able to locate your freshwater leak. Do you have the leak when using the water pump or just while on city water? With the system pressurized you should be able to look under the dinette seats to see if there is moisture that might indicate it is coming from the bathroom. Checking under the curbside bed (both access points) for moisture on the floor would tell if it is from all the plumbing on that side. A blue paper towel is your friend when doing checks. If there is no moisture on either side of the trailer then looking under the basement floor in the back would be the next area to check. That entails emptying the basement and lifting the floor to examine the water lines that run from the city water inlet on the back side of the trailer around the curbside, past the furnace and hot water to the water pump area. If you raise or lower the front of the trailer does it make a difference in the amount or location of water leaking from under the trailer? I just repaired a freshwater leak that I had. I checked all the hull access points and found no moisture. I disassembled the basement to find moisture, but the pex lines were dry. When I checked around the furnace and hot water heater I found a cracked plastic Pex T-joint coming out of the hot water tank down below the heating ducts that was dripping whenever the water system was pressurized. I had missed that when checking the back access hatch at the bed. When I stuck a blue paper towel down there I found the leak. I replaced it with a brass T-joint. If you have a serious propane leak I would have that looked at right away. You might be able to find a propane guy that would help. The guy we use for our home propane told me once he could help with any propane issues I might have with my trailer. Same with your electrical, I’m not an expert and would have a regular electrician or qualified RV tech troubleshoot. Is your trailer still under warranty? Have you opened trouble tickets with service? Once you do they will call to help.1 point
-
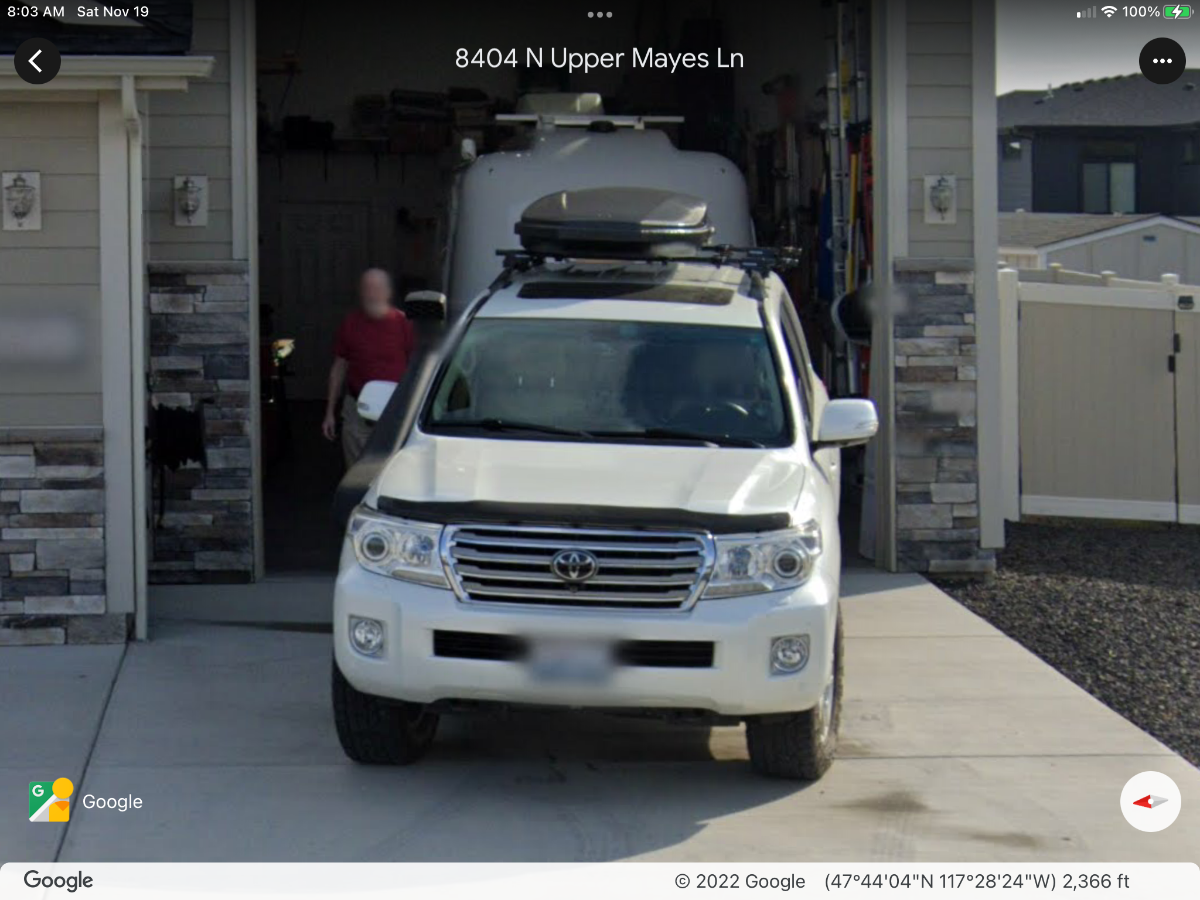
I am not sure how I feel about this, they did politely blur my house street number, license plate and face, but the actual app shows my physical address…. and much of the contents of my RV bay. Should I request that they blur out the Ollie and the inside of the bay? Am I being paranoid? Comments? Thanks. John Davies Spokane WA
1 point
-
So that’s where all those diabolical ingenious upgrades, modifications, and hacks to “Mouse” have taken place!1 point
-
Let me see ---- Reasonably nice neighborhood, Reasonably nice yard, Reasonably nice house, Really nice two car garage PLUS what looks to be an RV garage. With or without the pics - I'd bet that there is something expensive in that RV garage and while I'm in there I'd take a look around too if I was that sort of person. I wonder just how many crooks of the larceny type spend time on a computer "casing" houses to burgle? Surely its nothing that "Reacher" couldn't take care of. 😊1 point
-
I would advise against using closed cell foam to plug the vents underneath the trailer. The foam is semi-permanent and can't be removed from the bug screens on the inside of the vent at all if you needed to. If you ever get water in the basement, the holes are the only way for it to escape. I would suggest making a small ball of HVAC putty and place it in the vent opening, being careful not to push it in too far into the screen. The putty does not harden and can be flicked out with a screwdriver when you want to open the vents for ventilation. I personally like the vents open anytime the temperatures are not going below freezing.
1 point
-
The reason Oliver installs that huge vent right beside the furnace fan is because that is specifically required by the manufacturer’s installation instructions. You can go ahead and add return air paths far away, just be sure the total square inches is equivalent to that big grill. I plan to do this, I will be removing my Dometic fridge for maintenance and I am going to see about making a return grill at the entry door down low, forward of the fridge. Once you have plenty of air return, from different areas of the hull, then you can block off and sound insulate the existing air return, which will dramatically quiet the furnace. This is a future How To article, assuming it works out. John Davies Spokane WA
1 point
-
Just a couple of clarification questions: Wouldn't you think that by diminishing the size (or eliminating) the existing return vent by the furnace and placing return vents further forward that feed into the basement, that when the furnace runs, it would pull warm air through the basement ? In my case, I placed a vent by the toilet, feeding into the basement below the forward dinette. There are exterior shower water lines run through the garage which is the most susceptible area with water to cold temps. To address those lines, was planning on adding a vent to the wall (separating basement from garage) in basement under the streetside bed and another in wall between garage and basement by the furnace under the curbside bed. I've already rerouted a heat duct through that area feeding into the main cabin below the battery box. This has considerably warmed up the area around the exterior shower. By partially of fully covering the only existing vent (right by the furnace) wouldn't the furnace operating then pull warm air through basement from the bathroom and through the garage from the now warm area under the streetside bed?1 point
-
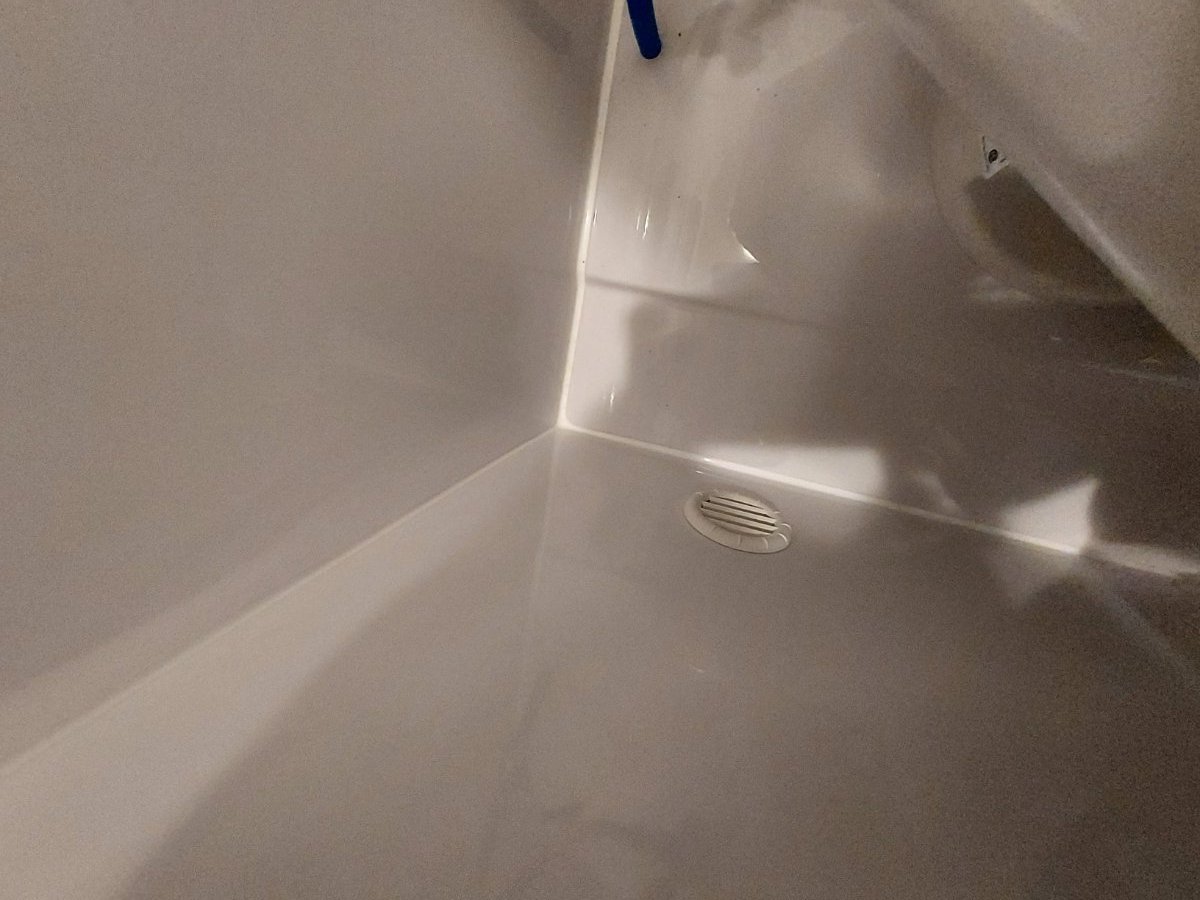
Attached is a photo of what I believe to be a bathroom return air vent in our new Hull #1291 Elite II. It is on the back side of the aft bathroom wall, right above the black tank flush/check valve, and therefore accessible from underneath the front dinette seat. The second attached photo is shot from the bath side. I suspect the return air is expected to make its way back to the furnace through the area under the floor. You will note that the forced air vents are smaller than in previous models. I believe this is because we were the third Elite II upgraded to the Truma AC/VarioHeat furnace package. The air ducts are smaller diameter, but much more substantial than I have seen in photos previously posted on this forum. Maybe Oliver added return air vents as part of this upgrade? For what it's worth, a cold front moved into Tennessee last night. It has been in the high 30's today, with lows for tonight forecast to be in the mid-20's. We have run the furnace most of the day, with the bathroom door closed, yet it has been only a bit cooler in the bath than in the main cabin. I suspect that small return air duct has helped balance the flow of heated air to the bathroom.
1 point
-
We live in Connecticut and use a Eevelle horse trailer cover. link to cover We use it year round and are super happy with it. Bought their top shelf version for a 24' V front trailer and it fits perfect except for not covering the storage box and leveler on the tongue - both fine with us. The material is very sturdy, there are vents running across the top lip which work really well even if cover is put on a wet trailer. A number of straps that go under the belly and one across the top, which holds the material firm to trailer even in wind storms. This also prevents the material from sitting on the ground and freezing to the pavement. There are top to bottom zippers every 6-7' with velcroe tabs at the top so it is easy to roll up panels for easy access to any part of the trailer. We wax and buff 2x/year, wash with a soap/wax combo in general and the trailer looks fantastic. Purchased on sale for 40% off so ended up costing around $550 including tax and shipping. They have lots of sales. Our primary reasons for going with the cover was twofold. We want to minimize drying/cracking of sealants arounds windows and roof. Also, leaves and dust collected around the roof supports for the awning which also pools water. This made for constant ugly staining which was a real chore to keep clean.1 point
-
I too have a 2020 LE II and I definitely bought mine new as a 4 season trailer and as I use it extensively through the winter in Oregon, I do not winterize it. I am extremely pleased with the LE II overall, but OTT completely failed when they engineered the forced air heating system. A forced air heating system does not distribute hot air throughout the living space, it has return ducts that pull hot air from the supply ducts across the living space to a one or more return ducts and back to the furnace. Oliver only put in one return duct and they located it immediately in front of the furnace itself. This means that there is no circulation of heated cabin air through the basement. It is dead air space. Even more inexcusable, OTT didn't put any return vent in the bathroom so when the bathroom door is closed, the supply vent in the bathroom pressurizes the bathroom space and warm air doesn't flow into the bathroom. Given the primary problem is a lack of properly sized and located return air vents, adding or relocating supply vents will not be very effective at warming the basement. I too spent did lots of testing with thermostats to get a good understanding of basement temperatures at various cabin temperatures. Like you, I found that no matter how hot I heated the cabin, the area around the outside shower would inevitably fall to around 5 degrees above the outside temperature. I determined the main reason was the lack of heated air circulating through the basement due to the lack of appropriately located return vents in the cabin. I also found that the tiny vents in the bottom of the trailer designed to drain any water that finds its way to the basement are a problem in cold weather given the flaws in the heating system. There are enough tiny air leaks in the cabin to create a slow convection effect which draws cold outside air slowly through the basement vents. Since there is no warm air circulating through the basement even when the furnace is running given the flawed design, this slow intrusion of outside air pools in the basement creating the dramatic temperature differentials between the cabin and the basement. I have not permanently fixed the problem yet, but found a temporary workaround that I am confident is good down to 15 degrees or so. If you have the inverter like I do, there is a large street side hole just behind the battery box (to access the inverter GFCI). When it gets cold, I just unscrew and remove the cover and create a second temporary street side return vent. Now more than 50% of the hot cabin air flows into the street side of the basement and across the water tanks and rear area stirring up the air. The area by the outside shower now varies less than 10 degrees from cabin temperature and the battery box stays within 5 degrees of cabin temperature (I have lithiums and have sealed and insulated the battery door). The furnace seems to run quieter and the cabin heat is more evenly distributed. The walls don't get quite as cold either. This winter if it gets real cold, I will also temporarily tape over the vents under the trailer to stop the convection currents from pulling cold outside air directly into the basement. For me, I think the permanent fix is to add a few return vents to the trailer. I will probably put one under the front dinette next to the CO detector and another smaller one in the bathroom. This should ensure that the entire basement enjoys adequate circulation of warm air when the furnace is running and that the bathroom is warm even with the door closed. You may want to try unscrewing the cover from the street side hole in front of the inverter and see if you experience the same improvements in basement temperatures that I did.1 point
-
Understood. But, Lithionics advises in its Rev. 7 Storage Procedure that their batteries with internal heaters will be fine (with no State-of-Charge concerns) if left connected to shore power during winter storage. The Rev. 7 Storage Procedure document states: "If your battery has the Lithionics Internal Heater, and you are subject to winter conditions, keep the battery ON, solar ON and plugged into shore power...This will keep the heater running and protect your battery. Doing this will eliminate the procedures below." The "procedures below" include the discharge/recharge protocol, which is required when the batteries with internal heaters are removed for storage, but not when left connected to shore power.1 point
-
I’m interested in this as well, we too would prefer not to remove the batteries and just stay connected to shore power with the battery heater on. I don’t understand why you would need an external charger if you can connect to shore power. Why is staying connected to shore power not recommended? If you can plug into shore power you don’t need an external charger. Last winter the previous owner had the Oliver stored outside not connected to shore power with battery heater on, I’m guessing the solar kept the battery heater charged? There has been so many different answers about this including from lithionics I’m not sure what to do. It’s unsettling that the person from lithionics you spoke to didn’t know if keeping it plugged into shore power was ok but then tried to sell you a portable lithium charger! Wouldn’t shore power charge it just the same?1 point
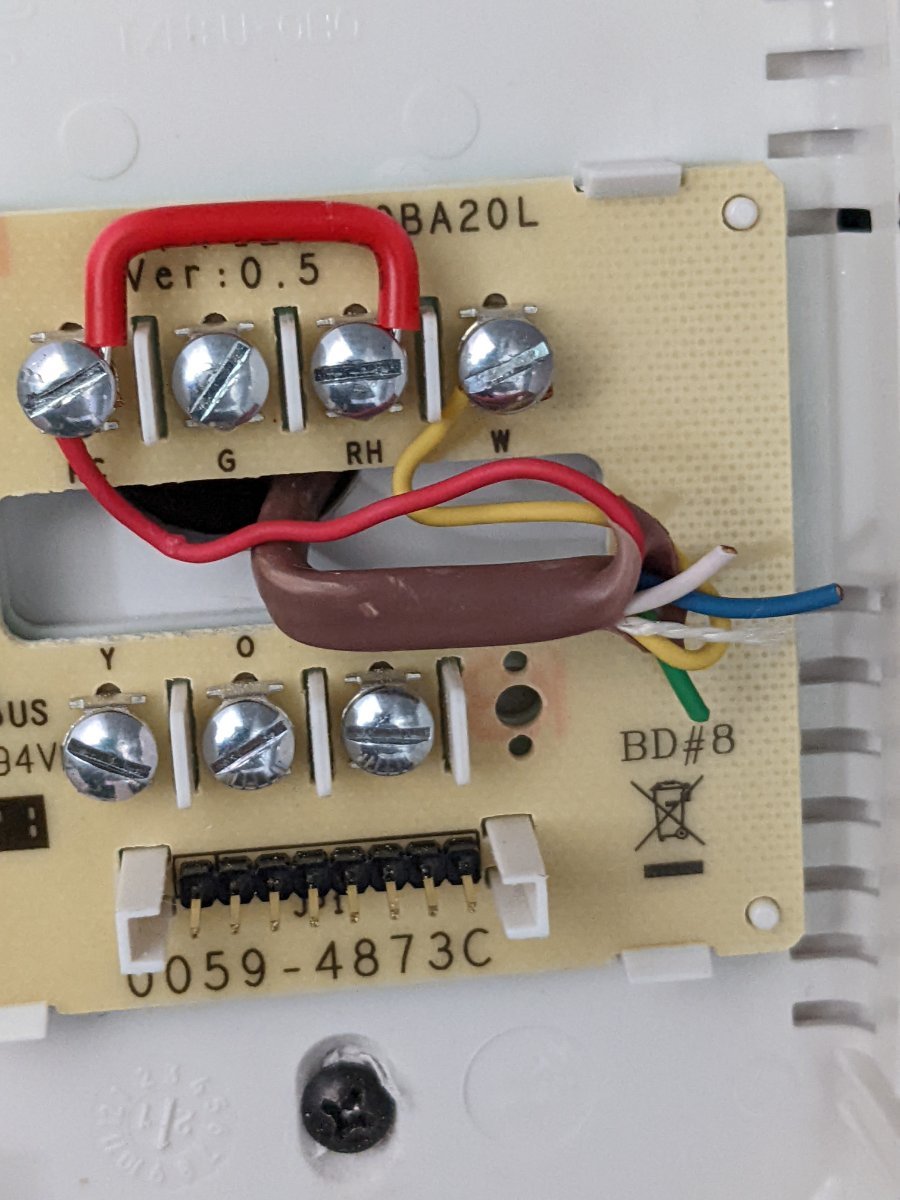
-
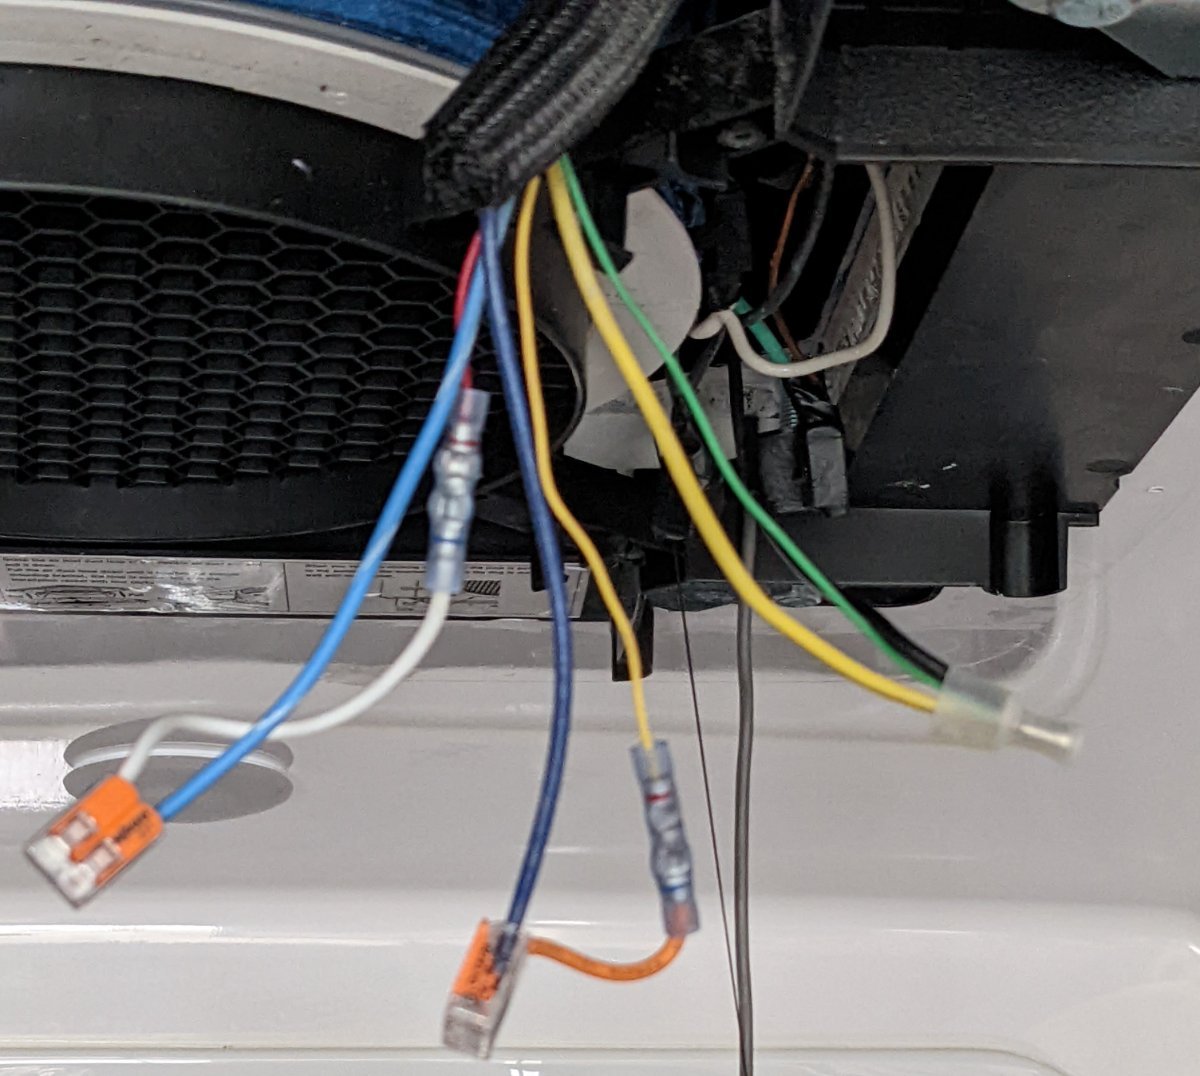
Here are the photos of the final wiring. I used the Red (spliced on AC side to white) and Yellow (spliced on AC side to orange) thermostat wires. As you can see in the photo the blue/white was the 12 v and the solid blue was the wire to the heater as @Minnesota Oliconfirmed. I checked with a volt meter and connected them at the AC side to confirm the heater would turn on. On the Tstat side the wiring is self explanatory from the picture. The only casualty in the install was blowing the 7.5 A fuse which is located under the dinette. After closing everything up and THEN putting in the new fuse so I would not blow it again everything is working great. What an excellent upgrade the low profile inside portion along with the reduction in operating noise was well worth it. BTW: if you are in the metrowest Boston, MA area and need any RV repairs; I used TRIC Mobile RV to do the heavy lifting to remove and replace the actual AC unit. https://tricmobilervrepair.com/ They did a fantastic job so I would definitely recommend them.
1 point
-
I actually made a label for my battery door that says "sewer hoses". 😆 John1 point
-
I guess we signed the contract with that indemnification clause included in it, as our trailer is only 9 months old I must have agreed to it. Since the clause was probably added for Oliver protection and advised by there lawyers it probably meets the laws of the land. I think this clause was regarding money for the down payment, but maybe not. All being said I have never heard of Oliver forcing you to take your trailer if personal problems arose that would make delivery not going to happen. You probably couldn't deal with a company devoted to doing it right for complete customer satisfaction. trainman1 point
-
Yea, weird. I wrote to the admin (using Deb’s account) asking for it to be reviewed and could she tell me what I did that was wrong. Just got a reply today. “Nope. too much drama” 🙁 I was really looking forward to interacting with the local owners on there once our trailer arrives, and joining their “Rolling Rallies” sub-group where members arrange gatherings. I sure don’t get it…0 points
-
I was patiently waiting for a fellow camper to finish his dumping operation and watched in amazement as he let his slinky slip and disappear into the campground sewer. He shrugged and left. Stuff happens I guess.0 points


-
Recent Achievements
-


")


