Leaderboard


Popular Content
Showing content with the highest reputation on 12/17/2022 in all areas
-
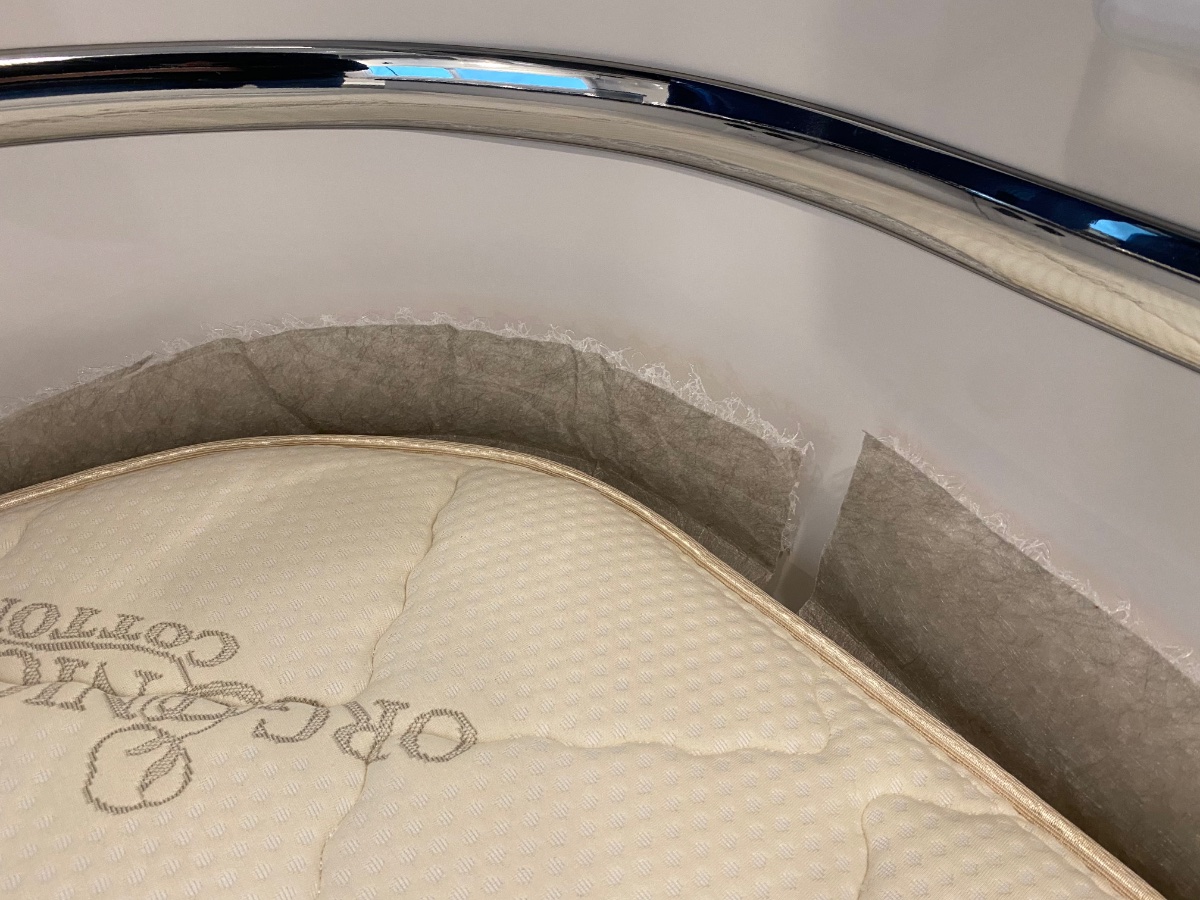
You may not want to push your new custom mattress dimensions to the absolute maximum. If you’re ordering the optional hypervent mat from Oliver for ventilation under the mattresses to prevent condensation & mildew, there are also sections of the hypervent mat that go between the outer sides of the mattress and the fiberglass wall of the trailer. You have to leave some room for those sections of the hypervent mat, ~1”. That’s why the mattress dimensions Oliver shows are slightly smaller than the absolute max space available.5 points
-
Too low! You need a 12 foot high door, at least. You also need a 16 foot ceiling in the garage so you can get up top and do maintenance and cleaning. In other words, an RV bay, not a garage. My door is 10 wide x 14 feet high. If you do not build it as a standard RV bay it will make it a lot harder to sell the house later. The older generation that is downsizing and investing in big RVs wants a bay and a small house. Out of the 25 houses on my street, 8 have attached RV bays. 43 or 45 feet long. John Davies Spokane WA4 points
-
That is true on the plant tour but not the showroom. I don’t disagree with the policy. Not everyone wants to be posted all over the internet just because they were doing their job. Also, corporate espionage is a real thing. Proprietary techniques and processes should be kept private. We spent over an hour in the LE II outside, the showroom was empty due to the company Christmas party, we tried out the Truma furnace and ran many other systems completely unplugged. The Truma did not disappoint. We got all the measurements and pictures we wanted from a true 2023 model. Brian3 points
-
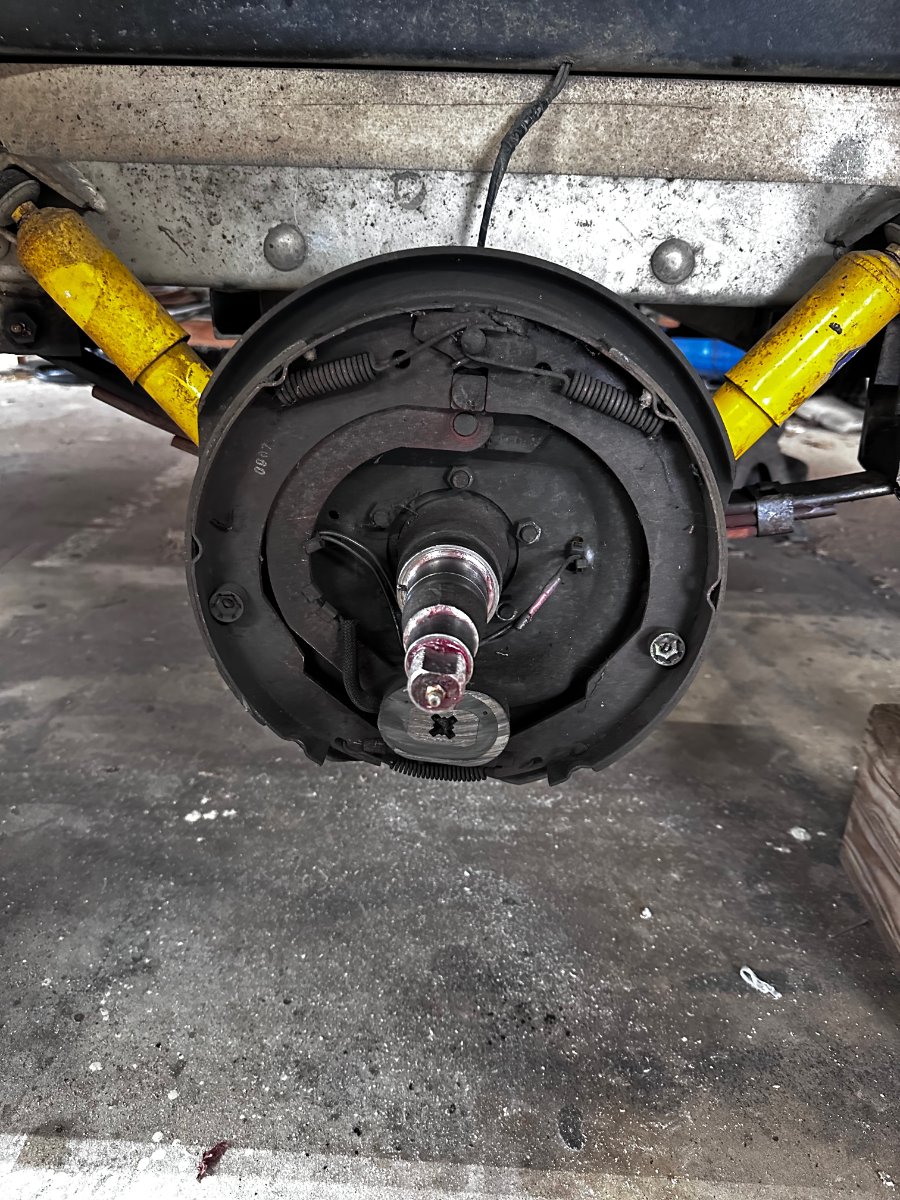
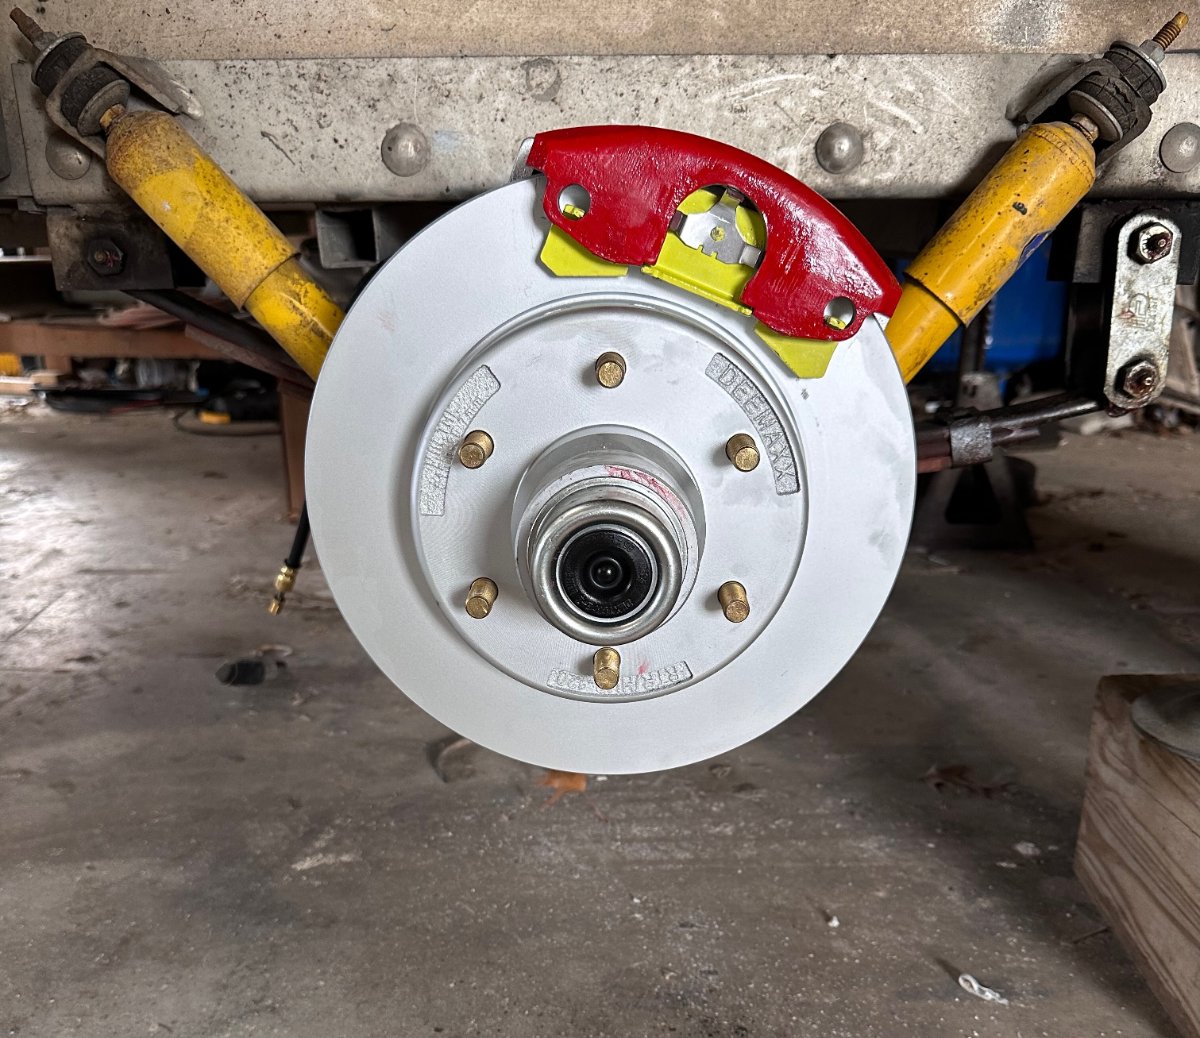
My drum brakes performed admirably for over a decade with regular annual maintenance . . . I was traveling 9 to 10 thousand miles a year then. Lots of braking events . . . and then . . . COVID! No travel at all for one year, and two years only going 700 miles into the mountains and sitting for 3 months with lots of friends in the cool air. Well. the dust and debris of normal travel had gotten into the drums and sort of solidified, causing the left drum to cease working altogether and the right one to be cantankerous. My TV is an F150 which has abundant braking power for my 3900 lb Wonder Egg. But that's not the point. I need to ensure safety at ALL times, even when going down 9 miles of 12-15° down slopes in the mountains. So that was the impetus for my move to disk brakes. Plus . . . they look COOL! $1600 in parts, $900 in labor. For me, where I am in life at this time, it is worth every buckaaroo. I hope to return to my long wanderings again this year. Woohooooo3 points
-
We just visited the factory at Hohenwald to take some measurements and pictures. We live about 90 minutes away so it is easy to do. While we were there, one of the techs mentioned Truma had issued a service bulletin on the screws originally sent with the air conditioner units and advised Oliver to not use them. Truma sent new screws to use for installation of the a/c units to prevent leaks. You might want to have a conversation with them to determine if the additional caulking was the appropriate corrective action or if something else needs to be performed to prevent leaks down the road. Brian2 points
-
Here’s a pic of the hypervent pieces around the outside of the mattress. I pulled them up for the photo. Normally they tuck fully behind the mattress and are not visible.
 2 points
 -
That's a "Positive" first step! Those batteries don't appear from the picture to have their terminals clearly identified. And that's a "Negative" too. Sorry for the pun, I know this is frustrating for you. Back to basics: Use you volt meter... if you don't have one, many of us use the one below with great success from Amazon. Just check the voltage from the two biggest cables going to your battery area. Make sure you set the meter for DC Voltage first. if it is not 12+ volts, then the next step is to disconnect both batteries and charge them at 6 volts as indicated above. Once the first one is charged, measure the battery voltage. It should be 6+ volts. Then do the same test with the other battery. For two 6 volt batteries to produce 12 volts, you need to hook them up in series. This is + to - as indicated above. If you were using 12 volt batteries, it would be parallel connections. That would be + to + and - to -. If the above is not working, PM me and we'll talk it through on the phone. Just remember I'm in Hawaii so please don't waken the bear too early. 🙂 GJ
2 points
-
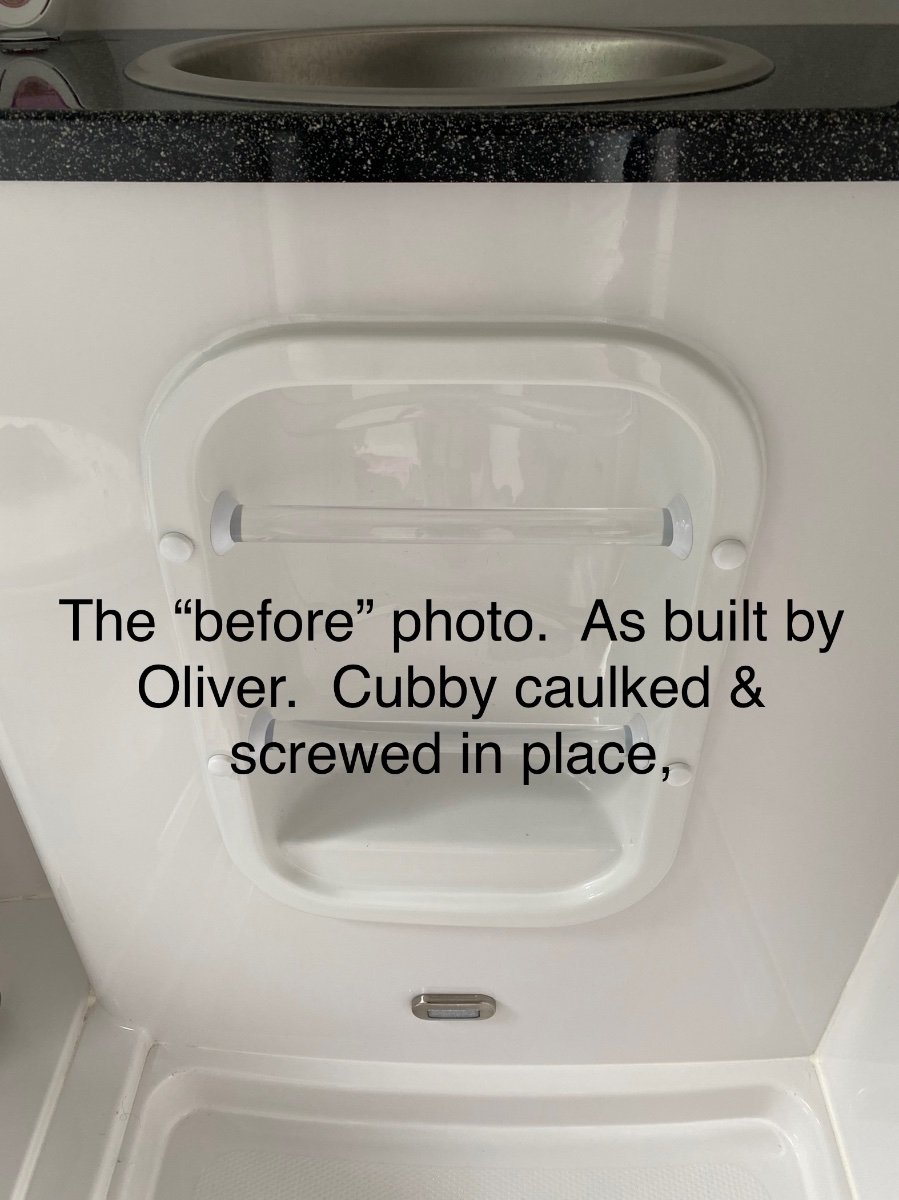
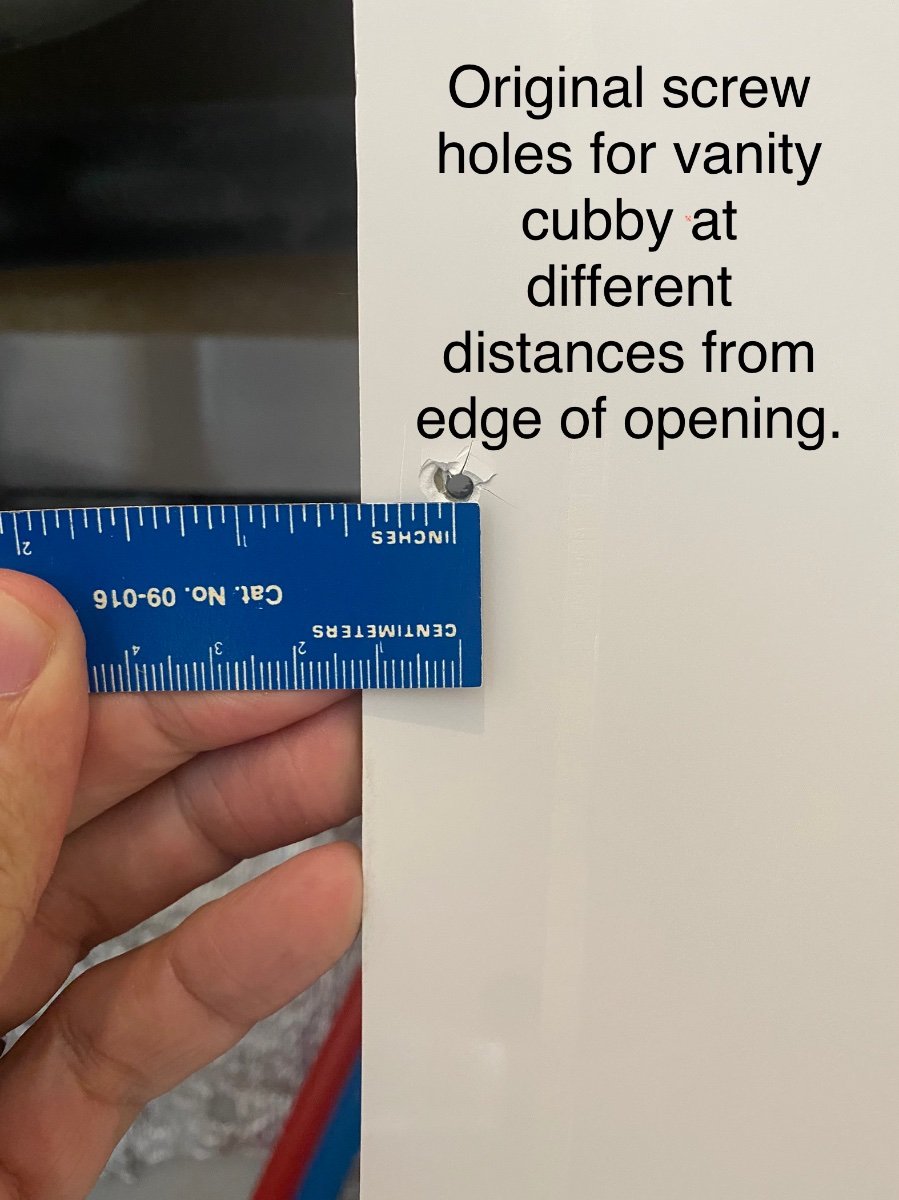
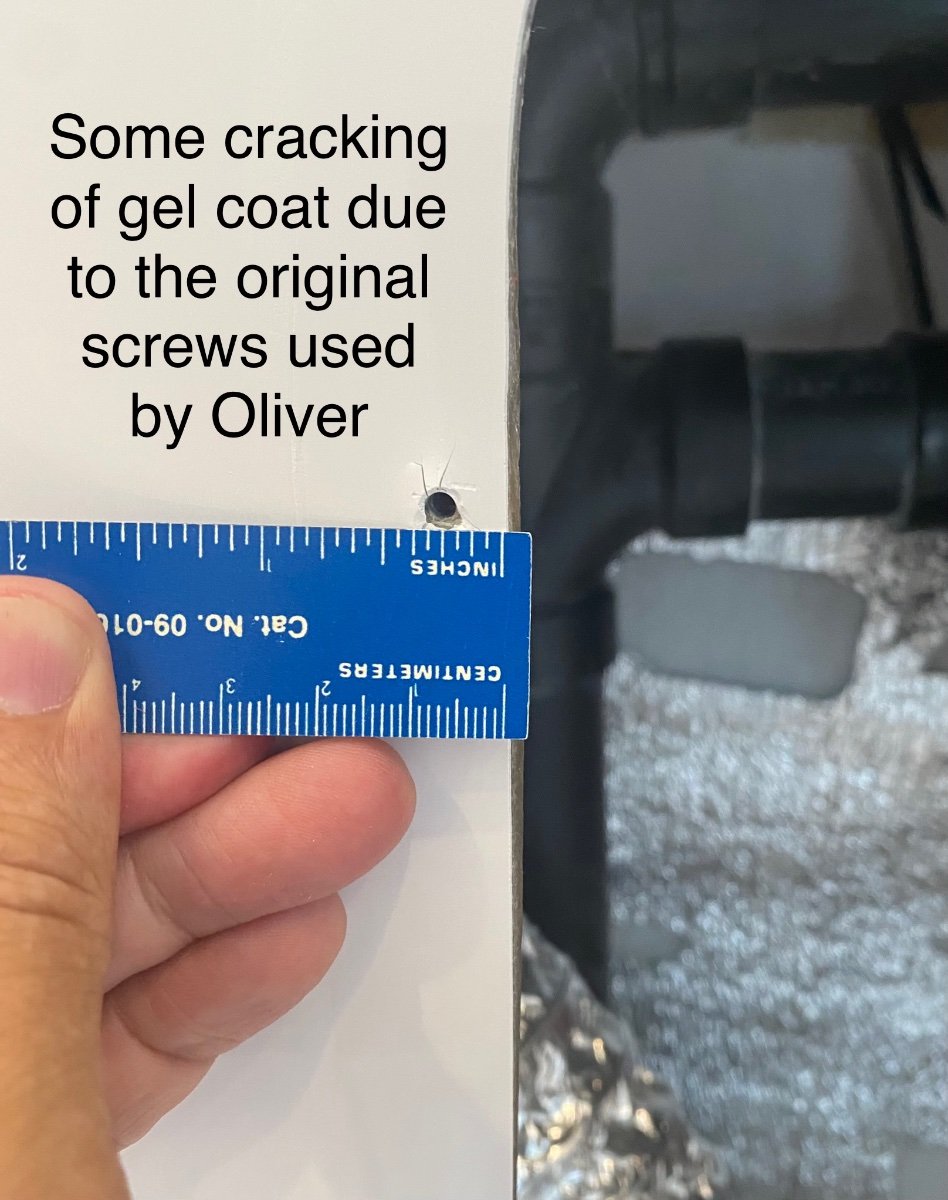
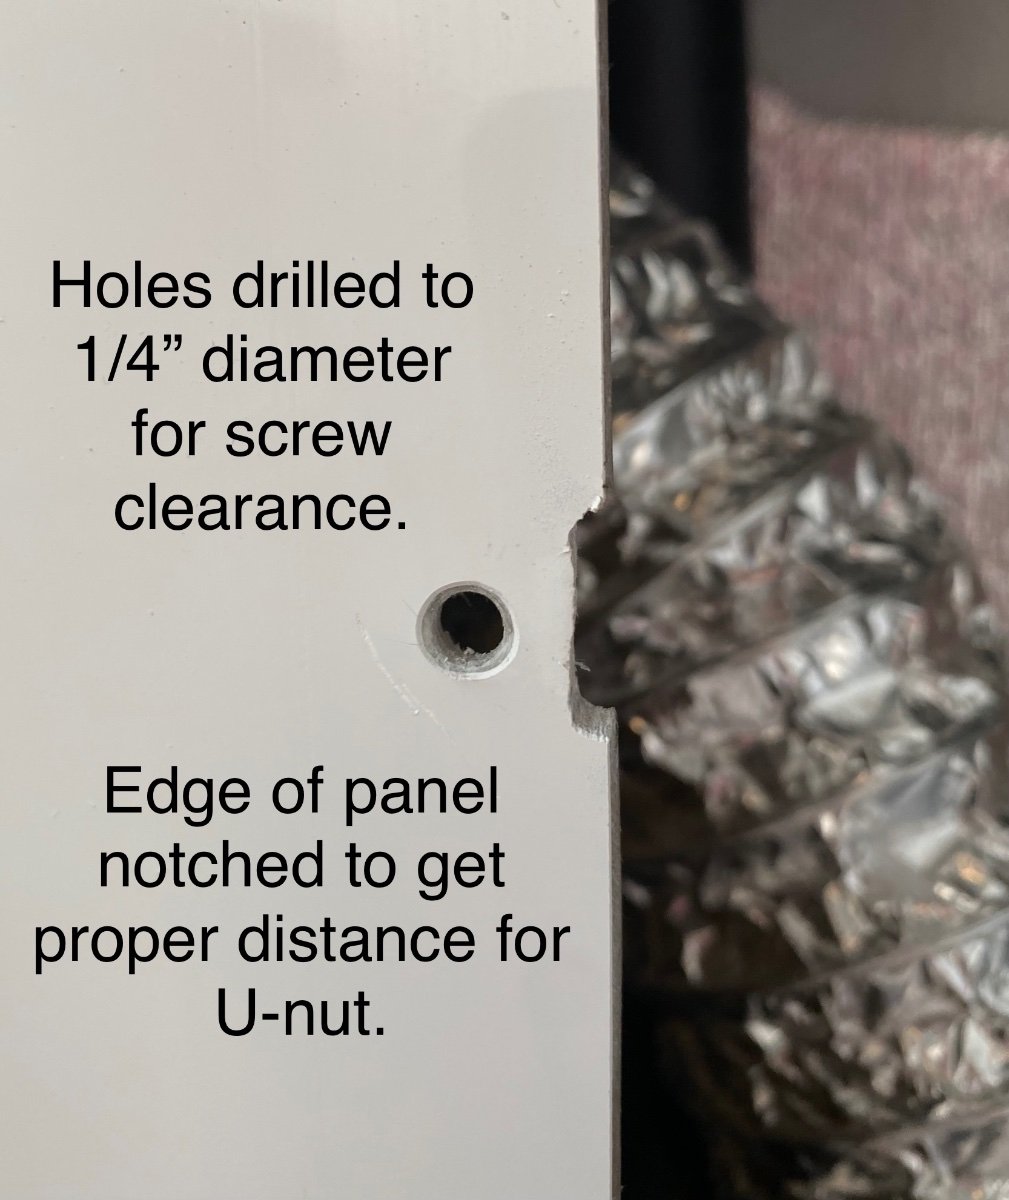
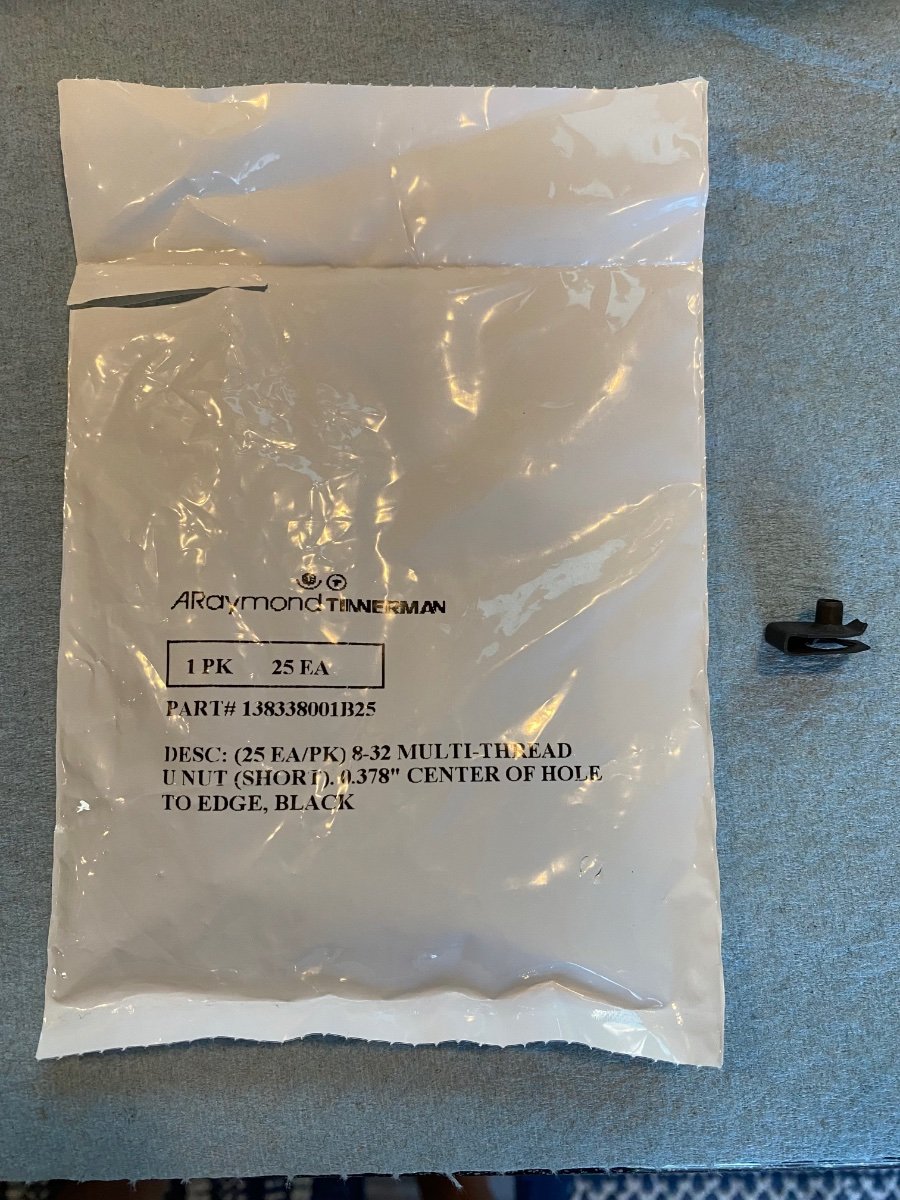
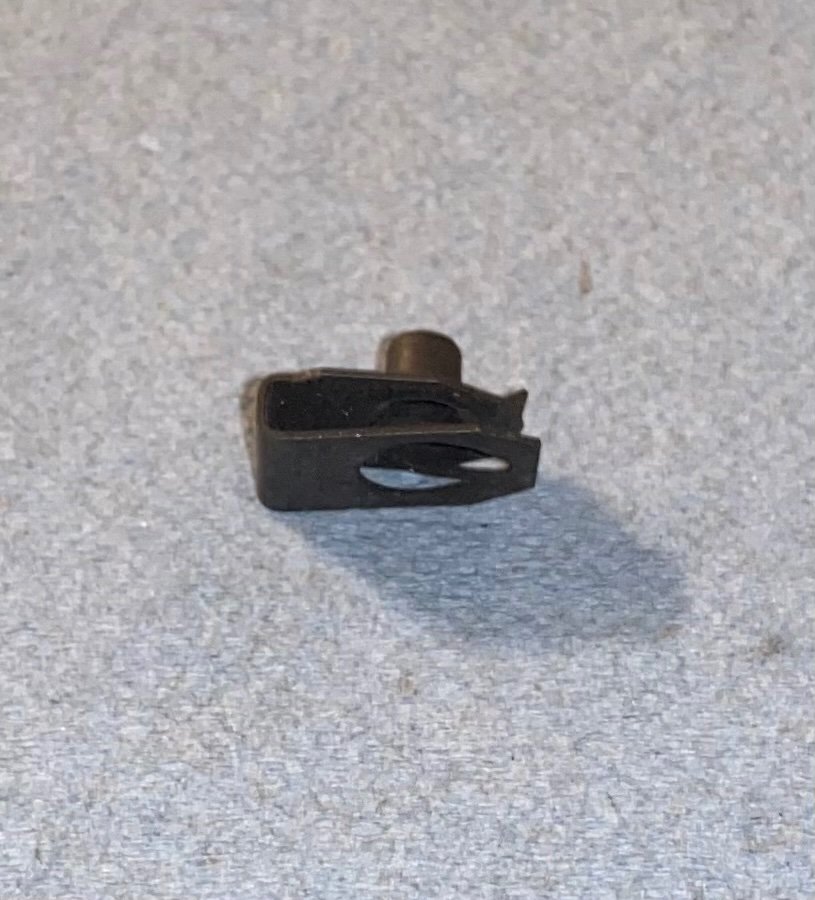
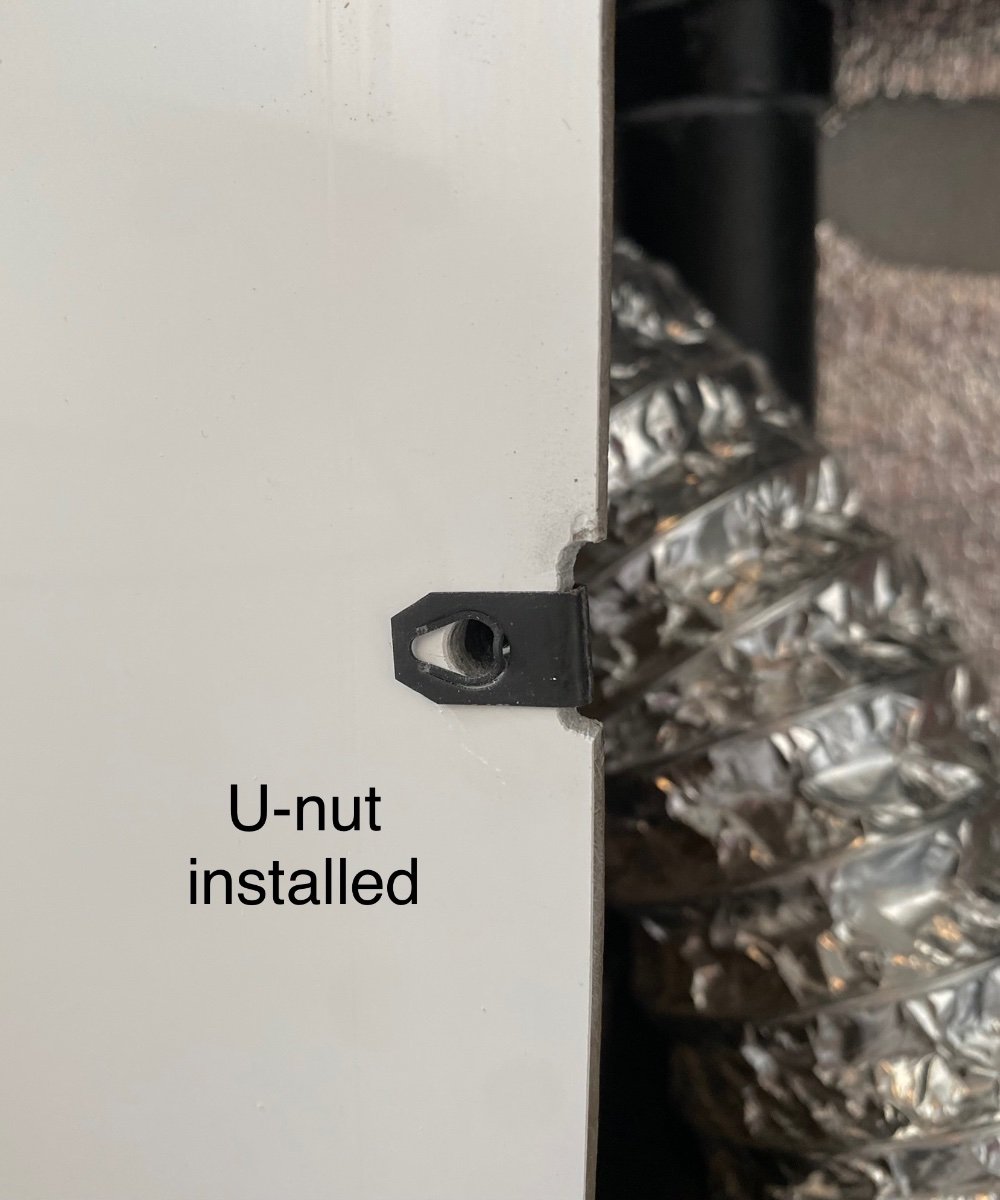
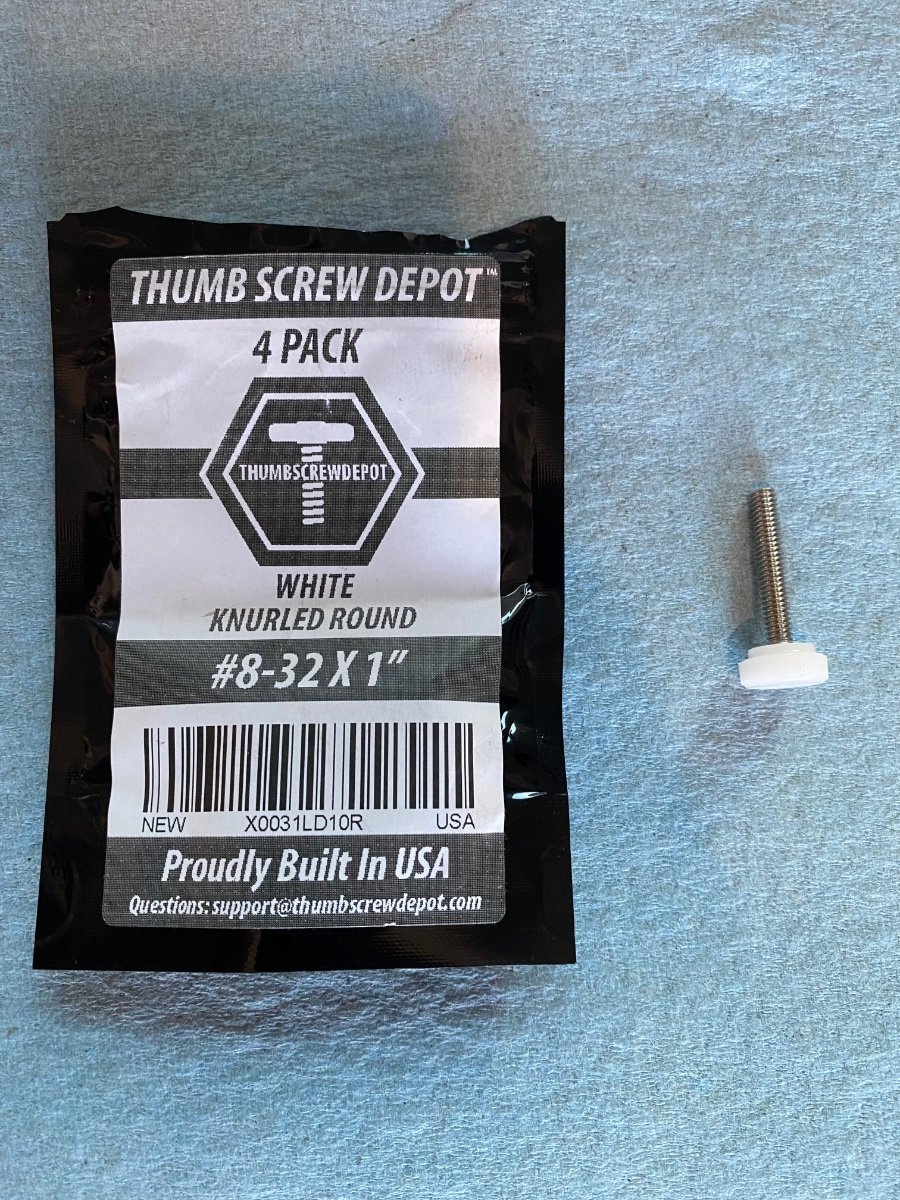
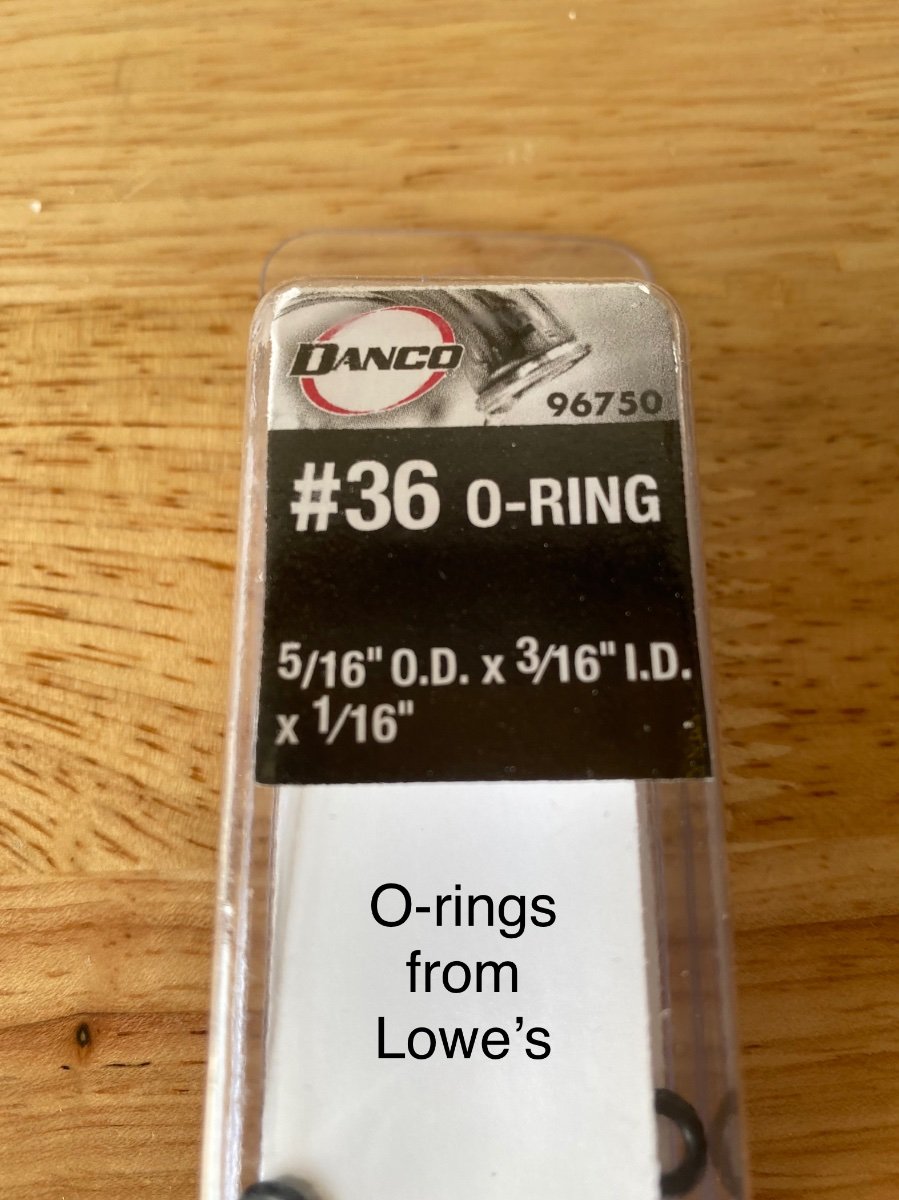
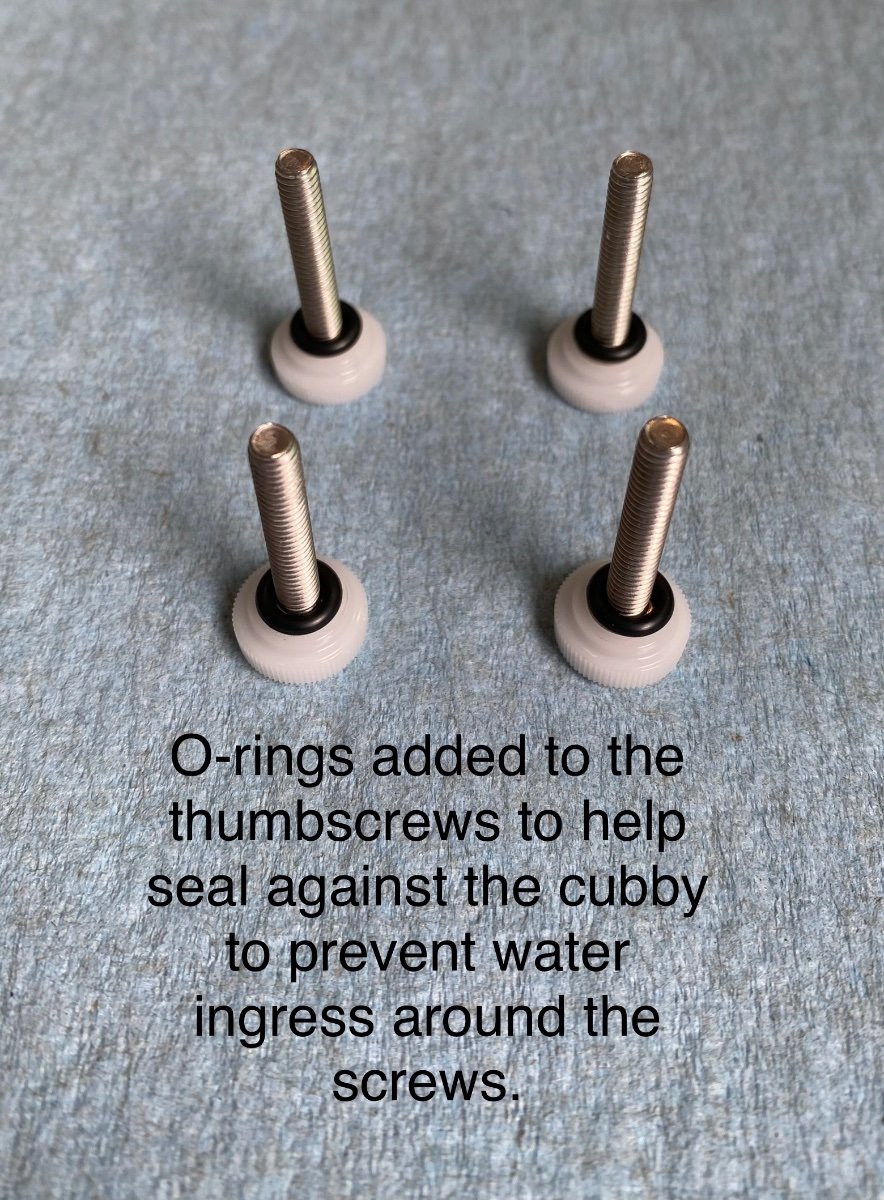
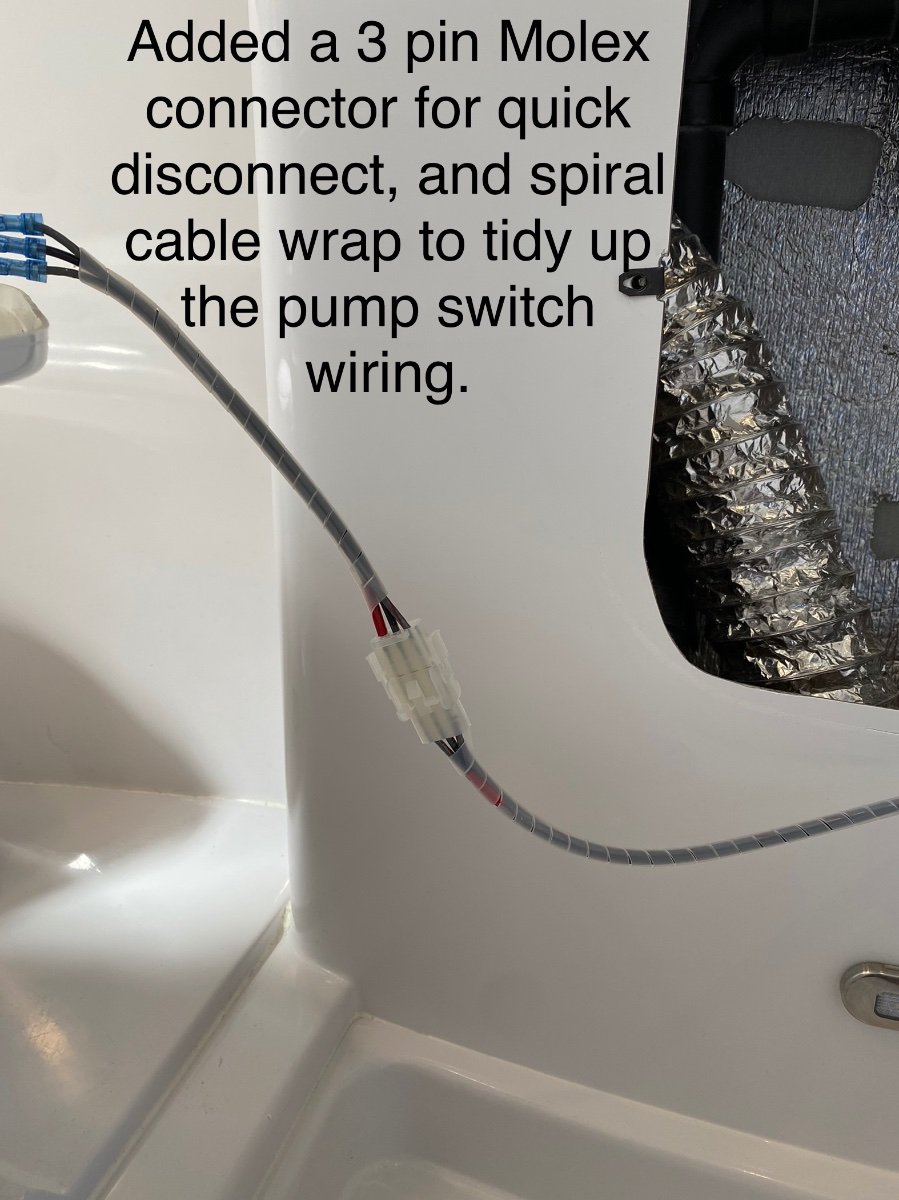
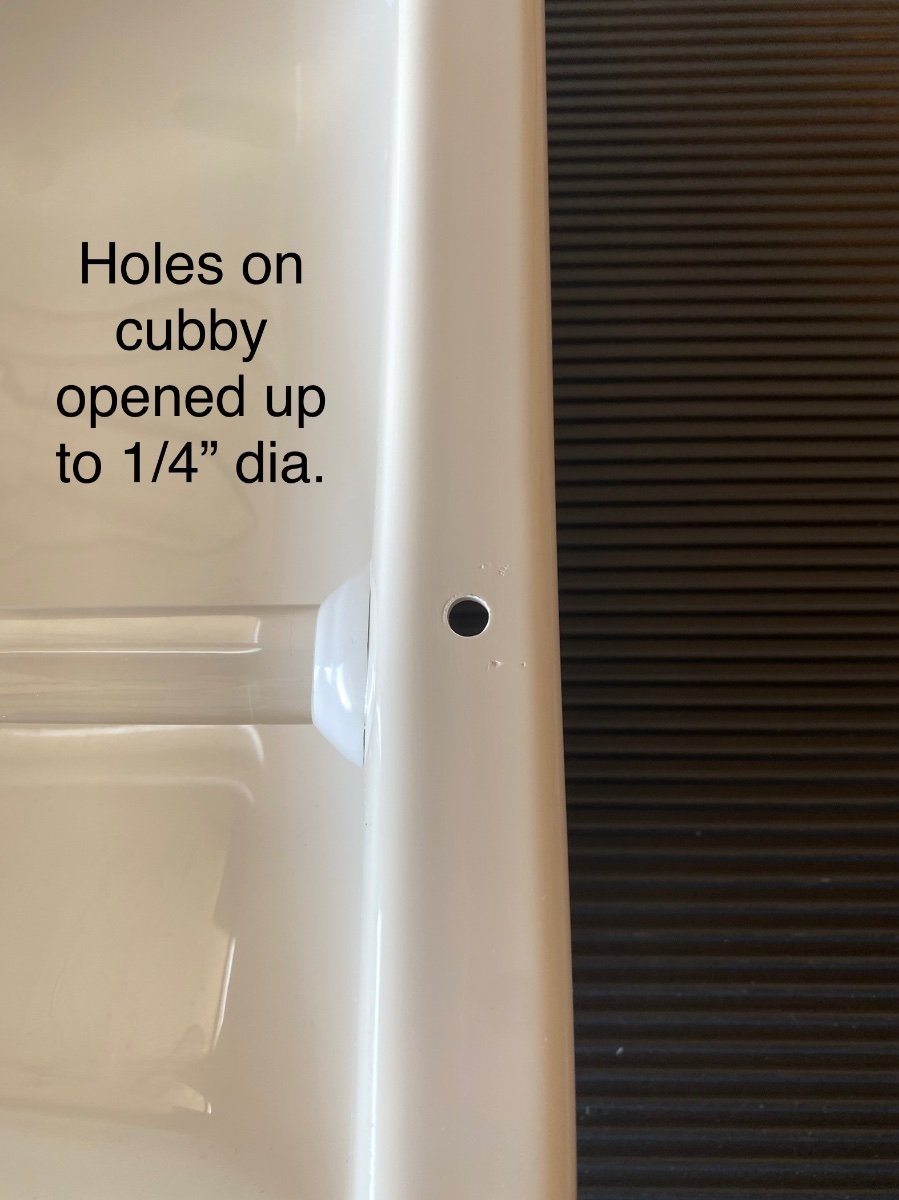
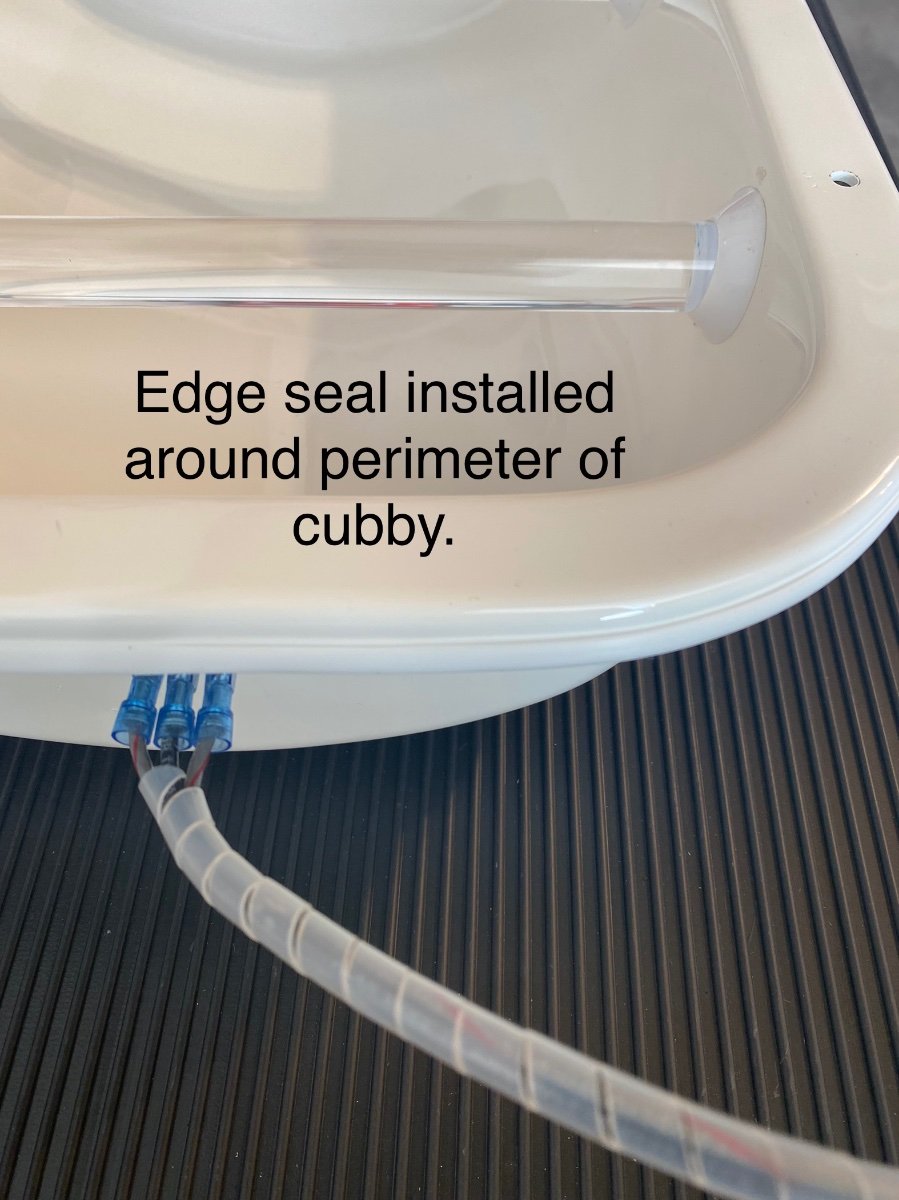
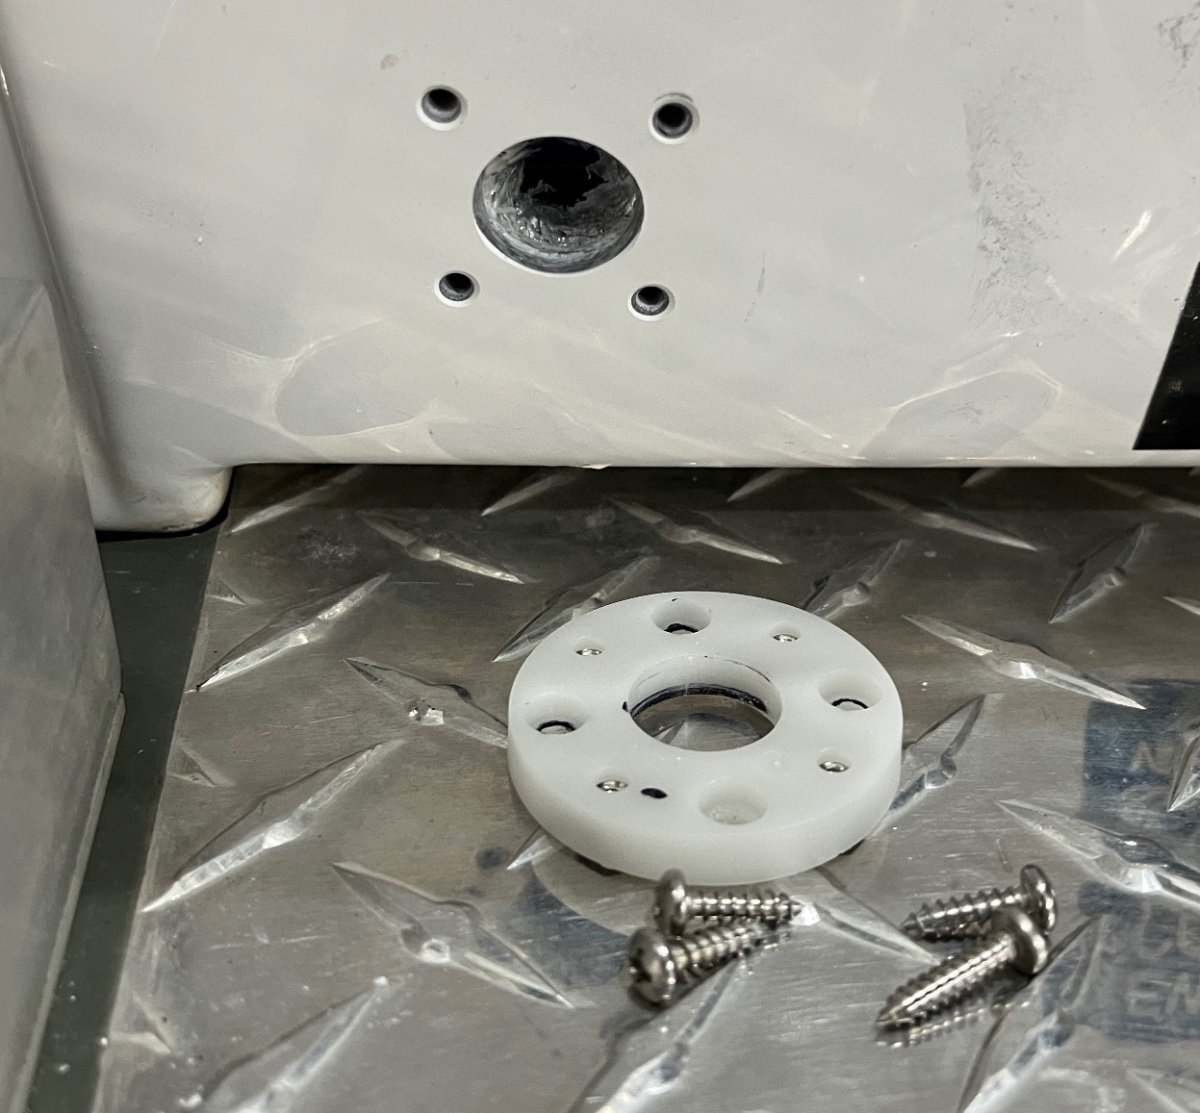
One of the great features of the Oliver trailer design is the fast and easy (no tools needed) access to ALMOST all of the plumbing, heating, and electrical systems through the hatches under the dinette seats and the beds, or by removing the kitchen cabinet drawers. One area that’s NOT readily accessible is the area under the bathroom vanity, even though there is plumbing, electrical, and furnace ductwork all tucked inside the vanity. The storage cubby in the front of the vanity is screwed AND CAULKED in place by Oliver at the factory, so access is a bit more complicated than the other areas. I recently needed to get into that vanity area for some inspection and maintenance, and after completing that I wanted to make future access easier (no tools needed and no caulking). I know some owners have replaced the storage cubby with a hinged marine access panel, but I didn’t want to lose the cubby storage. So here’s a detailed description of a simple modification I did, along with links to the parts used. Access is now fast and easy. No-Slip Clip-On Barrel Nut, for 0.025" to 0.15" Panel Thickness, 8-32 Thread Size https://www.mcmaster.com/94850A111 #8-32 x 1" Thumb Screw Stainless... https://www.amazon.com/dp/B09FZVLZKD?ref=ppx_pop_mob_ap_share uxcell Edge Trim U Seal Extrusion, Silicone White U Channel Edge Protector Sheet Fits 0.5-2.5mm Edge 3Meters/9.84Ft Length https://a.co/d/1uWUZB3 Molex -3 Match Set - (3-Pin) w/14-20 AWG, Wire Connector - 2.13mm D, Latch Lock, MLX https://a.co/d/gapvioi
1 point
-
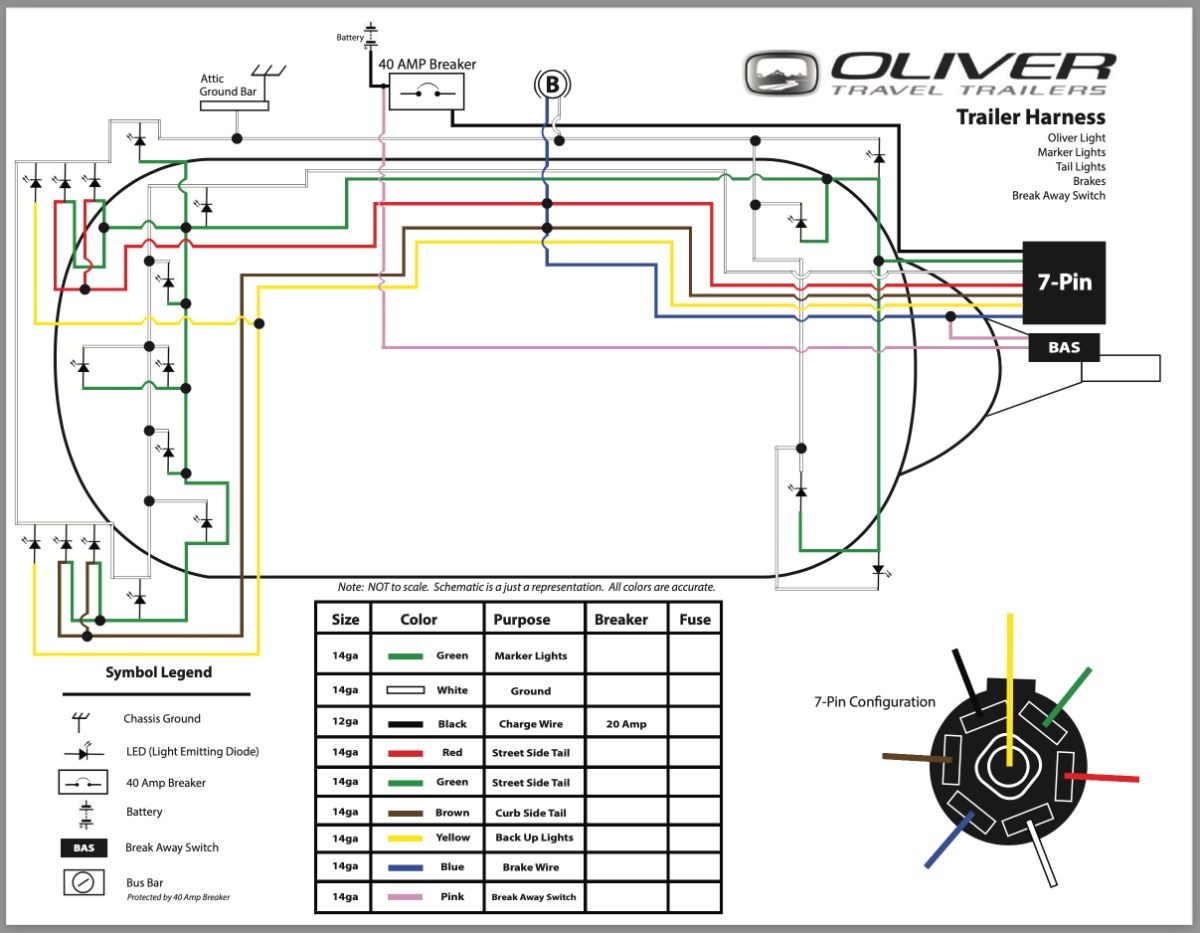
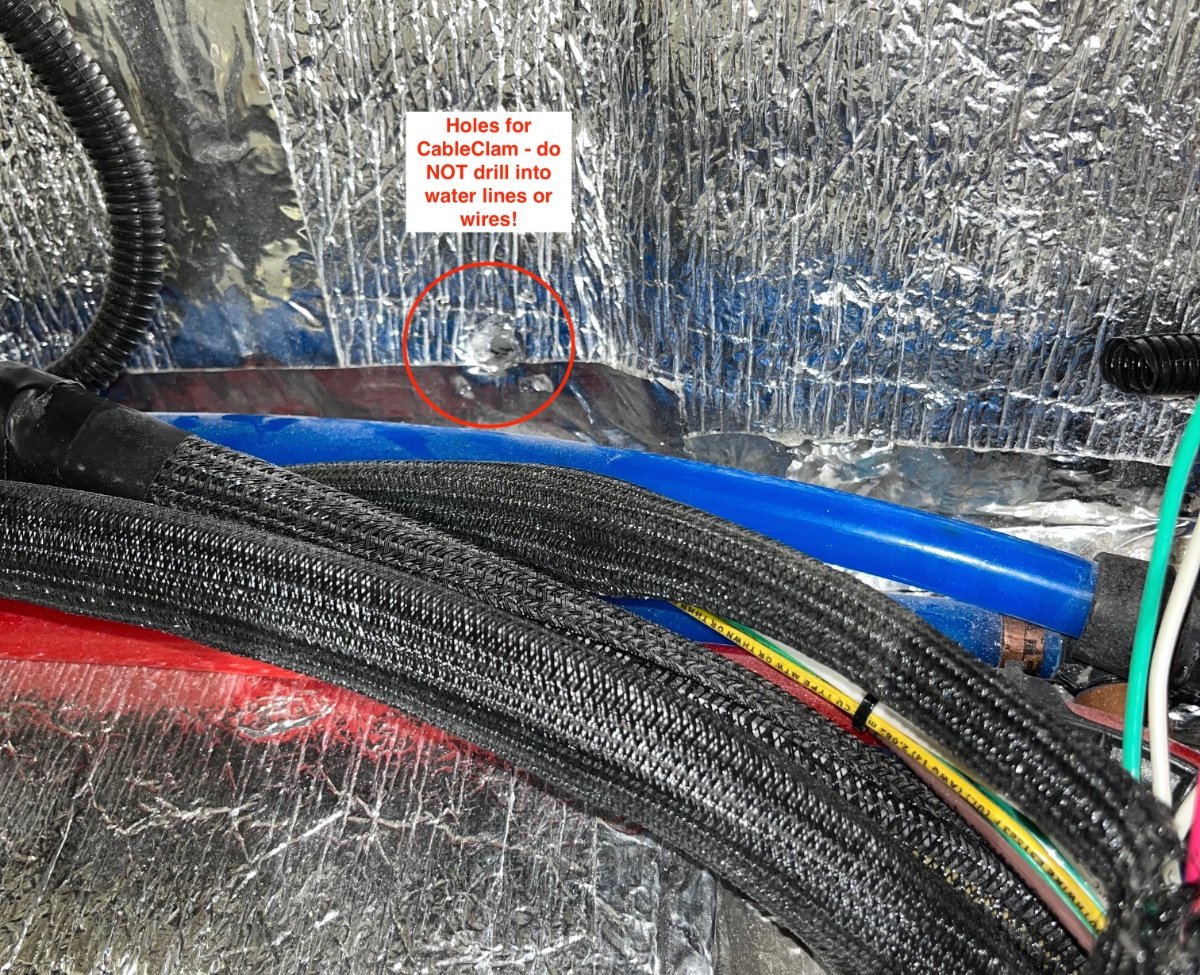
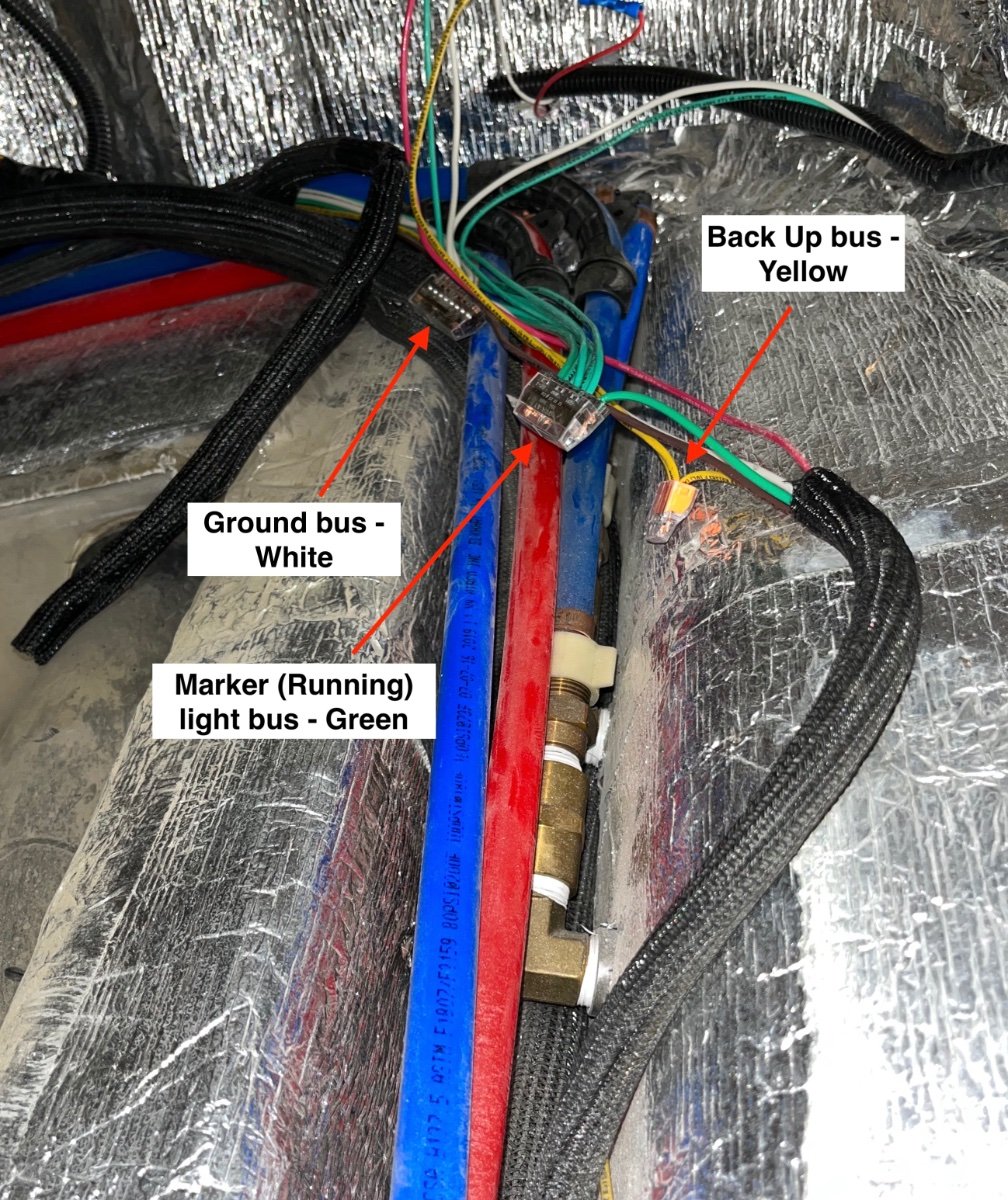
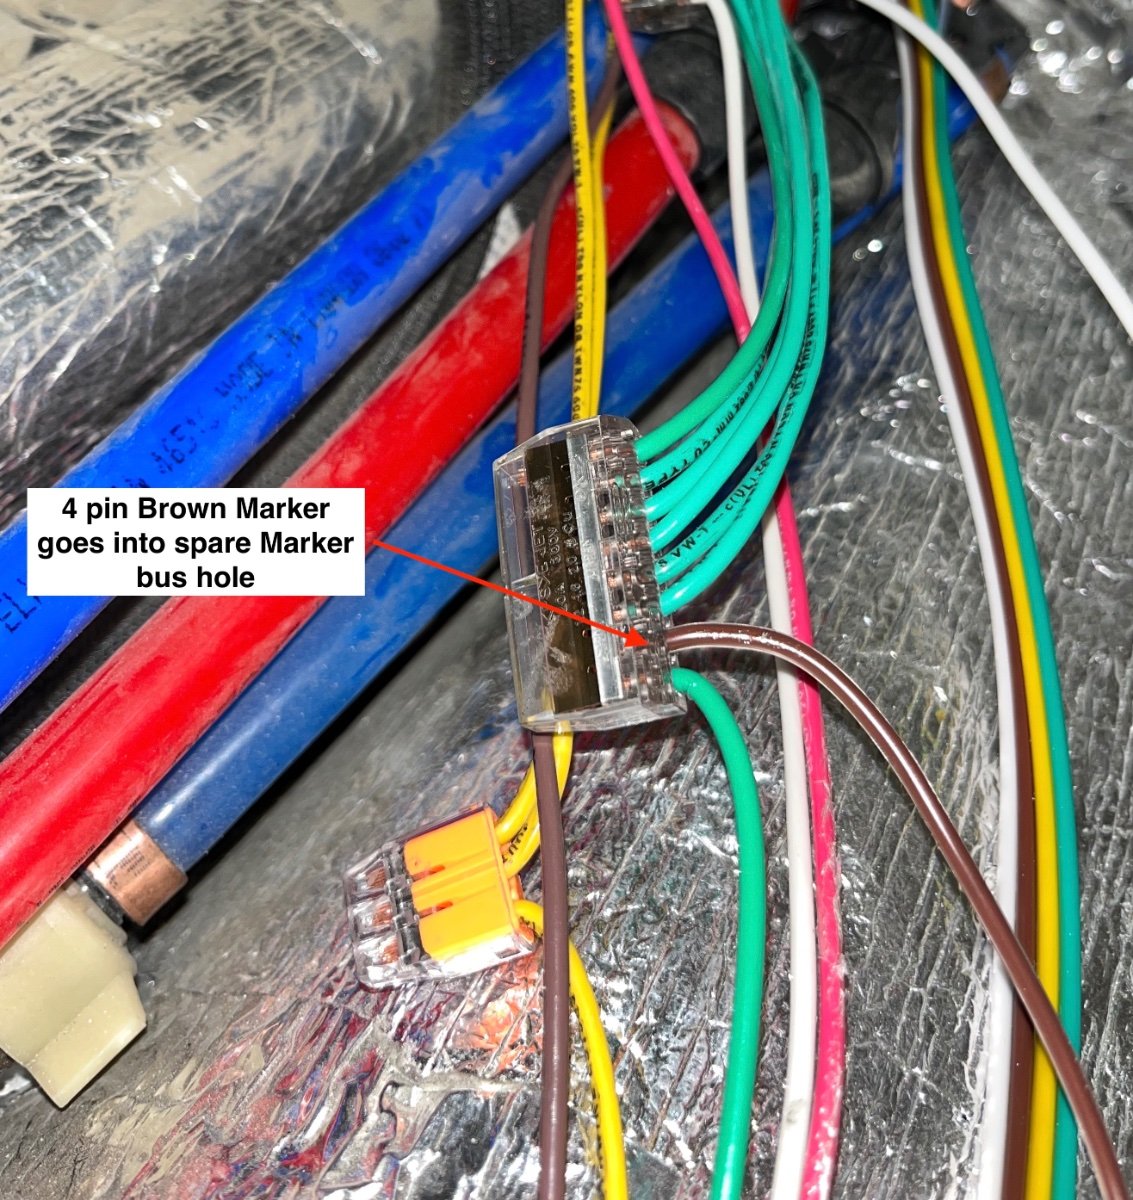
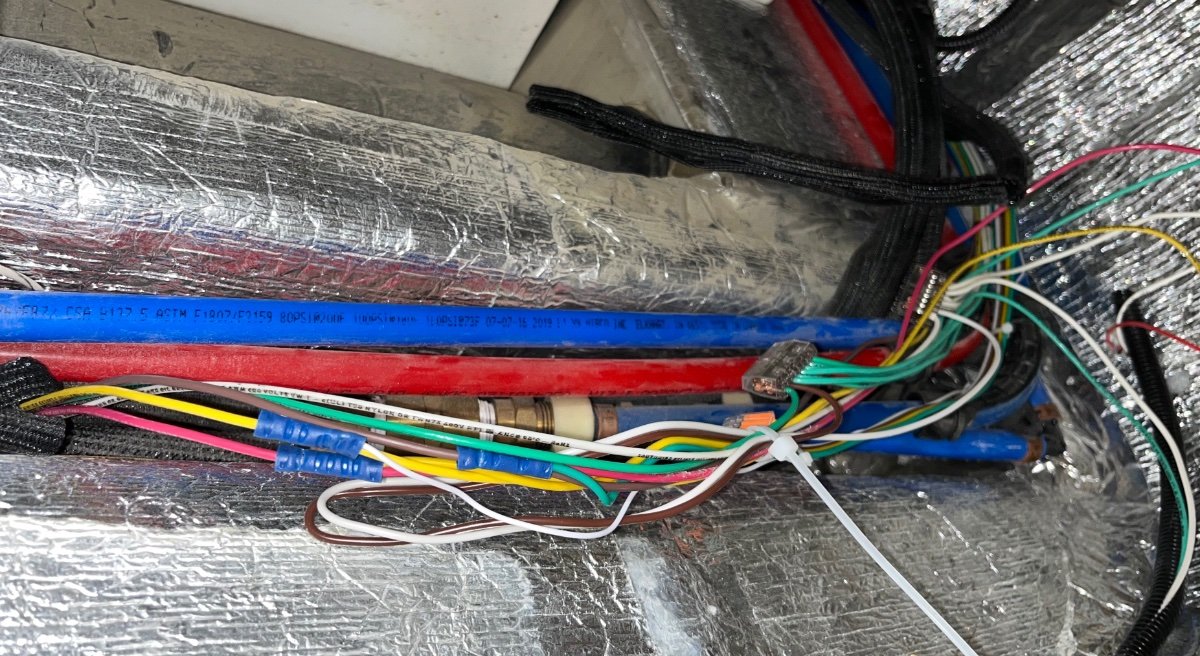
If you have blocked your tail and brake lights for some reason, with a big cargo box for example, you need to add aux lighting to be safe and legal. I added an LED light bar here: ... https://olivertraveltrailers.com/forums/topic/6848-how-to-add-a-full-width-led-light-bar-to-your-bike-rack-when-your-bike-blocks-the-trailer-lights/ The factory wires are easy enough to access underneath the rear cargo floor, near the side door, but the colors do NOT match "industry standard" color coding. Not even close. This is based on my 2017 LE2, yours may differ. Oliver stopped providing wiring diagrams a few years ago, please complain to Sales! I made this chart showing the differences. Why they did this is beyond comprehension. This is from the lightbar thread, it shows the CableClam in the exact location of the left round red reflector. Be VERY careful drilling holes here ... ... because directly on the other side there are water lines and electrical cables: To access the wires, remove the rubber floor sheet and the several tiny screws holding down the floor panel. Remove any cable ties, black electrical tape and peel away the protective split loom material. You will see some wire buses and also the two water ports and check valves. My two larger buses each had a free spot, so I could just strip the appropriate wire and push it into place. The other three wires had to be spliced directly into the Oliver wires. A little confusion here, the separate LED light bar Back Up wire was white, so it is important to keep track of the wire's purpose - function supersedes the actual color at all times! AFTER testing to make sure all your lights work .... OLIVER Bike Rack LED Light Bar Initial Test .... reinstall the split loom and secure everything well with nylon wire ties. Don't forget the big bundles that run along the back wall, mine were completely loose. Double check your lights to make sure they still work. Put the floor and rubber sheet back in. Go have a beer. I hope this helps. It is infuriating when colors do not match industry standards. ESPECIALLY IF YOUR TRAILER MANUAL HAS NO WIRING DIAGRAMS!!! John Davies Spokane WA
1 point
-
Well, she may be a "vintage" Oliver Elite with almost 140,000 miles, but she's had a NEW upgrade to her list of many, many improvements over the years. Following ScubaRX's template from 2017, with some minor modifications, the old tired drum brakes have been retired to the history bin and have been replaced with disk brakes. Woohooooooo . . . Took her for a test run today and I'm very pleased with the result. If anyone is near San Antonio and desires the same modification (5200 lb axles required) contact Ron at Boerne RV - Eight 30 - 8 one 6 - 388 three and he will take good care of you.
1 point
-
1 point
-
I went with a 12ft high x 14ft wide and it is 30 ft long. I really like the 14 ft wide, for being able to work on the Oli and it gives me extra width for getting backed into place (still working on the backing skills). The extra height is also nice to get up on top. I had enough room I could have gone 36ft long, and I wish I had. When I was going over things with the contractor he told me that for resale I should do a 14ft high opening, and max the length out. We had set a financial limit on what we could spend on Oli, truck, RV port/garage, and accessories to get going. When it comes down to it, we hope this house will be our last, and we will never go with bigger RV/Trailer. I had a GMC greyhound bus conversion many years ago which was fun, and it had lots of room and storage. Although it was to big to get in placing that I can get the Oli into. We really like the Oli trailer setup better, and I no longer have to take care of a towed vehicle. So my decision for the RV garage was right for me. My Children will have to worry about resale in the future, I hope to be to darn old to worry about it. What I do regret is that 10 years ago I built a 10ft high x 24ft wide x 36ft deep garage with 2 stalls . I wish I would have be more forward thinking and built a 40ft wide x 36ft deep with 12-14ft height with 3 stalls. I would have saved 1/2 of the cost of the RV garage doing it all at once, and had more room. Good luck with your decisions.1 point
-
The 2020 Ram 3500 lists a payload capacity of up to 7680 lbs., depending on configuration. It would be interesting to know what the GVWR sticker on that truck says...1 point
-
@Geronimo John Oh, it's real! Get a flashlight, and go stand next to the farthest tree out back. We'll chase 'em your way. 😉 But seriously, yes, this is how we do it all the time. Toss in entire ear of corn, and cook on high for four minutes times number of ears. Then chop off the stem end and squeeze the corn out from the other end. Almost no silk left, and perfect every time. As you've likely figured already, serving more than a few ears takes considerable time. You can cheat a little, cooking six ears 20 minutes, but not a lot less. More than that, we report to traditional boiling. This was the guy that became famous for figuring it out.1 point
-
https://megagaragehomes.com/rv-garage-dimensions-cheat-sheet/ John Davies Spokane WA
1 point
-
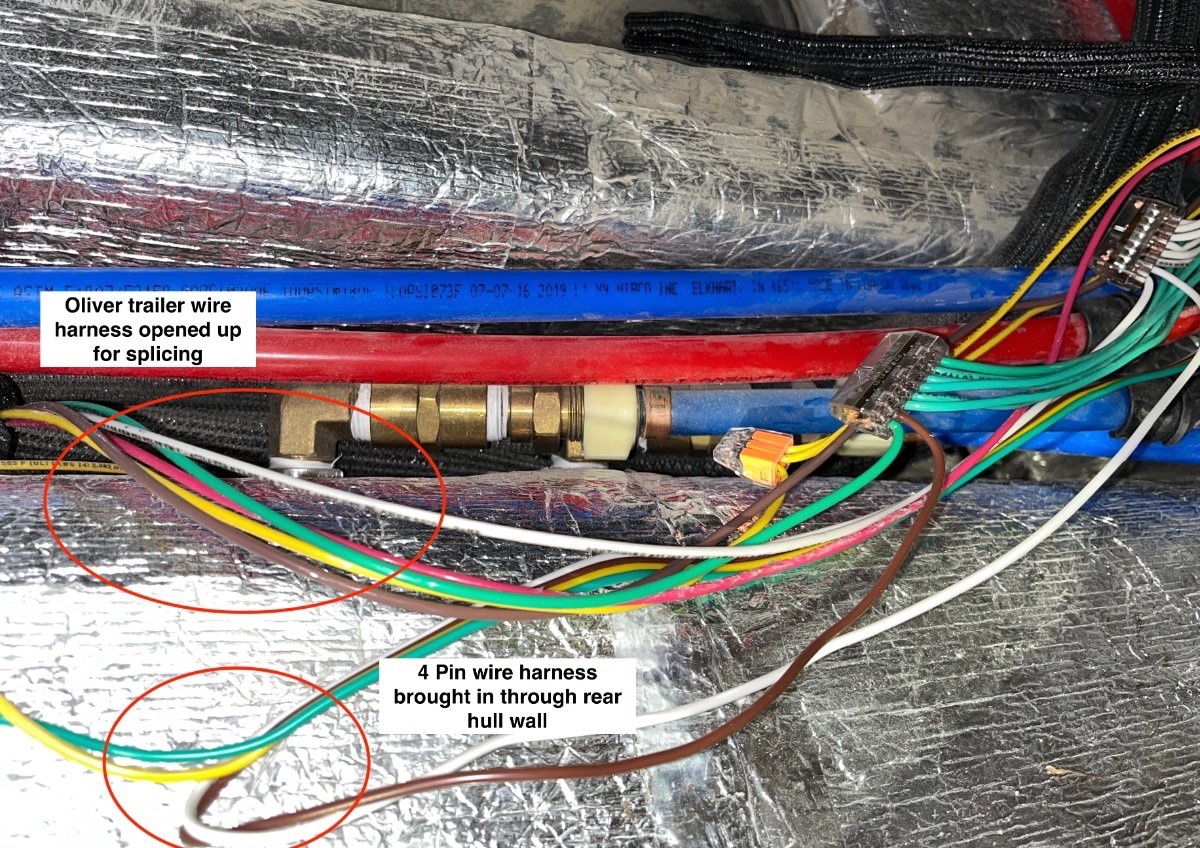
Speak and ye shall receive … Merry Christmas. https://olivertraveltrailers.com/forums/topic/6892-how-to-connect-a-standard-sae-4-pin-harness-or-4-pin-with-backup-lights-to-your-oliver-factory-7-pin-wires/ Warning - the color coding may be different in your brand new trailer. An extra strong warning - do NOT cut open the light bar harness itself!!! The wires inside mine were incredibly tiny and treacherous to splice, maybe 30 AWG. My light bar works great. It is a very cool and sexy mod, even with nothing on the rack. John Davies Spokane WS
1 point
-
Thank you Frank and Topgun2, your answers helped.1 point
-
USAA/Progressive1 point
-
When cooking for a small herd, I make them my Geronimo John International Cowboy Special: Pan fry well several cans of diced low sodium Spam with just a bit of butter. Drain well. Dice many pounds of potatoes and pan fry a bit crisp with some olive oil. Salt and Pepper. Mix Spam and Spuds in skillet and get it hot. Whip raw eggs and mix into hot skillet with the above. Mix some while cooking. Add lots of cheese, Pace Picante Sauce, and some sour cream on top. Then sprinkle Tabasco (Depending on the crowd: If children, about two drops. If Texan, a lot. If Cajun all you have!) You don't know how many times I have been asked where I got the delicious ham I used. Seriously.1 point
-
Correct! When temperatures are satisfied too quickly, the compressor ceases removing humidity. Charlie1 point
-
The attic and the storage compartment above the rear window are one in the same thing. Not being familiar with your Ollie - mine is a bunch older - are you sure that you're not confusing the little switch on the cable antenna booster box? The cable not connected to anything is most likely the other end of the satellite cable and is used to connect to a satellite decoder box. Bill1 point
-
On our Ollie, that cable in the attic comes directly from the external “satellite” port on the outer hull. It is for connecting an external portable satellite antenna to a satellite receiver that you would locate in the attic. The external “cable” port on the outer hull goes directly to the TV. The switch you mentioned that other owners have is part of the optional TV antenna package that Oliver offers as an extra cost upgrade. If you didn’t get the optional TV antenna package you won’t have that switch.1 point
-
Progressive1 point
-
People don't get hurt (as badly) with fiberglass poles. We made sure every metal pile/rod had a plastic cap, every day, building our home. At our camping property, we use pvc poles, to line the driveway bad parts. The Japanese vehicle jet linked is actually pretty cool.1 point
-
I think a big part of the humidity issues some are having is that most units are oversized for the volume of airspace being conditioned, especially when that airspace is well insulated like our Ollie's are. In high humidity conditions temps are knocked down quickly (but the humidity is not) which results in short cycling of the unit. The humidity issue is made worse by setting the fan to the "on" position since once the compressor shuts down any moisture still on the evaporator coil will be sent directly back into the living space as vapor and will not have the time to drain to the outside as intended. We have an older Coleman 9.2k unit and have no such issues with humidity even though we do all of our camping here in Florida where it's almost always hot and humid. We usually set the thermostat to around 70 and the fan to "auto-low" which pretty much keeps the unit running non-stop and humidity at 50% or below. Not sure if these Houghton's have an "auto-low" setting, but I highly recommend using that setting in high humidity conditions. Might also be a good idea to contact the manufacturer to see if the fan's CFM (cubic feet per minute) is adjustable as it is in residential AC units. A lower fan speed would help remove more humidity by increasing the run time of the compressor.1 point
-
Giant tom thumb donuts.... Interesting1 point
-
Dessert: Campfire Banana Boats! So many variations, always so good.😋
1 point
-
Fresh trout salad if I am near a trout stream…amazing.
1 point


.thumb.jpg.e34bf01ef7f7d5e99ad31856d45afbeb.jpg)


-
Recent Achievements
-
")


")


")

