Leaderboard


Popular Content
Showing content with the highest reputation on 09/17/2024 in Posts
-
I've attached a simplified electrical schematic for my 2021 Oliver Legacy Elite II. This schematic will be "basically correct" for most Oliver models. The numbering and amperage ratings shown for the breakers and fuses matches the numbering scheme in my Oliver Owner's Manual. I made this diagram because my Zamp solar charge controller stopped charging the house battery, and I couldn't find a good electrical diagram online, and the Oliver Owner's Manual didn't provide a decent line drawing. So, I made this one. (my specific Zamp issue turned out to be caused by a badly corroded terminal on breaker B1 ... which by the way, any auto parts store will have a replacement for this thermal-type breaker). I also realized I didn't understand how the AC and DC systems work together, so I made a single diagram showing both systems. Often a simple diagram can be used to trace a myriad of symptoms back to a common component such as a breaker, fuse, or even the house battery. Or, to answer a simple question like "why does the inverter run when I'm connected to shore power"? (the answer is, it has to because the inverter is supplying power to the 25A sub-main that feeds all your AC loads except the refrigerator! And the inverter gets its power either from the house battery, or from shore power, or from the aux (generator) input). I hope people find this schematic to be helpful. OliverSimpleElectricalv2.pdf5 points
-
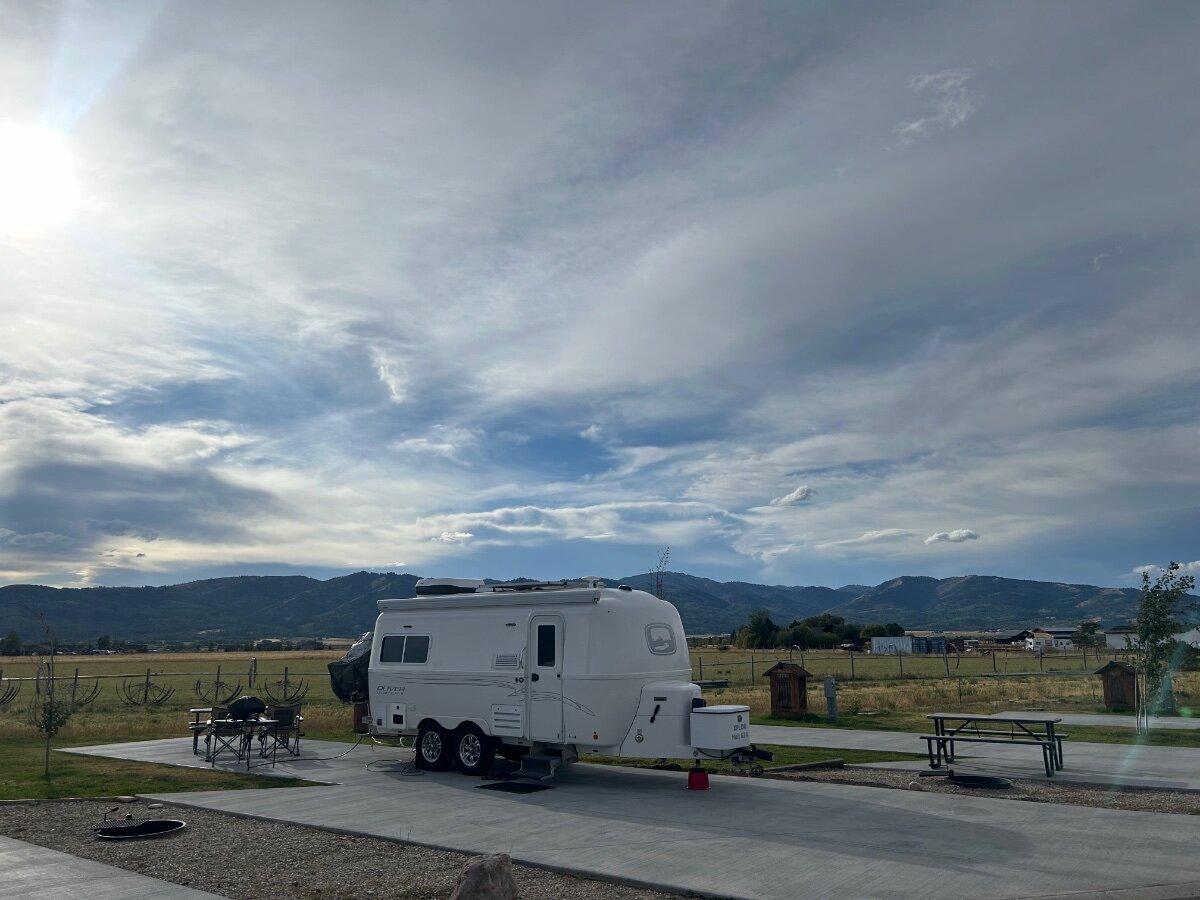
After a great nights rest at Teton Valley Resort here in Idaho, this morning we headed up to the Grand Tetons. Such a beautiful NP! We really enjoyed the scenic drive over Teton Pass. Soooo glad we have the diesel engine brake, as I rarely used our truck brakes at all. Ford nailed it with the 6.7 10 speed and diesel engine brake. After hiking up and around Jenny Lake a few hours we headed into Jackson Hole for lunch and of course hit a few T shirt shops and just walk around town. We walked into the Million Dollar Saloon which was kind of neat to see. We landed for lunch at place called “Hatch” Needless to say after a light breakfast we were both ravenous and the food was really fresh and delicious. We have 3 more nights here and plan to spend a lot more time touring and hiking in the Tetons before heading to Yellowstone. The temps are perfect! No AC needed at night as our low this morning was 49 and mid 70’s during the day. As you can tell by the park road entrance pic, it was not very crowded when we arrived, which is just the way we like it. Cheers and Safe Travels! Teton Valley Resort…nice digs and we are enjoying our stay here. It’s not very busy at all. The kinda road we like to see inside a NP. Less crowds, less people, less traffic on the road less traveled. We really enjoyed the cooler temps while hiking around Jenny Lake. Lunch at the Hatch… wow factor for the foodies we are. We were both hungry after our morning hike. The Elk Antler Arch… Our Beast of Burden doing Tremor things… The Beautiful Tetons are really amazing.
 5 points
 -
This won't be helpful for anyone with an OE I but on used pricing for the OE II, here is a plot of asking prices since early 2023, mostly from RV Trader. I stopped updating this about 2 months ago after we bought ours. FWIW.
3 points
-
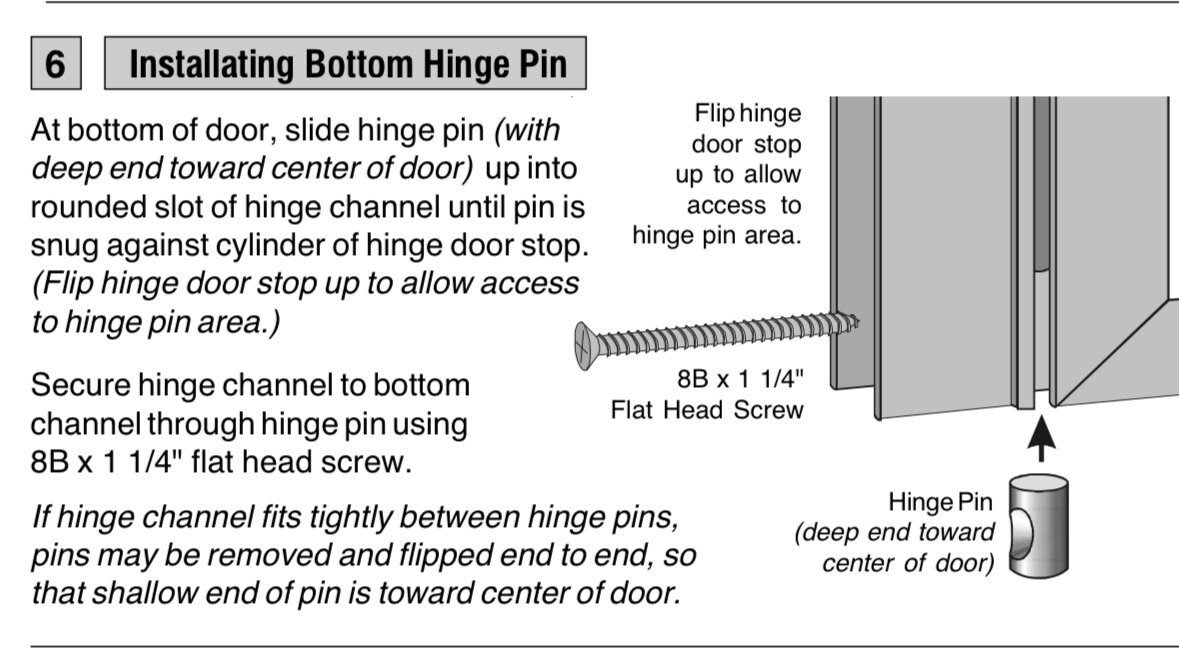
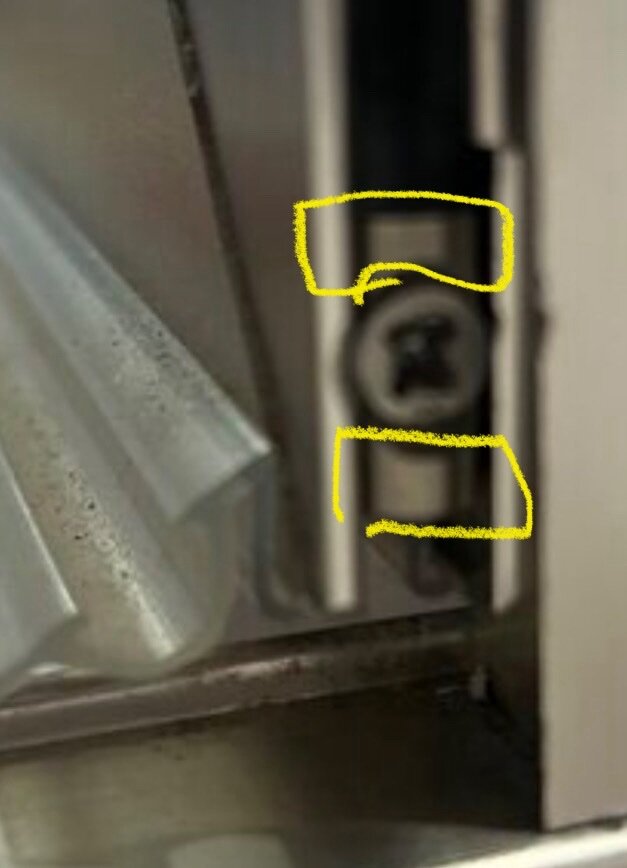
From the company that makes the door: KstlKD_HingePin_982.pdf Excerpt below of bottom. It appears my hinge pins have worn away the silencers sleeve so it now drops the door down. once I get confirmation of what’s happening I’ll update. craig
3 points
-
Three of the six Olivers in attendance at the 2024 Ohio Fall Annual Egg Rally, held at Cowan Lake State Park, in southwest Ohio. @Ollie-Haus @csevel Matt & Sue Jones, Deb and me, the folks with the micro-truck at the Oliver Rally, who I've *again* forgotten their name, and an unknown E1 that pulled in but was not found while riding around. Plus a couple who spent about an hour looking at our trailer and talking to Claudia, who have found a 2019 EII and are considering buying it. A fun time, and beautiful weather.
3 points
-
I just installed the Beech Lane Leveling system on our OLEll and it really works well and actually has exceeded my expectations. Having used it each time on this western loop we are on, it has been spot on every time. Not bad for $80 and about a 10 minute install. Just my field experience so far. A big Congrats on your 2025 order! I would highly recommend the factory tour.3 points
-
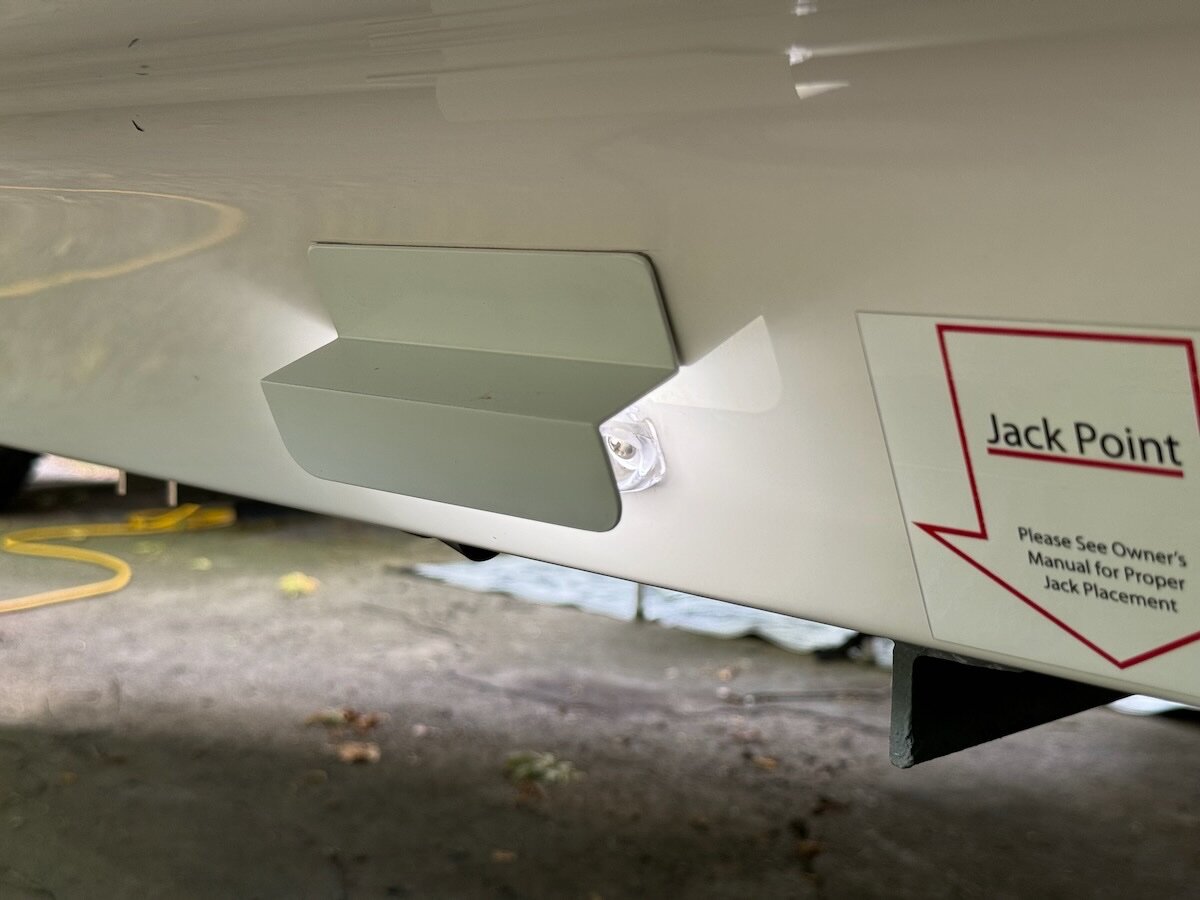
sorry to "pop" the bubble, but while many of us indeed DO use our three jacks to level (or even jack up one side to get the tires off the ground), Oliver advises against using them for anything other than stabilizing. Therefore, if you want to level the trailer you can use products like Beech or Andersen levelers (there are several very similar systems on the market, or a product affectionally know as "legos" stacking blocks or even assorted thicknesses of wood that (similar to the "legos") are simply placed under each tire on the side you are trying to raise until you get the trailer level. For the purposes of leveling the trailer (side to side) there is no need to really understand the suspension system. Just make sure that whatever you do to one tire on the side you are trying to level, you do the same to the other tire. Bill p.s. if you travel alone a reasonable amount of the time, levelers like the Andersens or Beech are well worth the price.3 points
-
Received this PDF from Progressive Dynamics. Thought I would post it here for anyone's interest. News to me that when calculating wire length, the combined length of the positive and negative leads must be added together. Dave Wire-Guage-for-Lithium-Charging.pdf2 points
-
Pricing used older Oliver’s should be pretty straight forward. When we ordered ours in 2015 the base price was $46K-ish. With options (not as many available as today) ours was just over $50K. That’s where I would start if/when I decide to sell. I would add some for the lithium upgrade and a few other mods that have been done. Factor in the age of tires and general condition of the trailer and you might add or subtract some. For example, ours has a new inverter, new shocks, springs, bearings brakes and tires, and a fairly recent ceramic coating. Those are all adds. In other words, I’d want what I’ve put into it and it would still be a bargain for someone interested in a used trailer. Mike2 points
-
Yep. How old are your AGM batteries? The symptoms you describe are consistent with dead batteries. Have you verified voltage directly on the battery terminals with a multimeter? If not, this is a good time to buy a decent quality multimeter and learn how to use it to check DC voltage. I have had good luck with Kleins: https://www.amazon.com/Klein-Tools-MM325-Multimeter-Manual-Ranging/dp/B0B57L9FNL/ref=sr_1_3?dib=eyJ2IjoiMSJ9.61XKRl89-3qY_jOJ1tlRT6tFtXNi8iiTpXqgzJqMZsrq7RzLpFwfoWRgEHYrZp8penyQEogP6kuBaZthL2fdJqqzGaPZUGzR4Ve04WpsxcPqWYRXosVndFIsRAyHUEfeWwL2wFYskycszgVtiIZzkz10nH_v2yqeby4RP-ofXUq1_amtpf375sJDuy6KSDEZA3IShhRIX0z0PPh9ONsoOL32aw9119j9kyiVMmCjXJksbjlqQs6LxNXerLk8LHfRdd_4gJTGyRX2_9tTVMGDmBpCQP2MtLlTKd0NF4x6DpU.At0pL72QN-091RMJyRyQ4TbKFEcmWWFbNvncC9xG1qA&dib_tag=se&hvadid=580671312857&hvdev=c&hvlocphy=9029558&hvnetw=g&hvqmt=e&hvrand=7645837832001151333&hvtargid=kwd-29526678819&hydadcr=8432_13498106&keywords=klein%2Bmultimeter&qid=1726585739&sr=8-3&th=1 "Healthy" 12 volt AGMs should read at least 13V after charging. Any reading after recharge below 13V indicates a dead, or dying, AGM battery. If your AGMs are dead, I recommend you invest the time now to get educated about the pros and cons, including cost, of switching to Lithium Iron Phosphate (LiFePO4) going forward vs. buying a new set of AGMs. Since you boondock (like we do), if you plan to keep your Oliver for at least another 5 years, I believe the upgrade to LiFePO4 would pay off long term. The initial investment in Lithium batteries (and other components of a retrofit) is much higher, but they last at least twice as long and provide more usable 12V power per amp hour than AGMs. This long string may provide a helpful starting point: Good luck!2 points
-
The Beech Lane and Anderson brands of levelers look to be the same in appearance and design other than in color, black and red, respectively. Although there is a diverse selection of levelers available, this tear drop ramp-type leveler pairs well with OTTs, especially when used in conjunction with a cell phone app leveling systems as @Patriot and @jd1923 refer. Reason being these systems will indicate if leveling adjustment needs to occur side-to-side, then the leveling ramp(s) can be positioned on the side to be raised and vehicle driven onto them until level according to the app. Set the TV emergency brake, position the wedge(s) of these setups, detach trailer, complete front-to-back leveling per the app utilizing the forward stabilizing jack.2 points
-
Sitting on our deck, having’ a drink before dinner, our Oliver some 60 ft away, and “Honey she’s still level!” 🤣
2 points
-
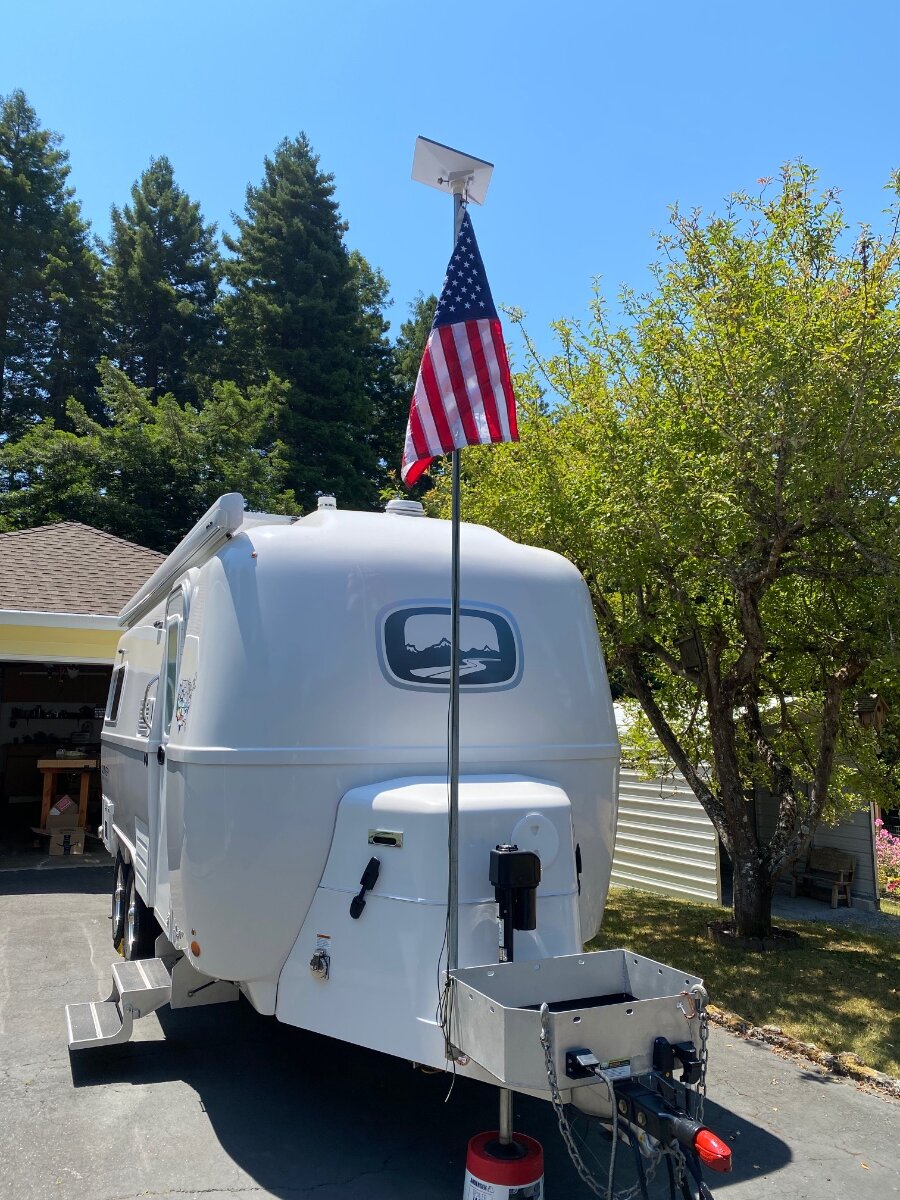
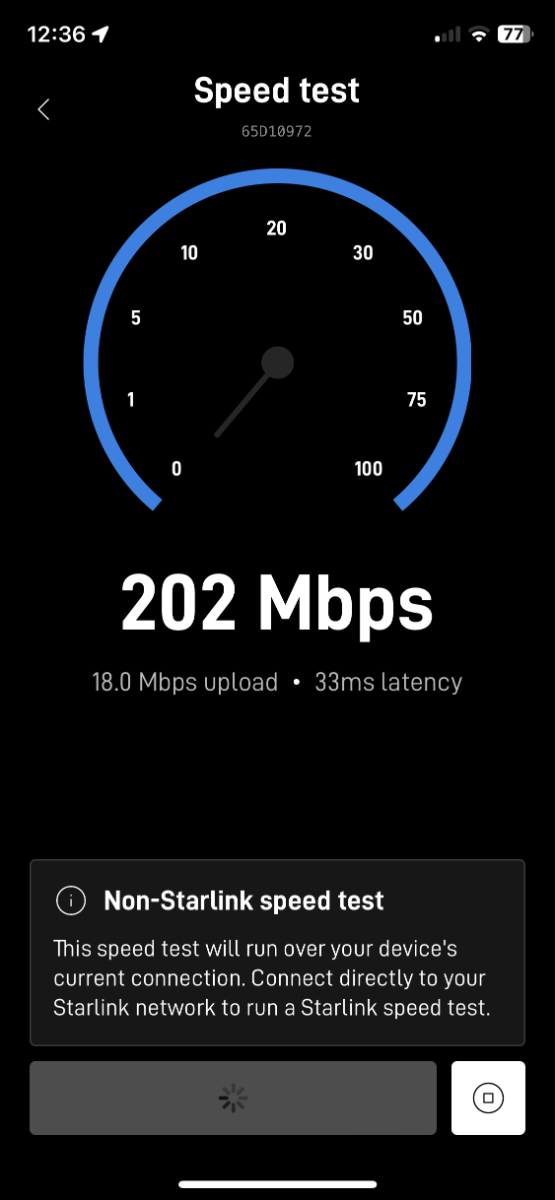
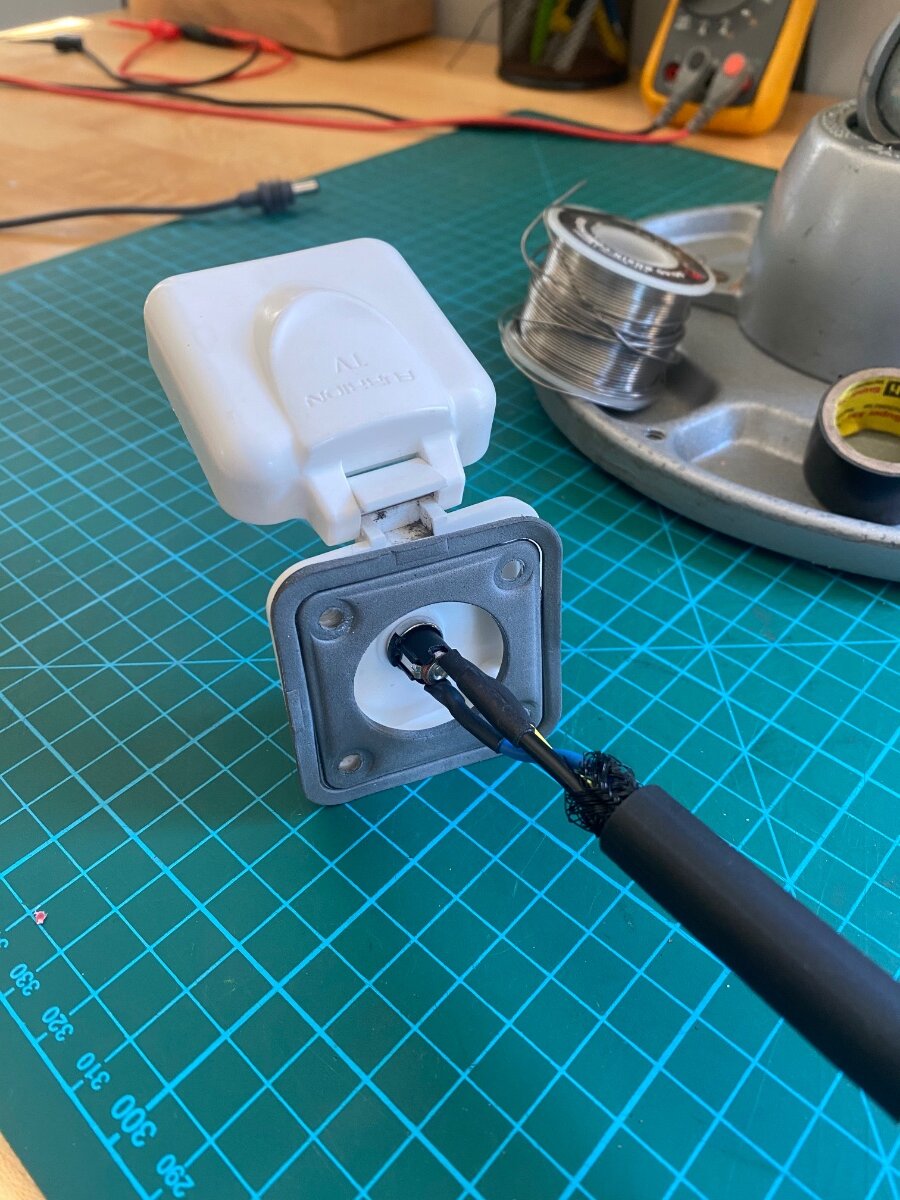
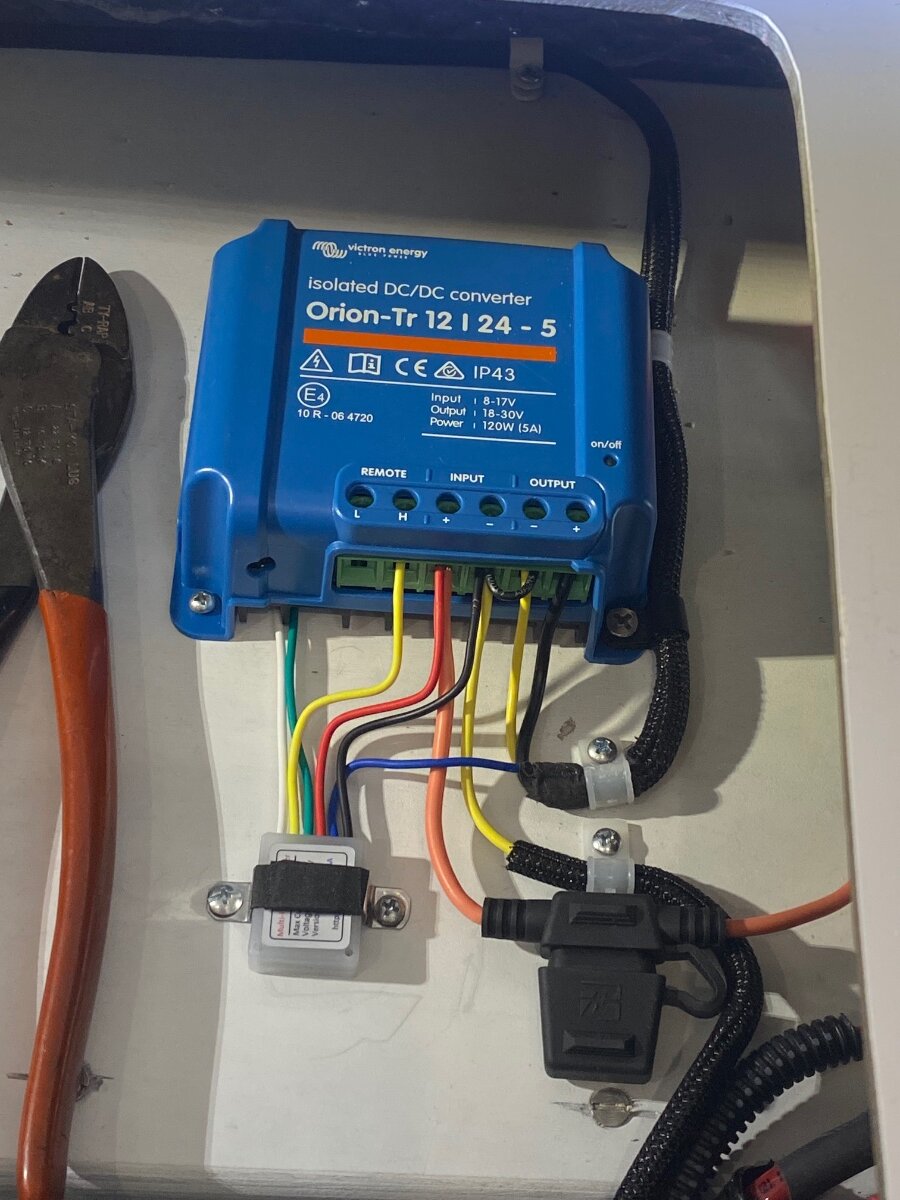
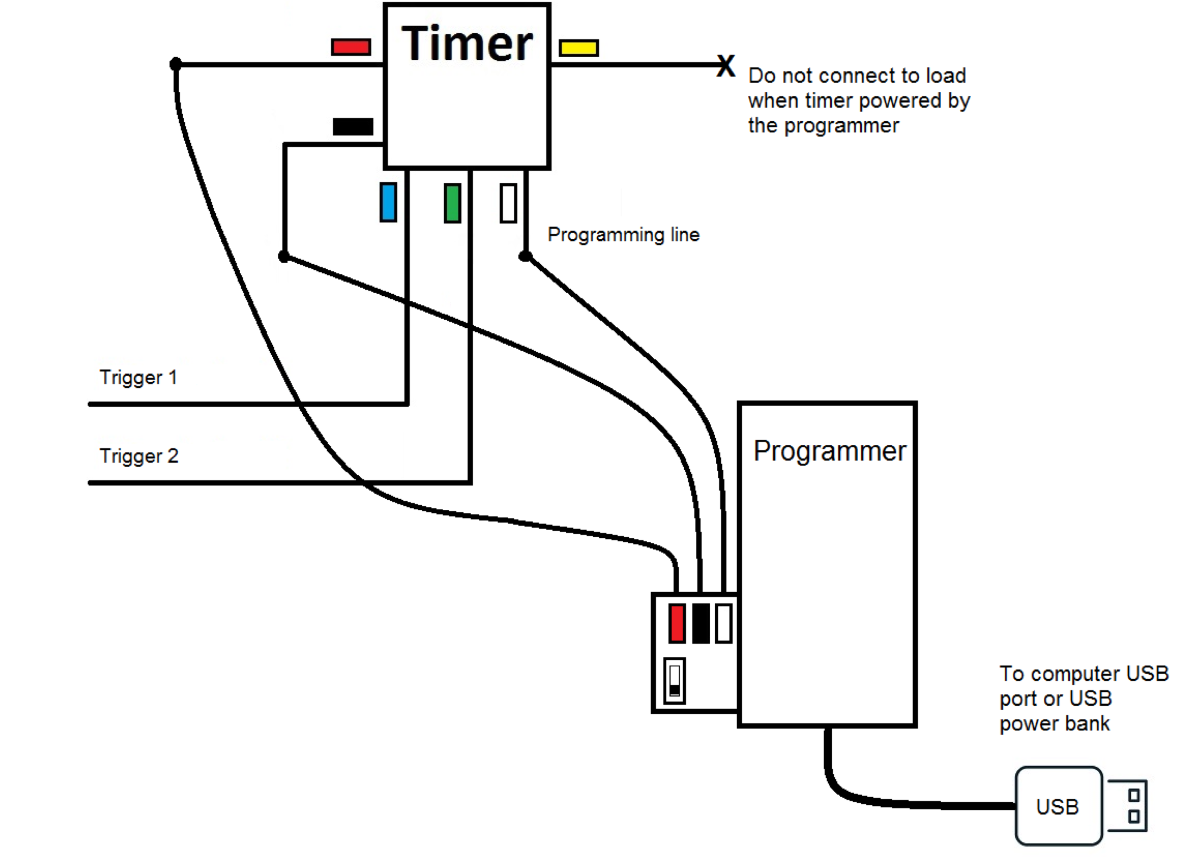
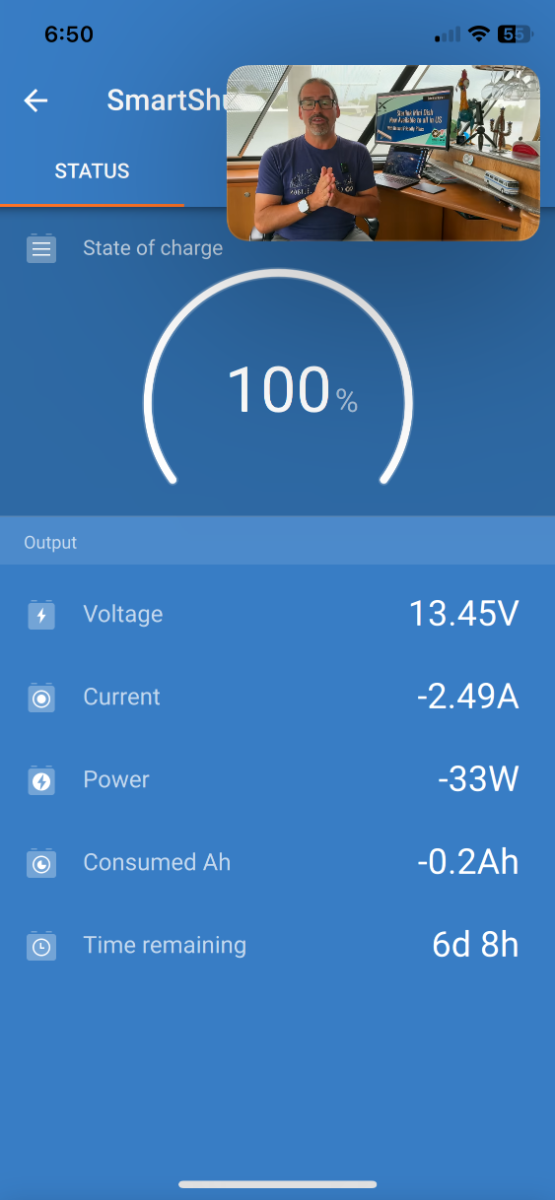
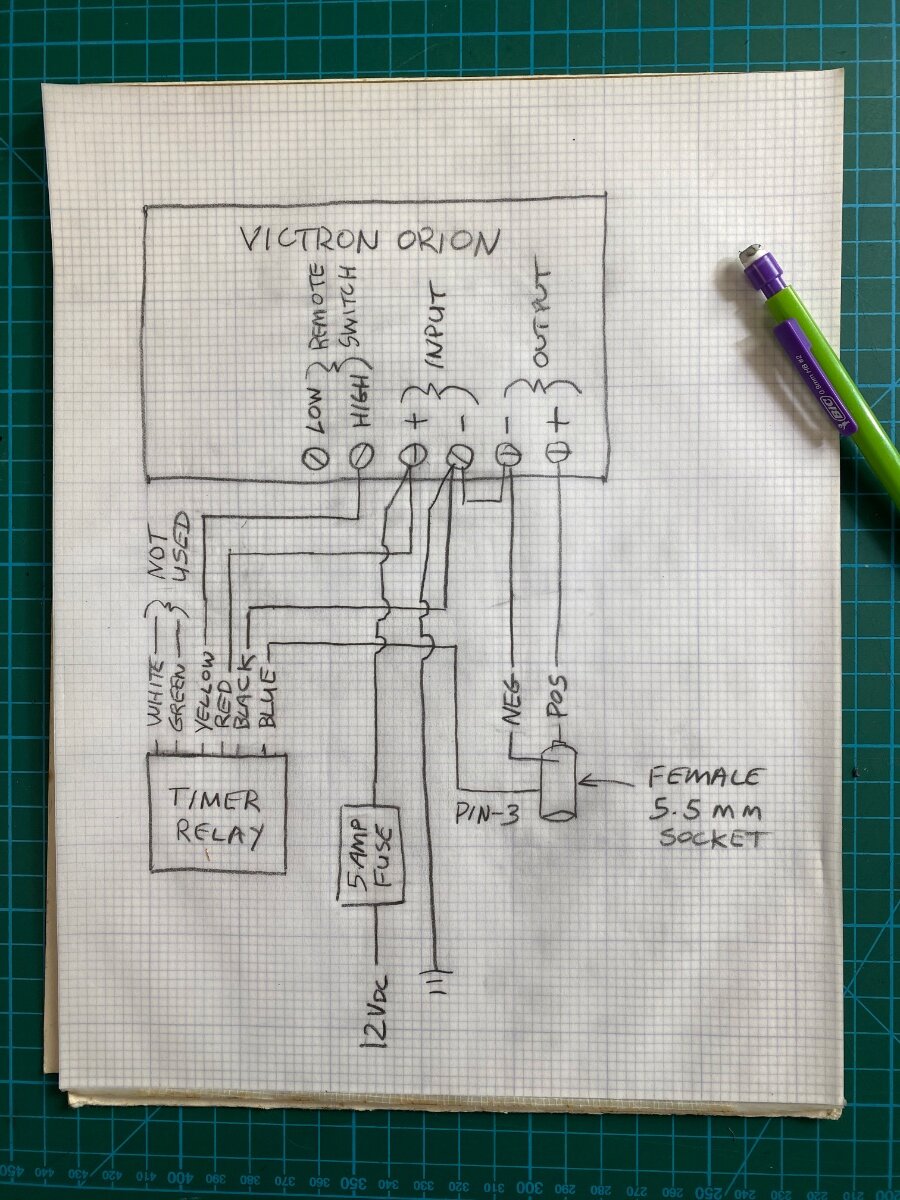
After lugging around my old heavy Gen-1 Starlink for a few years, I was thrilled to get the new Starlink Mini. It’s small and light, and the router is built into the dishy. It speed tested at 202 Mbps, a very respectable speed, although not as fast as the Gen-3 which typically runs over 300 Mbps. The Mini comes with a 50’ x ~1/8” diameter power cord that has 5.5 mm barrel connectors on each end. It also comes with a 120 volt AC wall transformer that puts out 30 volts dc (vdc.) The Mini is rated to run on 12 to 48 volts vdc, and 25 to 40 watts. It peaks at 60 watts with snow melt on. The 12 Vdc rating is an attractive feature, particularly for Boondockers who don’t have inverters. However, when I first hooked it up to the Oliver’s 12 Vdc battery… it would’t work?? After some investigation, it turns out that it’s not so simple and I’ll try to explain why: Given that the AC transformer puts out 30 volts, and the power is about 40 watts, then it would be drawing 1.3 amps per Ohms law (40w/30v = 1.3 amps.) With the same calculation at 12 volts, the amperage increases to 3.3 amps. The resistance of the long thin power cord can’t handle this higher amperage and the resulting voltage drop puts it below the minimum 12 volts operating range. In fact, I did some bench testing and found it would only work at voltages over 18 volts. There are solutions to this issue including cutting the cable shorter, using a larger gauge cable, or increasing the voltage. Without a better option, I chose to increase the voltage. I looked at cheapie power converters that would probably work, but I wanted something more robust and higher quality. I found a Victron Orion TR 12/24-5, isolated, DC to DC Converter, and it was perfect for the job. It has a 12 Vdc (+/-) input and an adjustable output of 20 to 30 Vdc at 5 amps. Standby power is under 80 mA, and it has remote on/off switching capability. It comes factory set at 24 Vdc, but I adjusted it to 30 Vdc output with the potentiometer on the front. To connect the Mini to the trailer’s 12 Vdc power system, I installed a 5.5 mm female panel mount socket into the Satellite TV inlet. I removed the Coax connector and the 5.5 mm socket and nut fits perfectly in it’s place. Oliver conveniently labeled it “Satellite.” If you need the satellite TV, then install a third “Furrion” inlet as I did for my old starlink RJ45 connector. I mounted the Victron under the rear seat on the street side. The socket wiring was sheathed and routed along the ceiling of the outside storage garage. There are a number of options to pick-up 12 volts in that area, I took power off one of the circuit breakers. I ran the negative wire to the ground bus under the rear dinette seat. The Mini comes with both a snap-in kick-stand and a 2” pole mount, and they’re both necessary for optimum RV use. I prefer having it on a pole, but we often have to move the dishy away from the trailer for a clear sky view. That’s why it’s a bad idea to shorten the cord. It also has an RJ45 port that I suppose is for hardwiring without WIFI, but I probably won’t ever use that feature. I built-up some PVC fittings on my 10’ Electrical Metallic Tubing (EMT) mast to fit the Mini’s pole adapter. (See the post for Tacky Starlink Dishy Mast). A little sanding was involved, and the starlink mount uses a thumb screw to hold it in place. It’s better to turn the Victron off when not in use, so I recommend using the remote switching feature with a switch installed in an easily accessible location. I’m too forgetful to switch the Victron off every time, so I came up with a way to turn it on & off when the Mini’s power cord is plugged in & out. Read on if your interested in that part of the installation: The “three pin” 5.5 mm female socket sold by Amazon has a built-in switch that’s designed for appliances that use either batteries or a 120v transformer supply. When the transformer is plugged in, the pin-3 switch opens to disconnect the batteries. This is opposite of what’s needed for the Victron remote switch, but it can be used to trigger a digital relay and it’s actually easier than it sounds. Amazon carries fun little programable 5 &10 amp timer/relays for under $20. I already had the 10 amp version in the Oliver for a hot water recirculation pump timer, and it works great! The 5 amp is adequate for this application, and you will also need the $20 dollar re-usable Bluetooth programer. They use 50 μA of idle current, which is nothing, and they can be programed for delay-on, delay-off, flashers, dimmers, duck decoys, and more. But for our application, we’re just interested in the trigger functions, specifically the “ground-open” trigger. Before installation, the relay has to be programed from a smart phone or computer. It’ links by WiFi to flash the program into the relays memory. Use wire nuts to connect the timer and programer together, and power them from a USB port. Follow the well written and simple programing instructions using the settings shown in the screenshot below. The relay requires a timing function, so I arbitrarily used function #12, which is “delay-on.” I set it randomly to 1.5 seconds. The trigger is programed to use the “Trig Blue” set at #5, which corresponds to the blue wire used as a “grounded trigger.” The green wire trigger is disabled. My wiring sketch shows that the timer is powered with 12 volts from the Victron’s positive and negative inputs. The relay’s yellow output wire feeds the positive side of the Victron’s remote switch (the negative side is not connected). The Victron’s output feeds the 5.5 mm power socket, and the blue trigger wire goes to the 5.5mm socket’s pin-3. Use a continuity tester to identify pin-3, it’s normally shorted to the negative lead of the socket and it “opens” when the male connecter is plugged in. The socket barrel is negative, or ground, and the center pin is positive 12 vdc. There is one other step to make this work. This Victron model is “Isolated,” meaning that the input and output “negative” terminals are isolated from each other. It needs to be “non-isolated” because the timer is grounded to the Victron input, and the socket is grounded to the output, and the trigger needs continuity between the two. So remove the jumper wire that comes on the Victron’s remote switch, and use it to jump across the two negative terminals. Victron support confirmed that shorting the grounds is not a problem, it just un-isolates it. This works satisfyingly well! I checked out the power draw with the solar turned off, and while streaming a video. It was 2 amps, 27 watts (after subtracting the parasite load). That’s a huge improvement over my previous Starlink, and I don’t have to worry about running the inverter and draining down the batteries anymore. I hope someone finds this useful Cheers! Geoff
1 point
-
This doesn't solve the problem. But this past weekend, I got to see the modification that @Ollie-Haus made on his 2023. It is a 5"+ length of 1x1x1 aluminum Z-bar, painted white, and adhered to the trailer with double-sided tape. https://www.mcmaster.com/7062T15/ I'm going to do the same, but before mounting the shield, I will cover the lens with amber Lamin-X film (that I bought before getting the trailer but have yet to apply...) It makes a huge difference, and even while still a cool white, it is less objectionable than just covered with Lamin-X like the trailer beside us had. It was great to compare the two, which is what convinced me to do both!
1 point
-
John, hoping this will help, error code 20 is covered here.1 point
-
Yes, it appears so. Just added. It also appears in the pic's as though the Phillip's Head driver 'spun' in the screw head during the install...
1 point
-
Thanks @Patriot In my door those pieces above and below the screw (in yellow area on your pix) are missing. tried loosening, lifting and tightening to no avail. I think something fell off or wore away
1 point
-
I concur with Ronbrink's advice. We use the Rophor system, which has worked well for us for the past two years, and is less expensive than some competitive products: https://www.amazon.com/Rophor-Leveler-Version-Leveling-Non-Slip/dp/B09NJSXRRB/ref=asc_df_B09NJSXRRB/?tag=hyprod-20&linkCode=df0&hvadid=693330410595&hvpos=&hvnetw=g&hvrand=15739391212809512128&hvpone=&hvptwo=&hvqmt=&hvdev=c&hvdvcmdl=&hvlocint=&hvlocphy=9029558&hvtargid=pla-1637492471943&psc=1&mcid=8b6eff5b433a3cedbac02e4e81b209a91 point
-
@Snackchaser My LE2 #193 has a breaker/switch panel in the attic/rear overhead cabinet. It is a sub panel that that controls all of the 12V DC circuits above the belly band. Does your Ollie have such a panel? Mossey1 point
-
I stand corrected then. All the brand name WAGO connectors I've ever seen had it printed on the levers. They DO have a strong spring. You don't want your thumbnail under it when it unexpectedly comes down.1 point
-
In his usual style of excellent service, Jason Essary has already answered my email to him from this afternoon. Here is what he had to say: "I don't have exact information on it but I would say that it has 5k springs. Jim typically as soon as one of his units was built had 5,000lb axles and springs ordered for it. I would guess that it is just the same Dexter axles because that's what we did on his 2017 model. He typically always loaded his units up with extra stuff that made them extremely heavy." I'd add to this that Mr. Oliver did this because he thought that if he or his family might like a particular or product in/on the trailer then we (present and future owners of the Oliver Travel Trailer) might like it too. For instance - the counter tops and spice rack that are in the pictures I recently posted are actually made of a product called Corian. It looks a lot like Oliver's fiber granite but it is much heavier. He and a few other early buyers of these fine trailers did a bunch of the early "testing" of the basic products we all now enjoy. Bill1 point
-
We have the Anderson levelers and they work great!1 point
-
I would buy a new 50A Bussman breaker (check PD manual for correct breaker amperage) between the new charger and the batteries on the new 4 AWG B+ Red cable. You can add a bus or merely connect the current 6 AWG wire to either end of your new 4 AWG cable (at battery or charger) to the current 40A busman which feeds all DC fuses, fuses for stabilizer jacks etc. This way the 50A breaker governs the charging only and the original 40A breaker governs 12VDC use in the trailer. If you need more help, post pics. I used our 40A Bussman as described above and I have additional breakers for each solar charger. Note when wiring, the breakers are marked battery and load sides. OTT had some wired backwards in our hull.1 point
-
Does "everything fine" when plugged into shore power mean both 12 volt DC and 120 volt AC are working? What goes crazy when unplugged? Since you were boondocking for 9 days, then you were running on your batteries. What was the state of charge from day to day? There are a lot of helpful and experienced folks on this forum. Someone is bound to respond if you provide additional details about your coach (type of batteries and inverter/charger) and the troubleshooting steps you've already tried.1 point
-
I happened to find our Ollie on CraigsList but saw several good leads on RVTrader. I had alerts set up on both sites for several months so I had a good idea of what the typical asking prices were, how quickly they sold and could also see when the prices were reduced. We sold our Minnie Winnie through RVTrader in just 2 weeks, but it's a little pricey, CraigsList is free. There are a lot of on-line scammers out there, just be careful to only deal with someone that you can actually meet in person. Good luck!1 point
-
I'll send an email to Jason Essary to see if he can add any information on this subject. With all due respect to Scott Oliver, I don't think he would necessarily know the details. Bill1 point
-
Unfortunately, but, understandably, the classified section was removed when Oliver started having "dealerships". Simply put - the dealers didn't want Oliver to be in "competition" with them for selling any Oliver trailers. And, Oliver didn't want its dealers to think that the factory was trying anything "fishy". However, it sure would be nice to have the classifieds back on the Forum for all other things related to camping and even "used" Oliver accessories. If the members of this Forum would send an email to either (or both) Rodney Lomax and/or Scott Oliver, there is a chance that we could get it back (of course with the exception of selling used Olivers). Bill1 point
-
Thank you! (Even though I hate Facebook)1 point
-
Hello to the Oliver I spotted on September 9th, heading west on I-90 toward Spearfish SD -- I was heading east. I've been on the road for five months and this was the first Oliver I've seen this year!1 point
-
That is true. During one of the calls I was presenting and it worked great. Again it all depends on the speeds you happen to be getting. But then again I have the same issue at home sometimes. This morning working from the camp spot speeds are good. Upload is for sure slower but 15 Mbps up with 22ms latency will work. On my plan Starlink can throttle me though so your mileage may vary.
1 point
-
My bet is we were with an Oliver ha! 😝1 point
-
It doesn't look like you were the first ones to ever enjoy that spot. Certainly the lack of humans is one of my favorite things when it comes to Wyoming, Idaho and Montana. Lots of places like this to enjoy. Looks like great weather too with no smoke haze. Bill1 point
-
Ollie in the Wild. Three days here at Steinaker SP in Vernal, Utah site #7 FHU site, and a gem of a place to stay. There is a local Walmart in Vernal for resupply. ✅Today we are off to check out and hike around the dinosaur national monument. Thanks to our SL mini and excellent connectivity, we landed 5 nights at the Teton RV resort in Victor, Idaho. We also booked 5 nights inside Yellowstone NP at the Fishing Bridge CG with F/Hs. All of our reservations on this trip have been on the fly which how we roll. 😊 Just before sunset and our low last night in this high desert was a 41 and just perfect sleeping temps! It’s so quiet here. More often than not for us, the best sound is silence and no crowds. This morning with our SL mini deployed on the picnic table, a total changer on this trip.
1 point


-
Recent Achievements
-


")


")


")

