Leaderboard

.thumb.jpg.e34bf01ef7f7d5e99ad31856d45afbeb.jpg)


Popular Content
Showing content with the highest reputation on 08/05/2025 in all areas
-
I know that Oliver terminated it's agreements with all the dealers in the southeast. I believe there was at least one dealership who had not paid for the trailers that were sitting on their sales lot. I'm sure there were other reasons as well, but it was just easier for them to handle all the sales for southeastern customers through Hohenwald.4 points
-
Tech moving fast with beam switching. 👍🏻🇺🇸 https://www.dishytech.com/starlink-beam-switching-upgrade-improves-reliability-for-obstructed-dishes/3 points
-
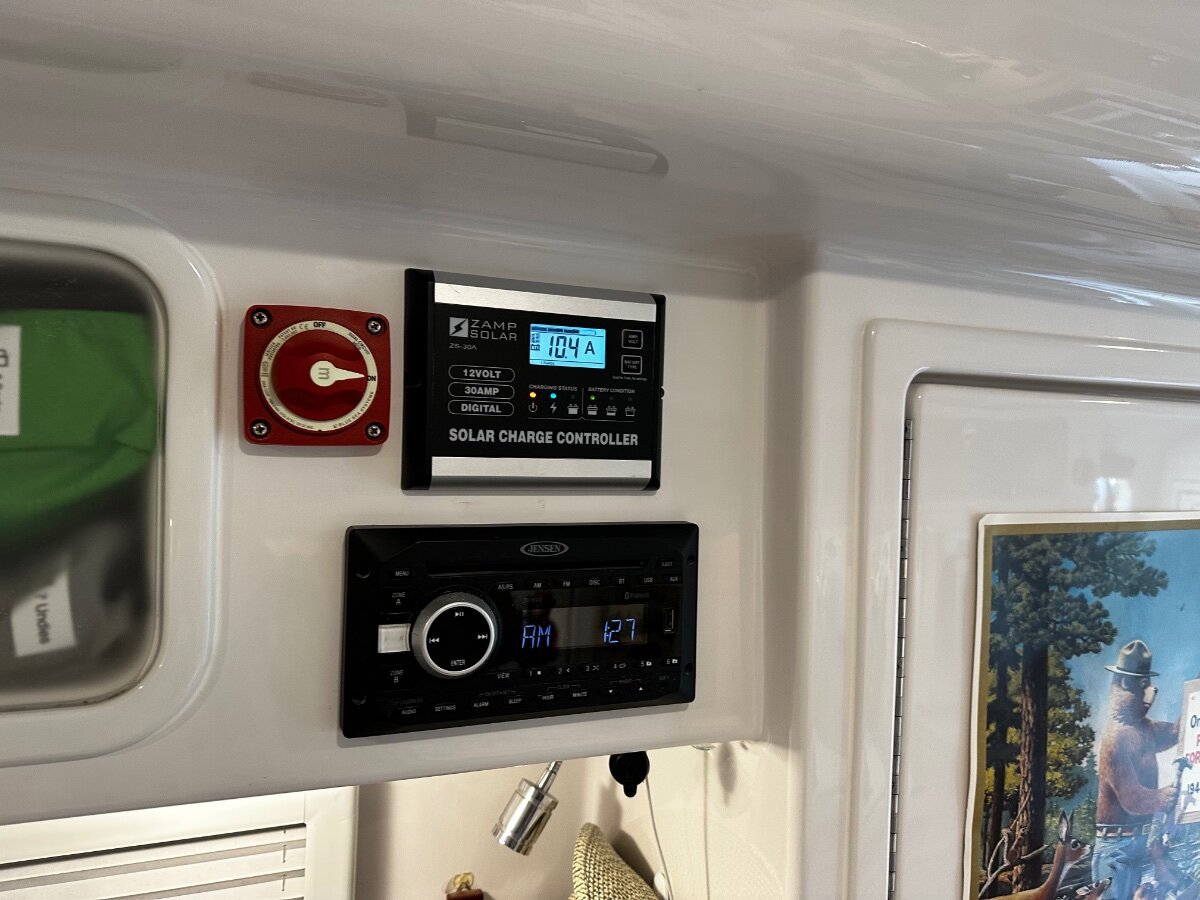
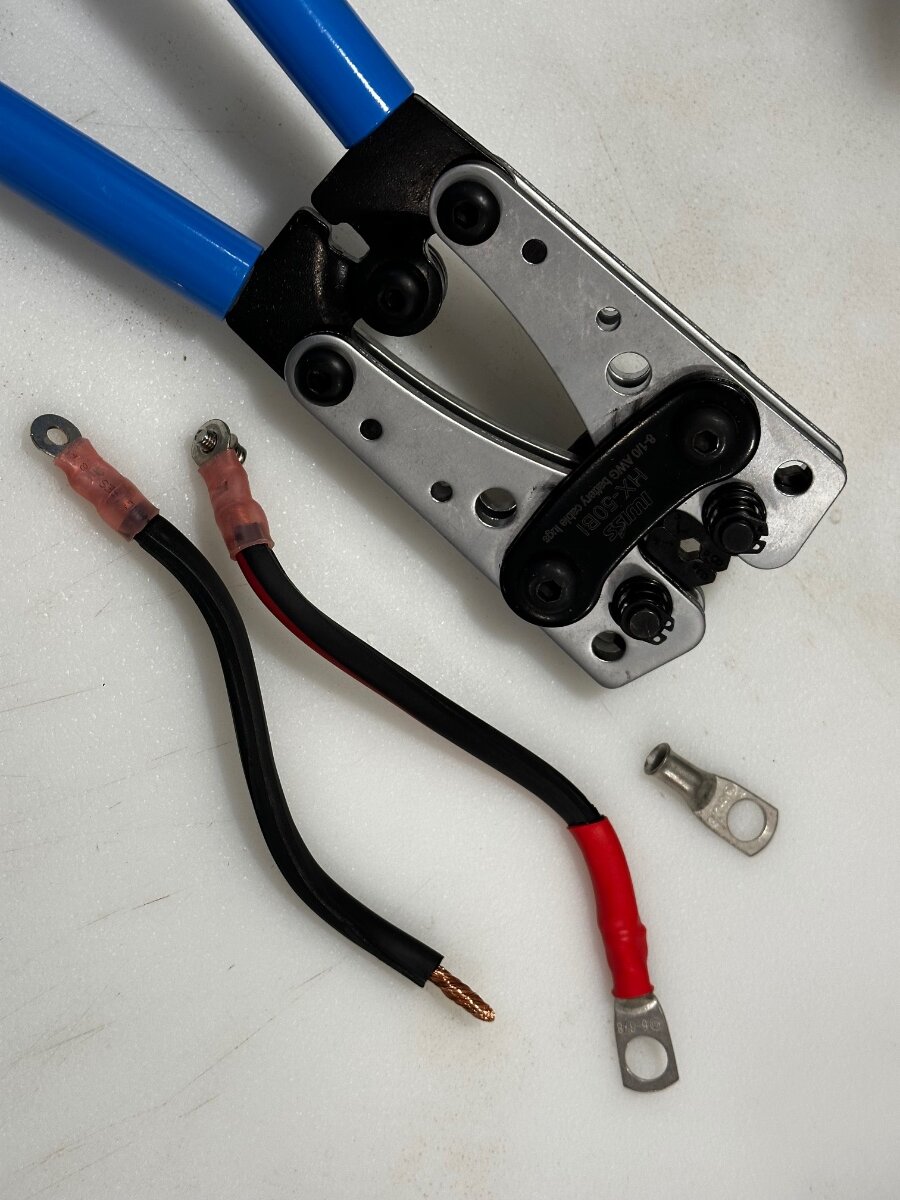
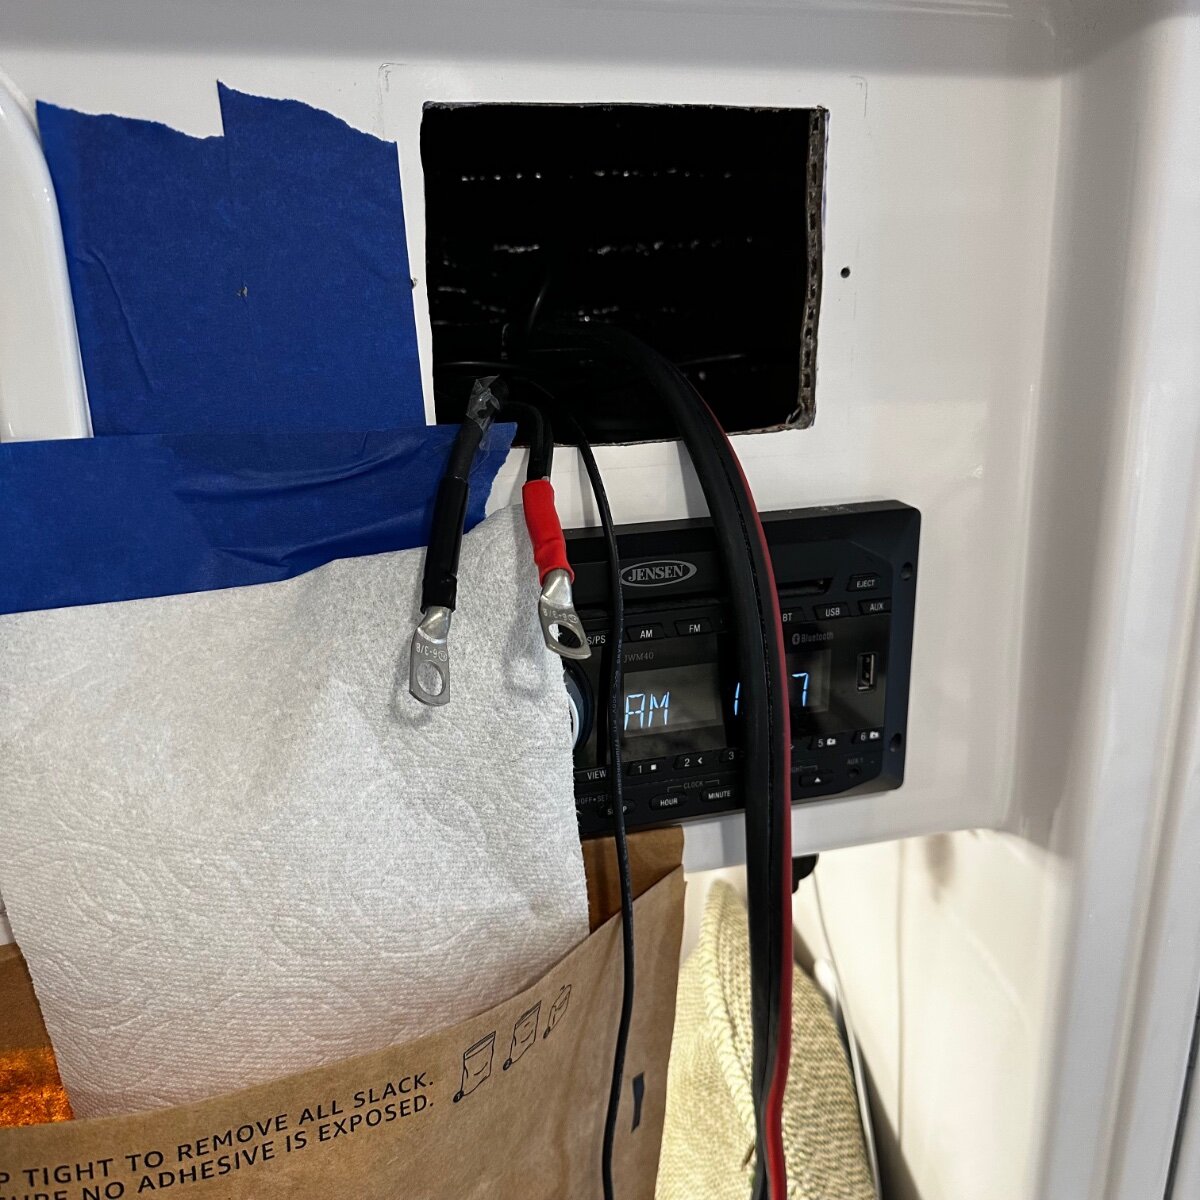
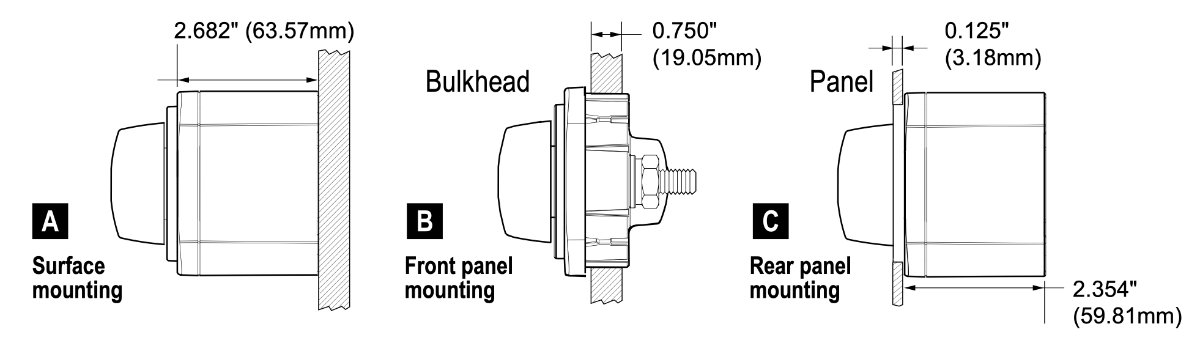
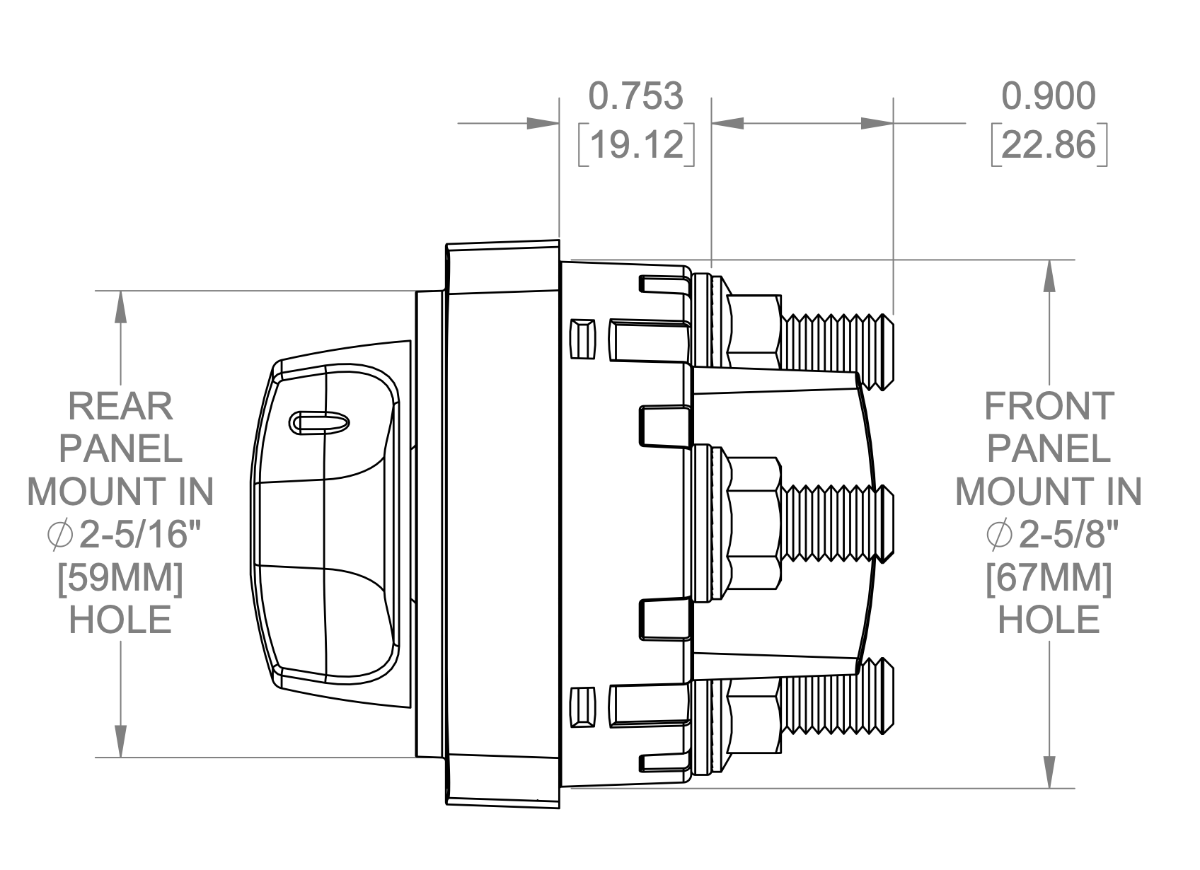
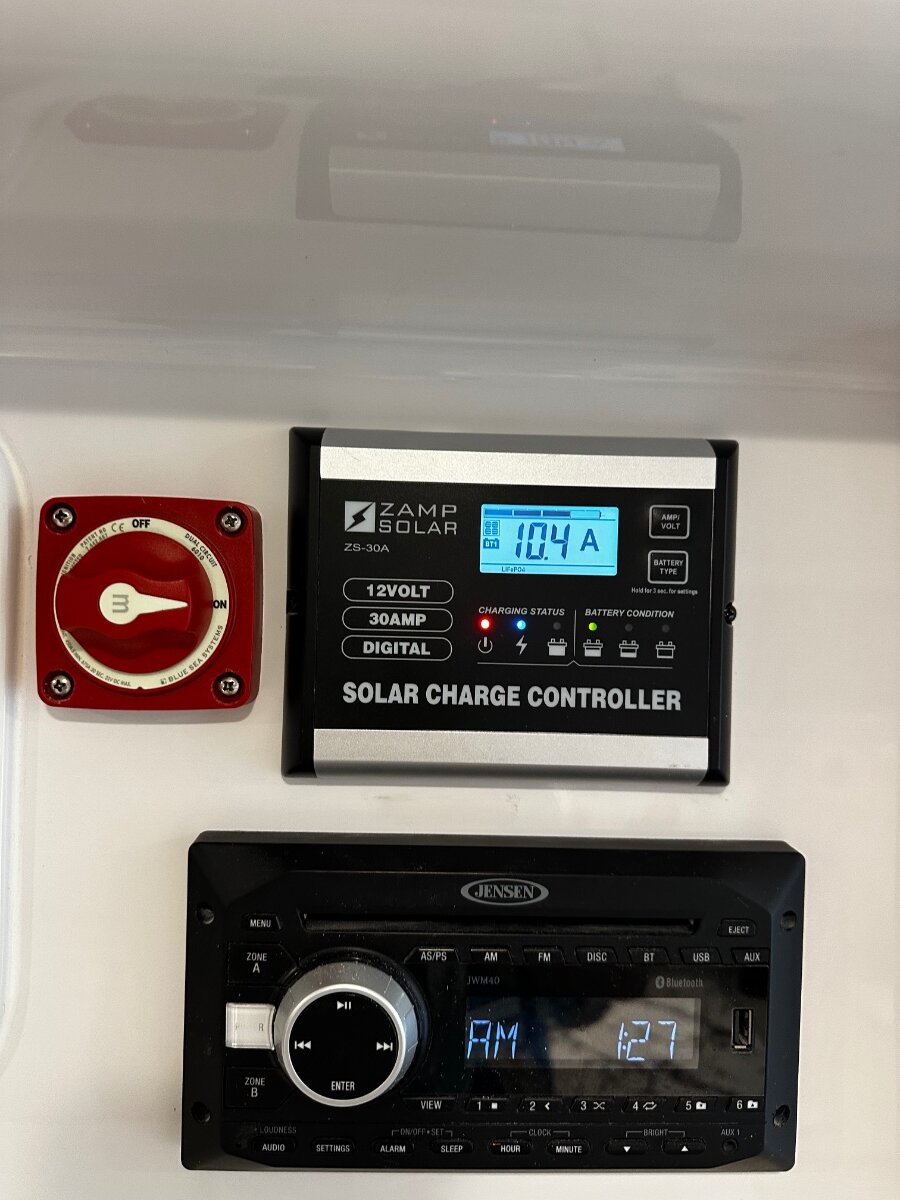
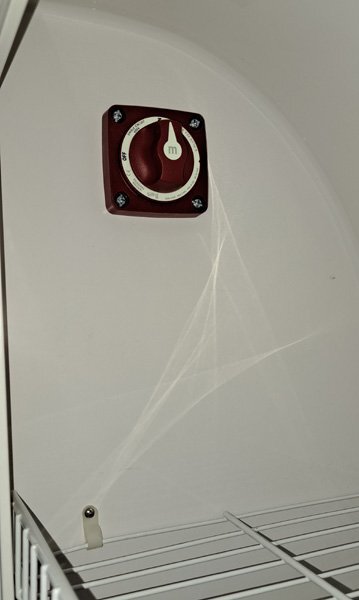
I like where you put your unit in the side of the pantry. I assume you had enough original lead wire coming from the solar panel to reach over to that wall. In hull 505 they left a ton of wire for the run after the controller down to the battery, but not an extra inch on the roof solar leads. I also just finished the installation of a Blue Sea Dual Circuit Cutoff Switch m 6010 and then read your post. Thanks for showing the pix ! Full Blog Post here: https://4-ever-hitched.com/blog-articles/f/install-a-solar-cutoff-switch?blogcategory=Electrical+Upgrades After inpecting the space I decided to mount the switch to the left side of the Zamp solar controller. A bit ugly but very visible to anyone using the trailer. I'll be adding a label just above the switch for instructions. Finished Installation Below - M 6010 Blue Seas Dual Circuit Cutoff Switch mounted as a bulkhead mounting. Here are a few "in the process" photos and the steps taken for this installation: SWITCH USED: Blue Sea Dual Circuit Cutoff Switch m 6010 WHY: The code for Solar Cutoff is that the switch must disconnect both legs of the solar panel leads. This means a dual pole (dual circuit) switch is recommended. Buy it from Amazon: Blue Sea 6010 Dual Feed Switch Mounting considerations: This switch can be mounted in 3 ways... I chose the middle - bulkhead front panel mount - for ease of installation. 6010 Blue Sea Switch Dimensions - Front Panel Mount hole saw size is 2 5/8". Installation Process: 1) Covered the solar panels with cardboard so the panels were dark with no voltage output. 2) Unplugged trailer from Shore Power and turned off the Lithionics Batteries. 3) Removed the 2 screws holding the Zamp Controller and inspected the space for positioning of the switch. 4) Decided based on my particular situation to cut off 5" of the leads coming FROM the Solar Panels. I reuse the cut portion leaving on the Zamp connectors to connect between the switch and the input side of the controller. (Note: If you have a bit more length on the input solar cable, it would be better to have about 8" of cutoff to make mounting the switch easier.) Here are the leads being prepped that will go from the output side of the switch to the input portion of the Zamp controller. The switch has 3/8" (M10) lugs, so I crimped #6 x 3/8" lugs to each of the cut wires. Heat shrink was added to each. (Note - I left the Zamp output leads mounted to the controller as they were and just checked for tightness when re-installing Zamp into mounting hole.) 5) Mounted the leads back onto the controller. Crimped the leads onto the lines coming from the solar panels. Next phase is drilling hole and mounting the switch. 6) Prepared and drilled the hole at the centerline of the controller and centered on the empty space. As I was doing a front mount of the switch I needed to use a 2 5/8" hole saw to match the engineering drawings for the switch. The bag at the bottom is to catch the shavings that come out the front as the hole is drilled. 7) Attached the input leads and output leads to the switch and tightened using a 14mm Deep Socket. 8. Mounted the switch by predrilling holes and then attached with stainless pan head #10 screws / 3/4". (Note - I drilled the holes slightly smaller than the screw so they had bite. You can also just drill holes and use stainless bolts with lock washers on the back side.) 9) Go remove the covers from the solar panels and test....voila you now have a solar cutoff switch for storage and safety while working on your electrical systems. Craig Hull 505 - Galway Girl
 3 points
 -
We went with the Gen3 for a couple of reasons- you can switch between residential and roaming plans with it, and the residential plan is less expensive with higher bandwidth. As of now you can't do that with the mini. The Gen3 is supposed to have better performance though I can't give an opinion on that since I've never had a mini to compare it to. Also, you can run the Gen3 off of 12v DC with a convertor though it will still use about 20-30 watts more than the mini does. When it comes to the residential vs roaming, *so far* we've been lucky and haven't had to switch to a roaming plan when we hit the road. We just change the service address from our home address to the campsite and it works within minutes. You can do this an unlimited amount of times but must be prepared to be denied access if the area you are in is not allowing any new residential connections. If this ever happens we would just change to a roaming plan until we got back home.2 points
-
The inverter has a standby power consumption constantly while it is turned on. This is true whether you are using 110vac or not. Personally, we keep the inverter off unless we are using something like a hair dryer or the microwave. Our camping style is 90% boondocking but we use the inverter very sparingly. This is even more important since you have the AGM's and have to watch them carefully to prevent them from getting to 50% SOC.2 points
-
I WAS going to break down and get a standard unit this week, but....in light of David's post on beam switching I may have to do a little more research. I had gravitated to the larger Gen3 because I would prefer the stronger reception and upgraded router. But the mini has the advantage in size and weight savings. And the DC power ability. And less equipment re the built in router. Does the larger unit actually receive any better with partial tree obstruction? We are not power users but we do stream a good movie occasionally. This beam switching seems like it could bring me back into the "mini" market. I finally talked Wendy into the Starlink technology so I want to make the smartest choice. We've boondocked 4 out of 7 months this year and have had really spotty connections with our Verizon unlimited plans. They work very well if within reach of their towers. How long of a cable can be used to move the mini dish to an unobstructed site? Is there anyone who switched from the larger unit to the mini who wishes they had stayed with the larger? Thanks for any help, John1 point
-
I don't think the numbers will change one bit. It cools the Ollie so effortlessly there's not much load in cooling an insulated cooler! ;*))1 point
-
I think the highest watts draw the engineer in the Youtube video was able to see at max power was around 1100. Still far less than any of the single speed compressor units of comparable size. In our small insulated spaces I'm guessing we would be consuming around 500-700 most of the time once setpoint is met.1 point
-
I suspect the “numbers” will increase somewhat as the compressor will work harder to reach and maintain temp in ambient conditions. However, likely less than what is typically seen with conventional units.1 point
-
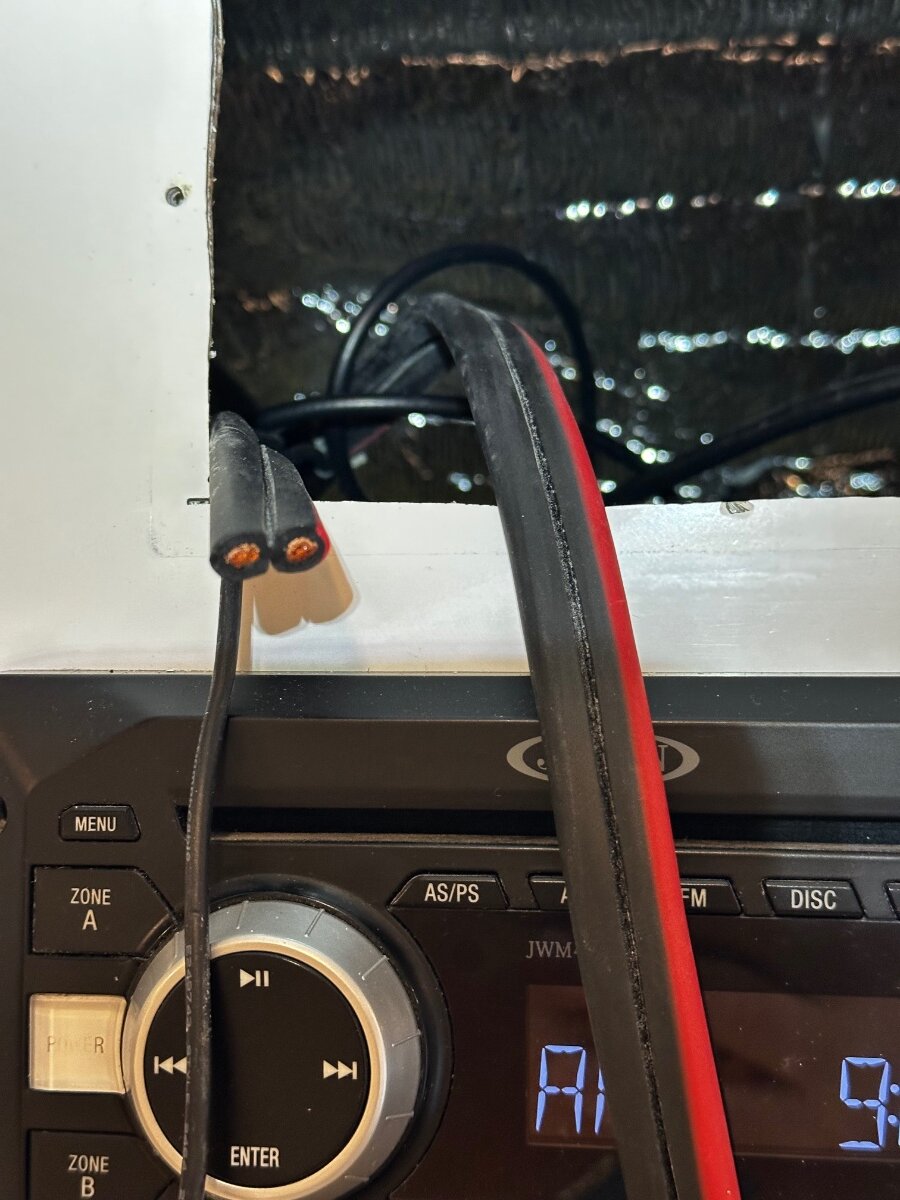
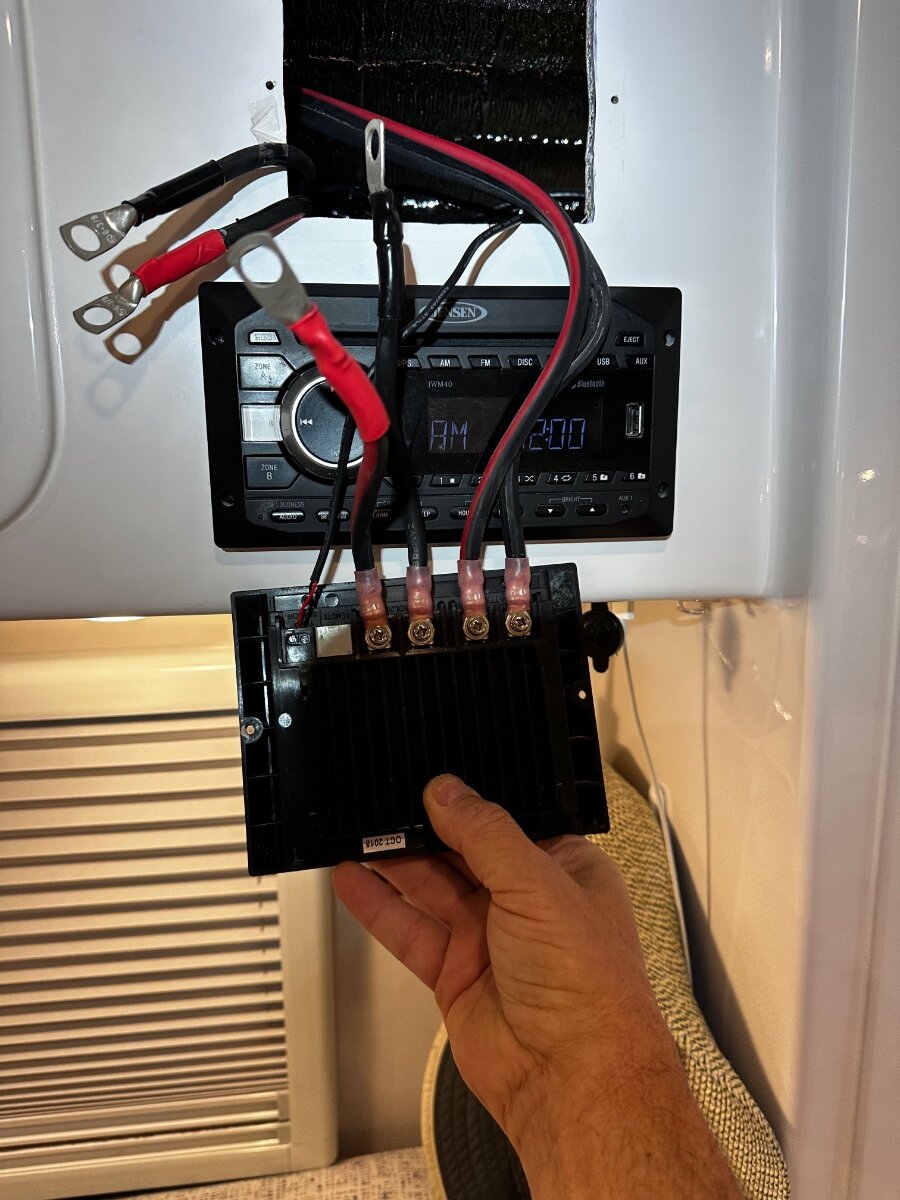
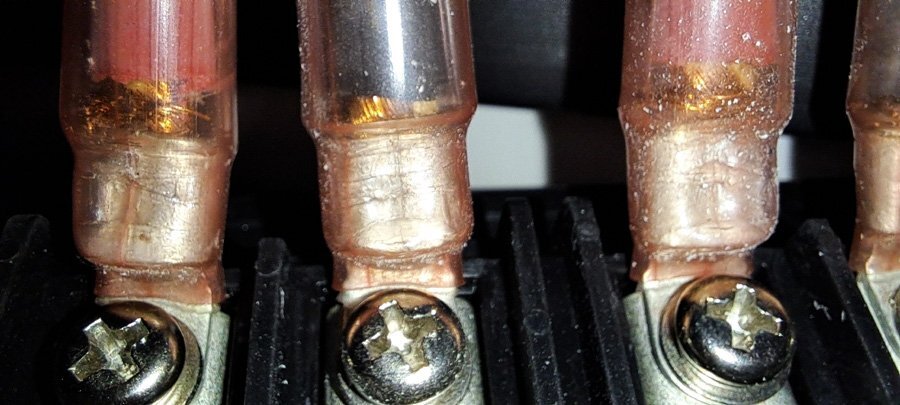
I'm happy to report progress on my solar disconnect switch. I've drilled my first hole in our Oliver. And installed the switch. Unfortunately I ran into a problem as I was making the short wire between the 3/8" ring terminal post on the BlueSea switch and the ring terminal to the back of the Zamp. I ordered 3/8", 5/16" and 1/4' ring terminals for the 6awg wire attaching to the back of the Zamp. Unfortunately it uses 3/16". They should be in today. I also noticed something that makes me a little concerned about the solar wiring safety. I'm not an electrician but this install does not look like it was done by an electrician either. If you look closely at the red (+) wire connections in the photo below, it appears at least a couple of the ring terminals used on the 6awg solar wire are under sized. It's hard to see but the "excess" wire strands are wrapped around the ring terminal and covered by heat shrink. The black (-) wire connections look OK. Not sure if this is common practice but it seems unsafe and more like a DIY rather than a professional install. I haven't removed any of these ring terminals yet but, but once I do, I'm going to cut off the heat shrink to examine this more closely
1 point
-
I suspect that's where it's really going to shine, especially in controlling humidity once set temp is reached.1 point
-
Have you used it camping? Not Yet Still getting the same numbers? Yes Is it truly quiet or how would you describe it? You can have a conversation with it running For every hour of use on a summer day, how many Ah are used in battery SOC? It only runs a few minutes every 30 minutes or longer. Mine is stored in the Vault in the AC Answers to any of these Qs would be helpful. Also, did you keep the fiberglass platform that OTT had mounted behind the 14x14" A/C opening? Yes I don't believe our hull has that add-on. I'm trying to finalize if this is the right purchase and is now the right time to buy the Turbro Greenland which is now at $1,275 plus tax. Except in warranty and perhaps temp range, the Pioneer and Greenland appear to be the same. minutes or so. Only you can make that call Sorry I can't give you more info.1 point
-
I do know the GM trucks have a trailer charging line (as well as the others) that is fused under the hood.1 point
-
Wondering 6 weeks later, could you provide additional feedback on your new Pioneer? Have you used it camping? Still getting the same numbers? Is it truly quiet or how would you describe it? For every hour of use on a summer day, how many Ah are used in battery SOC? Answers to any of these Qs would be helpful. Also, did you keep the fiberglass platform that OTT had mounted behind the 14x14" A/C opening? I don't believe our hull has that add-on. I'm trying to finalize if this is the right purchase and is now the right time to buy the Turbro Greenland which is now at $1,275 plus tax. Except in warranty and perhaps temp range, the Pioneer and Greenland appear to be the same.1 point
-
Thanks... This is one of my concerns.... How to know if the trailer is still safe to pull? If there are stress cracks. How can this be repaired? I think this would be beyond most RV owners' or RV Service departments' knowledge and skills to repair. I also wonder what the usable lifespan is compared to a traditional trailer.1 point
-
I have extensive experienece with carbon fiber vs alloy aluminum for structural components under heavy load. Specifically in critical components such as hang glider frames. I have many times put my life on the line with them in that sport. They are strong and reliable... until they are not. When they fail, the consequences are generally been dire. This happened to two of my free flight friends. They died. The problem is that carbon fiber components are extremely difficult to inspect for tell-tale structural failure. With aluminum, for most spars, we see micro crazing then small cracks. They grow as the structural intregruity deteriorates. I no longer fly or use carbon fiber for life safety applications. The reason is that the inspection technology to ensure they are still safe to use is way way beyond what the average owner can do at home or in the field. GJ1 point
-
Inverter should be off unless using microwave, outlets, or watching TV1 point
-
I recommend you leave your inverter off until you need to use 110, especially with AGM’s. As mentioned above, just having your inverter on and not being used draws down battery capacity. We rarely turn our inverter on.1 point
-
Tony: It has been hot in Maine but not as bad as your weather. I started the AC about 1/2 hour before starting the work. I used a brand new plain metal toothed hole saw with the center arbor (drill bit) attached to a battery operated drill. I drilled slowly until the bit made the hole. I then drilled in reverse to get the hole saw started into the jellcoat. After the hole saw was started into the fiberglass, I completed the hole by drilling in forward. The hole came out perfect with not chips of the jellcoat. Be sure to keep both hands on the drill so the hole saw does not bounce around.1 point
-
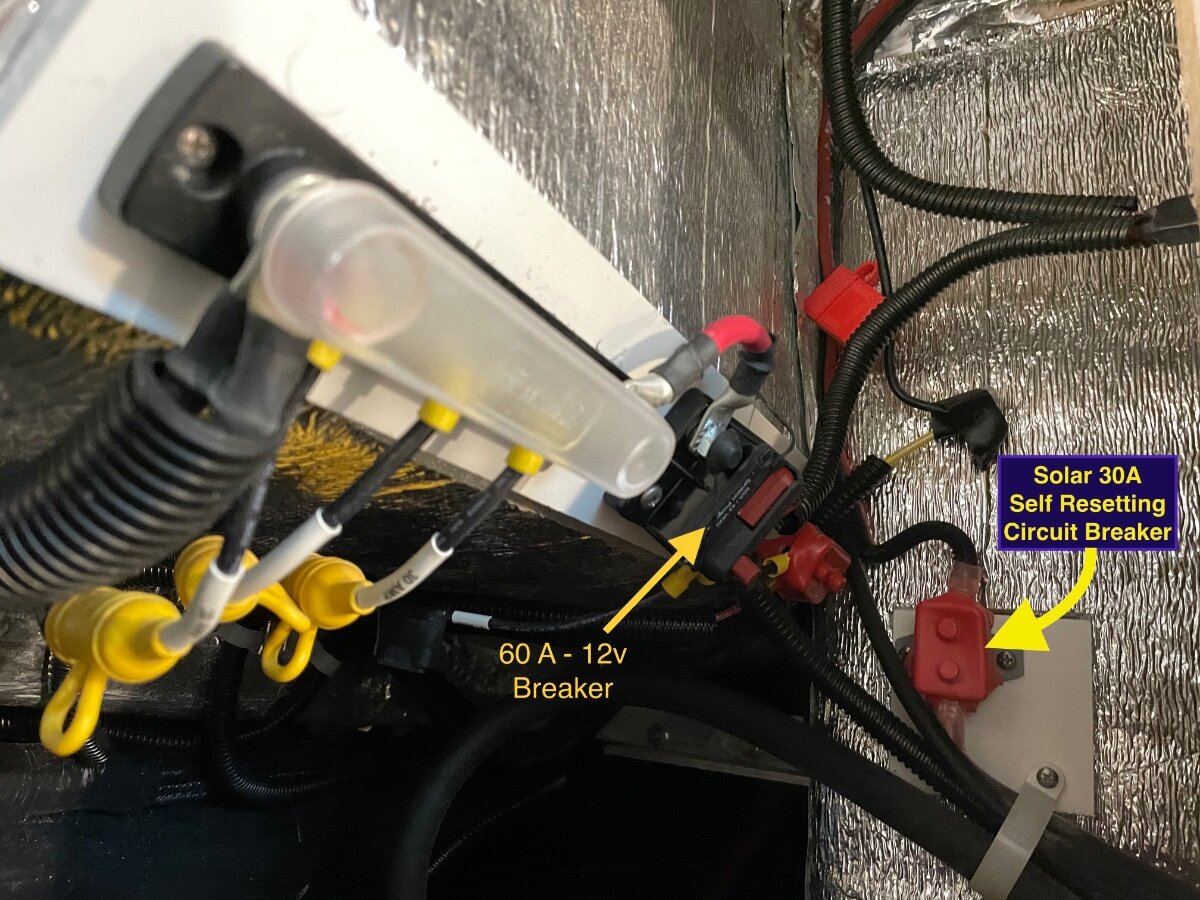
Some of our older Olivers don't had a solar cutoff but instead have as a safety from shorts a 30A self resetting circuit breaker. I suppose one could wire in a 30Amp solar cutoff right after that and mount it in the under bed area where that circuit breaker is located. Saw this demo video showing how that breaker works....about half way into the video. Didn't realize that the ones in some of our Olivers don't have a button to push, but reset automatically after the spring circuit inside cools down. Cheers, Craig
1 point
-
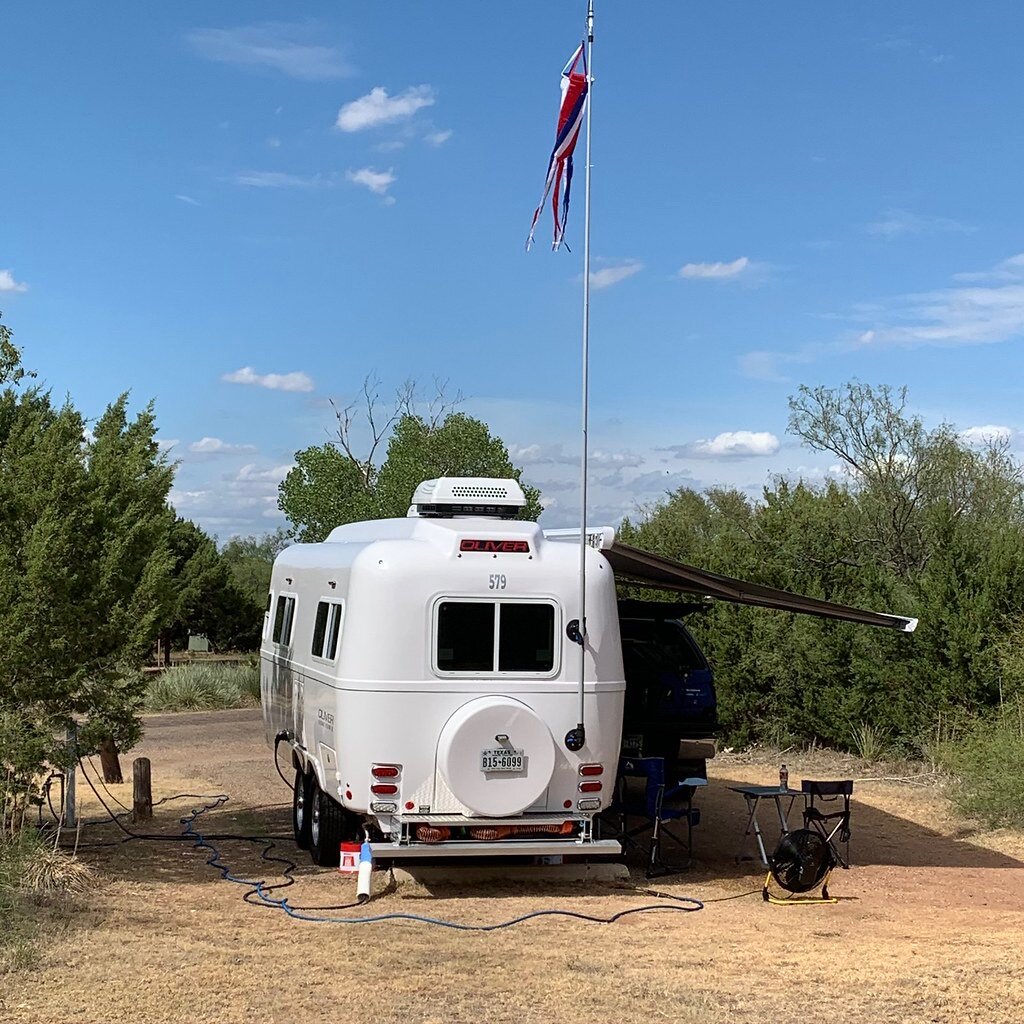
No experience with this SL pole setup, but years of using the same suction cup mounts on an actual 16’ fiberglass flagpole from the same company; a WeBoost antenna was also mounted at its top. I never had a suction cup loose grip. Yes, they do require a daily check and a couple strokes of the integral pump to maintain adequate suction; a visual indicator on the pump is used to ensure optimum suction. If there is too much obstruction at the Oliver, I like that the SLM can be mounted on the van with magnets while parked in close enough proximity to the campsite for Wi-Fi reception in the trailer. That said, I have parked at the COW Barn several times in like manner and been able to operate the Atmos via the Cielo and steam movies.
1 point
-
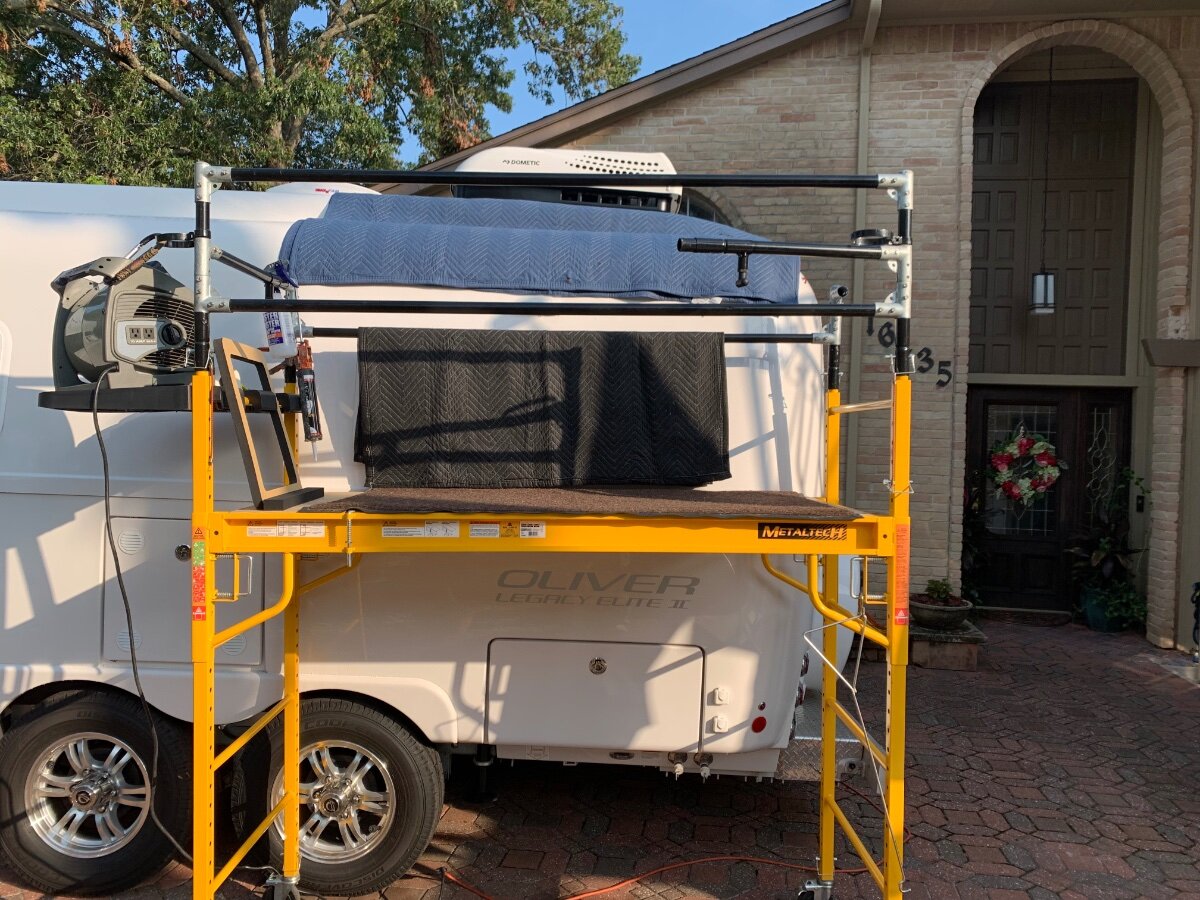
Removal made easy, used moving blankets to protect the gel coat. I detailed my a/c swap in Dreiha Atmos 4.4 Home Install/Ollie Modifications; follow your installation manual, the process should be very similar in general.
1 point
-
10,000 mile update on Alcan springs: A year had passed since my dreaded roadside leaf spring break and 10,000 miles are on the Ollie with Alcan springs underneath so I thought I would provide my update. Ride height - rear bumper rides approx 1/2” higher than stock Ride performance - first 500 miles seemed a bit stiffer than stock with a few more items from counter and beds on the floor but the springs settled-in after that and there is no observed difference inside the trailer now (no additional stuff found fallen to the floor). Trailer tracks the same as stock, however visible jouncing (up and down) and side to side (roll) are observed to be less pronounced than stock. I also noticed when doing annual bearing maintenance that the spring shackles no longer invert when both wheels on the same side are jacked off the ground. Overall impression - had I known that a heavier capacity, 5-leaf spring, made in the US with US steel and featuring a design with the second leaf which extended all the way under each spring eye was available sooner I would have swapped sooner, just as I had previously done with solid stainless lug nuts and US made Timken bearings. No regrets on the upgrade from stock springs.1 point
-
Just a quick note on the use of twist drills - while they will cut through mild steel and do an adequate job, the use of an annular cutter is likely to yield better results. As these cut only the outer "annulus" of the hole versus a twist bit that removes all of the material in the hole - they cut quicker and cleaner. At least that has been my experience with them on several steel and aluminum projects. The smaller sizes are not terribly expensive and have been a valuable part of my shop's tool collection for several years now. One project I used them on was the replacement of the stock Bulldog coupler with the 2 5/16" size when we updated our Andersen hitch. https://www.hougen.com/cutters/annular-cutter-kits/annular-cutter-kits.html1 point
-
Mine are fine. We’ve put about 5,000 miles on the ALCANS and all is well! Mike1 point


-
Recent Achievements
-


