Leaderboard


Popular Content
Showing content with the highest reputation on 06/02/2026 in all areas
-
Oliver's response has been outstanding. We are working together to address the issue. More to follow when I have a chance to provide a detailed update. Bob6 points
-
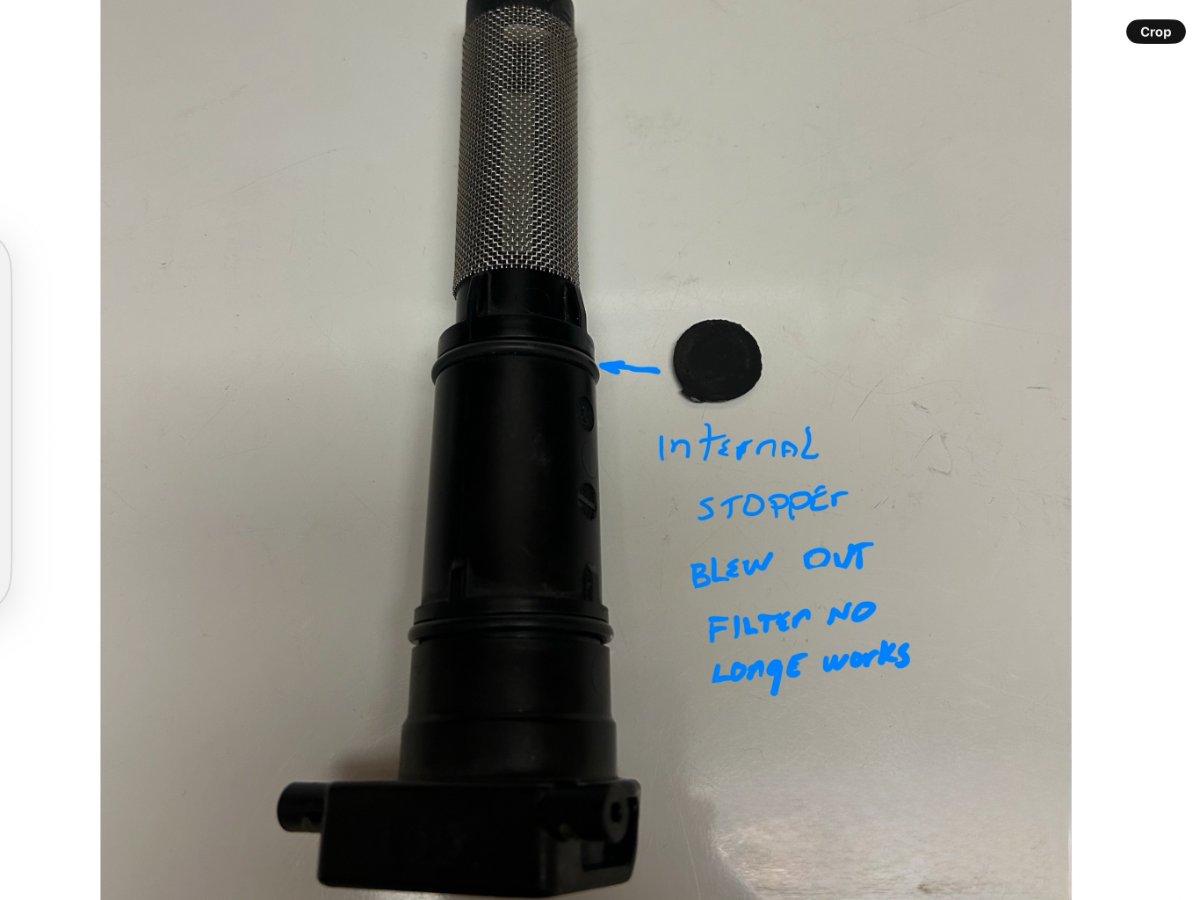
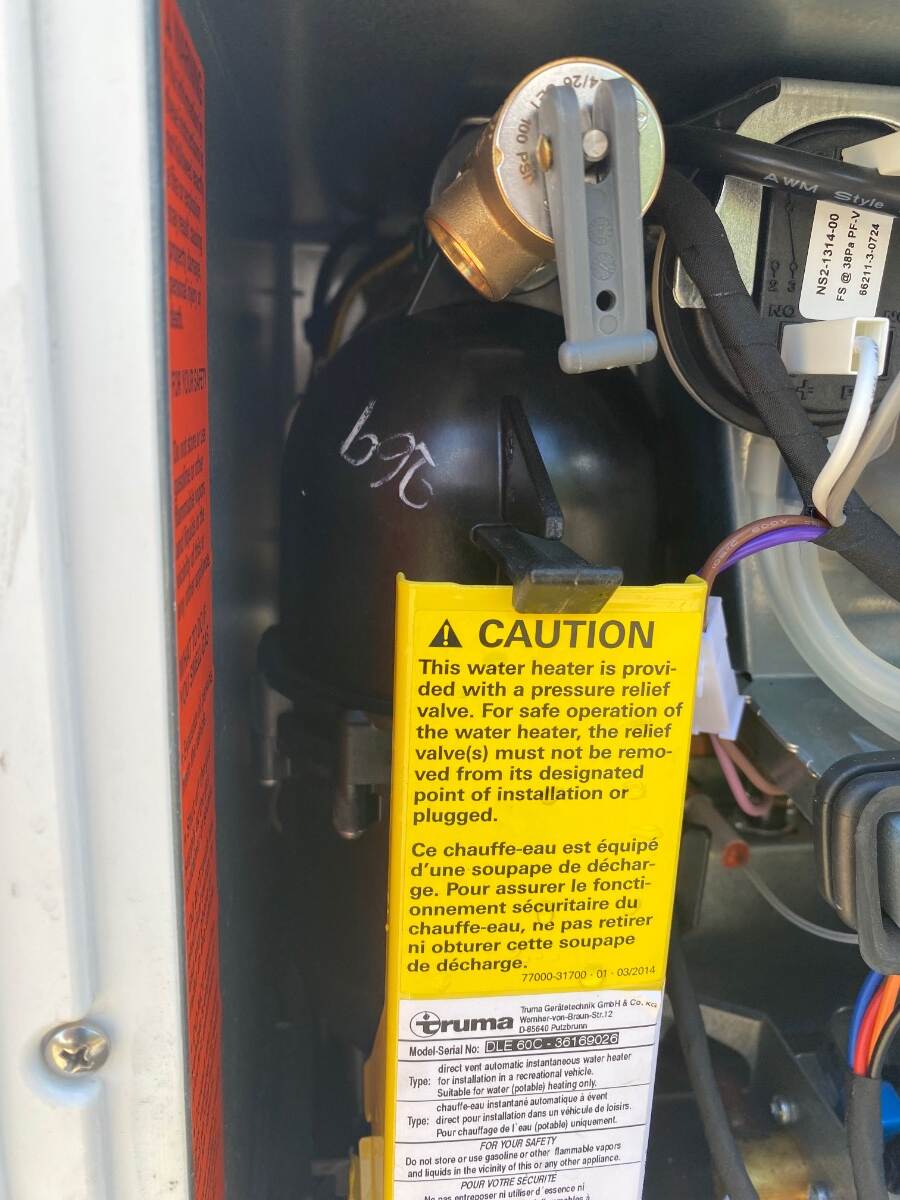
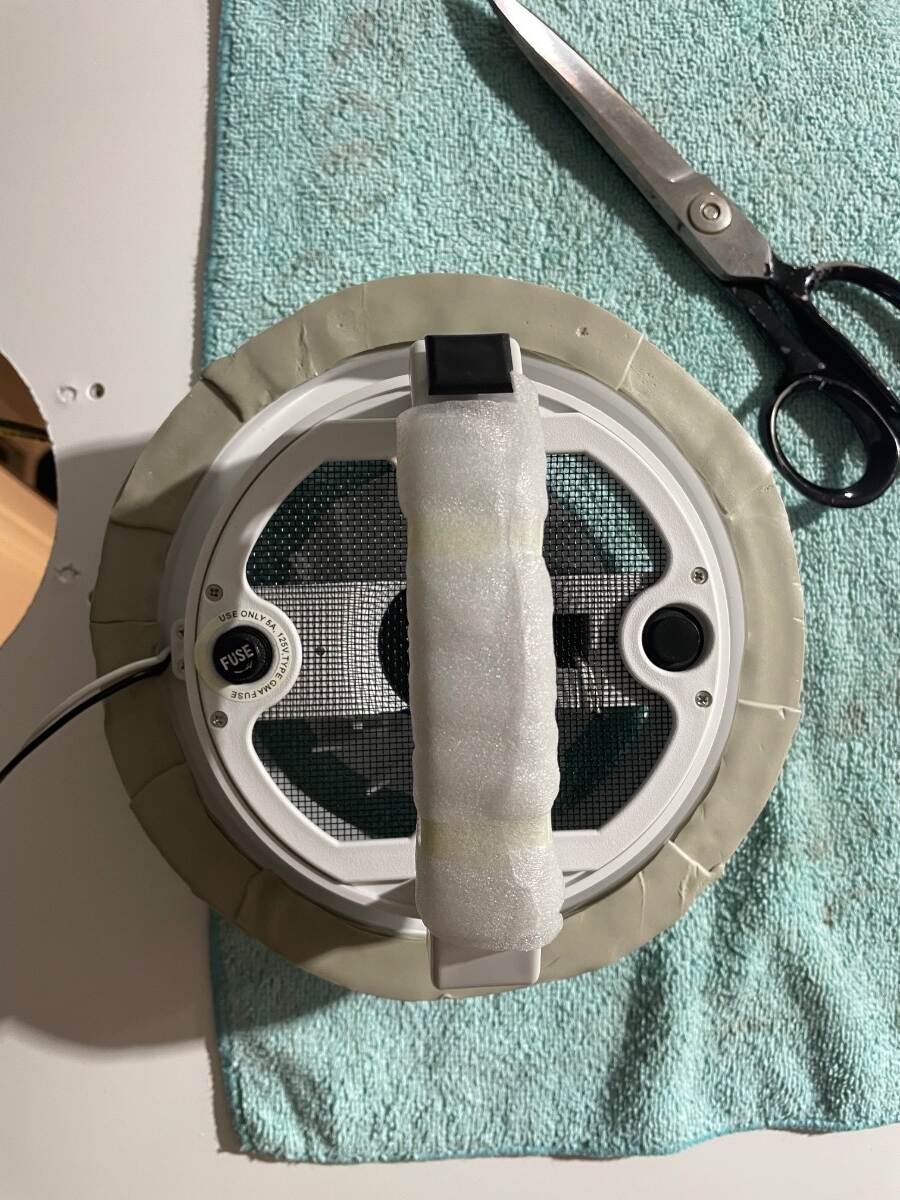
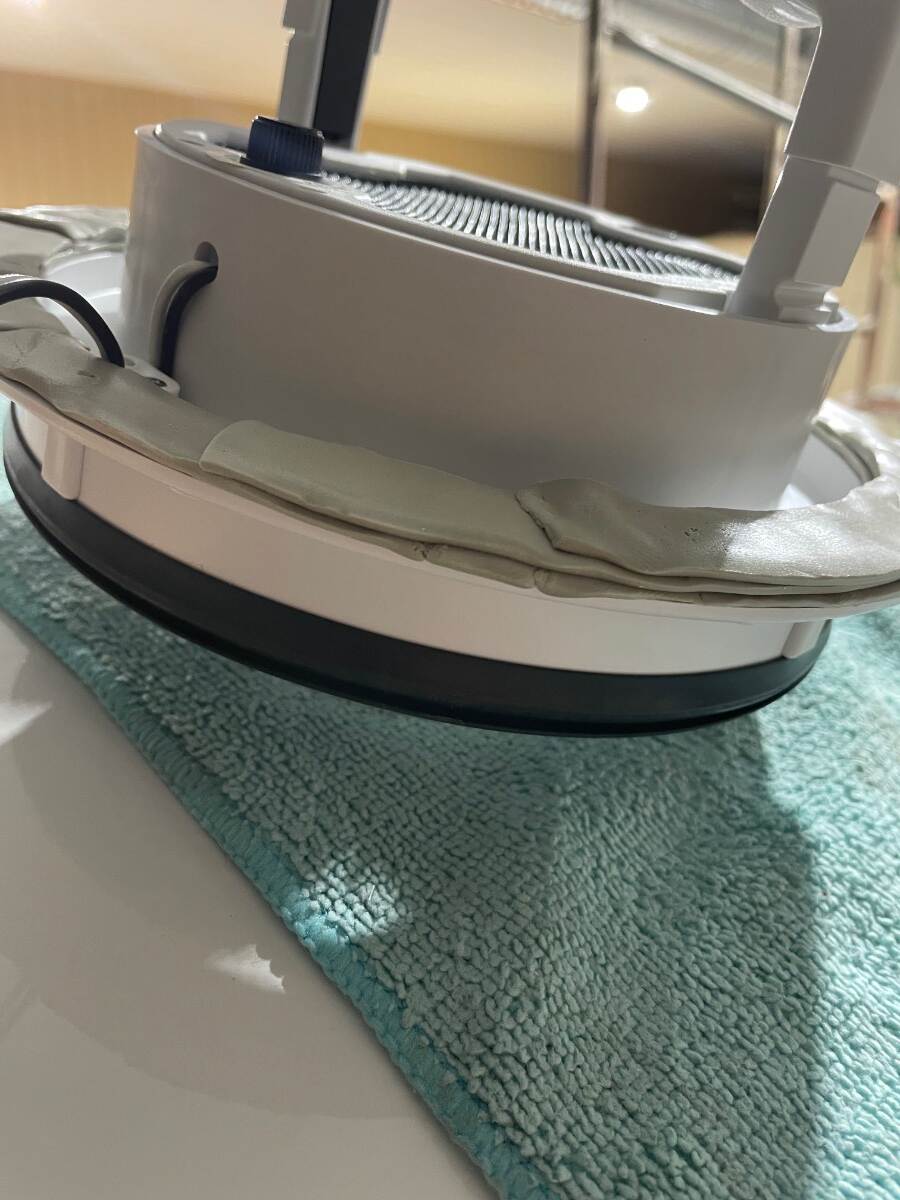
Here's just a little insight into what likely happened in David's situation and how to reduce the chances of others experiencing the same situation in the future. After examining this filter plug more closely, I have determined that the part that broke out of David's filter is designed as an over pressure protection for the water heater. By code all water heaters are required to have a high pressure relief. For the Truma, instead of a standard pressure relief valve, they have chosen to use a sacrificial relief that's designed to let an over-pressure situation release and drain to the outside. With David's description of the event, I'm convinced that when the water supply valve at the water heater was opened to run through the water heater, a high pressure surge hit the water heater causing the "safety device" to rupture. This was very likely a high water pressure situation, possibly caused by and air pocket in the water line just before the valve that caused a water hammer effect in the heater when the valve was opened. Now I can't prove this is what actually happened, but in liquid and steam systems I have worked with over the years, coils such as that in the Truma water heater are usually protected by what is called a rupture disc, designed to fail before damage can occur to the more valuable parts of the system. Whenever opening a valve to pressurize a system, it's imperative to open the valve very slowly so as not to cause a hydraulic hammering of the system when doing so. Also it's very important to run a system clear of any air pockets before opening a valve to other components in the system. For air and gas systems this is not an issue. But with hydraulic systems it's critical. A very good precautionary step to reduce the chances of water hammer when opening a valve is to very slowly open the valve to prevent a surge. One additional precautionary step to take before repressurizing the water heater is to open one of the faucets to hot water to allow flow through that side of the system when the valve to the is being opened to the water heater. Again this allows flow through the water heater, allowing air pockets to escape without cause a water hammer condition. These steps should prevent this from occurring to anyone in the future. Hope this helps anyone with concerns about their Truma water heater. PS - Obviously a high water pressure from the utility source connected to the trailer could also cause this situation to happen. This is the obvious reason why we must always use a pressure regulator and never setting it above 40 psi. PPS - If you purchased the Truma anti-freeze plug when you bought your Oliver, it can be used in place of the regular filter plug should you need a short term backup. It works exactly the same as the standard filter plug, just has a heat coil built into it. You don't need to plug the coil in for this use purpose.4 points
-
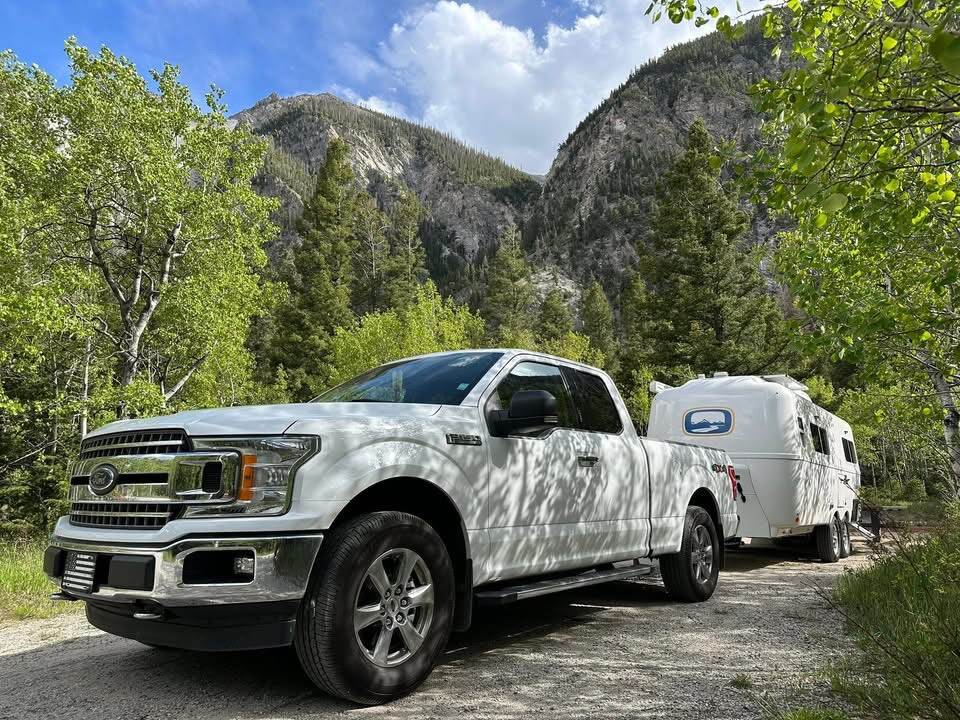
San Isabel National Forest , Cascade Campground near Buena Vista Colorado Gonna hit the nearby hiking trails, Ghost Town of Saint Elmo, Hot Springs Got the hang of the Ford 10 speed on mountain passes tow haul mode only , select M , 2nd gear off the top
 4 points
 -
Cool this all makes sense. If I understand it now, the regular brass valve is for hot over pressure, and the plastic sacrificial filter/rupture disk is to protect against freezing over pressure. Smart design2 points
-
Lesson learned. So after a little deeper dive into cause and effect of how my water filter failed, I learned the following. Last fall when we winterized, I turned off the water supply to the Truma. I went out and pulled the yellow lever down, pulled the filter out and drained all of the water out of the Truma tank. With the system and the tank drained, I reinserted (error on my part) the Truma filter and it must have had a tiny amount of residual water near the internal plastic sacrificial disk inside the filter which resulted in it freezing and then cracking. If I had completely removed the filter and stored it inside the Oliver as I have done for the past 5 yrs, I likely would not be needing a replacement filter. Important to note, the Truma tank system was completely void of water with exception of what residual was in the filter housing which was apparently just enough to cause the sacrificial disk to do what it is suppose to do…fail. To complete my inspection of the Truma hot water tank, I temporarily used my winterization filter and the system worked as designed. We had the system set at 120d within about 8-10 seconds we had unlimited hot water in the galley and shower. Here is what I learned -open source- If your Truma AquaGo filter (or Easy Drain Lever) blew out, gushing water from the housing, the internal plastic disc or O-rings likely failed. This is almost always caused by residual water freezing and expanding inside the housing, or the O-rings being misaligned. [1, 2, 3, 4] The Fix You cannot repair a broken filter assembly with glue or tape due to the system's high water pressure. You will need to replace the entire filter/drain assembly. [1, 2, 3] Depressurize the system: Turn off your RV water pump or city water supply, and open a hot water faucet to relieve the pressure. Remove the old filter: Lift the thumb latch on the easy drain lever to drop the assembly down. Inspect the housing: Look inside the chamber for any leftover pieces of broken black plastic. Install the replacement: Pop the new filter cartridge into place and snap the lever back up to lock it. [1, 3] How to Prevent It Truma designed the filter to fail (break) first to prevent the internal mixing vessel from freezing and causing a $2,000+ tank replacement. During winterization, always make sure you pull the yellow lever, remove the filter cartridge, and drain the water entirely. Do not reinstall the filter until you are ready to use the RV in the spring.2 points
-
Too funny! I was standing up when I looked under the cover plate and my relief valve lever was turned upwards where I couldn’t see it. Kind of like me looking for the ketchup in the fridge I guess. 😉 Looks like they have the typical water heater relief setup after all. Nevertheless when you look into the open end of the filter, you can see it’s designed with a much thinner wall around the back of the plastic housing, very similar to a rupture disc. Again I don’t know first hand if that’s actually Truma’s design intention, but with an overpressure situation this would be a weak point that would likely fail. And it would fail through the drain port of the water heater as you would expect if that was their intention. Anyway, take it for what it’s worth.2 points
-
AMEN! Best suggestion of the week! ++++++++++++++++++++++++++++++++++++++++++++++++ Bill: Best installation approach I have seen. Very creative way to intall the fan on a curved roof. Thanks for your time and effort to create a bathroom fan replacement "Best Procedure" yet. GJ
2 points
-
@DunnYet Open source - No, you should not leave the Truma winterization (bypass) filter or standard stainless steel filter installed all season long. [1] If you are actively using your RV during the camping season, you should be using the standard stainless steel filter (or the Truma Electric Antifreeze Kit if actively in use). The official winterization plug/filter is strictly designed to replace the standard filter for winter storage and is not meant to be run full-time. Keep these quick winterization rules in mind: For Winter Storage: Drain your Truma system and remove the filter cartridge entirely. Store the filter in a dry place inside your RV and leave the yellow Easy Drain Lever closed. Leaving any filter inside during freezing weather can trap water, expand, and permanently damage the unit. [1, 2, 3] For Active Winter Camping: If you plan to travel in freezing temperatures, you can use the Truma Electric Antifreeze Kit. This specific kit can be installed in place of your standard filter to keep the water heater from freezing without draining your propane. [1, 2] For Normal Summer Use: Remove the winterization plug and reinstall your standard stainless steel mesh filter before de-winterizing and turning your water system on for regular use.2 points
-
No worries, thanks yeah I did get clued into that trick. Worked great, the suspension quieted right down. Still a little creaky, suspecting the leaves are rubbing or maybe there’s a bit of grease missing somewhere. I noticed on the Alcan page they smartly put poly rub pads on the end of the leaves to avoid this. Well we’ll be in the neighborhood this summertime (roughly) so I set up an appointment to get fitted at Alcan. Full hog five leaf, who am I to argue with them? And I was thinking about when camping we’re going over weight anyhow with all the tanks and people in it. Plus I generally agree with having some extra margin and IIRC Alcan believes 20% is the right amount so OK.2 points
-
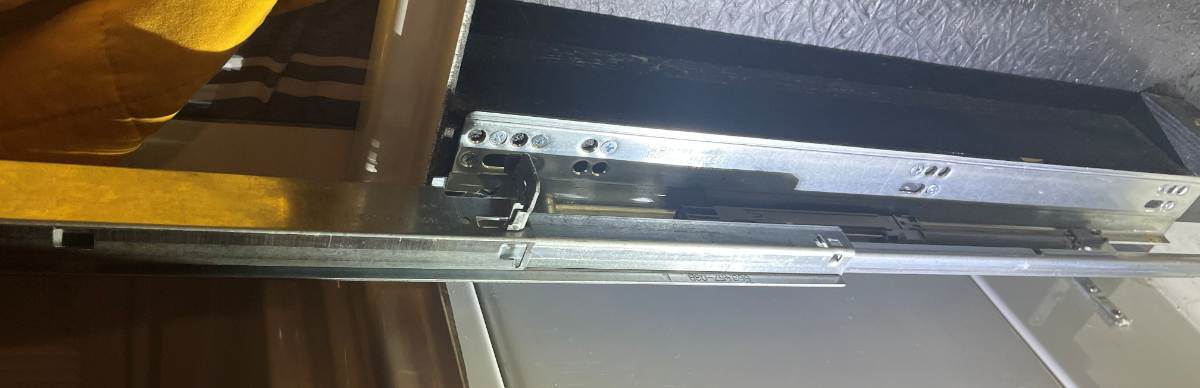
Just replaced the Blum slide on our nightstand drawer. This item is the OEM part replacement. Maybe I should have bought the 6-pack, LOL! The nightstand drawer and 5 kitchen drawers all use the 18" length, the short drawer uses the 12" Blum slide. https://www.amazon.com/dp/B0G7LQ3PQ4/?th=1 Lately, the drawer would open during travel so I suspected something was wrong. After removing the drawer (squeeze two orange levers underneath), I found the old slide was truly worn out. When fully extended the end would drop a couple inches. Not good! The new slide is in and now again it works great. But per the subject of this thread, OTT installed these slides with only three screws per slide! 😒 The slides are rated to carry 100 LBS, but three short #6 screws are certainly NOT! A couple year backs, working on a kitchen sink leak, I doubled all the screws on the kitchen drawers and went up one size. At the time, I forgot to do the nightstand drawer. The slides all wobbled a bit when unloaded with only 3 screws and I now contend it was the lazy installation that allowed this drawer to shake and eventually wear out the slides. These slides are substantial but need to be installed properly! BTW, Blum supplies 20 wood screws in these kits! 20 screws for 2 slides and 2 brackets not used for our application. I installed 8 screws on each slide! Why not? Blum certainly intends more than 3 should be used! I put 3 in the same holes to hold each slide in place and then drilled small pilot holes and screwed in 5 more (see pic)! Now this should last my lifetime. 😎 I suggest removing all your Oliver drawers, having at least 6 mounting screws per slide, 12 per drawer minimum.
2 points
-
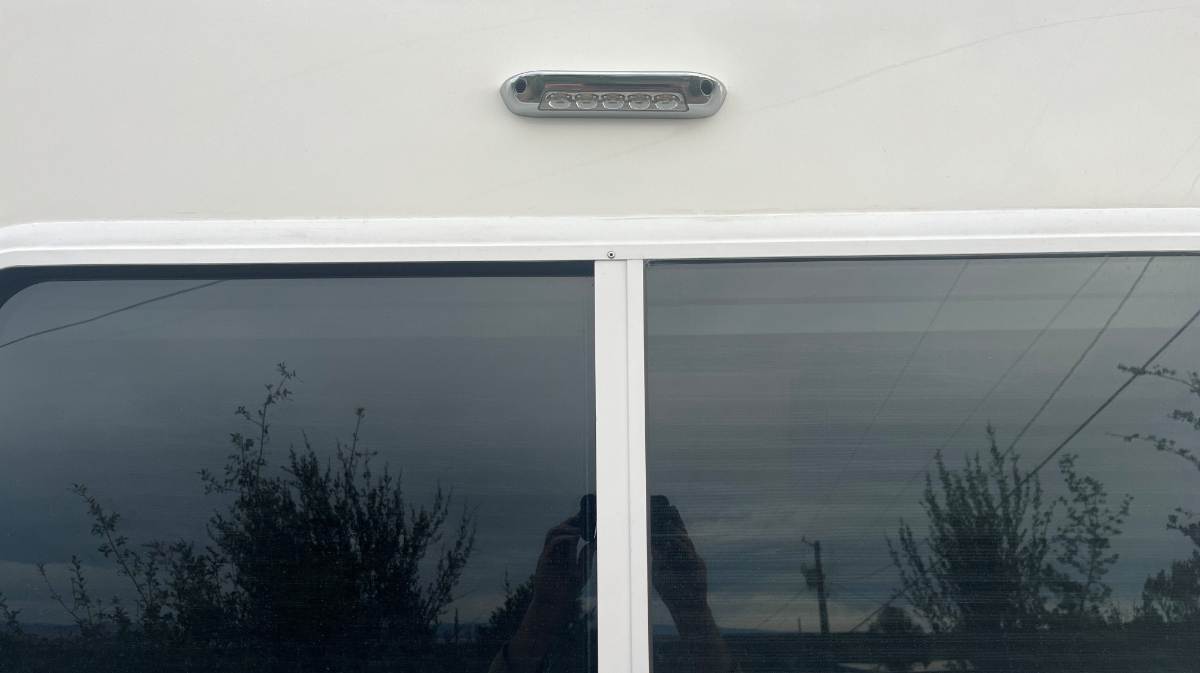
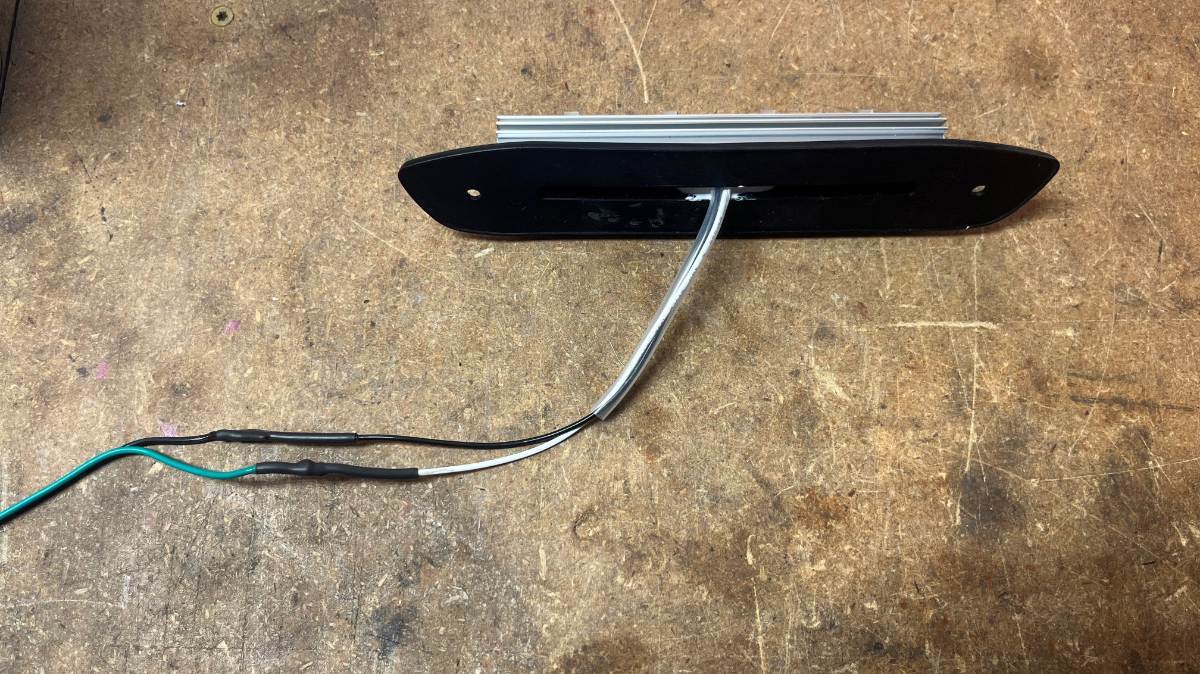
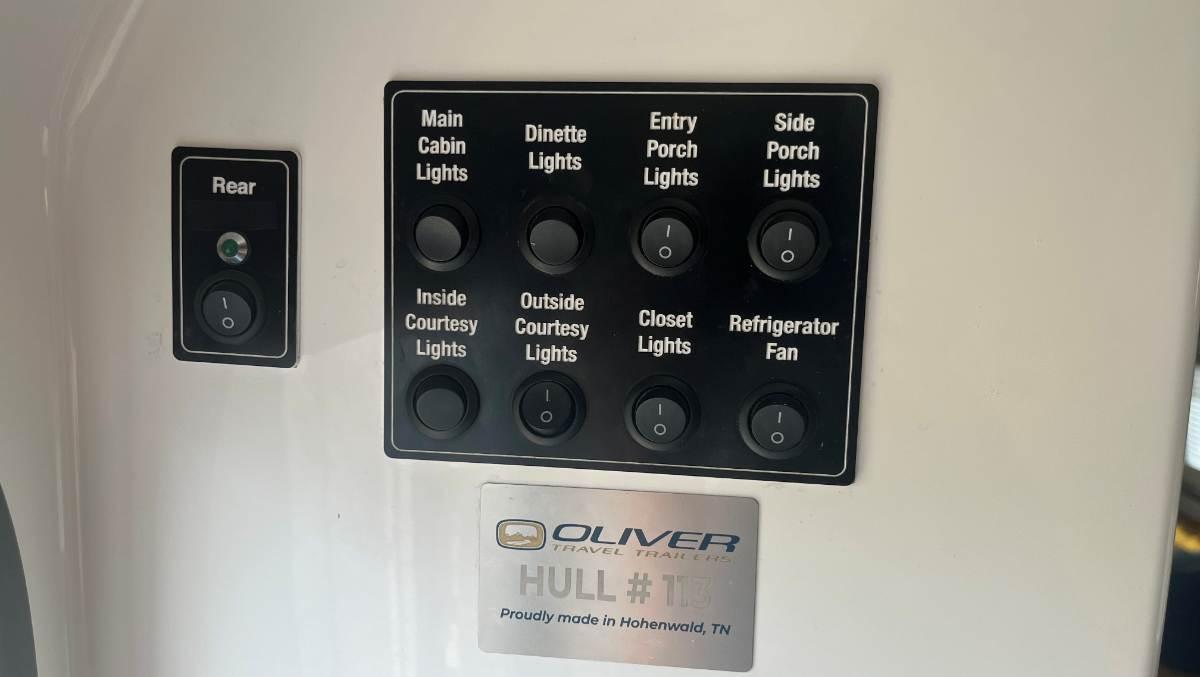
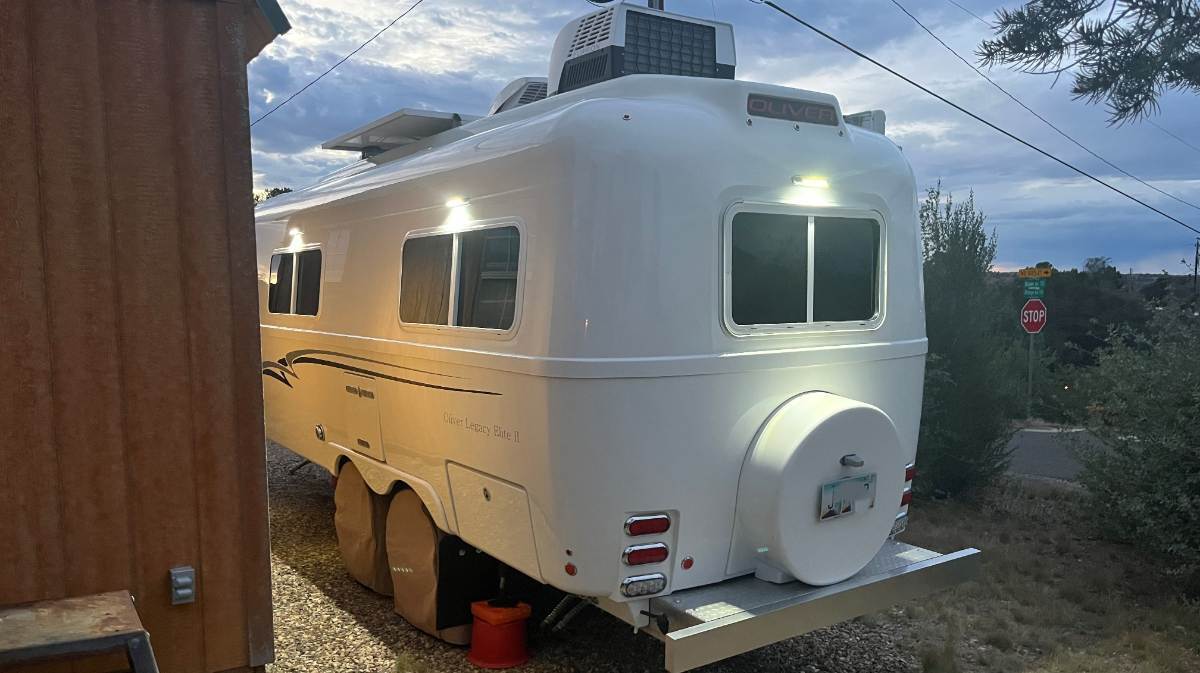
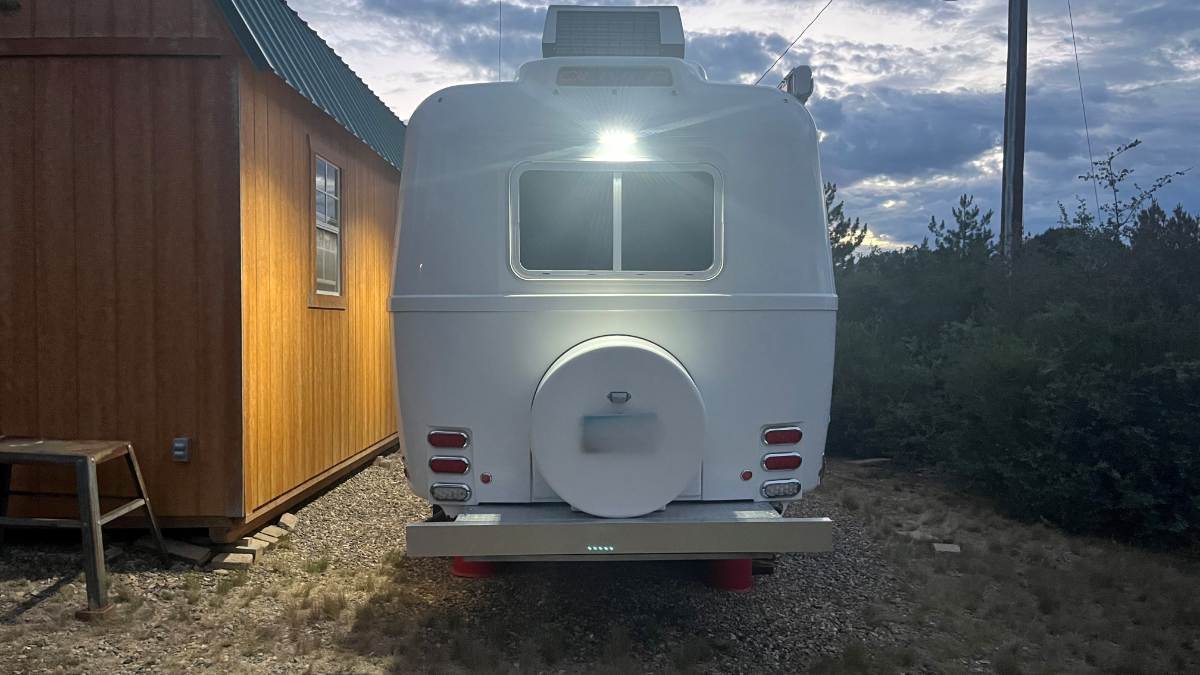
The Oliver Porch Lights are bright for a dark campsite, so we rarely use them. But if you need to light up the area they work great. I've often wondered, why isn't there lighting on the front and rear of the Oliver? I asked a year ago about replacement lights for our OEM Porch Lights and just purchased some recently. OTT should install these lights in all four directions. I would have done one up front too, but running wire would be difficult. I got something else for up front, more on that later. https://itcshopnow.com/products/assurance-exterior-flood-light?variant=50392962007319 I carefully measured the four Porch Lights OTT installed, as the distance from hull belly line, which btw holds a tape measure nicely, up to centerline of the Porch Light at the mounting screws. Turns out they were all installed at different heights +/- 3/4". As a special bonus, this light is 1/4" off from front to the rear mounting screws. My new Rear Porch Light, I promise is the straightest of the bunch! 🤣 It's not easy to choose the best spot to drill into the exterior of your hull, this one especially. I cut away some of the white insulation in the back of the attic. I used a 2-ft piece of metal fish-tape with the ends curled back, running it down the inside of the back exterior hull. Repeatedly, it measured 12" form the bottom of the OLIVER taillight to where the fish-tape hit the top of the rear window frame. It measured 12" so I figured I should go 10" max. Looking from the outside, there is a flat fiberglass frame around the rear window. Above that, the top rear is convex. I had to find the best spot so that the approx. 8" x 1 1/2" light would sit flat in both directions. If not water would get behind it. I drilled a 1/4" hole centered to the window, so the light is just above the flat frame area of the rear window. I soldered and heat shrink extra length of wire to the light. If they only attached 18" of wire! Offset the splices so that they would fit nicely into the drilled hole. It wasn't an easy pull but a few ins and outs and the light pulled flush (would be easier with 2 people, one in one out). I eyeballed the light level to the window frame. I wanted to VHB the light housing vs. drilling two mounting holes but the design of the light would not allow for it. They do not include hardware. Found the stoutest 1" course thread screws that would fit the openings and I drilled 6/94" holes after marking the centers. Wiring? I wanted to add the new rear light to the Side Porch Lights (streetside). However, I could not find the switch leg in the back corner of the attic and I did not want to remove all the stuff out of the kitchen cabinets. But that would be the right way to do it. Cabinets empty, you can easily run wiring up to the main switch panel. Our hull had a rear camera and a separate switch to power it. I removed the camera a year ago, so I'm using this separate switch with existing wiring. I copied something Geoff did, where he used a Sharpie to black out the word "Awning." Mine has a thin cut piece of black tape over the word "Camera" so it just reads "Rear" now! 🤣 I had to wait patiently for dusk and dark tonight! The hull looks great with the new Rear Porch Light to compliment the side lights. And finally, it alone lights up the yard! 😎
1 point
-
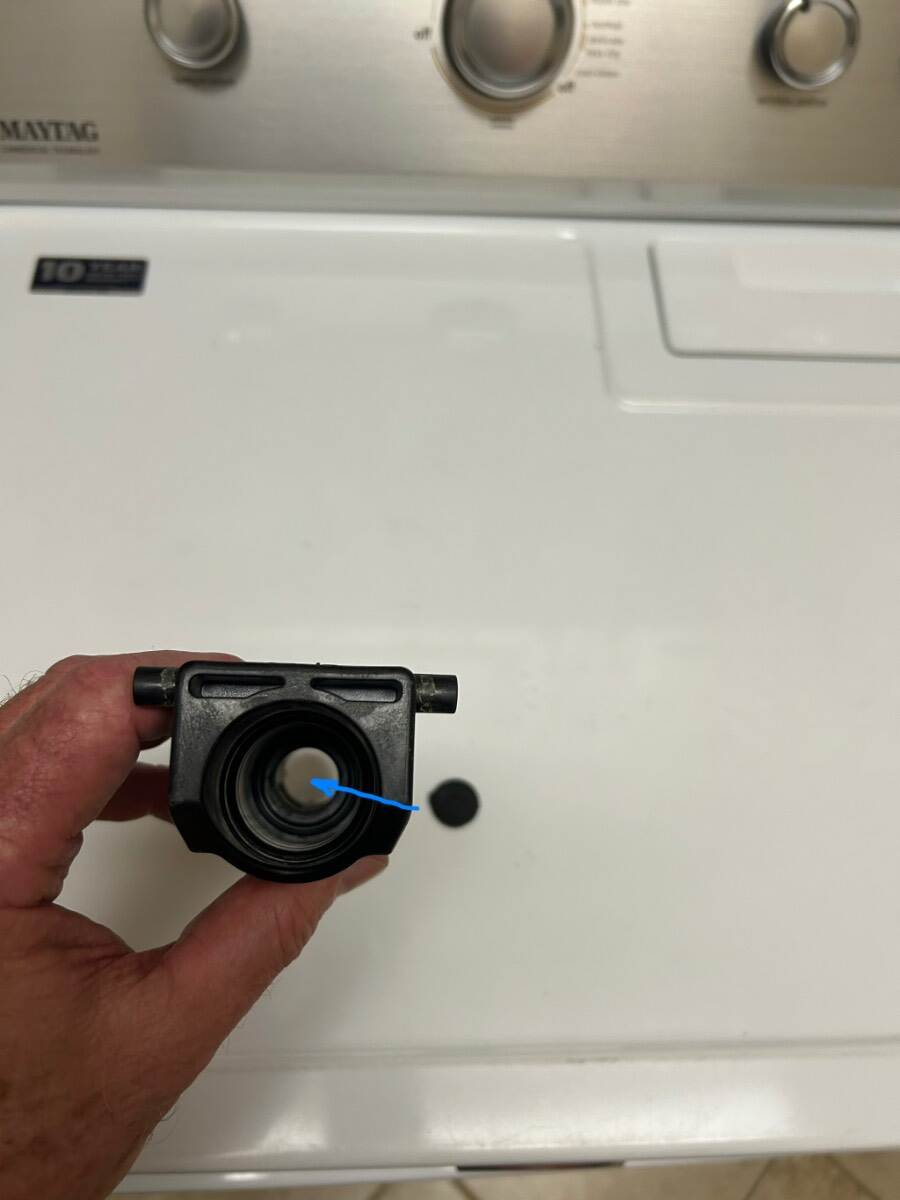
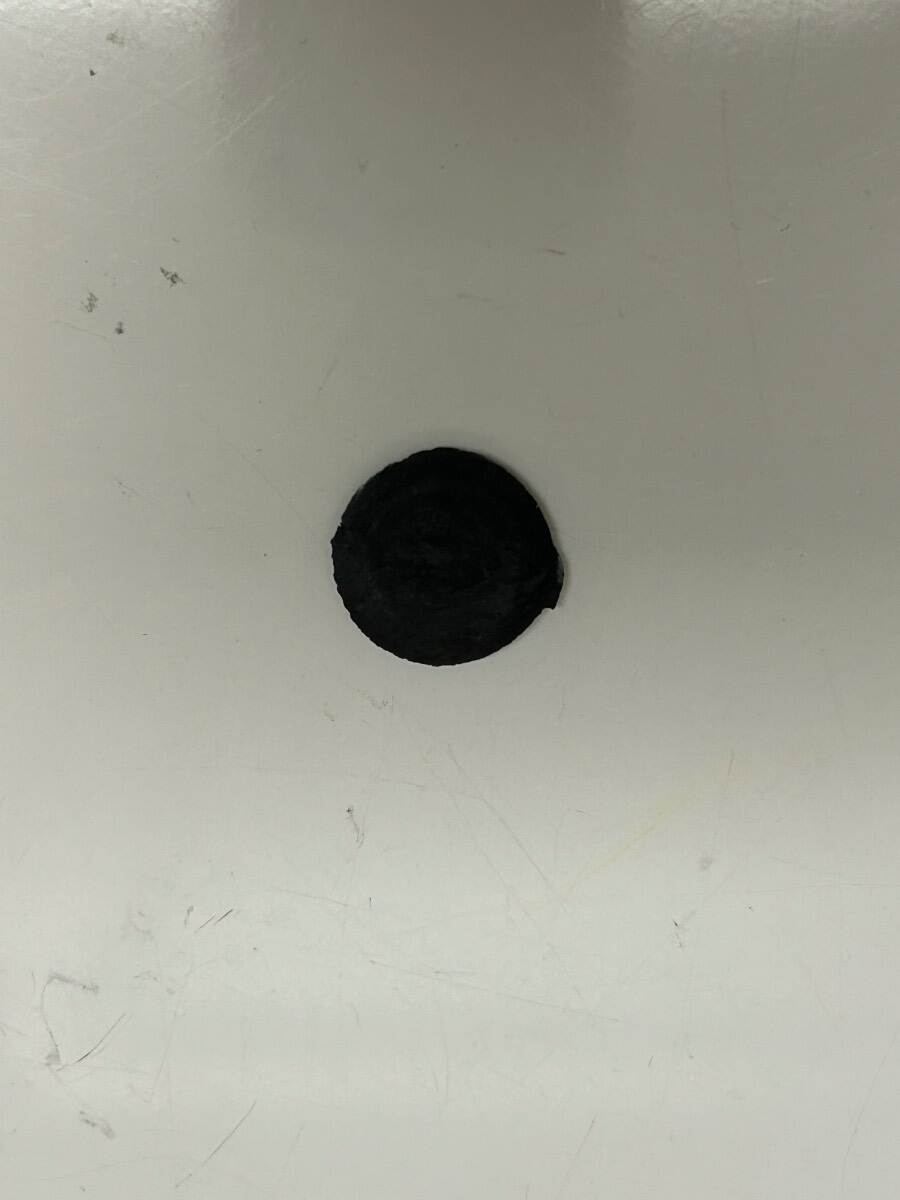
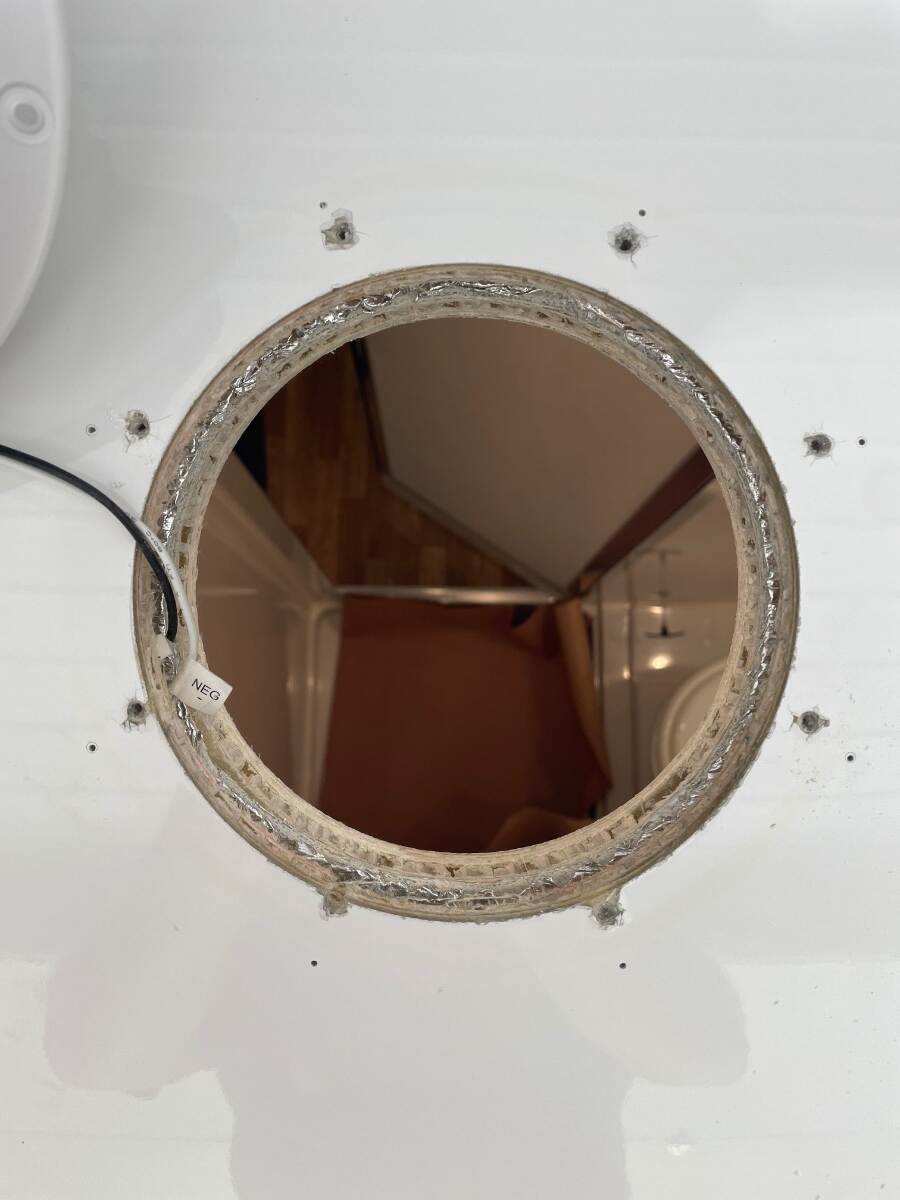
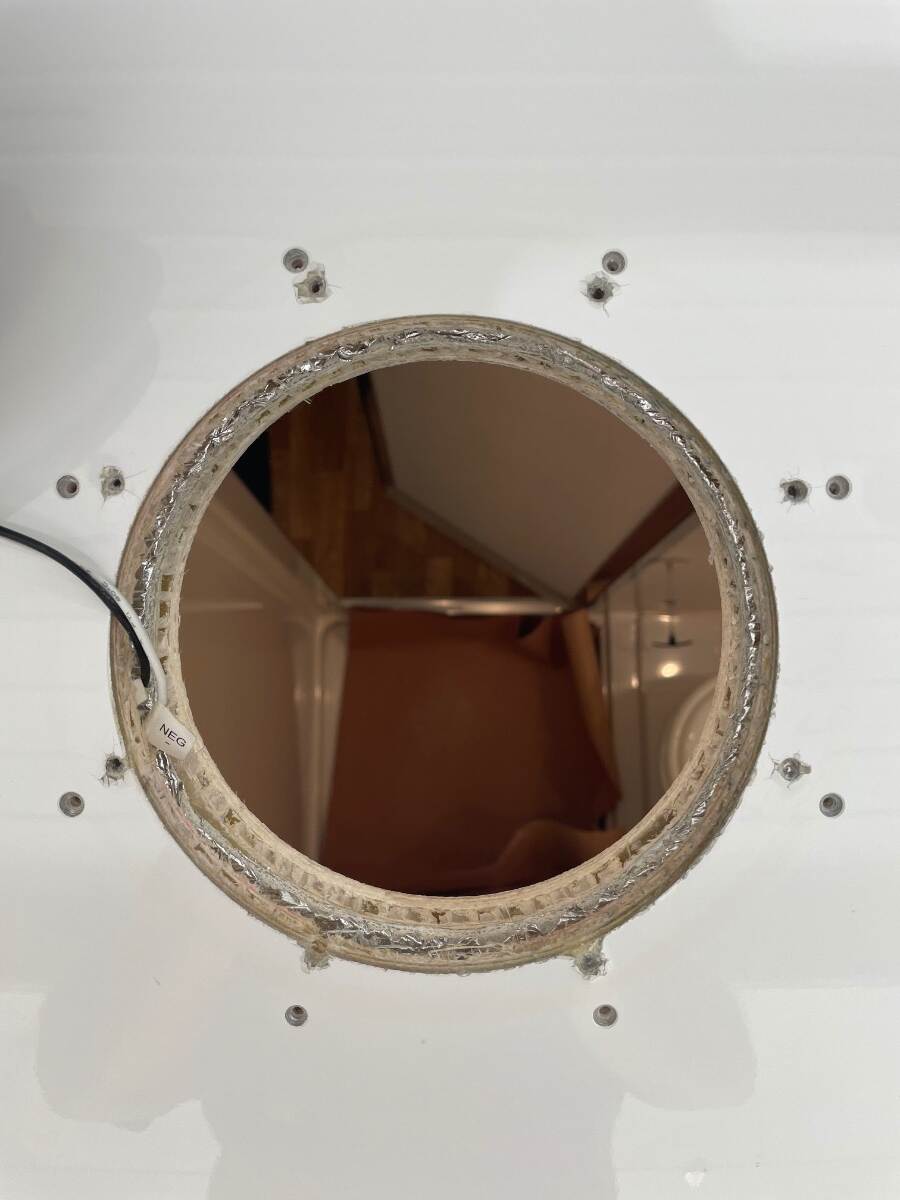
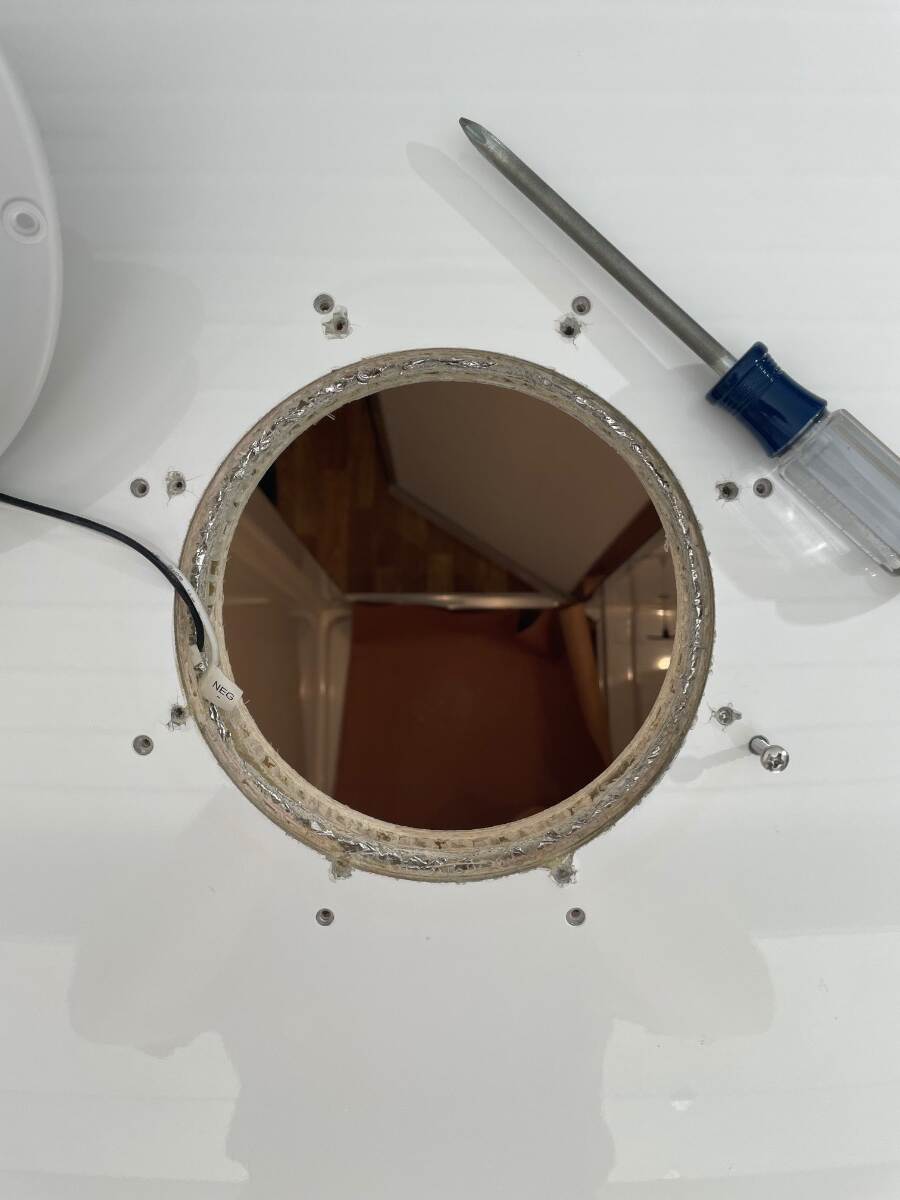
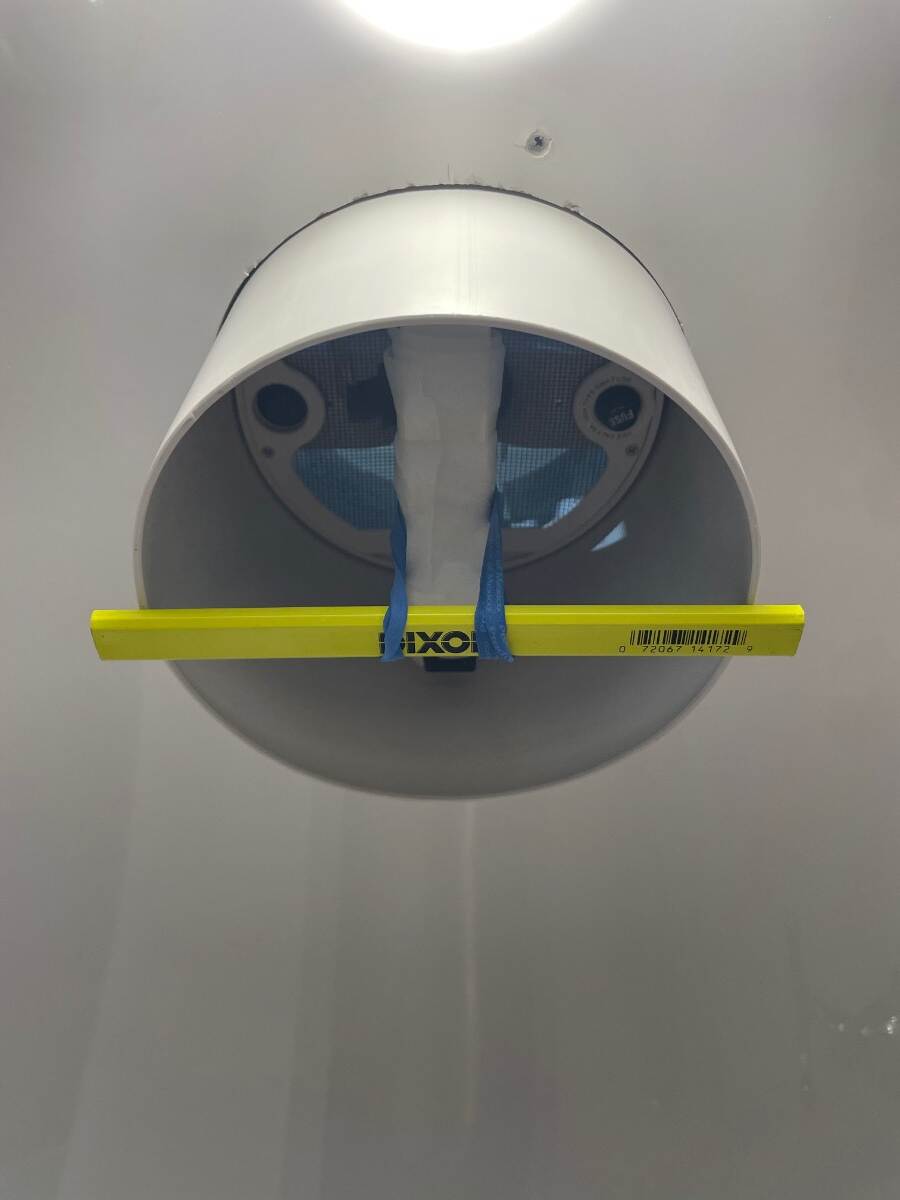
This morning while doing a full systems ‘go’ inspection on Hull #634 XPLOR, I discovered when I configured the Truma water heater valve to the ON position, an impressive stream of water shot directly out of the Truma filter exterior housing. After a little troubleshooting, I removed the filter and discovered that inside the filter housing, a small black round piece of plastic had blown out of the filter housing. This rendered the filter useless. We have had 5.5 years of trouble-free service from our tankless Truma and this was a first. We like our Aqua Go. I am posting this in the event anyone should have the same issue with their Truma filter. I have the optional antifreeze filter which works in a pinch as a back up. If you do not have the optional antifreeze filter as a back up, you will be stuck like Chuck with no hot water. In order for the Aqua Go to work, it has to have the filter element. I contacted Oliver Service and ordered a OEM replacement and an extra back filter up of the exact one you see in the below pics. “Two is one and one is none.” 🫡🇺🇸 Replacement filters are $95.00 plus shipping. Thank you Mike Sharpe for getting my new filters shipped out. The tiny piece of plastic that broke loose. Here is the filter that failed. You should not be able to look through your filter. The arrow points to where this tiny piece blew out. There is no way to repair it. I pass this on, so that if you have this issue you can just replace the filter with a new one.
1 point
-
Our 2016, about the same thing. I reinstalled a replacement cable, but to do it properly I would have to reroute the waste drain plumbing. More here =>1 point
-
Great comments thanks. This part is interesting because it does have a standard over pressure valve just above the filter housing. Do older Trumas not have this? Otherwise great tip about the antifreeze unit, I had it in there full time
1 point
-
Not sure of the exact situation from the information given, but here’s some commentary Using the induction on battery The induction will only pull full 1.8kW when both burners are on full power. The smaller one is limited to 8/10 vs 10/10 of the bigger to meet this spec. With my 3k inverter and the max lithium I can only use both at full power by themselves, no microwave or other high power devices typically at the same time because tripping the 3k is easily possible. But you have a 2k, the reason you can’t get full use out of the 2k is twofold I believe. One is code (for buildings) limits you to I think 80% of full spec for wiring. It depends on various factors like if it’s in conduit or whatnot. But the idea is there’s a difference between continuous high draw and momentary. EV’s for example, if say drawing 32A Level II charging at home overnight, will actually draw close to 32A for hours. Household wiring and sockets aren’t meant for that and will usually overheat, so they have different specifications. But maybe the wiring is rated for full use, as I do get full power on both while on shore. Two, inverters never seem to give the full rated spec, I think they leave margin for spikes. Again 80% is typical from my experience. Seems like if I get close to 3k it’ll freak. Finally there’s the phantom steady state draw from the rest of the camper, so the inverter needs margin for that. All told, an induction cooktop is much like an EV in that when it wants 1.8kW it will draw a full 1.8k until changed. That’s a high load/high stress situation for a camper. So it’s not surprising that a 2k inverter may not support both burners on full. I rarely to never use both mine on full with my 3k, it’s too easy to trip! I use the main burner on full, and if I need to simultaneously use the second one for say boiling some water, I just do it at a lower setting and it takes a little longer. But who cares? Induction is way faster than gas any day of the week so it takes about as long as gas. Breaker The LEII has a 15A dedicated breaker for the stove as you’d expect Stove top not doing anything If there’s zero response from the stovetop - pressing on (which uses no power) doesn’t turn it on than this is a problem. Most likely issue is a tripped breaker. Induction is definitely 120V not 12V feed. Anyhow the induction is a game changer IMO. No toxic gas danger, no condensation from the propane burning, no fire risk, faster, cleaner and better. But you have to know how to work with it as it’s a very high power device. I don’t think it’s a deficiency that the 2k won’t support full power on both burners, that’s ‘by design’. it’s the same reason you can’t run AC, wave and stove at the same time. You pay for the inverter size you wanted. So I wouldn’t worry about that, even at a reduced setting it’s still going to boil water faster than propane.1 point
-
Wanted to chime in on the black tank valve cable installed from the factory (2022). Mine was being hard to open and close all the way so I pulled the valve, did a thorough cleaning and reinstalled it. It didn't improve, so I pulled the cable out of the sheath and found a small kink in the cable about midway between the valve and the pull handle. I'm not sure if it was from impact during construction or from being pushed in too hard. I ordered a new cable and looked at the instructions and found out the cable must be straight at both ends for at least 6". It is also required to be secured every 2' O.C. for the entire run. The cable from the factory doesn't meet either criteria. My guess is if the cable was properly installed at the factory it would operate the way it should. Has anyone "properly" installed a replacement cable? Results? Black Tank Blade Valve Cable Installation Instructions.pdf1 point
-
That creek that is basically on your right as you take the drive up to Saint Elmo is full of hungry trout. Bill1 point
-
Thanks for sharing David, I just purchased a backup on Ebay for $25. If anyone needs a replacement or spare and can’t find one on the cheap, they are available on Amazon as well. https://a.co/d/00C38npm1 point
-
Thanks a million for invite ! That is so kind of you ! we plan to stay in the Colorado High Country for most of the summer one of Therese days we will visit you in Prescott1 point
-
Thanks very much @Patriot for this. It makes me wonder - I generally leave the “heater” filter in all the time regardless of season. Should I pull it for the “off season” and only put it in during the cold camping months? I only switch to the standard filter when running the decalcification cycle. Am I doing this wrong?1 point
-
Wired and tested the iRV62 today. Very easy to wire to Oliver wiring with AM/FM, DVD, and CD player working great with original Jensen TV and Jensen speakers! Great choice!1 point
-
Try unloading the fitting and likely you will get it to take grease. Sorry for speed reading this 36 page thread if you already tried this. GJ1 point
-
Please read my detailed report that I sent in on this topic attached....I've had truma's replace 3 times. First potential cause - Truma didn't properly tighten the brass fittings internally that feed the burner assembly. Second potential cause - Truma didn't crimp the burner tube assembly correctly, and with travel they rattle out (the burner tubes are like in a bar-b-q and can fall off which causes raw gas to be injected into the burner area for explosive ignition instead of gentle start.) This blog post has 3 goals and was SENT to NHTSA for evidence of why Truma needs to do something to fix their defective mfg process. 1) List symptoms we experienced with our Truma and use photos to illustrate the 3 firebox events. 2) Describe 2 different Truma reported manufacturing defects and show photos illustrating those issues. 3) Describe the in field solutions for each of the 2 manufacturing issues. 4) Show a pictures of the current Truma Burner Unit with all Manufacturing updates in place. The attached PDF is in full detail with picture of what is likely the issue or issues causing explosive ignition. Truma Issues.pdf Hope that helps...remember...you need to report this to both Oliver and Truma in order to get any warranty coverage. Craig Short1 point
-
6 or 7 consecutive for Wyoming. This will be number 21 for consecutive years in either Wyoming, Montana, Idaho or Colorado. Ya just don't know where the "stupid" fish are located! 😉 Bill1 point
-
Getting ready to leave at near the end of the month (June) for the rest of the summer. Got to get all of those "honey do's" done first!🥰1 point
-
Home for the Summer! 🤣 Come see us if your heading one state further West! 😎 Got electric and water for you, free dump station down the street, and lots of great camping around town and in the Prescott NF! (no bighorn sheep though, how cool!)1 point
-
Rally Early Registration is open and saves you $ as price will go up later. Rally link: https://olivertraveltrailers.com/events/oliver-owners-rally/ See Jason on the Morning Coffee Youtube just released...he also discusses the Rally Registration and Fee's in the video.1 point
-
Jason talks about registration fees in the video above. But for those that don't want to watch this video here is what he says: $100 per person from now to the end of June $150 per person from July 1st until close of "normal" registration - assume that this date will be announced later $200 per person from the close of "normal" registration for "late" registration Obviously, to save a bit of coin, registering before the end of June is less expensive. However, even though it appears as though the 2026 Rally will be well attended, the more of us that register "early" also greatly helps the folks at Oliver, helps the folks at the State Park and helps presenters and demonstrations with planning, ordering food, swag and venues for each of the activities. For those that might be worried about something happening that would prevent attendance after already paying your money, in the past up until a fairly late date prior to the Rally, Oliver has refunded most (if not all) of the Rally fees. Looking forward to seeing "old" friends and meeting a bunch of new folks too. Bill1 point
-
I have been using the Cielo Breez Max smart thermostat for almost a year with no apparent issues, nor have I read any negative reports from other users (Oliver, as well as SOB owners) regarding potential harm to their RV air conditioners. Some have expressed concern with the power ON/OFF attribute of the Cielo and inherent longterm harm to electrical control and mechanical components. Proper configuration of settings to prevent ‘short cycling’ is paramount in avoiding said harm, whereby the compressor is allowed time to equalize refrigerant pressures and thus, significantly lessen subsequent strain on sensitive equipment. I’m of the opinion 1) that Cielo has built in scheduling features by default to provide for necessary delays between compressor cycles, as do most RV thermostats, and 2) the soft start device pairs well with the Cielo to further lessen any longterm concerns I may have. I can honestly say that the Cielo has completely resolved the ‘humidity spike’ issues once experienced and exceeds my expectations as a replacement thermostat in our Oliver.1 point
-
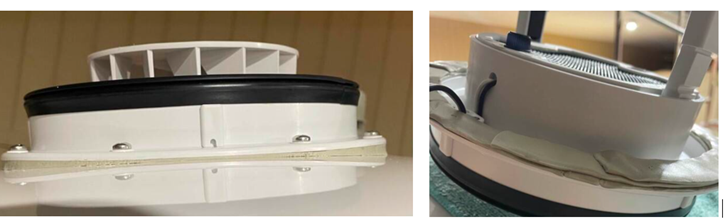
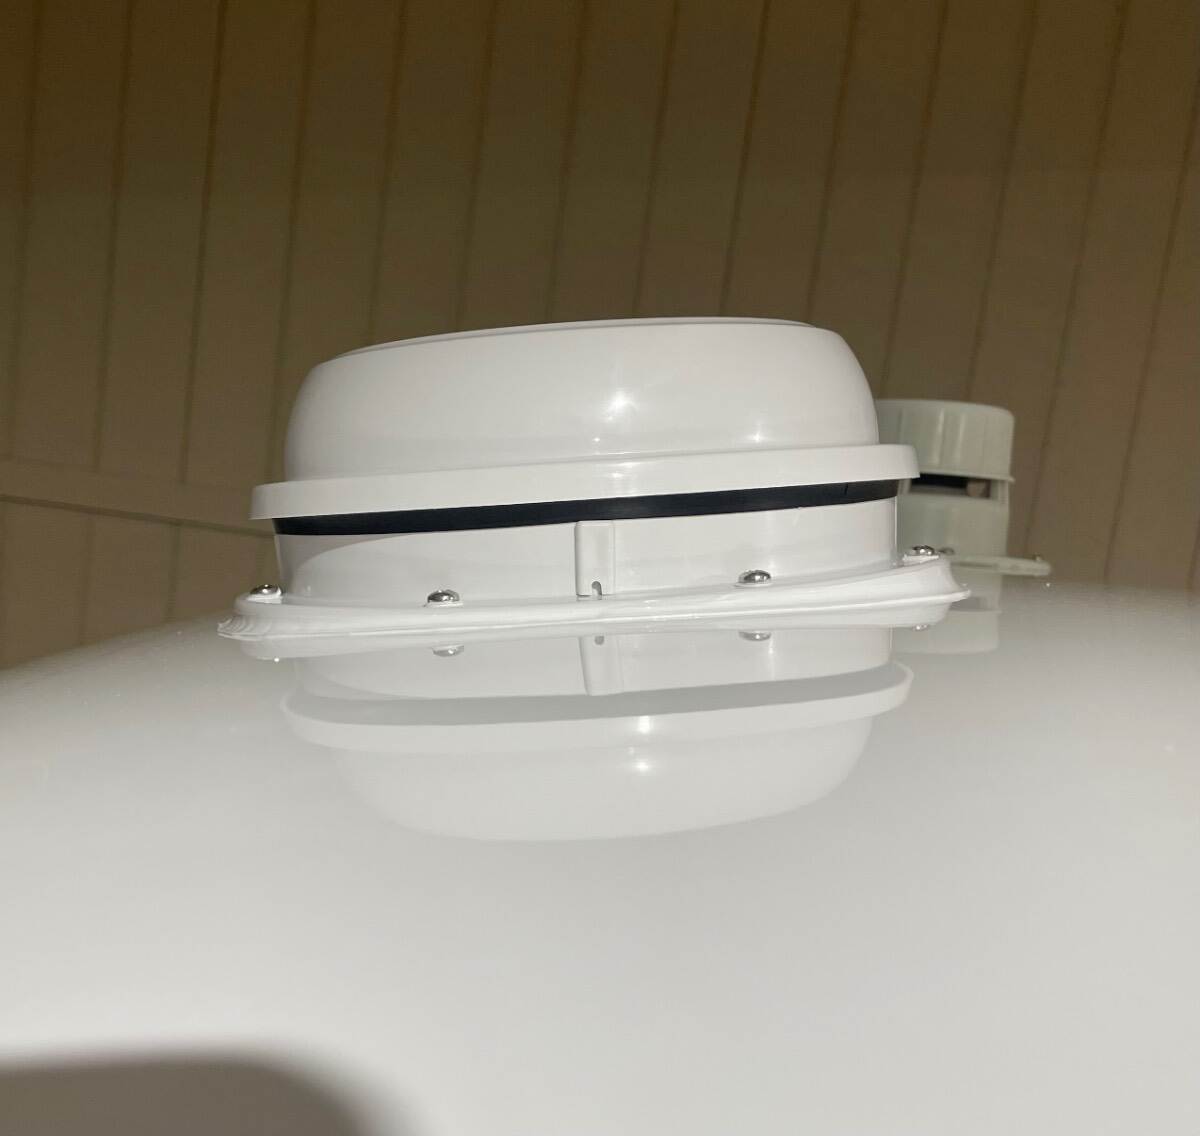
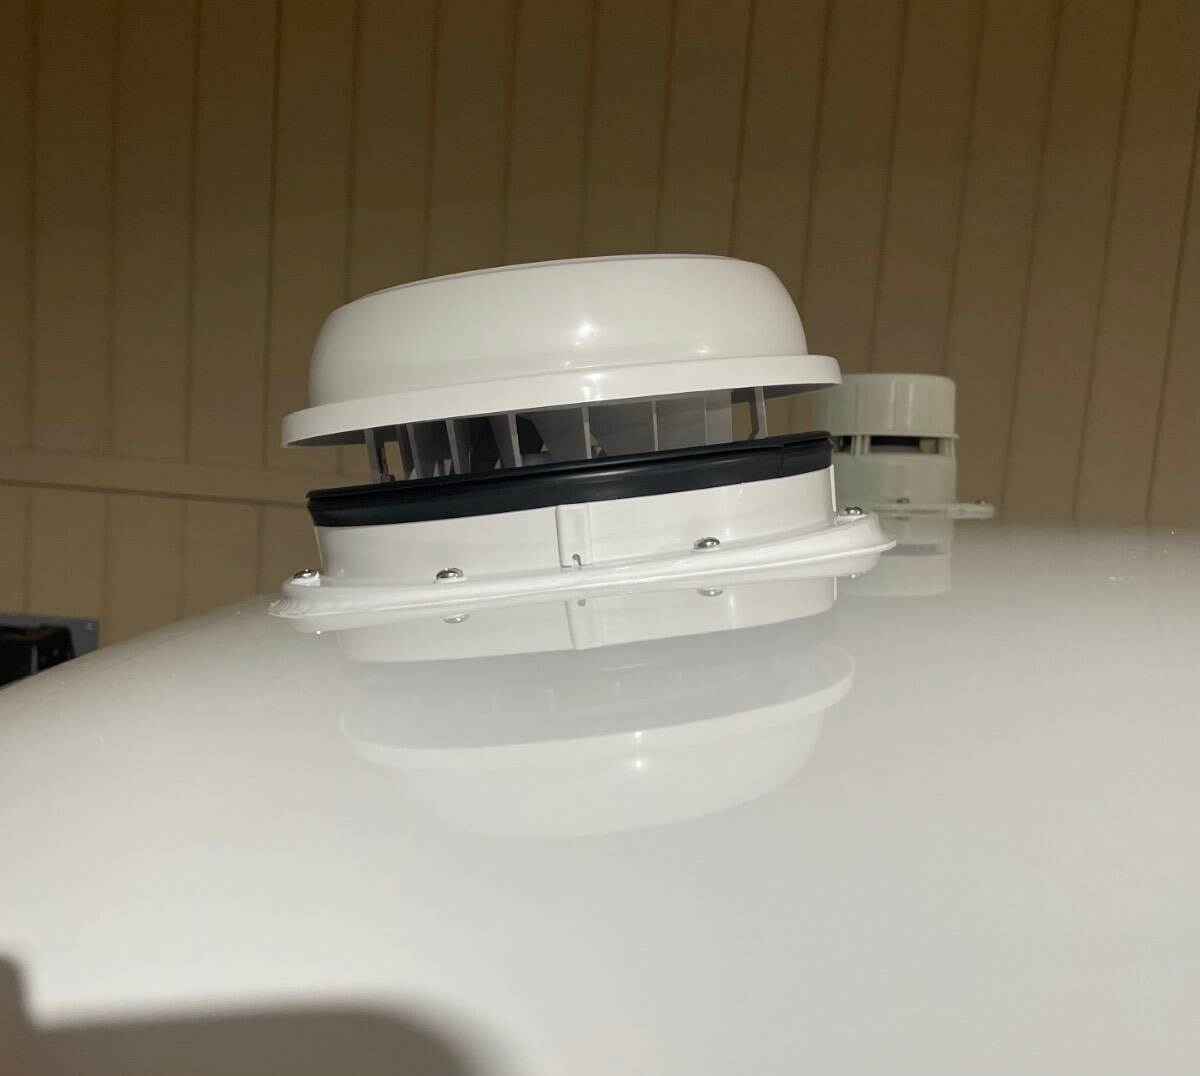
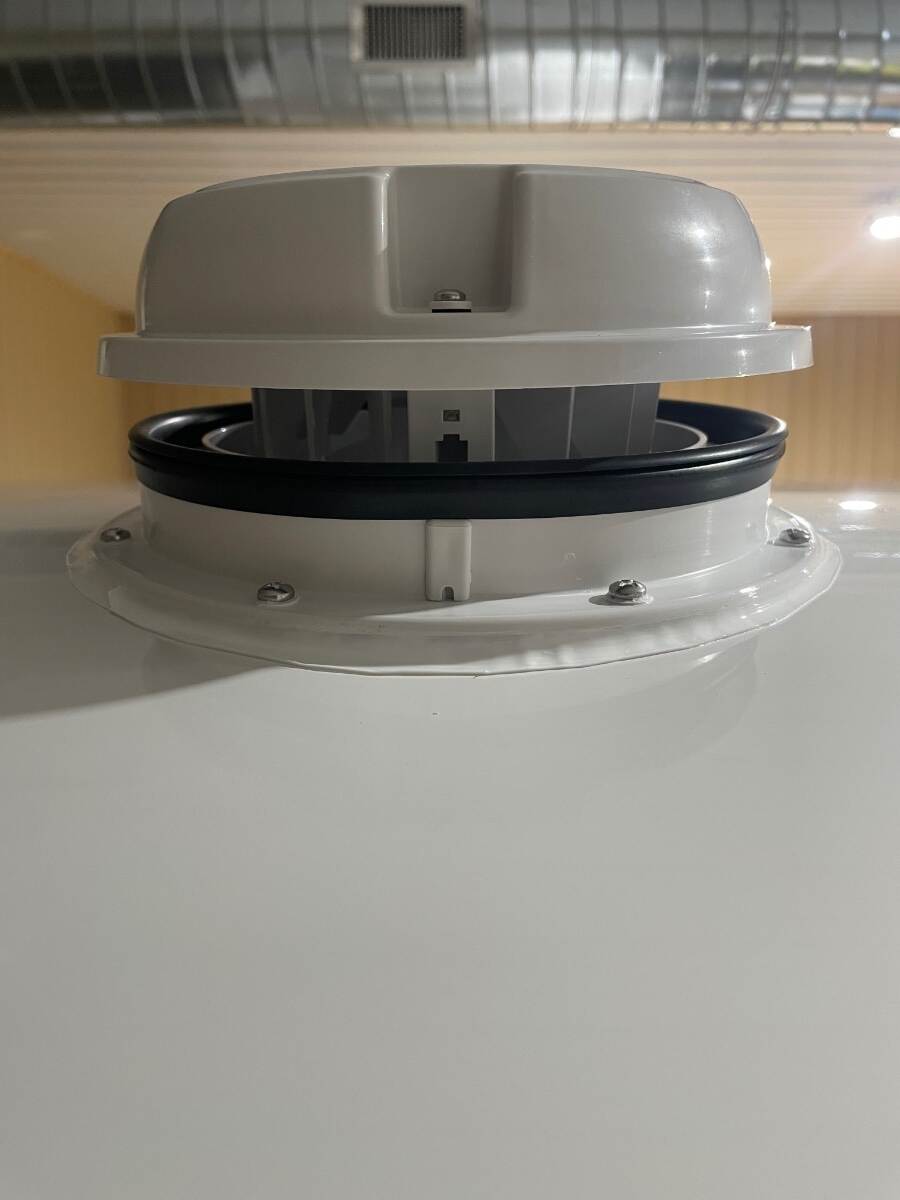
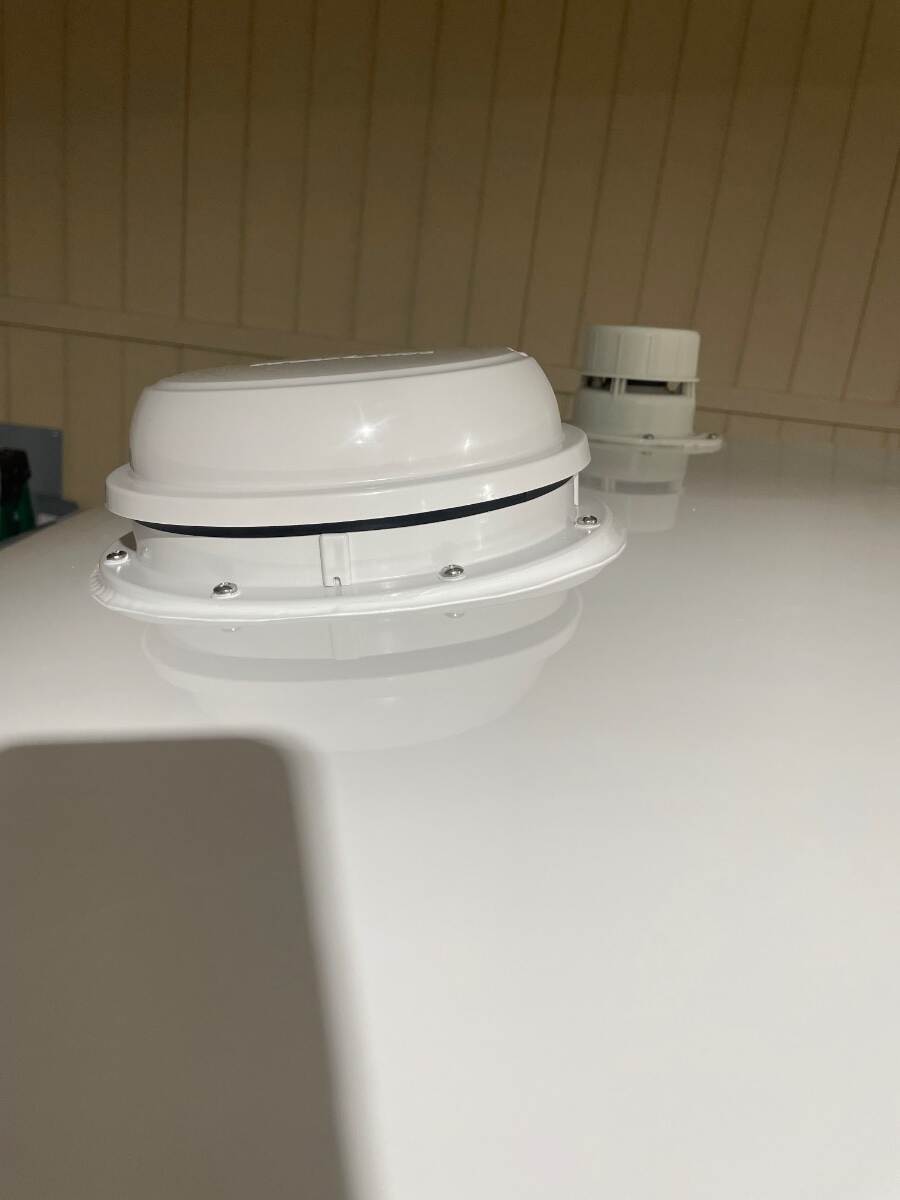
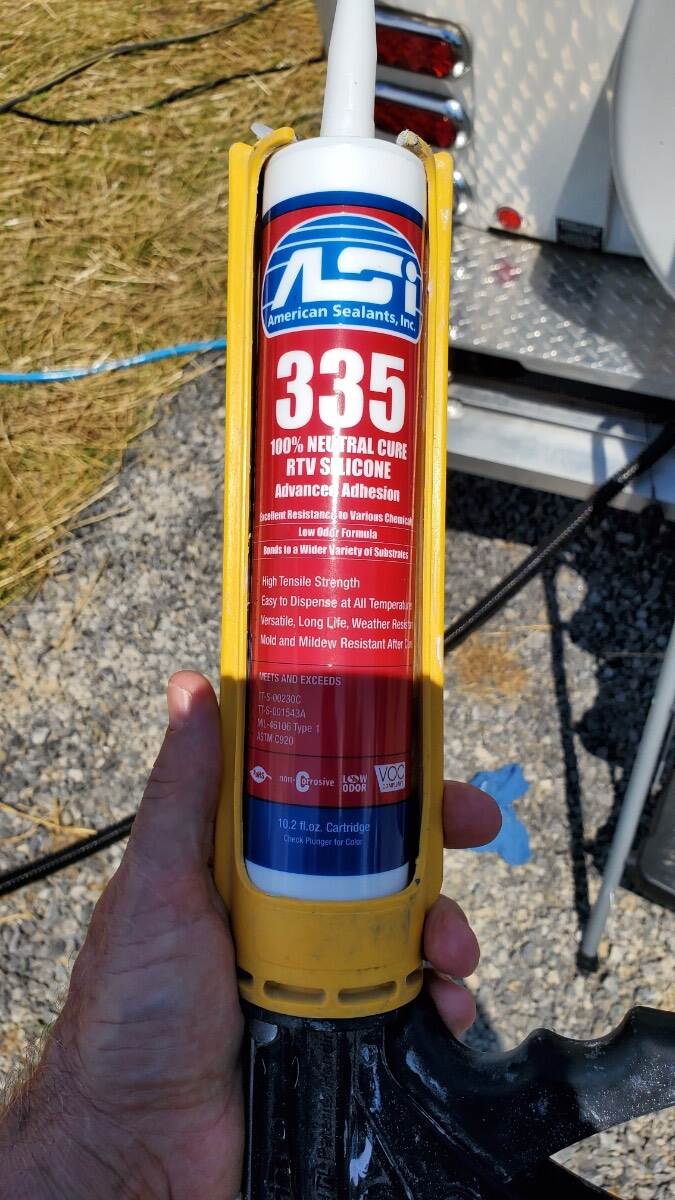
With the inside work complete I went back to the roof area, trimmed the oozed butyl, wiped with isopropyl alcohol again, and taped off the area to be caulked leaving about a quarter inch gap from the edge of the flange in the front and rear and about an 1/8 inch gap on the sides where the caulk would be the shortest. I applied the caulk 3 times, wiping it off the first two times, reapplying the tape and recaulking each time because I didn’t like the way it looked. I finally left it alone because I decided that if I kept messing with it I would keep screwing it up and it was close to supper time and I was starting to get hungry. This picture shows the fan after the oozed butyl was trimmed back. It shows the built-up butyl in front of and behind the fan to keep the flange straight. This next picture is after the ASI 335 was applied. Notice that the black seal is straight, not bowed down at the front and rear due to having the flange pulled down to touch the roof. The black seal must remain straight so that the cover will seal properly when closed. I applied the ASI 335 to the screws but didn’t like the way they looked so I wiped it off. I had applied ASI 335 to the screw holes and the screws were twisted in through up to 3 layers of butyl so I figured they were sealed well enough. The caulk job wasn’t perfect but it looks good from the ground. The ripples are from my hand shaking after going through the process 3 times before finally accepting that it wasn’t going to be perfect. I actually like the stepped edge of the caulk versus a feathered edge because I think the feathered edge of caulk doesn’t hold up well after repeated washing, drying, and waxing. We’ve pulled the trailer through wind and rain for 1350 miles and it has remained closed and hasn’t leaked. I can’t completely say that it is quieter than the original Ventline fan but it does not have the rattle that it did. ASI 0240 https://meridianadhesives.com/products/asi-0240/ ASI 335 https://meridianadhesives.com/products/?product_search=335 It looks like ASI has two versions of the 335. The stuff I used looked like this Good luck on your installation. Bill
1 point
-
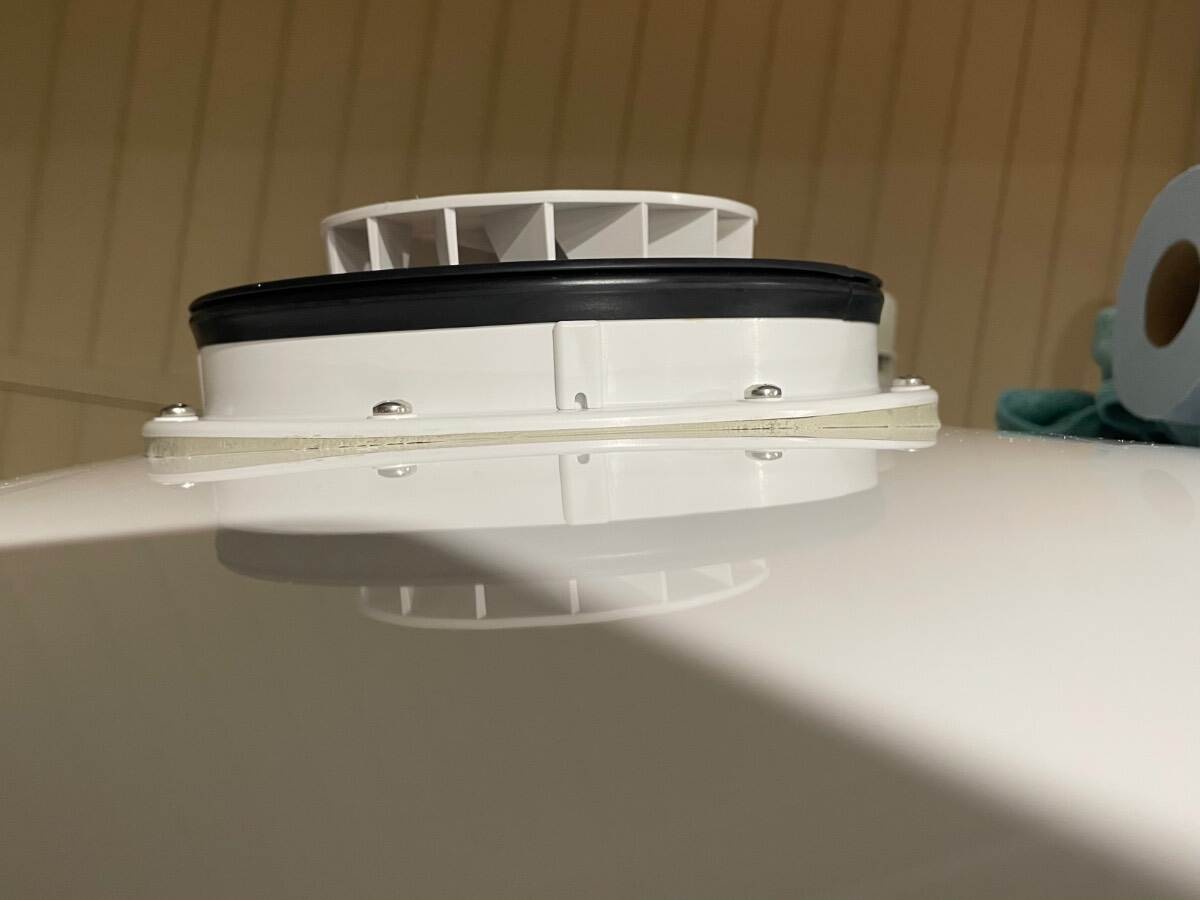
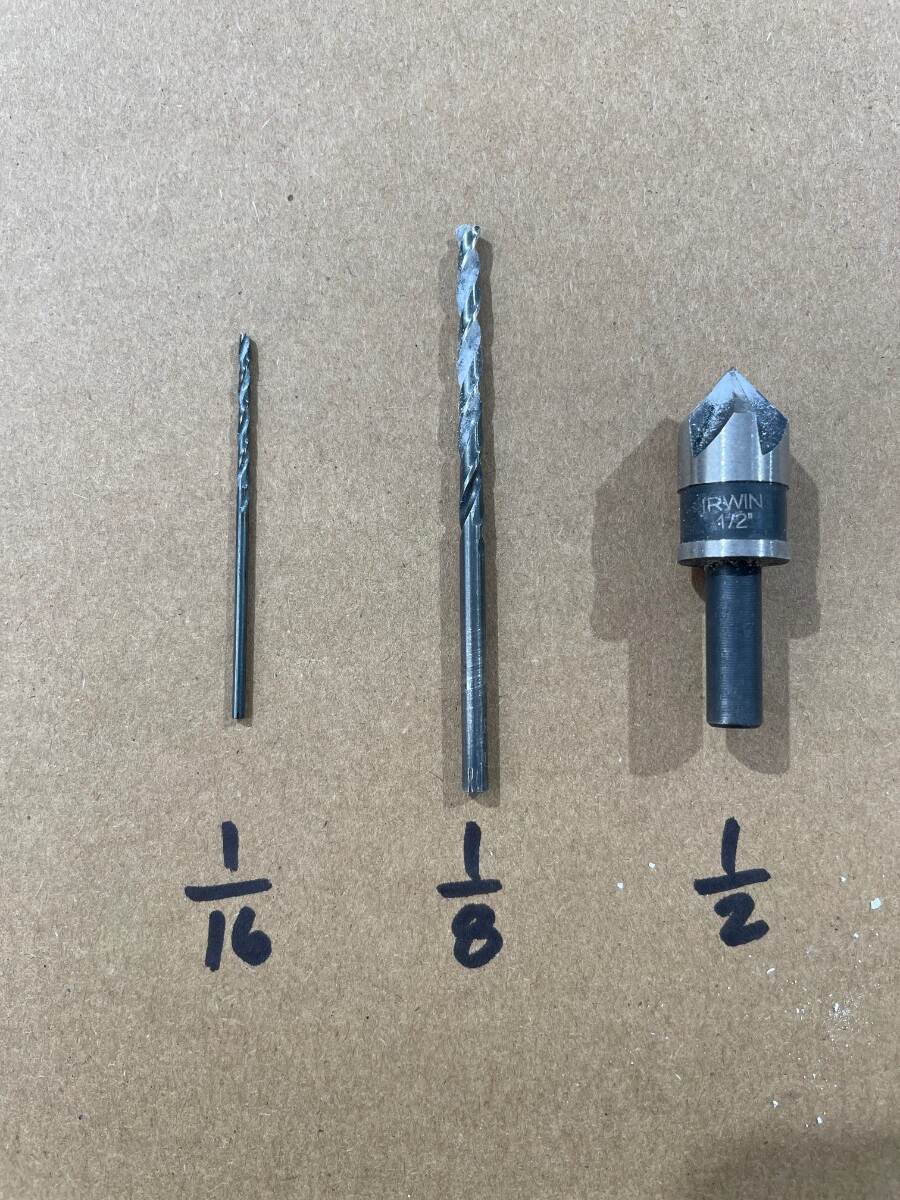
Picture below shows old Ventline fan removed and the roof area cleaned up. I used ASI 0240 adhesive remover and plastic razor blades. I cleaned up the edges of the original holes with a chamfer bit in a drill motor. The factory didn’t align the old vent with the hole very well resulting in screw holes too close to the edge of the opening and didn’t drill and chamfer the holes which resulted in chipped gelcoat. In this picture the pilot holes (1/16”) for MaxxFan Dome are located and drilled. I wanted the screws to be perpendicular to the MaxxFan mounting flange not the roof line so I tried to drill them at the correct angle to the surface of the roof. I did a lot of test fitting inside and out. The outside fan, the middle sleeve, and the interior trim ring must fit together well for this retrofit to work out right. I used a carpenter’s pencil and 2 rubber bands from of a bunch of broccoli to hold the sleeve in place while I got the pieces located just right. I did this before I marked the holes for the flange. New pilot holes are enlarged to 1/8 inch and chamfered Test fit the screws to make sure they are not too tight. If they are too tight you risk twisting the screw in two in the hole. This would be bad. Very bad. If the test fit is too tight go up to 9/64 inch bit. I used a 1/16 inch drill for a pilot then enlarged with a 1/8 inch drill and finished with a 1/2 inch chamfer bit. Be sure to use sharp bits and drill SLOW. I wanted the flange to be straight, not pulled down to fit the curved roof. I applied one layer of butyl all the way around the bottom of the flange. I then applied 2 short strips between about 10:00-2:00 and 4:00- 8:00. I again applied 2 even shorter strips between 10:30-1:30 and 4:30-7:30. I tried to build the butyl up in the places where the widest gaps would occur, that is the front and back of the fan. I wiped the mounting location with isopropyl alcohol and let it dry and filled the old and new screw holes with ASI 335 and set the fan in place using a couple of screws inserted through the flange and butyl for alignment. The black button on the handle goes toward the front of the trailer. Work the wires and splice connectors into the space between the hulls while inserting the fan assembly into the hole in the roof. Go back inside the bathroom and put the sleeve, pencil, and broccoli rubber bands in place to help maintain alignment of the fan on the roof. Back on top, tighten each screw down a little at a time and try to keep from distorting the flange. I would tighten the screws and leave them for a while to let the butyl push out then I would tighten them a little more until I got the flange sitting like I wanted it to sit and then left the butyl to do what it wanted to for a while. While the butyl was oozing I went inside the trailer and made sure the sleeve was in place with the upper edge of the sleeve against the bottom of the fan and the notch in the sleeve for the wire retainer properly located. Using a pencil I marked a line around the sleeve where it exits the curved ceiling. I drew another line 0.35” below this line to account for the interior trim ring and cut the sleeve to this line using a pair of heavy shears and a razor knife and finished to fit with a sanding block. I attached the trim ring and tightened the screws enough to pull the ring up to conform to the curvature of the ceiling.
1 point
-
I took it to mean that you place the power button forward, not the release button. That’s why I posted this question, to get responses from owners whose Olivers had the MaxxAir MaxxFan Dome installed at the factory. Also, I don’t intend to pull the flange down much to form to the roof curvature. I intend to build the butyl tape up some under the front and rear of the flange where it stands proud of the surface. Bill1 point
-
I totally agree though our Furrion unit is probably older than yours but regardless these things could have only been made by a very troubled mind. Effectively we never use ours, never watch TV while out in the Oliver and radio reception is near non existent in places where we usually are at. If it weren't for creating an ugly gapping hole I would have taken the thing out years ago. Looks like you found an excellent alternative. Looks nicer too.1 point
-
I have a new 2026 with the D35 3” axels, EZ everything and the 072-042 1750 springs. Considering whether going for a heavier spring makes sense now for these reasons. In 4k of towing so far I sensed no issues, no roll at all, no porpoising except on bad roads where you can’t avoid it, and a smooth tow. I previously had researched Bigfoots quite a bit before settling on Oliver. Over there an owner was looking to upgrade to a heavier suspension but was advised against it by the Bigfoot company owner (forget his name now). Reason being “that axel would beat the hell out of the trailer”. This makes sense and jives with the experience above. A higher rating will necessarily be a stiffer suspension. This will have a comparable narrow band frequency response to vibrations, relative to a less stiff system I play as an engineer by day and while the natural tendency is to over engineer, when it comes to mechanical design that’s often not a good idea, but I’m not an expert in suspensions. Anyhow I’m wondering whether the stiffer springs are a good idea here. Older Oliver’s it might be good, but not so sure now.1 point
-
In the fine print, they always state to run at the minimum when under the min, and of course do not exceed the maximum. Given you actually keep your Oliver at 6000 LBS, you can run 35 PSI. I would not suggest subtracting tongue weight, since when running at highway speeds the hitch is bouncing up and down and half the time ALL weight is on the trailer wheels. This is why for years, yes YEARS @John E Davies ran his Oliver at 42 PSI, and suggested we all do the same. I've been at 46 PSI last two outings. Those of you still running 50, 60, even 80 PSI, STOP doing that. According to Michelin, 40 PSI is a good number for the Elite II, and when we leave to Casa Grande next week, I'm going with exactly 42 PSI to honor our good friend John E. I wonder if there is some correlation between spring failure and those running the 80 PSI printed on the tire? Or, have these springs failed mainly on those pushing the GTRW? Perhaps, but again the broken cross-section looked like cr@p and some of these leaf springs were not hardened properly. When not hardened properly, steel will bend. These springs should not bend as in the picture above. They should break if over-stressed (over the GTWR), but not bend.1 point
-
This is the direction I would like to see as well. One of the US Spring manufacturers (St. Louis Spring) said they would replicate the springs on my E2 with USA sourced 5160 spring steel if I would send them a new one to copy. Knowing what I know now, I certainly would have paid a premium at time of purchase of my Oliver for USA made springs. I would like to see Oliver investigate this path. Now that they are at dealers, it would certainly further set them apart from the rest sitting on Chinese suspension. I cringe now knowing that my trailer went 25,000 miles supported by a $150 set of springs (again, not Oliver's fault. The entire RV components industry has gone to the cheapest possible cost model without regard to quality or safety).1 point


-
Recent Achievements
-


")


")

