mossemi
-
Posts
1,791 -
Joined
-
Last visited
-
Days Won
43
Everything posted by mossemi
-

Using a Foy support for a Foy (Overland) Laguna Table
mossemi replied to Doug S's topic in Ollie Modifications
I may have some hole plugs that will fit the screw/bolt mounting holes from the original Lagun base plate if you haven’t already done that. Let me know the size you need and I’ll see what I have left. Mossey -
Using a Foy support for a Foy (Overland) Laguna Table
mossemi replied to Doug S's topic in Ollie Modifications
It is often easier to reach Foy through the Oliver Facebook group. Mossey -
What material is this white electrical mounting board?
mossemi replied to John E Davies's topic in Ollie Modifications
I’ve been out of the country for a couple of weeks and I’m just getting back to the forum and started poking around. As you have stated before and the picture confirms it, you have 3 BattleBorn Batteries. I am not a math major, so where is the mid point of a 3 battery system?🤔😂 Mossey -
The first picture is from the 2017 Oliver LEII manual and the second is from etrailer.com. Both indicate that the black wire is the hot/charge wire. Mossey

-
Battery compartment door lock replacement
mossemi replied to StillGame's topic in Ollie Modifications
I just viewed this YouTube video by 'The Fit RV'. It has a new lock that might satisfy some of the security concerns mentioned in the post. https://youtu.be/SVlGeO6RoKM?si=Gb0OrYhrs2SGJEbx Mossey -
Nightstand USB Access Question
mossemi replied to Wandering Sagebrush's topic in Mechanical & Technical Tips
@Wandering Sagebrush The panel that closes off the back ~3" of the drawer cavity in my Ollie has a black access panel that covers a 6"hole. The attached picture shows the access panel resting upright on the deck above the basement area. It also shows the access hole which I can reach through and touch the back of the 120V receptacle as well as both of the 12v ports. Mossey
-
I have to ask, how long does it take to fill that Ollie spare tire with the foot pump? 🤔 Mossey
-
Nightstand USB Access Question
mossemi replied to Wandering Sagebrush's topic in Mechanical & Technical Tips
All of the cigarette and USB ports that I have seen have a nylon retaining nut which match’s the threaded body of the device. You can remove the drawer and locate an access panel. Remove 4 screws and you should be able to put the retaining nut back in place. Mossey -
No 120 vac from outlets in Elite II.
mossemi replied to docron's topic in Mechanical & Technical Tips
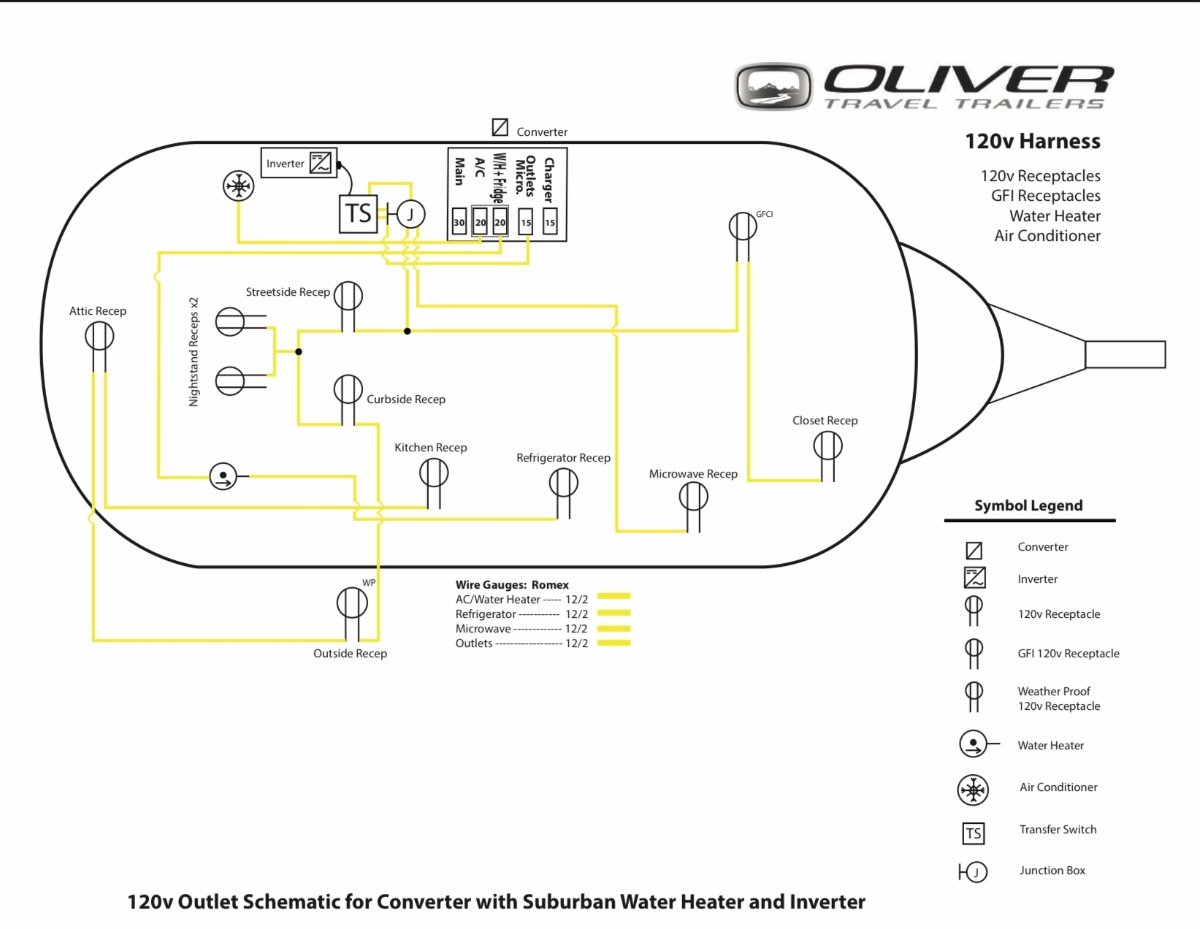
@docron I’m a little late joining this conversation and I haven’t seen your final outcome, so I will add a little information that may or may not be of benefit. I know you have completed some initial troubleshooting and I would like a clarification on your statement above. Does it mean that you have used a 120V outlet tester which would test the output of the receptacle or have you removed the outlet cover and tested for voltage at the receptacle/wire connection which would test the input to the receptacle? If there isn’t any input voltage at the receptacle then as has been mentioned above, the problem is up stream and the junction box near the transfer switch would be the next test point. Then the transfer switch. The picture attached is from a 2017 LEII, but should be a fair representation of the components involved. Please let us know if you have solved your issue or if we can be of further assistance. Mossey
-
Can you supply some pictures of the equipment you are referring to? Are you referring to breakers as I don’t think I have ever seen black fuses. Mossey
-
Oliver Elite II Moisture Inspection
mossemi replied to NomadLife's topic in Mechanical & Technical Tips
@NomadLife Your Oliver forum personality shows that you do not own an Oliver Travel Trailer or any RV, so what is the nature or reason for your moisture question? Mossey -
@johnwen I’m glad your tire failure only resulted in a dented wallet and y'all are safe! Hope your remaining vacation and return trip home is safe and uneventful. Mossey
-
Excellent idea and execution. Well done! Mossey
-
Very nice job! What brand of safety shoes are you sporting? Don’t think I’ve seen ‘em before! 😂🤣😂 Mossey
-
If the fuse is inconvenient to get to, just move it to someplace that is convenient. Or install a switch someplace handy. I also have smoke/CO detector under attic in the rear of my Ollie, so I would still have some protection if I powered down the CO/Propane detector under the dinette. I and many others have solved what could be considered a false alarm by replacing our CO/Propane detectors. I don’t know how to properly test the detector, but if replacing it fixes the problem for me, that’s a win for the good guy! Mossey
-
Maybe I should have called a technical foul.🤣 Mossey
-
Great! Thanks for correcting my misinformation! Mossey
-
I agree, but only if your flashing lights are amber. I simple will not follow a driver with flashing red lights because every flash makes me think that they are applying their brakes and I automatically put on my brakes. Mossey
-
I This job is a lot easier with 2 people as Mike mentions, but if I am by myself I use a hose flow meter which are readily available at Amazon and hardware stores. This allows me to monitor the amount of water that is flowing into the black tank. I usually limit the rinsing fill to 12 gallons. And as ScubaRx stated above, always ignore any interruptions from anyone! Sometimes it’s OK to be rude. Mossey
-
If you can locate the rear of the CO/Propane detector under the rear dinette seat, there should be 2 small wires coming out of the detector. Following those wires, one should lead to the negative buss bar, it’s the one with a lot of yellow wires connected to it and should be visible near the floor. The other wire should be the power/positive wire and should connect to a fuse somewhere along that wire. You will probably have to open the wire loom which covers and protects the wire bundles. Mossey
-
Best Tire and Wheel Sizes on your HD Tow Vehicles?
mossemi replied to jd1923's topic in Towing an Oliver
Thanks Mike! I'm probably the only one to read it wrong, but it’s easy to confuse me.🫤 Mossey -
Best Tire and Wheel Sizes on your HD Tow Vehicles?
mossemi replied to jd1923's topic in Towing an Oliver
That statement made me do a double take because it sounds like you are running 18's on you Ollie. Can you clarify? Mossey -
My best guess is that those wires would power/operate the optional Barker electric dump valves. Mossey
-
Congratulations on your troubleshooting success! Now a word of caution concerning the solar system. If the solar panels have light shining on them at all, they a capable of producing both voltage and amperage. So it was fortunate that the solar cutoff switch was in the off position when you disconnected the power cables from the panels to the charge controller or you would have been handling live cables. It is a good practice to cover the solar panels with anything that would block light from producing power when working on the solar system in the area between the panels and the cutoff switch. I use moving blankets, but cardboard or wood panels would also work. The solar system manufacturers usually have a sequence of steps to follow when connecting the components of the system, so the Zamp manual would be an excellent reference source and you can find it online at the Oliver University. Click here! Mossey
-
This product is typically used to protect wood and other wall materials while soldering copper plumbing fittings, but I have used it in the Ollie to protect other wires. Mossey