

dhaig
-
Posts
99 -
Joined
-
Last visited
-
Days Won
1
Posts posted by dhaig
-
-
@johnwen, you are correct- yellow is ground and red is 12VDC.
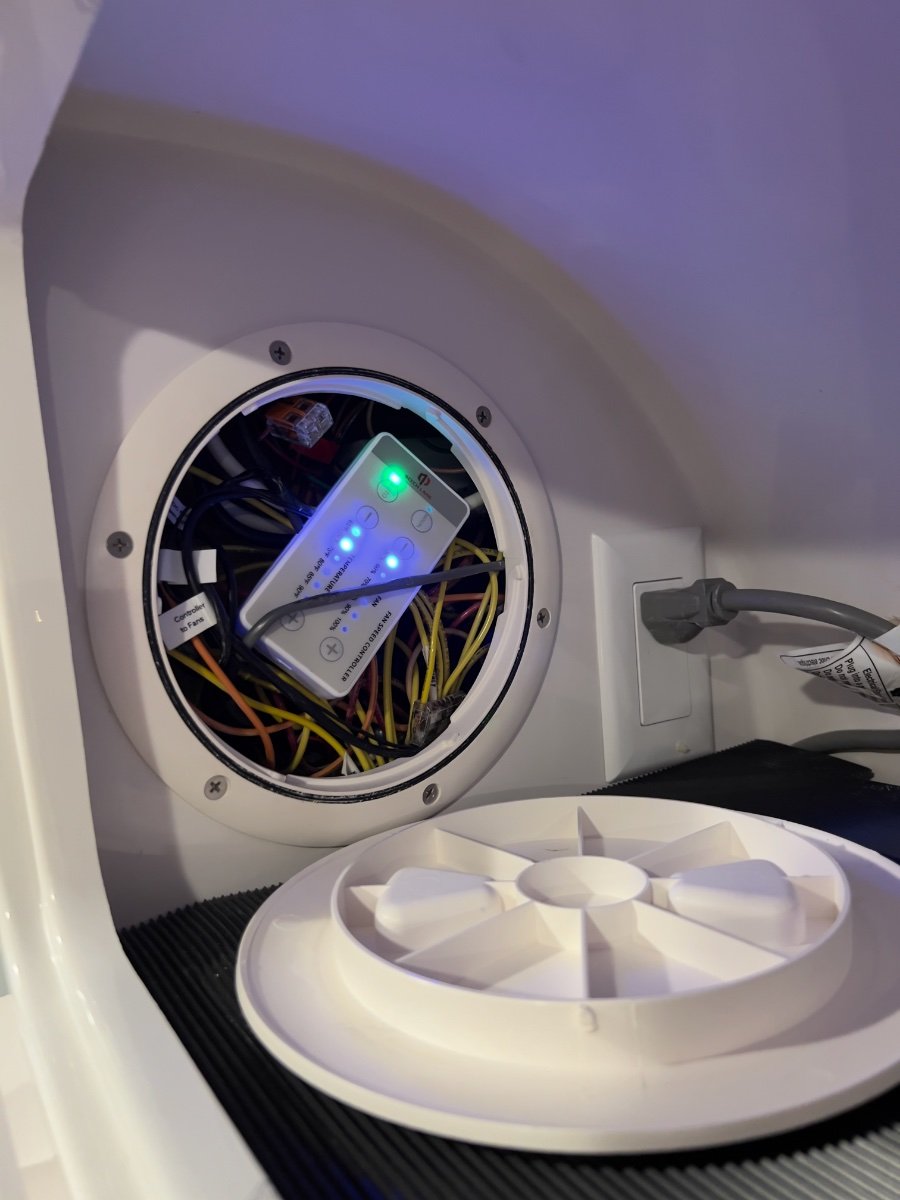
I believe you were referring to the image below:

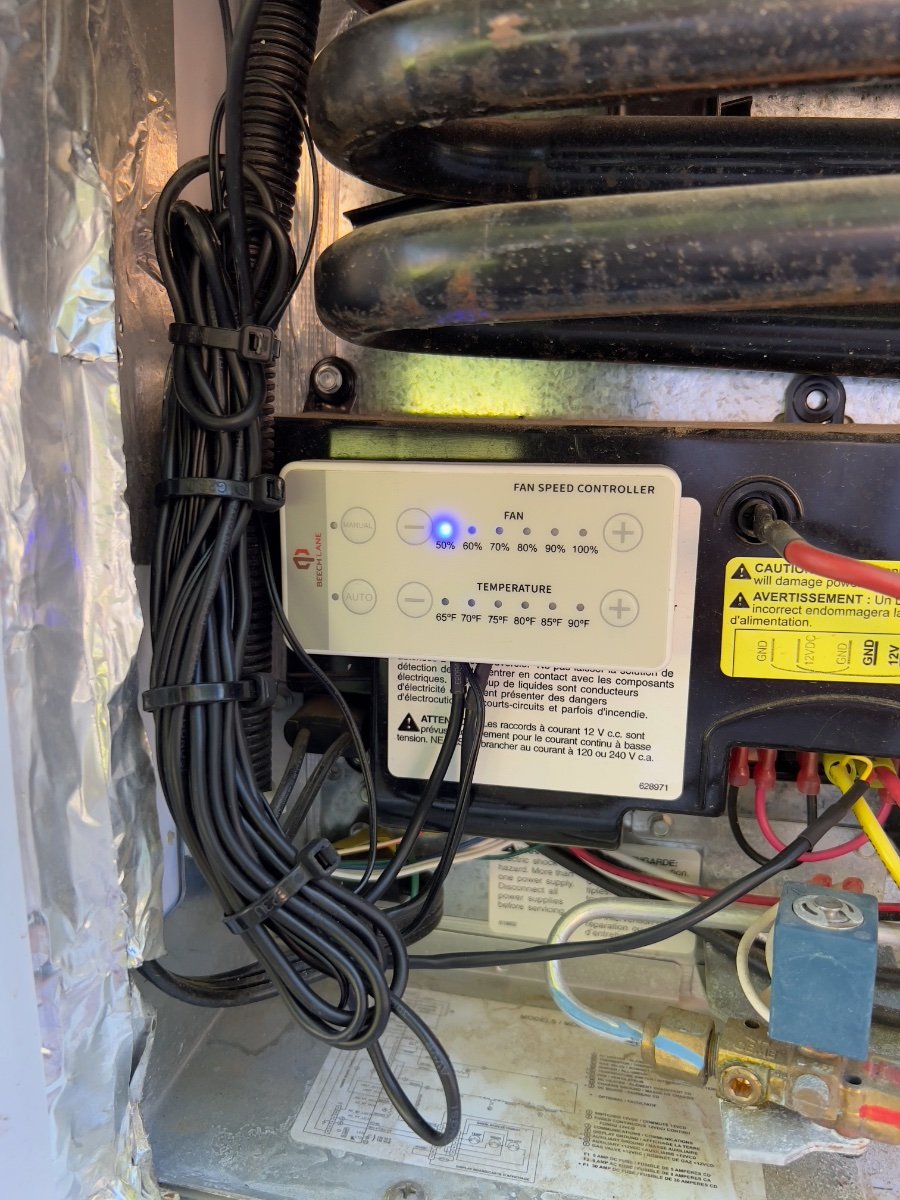
Please note, I later relocated the fan control to the upper storage cabinet above the refrigerator and microwave oven. The power connections for the fans remained unchanged from what is shown above.
Regards, Don
-
 1
1
-
 3
3
-
-
6 hours ago, Geronimo John said:
I have installed similar fans, and am thinking of doing both sides. Purpose obviously is to reduce the bypass of outside air into and then out of the fans so that they pull fresh air in below. I also know that there have been changes in the grills between your and my older OE2.
Hard to tell, but it looks like you have blocked off airflow on the aft side of the fans, but maybe not on the fore side. Is that what I'm seeing? IF so, what's your thoughts?
Thanks
GJ
@Geronimo John, the airflow around the fans is unobstructed. I suspect what you are seeing is the sloped interior wall above the refrigerator covered in aluminum tape. The fans do pull outside air into the lower vent and out the upper vent, where they are mounted. The flow of air is noticeable and I usually have them running at 50% of max speed, or less. The two fans easily produce sufficient airflow to significantly improve the performance of the refrigerator.
Don
-
18 hours ago, johnwen said:
Hi dhaig,
We are hull 996, also 2022 elite2. It appears there is not enough room to mount this fan on the upper vent. The space above the condenser coil has a slanted roof that interferes with the upper mounting of the fans. Yours must be the same design. How did you get yours in that space? From what I can see in your pictures it appears the 2 top mounting screws/tabs are just screwed into the upper slanted panel. Is that correct? I can get the fan assy into the space behind where the screen mounts to the frame but I need the bottom of the fans up off the fins and tubing as it gets pretty hot there at times. Is it possible to post a picture of the lower section to see the mounting of those lower screws? I wonder if that slanted piece of fiberglass/plastic can be modified to give me a little more room in that area. After looking at your picture a little closer, yours might not be slanted like mine is.
Thanks,
John
@johnwen, The fans on our LEII mount to the inner edge of the flange around the vent opening. Not to the slanted panel inside the vent opening. There was no cutting of the fiberglass. In the three photos below you should be able to see the screw heads which clamp onto the edge of the fiberglass. There are also small metal "ears" fastened with hex screws to the fan frame. The combination of the "ears" and the large screw head serve as a clamp. The fans are quite secure using this mounting mechanism.
Regards, Don

-
1
-
-
10 hours ago, ThomB87 said:
Top or bottom vent? How easy to attach and wire up?
@ThomB87, the fans are installed in the top vent. When they are running the movement of ward air from the upper vent is noticeable. There is very little fan noise. As @Ray Kimsey describes, only a 12VDC and a ground connection are required to run the fans. Attached to the fans is what looks like another wire, but is a temperature sensor. This is run down behind the regfrigerator.
A small remote control panel is also attached to the fans with 5 or 6 feet of wire. I ran wires for the remote control up behind the main control panel near the entry door. There is an access hole behind the control panel, with a round cover. This is inside the forward most storage compartment above the refrigerator and microwave oven.
I did not like having to remove the lower panel to access the fan controls. Also, the fan control has a bright blue LED which is visible outside the trailer if located behind the lower panel. Access from inside the trailer requires only opening the storage compartment and removing the round cover. This location also contains the annoying blue light on the remote control, which cannot be turned OFF.
-
1
-
1
-
-
@Nancy_D, we have a Norcold 3-way refrigerator and use it to freeze the blue freezer bricks. We typically use 6 bricks, in 2 groups of three and rotate the groups as needed to refreeze them. Typically this is a daily rotation.
We have added supplemental fans mounted at the rear of our Norcold refrigerator, which make a significant improvement in the cooling capabilities of the Norcold refrigerator, especially when outdoor temperatures are high. If you encounter problems with you refrigerator, I recommend use considering the Beech Lane Refrigerator Fans
The freezer bricks always refreeze overnight. I don't know exactly how long they take to refreeze, which will vary somewhat depending on the outside temperature and activity opening the door.
-
1
-
2
-
-
@Mountainman198 great idea? Could you please provide a link to the bins? I had no luck searching Target's website.
Thanks, Don
-
1
-
-
@Ronbrink, good question, I don't know. I have not opened the Xantrex app at the time the Xantrex Inverter/Charger has been heard to come on. On Sunday, I put our trailer back into storage, probably until January, so I won't be able to check until our next trip. Although I have been told by both Oliver Service and Xantrex "not to worry", I am still curious as to the cause. Also, I have noticed the brief periods when the inverter/charger comes ON mostly during the night, when I am in bed. I have not, so far, been sufficiently motivated to rise and investigate these incidents.
We are planning a January trip to the TX gulf coast in January to photograph migratory birds. I will try to remember to check the Xantrex app when I next notice the short interval of operation.
Regards, Don
-
1
-
-
On 11/13/2023 at 5:51 AM, MobileJoy said:
One other thing you might try is to charge the batteries slower. Setting 24 allows you to change the charger current. By default it is set to 150A. When I had poor 30A shore power at a campsite (low voltage), I changed this value to 25A, and it allowed the AC to operate for a while before the input voltage level fell to the point where the EMS rejected the input power source. Ultimately we wound up changing campsites.
The setting can be adjusted in 5A increments between 5A and 150A.
On 11/13/2023 at 9:52 AM, dhaig said:@Rivernerd, thanks, I was aware I should not use a traditional charger designed for lead acid batteries to charge lithium batteries.
I will certainly post on the advice I receive from Oliver Service, and the results.
Don
On 11/13/2023 at 9:52 AM, dhaig said:@Rivernerd, thanks, I was aware I should not use a traditional charger designed for lead acid batteries to charge lithium batteries.
I will certainly post on the advice I receive from Oliver Service, and the results.
Don
@Rivernerd, @Chukarhunter, @Steph and Dud B, @MobileJoy, @aaronorange, @John Dorrer,
My issue has been resolved. The Xantrex Inverter/Charger is now charging my Lithionics batteries. As promised, following are the details leading to resolution of the problem.
After logging a service ticket (including thorough details) with Oliver on Sunday, 11/12/23, I continued to read the Xantrex owner's manual and search the internet for clues to resolve the "AC bypass" preventing charging of the batteries. This effort was largely unsuccessful.
On Monday morning, 11/13/23, I phoned Oracle Service to inquire if they could provide guidance to resolve the problem. In short, they could not. I was told since this was an AC problem, Oliver could not help resolve the problem. They recommended taking the trailer to a service center. In the course of the discussion, I was also provided erroneous information, such as the as the state of the ON/OFF switches on the Lithionic batteries. I was told the batteries are fully charged if the switch button is lighted a steady blue color. This is incorrect. The owner's manual from Lithionics clearly states a steady blue light indicates only that the battery is ON. I knew from using the Lithionics app on my phone exactly what the charge state was- between 10% and 12%.
Oliver Service did forward my service request to Xantrex and I received an email from Xantrex which included a case number in their service request tracking system. In the automated email were instructions for submitting additional information. Using the Xantrex FXC Control app on my phone I made three screenshots of the current settings on the Xantrex inverter/charger, plus serial number, purchase date, etc. Below is one of the screenshots.
Oliver Service also provided a phone number to Xantrex customer/technical support, (800) 670-0707. I placed a call to Xantrex, only to receive a recorded message stating they were closed for a Canadian holiday. Today, I finally reached Shawn, a Xantrex tech support agent, after about a 25 minute wait in a phone queue. I provided the case number and Shawn spotted the screenshots and quickly reviewed the settings. Shawn told me he was almost certain my issue was caused by the setting of Charger Ignition Control being Auto-ON.
While still on the phone with Shawn, I went to the trailer, opened the Xantrex FXC Control app and changed the setting of Charger Ignition Control to OFF. The Xantrex Inverter/Charger immediately came on and began to charge the batteries. Neither Shawn nor I can explain how this setting got changed from the default Oliver setting of OFF. In the two hours since changing this setting the batteries SOC has increased from about 10% to >40%, while connected to a 20 amp circuit. In another hour, the batteries are all near 80% SOC.
Lessons learned- I had not checked all of the inverter/charger settings using the Xantrex FXC Control app against the Oliver default settings listed at https://support.olivertraveltrailers.com/portal/en/kb/articles/xantrex-inverter-settings. Had I done this, I may have resolved the problem sooner. In my opinion, Oliver Service should have recommended verifying the current settings against the Oliver default setting for the Xantrex Inverter/Charger and our model year trailer.
I had ordered #10 AWG wire and components to add a 30 amp RV outlet to a utility building near our driveway. I am now reconsidering spending about $200 and several hours of labor to do so. The 20 amp circuit already in place seems adequate for our needs when we have the trailer in the driveway. This incident confirmed my prior observation- the lithium batteries can be recharged from a very low SOC to full charge in approximately 4-5 hours using a 20 amp circuit. I have also used this same circuit to run the Dometic air conditioner in the trailer for as long as needed.
While I had Shawn on the phone, I asked him why the Xantrex Inverter/Charger would occasionally come ON for brief periods (2-3 minutes) while attached to shore power. I have noticed this occurring at night, such as when the furnace cycled on. Shawn said this was not unusual, if a large DC load is activated, such as a bilge pump, or a furnace blower.
I hope this information is useful to other Oliver owners whose trailers are equipped with Xantrex Inverter/Chargers. My thanks to all who offered suggestions to resolve the problem.
Regards, Don
-
1
-
6
-
-
I also encountered problems with air loss from Shrader valves which would not seat due to obstruction from balance beads. I suspect the problem affects more than 25 trailers. @AlbertNTerri indicated their hull number to be 1125. Our hull number is 990.
As had been indicated by nearly everyone posting on this subject, Discount Tire has loyal customers for a reason. I have been doing business with them for over 25 years. I don't recall ever encountering an issue with their service, but do recall many occasions on which they exceeded my expectations. Fortunately, their nearest store is within 3 miles of our home.
-
2
-
-
28 minutes ago, Rivernerd said:
I concur. Just be sure that any external charger you buy is designed for lithium batteries, or has a "lithium" setting. Ordinary battery chargers work great for lead/acid batteries, but do not properly charge lithiums, which require higher charging voltage.
That said, you sill need to get your Xantrex Freedom Pro inverter/charger addressed so it will charge your battery bank as designed. Please post what you are advised to do by Oliver Service, in case others (like me) are faced with a similar problem in the future.
@Rivernerd, thanks, I was aware I should not use a traditional charger designed for lead acid batteries to charge lithium batteries.
I will certainly post on the advice I receive from Oliver Service, and the results.
Don
-
1
-
-
3 hours ago, MobileJoy said:
One other thing you might try is to charge the batteries slower. Setting 24 allows you to change the charger current. By default it is set to 150A. When I had poor 30A shore power at a campsite (low voltage), I changed this value to 25A, and it allowed the AC to operate for a while before the input voltage level fell to the point where the EMS rejected the input power source. Ultimately we wound up changing campsites.
The setting can be adjusted in 5A increments between 5A and 150A.
@MobileJoy, I had overlooked setting 24, assuming that reducing the value for setting 28 (input breaker size) would result in lower charging current. Now that you have pointed this out, I will reduce the charging current to 15 or 20 amps. The symptoms I have observed lead me to suspect the inverter is trying to charge the depleted batteries at 150 amps, which is obviously not sustainable. Thanks very much pointing this out.
Don
-
1
-
-
@Dave and Kimberly, it occurred to me that the current draw from significantly discharged batteries could be quite high, as you described. I have never tried to re-charge from such a discharged state. The most extreme case I recall was recharging from about 50% SOC after having the trailer in storage for a couple of months (placed into storage at ~50%, as recommended). I have tried changing the parameter 28 setting to 15 amps using the Xantrex app, to no avail.
I hope to receive a call from Oliver Service tomorrow in response to the service ticket I logged. Thanks for the reply.
Don
-
1
-
-
2 hours ago, Rivernerd said:
Do you have a larger 50-foot extension cord, perhaps 12-gauge, which would be rated for 20A? When I connect house power to our 2022 Elite II, I use a 10-gauge extension cord so there is no issue with delivery of at least the 20A provided to the receptacle by the 12-gauge wire on a 20A circuit in our house wiring. If I didn't own at least a 12-gauge extension cord, yet needed to connect my Elite II to house power some times, I would invest in one, or maybe even a 10-gauge.
Also, be sure to submit a service ticket. Oliver Service has surely encountered this issue before.
@Rivernerd, thanks for the suggestion. I have previously used the 15 amp extension to provide shore power when at home, using the 20 amp circuit (many times), with no issues until now. I logged a service required to Oliver Service early this AM.
-
3 hours ago, rich.dev said:
I have never charged my batteries (lithium platinum package) with 15A shore power, but I believe when doing this you have to change setting #28 in the Xantrex app from 25 to 15.
@rich.dev, thanks for the suggestion. I was aware of the need to change parameter 28 to match the circuit capacity. I have set it to 15 amps, after having used it successfully set to 20 amps, using the same extension cord and outlet. The surge suppressor display in the attic reports 120V, ~1amp, 60 Hz.
-
My wife and I returned yesterday evening from a 10 day trip, which involved stays at 3 campgrounds. We were tired upon arrival home and I failed to connect shore power to our 2022 LEII with the Lithium Pro solar package. This morning when I went out to unhitch, I found the 3 Lithionics lithium batteries (390 Amp hours total capacity) significantly depleted (12=13% SOC, voltage= 12.5 V). During our 10 day trip the 3 lithium batteries had stayed near full charge, since we were staying at full hookup campsites. On our return trip home, the Norcold refrigerator was running on DC for a total use of approximately 24 hours (10AM departure yesterday to10AM today discovery of low SOC level). The refrigerator load apparently was the primary culprit for drawing down the SOC of the batteries. The refrigerator is now OFF.
I connected a 50 foot extension cord, rated for 15 amps, to a 20 amp outlet and to the power port on our LEII. When I checked the remote control display for the Xantrex inverter, I was surprised to see it reported being in "AC bypass mode", which was NOT charging the batteries. This same extension cord and outlet circuit I have used many times when the trailer has been parked in our driveway. I have previously observed the batteries being recharged very rapidly, e.g., from 50% SOC to 100% within 4-6 hours by the inverter. At no time during our trip did I notice anything abnormal in the battery charging.
The Xantrex FXC Control app on my iPhone issues a notification "utility power not available or qualified due to poor ac power..." when shore power is first connected to the trailer.
The display located in the attic reports normal shore power conditions: 120 VAC, 60 Hz, 1 amp, No error messages (E0).
I have previously noticed on numerous occassions when the Xantrax inverter would come ON for short periods (2-3 minutes) while connected to shore power. I have previously asked Oliver Service why the inverter would come on when connected to shore power, when the batteries are at or near full SOC. The most recent answer received was a conjecture that our shore power was unstable. This seems unlikely, since I have observed the short intervals of inverter operation when connected to shore power in many different campgrounds and at our home, where I know we have stable power.
I proceeded to read the Xantrex owner's manual to determine how to get the inverter out of AC bypass mode and charging the batteries. I am unable to determine how get the inverter to recharge the lithium batteries. The solar panels appear to be recharging the batteries slightly, due to having a largely cloudy day.
Tonight I checked the SOC of the lithium batteries and they have declined 1-2%. I am going to turn the batteries OFF to prevent being fully discharged.
Has anyone encountered similar charging issues?
Regards, Don
-
3 hours ago, GeoffChapman said:
Thanks for the multiple replies, everyone, and the encouragement.
@topgun2, I like your cautious recommendations on electrical power and AC. No need to move too fast on those, and I am certainly just learning how well my current capacity will work. We have yet to be camping under full clouds for multiple days. And the CalMark cover sounds like it would be worth it.
@dewdev, the placement of your Tireminder booster is easy to do. Connecting it to the Rear Camera switch would be an attempt to pair it with a device that would have an identical use pattern - and would prevent me leaving it on (and draining the battery) when the trailer was not in use. I'd still like to try that.
Sounds like the cell phone connectivity is an unsolved challenge. I'll be interested in any solutions that are not too expensive. My primary concern is doing a solo set of nights in a 'dispersed camping' area - say the Allegheny National Forest here in western Pa - where there is little connectivity. My wife will want to know I am safe, and functioning text messages would get it done.
My booster unit was installed 90° perpendicular to @Steph and Dud B's unit, and does not suffer a kink in the coax cable. And I have not tried resetting my phone after the booster unit was turned on, as per @dewdev's suggestion. I hadn't tried that and will give it a go.
Geoff
@GeoffChapman, prior to ordering our 2022 LEII, I received what proved to be good advice on multiple points from another Ollie owner. One recommendation was to forego the cellular booster option, as they were widely seen to be ineffective. I also read reviews elsewhere convincing me this was not a desirable option.
If you anticipate going into areas with little or no cellular service, I recommend you consider purchasing a Garmin InReach MINI2, or similar Garmin inReach device. These cost approximately $400 and operate on the Iridium satellite network. They will operate anywhere in the world. Several service plans are available through Garmin and the plans may be started/stopped on a monthly basis. The least expensive plan is about $15.
These devices provide safety features the cell booster cannot. Carried on your person, they could save your life if you are lost or injured in a remote area. IMHO, the devices are of much greater utility. They provide two way test communication and emergency messaging. The inReach devices can be paired with a smart phone via Bluetooth. A Garmin app on the phone will enable use of the phone keyboard for text messaging, which is far easier than entering text characters directly on the inReach device.
Connecting your TireMinder booster to the switch for the rear camera should work well. I had not thought to do that, or seen such recommendations. I installed my booster under the rear dinette seat, so I must remember to turn it off when storing our trailer. You can access the rear of the control panel containing the rear camera switch through the access hatch over the microwave oven. You will probably need to pull out the control panel to access the switch wiring connections, which involves removing only a few screws. I assume you would leave the booster in the space behind the control panel.
Regards, Don
-
2
-
-
@johnwen, glad to hear your experience ended without injury or serious damage.
We also installed a standalone TPMS for our LEII (Hull 990), the TireMinder i10, with 6 transmitters (TPMS), four for the trailer and the other two for our spares. See: https://technorv.com/products/tireminder-i10-rv-tpms-with-4-to-10-sensors?_pos=1&_sid=585f6a851&_ss=r
I installed the signal booster under the dinette rear seat. I have tested the range by walking over 300 feet from the trailer with the monitor, without loss of signal. Our TV does not have the option for adding trailer sensors.
Don
-
1
-
4
-
-
@topgun2/Bill,
Thanks for the reply and the info on the dimmer. Sorry to hear of your hardship conditions you are suffering there on the beach in NC. And no Ollie nearby in which to seek refuge.
Have you explored the viability of separating the exterior lights from the interior?
Don
-
57 minutes ago, topgun2 said:
I installed a dimmer switch such that just about all lights (inside and outside) the Ollie are dimmed.
Your solution certainly is a bunch cheaper! And, easier to do too.
Bill
@topgun2/Bill, could you please post details on how you implemented a dimmer for the lights?
Thanks, Don
-
3
-
-
@Galway Girl/Craig, could you please list the temperature sensors you are using to monitor the belly/bilge temperatures? I may have overlooked them on your Amazon page. These seem useful when camping in freezing weather to monitor the high risk areas, such as the external shower. I have been contemplating some mods to improve airflow, especially to the street side.
Thanks, Don
-
3 hours ago, Ray Kimsey said:
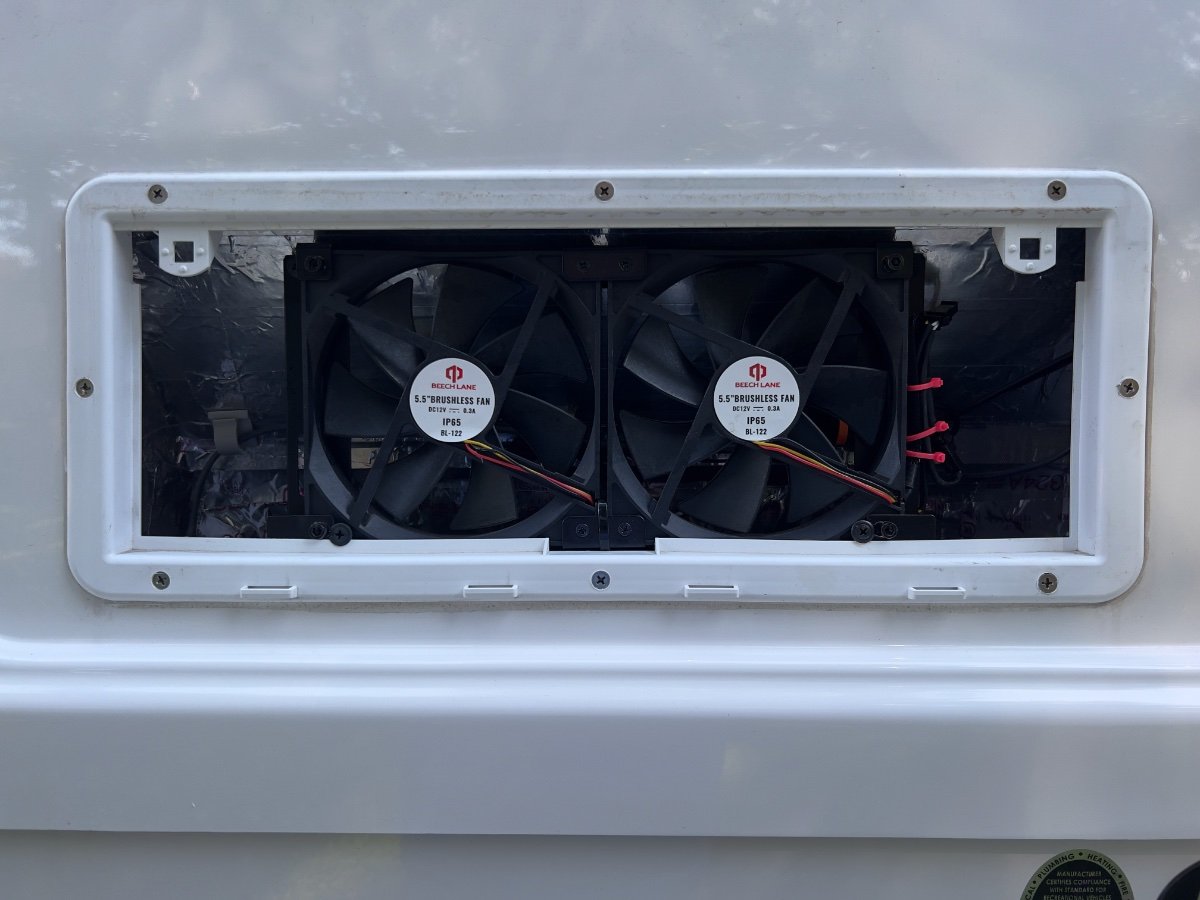
I have a set of 3.5 inch fans where I did a very similar install. My question is how were you able to secure the 5.5 inch fans? I would like to use the larger fans, but cannot figure out a way to do it. I secured the smaller fans to the upper vent cover, but the larger ones seem to prevent me from closing the cover. Maybe you could post a close up picture of how they are mounted. I can't tell from the first picture. Thank you!
@Ray Kimsey and @CRM, my apologies for not including the detail photos below in my original posting.
The fans come mounted together as an assembly. Mounting hardware is included in the kit. In the first photo below, at the right rear of the fan a flange can be seen with a Phillips head screw circled. This screw and a matching one on the left side secure the upper part of the assembly to the sloped MDF panel which forms the top of the rear compartment of the refrigerator.
At the lower right another Phillips screw with a large head clamps to the front vertical edge of the vent opening. A hex screw attached to the front lower right of the fan frame holds a small rectangular bracket which clamps to the rear side of the vertical edge of the vent opening. Together, these two screws form the clamping mechanism to the vertical edge of the vent opening. The same arrangement holds the lower left side of the fan to the vertical edge of the vent opening.
I editing the photo below to to brighten the interior details. Unfortunately, I do not have the exact dimensions of the upper vent opening. My recollection is that I did a quick measurement of the vertical height available inside the opening and concluded the 5.5" height of the fans would fit. Amazon lists the dimensions of the 2 fan assembly as: 1"D x 12.5"W x 5.5"H. The Beech-Lane website does not list the dimensions of the fans. My trailer is in a storage facility about 35 miles north of my home.
The cables for power and remote control run up the left side of the compartment, across the sloped MDF panel behind the fans and up into the right corner of the compartment into the area behind the microwave oven.
Our ELII is a 2022 model. I do not know if the size of the upper vent opening has varied over model years.
I hope this helps clarify the mounting method.
Don
-
2
-
2
-
-
2 hours ago, topgun2 said:
This "story" is a bit embarrassing but ....🥵
At the end of last year my original exterior fridge fan bit the dust. It had been making noises for some time, but, finally, mercifully, it made no more noise. Certainly these poor things do live in a rather harsh environment and get little "love".
So, over the winter I decided to get a replacement (I ordered THESE).
While TWIST was in storage I looked at how the old fan was installed and decided to replace the rubber isolation bushings too which I got at Lowes. I also noted how the existing fan was wired and did all that I could in my home workshop (i.e. I installed spade connectors on the fan wires) so that when it came time to install the fan in the Ollie the process would not take very much time.
Fast forward to a day before leaving for the Owner's Rally and I installed the fan with my plan proceeding very smoothly. Except for one "small" detail - when I hit the switch just inside the Ollie's door, the fan didn't come on! Of course I rechecked all my work - to no avail. I got out the multi-meter and started checking my wiring and found out that I was only getting a little over 8 volts in the fan wiring. THAT would tend to indicate a bad ground or loose connection but with the time I had before leaving I could not find any problem.
Due to lack of time - fast forward to a month ago when I stopped at the Mothership for annual wheel bearing service. I mentioned my fridge fan problem to Jason and asked that if the Service guys had time would they take a look to see if they could identify the issue.
That afternoon when I picked up Twist I asked if they had enough time to look at the fan . With a grin and a wink I was told that the issue was with a faulty crimp in one of the spade connectors! Yes - I did the "tug test", yes I've done hundreds of crimp connections over the years without any issues, I even double crimp each connection. Due to the environment that these things live in I also took the extra step of putting heat shrink over these connections! Just shows what being in a hurry will do.
Now that things are back to normal - I can report that the fan I installed actually works better than the original and it is quieter too.
Bill
@topgun2, Bill, I appreciate the story of your fan installation experience. Thanks for sharing.
I dread projects which I must do a hurry, because they invariable turn into a huge PITA. Fortunately, I had no deadline pressure for modifying the installation of the remote control for my fans. Nonetheless, I had to re-do all of the electrical connections and add a few, due to the additional of the switch in the control panel, so there remains the possibility of problem "in use". The acid test will be our next road trip, where the shake table torture will be applied. I have very high confidence the fans can deal with extreme heat, as my driveway tests proved.
One of the benefits of DIY projects is gaining the knowledge of where to look to diagnose problems appearing later. I try to take photos, before, during and after and keep notes. These are great aids in dealing with problems such as you described. Smart phones are a tremendous aid in doing so.
-
1
-
-
@Mike and Carol, I suggest checking for a loose ground connection, or a corroded connection, probably on the trailer. Also check the ground connection to the 7-pin connector. Add electrically conductive grease to the 7-pin connector, if you have not already done so. I have encountered similar symptoms on a utility trailer, which ultimately proved to have a poor ground connection. I have not seen these symptoms when towing our Oliver.
Does the cover/latch on the 7-pin receptacle on the truck engage the catch on the 7-pin plug of the trailer to secure it? Have you tried wiggling the 7-pin connector when it is engaged in the truck's receptacle to see if this triggers the message?.
I assume your Ram TV has an OEM brake controller. Has this been checked? When the message is displayed do the brakes respond when pressing on the brake pedal or by manually applying the brakes using the brake controller?
When the trailer is connected and the the "trailer brakes disconnected" message is displayed do the lights on the trailer work? Brake lights?
If you have another trailer or a friend has one, does the problem still occur when another trailer is connected to your truck?
Good luck.
Don
-
1
-
1
-
-
- Popular Post
- Popular Post
From late May to mid-June my wife and I took a loop trip from our home in Dallas, TX to: Greenville, SC; Asheville, NC; Asheboro & Seagrove, NC and back to Dallas. The trip covered approximately 1900 miles, with significant temperature variation.During the trip we experienced erratic performance by the Norcold Model 412 refrigerator, standard equipment in our 2022 Oliver Legacy Elite II trailer. The refrigerator would not maintain food safe temperatures in either compartment, except when operating on AC current. This problem occurred mostly on the second half of the trip, as daytime temperatures exceeded 90 degrees (F). Especially when in transit, operating on propane or DC current, the refrigerator temperature would climb to approximately 60 degrees and the freezer into the mid 20s.We contacted Oliver Service and made an appointment to have the refrigerator problem assessed in Hohenwald. We later decided not to divert from our trip plans and to deal with the problem when we returned home.Upon our return home to Dallas, TX, on June 20, I began a series of tests with the trailer parked in our driveway. To monitor the temperatures in the refrigerator and freezer, I used an AcuRite Digital Wireless Fridge and Freezer Thermometer, which we had purchased to monitor the Norcold refrigerator and had been using since September, 2022. I also used an Etekcity Infrared Thermometer 1080 to compare readings with the Acurite thermometer. The AcuRite and Etekcity thermometer readings agreed closely.With the refrigerator empty, I recorded the time required to go from ambient temperature to food safe temperatures using AC, DC or propane. Using AC, the refrigerator/freezer would reach food safe temperatures in 6-7 hours (low 40s F for the refrigerator; 0 degrees F for the freezer) with ambient temperatures ranging from 87 to 99 degrees F. Once achieved, when on AC, the temperatures on both compartments would hold in a food safe range.Conducting the same test on propane, the refrigerator and freezer would reach only 62 degrees and 19 degrees F, respectively after more than 12 hours of operation. This test also was done while ambient temperatures ranged from 87 to 99 degrees F. Similar results were observed while operating the refrigerator on DC.I again contacted Oliver Service and was recommended to take the trailer to an authorized Norcold service provider. Blue Moon Mobile RV (Blue Moon) was determined to be the closest available Norcold service provider.I arranged an appointment to bring the trailer to Blue Moon for troubleshooting of the refrigerator. Technicians at Blue Moon confirmed my observations of the behavior of the refrigerator. They also confirmed the cooling function was working properly, since proper temperatures were achieved when operating on AC. They also confirmed the single, small fan located at the rear of the refrigerator was operational, but providing insufficient air flow for the refrigerator to operate properly when ambient temperatures were high. Blue Moon conferred with Norcold technical support on their findings. Blue Moon and Norcold recommended additional fans be installed to dissipate warm air behind the refrigerator.Having anticipated installing additional fans, I had done online research and chose a dual fan assembly from Beech Lane 12V RV Fridge Ventilation Cooling Fan 5.5" (140mm). These fans come with a remote control with which fan speeds and threshold temperature may be set manually or automatically. These fans were installed by Blue Moon in the upper vent opening of our LEII.
The 12VDC power supply to the refrigerator was also used to power the fans. The remote control was mounted to the cover over the refrigerator circuit board using double sided tape. The excess length cables provided with the fans were bundled with zip ties and secured nearby, as shown below.
Blue Moon tested the operation of the refrigerator following the installation of the Beech Lane fans and reported food safe temperatures were being achieved and held, with high ambient temperatures.Regards, DonOn July 19 I picked up our trailer from Blue Moon and returned home to repeat my prior tests to compare results running the refrigerator on propane and on DC. The trailer was parked in the same location in our driveway as previously.After installation of the ventilation fans, using propane, the refrigerator and freezer compartments achieved safe food temperatures in approximately 8 hours, with the refrigerator control set to 7, despite ambient temperatures ranging from 93 to 105 degrees Fahrenheit.Once safe food temperatures were achieved the refrigerator control setting was reduced from 7 to 6 and allowed to run overnight. The following morning both the refrigerator and freezer had slightly warmer temperatures, but still satisfactory for safe food storage.We have not yet had an opportunity to utilize the Norcold refrigerator on a trip to observe how effectively safe food temperatures are maintained when full of food and under changing environmental conditions using the three power sources. Based on the test results using the ventilation fans, I expect the performance of the refrigerator to be significantly improved. We should now be able to use DC to power the Norcold refrigerator when in transit, and avoid the use of propane. Performance running on DC appears to be similar to running on propane.While I was pleased with the significant improvement in the operating temperatures achieved by the Norcold refrigerator, there were three aspects of the installation I chose to change, all related to access to the remote control:- The remote control for the Beech Lane fans has very bright blue LEDs which are ON whenever 12VDC power is ON. At night, we noticed a bright blue glow emanating from the lower refrigerator external vent cover.
- Accessing the remote control to change settings required removing the refrigerator external vent cover. When we store the trailer we typically turn OFF all DC power by turning OFF our lithium batteries. Upon the next use of the trailer, when DC power is restored, the refrigerator ventilation fans must also be turned ON manually.
- There was no switch to turn OFF DC power to the remote control.
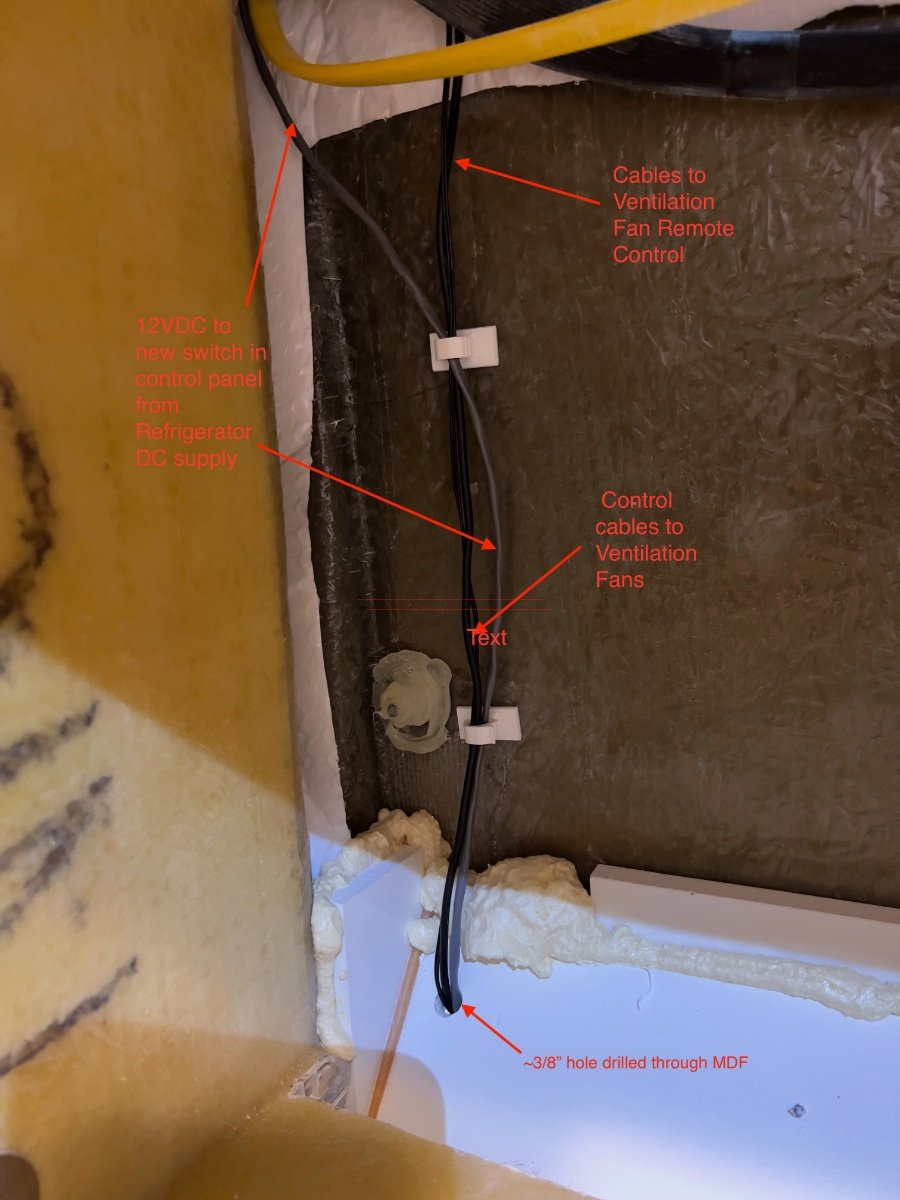
To address these issues, I relocated the Beech Lans fan remote control to the interior of the trailer and installed a switch on the control panel located at the entry to the trailer. I chose to have the remote control inside the access hatch in the storage cabinet located over the microwave oven, directly above the Norcold refrigerator.To re-route the cables to the ventilation fans, I had to remove the microwave oven. To install a new switch in the control paneI I had to loosen the panel from the wall. I had to add approximately 10 feet of 20 AWG twisted pair cable (gray) to reach from the new switch on the control panel to the 12VDC power supply at the bottom rear of the refrigerator.The photo below shows the routing of the remote control wires (black) and 12VDC power supply behind the microwave cabinet. I had to drill a ~3/8" hole in the angled MDF panel behind the microwave cabinet, directly above the refrigerator. I caulked around the cables after routing them through the hole and behind the refrigerator. Fishing the wires into the area behind the control panel was not difficult. The yellow Romex appearing at the top of the photo below supplies the AC outlet for the microwave oven.
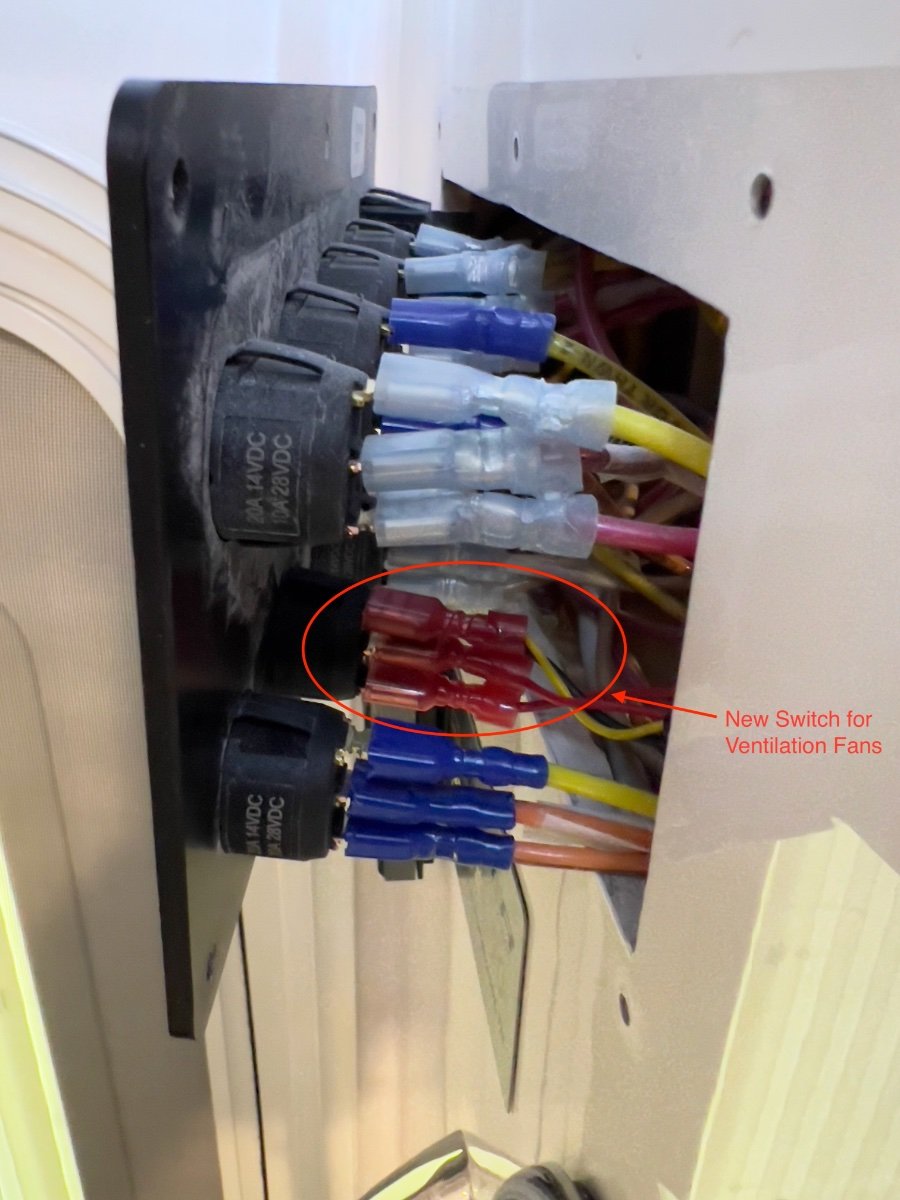
I contacted Oliver Service and ordered a single pole switch (with blue light) to match the others in the trailer control panel. The cost was slightly over $7, including shipping by first class mail.The new switch was installed in an unused location on the control panel which previously had a blank cover. I added crimp on spade type connectors to the twisted pair cable to connect to the terminals on the new switch.
Although the new switch is single pole, there are three terminals on the rear with the wiring connections listed below:- Ground (dissimilar color)
- DC Power IN (center)
- Switched DC Power Out
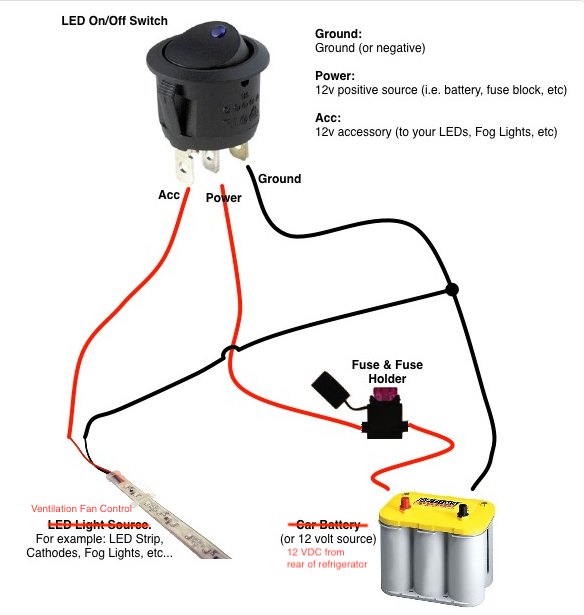
I found the wiring diagram below which shows an analogous circuit. The switch and the ventilation fan remote control both require a ground connection. The Switched DC power terminal is connected to the DC+ power connection for the ventilation fan remote control. The new switch needs a ground connection in order for the blue light to operate indicating the switch is ON. In the diagram a car battery is shown as the 12VDC source. On the trailer, the 12VDC source is located at the bottom rear of the refrigerator. This DC circuit is already fused at the DC power panel located below the rear dinette seat.
I chose to locate the Beech Lane fan remote control behind the access panel in the storage cabinet above the microwave oven. I made this choice to avoid having the bright blue LED lights on the remote control illuminating the interior of the trailer. The access panel is easily removed when there is a need to access the remote control, to turn ON the ventilation fans, or to change the fan speed or threshold temperature.
The Beech Lane ventilation fans are very quiet. With the auxiliary fans running, the volume of air exiting the top exterior vent is noticeably greater than with the small, single OEM fan mounted to the rear of the refrigerator. We have not yet tried sleeping in the trailer with these fans running. There is no chance of hearing the fans inside the trailer with the Dometic A/C running. They are not noticeable when they are running unless you are standing close to the upper exterior vent.I recommend these fans to anyone having similar difficulty maintaining food safe temperatures in the refrigerator when ambient temperatures are high.-
1
-
14


How To Install a Rear Cargo Carrier on an Oliver Legacy Elite II
in Ollie Modifications
Posted
@Leftwinger, I missed seeing your request for an article on the installation of the 4 pin wiring harness to provide lights for our rear mounted cargo carrier. I have not gotten around to writing the article. However, if you still would like the details, send me a PM and I will respond.
Regards, Don