
rideandfly
-
Posts
1,901 -
Joined
-
Last visited
-
Days Won
66
Everything posted by rideandfly
-

Ollies at Mount Pisgah NC on the BRP
rideandfly replied to rideandfly's topic in Campgrounds & Parks
Agree, we like hiking to local waterfalls, drives on the BRP, and cool temps in the summer. When it's 90's and humid at home, we go to Mt. Pisgah to find cooler temps and beautiful views on the BRP! -
Last year we met Wayne and Gayle while camping at Mount Pisgah NC on the Blue Ridge Parkway. They were very interested in Ollie and we gave them a complete Ollie tour. Late last year they purchased a new LE2. While camping at Mount Pisgah this week, we saw another Ollie. It was Wayne and Gayle with their new Ollie. Congrats Wayne and Gayle on your beautiful Ollie! First time we saw an Ollie was also at Mount Pisgah during 2010 and the kind owners from Florida gave us a complete Ollie tour, too. It's $10 per night at Mount Pisgah with the geezer card. No electricity or water at the sites, but very nice campground at 5,000' with cool summer temps! Took this shot in the early morning clouds: B27 walkup site:
-
Using external suitcase solar panels
rideandfly replied to Imelda's topic in Mechanical & Technical Tips
Sherry, Talked to Oliver before a service trip last year and they were installing the ZAMP PORTABLE SOLAR PORT W/ 20AMP INLINE FUSE for add on ports. Decided to install the 10Amp Furrion port on Ollie for my 100W portable panel. With the 100W panel have not seen over 6 amps charging so far. Bill -
Nan, Understand how you feel and we were initially frustrated, too. We purchased Ollie used 2016 and first camping trip had leaks from top dinette window. The dinette window leak was coming in at the porch light (old style light fixture) over the dinette window. Resealed the porch light and leak stopped. Another leak was coming in at the Oliver sign over the rear window and travelling between hulls and dripping out of the rear window onto curbside bed. Removed rear Oliver sign, resealed and no more leaks in that area. Once these leaks were fixed, have not had other issues with these areas. Since our leaks were repaired we towed through the heaviest rains we have ever seen and one night a tornado passed not too far away with heavy rains without any leaks. I believe campers will eventually leak, but when you get the leaks fixed on your Ollie, you will find Ollie to be a wonderful camper.
-
Andrew, We purchased our 2015 LE2 used and it did not have factory solar. Started using a portable 100W panel and wired a system on Ollie earlier this year, really like it. Now interested in a roof solar installation just like yours. Really like your Battle Born Batteries, too. Appreciate the information!
-
Steve and Andrew, Appreciate information shared. Andrew nice installation! Did Oliver install aluminum roof plates in the 2015 LE2s that did not come with factory solar?
-
Dexter axle, grease zerks, and non-Euclidian Geometry
rideandfly replied to nrvale0's topic in Mechanical & Technical Tips
I'm going to order a "Lube Shuttle Hobby Greasing package" today and start testing. We have Ollie, 2 utility trailers, motorcycle trailer, and Ollie's TV with U joints to grease & maintain. Going with the standard narrow coupler and not a locking coupler to start with. Have one tough to get to universal joint grease fitting that's hard to get to with a locking coupler. https://advancedenginetech.com/product/lube-shuttle-hobby_greasing_package/ Just got off the telephone with AET Systems that sells "Lube Shuttle" grease guns and grease in the US. They have worked out an agreement with ACE hardware so Lube Shuttle products can be purchased starting 1st quarter of 2020 or no later than 2nd quarter of 2020. They're also talking with Tractor Supply and Home Depot, but cannot say if an agreement has been reached yet. Something different from what we're accustomed to in the US, their grease coupling is metric M10X1 thread. Grease couplings in the US are 1/8NPT thread. If you replace the coupling, M10X1 threaded coupling will be needed. Their G 200 EP grease (two tubes included with package) in the "Hobby Greasing Package" meets NLGI 2 spec. Dexter uses Lithoplex Red MP #2, also meets NLGI 2 spec. Grease Dexter uses: https://www.docs.citgo.com/msds_pi/C10198.pdf Lube Shuttle G 200 EP grease: https://advancedenginetech.com/product/airtec-g200-grease/ Here's an informative AET video: -
Dexter axle, grease zerks, and non-Euclidian Geometry
rideandfly replied to nrvale0's topic in Mechanical & Technical Tips
Started searching for a "no leak" manual grease gun during this discussion. Found one manufacturer so far, but there are probably more. This manufacturer has special loaded grease cartridges or empty cartridges available for use with your selection of grease. https://advancedenginetech.com/product/lube-shuttle-hobby_greasing_package/ https://tractortimewithtim.com/2018/08/17/lube-shuttle/ Will continue looking for different manufacturers, time to replace my old grease gun anyway! -
Dexter axle, grease zerks, and non-Euclidian Geometry
rideandfly replied to nrvale0's topic in Mechanical & Technical Tips
Sounds like you should have an easy time lubing the EZ Flex system. Going to order a new standard Alemite narrow hose coupler for the grease gun today. Mine is worn out after many years of use. My Tundra tow vehicle has 5 drive line grease fittings, older Tundras have more and new Tundras have none from what I've been reading. One of the Tundra's universals has limited space and prefer to use the small hose coupler for lubing. May need to buy a locking hose coupler for the equalizer grease fittings, will see how the new coupler works first. When on the road with Ollie, sometimes pass the recommended lube interval. Keep a grease gun in a small plastic tool box and lube on the road without getting under Ollie. When it gets hot grease will sometimes drip out of the grease gun, the box with paper towels in the bottom keeps it from making a mess. Heading to Virginia next week to pick up a used utility trailer, packing the grease gun box along with other tools just in case problems are found. -
We attended Land Between the Lakes (LBL) KY fiberglass rally, Overland Expo East, and Hungry Mother VA fiberglass rallies during the last two months. We met many nice folks. There were three Olivers at the LBL Rally. Met Rodney Lomax, Oliver Sales Manager and fine gentleman. Really liked the beautiful Ollie he had at the rally, too. LBL Rally:
-
Dexter axle, grease zerks, and non-Euclidian Geometry
rideandfly replied to nrvale0's topic in Mechanical & Technical Tips
Here's a photo with the pin grease fittings pointing outward: Made this grease gun stand out of 2X4s for another member with grease fittings pointing outward on his Ollie: -
Dexter axle, grease zerks, and non-Euclidian Geometry
rideandfly replied to nrvale0's topic in Mechanical & Technical Tips
nrvale0, When I installed my EZ Flex system on a 2015 Ollie ( EZ Flex was not standard equipment at that time), pointed the pin/grease fittings outward with the idea of not crawling under Ollie to grease. The two grease fittings on both equalizers are not always easy for "me" to get the grease gun hose fitting squarely seated resulting in a few extra pumps of wasted grease during each EZ Flex lube. Pins can be reversed and pointed outward during repair/inspection. Hope this helps. -
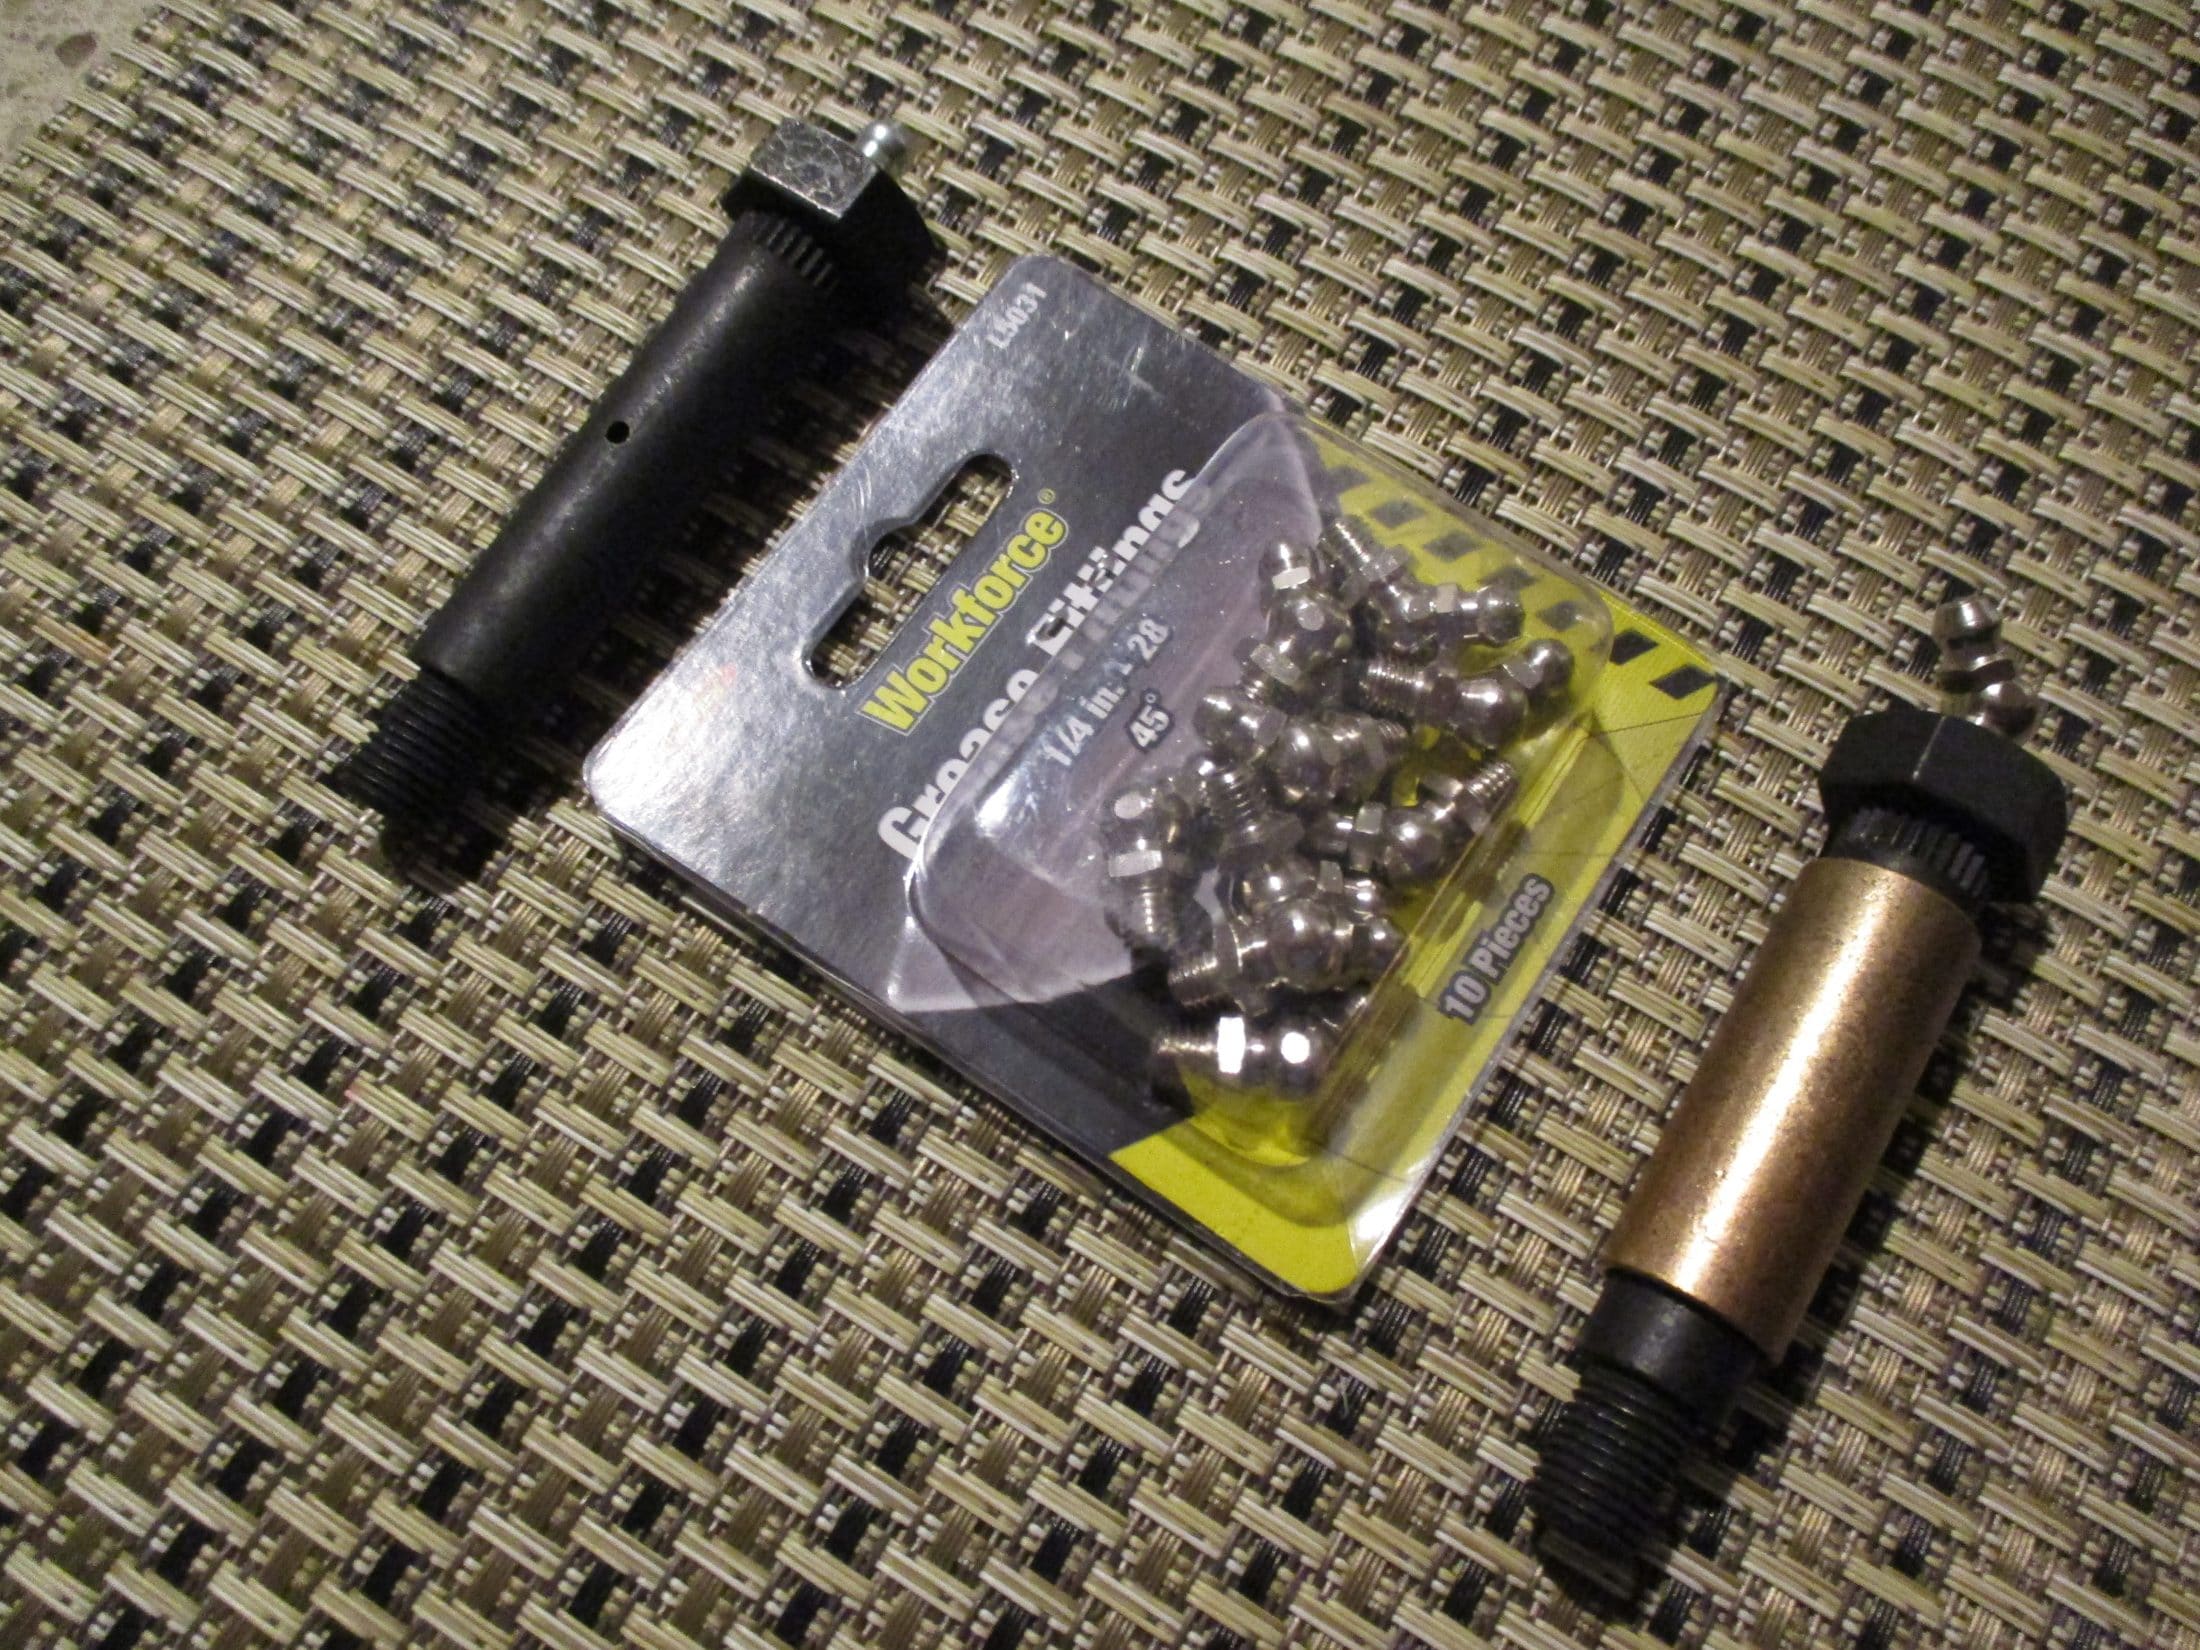
Choied, Have some Dexter pins, Dexter bushings and 45 degree fittings on the shelf to look at. The Dexter pin takes 1/4"-28 thread grease fitting. Ours came with straight fittings, but 45s could be used, too. Hope this helps.

-
PM Sent We will be passing through your area towing Ollie during October. Thanks,
-
Beginner Lessons Learned and Relearned
rideandfly replied to DonnaDuane's topic in Ollie Boondocking
Here's how to find the Dexter axle lot serial number in the following link, if you don't have the owner's manual that BHNCB mentioned. Give Dexter's service department this number and they will email a PDF copy of the axle build sheet. This sheet has dimensions and Dexter part numbers that can be crossed over to your preference of seals/bearings. We buy our axle supplies from Redneck Trailer, there's a local store. There are large industrial supply chains like Motion Industries that have an assortment of bearings and seals, too. https://www.dexteraxle.com/docs/default-source/default-document-library/light-duty-axle-identificationb27a839d2ba463c18d7aff64007a4014.pdf?sfvrsn=0 -
Here's a master switch (knife switch) like we use on Ollie's batteries to keep the batteries from discharging between camping trips, need to learn how to share a link with a few words like David: https://www.amazon.com/Wadoy-Battery-Disconnect-Terminal-Automotive/dp/B074GPSZS7/ref=sr_1_8?crid=17AONQCQ12DNV&keywords=battery+blade+switch&qid=1567651507&s=gateway&sprefix=blade+switch%2Caps%2C205&sr=8-8
-
Bill, here's some additional photos. Connected # 4 pin to controller's + connection and # 1 pin to controller's - connection on the bottom right side of the controller, from receptacle shown in Bill's 7 pin diagram. Purchased 7 pin receptacle from Walmart. Used a worn out camera tripod. I should have installed a 5A inline fuse between controller's + pin to #4 pin in the 7 pin receptacle, too.
-
John, In the last photo we were not using a lock, but we use a 10' bicycle type heavy cable with padlock to the suitcase carry handle. The panel can be locked to Ollie or picnic table.
-
Tried out the 100W Renogy suitcase panel earlier this week with Ollie in the shade. Used three 12/2 cables about 12.5' each connected together with MC4 connectors measuring about 37' total from the panel to Ollie's Furrion solar port. Moved solar controller from solar panel to Ollie with about 2' of cable from the controller to the batteries. The system is working fine with two Duracell group 27 12V AGM batteries. Needed that much cable to reach an area out of the shade. Appreciate ideas shared here!
-
Steve, Here's project photos from last year:
-
Bulldog coupler complete bolt failure !
rideandfly replied to John E Davies's topic in Mechanical & Technical Tips
John had it right @ 80 FT LBS, Found the Fastenal Torque Value calculator: SAE J429 Grade 8 bolt 1/2" coarse thread: Recommended torques: 79.8 FT LBS WET 106.4 FT LBS Dry https://www.fastenal.com/en/83/torque-calculator -
Bulldog coupler complete bolt failure !
rideandfly replied to John E Davies's topic in Mechanical & Technical Tips
John, Our Grade 8 failures were with Fastenal, too. Permatex Anti Seize is a lubricant. This statement from the following link: "Torque-Tension Relationship" " When applying an anti-seize to your components, the torque value to achieve the same clamp load will be lower. If anti-seize is used with the torque specified for a dry assembly, you risk exceeding the proof load of the fastener." https://www.manufacturing.net/article/2013/04/understanding-true-value-anti-seize -
Bulldog coupler complete bolt failure !
rideandfly replied to John E Davies's topic in Mechanical & Technical Tips
John, We had several failures with grade 8 bolts on one industrial application and found the bolts were torqued wet (oil used) at the dry torque value, Never Seize would probably have the same results as oil, if used. This was several years ago, but must have been the same bolt size because remember 80FT LBS dry for that application. Once we started torquing dry threads the issue went away. If you go with Bulldog's recommended grade 5, would torque to the dry value with dry threads. -
Mike, We camped at Buffalo Bill State Park North Fork, twice, it's between Cody and Yellowstone. Some of the sites have electricity/water and showers cost about 50 cents, very clean. Cody Laundromat on Beck Ave will wash & fold your clothes by the pound for a reasonable price, we found a nice place to eat while they took care of our clothes :). We like camping at Custer State Park Game Lodge Campground while visiting Badlands, Mt. Rushmore, and Sylvan Lake. Their restrooms are clean and they have a nice laundry, too. Bill