Leaderboard


Popular Content
Showing content with the highest reputation on 06/04/2018 in all areas
-
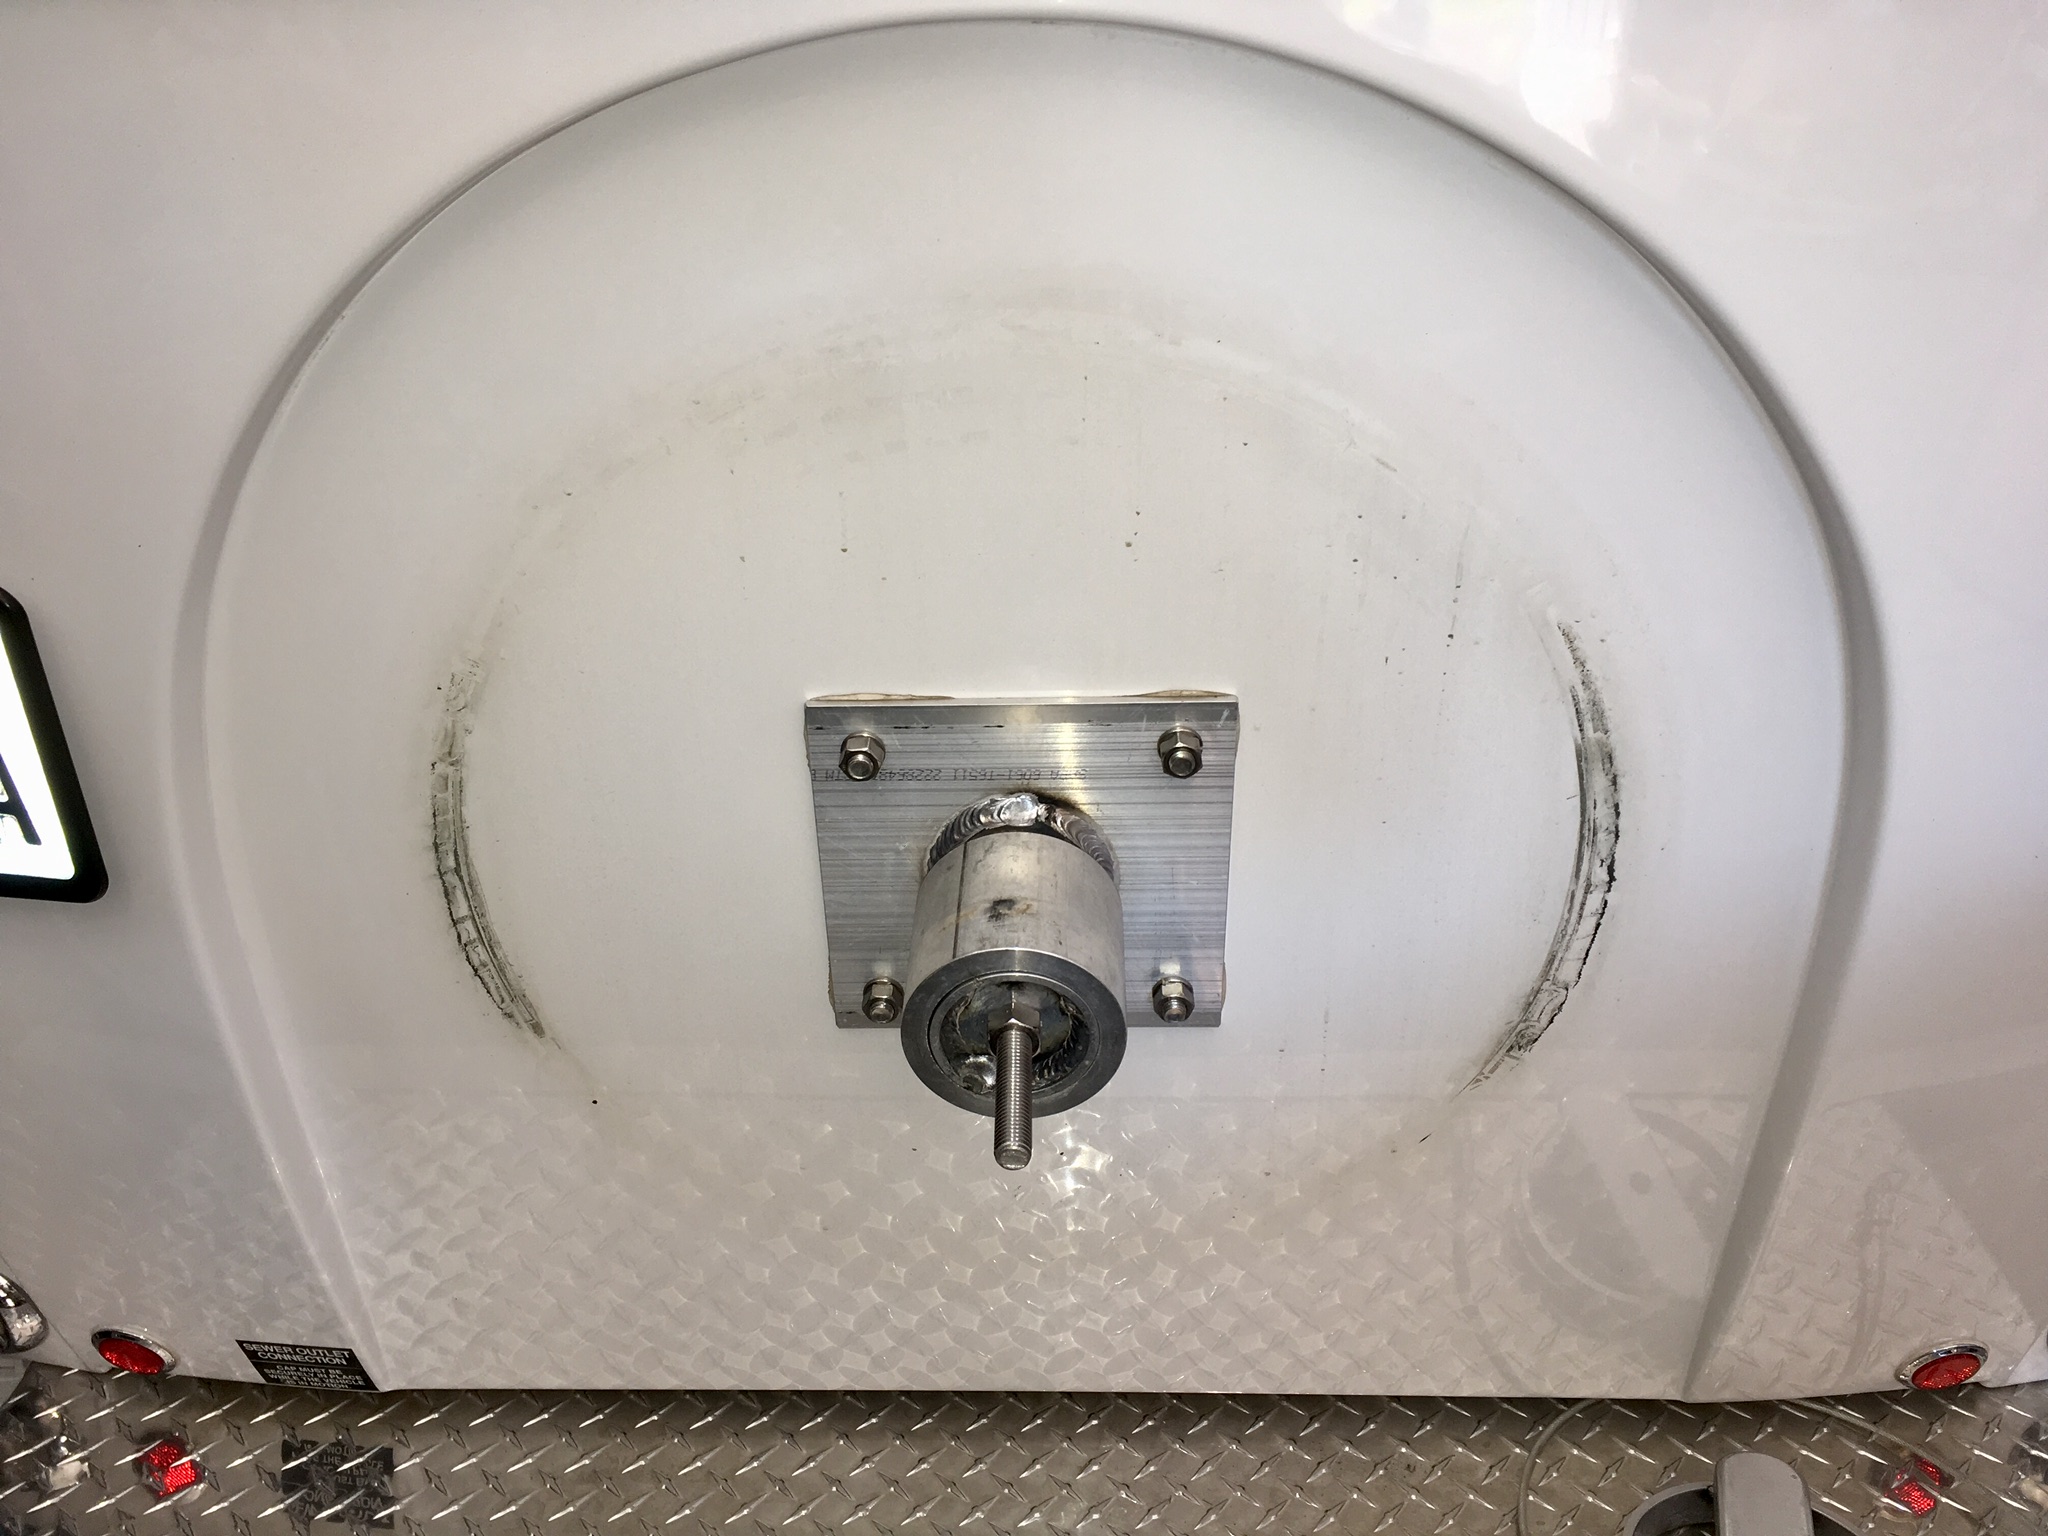
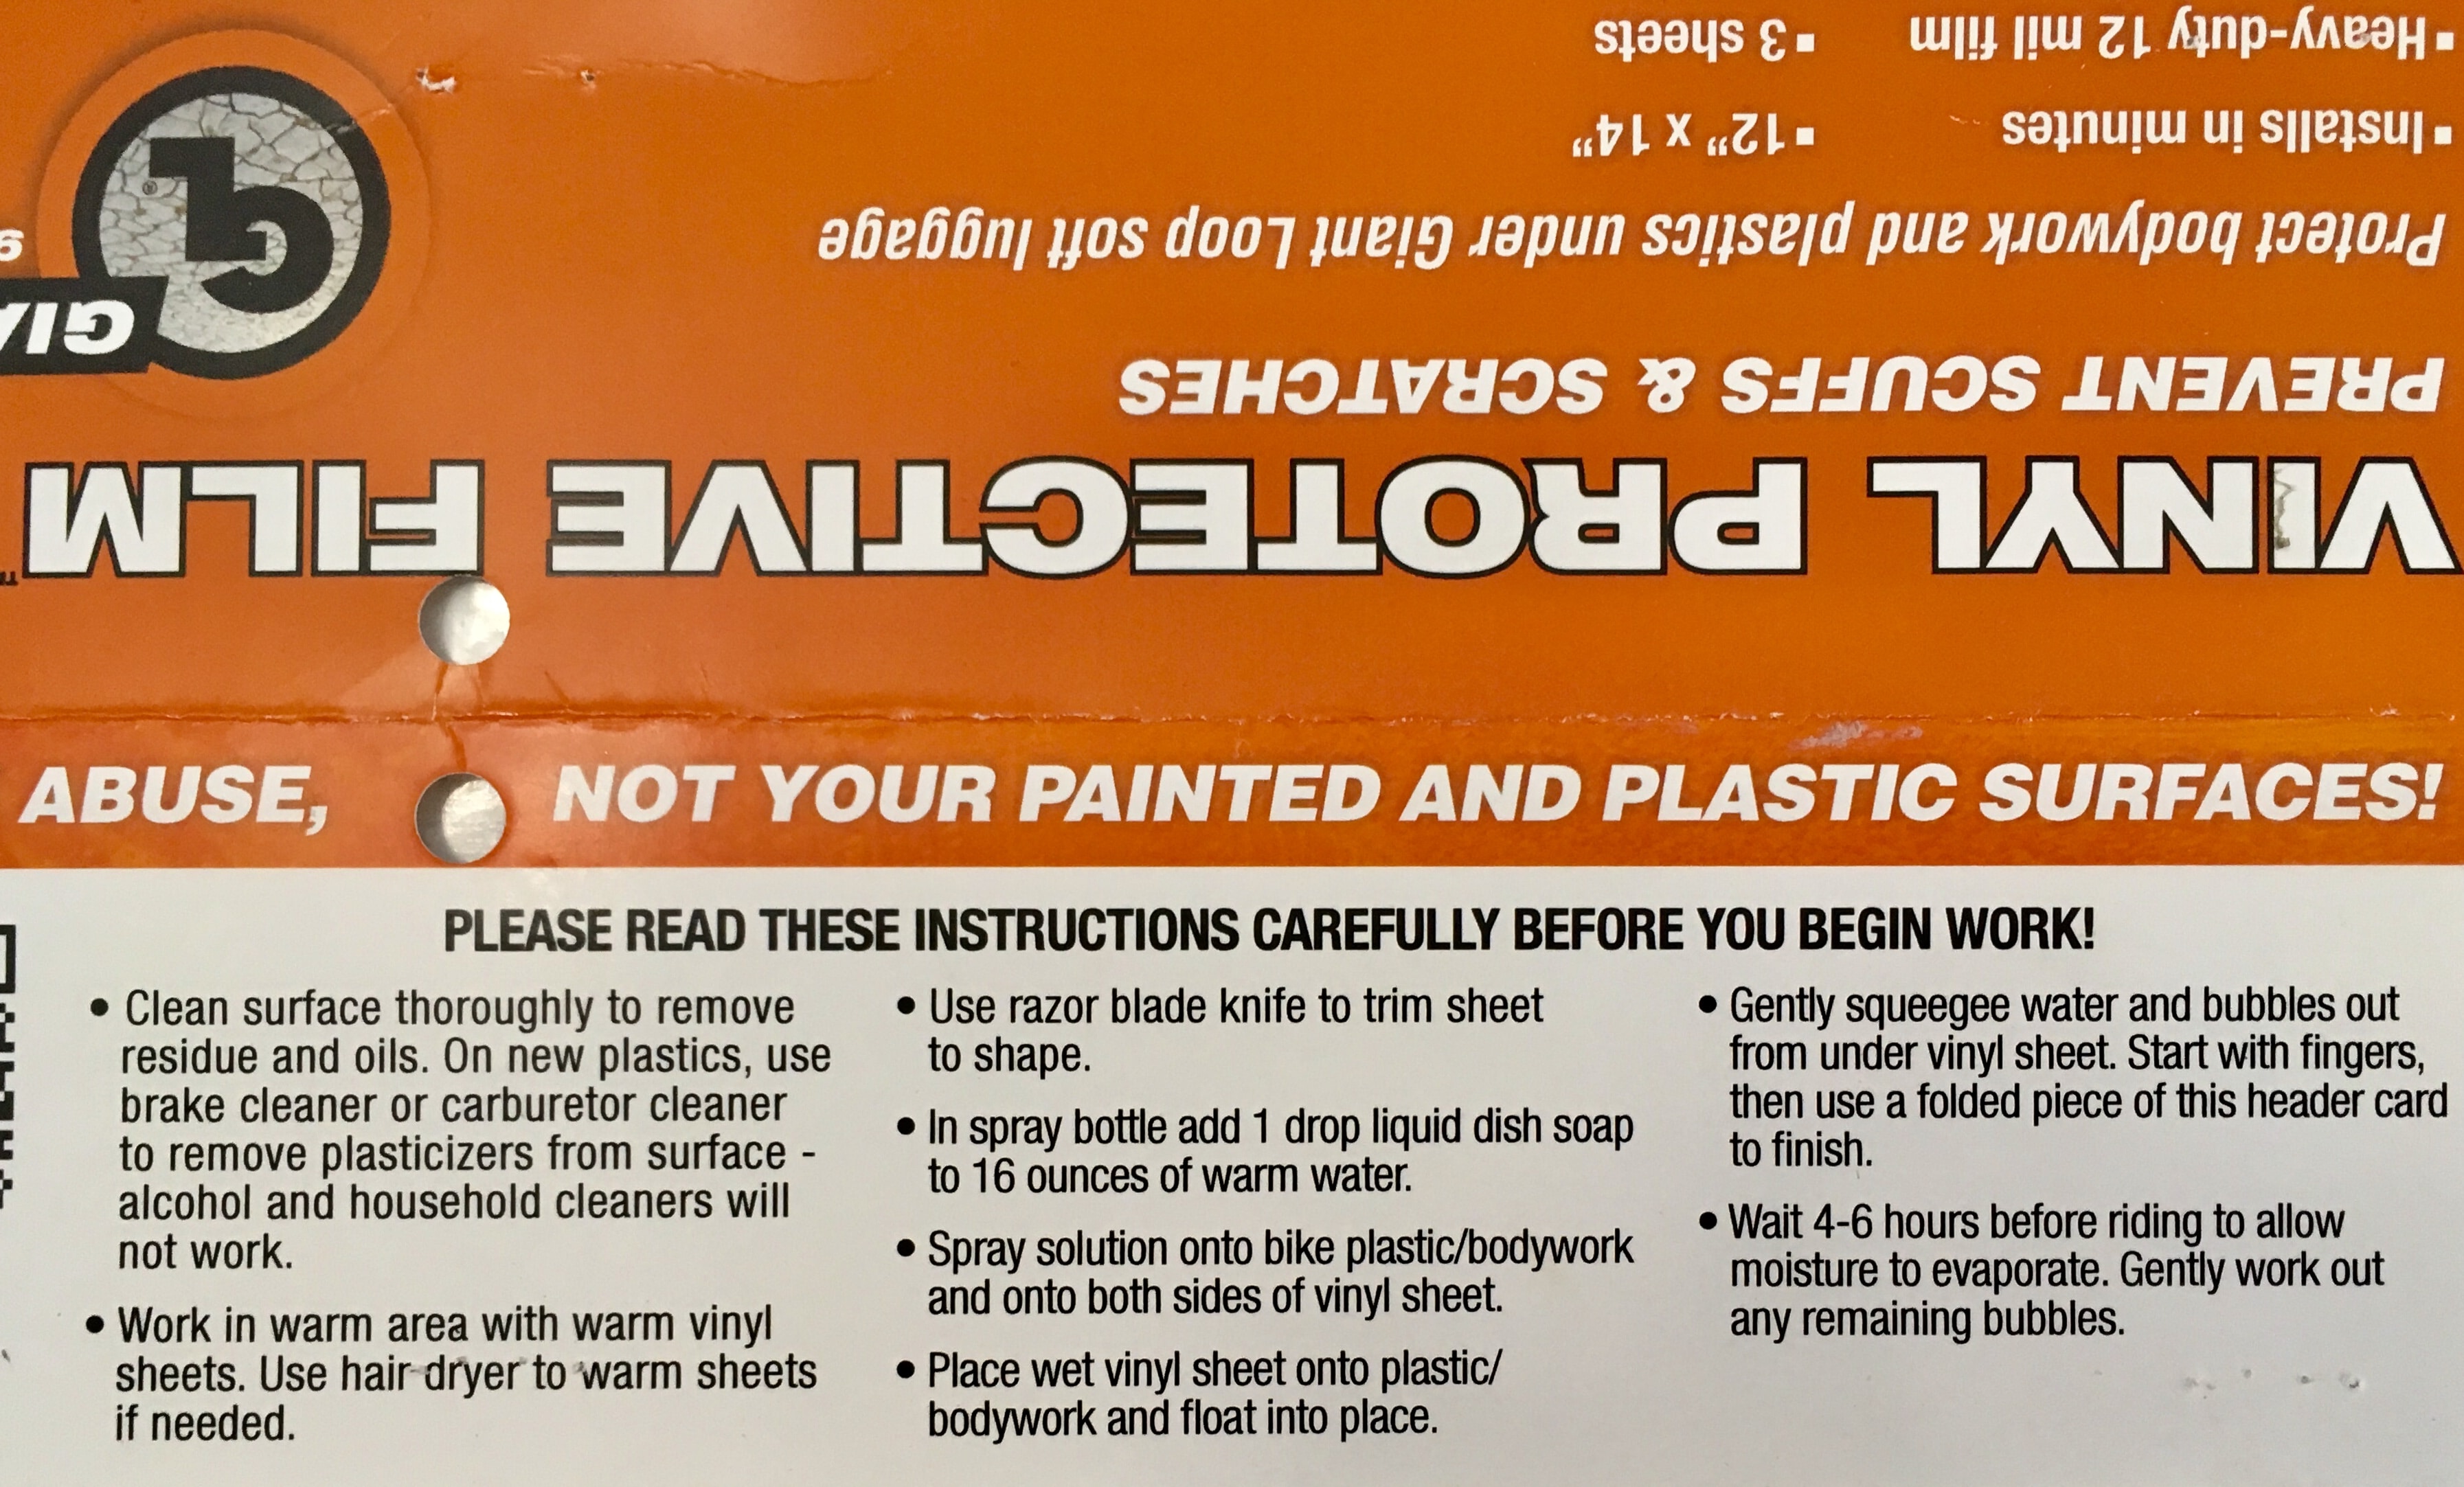
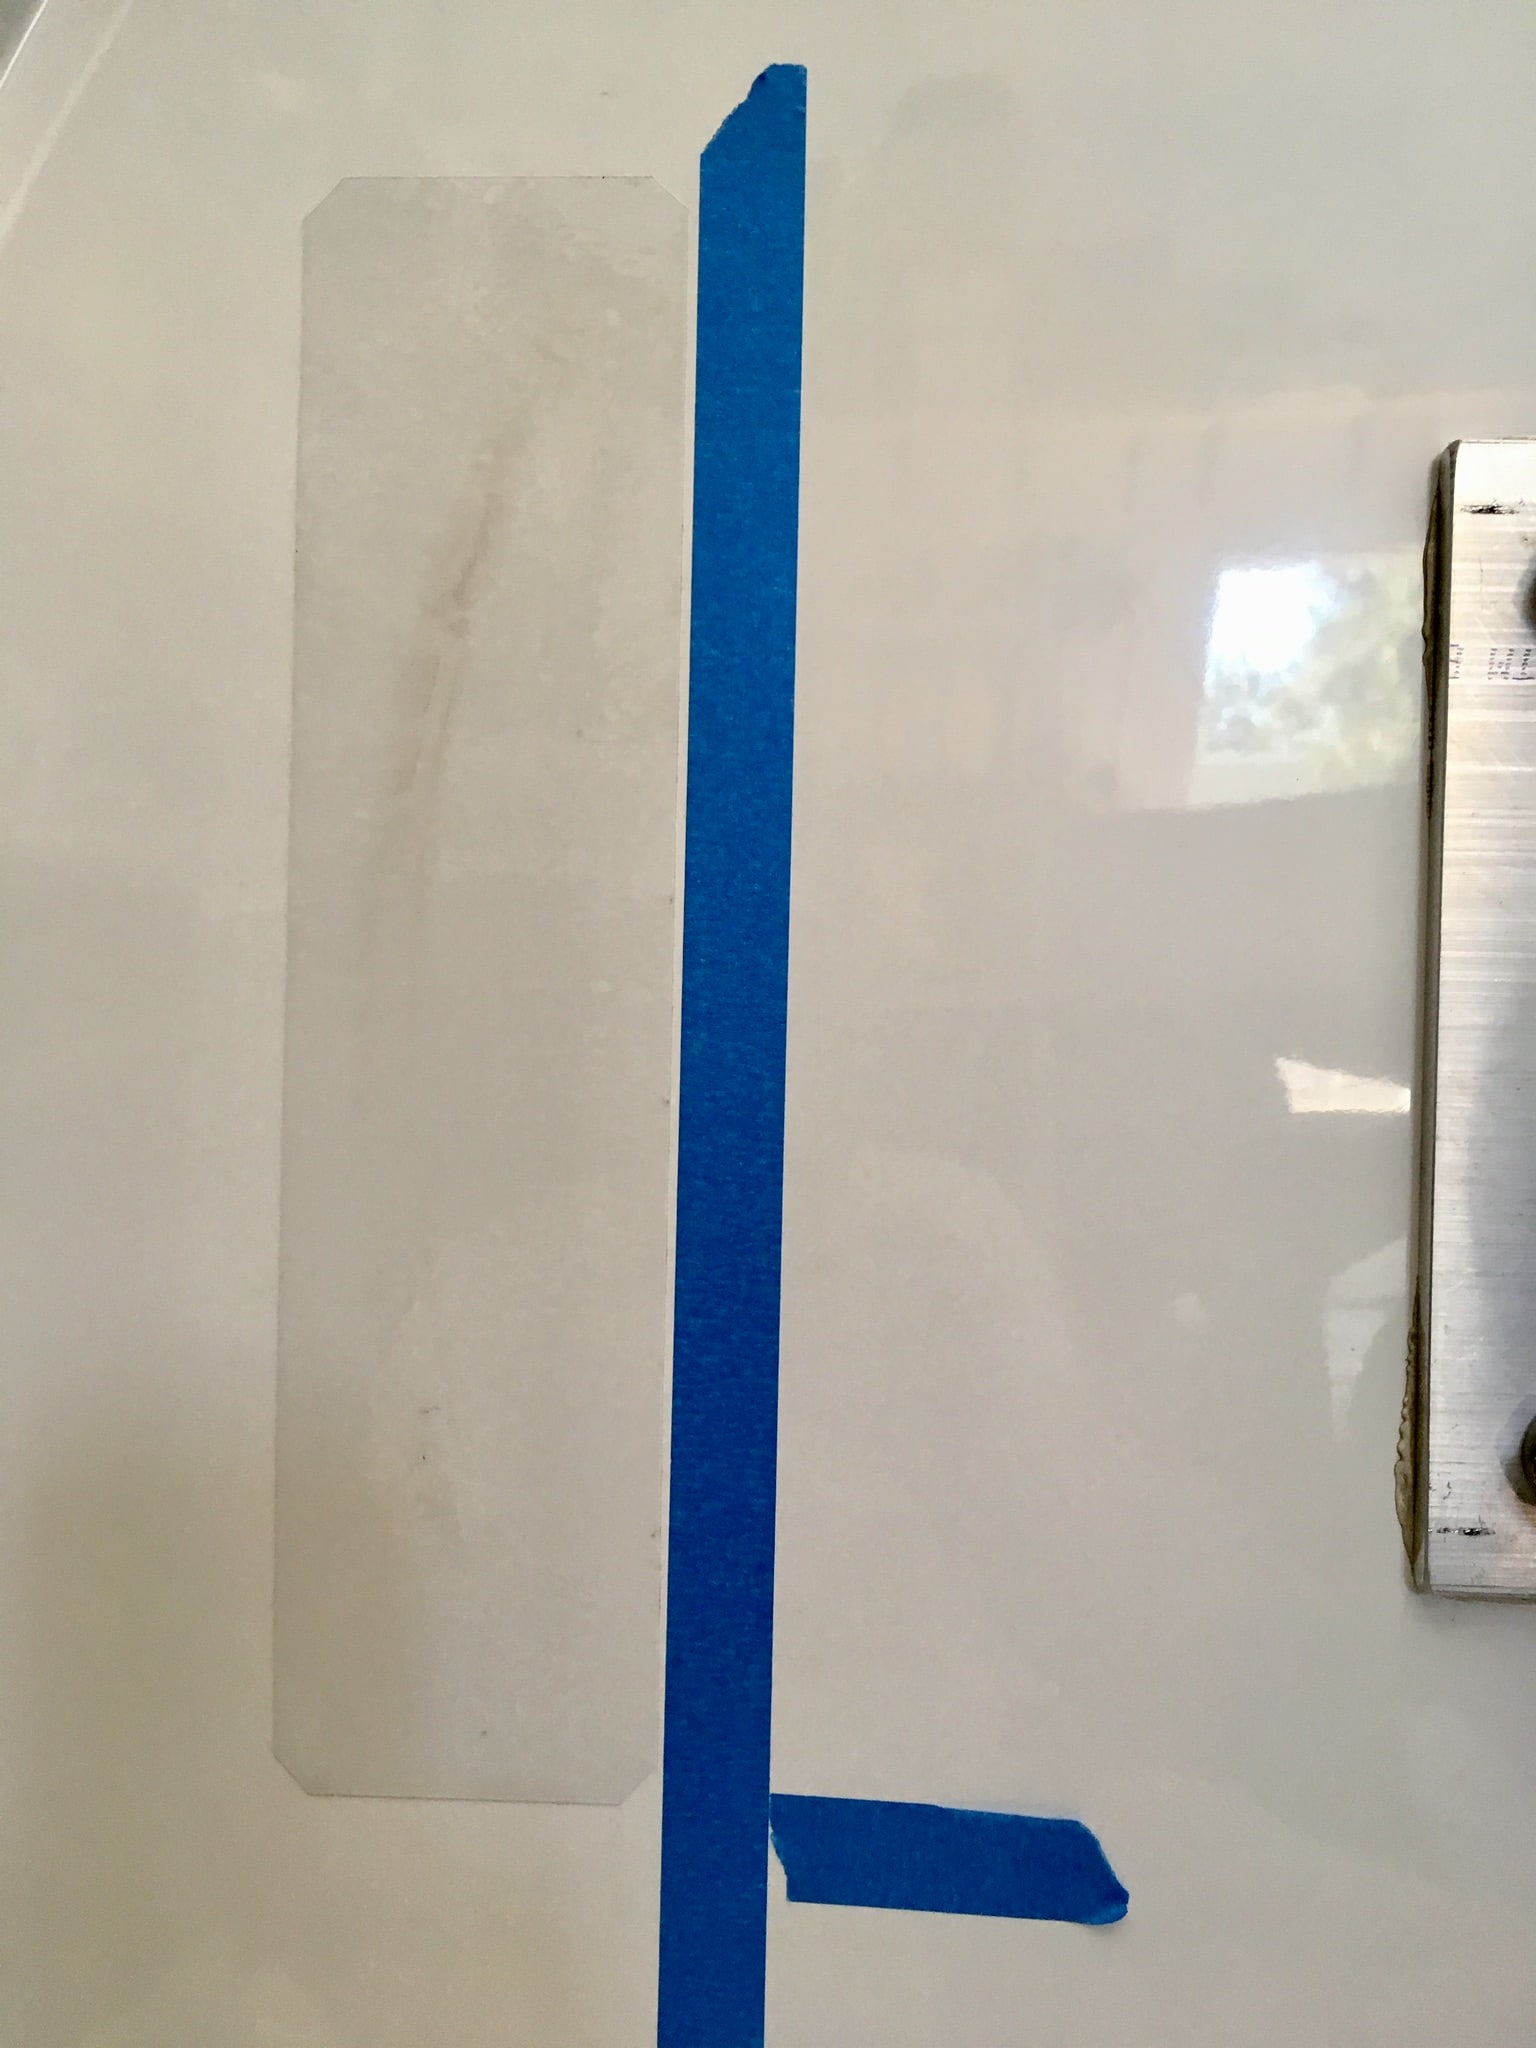
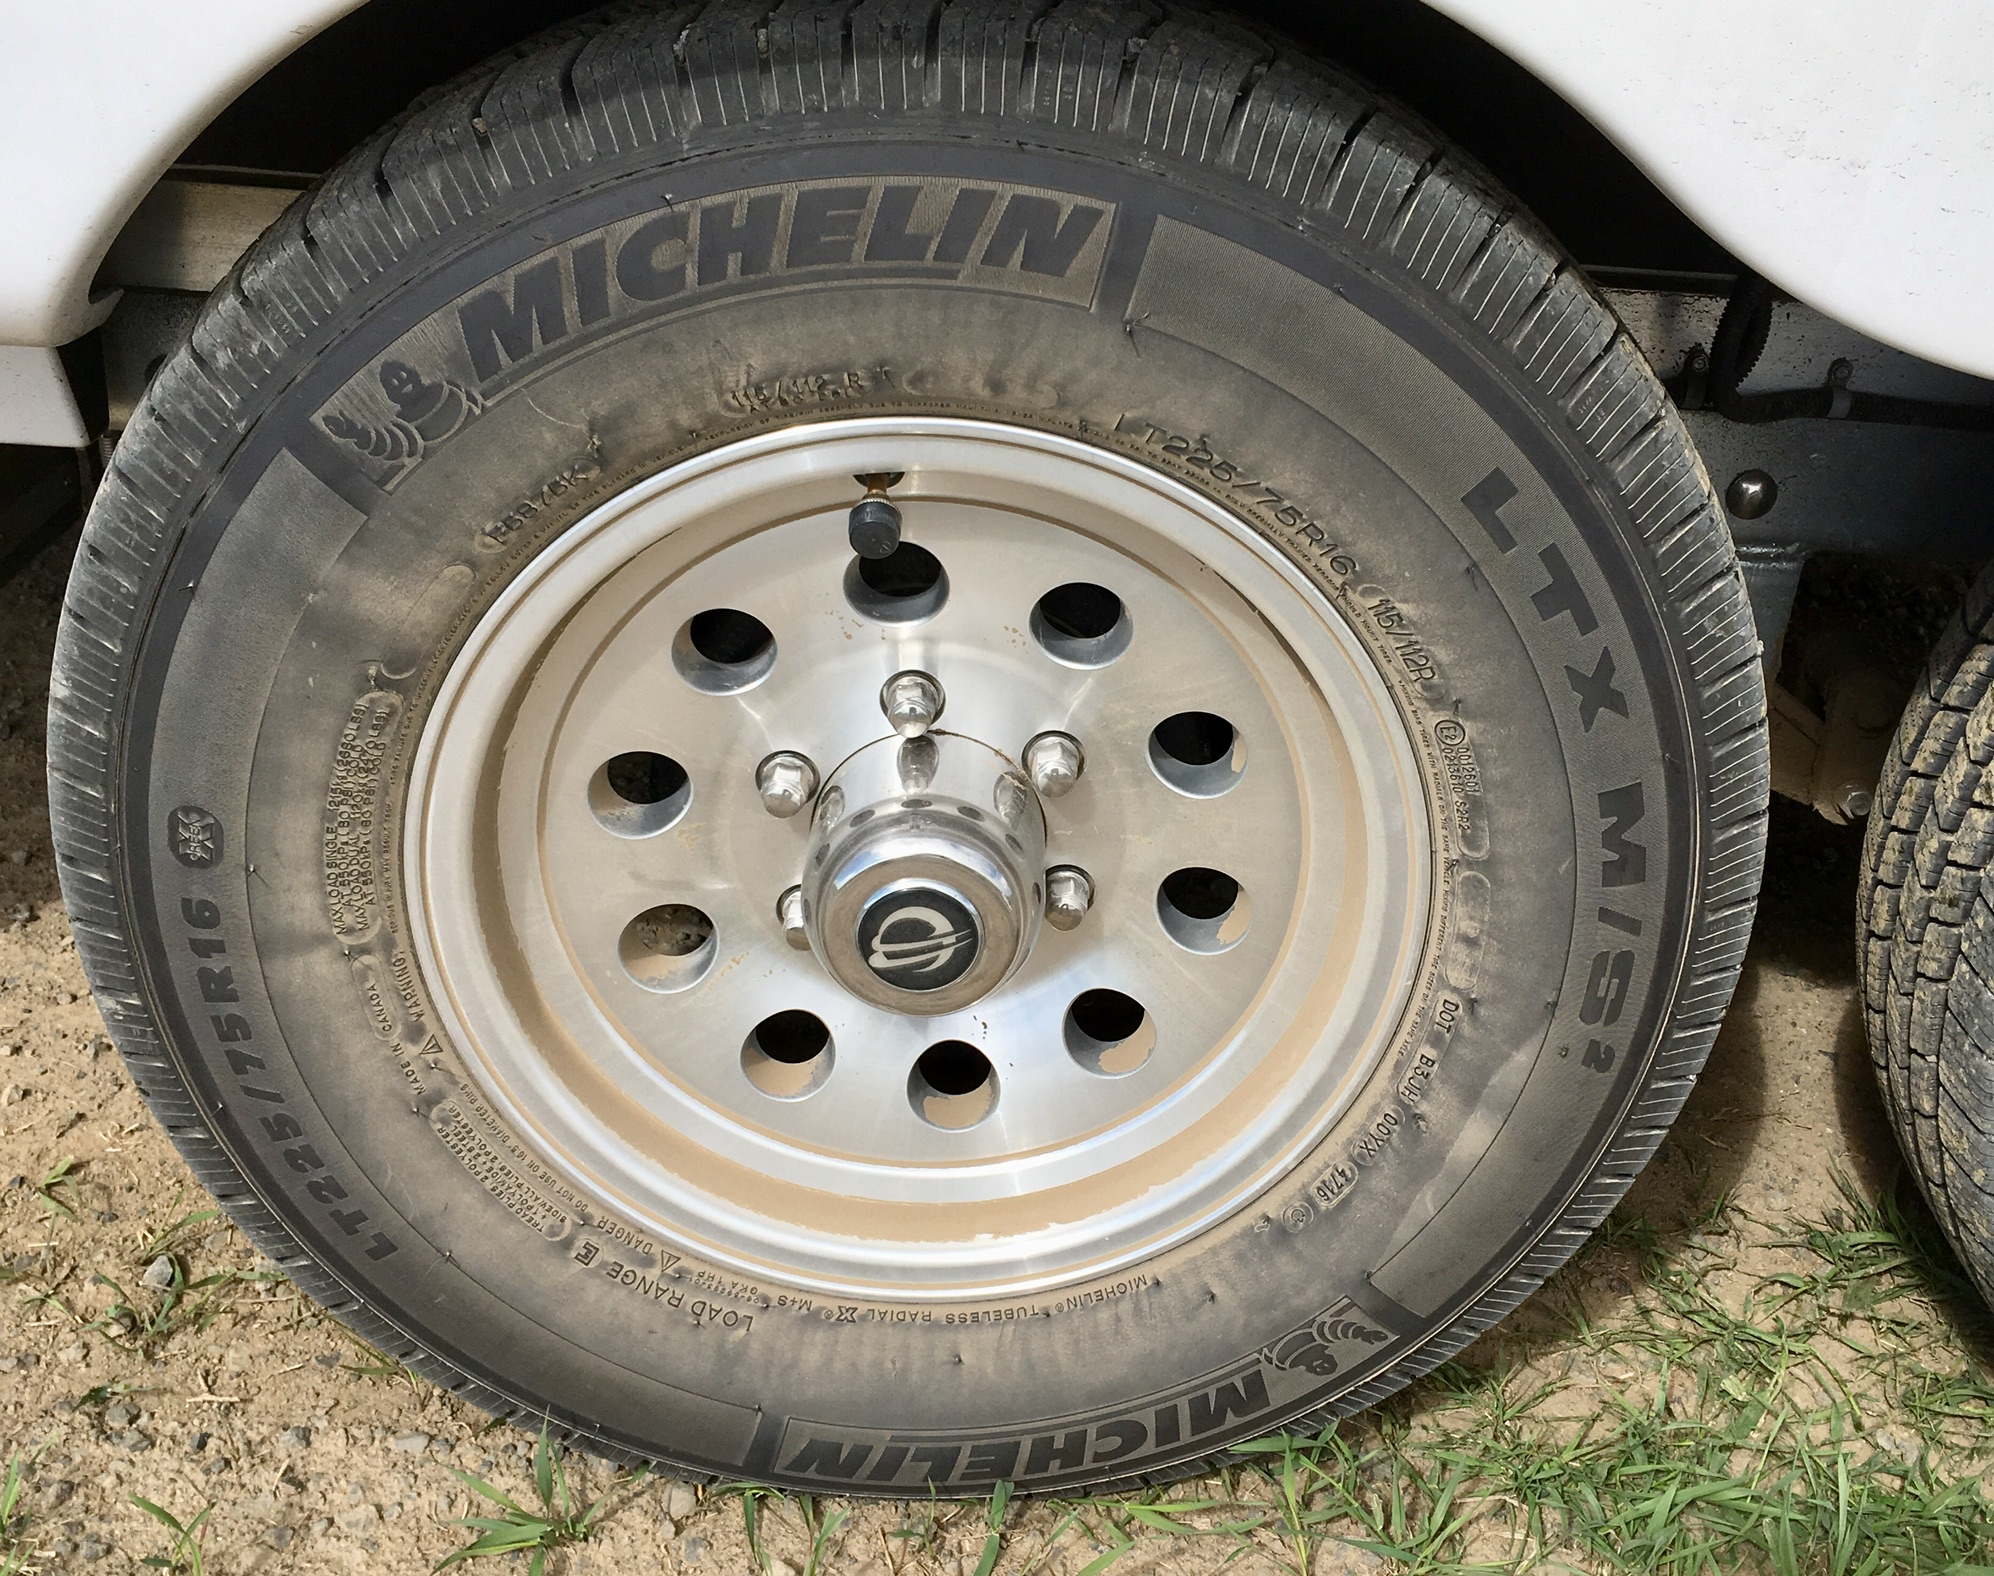
This is an easy mod, you just need some heavy urethane film, such as is used on headlights as stone guards. It needs to be thick, not the thin stuff used as a car bra. I used 12mil (0.012”). I noticed that the spare tire was chafing pretty badly in two places, so I decided to install a pair of pads. After cleaning with 3M Adhesive Cleaner, all that glop came off, but the gelcoat was pretty scuffed. I used some film I already had, cut a couple of 3”x12” strips, and installed them as per the instructions using soapy water. I laid out some pieces of tape at 5 inches from the tire mount to act as guide lines, and I used a 3 inch rubber roller to get the bubbles out rather than a squeegee or piece of plastic. [attachment file=136477] This area is invisible normally, but I feel better knowing it is protected,and it will stop gel coat from getting on the outer sidewall of the spare. While I was in there I applied RejeX, to get that mirror shine and repell dirt. ... https://www.amazon.com/Rejex-High-Gloss-Protective-Finish/dp/B00GM6NF0I Here is the source for the film I used. ... http://www.giantloopmoto.com/product/vinyl-protective-film/ John Davies Spokane WA
 3 points
 -
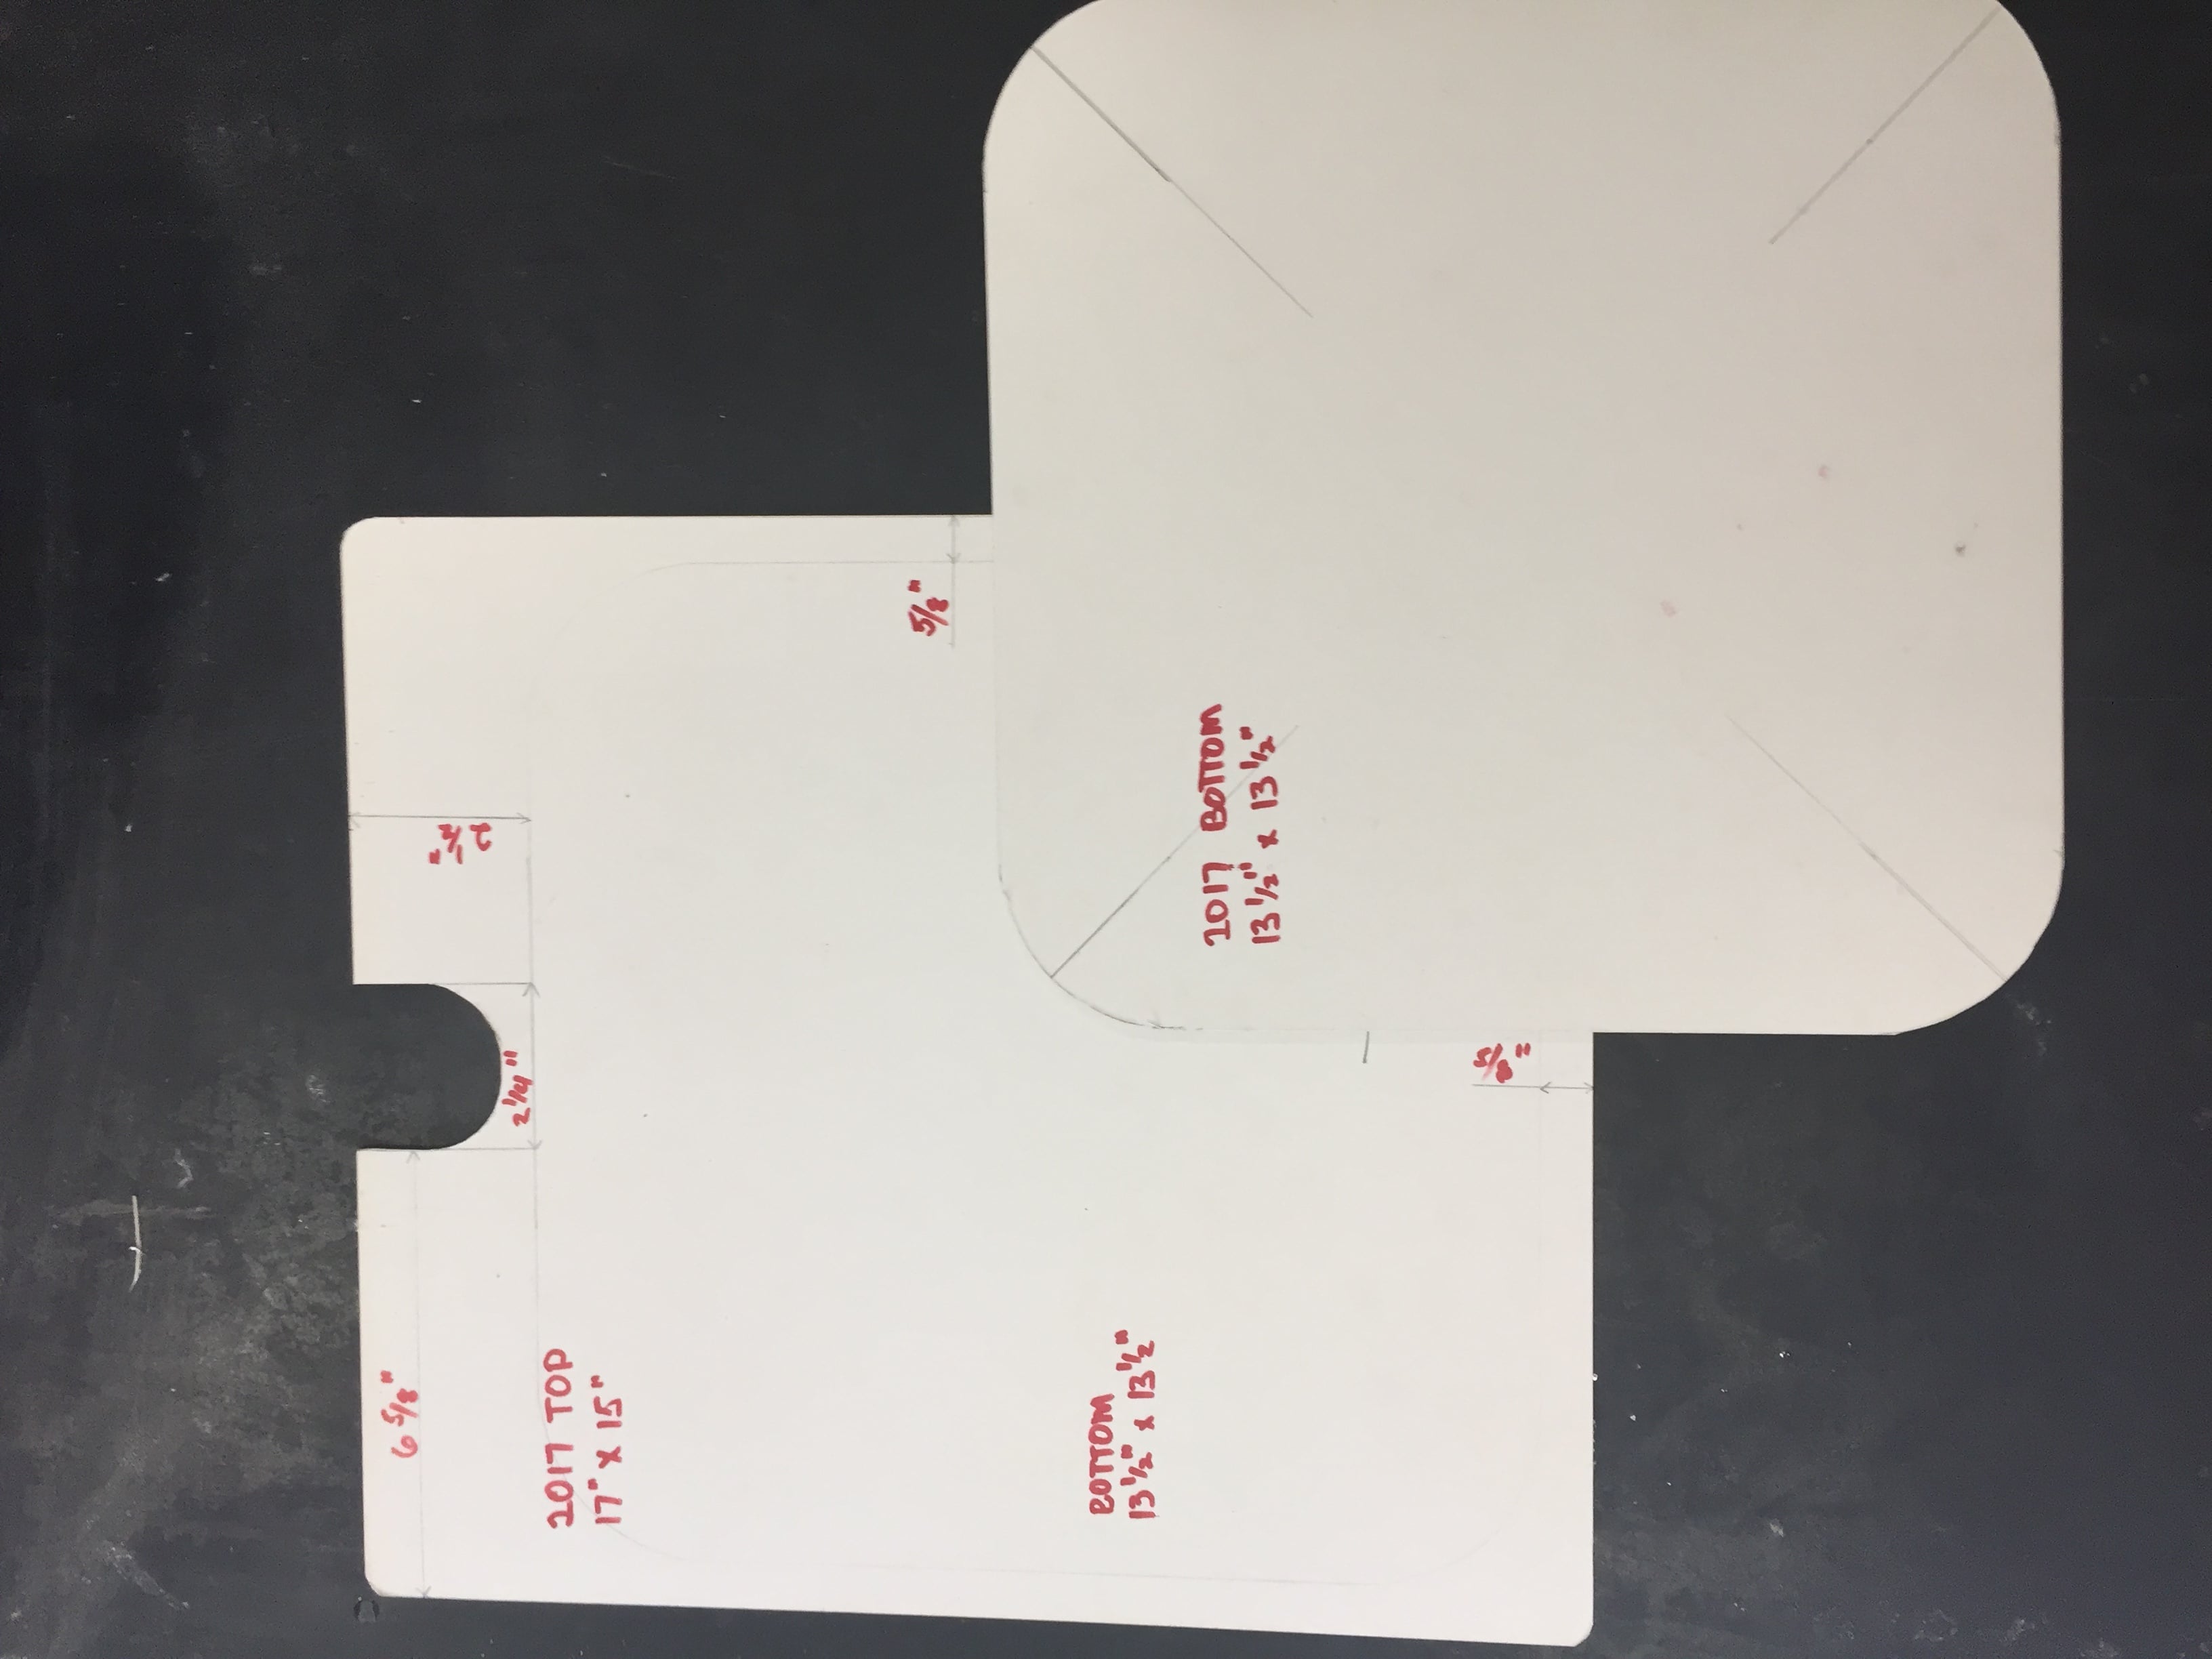
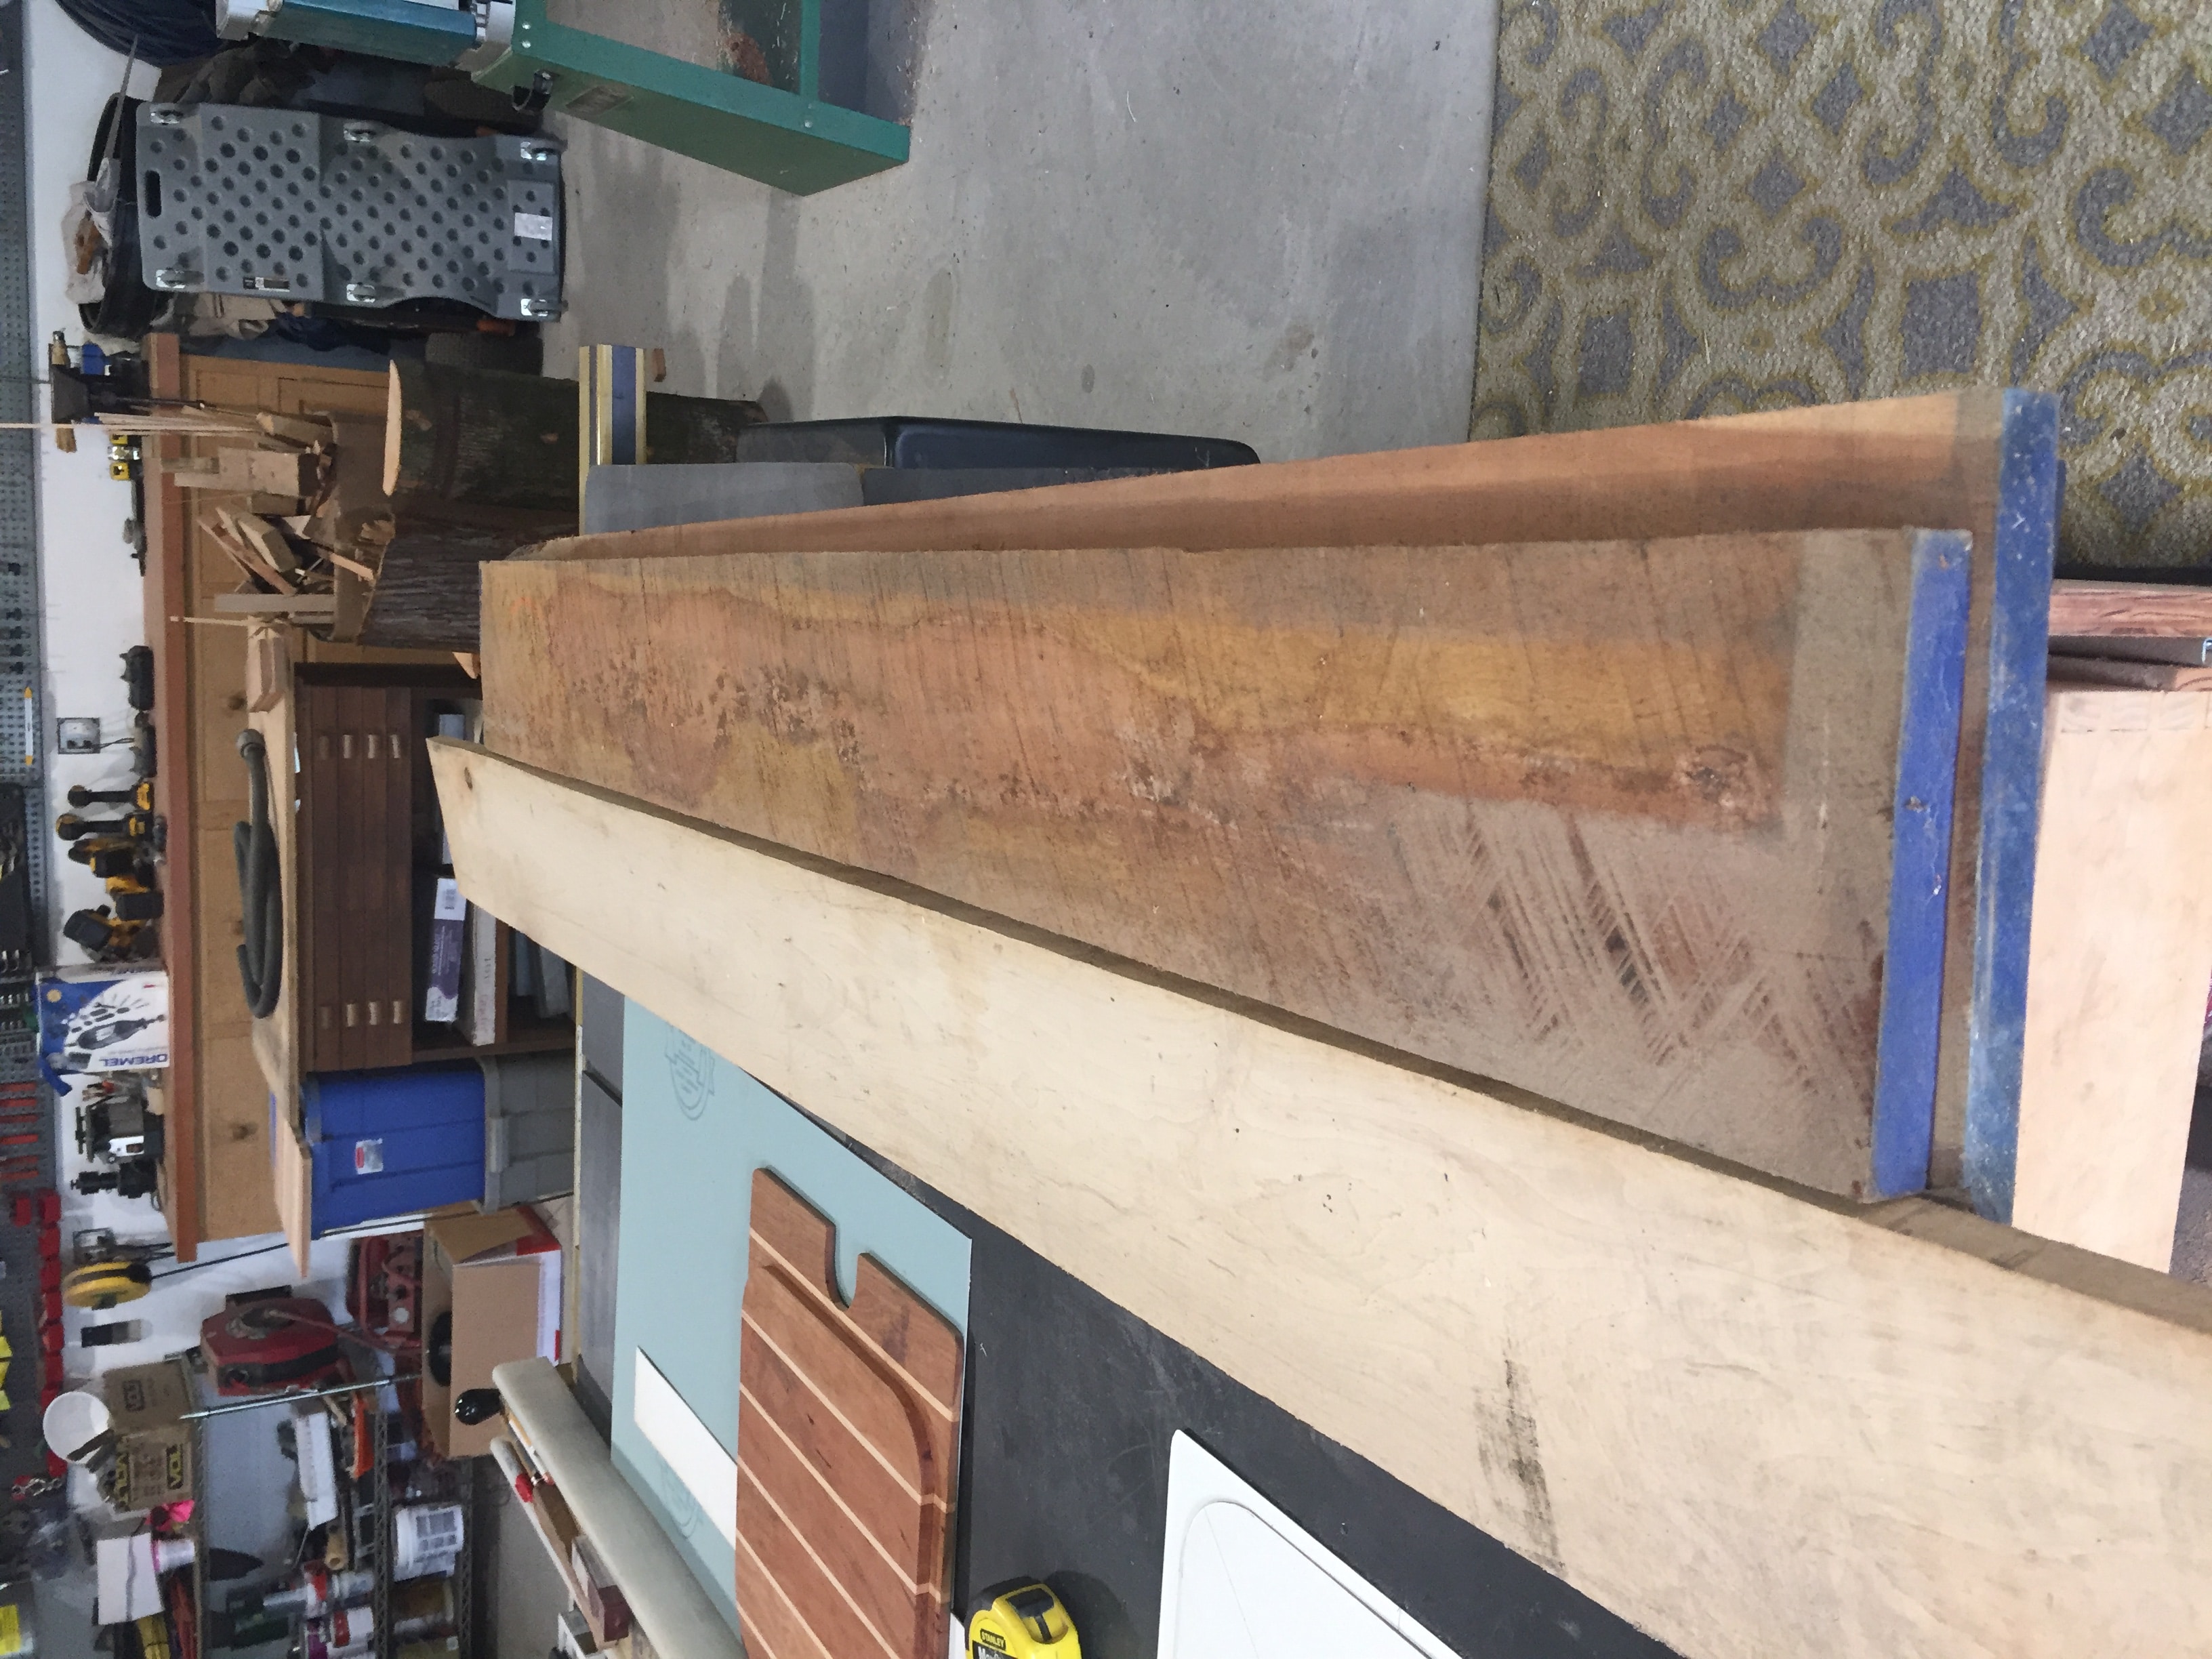
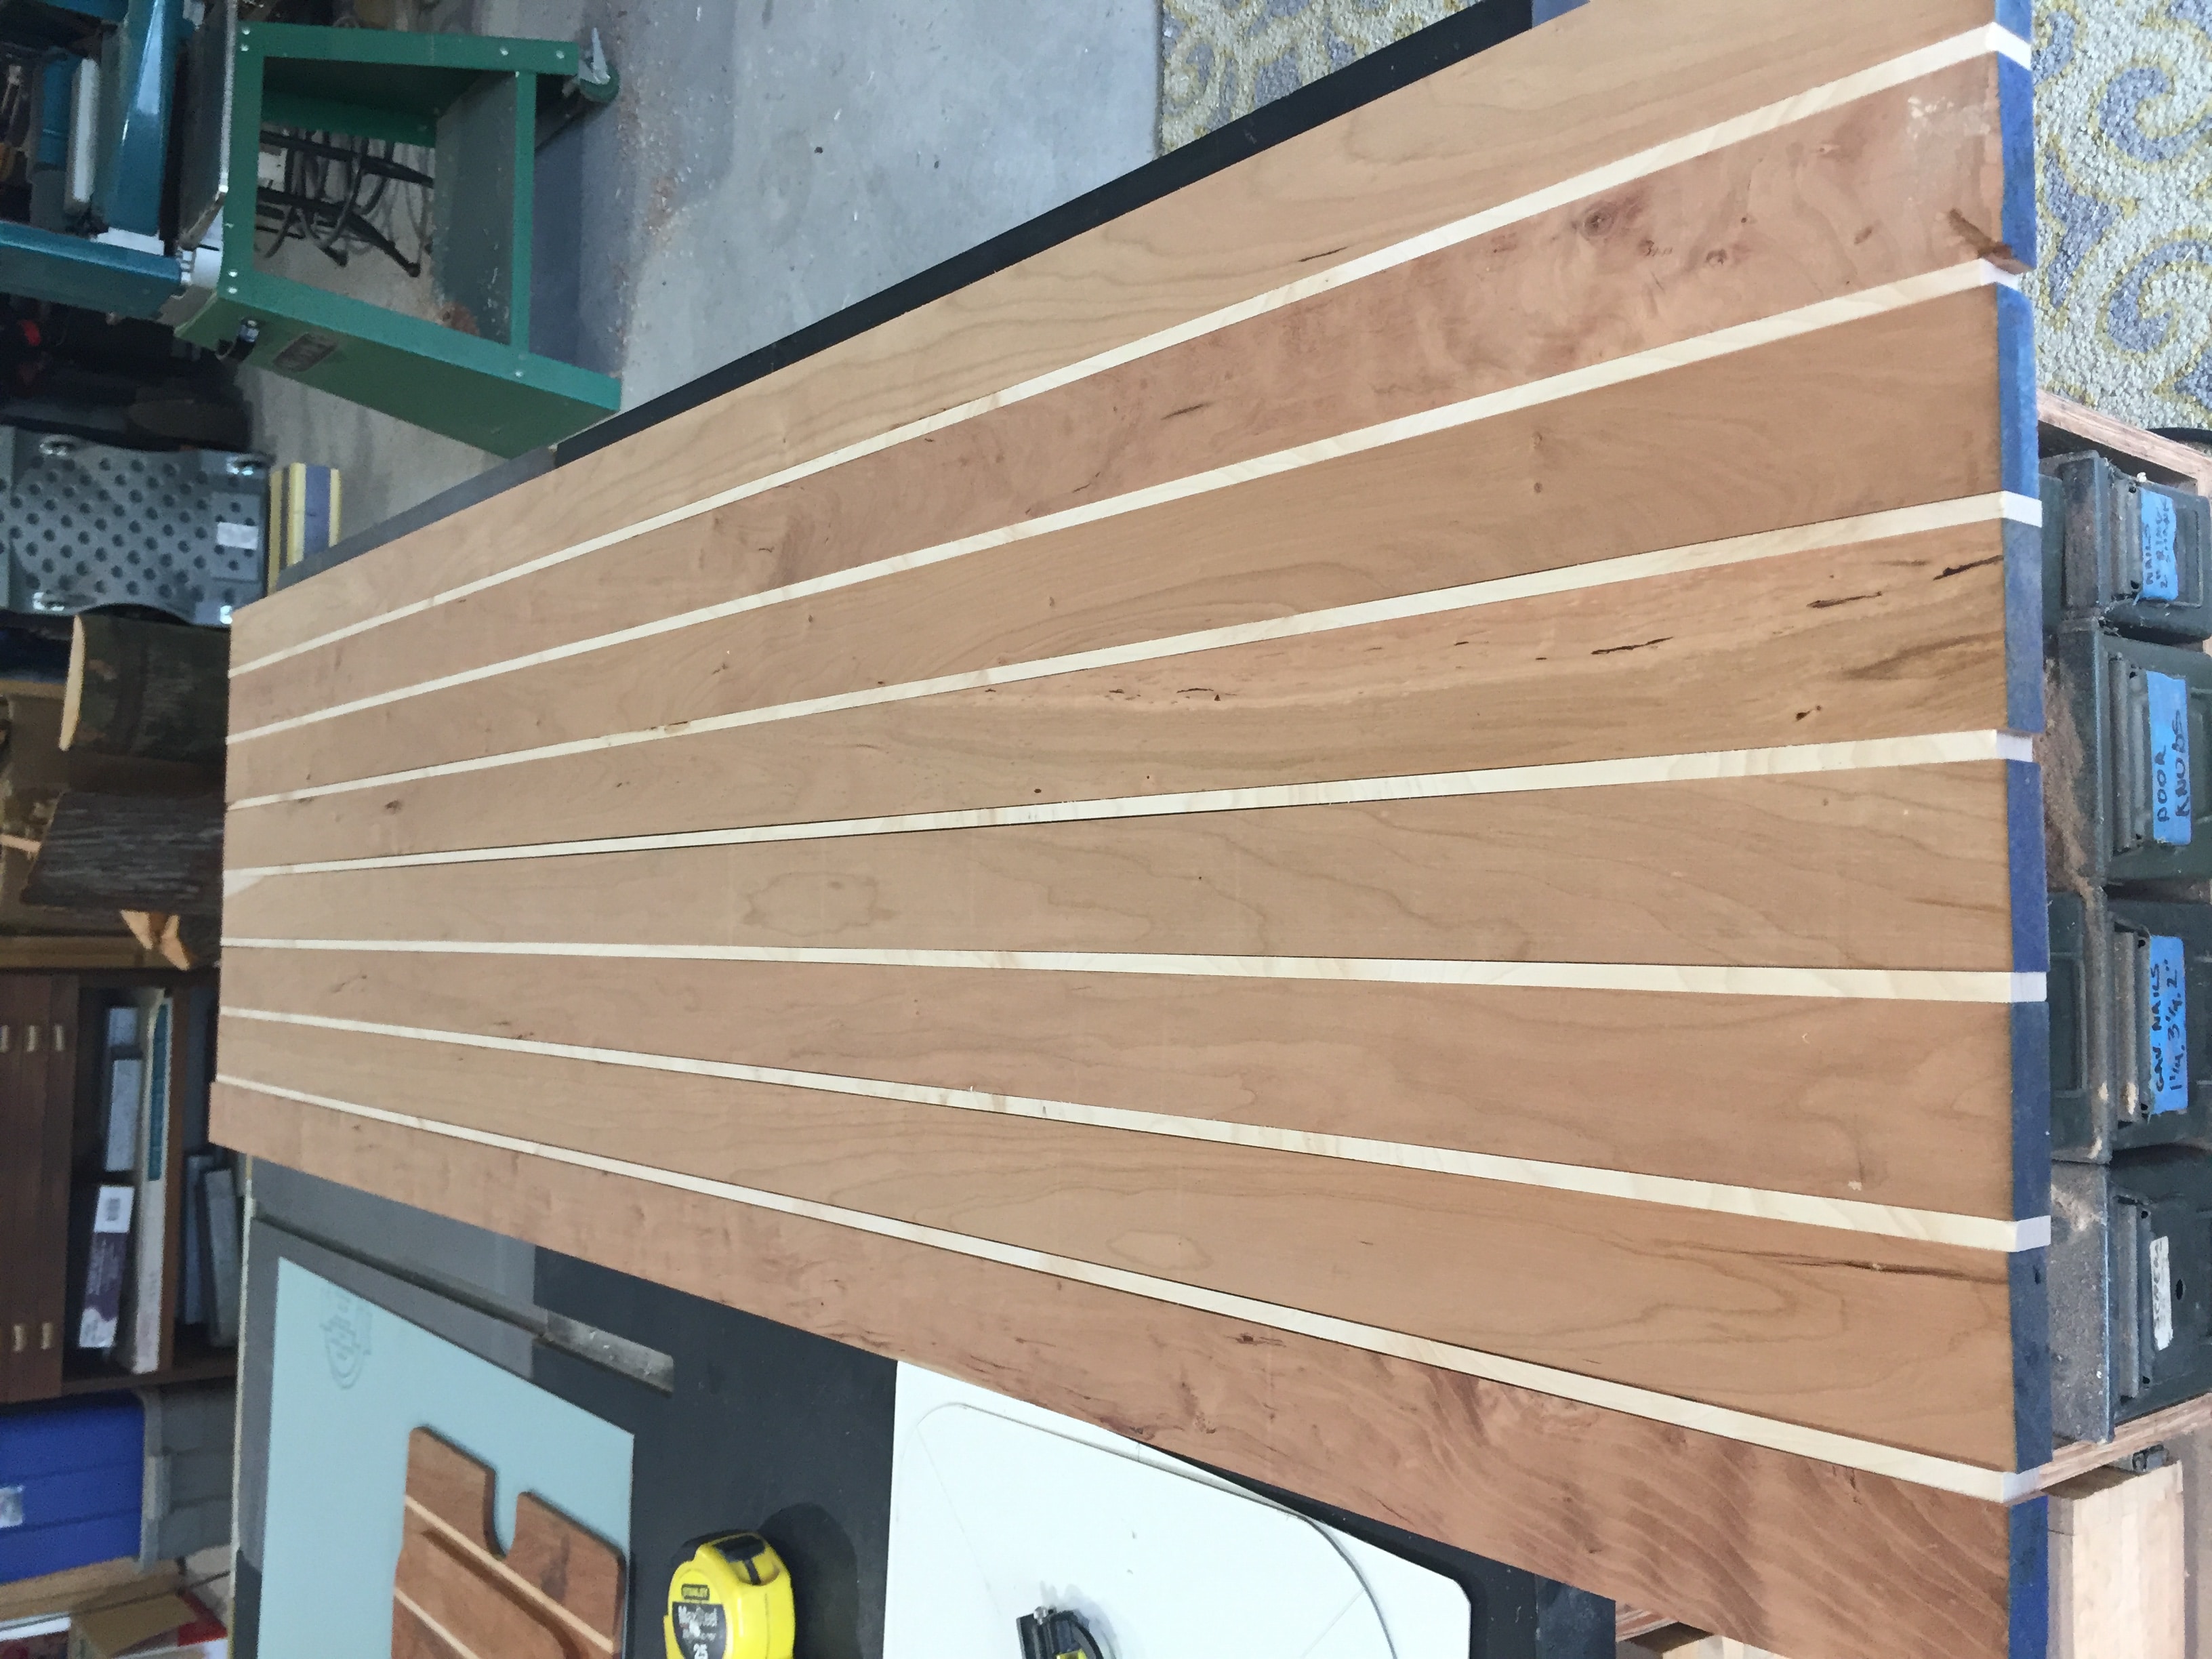
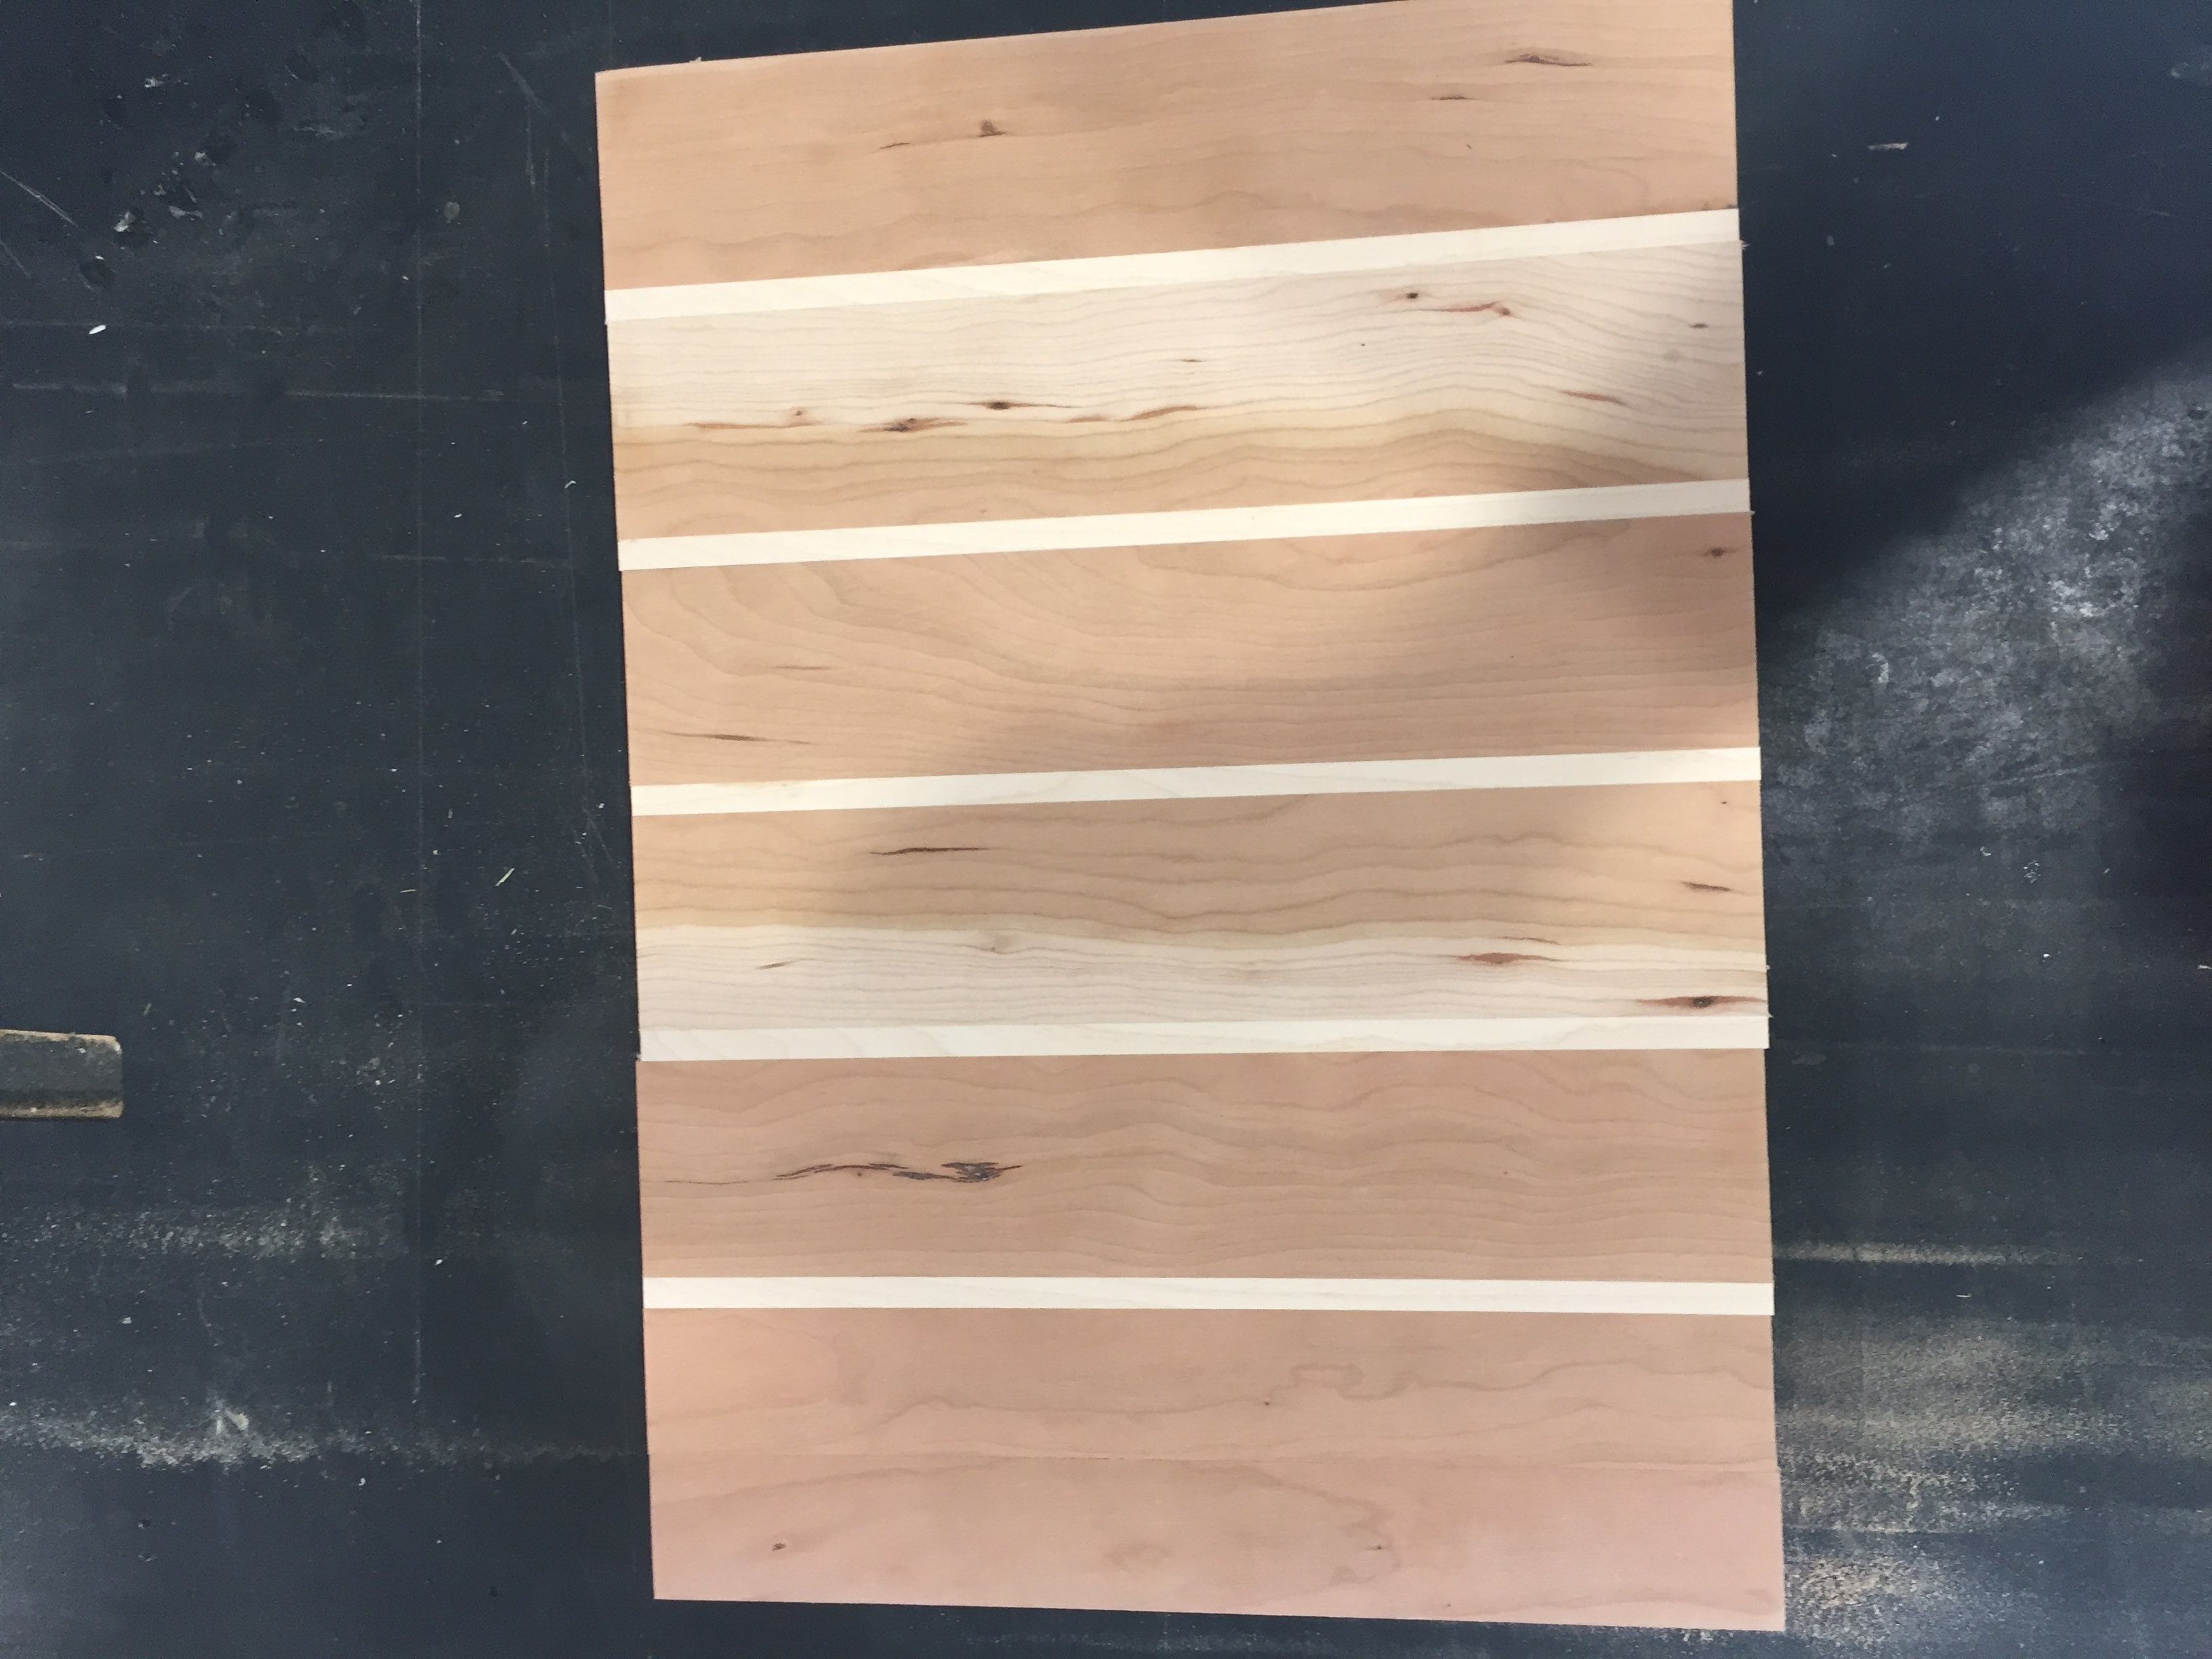
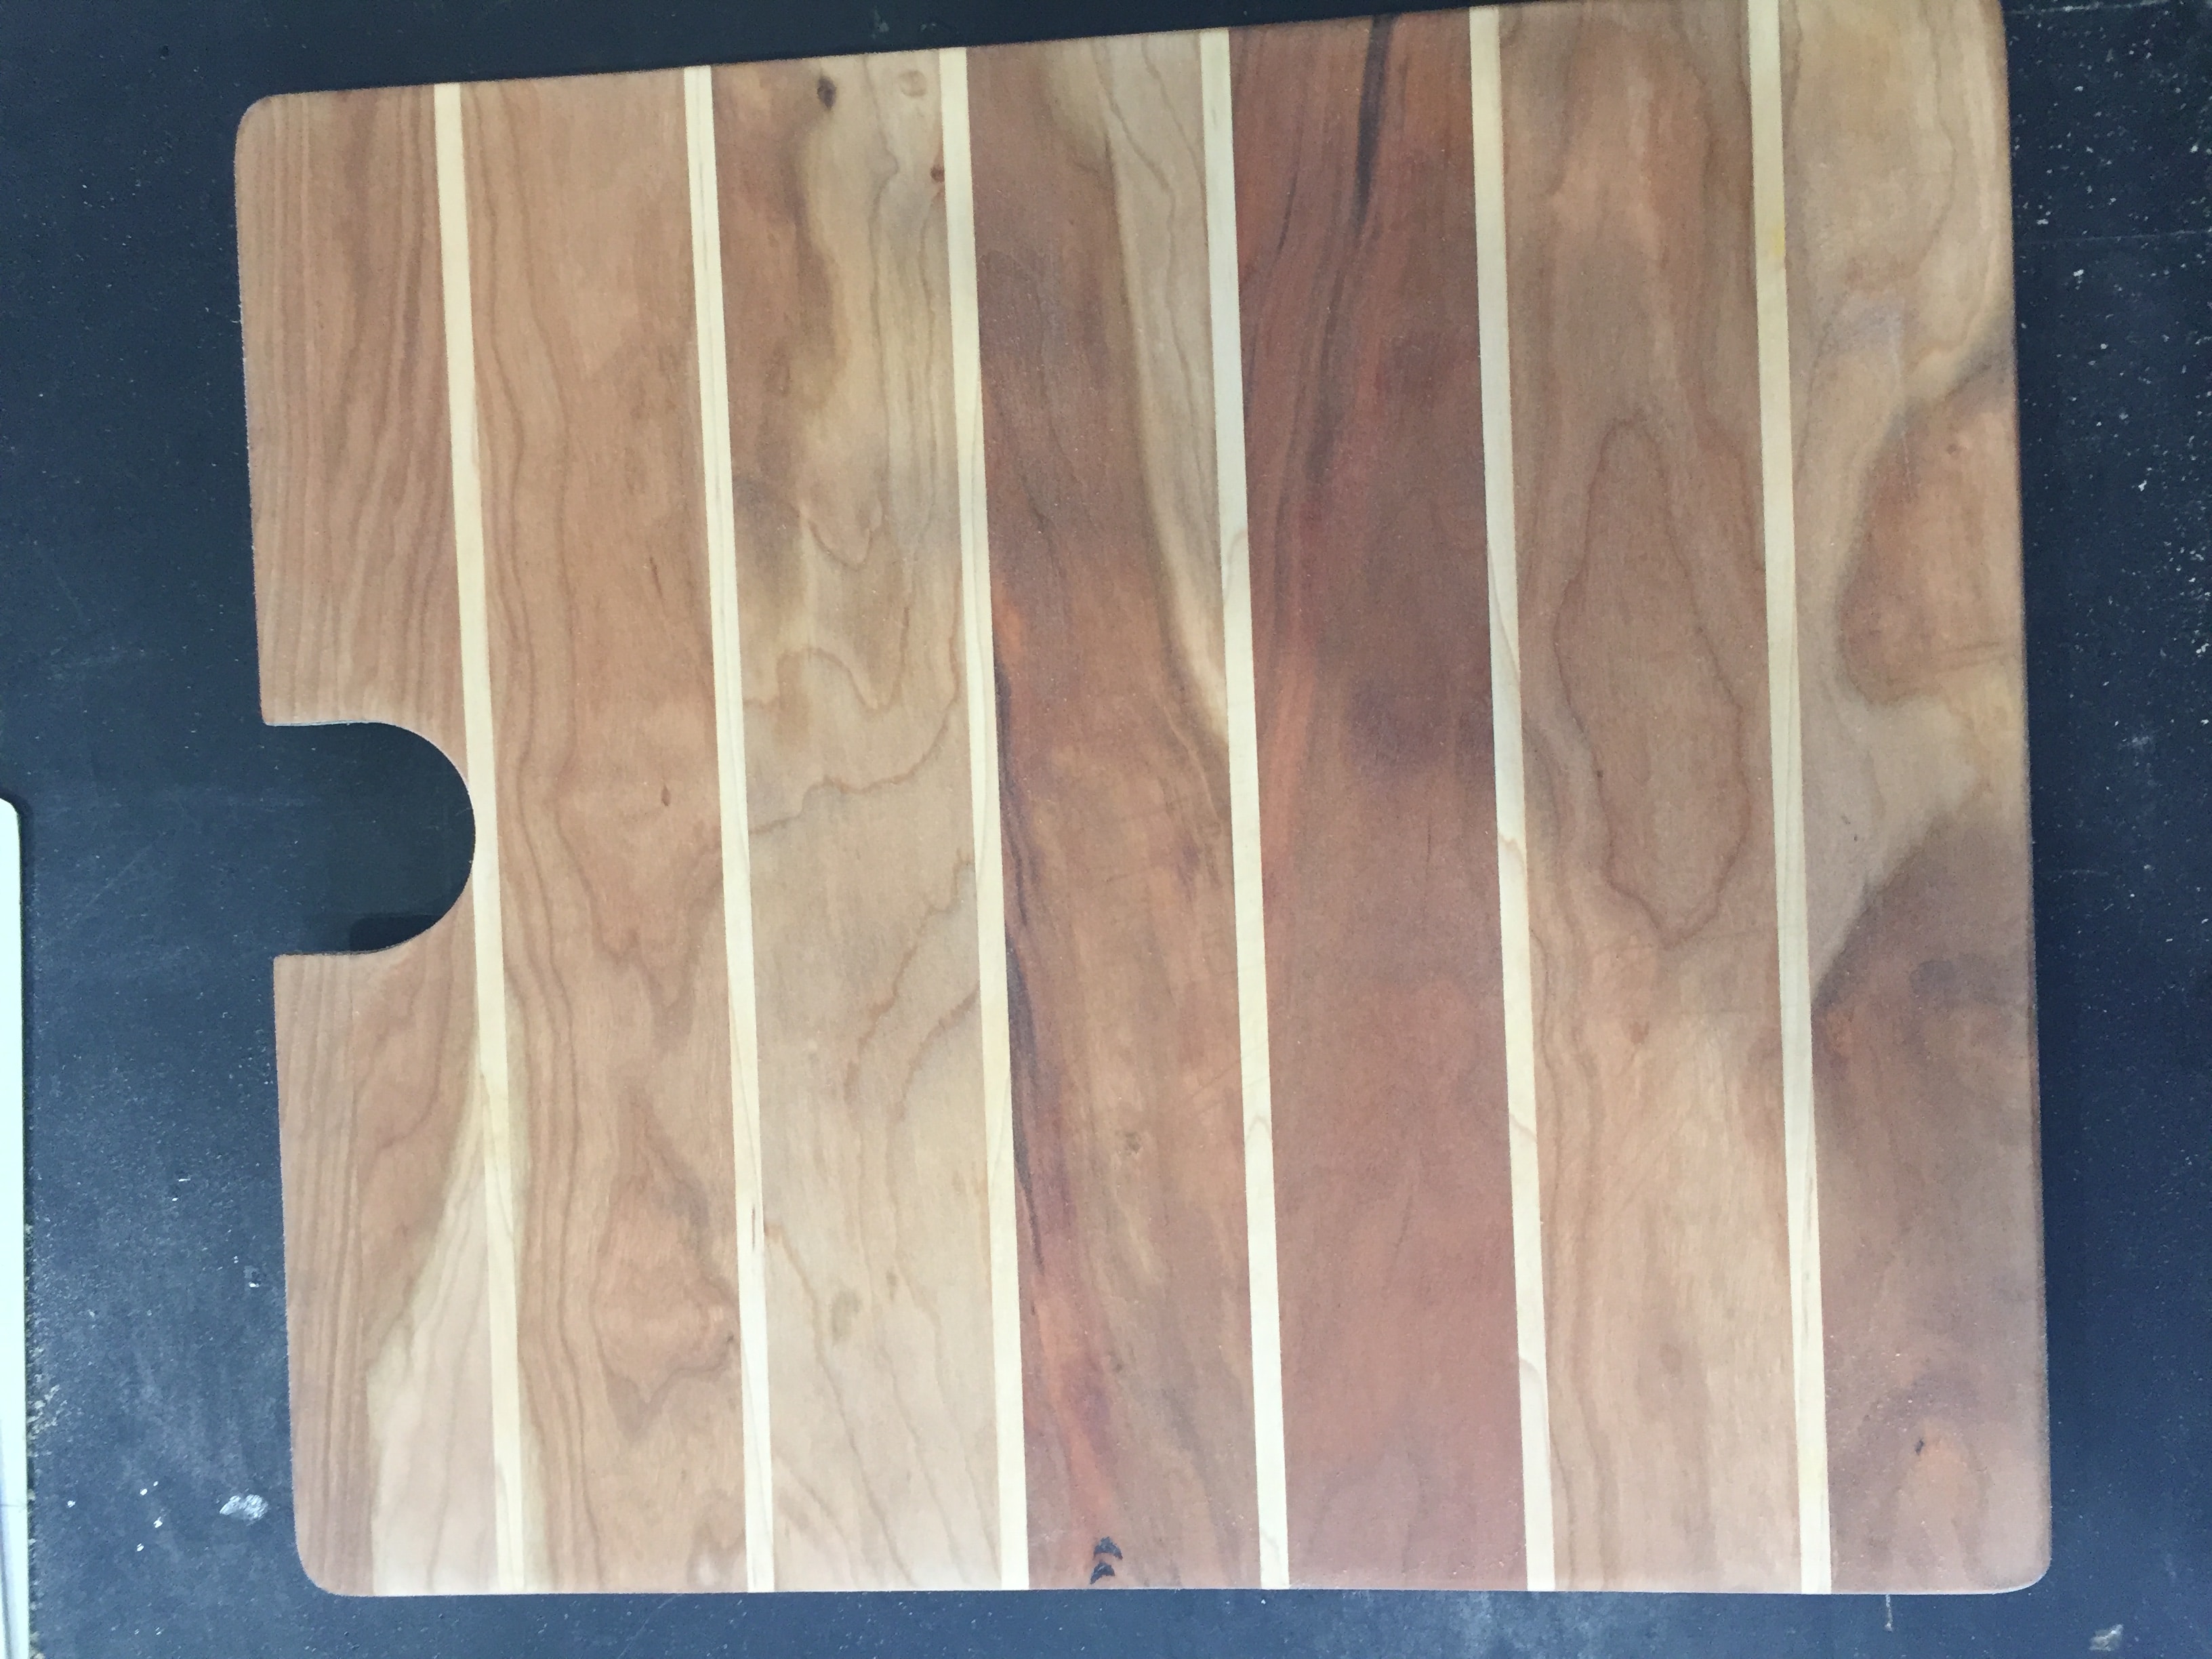
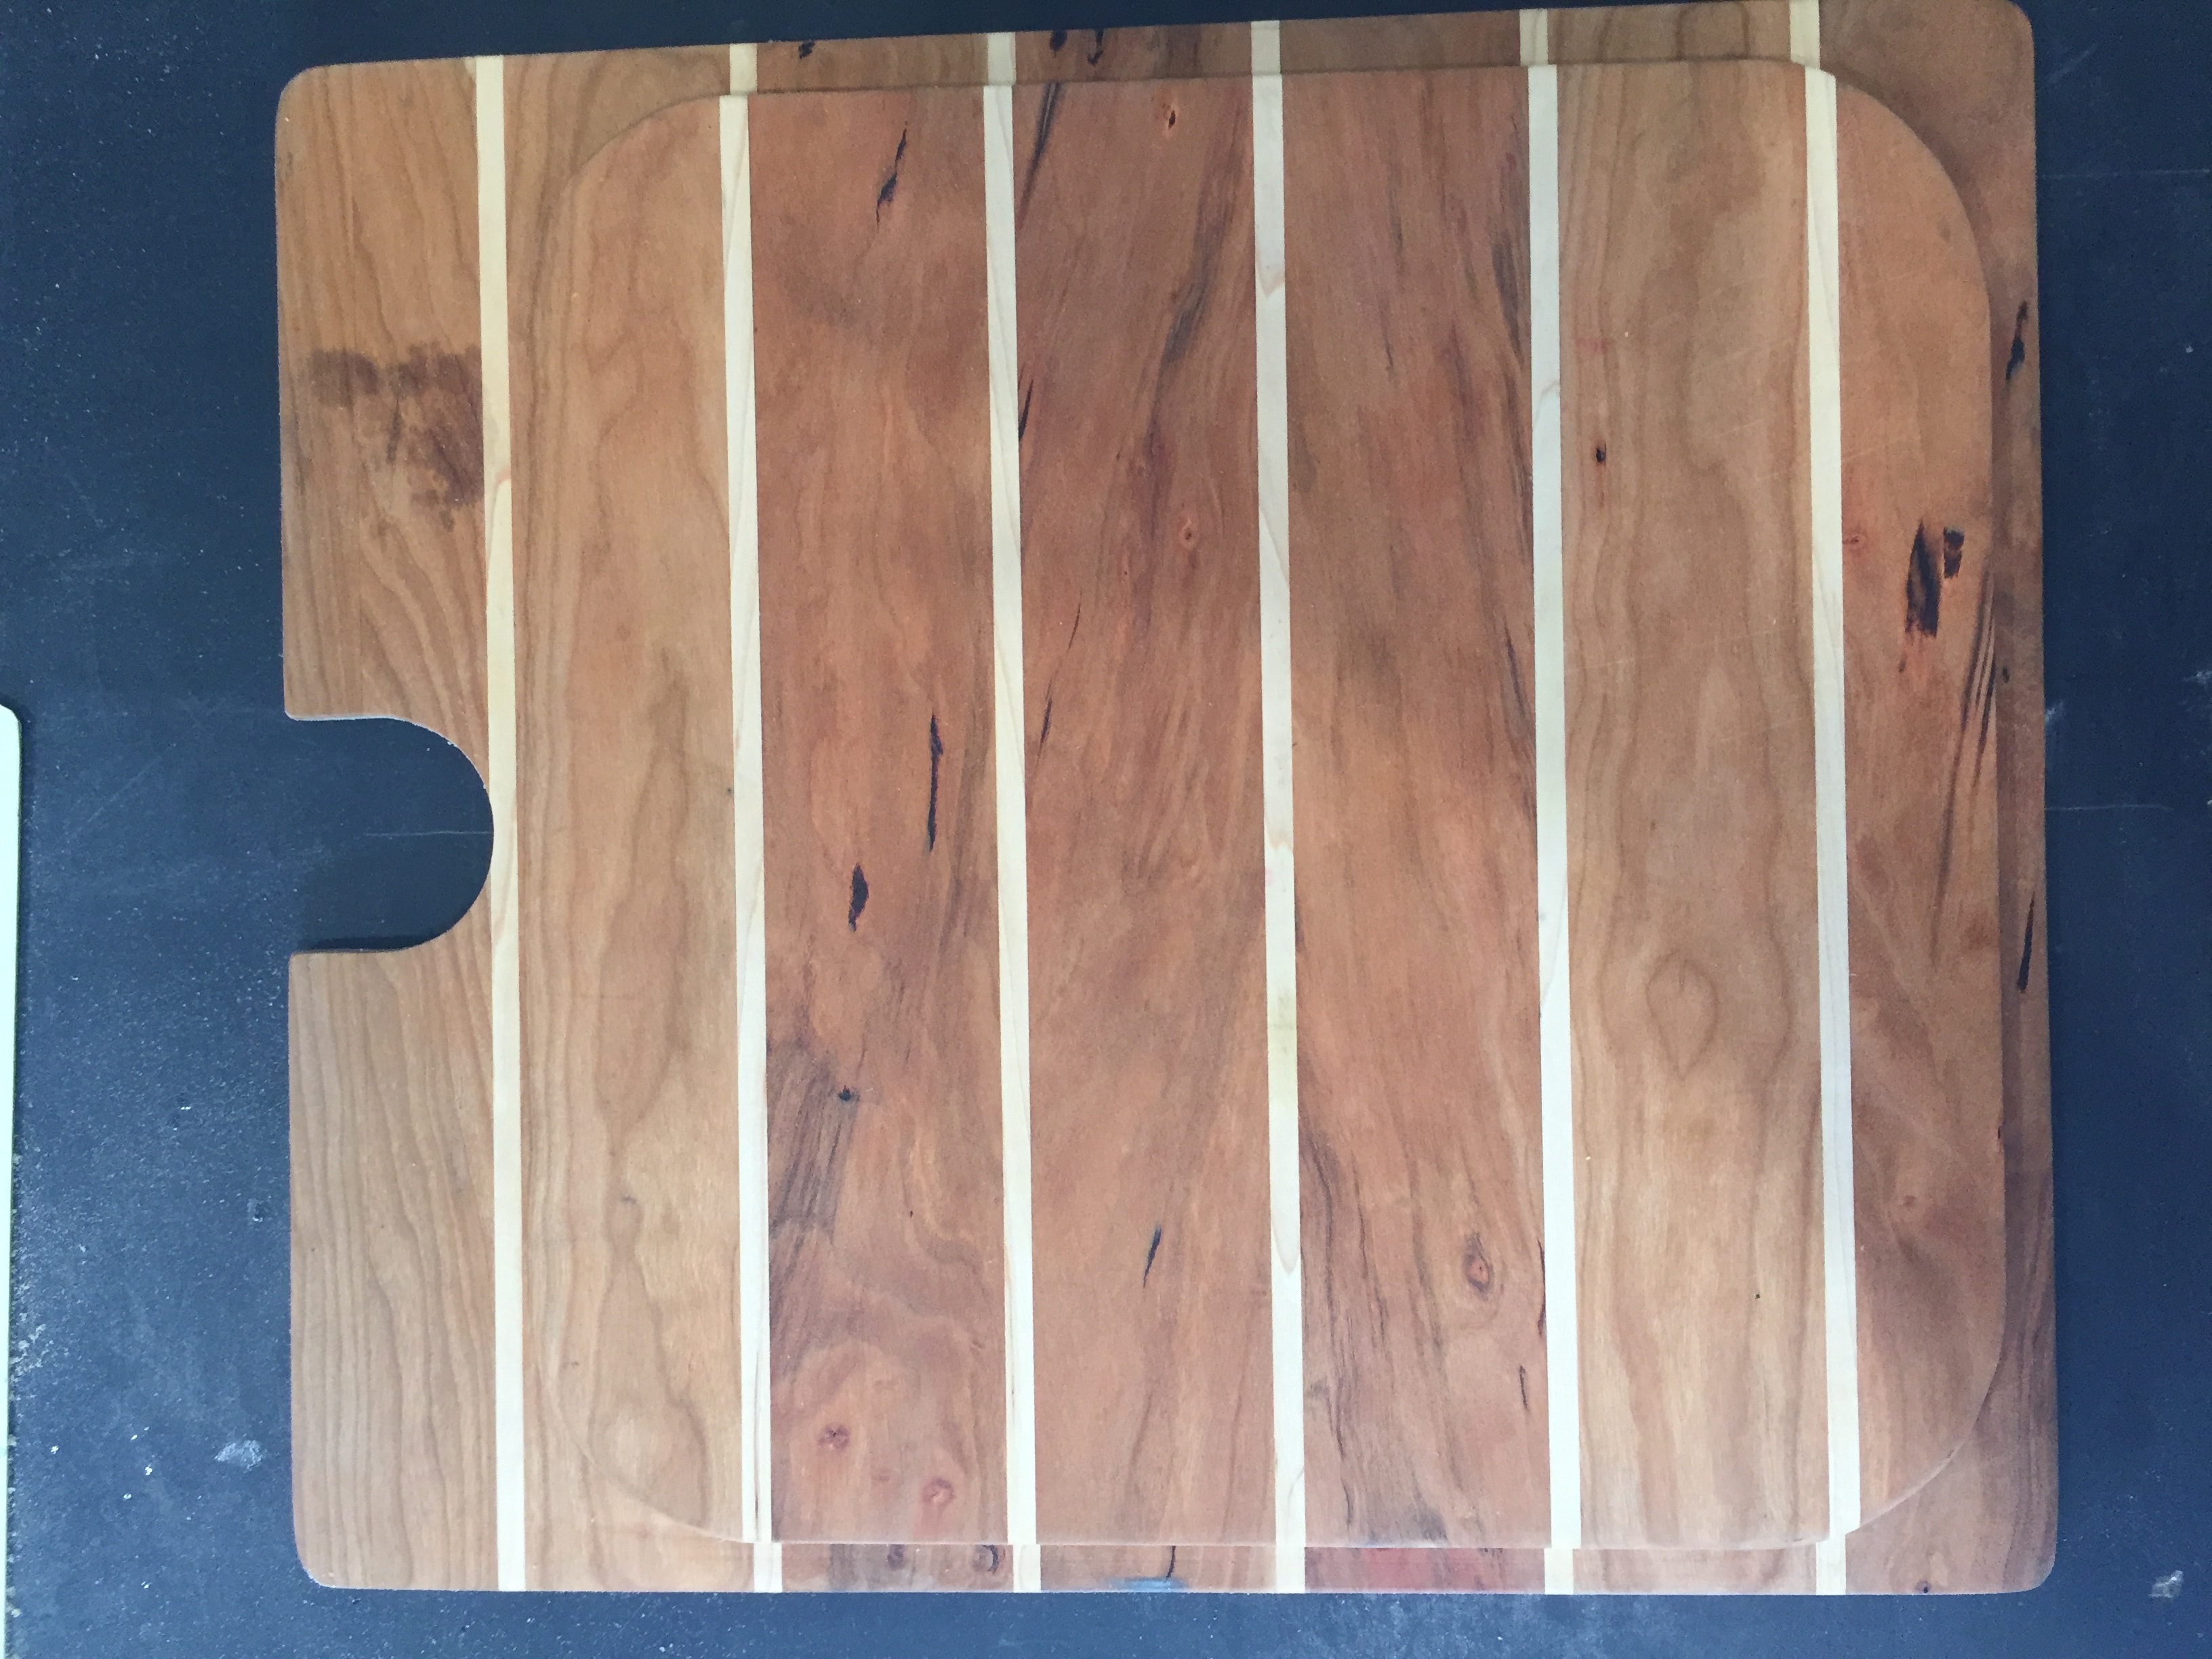
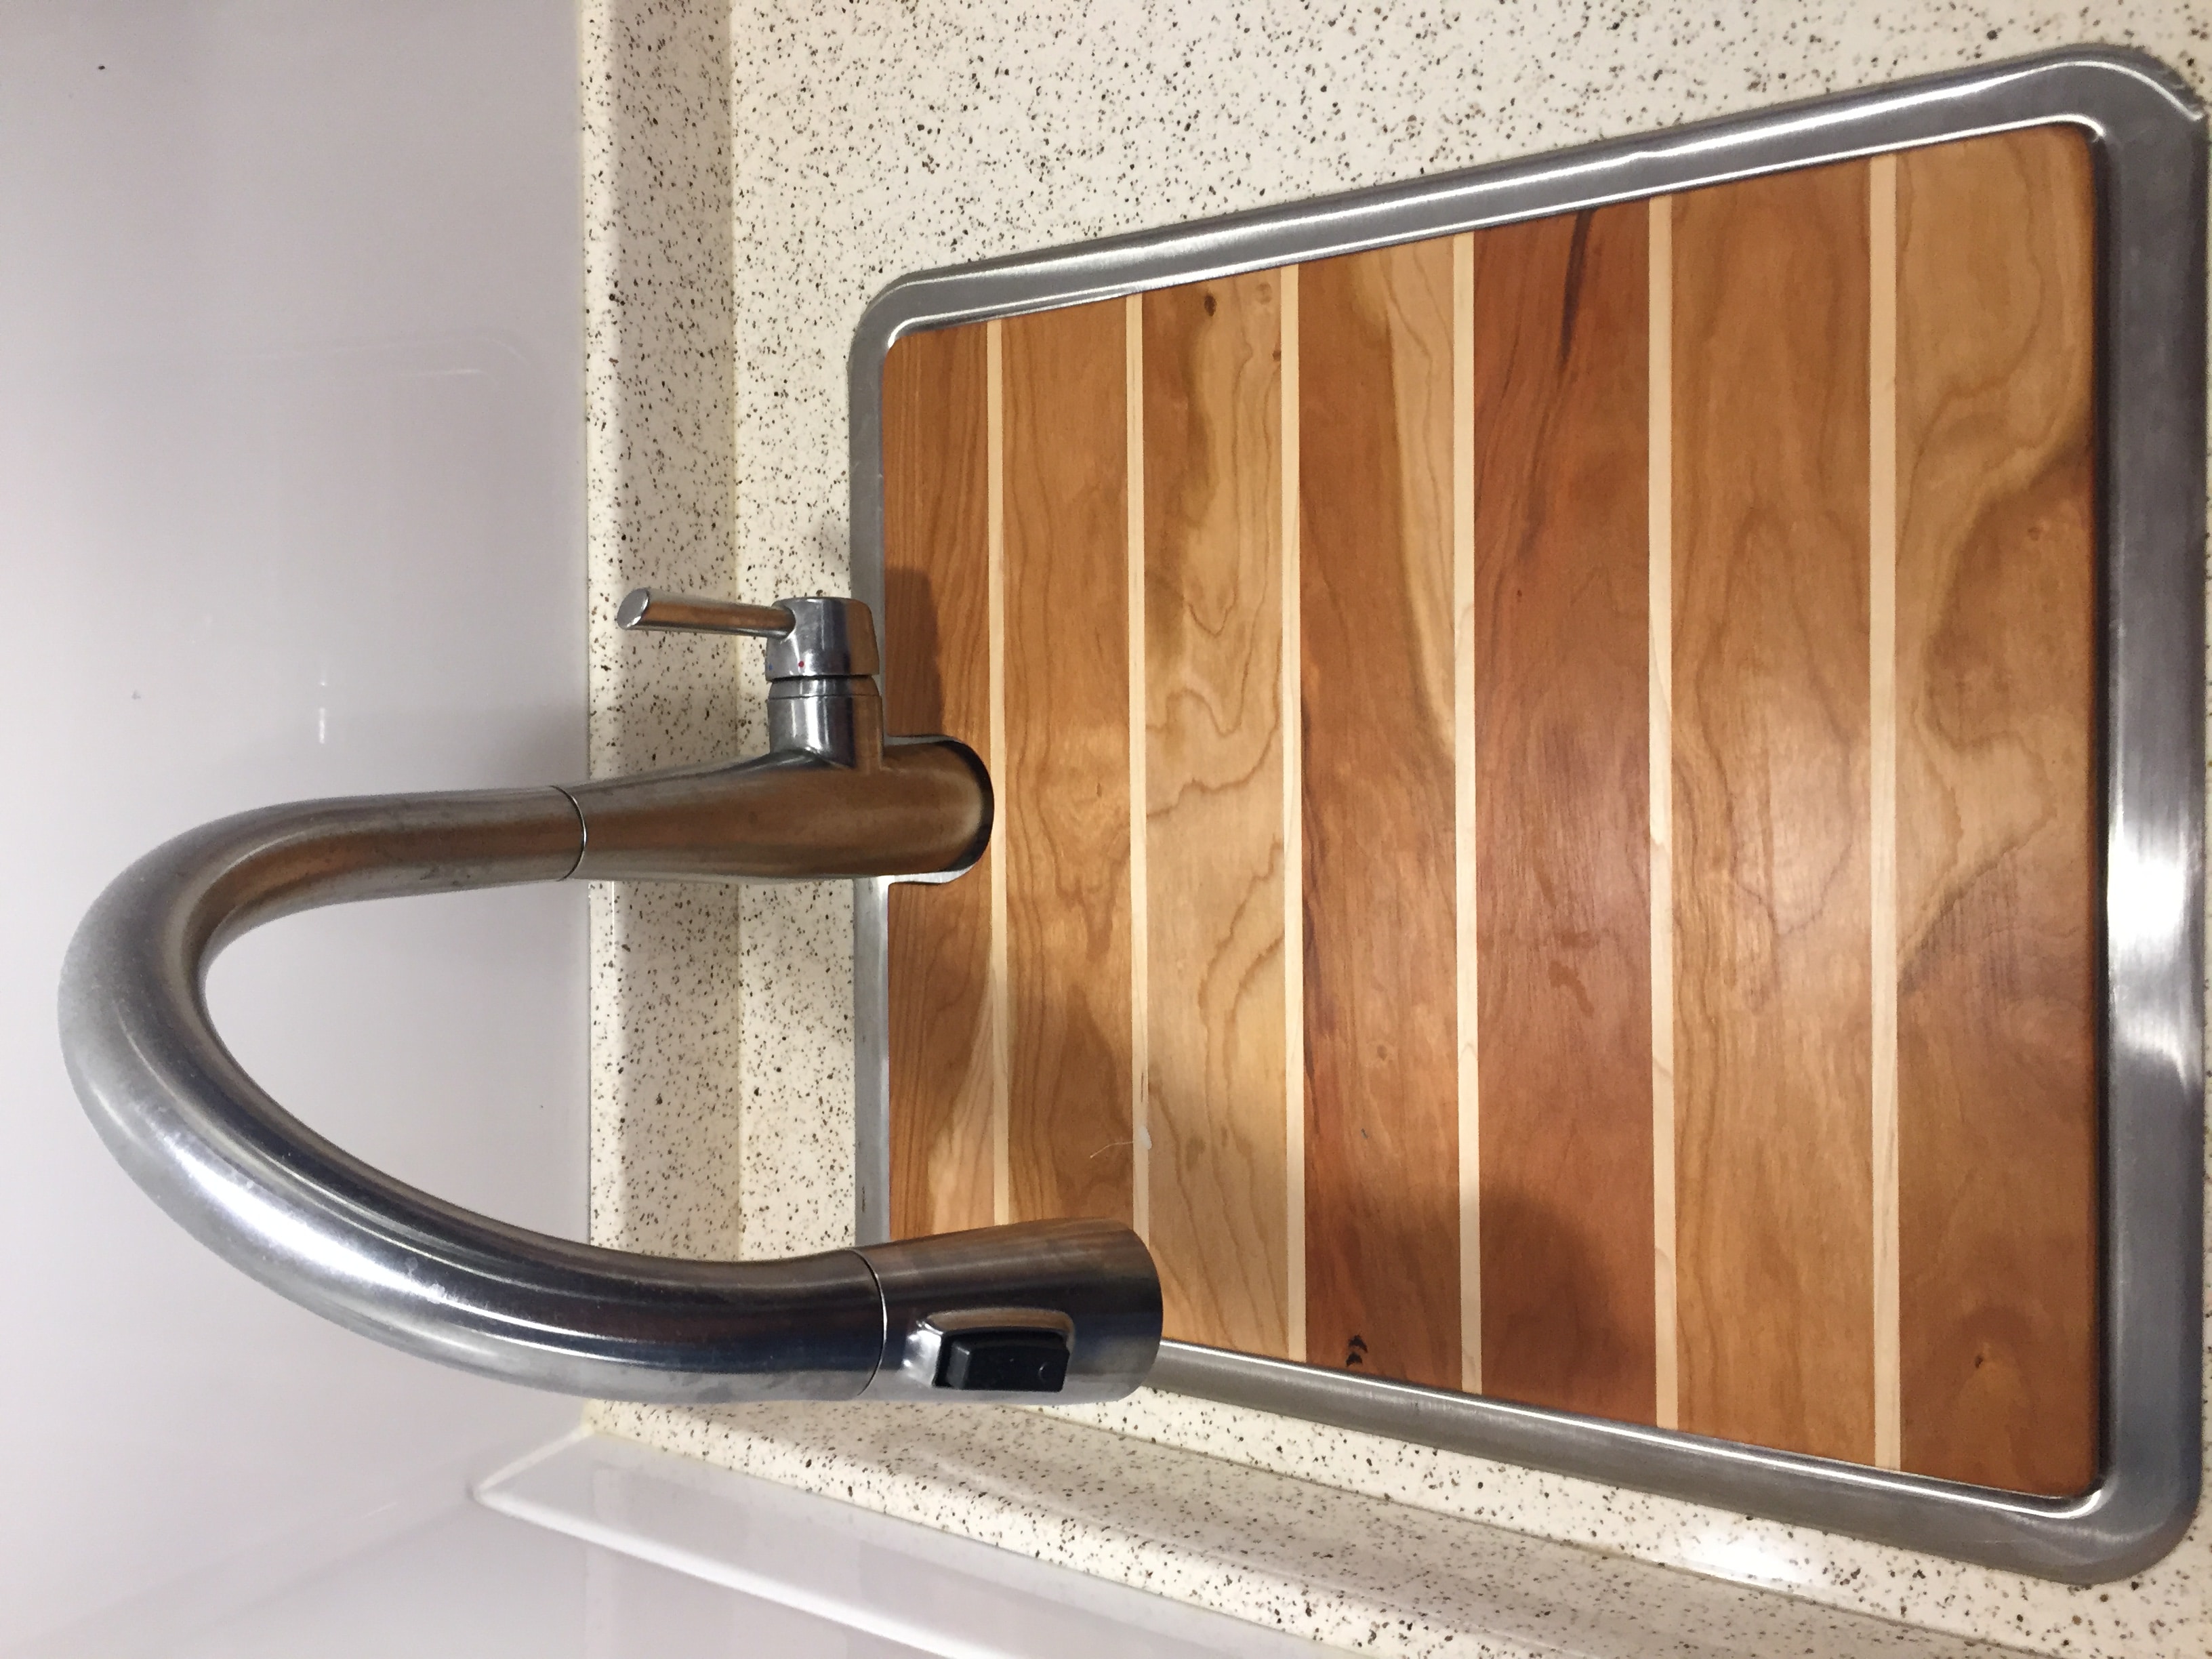
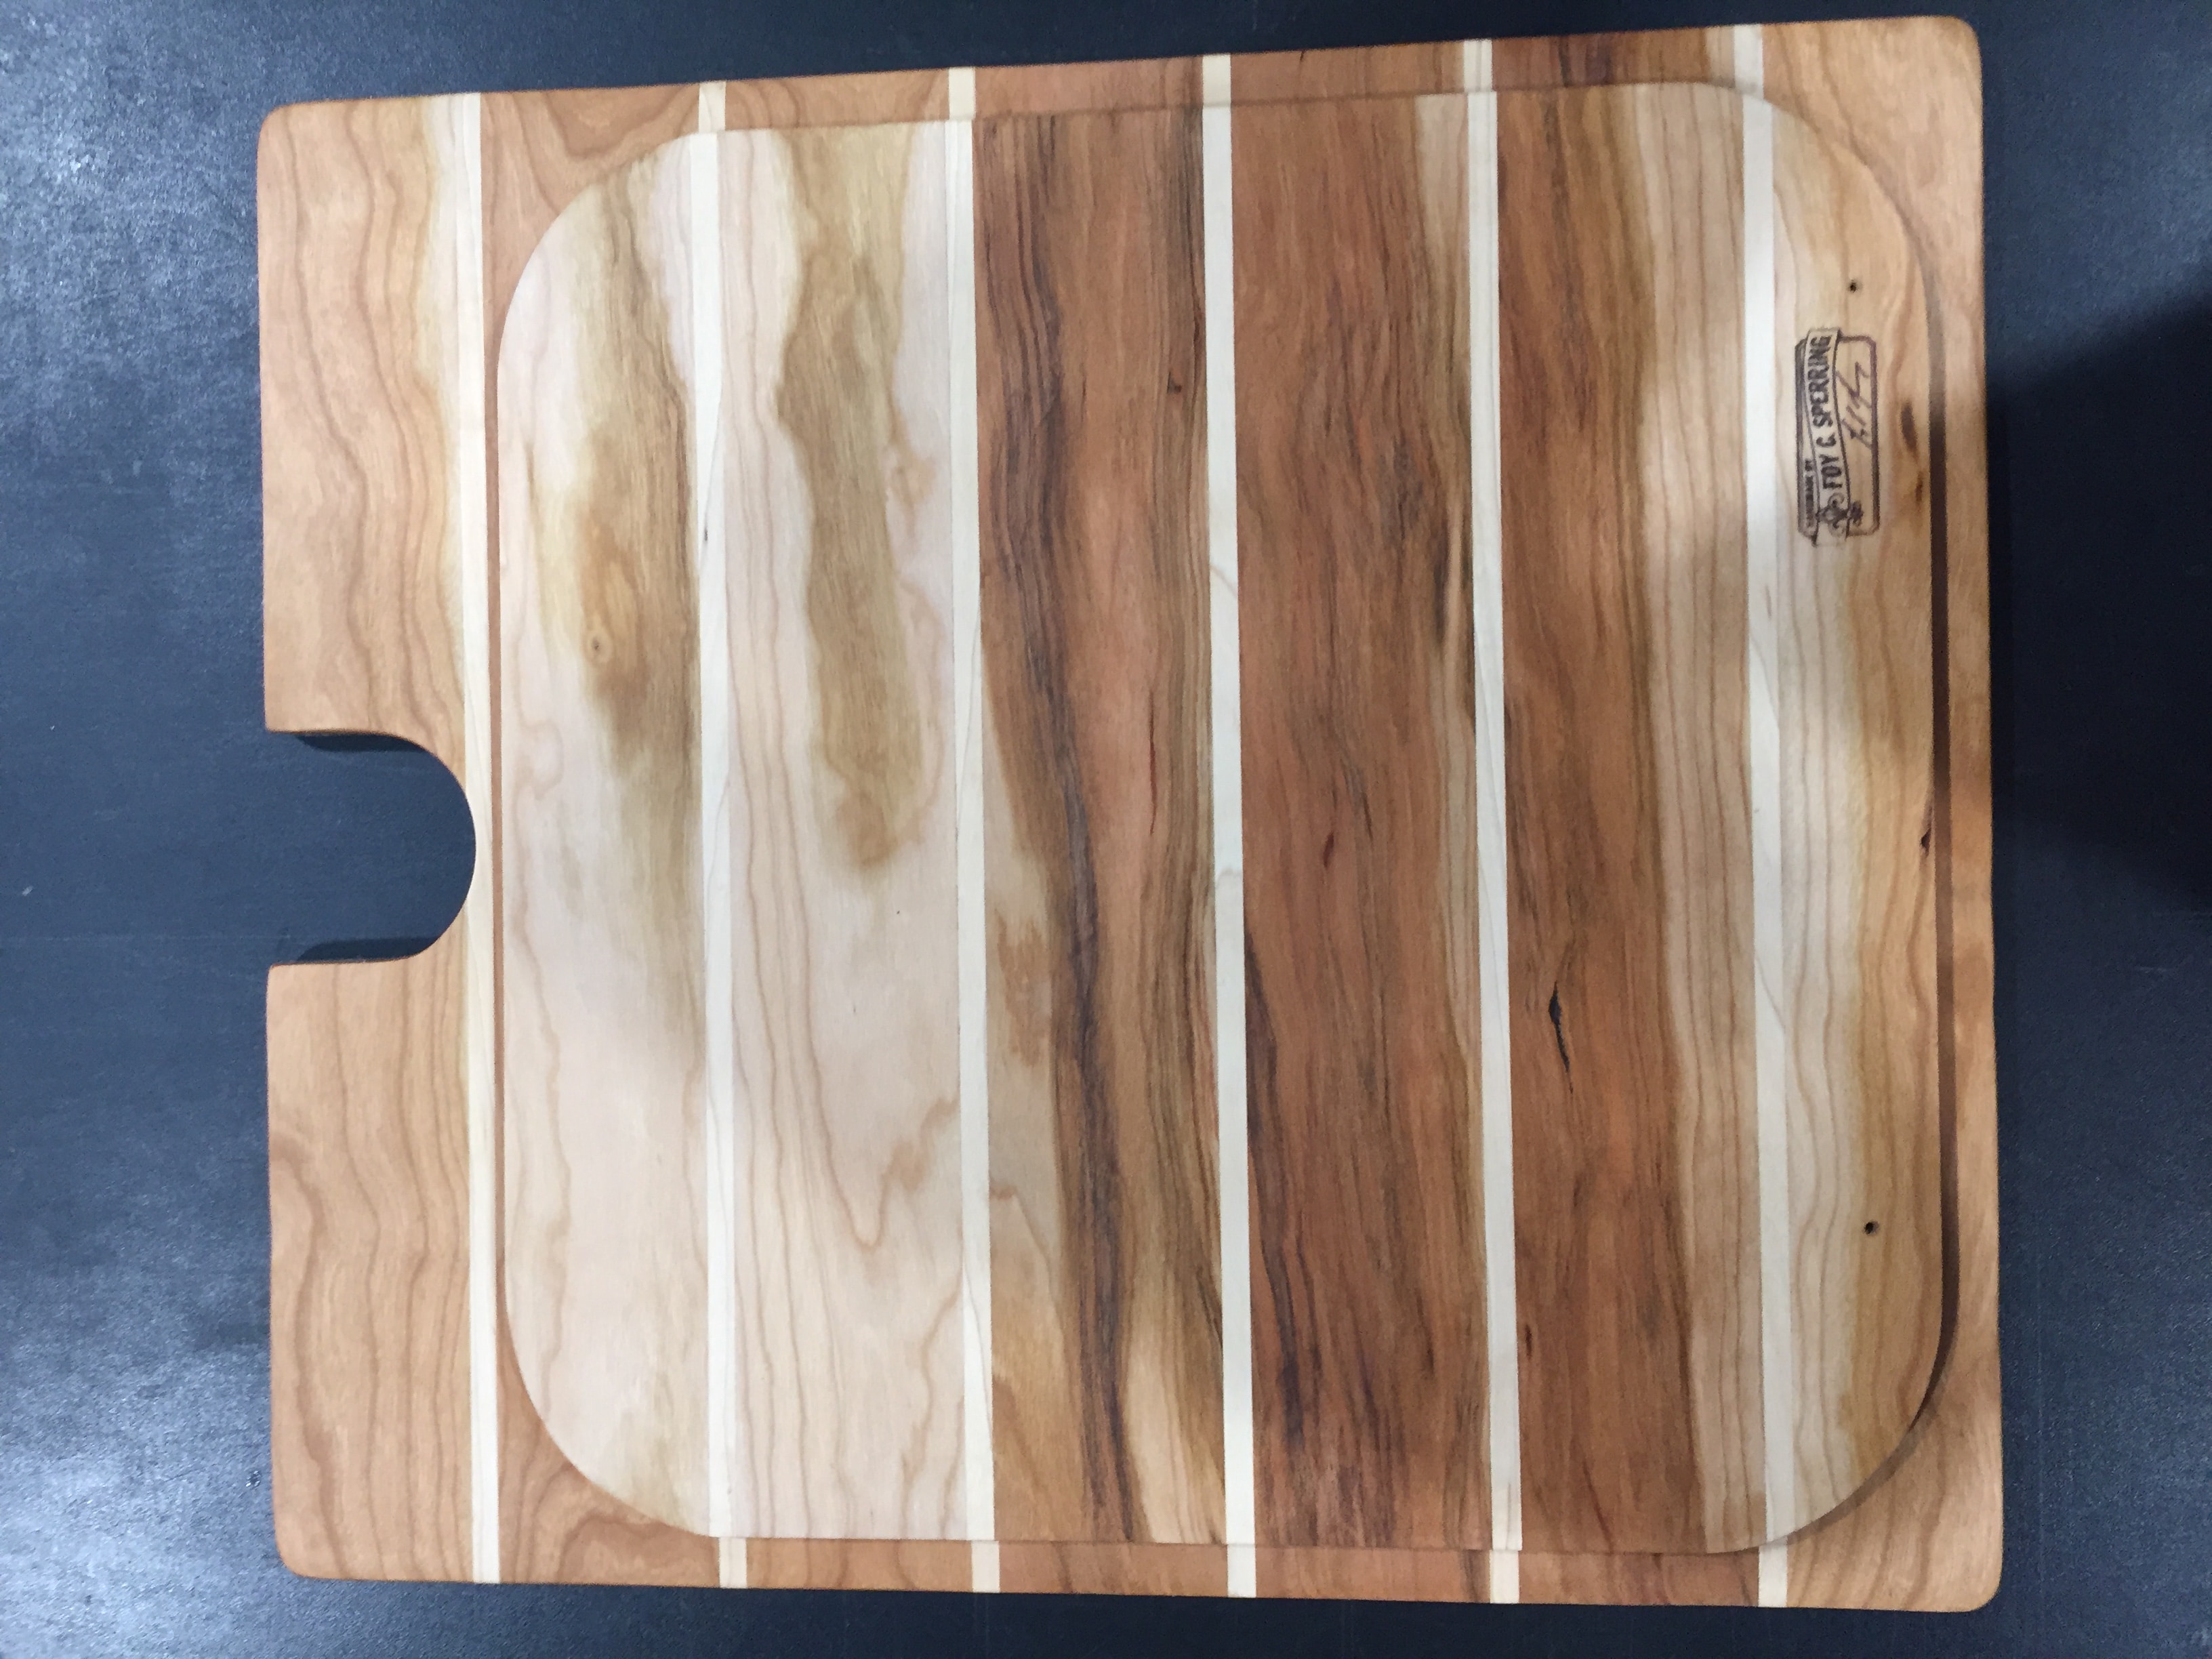
For those of you interested in my craft of making cutting board, I though I would do a quick overview of the process. It all starts with templates for the sink, in this case 2017 Elite II. A top cardboard template that is cut to the finished size, faucet location/cut-out and corner details are establish. I second template is made for the bottom which is use to hold the cutting board in place by dropping down into the sink bowl. Once these are checked for fit, I can make as many as I need knowing they will all be the same. Rough saw 1 1/4” thick Cherry and Maple are select and measured for total board feet need to build all the cutting boards. The board are then milled on the jointer to establish a flat bottom side and then passed through the planer for a perfectly flat board. The final thickness is 7/8”. These are then ripped down on the table saw – Cherry to 2 1/3” and the Maple to 1/4”. [attachment file=IMG_0859.JPG] With all the milling done the boards are then arranged in the ship decking pattern and glued together with food safe, water proof glue. These large panels are then cut to rough size cutting boards. Using the top template the corners are rounded and faucet location are cut on the bandsaw. The final size is cut on the table saw for last minute adjustments. The bottom template is then use to mark the bowl location and the wood is removed from around the edges at the router table. This allows the cutting board to sit inside the sink and not move. Last step is sanding and more sanding and more sanding. 80, 120, 220 and 320 grit sandpaper are used. The final step is a coat of mineral oil and they are done. It takes about 3 days to make a run of 4 cutting boards. Some people have ask why I do this? And think I am a bit crazy. It's not for the money for the wood alone cost what I charge. It is for the love of working with wood and created something I can share with others who value my craft. Over the next few week I will begin shipping these board to their new Oliver Owners. I hope they enjoy them as much as I did making them.
1 point
-
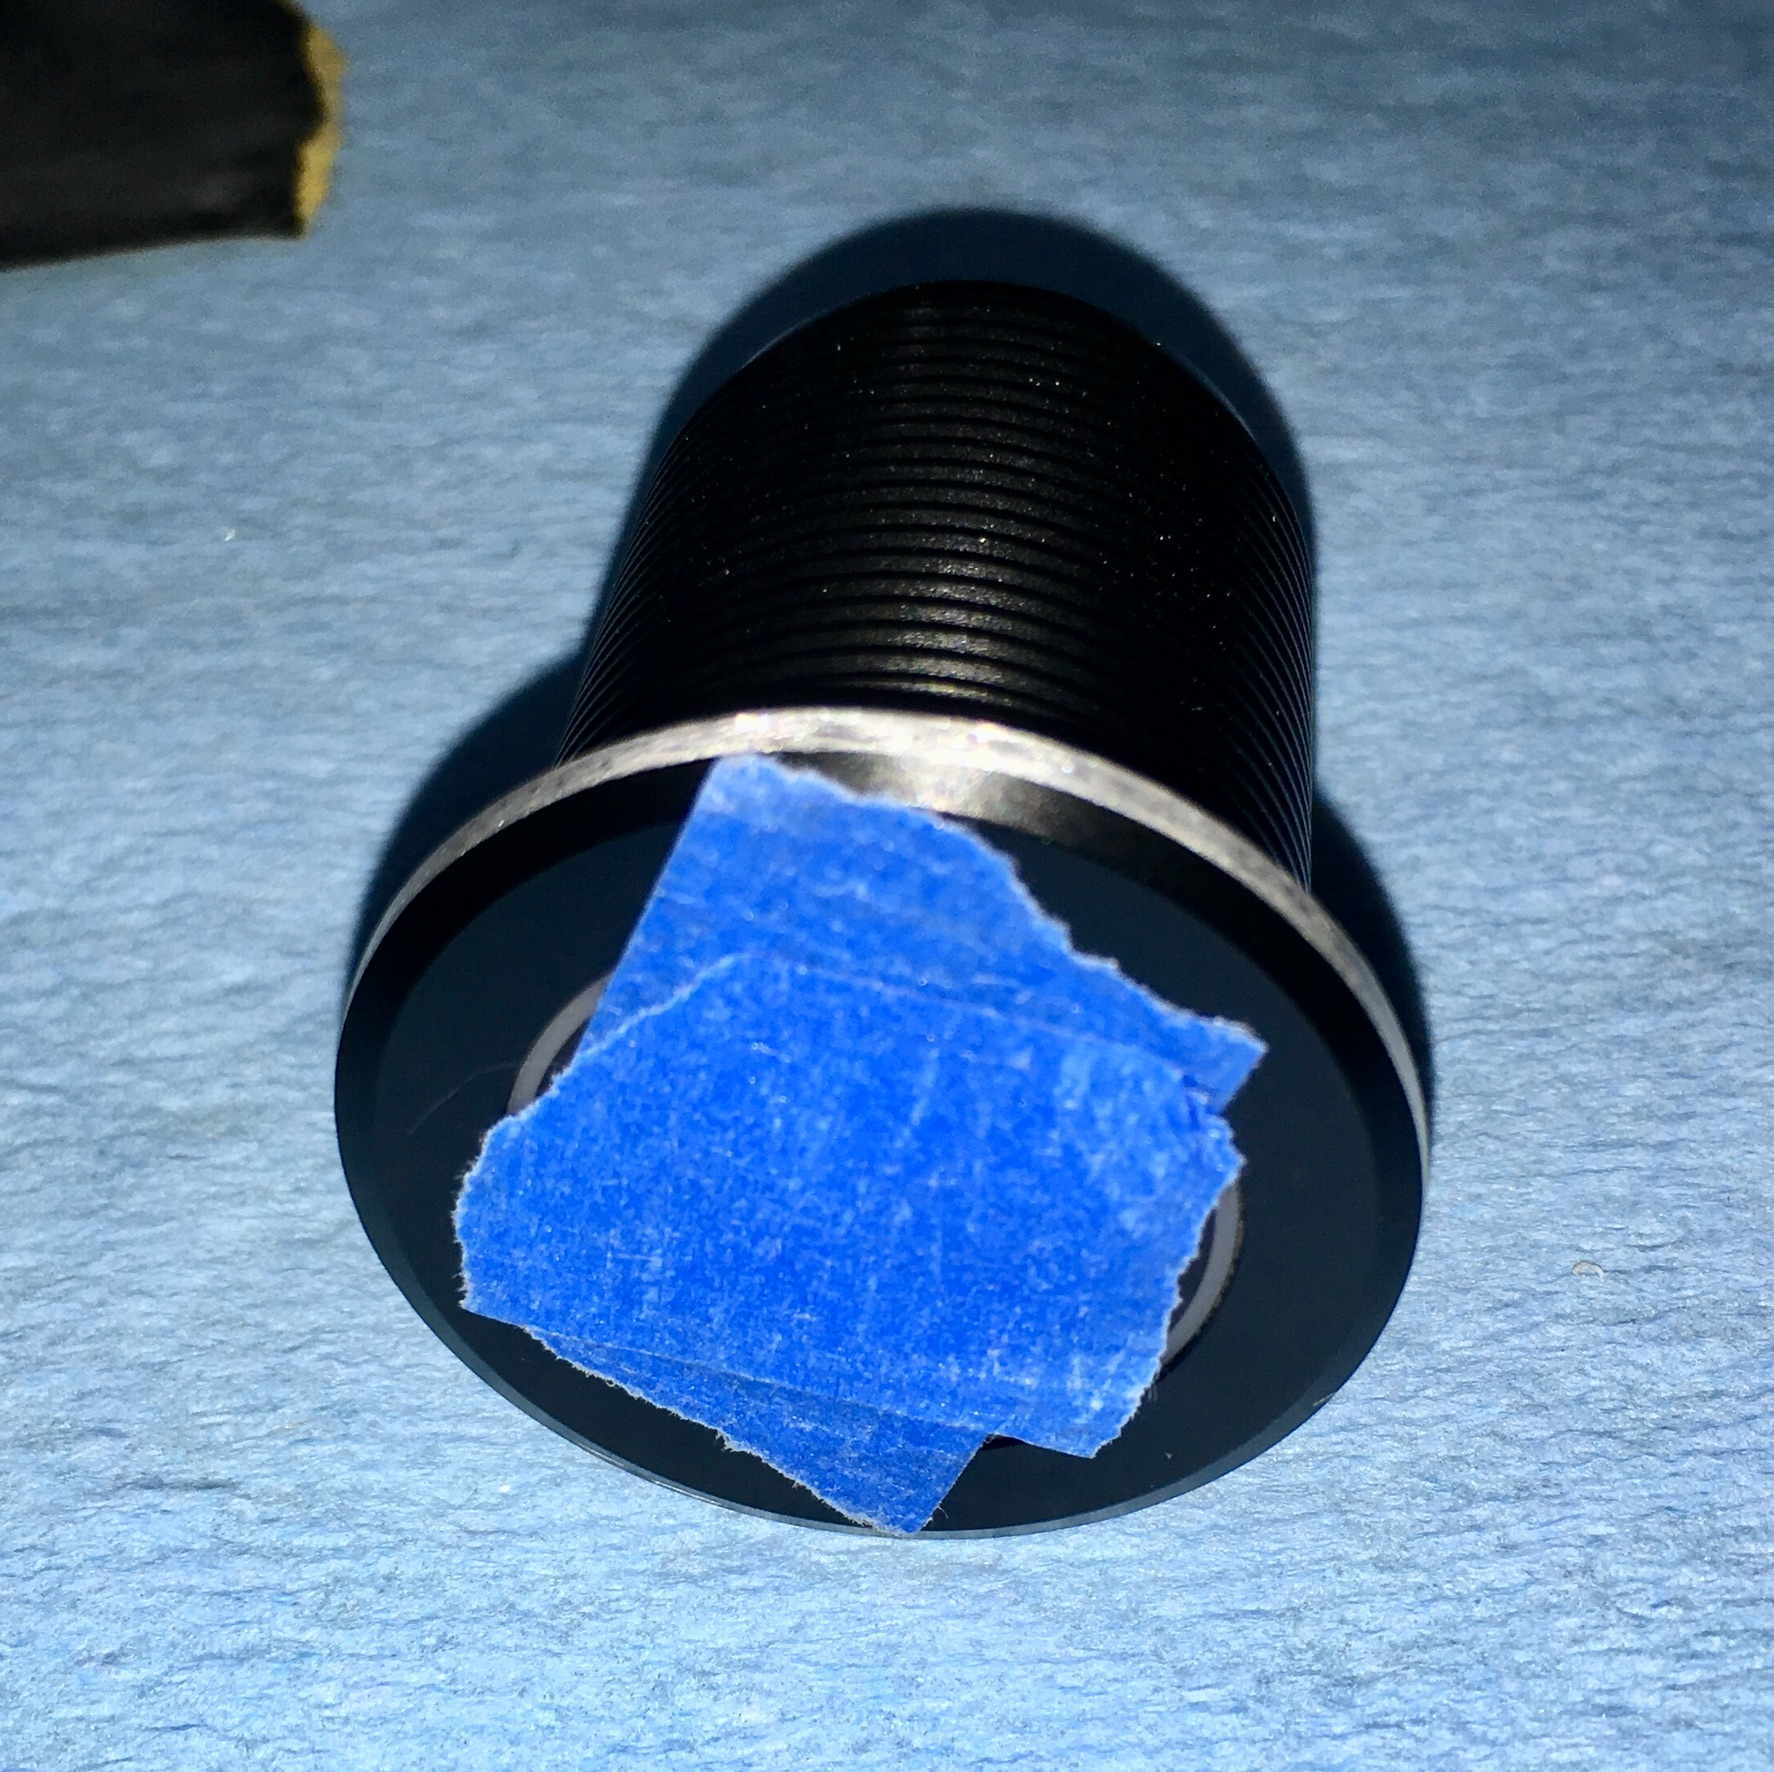
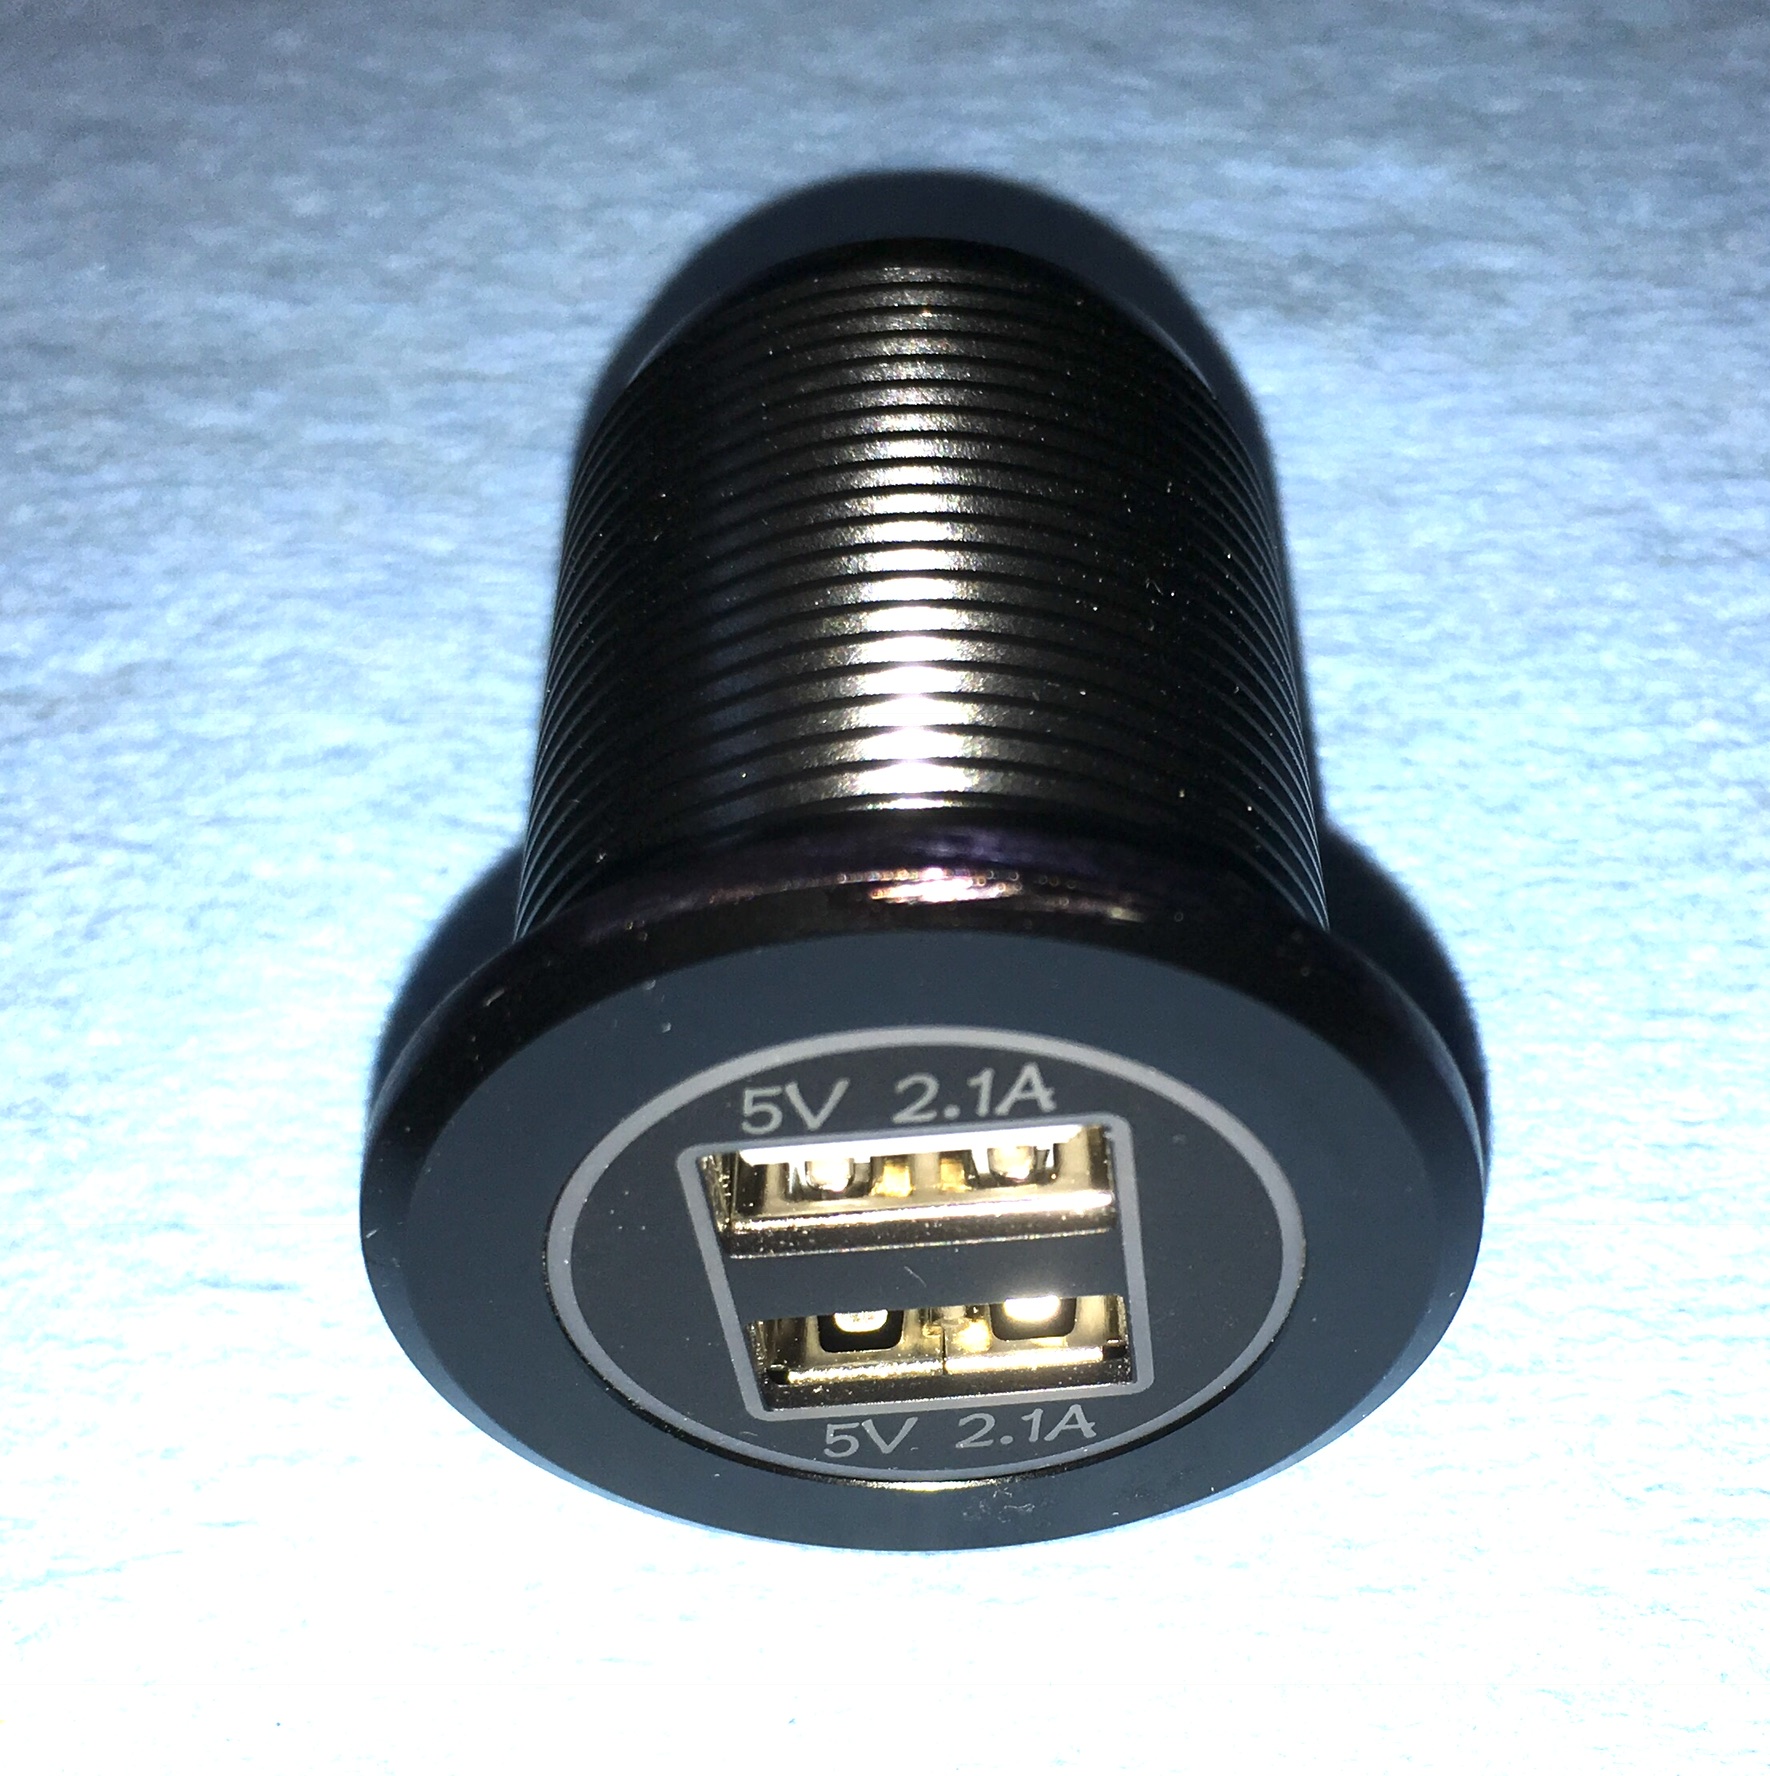
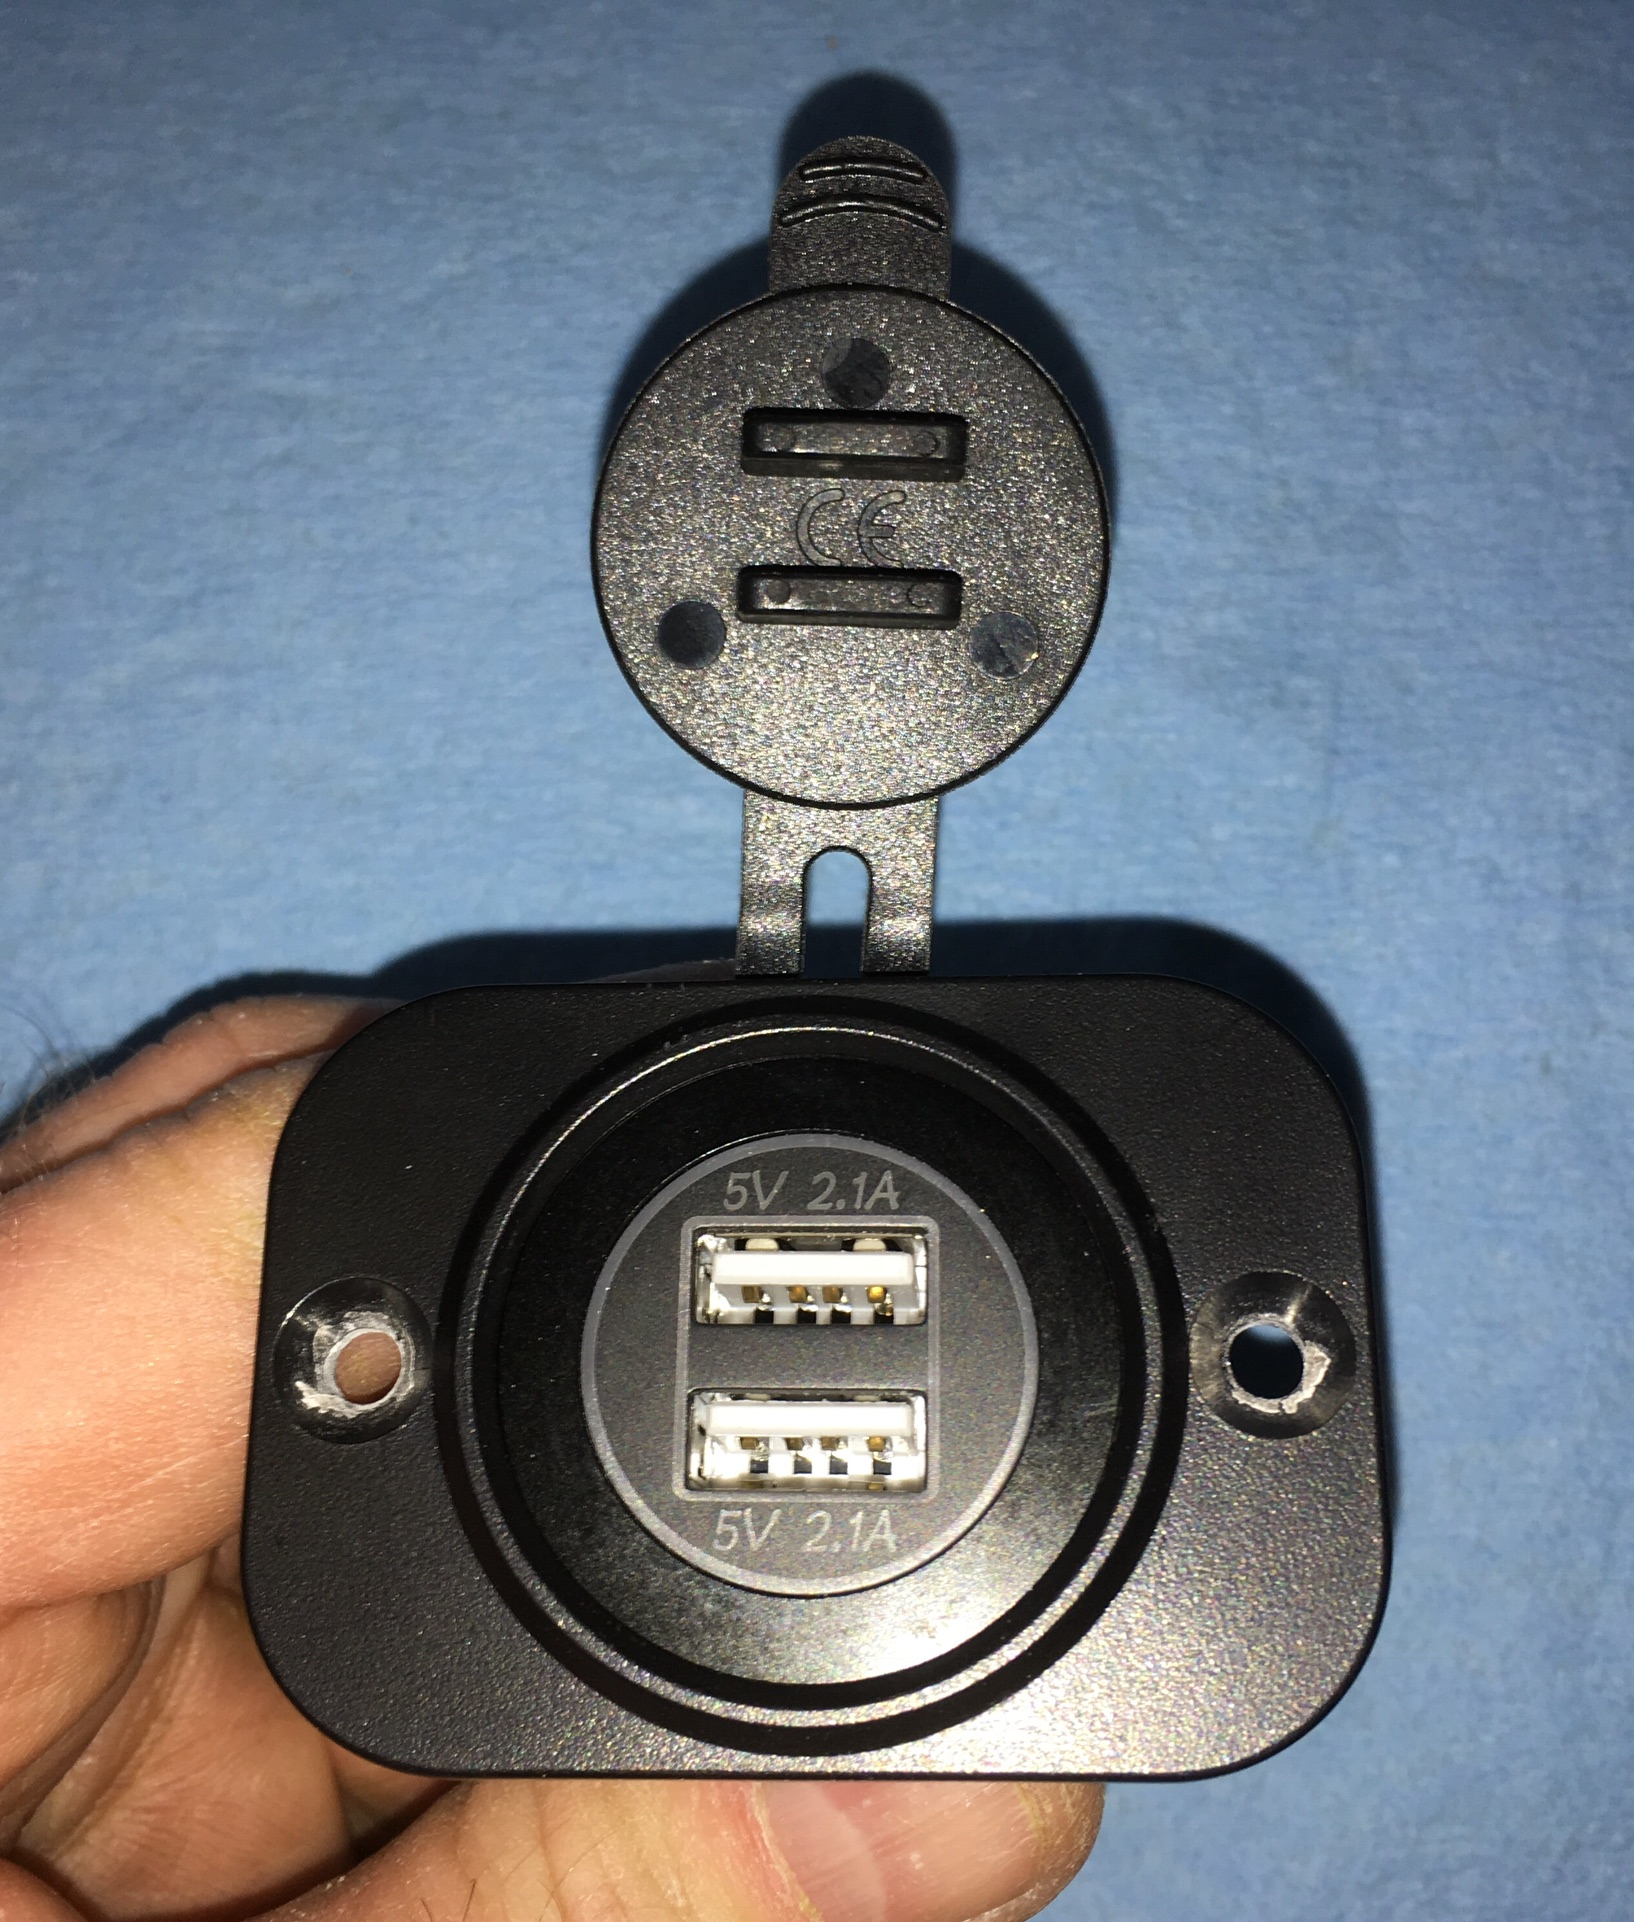
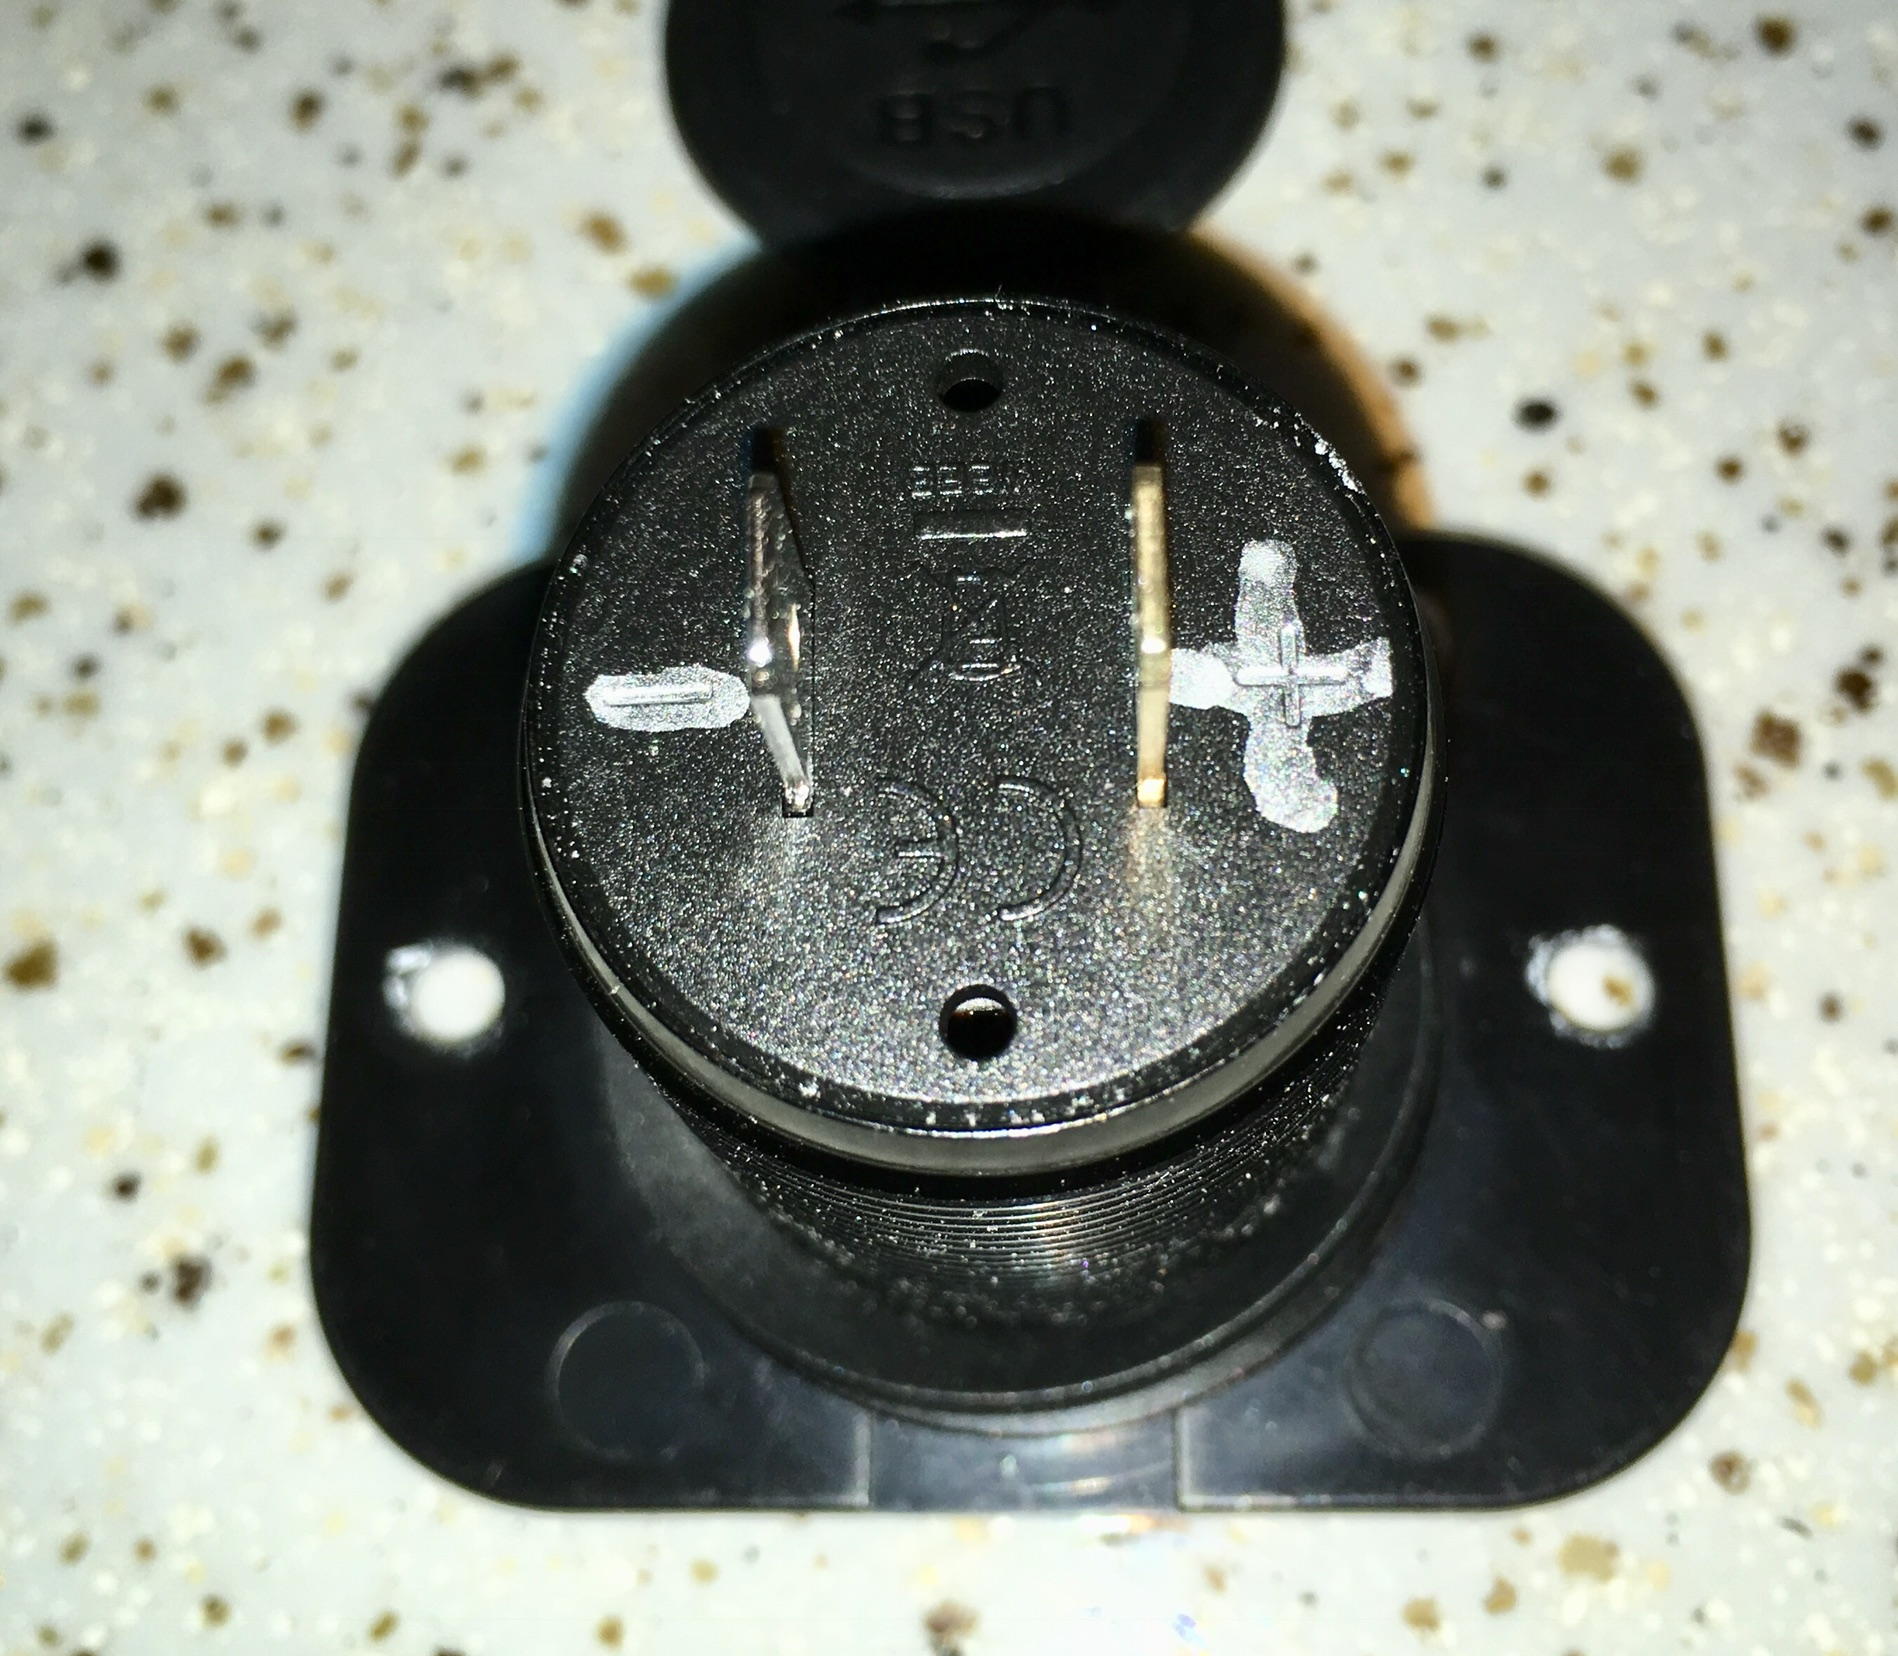
The factory units in Hull 218 are high quality (Blue Sea) but only 1 amp, so they are slow when charging a modern smartphone or tablet. It took a lot of searching but I finally found a nice CNC machined replacement that is available with a NON-illuminated face, which is perfect for over a bed or anywhere close to the sleeping area. https://smile.amazon.com/gp/product/B07CJW3ZRP/ref=oh_aui_detailpage_o01_s00?ie=UTF8&psc=1 The bezel is smaller than the diameter of the charger. Mask off the openings to keep out debris! Carefully reduce the diameter of the lip to closely match the bezel, so it will slide inside snugly. I used a belt sander with a fine grit belt, followed up by 220 grit hand sanding. MAKE SURE the unit functions properly before grinding, you might not be able to return one that you have altered! Also double check function just before installing. I “painted” the raw aluminum with a black Sharpie. Inserted into the bezel, and marked the + and - terminals with a silver pen so I could actually see them. and installed it into the hole where the factory unit used to be: Note how very thick that cabinet bottom is, I wanted to mount one more on the street side, but there was no way it would easily work through that much thickness. I pulled the stereo and drilled a hole next to the faceplate, picking up power and ground from the radio wires. I used an inline fuse holder plus a 10 amp fuse. My wife can lay her devices on top of the galley counter, or underneath to get them out of the way for food prep. These new chargers will charge my iPhone way faster than the old one. And no more glowing light in the eyes at night.... Neat mod, highly recommended! John Davies Spokane WA
1 point
-
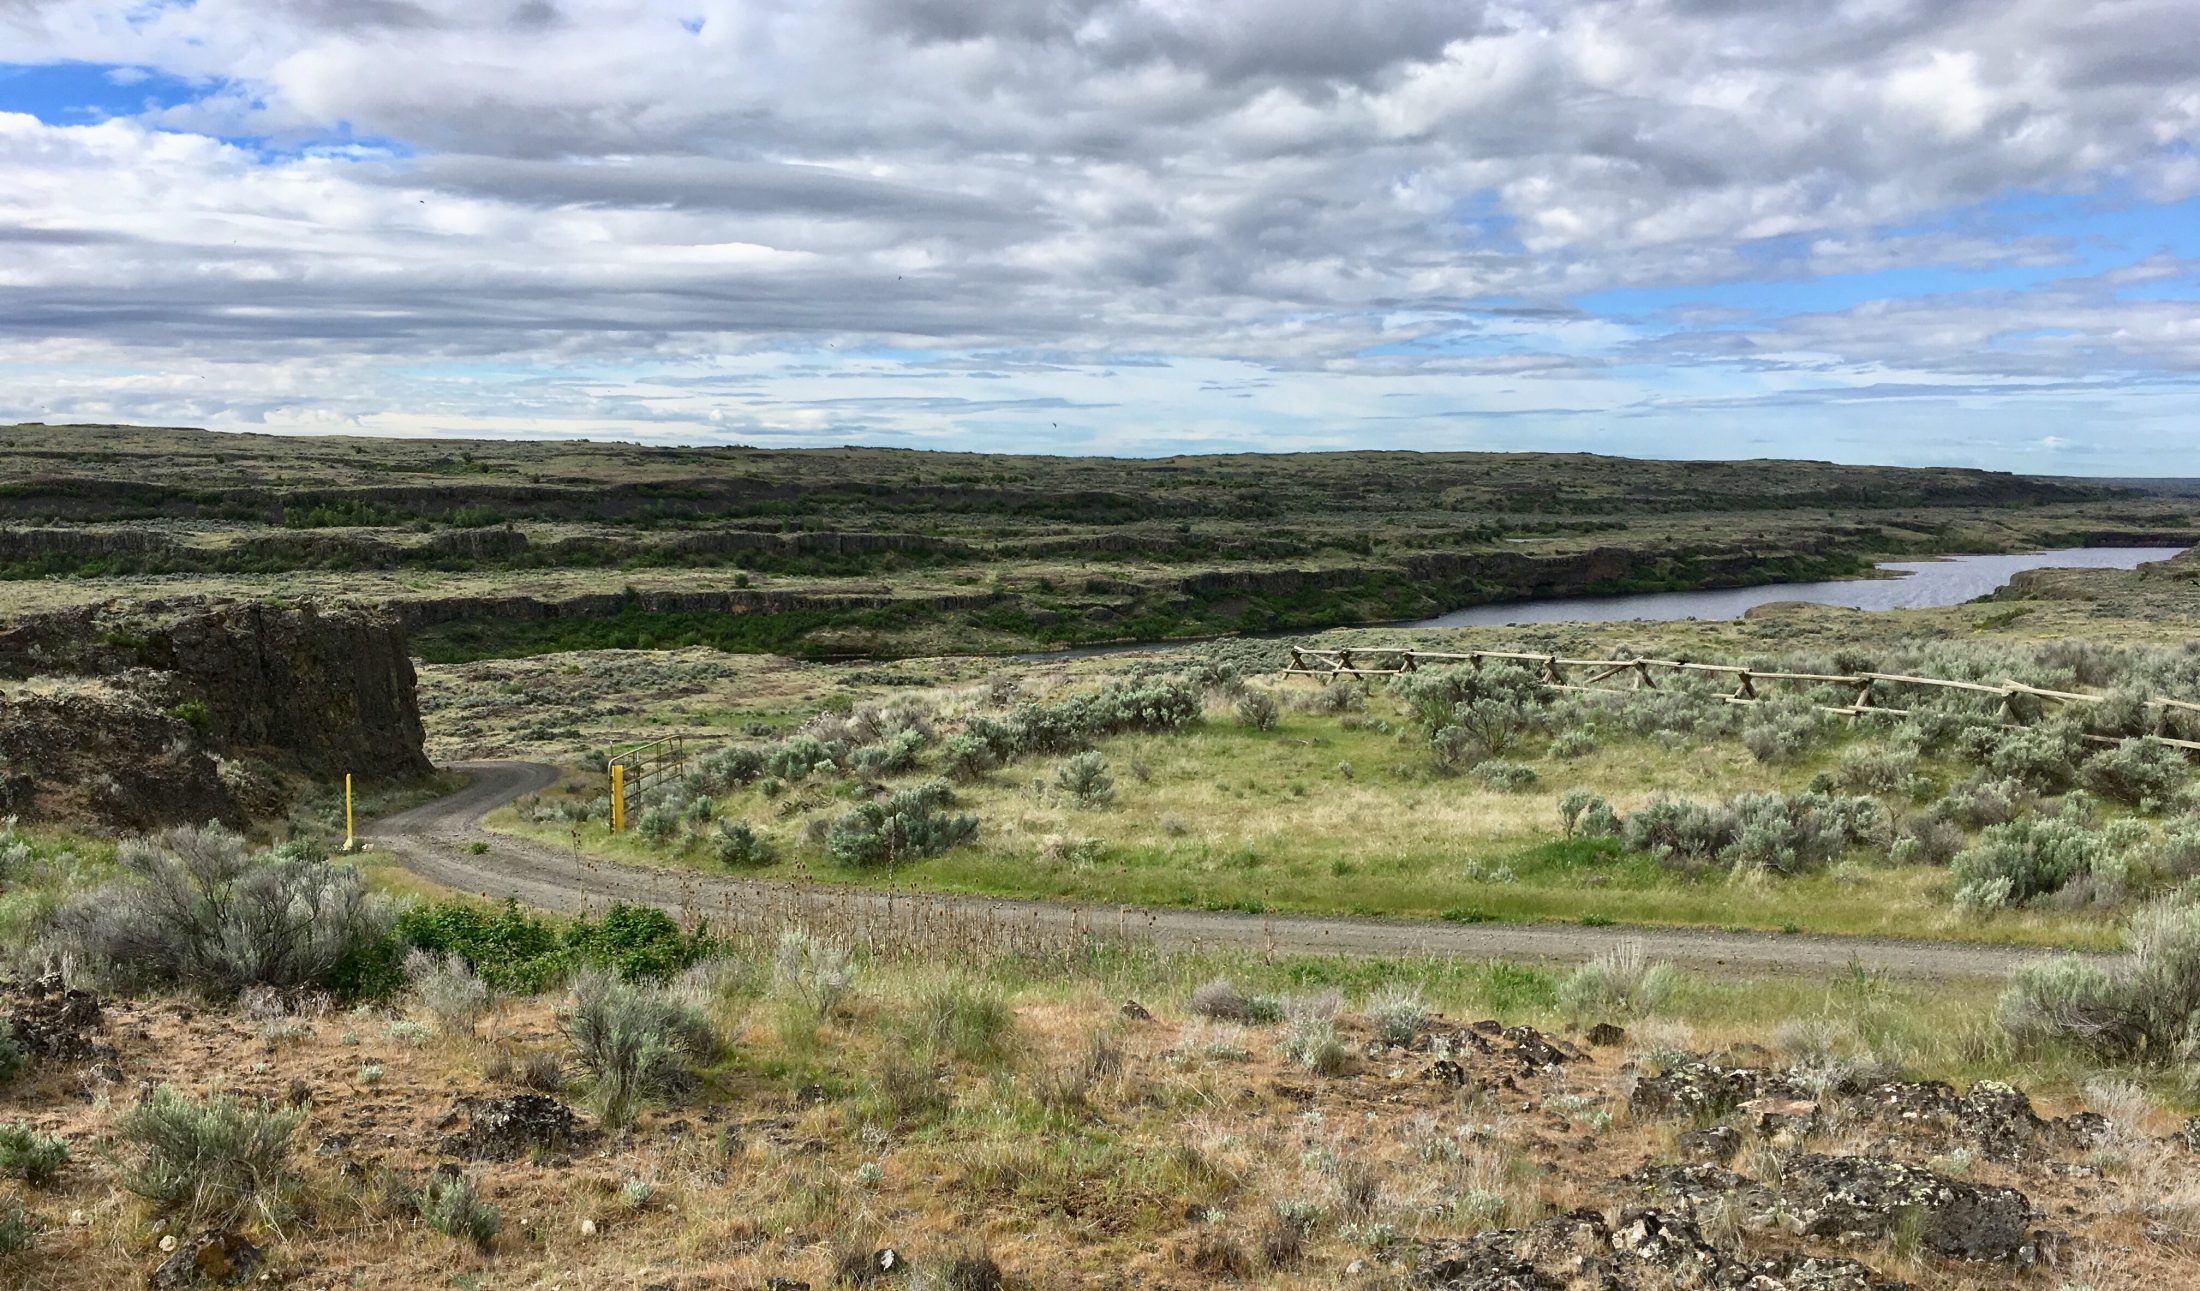
This is BLM land, no facilities, with a rough, steep dirt road leading to dispersed sites on two small Channelled Scabland lakes. Twin Lakes Recreation Area is between Odessa and Harrington WA,in the very middle of the state. https://news.nationalgeographic.com/2017/03/channeled-scablands/ When you are alone and the bugs are out, you have lots of time to mess around with a camera, making time lapse videos: [attachment file=133808] John Davies Spokane WA
1 point
-
Related to this post, our Carefree awning weathered a hail storm last week outside Grand Teton with no issues. I'll try to do a post this week with some pics on how I've modified the awning and how I tie it down for the weather. But yeah, those little orange clips are going to be a constant headache for all of us with the Carefree. I've also broken off one of the metal tabs on the top joint of one of the arms by twisting it before I got it fully extended and that seemed to break off way too easily.1 point
-
Kim & David - I can feel the excitement in our words! And, rightfully so. Since your delivery date is only 56 days away, I will still be in Idaho. Just about as soon as I return from the West, we will be headed to the South Carolina beaches for a bit of sun and surf. By the middle to end of September I will be back in town for at least a month or so and you two will have just about everything sorted out. However, my offer still stands - if there is anything that I can do or help with just let me know. Bill p.s. I will send you a PM so that you can see a bit of how that works.1 point
-
Thanks BoondockingAirstream! You asked about our Airstream vs Oliver decision. For over a year we saw ourselves in a small Airstream - we loved the iconic nature of them, the quality and stylish interior - we breifly considered the Base Camp, then the 16' Scout, then settled on the 19' Flying Cloud - but in the back of my mind I realized we would in time feel the need to go further up, to the 23', for a "just right fit" for extended 3 month or so trips. But that was beyond the budget and really much more than we wanted to ultimately tow. Coming from a backpacker background, we wanted to be a little more nimble, and we also wanted to be boondockers which means we would have had to make additions/modifications (composting toilet, solar, more batteries, etc) as you know, meaning more money. When we stumbled on the Oliver and followed with the factory tour we were sold on the commitment to quality, the clean bright zen like interior, the great storage, the ability to customize for our camping preferences - including true 4 season camping which is important to us, and the perfect arrangement for two (we have the twin floor plan). It was like Goldielocks finding the "just right fit". No need to ever have to go up in size - we would be able to get it "right" the first time around. That was big. The Oliver community support and loyalty and the company's 5 star customer service were huge selling points too - especially since we are RV newbies - we really need that help! Anyway, there is no doubt in our minds that we made the right choice for our particular needs. So, when we find ourselves in Boulder City, you bet we'd be happy to give you a shout and let you take a peek! (But maybe by then you too will have an Ollie on order!) Kim1 point
-
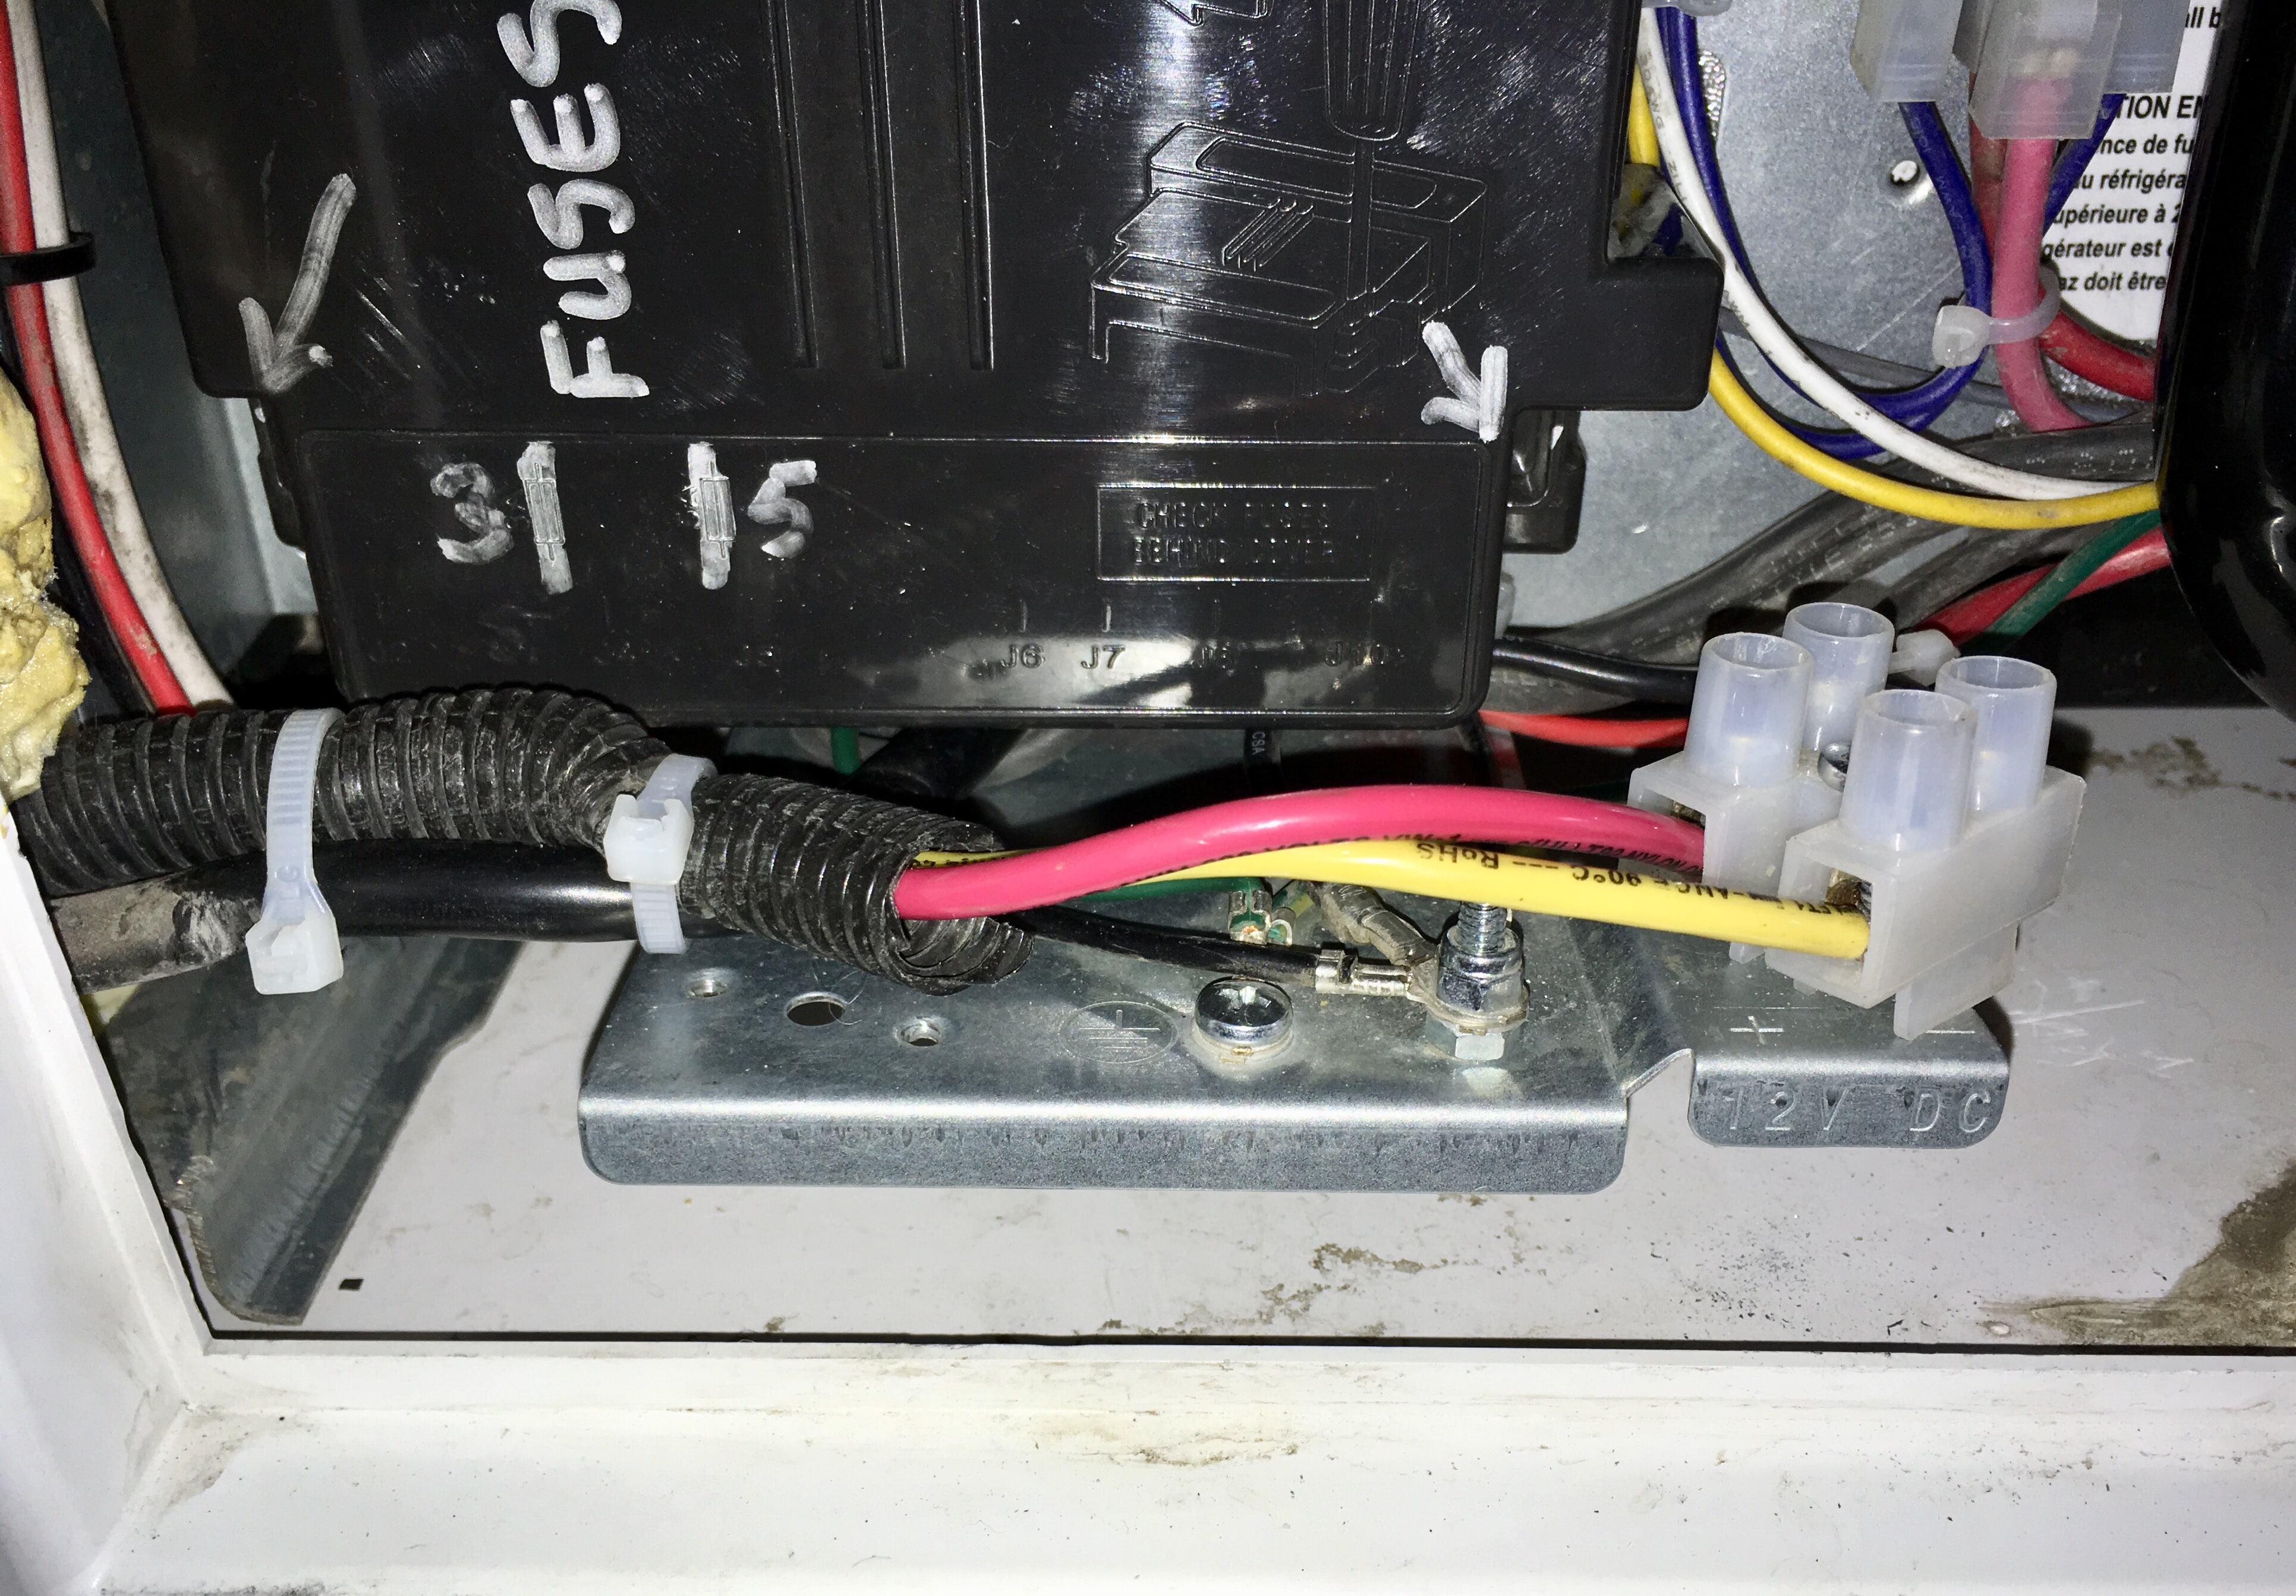
The fuse clips are very weak, and if you apply any side force to the fuse while inserting it, the ears can spread and then you have a poor connection. I had intermittent fridge operation due to this problem. Check EVERY single fuse by carefully removing and reinstalling it straight! If one fuse is loose, tighten the clip by gently squeezing the little ears together to make a narrower gap. You can use a set of narrow tipped needle nose pliers, and you could do it with power connected if you tape the tips and are brave like me, but it would be best to disconnect power entirely. I am less than impressed with the choice of this unit for an Oliver when there are better marine grade units out there. I consider it to be an unacceptable shortcut on their part foe a premium trailer. I too found an incorrect fuse. The Natures Head one should be 2.5 or 3, they had a 1 amp that blew on Day 2.The mistake was probably due to a simple failure to read the installation manual, it is clearly listed there. John Davies Spokane WA1 point
-
While you are in the compartment looking, check the fuses. The chart on the door doesn't match the fuses that the factory installed, at least in mine. The chart shows the basement should be 15 amp. However what they actually installed was a 7.5 amp. Now I have not had any problems and the 7.5 amp has not blown, so it may be adequate. I guess my concern is if the fuse blows and it is replaced by the 15 amp, have we created a problem? But I also found that I need to carry a fuse removal tool. Laying on the floor trying to look around the door, holding a flashlight, fuses are hard to get too. We also pushed the test button on the propane/monoxide under there too. It did not go off. There is our immediate next project...1 point
-
Hey, us old timers gottakeep a few secrets to ourselves. ☺ I sometimes find myself fighting the cover and I realize I didn't take the time to remove the screw in port. Do it from the curb side and the cover removes and replaces easily. It's balanced and there's no need to put your hand inside.1 point
-
Just did that with the dinette shade. No appreciable warp. Also, the problem occurs with at least one other shade. Still hoping for the person who previously posted the fix involving--as I remember--working with the screws holding the clips to respond. Thanks, and happy mowing. It is now 100 degrees here in the high desert of SE AZ.1 point
-
I resemble that kind of remark!1 point
-
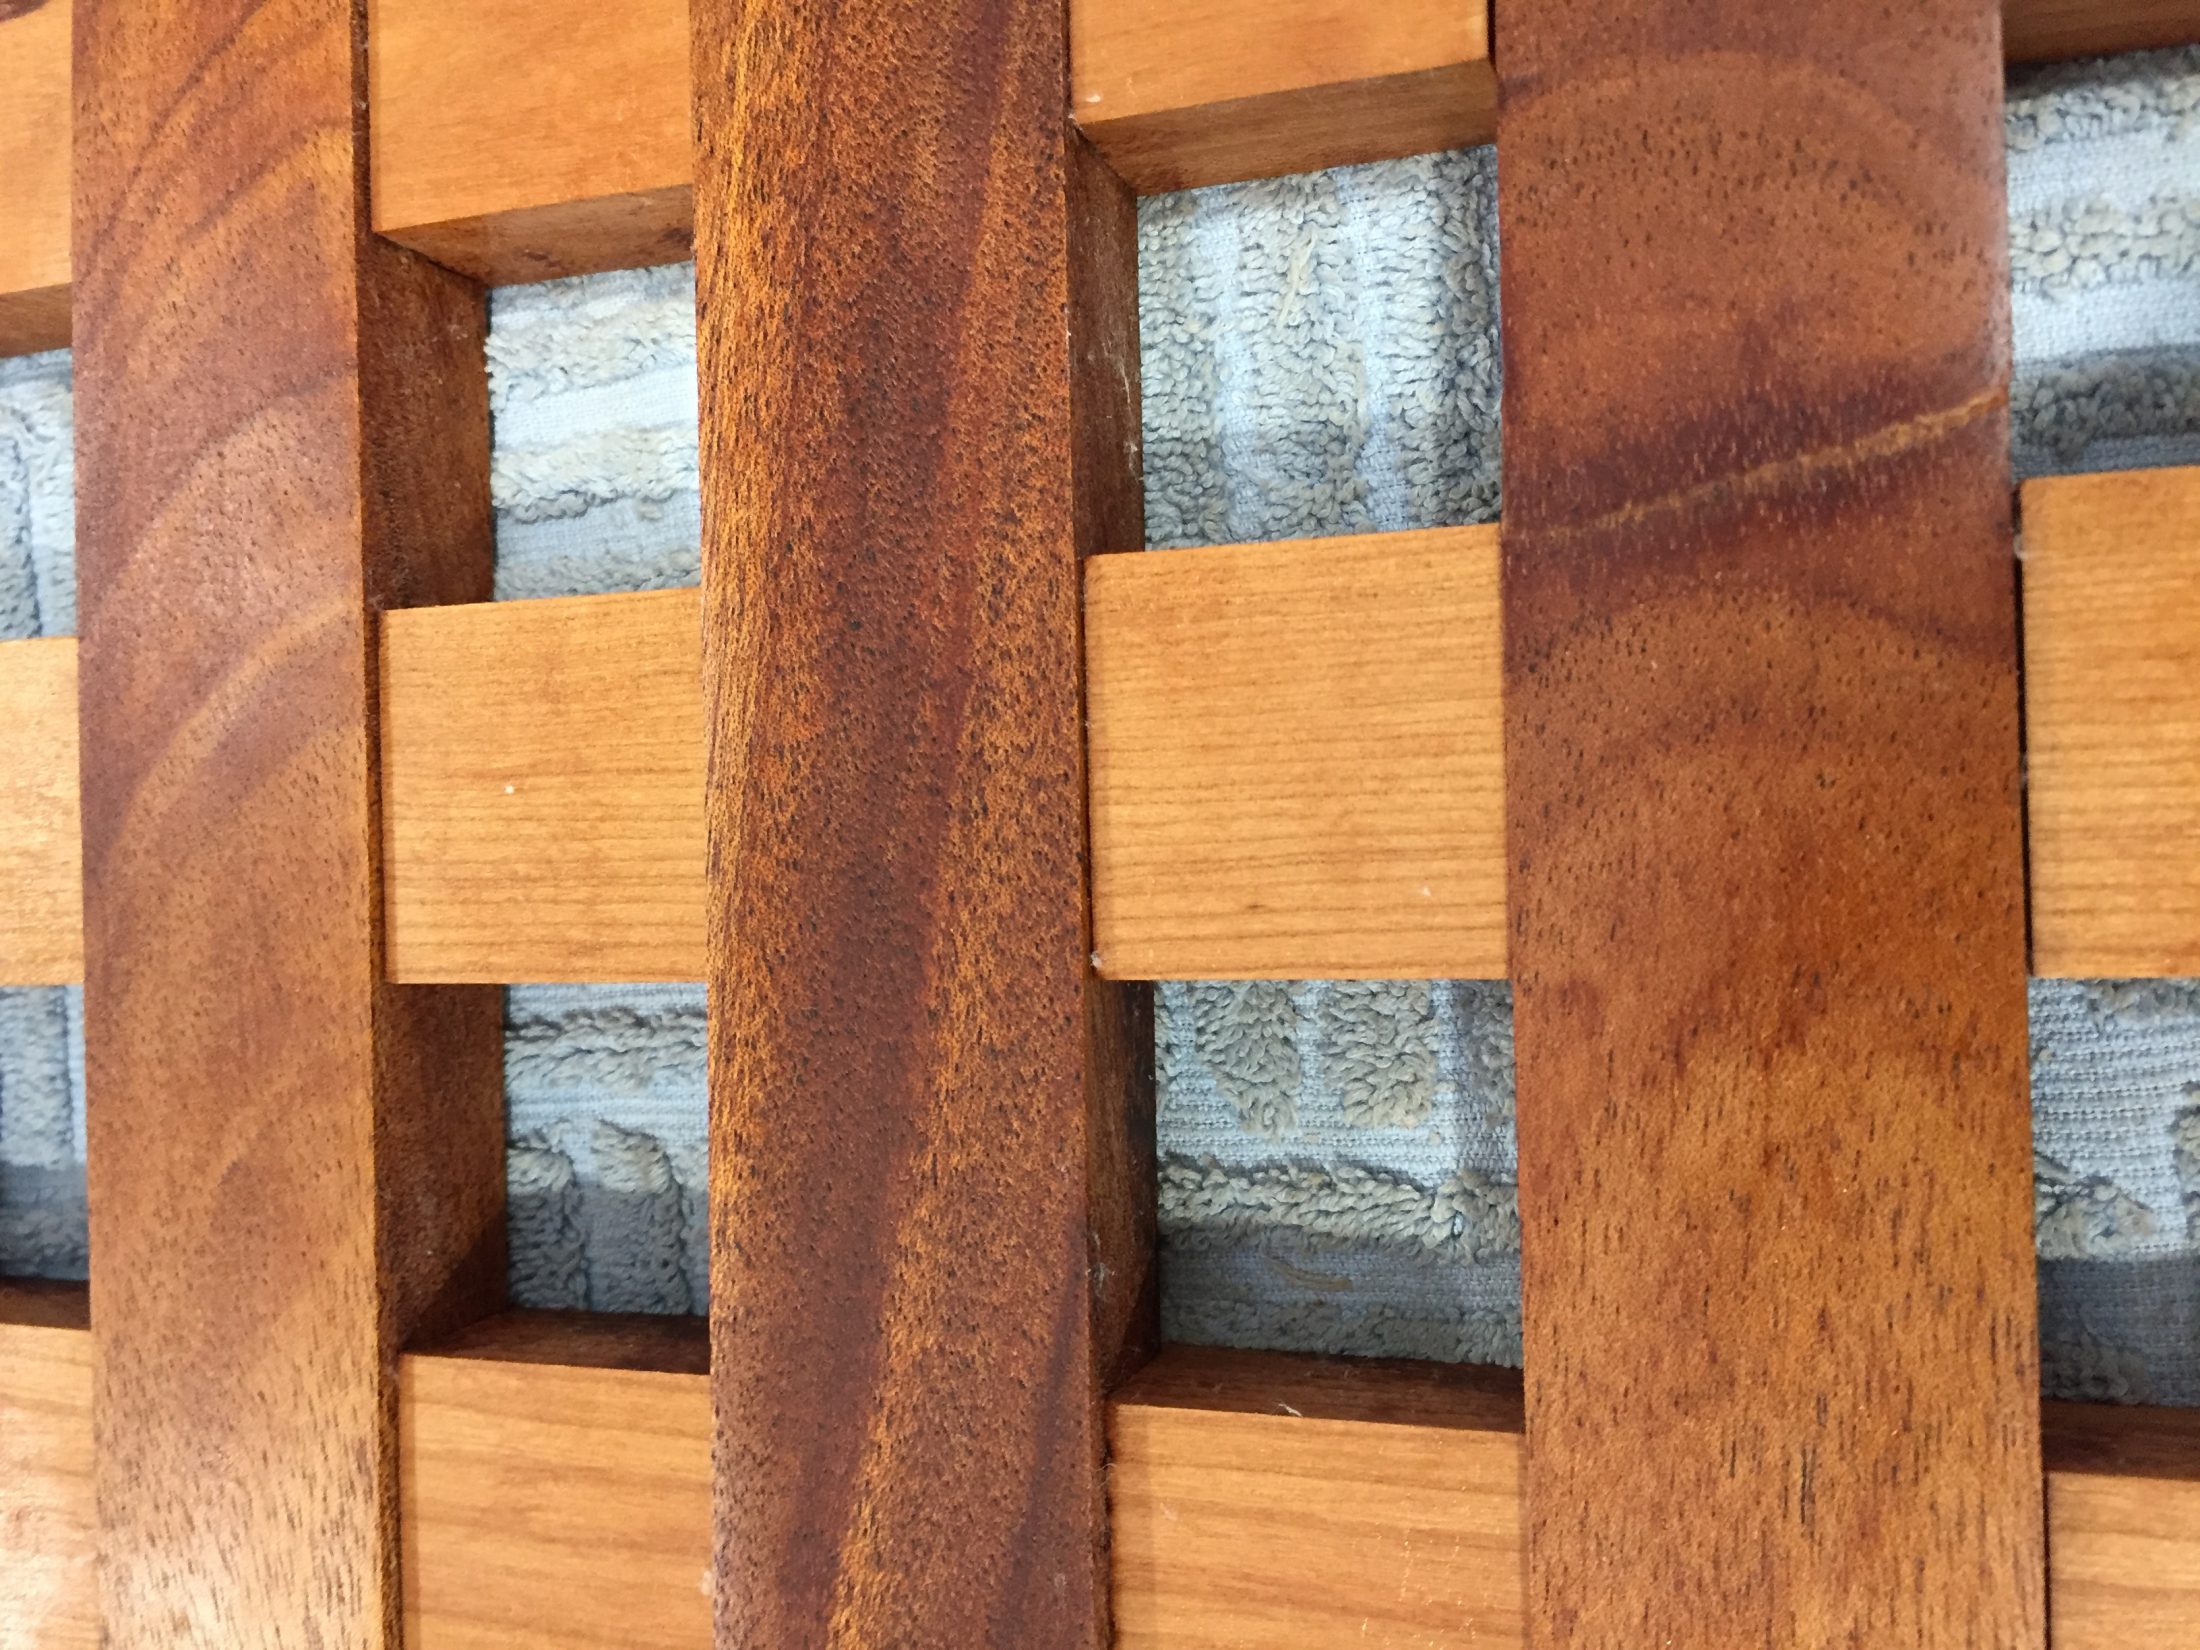
Thanks for all the interest in my woodworking! I have enough requests to keep me busy for the next month. I may open this back up but for now, I am taking NO more orders. It was wonderful to get to know some many Oliver Owner's at the Rally and many of you have asked about our cutting board & shower mat. Lots of you have asked about getting one or both for your trailers. So, this week, I will begin milling the wood to make more. While I have a few confirmed requests, I will open this up to any and all. If you would like one please, let me know as this will be my last run as all good things come to an end. Contact me at 516 635-5656 or 48ocean@gmail.com. Cutting boards are made to your specific sink size. They are American Cherry and Rock Maple done in a ship decking pattern (pictures below.) They are designed to stay in place when traveling and can be used on both sides. Cost $50 plus UPS charges to ship to your address. Shower mats are designed to fit both Elite I and II showers. They are made of American Cherry and Honduras Mahogany in a criss-cross pattern. The construction uses shiplap joinery and brass screws with no glue for long life. Silicone feet keep them off the shower floor and allow water to drain. Cost $150 plus UPS charges to ship to your address. Please note: These are wood and as such will need a little care from time to time. Cutting boards should be cleaned and dried after each use and a coat of plain mineral oil applied once a month to keep up their glow. Shower mats should be stood up after use to dry and a coat of plain mineral oil once a month or sooner if you shower in your trailer often. Happy trails, Foy
1 point
-
Welcome from another Thompson family. I’m sure you’ll be happy with your decision. This is our first trailer as well. The hard part is waiting to pick it up! Mike1 point
-
Welcome, we were in the same dilemma almost 14 months ago. Except we didn't even consider the spare room. We had more room in the garage. We set up the Camp Chef stove so we could try out the oven. We found we needed a folding table to set it on. Then the chairs, and another table for between the chairs, and a mat. A tool box, pillows, bedding, food, dishes, eating utensils, towels (paper and cotton) water, hoses, extension cords, adapters, and totes for the little stuff, whew. Then we had to see where, along with the dog, where it was all going to fit in the truck. Being 1500 to 1800 miles away we didn't want to run back home for something. We had blocking, chocks, even some firewood, and strike anywhere matches, even a toaster. Then came the realisation that they had stores like Tractor Supply, Wally World, and regional grocery stores near by. We probably could have left a lot at home. We are glad that we had an extra water hose, fittings and hose for sewer, and a 30 amp extension cord. Amazing how many times a campgrounds facilities are just out of reach. We are still removing "stuff" we have not used... We are most thankful that we found the Oliver. We started our research by looking at the Airstreams. Most of the used ones ads said new floors all done, and maybe only $600 or so for a nice polish job. Hmmm.1 point
-
Kim & David - Now that you are on board we have just about all corners of this mountain covered in Ollies. I really didn't enjoy the wait and it seemed like a very long winter between the order and the pickup. However, it certainly was worth it. If you ever plan to get over here on the south side of the mountain send me a PM and hopefully we can get together. Bill1 point
-
Same last name and similar experience. I spent about a year deciding on the purchase of a 27' front bedroom Airstream. Negotiated a price, decided on a tow vehicle and called the dealer to place the order. The fellow I was dealing with was on vacation so I decided to wait until he returned. Then I found the Oliver on the web. Drove to the factory and ordered an Elite II in October 2015. Haven't looked back!1 point
-
Welcome! I'm also curious about your thoughts as an almost-Airstream owner. We never considered Airstream mostly due to the aluminum (we get hail here) but also cost and not enough ground clearance. I laughed about the guest room comment. Ours is in the same condition!1 point
-
Congratulations! I am anxious to hear more about your comparison shopping with an Airstream. After 12 years Off the Grid Boondocking with two Airstreams, a 23 foot and currently a 25 foot, we are waiting to see our first Oliver in the Rocky Mountain West. After eight years we had 'Boondocked' the 23 foot Airstream to handle National Forest and BLM roads and wash board road vibrations with hardware upgrades ourselves. This is currently being done to our 2014- 25 foot Airstream. This time 'piano hinges' to cabinet doors that use hinges that vibrate loose on mountain roads. You have an excellent Tow Vehicle with the 5.7L engine and solid transmission. When near Boulder City, Nevada... I sure would like to get a... peek.1 point
-
Materials required for modification: two 3/8x 3/4 in bolts, flat washers, nylock nuts.
1 point
-
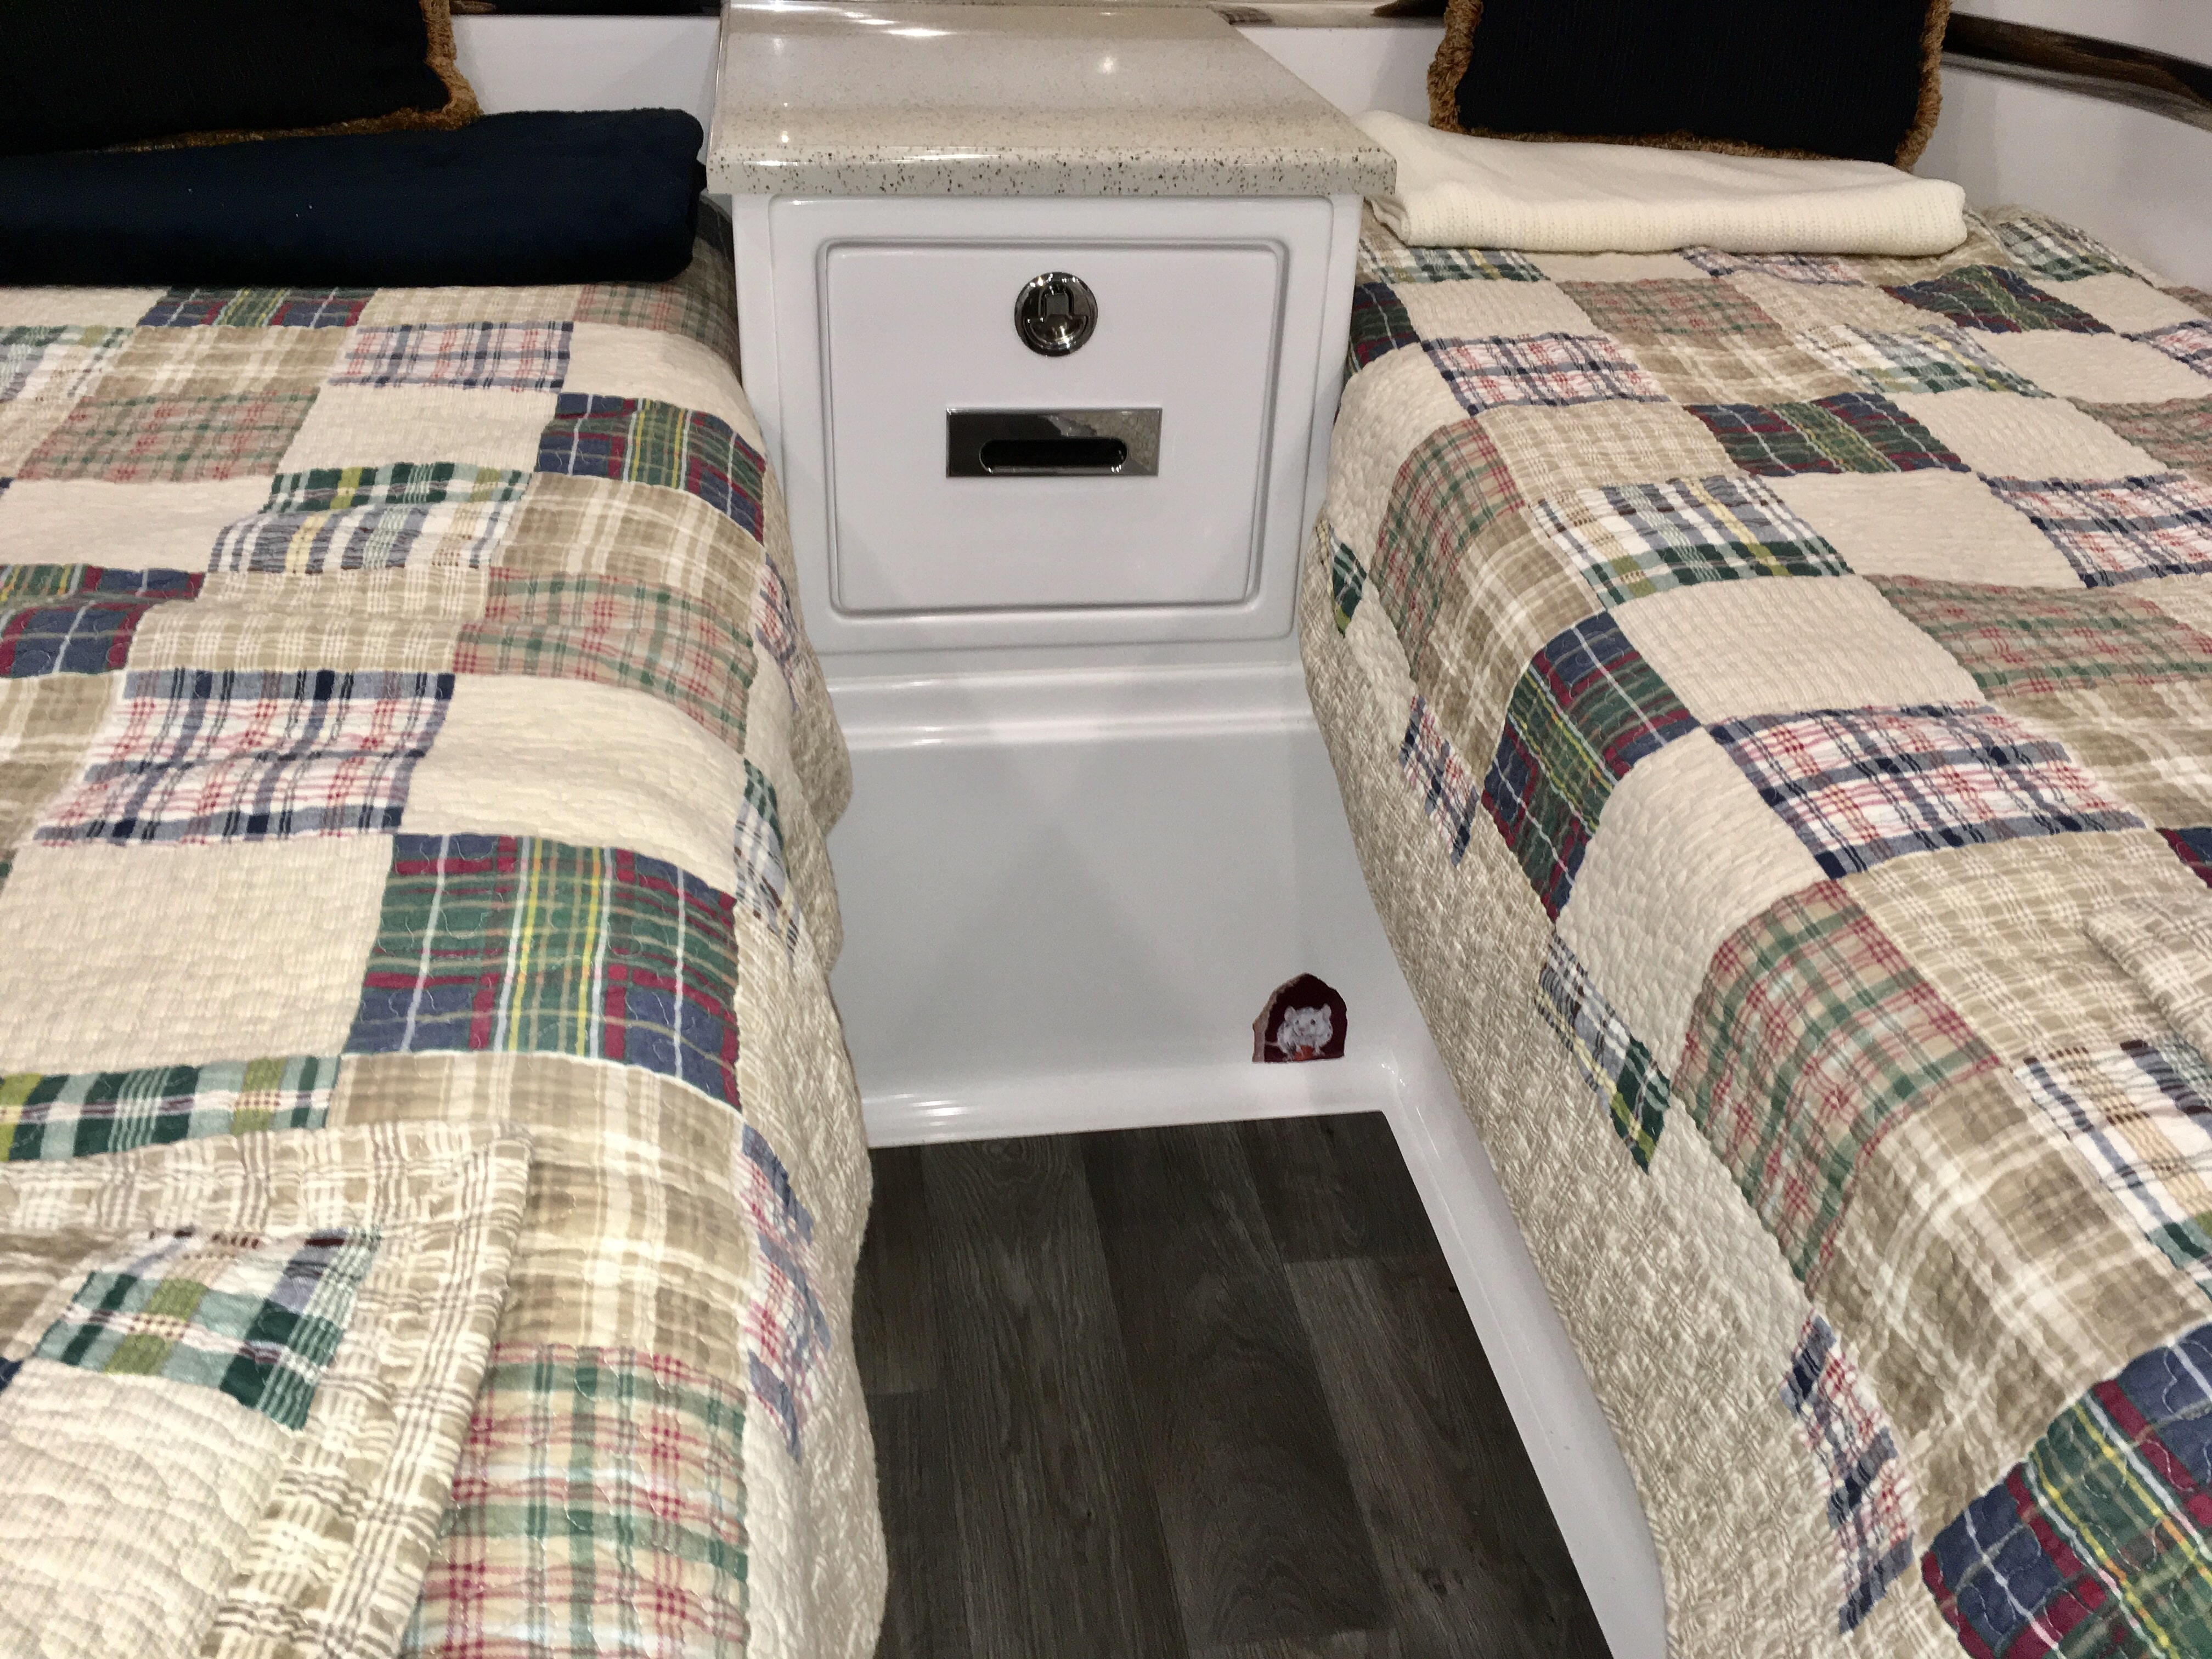
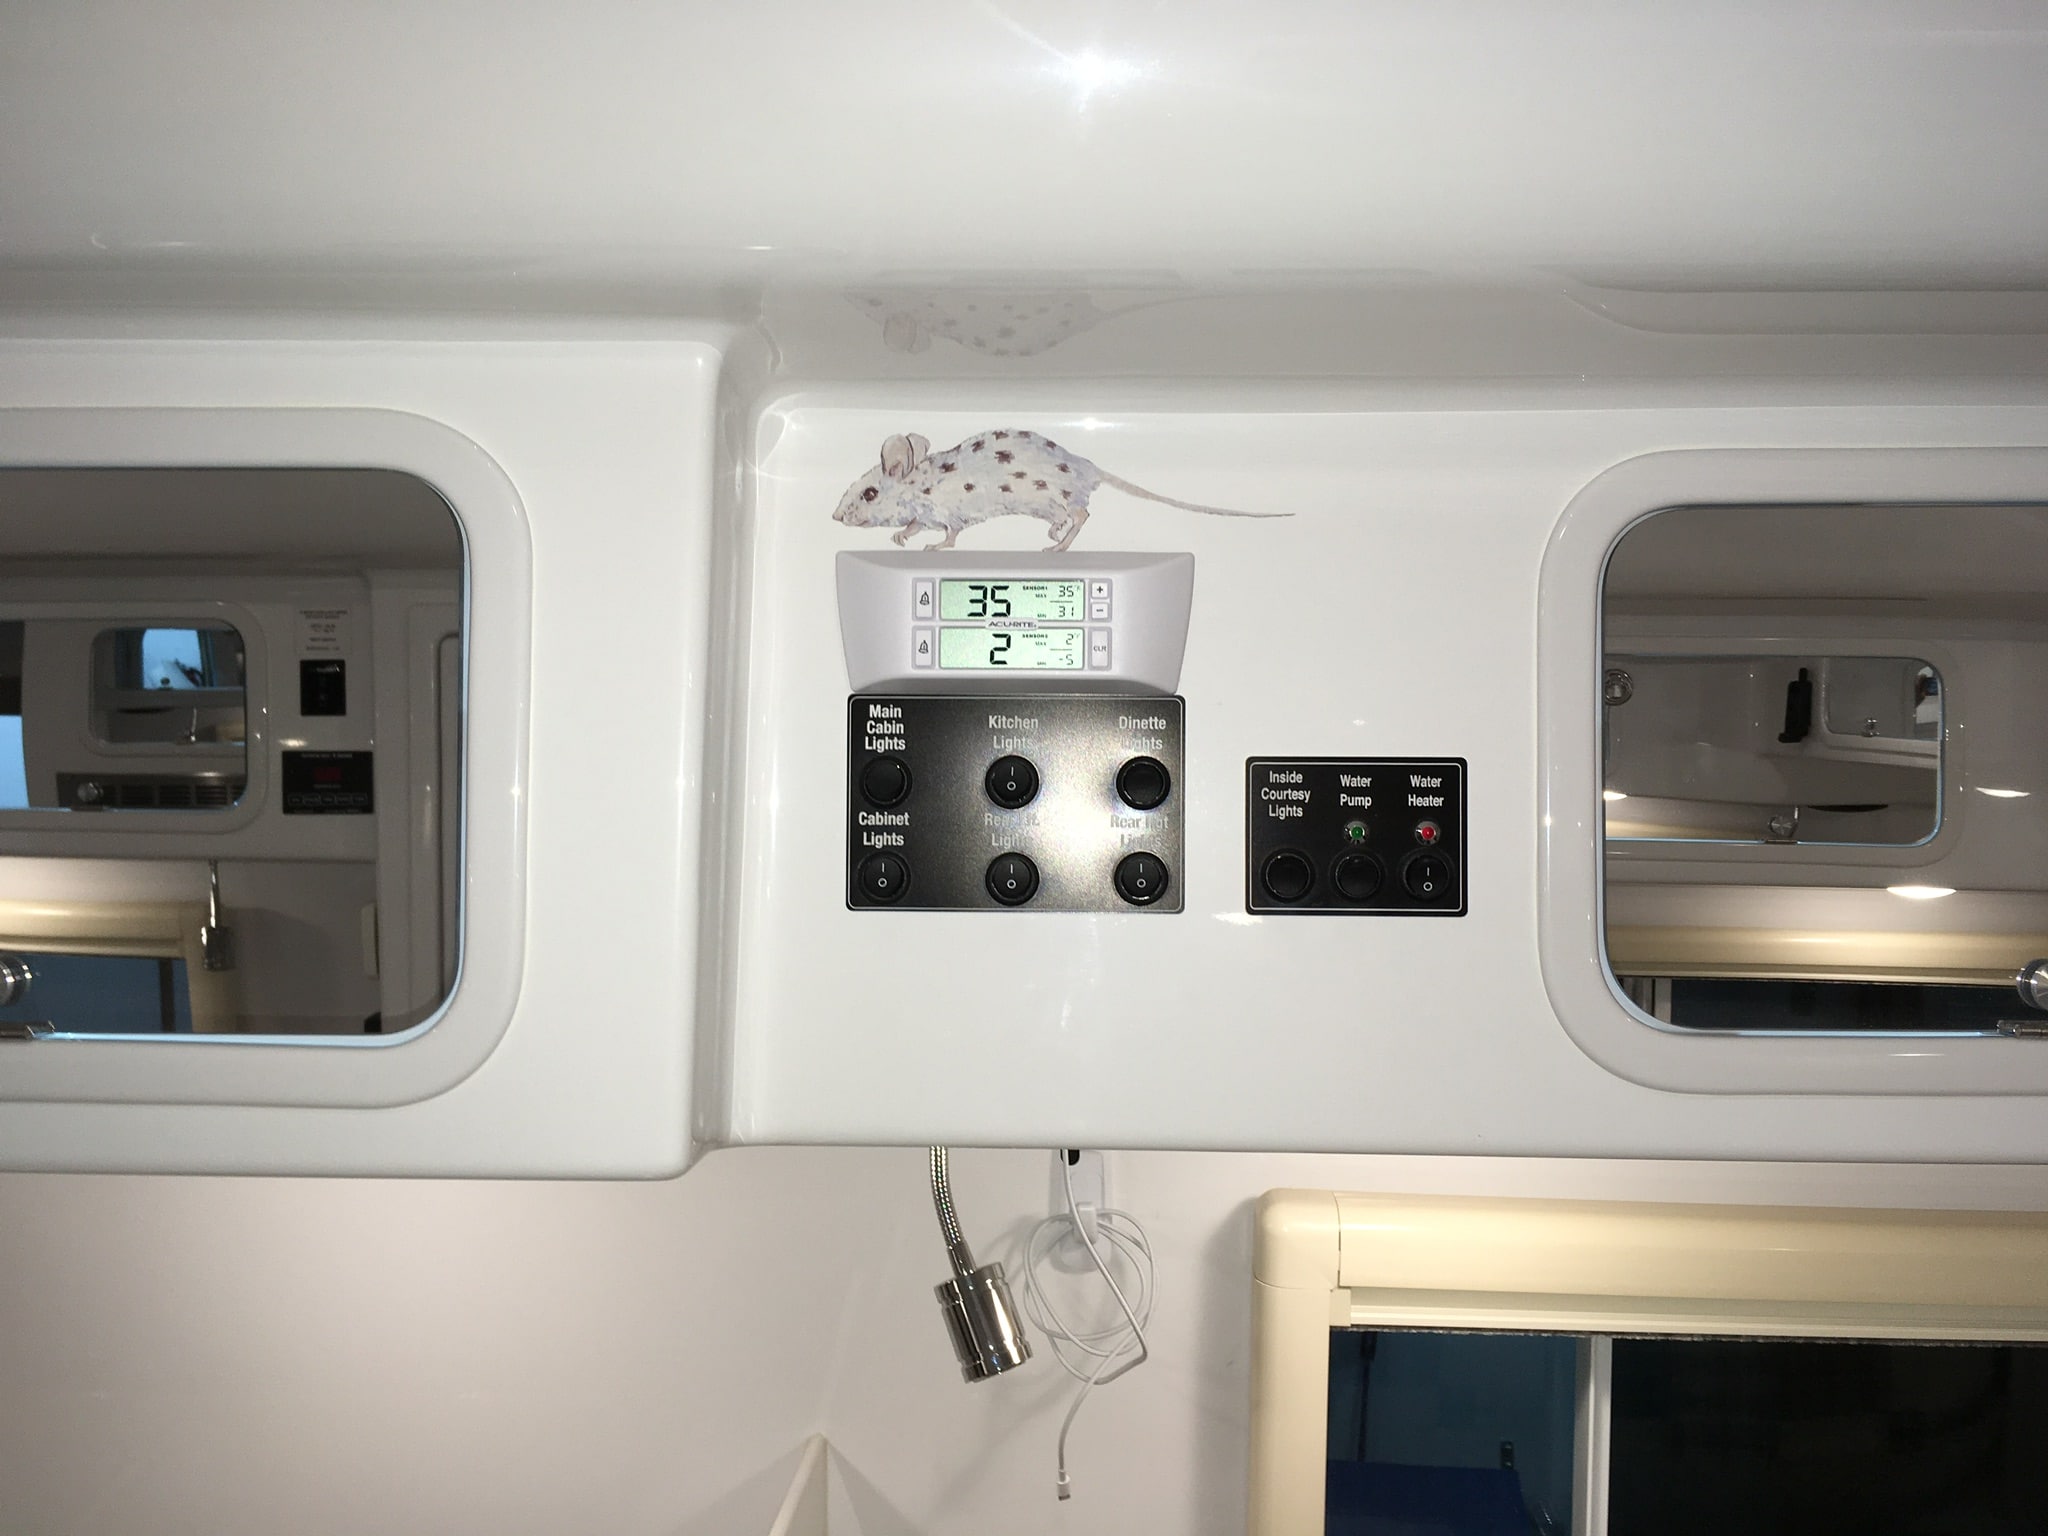
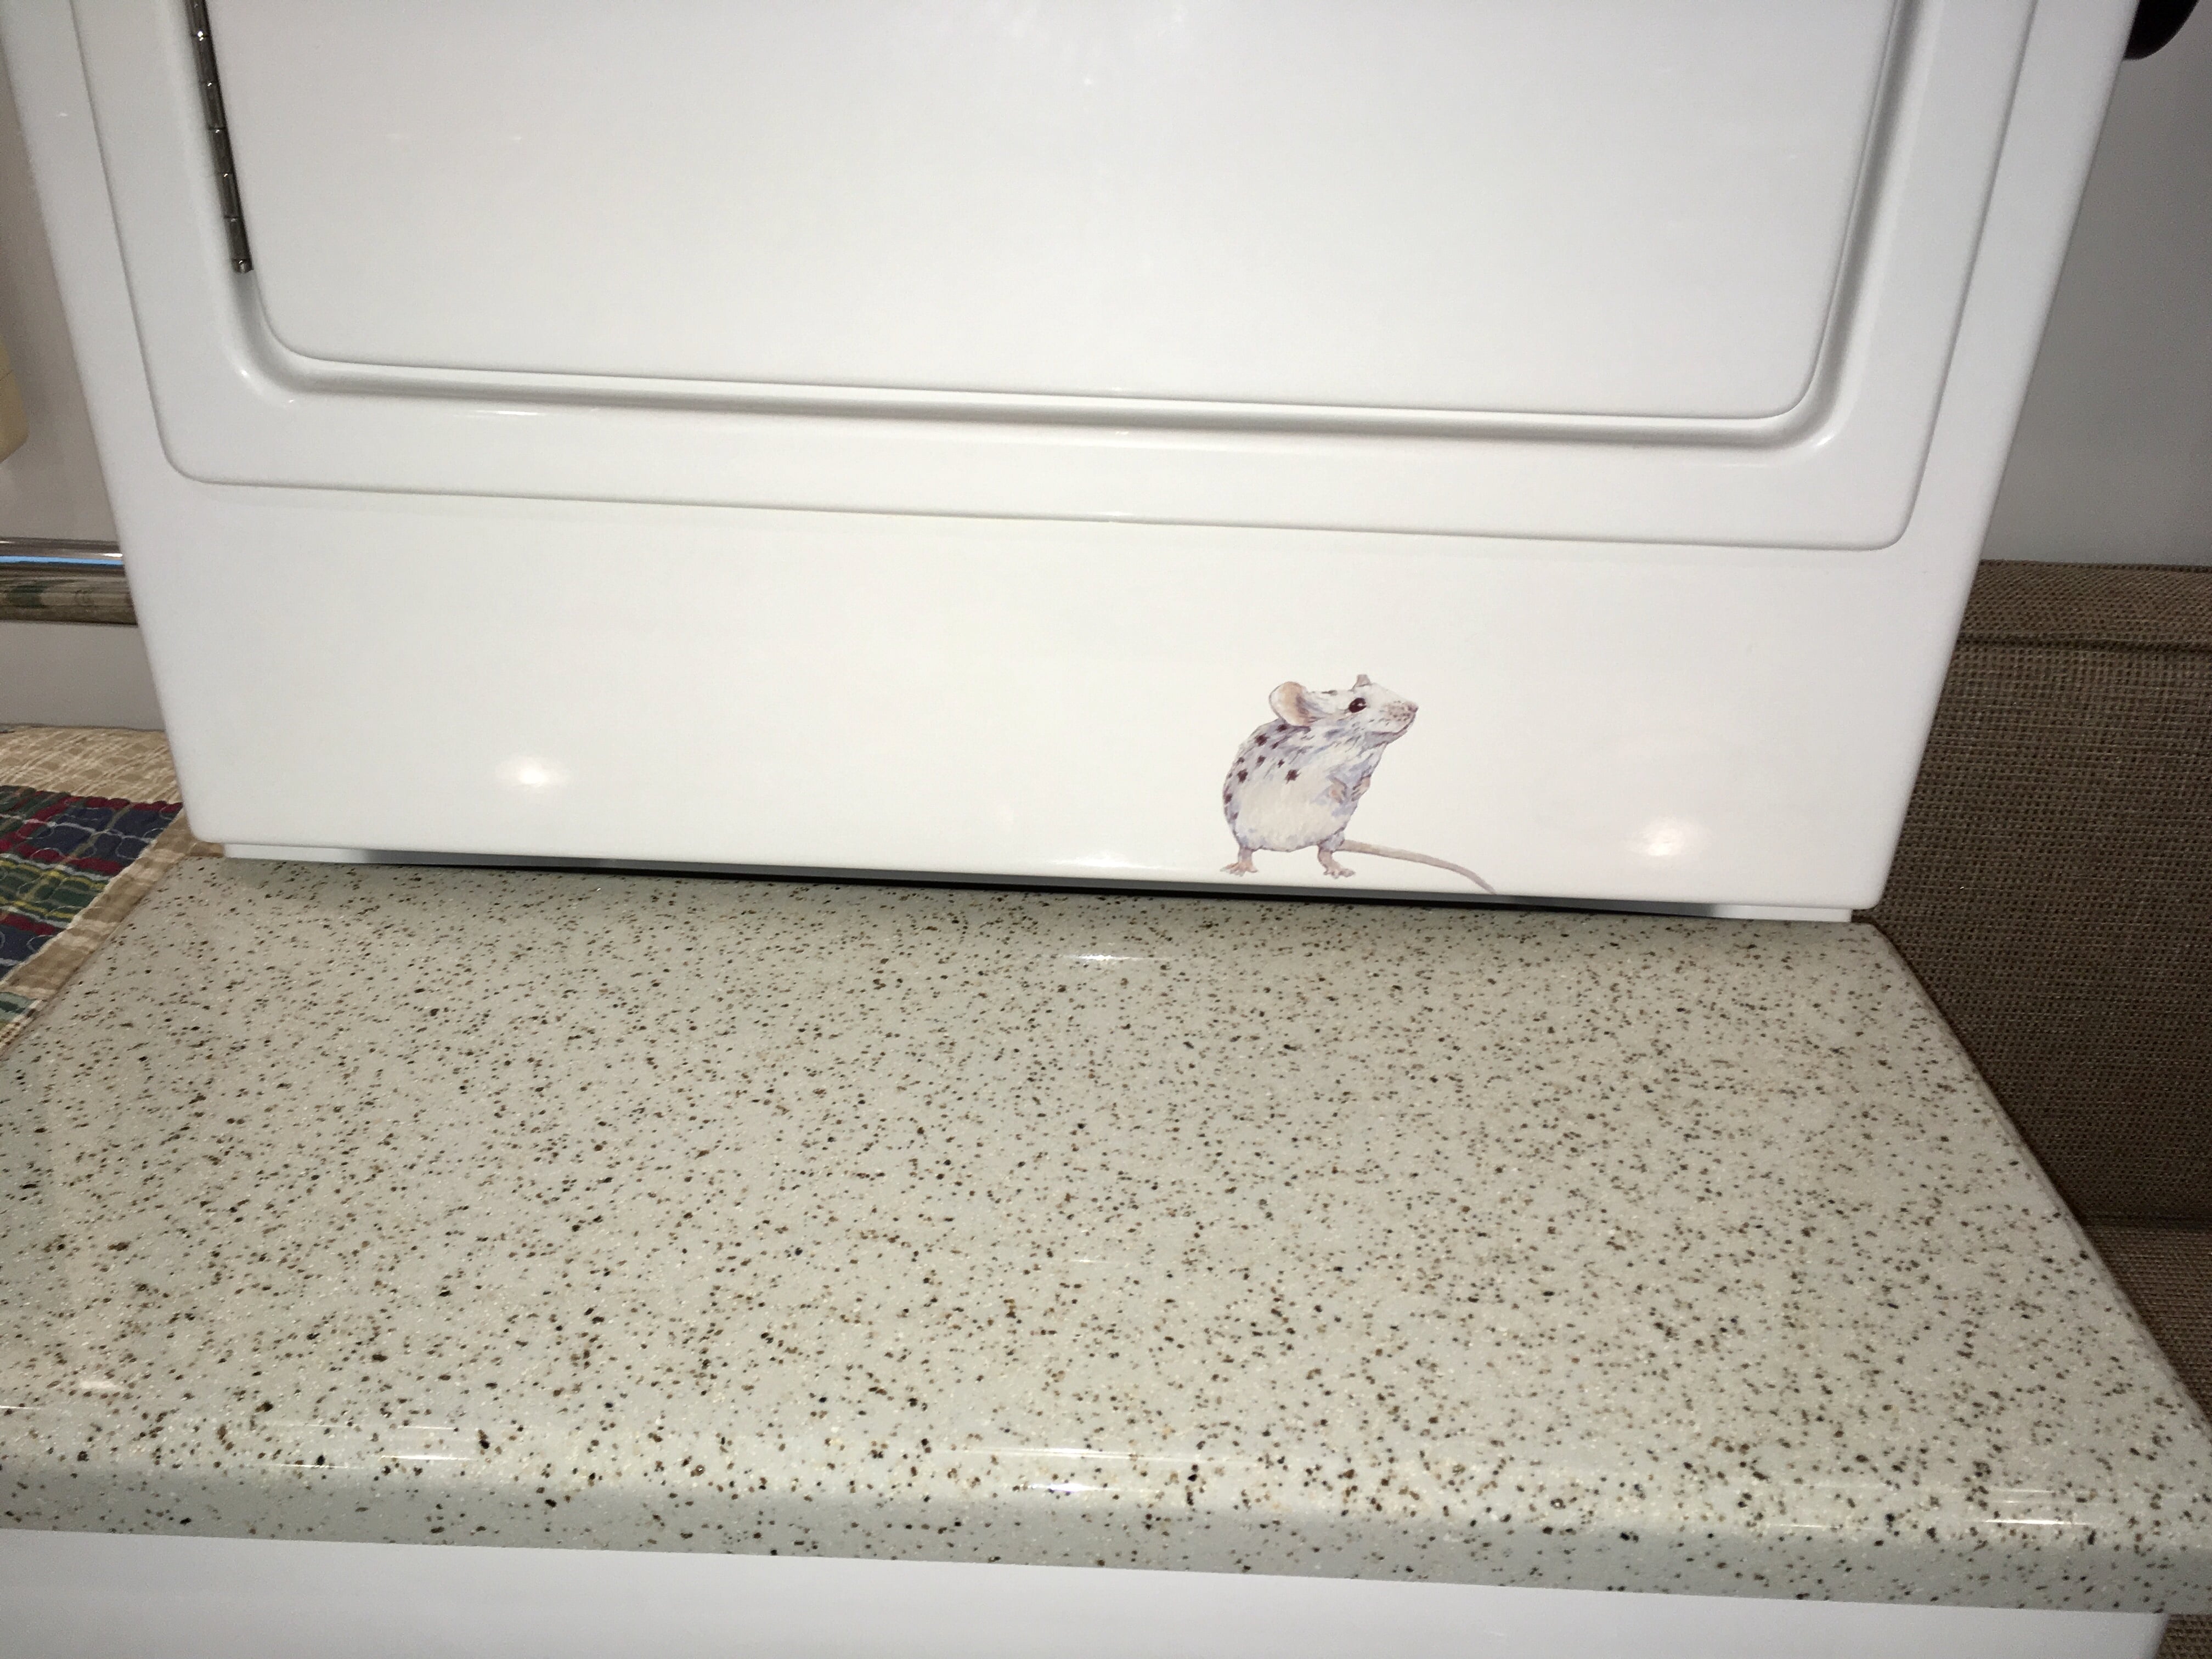
My wife found a set of four stickers on eBay from the UK..... John Davies Spokane WA
1 point
-
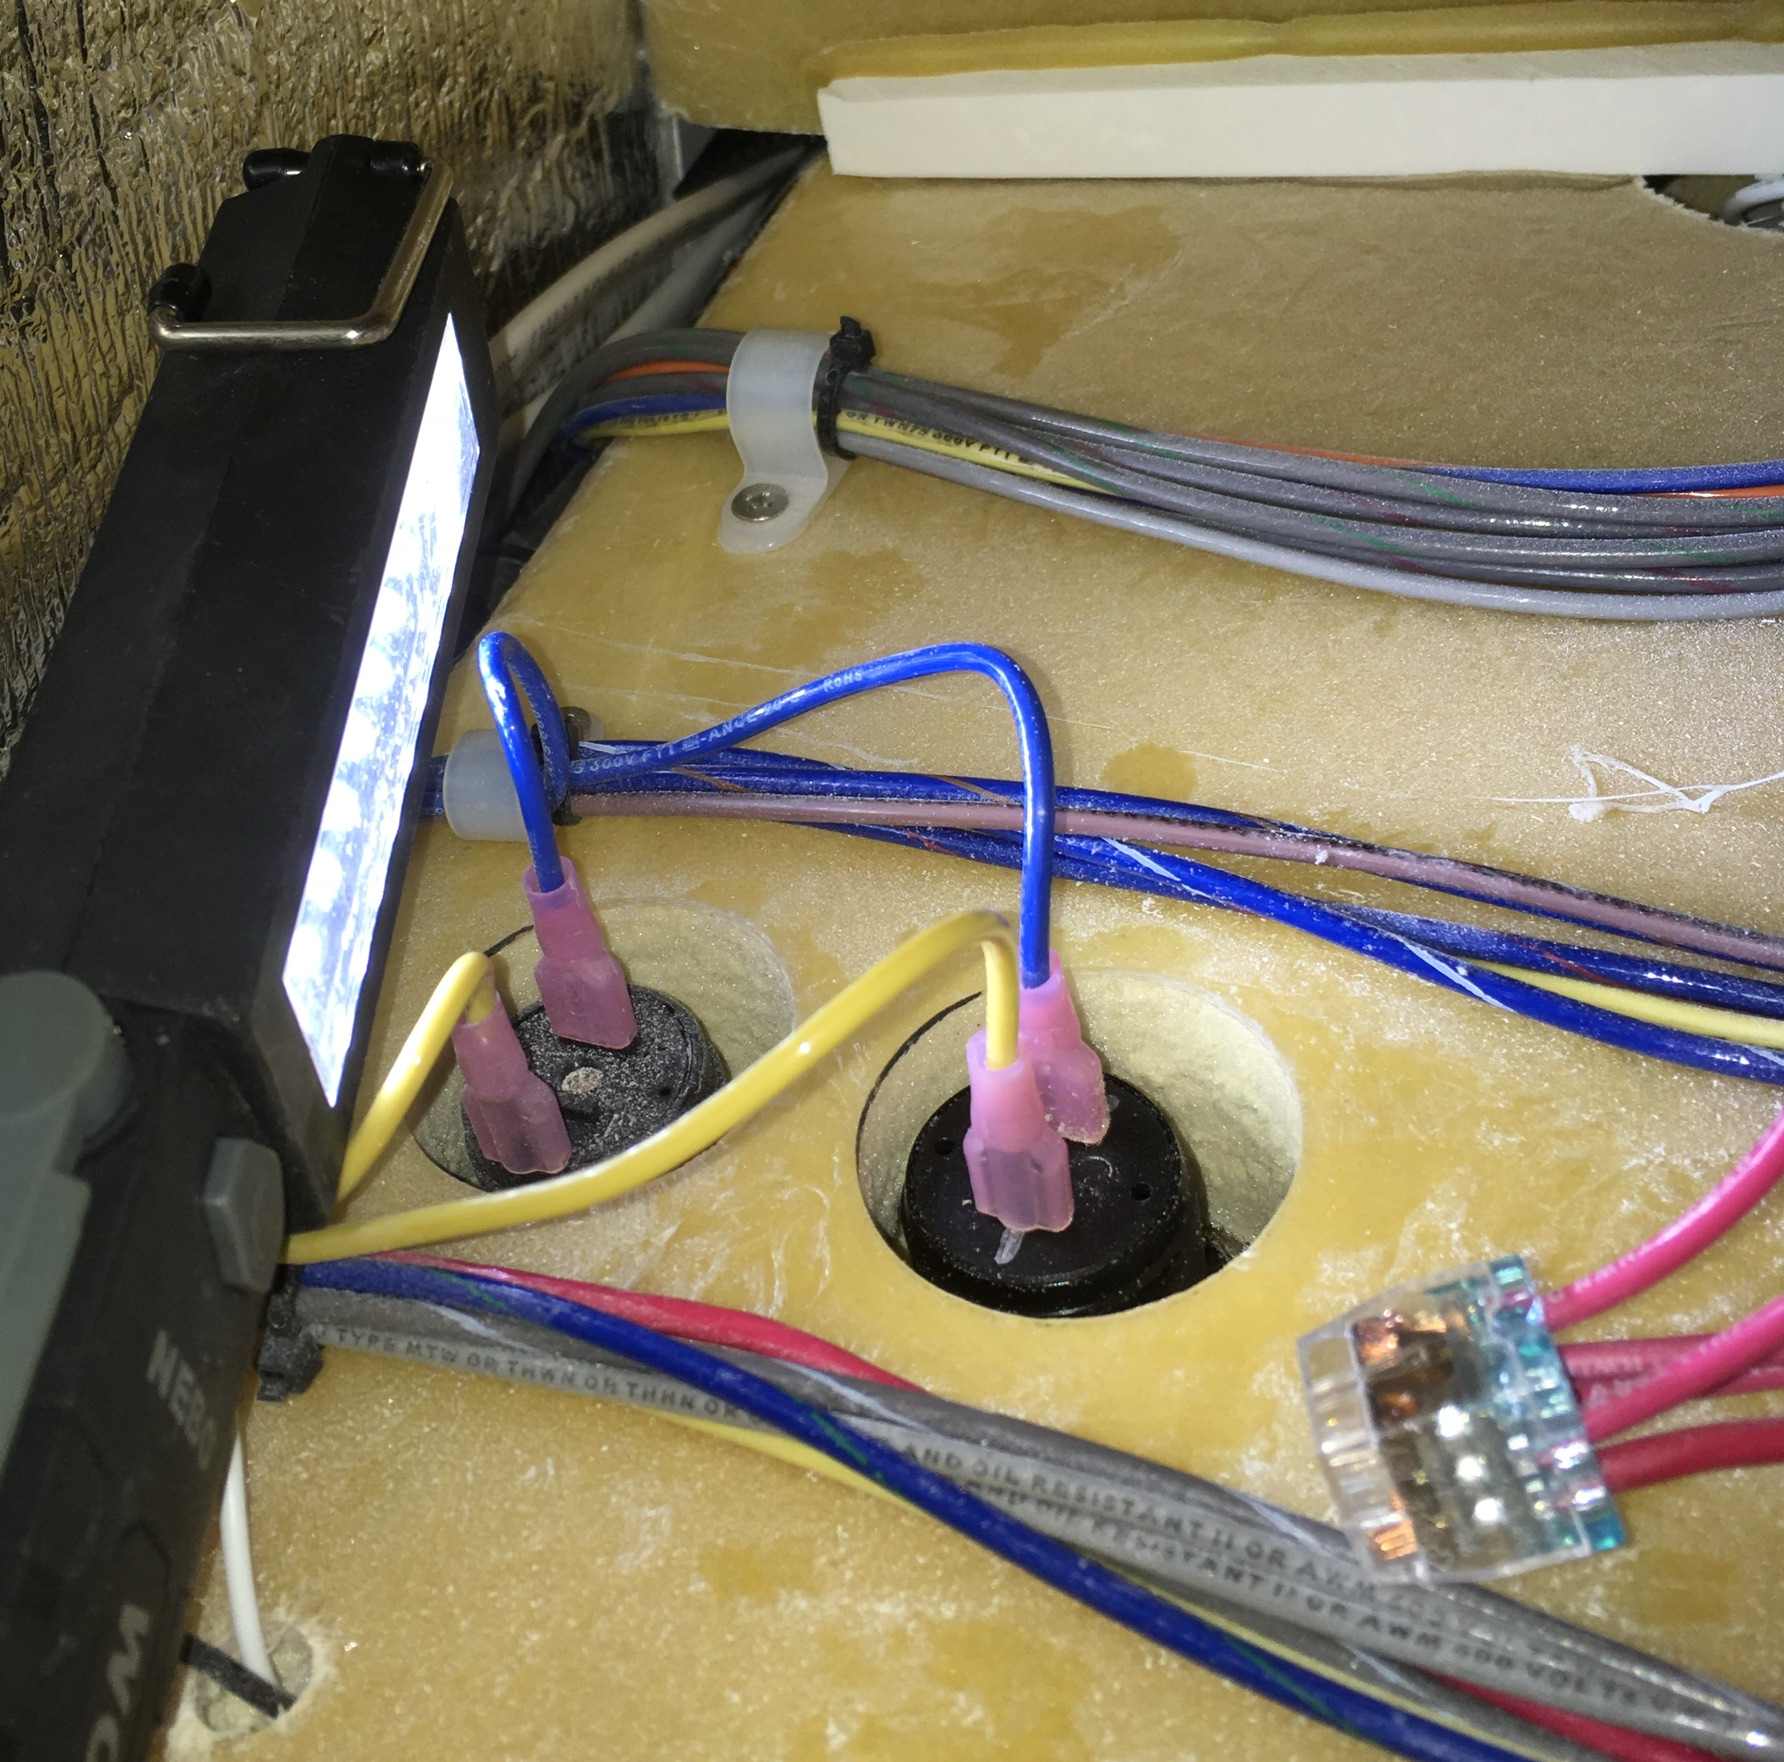
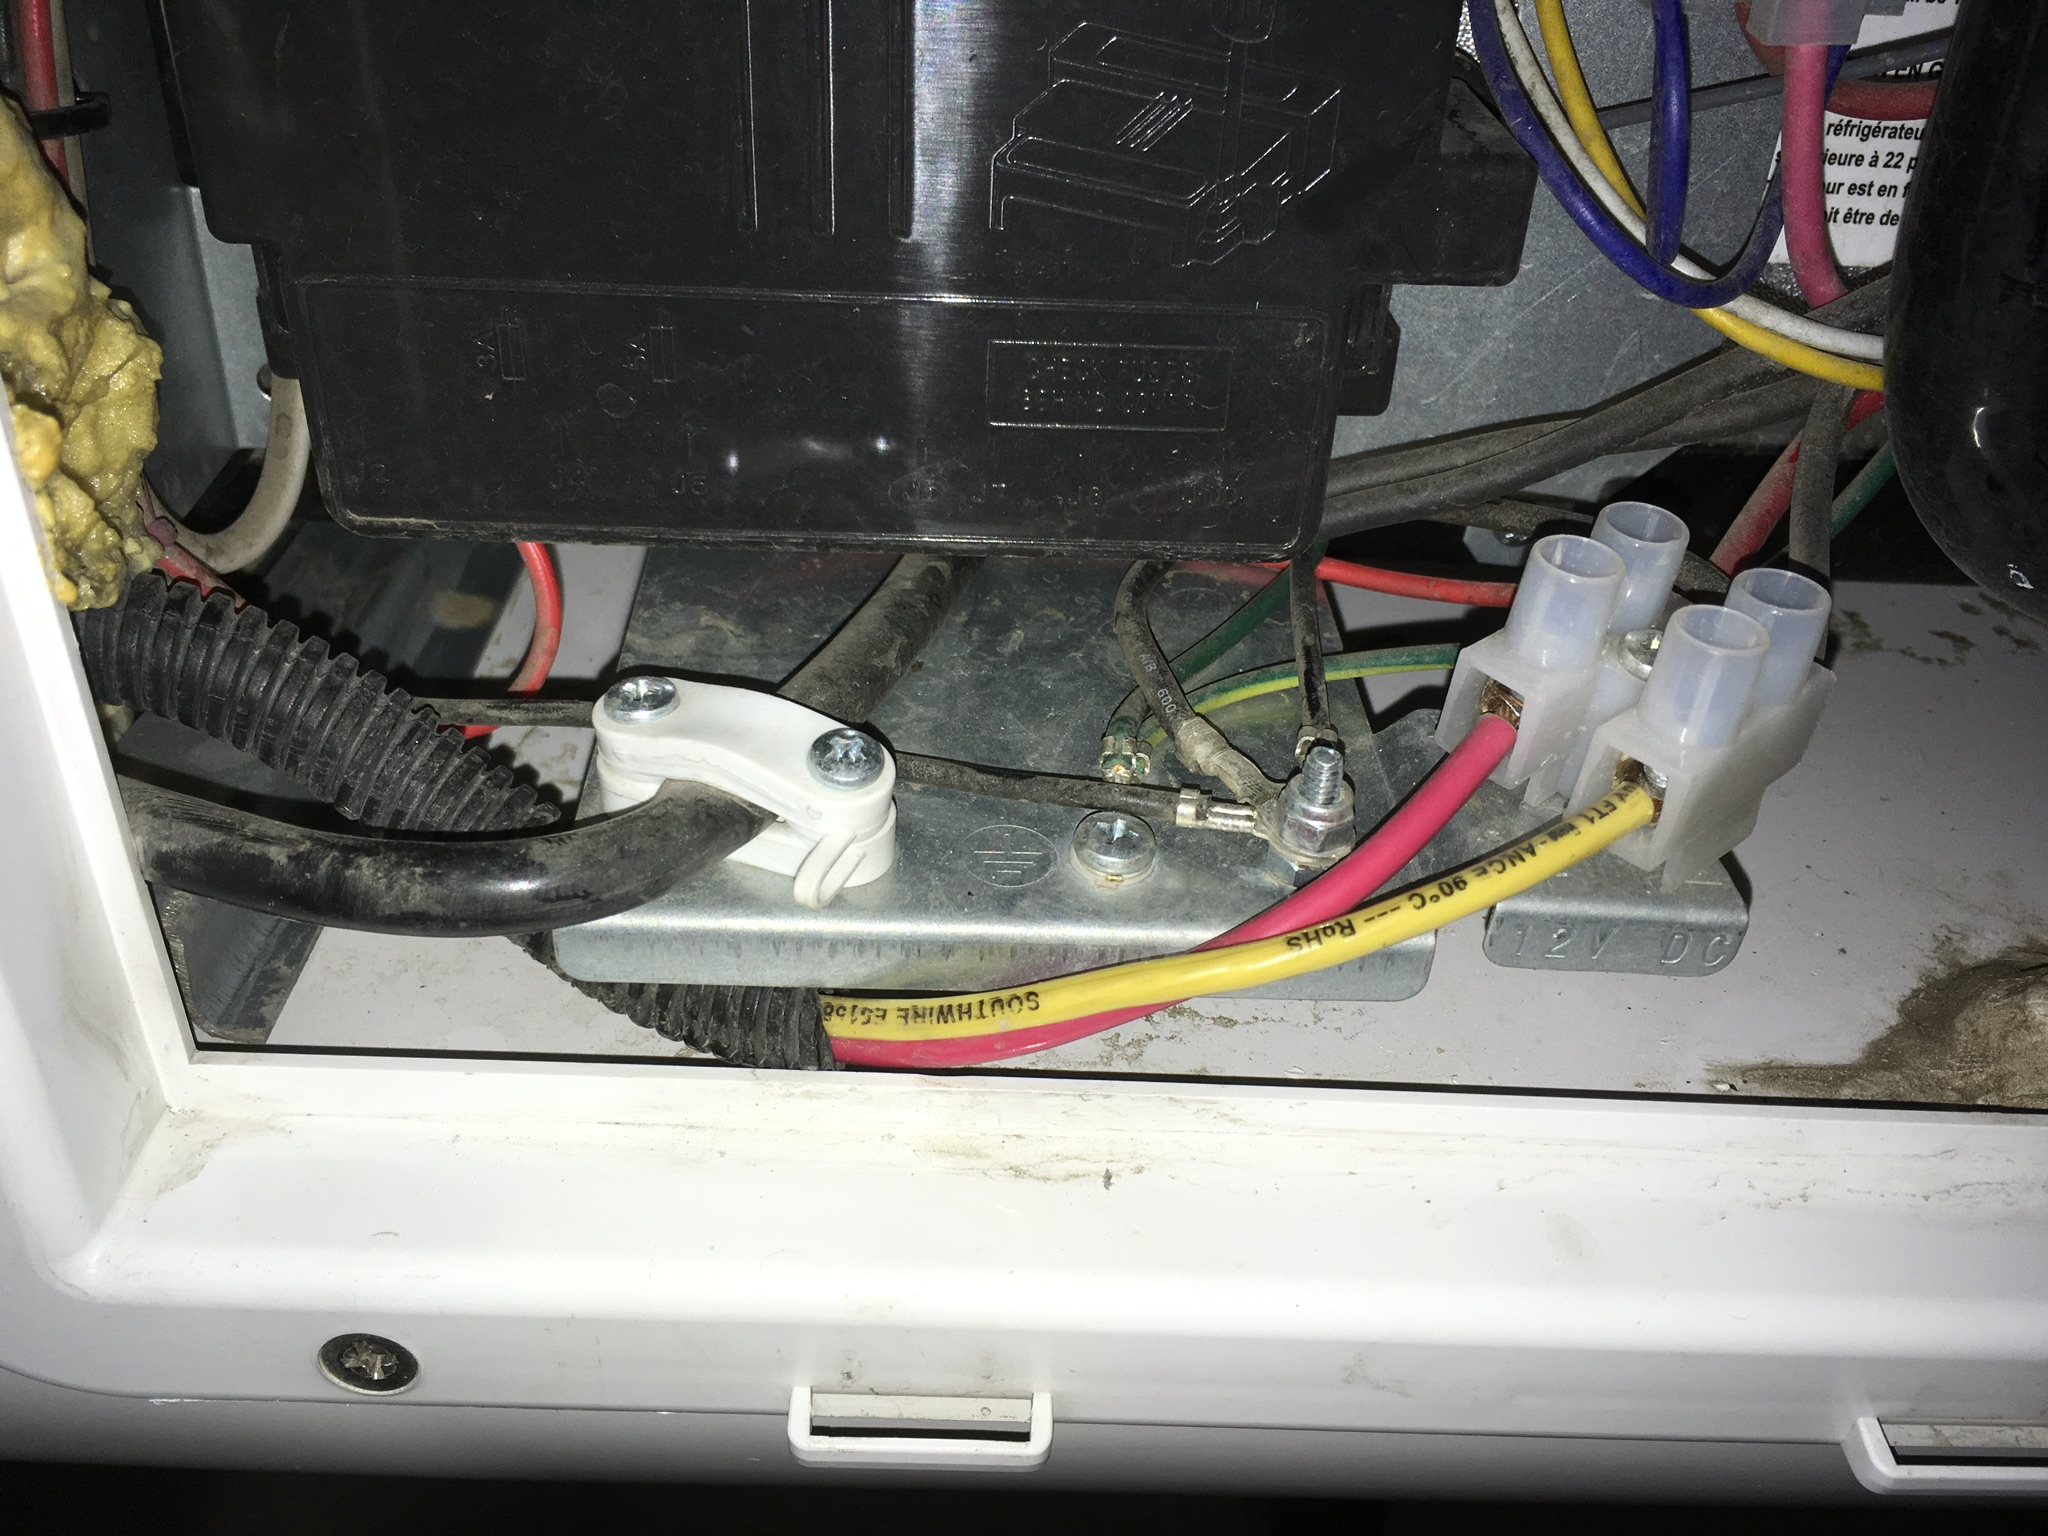
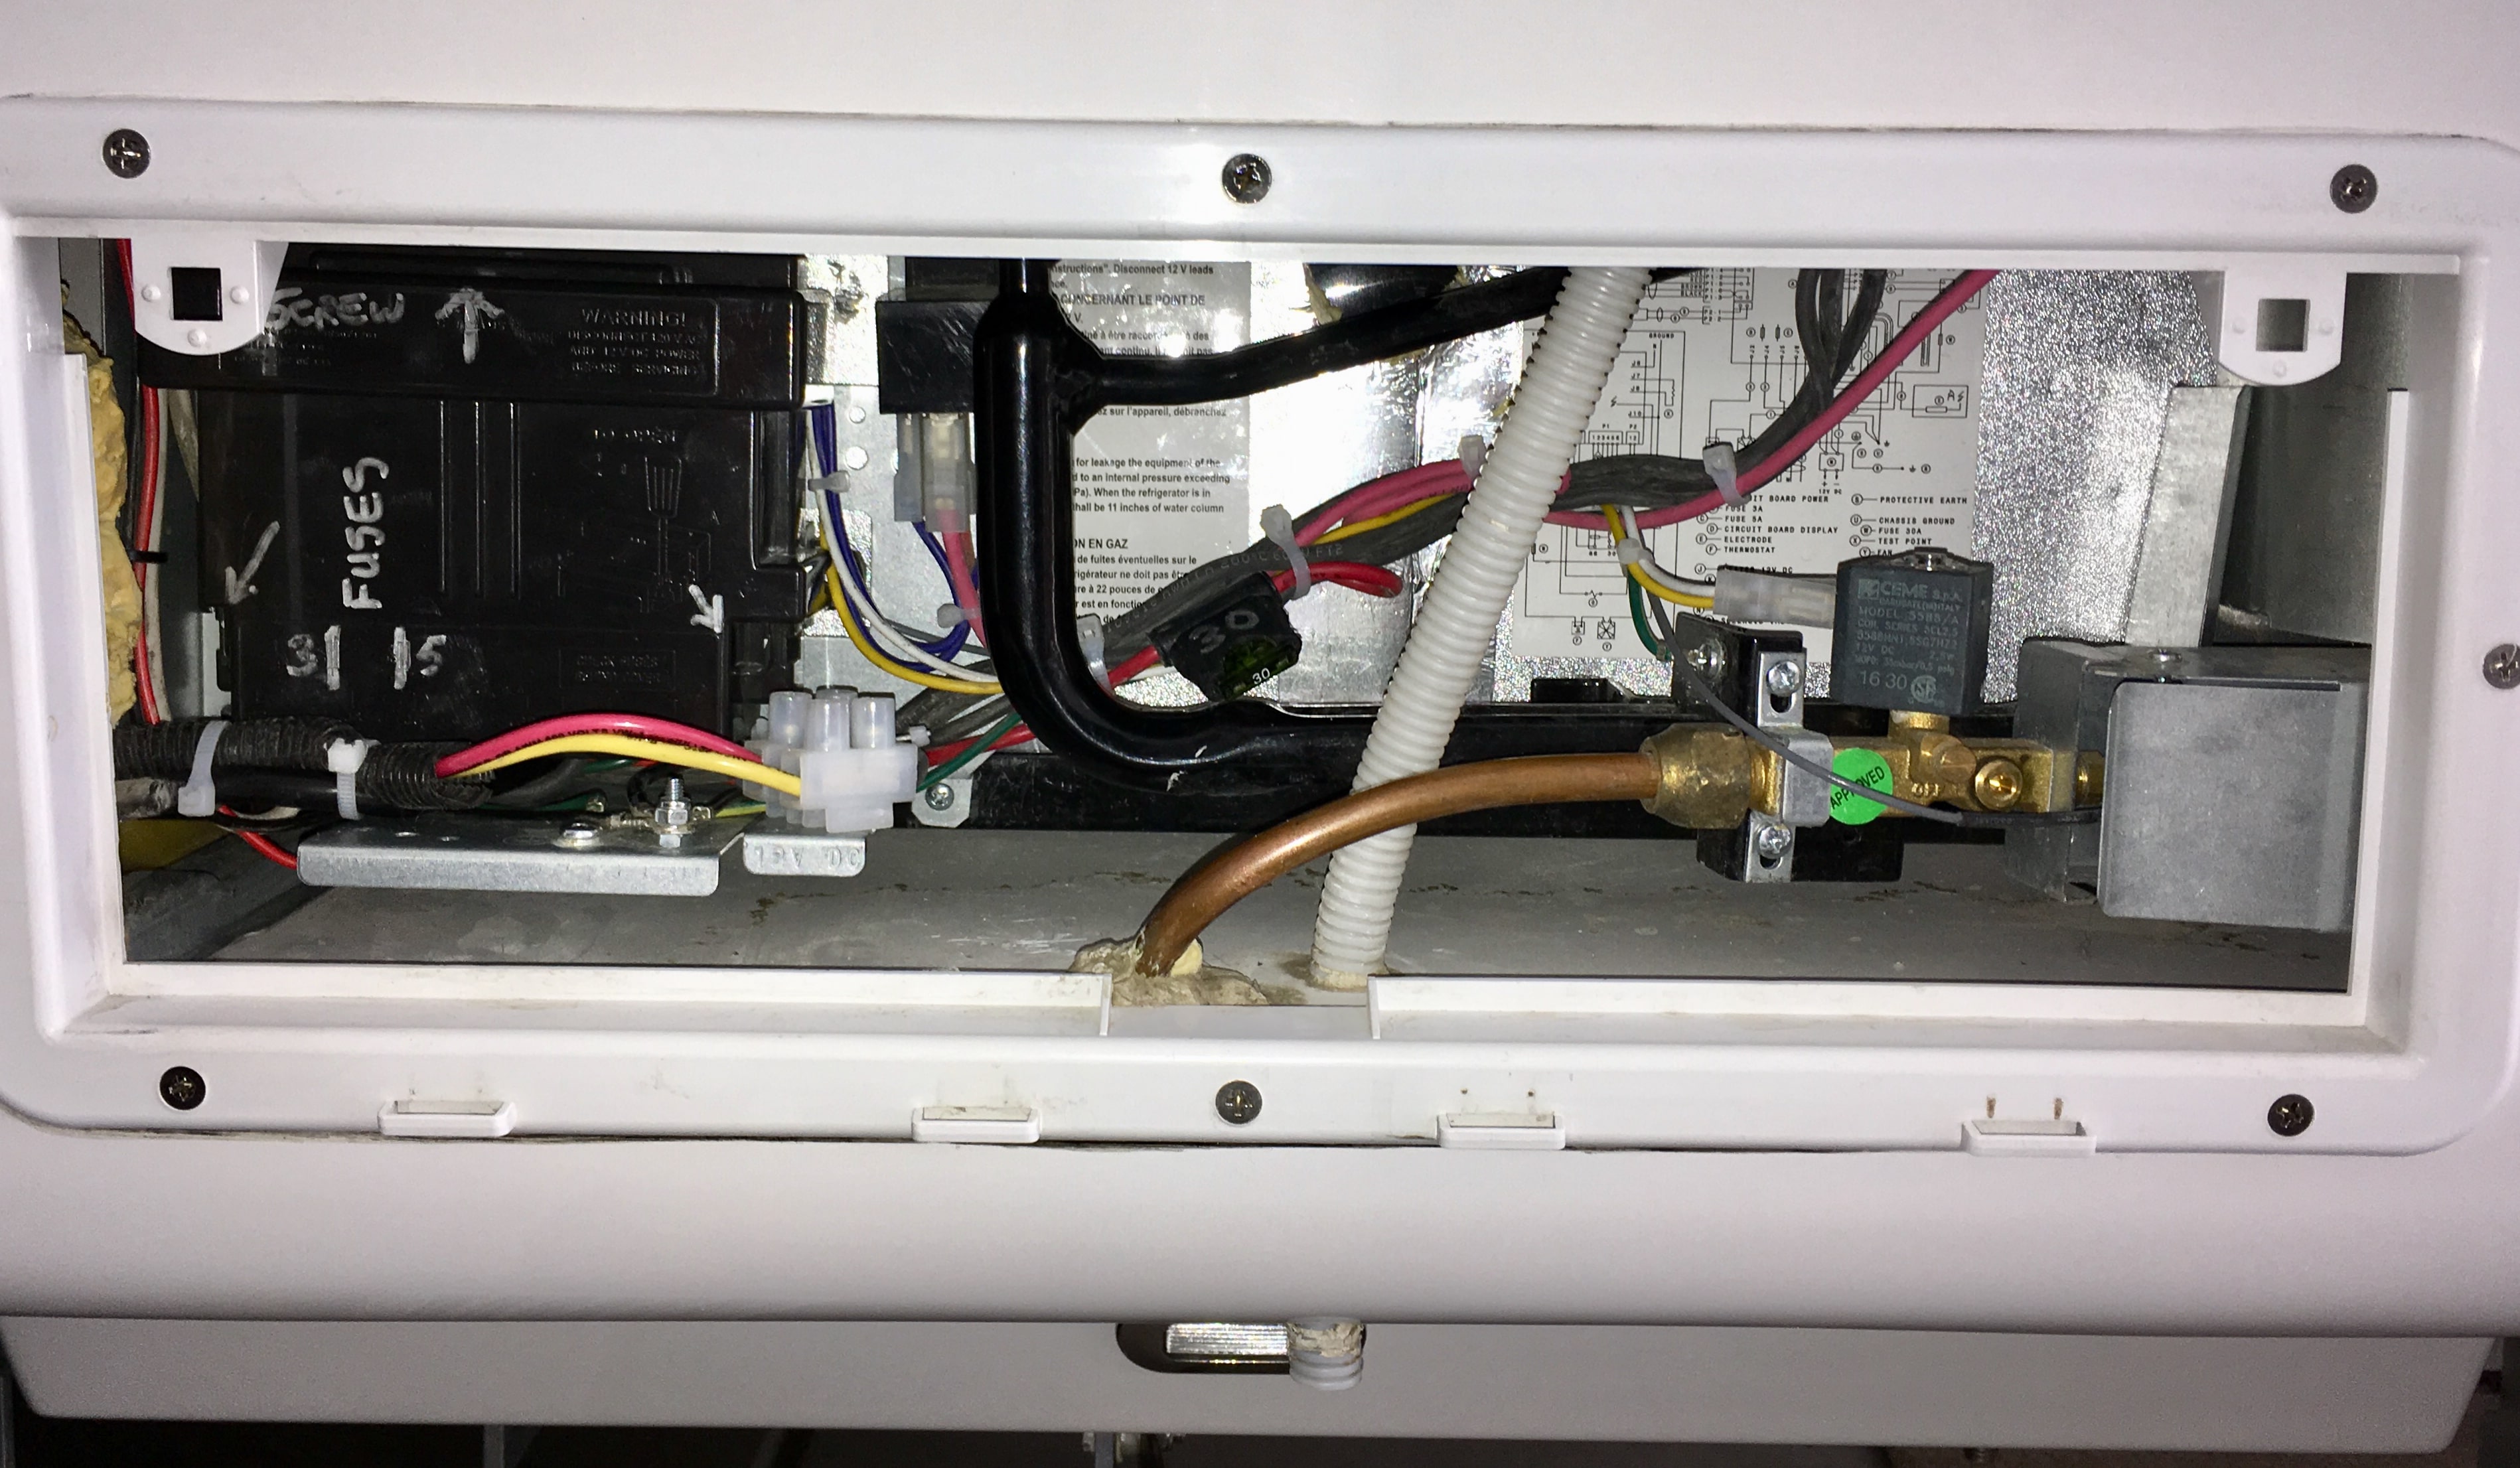
Noticed this in tidying up the wiring in my lower compartment: The fat red and yellow wires are the 12 volt power and ground for the fridge. The white block is a terminal block to join them to the wires coming out of the control board. I did not like to see them chafing on the steel bracket. Remove the 20a fuse for the fridge (under the dinette) and turn off 110vac before messing around in there! Unscrew and discard the white plastic cable clamp on the left, reposition the wires as shown and secure with cable ties. Make sure the wires are clear of the ground stud sticking up nearby. Check the tightness of the screws in the terminal block, one of mine was a little loose. I also looked inside the control box and secured the other wires to make them neater and so they cannot flop around. Check yours, and clean out the dust while you are in there. Remove the 30amp blade fuse from the holder on the red wire, dead center in the above pic. Clean any corrosion and reinstall the fuse with a coating of dielectric grease on the contacts. Secure it with the fuse angled down, to keep out water! This fuse holder really should be a sealed unit, there is no excuse for exposed electrical connections in a completely open outside compartment! Question: I am thinking of a simple way to block off this compartment for travel on dirt roads, to keep electronics and coils clean. How about a heavy trash bag filled with enough styrofoam peanuts to fit snugly in the cavity, around all the various components? The vented cover should hold it tightly in place. Obviously the fridge and propane would be switched off. Thanks. John Davies Spokane WA
1 point
-
Notifications are back on. This should help with the private messaging notifications. Keep me updated please! Thank you!1 point
-
When I last checked my propane tanks I noticed that one of the plastic blocks had come off. They are not screed in but placed using some kind of contact cement. So take a look at yours and see if they are holding
1 point
-
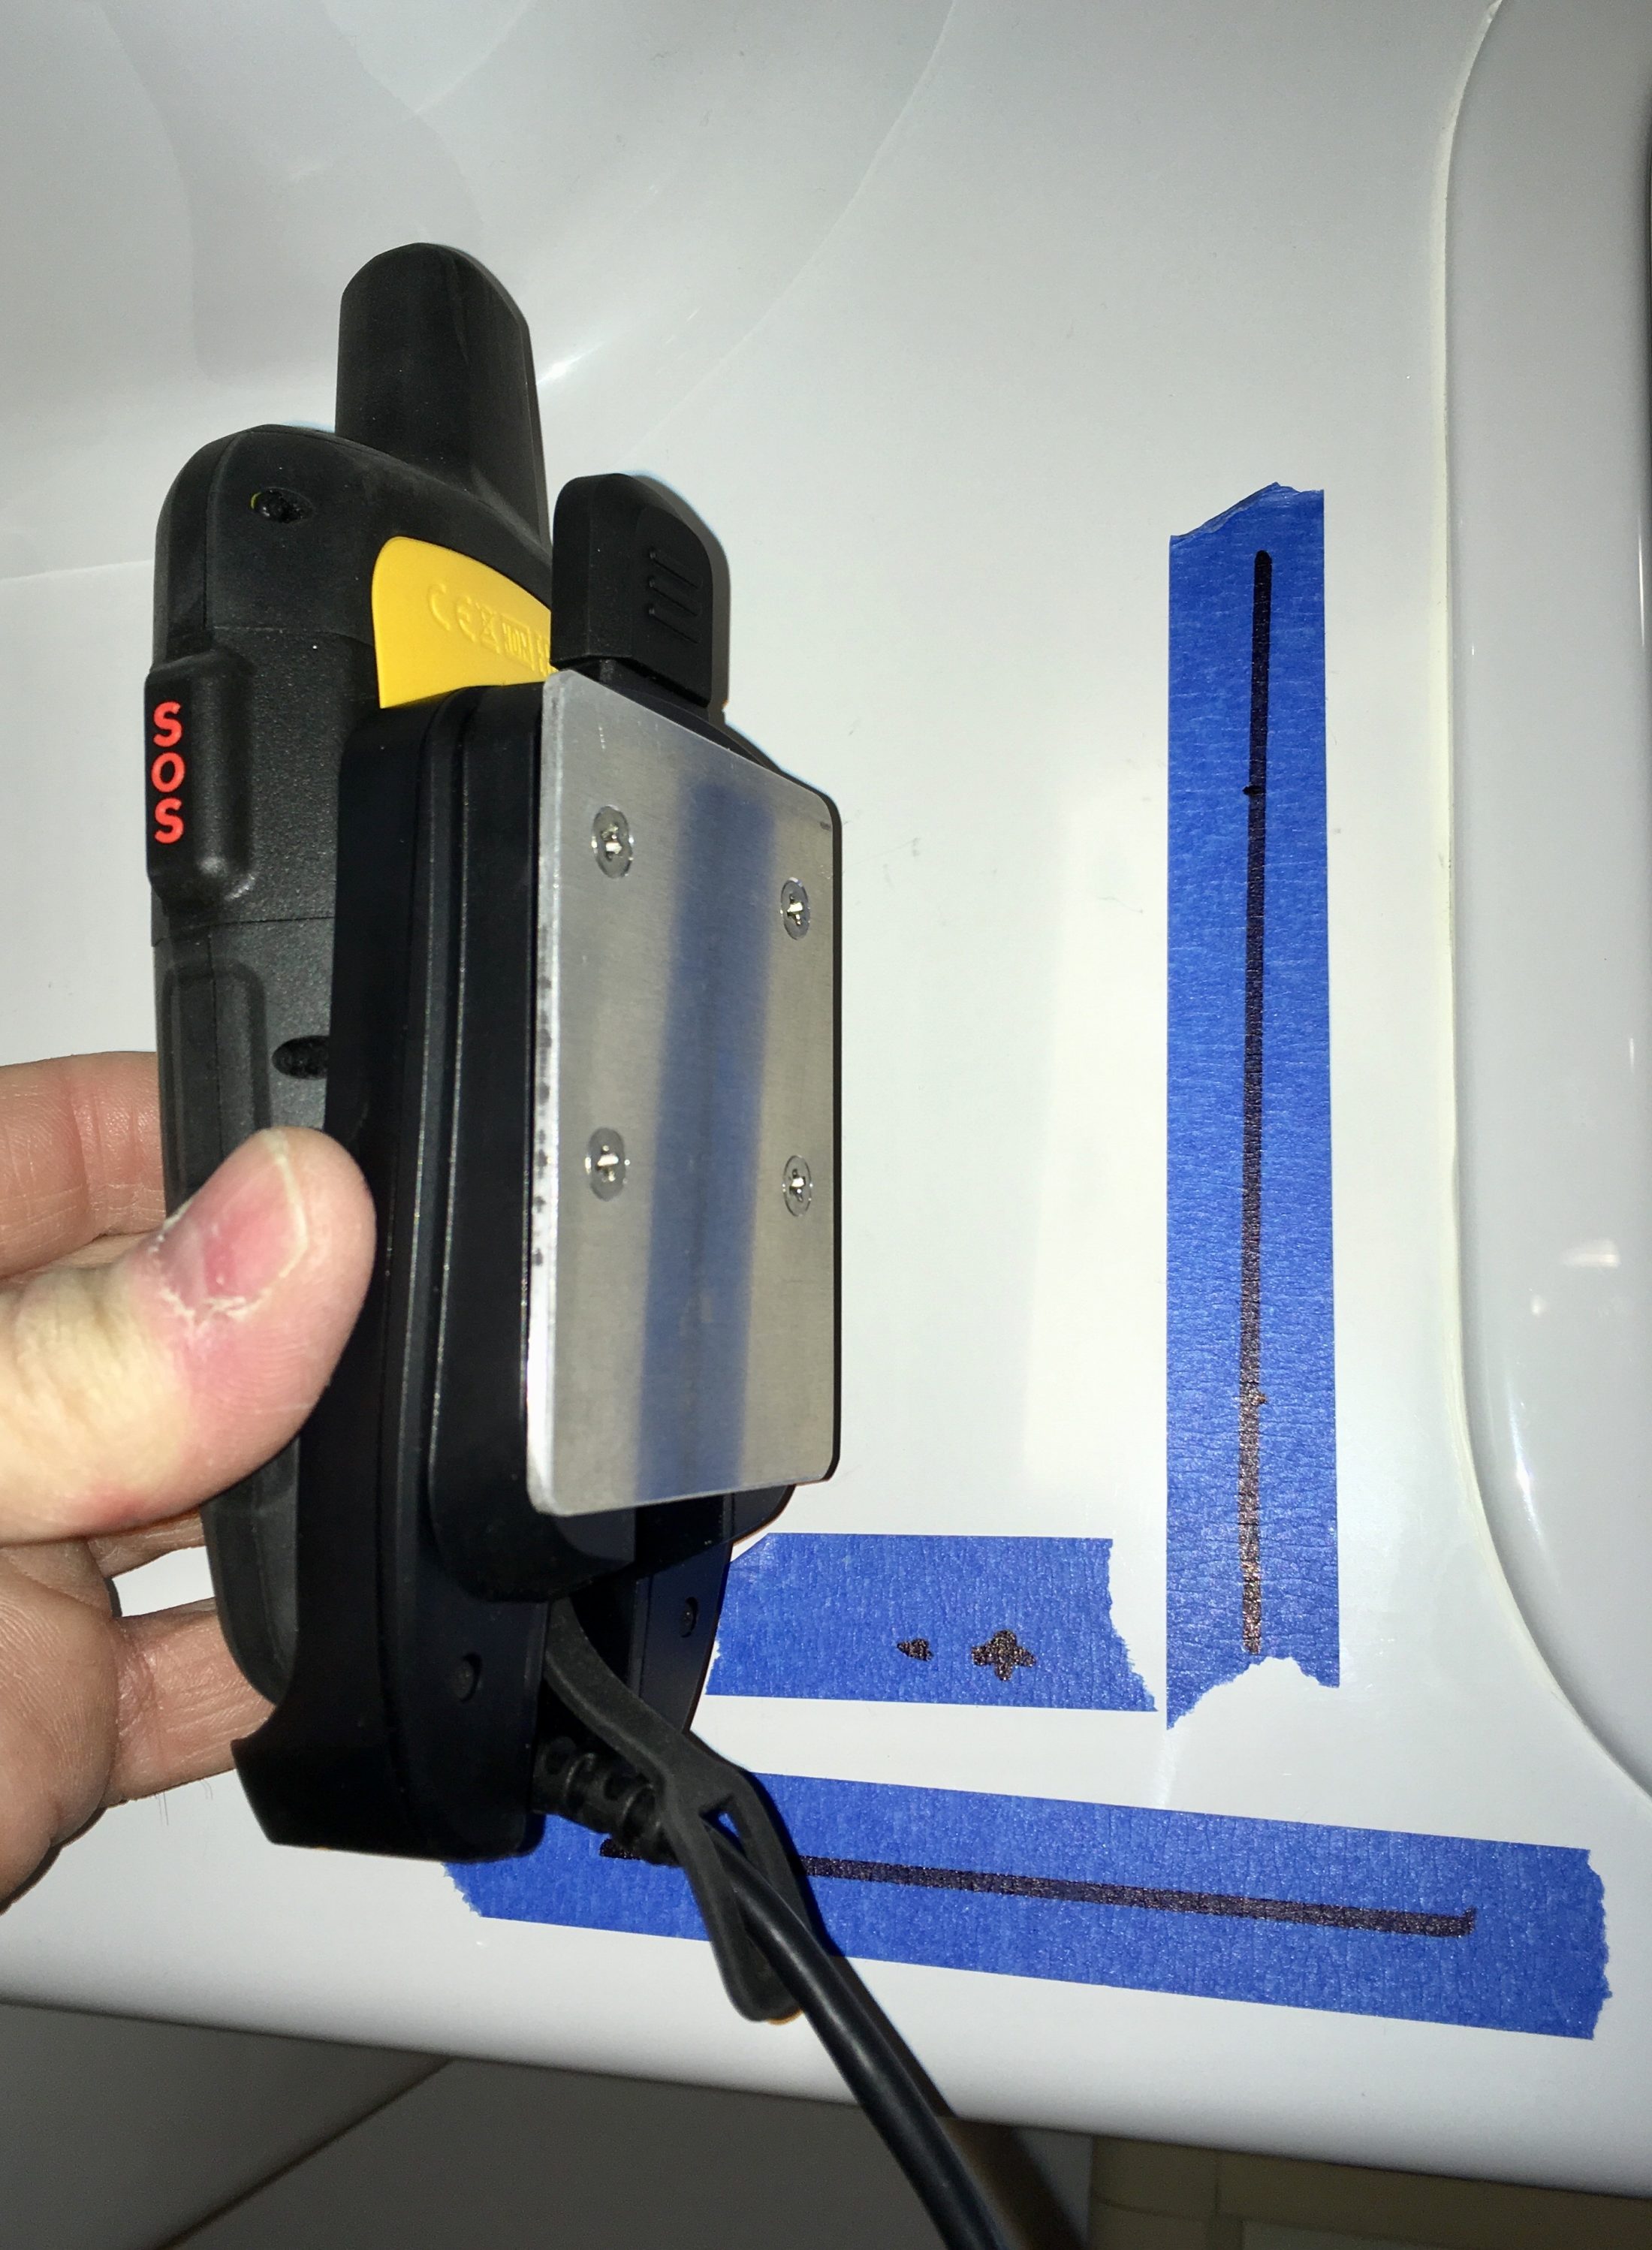
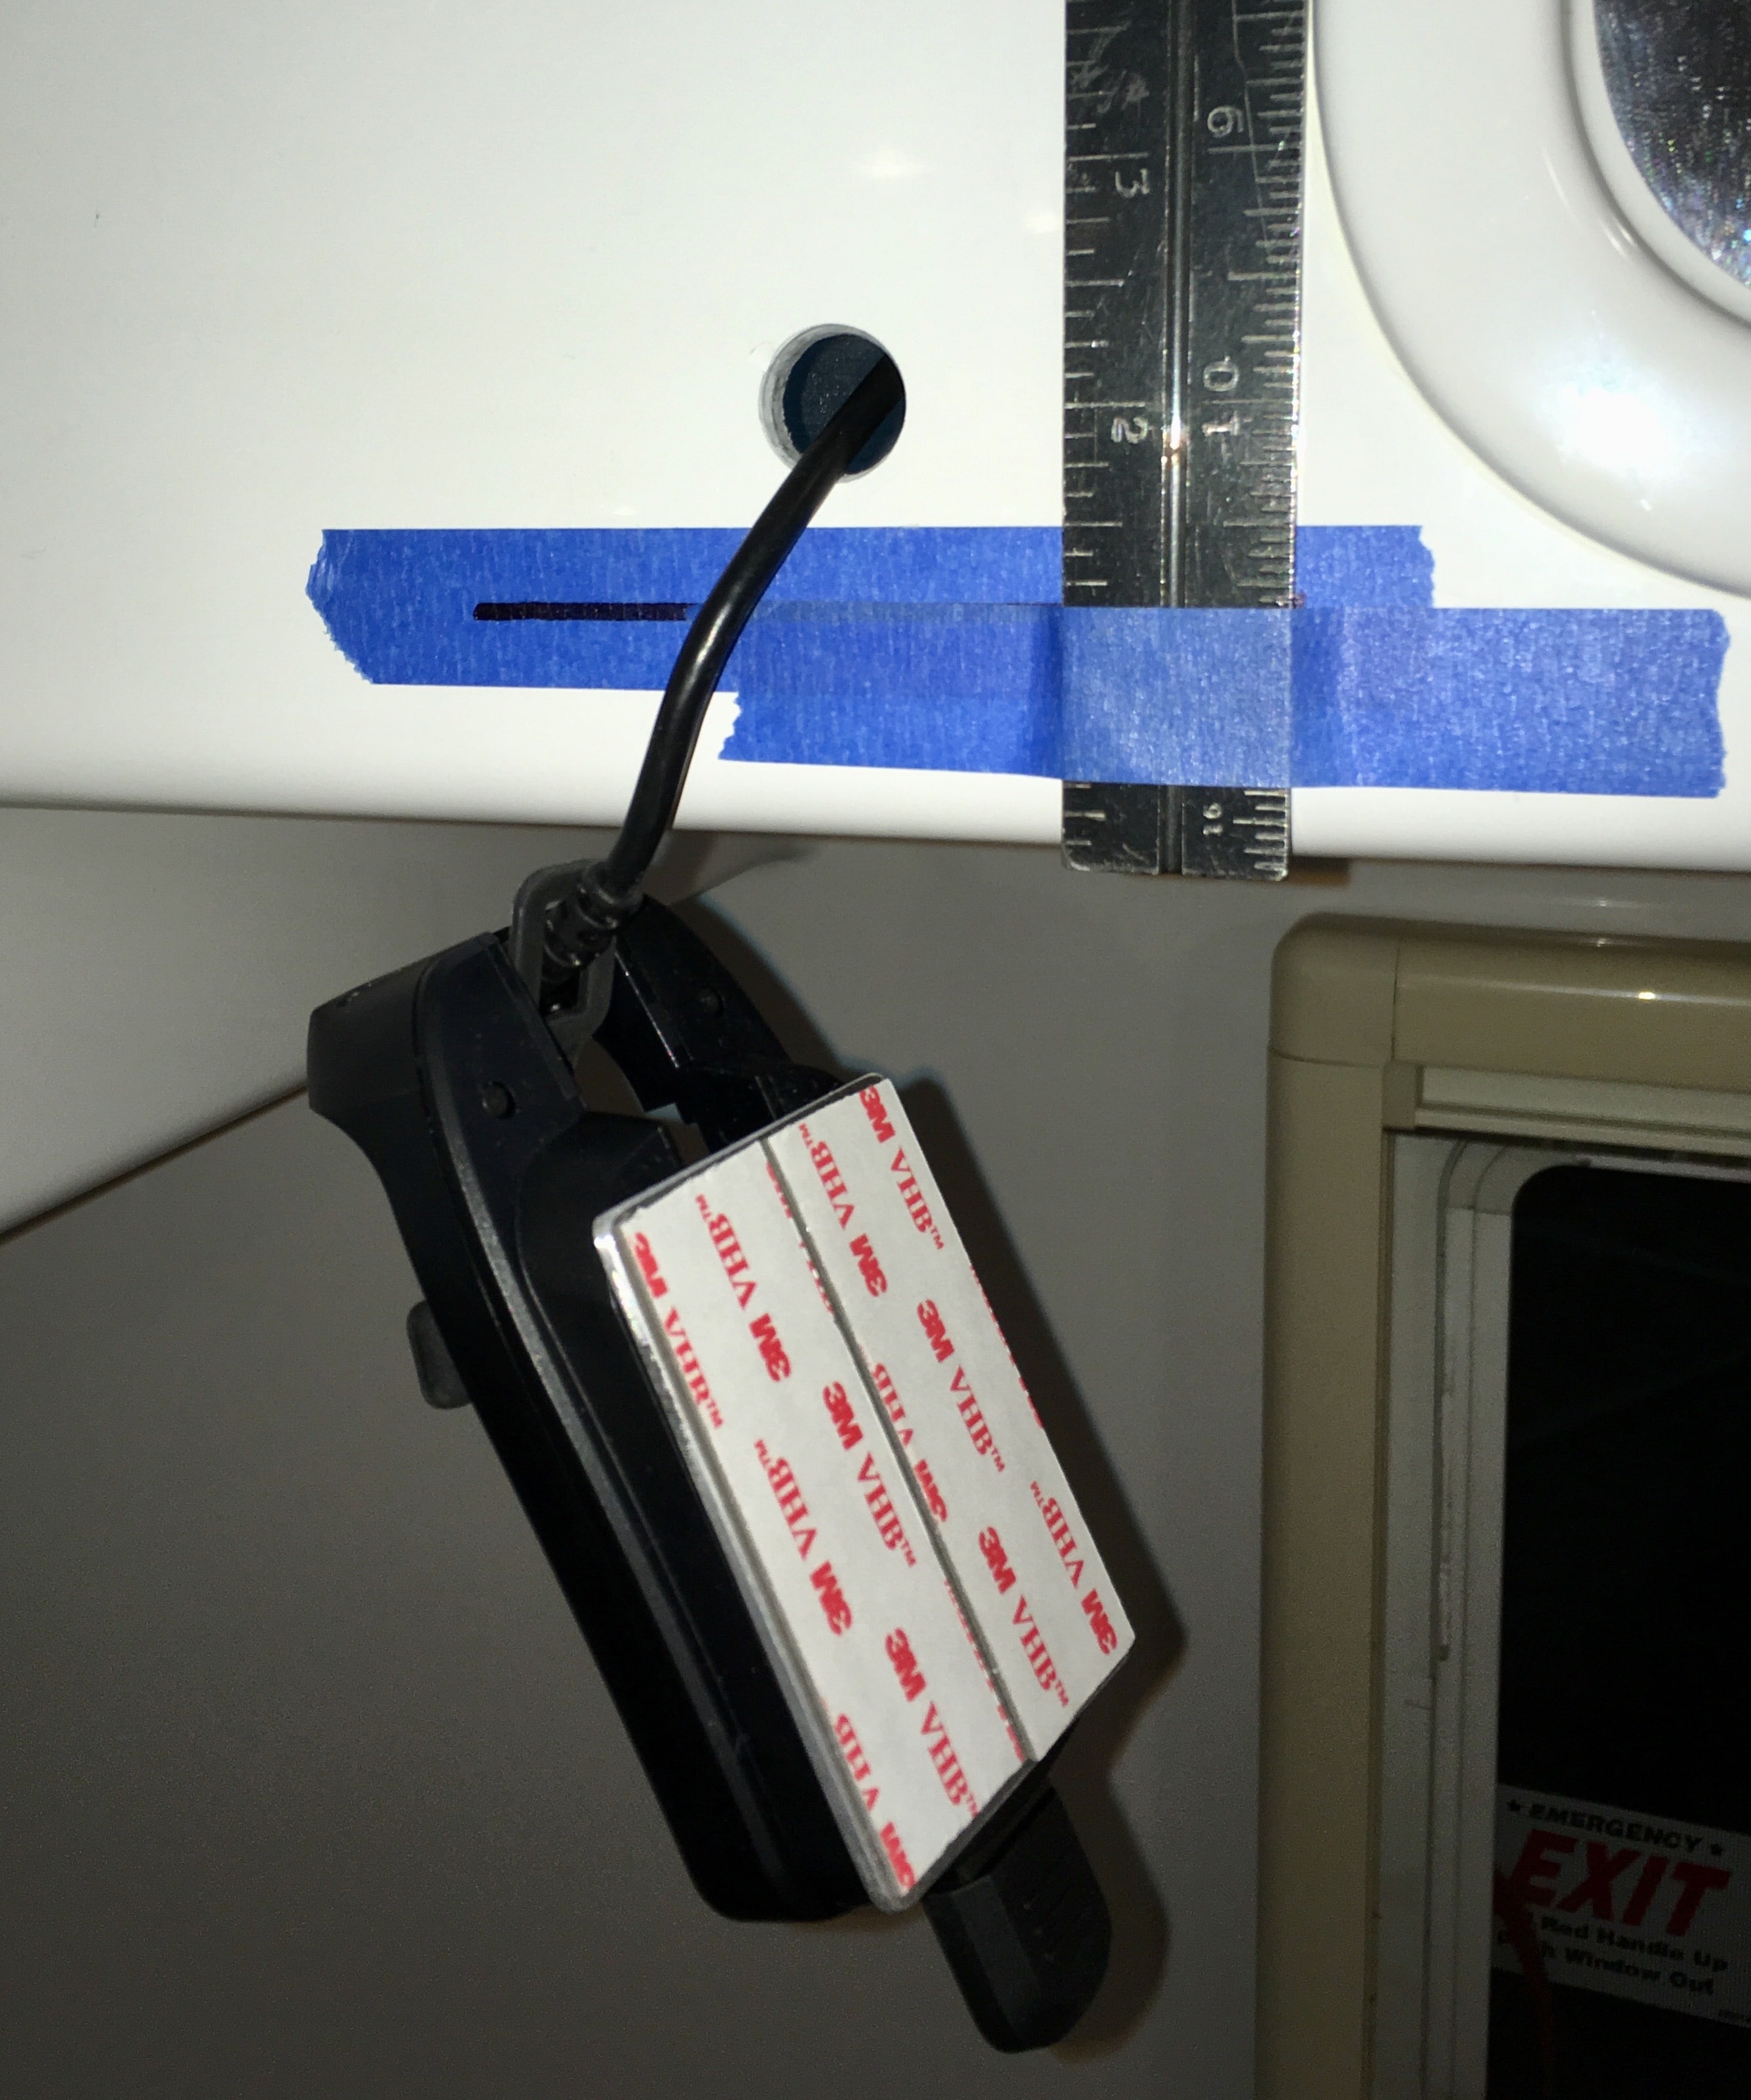
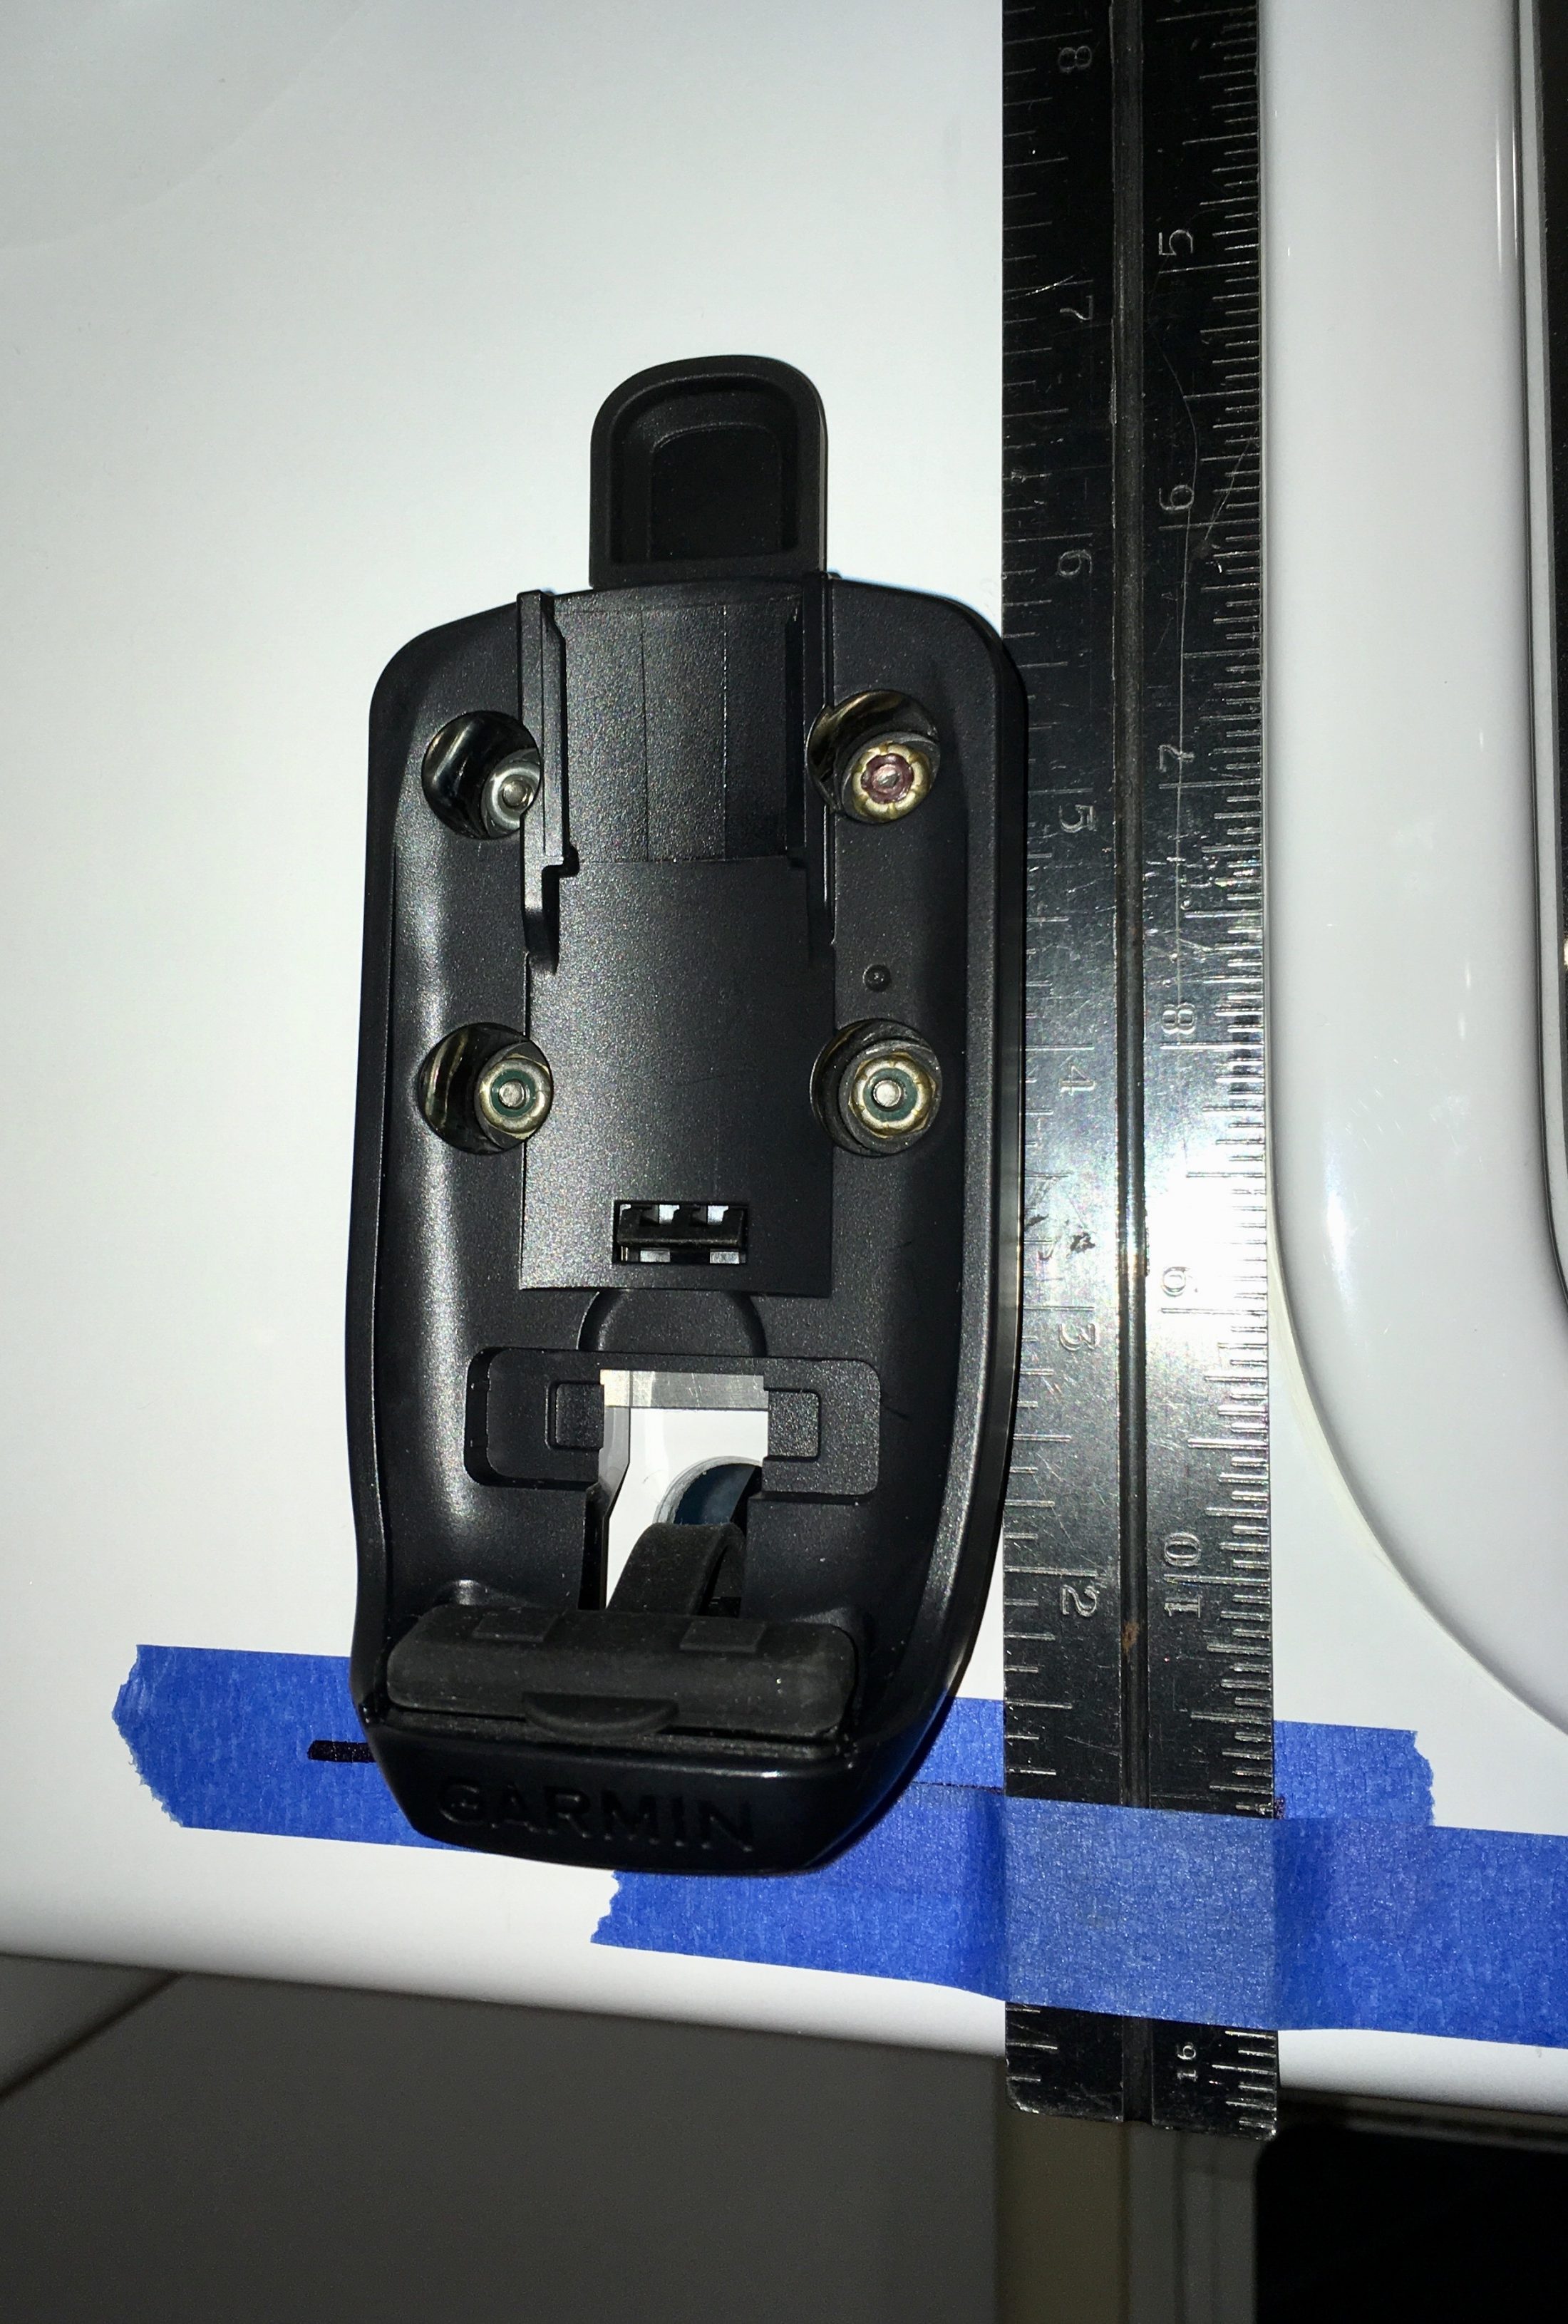
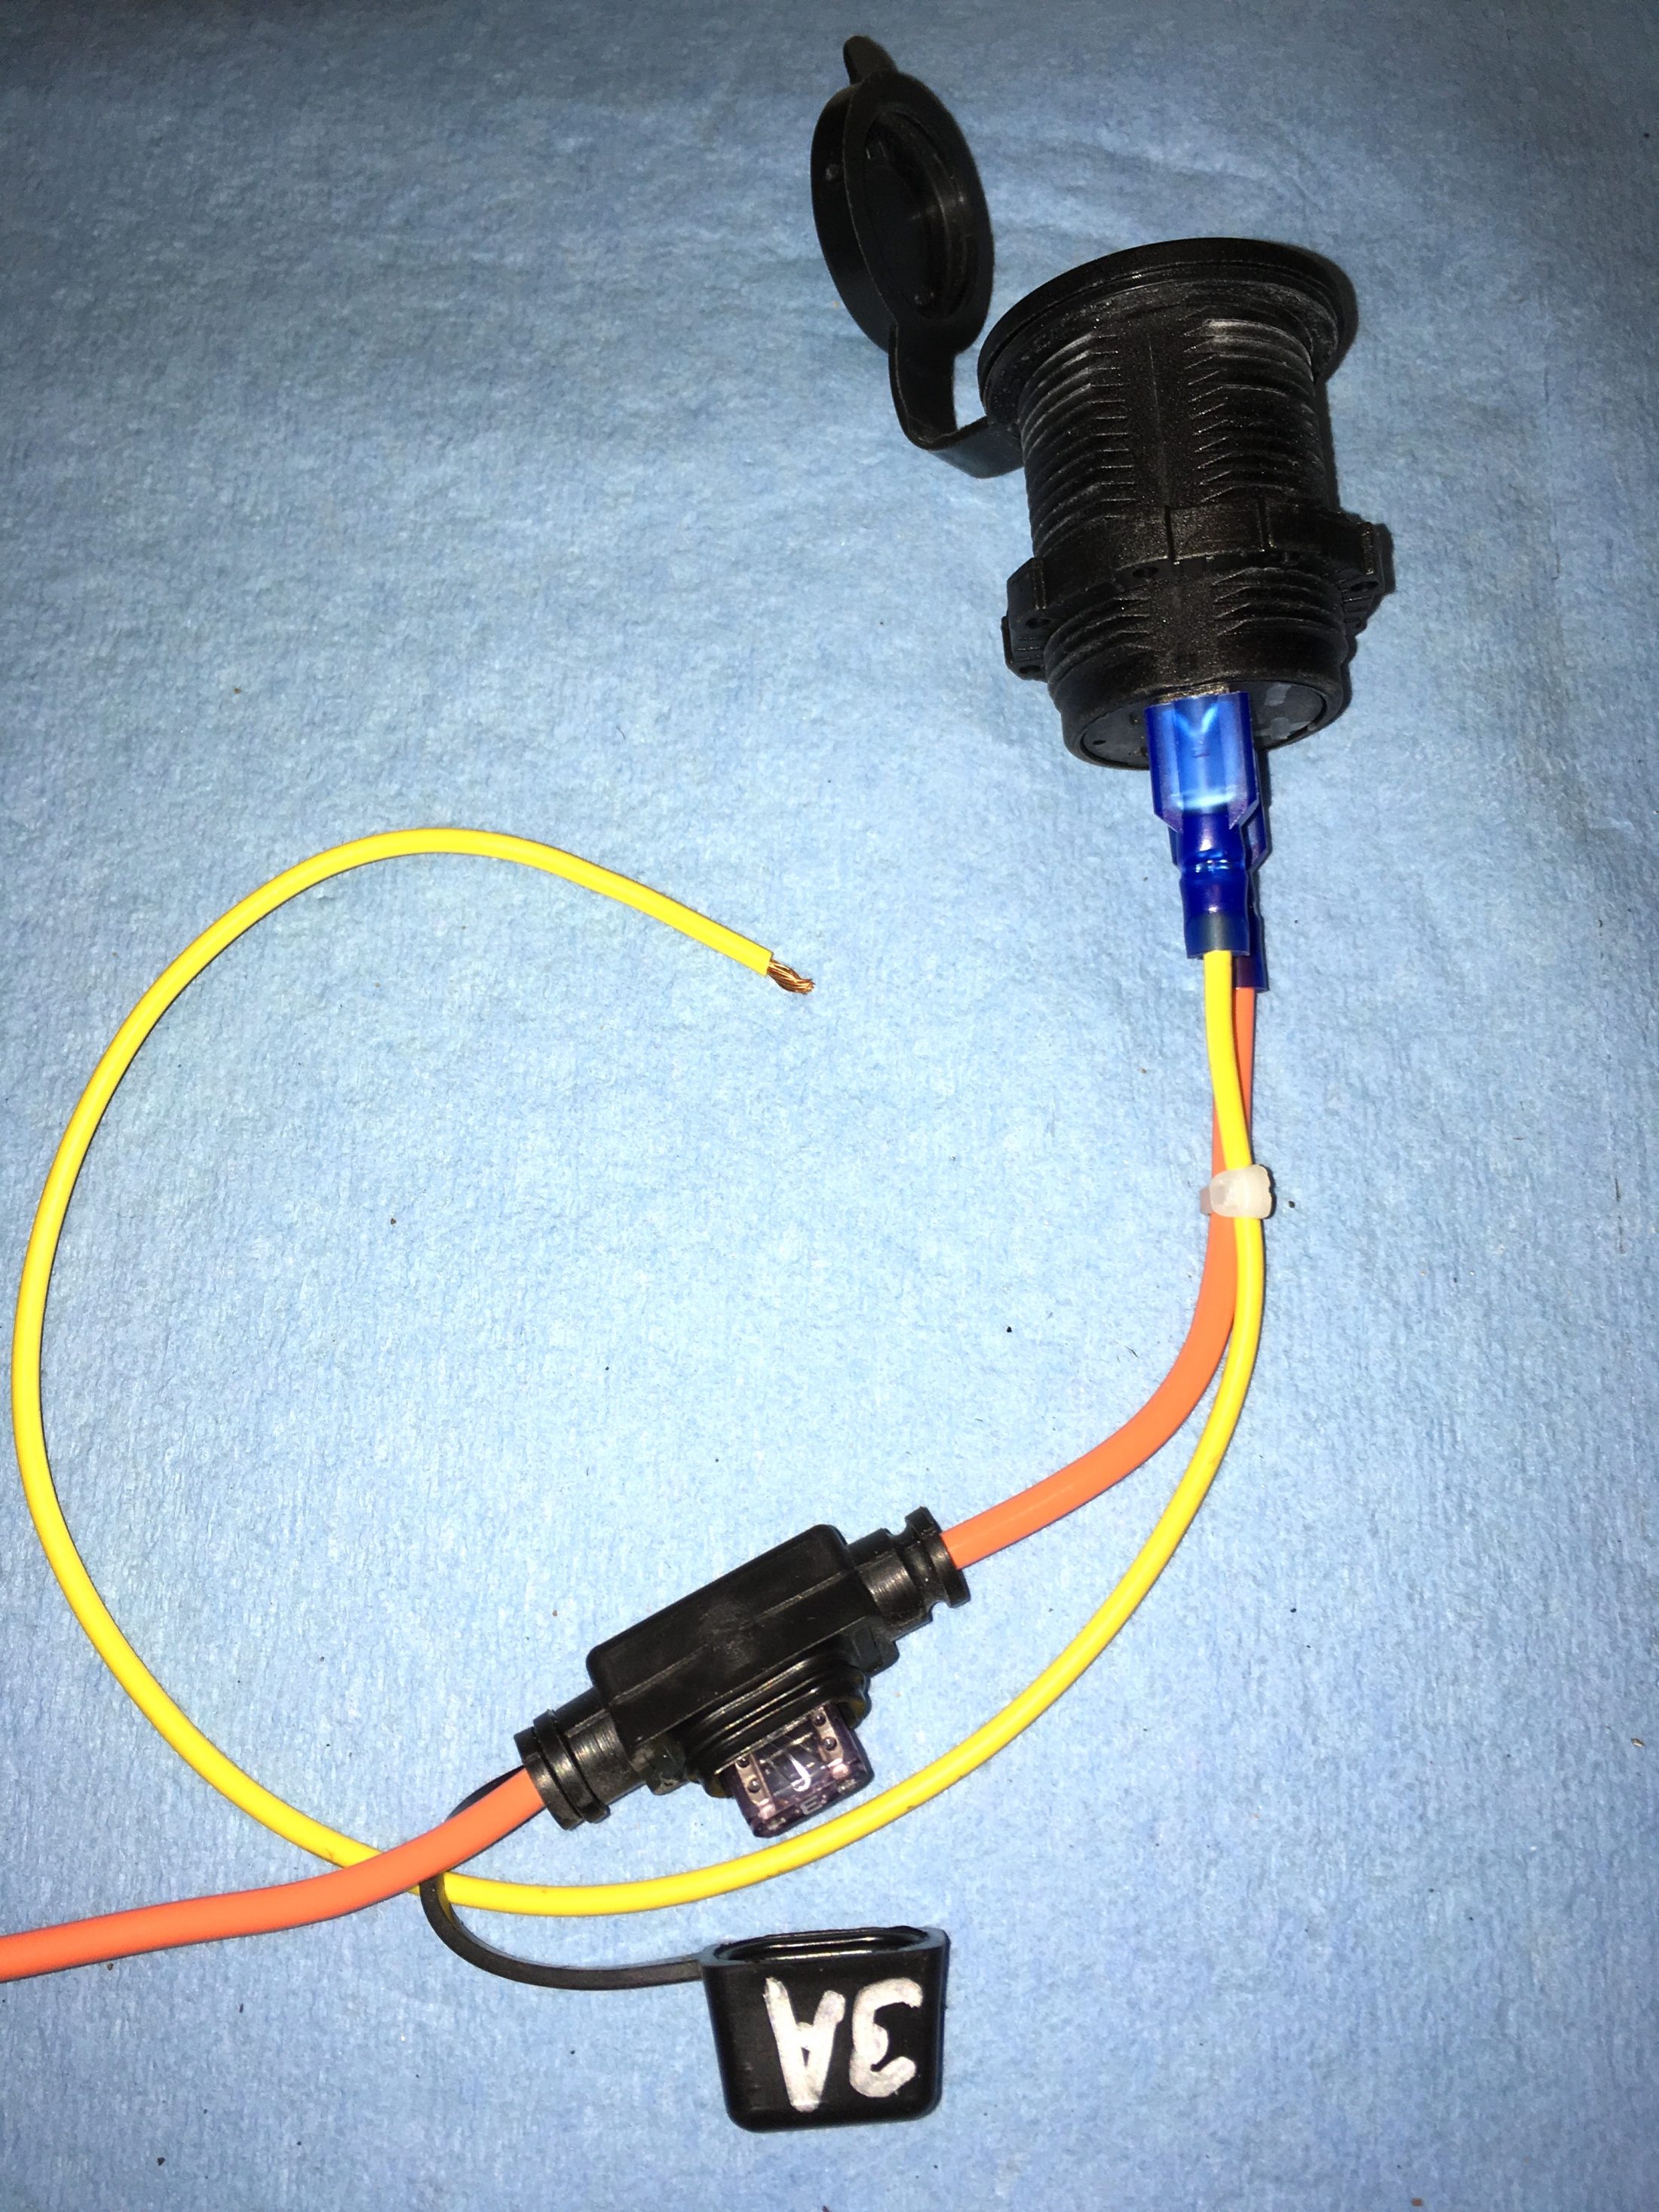
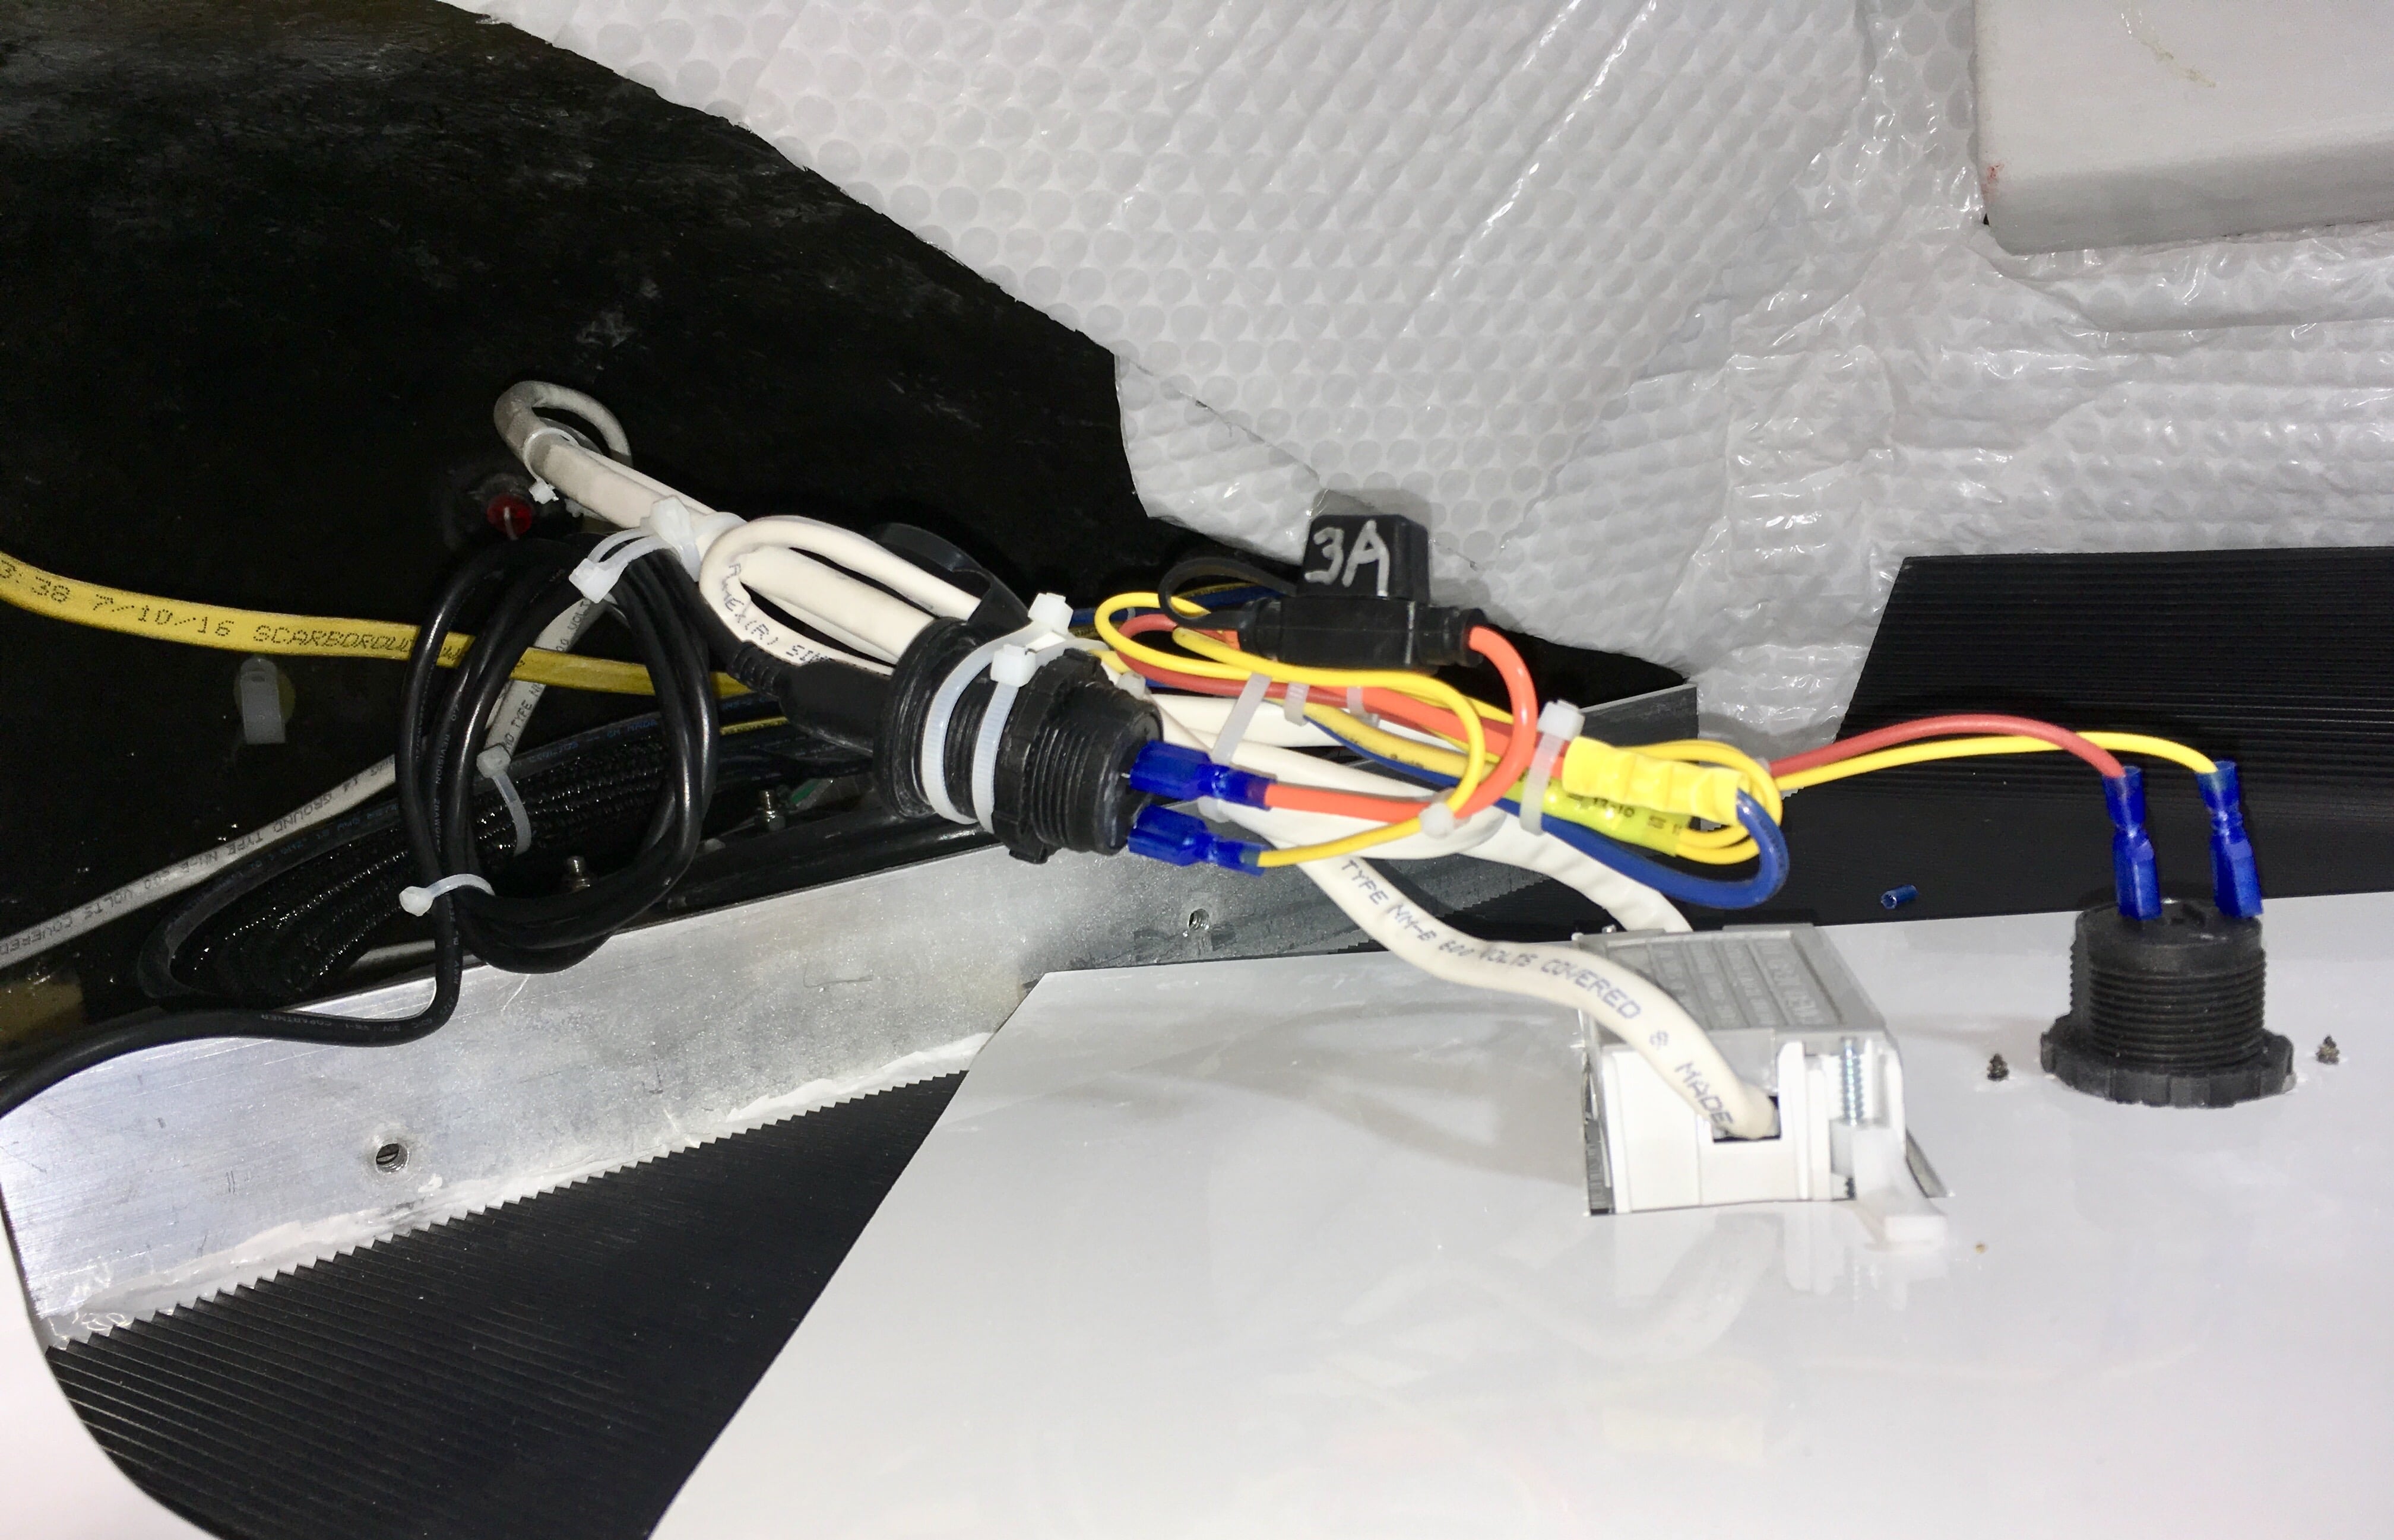
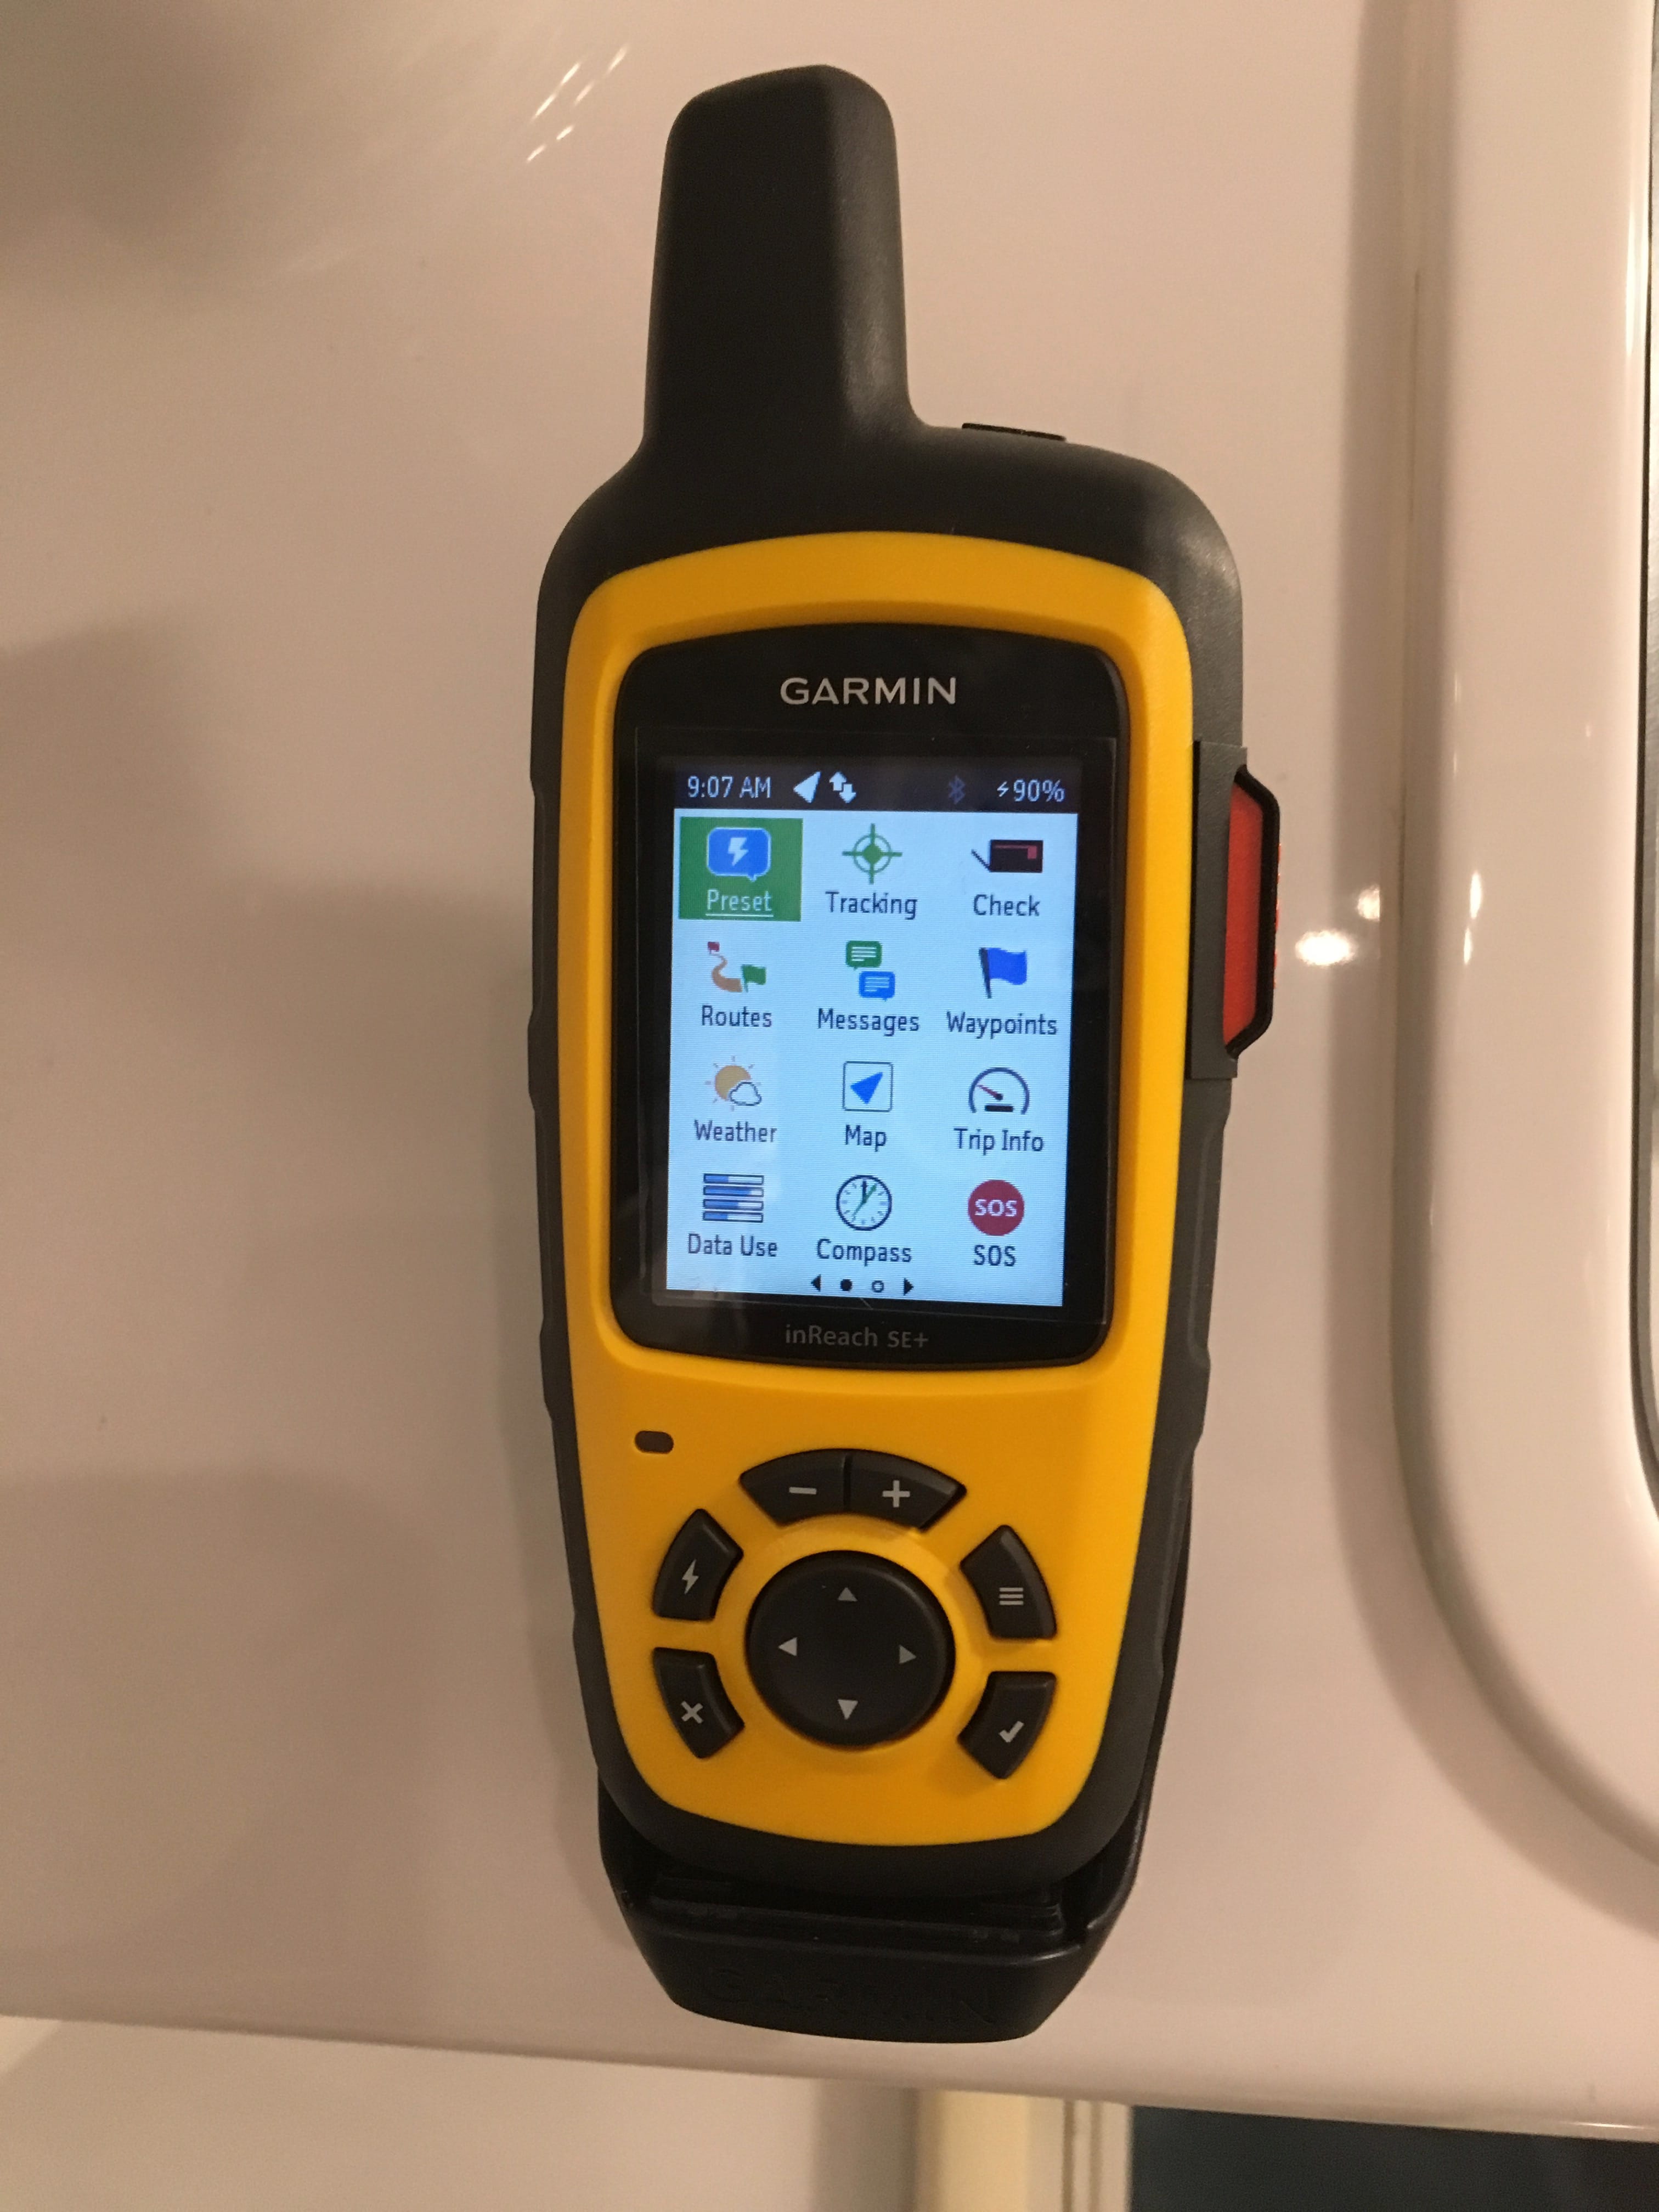
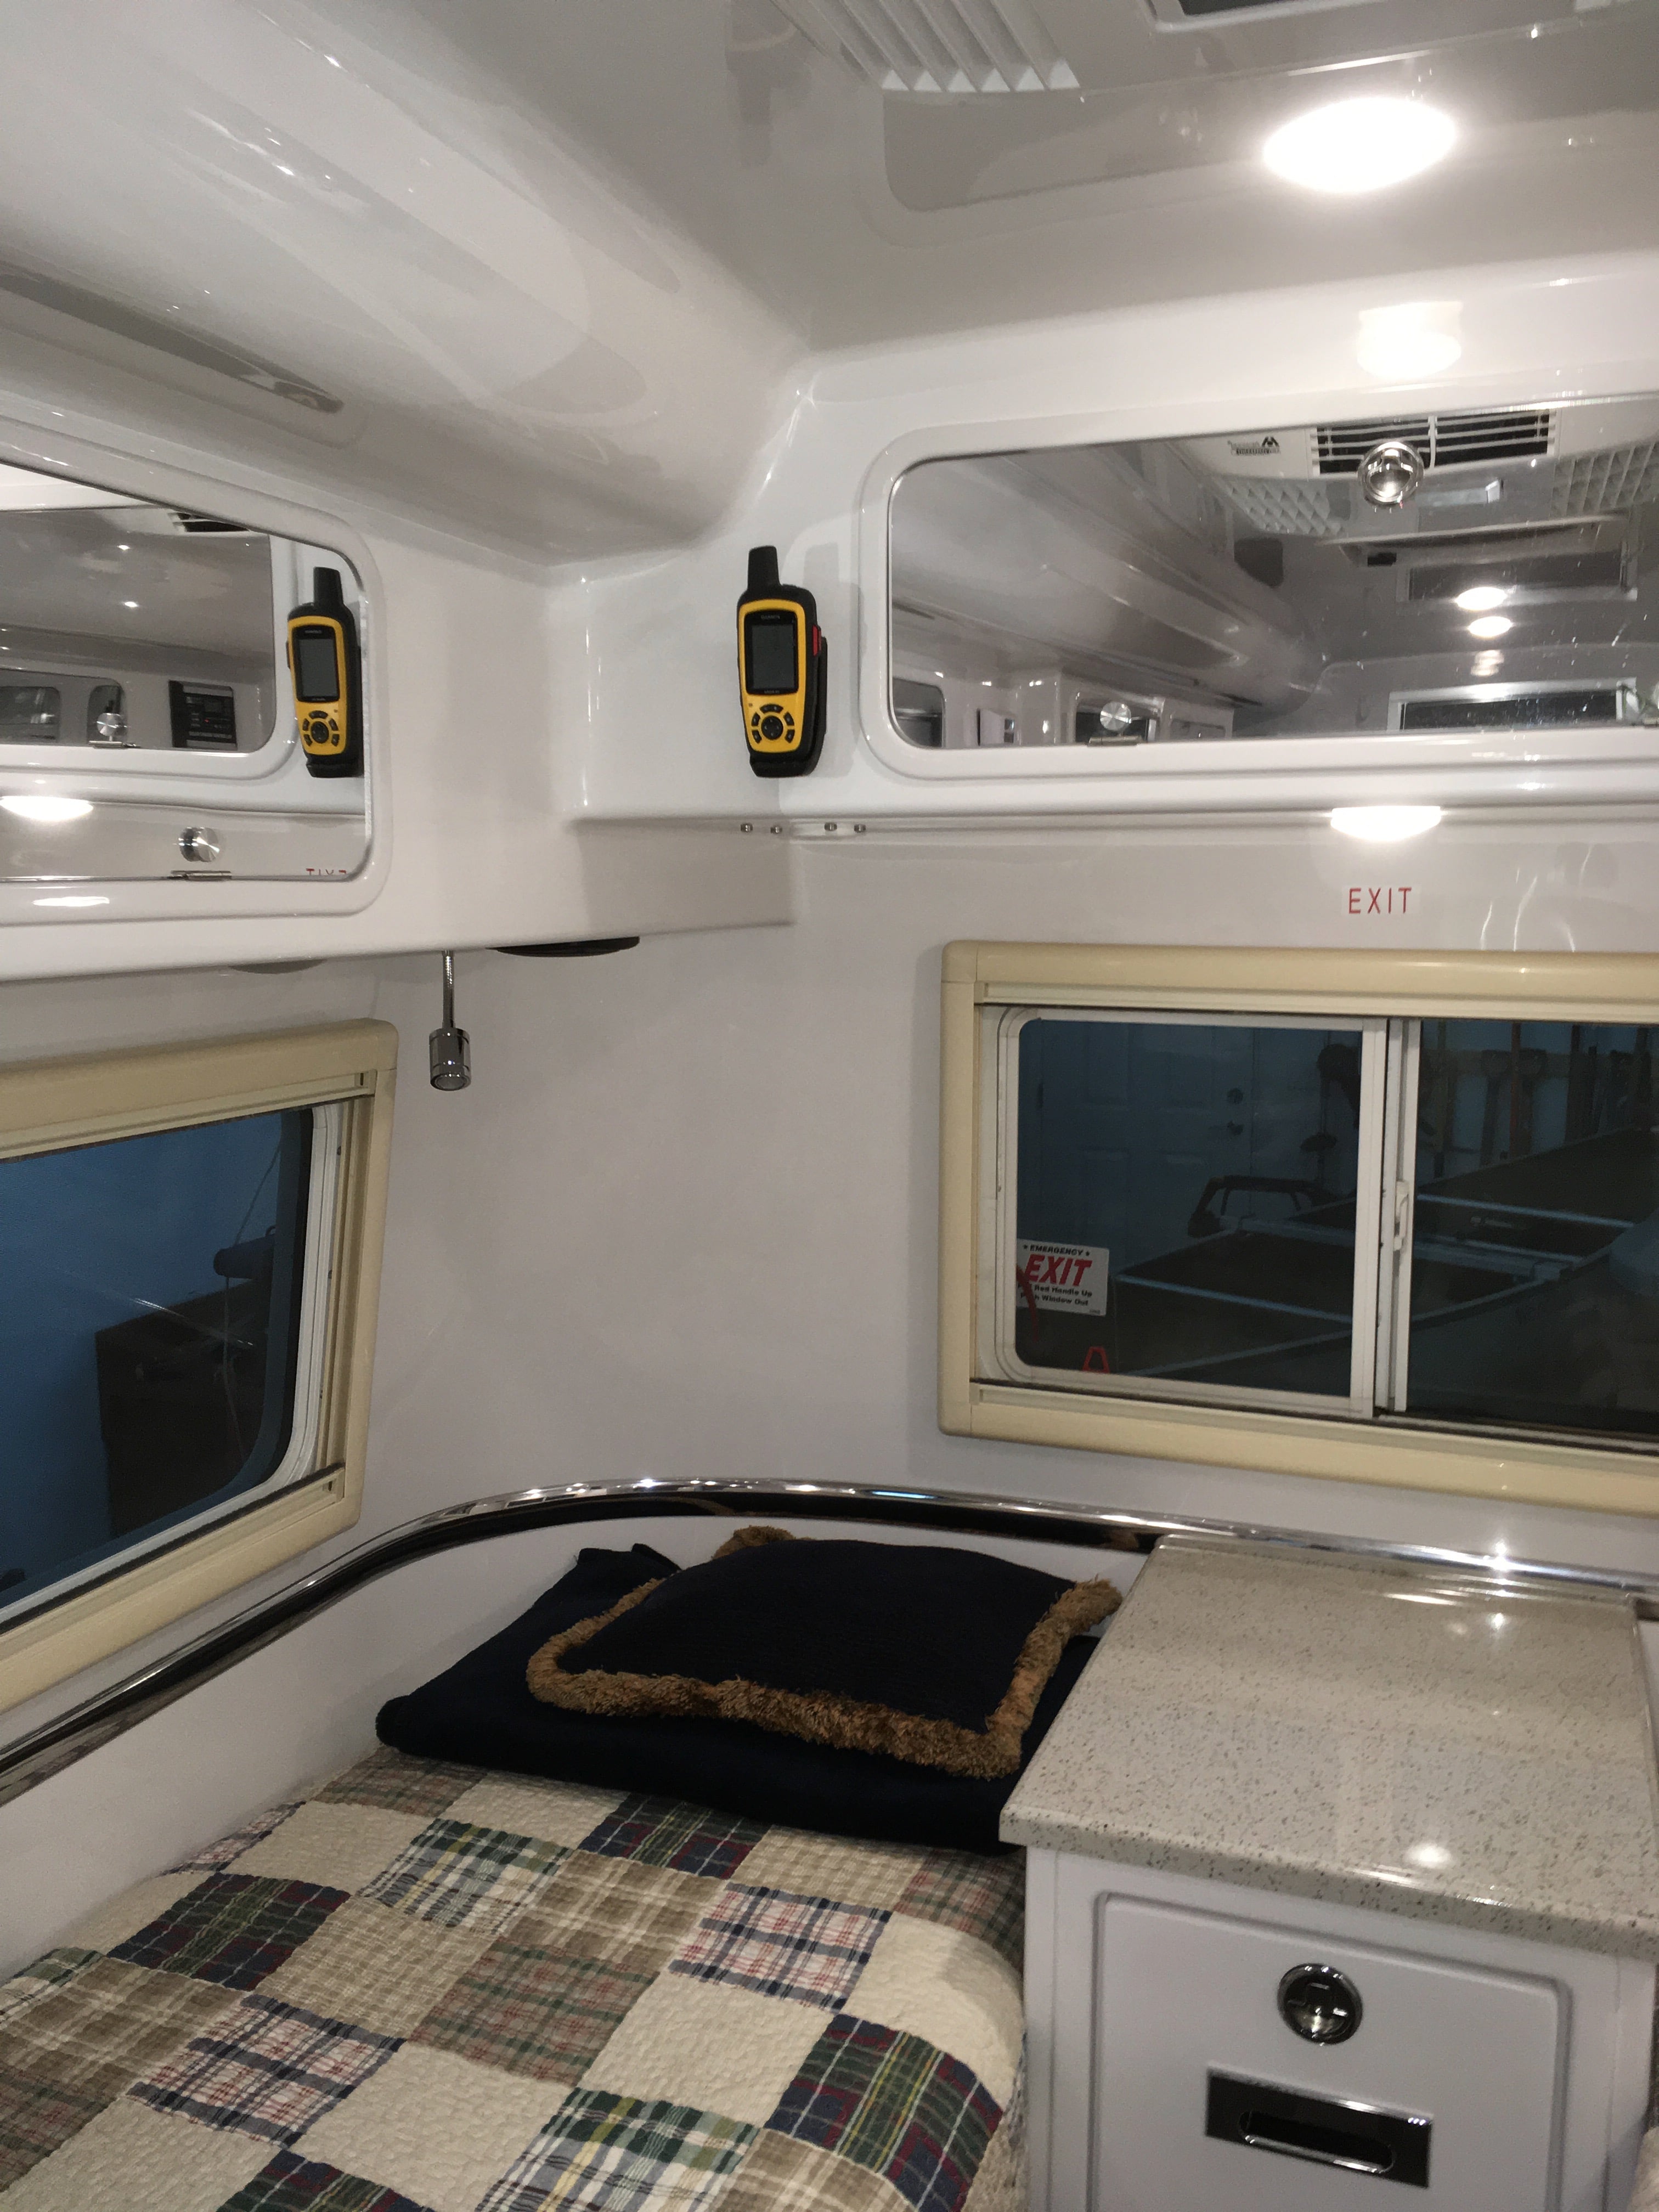
I spend a good amount of time traveling and camping way off the grid, where I have no cell signal. I have been using a SPOT ever since they came out, but I finally decided that I need more capability. The SPOT works great for continuous tracking while riding a motorcycle, but it is very crippled for sending help requests and the plan has gotten extremely expensive. I replaced it with a Garmin inReach SE+, so I can send and receive short text messages, send an SOS, and actually communicate real time with rescuers. It also links to the Garmin Earthmate app on my iPhone so I can use the phone to do stuff, such as access my Contacts. It provides great peace of mind and the basic plan is very affordable, and WAY less expensive than any sat phone. I am on the Freedom plan, and can suspend my monthly coverage if I want to , with no penalties. No mandatory annual subscription! I discovered that the inReach doesn't need to be outside, the fiberglass roof of the Ollie is completely transparent to its signals. I do think that the major appliances and pots and pans might get in the way, so I decided to install the powered mount at the back corner where it is easy to see and reach, and it can communicate from that location while it is charging. Normally a message will go out in under a minute, but sometimes it may be as long as ten. I needed clearance on top to lift the unit up and out of the cradle, and it needed to be positioned where I could route the USB charging cord into the upper rear compartment, so I could power a USB charger from the existing 12v round charger circuit... just to the left of the cabinet door frame looked ideal. I made an adapter plate from thick aluminum and screwed it in place using 6-32 stainless hardware: I taped a steel ruler to the frame, to act as an alignment jig. I was going to be spending hours looking at the mount from my bed and did not want it to be crooked! (Like my wonky rear window...) After adding 3M VHB tape, I stuck it in place: I took the factory installed Blue Sea USB low power charger from its location above the curbside bed, and wired it up: And spliced it into the existing 12 v system; That circuit stays hot all the time, and the inReach will charge whenever placed in the holder. It is easy to see from the galley or either bed (we sleep head to front) and it is easy to grab, and unsnaps from the mount with a flick of the safety catch. I have ordered an UNLIT USB high output dual charger for the empty hole over my bed. That will be a future thread. https://smile.amazon.com/gp/product/B01MRZ9ATL/ref=oh_aui_detailpage_o02_s00?ie=UTF8&psc=1 https://smile.amazon.com/gp/product/B01N2YKO3L/ref=oh_aui_detailpage_o02_s00?ie=UTF8&psc=1 John Davies Spokane WA
1 point
-
Speaking of Checklists: Here are the checklists that we use when setting up and breaking down camp. Liz takes care of the inside, while I work on the outside. We keep the inside lists on a clipboard in Ollie and the outside lists on a clipboard in Stan (our Tundra). So far--knock on wood--we have avoided major--expensive or dangerous--errors. They are composed in MS Word. Feel free to download and modify. P.S. "Hank" on the checklist is our dog, who is secured with a "seatbelt" in the backseat of our Tundra. Also, we have the Nature's Head composting toilet, so no sewer hose, etc., is mentioned on the lists. --Jeff Breaking-Up-Camp-Checklist-OUTSIDE.docx Breaking-Up-Camp-Checklist-INSIDE.docx Setting-Up-Camp-Checklist-INSIDE.docx Setting-Up-Camp-Checklist-OUTSIDE.docx1 point
-
Hi & Welcome Spike & Liz :) You can find ladders and a bunch of accessories here - https://www.amazon.com/gp/registry/wishlist/DVETVI1ZF5E8/ref=cm_wl_sortbar_o_page_2?reveal=all&view=null Then as far as recommending things, the very first recommendation that I have is buy this https://www.amazon.com/dp/B003YJLAIK/ref=wl_it_dp_o_pd_nS_ttl?_encoding=UTF8&colid=DVETVI1ZF5E8&coliid=I2LDTOZB66F2O6 This way you can regulate the water to the level of pressure that you guys want. Then the list above has a lot of stuff that we use. As far as options, I would definitely get the Truma Hot water heater, Dexter easy flex, most definitely the built in inverter for blow driers, microwave, etc. The thickest mattresses they offer, the propane outside quick connects with the 30lb propane upgrade and at least the 4 - T105 batteries with the Solar. This way you will never be restricted to using a generator or needing to stay in an RV campground for power ever. We also bought the Rhinoflex that is in the Amazon list, the Magma pots and pans and the cooking utensils that we have used for a few years. Plus you will at least want a sewer slinky to put the hose on top of. These are our every day recommendations that really work for us.1 point


-
Recent Achievements
-
")


")


")

