Leaderboard


.thumb.JPG.dd838cdb3df463dab6a16861fa23a319.JPG)
Popular Content
Showing content with the highest reputation on 12/19/2020 in all areas
-
Oh the irony! 🙂3 points
-
Our third taillight has had its issues over the 13 years, requiring resealing every 3 years or so. This year, it developed some hairline cracks, as well. We decided to remove and replace the lens. Ours was held mostly by (probably 4200) adhesive, and a few dabs of epoxy. The adhesive loosened with a heatgun on low in the attic, and a plastic scraper. The epoxy was mostly mechanical, plus heat. And not fun. We broke the lens in several places removing it. We installed the new lens from Oliver with a bed of grey butyl tape. Since that's not truly an adhesive, Paul added 6 small stainless screws. We felt pretty comfortable with the addition of the screws, since butyl is pretty much self-healin, self-sealing. After a couple days for the butyl to rest, he applied loctite marine to the exposed edge of the trimmed butyl, to protect it from uv and dirt . Today, we added a lip of eze rv gutter on the eyebrow, for good measure, extending beyond the length of the bottom of the trapezoid lens. I can't tell you for another 5 or 6 years if this is a better solution, but I'll be able to tell sooner if it fails. We'll see. We're both very happy with tried and true old school butyl as window and hatch bedding.
 2 points
 -
A number of years ago, prior to finding Oliver, I was camped in Yellowstone National Park. Unfortunately I got up one morning and found that my battery was almost dead. Not having a generator nor solar panels I was left with the Toyota Tacoma and its convenient outlet at the rear of the truck which produced 110v power. I did have a smart charger with me and in a matter of minutes I had everything hooked up with my battery soaking the juice in. About that time there was a knock on my door - it was the camp host. He informed me (which I already knew) that generators were not allowed in that campground. I explained that I was aware of this, but, this is a vehicle at idle - not a generator. Unfortunate for me, his definition of a generator was different from mine. Later, in thinking about his definition, I understood. Perhaps I was a bit quieter and perhaps a bit more discrete but, indeed, I was using my truck as a generator. At least in some camp grounds JD's potatoes will not be needed. Bill2 points
-
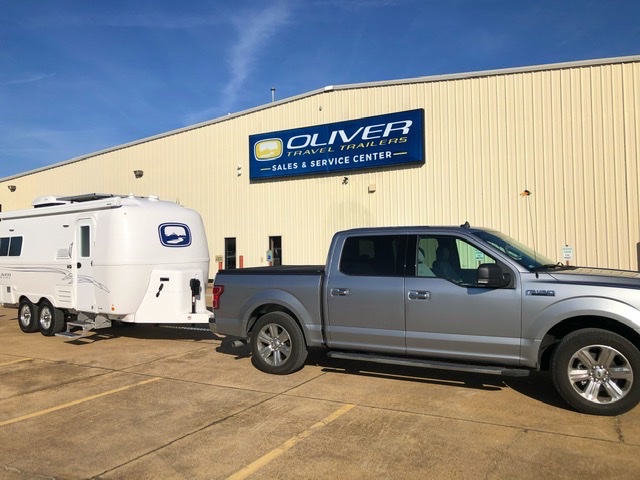
Hello All! Thanks for the warm congratulations. We’ve made it through the newbie gauntlet! (High praise for Tucker!) This included the major face-palm moment when we realized that the “tow package” on our new F-150 did NOT include a trailer brake controller. We went down to David Crockett for the night. So peaceful... beautiful sunset through the silhouette of bare trees. Luckily, the guys at Oliver helped us find Darin Runions in Hohenwald who could install a controller on Friday morning. This pic was taken mid-morning Friday since we stopped by to ask a couple more bone-headed questions (What button do we push? What light comes on?). We think we’re going to name her Heart-A-Lee... a nautical nod to our past and the yawl we sailed for many years and the voyages we keep in memory... Ready about...Hard a lee! Thanks especially to George for the photo of the prototype. Chuck Macatee was a large influence in Zef’s openness to new adventures and self-reliance. Z’s amazed you could still fly that lady in 2003! We plan a few shake-down cruises before the hoped-for trip to see our son in Denver...late spring. Looking forward to running across you all some day...we signed up for the NOT A RALLY in May. Zef and 00na # 707 Heart-A-Lee
2 points
-
John, Maverick modified his tray locking system, but have not modified mine. Making repairs to my battery tray right now. JD's photo looks like a good idea.2 points
-
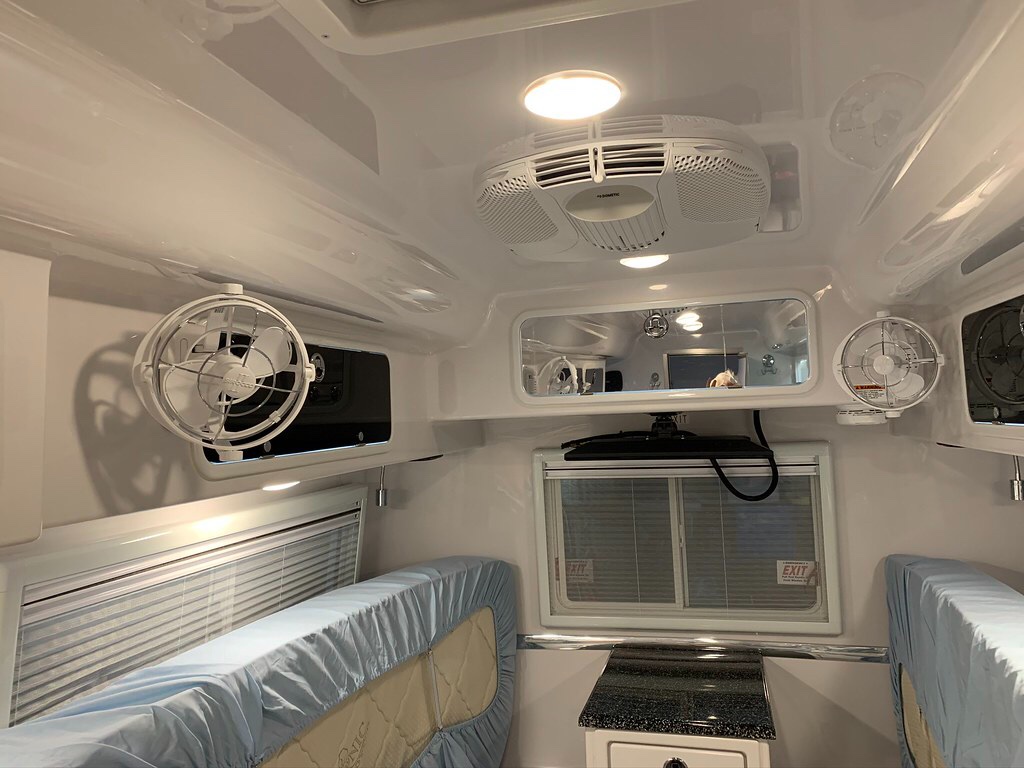
Anyone have a fan solution for the Elite II twin configuration where each twin bed has its own dedicated fan, preferably with remotes? Perhaps an odd request, but there are limits which must be addressed in order to maintain a more perfect union, establish justice, and insure domestic tranquility. David1 point
-
I don't own a drone but I've been impressed by various videos shot from them. It sure is impressive what these drones can be made to do. Happy Holidays! Bill Drones.mp41 point
-
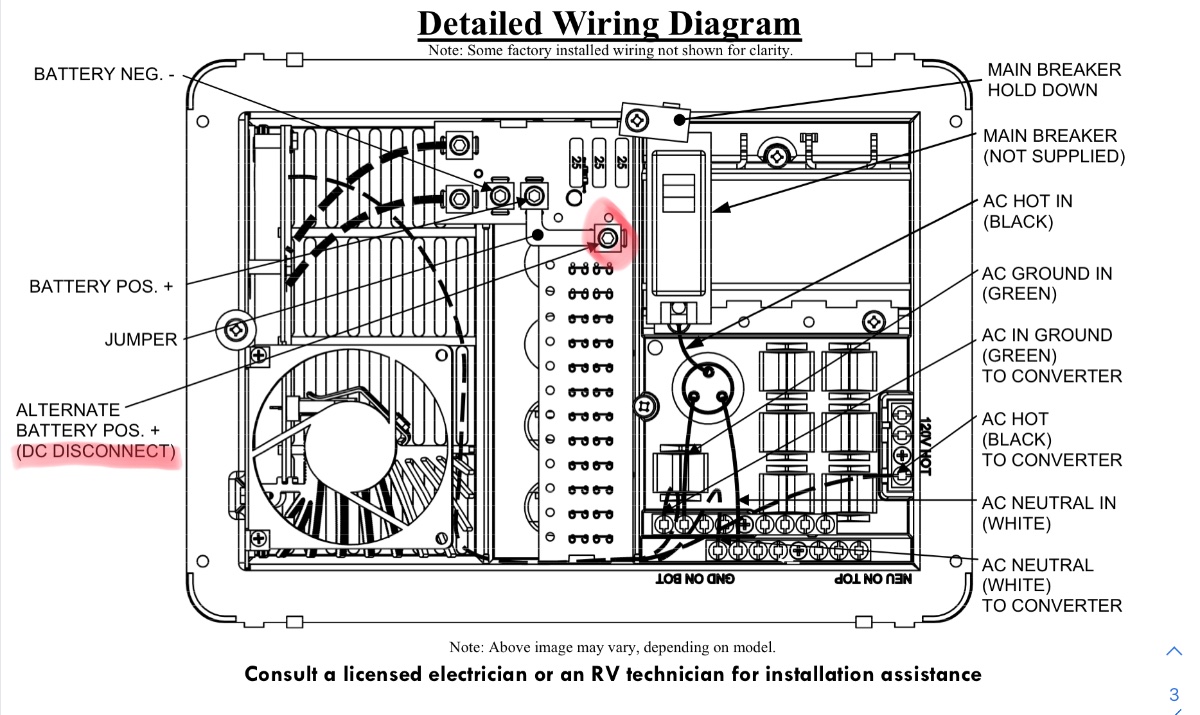
From what I read, the BTV (internal to the Victron battery) controls the cell imbalance. The charge/discharge rate protection offered by the BMS relies on communication to the Victron charge and load controllers. I believe that you are correct in that the PD controller lacks the ability to be controlled by the Victron BMS. However, you might leverage the DC disconnect relay. If I am understanding the Victron setup correctly, a fuse between each battery would be prudent. I am not sure why Victron chose to design their system this way. The Battleborn BMS is an internal battery device and performs temperature control, balancing and charge/discharge rate protection.
1 point
-
Mike - If you liked that - try this one. I don't care for some of the music, but, that is what the mute button is for. Bill WalMart drone show December 5, 2020 p.s. fast forward to about 2:37 for the start of the show.1 point
-
Yesterday I was doing some initial planning for my 2021 Western fly fishing trip when I stumbled on a "problem" with converting formats for GPS coordinates. While I don't know or even care about the various names of the several different types of GPS formats that exist, I've always assumed that when converting from one to another (there are numerous programs for this purpose - just Google it) the results of the conversion would result in a location that is reasonably close to the original location. Unfortunately, my results yesterday for one particular location that I have been to before were 200 to 300 yards off. For most purposes this magnitude is really not all that important. However, I can see certain situations where this could result in "problems". This is the example I was dealing with: In Google Maps, the coordinates 43.456592, -109.547743 will result in a nice boondocking spot right on Torrey Lake which is located east southeast of Dubois, WY. In order to get this coordinate into my new Garmin 890 (or any Garmin for that matter) I had to convert this decimal coordinate to the "old" degree, minutes, seconds format that Garmin uses - yes, I'm aware that Garmin can use several different GPS coordinate formats but the decimal format is not one of them. So, using a converter I got N 43 degrees 27 minutes 23.731 seconds, W109 degrees 32 minutes 51.874 seconds. When entering these coordinates into the Garmin, the result on the Garmin map is a location 200 to 300 yards further to the east northeast as compared to the Google map location. This result is close enough for my purposes and would even be sufficient for anyone that had never been there before because it is obvious where to camp once you get close. However, close by at Google map coordinates: 43.446988, -109.543162 there are some petroglyphs (just up the hill mostly on the west side of the rocks) that simply would not be found if one was 200 to 300 yards away. At first I assumed that the difference between to two formats was caused by Garmin's only accepting two decimal places under the "seconds" and I had to round off that last digit that the converter gave me. But, that is not the case as I found out when trying to force the Garmin format to be more precise in pinpointing the exact location I had identified using Google Maps. I have not nor do I really care to reverse this experiment since for most (if not all) my purposes either Google Maps and/or Garmin will get me "close enough". But, at least now I know that there is an issue here - be careful. Bill1 point
-
I have not had time yet to read your reference material but I believe that Victron recommends a fuse on each battery to prevent an issue with battery imbalance. This can occur when installing batteries with different charge states or if some "event" happens while the batteries are connected in service. If the batteries are not balanced, there can be large current from the higher charge state battery to the lower charge state battery. A BMS board should limit this current, as would a fuse. From the images posted here I do not believe that Oliver is fusing the two LifeBlue batteries. Someone would need to verify this. Mike1 point
-
Interesting! Mine seemingly works out of the box with decimal notation but I'm glad you found something that works! My result with your location: If that is in fact the location you're attempting, the only thing I've done is update the device a few times while connected to wifi.
1 point
-
Jairon - THANKS! However, it is a slight bit more complicated than that. First I had to change the "coordinate format" and the "datum" to "h ddd.dddddd" and "WGS-84" respectively. Once that was done and "saved" I was able to do as you suggested and the location in Google Maps and the Garmin are very close. Bill1 point
-
Some of the newer Garmins accept decimal degrees for those that might have them. Edit: I just saw you have the 890. Try decimal degrees again. Format: 43.456592, -109.547743 I'll test again to make sure once this huge map update completes.1 point
-
Russell, I am with you on the KISS side of the argument: Keep It Simple Stupid. I even have that as a prominent sticker on my home tool chest..... I wonder how an F150 owner will feel when an out of warranty inverter (or related component) failure rears it’s ugly head? Are these devices user repairable? The most expensive part on your typical Honda EU2000i is the inverter unit, a brand new replacement is $400+, with used ones costing a third of that. Installation takes a few minutes. I would like to see an illustrated parts list with prices and a labor flat rate chart for the Ford, please. There is bound to be some unpleasantness from close neighbors in the campground. I already carry a small dead-blow mallet for pounding stakes into the ground and for mechanical repairs. Maybe I will start carrying a couple of large baking potatoes. One plugging each exhaust tip would do the job I think. Add a little olive oil before installing and it would smell like French fries. 😬 Or maybe a bunch of party horns. .... https://m.youtube.com/watch?v=ht35P7GnvuQ Bah humbug. Stay well. Merry Christmas. John Davies Spokane WA1 point
-
We’ve had a couple of Tacomas, lots of miles and they still held their value. I was surprised both times at the trade in amount I got. I actually got more at the Ram dealer for my second Tacoma than the Toyota dealer where I bought it. Mike1 point
-
Interesting - a generator disguised as a Ford Truck. I find it amusing - as many seek out alternative means of energy to replace the old carbon based systems- too often the consequences of said "new clean" energy source are ignored. A turbo powered, carbon fuel based engine to power an inverter system - to supply the electrical current needed to run an RV, a worksite, a whatever - are are all wrapped in a package of coolness - labeled a hybrid - A pig with new age lipstick. I suppose one could use the PTO of a similar new age truck to mechanically run a generator/inverter - add some brightly flashing gauges, a few cool monitors depicting power usage - add a battery bank as a buffer (stored under the bed) Yes it would not be as efficient - but none the less - its the same thing - massive overkill in cost, and fuel usage. No luddite here - just a common sense, rational thinking human. It is a long and winding road. RB1 point
-
I ended up with a new one (2021). I had a deal on a 2017 with 34k miles for a bit less, but decided to go with new. I am not sure exactly how Covid has impacted the truck market, but I can tell you I found fewer trucks for sale in my search than ever in the past. BTW, I drove my Tacoma for two years, put 19,000 miles on it, and traded it in for $500 less than I bought it for. Weird times. I know the Tundra is dated (to say the least), but I am a card-carrying Toyota fan-boy, so in the end, it was easy for me to overlook its shortcomings. I am working to get it in shape and camping-ready! Bill1 point
-
I would hate for there to be no Tundra V8. The Land Cruiser is going to be gone here in the USA, and the Lexus LX will have that heavily boosted twin turbo hybrid 3.5 liter V6. The Sequoia will probably lose the big motor too.... I suppose the light duty trucks have to keep pursuing those improved miles per gallon numbers. I have owned either a Cruiser or an LX for the last twenty years. I will keep my present LC 200 until it is totaled, burned or stolen. At that time I will either look for a low miles used replacement 200, or perhaps get a Power Wagon. If the new Tundra were to be offered with a big motor, I might consider it, if I could also get the good off-roady stuff like locking differentials. I am a huge fan of big V8s. My wife drives a 1998 Lexus SC400 (290 bhp V8) what a lovely car and what a stellar drivetrain. John Davies Spokane WA1 point
-
I just posted my video to YouTube. If you search "Oliver Travel Trailers Factory Tour, Sept. 29, 2020," you will find it in my channel named "Kelley Custom Leather."1 point
-
The drilling was doing before installing the tray; but it could be drilled while still installed. Like you said just use a block of wood to prevent any damage during drilling.1 point
-
We were delighted when we found out our hull number was to be 707. In 1959, Zef’s godfather Capt. C. Macatee flew the first transcontinental US commercial 707 flight LA to NY. Could there be a more perfect coincidence? We’re ready for our flight!1 point
-
Maverick, Rivets are starting to loosen where the battery was impacting, found that issue today after removing the tray from Ollie. That could cause premature failure where bearing slides connect to the tray, too. Need to drill out rivets, then reverse and replace them. Already have various rivets, manual & electric rivet pullers. The battery strap hook can be replaced with a longer strap getting rid of the hook that can possibly damage the battery. Lightweight Lithium batteries sure would reduce stress on the battery tray.1 point
-
Ray & Susan - I've just looked into the "alternate route" issue and from what that quick look gave me it appears fairly easy. Take the route that is calculated and then save it. Bring up that saved route and a list of the start, end and all stops in between will come up. Touch the wrench in the upper left hand corner of the screen and then chose shape route or route preference. You can then touch the map to draw around sections you don't want to see or chose dirt roads or shortest route (mileage wise). I've not found a way (yet) of getting it to show several alternative routes on the same screen in the manner that Google maps does. Bill1 point
-
BlueHighways - If you plan on hardwiring your Garmin after you receive it, please drop me a PM and we can talk about getting that job done without cracking, denting or otherwise destroying any of that nice plastic that is your dash. Ray & Susan - I've not used the "alternative route" function on the 890 yet. But, I'll take a look at it soon and send along any "wisdom" that I can. Bill1 point
-
Bill, what a nice installation, it looks slick! FYI about map updates, do them often. They come out about every three months. When installing, look at Options and choose to install a copy on your computer. Their BaseCamp PC or Mac mapping application works pretty well for a free app, but any updated maps have to go onto your computer as well as your device. https://support.garmin.com/en-US/?faq=vxmflP3DAk2ajAJSmzVSW6 Map files are huge, try to delete older ones off your computer rather than just letting them accumulate. The new one that goes onto your device over-writes the old one; NOT so with the ones that go onto your home machine. Also you can add a few “custom” map types to your device and to BaseCamp, like 24K state topographic maps. These have to be downloaded from another site like .... https://www.gpsfiledepot.com/maps/ .... and then loaded using the Garmin Map Install app. https://www.gpsfiledepot.com/tutorials/ John Davies Spokane WA1 point
-
I agree, the Sirocco ll fans are tops! I did not want a permanent mount, so I used heavy duty Velcro to secure the fans (His and Hers) in optimum locations to maximize their use and be more obscure. One over each bed at the cabin rear and another curbside at mid-cabin (see pic) to better serve the galley and dinette areas, as needed. If you look closely, the white Velcro to secure the rear curbside fan is hardly noticeable. The fans are stowed in the attic when not in use or underway. I did alter the wiring to facilitate use of the 12v female lighter sockets of proximity. The rear street side fan cable loops through the cord hole servicing the TV to the socket in the attic, and for now the rear curbside is routed through the attic doorway until I make a hole to route it in similar fashion as the street side. I utilize the under counter socket above the cooktop for mid-cabin fan use. I installed DC 2.1x5.5mm female socket jacks and connected the fans’ stock power wire internally in each. I then altered two DC 2.1x5.5mm power plug extension cables by replacing the female end with a male lighter socket plug connector. This set up now allows for ‘plug and play’ versatility if I want to use the fans in my TV or an outdoor setting.
1 point
-
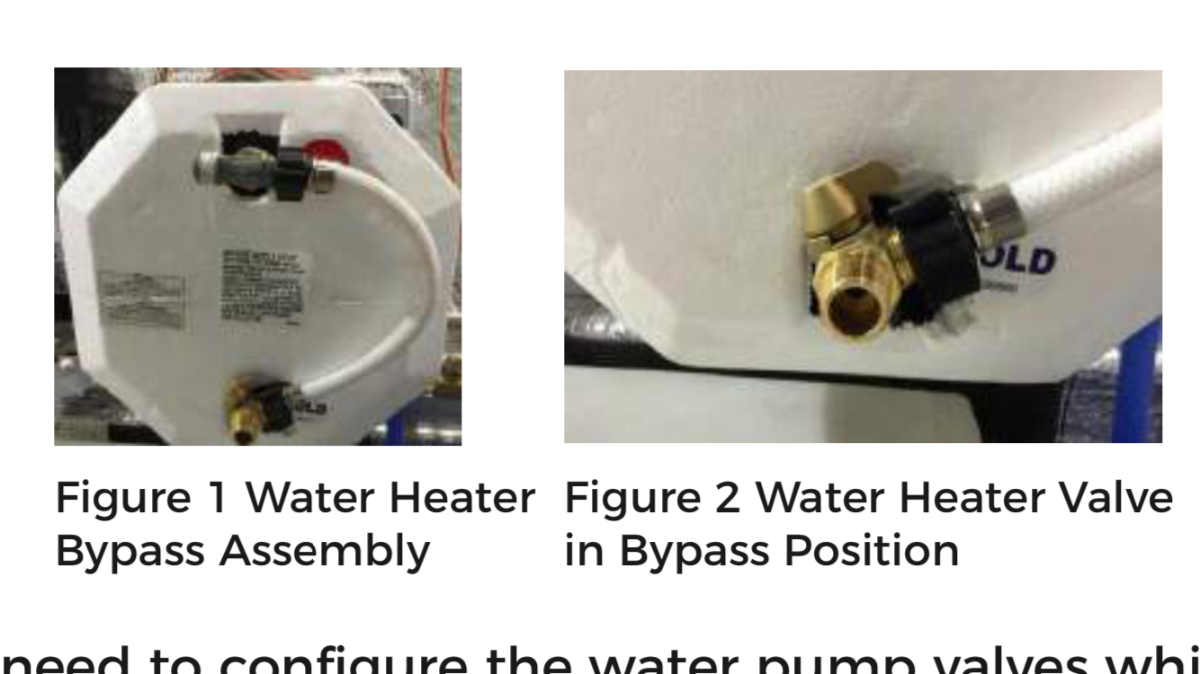
Most likely it is hidden from view by the silver air duct, carefully lift it out of the way, or just reach around it. On a 2020 it is the bottom valve. In bypass mode the water no longer enters the bottom port, it loops around to the outlet (hot) side. Have you looked at the Winterization section of your manual? John Davies Spokane WA
1 point
-
Kinda of tangential to this thread but now that I've been FT for 1.5ish years and had some time to experiment... Attaching shelves and similar to the walls... You can see the dollar store baskets I've been using for shelves above. I've tried a couple of things to attach them to the walls with no real luck until(!) now. I've been through suction cups, industrial suction, cups, command strips, industrial velco, and a combo of velcro and command strips without much luck. Temperature cycling in the winter really seems to do a job on the suction cups and if you go anywhere bouncy then the velco + command strips option eventually fails as well. The area that has been hardest is above the sink + stove where there's lots of moisture and temp changes. A possible solution? Yes: "Nano Tape". It appears as though Nano Tape may just be a trademark name for a particular type of clear, double-sided, directional tape. Aka: https://www.amazon.com/s?k=Nano+Tape&ref=nb_sb_noss_2 and in particular, the one I purchased: https://www.amazon.com/s?k=EZlifego&ref=bl_dp_s_web_0 There are some YT videos of this stuff with mixed reviews so let me tell you what I did. It appears surface prep is pretty important. 1. I roughed up the plastic on anything that I needed to attach to walls with a piece of fine grit sandpaper. 2. Cleaned and dried both the plastic basket/shelf and the wall with generic "windex". 3. Mounted the shelf. Press firmly! 4. Left it in place 24 hours before "loading" it up with the usual contents. So far both I've loaded the baskets up with sizeable salt and pepper shakers, spices, keys, pocket knives, cell phones etc to the point where I thought sure it would come off the wall the next time I pulled but everything has been holding up. No spills yet and it has been 2-3 months for the stuff above the sink.1 point
-
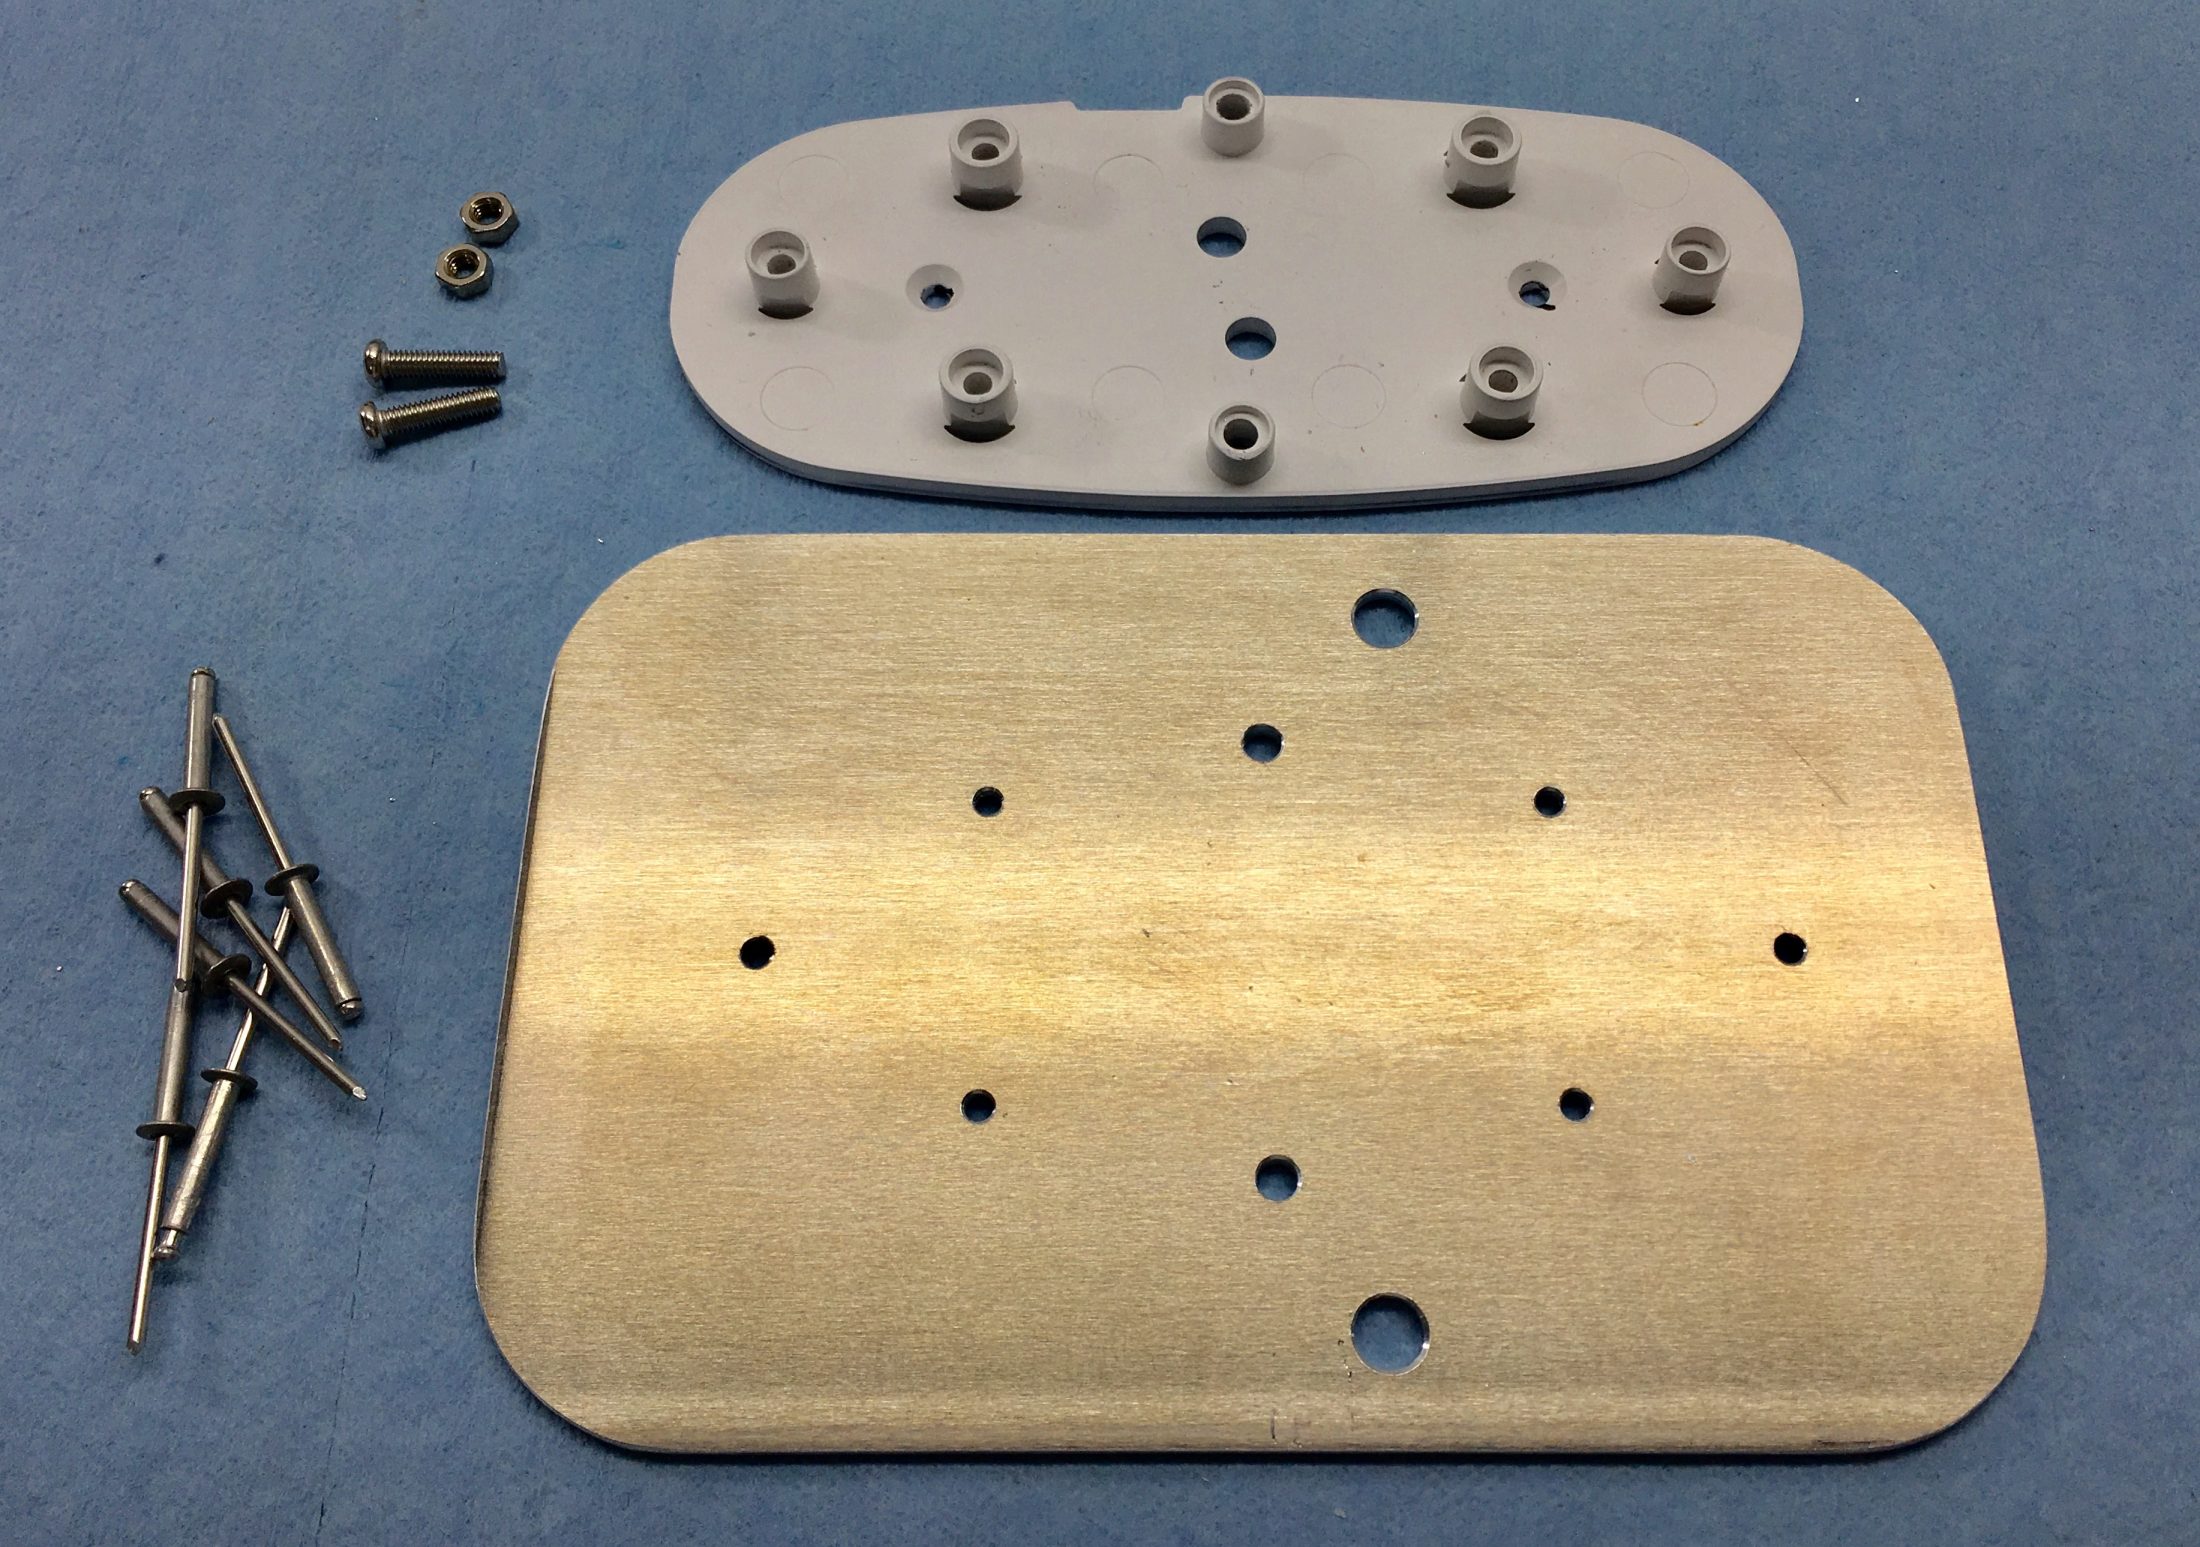
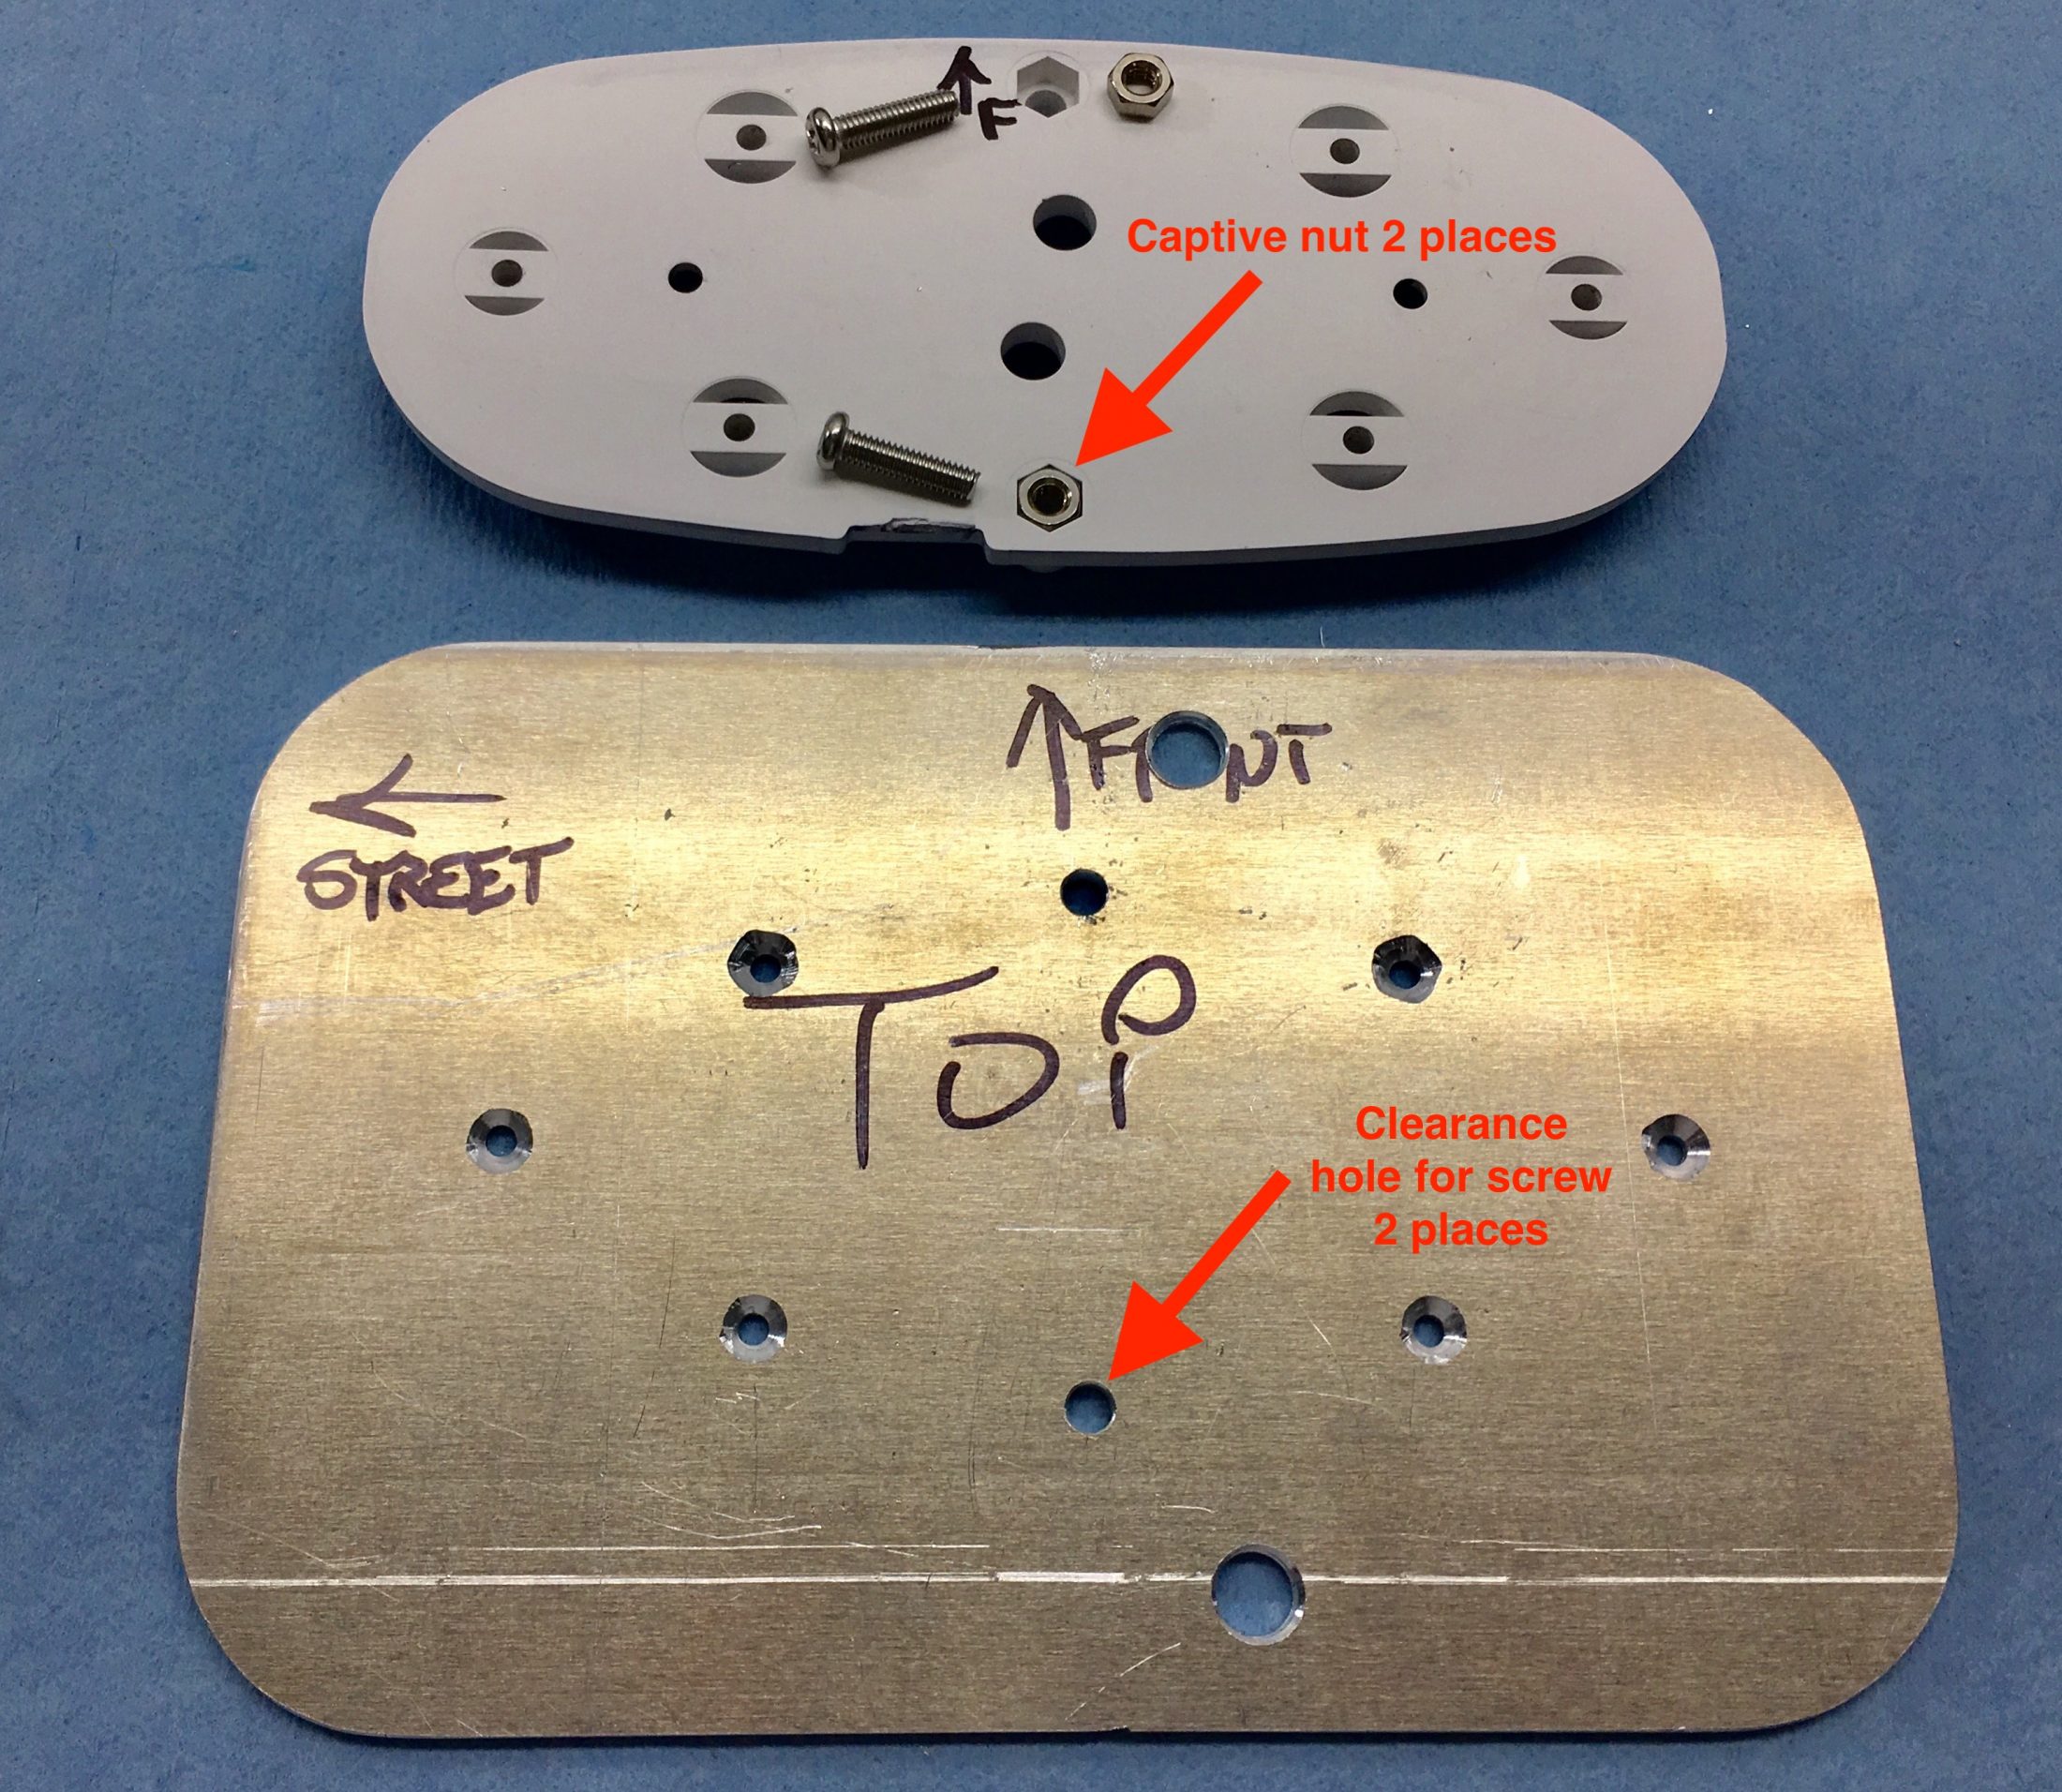
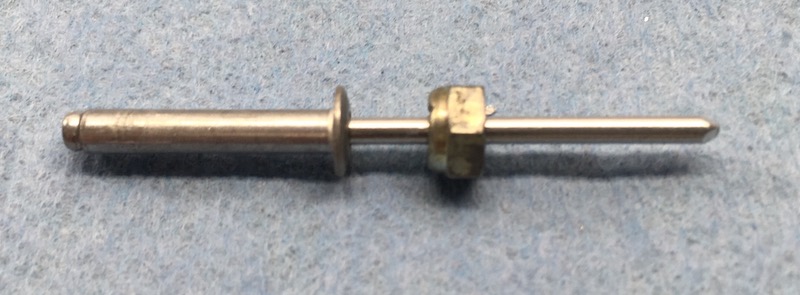
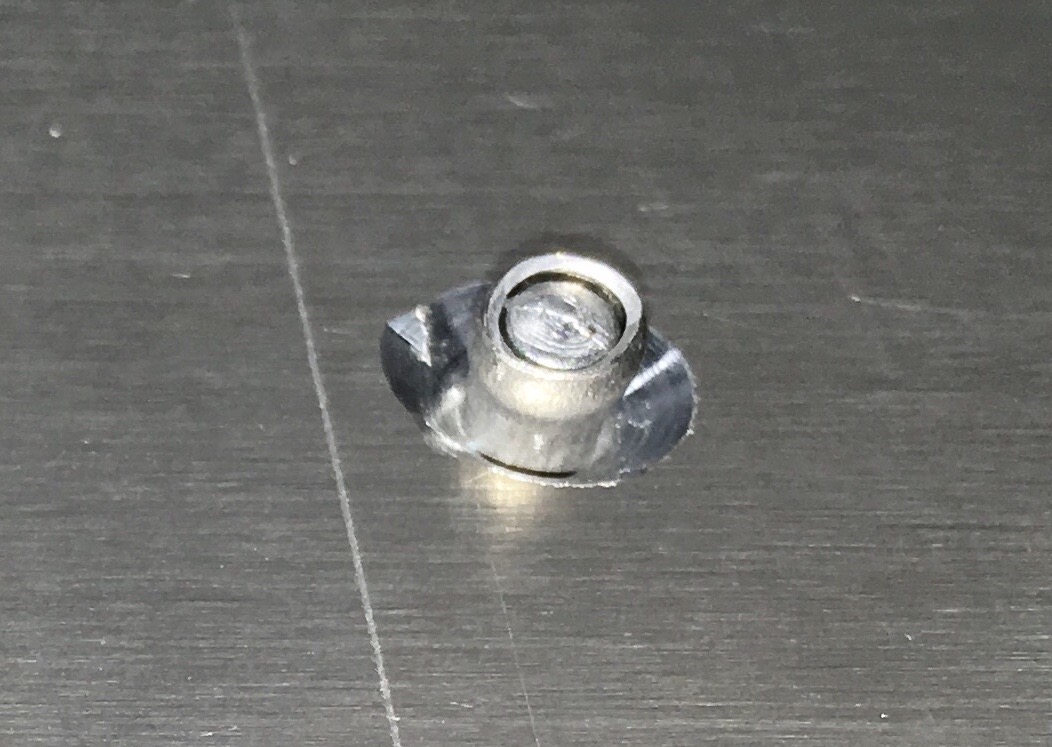
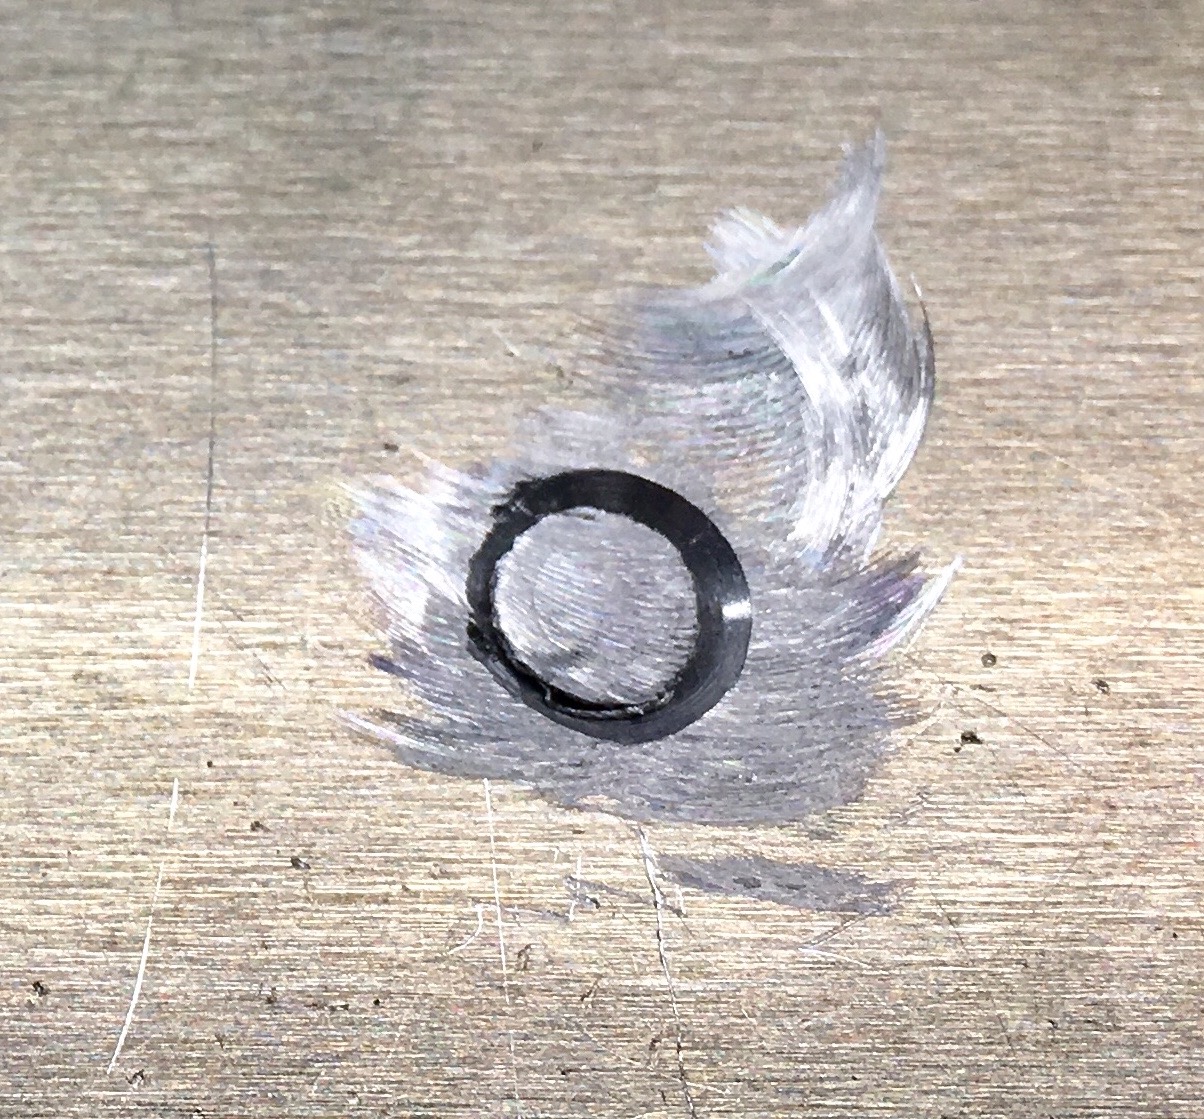
I had been using a 120 volt desk top Vornado fan (which was very effective, though a little bulky) but I wanted a built-in one that used less power and did not require continually running the inverter. This is the well regarded Caframo Sirocco II, made in Canada. The price varies a little, I bought it when it got down to $100. https://smile.amazon.com/gp/product/B01LDY4TE4/ref=ppx_yo_dt_b_asin_title_o04_s00?ie=UTF8&psc=1 It has three speeds and a "time delay off" function. Amp draw from the small DC motor is very minimal: Low: 0.12 amp, Medium: 0.22 amp, High: 0.35 amp (at 12 volts). Max airflow is 140 cubic feet per minute on High. That is not nearly as much as the Vornado on Low, but it is plenty adequate. I had already removed the fixed TV and mount from the back curbside corner, so I mounted the fan there. Since there were already 4 big holes, plugged by the original screws, I did not want to drill any extras. I made a plate out of 6061-T6 1/8" thick aluminum plate, attached the fan mounting plate to that with rivets, and bolted the plate to the bottom of the cabinet using two of those big screws.A future owner could remove the fan without leaving behind any extra cavities... and the location is good for sleepers and does not get in the way when folded up. The fan mounting bracket is designed to mount to a flat surface, then you slide the fan sideways onto the plastic studs and secure it with two long machine screws. I used common long 1/8" diameter aluminum pop rivets. Because each rivet head was down inside a cavity, I added a teeny nut to the shank before pulling it. The back side of each rivet hole was countersunk most of the way through the material: I used a small flat pin punch in the vise and a bigger one on top of the tail to drive it into the countersunk part: And ground each tail flush using a little Dremel grinder with a sanding disc: By grinding the tails flush, they would not damage the nice gelcoat of the overhead cabinet. Here is the assembly screwed in place: John Davies Spokane WA
1 point

.thumb.JPG.c11094a6a8c73946473572dfe3e34685.JPG)


-
Recent Achievements
-


.thumb.png.fbbde3486e933f990ff511bff8d6bda0.png)