Leaderboard


Popular Content
Showing content with the highest reputation on 07/29/2024 in all areas
-
7 points
-
What a surprise when D and I were screaming around a left turn in the Jemez Mountains of northern NM and spotted that "oh, so familiar" big red Texico Star prominently fixed on the nose of Mike's and Carol's Oliver at a local service station! D poked me hard in the ribs and shouted over the roar of the engine downshifting to an appropriate gear for what will become a serious "bat-turn", "Look! There's Mike and Carol!" HA! Sure enough, we circled back and pulled into the station to say, "HEY!" After blasting out a, "Hey, MIKE!" -- it was clear from his 2,000 yard stare that Mike had no clue who was addressing him from atop a big Beemer, so, like Mike described above, I introduced myself and the look of recognition appeared on his face and we both laughed! I'm certain that this will likely remain as our most exciting "Oliver Sighting" ever! Small world, for sure! Cheers!5 points
-
Updated: 2010 LE2 #45 SC 50.5" D52 Original axle capacity 2014 LE2 #50 SC 50" D52 Original axle capacity & Alcan spring & Disc Brake upgrades 2015 LE2 #75 SC 50” D52 Original axle capacity 2016 LE2 #110 SC 50” D35 Original axle capacity (Gathered from Wayfinder's posts) 2016 LE2 #113 SC 50 “ D35 Original axle capacity 2017 LE2 #193 SC 50.5" D35 Original axle capacity 2017 LE2 #208 SC 50.5" D35 Original axle capacity 2017 LE2 #226 SC 50.5” D52 Upgraded axle capacity & Alcan springs 2020 LE2 #579 SC 50.5" D35 Original axle capacity 2021 LE2 #898 SC 50.5" D35 Original axle capacity & Alcan springs upgrade 2023 LE2 #1386 SC 50.5" D52 Original axle capacity Please me know if information needs to be added/changed for a hull # and can also add additional campers including LE1's.4 points
-
Just brought her home, new to us 2017 Elite II. Hull 207. We are so excited to be here and to be the proud new owners of this beauty! We have a Casita independence which we will be selling. We live in NH. We both retired in the past few years and want to explore our amazing United States while we are still in our go go years. We are looking forward to learning about the Ollie and enjoying adventures on the road.3 points
-
2014 LE2 #50 SC 50.5" D52 Original axle capacity & Alcan spring & Disc Brake upgrades This is my trailer but I went out and measured the spring centers as 50.0"3 points
-
I found the SN engraved on the rear side of the axle near the center. Take a damp rag and a flashlight with you and wipe the axle down, it should be visible. Mine was close to where the label used to be. Mossey3 points
-
My older brother often said "that many hands, make light work". Mossey2 points
-
When I do these jobs, I do all I can, prep everything, get to the point where I can grab my son, and he helps with the heavy lifting! This is at times a two-person job.2 points
-
After you get your axle as built sheet, go to Dexter's website and find the equipment you want or go to a local distributor and let them know what you want to do. FleetPride in Augusta is a Dexter distributor. Mossey2 points
-
All good thoughts. It would be best, for my own experience, if I were to do all the work myself. Erggg. But the body is feeling its age. LOL I could also find a good shop near me to do the heavy lifting and me get the parts.2 points
-
I would still prefer the 2400 rated dexter four leaf if it has more steel. One would need to compare the weights though. GJ2 points
-
Chris, Oliver could still upgrade your Ollie if they ordered axles according to your specific serial numbered axles, probably SC 50" (axle spring center), Dexter's axle lead time of 3 to 3 1/2 weeks for special orders, if Oliver would agree to this. Hope you don't mind me thinking out loud, 🙂2 points
-
I was pumping diesel into my truck at a random gas station in the New Mexico desert north of Albequerque when I hear “Hey Mike”. I turned and saw this biker dude with his biker babe on the other side of my truck. Obviously, my deer-in-the-headlights look sparked the biker dude to say, “It’s Art Flynn!” With the helmet, shades and new-since-the-rally beard it took me a second to focus! He had seen me pull in while going in the opposite direction and turned around to say hi. We had a nice chat. Thanks Art and Diane for the making short detour to say hi and welcome us into your home state! Mike2 points
-
William, it was good talking to you as the diesel was flowing! After encountering MAX Burner I was not expecting another!! Thanks for stopping and hopefully we can talk about your Alaska trip. Mike2 points
-
@jd1923 and @Ronbrink did a great job laying out what they did to tie in the new Beech Lane fans. I just wasn't "getting it" at first what @jd1923 had done, since we seem to have the same fridge setup. Even with pictures in color I was not "seeing it". LOL. Now I get it thanks to Mike adding my own picture back to me. Nice! I've just ordered my Beech Lane and will be attempting the same setup. Thanks again, and again, and again, to everyone participating. We need to get together someday and talk in person. Maybe a non-rally technical gathering. Heck, we could even do a Zoom call or something like that someday. That would be fun too.2 points
-
Y’all are welcome to come and measure my tire gap, weigh my truck, weigh my wife, etc. But you’re wrong. I measured tire gap before adding Firestone bags without the trailer, after adding bags without the trailer, and after adding bag with the trailer. The fronts are within 1/4” of stock, and the rears are taller than stock with the trailer in trip configuration. No kitchen sink here, and a good thing my wife doesn’t see your saying she weighs more than average! Combined we are 318 pounds. Mostly you’re making assumptions about things you know nothing about…2 points
-
Two in one trip. Janet and I live in San Angelo, Texas (airport code SJT, hence my sign-in name). I saw an Oliver with a logo I recognize traveling south on US 87 through San Angelo around 2:00 this afternoon. I made a u-turn and sure enough found Mike and Carol at a gas station. I pulled in and said: Hey Mike!2 points
-
Yep, we've discussed this before. Even back when you and I talked on the phone shortly after ordering our Oliver. I need to get it weighed to have some real numbers. The platform isn't the limiting factor, it is the US ratings. The rest of the world has substantially higher GVW than the US with an identical truck (not car - it is a body on frame construction beefier than most full size trucks.) Up to 8400 (vs 7385) with a simple rear spring change and up to 9900 pounds with a rear axle upgrade - all certified by the respective countries. But that doesn't do squat for me in the US, legally. I do know that a lot of of US Land Cruisers have been roaming the highways and mountains out west with GVWs of 8-9000 pounds for many years without legal ramifications. But it only takes once. The question has come up on the Land Cruiser forum whether the door sticker cargo capacity (based on tire loading) is legally binding when it contradicts the metal plate showing gross axle weights and gross vehicle weights. The discussion between some lawyers, law enforcement officers, and insurance agents came to the conclusion that the GVWR takes precedence if the tires are up to the requirements. A court would have to be the final arbiter, though. Delivered dry weight of my Land Cruiser was 5715 pounds; 1670 pounds less than the GVWR. There are no options, so that doesn't come into consideration. Taking out another 190 pounds of seats and roof basket should have started me off with 1860 pounds to play with. Eight quarts of oil, 24 gallons of fuel, and 12 quarts of water take up approximately 260 pounds of that, and our fat asses another 340. Tongue weight was 550 pounds in travel trim with full water and bikes, and your 65 pounds for the hitch. Fridge and shelves are about 150 pounds. That leaves around 500 pounds for stuff. So, do I have another 500 pounds in there? I don't know. That's why I need to weigh the truck, trailer, and both combined to get accurate numbers. I do know that I'm not going to get a different vehicle. I've said before, that I know this combination is a compromise, and one I'm willing to accept for my use.2 points
-
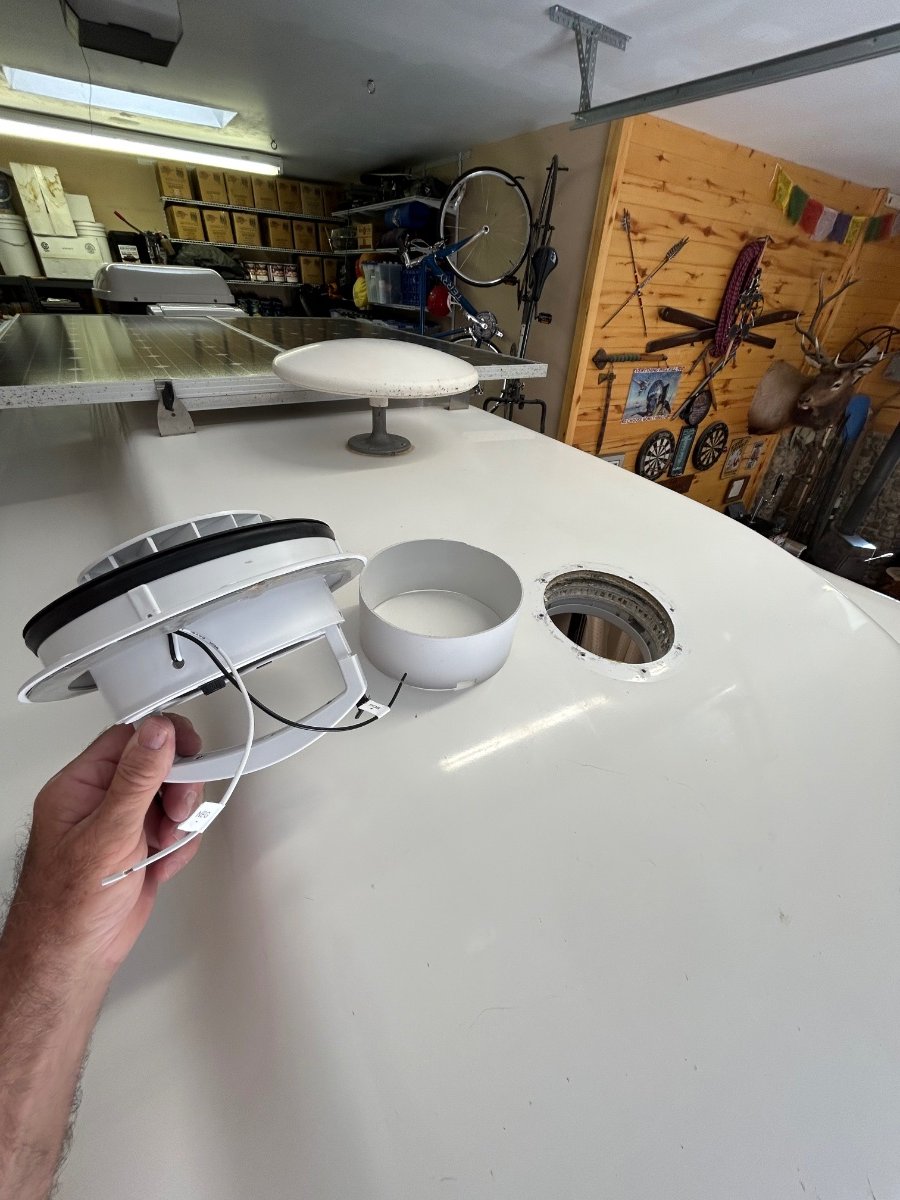
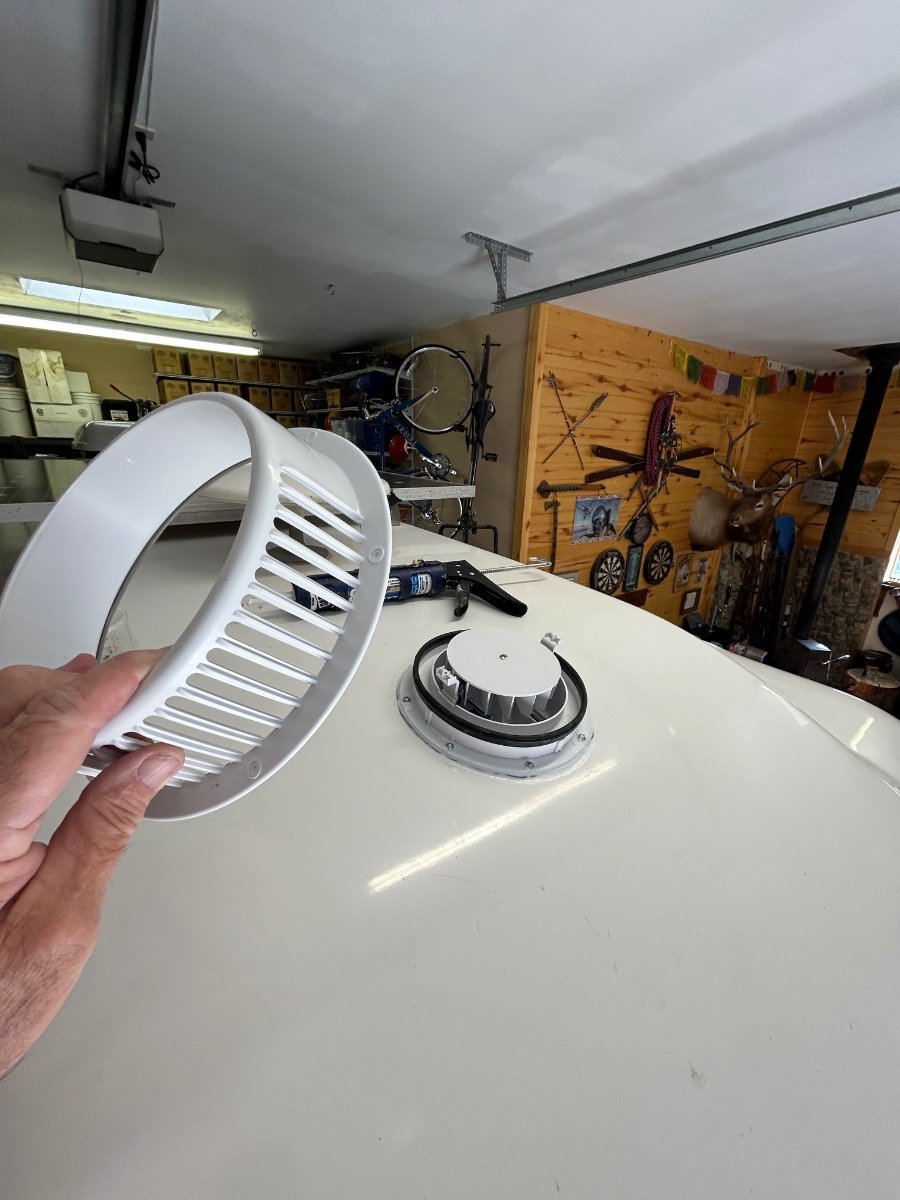
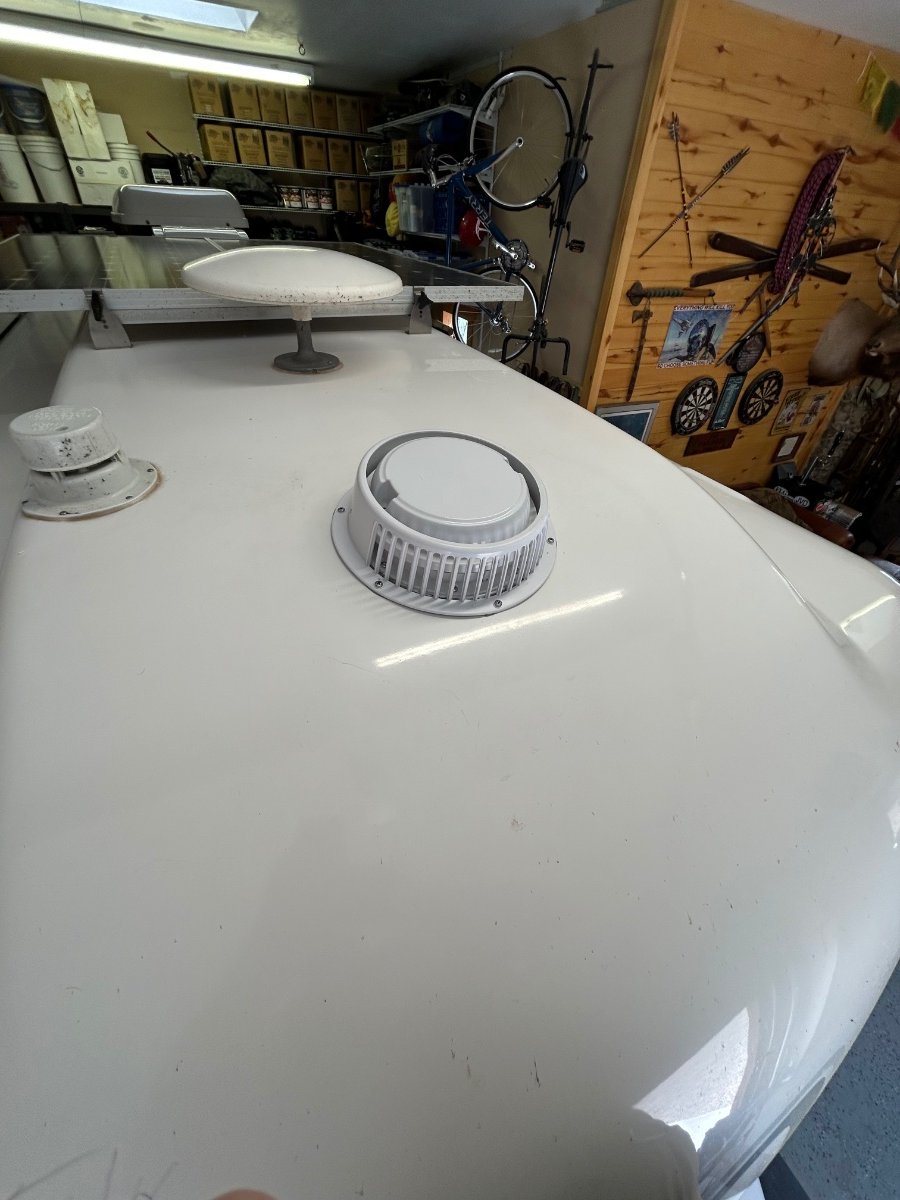
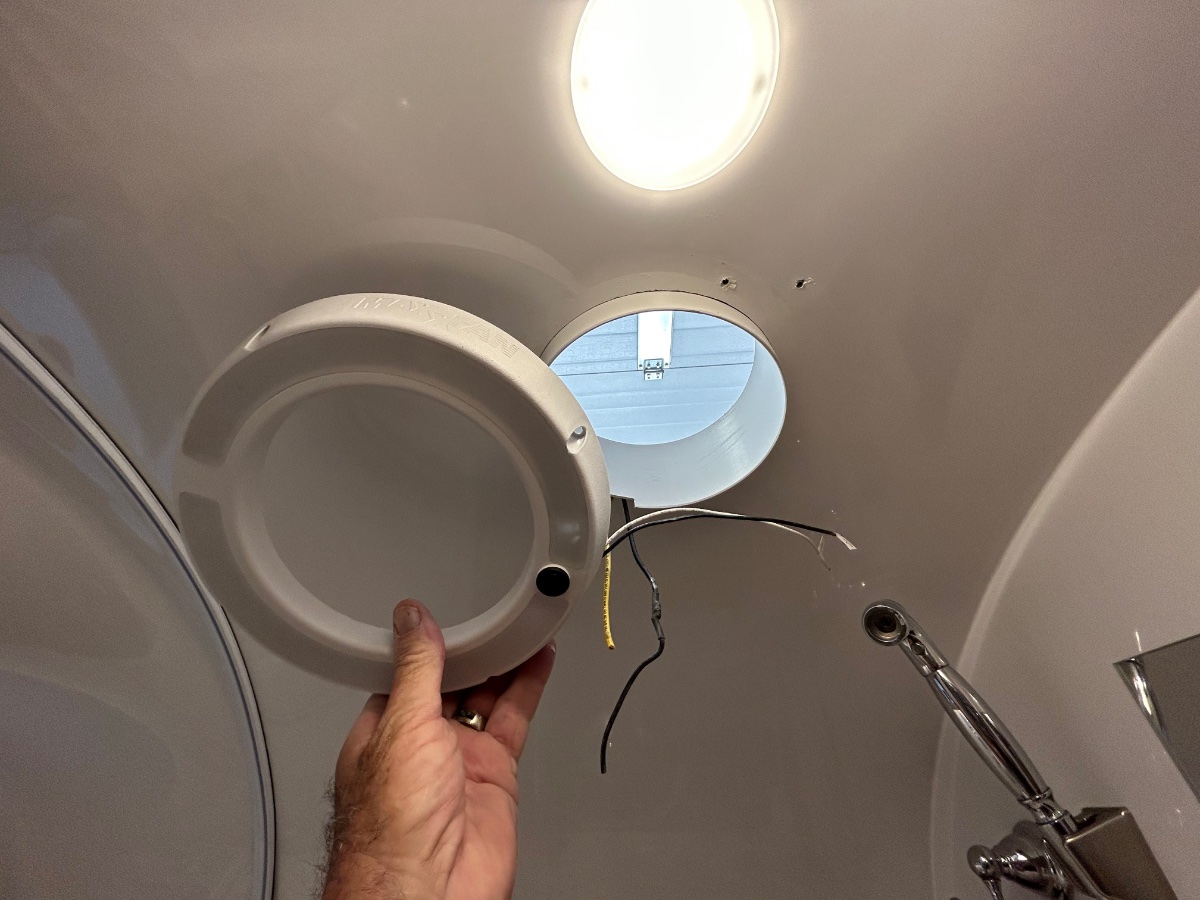
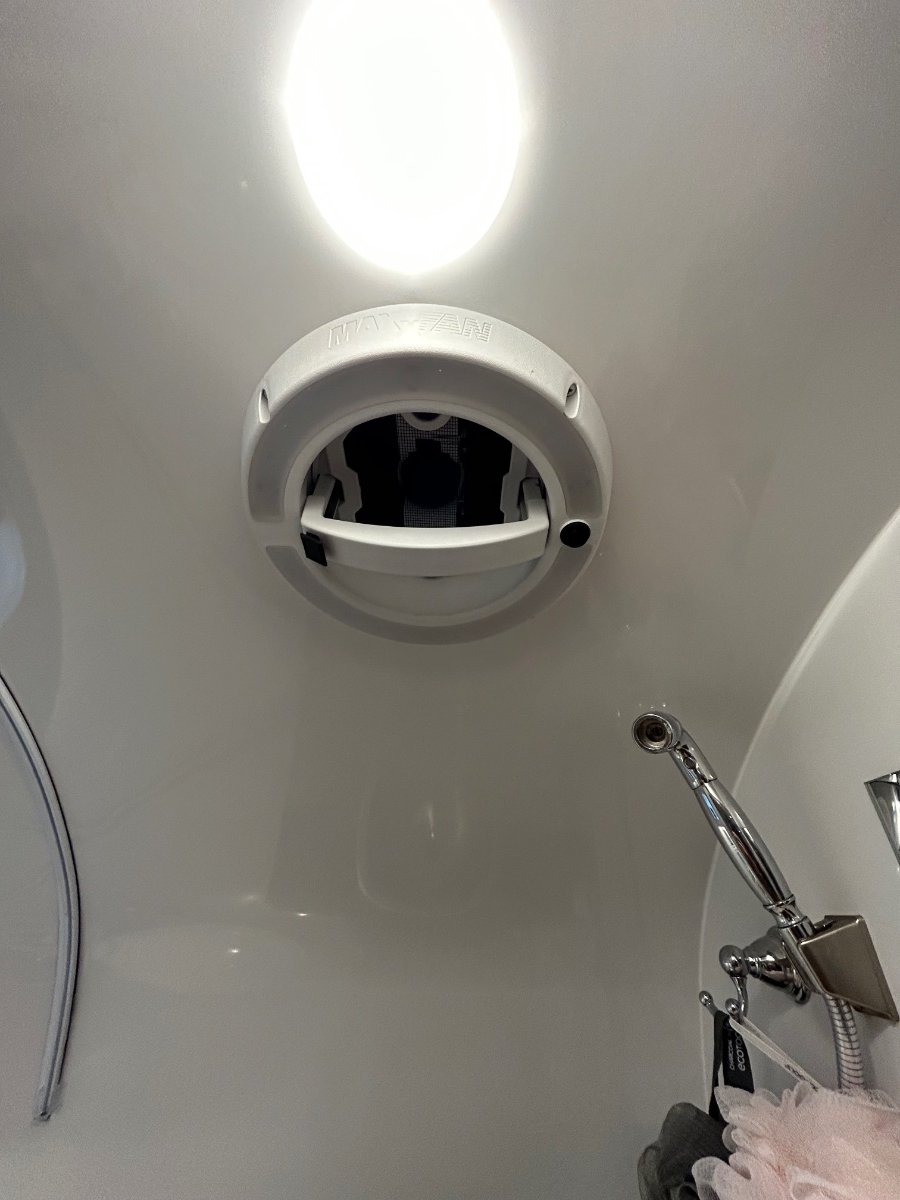
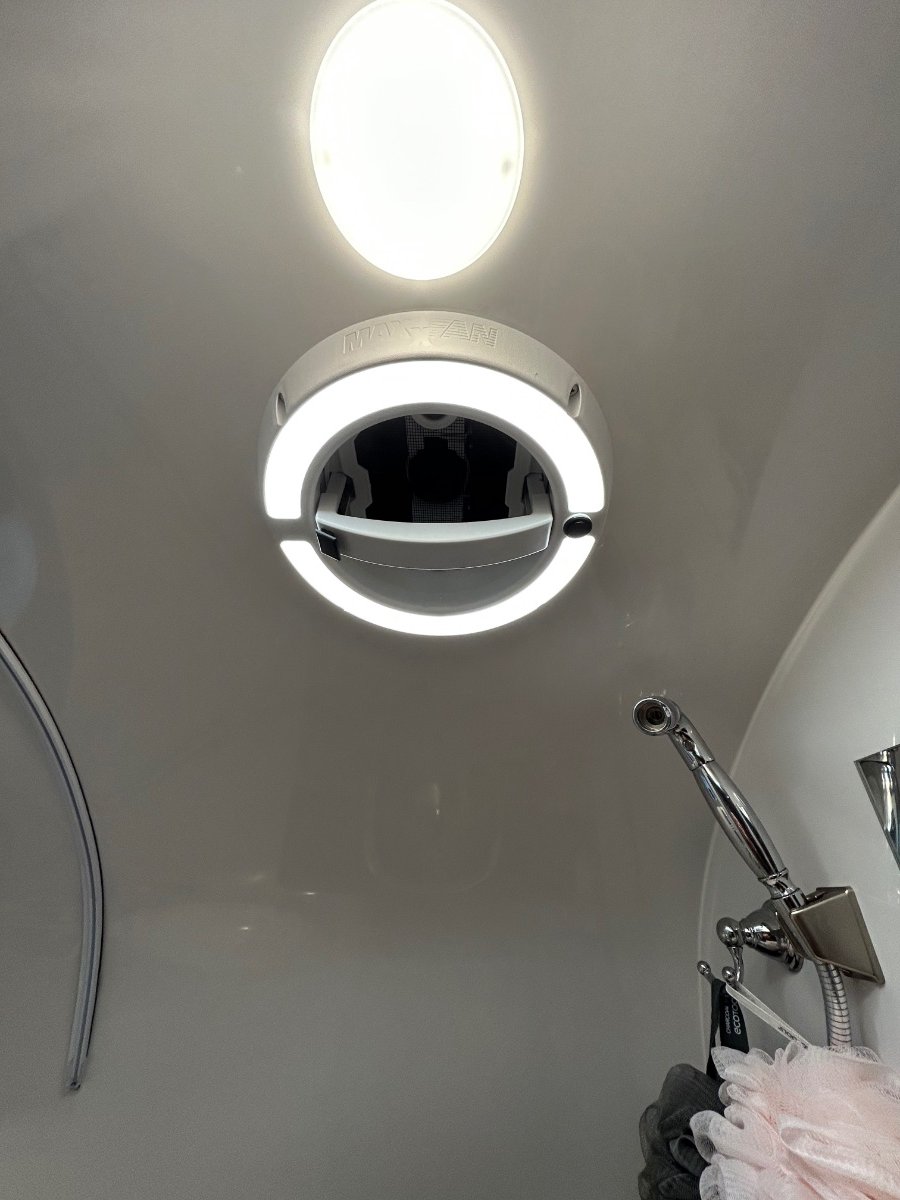
Ok... I love these forums! Nothing like great ideas shared by a group of common minded OTT owners. I'm thinking I stole this one from a comment that @SeaDawg mentioned a while back regarding his "LED-lit" Shower Fan. Well, Diane read his post and thought it would be a good upgrade - so, the new MAXXAIR w/LED unit arrived yesterday via Amazon (Happy Wife - Happy Life category). This would be the short story of its installation... First off, the original VANAIR Ventline fan assembly operated perfectly - no leaks, no bearing wobble, smooth actuation, but alas, no LED. It's the exact unit we had in our previous SOBs. BTW: Its up for grabs - a "freebee", I'll cover any CONUS shipping costs for anyone needing a Ventline. There was major brain cramping involved to plot-out a list of instructions for the R&R drill, especially the Removal phase. The first "R" was straight forward - using a plastic "razor" scrapper to remove the butyl tape from the gelcoat. Cleaned gelcoat with a fresh microfiber cloth doused with an ounce of rubbing alcohol. 2. Filled original mounting holes with clear silicone, they will be further sealed with the butyl tape attached to the new fan housing. 3. Cut-to-fit the included plastic sleeve that fits between the top flange and bottom (shower side) trim piece. Applied clear silicone around circumference of plastic sleeve and upper gelcoat. BTW - the OTT factory fan hole was exactly the correct diameter - no additional cutting was needed (WHEW!). 4. Mounted new assembly up top, carefully pre-drilled/chamfered 8 new holes in exterior gelcoat. Lightly torqued-in stainless screws enough to "push" butyl tape out from flange. Trimmed tape and applied clear silicone around perimeter of flange. 5. Rain guard: The new unit included a "rain-guard" which may be helpful if operating the fan in a heavy downpour. Applied butyl tape on the RG flange and carefully pre-drilled/chamfered 6 new holes for the RG. Trimmed tape after torquing screws in and then applied clear silicone around perimeter of RG. Attached fan cap with the provided 2 white screws. 6. Applied clear silicone to the trim piece groove where plastic sleeve seats. Carefully pre-drilled/chamfered 4 new holes for the trim. Connected 12vDC power to fan motor and LED - used solder and heat-shrink for connections. Tucked wires inside trim piece and mounted it with 4 screws. 7. Unlike the Ventline unit, the MAXXAIR has a locking mechanism when depressed allows the fan lid to open/raise. Its raises/lowers smoothly. Fan and LED each have separate switches. And as, I believe, @Patriot has recently said, "Let there be light!" One and done... Happy Wife.
 1 point
 -
I was tired of the Shower door flexing and decided to try little upgrade. Cut out door from 4 x 8 FRP plastic sheeting. Picked up damaged piece from Lowes and cut out. It has made the door more ridgid and solid. Used Cauling on edges and glue on innter. Was afraid to drill anything. Seems very solid for now. Only issues are my skills are lacking on cutting and saw did get away from me on the bottom not quite a perfect line. Love how the new doors are a solid piece on newer models of olivers.
1 point
-
I have read much of this thread. Super helpful to all - and have captured the general steps for the springs installation, with correction of placement of wet bolts to be at 3/9 O'clock. Now I'm getting upset because I thought I'd have upgraded to 5200 lbs axles, springs, brakes, etc, but since Oliver cannot upgrade my #110, I still have a ton of work to do on it. My back hurts just thinking about it. LOL My under carriage to-do list still (oy): New springs (Alcan) U-bolts, nuts, plate (Alcan) New shocks (??) Brake assemblies (auto or manual adjust - decisions, decisions) Rotors Bearings, and races if not installed in rotors1 point
-
I am one who uses an Andersen WD hitch because we pull an Elite II with a 2019 Tundra. To ensure we are not over the GCVWR for the Tundra, we visited a CAT scale on our last trip. We're not even close. But, our fully-loaded Elite II weighed in at over 5000 lbs., so the WD hitch is required for us. That is what we suspected. I strongly recommend you verify whether you "have another 500 lbs. in there" with a CAT scale. You will then be empowered to decide whether you "feel lucky" enough to stick with your current setup.1 point
-
I did months ago when I was troubleshooting that fan. The wire going up to the switch provides no voltage at all and the switch itself seems to be working fine. Not sure when it comes from. Was not looking forward to pulling out the fridge just for that. I may run all new wires to power on/off the new Beech Lane twin fans. We'll see.1 point
-
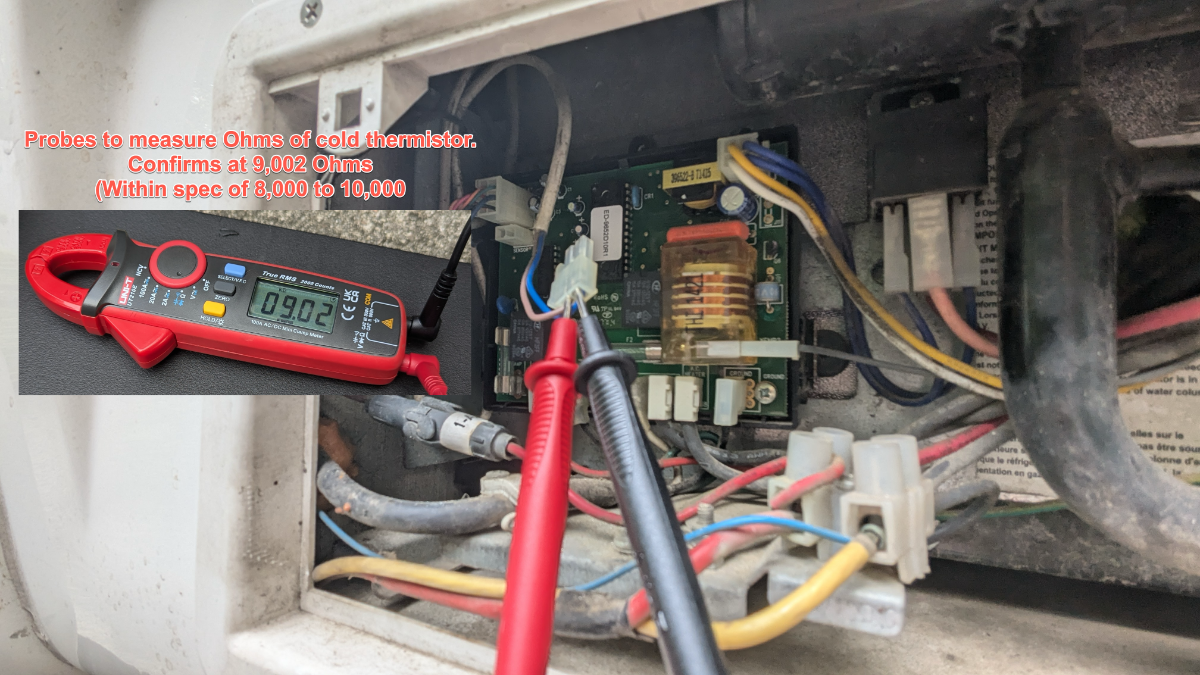
The new placement of the thermistor has done the trick. It's on the very last cooling fin inside the fridge and moved to the top. I woke up this morning with 29.5 degrees inside the fridge. I've not seen that ever. And that with no fan running last night. And the #5 lamp bulb was illuminated when I checked on it this morning. Now moving down to #4 setting to observe the temp drop.1 point
-
Nobody said that. 🤣 At your number, you two are petite! Gallup says the average weight Americans ‘“say they weigh” is 181 (average of adult men and women). Let’s add 10 lbs each for the little white lies and you have realistic 380 lbs AVERAGE for an American couple! Easily 400 for an older couple, those of us who eat well at home and at camp! I’m 6’ 2” and 220 LBS. Though I always weigh 230 at the doctor’s office, dressed with jeans and leather belt, hiking shoes size 12, with phone, and wallet, keys in pocket. At 318 lbs total, Chris would have to weigh only 88 lbs and that leaves zero lbs for our pup Charley (65 lbs) and ANYTHING else in the cab! Put the dog in the trailer to save GVWR!!! No, not our special pup. Do you have any bags up front? Phones, computers, camera, a smaller cooler, a packed lunch? I’m an industrial engineer with years of estimation experience. I’d say the 3 of us with our stuff in the cab in our truck is 450 lbs min, just plan on 500 being honest. I weighed all that in place at the scales and we have 1300 unused GVWR, the amount any 1/2 ton truck has to work with from empty! God bless @ScubaRx. He has every suspension upgrade in his E2 to carry 10K lbs max, likely 8500+ in his Ollie and room to visit several flee markets on his winter missions out west. Love you @Steve Morris, and love our discussions. You ever get that Pepwave mounted? 🤣 Can’t wait to meet you, and your pretty thin wife, on the Oliver trail. ”On the road again…” Best wishes, JD1 point
-
I'm not entirely sure what you are trying to do but see if this helps you.1 point
-
Oh no dog in the race, I was just curious how you could tell from the picture showing the SUV and Oliver. I still learn every day, to me it looked like maybe the rear of the SUV sits a little lower than the front, but then the Oliver looks pretty level.1 point
-
_________________________________________________________________________________________________________________________________________________________________________ No, but I can from this one... And just how did your dog get into this race?
1 point
-
Mike, thanks for the confirmation where your fan now gets power. I was also wondering if that location would be enough juice for fans and fridge components. And No! There is no power making it to the inside fan switch. No biggy now that I know I can drop new wires to that location you circled. That's extremely helpful. Thank you so much. I have that beach fan in my cart, but did not pull the trigger yet. Also, after reading the service manual on the fridge and testing the thermistor, and placing it in the correct location in the fridge, I'm currently at 35.5 degrees in the fridge at 9:30 at night. The fan is currently off. This is the coldest I've seen it in a long time, and with nothing in the fridge. I think I have confirmed that lamp #5 in the "eyebrow" is faulty, I've set the fridge from #4 lamp to #5 and no lights (lamp indicators) on the eyebrow are lit up now, but the fridge still gets cooler. So far, so good. We'll see how much longer this fridge will last. Oddly enough I found the Domestic Service manual pretty straight forward and easy to read. I'm sorry for breaking any "Manly-Man rules" by reading the instructions. It will not happen often, I promise. 😂 I will site the Man's Prayer now from the Red Green Show.1 point
-
Think of the 12V B+ and B- as 2 of the wires in a CAT5 cable, if data doesn’t get from the server to my desktop, what is the IT Department going to do about it. Verify the output of the server and the input at the jack in my cube. Look for the break or run a new CAT5 cable. Your picture below has been marked up to show where the 12V power connects to the refrigerator in my Ollie. Yours may or may not be the same. Does your fan switch have power in and out? If so and the power does not’+**get to the fan, I would run a temporary B+ jumper from the output of the fan switch to the in put of the fan. Does the fan work with the jumper? If so, there is a break in the in the original B+. I don’t think that the original B+ wire is at fault and it is probably the thermostat switch which is located in between the on/off switch and the fan as @jd1923 mentioned. Try following the B+ wire from the fan back to the on/off switch, you should be able to locate the thermostat. When you locate the thermostat, disconnect it and put a jumper between the input and output of the thermostat. My original thermostat had male spade connections and the jumper I used was about 6" of wire with female spade connectors crimped on. If the on/off switch now works, you can replace the thermostat or just use the on/off switch to control the fan, although a thermostat works much better and saves 12V power. And forget about removing the refrigerator or microwave, just run new wire. Mike Mossey
1 point
-
I agree fully with @ScubaRx, except he underestimated the average weight of two adults. The truck picture shows it. These Toyo trucks sit with much more space between the rear tire and the fender vs the front. This pic the front gap looks a little larger than rear. That takes weight off the steering. The Anderson should be tightened some to help. Also see the pic showing what’s in the back of the truck, the plywood platform, the cooler, etc. wail until the shelf has stuff on it. Yep, overloaded.1 point
-
Tough to tell head on. Looks level to me. Air bags are at 15 PSI. More raises the rear too much and makes for a harsher ride.
1 point
-
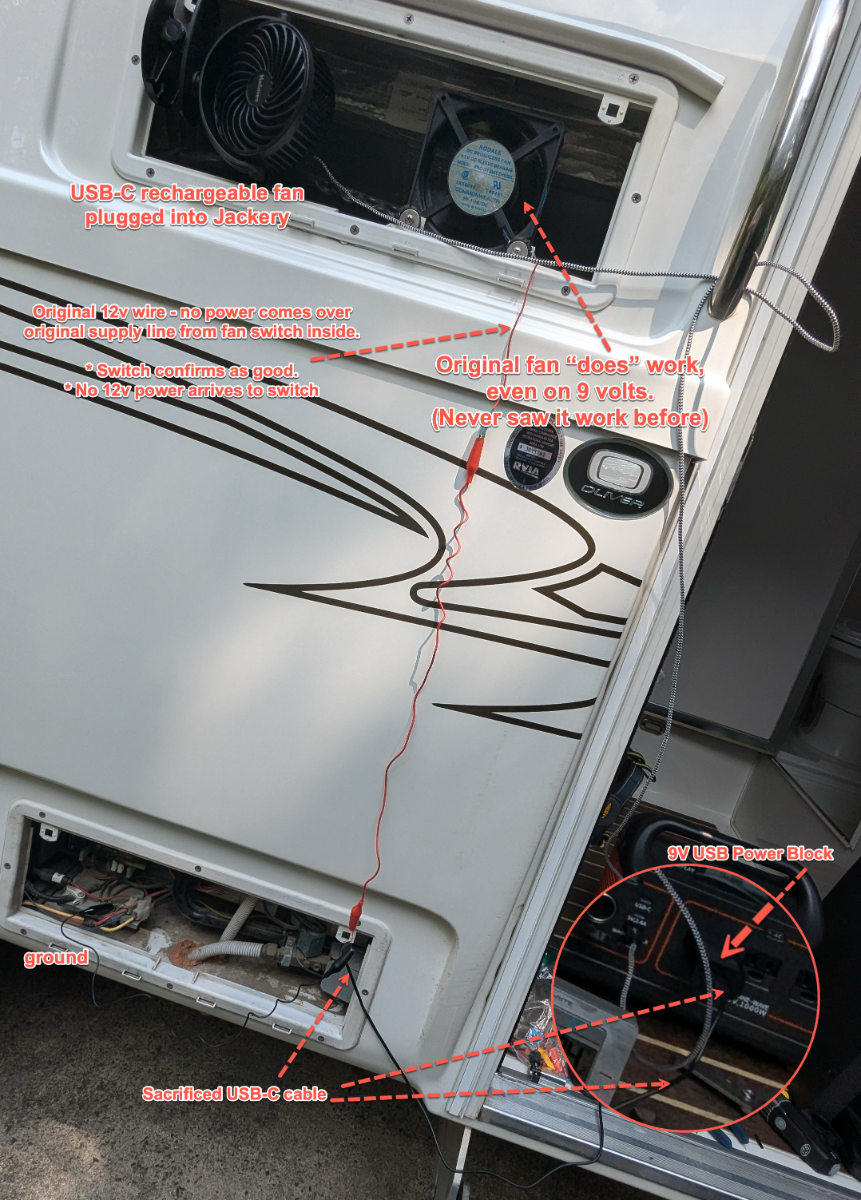
Well, I had to use what I had on-hand to confirm the fan functionality and I verified the thermistor. The fan has never worked and I've confirmed that... no 12v power is arriving to the fan push-button switch inside the camper. I'm not really wanting to pull out the refrigerator just to find the broken 12v wire. I'm afraid I'll brake something more important. That's one issue. I did confirm the inside switch and the fan itself do actually work. To verify the fan, I used an old USB cable to plug into a 9v source and a USB-C power block (AC) from an Amazon Fire TV stick. At first, I used a 9v battery to verify the fan worked, and it did (yay). I have never seen the fan spin before, ever! Now I'm thinking of finding another 12v source, or more likely, if I can use the 120v AC plug for a 12v block, instead of pulling out the entire fridge. I could run new wires from the fan. Something red-necky like that. How "destructive" is it to pull out the fridge in an Elite II? All the vent stack tape looks pretty tight in there, and the fridge seems super tight on the sides. Doesn't look fun to redo. Like others have mentioned in these forums, the Dometic fridges don't do well above 90 degree temperatures. I did move the thermistor (sensor) inside the fridge up a bit to the very top, and it was not on the last cooling fin, but the second to the last fin. I did not see any mention the placement of the thermistor mentioned in any of the RM2454 manuals. The coils look pretty clean behind the fridge too. One Note: The #5 lamp (light) of the temperature indicators, (aka the eye brow), on the front of the Dometic usually will not light up anymore. Mean anything? I did tap it once and it came on for a bit. I figure maybe it's faulty too. Has anyone switched out the mother board using the "Dinosaur" boards or only the Dometic OEM? Otherwise, the fridge pretty much cools the same on AC, DC, and Propane. Just not keeping up with the outside temps. Any other ideas? Thanks!
1 point
-
Thanks JD. I had lost track of that threads altogether. I'm going to have re re-read that a few times to understand where the 12v power really came from. There's a lot there. I like that dual fan setup.1 point
-
You can tell from this picture he’s overloaded?
1 point
-
That's why I took the recommendation of others to replace the OEM fan with a larger dual fan setup. You could change out the thermal switch screwed into the top RHS of the condenser. Given your fan works this is likely the issue. Note all the comments here. It's worth the $80 plus tax and a few hours and YES, run new wires to the switch or wire without the toggle switch on the lights panel. The Beech Lane fan product it very nice. I just purchased and installed a second one to cool the streetside bed basement area where I'm installing a 3KW inverter.1 point
-
If it turns out not to be the fuse, check the spade connector at the switch. One of ours came loose so its jack quit working until we pushed it back together.1 point
-
Today we pulled the trigger on the Starlink “mini”and I also ordered a custom fabricated aluminum protective Striker mount case made by a small family owned company in Florida 🇺🇸 called Strikerfab.com. I will post up thoughts on connectivity, speed and use once we receive it and get some camping and travel time in with it. https://www.starlink.com/us/roam?fbclid=IwZXh0bgNhZW0CMTAAAR3VXVoA8Gb9hdnLaMWqBcXsa1BfRBdqm_l2iKkNW-Va5r6RJiPc2u8PpD0_aem_DeHBx7JMI-i_vIWAYBg03Q https://www.strikerfab.com/1 point
-
HD... I feel your pain. I too loved taking off on my motorcycle and just catching a hotel somewhere along the way... with little or no planning except a "general direction" in mind. That said... I've learned with the Ollie how to be nearly as spontaneous by becoming more and more aware of the Ollie's capabilities... AND I CAN SLEEP IN MY OWN BED EVERY NIGHT. It's also much cheaper than decent hotel rooms at today's prices! It's taken us a couple of years... and now with nearly 270 nights in our Oliver to get used to how to maximize all of it's strengths. As you learn how long your fresh, gray and black tanks last (the way you travel), you start to learn just how "free" you are. If you are just traveling, trying to get somewhere, a Walmart or Cracker Barrel work great because they are nearly everywhere. It's also very nice to have, besides your rolling hotel room... a rolling restaurant with great food and snacks, and a clean bathroom when the moment strikes. Let's not even talk about that quick nap! The Oliver is so self contained and easy to get in and out grocery store parking lots, fast food joints, gas stations, small towns and side streets, etc., that you will come to appreciate the amenities of your Oliver. It's also easy to get in to campsites that many would not be able to. Regarding planning; it takes a certain amount of planning to go see and spend time in those destination "hot spots" that we've always wanted to see. What we have found works best for us is to anchor your trip with reservations in those places that just require it... but allow time in between those hot spot reservations to be spontaneous (that place the locals told you you just can't miss!), time for medical or mechanical emergencies and to just allow time to shop for groceries and do the laundry. Of course I'm saying all of this and assuming that you don't have too many time constraints. If you are still working you can throw out everything I just said! 🙂 If you ever took Stephen Covey's class on "Seven Habits of Highly Effective People"... all of this reminds me of the "lesson" of putting in the big rocks in the jar first (the things that really matter) ... and then sprinkle in the little rocks (smaller things that are fun... but maybe not absolutely necessary). Travel is fun, but I don't like it to be so much like work. I'm done with schedules and self inflicted constraints to be somewhere at a certain time. Time to relax, enjoy, be surprised... and stop in at that store in the mountains that serves awesome huckleberry pie and ice-cream.1 point
-
All the U-Bolts supplied by Alcan have been 9/16". The OEM's (at least on mine) were 1/2". It is very important, if you buy the Alcans, to know before placing your order the diameter of the axles on your trailer. Most will be 3". Some of the earlier builds will have 2-1/2". One owner told me his (used) trailer had one of each. This, most likely, was from one having been replaced prior to his acquiring it. I'm not totally confident in the report that one owner said his axles were 2-3/8", but who knows? Measure them to know for sure. If you don't have a caliper or a micrometer or don't know what these are then you may have to result to the string method (but this does require some math.) You could use a C-Clamp as a poor man's micrometer. Just tighten it up on the axle just loose enough so it slides off, then measure between the jaw faces of the clamp.1 point
-
We just returned last week from another camping trip down in the southwest. Great time, with great hikes and weather although the first few days were a bit more chilly than normal. Hit some of our past best hits, San Rafael Swell, ST George Area, and finally a new one which has been on my bucket list for a long time, Valley of Fire State Park in NV. Beautiful place but have to say we were surprised by the crowds even in mid week. Thought I might share several pix including a few taking on heaps of mud while traveling down 25-30 mile gravel roads in the outback. Thanks BLM campground at Swinging Bridge shot of mud bath mud was inches thick, started falling on its own weight. Once this stuff dries it is hard as a brick. Took over an hour of pressure washing and $20+ to get most but not all of it off swing bridge now retired swinging bridge pictographs
1 point
-
Hey @Geronimo John; Just wrapped up installing the Alcan spring packs.... Here's some clarification for you and those interested in this mod: YES. Dexter calls these "EZ-Flex Equalizers" for double-eye leaf springs. Good Catch, John! - I will need to re-orient my wet-bolts to the 3 or 9 position - no biggie. My thought process was that the 12 position would have the least pressure from the suspension on it. They're all flowing now, but the OTT is still "up in the air", I'll get them changed out tomorrow. This is a great example of how cool these forums are for OTT owners! I got this from Dexter: "Install the plain shackle links onto the bolt ends that protrude through the springs and equalizers. Install the flanged lock nuts onto the bolts and tighten to 30-50 Ft. Lbs." The torque values for the U-bolts will be either 45 or 65 pound-feet depending on the size of your axles/U-bolts. Easy peasy! Cheers, All...1 point
-
@MAX Burner you're the man Art! I want a new set of springs now! 😂1 point
-
John: Michelin says inflate to their load table. They also say use a minimum of 35 PSI for our weight. Minimum because we are well under their chart range. So in reality they are saying go with a much lower psi than any of us are using. I started out at 80 from the factory. My first stop was to a gas station where reduced the pressure to 60 psi. Then several years later took it to 55, then to 50. Now with repeated experience and knowledge, I will be at 42 PSI for HY and 30 or less (Depending on road condition/hazards) for off road use. My previous thoughts were highway efficiency (I.E. MPG) was all important. With years of chasing cushions around the cabin, and now this thread topic: I have realized that maybe I saved $20 in fuel each season, but at what cost to my Ollie. Springs and shocks have a purpose. Over inflation hinders their effectiveness and I am guilty of "Ollie Abuse" as a result. My recommendation is to save yourself the 6 year learning curve, and reduce the pounding for your OE2 by going with a somewhat consensus of 40 to 42 PSI for your OE2. +++++++++ All: To cut this off at the pass: Yea, I know that I'm over the Michelin recommendation of 35 psi. Maybe I'm admitting to being somewhat hard headed. But I can assure you that my learning curve continues. Who knows, maybe next year I'll be saying time to move down to 38 PSI. The Japanese call this Kaizen or contineous improvement. Yep, I am for sure a work in progress. But my wife says that my progress is moving at a glacial pace.1 point
-
Very good call, IMO. A SHORT RANT: It's always a good thing to get your rig & TV weighed every once in a while - we do our's at the beginning of winter and spring because our load-outs are different for each season. D & I ran into another RV'er (AS type) a couple months ago at Picacho Peak SP in AZ. We discussed GVWR - both trailer and TV. He was new to RV'ing and literally had no clue that GVWR is the maximum loaded weight of the TV (or trailer), as determined by the manufacturer and is placarded on both. He didn't know that the GVWR isn't just the weight of passengers and cargo but also the vehicle itself. I explained that the gross vehicle weight rating is all about safety. So we did a little drill - we located his placarded GVWR sticker on his TV and learned that the "useful cargo load" on his brand new Titan was 1,250lbs. On the back of an envelope we added up the weights of everything the Titan was hauling. You guessed it, with the 2 passengers, his 300# topper, camping gear, and the AS tongue weight of 950 (way over the 9-11% target wt. for a 7200# rig) - he was over his MAX cargo load by an unsafe margin. He said, "Holy crap, I need a bigger truck!" "Yup, or just pay attention to your equipment and respective weights", but that was my "inside voice." We did the same drill for his AS and discovered he was over his GVWR by several hundred pounds. The conversation went into liability issues should he perform an unsuccessful emergency stop while towing with an overloaded rig and TV - subsequently damaging property and/or causing injury. He got the point and was thankful for the conversation. He explained that no one advised him of this information during his recent purchases of the AS and Titan. The dude isn't probably the only one out there on the road without a clue about this basic, yet important topic. Admittedly, preaching to the choir here - but not only should we take this topic seriously but we can also be watchful for those like this guy and get the word out. Wouldn't be surprised if he's converted his Titan into a new 1-Ton diesel by now... HA!1 point


-
Recent Achievements
-
")


")


")


")


