Leaderboard

.thumb.jpg.e34bf01ef7f7d5e99ad31856d45afbeb.jpg)


Popular Content
Showing content with the highest reputation on 06/22/2025 in all areas
-
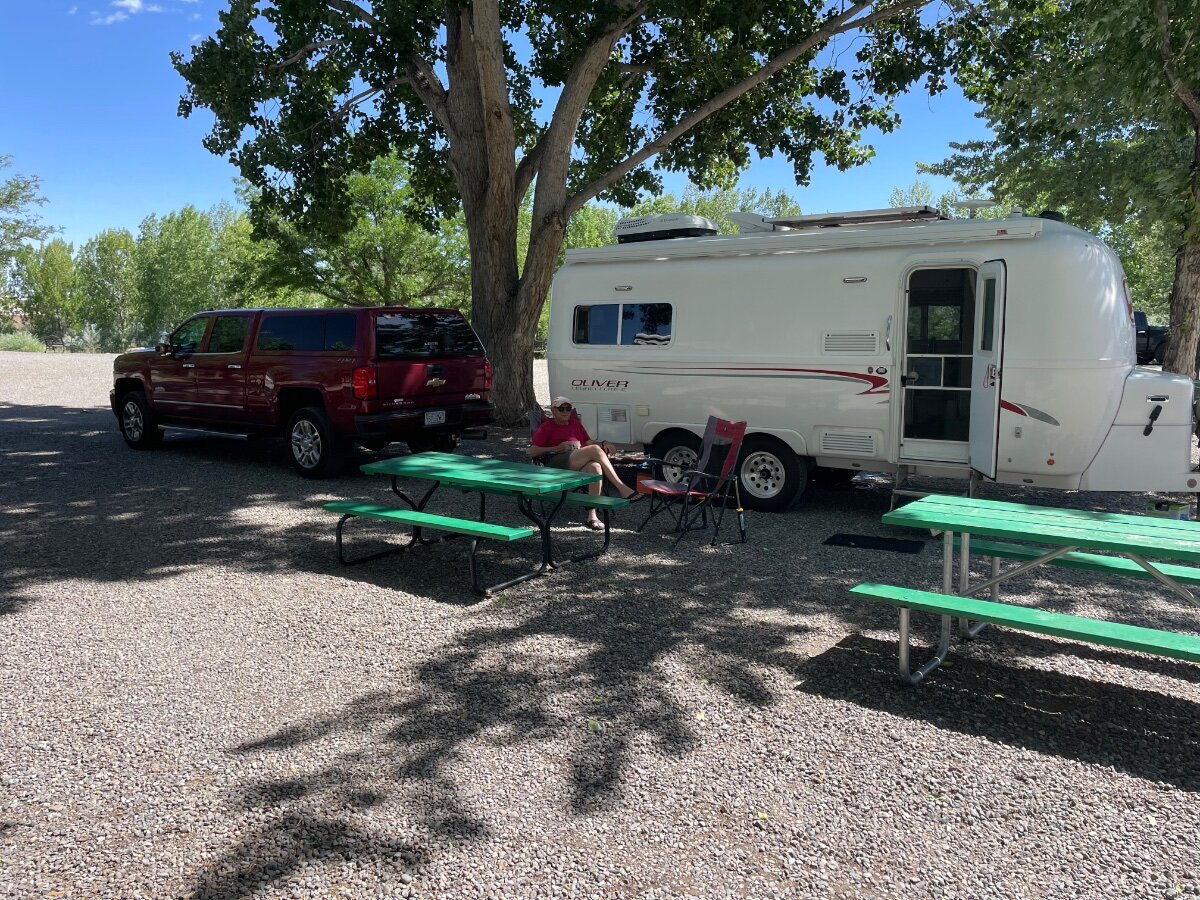
Enjoying our mid morning coffee and cool weather in Montrose, Colorado at River Bend RV Park. Still meandering westward. A couple of days ago we visited The Garden of the Gods outside of Colorado Springs and saw an Oliver from Florida in the parking lot. After our park visit we waited but unfortunately we didn’t get to see the owners. River Bend in Montrose, CO
 2 points
 -
Very well stated, to which I wholeheartedly agree! 9K BTU should be enough for the Cu Ft of an Oliver. Of course, I have less concerns re humidity than the two of you from Houston and Tampa! We are 4 weeks into our longest Oliver trip and there's been a heat wave, thank Goodness it just ended. Had to run the awful Dometic P2 over 4 nights and likely a couple more as we approach AZ. Noise was my greatest concern, but now it’s 2nd to Ah consumption. I ran it while towing for 90 min (see my post) and used 216 Ah. I could only afford to do so since we were driving to a campsite with electric. Given the Inverter A/C numbers hold true, we could do the same likely using <100 Ah and would be able to continue A/C use for a few hours at a dry campsite. The Atmos/Tosot may be quieter, but either choice has got to be half the dBs of the P2! So @CRM, I’m counting on you being next! I’m now strongly in this camp and will upgrade prior to getting stuck on the next trip in a heat wave. You guys are always in a humid heatwave!2 points
-
Watched the video, very interesting. In reading through the comments it appears the inverter compressor runs continuously, as in never shuts down. It was also reported that the TG only reached 12.5K BTUs in the tests, shy of its 13.5K rating. Although humidity concerns were not discussed, it would seem there could be benefit in the compressor running continuously; however longevity may be compromised. Perhaps the OP can provide comment on observations made regarding cabin humidity conditions.2 points
-
Sorry about that - I missed the part about this being the rear camera. I too had an issue mounting the very small rear camera. I fashioned a piece of wood in a bit of an "L" shape. After spraying the wood flat black, I 3M'd the top of the wood to the metal frame around the window. Then I used the metal bracket included with the rear camera to attach it to the wood. Good luck! Bill p.s. the heat issue is another reason I used that heavy duty packing tape on the front camera just in case there would be an issue. But, as I mentioned, it has not moved even after being on the "hot side" of one of those heat reflectors used in the windshield to keep the sun off the dash while parked.2 points
-
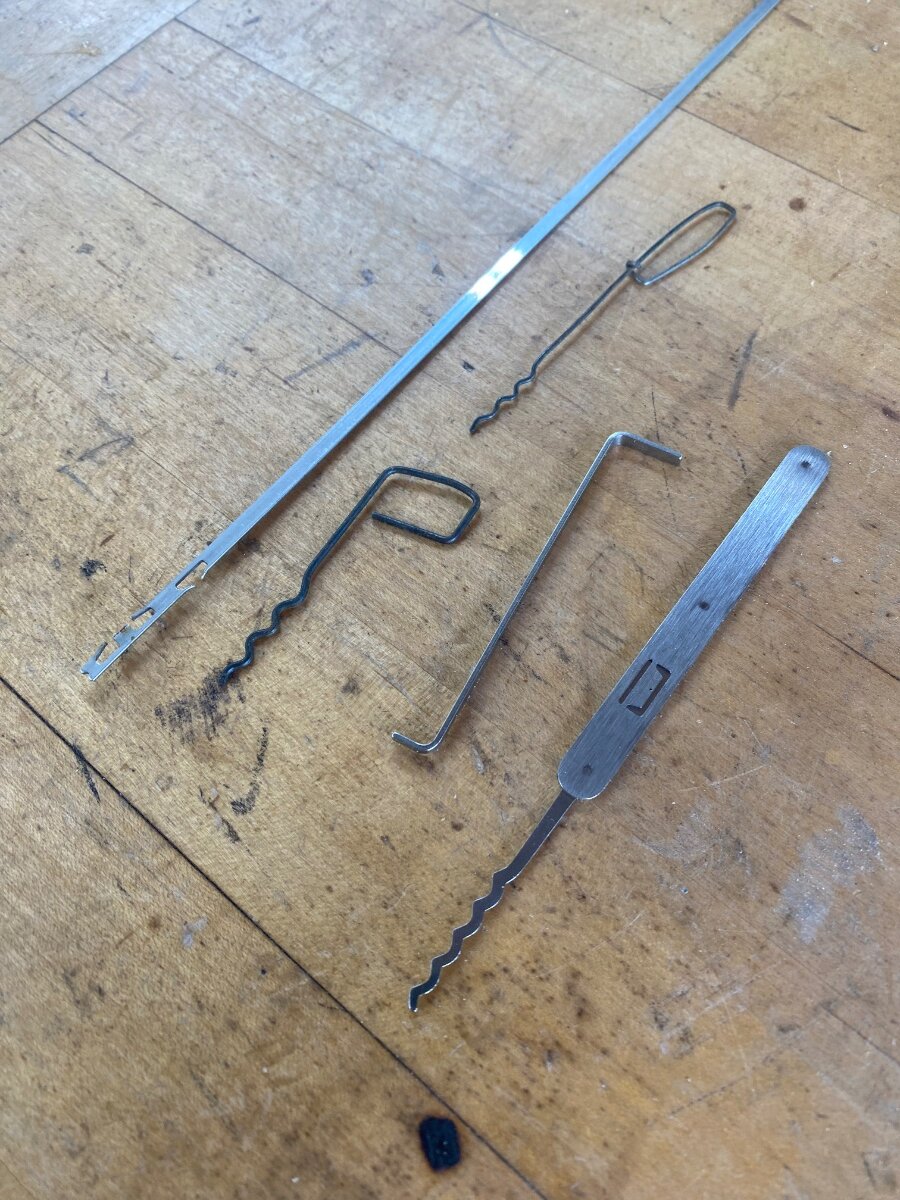
One thing that most folks probably don’t consider is lock picking. It’s actually a booming hobby and it’s simple and useful to know. I’ve saved a few folks from having a really bad day, and Iv’e even saved myself when the Oliver’s keypad failed (for the second time) and the keys were locked inside. Most auto and home locks are difficult to pick. However, the cheaper RV door locks, camper tops, tool boxes, bike racks, hitch pins, etc., are ridiculously easy to pick. The cheap cylinder locks found on millions of these products can literally be opened in seconds and it’s a real motivator to buy quality locks. I keep a professional lock pick in my tool kit. But in a pinch, you can use a paperclip and the flat wire found in most windshield wiper blades for stiffening the rubber. The paperclip, or pick, needs to be small and stiff enough to manipulate the cylinder pins while under a slight turning tension. The tension tool should be springy and light so that the pins can jump around while applying minimum turning pressure. The flat windshield wire is perfect for this. There are loads of lock picking tutorials on You Tube, and the trick is to be light handed on the turning tension as you jiggle the pins into the right combination so the cylinder will turn and open the lock. You can buy pick sets and practice locks on Amazon, and its perfectly legal. But a single quality raker pick and a home made tension tool is all you really need. The photo shows a piece of windshield wiper flat wire and picks from my tool kit. There is a tension tool, some old paper clips that I’d made in emergencies, and one professional raker pick I recently got from the Lock Picking Lawyer. You can use a small screwdriver, knife tip or hair pin, if nothing else is around. I hope you find this fun and useful. Cheers! Geoff
2 points
-
Doughton Park NC on the Blue Ridge Parkway. We head to the BRP to beat the heat this time of year. After the hurricane last year, many areas are still closed, but repairs are being made and areas slowing reopening. No electricity or water at the campsites but Ollie handles it fine with a portable solar panel. Directions to Doughton Park, take Rt. 21 to the BRP to the Park. Doughton Park Picnic Area: Air Bellows Overlook:
2 points
-
I'll be picking one up for sure as soon as I see the price drop a little. I really should have picked one up when they were in the $1,200 dollar range based on the inverter technology alone... One thing for certain, the second I buy one another even more efficient one will hit the market!1 point
-
Geoff, good post. I learned the lock picking skill exactly for that reason. It's is not difficult to learn and there are several pick kits and gadgets out there to make it very simple. My go-to set is inside my F150 side pocket, which is accessible even if my truck's key fob is locked inside the trailer. Thanks for bringing this up on the thread.1 point
-
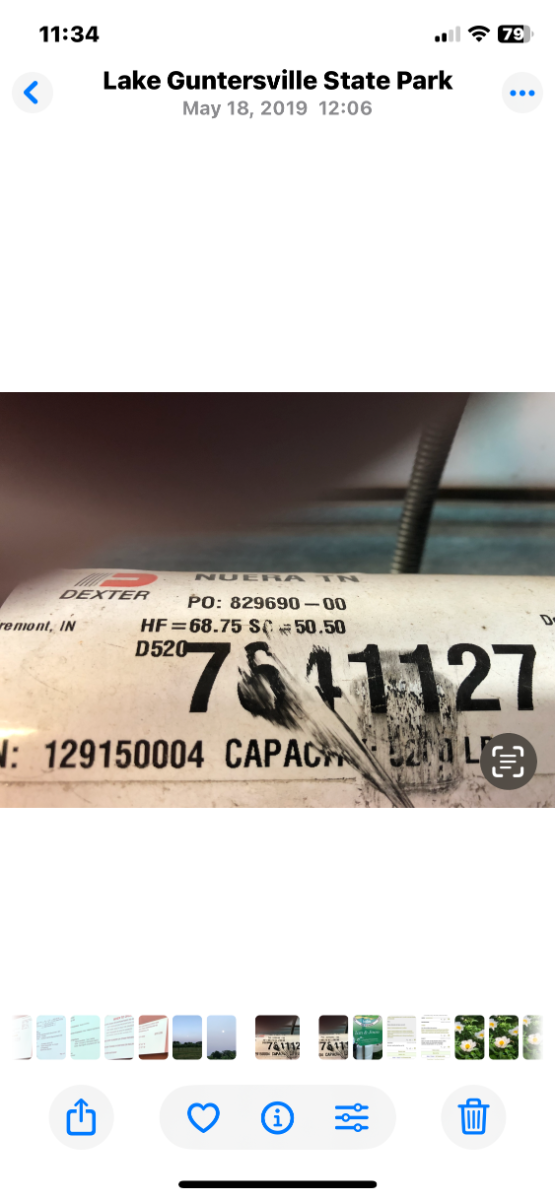
If it’s any assistance these D52 axles were installed on my 2017 OEII hull 254 Yes they are NevRLube axles in
1 point
-
Turn off AC Breaker and Remove Furnace Fuse Step 1 Remove Interior Trims and Screws. Step 2 Remove the 4 Mounting bolts from Inside cabin. Step 3 Take a picture of the wiring Step 4 Disconnect all wiring to the Control Box and disconnect drain hose Step 5 use a little Braid fishing line up on the roof to cut the seal on 1 corner of the AC mounting gasket. Step 6 Break loose the unit by picking up on the Braid loosened corner then working your way to each corner until unil is no longer attached Step 7 Remove old rooftop unit Step 8 Clean the residue from the old gasket with any type of oil even vegetable or olive will work, Scrub the oil off after. Step 9 set the roof top unit in place. All the foam seal and leveling is attached don't overthink it just mount it. Hole is perfect size already. Step 10 Open Dometic Furnace and use a continuity tester to ID the 2 wire from the Furnace. They were blue on the Furnace but changed to blue and green somewhere before arriving up at the interior hole on my Ollie Step 11 Remove Dometic Thermostat and ID the wires to the Interior hole. I had a 3 wire Green, Red, White. Step 12 wire 2 wires from Furnace to Red and white going to ThermoStat. Push the wires into the channel the wires are in up top to get them out of the way Step 13 Cut off drain pipe even with opening. No longer needed Step 14 Eye up 4 mounting bolt holes in the square hole and make them even spaced to each corner. Mine used the 2 inch one. Step 15 Apply the correct thickness foam seal to the Unit or bottom bracket. Step 16 Mount the bracket make be sure to feed the wires through the big opening. Step 17 Connect the connectors and hook up power wire Step 18 Torque the bolts to 3.5 lbs Step 19 Install the trims Step 20 Install the batteries in the remote. Turn on the breaker and fire it up Refrain from using the LED lights for at least a day the Joy of the New AC and then the lights will be too much for your body to take in 1 sitting! Get a 2 wire Heat Only Thermostat for the Furnace. I will post the one I got later. Wire it up and install the fuse. Enjoy I may of forgotten a few things but you Geniuses can help me with that. ;^)) The Interior trim is much smaller than the Dometic, There will be 2 screw holes showing, I am thinking just get 2 screws with finish washers and fill the hole. Let me know if there's an easier fix.1 point
-
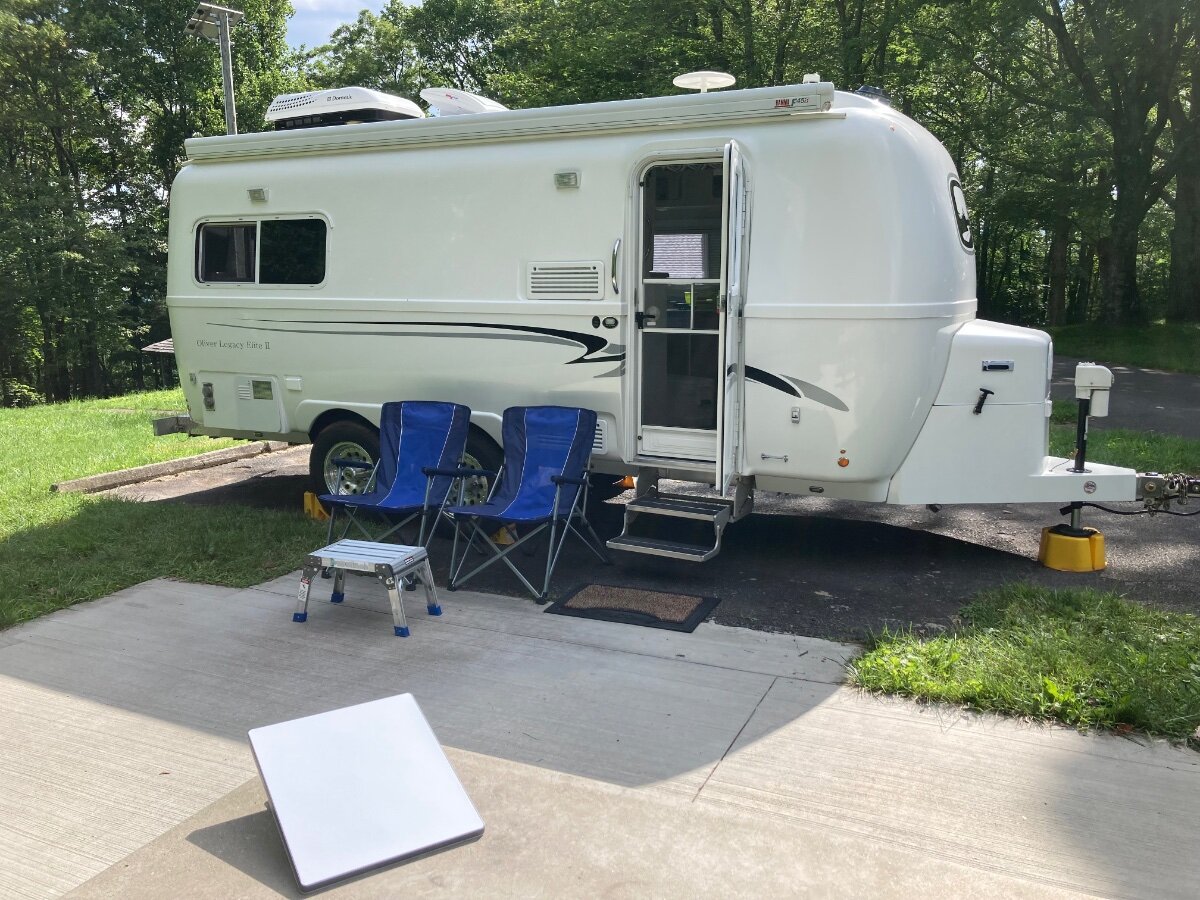
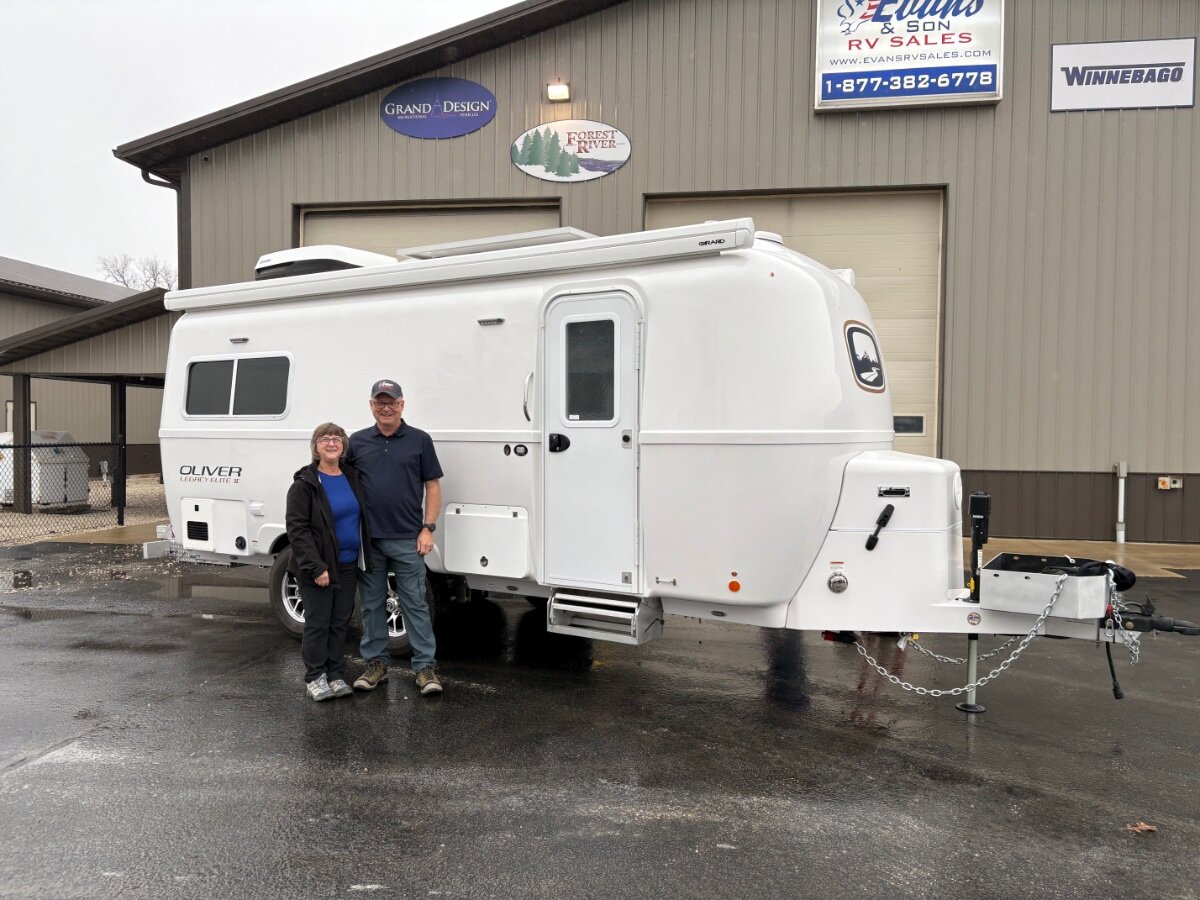
We just picked up our new Oliver Elite ll on Saturday Feb. 8, 2025 at Evans & Son RV in Petersburg, IN. Rained most of the way home to Tennessee, but it towed like a dream. Such a difference from our previous RV.
1 point
-
I think it is purposely designed to run continuously the majority of the time and to keep a steady temp / humidity level which is exactly what I've been looking for. The mostly steady state running at a MUCH lower watts *should* equate to less stress on the unit as compared to the typical non-invertor AC's frequent start/stop of the compressor and the surge amps encountered each time. Being fairly new there's really no way to know the reliability yet for sure, but a 3 year warranty makes the gamble worth it to me. Personally, I also don't worry about the unit testing a little low on BTU's at max since I'm running a Coleman Mach 9600 BTU unit that has no problem keeping our LE2 cool and humidity low. It also tested higher than the Dometic that he replaced.1 point
-
Haven't driven this road in quite a few years but when we last did it was a very slow go so if you decide to do this pack your patience with you. We were not towing at the time, just car camping with tents. In most areas it tends to be a near bumper to bumper experience with many small towns communities along the way. Think stop and go traffic and driving. It is a very pretty drive if you have the time and patience. At the time we were there the campgrounds were very packed and very crowded along the way, almost claustrophobic at times, and no doubt much more so now by any measure. Since 101 is on the Pacific coast even in the summer months it can be considerably cooler than you might imagine, pack accordingly. There are a lot of nifty little towns along the way and depending upon what you are looking to do it could be a pleasant trip. Just don't be in a hurry. Good luck.1 point
-
That makes sense. So kindly consider deleting your "I recommend" post, or at least via edit clarify it as you have clarified above. Neither of us would want a new owner to see to see it as an endorsement for "staying the course:" with the OEM 1750 # springs. Thanks GJ1 point
-
Delete the Optifuse asap (China cr@p) and replace it with a 300A ANL fuse. On a recent post by @John Dorrer I listed Amazon links for the parts required. I have an ANL fuse in line with our Victron inverter and can run the A/C and microwave simultaneously! Not that you’d want to, but it does so without blowing the fuse! You don’t want a breaker for this connection and OTT knows this (finally), now that they’re not using the Optifuse anymore. That’s what Jason should have told you.1 point
-
I’d considered that - but with the Rove dashcam, the only surface on the camera would be the bezel around the lens. I’m not sure that’s enough contact area to assure it would stay in place. Especially since we tend to be in “hot” areas that cause even tough 3M “VHB” tape. That, and I’d have to create an open circle of tape to go around the lens. (in case I wasn’t being clear - I wanted to mount a cam to the rear window of the P/U facing to the rear, and one on the rear window if the Oliver. Being vertical, the mounts supplied with the camera don’t provide enough clearance to aim the camera level to the rear.)1 point
-
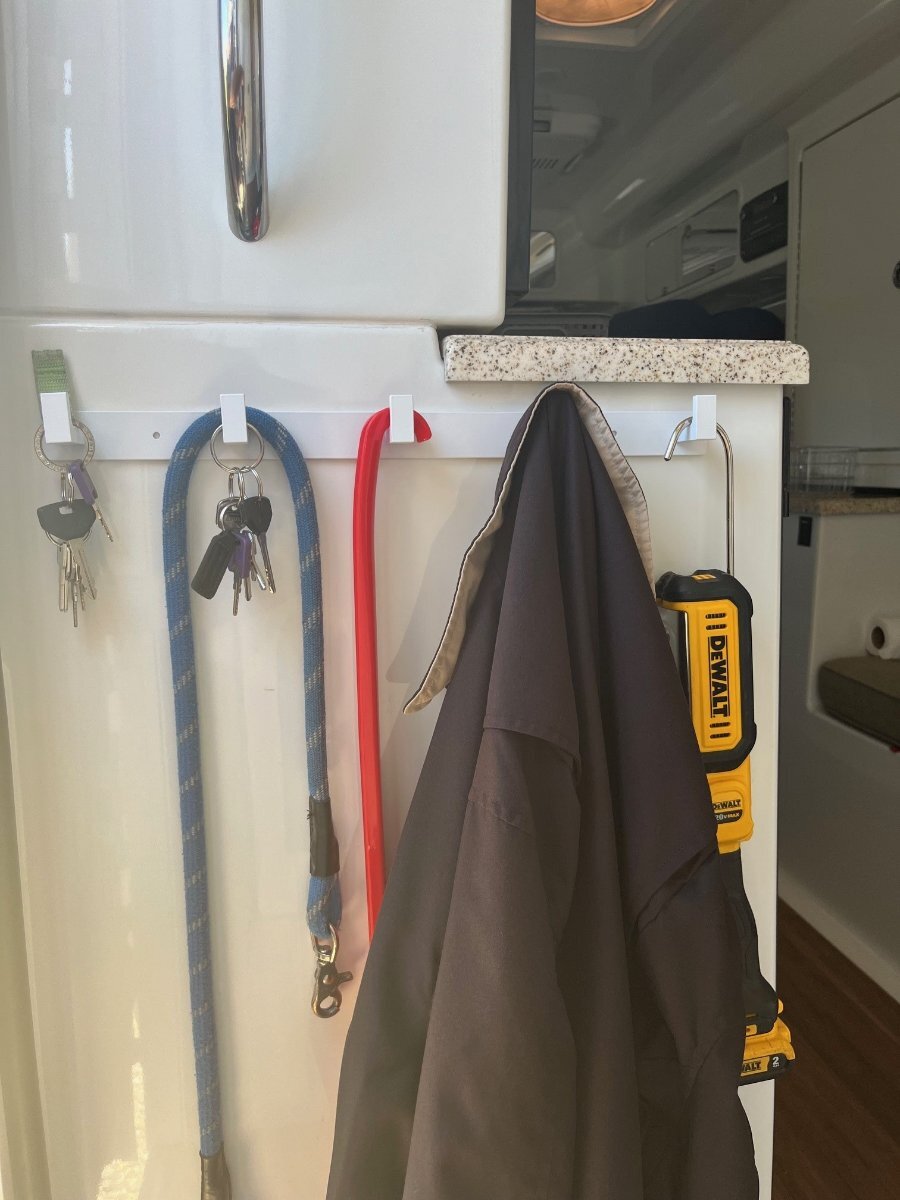
Thanks @Dave and Kimberly, this is a fun thread! 🤣 Another thing that has helped up immensely is having a key and coat rack that can be reached standing outside the door of the Oliver. When I put my keys here they are not lost!
1 point
-
I took a small square of "clear" packing tape and placed it on the inside of the windshield. Then an appropriate size of double sided tape (3M) with one side of the tape applied to the camera and the other side to the tape. In case you're wondering what the packing tape is for - it is much easier to remove this packing tape than it is to remove the double sided 3M stuff. The camera has now been in the same place for two years without a hint of a problem. Bill p.s. from the "high" position on the windshield it was easy to route the hard wiring into the head liner, over to the "A" pillar and down to the interior fuse box. All that is visible is about 1 inch of the main power wire and about 1 inch of the wire back to the rear facing camera.1 point
-
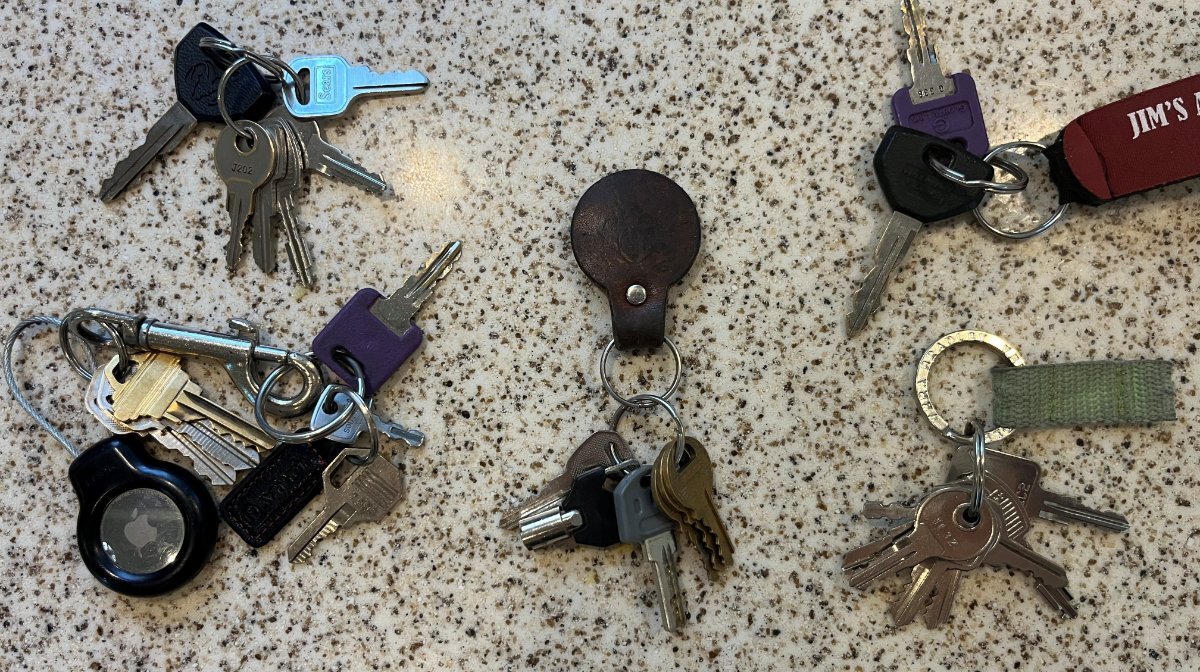
So this can get complicated so I've attached a pic! 🤣 If I carried all our required, notice the hook, I can be the janitor too! The keys on the left are my set, Chris' on the right and we each have every possible key for the Oliver and TV. The keys in the middle are used for hitch locks, our shed where we keep our camping stuff when home and some padlock keys. This set just stays in the truck toolbox side pocket and are always there unless hitching. I always carry the top left ring which has everything for the TV, 2 toolboxes, fuel cap and tailgate key, etc. and they fit nicely in my jeans pocket watch pocket. Bottom left are my Oliver and house keys for when we return and I always keep these in the TV console unless when rarely needed. Chris has a duplicate set. She is in charge of the Oliver door and when we take a hike, walk the dog, or the like, she carries the two keys top left on a wrist band and I leave my TV keys on a hook just inside the Oliver. At home, I have a whole special box full of keys; 2-3 sets for each vehicle, bikes (not bicycles) and dirt vehicles, shed and outbuilding and more and the box stays in a locked closet, key hidden in the nearby cabinet. I also have a hidden key box in the frame of the truck because I'm only going to lock my keys in the truck once without a backup! I loose my keys ALL the TIME! But they're always somewhere in the truck bed or on the Oliver bumper or somewhere like that and we never leave camp without my keys. Chris NEVER looses her keys, period end of story! She reminds me of that when she helps me find my keys. 🤣
1 point
-
We have a Rove R2-4K dashcam. Though by default, it plugs into a “cigarette lighter” outlet, our new TV doesn’t have one. Though the cable supplied with the unit will also plug into a USB-C receptacle - which our new TV has, I decided to buy the “hard wire” kit which lets you tap into your TV’s fuse block. I bought 2 additional units to add a rear-facing dashcam to the TV, and one for the rear window of the Ollie. A problem I have yet to solve is that the supplied mounts - both suction cup and adhesive mount - won’t work on a vertical window like the rear of a Pickup truck, or the Oliver. Has anybody found a way to mount a cam on a vertical glass?? I think I could just use a spacer of an inch or so, but curious if someone has already invented this wheel. (Apparently Rove hasn’t.) TIA, V1 point
-
We had GEICO for several years after Farmers got far too expensive! Then GEICO became a pain. They stopped allowing us to make changes online. Then they wouldn’t allow me to change what family member was driving what vehicle and charged us for commuting and I hadn’t driven to my job in years! I remember trying progressive online years ago after all the Flo commercials and it was very expensive. Recently we went with a local independent agent. He shopped many companies and he got us into a preferred account with Progressive. Costs were 20% or more less than GEICO. We switched all of our vehicles and we have several. Twice a year I switch winter vehicles to summer. Switch two vehicles from full coverage to comp only and vice versa. We insure our TV and Oliver with them. When we get done traveling end of July, I will put them both on Comp only for a couple of months until we travel again in October. This saves us quite a bit. Yes, in my head too, everything is too expensive these days! Like you wrote the 80s or at least the 90s.1 point
-
David, we agree!!!!!!! Believe many areas on the BRP will reopen by the end of the year! 🙂1 point
-
Your watt numbers closely match those seen in this test of the Turbro unit (which I assume is the same as the Pioneer) when it is throttled down into the 8000 BTU range. It has a crazy good EER of 18 at that BTU range and I bet it will run at that lower level in an LE2 in most situations once set temperature is met. They only recorded a max watt draw of 1100 watts while running at full capacity which is also a crazy good number. Thanks for sharing this info... I'm just waiting and hoping for a sale on one now.1 point
-
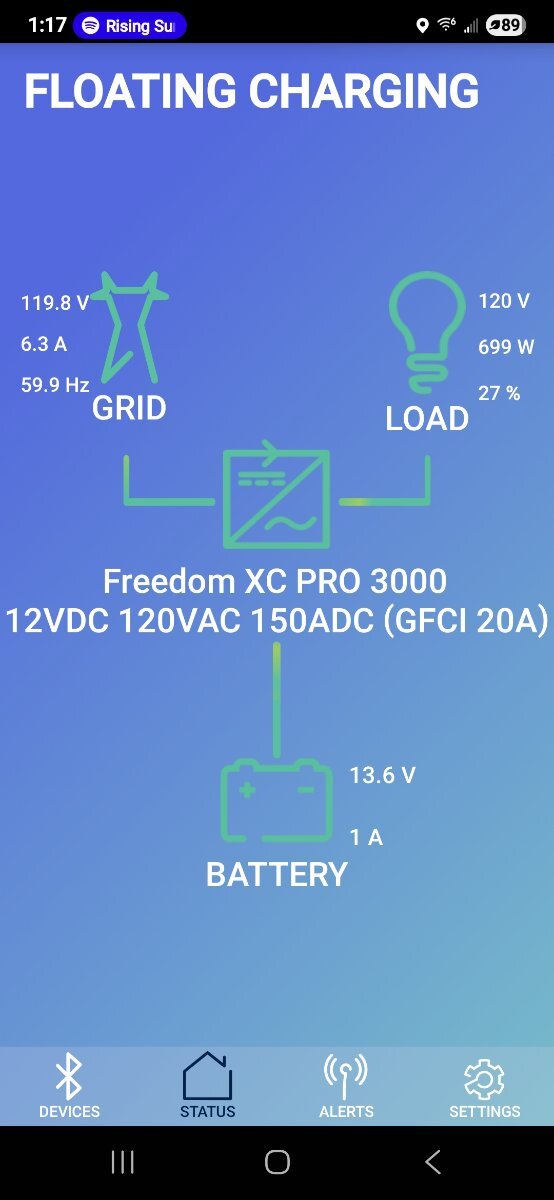
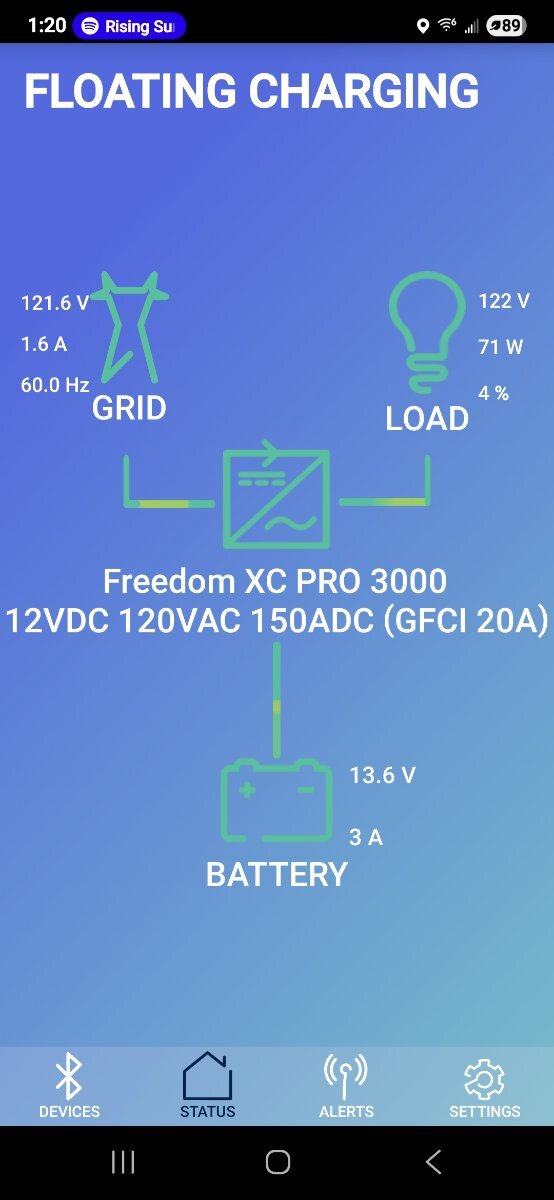
I have the Xantrex XC 3000 as shown in pics and 2 LifeBlue 200 AH Batteries. Here is with AC Compressor running and the lower wattage is compressor cycled off and fan running. It will drop down to near 500 watts as it cycles. It starts up around 200 watts and ramps up to 720 and settles in a few seconds just under 700 watts on start.
1 point
-
In the recent thread, "2 broken leaf springs / shocks" the discussion of Alcan springs came up again. Then I realized we would travel right through Grand Junction CO on our way home, so it got me thinking. Is now the right time to upgrade? So, I called Alcan yesterday and thought I would be connected to Lew, the name I read on our forum many times, but instead talked to Tim who was fully versed in Oliver needs. We talked about the leaf springs and upgrading to 5200 lb axles. I cannot see doing one without the other. I sure wish they had run out of 3500 axles, like some others, when they built our hull! The 5200 axles and Alcan springs would allow carrying more weight. I don't see much in other limiting factors, the wheels, tires, frame and steel sub-frame should all handle more weight. Not that we would ever carry much more weight being at about 6500 lbs today, but nothing wrong with over-engineering overall strength. My only worry about new axles are the mixed reviews on the Nev-R-Lube bearings. I want 5200 lb axles to have 12" vs" 10" drum brakes. This is a big deal/difference for mountain towing. I was contemplating having them do the work, biting the bullet on this large $$$$ ticket item, but in the end I got off the hook! Alcan stocks the Dexter 50.5" 5200 lb axles but not the older 50" model that only a couple of us have. Tim put a set of 5-leaf Alcan springs on hold for me including their HD shackles and new wet-bolts. I will hold off on new u-bolts until I purchase new axles. The Alcan leafs will like sit on the shelf in my shed for a while. Our original leafs are still in like new condition, not a spot of corrosion and nicely arced. I also have a new pair of leaf springs and new u-bolts under the tool box of our TV, with the necessary tools, for any roadside emergency. I'll spend close to $1,000 next week and then another $2,000+ at the time we purchase new axles...1 point
-
Sounds about right for us as well, except the e-bikes have separate keys for each battery with two batteries for each bike🤪. It’s kind of ridiculous! I have lost a full set of keys recently so I’ve changed tactics for “key management”. First off, with keys pads on TV and Oliver like @Patriot, I’ve always kept most of the keys ringed together in a safe location in the truck. Unfortunately this gives you the potential to lose all the keys with one mistake 🤨. The difference now is the keys are still kept safely in the truck, but ringed together in logical groups. Truck and trailer access, bikes, hitching related, and miscellaneous which includes cargo boxes and any other keys that don’t fit the other groups. I only grab the keys needed for whatever occasion, and of course never lay them down while in possession 🤔. The incident mentioned above happened by laying the keys on the bumper while making a hitch adjustment 😩. Some of these keys are very hard to replace because blanks can be very scarce depending on the design. Oh and now there’s a full set of backup keys in a safe location in the Oliver including a second key fob for the truck, and additional backups for everything at home. Not going through that again!!😆1 point
-
I should have added, that the decision to go from 3500 axels to 5200 axels is a personal choice. Some owners have found out from Oliver that switch can't be made. While the springs breaking have mostly been on older trailers, 2021 and older, I'm sure the 4-leaf spring will continue to have issues. Dexter supplies most of the RV industry with their suspension system. Oliver could instruct Dexter to install 5-leaf springs. This would be a better option than the 4-leaf, but not close to the Alcan 5-leaf springs. I have our springs and shocks checked professionally, every 3,000 miles, when my Zerks are greased. With our 2022, am I playing Russian Roulette? That is a really good question. Many of you might say yes, but I think I'm watching things carefully. At some point, I will make the switch to Alcan, and schedule a day to get it done in Grand junction. Switching to Alcan, or other choices, are personal choices we all have to make.1 point
-
8 ~Oliver Door Lock ~Basement/Battery door ~Master tongue lock ~Bike rack locks (all keyed alike ~2 Bicycle keys ~Cable lock across tongue box ~Toyota key But at camp, I only carry the door lock key, and while travelling, just the door key and the Toyota key. I have two duplicate sets stashed, because I once arrived at camp with just the door key. So I spent four days without unhooking from the truck, leveling, dumping, or external power...1 point
-
It sounds like you may have either a high resistance connection. It would be heating up a lot. A thermal sensor (Like we use for checking brake temperatures) would spot that easily. Or you have loads that are not on your view screen yet. For example: Like your litho's are force charging the TV AGM's. Like the hot water heater switch is on 120V (Switch lower left hand corner of the hot water heater (outside). With your Clamp on Amp meter/Multi Meter you can trace the current flows and voltage drops to see where all that energy going. You can also check the accuracy of what you Gizmology is telling you. GJ1 point
-
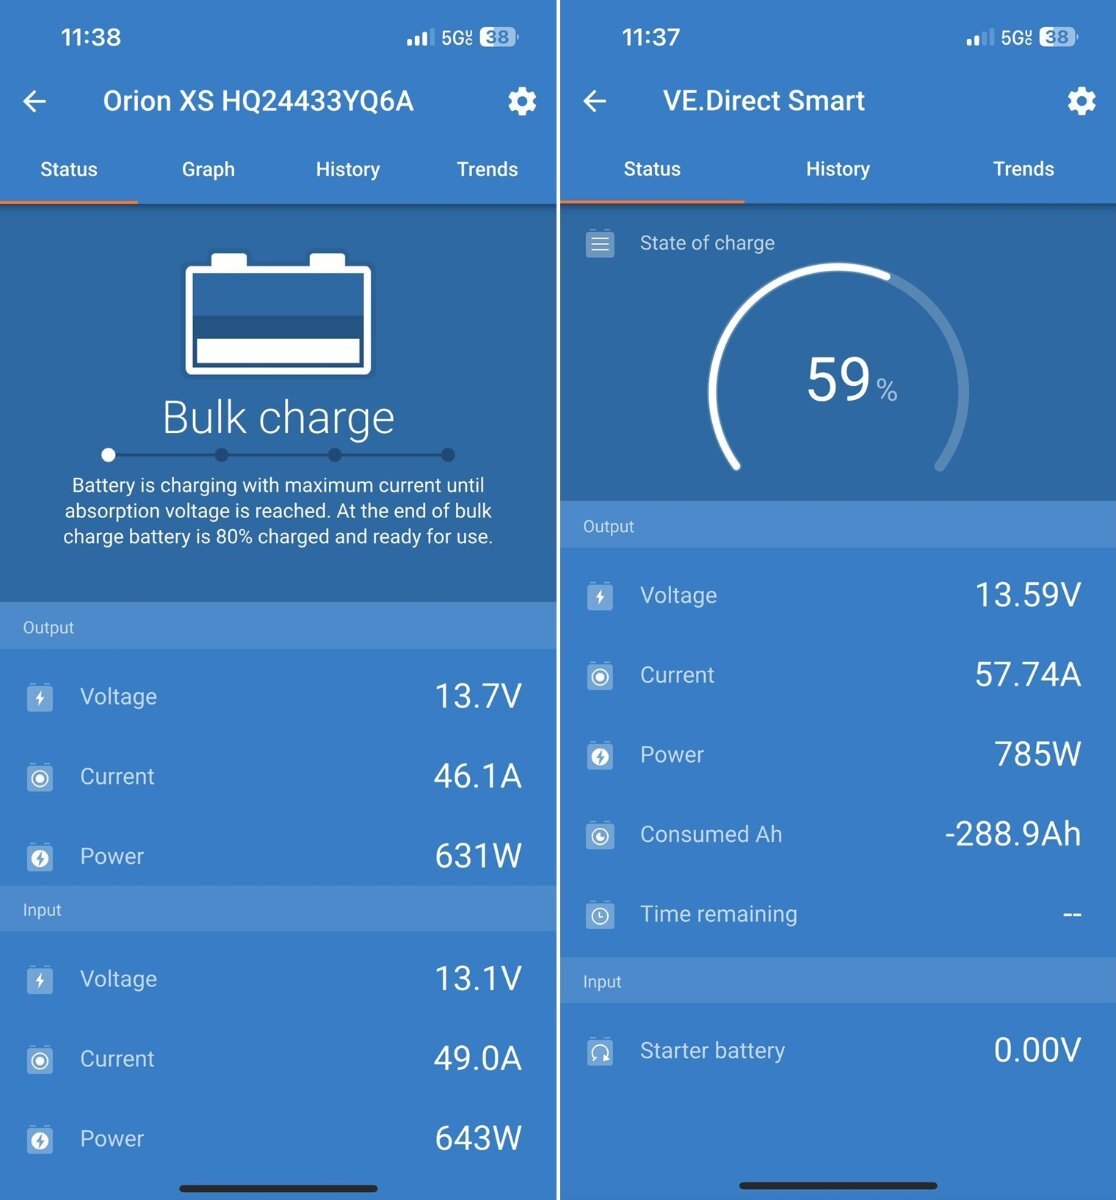
We just got back from our Albuquerque trip and it was our first outing with real highway miles, about 1000 miles roundtrip over the last 12 days. We are now getting BETTER performance with our Orion XS 50A DC-DC charger. I have seen charge rates often at 45-47A and once 48A was observed! Check out these pics. As soon as I read total charge of 58A (see 57.74A on right side) from the shunt reading, I switch to the Orion reading asap and it was at 46A (46.1A on left). The fridge was on DC but likely not pulling amps at the time, so the Blue Sky charger with 320W rooftop was supplying the extra 12A. We were at 59% SOC (of 600Ah) when leaving after two nights and was up to 82% when we arrived at our next camp. A 58A charge rate is likely the best case scenario, but no more worries about battery SOC%. You gotta get one of these!
1 point
-
First highway test today. Left home today and drove 175 miles to Holbrook AZ. We went mainly state highways, drive-time of 3:10 hours, an average of 55 MPH. We started at 59% SOC (600 Ah total) since we had started the fridge on DC about 40 hours before departure. Just after we arrived we had 81% SOC. That's +132Ah in charge or 41.7Ah per hour charge rate. However, the Orion on the Victron app never got above 38A and was more often running at 35A. This means the Blue Sky SC and 320W solar was supplying the DC power to run the fridge and net close to +7Ah. This is so cool! Tomorrow we will arrive in Albuquerque and since it is about 240 miles I'm thinking will be pretty close to 100% SOC. I'm never going to worry about our batteries when we have a half day or more on the road again!
1 point
-
I have been running this D/C since 2022 and am really pleased how it works and how small and compact the camera is. Clear crisp photos or video. https://www.amazon.com/Garmin-140-degree-Monitor-Connected-Features/dp/B0931YZ82P/ref=sr Memory card -https://www.amazon.com/SanDisk-Extreme-microSDXC-Memory-Adapter/dp/B09X7CRKRZ/ref=sr I also recommend this polarized lens cover- https://www.amazon.com/Garmin-Polarized-Lens-Cover-010-12530-18/dp/B07LDCK7ZR/ref=sr_ Here is the Ford specific plug and play dongar.tech short connector which plugs into my review mirror and powers the camera. Install is a breeze. You can barely see the Garmin Mini 2 while in the cabin as it mounts up hidden discreetly forward of the review mirror. Note: you must have the auto dimming rear view mirror with the 16 pin connector for this plug’n play to work. 💯 happy with this dash cam set up and would buy again. You may want to call Dongar tech to determine which connector will work for your Expedition trim level. https://dongar.tech/products/16pin-ford-f150?srsltid=AfmBOookPpMlEZvtWy9Hi5SQfoIIYMJNOU0HJqtJewLLbWFu9zZgQjjS
1 point
-
Hi all, Shopping for insurance (again) and trying to find out who the “best” companies are. We currently use GEICO for both TV and our Oliver. Maybe I’m just still living in the 80’s, but insurance has gotten rather pricey! I have to admit to not having read every jot and tittle of our policy - but you can be sure I will now! I hit a bit of a rude surprise when I found out “yacht” (Catalina 30 sailboat) needed a rudder and that our “cash value” policy through GEICO (Boat US) is paying for the replacement of the rudder - depreciated by its age. So they’re only going to pay 20% of the replacement cost of the rudder and other parts that are replaced. (Getting rid of the boat anyway - ready for that “other happiest day of a boat owner’s life”) Anyway, suggestions? Experiences? Geico has been great with our previous TV that got hit while parked when it was 6 months old. You never get it “all” back, but they didn’t squawk at the estimates, let us use our dealer, and paid instantly. I’m leery after the boat experience that they may not be as good should we ever file a claim for the trailer. That, and I think I owe it to myself to shop around since I’m thinking I’m paying too much. (And who isn’t?!)0 points
-
I think that's a first for me. I guarantee they are laying in a ditch within a half mile of our house. Had to source the replacements from several key services as well as the manufacturers, Over $200 combined. Live and learn..........0 points
-
I’ve been able to narrow a similar list of keys down by using locks made by Pac Locks. They make a replacement Puc lock for the proven industries tongue lock, hitch pin locks, cam locks, and of course various pad locks for bikes and stuff. The beauty is that they can all be keyed alike so only one key is needed for all of them. I discovered Pac Locks through the “Lock Picking Lawyer’s” You Tube channel. He can pick most other locks in seconds, and Pac Lock is one of the few locks he recommends. Cheers, Geoff https://youtu.be/7eOt2mHEAOM?si=L-qhIZCfPWqQFOXa0 points
-
David and Gail: Welcome and happy travels. Here's our web page https://4-ever-hitched.com/trips-overview showing our trips for inspiration and ideas and well tested gear for your Oliver. If you ever come out west let us know. Craig & Rose Hull 505 https://4-ever-hitched.com/trips-overview
0 points


-
Recent Achievements
-


")


")


")

