Leaderboard


Popular Content
Showing content with the highest reputation on 08/11/2025 in all areas
-
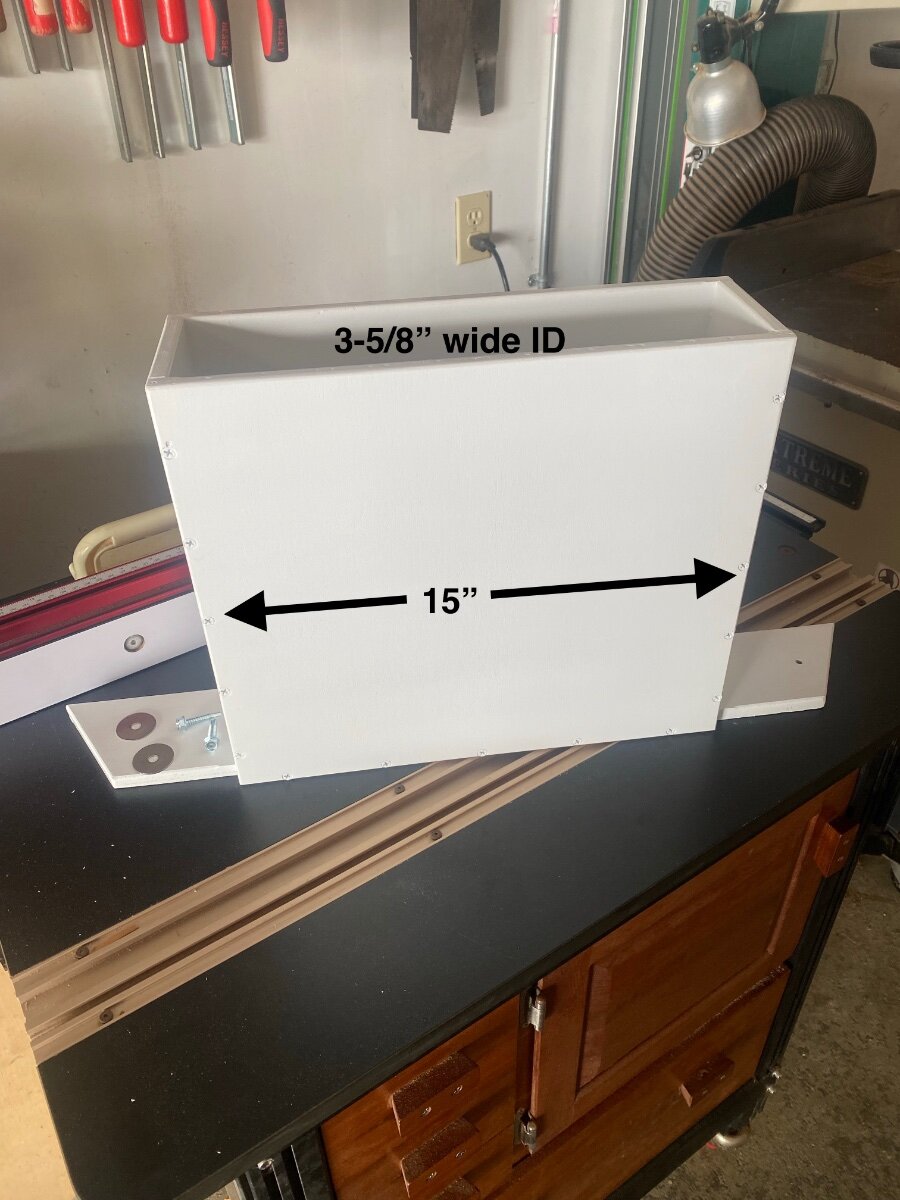
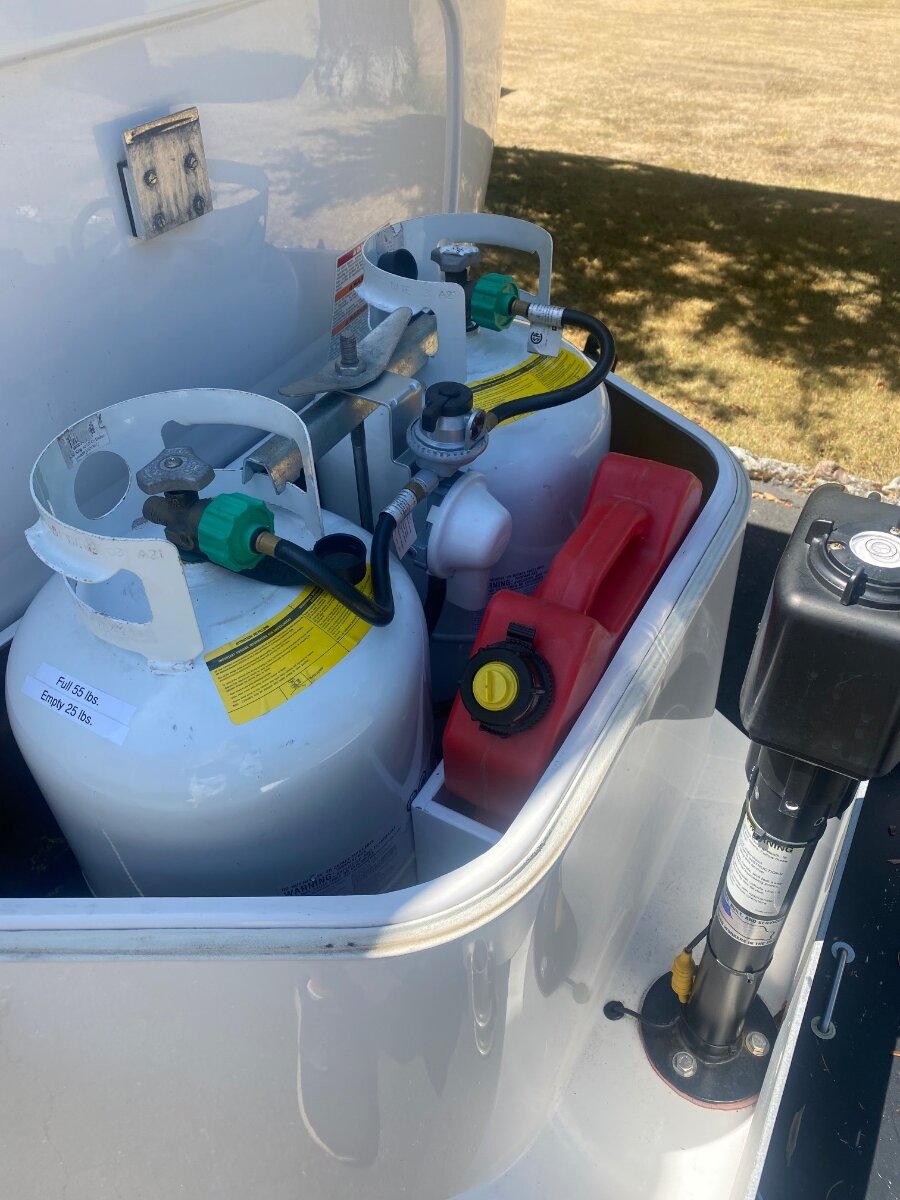
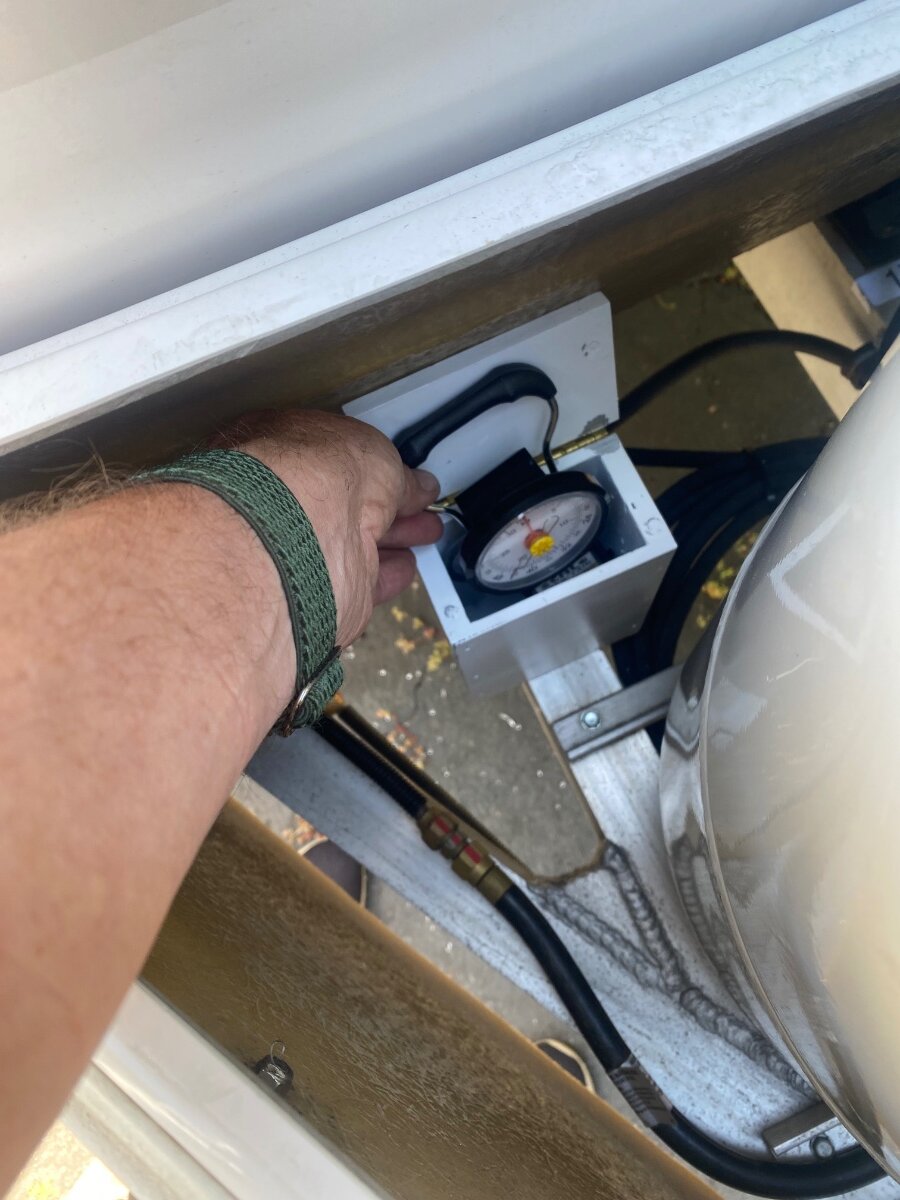
While preparing for an upcoming trip, where I’ll probably need to run a generator for AC, I decided to utilize some unused space in the dog house to store my RotoPax 2 gallon gas can. I used to carry it in the tongue tray with the generator, but now I’ll always carry it for emergency fuel. I made a rectangular box that's sized so there is just enough friction to hold the gas can snugly in place without needing a strap, and narrow enough to fit between the propane tanks and the front of the doghouse. The tank can’t come out anyway because of the doghouse cover. I measured the can after leaving it in the sun for a while to account for any expansion. The fuel can holder is made from 1/2” void free plywood (baltic birch), and it’s put together with glue and screws. It was rattle can painted with primer and plenty of white gloss, then attached to the frame with self drilling 1/4” screws, like the ones holding the propane tank tray. It can be locked through the handle if desired. The RotoPax gas cans were originally made for off-roaders, and they are pricey at around $85 each. But they are practically indestructible, and they come in different colors for diesel or water. I’ve had mine for around 7 years and it’s never leaked a drop. There are knock-offs available on AZ for about half the price, but I can't vouch for their quality. From the plywood scraps, I also made a little box for the luggage scale that I use for weighing the propane tanks. It was made in the same way with magnets to hold the hinged lid closed. It was mounted in the doghouse in front of the propane tanks. Hope someone finds this useful. Cheers! Geoff
 8 points
 -
This falls into the bucket of “Beauty is in the eye of the beholder”.
4 points
-
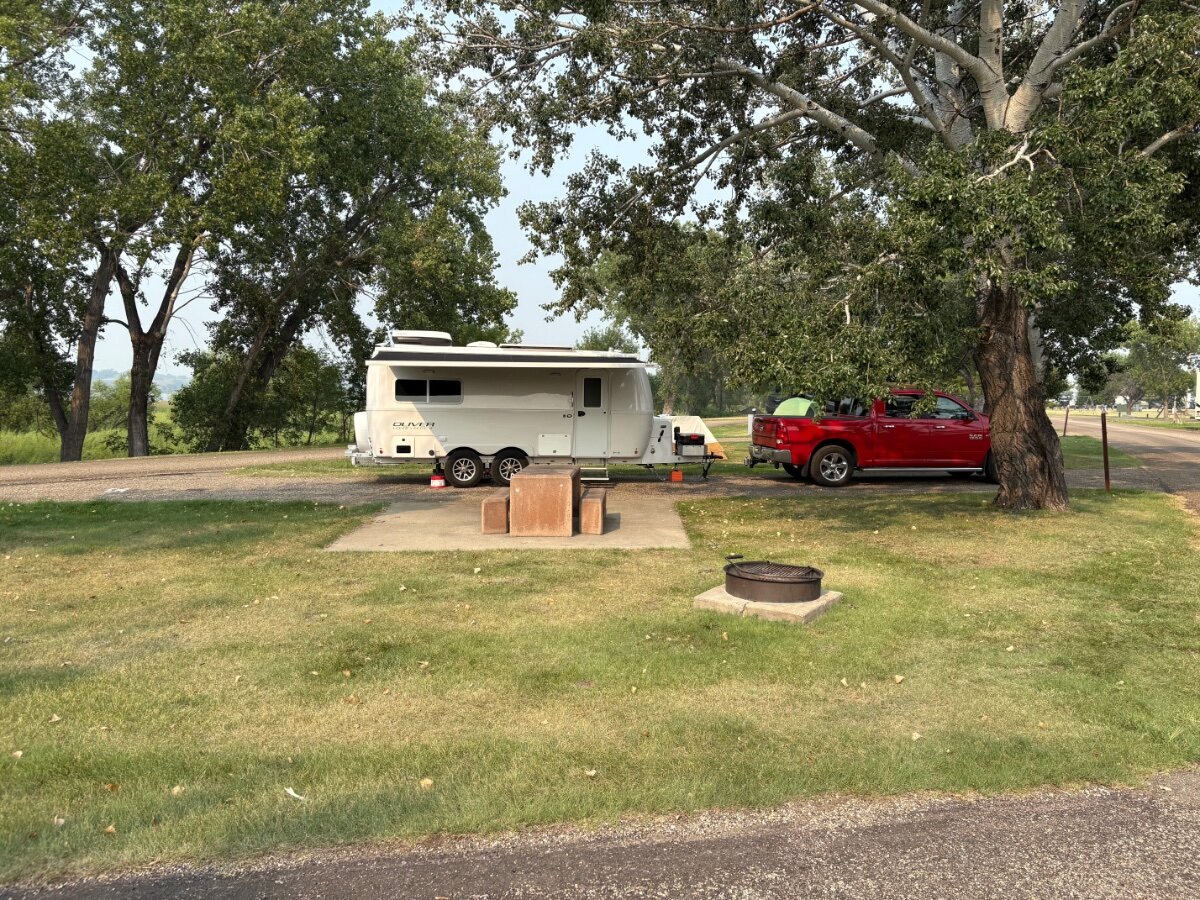
We scored a wonderful spot at a Corps of Engineers park today (August 11,2025). Site 25 at Left Tailrace Campground near Fort Thompson, SD. The weather has been much better than Tennessee when we left for the west. Looking forward to some great boondocking in a few days as we head to higher elevation.
3 points
-
Hard to be sure, but it looks like the overhead speakers are gone. We like the old sound system for music and videos. I'm glad the swing out windows are here, but they usually have integrated shades/screens in other RVs. Those bulgy shades look sketchy.3 points
-
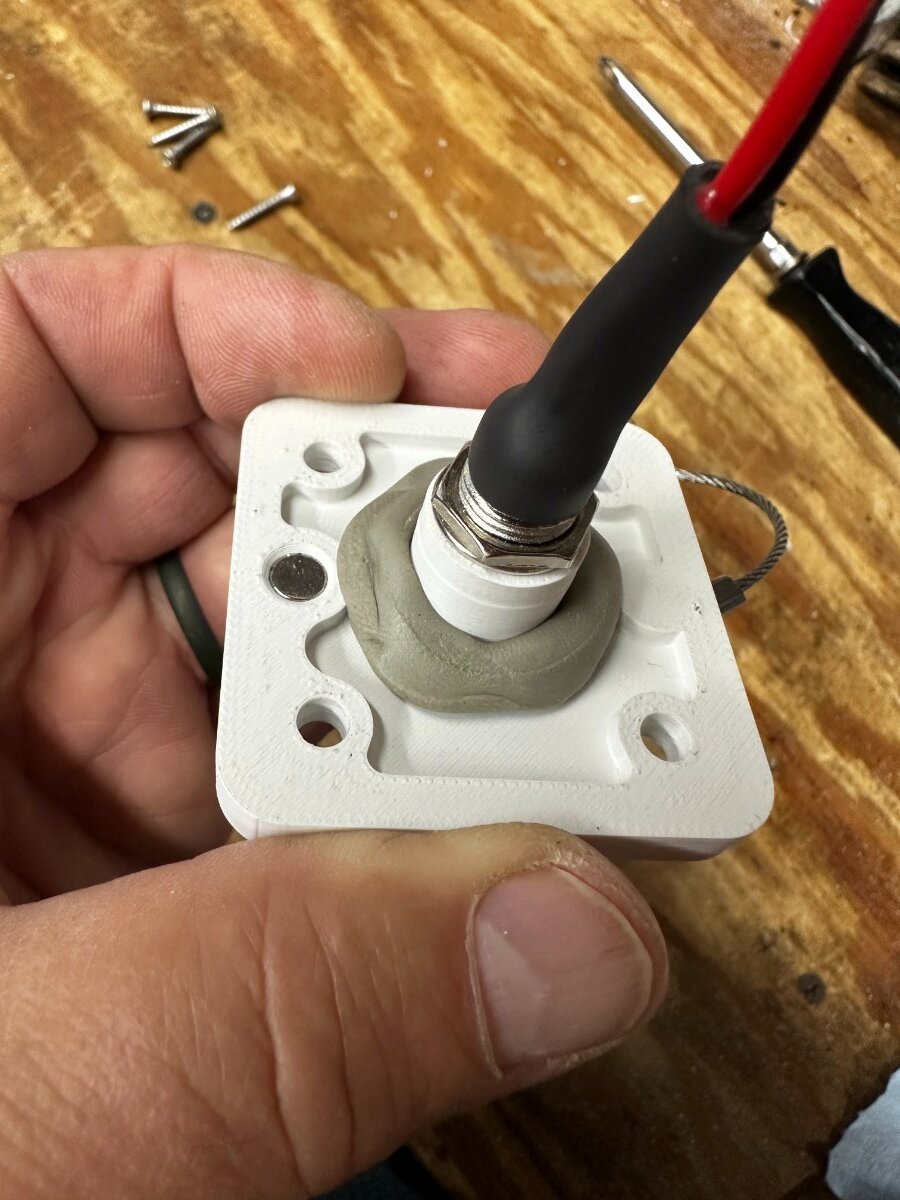
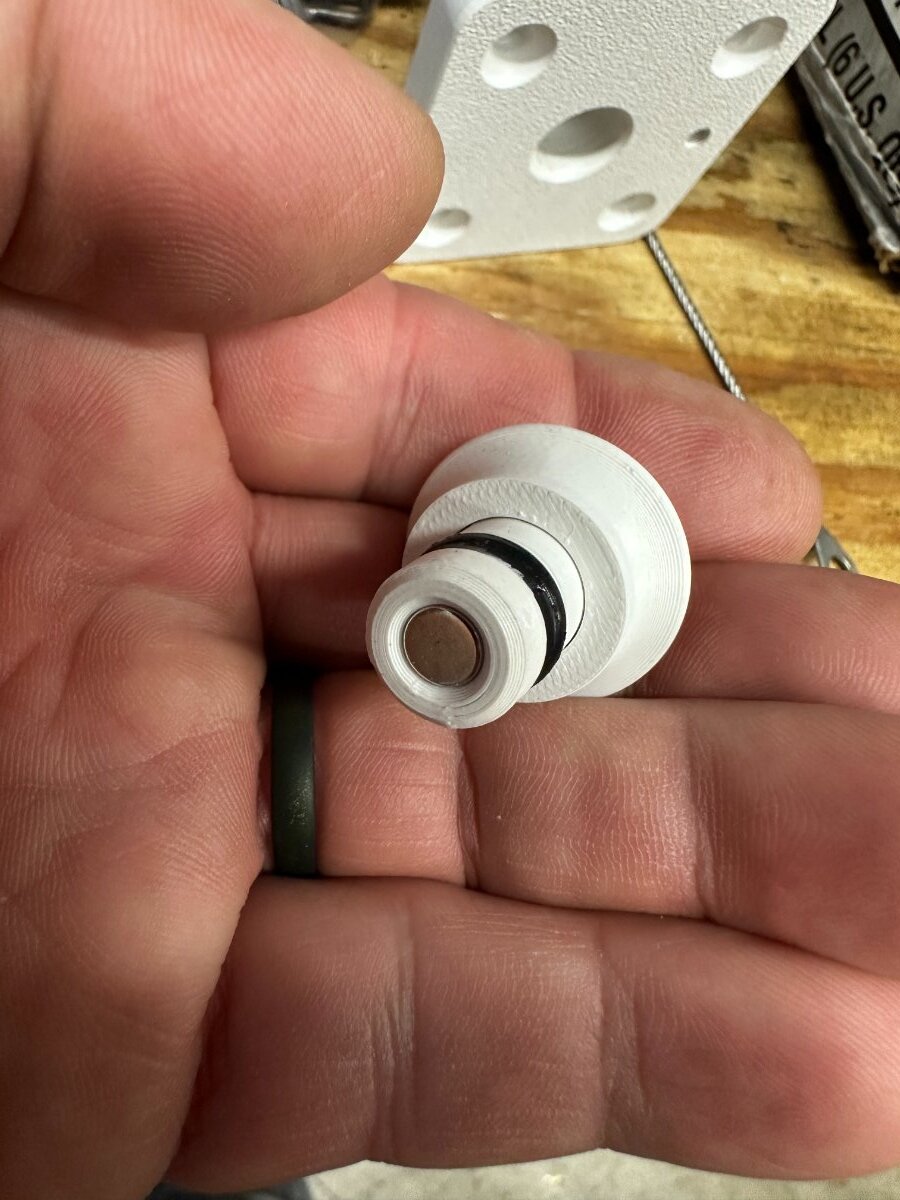
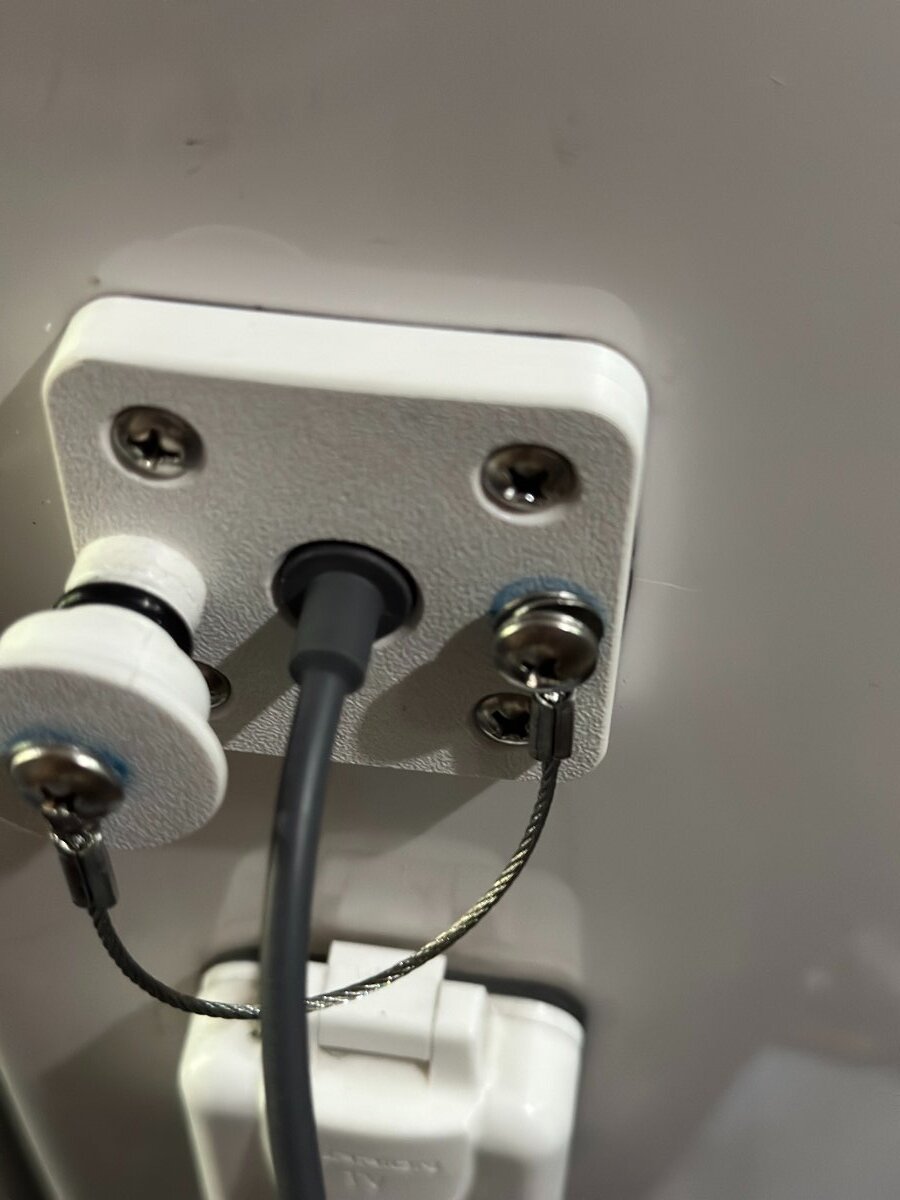
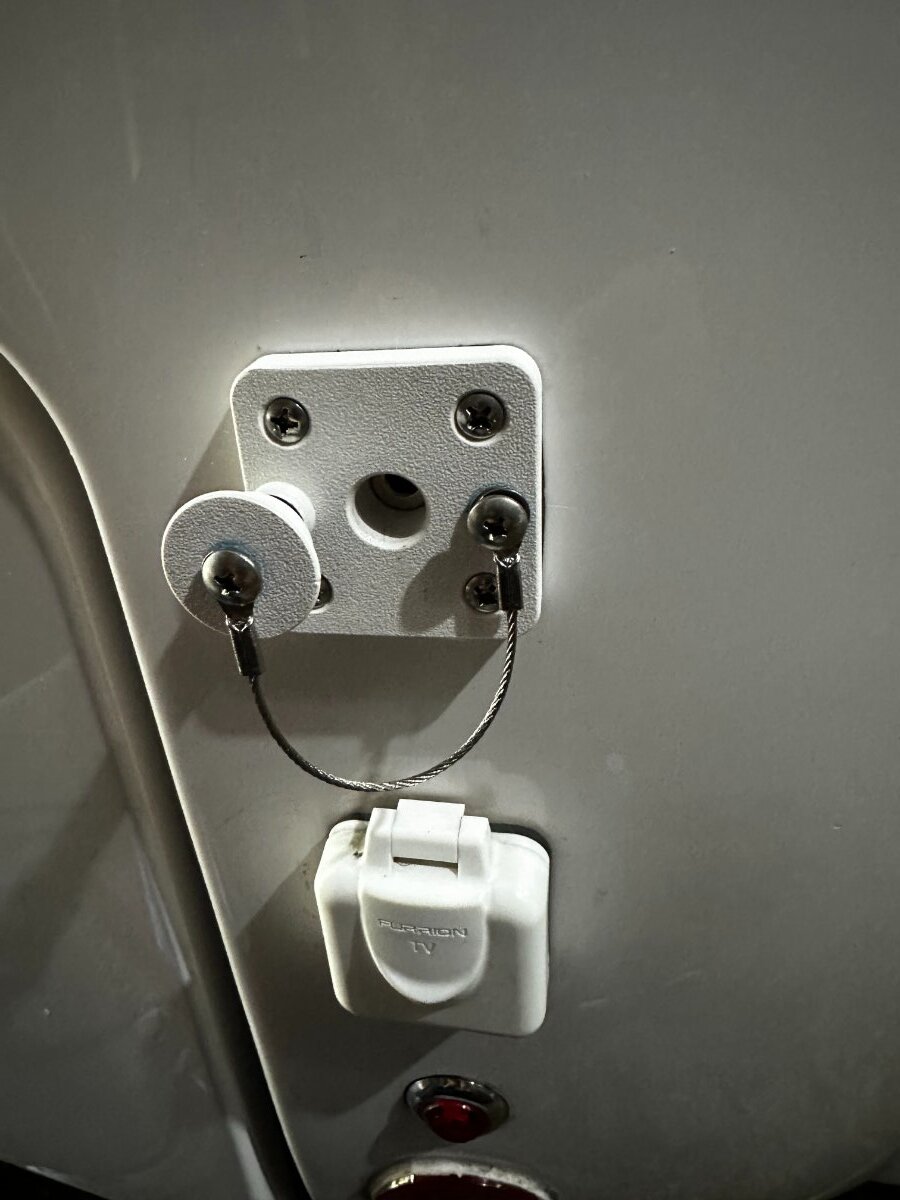
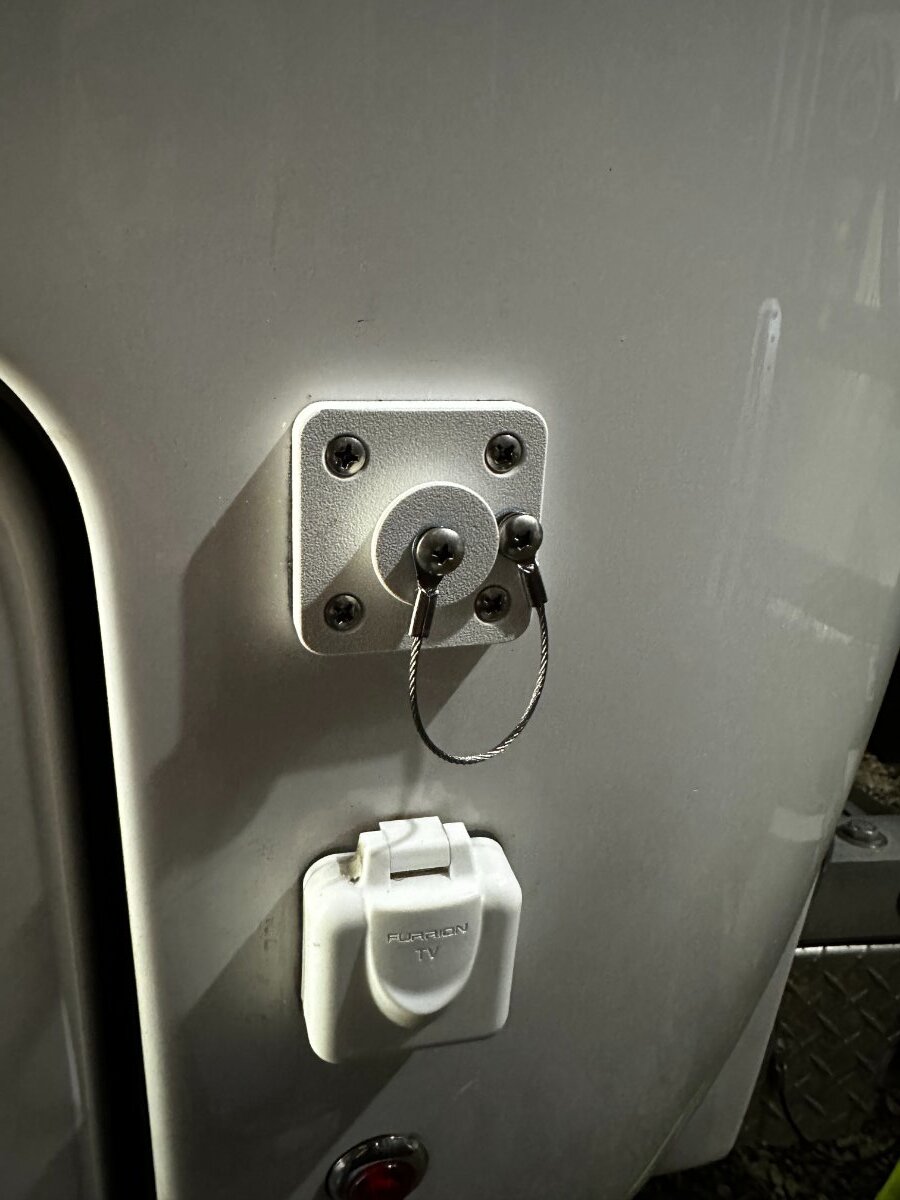
Going back to Geoff's original post on this thread, I did this (except for relay) and it works great but have been concerned about water penetration at the exterior socket when Starlink cable is plugged in. I have swapped mine out for a water-resistant component custom designed and made by Tom at Platypus3DDesigns in Mesa, AZ. Although the original socket worked great, it was not water-resistant so I asked Tom to create one that would replace the Furrion Mini TV/Satellite Inlet. Here is the link to his component. https://www.etsy.com/listing/4349330543/starlink-mini-dc-cable-pass-through It has 18 gauge wires attached and a magnet that holds the cap in. In addition, he adds another magnet on the side that can hold the cap when not inserted. I asked for a modification so I could add a lanyard. Tom drilled and threaded #8x32 holes for that. All screws and machine bolts were attached with blue Loctite. I was able to use the original Furrion gasket. I had to drill out the hole in the fiberglass a bit larger and I wrapped some butyl sealant around the barrel upon installation. Here is a link to the lanyards. https://www.amazon.com/dp/B0B4RXTKBH?ref=ppx_yo2ov_dt_b_fed_asin_title&th=1 To finish it off, I used a very small amount of dielectric grease on the cap seal and rubber fins on the Starlink cable end. Works great. David P.
3 points
-
Follow-up re this thread. This spring I worked brake service on our Oliver. I wanted to be certain the self-adjusters on the Oliver were dialed in. The front axle was close and the rears were a bit looser. This is likely normal. In doing so, Chris was applying the brake in the tow vehicle. At times there was nothing. I asked, "Are you pushing the brakes?" She said "Yes" but the brakes did not stop the spinning wheels. Increased the gain and tried again, the brakes would stop the wheels but 3-4 seconds later. My next comment was, "We need a new brake controller!" Purchased and installed a Tekonsha P3 Prodigy Brake Controller and ran the same test. On the default 6.0 gain when Chris hit the pedal the brakes (all 4) banged abruptly to a stop when spinning in the air. I now believe that when our brakes were over-heating last October, some of it had to do with the weak controller not applying enough power to the TT brakes which caused the brakes on the TV to overheat!2 points
-
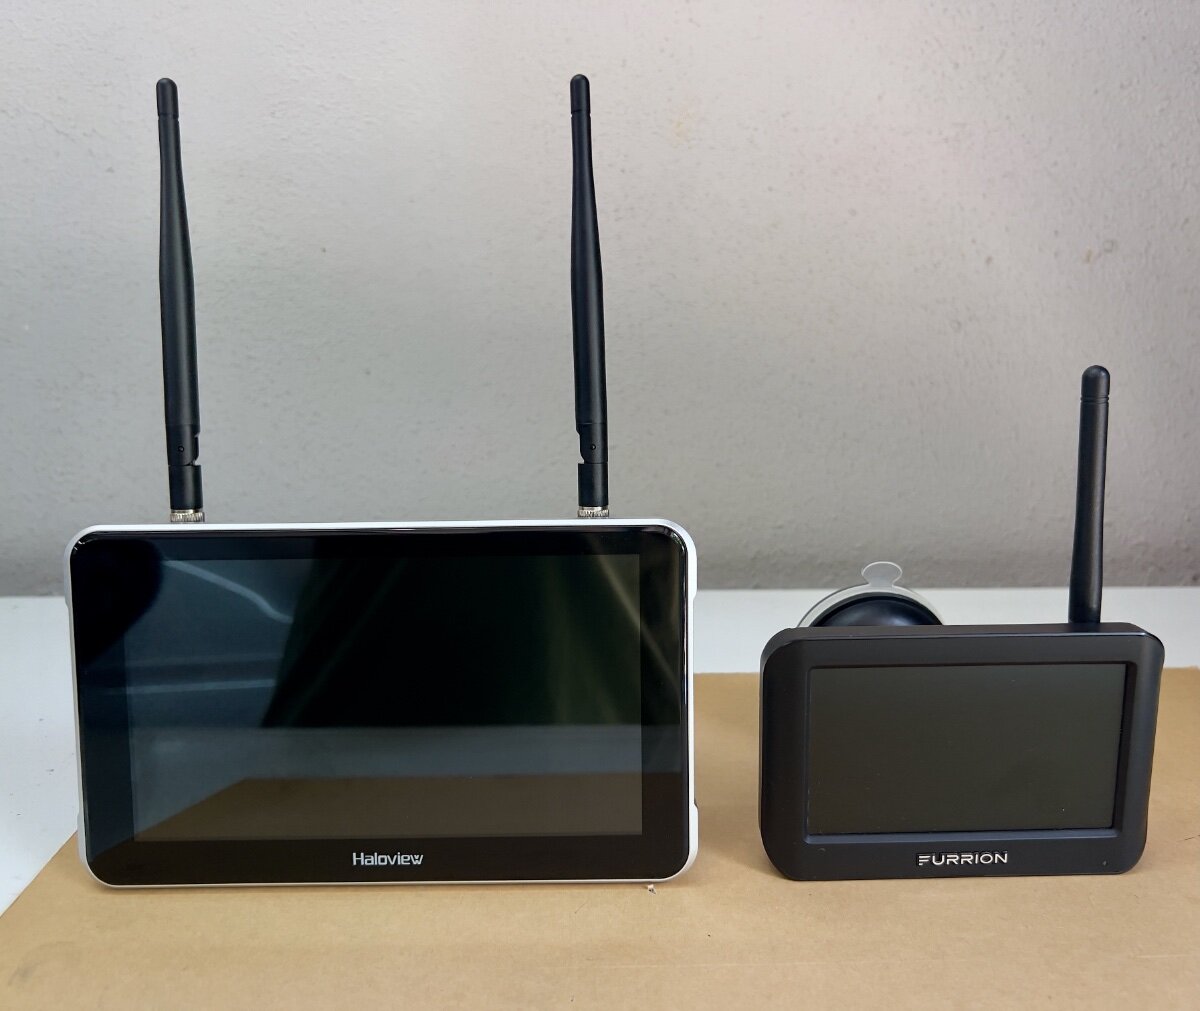
Steve, Sorry to hear of your poor experience with the Haloview MC7108. I am not familiar with this model, which apparently dates to 2019, based on the dates of YouTube reviews. The BT7 Touch, which I purchased, apparently dates to 2024. My experience with the BT7 Touch is limited to my 35 mile drive on Saturday and driveway testing following installation. In no case did I observe any flicker, dropouts or lag when viewing the monitor mounted to the windshield using the suction cup mount. The image was quite stable. As I mentioned, I folded the two antennas to rest horizontally on top to the monitor, which had no discernible effect on the performance of the monitor. If I recall correctly, the on screen signal strength meter dropped from 5 bars to 4. Also, on my short test drive, I was frequently looking back and forth from the TV mirrors to the BT7 Touch Monitor to compare the views to the rear and sides. The images on the BT7 Touch Monitor seemed to be real time images, with no delay, based on what I was seeing in the TV mirrors. We tow with a 2014 BMW X5 35d, using the standard door mounted side mirrors, plus a pair of Milenco MIL-2912 Grand Aero 3 Towing Mirrors. I have used these for 3-½ years, the entire time we have owned our LEII. I am very familiar with the view to the rear and sides provided by the mirrors, and I was comparing the increased visibility using the Haloview camera/monitor. We have a 200+ mile trip scheduled beginning August 27 (coincidentally 4 days prior to the closure of our Amazon return window). This will give me 3-4 hours driving time each way to observe the performance of the BT7 Touch camera/monitor. I will be happy to post an update following a trip of 400+ miles. Also, a minor clarification- The Haloview MC7108 Monitor resolution is apparently 1024x600, 720P high definition, not 4K. For reference, my Furrion, Model F0S43TADS, had resolution of 480x272. The Haloview BT7 Touch Monitor is 1920 x 1080, the resolution of 1080p (Full HD). Regards, Don2 points
-
I saw that on Facebook and commented. Definitely not a fan of the new blinds! They look cheap compared to the current version, and that spot where it rests on the window handle looks like a wear/puncture point, as well as just plain ugly. The TV looks smaller, and the cable entry for the TV swapped sides. Chrome belly band seems to break up the interior better to my eyes. Overall, *I* think it is a step backwards in quality appearance.2 points
-
Very good use of this unused space! @ScubaRx put a disc brake controller up there moving the LP tanks back a bit. One day I’m sure I’ll mount something up there, TBD! 🤣 I’m sure you know this, but recycle this fuel into your gasser TV every time you return home. You can’t count on our regulated fuel today to last much more than 30 days without an additive. I fight this battle constantly with all the many (near 20) gas engines we have on the property!2 points
-
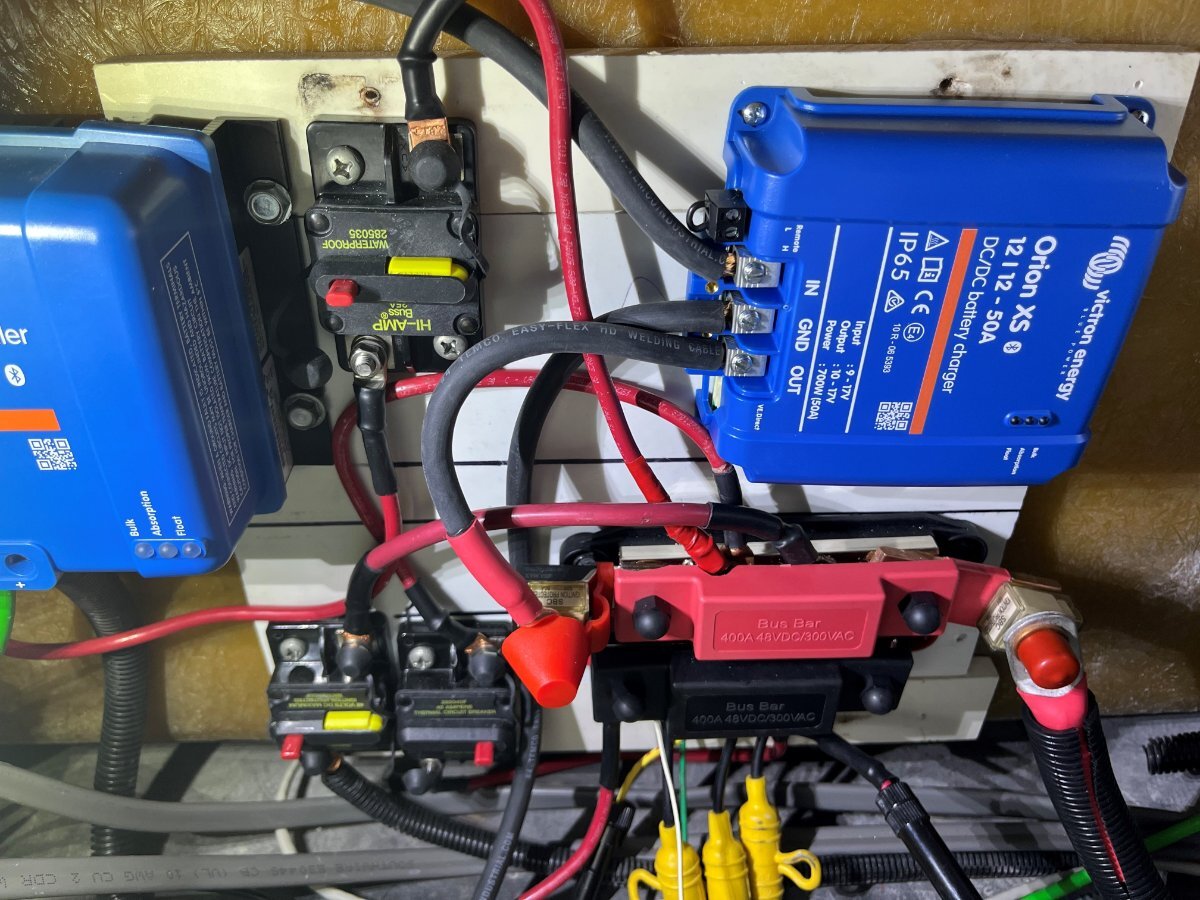
Final step on rewiring the basement electric. I had left room for the DC-2-DC charger and having everything conveniently rewired to the rear dinette seat made everything close and easy! 😂 I have another thread on the charger installation => https://olivertraveltrailers.com/forums/topic/10757-the-victron-orion-xs-1212-50a-dc-dc-charger-complete-installation-and-testing/#comment-115374
2 points
-
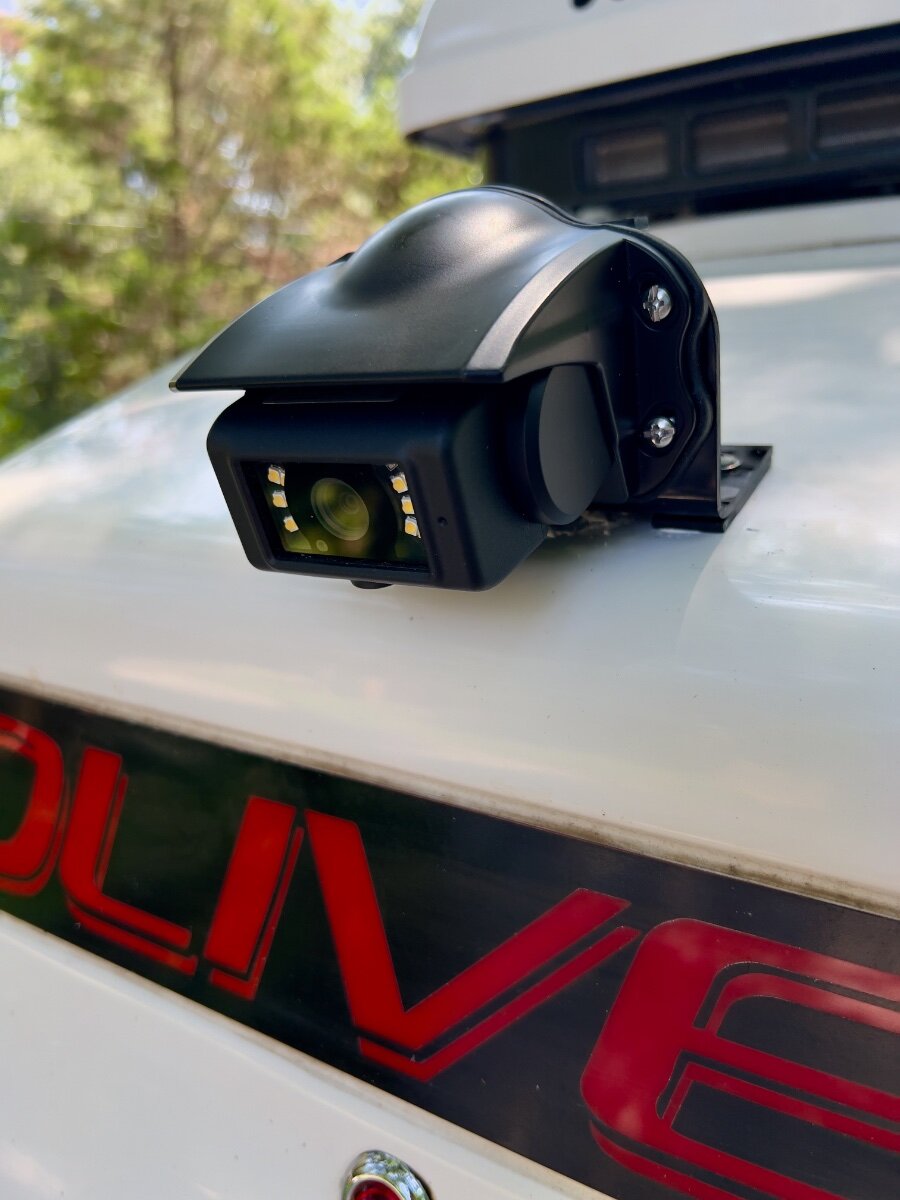
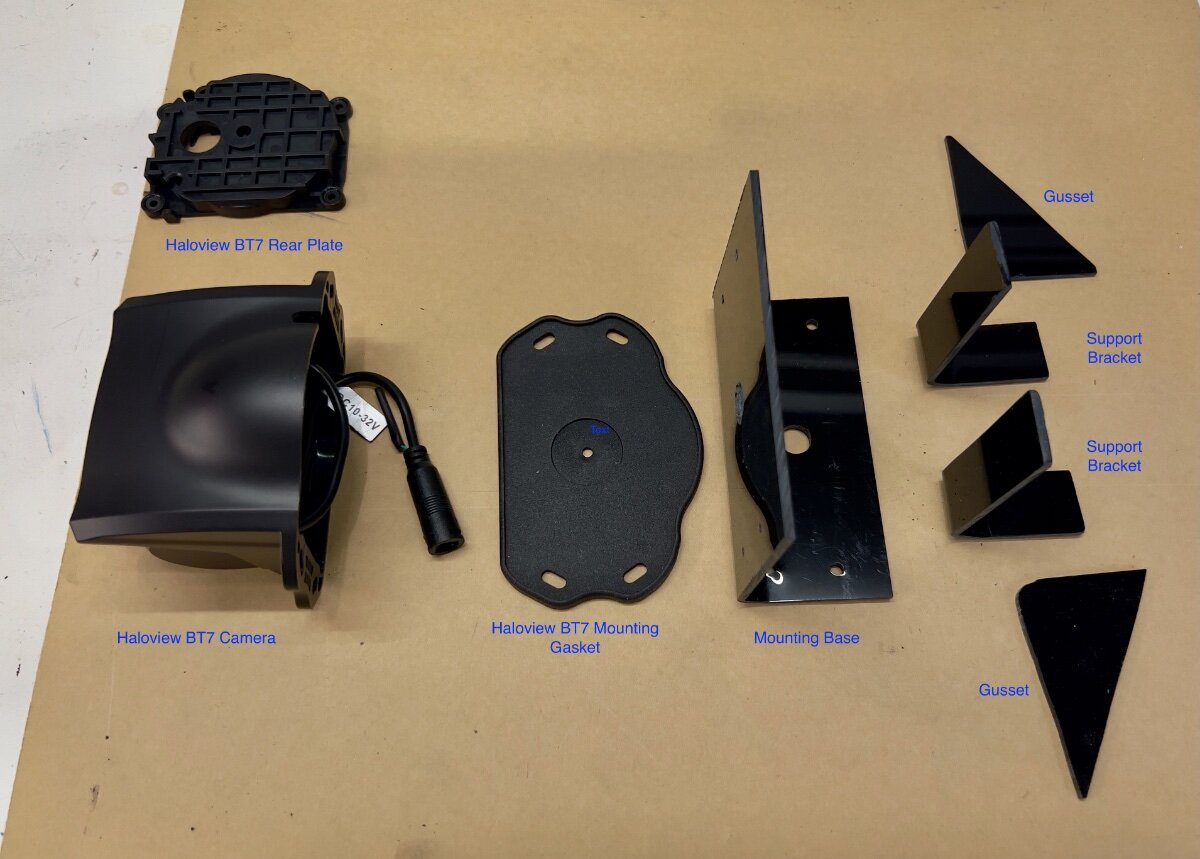
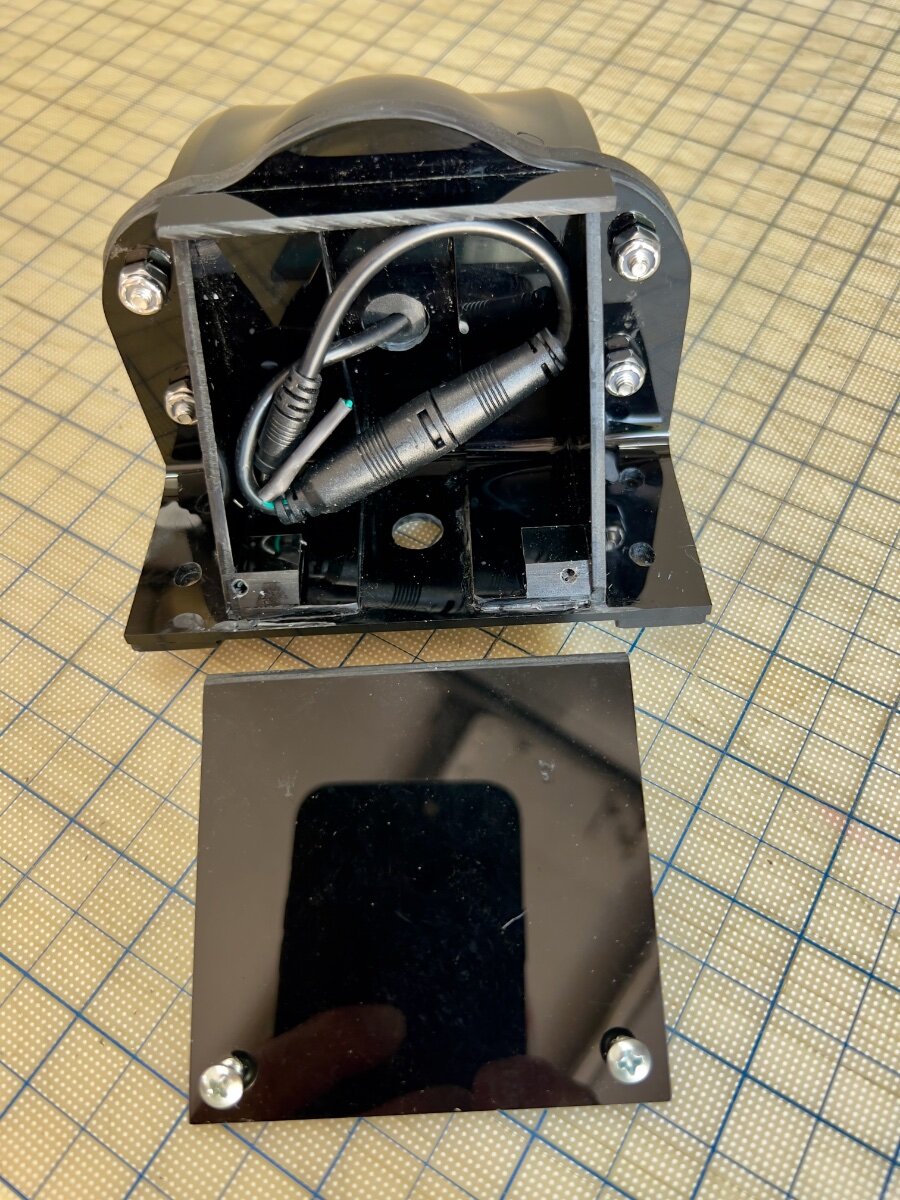
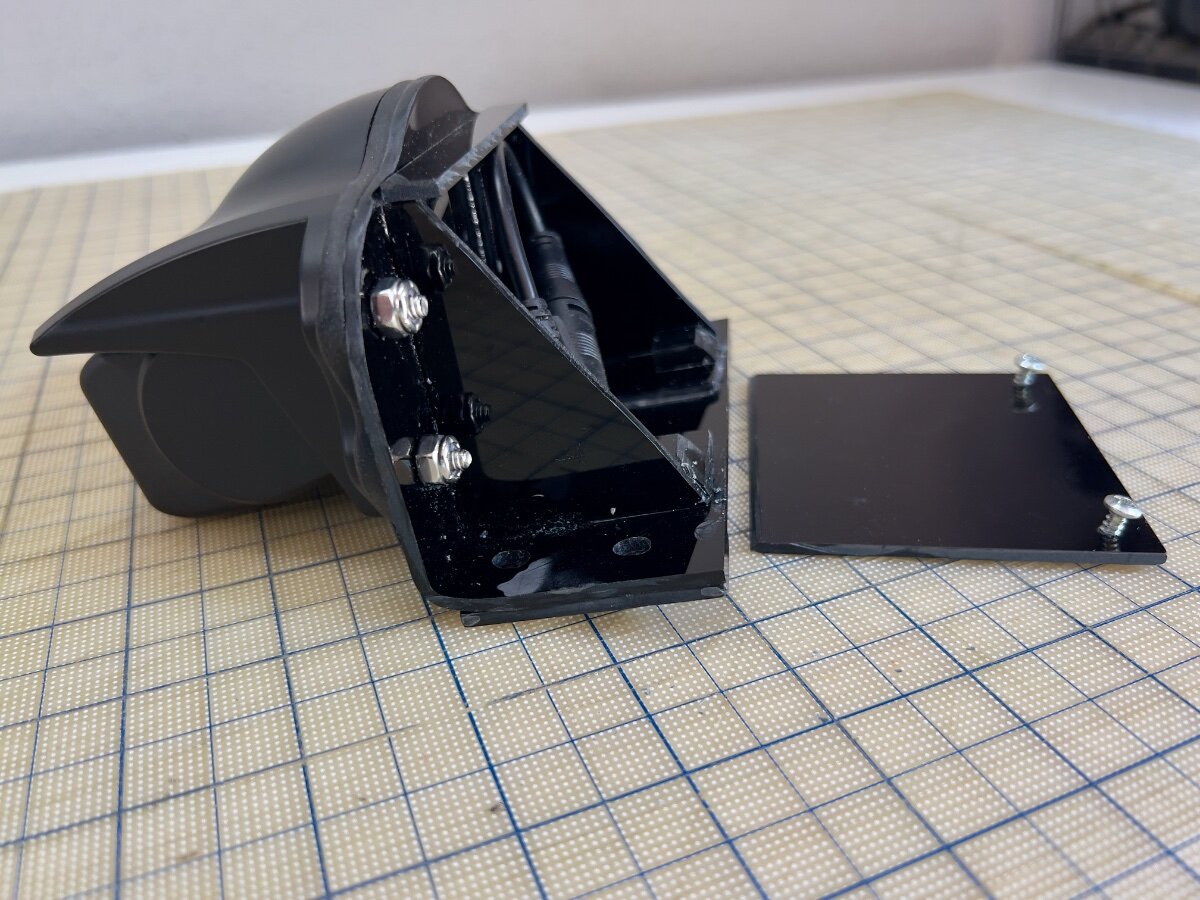
I recently purchased a Haloview BT7 Touch Rear Camera to replace the Furrion Vision S Camera System (Model F0S43TADS) we purchased as an accessory option on our 2022 LEII. Following delivery of our trailer in February, 2022, it was quickly evident the Furrion camera was largely useless. I continued to use the Furrion camera, with increasing frustration. The very limited view to the rear was a safety issue. I began to research RV rear cameras and after reading many reviews selected the Haloview BT7 Touch. I was impressed by the specs and favorable reviews, but failed to note the camera is designed to mount to a vertical rear wall, not the sloping rear roof of an LEII. I could have returned the Haloview camera, but I did not see a good second choice. Thus, I decided to fabricate a mount to be installed in the same position as the Furrion camera. The result is the custom mount below: Fabrication Process I had some black acrylic sheet, .010" thick, from a prior project (See: Window Vent Mod- Louvered Ventilators), which seemed suitable material for a camera mount. I had some thicker acrylic sheet, but decided to first use the thinner sheet to create a mockup by bending the acrylic sheet. Initially, I had concerns the thinner sheet would not be sufficiently rigid to hold the camera steady, but I was not sure I could bend the thicker sheet. The Furrion camera and its mounting gasket were removed from the roof of our LEII and used to begin the layout of the base for the new mount. I wanted to use the four existing holes in the roof which held the Furrion camera in place. I had a scrap piece of acrylic about 7" wide and 20" long. I used 2" blue painter's tape applied to the acrylic and, with a fine point mechanical pencil, began marking out the mounting hole pattern from the Furrion gasket. Next, I flipped the scrap sheet of acrylic over, applied blue tape and began positioning the Haloview camera on the tape. My initial concept was to have the main part of the mount be a single piece of acrylic bent to an angle of approximately 80 degrees. When mounted to the sloped roof of the trailer, the face of the mount would be approximately vertical for mounting the Haloview camera. The layout of the mounting base resulted in the base being approximately 2.0" wide, and the nearly vertical mounting face approximately 3.5" tall. I also allowed about 0.75" for the bend radius. So, before bending the rectangular sheet of acrylic was approximately 6.25" x 7.0". I cut this piece from the end of the 20" long scrap. Before bending, I drilled all needed holes in the mount base, as marked during the layout process. NOTE: See YouTube for many useful videos on bending acrylic sheets. To bend the mounting base, I sandwiched the rectangular piece of acrylic between two pieces of scrap wood approximately 12" x 3", with the acrylic area to be bent aligned on the long side of the wood scraps. I extended the acrylic from the wood scrap approximately 2.5" to 3.0" in preparation for bending. I clamped the sandwiched pieces to my workbench to ensure it would not move during the bending process. Using a heat gun, I began to heat the area to be bent, moving back and forth. Wearing gloves, I held two other pieces of wood, each approximately 2" x 5". As the acrylic became heated, I applied gentle pressure to the extended portion of the acrylic, using the pieces of wood in my hand. I continued to move the heat gun along the bend area until I could begin to bend the acrylic. As the acrylic began to bend, I used care to keep the bend straight and at 90 degrees to the sides. I used a steel carpenter's square to test the acrylic as I bent it. As I approached the desired finished bend angle, I released the acrylic to check the angle. Satisfied with the bend angle I trimmed the top of the mounting base to the contour of the Haloview mounting gasket with a scroll saw. Having the mounting base bent as desired, I began to plan how I would make it sufficiently rigid to hold the camera steady. The photo below shows the other parts which would comprise the rear support area. Also at the rear I wanted to enclose the wiring connecting the camera to the 12VDC power from the trailer. Haloview BT7 Camera and mount parts Once the mounting base was bent as desired, I cut two pieces approximately 1" wide from either end of the mounting base using a table saw. These two pieces became the support brackets. Being bent at the same angle as the mounting base, they fit well to backup the mounting face. The triangular gussets also add rigidity, being bonded to the mounting base and the support brackets. The photo below shows the mounting base (face down) with the support brackets and gussets attached at the rear. Acrylic cement was used to weld all parts together. Mounting base face down with support brackets and gussets in place Side view of mounting base with support brackets and gussets in place To protect the power supply wiring from UV exposure and squirrels, I added a cover and a top piece across the gussets. The rear compartment does not need to be watertight, since the wiring connectors are watertight. Haloview includes a short adapter which connects to the existing Furrion connector protruding from the roof. The photos below show the camera on the mounting base and cover from the rear and side views. Mounting base and cover (Rear) Mounting base and cover (Side) Mounting the Camera to the LEII When I removed the Furrion camera from the roof of the trailer, I noticed several things: The 12VDC power supply wiring passes through a hole in the trailer and was effectively sealed with the white caulking used throughout the trailer. This was not visible before removing the Furrion mounting gasket. The sealant was in good condition, however, it formed a small mound on the roof of the trailer. The base of Furrion camera was hollow and the mounting gasket conformed to the mound, allowing the outer shell of the camera to meet the trailer roof. The holes for the screws holding the camera to the trailer roof are NOT through holes, reducing the risk of water leaks into the trailer. The Furrion camera was not mounted at the lateral center point of the trailer, but not so far off that I had noticed in over three years using the trailer. The Furrion camera was also not quite parallel to the Oliver sign just below its mounting position. From the ground this was not perceptible. There were multiple trial fittings of the new mount as the fabrication process proceeded. From these fittings the following adjustments were made: The mounting holes for the new base were elongated (using a Dremel tool) to permit the new mount to be swiveled slightly in azimuth to have the front face of the camera parallel with the top edge of the Oliver sign. Two acrylic "runners" approximately 0.5" wide and 2.0" long, were attached to the bottom of the mounting base to straddle the mound of caulk where the power supply wire passes through the roof. I reused the mounting screws, putting fresh caulk into the screw holes and around the screws. The new mount covers the same area where the power supply wire passes through the roof. It is protected from UV by the new mount, but water can run under the new mount. The Results The Haloview BT7 comes with two mounts, one with a suction cup for windshield mounting, the other a 3M VHB bonded disk for attachment to the upper dashboard. I prefer the windshield mount, which is substantial and widely adjustable. It is very stable, with no vibration. The signal strength indicated on the monitor showed a 5 bar strong connection to the rear camera. Monitor comparison- Haloview 7" vs. Furrion 4.3" (diagonals) Yesterday, I took a 35 mile shakedown cruise for the camera on the way to the storage facility. The Haloview camera and monitor have met all my expectations. The visibility to the rear is vastly improved. I now see vehicles approaching in the same lane and in lanes on either side. I was particularly impressed to see merging traffic entering the highway on my right, before I could see them in my mirrors. Overtaking traffic is now seen well before they come abreast of the trailer. In bright Texas sun, the video on the monitor is clear and not washed out. There is no jitter in video from the camera, and the signal was always strong, even with the antennas folded horizontally across the top of the monitor. The touch screen controls work well and are easily used while driving. Also, my custom mount proved to be very solid, with no vibration of the video due to camera movement. I recommend the Haloview BT7 Touch camera to anyone considering replacing their Furrion rear camera. Unfortunately, Haloview does not appear to have a roof mount adapter available. I had sent an email query to Haloview Support and received a reply indicating they did have such a mount and provided the following URL: https://www.haloview.com/bt-series-camera-peaked-cap-bracket-compatible-with-furrion-and-voyager-pre-wired-rvs.html. Nothing on this page convinced me it was a roof mount. It does say the Furrion hole pattern is matched for mounting to the trailer. But only if the Furrion camera was mounted to a vertical surface. I have not yet received a reply to my email pointing out they sent me a link to a vertical mount. I hope this is useful to other OTT owners with Furrion cameras. Regards, Don
1 point
-
The Texas Oliver Rally 2025, for Oliver Owners only, will be held October 20, 21, 22. Checking in Oct 20 and checking out Oct 23 at Lake Mineral Wells State Park. For those interested in attending starting May 20 you can reserve a campsite. A potluck dinner is scheduled for Oct 21 and. BBQ dinner us scheduled for Oct 22. A hall at the campground has been reserved for these dates. Paula Ratcliff has arranged for live music for the potluck dinner. I have contacted Truma and they will have a service rep on site. If you need service, you are to contact Shelley Deisinger at s.deisinger@trumacorp.com be sure and let her know you are at a campsite during our rally. I did reach out to Girard but they let me know they will not be at our rally. A representative of the Oliver approved dealer in Ft Worth, United RV will be providing the BBQ dinner. However I had to reserve the group dining hall at $180 per day, so I hope everyone will contribute to this cost. Hopefully someone from Oliver will also be there. Jason E. Attended our last one.1 point
-
Anyone here ever done this? Planning another trip to the SW and would like to explore more of CO and this road trip is on the bucket list but given the steep grades and descents not sure a half ton with 6 cylinder Ecoboost engine will provide enough engine braking compared to an 8 cylinder or diesel. Curious to hear what others have to say or have experienced. Thanks Rob1 point
-
We use the built-in audio quite a bit. When we stream video to the TV we use the ARC channel to put the audio on the speakers. We also like to find local FM stations, especially the little independent ones, that have things like farm reports and swap meets. If Steph sleeps in, I use the A/B speaker selector to choose only the front speakers. I have music on a flash drive in the Furrion head as well and, once in a while, we'll break out a DVD.1 point
-
@johnwen, my apologies, I thought I had included the details on the Ethernet cable running from the RJ45 through jack utilizing the Furrion external shell. All of the Ethernet cables I purchased are Cable Matters products. All are shielded Cat 6A. In addition to the 20 ft. cable used inside the trailer, I purchased a 50 ft, and 2x 25 ft. cables and a single 1ft cable. I also purchased VCE CAT6A Waterproof RJ45 Coupler IP68, 10Gbps CAT6A/CAT6/CAT5E/CAT5 Female-to-Female Outdoor Ethernet Connector Shielded, Network Cable Extender for Outdoor Use 2-Pack, 5.3 in. To connect the Ethernet cable to the PoE splitter, I had to slightly trim the black plastic anti-snag protector on the 1 foot long Cat 6A able. This was necessary because of the tight fit through the watertight connector on the PoE splitter. You may have run across mentions of this issue by others online who are using this PoE Injector and Splitter. Once I trimmed the soft plastic cover over the cable release tab I was able to fit the RJ45 connector through the watertight connector on the Splitter. I chose to use the 1 foot long cable so that I could leave the splitter and the 1 foot cable connected to Starlink Mini. I find the connectors going to the Mini from the Splitter to be difficult to remove due to the watertight seals. I don't like the idea of pulling on the cables to release the Splitter from the Mini. I anticipate repeated removal of the Splitter from the Mini will result in damage to the cables on the Splitter. Replacement Splitters appear to cost about $65. At the other end of the 1 foot cable I attached one half of the VCE RJ45 couplers listed above. This way it is much easier to disconnect the Ethernet cable from the Mini without messing with the watertight connector on the Splitter again. I also installed the VCE couplers on the ends of the 50 foot and 2x 25 foot cables. This way they are like extension cords which are easily connected/dis-connected. I am impressed with the VCE couplers. They are excellent and easy to use. I bought the three longer length cables to be able to easily connect 25, 50, 75 and 100 foot long cables, as needed. I specifically want to avoid having to deal with a single 100 foot cable, which I find to be a PITA. I have not yet had a chance to use the Starlink Mini on a trip, but have only tested it with our LEII parked in our driveway. Due to tree coverage, I needed to connect at least 75 feet of Ethernet cable to position the Mini for a reasonably unobstructed view of the sky. The Mini still had some obstructions, but I was able to measure Ethernet speeds inside the trailer >100 Mbps. I sometimes saw speeds drop to the 50-75 Mbps and rise as high as 200+ Mbps. I suspect the variable is at least partially attributable to the position of Starlink satellites at the time of the speed tests. The satellites are each only in view 8-9 minutes, without obstructions. In any case, I connected my laptop to Starlink WiFi inside the trailer and was able to browse comfortably. I did not notice the occasional losses of service which I noticed in the performance data on the Starlink app. I don't recall any RV park or state park where the provided WiFi was anywhere close to the minimum speeds I have observed in our driveway. BTW, in our residence we have AT&T wired gigabit Ethernet throughout, so I have a low tolerance for poor WiFi service. I have high expectations for using the Starlink service, based on reports by others and my experience so far. At this point, I have not used any adhesive to attach the PoE Injector to the top of the frame member on which it sits. I have a small zip tie connecting it to a PEX cold water line. With the Ethernet cables attached it cannot really go anywhere. I did not want to use a more permanent method to secure the PoE Injector, until field testing on a road trip. We have our next trip scheduled in late August, so I will observe it over a 400+ mile trip. I will likely use a small strip of 3M VHB tape to fasten to the hard rubber frame covering. Good luck with your installation. If you have any questions, feel free to send me a Personal Message and I will be happy to answer.1 point
-
That sign was just on a short NF road off AZ Hwy 260 descending into the canyon to Tonto Natural Bridge near Payson. They had a parking lot there for the sole purpose of detaching trailers before descending! Generally 8% is the steepest I’ve seen marked on US Interstates and highways, some state highways are steeper. Good you have a special towing setup. I added 3rd Gen Dodge 2500 front rotors designed for the newer heavier model. Also just now adding oversized rear drum slave cylinders. Trailer brakes from 10” to 12” and these upgrades all help. FedEx Freight just called, axles coming tomorrow! I wanted to add a Pacbrake exhaust brake. Was $1800 two years ago, now $2300 and toooo much money!1 point
-
Wow! thats quite the road and story on that thread @jd1923 . All this talk about brakes, controllers et al has me wanting to go through my trailer brakes again to make sure they are in good shape. I do feel better with this new truck and its Max Tow Package. Looking at the front and rear rotors they truly look much larger than my older truck which only had the basic tow package. Still some of these roads out west are formidable descents, not to be taken lightly. Regarding Teton Pass, the drop down into Idaho is quite doable which I have also done. As long as your TV can make the climb up the steep ascent from Jackson without overheating the westward descent is not a big deal. The one time I towed going from Jackson to Driggs I had to stop at the pass to allow my F150 to cool down, both engine and transmission. They were getting pretty close to their limits. Grades of 14-18% is off the hook though, never saw that.1 point
-
I’d read in another post here or on Facebook that the speakers are gone, replaced by Bluetooth speakers. I don’t know if that is an option or standard equipment. I’ve never used the inbuilt audio system. We don’t use DVDs, and we have a Sonos Move for streaming audio inside or out.1 point
-
You took the words right out of my mouth! 🤣 Our Oliver has been parked in the sun the 2+ years we've owned it and who knows how much in its 10 years. It had a bit of a shine in 2023, not so much today. We hand wash it when we return from trips. It doesn't really get clean and I'm not going to be one that gets up there with power tools! I was also never one to paint over things, always preferring natural vs. painted finishes. But paint may be an answer for our hull at some point. I've got a local auto painter who painted our Lexus GX470 at a reasonable cost. Painting the Oliver might cost about what CGI charges for their work. I had a thought to match the colors to our tow vehicle. They look good together as is, with Oliver logo and pinstriping matching the TV colors, but what if the Oliver was the same light gray on the lower hull and the same bright white on the upper. Dull egg to bright white may be a bit of a shock to the eyes. Bring back the two-tone look of the great cars of the 60s! 🤣
1 point
-
I think it would like much nicer if the grey was on the bottom and of a much lighter shade.1 point
-
The old Pullman Sleeper Cars had nicer looking blinds. They were nice and tight, not like a pillow🙃1 point
-
It was delivered 2-tone by Oliver. I can't find the original announcements. They were off Oliver website. UPDATE: Hull # 1000 was all white upon delivery
1 point
-
Hull #1000 was built for couple from Tennessee that was 2-tone white/Gray. I heard it was sold. Memory was it was a white top and gray bottom, but I don't remember. It was a 2022. Not sure whether this is #1000 or someone else's. Who knows the story of Hull #10001 point
-
Yes, on the Ollie.1 point
-
Ah the beauty of a big diesel engine when it comes to engine braking. All that compression truly becomes helpful on these steep descents. A definite disadvantage for gas engines especially the 6 cylinders, turbo boost or not. A couple of years ago I learned this lesson all too well while going over Teton Pass dropping down to Jackson. By the time I was halfway down my then 2013 Ecoboost and Ollie brakes were all smoking. Even 2nd gear was not much use on a 10% grade that runs for about 10 miles. Not something I would ever like to repeat. We were not the only ones that day smoking brakes either. A fifth wheel just in front of us being pulled by a 3/4 ton truck was also in trouble and had to make an emergency pull over. Thus my caution on the Million Dollar Highway.1 point
-
This is what I keep hearing from some YouTube videos. Might be a better route on my return trip vs on the way south.1 point
-
@Dennis and Melissa Yes to what @Golfnut says! Put a work ticket in with Oliver so that you’re on the books for warranty. No need to give etrailer any money. Also suggest a quick phone call to Oliver to get help to trouble shoot. You are surely not the first with this issue. Post up when you learn the fix! 👍🏻😊1 point
-
Rob, just our 6.7 diesel 1 ton, and we absolutely loved the Million Dollar Highway. We let our diesel engine brake do all the work. We would drive it again in a min.🤩
1 point
-
We have done 550 several times each way with our previous Ram 1500’s. The grades up and down were not a big issue. Traffic moves at a leisurely pace and almost everyone drives cautiously and at a reasonable speed. You have to respect the road. We’ve also done the drive between Durango and Ridgway many times towing with our 2500, braking is mostly taken care of by the engine brake. We’ve also done the trip west through Delores and Rico on 160 and 145 that takes you by Telluride. It’s scenic in a different way, a little longer but a nice way to go. We’re currently camping in Durango visiting our son and family on our way to the PNW. He commuted up 550 weekly to Grand Junction for a year when he was working there. He said it was closed a few times due to heavy snow, but other than that he never had an issue. Mike1 point
-
You are not the only ones who have opted for the alternate route via 145 for the same reason. I have been to Delores in the past but don't recall the market but will certainly look for it if there again. Have an old forest service friend who lives there too. I understand CO 145 is also very pretty as well.1 point
-
@Mike and Carol Mike wrote he towed the Million Dollar Highway with a half ton truck (when in another thread I wrote I was too chicken for that route)! We went to Ouray then back out to Ridgway, south to Telluride and took CO 145 down through Rico and to Delores. We're heading back up there for a few weeks late Sept to mid Oct. Love the area! If you're ever in Delores go to the Delores Market. It's an amazing market with onsite butcher, fresh local produce and amazing baked goods! It will be our first stop on the way up and last stop on the way back! 😂1 point
-
After trying to get our Norcold 3 way refrigerator repaired and having Oliver service center look at it twice. The service center quoted us a price of $4800.00 to replace the Norcold with a Dometic 12 volt compressor unit. I decided to try to repair it myself. The power board is easy to change it is the one accessible from the out side lower panel. That didn’t fix it. So I changed the optical display board next part number 628663. This board is located behind the front panel of the refrigerator. This board didn’t fix it either. Next I replaced the front button control panel part number 630619. The fridge is working properly now. I purchased these items on eBay. The removal of the front panel was the most difficult of this process. Message me if you would like an explanation of how to remove the front panel.1 point
-
It’s simple math. Sell and Oliver, you have a happy customer but their trailer is going to last a lifetime, need minimal service, and provide them a wonderful experience. Sell them a Stick Built, you are going to see them in the service department every three to four months with an expensive slide out issue, leak, electrical failure, or suspension collapse. And in no more than five years you are going to sell them another one. Bonus, you will finance each of these and get the lift on that. We were talking to a couple with a Grand Design at a park a couple of months ago who had been camping 20 years and had gone through 10 trailers. What dealer does not want to have people like that as “customers for life.” (We met them when they stopped to look in our Oliver - they were looking to downsize from their 5th wheel and had heard all the good things about Olivers 😀)1 point
-
Just saw this pic of the 2026 Oliver “retro” interior with roller style window shades. 😳 Appears that the interior window latch may rub on the shade. Also note the white belly band instead of chrome.
0 points
-
Wow, I read this two years ago when I first joined the forum! Rivernerd, were you ever able to get OTT to assure the correct wire gauge in your hull? I'm getting new D52 axles next week. Wonder what gauge is used in the axles? And what gauge OTT installed from the junction box under the bathroom vanity and to the wheels. If I find this wire undersized I will replaced that section of wiring. Going to 12" brakes on new axles and want them working correctly. You can test each drum brake by lifting each wheel off the ground, rolling the wheels and actuating the brakes, listening and feeling for proper drag. Make sure the self-adjusters are where they should be, tighten them as needed. Just did this in May prior to our long trip and discovered our brake controller needed replacing. John E Davies was an artist when it came to Oliver mods! But many of them left me with the question, as to why? I believe wiring the brake wires external to the axle is not recommended. Not only for the reason of road debris and zip-tie maintenance, and what a mess! Where we live Pack Rats would devour the wiring and cable ties. The other thing is the suggestion to go to manual-adjust brakes. Also not a good idea. If you do, get under your trailer every few hundred miles and adjust them manually. This means every couple weeks for those of you who tow 1000-mile trips! The only issue with self-adjusters is that they may not adjust adequately and so should be checked, tightened when needed and more so the rears in a tandem setup. Brake wires in trailer axles and self-adjusters on drum brakes have been industry standards for longer than our lifetimes. This Arizona Pack Rat looks too cute just sitting there. They are troublesome little SOBs and they take too much time out of our lives in trapping them and removing their nests from our property. Everybody in our town leaves the hood up on their pickup trucks so that their engine bay does not become one big nest made of hood insultation, wire insulation, shock boots, plastic parts, etc.
0 points


.jpeg.bc5410dca345743218c7cdd61cd7a837.jpeg)
.jpeg.db24308a47698837a565fc55eec3a655.jpeg)
.jpeg.b601f1e7eac4638423f2297d1cfed3e5.jpeg)

.thumb.jpg.e34bf01ef7f7d5e99ad31856d45afbeb.jpg)


-
Recent Achievements
-


")


")


")

