Leaderboard


Popular Content
Showing content with the highest reputation on 08/29/2025 in all areas
-
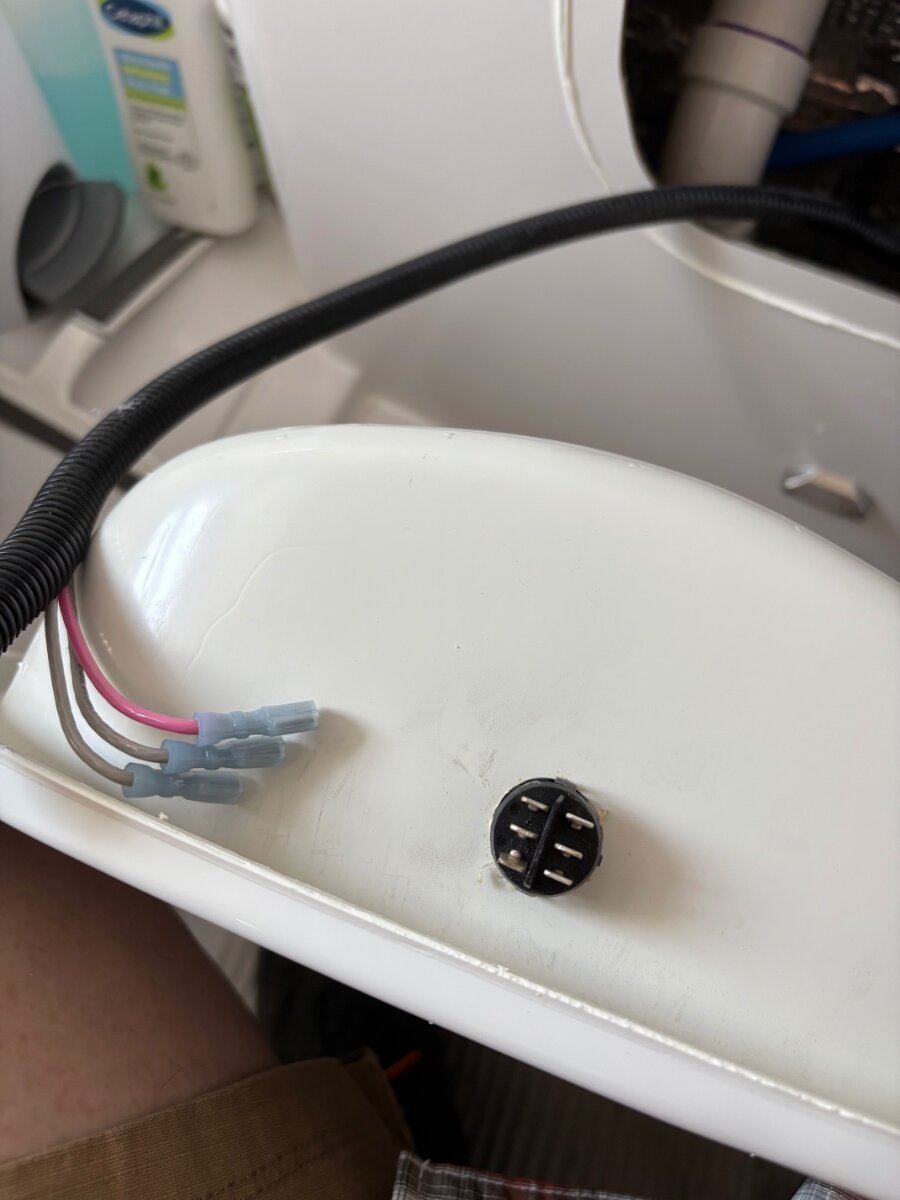
This is a Double Pole Double Throw (DPDT) switch, and only one pole is being used (the right side as the photo shows.) The left is identical in function. Being a Double Throw, the centre tab is common, and it closes the circuit to the top tab when switched up, and to the bottom tab when switched down. The red wire is the common, sometimes called the Point wire (either a hot or switch leg,) and the brown wires are often called travelers. One or the other brown wires will become hot depending on switch position. The switch on the other end is the same, so that either switch can energize or de-energize either brown wire and power the pump. No ground wires are involved in these switches. I provided a wiring sketch for these switches in a modification titled: 4-way pump switch for outdoor shower. It shows the wiring diagram for the switches, and the addition a third (4-way) switch to turn the pump on/off from the outdoor shower. https://olivertraveltrailers.com/forums/topic/10604-4-way-pump-switch-for-outdoor-shower/ Hope that helps to clear up these confusing switches! Cheers! Geoff7 points
-
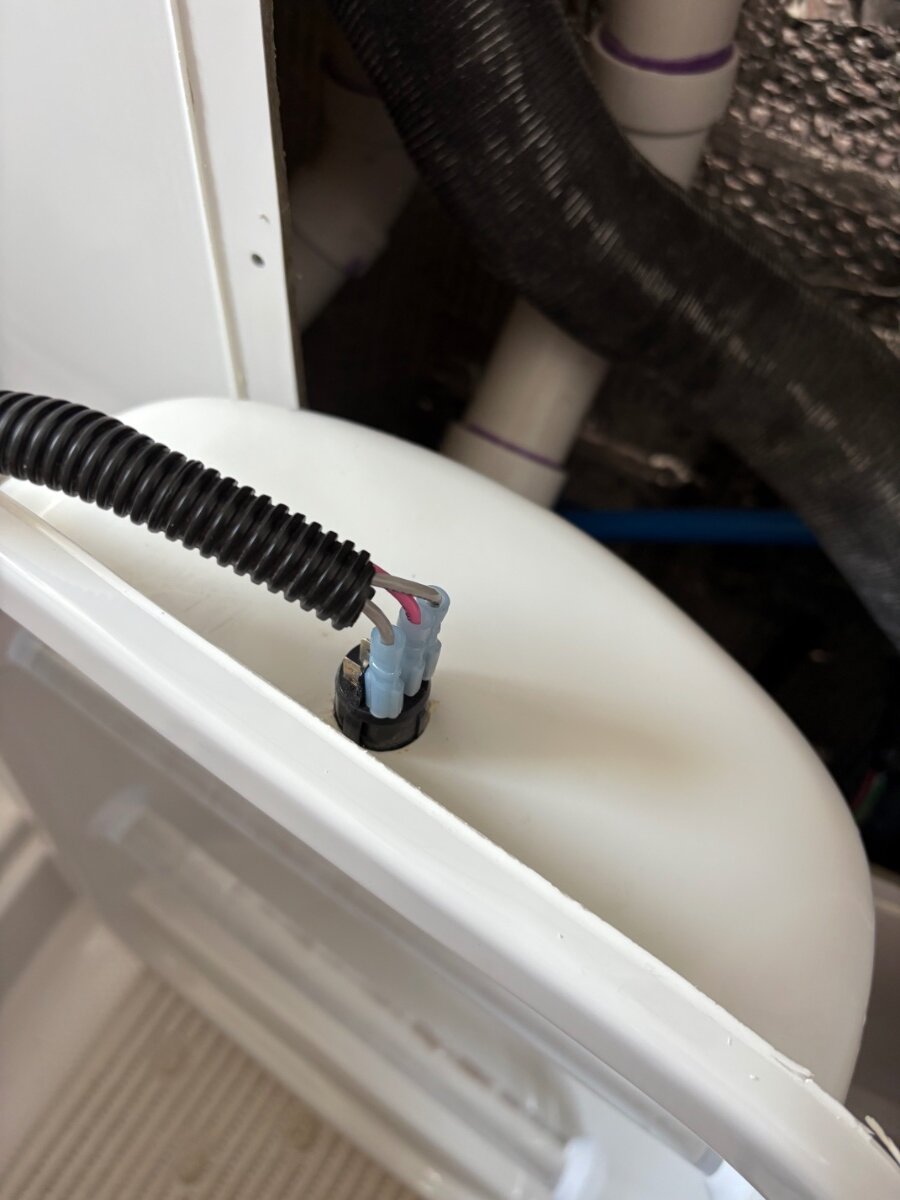
We were on our first long trip consisting of 2 to 3 months in the Ollie ( mostly Boondocking) . We were about 2000 miles from home in Billings,Montana and had stopped in a parking lot for lunch. I went to wash my hands and the water pump wouldn’t work. I noticed when I put pressure on one side of the switch in the bathroom it would pulse on like a momentary switch. I removed the screws from the bathroom caddy and carefully scored the caulk. When I removed the caddy all the wires fell off the switch. I had no idea which color wire went where. After a call to Oliver and with their help and research I used a pair of pliers to gently tighten the wire connectors and pushed them back on the proper spade. The red wire attaches to the center spade on the right side and the grays on the outside spades. I have two pictures that show the switch. Hopefully this post will help someone who might experience the same problem.
 6 points
 -
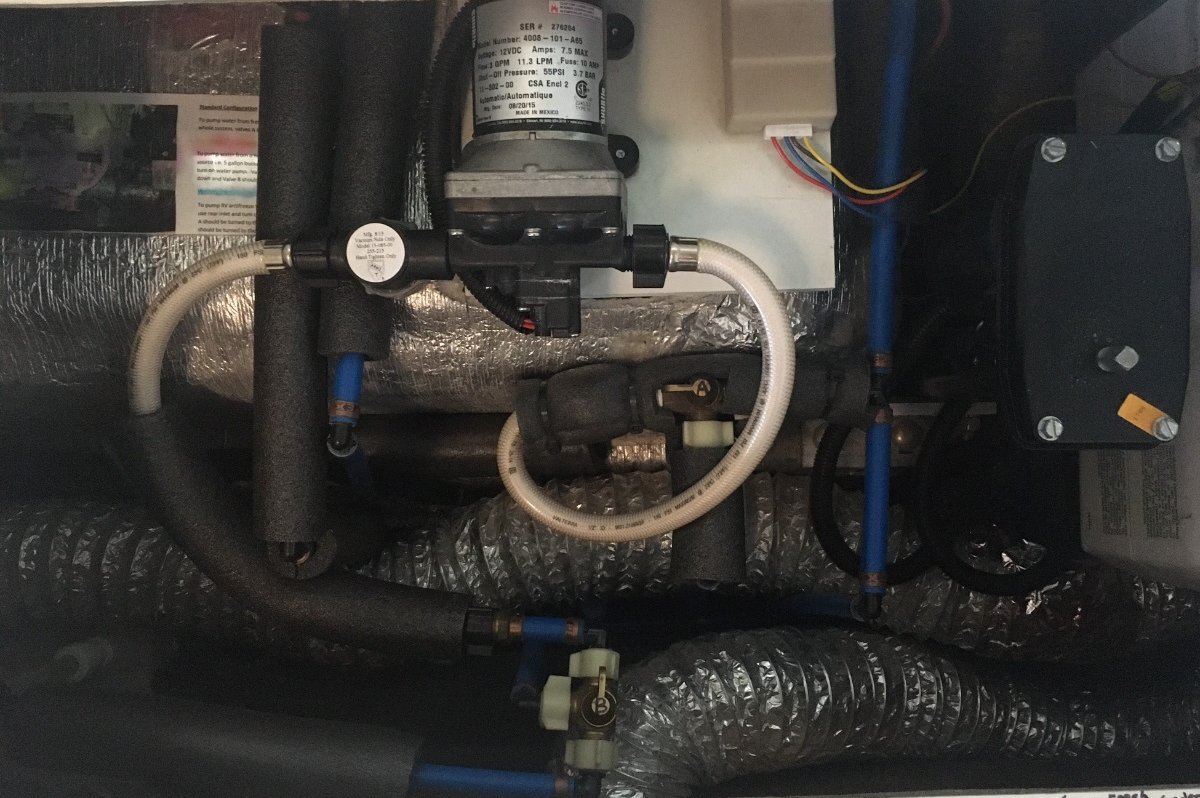
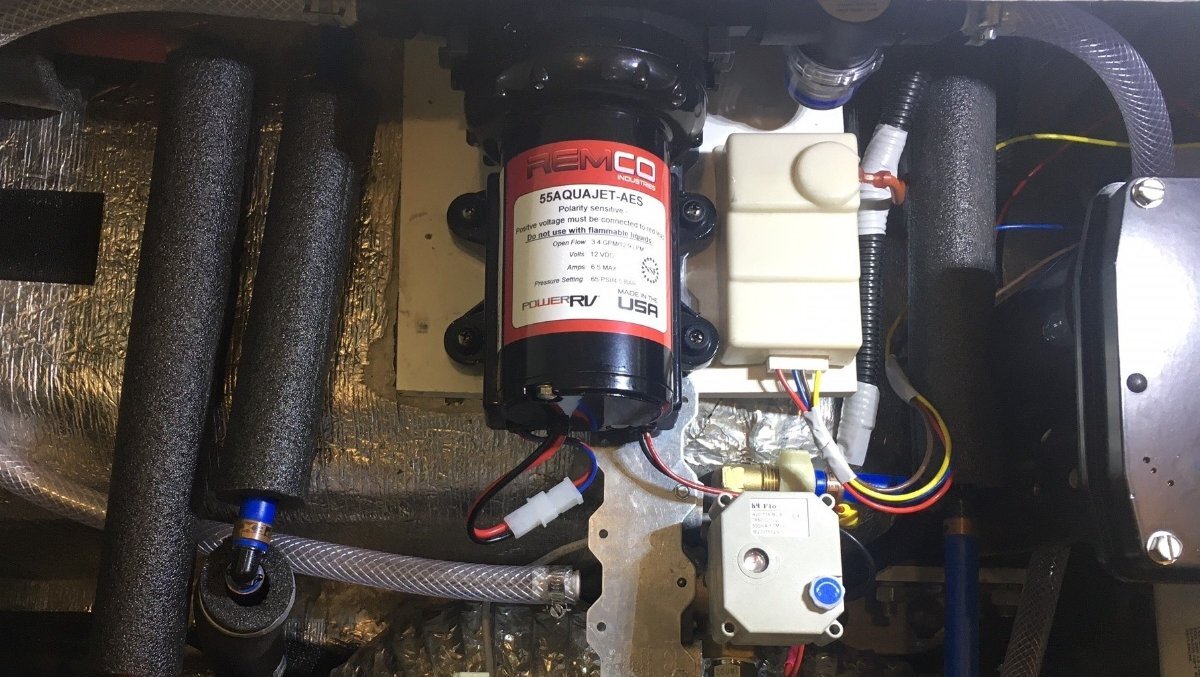
It's odd but true that the simple OEM ShurFlo water pump has two RED wires (see pic1, look very closely) which means it would run in either polarity. When I upgraded our water pump it certainly had explicit RED/BLACK wiring designating DC polarity (see pic2). The water pump switches are 3-way. You need to get the RED positive connected to the correct lead and the two other brown wires are grounds and perhaps the order of these two wires do not matter, but of course they must stay connected. Perhaps on our hull we were lucky to have a past owner to correct these many issues, but in two years, we have not had a wire disconnect while traveling, never a window shade fall off, a kitchen drawer open, or anything else. Thank goodness our black and grey tanks drain without incidents... The Oliver is a robust campin' machine! 🤣
5 points
-
Yes and no. The travelers will turn on/off the pump regardless of which is attached to the switch outside terminals. But they do make a difference. Many like having a circuit OFF when both switches are down. If yours is this way, do nothing more. If the pump is off with one switch up and the other down, then reverse the two traveler wires and you will be happy. Said differently, if the pump is on when the bath switch us down, reverse the travelers. Hope this helps. GJ4 points
-
Pretty sure Steve bought the very first LE2 after the hiatus with the four units between our hull 45 and his hull 50 all being LE's.3 points
-
I had the same issue occur but was luckily able to wiggle the switch out wo removing the panel. I also happened to the bathroom light switch. I was initially confused because the pump would only turn on with the switch outside the bathroom near the thermostat.2 points
-
Thanks for the nice words JD! Yes, one of the travelers is always hot, and the pump is grounded separately. My referenced sketch shows standard 3-way wiring for simplicity, with the (+) on one end of the circuit, and the switch leg (feed to pump) on the other. The Oliver is wired as a "dead end" 3-way switch, where both the hot (+) and the pump feed come to the main switch location, and bathroom is the dead end with the red point wire doubling back and being spliced to the pump feed at the main switch location. It doesn't matter how the travelers are connected, or if they are reversed. One or the other, or both, switches will always be in the physical On or Off position with the pump running. You may be curiously interested in how three or more switches (4-way switches) work in this 3-way circuit. The travelers will switched to run straight through, or they will be switched to Criss Cross each other. Clever! This is also illustrated in my referenced sketch! Cheers! Geoff1 point
-
Thank you Geoff. This is so nicely and concisely stated, now easy to understand! So if I truly do understand, when ON one of the 3-way switches is supplying power to the pump, by connecting 'hot' to the 'traveler' and the pump is grounded independent of the 3-way switches.1 point
-
We’ve also had the wires come off of the water pump itself. There are two red wires, I don’t think it matters which spade they’re attached to, it just took me a few minutes to find them! Mike1 point
-
I think Steve & Tali Landrum received the initial LE2 not long before the industrywide RV downturn and nationwide closure of RV manufacturing plants . Steve may have even had input with some ideas on the design. One of the greatest things about the Oliver family is how they treat their employees. Unlike most other manufacturers, who laid off employees at large, Oliver offered every worker a position within one of their other Hohenwald, TN manufacturing plants. Nobody had to lose their job. They kept them gainfully employed, and when the market warranted a return to the RV production line, they already had a skilled workforce ready to resume creating the best trailer out there.1 point
-
Thanks for the reply. It's very helpful to have site reviews that state the campground and site for future reference. Sometimes we have had to do reviews and say our trailer won't fit or the sites very steep etc. Here's a steep side slope at Devils Lake State Park in Wisconsin. It was once a golf course turned into a campground and many of the side lots had large left/righ slopes.
1 point
-
Joshua Tree is like visiting the Flintstones back yard! It should be a bucket list park. I'm pretty sure we stayed in that very same site. We had to reserve two different sites because of limited availability. Our first site was a 20 point turn to squeeze in, and then some kind folks suggested that we look at google satellite maps when reserving a site. This proved to be a great tip! Cheers Geoff1 point
-
Awesome. The only time we have been there was in our younger years with pre-teen daughter tent camping. Loved the park. Wind picked up that night and I swear it was like having a freight train running right through the campground. Wife and I were up in the middle of the night literally holding the tent up from the inside before it came apart. Daughter slept right through the entire thing.1 point
-
Regarding price.... We just had 5200 lbs Nev-R-Lube axles and 5-leaf springs installed by ALCAN. Total price was $3,928.28, and that included $141.99 in convenience fee for using a credit card (3.75%). They only accept the equivalent of wire transfers to avoid the convenience fee. They do not accept checks (I didn't ask about cash). Regarding the functionality... Larger brakes did not cause me to reduce the brake controller gain on my OEM controller (2020 F250). I had to increase it initially, but as the brakes adjusted I decreased it back to roughly where it was initially (+5). Braking is MUCH better. The first two tows were 50 miles each, and ALCAN re-torqued the U-bolts each time. Both times the TV had come down, but nothing else was disturbed. We then towed about 237 miles and then 170 miles, and the TV has not come down again. I usually use the stabilizer jacks to take out less than 2" of height on the low side for leveling. When I first tried to take out 1.75", the wheels lifted off the ground. I had to use the Andersen leveling wedges, and found that anything more than 1/2" would cause the wheels to lift off the ground. As we relocated, this improved somewhat, and Tanner said it would improve more as the springs break in. I expect it will be even better riding when I get new shocks. Two of them were blown, and one of these was broken as well. ALCAN fixed it up the best they could, and we ordered Monroe shocks to replace all four. I would have ordered the Bulldog shocks, but the stories on availability had me concerned in the timeframe in which I needed them. They will be installed this coming Monday.1 point
-
There’s a shopping center down on the north side of San Antonio we go to sometimes, there’s a Best Buy there. Earlier this summer I was there for something one morning and I saw an Oliver parked in the lot. I parked near it. I did my business and came out and there was a couple coming out of the trailer. I approached and introduced myself adding that I had owned an Oliver since 2016. He looked at me and said “nice to meet you” and then walked off towards Best Buy. Didn’t give his name. No handshake. His wife (I presume) said he had run over his cell phone while leaving their campsite and they stopped at Best Buy to get a replacement. She then left quickly to catch up to him. I understand they might have been stressed out, but they were not even cordial much less friendly. I wrote it off to him being upset that he had crushed an expensive electronic gadget and I went home. Don’t know who they were, I didn’t look at their trailer for graphics or anything, I was just a little surprised at the experience.1 point
-
We usually do if it’s along our way! 👍🏻🇺🇸1 point
-
I have been chasing down the solution to a Norcold refrigeration problem for 18 months. My fridge worked well on AC, so so on DC and inadequately on propane. The best it would do on gas was 7-10 degrees in the freezer and only 50 in the fridg section. We do a lot of boondocking and really wanted to keep the gas option. Here are the various steps I took one at a time without success: Pulled the fridge and cleaned the burner tube, changed the thermistor (3 times), changed the main board, checked the gas pressure, changed the thermostat and added a dual extra fan to the top, changed the DC board (one to the right of the main board), changed the eyebrow board, added venting, added insulation. All of these steps were recommended by techs who I paid. The last tech I hired told me that I needed to replace the cooling unit since I was wanting to keep the existing model. Unfortunately, Norcold no longer makes the N412.3 model and replacement cooling units are out of stock. I was advised to find a cooling unit from a 3rd party, order it and then pay the tech to install it. The first cooling unit manufacturer that I contacted did not make units for this smaller fridge model and recommended talking to a guy in Olive Branch MS who rebuilds cooling unit. When I spoke with this gentleman in MS on the phone, he was far more than helpful and told me that my cooling unit was not the problem. He told me to remove my burner and soak the orifice in a high percentage alcohol for a few hours, then blow it out with a compressor and reinstall. Now mind you that my flame looked fine and didn’t seem to be a problem to me or to the two professionals that previously looked at it. 80 year old Mr. David Force, owner of Cooling Unit Warehouse explained that there was a paraffin buildup in my orifice and that although my flame’s appearance didn’t visibly change after cleaning it, the temperature of the flame had been slightly below the necessary temperature. He said that a 10-degree flame difference can change everything. Bottom line, I followed David’s advice, the fridge has been working like a champ for 50 hours on propane so far. I wish I had known this before I spent 18 months and 7-800 dollars on un-needed parts. Nevertheless I am thankful that it works like it is supposed to so that we can head out next week for a month long trip. I'm posting this in hopes that someone can avoid a refrigerator adventure.1 point
-
Great question Jd. I opted to give AI a shot at this one 🤔and here is what I learned- AI Overview- Wax buildup, often appearing as a yellow, oily, or petroleum jelly-like substance, can occur in the LP gas lines of refrigerators (and other propane appliances) . This issue is primarily linked to impurities in the propane itself, specifically oily contaminants introduced during the filling of LP bottles. Causes of wax build-up Impurities in Propane: LP gas, while primarily gaseous, can contain small amounts of oil and other contaminants. These can be introduced during the filling process at the propane supplier. System Design: Certain parts of the LP system, like the SOV (solenoid operating valve) filter and the gas jet in Dometic or Norcold refrigerators, are particularly susceptible to clogging due to their small size and the nature of the oil contamination. Degrading Hoses: While less common, some buildup may originate from the gradual degradation of propane hoses over time. Risks and consequences Reduced Gas Flow: Wax buildup can restrict the flow of propane to the refrigerator's burner, impacting its ability to light or maintain a strong flame. Overheating: In the case of Dometic and Norcold refrigerators, restricted gas flow can lead to the cooling unit boiler overheating, potentially damaging the refrigerator. Soot Buildup: Incomplete combustion caused by inadequate gas flow can also lead to soot accumulation in the burner and flue, further hindering performance. Addressing the problem Cleaning the System: Disassembly and cleaning of the gas lines, including the burner, flue, and orifice, may be necessary to remove the wax buildup. David Force gave @carnivore very solid advice! 👍🏻 **** Cleaning Solutions: Isopropyl alcohol (91%) is recommended for flushing out the system, while acetone can also be used, but care must be taken to avoid contact with rubber or plastic parts.. Preventing future issues Using Clean Propane: Consider sourcing propane from reputable suppliers known for clean gas. Filter Maintenance: If the refrigerator has a filter in the SOV valve, regular inspection and replacement or cleaning can help prevent clogs. Bottle Draining: If oil contamination is suspected in an LP bottle, it can be drained and flushed when empty by removing the valve and turning the tank over. Regular Maintenance: Adhering to the manufacturer's recommendations for routine maintenance, such as cleaning the burner, flue, and burner orifice, can help ensure optimal performance and minimize the risk of buildup according to www.ezfreezerefrigerator.com.1 point
-
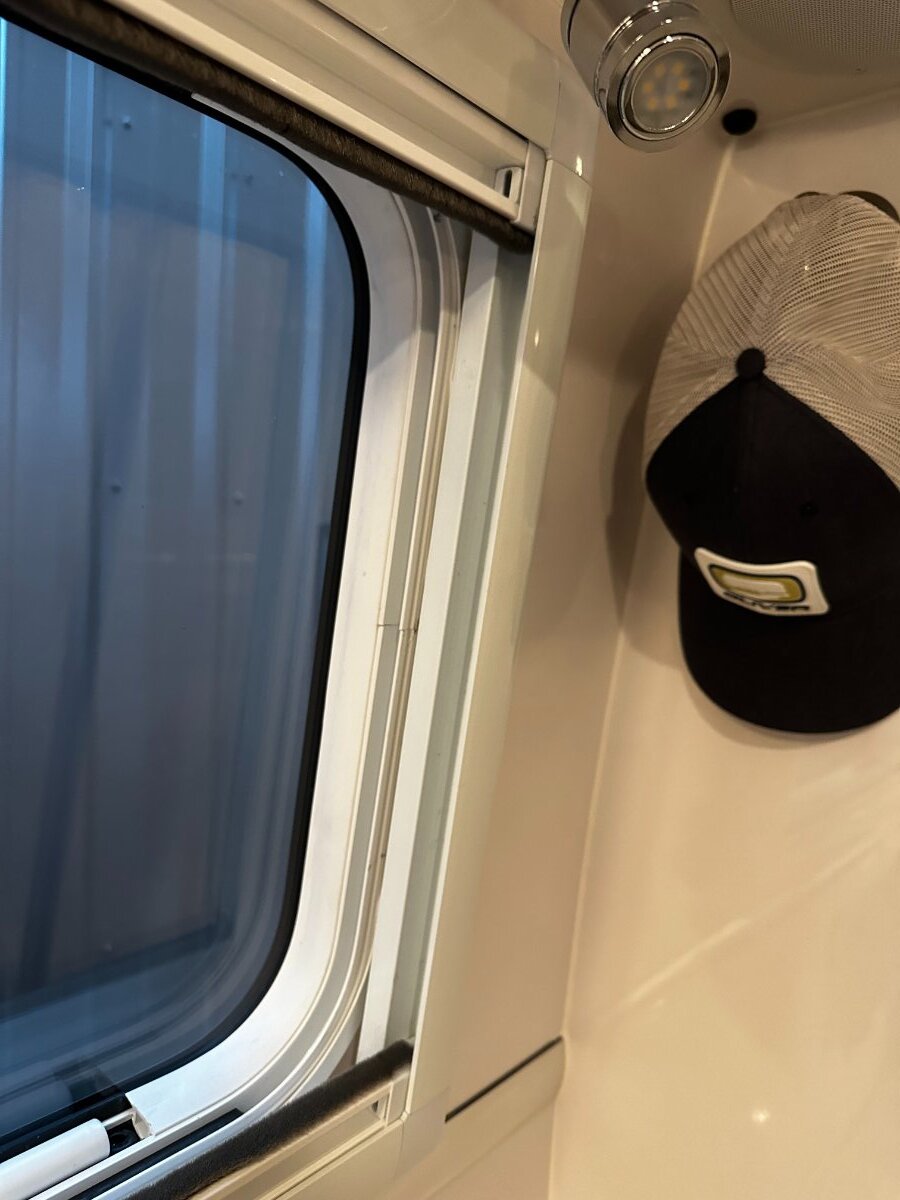
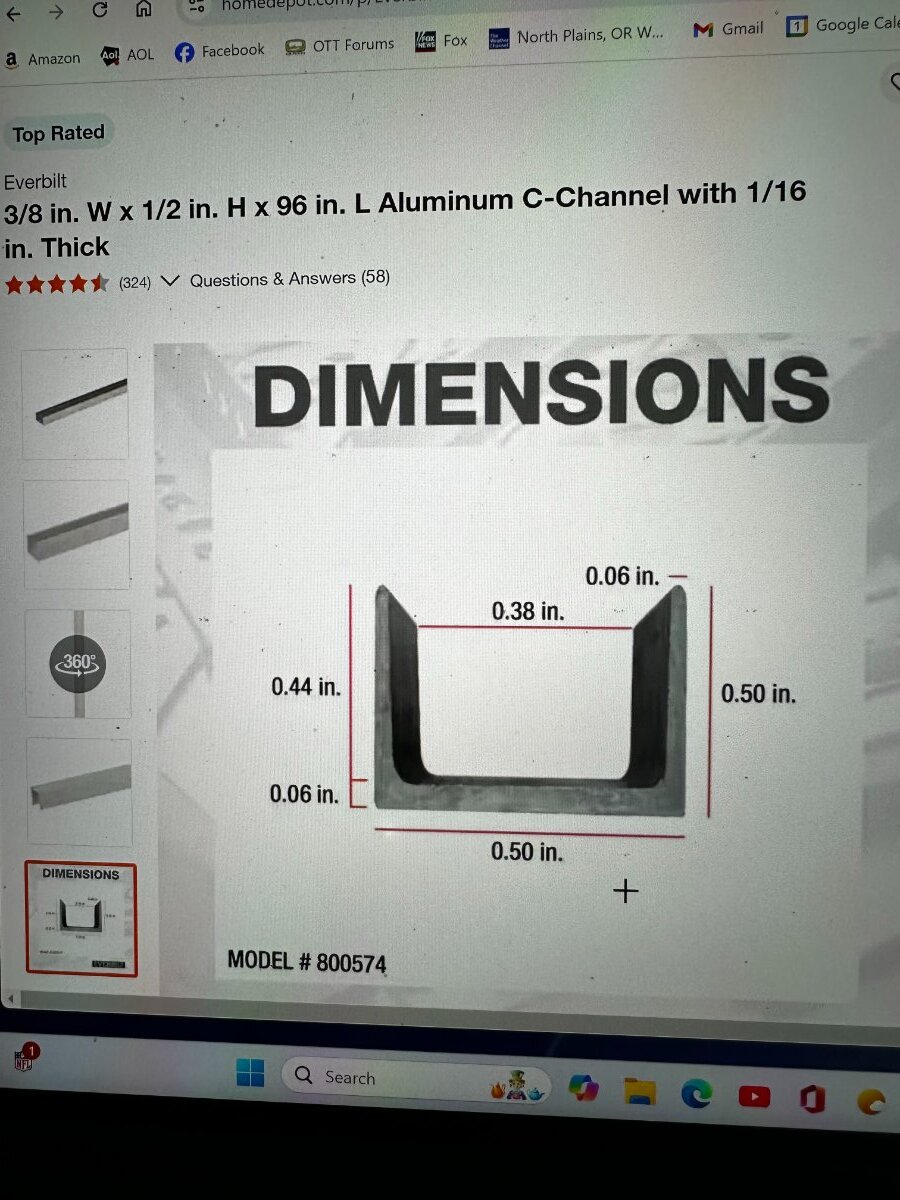
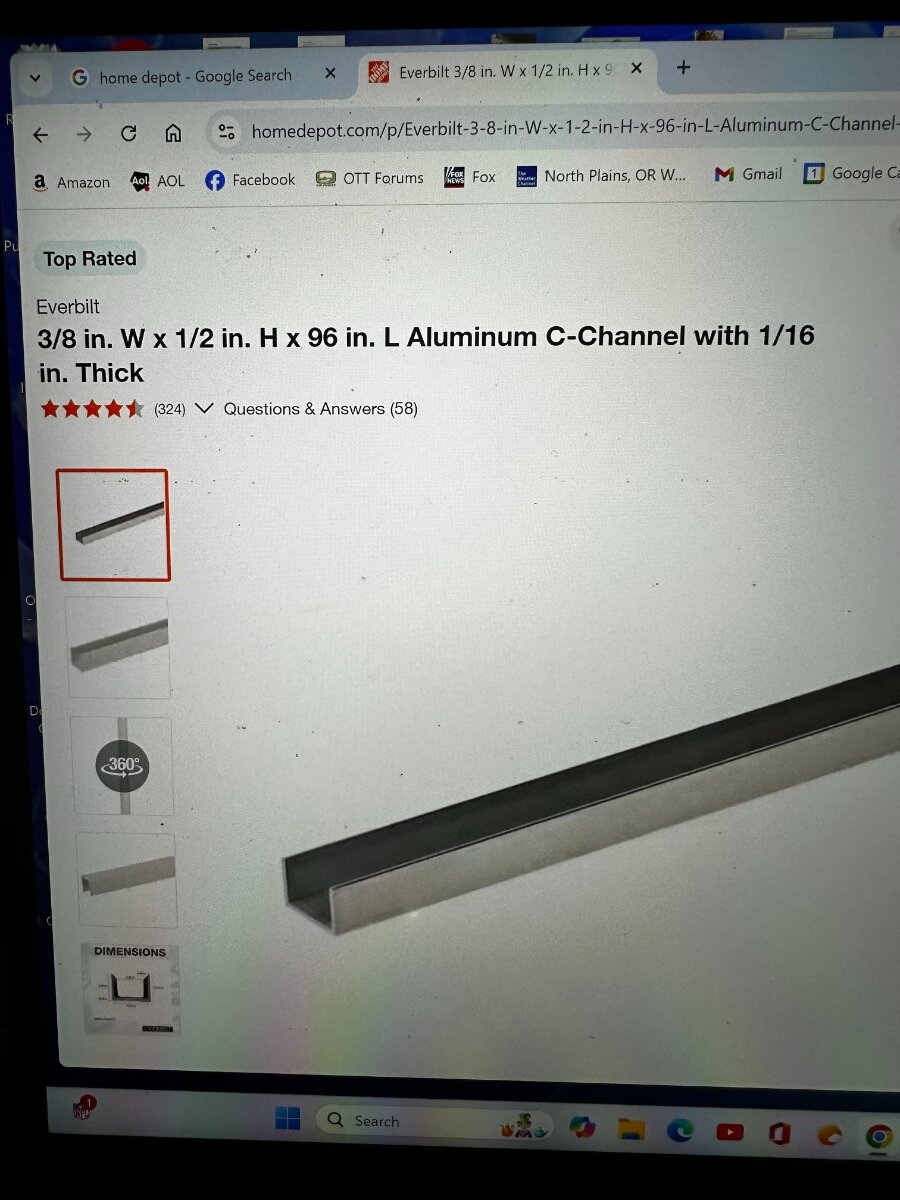
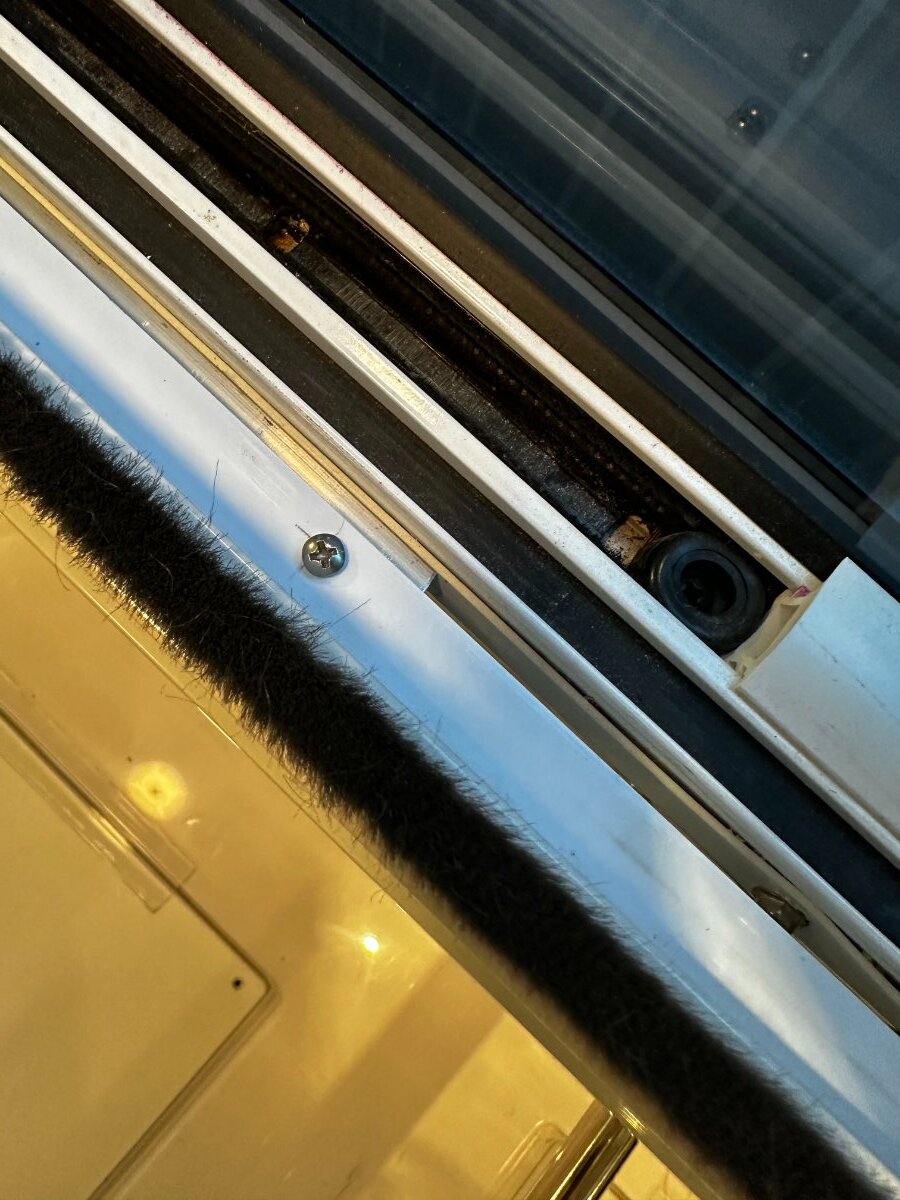
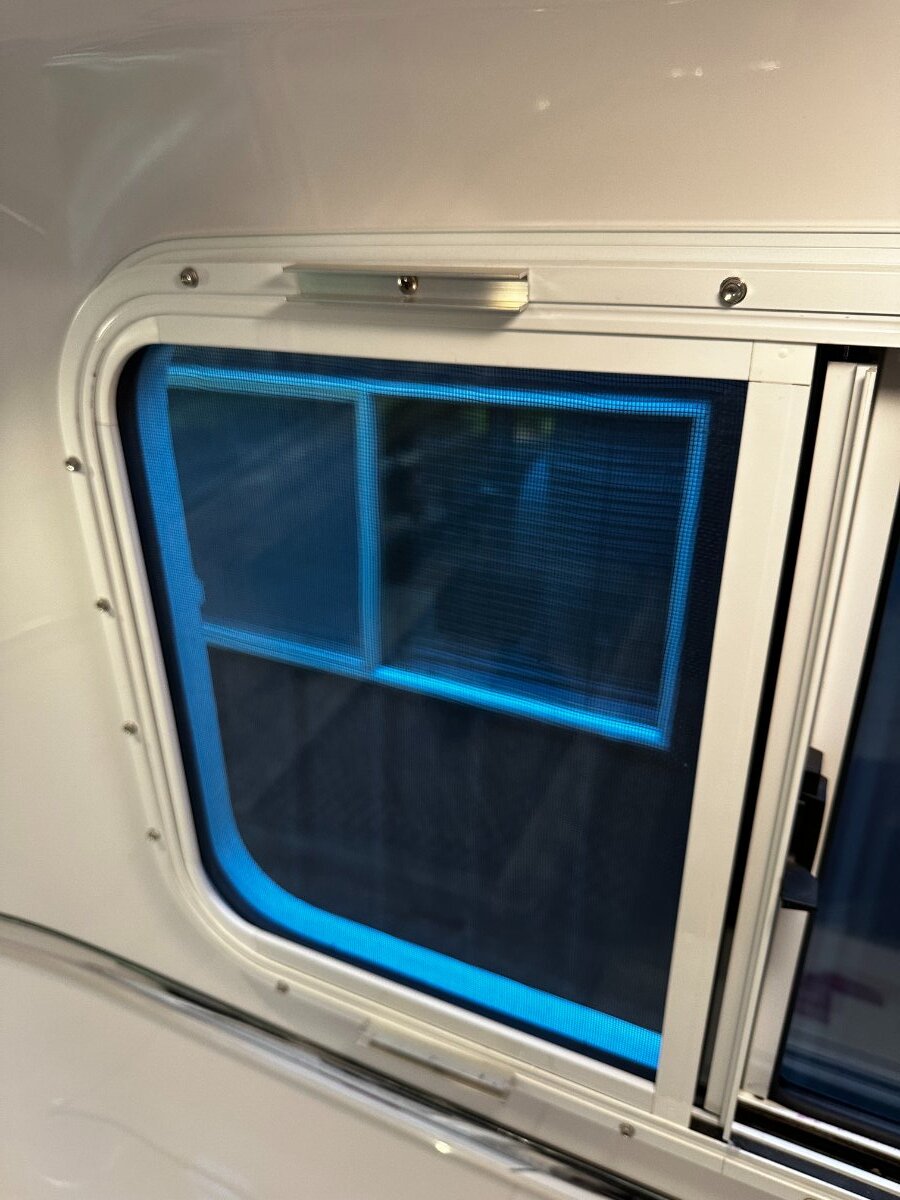
Fix for falling shade frames. I tried replacing the clips and applied silicone to help hold. Nope. The large shade frame fell off again on the last trip so I was determined to do something different. The shade frames will never fall off again. I removed all of the clips and their spacers. Cut and installed 4" long sections of aluminum c-channel purchased from Home Depot using original screws along with blue Loctite. Then placed the frames back on, drilled and attached the shade frames with #6 stainless steel screws. Fitment is perfect. Hope this helps others. Photos attached.
1 point
-
I had a similar problem with a 6 pack of tablets that I had for couple of years. It seemed as if the had swollen up and they were also a little more likely to crumble. I just threw them away and the newer package worked fine. So my take away was to only buy them when needed. Mossey1 point
.thumb.jpg.e34bf01ef7f7d5e99ad31856d45afbeb.jpg)


-
Recent Achievements
-


")

")


")


")