Leaderboard


Popular Content
Showing content with the highest reputation on 08/14/2018 in all areas
-
I am a tent/backpacker camper close to retirement. Plan is for my wife and I to purchase a small travel trailer and spend half the year on the road. Been doing a lot of online reading to learn about options and just by chance saw an an online ad for Oliver. I never pay attention to the ads although the sides of my web page but this one caught my I eye. Clicked on the ad and was formally introduced to Oliver Trailers for the first time. Very interested in the construction quality and 4 season capability. Also like the build approach, although long duration I do like having the flex to customize. Plan to spend time in this forum learning more about Oliver Trailers. Thanks4 points
-
Does anyone else feel like they should be down on knees bowing up and down while mumbling, “We’re not worthy, We’re not worthy...”? John, thanks so much for sharing all your labors of love regarding your Oliver! Alison3 points
-
I generally use accuweather, both the app and website. They have the best long range forecasts and also a really nice, simple app that you can customize to display the data you want - things like dew point, which is often overlooked on most apps. I'll bookmark ahead of time in the app the places we're headed and then take screenshots of the long range forecasts from the website for later in case we don't have a signal. I also like the hourly graphical charts from NOAA, which are much easier to interpret than the typical list of data from an app. If we're at a park, I'll usually check their weather charts since they'll often have weather for specific areas within the park, which can be dramatically different from what you'd see on an app. I'll also look up at the sky on occasion, just to verify that it's not raining.2 points
-
Not to be a smart ***, but as I try to go places where cell signals don't, I don't rely on them for weather - over time... especially in higher altitudes. Sure I'll look at the long range forecasts, but I often try to be prepared for whatever the season will throw at me. If there is something looming, I adjust appropriately, however, I must admit - I've never wondered about air quality. When we go out for a day long hike - I take the appropriate stuff, - just in case. If we are out for weeks - we just deal with what the day brings. Grin and bear it. Course - I've been know to paddle whitewater while its freezing water on the paddle shaft, and icicles are forming on the rock ledges - and it was winter - sure it was gonna be cold, I was looking for the sun to come out, and if it did - mo better. I love what technology, the WWW, and all these cool apps do for us, but to be honest, I don't rely on technology to keep me safe when I'm out side, well anywhere really. I'm convinced, Mother Nature goes out of her way to piss me off, so I just grin back, cuss a little, ok a lot, and go on. By the way, John, you do post lots of really good information - please keep them coming.2 points
-
4000 is a great choice - it is very resistant to UV and will not yellow - but all of the high tech 3M sealants are a pain because they must be used within about a day or two. Once exposed to air the entire tube will “kick off” and you won’t be able to use it the next time. I really wish they would offer these products in a 2 ounce size for say $4. It is very expensive to use the bigger tubes for a small repair. ... https://www.3m.com/3M/en_US/company-us/all-3m-products/~/3M-Marine-Adhesive-Sealant-4000-UV/?N=5002385+3293242579&rt=rud Be aware that regular cheap silicone sealers are generally a poor choice, the ones that do not include the word “adhesive” in their name. The better grades of Marine ADHESIVE sealer work fine for small stuff. But none of the silicones stick very well to stainless steel. If you have a job that penetrates the roof, use 4000. 5200 is for super permanent jobs. Do not mess with 5200 if you ever plan to remove it wthout a lot of swearing! I think I told this story before, but I will repeat it. I bought a 27 ft SeaRay cruiser new in 1988. They built it with cheap clear silicone and within six months every joint on all the stressed parts on the deck (such as cleats and life rail stanchions) opened up and let water into the balsa core. We are talking about several dozen holes. The upper and lower surfaces delaminated, when the core swelled and became mushy. When you walked on it, water would squirt out of fittings. They had to ship it to Arizona where it had been built. I insisted that they use 5200 for the big hull to deck joint, and 4000 for all the small parts when they installed a completely new deck. That blew three months of a short Seattle boating season.... It taught me a big lesson about balsa core construction, stainless parts, silicone sealer and idiotically poor build quality in general. Maybe that is why I expect a little too much from Oliver in terms of quality control.... As far as prep work, NEVER use alcohol for cleaning parts that you will glue with 4000 or its brother products. It will prevent the sealer from bonding. Use MEK, lacquer thinner or a similar commercial solvent. It says this in the instructions on the tube. It pays to use a good product, even if it costs a lot more. Weigh the extra cost against getting a leak, having to deal with the mess and possible damage, and having to do the repair all over again ..... John Davies Spokane WA2 points
-
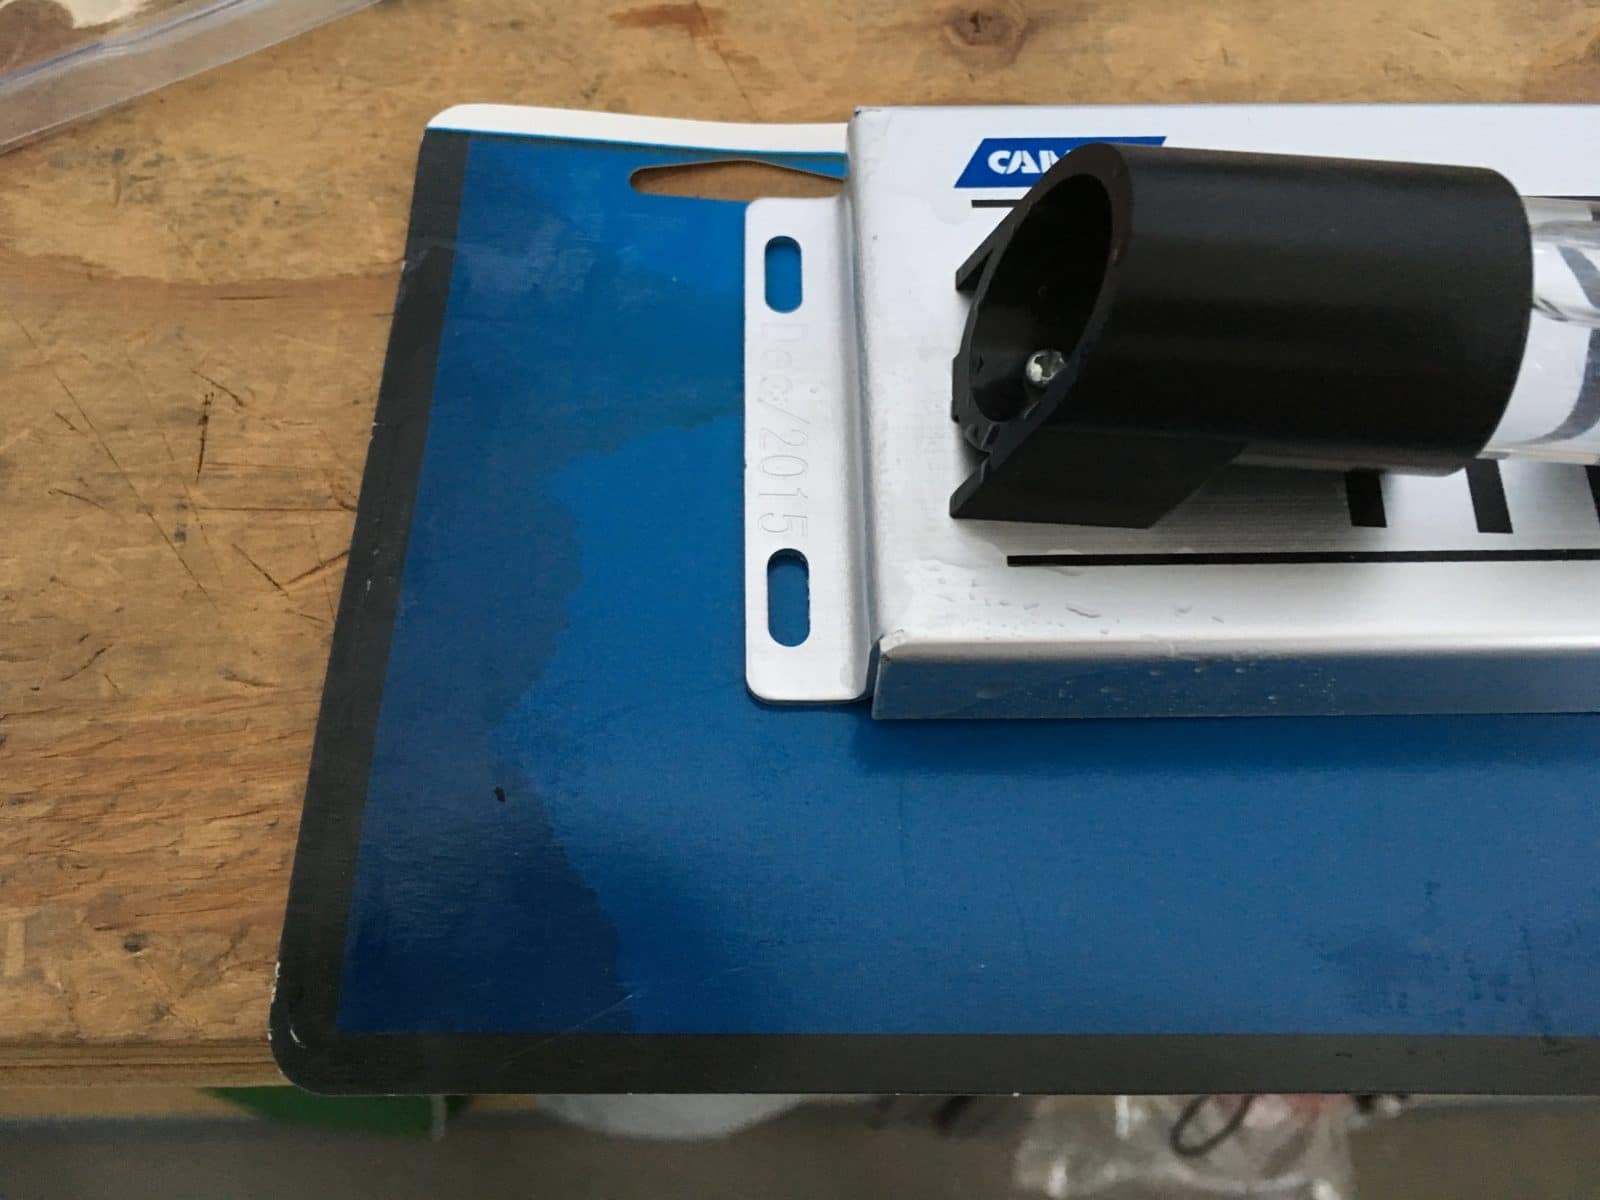
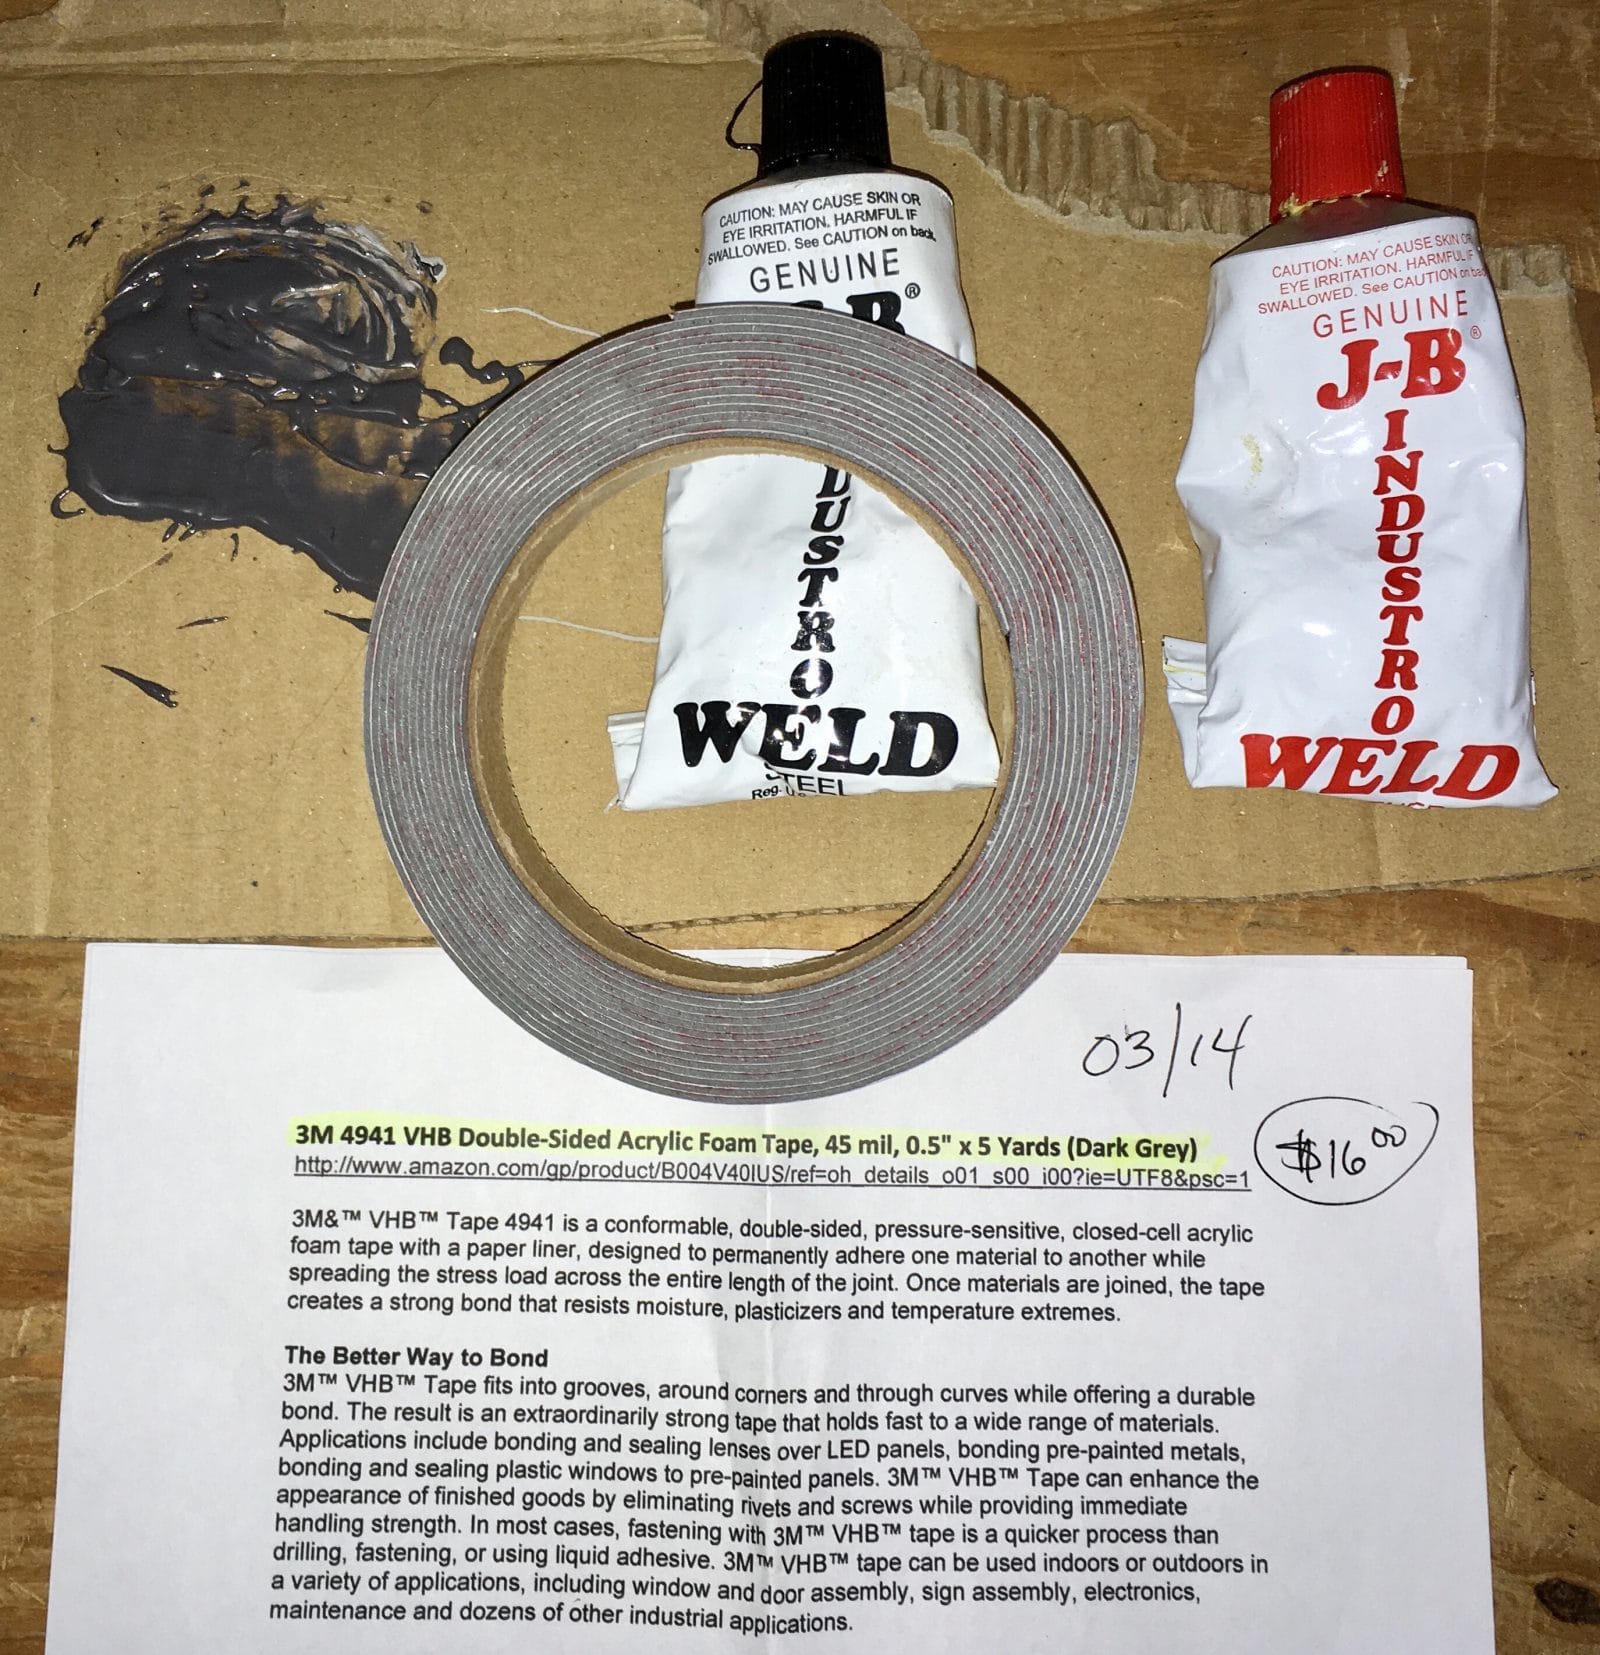
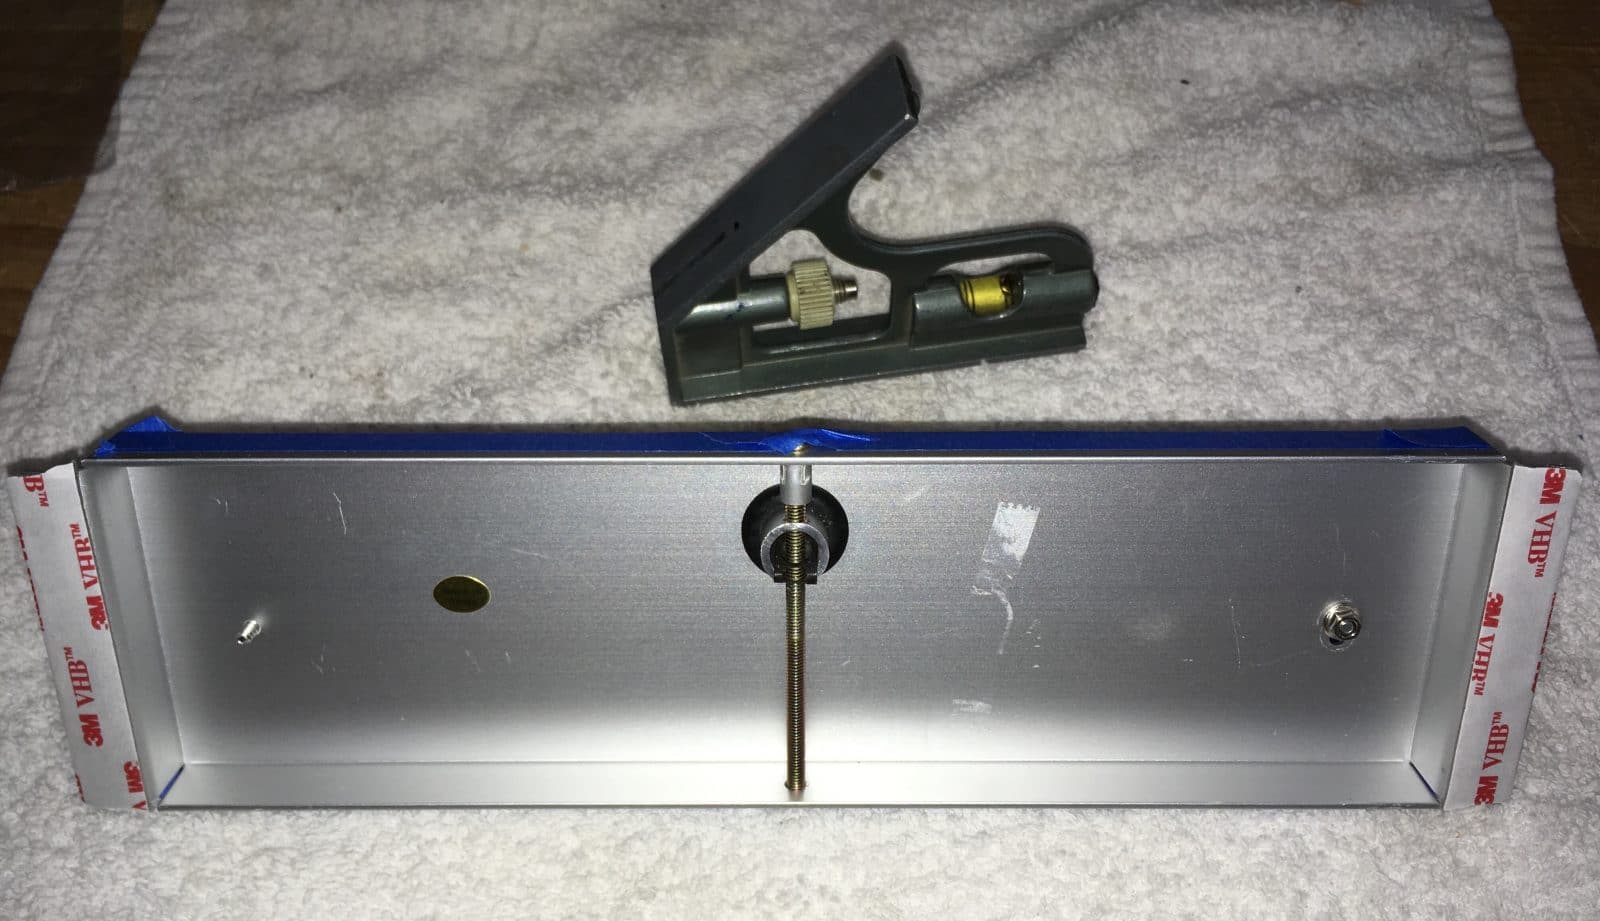
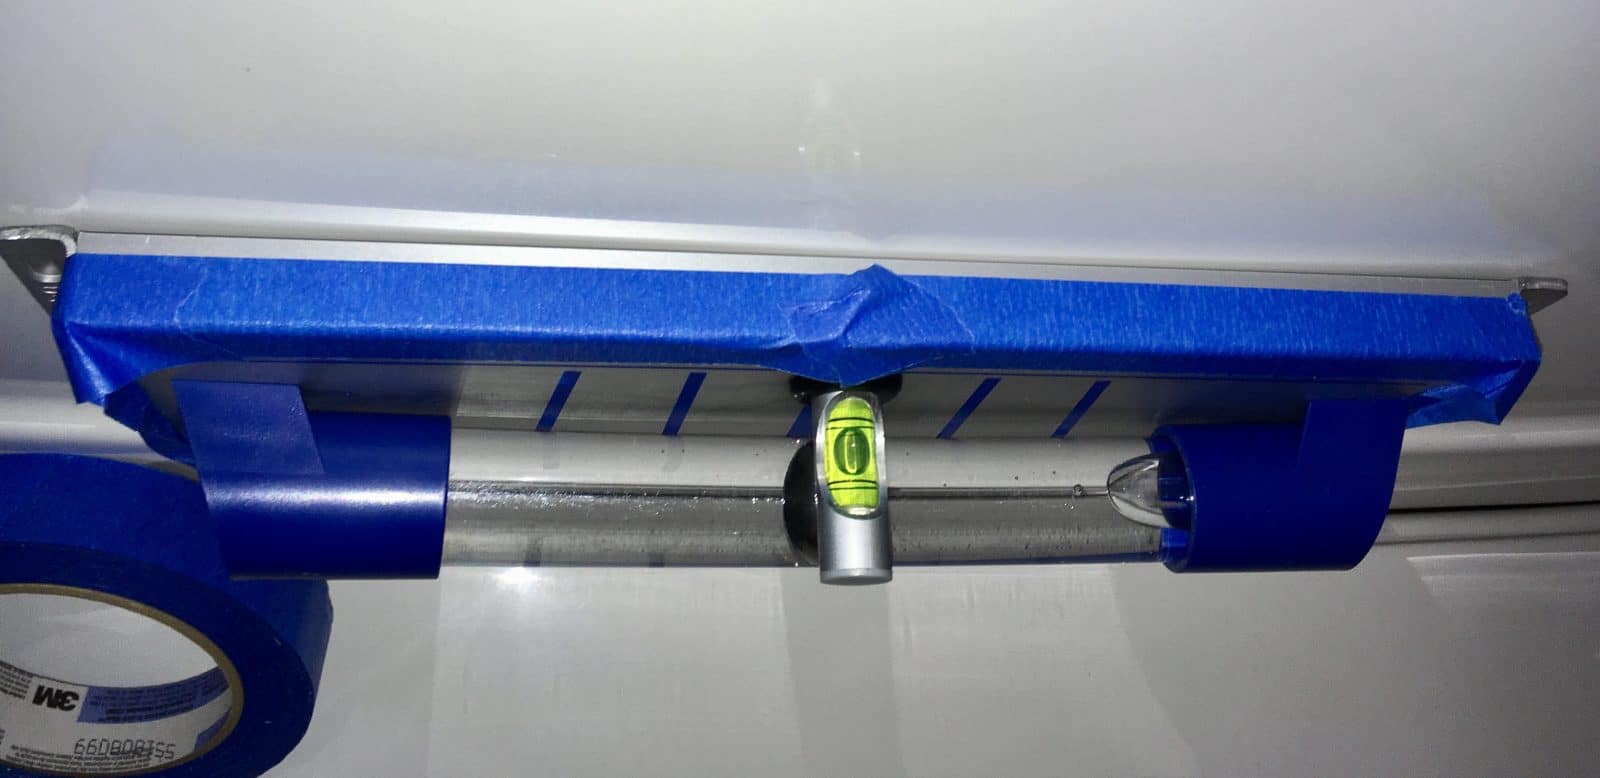
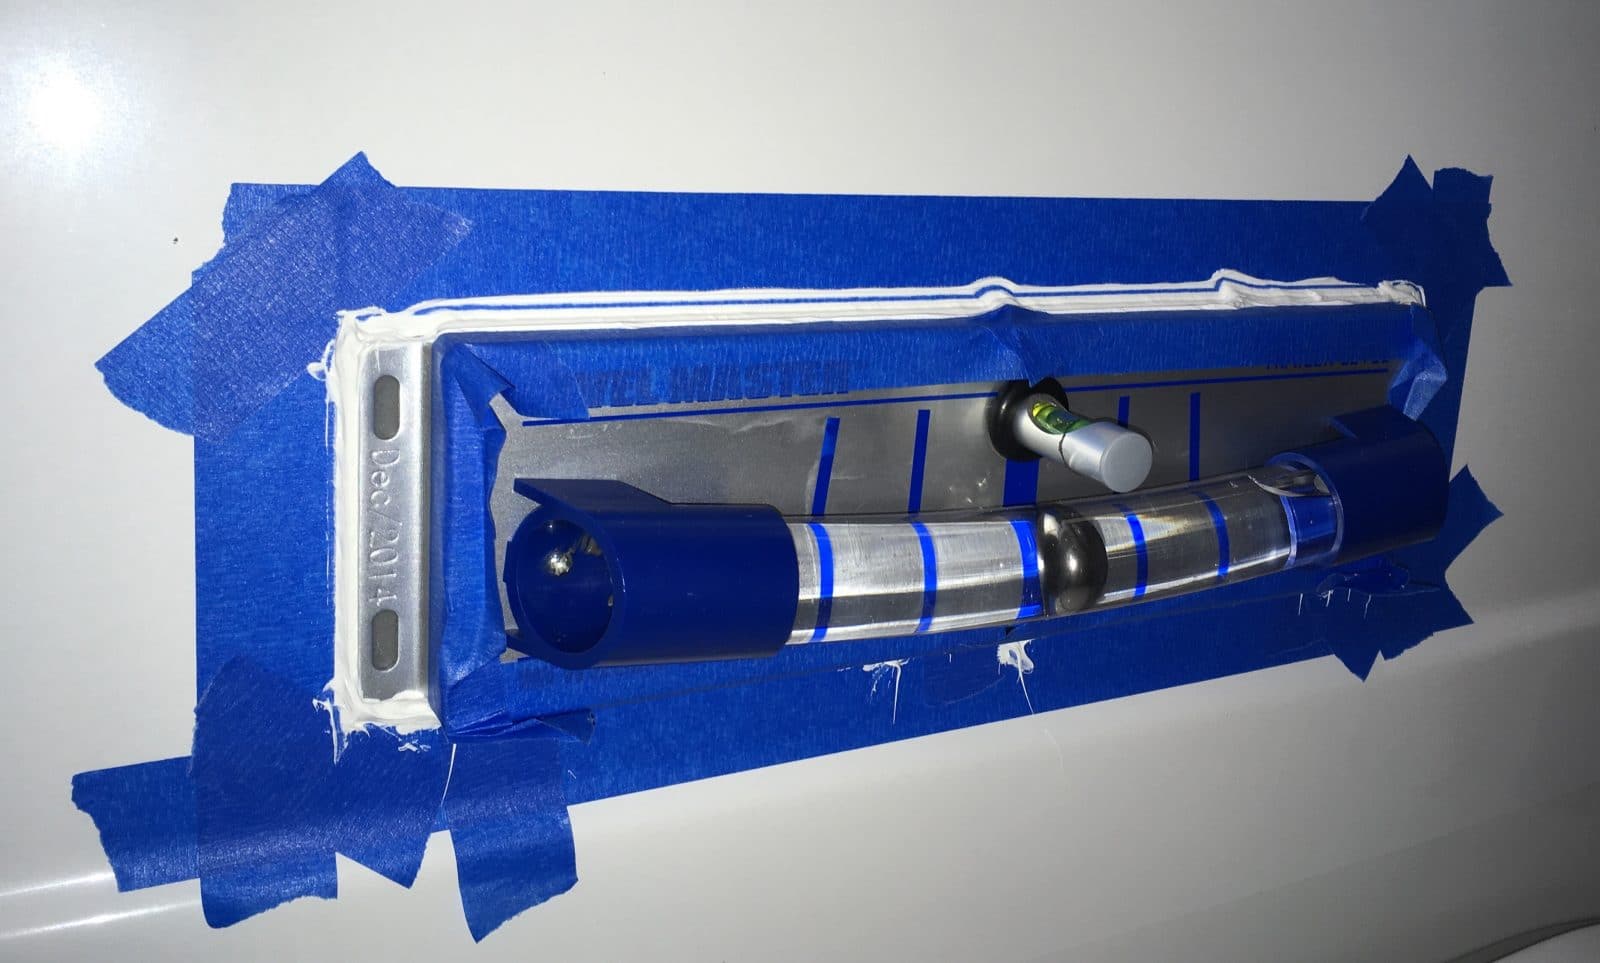
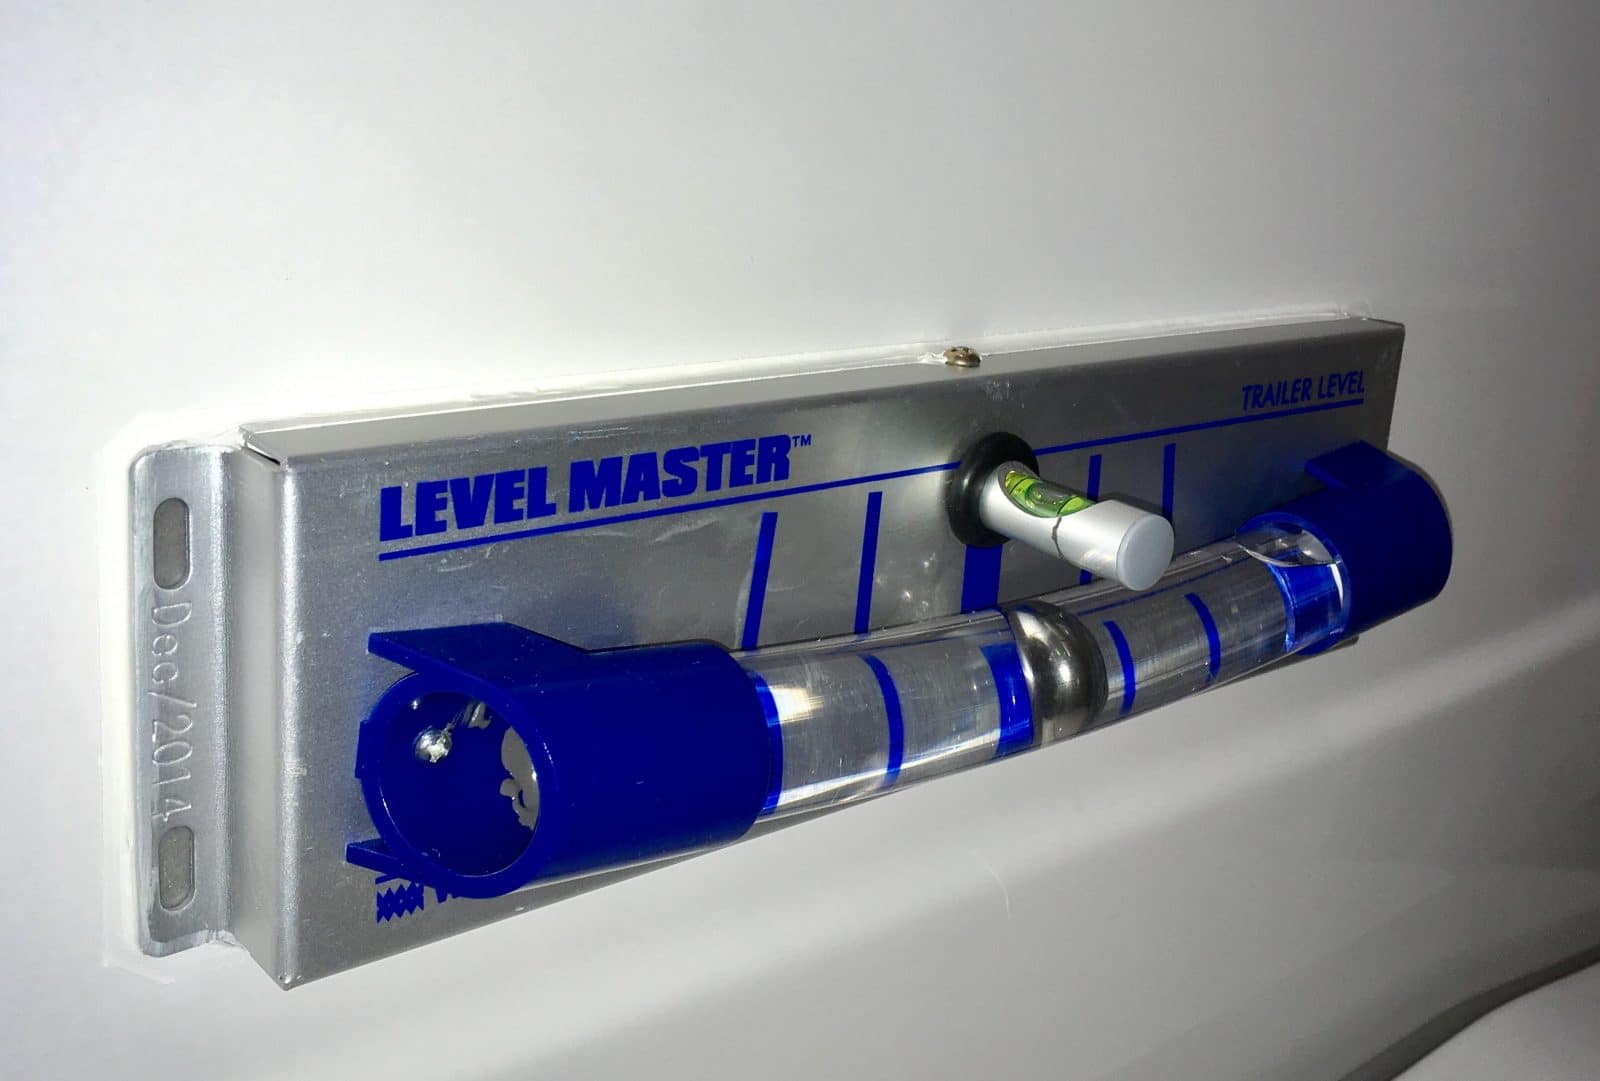
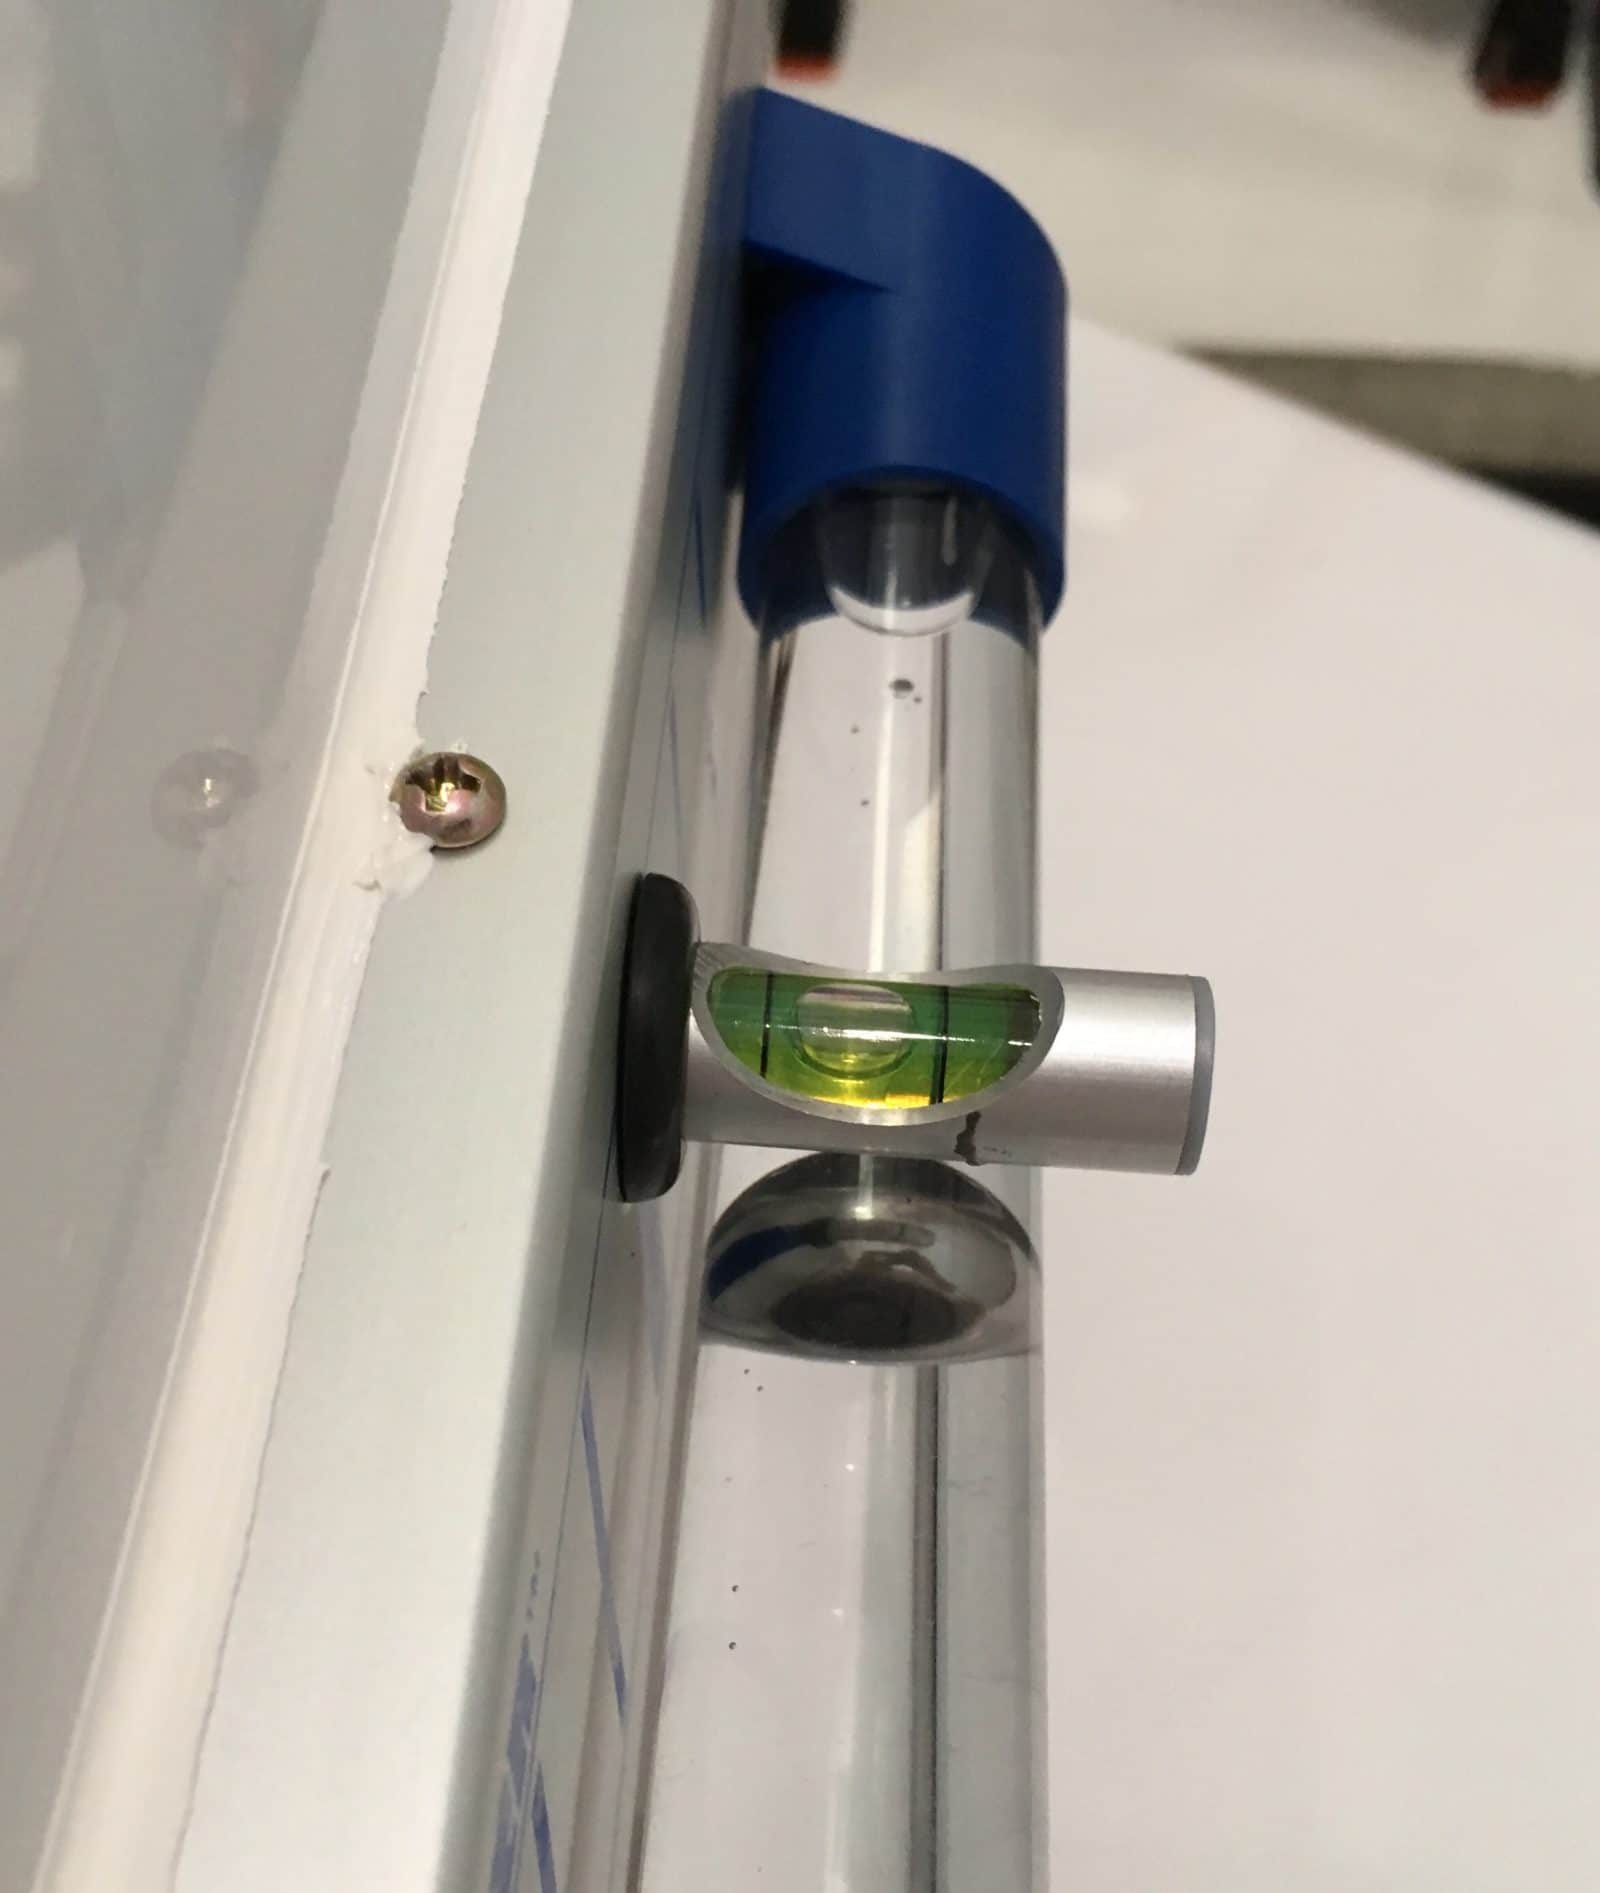
I originally wanted the Camco 25563 level because Amazon had it on sale for less than $15.... The one I received had leaked badly and there was oil all over the inside of the packaging, and the cardboard was soaked through: I arranged for a refund and another level through Amazon's painless return system. The next one I received had ALSO leaked, though not quite as badly. I returned that one and decided that maybe Camco was not a very good choice for this particular device. I went by the local RV Stealer parts department and found a similar model made by Level Master. It was $34, but it was not leaking, so I brought it home. After test fitting it where I wanted it to go, I pro-actively sealed the two ends where the factory plugs go, to prevent any future loss of fluid. Parts used: https://smile.amazon.com/Wheel-Masters-6700-Level-Master/dp/B000V55NB0/ref=sr_1_1?s=automotive&ie=UTF8&qid=1501042191&sr=1-1&keywords=level+master+trailer+level JB Weld (or any good two part epoxy) 3M 4941 VHB Very High Bond Acrylic Foam Tape 0.5" wide (used for securing automotive trim, very tenacious!) White Marine Silicone RTV Adhesive Sealant, UV stabilized. Not regular silicone sealer. The "Adhesive" part of the description is important! Masking tape and assorted measuring stuff Carpenters level I carefully secured the level vertically in a bench vise and added a thick layer of epoxy to cover the factory "plug" in the hollow tube. I let it kick off (two hours) and then did the other end: [attachment file="IMG_2792.jpg" There is no way that is going to leak, unless it gets hit with a bird or large rock..... Here is the back, showing the small bubble leveling screw. It has a hole at the bottom where it turns, this must not be covered with sealant on the final step. Also shown is the two strips of VHB tape. Alone they are probably not quite enough, but with the adhesive/ sealant added afterwards it will be plenty strong:: I cleaned the front of Mouse with isopropyl alcohol, and also the surfaces of the level. I used masking tape to find the center of the front wall. My choice for height is based on being able to see the level over stuff piled in the rear cargo area of my Land Cruiser, so it is an inch above the belt line. [attachment file=IMG_2794.jpg] I leveled the trailer left to right using the rear bumper, double checking the inside floor ... and carefully stuck on the level. Once pushed down firmly there is no removing the VHB, but if you lightly position it, you can readjust it. Once in the correct location, push and hold each side hard for 30 seconds. Now it is stuck hard! Detail showing that there is a gap all the way along, in spite of the curvature of the wall, thanks to the thickness of the VHB tape: Mask off the perimeter, leaving gaps on the bottom at each end and at the hole for the small level adjuster screw. The gaps are for moisture drainage: Inject the adhesive/ sealant into the cracks all around: Work it in smoothly by dragging your finger along it. Do not lick your finger! I am sure it tastes really bad: Carefully peel off the tape, do not let the sealant dry first. Mistakes can be wiped up with a dry paper towel: Make sure the trailer is level fore and aft and adjust the little level: Done: If the big ball is a little off center, you can adjust the entire tube a _small_ amount by loosening the left screw (looking at the front of the unit) and then gently tapping that end down or up with a screwdriver handle. The mount is slotted for that screw and the nut is serrated, so you can retighten the screw after and the nut will not turn. DO NOT LOOSEN THE SCREW MORE THAN A TINY AMOUNT, just enough to move the tube, or the nut back there may spin around and you won't be able to tighten the screw. Then you will say very bad words, indeed.... I will post more pics when I next tow Mouse. This should make it a lot quicker to get the side to side leveling done, from the driver's seat, by simply driving along until the ball is closest to dead center. John Davies Spokane WA
 1 point
 -
Yet another bit of distilled research, as posted here: http://radven.livejournal.com/128906.html === Boondocking or "dry camping" in an RV without a battery monitor is like driving a car without a gas gauge. If you fill your tank up everyday and never drive further than to the corner store, this strategy can work just fine. But if you are going to do any sort of serious camping without electrical hookups or a daily dose of generator, it is essential that you keep a close eye on your batteries. This is particularly important when relying on solar, because you will rarely know for sure what state of charge the sun has left you with. Batteries will last longest if you never cycle them below 50% capacity, and going over 80% drained starts to seriously damage even the best "deep cycle" batteries. If you use the "lights are getting dimmer" method to tell that your batteries are running down, they will almost certainly be permanently dead within a year. Not good - particularly if you've invested in expensive AGM batteries. Voltage Metering: The simplest way to keep an eye on your batteries is via a voltage meter. A fully charged 12V battery will read 12.73 V, at 50% capacity 12.10 V, and when you have just 20% left (critical territory!) 11.66 V. The Oliver trailer includes a system status panel that will show you your battery voltage, and by keeping watch you can get a sense for how you are doing. But there is a BIG catch. To get an accurate and meaningful voltage reading, your batteries must have been sitting idle for at least six hours, and preferably twenty four. That means no lights on, no charger connected, no solar running - essentially no use whatsoever. If the battery is not well rested, particularly if it is currently being used (even if just to power a light), the voltage reading is going to be off - and therefore nearly useless. Imagine if your car's gas gauge was only accurate after you had been pulled off the highway for six hours. That is not particularly conducive to getting anywhere.... Consider the voltage meter to be essentially just a "guess gauge", and not a gas gauge. Specific Gravity Testing: You can also very accurately test the state of charge of well rested flooded lead acid batteries by using a hydrometer to measure the specific gravity of each individual battery cell. But doing this involves sucking up battery acid into a glass tube. Not fun, or typically practical. In a car, this would be akin to pulling off the road, letting your engine cool, and then sticking a hose into your gas tank to see how much fuel remains. You really don't want to be doing this. Trust me. Battery Monitors: A real battery monitor works by measuring the current flowing into and out of your battery via a very accurate shunt. Once the monitor detects that your battery is full, it keeps track of every amp of outflow, and it gives you a percentage remaining readout or an easy to read empty to full bar graph. This at last gives you a usable "gas gauge" view of the sate of your batteries. Battery monitors are not cheap, but they are worth it. If you are actually going to be using your batteries for more than a day or two of disconnected camping, I consider a proper battery monitor to be essential equipment. There are only a few options on the market however: + TriMetric TM-2020: The TriMetric has been on the market forever, and it is a trusted and well proven design. It is also the most affordable battery monitor around, available for about $165. The TriMetric has a simple (though unattractive) LED display that shows you the battery % full readout, and which can also display battery voltage and current. The maker of the TriMetric also has available the much more expensive PentaMetric unit which does data logging and which can be interfaced with a PC. The PentaMetric is overkill for all but the most extreme RV installations. + BlueSky IPN-Pro Remote: The IPN-Pro remote requires and works in conjunction with a BlueSky solar charge controller (like the 2512iX). The IPN-Pro provides a very attractive display that combines both solar charging status with real battery monitoring. It even learns your batteries internal charge efficiency, becoming more accurate over time. If you have a BlueSky solar controller - this $180 option is an ideal match. + Magnum Energy Battery Monitor: If you have one of the higher end Magnum Energy inverters (expensive), and the Magnum Energy inverter remote control interface (also expensive), you can add real battery monitoring to your system via this $160 upgrade. I was disappointed however to discover that this battery monitor will not function when combined with the more affordable Magnum MM series inverters. + OutBack Power Systems: If you are looking to spend a LOT of money and you have a much larger RV than the Oliver, OutBack Power Systems produces a line of high-end inverter / chargers and solar controllers that can be combined with their FLEXnet DC battery monitor and MATE remote display to produce a very snazzy looking integrated system. + Xantrex Link 10: The Link 10 is a basic battery monitor with a simple LED display and red, yellow, and green status lights to indicate how close to critical you are. The Link 10 does not display a percentage battery remaining view, but it will tell you how much run time you have left at your current load. Aprox $200. + Xantrex Battery Monitor: This $230 monitor is very similar in functionality to the Link 10, but it does offer a nicer display, a proper battery percentage readout, and an option for data logging to a PC. + Xantrex LinkLITE: The Xantrex Battery Monitor is currently being discontinued and replaced with the new LinkLITE and LinkPRO models, which are due to ship in August. The LinkLITE will cost $270, can monitor two battery banks, trigger a generator to start when the battery is getting low, and it looks to have a very clear and intuitive display readout. Current Awareness: One of the nice side effects of using a real current measuring battery monitor is that it shows you exactly how much power you are using at any given time. When you flip on a light switch, power up an inverter, or turn on the radio, you will see exactly how much additional current that new load is drawing. Without this sort of awareness, you may never even realize which things are the major drains on your battery. Once you have a battery monitor installed, it is a good idea to work your way through your RV - turning each light and gadget on and then off, one at a time. Make a note of the current draw of every item. This information will be invaluable later, particularly if you are trying to be miserly and maximize your run time on batteries. Concluding Thoughts: If you are using cheap Walmart special batteries, it is actually not unreasonable to abuse them till they drop, and to just plan on replacing them every year. If this is the case, a real battery monitor is probably overkill for you. Pay attention to the battery voltage, never ever run things till the lights get dim, and you'll be fine for a while. But if you are going to be doing a lot of off grid camping, or you are planning to spend a lot of money on expensive batteries, you are a fool if you do not also invest in an accurate way to track their condition. You really should get a battery monitor of some sort. If you have a BlueSky solar controller, the best choice is obviously the IPN-Pro. If you are building a Magnum or Outback complete system, you also have an obvious choice - though certainly both of these are overkill for something as small as an Oliver. If you are getting a standalone battery monitor, I'd base my choice primarily on aesthetics - since you do NOT want your battery monitor mounted in an out of the way place. You do want your gas gauge to be readily seen, after all.1 point
-
I used to use the Weather Channel’s wonderful Storm app and loved it. They recently replaced it with Storm Radar, which is pretty much useless, slow to load data, buggy and very frustrating to use. It no longer shows highs, lows and fronts. I found an “old school” interactive map with those features which looks interesting. https://www.wpc.ncep.noaa.gov/exper/nationalforecastchart/map.php Here is an article “The Demise of the Surface Weather/ Frontal Map”. ... informative and also quite sad for me, who grew up with these maps. https://www.accuweather.com/en/weather-blogs/weathermatrix/the-demise-of-the-surface-weather-frontal-map/70000589 Here is an air quality (smoke) map I refer to often. Current level for my home area is 162, hazardous ;( The AQI Loop video is cool. https://cfpub.epa.gov/airnow/index.cfm?action=airnow.local_city&cityid=260 Anyone have a recommendation for a better IOS weather app? How do you monitor the weather, especially when far away from radio or tv news? Do you use an emergency weather radio, and what features do you like and utilize? Do you need an external antenna? I am planning a week long west coast trip (Ocean Shores, WA and then north) for late September and would like to be able to receive tsunami, earthquake and storm warnings independntly from my phone. But not have to leave it turned on constantly. Please educate me. Thanks. John Davies Spokane WA1 point
-
We used GE Silicone that is available from any Home Depot or Lowe's (I am sure most hardware stores have it too). The nice thing is it comes in a small tube, about the size of a large tube of toothpaste. No caulking gun needed. There is a built in nozzle, that when capped is reusable the next time you want some. The tube also fits in your tool pouch. It works extremely well, sets overnight, and remains flexible.1 point
-
I live on Schoodic Peninsula if you need any assistance while up this way. Should be around except for 8/22 - 8/271 point
-
" DavidS - It is unfortunate this happened, the situation had/has the capability to cause personal harm. I would guess the "guy" simply verified voltage, and blew you and the problem off. He should have been fired. It would take very little effort to correct the problem. The liability he assumed was much larger than he ever dreamed. Say Matteo would have been harmed, and later looked for compensation. Well ,we all know how that works out. I never assume wire color means anything - always verify - is there voltage present and how much. Black, red, blue, etc. are not always "hot, and white is not always neutral. I do the same with grounds, if you cannot read voltage to ground, you have no ground. As far as what to do when you have an problem in a RV site - I let the park management know - if it is simple and fixable - quickly - fine, otherwise I move to a site that is safe and working correctly. To be clear - I am not one that worries about much - I take a few seconds, plug in a tester, if ok, I hook up and go about my business. If not, I make changes, its simple really. Life is to short to argue with folks to lazy take care of their business. But this dude needs retraining at the minimum.1 point
-
First, I am not an experienced RVer. I have had Ollie for under two years. One time there was a problem with voltage being way too low, and we were able to move to another campsite. The other time was last May at the Oliver Rally at Lake Guntersville. I believe the problem was hot and neutral reversed, but my memory might be wrong on the details. I contacted the park people, and a guy came by on a golf cart. He seemed pissed off at me. “I just rewired all of these last month.” He checked it with a multimeter, and said “it is fine” and quickly left. I checked it again, and it still showed the same problem. The camper was very warm from our drive and we needed AC ASAP. After a quick google search I decided to hook up and hope that the Progressive Industries surge protector would protect us. The AC started up. Later that evening I found out the most of the 120V outlets did not work. None of the circuit breakers had tripped, but I finally figured out that the GFCI outlet under the bed had tripped. That solved the problem. Two days later Matteo Giovanetti came by to install our Micro Air Easy Start. Before he climbed up on the roof, I warned him about the hot - neutral reversal (if my memory is correct about the nature of the fault), and he said okay, not a problem. As part of the process, he had me flip off the circuit breaker under the dinette that controls the AC. A few minutes later there was a loud POP from the roof, and a little smoke from the AC unit. Matteo was not hurt, but I could tell he was a little shaken. He said “Of course, the hot - neutral reversal,” and asked me to shut off the 30 Amp breaker at the campground pillar, and I did so. The AC was not damaged, and I have verified that the Easy Start works. One last thing. A shout out to Matteo Giovanetti for great customer service from Micro Air. I have had excellent support from a number of companies that supply components to Oliver.1 point
-
Thank you for your responses. Happy you mentioned the Andersen Jack Blocks - looks to be a good combo: Andersen ramp + Andresen Jack Blocks.1 point
-
I use the Andersen leveler ramps that you drive up on. I’m a solo traveler and have a good level that I use on the kitchen counter. I don’t mind getting out of my tow vehicle to check the level as I back onto the levelers. Rarely have to get out more than twice—you get to the point when you have a pretty good sense of how much height you need to achieve to level. I also use the Andersen Jack Blocks now under all three jacks. They are light, but take up quite a bit of space and they aren’t cheep. But, I like this system.1 point
-
Welcome aboard. We have one of the oldest Oliver trailers. Still loving it, over ten years later. There are many people here with answers to whatever questions you have. Enjoy the quest. Sherry1 point
-
Since I pick up my first travel trailer April 2019, I know nothing about leveling a trailer except what I have viewed on YouTube. I think I like the Andersen levers (ramp style levelers) coupled with the LevelMate Pro Bluetooth technology. Do you have opinions and/or experience with these devices? Since I prefer not to screw into the fiberglass, what adhesive tape (Velcro?) is best for attaching and securing the LevelMate Pro device to the inside of the travel trailer? My understanding, able to sit in the TV cab and back onto the Andersen levelers until the iPhone app indicates level. Maybe a spouse qualified in working a bubble level and shouting at the TV driver will work just as well? Thoughts?1 point
-
Spike: I have had issue at several campgrounds over the years; most of the time when I contacted the campground office about the problem, they sent someone right out and they corrected the problem, if it is with the wiring or defective receptacle. However if there is a voltage issue, most of the time just moved to another section of the campground.1 point
-
I repeat the question because I'm not sure how many who could answer it read it. Since I am relatively new to RVing, I am interested in how more experienced RVers have dealt with this issue. (I promise not to bug the forum again with these questions if I still get no replies.)1 point
-
Exactly. I unhook the HDMI from the Furrion and hook into my iPhone. My iPhone then provides the video to the TV. The TV provides sound to the Furrion via the RCA cable. I put an HDMI splitter in the attic above the TV. The HDMI from the Furrion terminates at the splitter. On the other side of the splitter I have a short HDMI cable into the TV. The splitter provides the spot to insert my iPhone. Mike1 point
-
Thanks for the clarification! Have a good one!1 point
-
Bill, The rear Oliver LED exterior red lens started leaking into the upper rear cabinet during 2016. Removed the the exterior lens and cleaned out the original sealant. It was tough to remove the original sealant. The lens was temporarily resealed with clear silicone and taken to Oliver, they resealed it during 2016 guessing with 3M 4000, it eventually started leaking again. Removed the lens and sealant again, decided to use a more flexible sealant this time. I used white Marine silicone last year, no leak issues since. The other Bill :) ,1 point
-
I had to replace the little antenna on the back of the Oliver. I asked Jason in service if they used 5200?. He said no, they used white silicone. He thought it was more flexible. I had a small tube of clear that I carry anyway and it has worked great and easy to use. (I usually coat electrical butt splices and such with it to waterproof, has worked well for years in a salt water environment at the coast)...1 point
-
Strange, given that the voltage is the same, whether you use an adapter or not, as long as ground, neutral, and "hot" legs are connected correctly, the cord has no way of knowing what kind of connector your using, at any amperage. It should see 120 volts AC. I just checked mine, connected to the factory supplied Furrion cord, with an adaptor to a 15 amp rated extension cord (14 awg), and all is well, blue light as normal. (I use this set-up when not running AC, and to far from power source for current cord) If yours is not blue, or red, I would suspect a faulty cord, but to be sure, you should verify voltage, polarity and grounding on your home power source. KWRJRPE: You will invariably find that 25' of power cord is not enough - as such - a simple 30 amp cord, which contains at least 10 awg conductors, from 25' to 50' will suffice in most any situation. You can daisy chain them with the Furrion, but make sure your additional cord has the correct end connectors - in my situation I use the Furrion, and add the additional cord - with straight connectors, a twist lock will not fit the male connector on the Furrion. You can use whatever adaptors needed. 30 amp, 50, amp, 15 amp, or any 120 volt, correctly wired shore power receptacle will work - as long as you don't over load the circuit. Additionally, - the progressive unit provides useful information if you pay attention. In addition to any fault codes, the unit displays voltage, amperage and hertz. All but the Hz can change as you add additional power draw, additional cord length, underrated cord ampacity (small household type ext. cord) Voltage will drop as the load goes up, if supply cord is overloaded, or length is excessive, and you can monitor amperages as different loads are added. i.e., AC unit. As an example - My home static voltage is 124 volts, 60 hertz. Using just the 25' , 30 amp cord with Ac on, I will see as high as 19 amp draw, voltage drop is negligible. Now as I moved the trailer to a spot 50' away I have to add a longer, smaller rated cord, a 12 awg heavy duty cord, with an adapter, connected to a different 20 amp household receptacle. My voltage dropped to 119, amperage was similar. To much voltage loss and you risk damaging your AC, and perhaps melting a plug end, cord or worse. I tried a longer - 14 awg cord, and my voltage went to 110 - not sufficient - I went to the heaver duty cord. (Yes, I have way to many electrical cords - from my construction days.) For this reason, I usually verify voltage, and polarity when connecting to new power sources, and then take a look at the readings on the progressive, once the loads are added. For the most of the time there will not be an issue - but it takes just once - if not protected - as the progressive unit provides. Sorry if this is TMI. or confusing. RB1 point
-
Welcome to the forum, Dave. There are lots of folks here with knowledge and experience with Oliver trailers. Let us know your questions and we will try to help! Mike1 point
-
When you are in Acadia....try to make time to drive over to the quiet side (Southwest Harbor) get takeout at Charlotte's Legendary Lobster Pound and then head to the picnic area across from Seawall campground to have your picnic dinner and watch the sunset. Another great spot on that side of the park is the Seafood Ketch in Bass Harbor, sit outside on the deck and checkout the lobster boat harbor.1 point
-
Good morning Canoe12 and welcome to the Oliver Forums. The Oliver electric jacks do extend far enough to not use any blocks at all. It's just with the use of a tall block we have discovered several benefits: 1 - Time saved in running the jacks as you don't have to run them all the way down (and back up) 2 - Energy saved in not running the jacks so much (they are hogs) 3 - Less chance of accidentally driving off with them fully extended and bending the jack (you will simply drive off the block)1 point
-
Chris, I just want to tell you how much I appreciate your posts! I have learned more, since you have joined our forum, than I ever thought I would be interested in knowing! You make learning about this technical stuff interesting and fun! Usually when I start reading anything technical, I develop brain freeze and then the brain teflon kicks in and nothings sticks! I just wanted you to know this old lady appreciates you! Actually, I imagine everyone who reads your posts is just as appreciative as I am! Geri *blush* But... I do actually have a knack for this stuff. Around 10 years ago I used to be the Technical Editor for a computer magazine. It is still around on newstands - now known as "Maximum PC". I'm glad you are enjoying the posts! - Chris1 point


-
Recent Achievements
-


")


")


")
