Leaderboard


Popular Content
Showing content with the highest reputation on 01/29/2021 in all areas
-
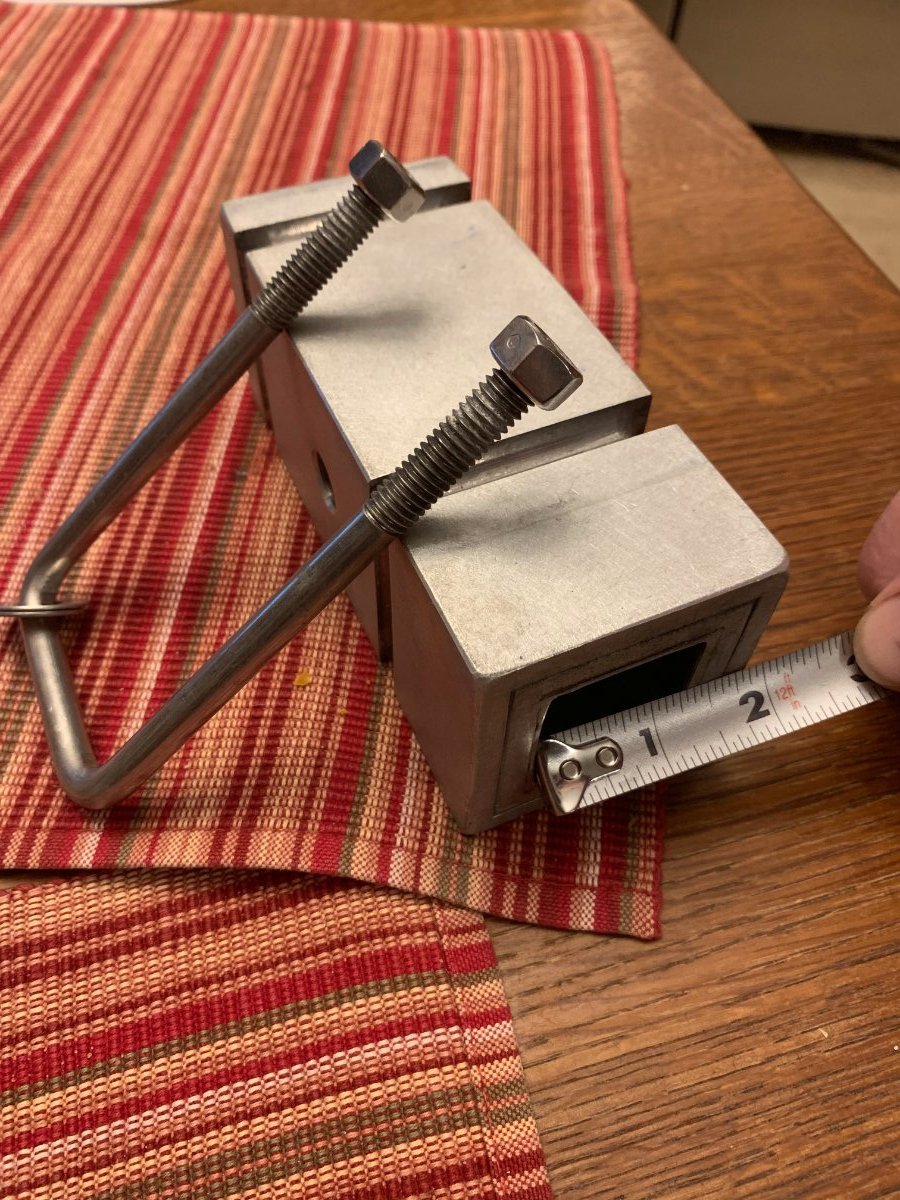
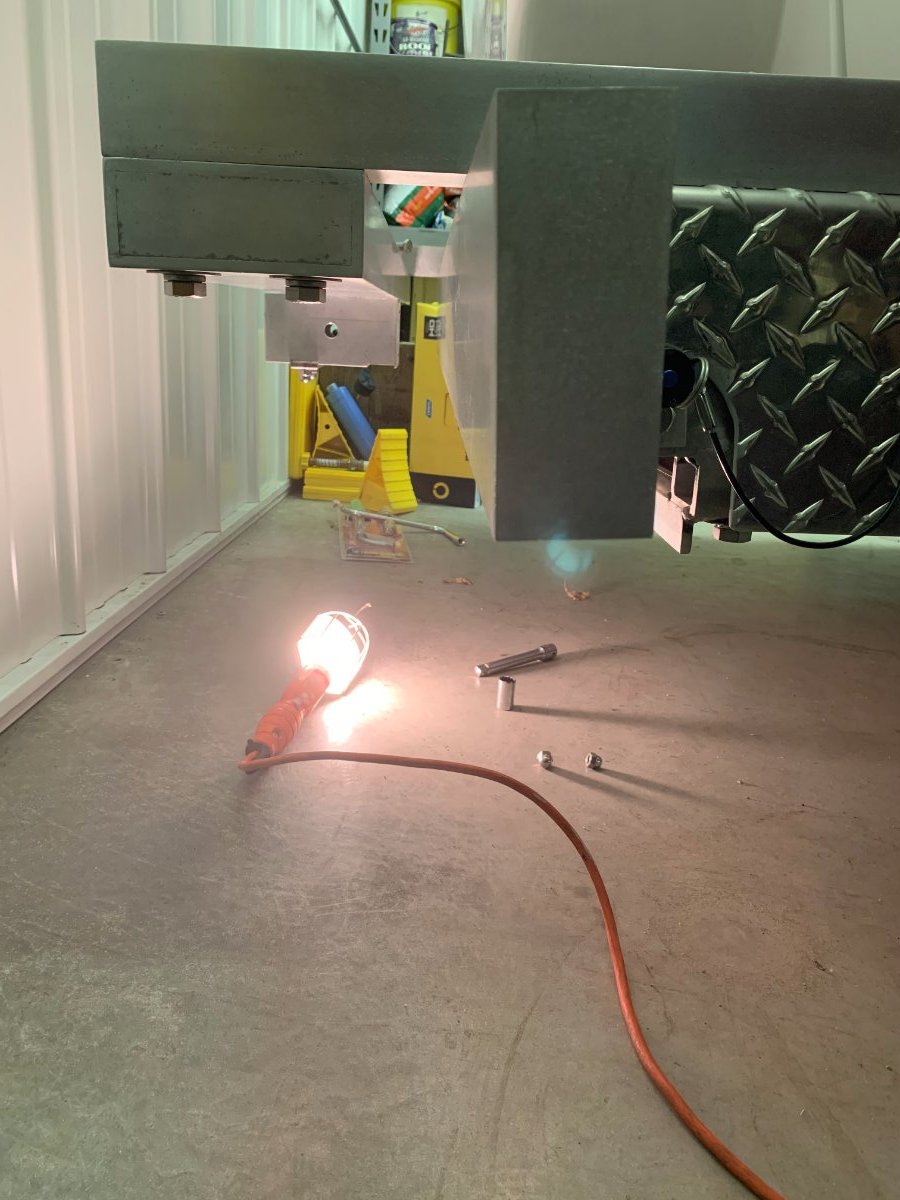
I misspoke that it came out of a solid piece. Here are some pics to look at. I used what I had on hand. It was one piece that was 3 '' by 2'' and cut a 2 '' wide by 1 1/2 '' deep slot down the length of it. The other was 3 '' x 1 '' and cut a 2 '' wide by 1/2 '' deep slot down the length of it. I used a quantity of four 1/4 - 20 '' stainless steel socket head cap screw to fasten together. Then drilled four 3/8 '' hole through side wall, two per side to match the existing holes that were in the factory cross member. I reinforced the mount with stainless steel plate top and bottom because of the 3/8 '' through holes in the 1/2 '' wall of receiver.
 3 points
 -
I saw that someone "liked" this good thread, so I thought I'd bring it back up for discussion. Over the years, I've definitely "culled" the essentials. We travel with some empty cupboard and truck bed space, years in. We carry less every year.3 points
-
Congratulations on your new Elite I. I am very excited and happy for you... but I must admit also being a bit jealous. We have ordered our Elite I but will not take delivery on it until October!!! Yikes!!! Keep your stories and pictures coming. Some of us are living vicariously through you new experiences. Along with many others, I encourage you to take a deep breath, take your time, never be in a hurry and enjoy every new thing you learn about about your new trailer. Oh... and don't forget to laugh a lot along the way. You do have a large following here that are rooting for you so you are never alone. I've already learned so much from the members of this forum, all of which have been very helpful. Something else I would recommend is to check out the Oliver University online. They have a ton of great information and videos on each of the systems in your trailer. I have watched almost all of them and they have been a great source of information. Don't forget to savor each new day you have with your new Olie! We are all here cheering you on! You can do this! Carl3 points
-
How long are you staying in your current spot? Sat weather looks interesting - would you like a visit - my SO needs to get out for a brief trip. (ok, so would I , and the dog - Harley) text me - 615 six 0ne three two four23.3 points
-
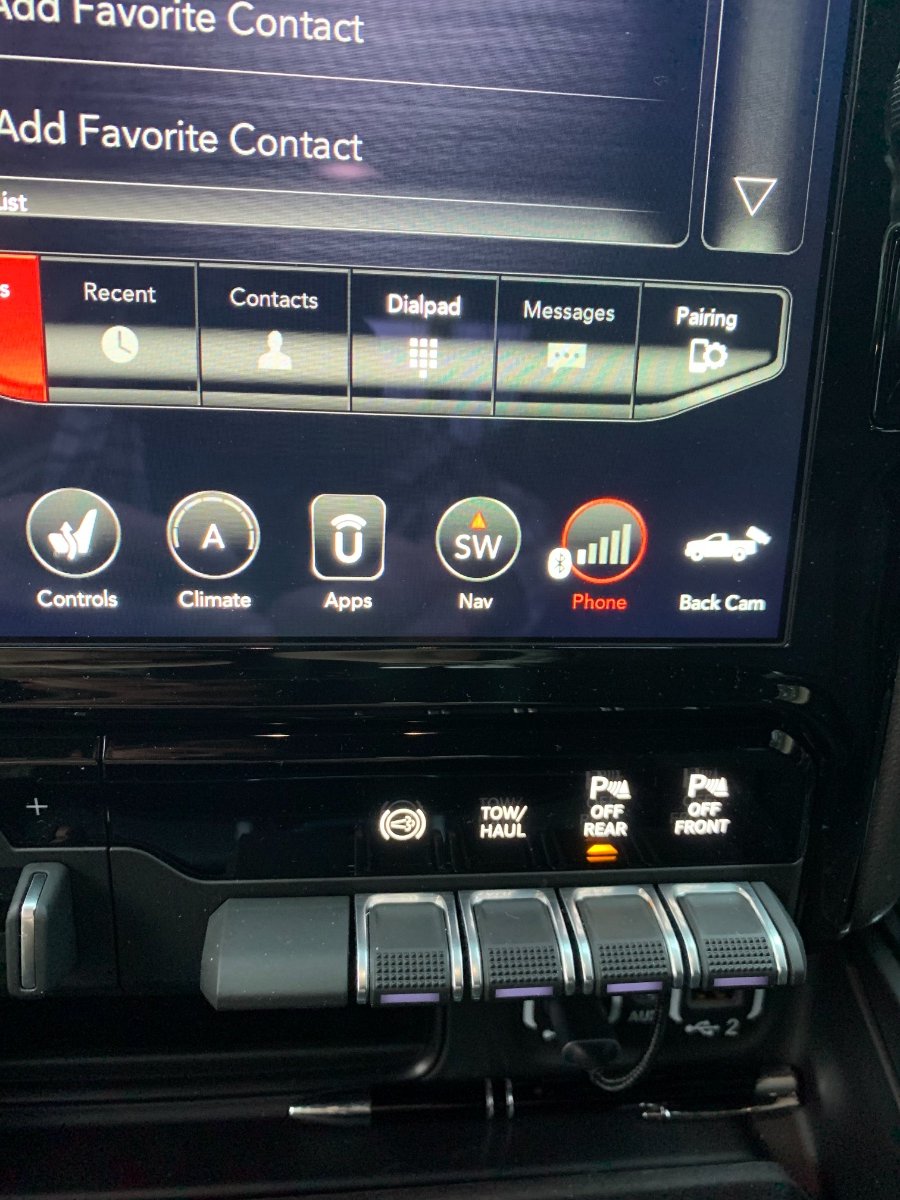
The backup cam on the Ram is just amazing. Three different colored lines and very specific as to actual location as you slowly move in reverse. The *slightest* touch on the steering wheel lets you see very clear dotted lines, pretty precise alignment guide, on the dash screen, which is HUGE, like a big iPad. So, that was ONE try. One! See, this is an example of when I *love* technology. At other times . . . not so much. Ha.2 points
-
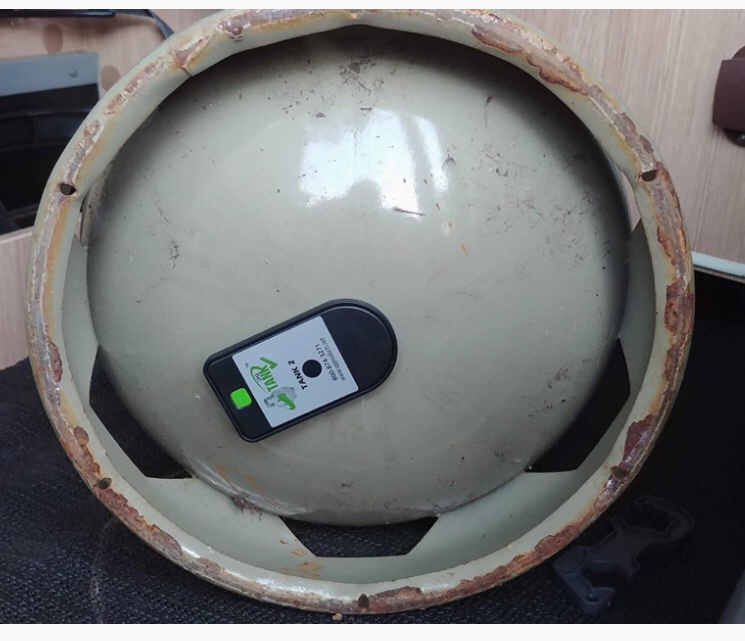
Propane goes fast in below freezing temps if you are not using electric heat as a secondary method. You should definitely take advantage of shore power when it is there! I rarely camp in cold weather so my supply is not usually a worry, you are full timer, so you should get some sort of monitor. This is well regarded ... https://www.amazon.com/AP-Products-024-1001-Propane-Indicator/dp/B01C5RQJHS/ref=mp_s_a_1_3?dchild=1&keywords=AP+Products+024-1001+Propane+Tank+Gas+Level+Indicator&qid=1611919630&sr=8-3 You might maybe have to raise the tanks up a little to make room to install the transmitter(s) under the bottle(s)... https://www.amazon.com/Mopeka-Tank-Check-024-5002-Halo/dp/B07HQZRR9F/ref=mp_s_a_1_1?dchild=1&keywords=Mopeka+024-5002+LP+Check+Tank+Halo&qid=1611919707&sr=8-1 Some people complain of poor battery life. That is probably from using crap counterfeit cells which infect the Internet. If the price is just way too good to be true, it is FAKE. Buy a name brand multi-pack of CR2032 cells at a local hardware store so you know it is genuine! I have no personal comments about how well the sensor actually works. I would definitely not install the butt ugly display unit they have available. Instead I would install just ONE sensor underneath ONE tank; call that your Secondary tank and write that on the tank near the shutoff valve. Label the other tank Main. Set the little movable arrow to point at Main. When your gas supply has been used up in Main, the regulator will automatically switch to Secondary. (The green indicator window for Main turns red.) At this point you can monitor the gas level in Secondary using the electronic sensor and your phone app. When that drops to say 1/2, take out both bottles and get them both refilled. There is no need to have two sensors, just check the app daily to get an idea of your gas usage. Once the valve switches itself, you will start to see the level go down. Make a habit of checking it daily first thing in the morning, so if you need to buy more gas, you will have a full day to deal with that.... That would be my setup.... right now I leave Secondary turned off; when Main runs out, my fridge, furnace and hot water quit working and I freak out and go outside to open the other valve. Then I have to reset the fridge and water heater; sometimes it is the middle of the night. But at least I do not completely run out and then start to freeze my butt off or lose food..... Maybe I should install one of those gauge doohickeys! When you remove the tanks for servicing, you should remove the sensor so it is not damaged in transit (setting it down on a rock!). Some owners carry a third propane tank in the bed of the truck as a backup, that sounds awkward and just a little dangerous to me. I would strap one to a rack on the Ollie if I were to do this. When transporting for service do NOT lay them on their sides, upright only! Hang in there. Some days of worry will get better, to be replaced by many days of pleasure and new experiences. John Davies Spokane WA
2 points
-
OK, on the smelly thing topic - Did you "flush" the toilet after use? If not - then all you have to do is step down on that pedal that is on the right side of the toilet near the floor. By depressing this pedal to the floor and looking in the toilet bowl at the same time, you will see the toilet "open" at the bottom. When you release the pedal you will see that the toilet "closes" at the bottom. With a little practice you will come to realize that this pedal actually has two functions - adding water to the toilet and opening/closing that trap door in the bottom of the toilet. A press of the pedal about half way will get you just water addition while fully depressing the pedal will get you a bit of water and a full open of that trap door. Obviously if you do not have any water in your fresh tank and/or are not hooked up to water at your camp site then you will not get any water. It is best to always have at least a couple of inches of water in the bottom of the toilet. This helps keep odors from the blank tank from seeping through the seal on that trap door and up into the bath area. However, too much water (or other liquids - let alone solids) in the toilet can cause "splash" while going down the road. Bill p.s. assumed that you did a bit of a cleanup of the shower area after you found out how to open the grey tank valve. p.p.s. (added edit) for the longer term and only after you feel settled in, you might want to take a look at THIS VIDEO. In the video they talk about (among other things) toilet maintenance.2 points
-
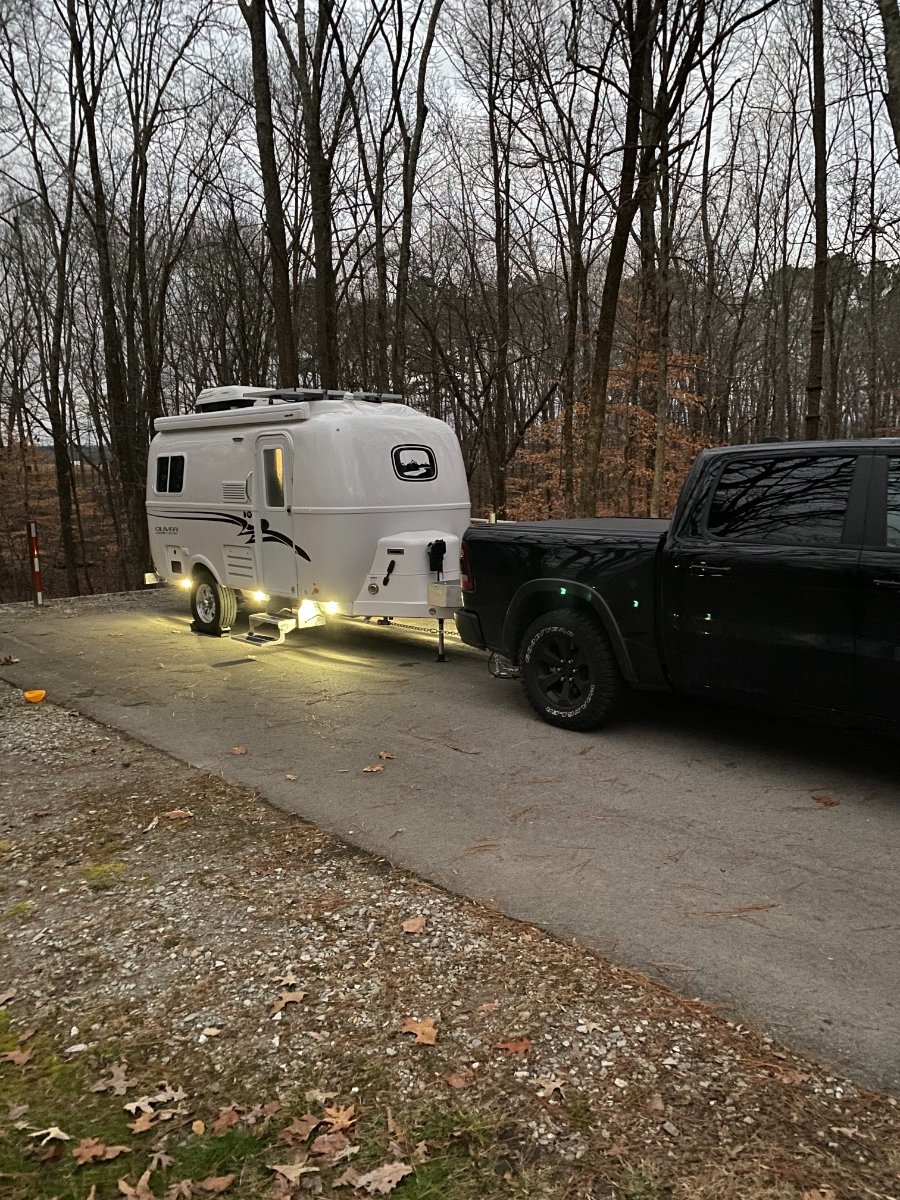
All: well I got it! So much to do today - LEARN. Newbie, 2000%. Hellva time backing in and park empty but a couple finally came along and he helped me back in. HE said it was not the easiest place to back in. I need to learn everything. Only hooked to elec so far. But restroom right across from me with SHOWER, which is now the most beautiful word in the English language, in my book. I am so glad I booked a week here to figure basic things out! Here is the Ollie (it’s 6:30 AM CST).
1 point
-
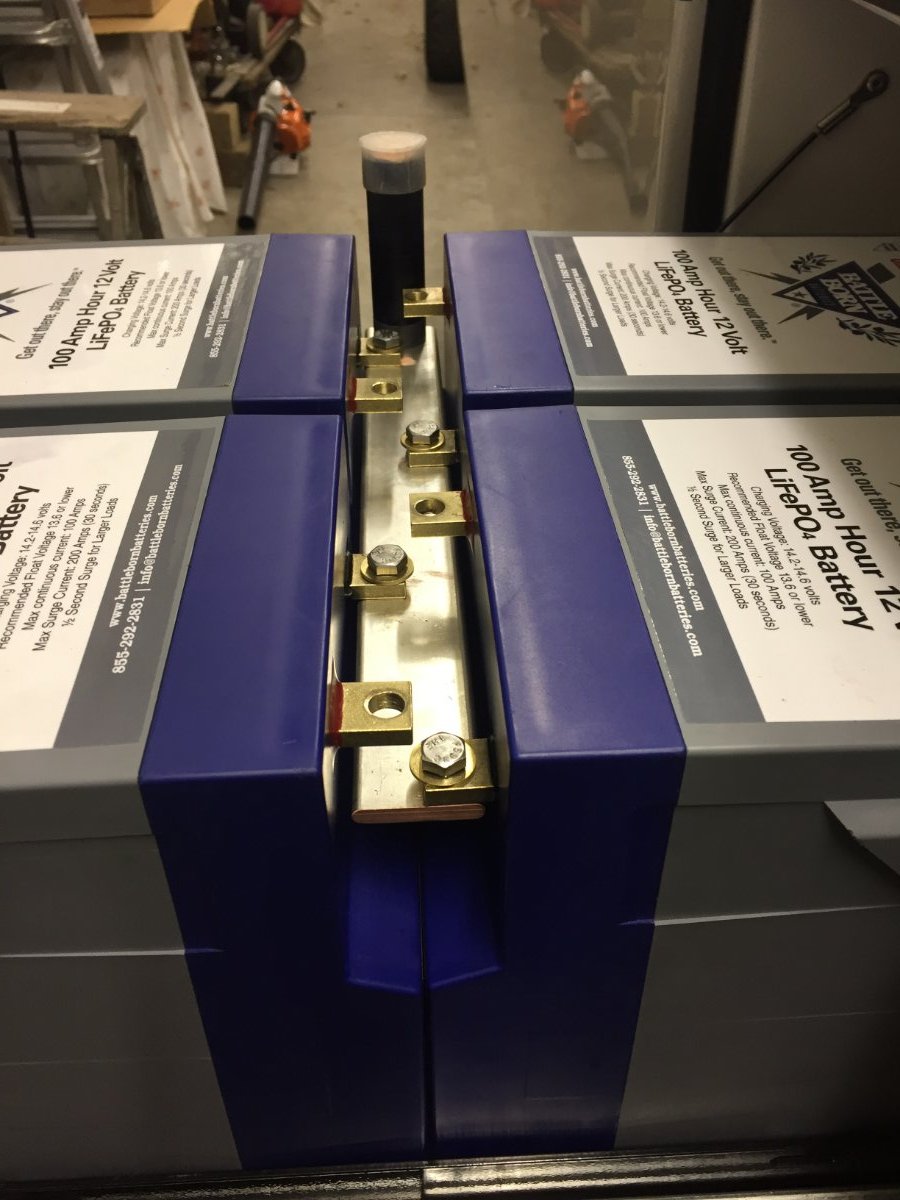
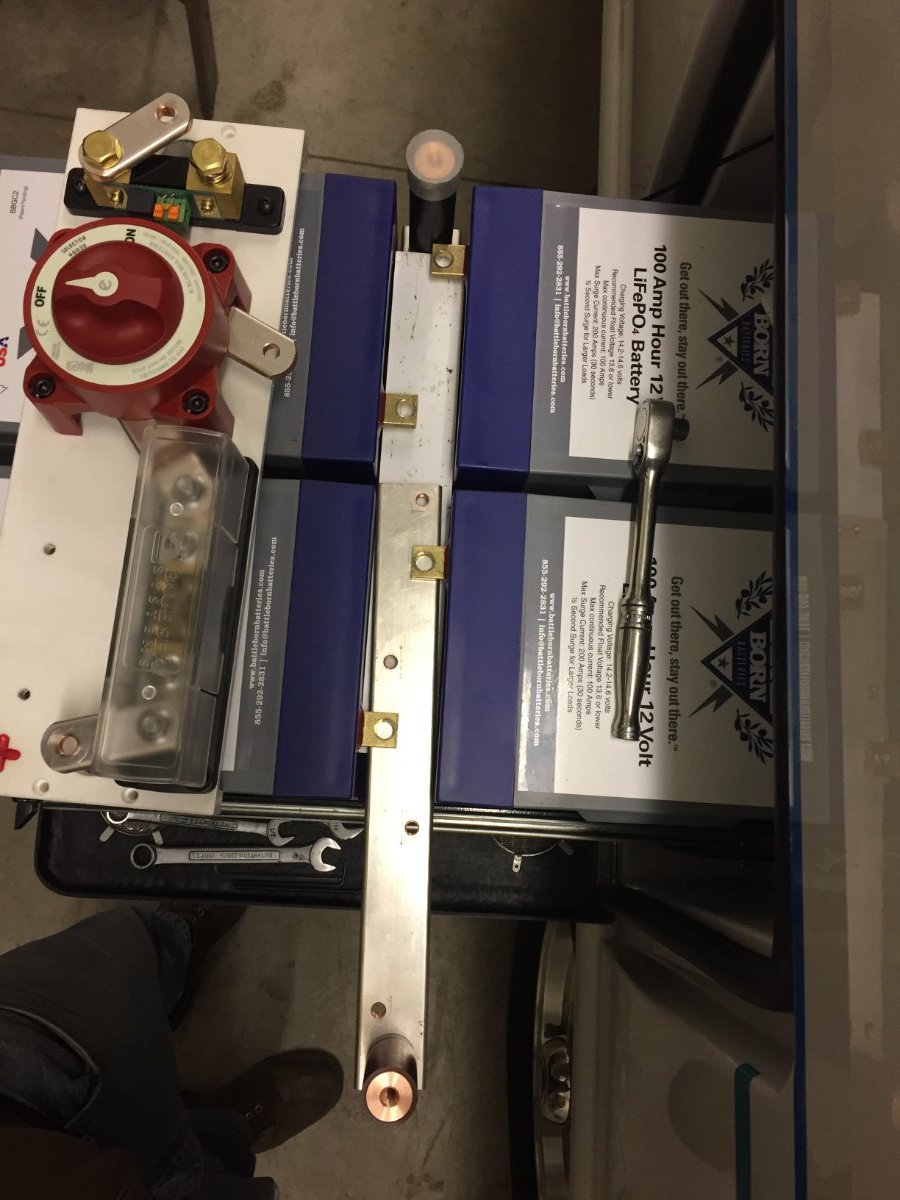
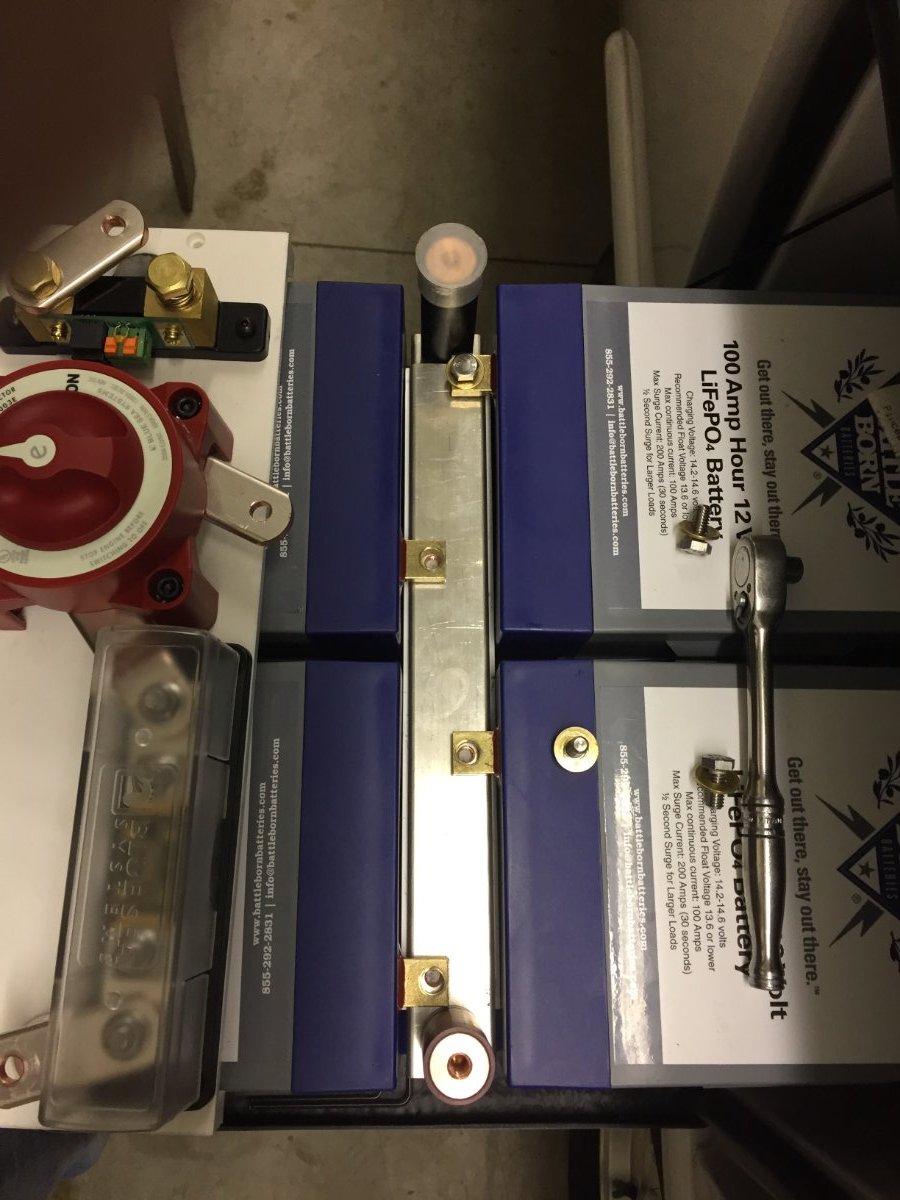
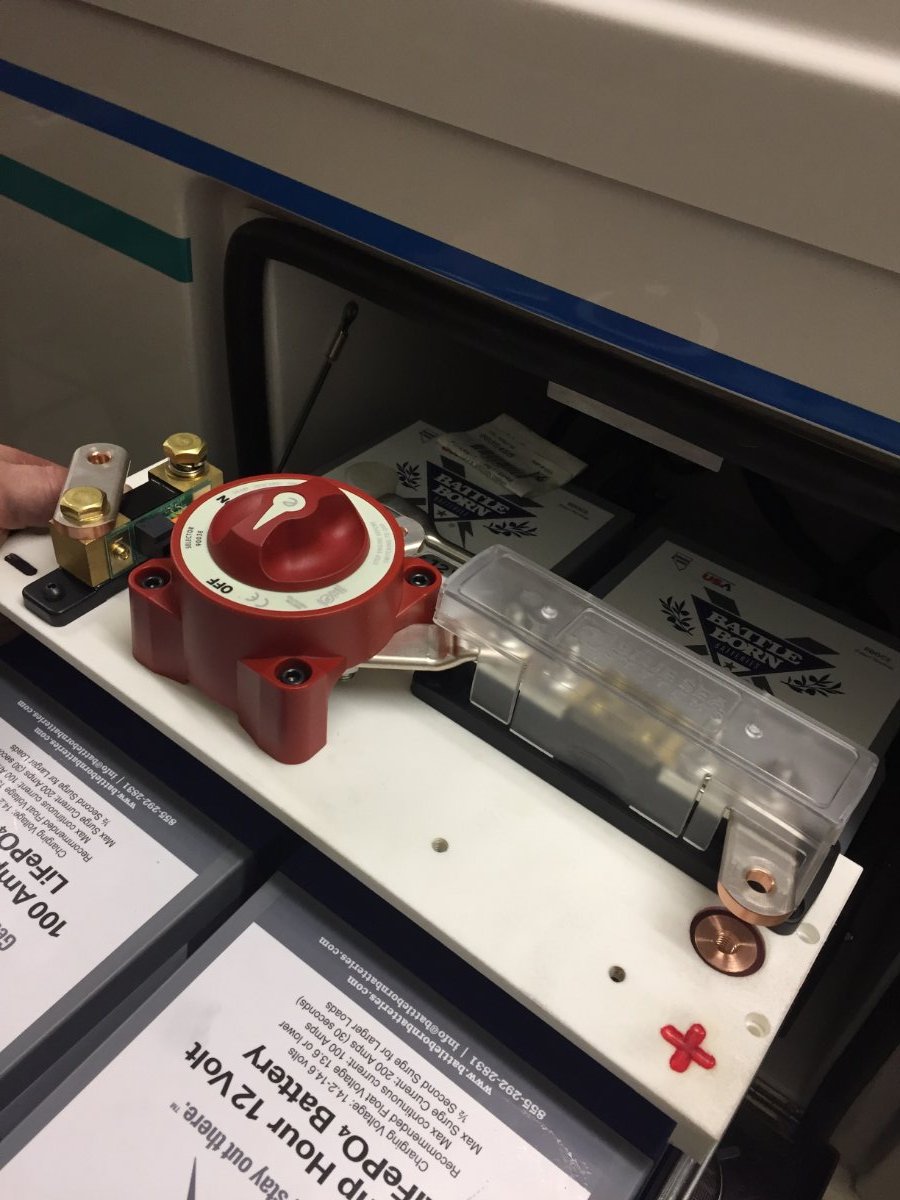
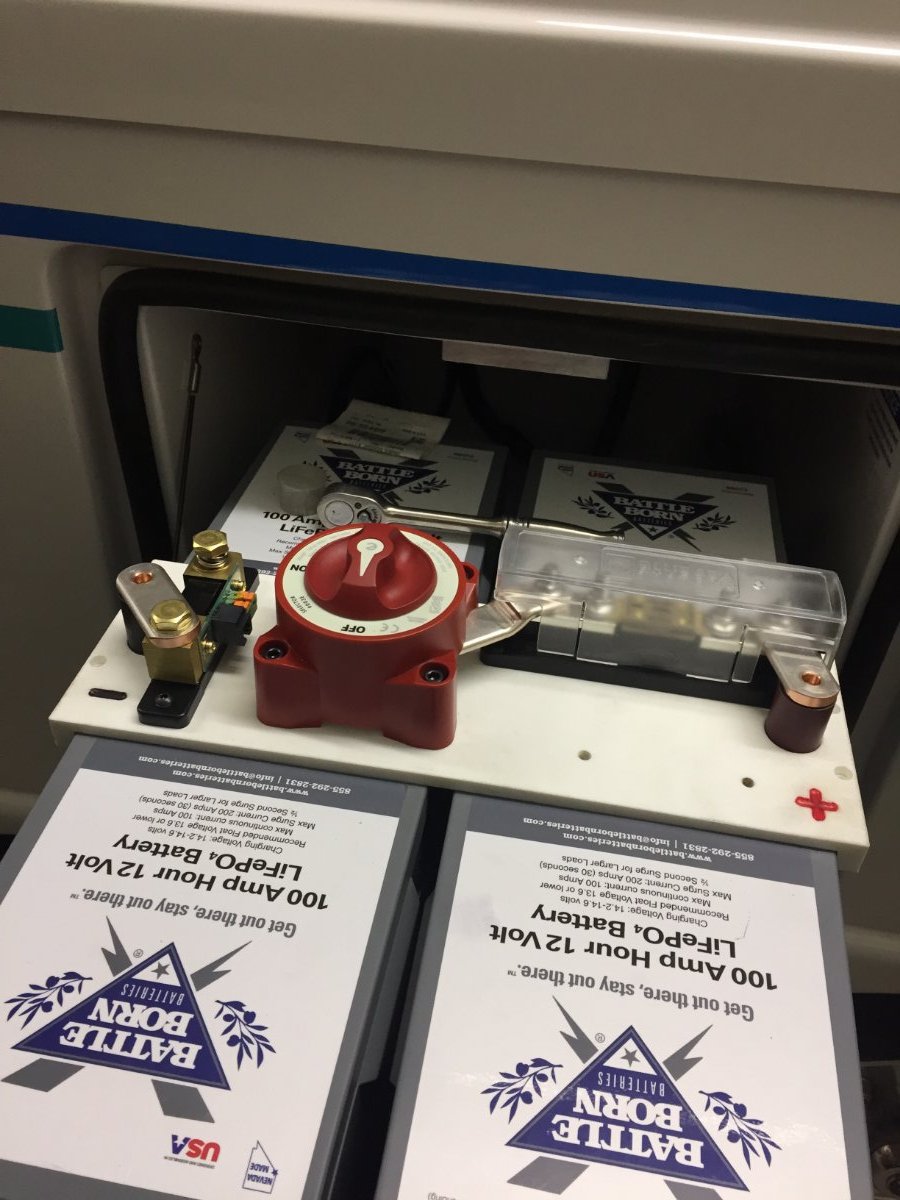
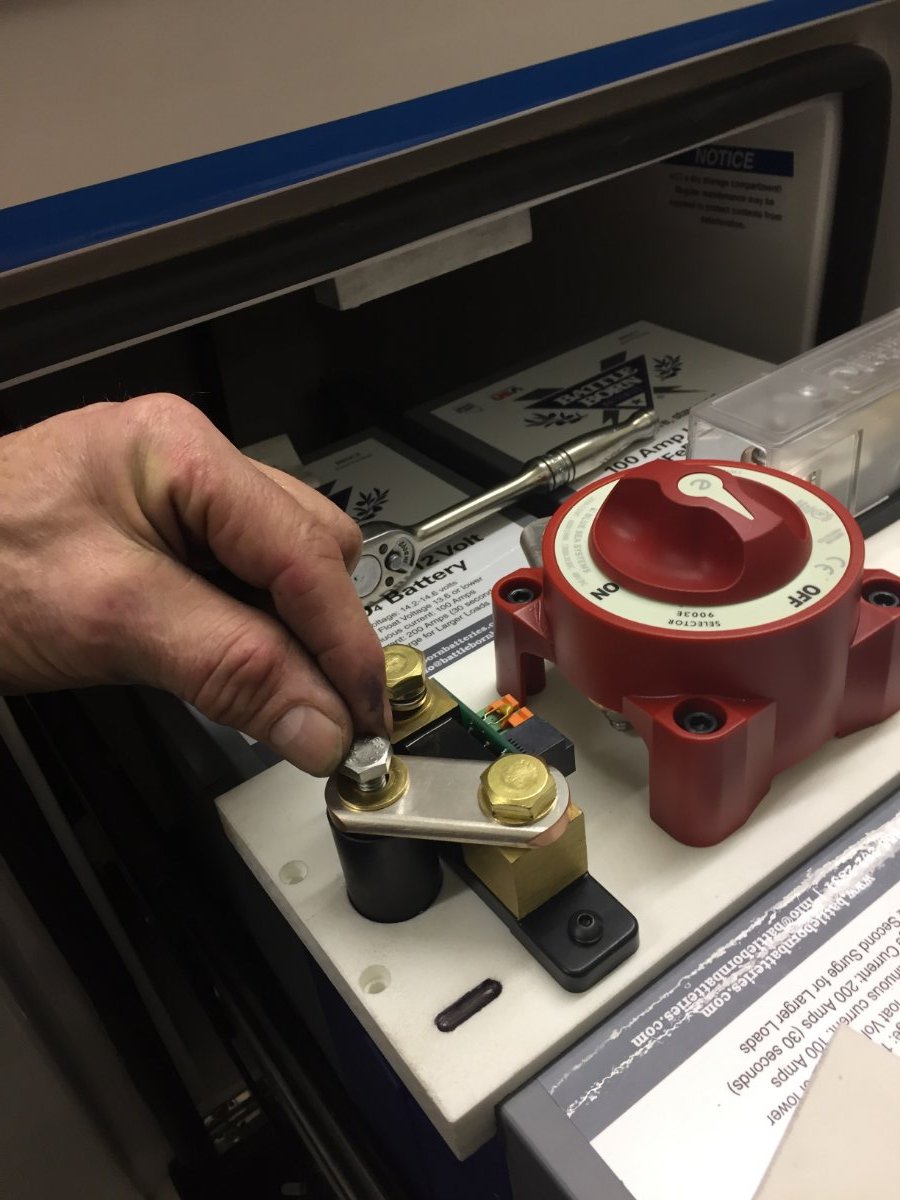
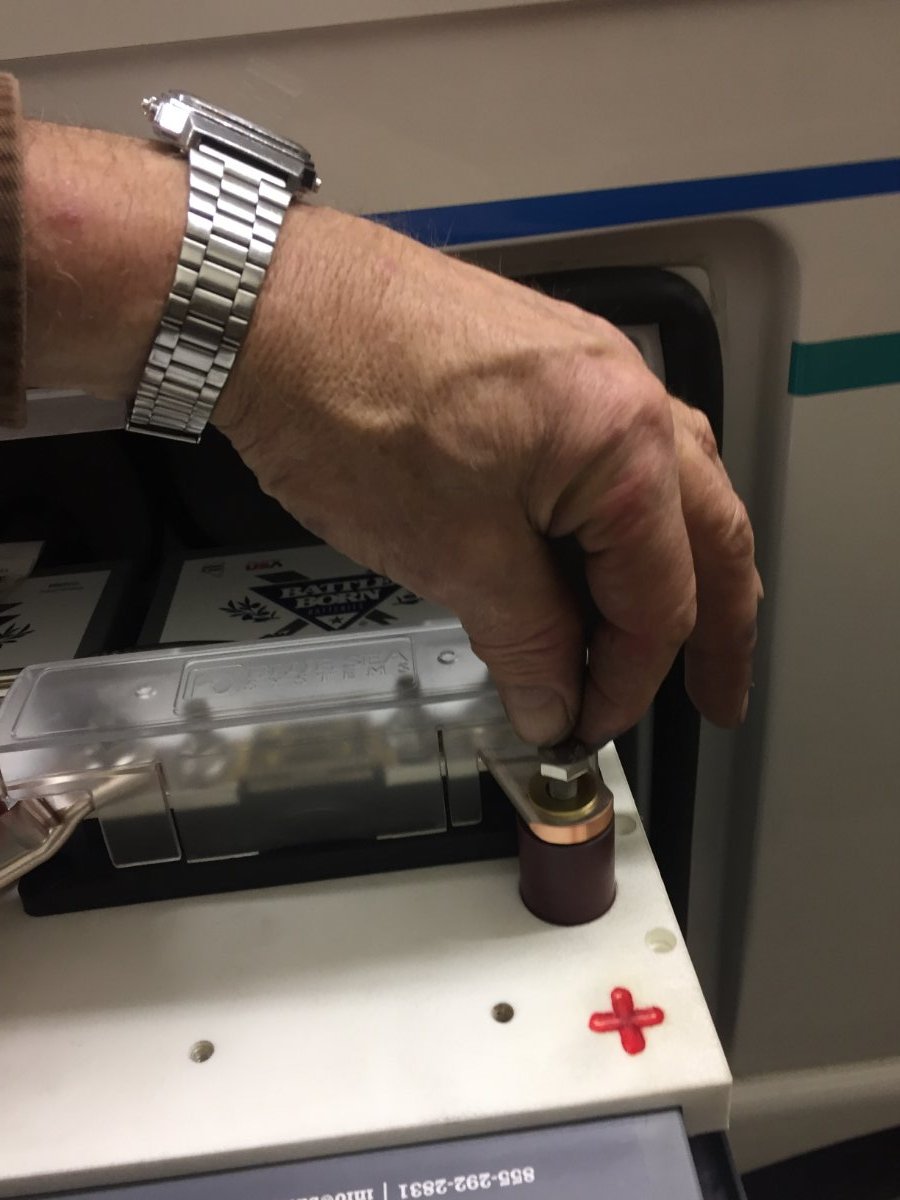
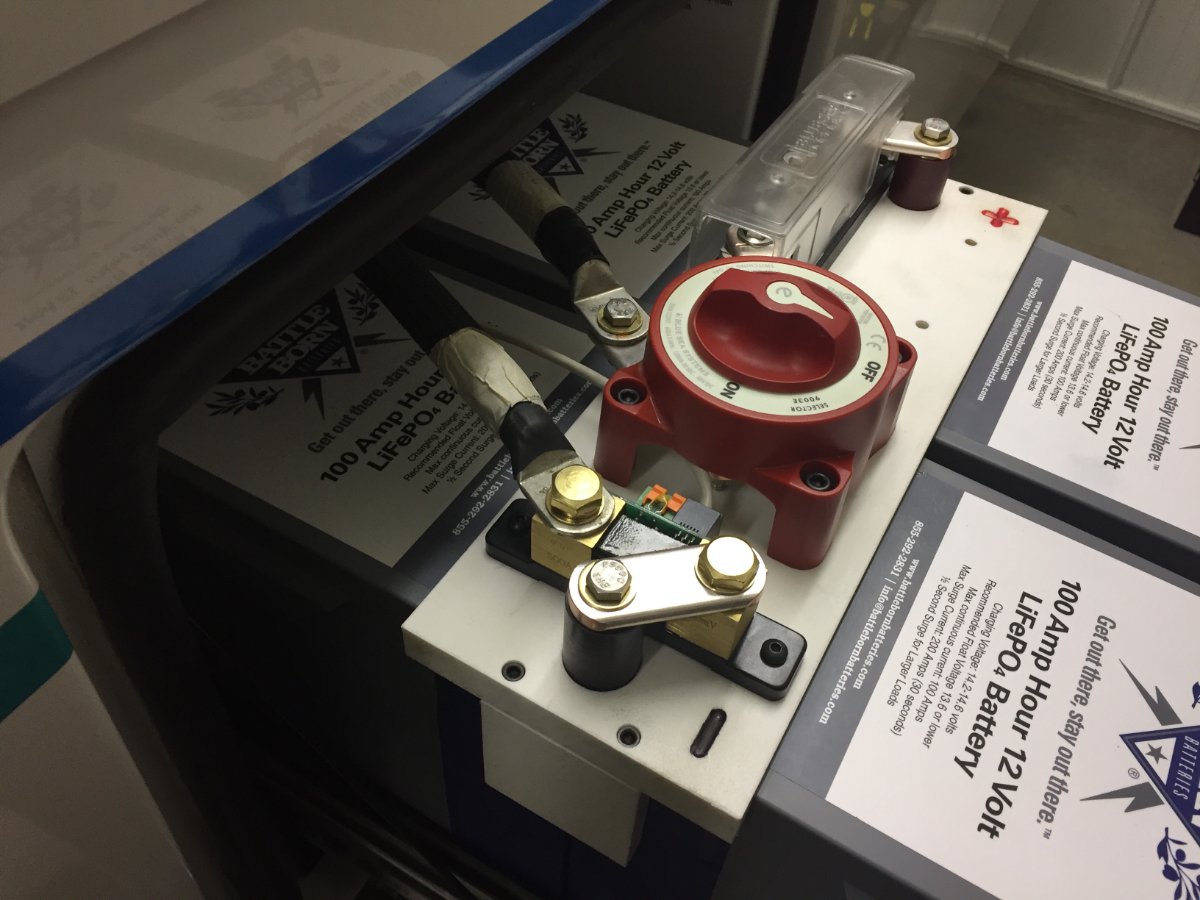
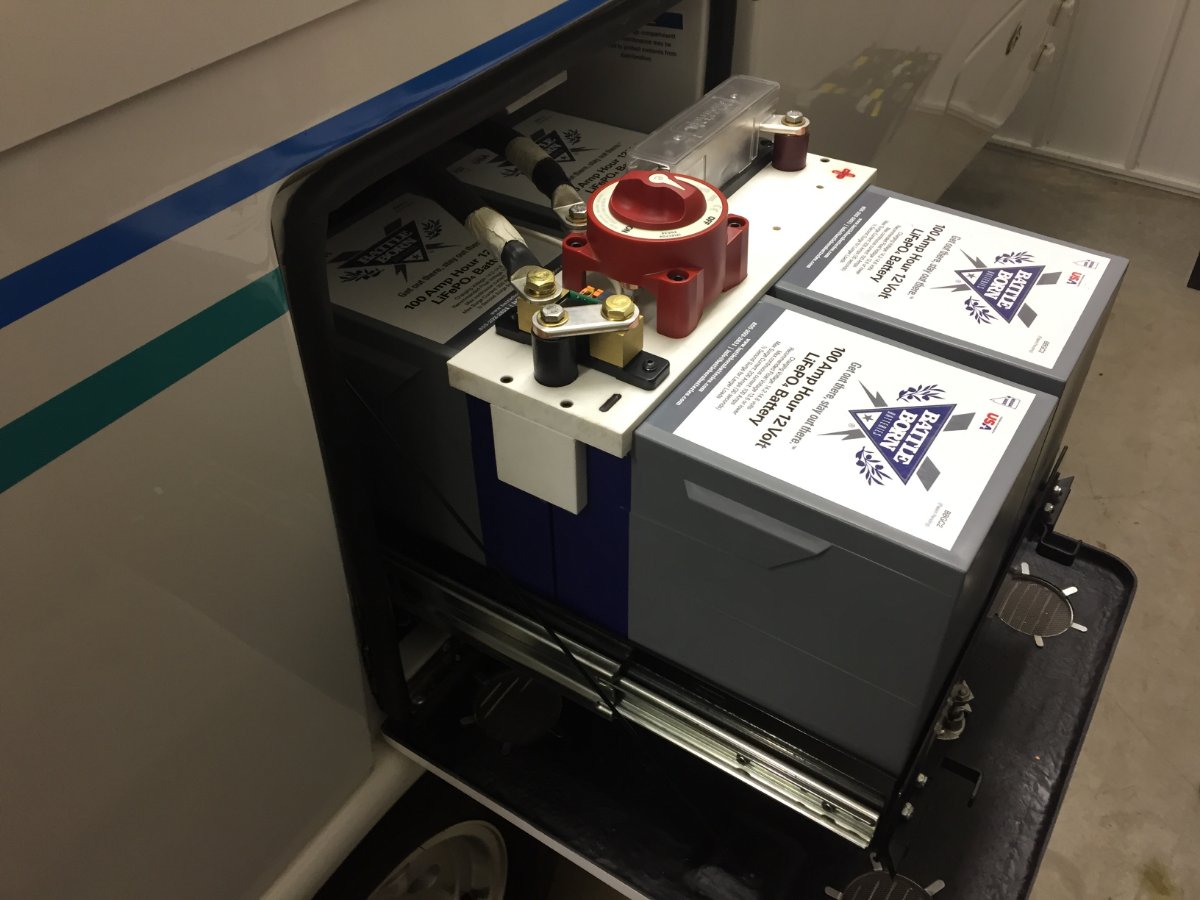
Went from 4 Trojan 6 Volt AGMs to 4 Battle Born 100Ah GC2s. Mounted a BMV-712 Victron in close proximity to the negative post of battery Mounted main fuse in close proximity to the positive post of battery Mounted main battery disconnect in close proximity to the positive post of battery Added a positive and negative bus bar and moved all cabling to inside the basement except for the 2 main 4/0 cables. (I was able to exchange main fuse with a positive bus bar using the same mounting area, then moved the fuse out to the positive post of the battery) I used bus bars to connect the 4 batteries in parallel A strip of flat PVC was used to insulate between bus bars
1 point
-
Some time ago, I requested suggestions on "must have" items to have on hand when we take delivery of our Elite II (early spring, 2019). This is our first trailer so seasoned suggestions are great and we got plenty of them via the forum. I am putting together a short list of items to procure starting now and would ask for additional finite details for the items I list as well as suggestions for some absolutely necessary items that I have omitted. I will try to break it down by categories of hardware vs interior items (dishes, towels, sheets, etc.) In all instances, suggestions as to specific brands and places to procure are most welcome. Here is the starting point: <p style="text-align: center;">Hardware: </p> Plug converters: 50 AMP to 30 AMP: 120 volt (house) to 30 AMP (any others??) External Surge Protection: (In addition to the built in one) Yes or No?? If yes, which one? Wheel chock or "X" blocks: Which one? Both? How many of each? Extra 25' potable water hose: (brand?) Extra 25' water hose. Extra 25' 10 gauge extension cord. Jack stand blocks: which ones? External water filters. On this point, is there not one already in-line inside the trailer? In either case, do I need an external filter too and which one? Hitch lock for BullDog 2 5/16" coupler. Which one? Extra grey water discharge hose: Yes/No? What if any accessories for discharge lines? For composting toilet: What kind of toilet paper? What kind of media and how much? Tool Kit: List of tools that are needed or desired. Is there a fairly comprehensive tool kit for RVers that already exists? <p style="text-align: center;">Interior Items (Donna's domain)</p> Cookware: (Pots, Pans,etc. )Suggestions as to "what" and where to purchase RV specific items (also looking for good sources). Utensils: Spatulas, serving pieces,, forks, knives, spoons, etc. (also looking for good sources) (RV specific?) Dishware: plates, bowls, glasses, cups, coffee mugs, serving items, etc. (also looking for good sources) (RV specific?) Napkin and paper towel holder/dispenser. Utensil and plate organizers: Suggestions Dish soap and hand soap (storage). Paper towel dispenser: Type, location, how to attach? Towels (bath and hand) RV unique? Fitted linens sheets for the upgraded single bed mattresses available as an option from Oliver. Inside entrance matt:(brand/size?) Ground matt at exterior entrance to trailer: Extra matt for outside of bath area: (Yes/No?) (We're getting the teak floor covering for bath and sink from Foy) Trash receptacle: (??) Toiletry organization suggestions: Any kind of cabinet or closet organizers that are essential: Toasters: Coffee maker: (We like GOOD coffee and grinder but want to know if there is something smaller for an RV) <p style="text-align: center;">Other stuff that we MUST HAVE at pickup???????</p> We'll worry about food, drink etc. Please feel free to comment add or delete but please keep in mind that we're trying to prepare for essential items needed at time of delivery and time of pickup and don't intend to purchase every nice-to-have item. If we did that, we probably couldn't pay for the trailer. All for now. Thanks1 point
-
The Walmart at Lawrenceburg is nicer than the one in Hohenwald, assuming you are staying at David Crockett SP after delivery. We settled into our campsite before going shopping. It's about a 15 minute drive; maybe less. Seen in the Walmart parking lot:
1 point
-
After packing for our last trip, we had so much space left over in both the truck and trailer that we were nervous for the first few days that we'd suddenly figure out what we'd forgotten. I think it's a combination of paring down what you take, along with perfecting your packing skills.1 point
-
Yes, I think you are correct about that. I've been amazed at how much the little light reflections are to me given how effectively they bounce around in the darkness. I will live for a while with it in the attic with a user-added flap over the display and see how that goes. I have enough other things already on "the list" to be content with its current position with that little mod.1 point
-
John, Not to say your bedtime matches mine - but now that my usual slumber too often comes about 8pm (ha- ha) - I doubt I would ever know a seal was lurking outside my window....approaching what used to be old age - has it's benefits. 60 may be the new 45, but 8pm is now the new 10pm........ On the other hand - I was always intrigued by the boys training on the same beaches of CA and FL that we frequented not so long ago. Last time was off Pensacola - Spec Forces running down the beach, and later - Navy Blue Angles overhead on practice runs - a good day. RB1 point
-
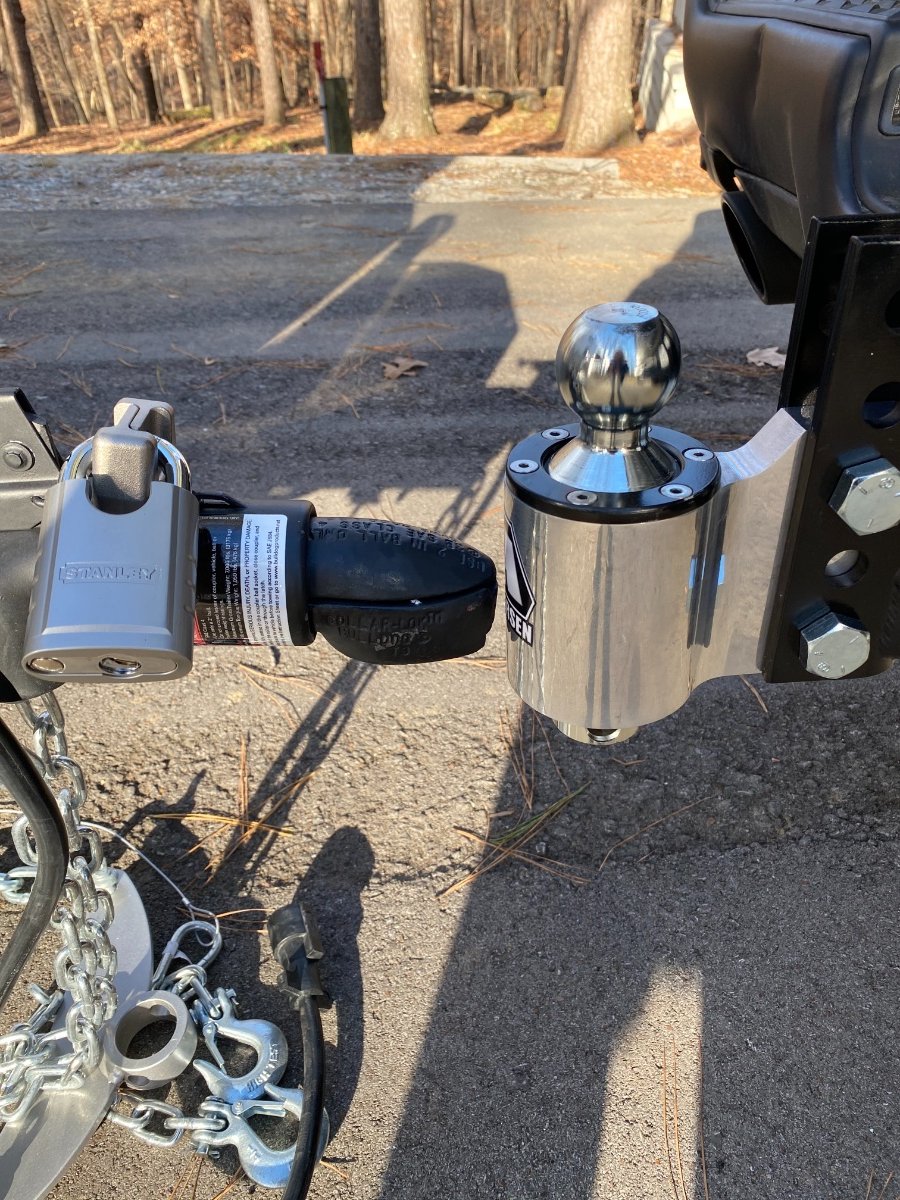
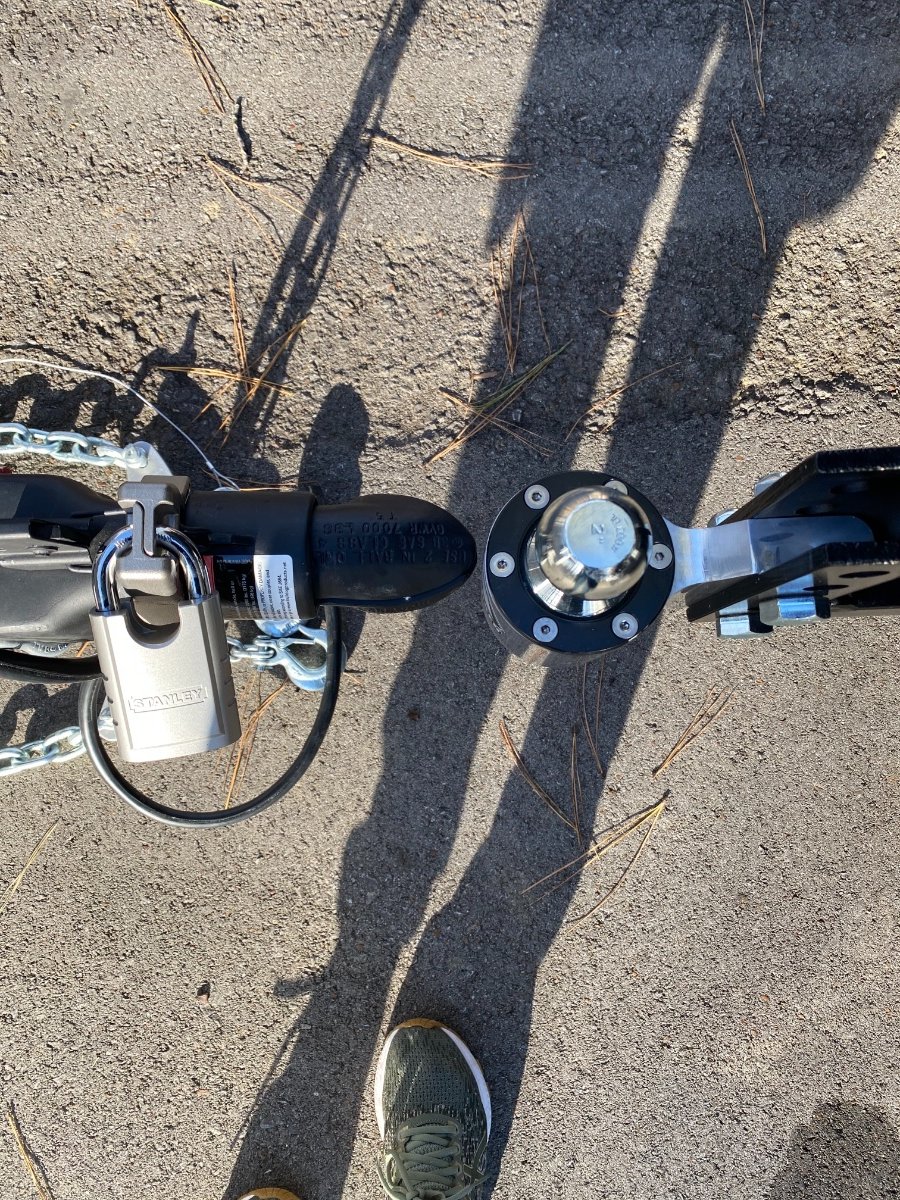
Woohoo! How many tries was that? That is pretty much perfect. Obviously further back whacks the parts together. That is why the wheel chocks are there, but go super slow to minimize any impact. Add this to your Honey Do list. A Magnetic bubble level, stick it on the side of your Bulldog coupler. When you DISCONNECT the hitch (it is raised up enough to clear your ball) move the level until it is horizontal ... the next time you get ready to hitch up, like in those pictures, you raise the tongue with the jack until you see the bubble where it is level. Then you know you have enough room for the ball to clear, with no bangs. Without the bubble it is a matter of trial and error. Once the BD is aligned pretty close to the ball, you can use a little brute force with your foot to kick the Andersen left to right, since there is play where it connects, or even kick the trailer tongue. It will wobble a bit too (sways as the tires shift against the pavement ). Sometimes if the coupler seems reluctant to drop in place, a little kick is the best option. Keep hands clear!!! Having the small trailer makes this part of hitching up a lot easier. The tandem is more difficult to shift sideways. John Davies Spokane WA1 point
-
Dang! That's good. I know that you were just practicing, but, in "real life" it is a good idea to make sure that your trailer "bulldog" hitch is higher than your truck's hitch ball before you start the process. It is also a bit easier to see that bulldog hitch in your camera screen if it is a lighter color than black - I spray painted mine silver. All you need is a can of spray paint, a bit of masking tape and a few minutes for drying time. Bill1 point
-
Look! I backed up without Annoying Park Assist thing on, and this almost looks doable alone when it comes time to re-hitch, am I right? Used the Ram’s backup camera.
1 point
-
Got it turned off - my panel looks diff but thank you!!!1 point
-
Mike I have the 2021 and I am going yo caffeinate and go sit in truck in a few minutes with manual and deal with this. Will keep posted. Had to tire doggo out - 2 mile walk. He keeps me going, I tell you. NOW he is sleeping and I can start dealing with everything else here til he needs to go pee!1 point
-
Jim - I moved mine into the pantry due to the very reasons you cite. Actually I initially wanted to move it into the first cubbie forward of the pantry but I didn't. For those that have the translucent doors on their cubbies I don't think that moving this readout into those locations would be a good idea given that this pulsating light will simply "pulse" right on through. I like your idea about moving it near the switch panel near the door, but, I'd bet that with all the reflecting surfaces of that beautiful nice white interior of the Oliver, the reflections will still drive you nuts. Therefore, behind a solid door is (in my opinion) the only way to go. However, don't forget that it is helpful to place it in a location that is easy to get to for those few times when you really need to see what it is telling you. Bill1 point
-
Here’s a pic I just took. The toggle with the light on is the one you want to push. I have my hitch on now and leave that rear parking sensor off.
1 point
-
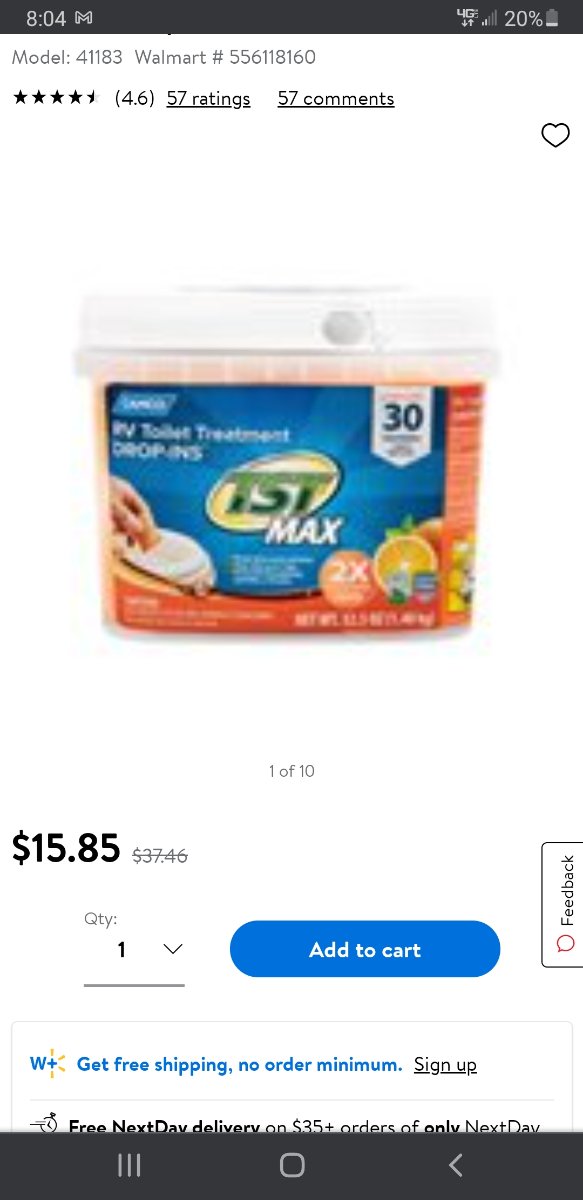
Pink stuff is rv antifreeze. Orange and blue are the typical colors for rv tank treatment.1 point
-
Look at the row of toggle switches underneath your display screen. There should be four or so that do something. One of them is your rear parking sensor, just push it down until the light comes on. That means it’s off, you will also get a notification on the display between your speedometer and tach. Just leave it off as long as you have your hitch on! Mike1 point
-
Sheri - There are always Park Rangers around and I'm sure that one of them would be glad to help - if you really need it. Bill1 point
-
Thanks John I really appreciate the complement especially from you. I also appreciate the reminder of the use of safe practices around potentially dangerous areas. Especially when putting up pictures that the rest of the Oliver commuity will see, a person needs to show good example. Thanks again Paul1 point
-
Carl, cannot thank you enough for what you wrote, de-lurking or what-not too. Helps a LOT to know you guys are “there.” Trying to collect some text numbers (PMs) for Panic Moments. I am glad my stuff may help others. Once I know what I am doing I am going to blog. I am a writer (humor mostly, tough market because so subjective), among other sorts of unusual hats I wear. Or have worn. Normally not this frazzled, but it’s been a horrific 4 years or so. Relentless family, friend tragedy, etc. I have not had time (priorities and all) to set up internet, but when I get my MacBook and all set up I made a site (another hat I wear) where I plan to write whatever silliness and travel stories. https://whendogsdrive.com Sheri1 point
-
FYI, in hull #709, considered a 2021 model (delivered in late 2020) the SP remote is up in what I guess we call the attic - the cabinet above the TV and emergency exit window. It's on the streetside wall pretty close to the cabinet door. And yeah, having slept in there a few nights, I've done some temporary blocking of its flashing (or pulsing up and down if you will as it cycles through the readings) red furnace of hell glow but will be adding some sort of flap that normally covers it but is easily lifted. I haven't used it enough to be able to fully judge the location but it does seem like it would be a tad nicer somewhere like under the switch panel by the door or in the closet on the bath wall but I'm betting moving it or putting a second there will never make it onto my list...1 point
-
Since this is resurfacing... If you like *good* coffee, and are willing to do just a little work to get it, I strongly recommend the Clever Coffee Dripper. As explained at that link, "The Clever Coffee Dripper combines the best features of French press and filter drip brewing. It combines control over steeping time with a sediment-free cup." It really does work quite well if you follow the prescribed process (and there are of course some Youtube videos with coffee geeks suggesting variants of the process). We actually have two of them so we can each be making our morning cups simultaneously. Boondocking bonus - you can heat your water on a stove rather than using an amp-hours greedy electrical appliance (but if you're adamant about drawing battery down for your coffee you can use the microwave for the water 🙂 ). Buy the best fresh roasted beans you can find (one fun little hobby I have while out and about in new-to-me areas is finding the little coffee roaster operations that have sprung up in many areas) and grind them in the morning as you prep your water etc. using something like this little Hario coffee mill. It takes a bit more time than putting that pre-wrapped puck of coffee into the Keurig but it makes SUCH a better cup!! BTW I should warn any coffee geeks/snobs out there that the Sweet Marias web site that I linked for these two items is a deep rabbit hole of home roasting and brewing information, equipment, and green beans. Turns out that coffee is among the three food items (along with wine and chocolate) that stimulate the widest range of our taste and smell receptors, and there's a stunning variety of bean types and processing methods that create a rainbow of coffee flavors to be discovered, and the folks at Sweet Marias are clearly on a mission to help folks explore that rainbow. Don't say I didn't warn you if you lose hours there and end up exceeding your decadal appliance budget on roasting and brewing gear for home and trailer...1 point
-
If you don’t smell the odor now, it was most likely the first splash residual until it aired out. Maybe a spray bottle with a diluted vinegar solution for such cleaning? It will clean the spillage and odors. But still needs to air out. Open windows/doors use a fan and freeze but odor needs to escape. Or just wait once it is cleaned to naturally air out. no different than a perfume. It will hang out for a while. You are learning about air movement inside trailer. where was Walmart? I either need to shop before I get there, or after I park. Leaning toward waiting. enjoy.1 point
-
Congrats on your Ollie! I pick up in May and am so ready to get on the road!1 point
-
Btw, your toilet probably came with a little bottle of tank treatment. Put most of it down the toilet, but put a quarter down the bathroom sink. The odors will go away, even for those of us with hypersensitive noses, if the shower floor is now clean. Um, when you treat the toilet, open the valve/hole by depressing the pedal at the bottom of the toilet. It will close when you let off the pedal. Ps. Put an inch or so of water in the bowl from a jug, if you still haven't connected to water. There is a rubber seal around the valve at the bottom of the bowl that likes to stick, if it's left without water or rv antifreeze in it. After every dump, you'll need to add a little toilet tank treatment to keep everything happy. An ounce ot so of the orange liquid, or one pod if the pod packets is quite enough. The inexpensive orange liquid at Walmart is fine.
1 point
-
Two full 20lb propane tanks should last a week or more in those temperatures. When you have the energy, take a look at the regulator in between your tanks. There is a black lever that can point to one tank or the other. I point mine to one tank so that when it runs out I know it. Then I point the lever to the other tank and get the empty one filled. I second Sherry’s suggestion about a small electric heater. We have a very small Vornado that we use when we have shore power. It is quiet and keeps us plenty warm on low. Mike1 point
-
If both tanks are open and one empties, it will automatically switch to the other, once the primary is empty. You should be able to cover all of your propane needs for at least a week, on two tanks, even if the outside temperature is well below freezing. Andrew1 point
-
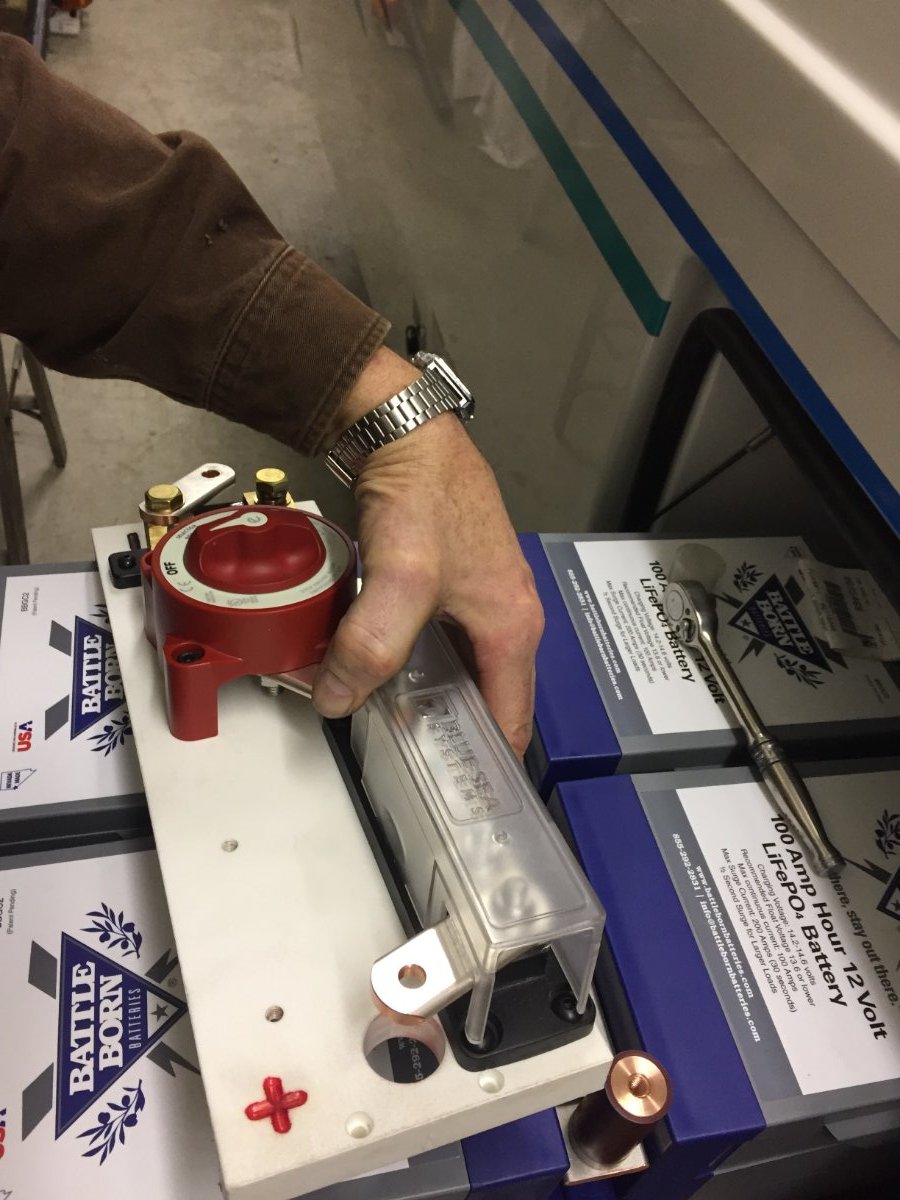
Beautiful, I really like it. Thanks for posting. As an ex A&P I can appreciate the fine craftsmanship. But you gotta take off the steel watch and band. Please. It doesn’t belong around potentially very high DC current. When I became an aircraft tech I gave up a necklace and a wedding ring.... Too many stories of guys with burns or missing fingers.... and screwed up equipment. And don’t leave conducting tools just lying close by. On top of the open battery door would be better.... John Davies Spokane WA1 point
-
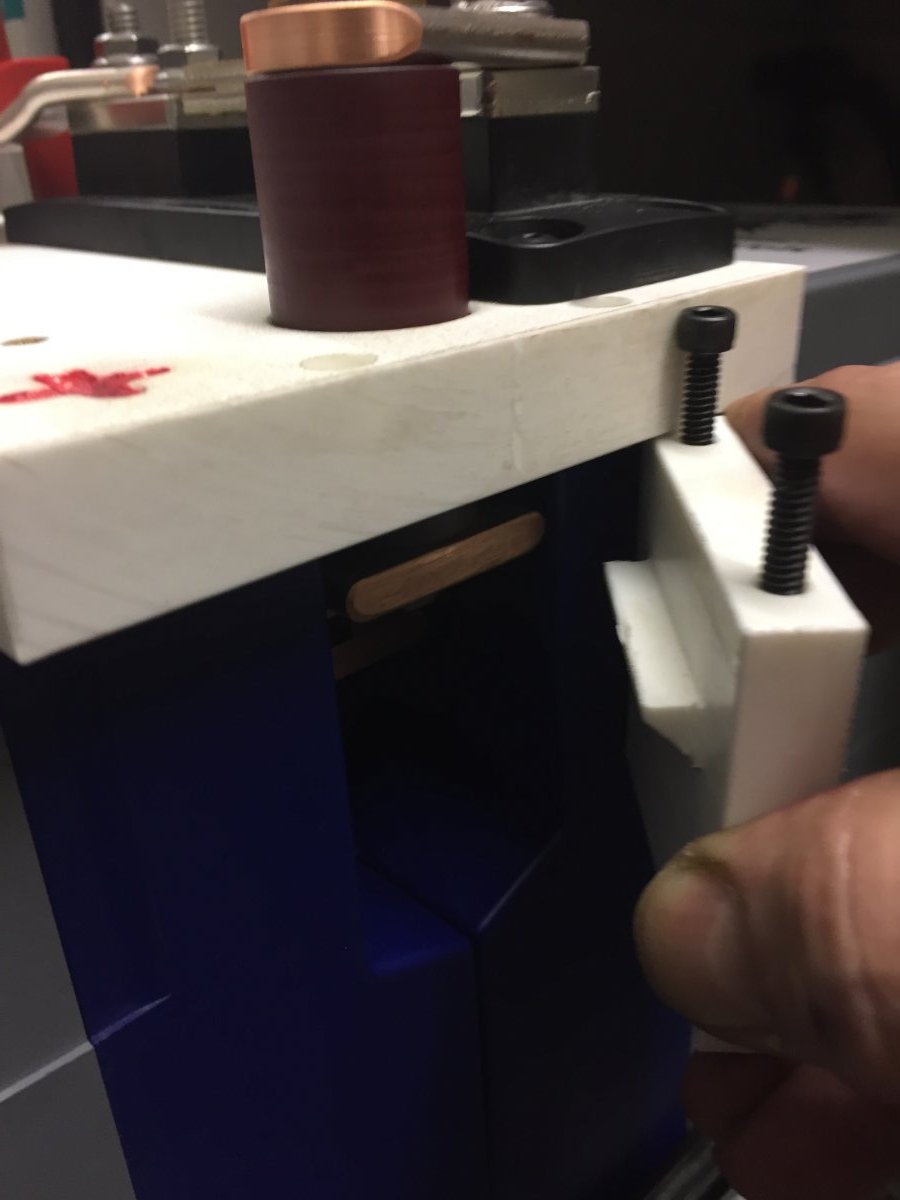
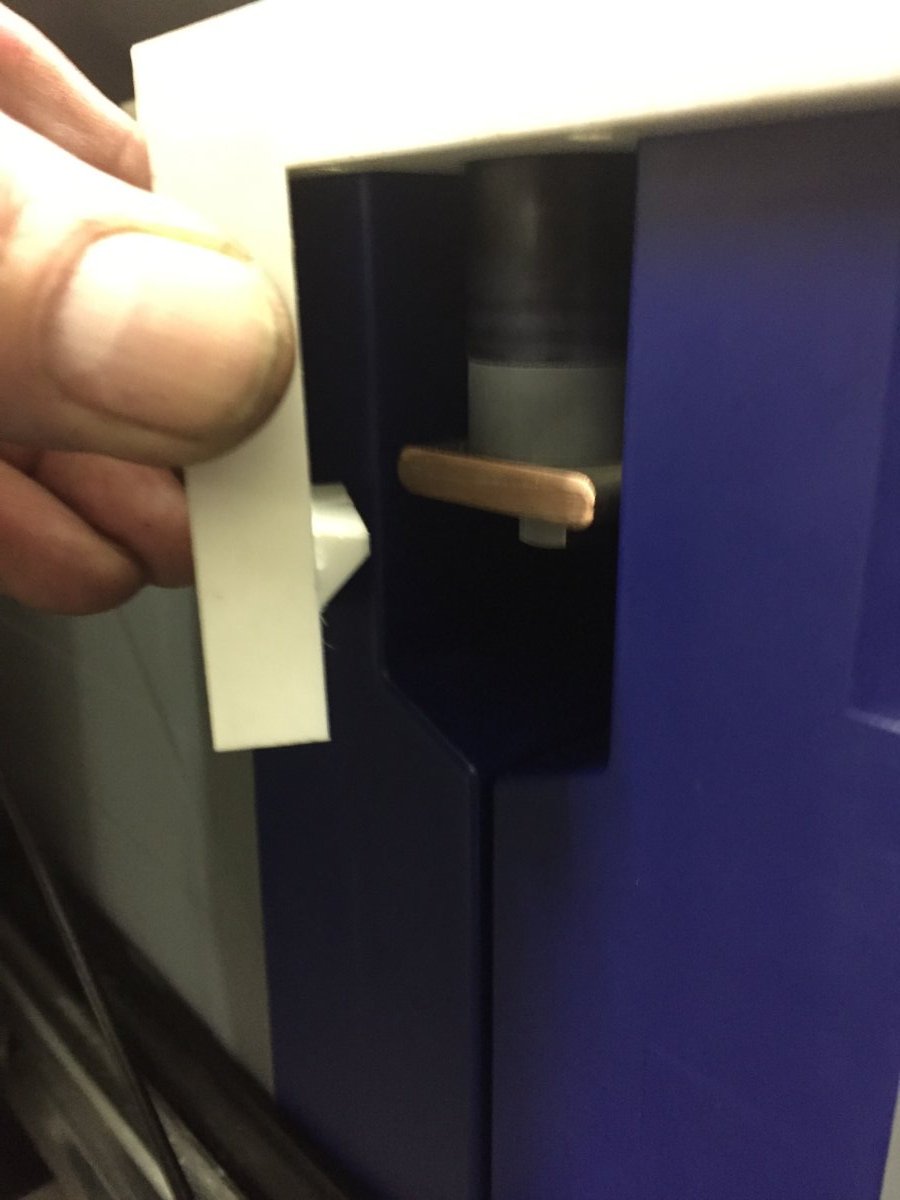
If you notice the under side of the star board I have cut relief so when it is slid down over the pos and neg posts it also locks the four batteries in place. It truly feels like one large battery,they do not even wiggle. Then the tray does the rest. I will be watching for damage by the strap hooks but it truly acts as one big battery so I hoping it is not going to be a problem. The neg and pos terminal posts are made from 7/8 round copper with a pvc sleave pressed over the OD.
1 point
-
This is the sketchiest character I have seen this far. I am reporting him to the rangers. APB issued. Outstanding warrants. Bad egg. Prison tats, too.
1 point
-
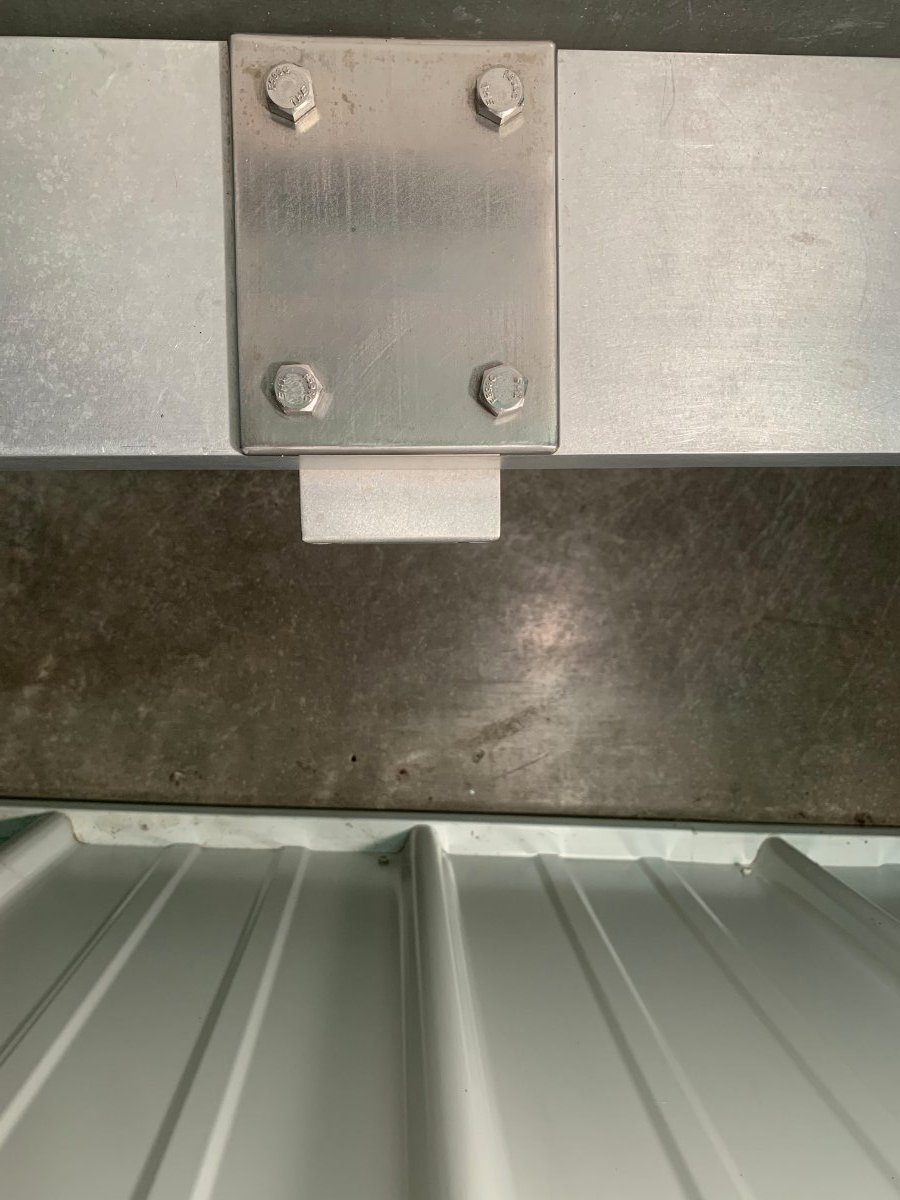
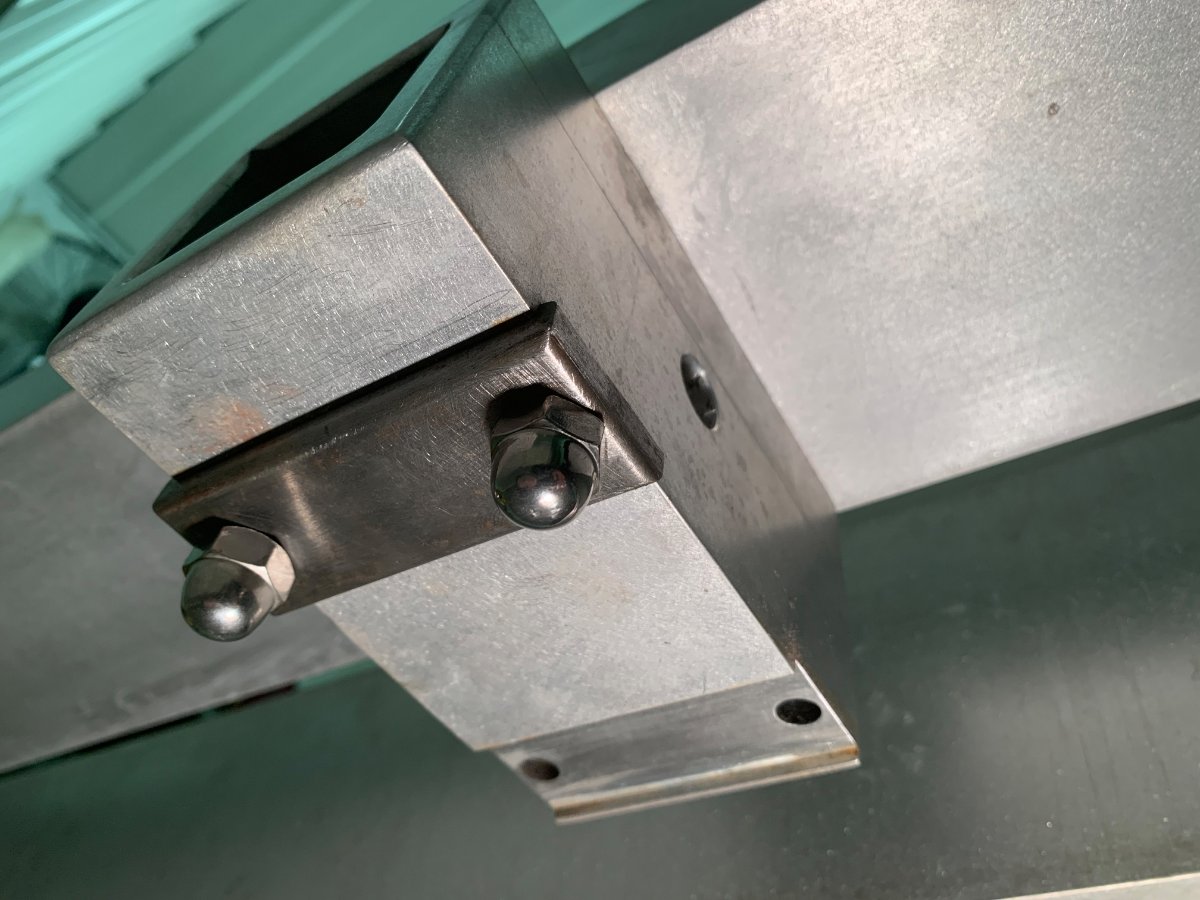
Hi John - This receiver is aluminum and I fabricated it out of a solid piece. I wanted something that would mate up to the cross member that already had 4 holes drilled for the factory 1-1/4 inch receiver. So, my receiver has holes drilled through the length of the wall and I added 2 stainless steel plates at the bottom and top which the bolts are threaded into. The receiver sits at 17 inches and the cross member of the trailer is at about 14 inches, so plenty of room. Unfortunately I don't have a picture of the old hitch. It consisted of 2 pieces of aluminum square tubing, 1 sliding inside the other with pins to secure. Now the 2 inch solid takes the place of them. The cross member was mounted on top which hampered you from pulling the spare tire cover off, so you had to remove the pins and pull the hitch before you could get to it. These were difficult because they would bind when pulling the hitch off. I mounted the cross member below the 2 inch so now no interference getting the spare cover off. The only negative is when you flip open the door to access the sewage pipes you have a little bit less room to reach in, but very do-able.
1 point
-
Mike, Please forgive me for drifting from thread topic. John, Yes, they are solar MC4 connectors. They work fine for our application, but Anderson couplers looks well suited for rugged environments when you're boondocking.1 point
-
John, Mounted the Renogy 20A waterproof solar controller in the battery compartment directly connected (fused) to the AGM batteries. Renogy does not recommend mounting the controller in an enclosed compartment with standard lead acid batteries. Since the battery compartment is vented and using AGM batteries, mounted the controller in the compartment with good results. This solar panel has been working great for years. Maximum charge rate seen so far with the 100W panel and controller located at the batteries is 6 amps using 35' of charge cord between the panel & controller, have seen battery full charge with this arrangement. This Renogy controller has several charge profiles including lithium & AGM batteries. Plan to use this arrangement with lithium batteries in the future, too. With 35' of cord and controller at battery location: The panel is in the sun in left portion of photo:1 point
-
Maverick, The tray mounting holes were located exactly the same as original tray holes, no modification needed. Using 12V Duracell Group 27 AGM marine/RV batteries. May eventually go with Lithium, but have a few years of life left in the AGMs. The 100W Renogy suitcase solar panel charges the Duracells nicely with three sections of cord combined of up to 35' for when Ollie in in the shade. The white plastic seen in the tray is a combination of UHMW plastic and kitchen cutting boards. Thanks! Bill https://www.driveduracell.com/pub/media/wysiwyg/2152.pdf1 point
-
Mike, Beautiful installation! Here's the new tray assembly installed with two 12V group 27 AGM batteries and Renogy Solar Controller:1 point
-
Confirmed that we are a cult? 😆1 point
-
My air conditioner will run at the same time as the heater if I do not set the cool temperature to about 90°. I never understood why, I just figured out a way to make it work and moved on to the next thing. I learned some new things about the thermostat from Victor's post last month. https://www.youtube.com/watch?v=cmcSvh6xG2I&feature=emb_rel_end Mossey1 point
-
My best advice is to start with the bare essentials and see what you need/want after you have been on a few journeys. It is easy to buy way too many "things" only to find later that some are not essential. If you are starting new (first time RVer) you will need more than if you already have an RV set up. This being said, know that I am the "Galley Expert"; my husband doesn't cook and I don't venture into the "Tool Man's" territory 😉 Disclaimer: Everyone does things differently; there are no set-in-stone requirements when it comes to RV life. Magma pots and pans: Magma pans are great, but certainly not essential. We got by for a time with an inexpensive set of camping pots and pans. It all depends on if you are a minimalist cook or more of a pro chef; or if you will be camping vs full-timing. I initially got the basic 7-piece Magma set plus the carrying bag. Since then, I have added the colander and the saute pan. They all nest together and these additional pieces don't take up more space (besides I might need them). They do add to your payload, if that is a concern. If you think you want all of these, then the 10-piece set is more economical. You save a few $$$$ from buying the 7-pc set and adding to it later. With the larger set you get the additional two pieces (above) and 2 additional sizes of saucepans. It also comes with an extra handle which is needed with so many pans. Get the non-slip pads that protect the pans. You're paying a lot for these pans, you don't want them scratched! If you plan to use an induction burner, ordinary camping pots won't do. If this is your plan, be sure to get the induction Magma set. I opted for the ceramic coated version, but not the "Professional". The difference is the professional can go in the oven (which Oliver doesn't have). Unless you also plan to use them at home. Others may chime in with other opinions regarding Magma. Appliances: With storage at a premium, appliances must be chosen wisely. Again, what you want/need depends on how you will be using your Oliver. We downsized from a large 5th-wheel to a small motorhome a few years ago, so have pretty much pared down our appliance lineup to an Oliver appropriate size. Here is what I have on board: Coffee appliances: Stovetop percolator or French Press. I will occasionally pack a Moka Pot. We grind beans in advance of a short trip or take a hand grinder for road trips. Also, an electric tea kettle (not essential, but good for making a pot of French Press when both stovetop burners are in use. These choices depend on your coffee making style. Some like an Aeropress (takes up little space); or a simple pour-over setup. Many are tea drinkers. There are many ways to get your daily dose of caffeine. Toaster: So, we have the two-slice toaster, but don't use it often and mostly when we have shore power. We also have a stovetop toaster that we use when conserving power or just don't want to fire up the generator. For our "soon to be Oliver", we are opting for a storage cabinet in place of the microwave. We seldom use the microwave and can learn to live without. My plan is to replace the 2-slice toaster with the Breville Mini Smart "toaster" oven we use at home. It will ride in the extra storage cabinet and gives options for baking, etc as well as making toast. Induction burner: this will be new territory for me. I have always wanted one and since we already have induction cookware, this will give us an alternative to indoor cooking that quickly heats up the trailer. Those who have one love it; not sure how I've managed without one. These are pretty much it for our appliances. We plan to camp in our Oliver while exploring the great outdoors; when we want the many conveniences of home, we stay home. I have no desire to full-time in an RV. The Instapot will stay home, as will the coffee maker and electric frypan. We like to enjoy nature - hiking, biking, kayaking, and me, pursuing my passion for photography. When on the road, don't spend any more time than needed in the galley. I prepare a lot of meals at home, as I do love creating meals from scratch. With RV cooking, it is important to keep this in mind - the complexity of your meals dictates how many utensils and cooking accessories are needed. Campfire gear: Of course, I'm not including the various campfire "appliances" - we use a simple charcoal grill; others opt for a portable gas grill. A dutch oven, if you like cooking over a fire, marshmallow/hot dog sticks, pie irons (versatile alternative to roasting stcks) and of course a trusty cast iron skillet. These can all be organized in a tote and carried in the tow vehicle. Depending on the circumstances, we sometimes take a two burner Jet Boil Base Camp propane stove for outdoors as well, especially if we are camping with family/friends. Can we do that yet??? Cabinet organizers: I am an organization freak (just ask any of my pre-retirement coworkers). I would definitely wait and see before purchasing too many organizing tools. After several excursions you will move and relocate supplies many times before settling on the best storage arrangement. I like to have the most used items in easy reach; less used can be somewhat buried. You don't want to have to unload the entire storage bin to get the items you use most often. That being said, totes will be your friend. They help keep cabinets organized and prevent contents from rattling around. Also, take advantage of the storage potential of your tow vehicle. Sorry for such a long post (is there a post length limit here? Am I going to be banned?) There is so much I haven't said, and I am leaving the Tool Shed to those more capable (it's important to play dumb when it comes to mechanical things. Then the better half will make necessary repairs 😃) I will end by saying, search the Internet for supply lists and get ideas from Family and Friend RVers. Someone else's ideas are often overlooked. If you find a great idea, share it here. If you try something that doesn't work for you, simply look for a better way.1 point
-
The accessories that Oliver provides (hoses, etc) will pretty much get you through an initial pick up trip. You are going to want to get some “just in case” items, so it doesn’t hurt to show up with those at pick up. Plug converters: I’ve got a 30a to 50a and have only used it a couple of times. I also have a 30a to 20a and use it when the trailer is in the storage area. External Surge Protection: If you have the built in you shouldn’t need an external. We don’t have the built in and I carry a Camco external. It has a 60 second delay when first plugged in to check the circuit and if it’s okay it passes electricity. If not it blinks yellow or red. Wheel chock or “X” blocks: We carry both. The chocks are good if the tires on on the ground. If I drive onto legos to level the chocks aren’t so good. I got a cheap “X” block that fits between the wheels and you turn a handle on top to tighten for the side that might be on legos. Extra 25′ potable water hose: I have a black collapsible hose that I use to flush the black tank. I think it expands to 50’. It’s also used with a nozzle for general clean up tasks. Extra 25′ water hose. We got an extra at Camping World. There have been a few sites that required two hoses to reach the water. One hose is enough for most sites. Extra 25′ 10 gauge extension cord. I carry one and have never used it in over 35K miles and 250 nights of camping. Jack stand blocks: which ones? We got the yellow Camco pads. I made some blocks out of 2X6’s and set them on the pads. We also use the yellow legos that we got at Walmart for leveling. External water filters. On this point, is there not one already in-line inside the trailer? In either case, do I need an external filter too and which one? I don’t think there is an internal filter. We use the blue or white filters that you can get at Walmart or Camping World. Hitch lock for BullDog 2 5/16″ coupler. Which one? https://www.amazon.com/gp/product/B00HL2NM0K/ref=oh_aui_search_detailpage?ie=UTF8&psc=1 Extra grey water discharge hose: Yes/No? What if any accessories for discharge lines? We used the hoses that came with the trailer for black and gray discharge for over a year. Replaced them with Rinoflex and carry the old as back up. We also got a clear 90 degree fitting for the end that goes into the sewer so I can see what’s being dumped. For composting toilet: What kind of toilet paper? What kind of media and how much? We flush! Tool Kit: List of tools that are needed or desired. Is there a fairly comprehensive tool kit for RVers that already exists? Yes, there are a couple of tool list threads. Cookware: (Pots, Pans,etc. )Suggestions as to “what” and where to purchase RV specific items (also looking for good sources): We didn’t buy much, just repurposed extra stuff we had in the house. It depends on how you cook. Utensils: Spatulas, serving pieces,, forks, knives, spoons, etc. (also looking for good sources) (RV specific?). Mostly stuff we already had. Dishware: plates, bowls, glasses, cups, coffee mugs, serving items, etc. (also looking for good sources) (RV specific?): We have some Corelle dishes and some plastic cups, mugs, wine glasses. We also carry paper for those places that don’t have hookups. Napkin and paper towel holder/dispenser. Utensil and plate organizers: Dish soap and hand soap (storage). We use the pump dispensers. Paper towel dispenser: Type, location, how to attach? We found a cheap plastic one on Amazon and stuck it over the kitchen counter with On Command Tape. It’s been there over 2 years, no problems. Towels (bath and hand) RV unique? We bought some microfiber bath towels. They don’t take up much room and are functional. Just not as nice as a big fluffy cotton towel. Fitted linens sheets for the upgraded single bed mattresses available as an option from Oliver: We got regular twin sheets and just tuck them in. Also twin blankets and bed spreads. We’re on our second set. Inside entrance matt:(brand/size?) We have a 16X24 mat just inside the door. It has a grippy rubber bottom. We also use a runner between the beds we got at Walmart. Ground matt at exterior entrance to trailer: There’s a bunch to choose from at Amazon or Camping World. Extra matt for outside of bath area: (Yes/No?) (We’re getting the teak floor covering for bath and sink from Foy): We use a round bath rug that is in the bathroom when we’re not showering and then we set it outside the bathroom when we shower. Trash receptacle: We have a small plastic one with a lid that pops up. Plastic shopping bags fit it nicely. Not sure where it came from. Toiletry organization suggestions: Shampoo and soap bottles can fit in the area under the sink. We have a couple of low plastic boxes in the area above the toilet for other toiletries. Any kind of cabinet or closet organizers that are essential: Toasters: Cheap two hole toaster. Coffee maker: (We like GOOD coffee and grinder but want to know if there is something smaller for an RV): We carry a Nespresso Pixie and also a Melita pour over cone and a small electric grinder. When boondocking we heat water on the propane cook top and use the pour over into a thermos. When we have electricity we use the Nespresso. In general, I wouldn’t worry about getting too much stuff. We carry less now than we did the year we picked up. It’s easy enough to acquire things as you see the need, stores are everywhere. After you’re out a few times you’ll get a feel for what you need and don’t need. Mike1 point


.jpeg.ecac4362e715bf0263438706bed3777f.jpeg)
.jpeg.8b7f7e108535c1dcc1fffbc9041ff791.jpeg)


.thumb.JPG.dd838cdb3df463dab6a16861fa23a319.JPG)


-
Recent Achievements
-
")


")


")


