Leaderboard


Popular Content
Showing content with the highest reputation on 03/19/2022 in all areas
-
If you have to recaulk, just seal the gap between the window frame and the gutter. I intentionally left that 1/8” gap there, for this reason. No big deal IMHO. John Davies Spokane WA4 points
-
Many good memories of our years in Sierra Vista!4 points
-
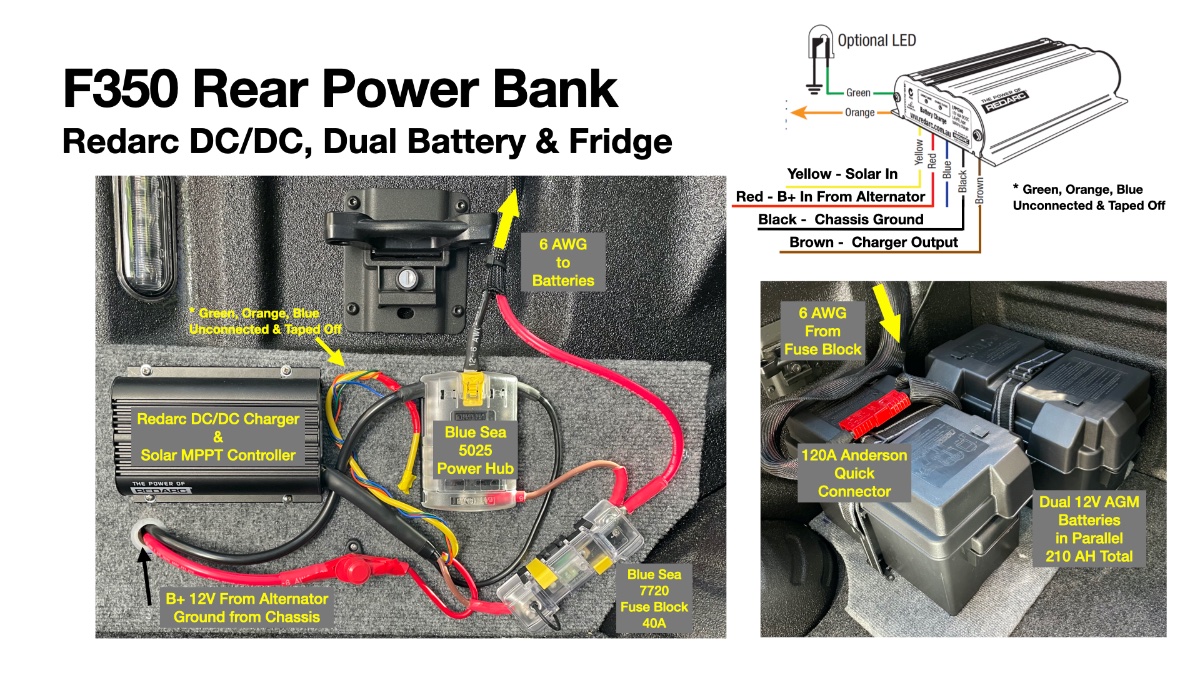
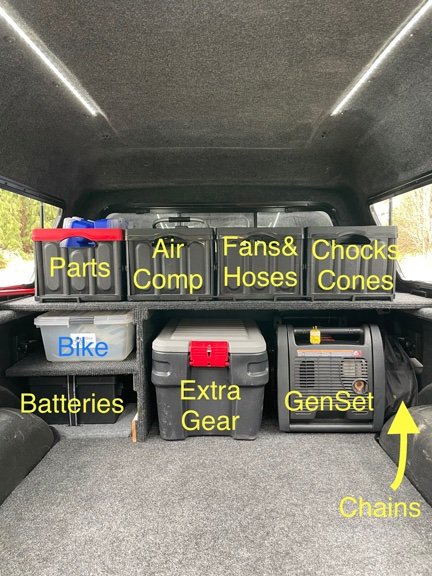
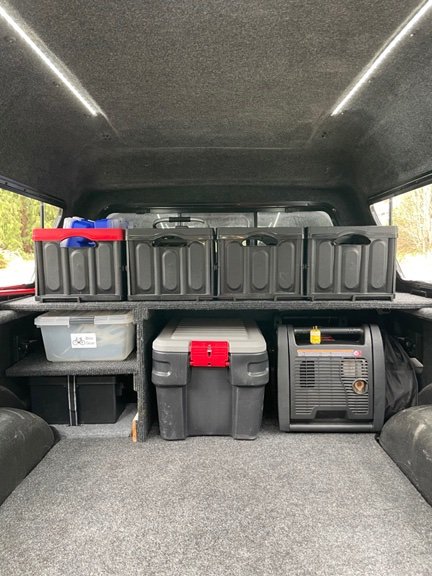
Here is a NEW post that ties together posts and threads that generate a fair amount of feedback and I thought I should update them as things change. First: Starting a Lithium Upgrade: That post lives on this Oliver Forum thread: (In addition you can find more details in our 4-Ever-Hithed.com web page blog is linked here: https://4-ever-hitched.com/ggs-blog/f/lithium-battery-upgrade ) Second: ...buried inside the Starting Lithium Upgrade thread...a ways down. Not long after the Lithium Upgrade I posted about adding an ARB Fridge to the back of our truck. This mod required adding a pair of batteries and a Redarc BC/DC charger. The original post is below : Recently - Geronimo John pointed out that the wiring details were good, but I had inadvertently exposed too many snag points with the wiring as shown. As GJ pointed out, stuff flies around on bumpy roads and could easily contact or snag the wires. After our recent 6 month road trip I took his words to heart to rewire the fridge/charger and build extra sturdy storage with Tie Downs for our F350. So here's both an update own the Fridge wiring and some pix of the new storage solution in the back of our F350. Wiring up dual batteries and a Redarc for Charging while driving: Original View: After the feedback from GJ...I modified the wiring to put most of it on the back side of the mounting board. I added standoffs so there was room behind the board for the wiring and connectors and mad sure I had a simple way to drop that board back down with the removal of 4 screws. Here's the after pix on that modification: UPDATED: Rats Nest tucked behind and wires now secured under edges of bedrug. New Front Storage Shelving: I then moved forward to create some storage space in the front of the truck for extra gear. The goal was to create a place to store bins of gear that can be strapped down during travel. Below: New Shelving with Storage Bins Shelving unit is 6' wide x 2' deep. Shelves and dividers 3/4" Plywood - wrapped in automotive carpet glued to surface. Access through side windows so I can quickly access all items in the top row Here are examples of accessories we carry that fit into various spaces/bins Hope that is of some use to anyone looking for storage solutions for the back of a truck. Craig
 3 points
 -
I wonder if a water leak alarm would work at this location? Some are battery operated but if there is a 2nd plug in the fridge outlet, could you use a electric version? We have one of these at home, it lays in a metal tray under our HVAC system.
3 points
-
Love the eastern half of southern Arizona - especially the wine country and rolling hills. Usually we're there three or four times a year - staying at Harvest Host sites like High Lonesome Vineyards and Birds and Barrels Vineyard. Both have wines that fit my palette. We also have stayed with the nice folks in Benson numerous times at the over 55 Pato Blanco Lakes RV Resort.3 points
-
My windows are pictured above with the gutters applied. It’s been several years and no issues. I haven’t tried to re-caulk. In fact, I’ve never re-caulked. Going on 7 years now, no leaks. I’m a “if it ain’t broke, don’t fix it” guy. If I get window leaks, I’ll just peal off the gutters, caulk and put new gutters on. Mike3 points
-
Fixed it for you. 😀 You need to upload as a Photo, not a File; in this case it is an Apple HEIC file. On an iPad or iPhone, the source should be your Photo Library. Read this: …. https://backlightblog.com/iphone-heic-to-jpg John Davies Spokane WA
3 points
-
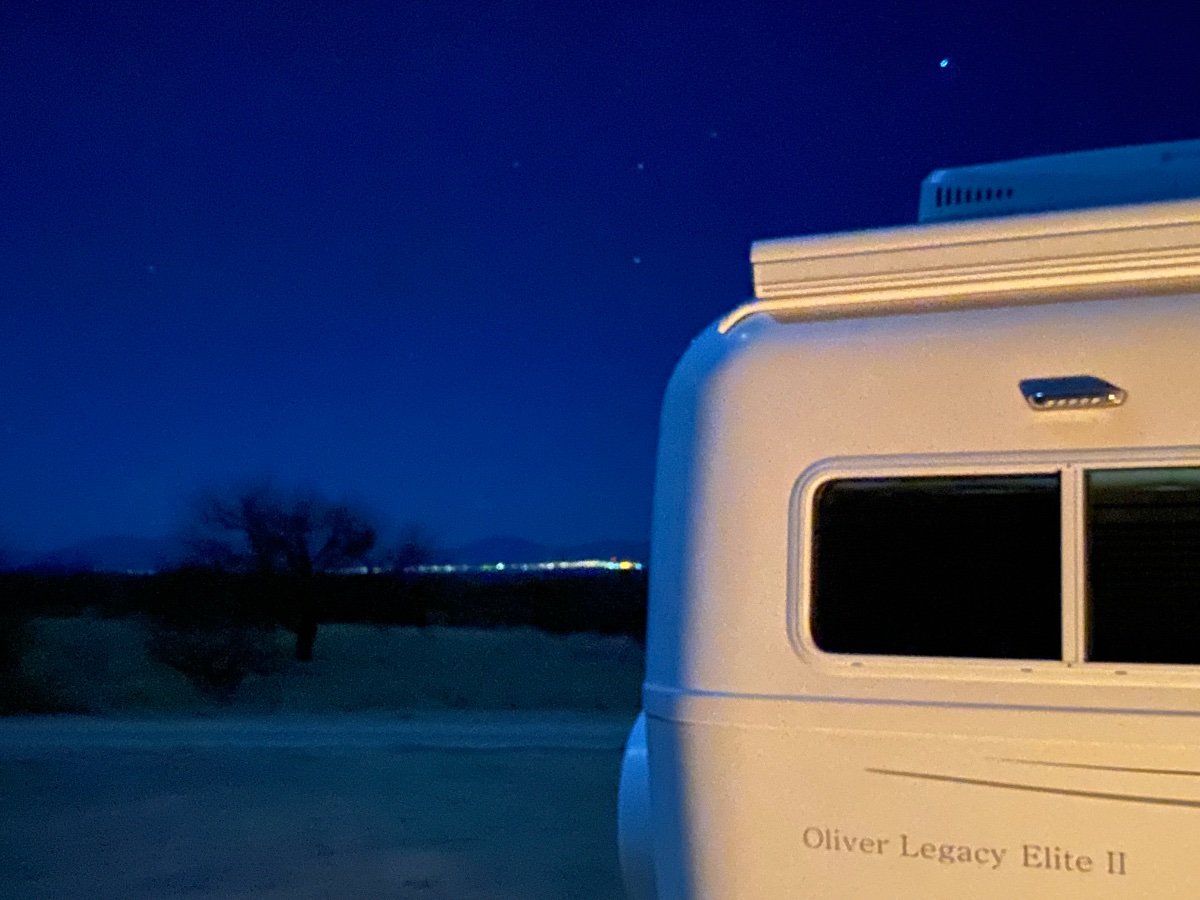
IMG_3504.HEICIMG_3504.HEIC We spent St. Pat's day night in the Dragoon Mountains of Cochise County, AZ with the lights of our town, Sierra Vista, visible in the distance and our Ollie illuminated by our campfire. Kinda think this photo could be used to advertise the glory of the Oliver Elite II.2 points
-
Send your picture to Matt Duncan at Oliver and he just might grant you your wish! Bill2 points
-
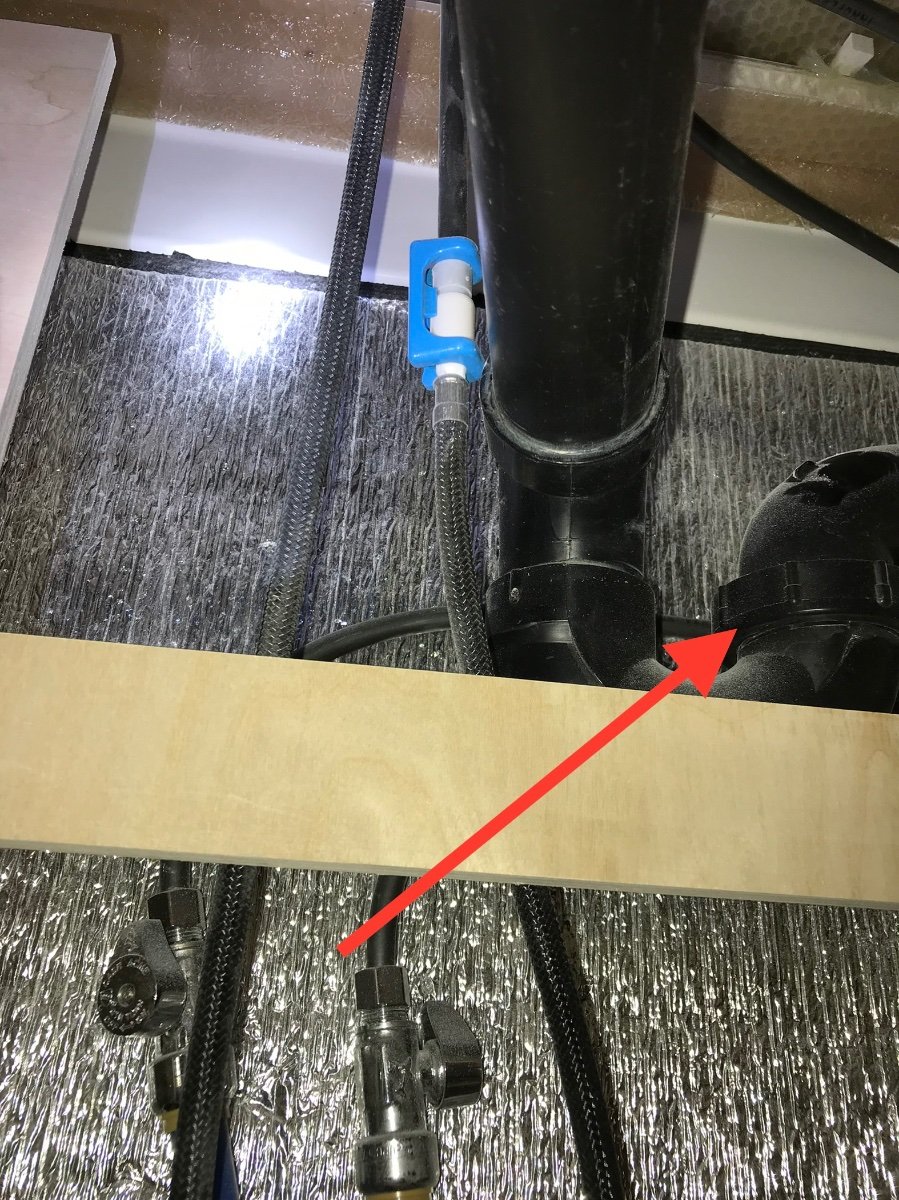
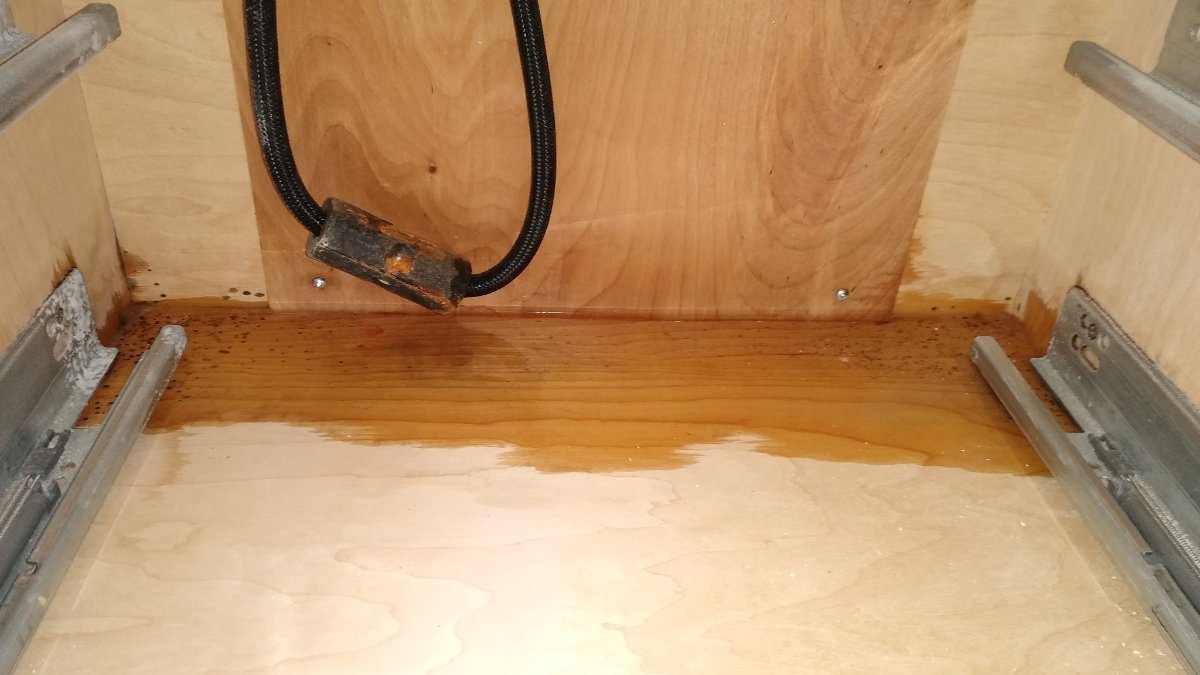
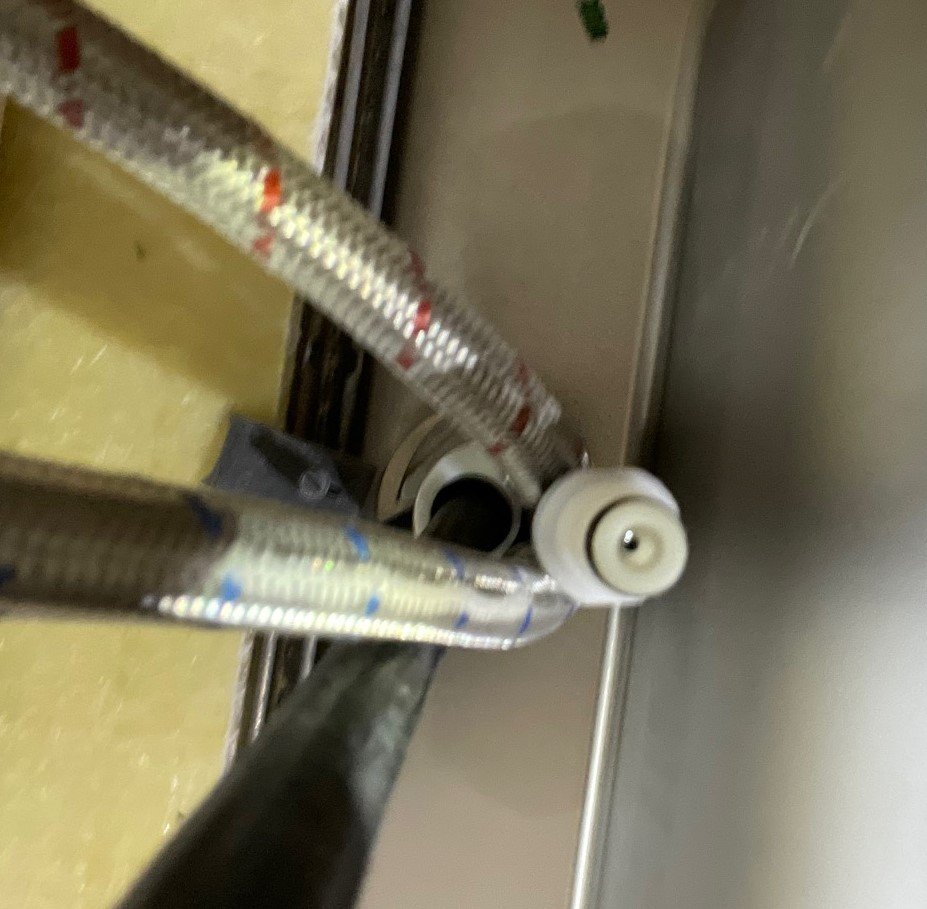
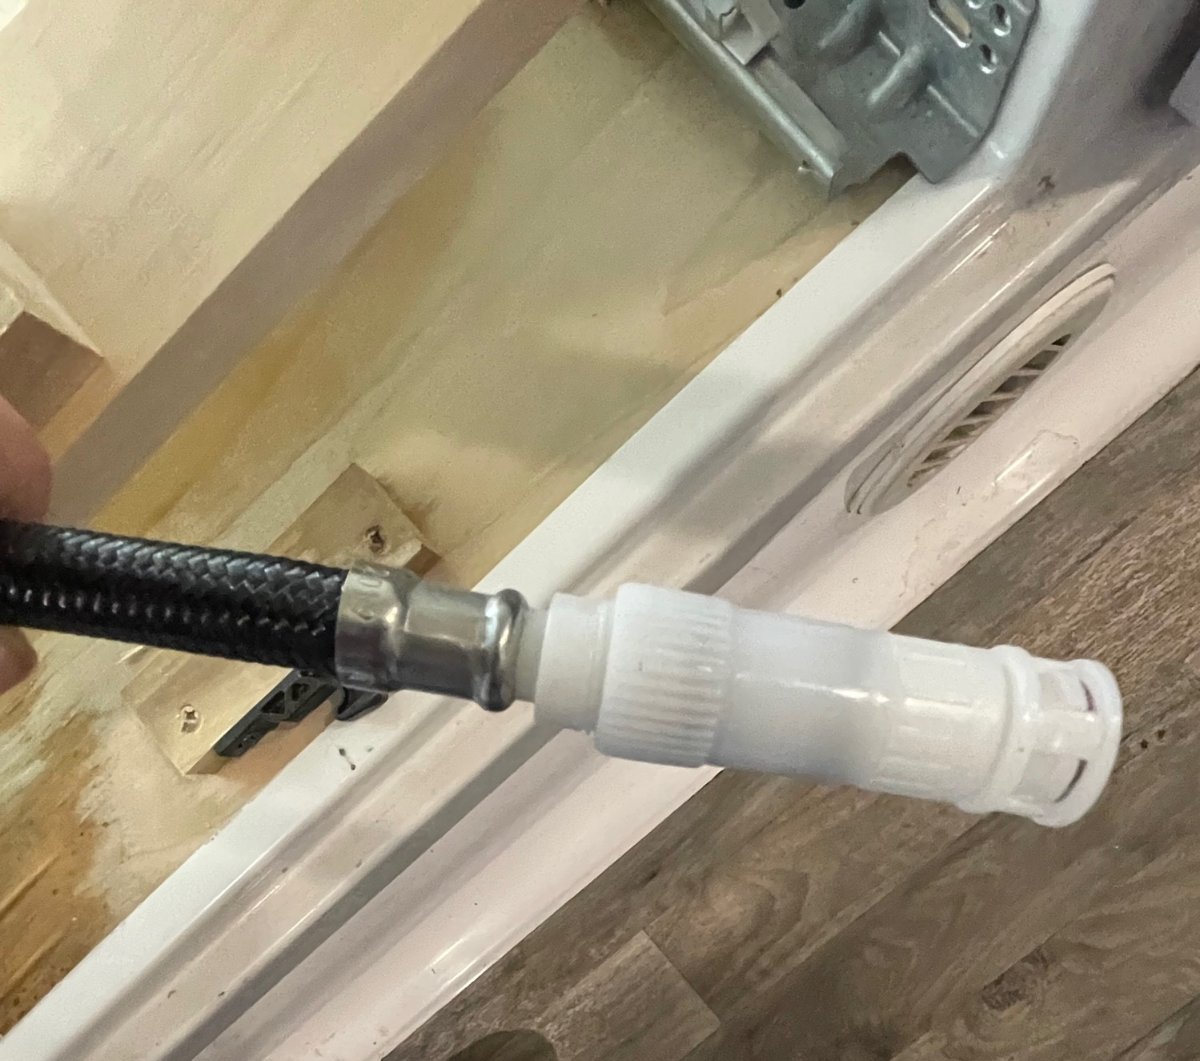
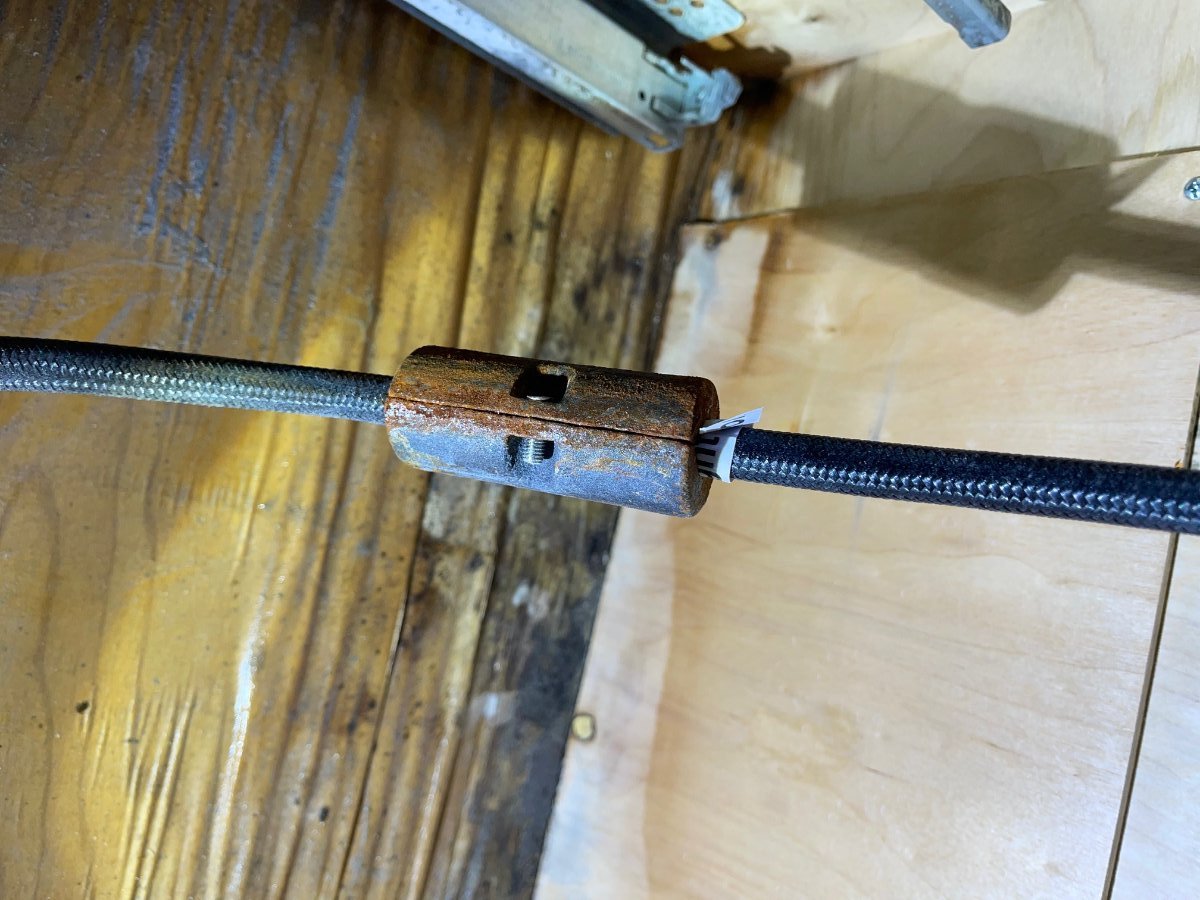
The photos tell the story; thanks for those. The "black water line" you reference connects the two parts of the hose that supply water to the pull-out part of the faucet. The two parts are designed to "click" together and be water tight, held together by a clip that is usually blue. Can you find the clip? If so, I recommend you try pushing the two parts together, then secure them with the clip. If you hear a (very satisfying) click, and the clip seems secure, then run water through the faucet and into the sink, then verify there is no leak at that joint. If it doesn't leak, I'd leave the drawers out for a couple of days to let it dry out, aided by a fan, then test each day to be sure there is no further leakage. If it leaks, or if the clip is AWOL, I would replace the faucet with any standard faucet from Home Depot or Lowes. Replacing the plywood is a major project. I don't yet own an Oliver, so I don't know what supports the plywood in that area, and therefore what would be required to cut the water-damaged wood back to a "joist" that could support a replacement piece. I hope someone with an Oliver can chime in here. But, proper replacement of the plywood might require removal of the entire cabinet under the sink, including drawer glides, etc., cutting out the rotted part, then patching in a new piece, replacing the cabinet, etc. Uggghh. Before committing to that route, I would allow the area to thoroughly dry for several days, aided by a small fan. I would then scrub down the entire damaged area with a 10/1 water/bleach solution (90% water, 10% bleach) and let it dry aided by a fan. I would then scrub it a second time with the water bleach solution, rinse it with clean water, then let it dry again, with a fan. If done thoroughly, that should kill the mold and mildew. I would then apply 2 coats of a mold and mildew-killing primer. Kilz and Zinsser are common brands. https://www.homedepot.com/p/KILZ-Mold-and-Mildew-1-qt-White-Water-Based-Interior-and-Exterior-Primer-Sealer-and-Stain-Blocker-L204604/308880646?source=shoppingads&locale=en-US&pla&mtc=Shopping-BF-F_D24-G-D24-024_022_PRIMERS-Multi-NA-NA-LIA-NA-NA-FY21_Multi_LIA&cm_mmc=Shopping-BF-F_D24-G-D24-024_022_PRIMERS-Multi-NA-NA-LIA-NA-NA-FY21_Multi_LIA-71700000075826637-58700006498654198-92700058683659541&gclid=Cj0KCQjw29CRBhCUARIsAOboZbKRQh3-hFhcRWkMTa0atxXTbXPq-07ksX-WbroktVhk_ID8pcc3WMoaAqekEALw_wcB&gclsrc=aw.ds After the paint is dry, I would cut and screw a piece of 1/4" hardboard (a/k/a Masonite) over the top of the entire accessible part of the water-damaged, but now treated and primed, plywood. If 1/4" interferes with the bottom drawer glide, try a piece of 1/8" hardboard instead. Out of an abundance of caution, I would then prime and paint the entire affected area, including the new hardboard, with two coats of a shellac-based primer. Below is a link to one option: https://www.homedepot.com/p/Zinsser-1-qt-B-I-N-Shellac-Based-White-Interior-Primer-and-Sealer-00904/100398380?source=shoppingads&locale=en-US&pla&mtc=Shopping-BF-F_D24-G-D24-024_022_PRIMERS-Multi-NA-NA-LIA-NA-NA-FY21_Multi_LIA&cm_mmc=Shopping-BF-F_D24-G-D24-024_022_PRIMERS-Multi-NA-NA-LIA-NA-NA-FY21_Multi_LIA-71700000075826637-58700006498654198-92700058683659541&gclid=EAIaIQobChMInKuf5ZzR9gIVeh6tBh3-CAT8EAQYAyABEgKNZfD_BwE&gclsrc=aw.ds The shellac-based primer will help prevent mold, mildew and dry rot should you have another leak. It will also add another sealing layer, and leave the finished assembly almost as good as the original. It is lots of work, and will require many days of dry and wait time. But if it were my trailer, I would choose that route over tearing out and rebuilding the floor under the galley. So much more can go wrong with that kind of rebuild..... Good luck!2 points
-
OK, After looking through the NYC options, I'm voting for my first choice to be Liberty Harbor RV park for the following reasons: 1. You'll be able to go to the statue of liberty and Ellis Island which if you haven't been to either or both is a nice way to start your New York City experience. I recommend springing for the Ellis Island Hard Hat tour, it's kind of behind the scenes and a little more intimate. You have to get your tickets in advance and make sure you're booking the ferry that goes from the Jersey side, same thing applies for the Statue of Liberty, book early and make sure you book for the ride from the Jersey side. Depending on the time of year, you may have to book months in advance so get on that early if it is something you really want to do 2. There is a ferry that runs steps away from the RV park from morning commute (~6:30 am) until about 7:30 PM to-and-from Manhattan for about $8 each way. After that time you can take the PATH train ($2.75) which runs until 10:45 PM. The station is 0.8 miles from the RV park so after dark I would Uber (~$11) from the station to the park instead of walking. If all else fails, you can always just Uber back from NYC to the RV park Which is on the order of $60 each way and takes about 30 min (I checked the price for Uber on Friday Night at 10pm). 3. Even though I would still like to try the Brooklyn RV park (and still might), The Liberty RV park looks less sketchy than the one in Brooklyn and seems like it may be a bit more secure. I haven't stayed at any of these places so if anyone has been to any of them then their input would be most helpful. I'm comfortable riding the train and subway but I know some folks are wierded out by those transportation modes, I figure it's part of the NYC experience and kind of look forward to getting around that way, plus if you purchase a Metro Card it is pretty cheap, on the order of $3 /ride and can be used on all the trains and busses 4. NYC is a wonderful place to walk around and explore so if you're up to it, make sure you're wearing good walking shoes. Surprisingly, the terrain is a bit hilly so it can be a bit of a work out. In the warmer weather there are kayak tours of the city. The view from the water is the way the city was originally seen so I'm told it is a wonderful perspective. We have yet to do that tour but it is on our bucket list. I hope this is helpful.. Albert2 points
-
At least in our 2018 Elite I, the battery compartment is indeed smaller than in the Elite II, nominally holding 2 batteries of "normal" size. Lithium was not an option when we purchased our Elite I. We have the high-tech upgrade for that time - two 6V 220Ah AGM batteries in series, with (2) 115 W solar panels on the roof and the 2000W Xantrex inverter. We are by nature pretty frugal regarding our electrical consumption. We rarely use the inverter, and the Air Conditioner is not on the inverter circuit (which wouldn't have enough power from the AGM batteries anyway...). We camp a lot in the Northeast with partial-to-full shade and cloudy weather and can't always recharge to 100% every day. Its not unusual to be at 80-something percent at end-of-day under those conditions (as long as we're not using the furnace overnight and run the fridge on propane). We do carry a small generator but so far have not needed it to recharge the batteries. Newer lithium options should provide additional electrical "range of discharge" while waiting for a sunny afternoon to come along.2 points
-
We recently met a very nice couple with an Oliver at a campground. I was walking around their Oliver and we were talking about our trailers when I noticed water trickling down the curb side rear stabilizer. I asked if I could look under the curb side bunk and after looking for several minutes I could not find the source of the leak, but from where I was seeing the water running from underneath the insulation I suggested that he pull the drawers and take a look under the kitchen sink. We exchanged phone numbers and I left. With in just a few minutes of leaving their Oliver I received a text saying that he had done as I suggested and he had found his p-trap coupling loose and water from the drain dripping on top of the fender well under the kitchen sink. This leak made its way between the insulation and inside of the bottom hull to the opening where the rear stabilizer goes through the bottom hull.2 points
-
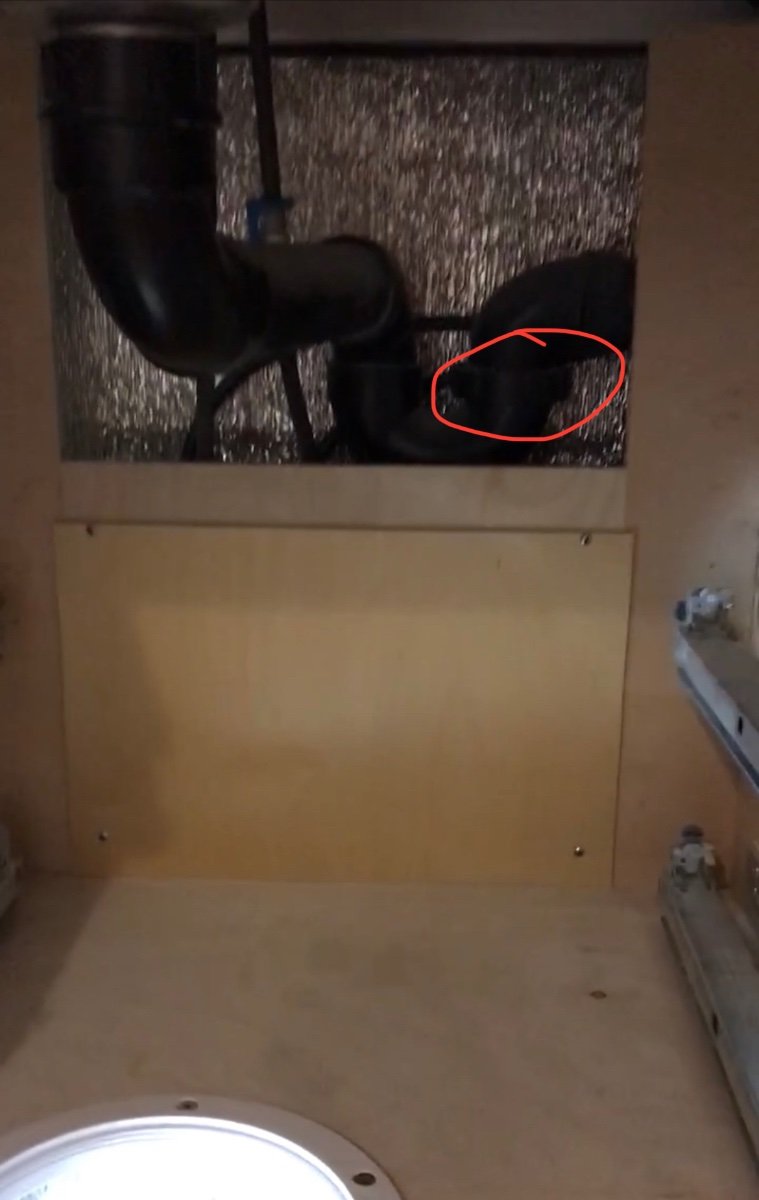
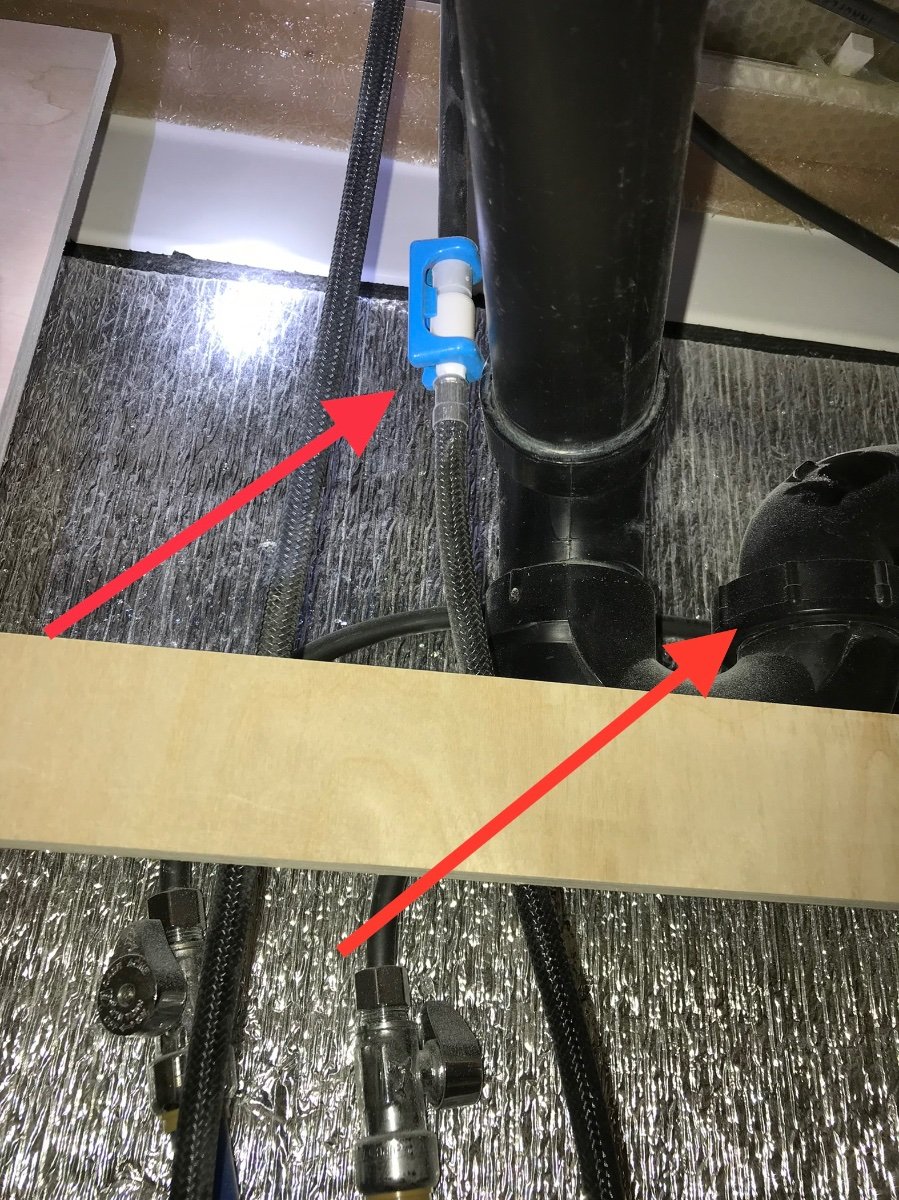
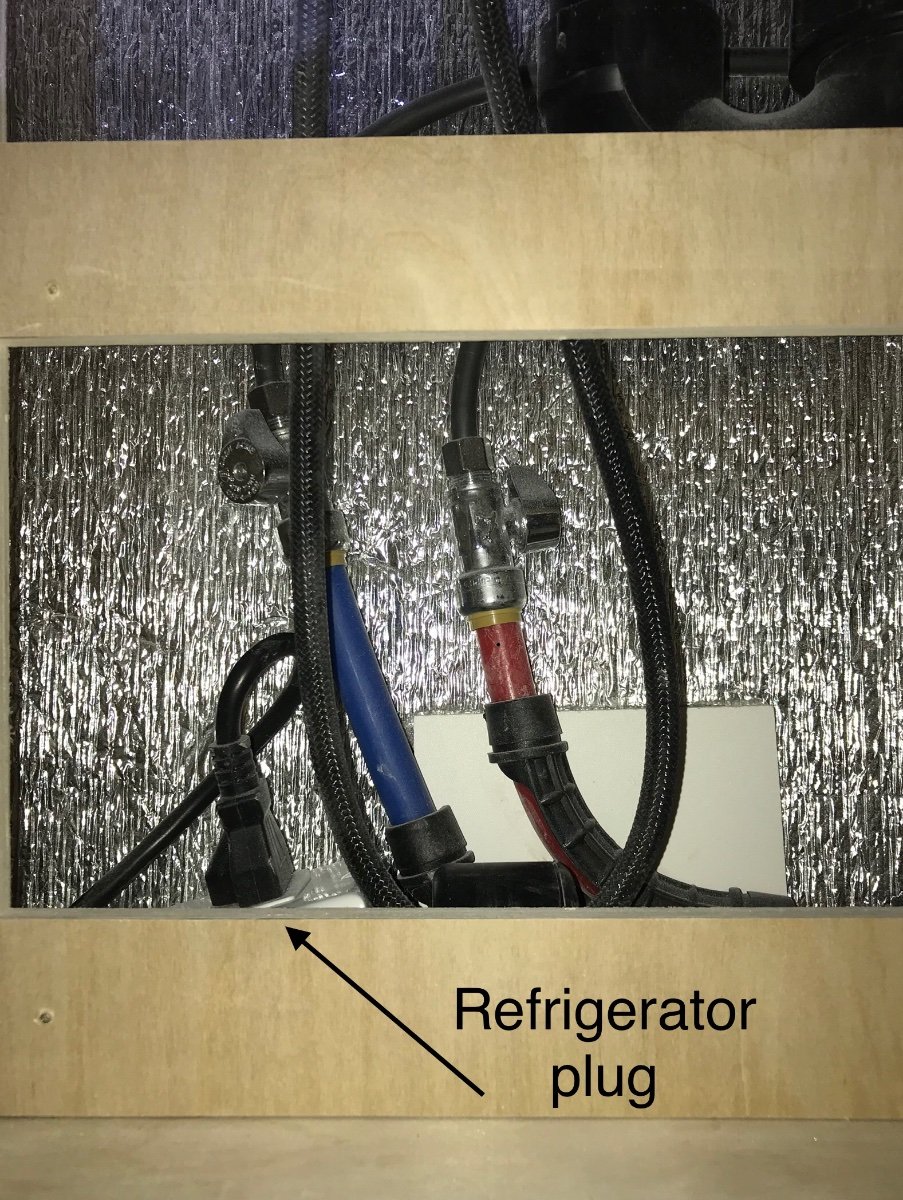
@ImeldaPress these latches under the drawer and lift up Very likely this drain coupling has come apart. Or the blue clip that holds the sprayer hose to the faucet tube is missing and the hose has slipped off of the tube You may have to remove this plywood panel to make the repair. While you are in there make sure the refrigerator plug is plugged in well
2 points
-
NYC can be a wonderful place with all kinds of things to see and do. However, be absolutely sure that you and all in your party amplify any "spidy senses" that you have. Really trust those hairs on the back of your neck - if they even have you thinking about them it probably means that you are in the wrong place. Get out of that place as soon as you can. If you do not know the city and/or any people that are familiar with it then your best and safest bet would be to arrange tours. Bring $$$$$$. Bill2 points
-
Welcome to the forum. There are lots of helpful people here that can answer your questions. For us, it was the composting toilet as my wife didn't want that. You might check the Facebook page called "Oliver Travel Trailer for Sale" for late year model trailers that are for sale. Some are only one or two years old. Good postings with pictures and what options they have. They sell for about what they paid for them. They're not like cars that depreciate as soon as they leave the lot. Happy hunting!1 point
-
Hi, Nittybelle, and welcome to the forum. I see this is your first post.1 point
-
Oops 2,700. Senior moment🥴1 point
-
I don't think so. This connection would only leak when the faucet is on and water is flowing to the sprayer. The system would hold pressure with the faucet off and the pump would stop.1 point
-
Wouldn't this qualify for warranty coverage of manufacturing defect?1 point
-
Rivernerd, thank you so much for excellent information. It would be a big undertaking for me to replace the plywood under the sink. It's not in good shape right now but I am worried about black mold. The leak has obviously been going on and unnoticed for a while. The last trip out in Oct 2021 the pump would occasional run for a few seconds when every faucet etc. was turned off. I suspected a small leak somewhere but couldn't find it. I have 2 weeks until I leave for Utah. I am going to try your suggestion on the bleach and mold and mildew-killing primer as a short term fix. I may take a rotary cutter and cut a small hole in the base plywood to see how bad things look under the plywood. I have a couple of friends that are good at carpentry that could help replace the plywood when I get back. I think I should just replace the faucet rather than trying to make the old leaky one work short term and then fail on my trip. The one Mike's used looks like a good replacement. And per John's suggestion I need to check the refrigerator connections at the back. It's a little dangerous for the electrics to be this close to water. Live and learn. For sure adding pulling out the kitchen drawers to check for leaks on a routine check list. I had to get help on how to get these out and that's on another post. I am going to submit a ticket to Oliver regarding this.1 point
-
Excellent advice. I have some spar urethane left over from a project that now will be finding a home on all plywood under the sink. john1 point
-
I would like to point out one important factor! If you normally use the city water connection, the leak under the sink could go on for a very long time before it was discovered. OTH, If you normally use the 12 volt water pump, it would immediately be obvious that the system was not holding pressure, because the pump would cycle rapidly. I have never looked under my sink (though I plan to ASAP) but I know that the pressure hoses are OK, but there still could be leakage from the sink drain and trap. This should probably be added to your annual maintenance checklist. I am going to investigate, and think about installing a stainless drip tray with a drain hose going out the bottom of the cabinet. John Davies Spokane WA1 point
-
Thanks for that info. That would indeed be a valuable feature. Marv1 point
-
Thank you, John. Interesting option should I decide to go the big gas truck route. Marv Thanks, Jim. I appreciate you sharing your thoughts with me. Marv1 point
-
I have owned a Tundra with 5.7L V8, 6-speed auto transmission and trailer package since 2008. First a 2008, and now a 2019. They both have the "Select Shift" feature ("S" on the gear display below the "D") which allows you to manually control the transmission with a thumb wheel on the gearshift lever. I have towed several different trailers ranging from 3K lbs. to 6K lbs., sometimes with passengers and a loaded pickup bed, up and down the mountains of Washington, Oregon, Idaho and Montana during those 14 years. I have been able to sufficiently control my speed with the thumb wheel going down steep hills, being pushed by the trailer, that I rarely have had to engage the brakes. One of the reasons we bought the 2019 Tundra when the 2008 got old (in addition to our love of Toyota reliability) is this feature. I find it remarkably useful when towing in the mountains.1 point
-
HI Marv Not to say I have all the answers so I will tell you my last twenty years of towing. First i just sold my 2008 Airstream 25 (5600 lbs dry and 960 in hitch weight), my wife and I put 65,000 miles on it towing with a 2014 Silverado 1500 with a 5.3 and 6 speed trans. The truck had a max tow PKG and a 373 axle . The mpg around home 19/20, towing if i stayed in the 65/70 range was 11to 12 mpg . The last trip in TX and AZ running 75 to 80+ milage was 10 to 11. I never use cruise unless it flat with no wind. With all that said I am waiting for my Elite 2 in June and my new 2022 chevy 1500 with the 3.0 and 10 speed. For the last 20 years at work I have towed boat all over Michigan and other parts of the country. I have used GMC 1500 ,2500,and 3500 both gas diesel, tow from 5000 lbs to 19,000 lbs. When I grab a truck to tow I always when i could a truck that was rated for twice trailer as the load i was moving. By doing that it was a lot nice drive, and it also gave me the best tow milage. On the 5.3 i had it ran down the highway towing @ 2200 to 2450 rpm in 5 gear and would up shift in to 6 on fall roads or with a tail wind. The Oliver weights less then my own boat by 1000 lbs a nd the hitch will be about the same. i tow the boat all over MI with out a weight equalizing hitch ,but with Sumo Springs installed. Boats do not tow near as good as Airstreams or Olivers. So with all that said I have a 2022 chevy 1500 with a 3.0 max 4 wheel drive with a 10 speed . 12900 lbs tow rating and a 2100 lbs payload I my add Sumo Spring ( 1000 lbs units) mostly to stop the bounce when towing the boat , they create a lot more bounce than travel trailers. The GM 6.6 gasser are testing a 10 speed for 2023 to help them get some milage ( family works for GM trans) lots of power for heavy loads around town but I wouldn't buy one for la daily drive or long hauling. Jim1 point
-
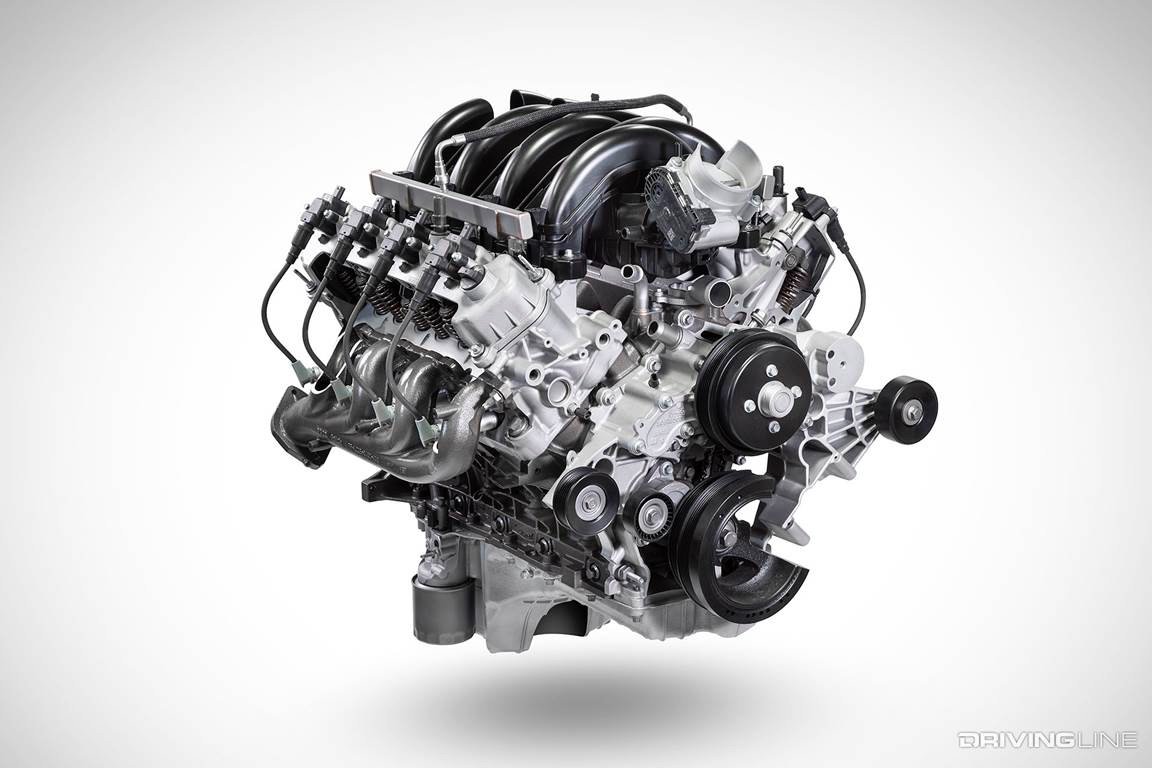
Hill Descent is used at a walking pace, it uses the ABS as a sort of low speed cruise control, for going down really steep hills. It won’t work at highway speeds. I much prefer to just engage 4 Low and shift manually, it is much less chaotic for the passengers that way. I suggest that you research the Ford HD trucks with the 7.3 liter “Godzilla” gas motor. It has almost diesel power characteristics, is super simple and cheap to maintain, and will pull either Ollie easily. https://www.drivingline.com/articles/godzilla-truck-is-the-73-liter-v8-ford-f-250-a-throwback-big-block-muscle-pickup/ John Davies Spokane WA
1 point
-
Had gas. Had diesel. Back to gas now. Loved towing with the diesel. Loved the costs of repairs less. Our gasser struggles a bit with our 9500# fifth wheel but I'm hoping it'll be a good match for the Ollie. We'll see.1 point
-
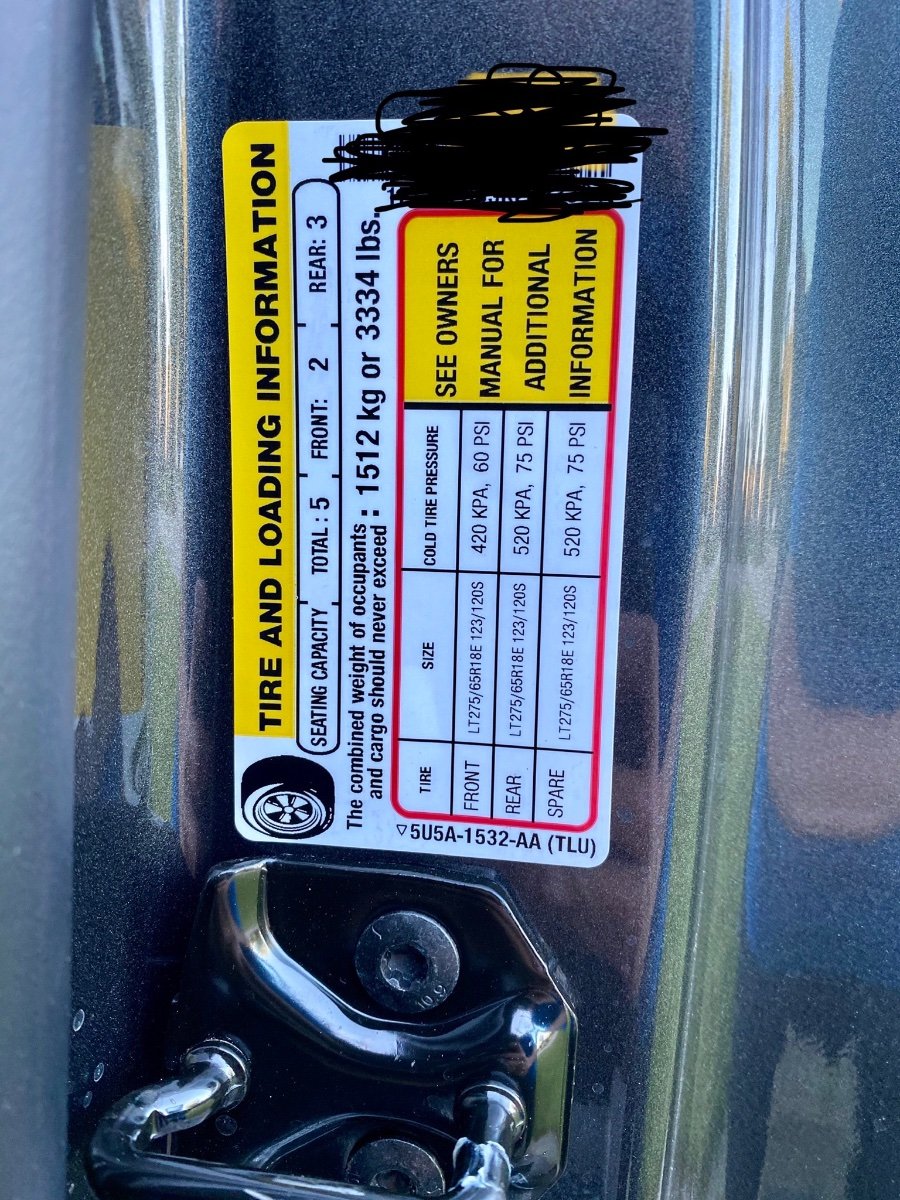
Not sure what Ford calls the option package that I have on my F-250, but it’s rated at 3,334 lbs payload. Highest I’ve ever seen on an F-250. Grabbed it right away when I saw it on the dealer lot. I think it was intended to be a snow plow/salt spreader type work truck.
1 point
-
Ok sorry for my bad.1 point
-
Virtually any late model 1/2 ton will do the job if properly equipped with towing package. However, you will need to watch the 1/2 ton's payload capacity very closely and you should use the Andersen weight distribution hitch. The 3/4 ton will generally not be a sensitive to the payload issue. The Ford you mention will get you between 11 and 12 mpg towing the Elite II while getting over 20 mpg when not towing at interstate speeds (65mph). The 1/2 ton is generally easier to live with when you are not towing (i.e. it is smaller). The 3/4 ton is easier to tow with particularly if you get a diesel since you will have an engine brake. I can't speak for the diesel since I've never owned one. Good luck with your decision! Bill1 point
-
I highly recommend that everyone pull drawers and check this area early and add it to your routine check list. I discovered ours had started leaking at the latest four months after taking possession and suspect it was leaking on delivery day. The source of this leak was the faucet where the water lines screw into the the base at the handle. I replaced it with a household Dura faucet.
1 point
-
Not sure yet, I know there's a place in brooklyn that has been described as a mosquito heaven (I think that's the place with views of the stature liberty). As far as I know there are no good places close in just as the other folks have mentioned but the advantage of being able to walk out of the camping area and get on the subway in my mind out weighs having to spend 45 minutes or an hour on the train everyday coming in and again going out, but that's just my personal preferences. If you opt to go for the place in Newburg (which sounds like a nice place), I would highly recommend staying away from the train during rush hour because then you'll have most of the train to yourself1 point
-
I'm loving this! NYC is certainly one of my wife and my favorite places to visit. I've been driving all over the area since I was 19 and started driving 18-wheelers. It takes a bit of getting used to the culture but as far as places to go, things to see and do etc, NYC is by far the place to be. We've never done it in a camper, only in hotels, and one of our first plans is to take the new Olie to the city and see if from that perspective. One of my favorite finds is https://thepit-nyc.com/, the peoples improv theater (The PIT) on 29th st between 7th and 8th ave (28th st. subway stop is about a block away). This is a place where improv students show their talents. Shows are in the $5-$20 range and run 30-40 min. There's a bar when you walk in and 3-4 theaters so you see a show, go get a cocktail then go see another. It's a cheap night out and you will rarely be disappointed. Terri and I will leave a few days open to just walk around and explore, if you keep your eyes open you're going to see some very interesting things and find some places you'll want to return to (that how we found The PIT). Keep an open mind and have a great time. Here's a 4min youtube about visiting NYC that I love. Enjoy!!1 point
-
https://www.usconcealedcarry.com/resources/ccw_reciprocity_map/ny-gun-laws/?amp If I were to go to NY (about as likely as my growing a tail) I would be very sure not to have any handgun, anywhere. The mere possession of an unlicensed one in NYC, even if it is disassembled and locked inside your Ollie, can get you charged and imprisoned. Federal transport laws have nothing to do with it. Consider a fighting cane. As a medical device it can go anywhere, I have even taken mine on a plane. I use it routinely as a walking stick, and in winter I install an ice tip with a retractable stainless steel spike. https://canemasters.com/tactical-canes-and-sticks John Davies Spokane WA1 point
-
We've stayed at the Newburgh KOA several times and taken the train in from there. Not exactly close. About 15 minutes from the campground to the train station and 45 minutes on the train, if I remember correctly, but it's a nice FHU campground. There's a great little ice cream stand just down the road called Cherry Top.1 point
-
This is a major implementation flaw. Instead of the water running down to the basement and out the scuppers, where it may be detected, it flows down the retractable water line to pool in the bottom of the wood cabinet then rot and fester. The stench from mine was unbearable, lots of ammonia. Ruined a lot of things in the drawers by nurturing rampant mold colonies and shortened the life of the drawers. If the weight is pushed behind the cabinet the weight will not work properly, bangs into, and has the potential to drip water into the 120v receptacle. Now the very few pieces of wood in the trailer are compromised by this inability to understand basic physics combined with using substandard parts. The only support from Oliver for this was what faucet was used in our trailer.0 points
-
All, I did get the drawers out under the sink and I did find the leak (see attached pdf) and I saw like the picture above accept the black water line had disconnected from it counter part under the sink. It must have been leaking for some time so yes this area should be checked frequently for water damage. So now, can I connect up the black water line again by just pushing it together with its counter part and it looks the plywood will have to be replaced? Any suggestions on how to go about that? Under the sink water leak.pdf
0 points


-
Recent Achievements
-


")


")


")
