Leaderboard


Popular Content
Showing content with the highest reputation on 04/14/2023 in all areas
-
@SNY SD UP Oliver suggests this suspension be greased every 3000 miles or 3 months. 👍🏻 Here is a neat video on the EZE flex. https://support.olivertraveltrailers.com/portal/en/kb/articles/dexter-ez-flex-overview-maintenance Patriot🇺🇸4 points
-
If your water heater has had water in it all this time, pull the anode and check it out, allow the tank to drain and flush water through your entire system for several, several minutes. Sanitize the water tanks and lines. While doing all this, check for leaks. Check out each system to make sure it works properly: fans, water pump, refrigerator (both 120V and propane, A/C, wheel bearings should be repacked and Dexter EZ-Flex greased, tires inflated properly, furnace, cooktop and batteries fully charged (I assume they have been maintained all this time). Change out batteries in any devices that used them. If the entire weight of the trailer has been on the tires, they will, most likely, have developed a flat spot where they contacted the surface under them. This may or may not come out after you have driven it for a number of miles.4 points
-
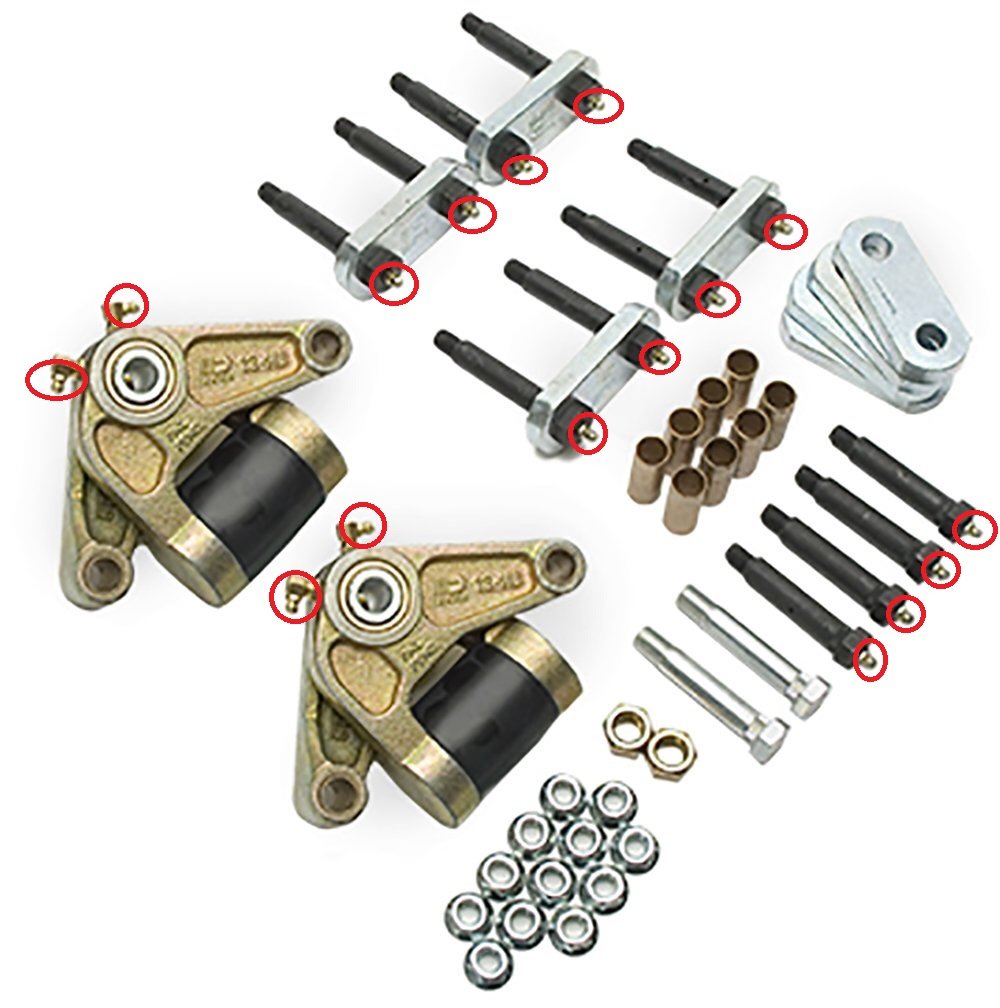
There was a thread on Zerks I was following, with some discussion on Zerk Count, which I believe ended up being '16', at least for the LE2. While crawling around underneath, I was able to locate 12. So I was looking for a diagram to show locations, but I believe a picture provided by John Davies, is a good substitute for a diagram. I just circled them in red on JD's picture, but did not number them, and I am now seeing 16. I will go back to the Quonset to verify, but is this the number and location? B~Out
 3 points
 -
3 points
-
If you winterized, you'll need to de-winterize. Video of Jason showing this procedure linked here. Check your tire pressure (most people like about 60lbs), make sure batteries are fully charged, operate everything you can in/on your trailer before going anywhere, check that you jacks are operational, check your propane level, check your trailer's brakes, grease all zerks on suspension (8 per side), if you have solar, check to make sure the knobs holding the panel are tight, make sure you have fresh, clean water in your hot water heater before turning it on, make sure you have some fresh, clean water Probably a few more things to check but here are at least a few things to get started on... Edit: Scuba just posted so there may be some additional or overlapping comments between us.3 points
-
Correct, there are the 16 that you have circled. The 4 (2 each) on the two EZflex couplers are very well hidden and hard to get to. Removing the tires makes it a lot easier to reach those ones.2 points
-
Thank you so much. We will be better prepared with this for the whole trip! This is a great group. Happy to be back here. Linda2 points
-
FYI: I've attached a MSWord file that's a fairly comprehensive checklist which was written by an Oliver owner (can't recall his name, though). But anyhow, it may be a good baseline for you.... Good luck with your trip this weekend - send pix! Safe travels! Oliver Checklist-2.docx2 points
-
One easy way is to have a mobile RV tech come to the storage location and essentially perform a pre-purchase inspection. That should cover the important stuff like whether or not the brakes and tires are still safe… John Davies Soikane WA1 point
-
Cool video!👍1 point
-
Hi Linda, good to have you back. Good advice in the above posts. Let us know how it goes. Mike1 point
-
Yes, you are correct the 16” wheels are no longer offered.1 point
-
Linda, Good for you that you can try and get back out camping with your Oliver. Along with the above recommendations and since your Oliver has been sitting so long please don’t overlook checking your spare tire pressure. Make sure your tires are not old and out of date. Welcome Back! Patriot🇺🇸1 point
-
Mark, Welcome to Oliver ownership and the forum. For your truck specifics, look at the RECEIVER of your F150 Hitch for a Rating Sticker. The one below is from a 2018 F150 with max tow package. It shows two sets of numbers, Weight Distributing: States max trailer weight and max tongue weight for the hitch if you are using a weight distribution trailer hitch (like the Anderson used on Olivers). In this case 12,200 lb trailer and 1,220 lbs direct downward force of tongue weight. An Elite II full of food and gear weighs between 5500-6500 lbs. The tongue weight is about 10% of that and can range from 525-700 lbs depending on how you've loaded the trailer. (10% of Trailer Wt calculated as tongue weight is a goal for a very stable tow with the Oliver Elite II) Weight Carrying: States the max trailer weight when you are NOT using a weight distribution hitch. This is just dropping a trailer on the ball and driving away. Note it's set to a 5000 lb trailer (like the Elite single axle) and 500lb's max tongue weight. Most of the time you'll find that a loaded Oliver Elite II will have greater than a 500lb tongue weight. (Ours runs in the 620+ range because we have a front basked full of gear. Implication: If you have an F150 with these receiver ratings, you should be using a weight distributing Anderson hitch with your Oliver Elite II for safety purposes. Hull 505 Galway Girl Craig Short
1 point
-
That video for the Elite II is now live! HERE1 point
-
After you think you have charged them to 100%, you can take them to a automotive parts store (NAPA, etc.) where they can test them under a load to see what their health is.1 point
-
THAT sounds like a good plan to me!😇1 point
-
All I can say is WOW! Maybe I can hold back my IRS payment and get ‘er done! Mossey1 point
-
We are anxiously awaiting the delivery date for our LEII. We have a similar situation with our current non Oliver trailer. We store our trailer under cover and the rooftop solar was ineffective. I can only address your first question. We use a 100 watt inexpensive panel and an inexpensive PWM solar controller we installed an inline fuse and connect thru the factory installed zamp solar connect on the outside of the trailer. We use a cable bike lock to secure the panel to a support of the storage shelter. We leave this connected whenever the trailer is in storage. We also bought a very small panel initially and it didn’t cut it. When boondocking, we often take the portable panel with us to augment the rooftop solar. Lastly, if you don’t have a battery monitoring system, I would strong recommend it. I initially made myself crazy trying to predict state of charge from battery voltage.1 point
-
The only weight distribution hitch that works with the Elite II is the Andersen. I expect your F150 owners manual requires a weight distribution hitch when towing over 5K lbs. If so, you need the Andersen. We use an Andersen with our 2019 Tundra tow vehicle. Once you get used to it, easy-peasy.1 point
-
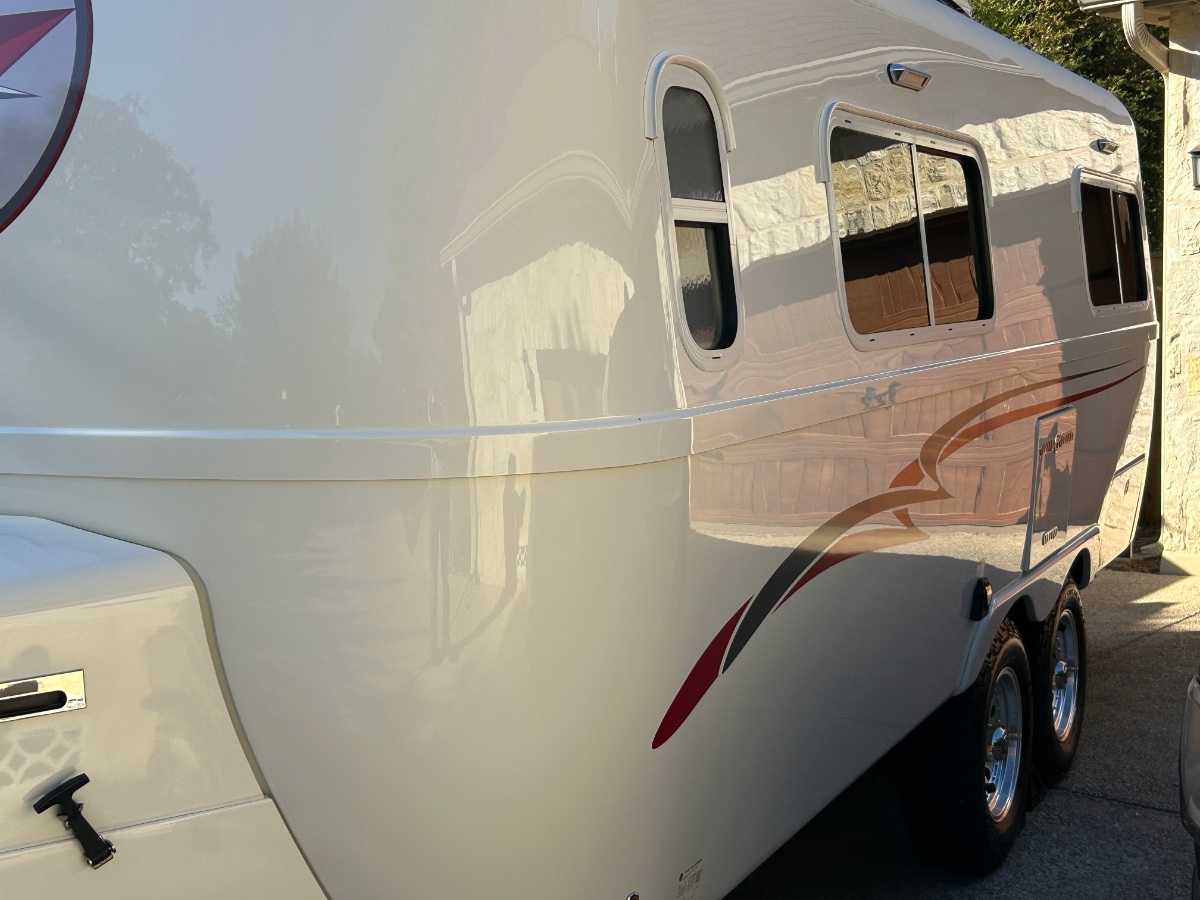
The ceramic coating sure looks great on H-#135! "WAX-ON, WAX-OFF" FYI: We took a couple days on H-226 to get a baseline wax job done. Phase 1: We start the 3-phase process with a general cleaning using a very diluted Simple Green wash-down. After the wash-down, I complete the cleaning phase using a "ceramic mitt" which removes any oxidation and generally cleans the gel coat to prepare it for waxing. The mitt is kept moist by a continuous spraying of the Simple Green solution. The CGI guys use the ceramic stage as well in their process. Phase 1 takes about an hour. Break out the elbow grease. Phase 2: Applies a synthetic wax material which is an advanced polish and buffing creme. It removes any staining and oxidation from the gel coat not removed by the ceramic mitt. It's very similar to McGuire's RV polish (which I used previously). I apply this material with a Cyclo Model 5-Pro, a 2-head polisher which saves tons of time. The buffing creme goes on with the yellow-colored foam pads which are a bit stiffer than the green-color pads used in Phase 3. Phase 2 takes me about 4 hours. End of Day-1: Break out a beer (or 3) and enjoy the Ollie Shine. Phase 3: You'll think you're done after Phase 2, but my professional auto detailer buddy insists that the buffing creme should be stabilized and "fixed" with an application of a high-quality carnuba/polymer high gloss creme wax, called, "Banana Creme Wax." Switch over the pads and away we go... 4 hours later and the beer appears. I start from the top and work my way down to the LED courtesy lights. I'm impressed with the final outcome and according to my buddy, the Phase 2 product will last a year provided a couple applications of "Banana Creme" is done. I can live with a half-day of polishing every 6 months. It sure makes washing an easier endeavor after this coating is on. As you see in the pic, both products are made by an outfit called, "Auto Brite." FULL DISCLOSURE: As a former vintage AS owner (both a 25 and 31-footer), maintaining the Ollie's gel coat in this manner is ahelluvalot easier than keeping the mirror shine on those babies! And, oh, that Cyclo in the picture, it's my second one - burned out the first one on the 25-footer, HA!
1 point
-
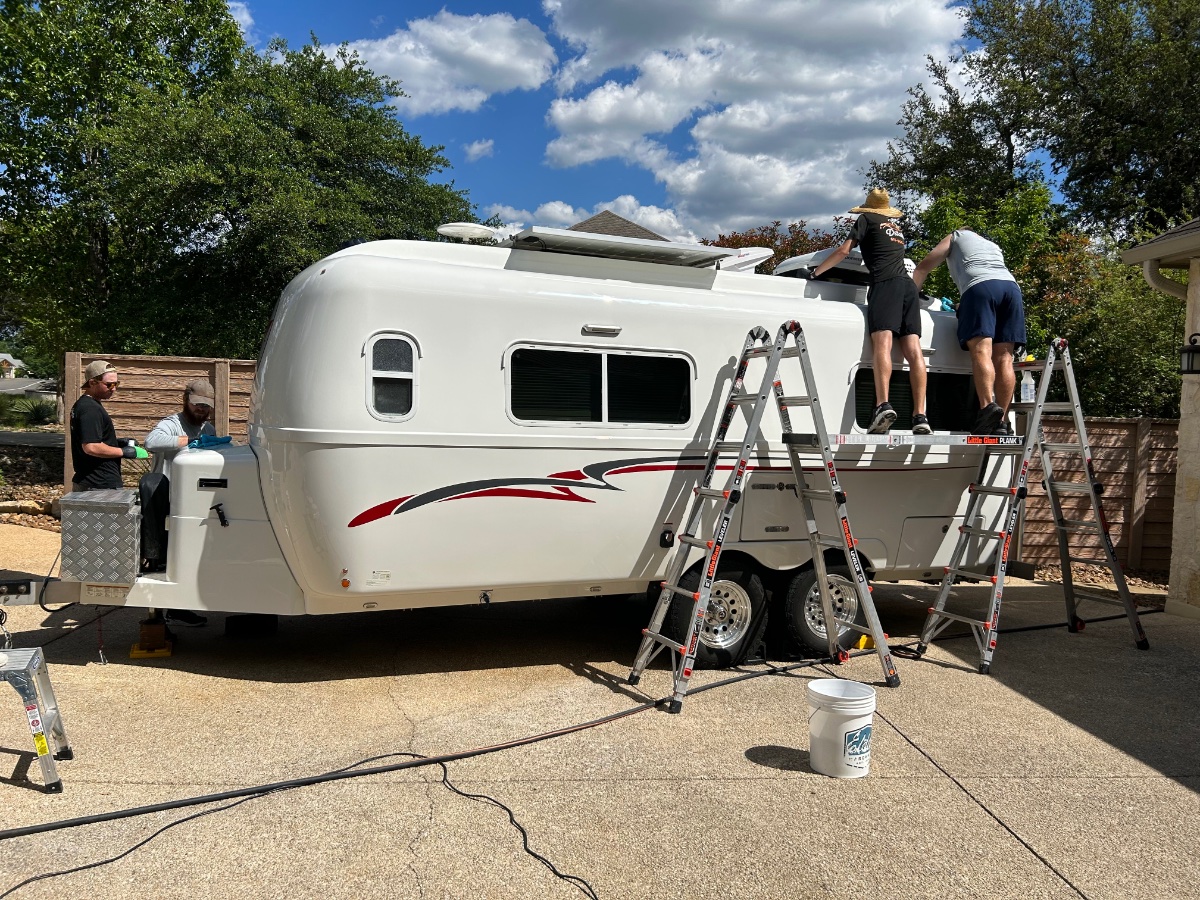
The CGI guys worked almost 12 hours straight yesterday to get our 7 year old trailer looking better than the day we picked it up!
1 point
-
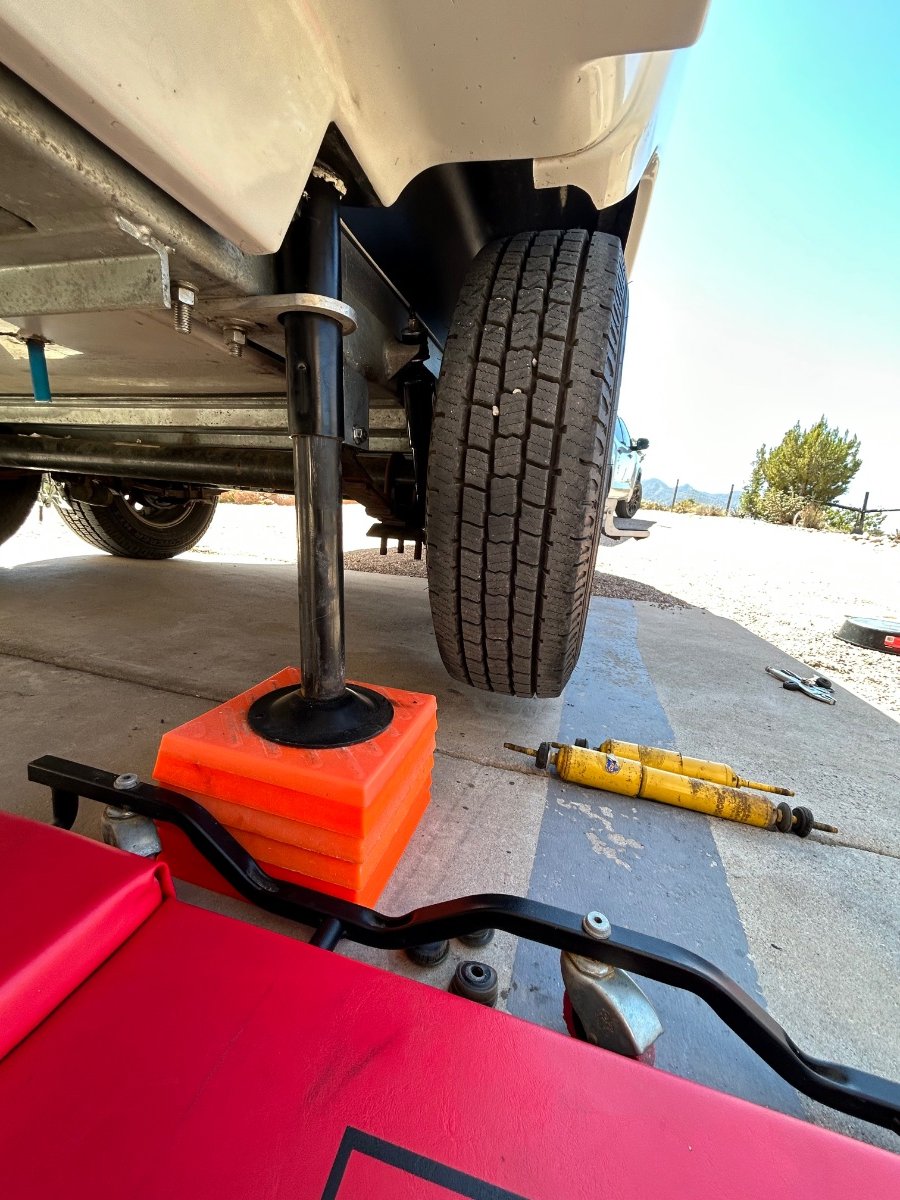
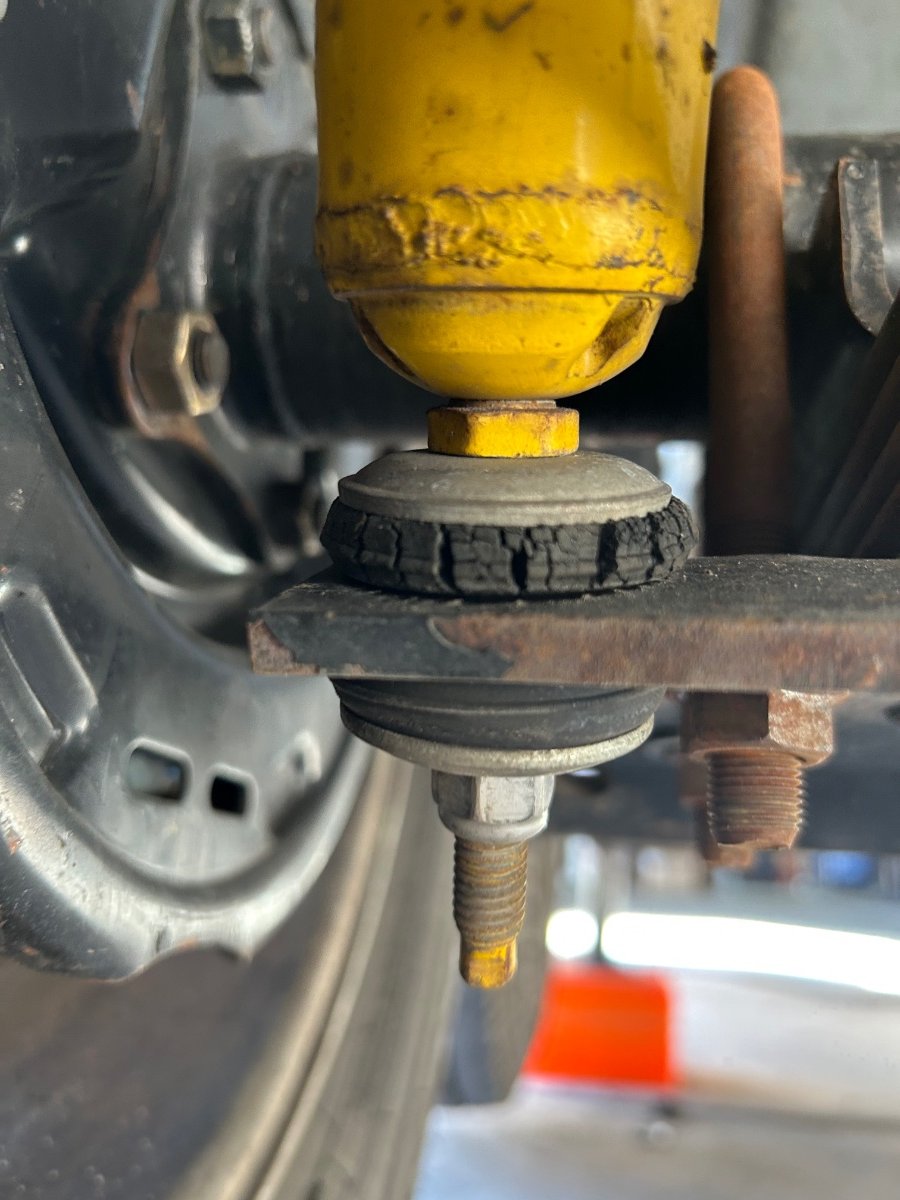
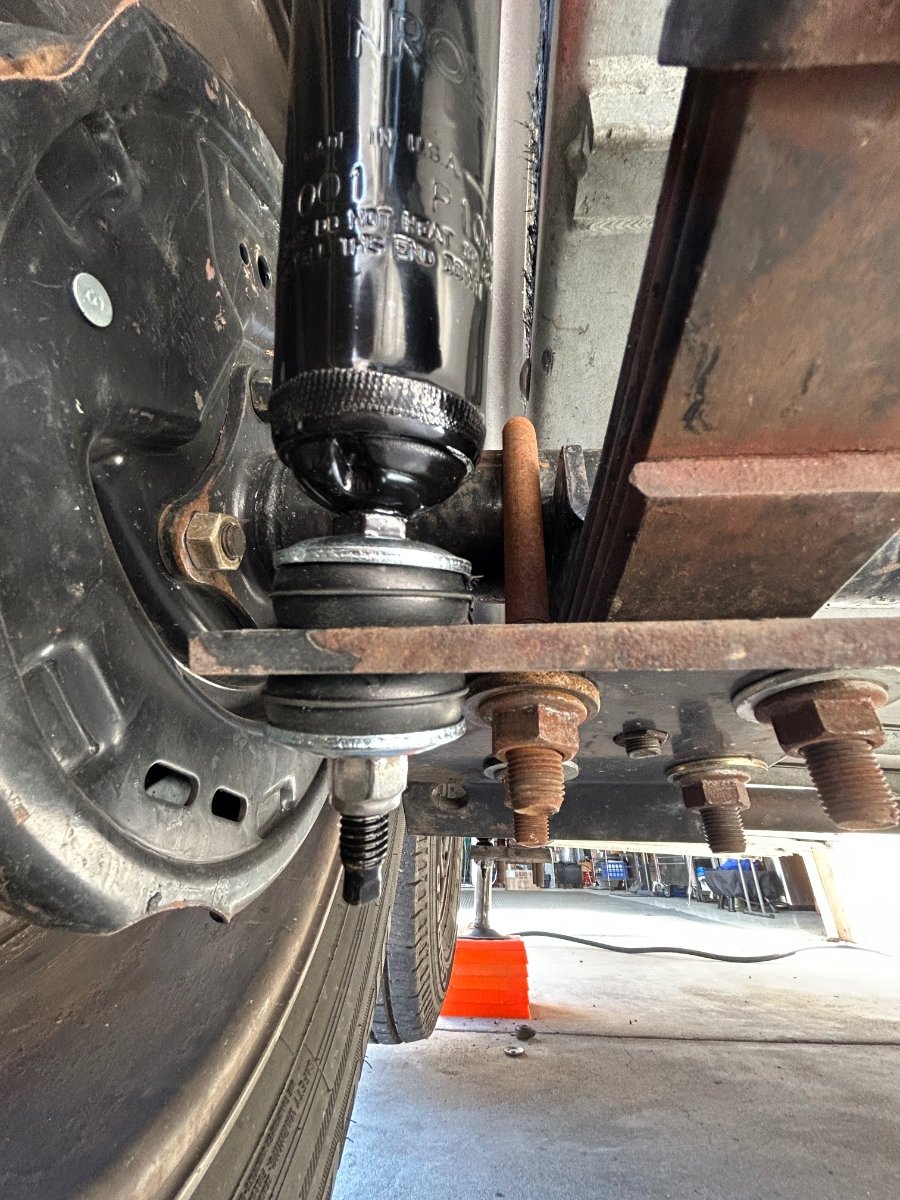
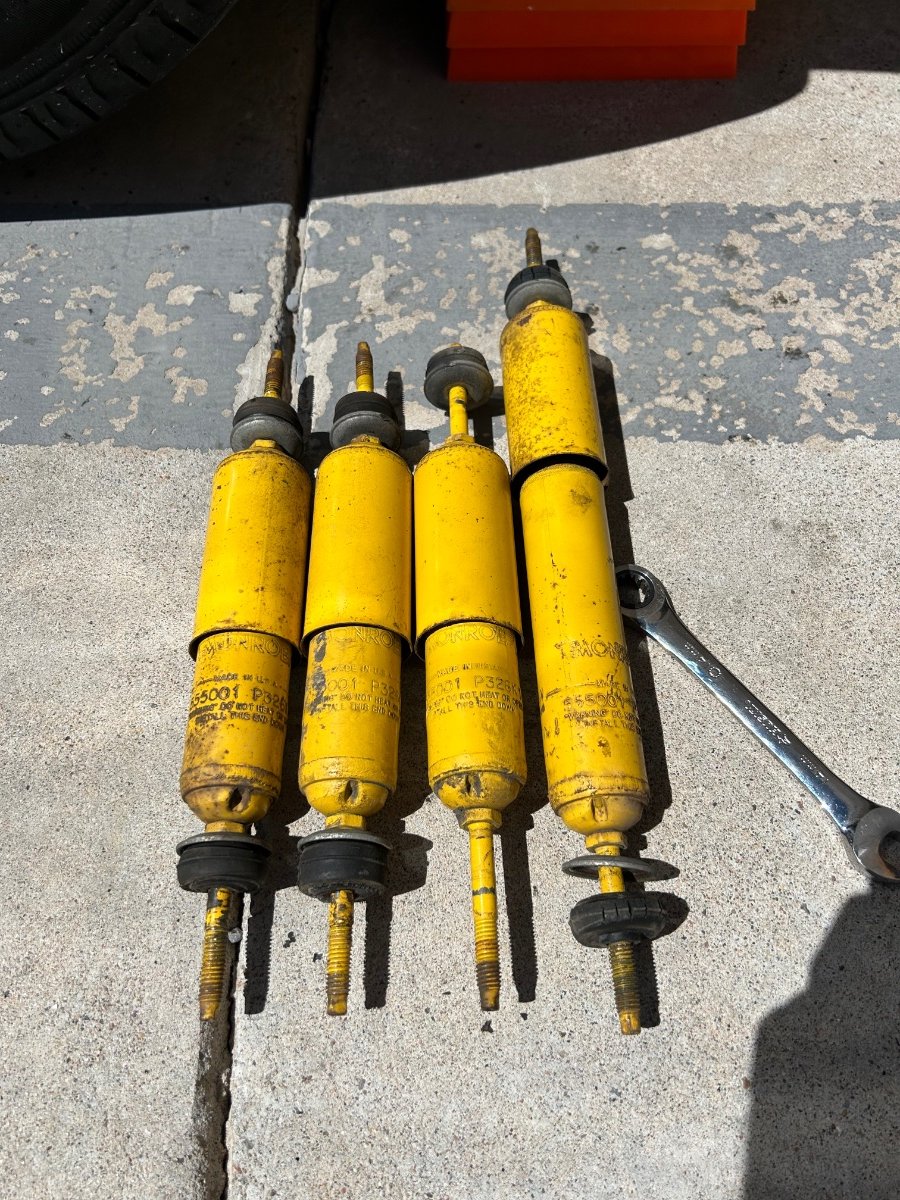
OK... SHOCKS. Back story: I noticed last week that we may have a couple of leaky Monroe shocks after doing a fairly major undercarriage power wash of our Ollie's running gear. That said, I ordered 4 Monroe replacements last Thursday and we wandered off for an extended Easter weekend at a lakeside state park in southern NM to get into some warmer climes. Anyhow, that was a 380+ round trip drill, right? So, as I was cleaning the rig this morning, FedEx arrives with the replacements - perfect frigg'n timing. I jacked-up and jack-standed the Ollie and commenced the shock R&R drill many of you have done over the years. Here's the deal... I'm fairly certain the shocks I removed on this drill were originals from the Oliver factory. The R&R went smooth as it could have. The only modification was adding fender washers on the upper and lower brackets and fresh nyloc nuts. At the end of the day - uplifted peace of mind regarding the running gear package. As it turned out (see pix) 3 of the four Monroes were Tango Uniform - they were just along for the ride and not providing any stability to the overall suspension system. A functional shock when compressed will expand to its fully extended length. The pic shows 3 of the removed Monroes compressed and not extending. Only one was marginally operational. Not good, IMHO. RECOMMENDATION: I believe these units were at least 5+ years old. So, if any of y'all out there are kinda like me and can't sleep at night when you know something's "not quite right" - and you may have 5+ year old vintage shocks, take a couple hours and check 'em out before your next road trip. Granted the Ollie suspension isn't "bomb proof" but it is somewhat robust as compared to other SOBs. With dual leafs and the Dexter coupler, the shocks contribute to stabilizing g-forces and actually aid in reduceing tire wear while being towed. That is... if the shocks are working as designed and not blown out. I'm planning to check them annually when I do my wheel bearings... Just say'n. Safe travels --- looking forward to seeing y'all down the road, until then; Cheers!
1 point
-
1 point
-
The Santa Rosa Plateau Ecological Reserve, located at the southern end of the Santa Ana Mountains in southwest Riverside County near the city of Murrieta. However it has been 25 years since we were there.1 point
-
Steph and Dud Steph and Dud B: Great visual. Thank for posting. For OTT's it is spot on. However, The reason it is great for OTT's is that there are only very limited circumstances wher the Ground to Neutral voltage is zero. When working on industrial or even home A/C units, I have been surprised by having up to 50 volts delta between them. Trust me, that hurts.... and had I been grounded, it likely would have been the last thing to hurt me. Point is: PLEASE never ASS-U-ME that handling a neutral or ground wire on anything has zero potential voltage. Treat them all as hot until you put your volt meter on all three nodes. Safety John (AKA GJ)
1 point


-
Recent Achievements
-


