Leaderboard


Popular Content
Showing content with the highest reputation on 01/07/2024 in all areas
-
Recently purchased a Victron SmartShunt and I did not want to do a fancy install, perhaps later once upon a Lithium upgrade, but for now the shunt will be physically close as possible to the negative battery terminal. They don't sell shorty 4/0 AWG cables, as far as I can tell, and if you need a bunch of different sized cables, you can cut lengths to your needs and save money buying bulk cable and battery terminals (lugs). I installed the shunt last week to check it out, grounding it with two shorty 4AWG cables in parallel, because I had them on hand. Twas fine for the testing, but the cross-sectional area of the two 4AWG cables s is about 60% of one 4/0. Amperage capacity is directly related to the quality of the conductor (less resistance) and its cross-sectional area (more capacity). Cutting 4/0 cable is not easy. When I install an 1800W inverter 3 years ago, I used 2/0 and was able to cut that with the cutters shown. This tool is a bit dull and beat up because of that, and no way it was going through the 4/0. I put the cable on the vise and used the metal hand saw. Saw just touching the vise so that the cable stays put. A new fine steel blade would be best, fine since this is only copper. Today I crimped the shortest cable that I've ever made, only 5" long, hole to hole. The other thing is I customized it by turning the lug on one side 180 to the other side. This allows for a 1" height gain necessary to mount on the taller shunt (picture mounted later). I used Selterm brand tinned copper lugs, that are so big that the insulated wire between the lugs is only 1 1/4" long. It is extremely difficult to get all the copper strands into the lug, due to the sawed edges. Hammer the ends as round as you can before you strip the insulation, and then just strip a little at a time. I purchased TEMCo pure copper 4/0 welding lead "Made in the USA." The crimper tool is their brand too, that I had from last time. Some guys hammer this kind on crimper. But I prefer again using the vise. This is a tug! You'll need a strong extension bar to get the full crimp. The TEMCo HD crimp tool works great btw. I ordered heat shrink tubing which came in the wrong size, so later on that. Cool thing is 3" of heat shrink will go lug to lug on a cable this short, will show that later.
 5 points
 -
Using a hand saw to cut the cable worked for building one, got me through the day. Just put this one on my wishlist! Klein Tools 63041 Standard Cable Cutter, 25-Inch - Wire Cutters - Amazon.com More pics --
4 points
-
I agree fully. Personally I made that exact decision as I started out 20 years ago with a TEMCO Hammer Crimper. Still find it quite useful here in Hawaii on smaller stuff. But for use on our Trailer without a vice handy it was a no go for me. Especially I would have to borrow a vice. But I would never put a cheater bar on another's vice. So I went hydraulic. DYI Pro': I am very open to loaning out my hydraulic lug crimper during the summer. I know it was really handy this summer while visiting MaxBurner and beyond. If interested PM me. GJ3 points
-
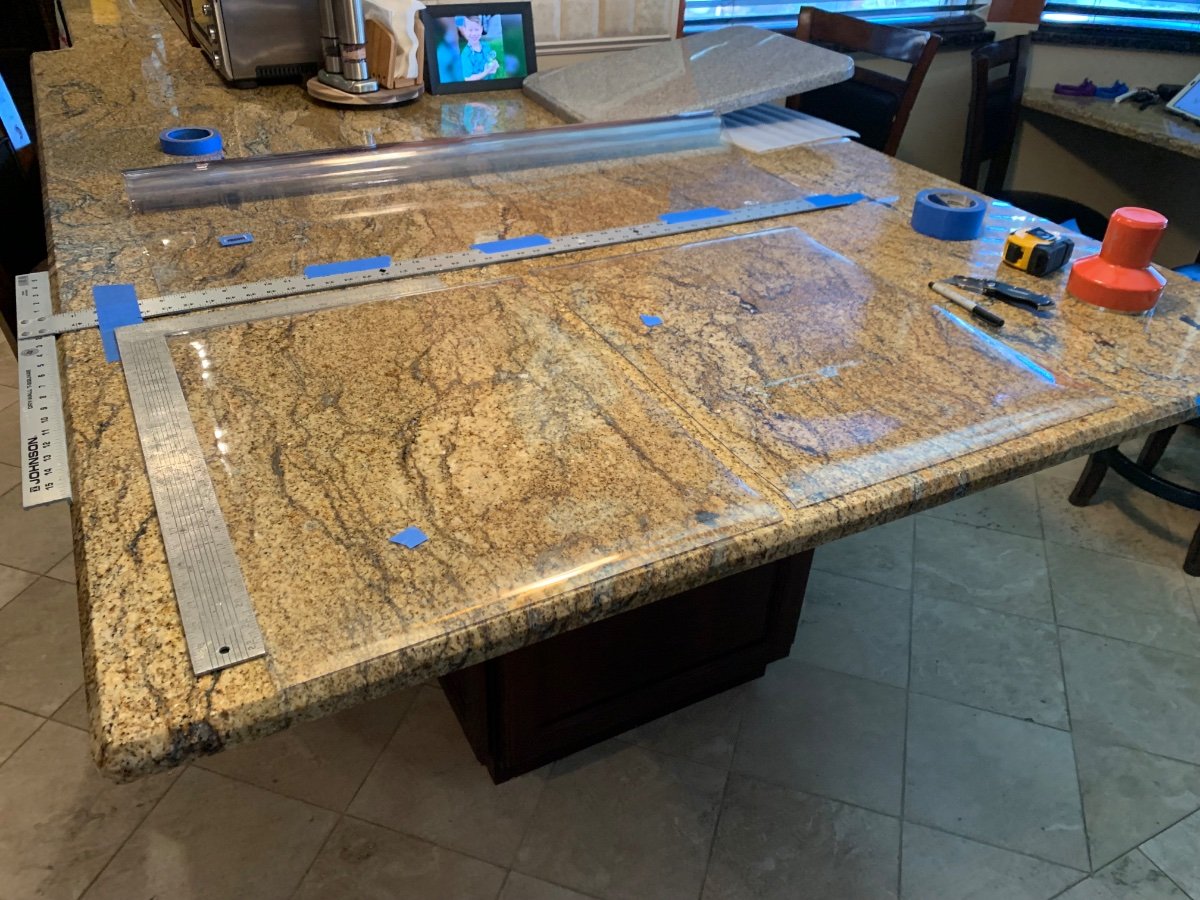
There are some learning curves with fabricating your own 4/0 cables. The below is the process that I have used successfully. Specialty Tools Used: If I needed to purchase tools for a 4/0 AWG cable efforts, I would spend the bucks for that Klein Standard Cable Cuter and a Hydraulic Crimper (shown above), or the one like John Davies suggested some time ago Amazon: TEMCO TH1818 Hydraulic Crimper Summit Performance: Klein Tools Standard Cable Cutter 63035 (16.25” long) 4/0 Cable Fabrication Procedure: I have found it very useful NOT to cut the copper bulk cable to length until AFTER you have completed the full lug insulation on one end. Failure to not do so will result in more cable wastage, and utterance of “Bad Words” as JD has mentioned occasionally. That said, one "trick" I stumbled on to help with getting all the copper stranded cable strands into the lugs is related to how I strip, cut and insert the cable to the lug. The amount of insulation to be removed varies by lug size and the length of the hole that your wire is inserted into. But for this description, let's say you want to have 3/4" of bare cable to insert into the copper lug. In this example I would: If the bulk cable does not have a perfect “clean cut”, then carefully cut it square with the cable cutter. Now mark the bulk cable with a paint marker ¼” from the end, and again at ¾” from the end. Use a tubing cutter (or a fancier insulation removing tool) circle cut the cable insulation (only) at the two marks. Only remove the ½” of insulation as you will be leaving that ¼” of insulation intact on the bulk cable. With the ½” section of insulation removed, now you want to loosen the ¼”" band of insulation by twisting the ¼” band of insulation on the bulk cable. Leave it in place to manage the strands of copper. Carefully done and you will have all the copper strands well managed by the ¼” band insulation on the end of the cut to length cable. Use a bench vice to hold your 4/0 lug. Since you have broken the bond of the ¼” band section of insulation, you can more easily insert the cable into the lug by pushing it into the lug as the ¼” of insulation retreats in front of the lug. As the ¼” band approaches the end of travel, remove it and you can finish insertion by twisting the cable into the lug as you push it. Only twist in one direction. Crimp the lug onto the cable. Now cut the cable to length and repeat the process on the other end. NOTE: Always purchase extra cable and lugs. There is a learning curve involved. GJ
3 points
-
Here's a really good video, made by a firefighter, that tests and goes over proper use of multiple fire extinguisher types - including the Element: I don't think the Element is a replacement for a regular fire extinguisher, but it's another tool in your arsenal - like the First Alert spray we have under our bed rails - that might be helpful because of its proximity when you need it.3 points
-
We now carry both traditional and Element fire extinguishers. What I like about the Element is the long burn time, and the small size that makes it handy to store (and grab) in the cab of the TV. Prior to buying, I spoke with my daughter who recently retired as a Fire Marshal from a large Oregon fire district. She keeps them in her vehicles.3 points
-
Yes, he is our best friend and goes almost everywhere we do.3 points
-
The outlet between the bath and closet is what Carol uses to blow dry her hair. We also have an outlet in the closet at the lower shelf for the handheld vac. Also, one in the attic, one under the curbside bed and the normal kitchen and dinette outlets. I think we all get used to what we have. Mike3 points
-
We've been using the same Weber Q1000 since we got our trailer. They are plenty durable. I also have a griddle insert that I can use on one half of the Weber when I don't want to break out the Blackstone. I prefer grilling meats, but the griddle comes in handy for breakfast with bacon, eggs and more. Mike3 points
-
All modern propane systems have a safety feature that will shut down the flow of propane if there is a surge beyond that which is normal. I was in a hurry and fired off the refer, stove and furnace after storage. The combination shut down the regulator. Simple solution is to turn off all propane users, disconnect the tank hoses. Reconnect, and crack just a bit your tank valve and light off one stove burner. it will purge any air and you can ignite the burner. Let it burn for a few seconds and then fire off the refer and furnace and hot water heater. This process assumes that your regulator was sized to fire off all your propane appliances sequentially and to use them at the same time with some surge capability (but not much). That said, if the regulator was changed out to one of lesser capacity, then all bets are off. Regardless give the system 15 seconds or so between light offs. Other consideration: The colder your tanks are the less their flow capability is. Concerning auto change over valve.... I never use it. I would rather get up on a cold raining night and manually change over when a tank runs out. That way I KNOW what my tank status really is.3 points
-
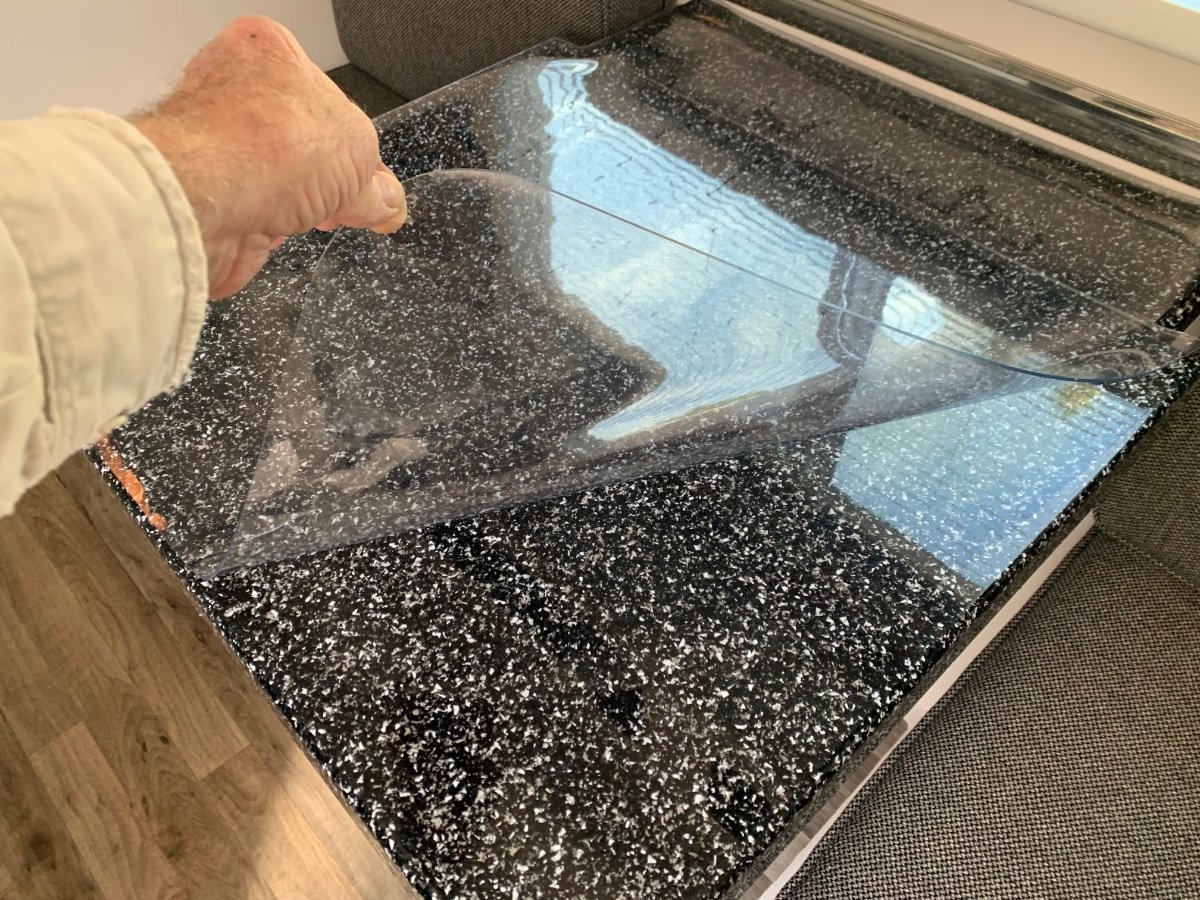
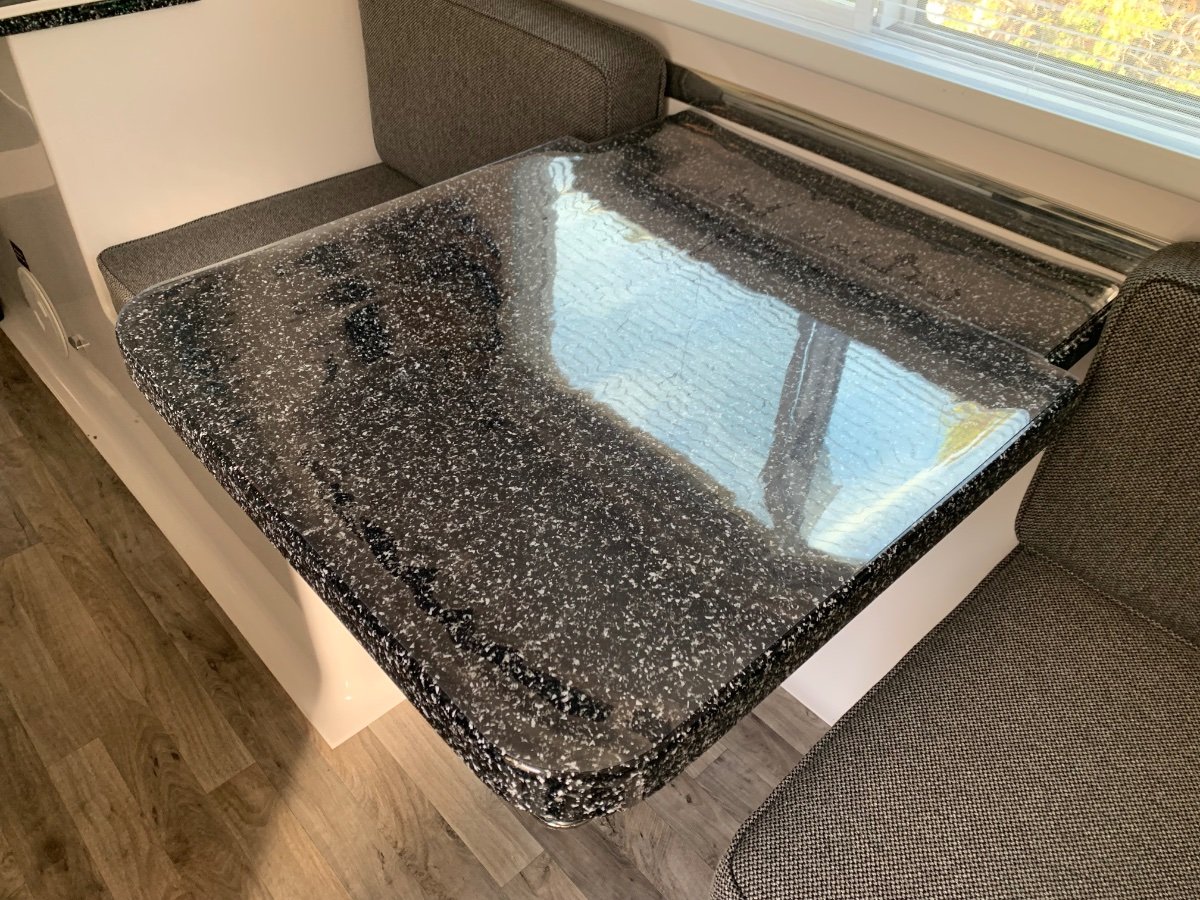
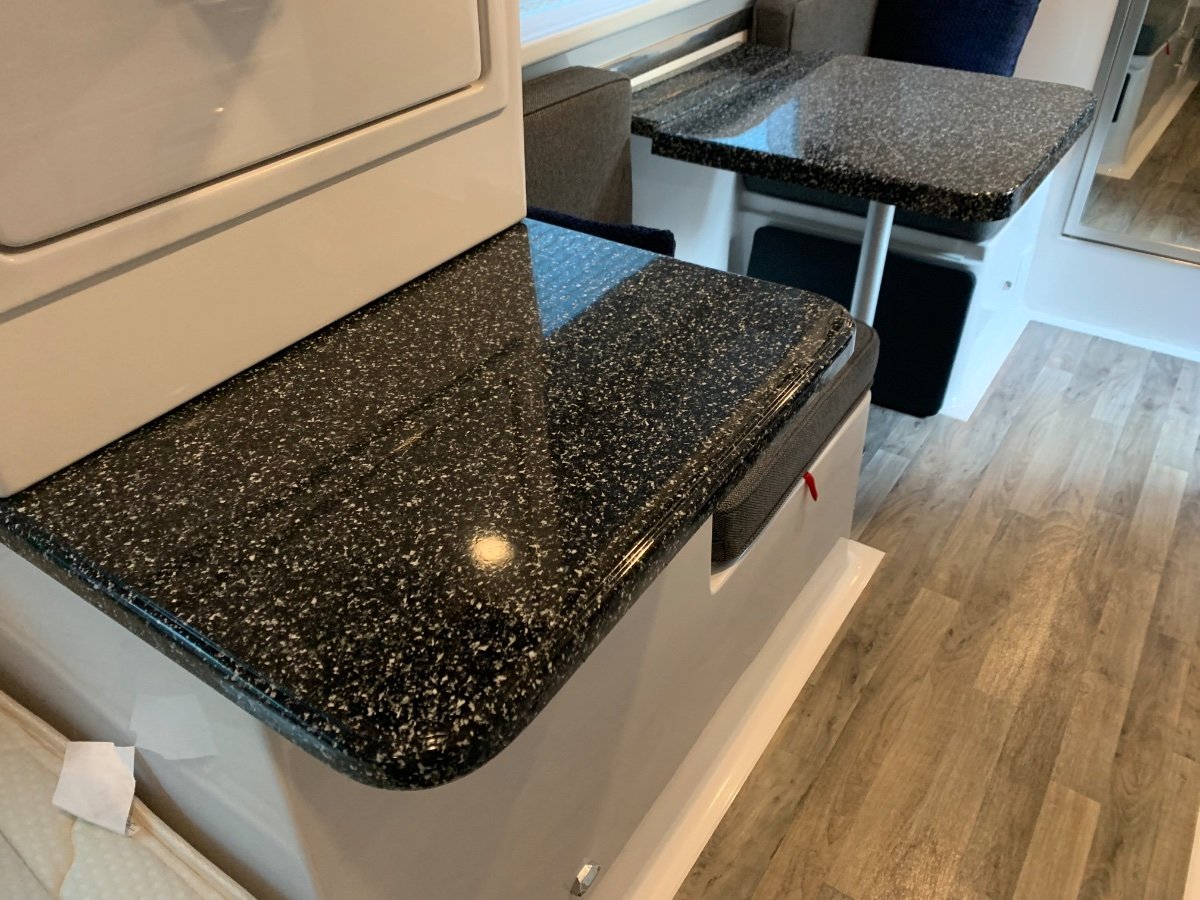
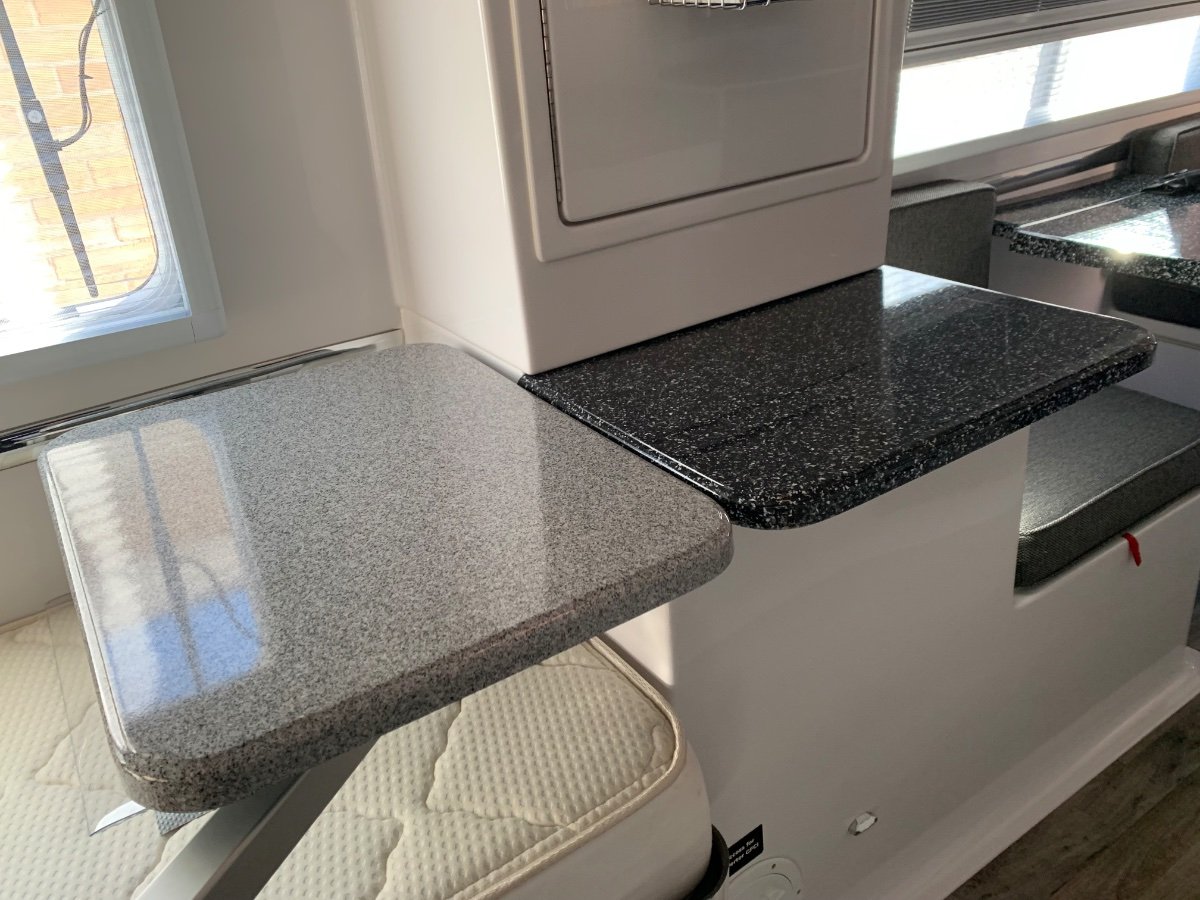
Just completed installation of table and counter top treatments. The material is a clear, 2mm thick, PVC protective cover generally used on home and office furniture; custom cut for all of the ‘flat surfaces’ in our Oliver. Now you see it, ….. now you don’t! Added protection for the pantry counter and Lagun tables that get a lot of use, as well. ‘The mess’, my wife’s words not mine! Sometimes you just gotta let a man do what he’s gonna do! Cutting corners. Best not to drink the margarita before doing this! The microwave counter and nightstand are also completed, but I need to purchase more material for the stove top/sink counter space. Say goodbye to the placemats and drink coasters!
2 points
-
I best keep my door open at night, elsewise I'll be trying to walk through it when nature calls at 3:30 AM. Learned the hard way to not close it at night....... Ouch! XXXXX words.....2 points
-
For anyone this is or is anticipating making their own battery cables this is all VERY GOOD advice. Learn from John's previous experiences (I had to learn from my own mistakes thru the years). If you already have a $150 utility cable cutter, you're in good shape. If not, I have successfully used a band saw to make a nice, square cut in 4/0 cables. No band saw either, put on your thinking cap or get out your charge card. Remember, the goal is to get as smooth and square a cut as possible on the end of the cable. I use a small tubing cutter to remove the insulation also, but his method of leaving 1/4' on the cut end is brilliant and I guarantee you'll be hard pressed to come up with a better solution for getting all the strands into the lug prior to crimping. I bought a hydraulic crimper off eBay years ago. I paid about $35 for it. This is a tool I thought I would use a few times and then it would sit on a shelf in the shop for the rest of my life. Not so, I have used it dozens of times for various things. Need to make a pinched locking nut? A 10 ton press will flatten a nut if you're not careful. The fact that I have it makes it useful for many tasks that require a lot of pressure that are difficult to do other wise. I would not be willing to pay over $50. You won't find $150 worth of usage out of it, or will you? If you do, the $50 model will do it just as well. A bench vise is a very useful adjunct to this project. If you don't have one already, you now have an excuse to build a shop...so you'll have a place to mount that new bench vice.2 points
-
I have the EGO 2405 24" 2-stage snowblower with four 7.5Ah batteries (a pair to run and a pair on the charger). We have an odd-shaped gravel drive (lots of little notches and spurs) that I'd estimate at about 1700 square feet with a slight incline. I added ARMORskids to the EGO because of the gravel, so it leaves about a 1/2" of snow behind. First snowfall was 5" of heavy wet snow with temps right around freezing. I cleared the entire drive in about 1 hour on the first pair of batteries. The 10% charge light was flashing when I finished. I did not suck up any gravel or break any windows 😅. The only thing I didn't do was the plow pile at the end of the driveway. I'm sure the EGO could have done it, but a neighbor with a plow truck got that for me. The snow blower is quiet and there's no gas engine to dither with, which I like. It's pretty light, which is both a plus and minus. Makes it easy enough to maneuver around, but it did have trouble biting into hard pack snow because it wants to ride up on top of it. It throws snow really well. I kept the auger speed low to save battery and it still threw as far as I needed. You can run it one-handed (left) and use your right hand to adjust the chute on the fly. They make a fancier one with heated handles and power turning, which I'm envious of, but it was $350 more and I figured the heaters would eat more battery. So far, one storm in, I'm pleased with it. UPDATE: 2ND PASS: Another 2" of snow fell. This time I used a more efficient pattern and moved a little faster. Finished the whole drive in 30 minutes, using 3/5 of the battery power. Nice machine.
2 points
-
I’ve heard tank sounds, as well, more of a ‘high-pitched whistling’ rather than ‘ringing’ That's the high/low pressure regular diaphragm. They can do that, especially in cold weather with high propane flow. Our last fifth wheel did it and the regulator was mounted right under the bedroom. 🤨2 points
-
I too prefer grilling steaks, reverse sear to be exact. However, when traveling I can cook a greater variety of foods, many simultaneously, on the BS; again personal preference. Enjoying this ribeye cooked to perfection at our Oliver dinette, along with sautéed mushrooms, roasted jalapeños and baked potatoes, all on the BS! With steaks in particular, a griddle can produce a better sear with regards to Maillard reaction, which further enhances flavor. I agree with your take on breakfast, most anything ‘breakfast’ can be made on a griddle, except for maybe waffles; we’d have to meet up with Patriot at Waffle House for that!
2 points
-
It may also be time to replace your lp monitor. You have a 2019. Logic tells us if you smell the rotten egg smell of propane, even if the sensor doesn't go on, turn off propane, and find the cause.2 points
-
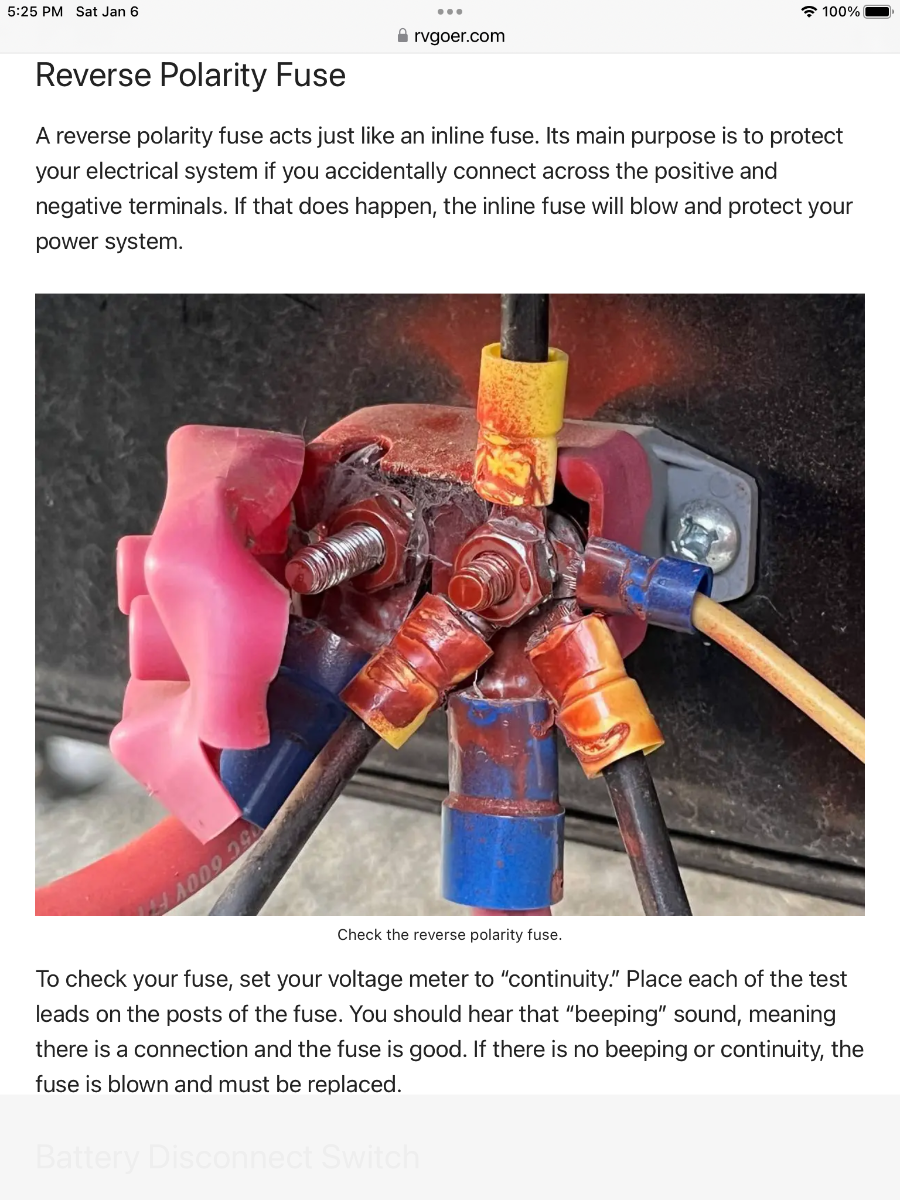
I don’t know about that, but my Oliver has a ‘reverse polarity fuse’ under the street side bed next to the 60A breaker for the DC buss bar. I purposely have the breaker tripped in this pic, the red rubber boot next to the breaker is said fuse.
2 points
-
The new door appears to be curved, at edges.. Our door is a rectangle, no curves. One check of "level, with our now 16 year old door, is if the bath door closes and opens easily. Out of level, not great. So far so good, but I do really like the looks of the new door!2 points
-
Love your repurposed radius tool!1 point
-
Wow love this! We've already noticed fine scratches on our counter tops so this is an upgrade I'd love to pursue sooner than later. Could you please share your source? Thanks for sharing.1 point
-
@Steve Morris, one big "pancake," made in a paella pan, is always a big hit at brunch parties. Might work on your skottle: dutch baby pancake: https://www.thekitchn.com/how-to-make-a-dutch-baby-pancake-2276291 point
-
So far, the only disadvantage to my wok-style Skottle (shown on previous page) is that I can't fry eggs or make pancakes, unless I want one big one in the center. In that case, I just rearrange the inserts and put my ancient Coleman griddle across two adjacent burners. I got a 12+ round pizza stone at Christmas, and I'm going to try biscuits on it. If that works, I'll try pizza. The aluminum lid doesn't hold in much heat, so I may need to add water underneath and use steam to heat the pizza like I did with the cinnamon rolls. Snow Peak used to make a single unit (the 9"X14" inserts) titanium charcoal grill with adjustable height firebox, but that's been long discontinued. Used ones have ridiculous asking prices.
1 point
-
Actually, most of them do that. Carbon dioxide and foam extinguishers also remove the oxygen. Water extinguishers remove the heat. The ABC dry chem extinguishers work by interfering with the chemical reaction itself (the fourth side of the now-called "fire tetrahedron").1 point
-
for those who haven’t seen the posts referenced by @Ronbrink, here you go!😊1 point
-
Oh, sad for them, lucky you, and lucky dog! He's obviously a much loved little dog, and now,he's camping, too!1 point
-
@Jason Foster, is your dog a Miki? His ears definitely remind me of Bugeydriver's Bosker. (our dog Liv's favorite camping pal.) @Liana, I'm guessing your door sag is a door frame problem, unless it's been that way from the get-go. As far as i know, Oliver has always used a good piano hinge on the bath door, and those rarely "sag." If your hinge is damaged, you can feel it by running your finger down the hinge. The hinge should feel pretty smooth (just an interiotin at each juncture), not a big change as you go down the hinge.
1 point
-
@Ronbrink, my question is:"what time is breakfast?" I can bring another table. 😆 Looks yummy!1 point
-
Huh! I always thought that was an automatically resetting breaker. Mossey
1 point
-
jd1923 cited some reading material in an earlier post: Should Inverter Be On When Plugged Into Shore Power? Ultimate Answer (rvgoer.com). In reading, I was directed to other articles by this author and came upon the following:
1 point
-
OK, I'll buy that you are killing the battery bay bank. But then, have you not seen your tail lights very faintly when you think EVERYTHING is off? Just saying lots of opportunities that could come into play. Glad you figured it out. What does the reverse power fuse/breaker do for us? Thanks GJ1 point
-
In theory, if you turn off the main manual reset breaker powering the inverter/charger and similar breaker powering the DC buss, you will be killing all battery power. Mystery solved! By manually tripping the 200A breaker shown in the upper right-hand corner and the 60A breaker in the lower left-hand corner of the below pic, the battery bank is totally isolated; thus no 12V power draw from the batteries by the Oliver, as evidenced by the above VictronConnect screenshot.
1 point
-
First, see if testing reveals a leak in the system. There is no "partially full" indication on the regulator. The indicator just tells you if an auto switchover has occurred. It should be either green or red, but not both. What position is the little arrow lever on the regulator in? It should be pointed at one of the tanks, not in the center. Our lever got accidentally knocked into the center position once, resulting in a "1/2 full" indication when one tank was actually full. For automatic operation with one tank full and the other partial, point the lever at the partial tank. When it empties, it should auto switch to the full tank. Switch the lever, fill the empty tank, and proceed normally.1 point
-
Of course, first thought was a play on words. Yes two tables, but this is my usual two table setup. I need room to work my magic!
1 point
-
Yes - look at the bottom of my post above and you will see information about my tow vehicle and my Oliver listed. You can put this same information in all your posts by left clicking your mouse on your Avatar. Then left click on "Account Settings". Then scroll down a little bit until you see "Signature" on the left side of your screen. Then left click on Signature. When the new window pops up you can fill out any detail (such as you see at the bottom of my posts) regarding your tow vehicle and Ollie. If you have problems - just PM me. Bill1 point
-
Looks like two tables to me - look at the support feet/legs. Bill1 point
-
Heads up if you own an F 150 YM 21-23 with Trailer Tow Max Duty pkg. https://www.cnn.com/2024/01/03/cars/ford-f150-pickup-recall/index.html?fbclid=IwAR3MKc3liwv0-IrlLVP5lHD2c6N3UWCFmmq7R0wA5suIdobPxc2NVzlqSGk Check your VIN here - https://www.ford.com/support/recalls/1 point
-
like you actually had/have a propane leak somewhere between the tank and the furnace? Tomorrow when the system is pressure tested you should know the answer to this question. How cold was it when the problem first came to light? yes as long as you had the regulator on either "automatic" or pointed towards the tank that was 1/3 full. There are circumstance's when this statement is not true but for the most part, those circumstances are rare. probably, but unless there is a reason to suspect that your current regulator and/or gauges are faulty - why change them? It would be helpful if you filled out your "signature" line such that members of the Forum had a better idea about the age of your Ollie and, therefore, be in a position to give you better advice. You also might want to review the "proper" way to "open" your propane tanks. Also, yes, there are gauges that will reasonably show you the level of propane left in a tank (look up Mopeka). Bill1 point
-
Our trucks automatically set them when parked on a slope.1 point
-
We never eat alone.
1 point
-
I’ve been using a Weber Q1200 with an additional griddle insert for one side…works well, because I’m still fat & happy. It was easy for me to convert it to run off my QC connection on my Oliver. As for storage problems, I’m good…just 2 of us, and we continue to do more with less because of years backpacking and tent camping and being very weight-conscious , so I have plenty of room in the back of my(gasp!)SUV! I must be getting something wrong, though….every time I hit the CAT scale, I’m still 100-200 lbs under my GVWR of 1380 lbs my 2010 Toyota Sequoia provides, which is rated to tow 9500 pounds, and happily controls our Elite II up and down the Blue Ridge Escarpment from Coastal SC to the peaks of the Blue Ridge mountains….spring, summer, winter or fall.1 point
-
As far as I know - there was only one Oliver ever produced that came from the factory with dedicated tank heaters. This was way back in the custom order days (even prior to my hull #117) and was for an Ollie that was to be used during the winter in northern PA and similar locations. Other than that, the tanks are located between the hulls of the Oliver and are "heated" by the radiant heat mainly coming off the hoses that come from the furnace to the various outlets located in the interior of the Oliver - i.e. these flexible hoses are not insulated and therefore give off heat in the area between the hulls. Hope this helps! Bill1 point
-
I use the one between the lav door and closet (isn't there another outlet *inside* the closet?), and I see from @Jason Foster's picture that two vents have been added, really good move!1 point
-
On point Mike! Our Q1200 weber will hickory smoke and grill up baby back ribs, tenderloin steaks, chicken wings, lamb chops, trout, blackened shrimp. Just not a griddle guy here, except if we stop at a Waffle House. 😄1 point
-
Won't happen anytime soon, that's for sure! Same. Tho, we learned that lesson the hard way, had to replace the glass... I don't honestly know, Mike in service didn't really know, either, thus the proposal to completely start over with its installation. The door seems to be square, it's screwed into the frame exactly as it came out of there, No clue. But we sure can't use it to check level as @SeaDawg said! I have to use the closet door for that! When we're in winter conditions, we *have* to keep the door ajar with a little space heater in there to keep the supply lines from freezing.1 point
-
This might also provide a good nightlight for those who need it.1 point
-
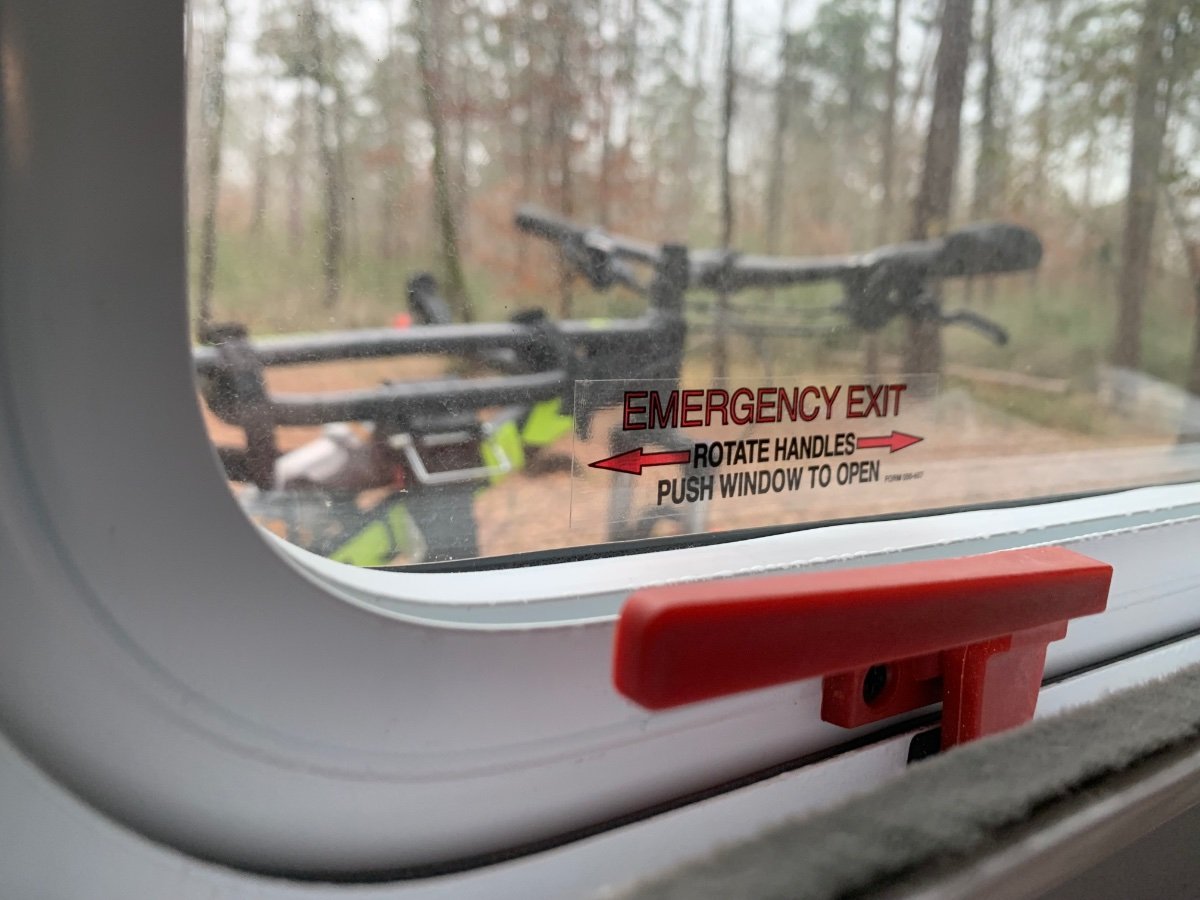
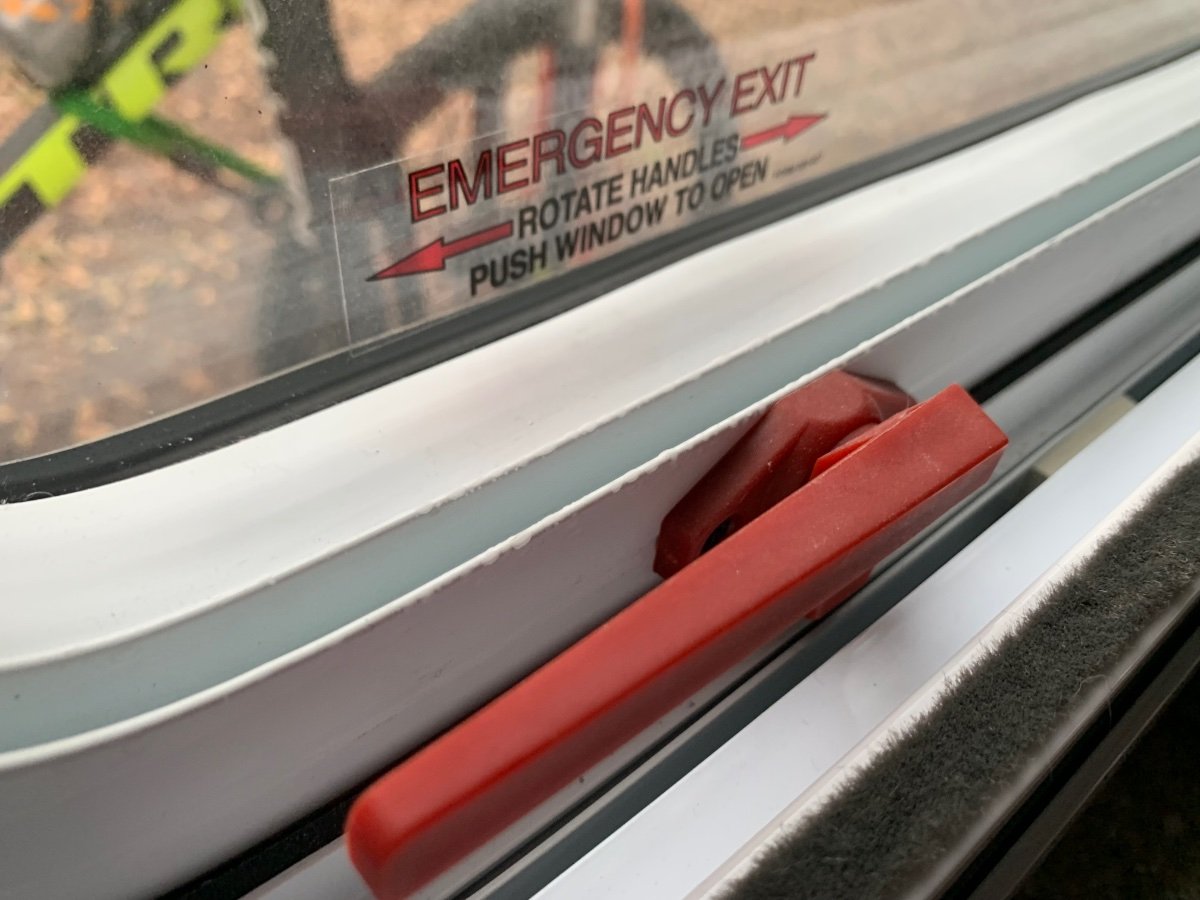
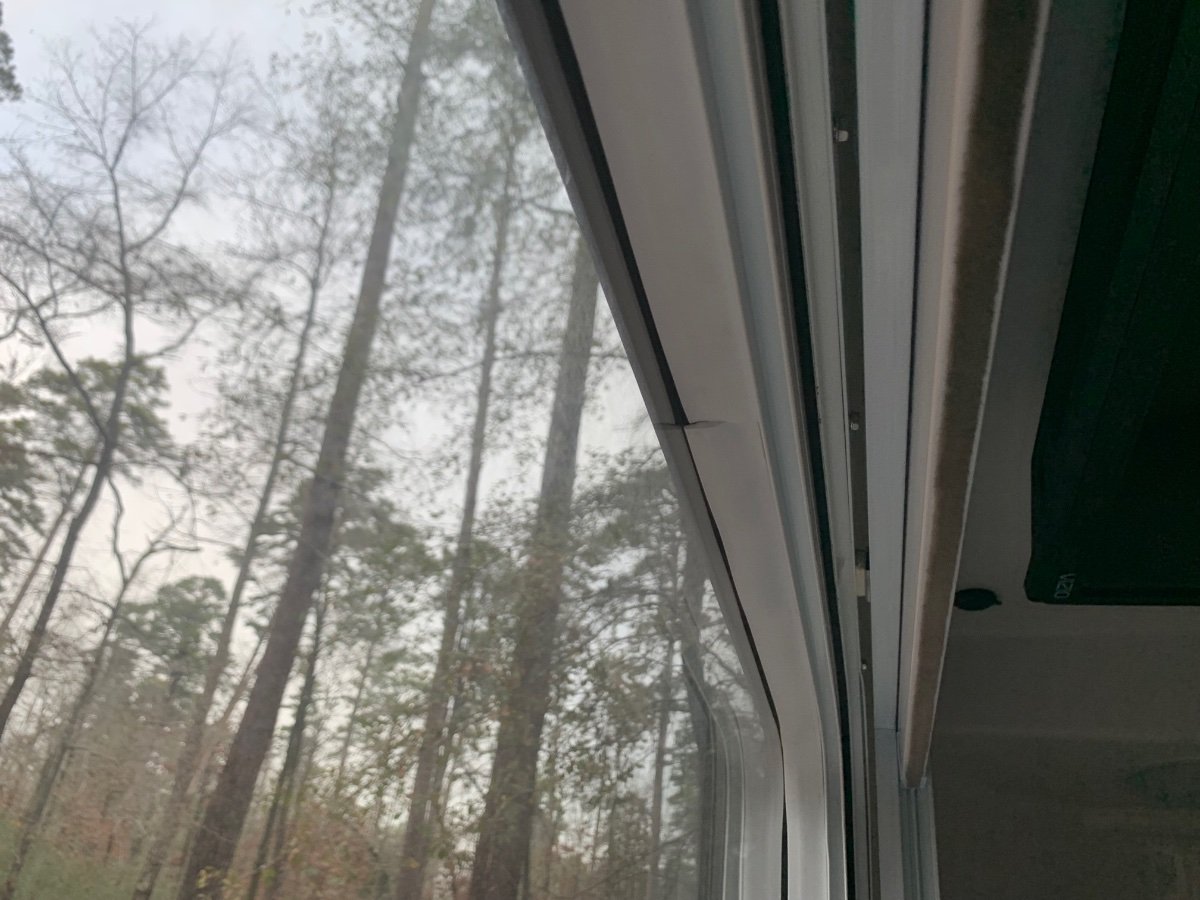
I got some photos of the rear window. It is double paned. Looks like the track where a screen could go here: But it is blocked by the handles. The removal of the screen is obviously a safety feature providing access to the big red handles.
1 point
-
Interesting view of the bolts/rivets on the hinged side of the door. Kind of like looking at an X-ray.1 point
-
Here you go. Not as dark inside but the opportunity was there.
1 point
-
Bummer on the sag deal - my 8 year old door is in exactly the same place as when it was delivered. Perhaps this is because (basically) when the Ollie is in motion, the door is closed and locked. When I'm camped, the door is open - unless I have guests. If I had to replace a sagging door then I'd certainly consider getting that new door instead - it appears to be more substantial than the one I have now. Bill1 point


-
Recent Achievements
-


")


")


