Leaderboard


Popular Content
Showing content with the highest reputation on 02/10/2025 in all areas
-
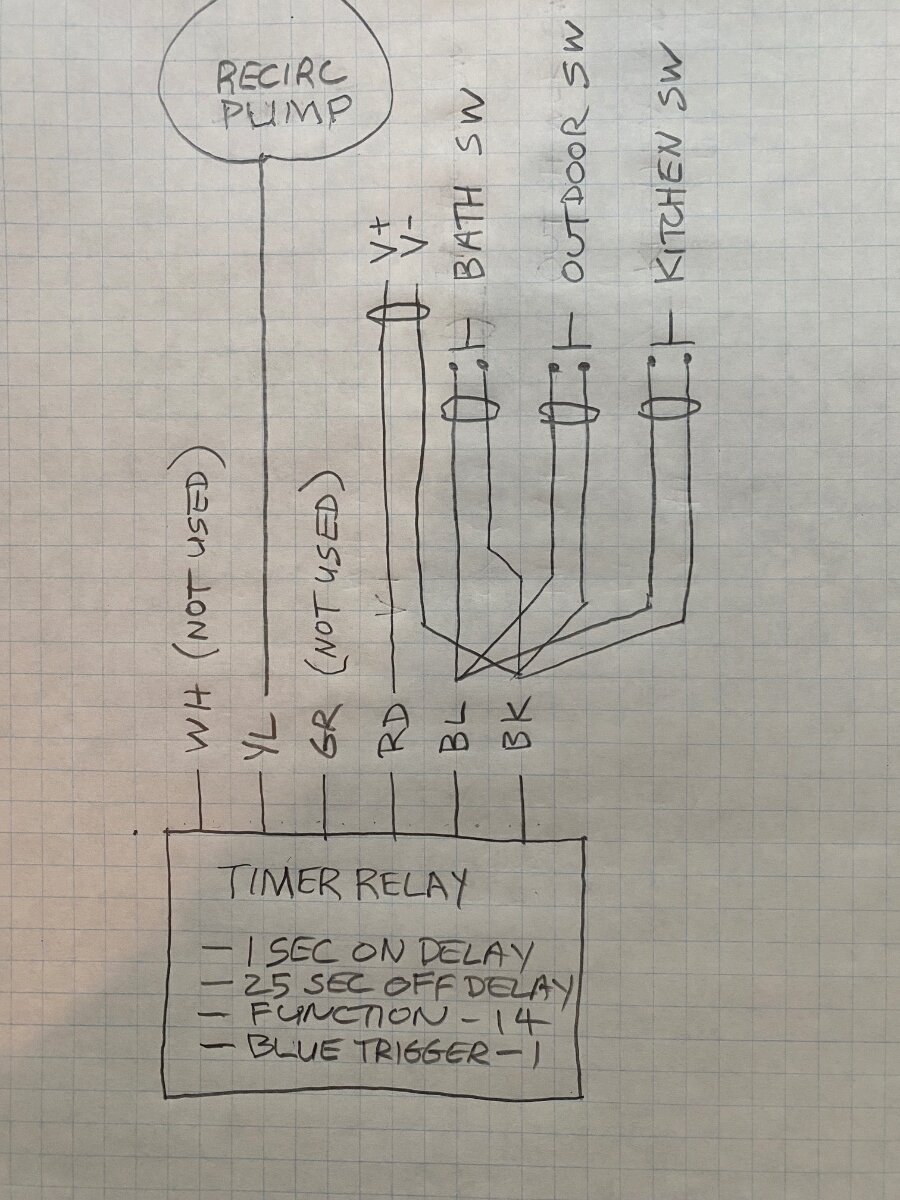
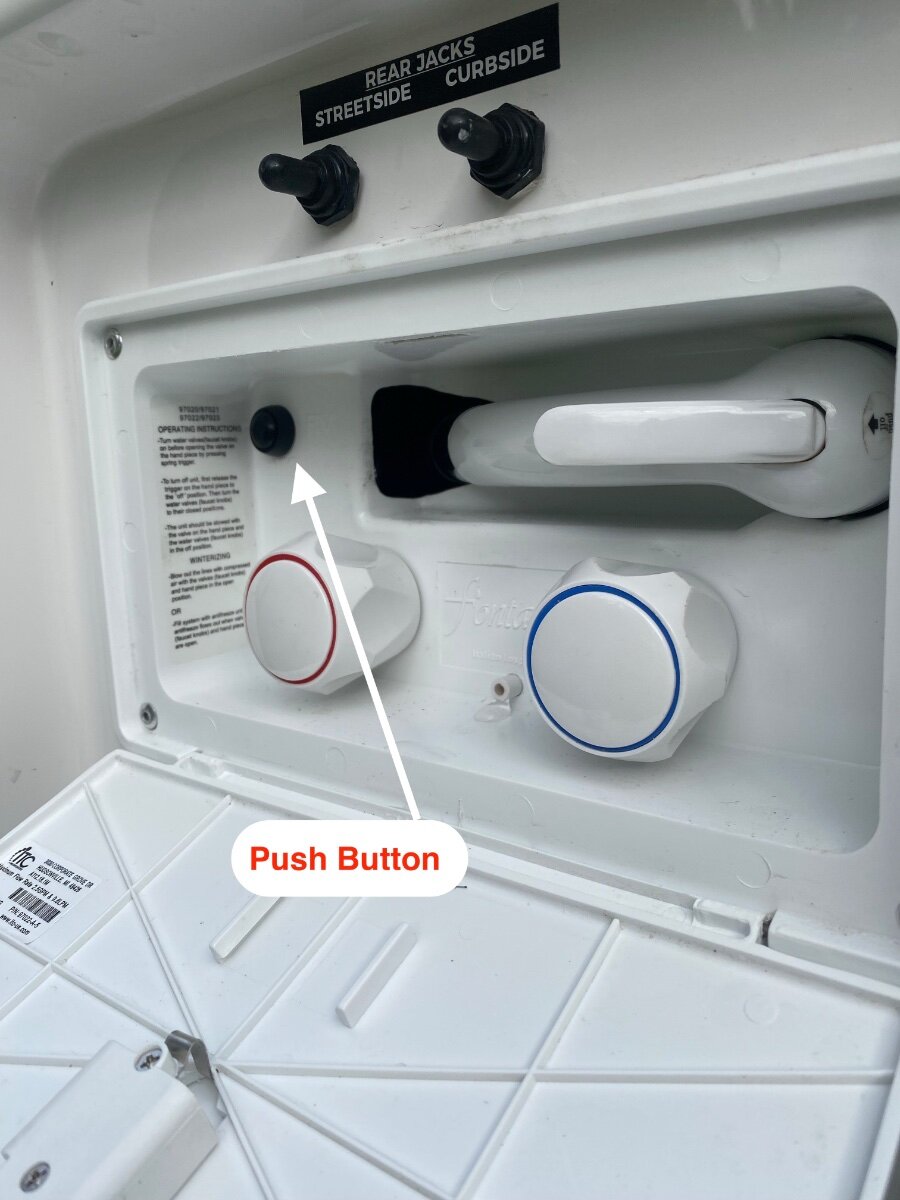
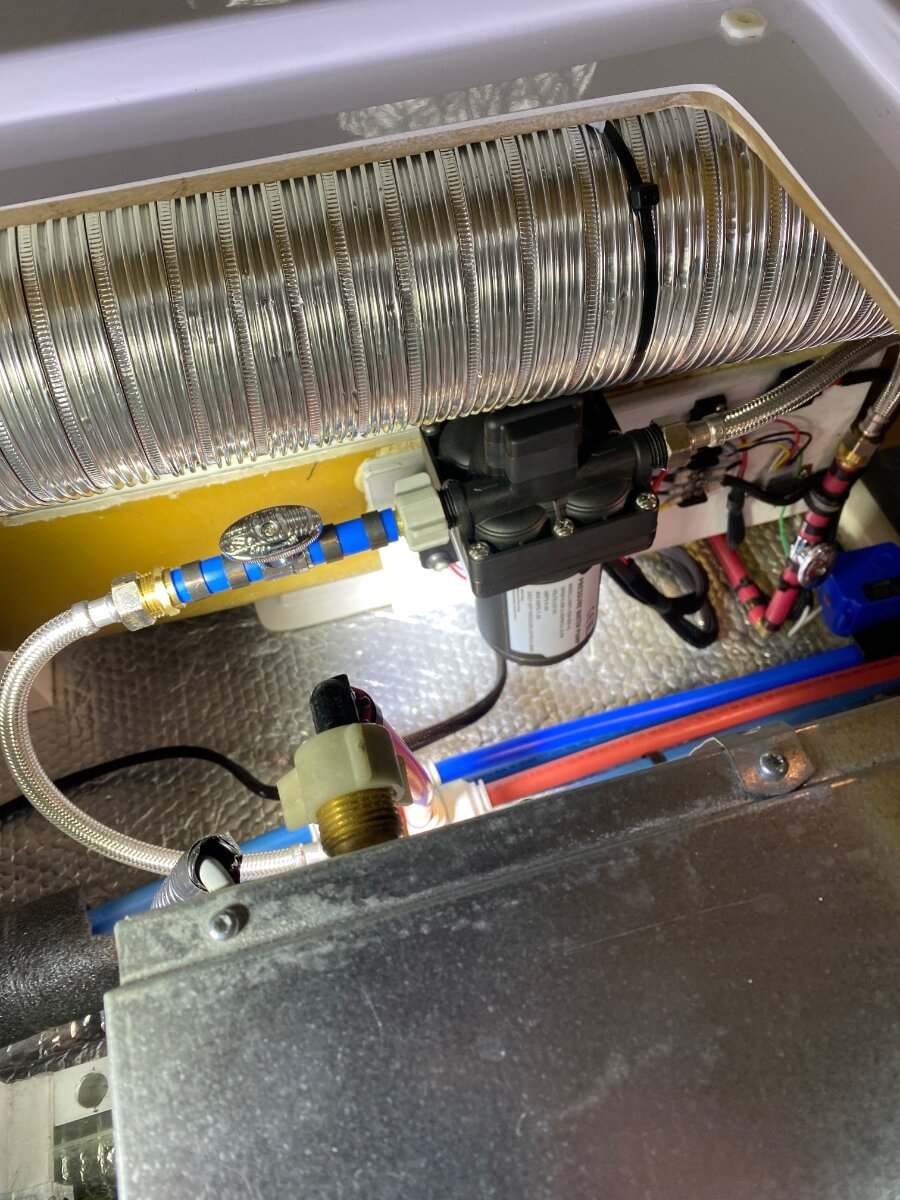
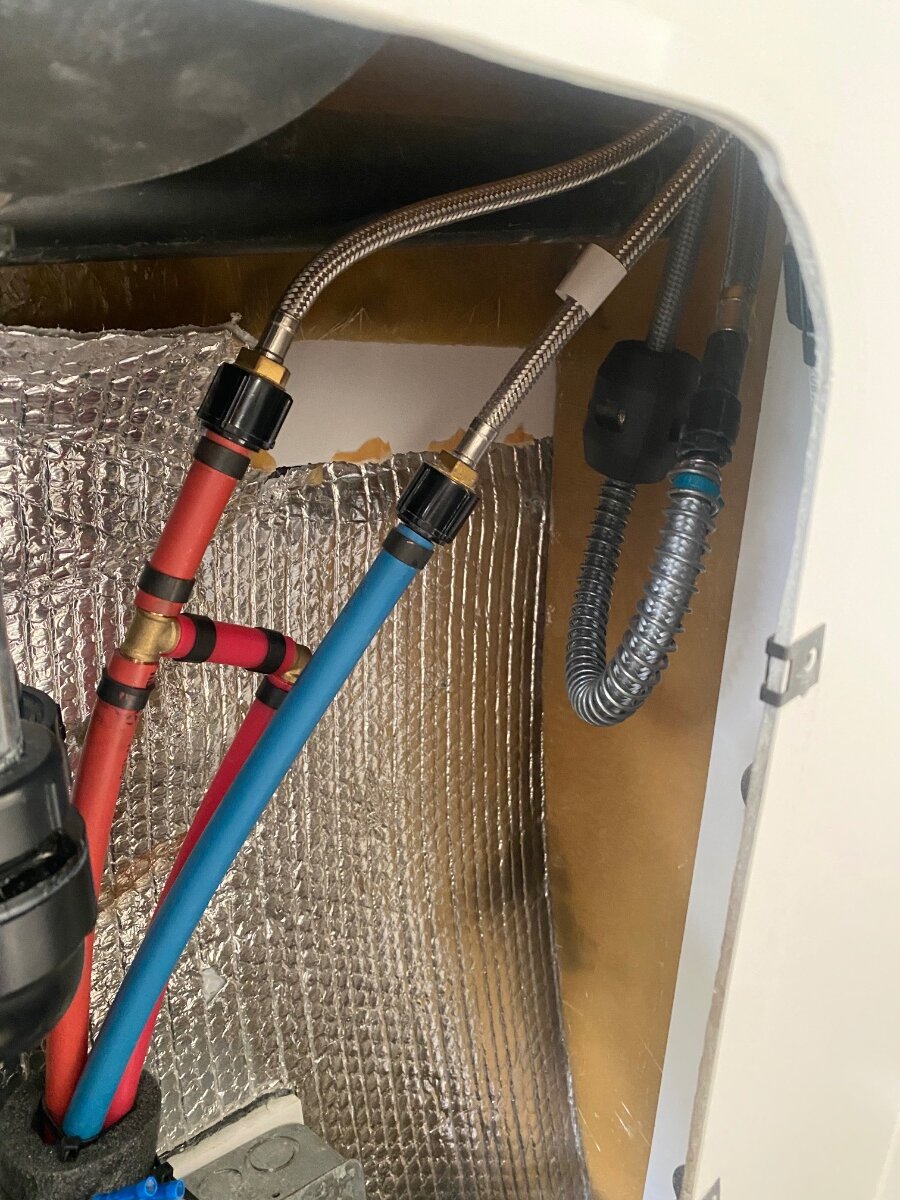
This is yet another modification for instant hot water. I was inspired by @Minnesota Oli who brilliantly installed a timed solenoid valve to circulate hot water from the bathroom faucet back to the freshwater tank. This saves from wasting water down the drain while waiting for it to get hot. I loved the concept of using a timer, but I went with a recirculating pump instead of a solenoid valve. We’ve used this design for about a year now, and it’s been very luxurious and effective. Not only does it help conserve fresh water, it prolongs the grey water tank volume which is now our most limiting factor when boondocking. The recirculation pump is started from momentary push button switches installed at each faucet. The button(s) activate a timer/relay that runs the pump for 25 seconds. Experimentation showed that 25 seconds sufficiently heats the pipes to deliver hot water at full temperature. The pump circulates the hot water back to the hot water heater, rather than into the fresh water tank. The new recirculation pump is the same model as the existing main pump. It was connected with flexible faucet hoses to reduce vibration and isolation valves so it can be used as a spare if needed. The pump was mounted on a plywood board fastened with construction glue to the vertical fiberglass surface by the furnace return vent. Note: Pump pressures can vary, so it might be necessary to slightly adjust the pump pressure switch to overcome the house pump pressure. Also, the pump may not overcome some of the higher city water pressures if a pressure regulator isn’t used. . . as it should be regardless. The Oliver has two separate hot water loops that I joined together so that the kitchen faucet is included in the recirculation loop. Being a shorter loop, there was less water wasted while waiting for it to get hot, but it's used more frequently so it's worth it to join the loops. There is plenty of room under the floor and behind the cabinets to run PEX return lines. “T” fittings were installed at the kitchen and bathroom faucets, and at the water heater input as shown on the drawing. Note: There was a buried 3-way valve, flexible by-pass hose, and a (clogged open) check-valve for water heater isolation. It was restricting flow and pinching the furnace duct so I completely removed it. The Water Heater can be easily isolated other ways if the need arises. The momentary push buttons were arbitrarily programed so that they must be depressed for one second before the pump will start. The buttons were non-intrusively mounted in 1/2” holes. The bathroom button is behind the existing bathroom pump switch, the kitchen button is above the sink, and the outdoor shower button is inside the shower wand enclosure. The sheathed button wiring is joined together under the street side bed along with the timer. I used terminal blocks, but wiring could be joined with any number of splicing methods. The button wiring carries no measurable voltage or current, it’s simply a switch to “low” (ground) for the timer trigger. Wire runs to the bathroom and outdoor shower switches are pretty straight forward, the bathroom vanity shelf needs to be removed for access. The kitchen switch wiring is laid under the liners in the upper cabinet, through the attic, and down the rear wall next to the clear AC drain tubing. I used a programmable timer/relay for the pump. An inexpensive (re-usable) Programer is also needed to program the timer. The Programer has built in App and Bluetooth for programing it on a smart phone and I’ve provided a screen shot of the program settings. This is truly simple to do, and quite fun! As many in this forum know, the Tuma Comfort II water heaters have a built-in circulation pump, controlled by temperature sensors, that keeps a small internal tank ready with hot water. Only one part (unavailable to public) differentiates it from the Truma Comfort II “Plus” that has a full hot water recirculating system. It took a few years, but I finally have the design details for that part and I’ll try to fabricate one when the Truma is removed for the up-coming factory recall work. More to come if I’m successful. The Truma “Plus” recirculation system provides true instant hot water (when not in Eco mode) because it keeps hot water circulating through the system based on temperature sensors. My system has a 25 second delay before the water is hot, then it cools down until the button is pushed again. This is less convenient, but more energy efficient because it doesn’t periodically cycle. I’m still on the fence which system is better, but fortunately the recirculation loop installed in this modification will work for both systems. Hope someone finds this useful! Cheers! Geoff Shopping list: Sureflow pump https://a.co/d/cSLUWEF 10 amp Timer/Relay https://a.co/d/g6C1zaZ Timer/Relay Programer https://a.co/d/9h1HtK6 Momentary switches https://a.co/d/i9wwhNs Terminal Blocks https://a.co/d/bkgrKhh Red PEX and fittings Flexible faucet hoses 1/4 turn valves
 8 points
 -
I think we were at Quartzsite some years ago camping next to Steve and Tali @ScubaRx and I was complaining that my black tank cable was getting difficult to pull out. Steve said to take it out, lube it and stick it back in. With that bit of technical instruction I did exactly that and problem solved. Mike2 points
-
Shouldn't be to difficult to replace if you do not have an inverter installed over top of it! Our valves and pull handles look to be original. An equal amount of patina on all parts. A friend of mine had suggested that the cables do not have to be removed. "Pull the cables all the way out and then apply silicone grease on the piston at the valve." And thank you Mike @Mike and Carol for describing your method. Glad to know the cable will go back in easy! I feared not. It should come out crusty black and dry! We got home yesterday from a week at Quartzsite, so both tanks are empty now and I rinsed the black until the water was crystal clear thinking valve replacement. I was liking two electric valves for $400 plus labor, but the labor on the gray valve just got to be too much. I have time to work on it this week and this has become a priority. I'll start with the black tank valve under the front dinette seat, since I can get to it easily and see if I can improve the action. Given that works well enough, I'll hope I can reach around and under the inverter to get some grease on the other valve and hope with a mirror I can see the set screw for the cable. It's odd that our hardest one to pull & push is the 1 1/2" gray valve, handle below the toilet. So is the longer cable really the issue? I will replace this one with electric even if I cannot on the two 3" valves. It will be great to remove the ugly pull handle in the bathroom and better yet if I can install the electric switch so it can be reached when standing at the Oliver entrance. For some reason the Valterra 1 1/2" electric valve costs more than the 3" model. I found one, only one left, with a seller on Walmart.com for $198. Most sellers state "out of stock" and etrailer has them for more $$$. Will keep y'all posted... https://www.etrailer.com/RV-Waste-Valves/Valterra/VAL55MB.html2 points
-
I sent a message asking the folks at RV Trip wizard if they had a feature to overlay multiple trips on one map...and they said no but to try exporting to Google Maps and using layers....here's a result as an example of what's possible, I'm still learning. So Google Maps allows direct import of the .gpx files that are output by RV Trip wizard. Normally the .gpx are used to load into Garmin devices, but Google Maps reads them as well. I started by opening up a new map in Google Maps created "My Map" as a BASE map with the first 2019 trip where we picked up the trailer, and added a layer for each subsequent main trip. I found that 6 is the maximum number of individual layers you can add in Google Maps. There are controls to change the type of marker, color, line width etc. There are also controls to turn on/off the titles for each stop. To create more graphic maps, Google enables embedding photos by geotag into the maps as well. I'm considering adding pictures of each campsite for each stop to see if it's at all useful. The map below lets us see big holes in our travel...so we've still got miles to go before we sleep! Craig & Rose Hull 505 - Galway Girl
1 point
-
Dunno what it means that Oliver Service recommends replacing with electric if lubing is a lasting fix. One would think if all that long cable needs is a bit of lube to function smoothly for a good long time, they would have lived it at the factory. Regardless, the behaviour of mine (pull out - very hard, push in - very easy) tells me that there’s more to this issue than lack of lubrication on the cable or valve gate itself. Again - have worked with similar cable before and not been satisfied with temporary fixes. Anyway, I still have the original valve, cable, and pull handle in place, so I can play around with trying to lube the cable and use it if my electric fails. (Though the electric valve already has a manual T handle.)1 point
-
Ron, your installation is exceptional! I may be wrong (like my previous assumption) but I think the DC-DC charger would sense the alternator is not running, not pull current from the starter battery by sensing voltage (not near 14V, instead under 13V). If not, why have a DC-DC charger vs. a hardwire connection of starter to house batteries? Yours is safer (redundancy being a good design principle). I was first thinking ANL. John showed me the resettable fuses last week. I had not seen these used in automotive applications before. They did not look to be substantial in design. I went with Marine MRBF instead since they should make for a simpler installation than mounting an ANL holder. https://www.amazon.com/dp/B0BR4X7ZP5?ref=fed_asin_title&th=1 I still feel, yet there is considerable contrary opinion here, that the frame ground is as good as running another 20 ft of 4 AWG copper. I will also wire short redundant 4 AWG leads from the battery + directly to the alternator and from the battery - to the front of the frame. We'll see how many amps I get in and out of the Orion XS 50A DC-DC charger. Hoping to get mine installed next weekend! 😂 Of course, I will author a post on my installation with pictures.1 point
-
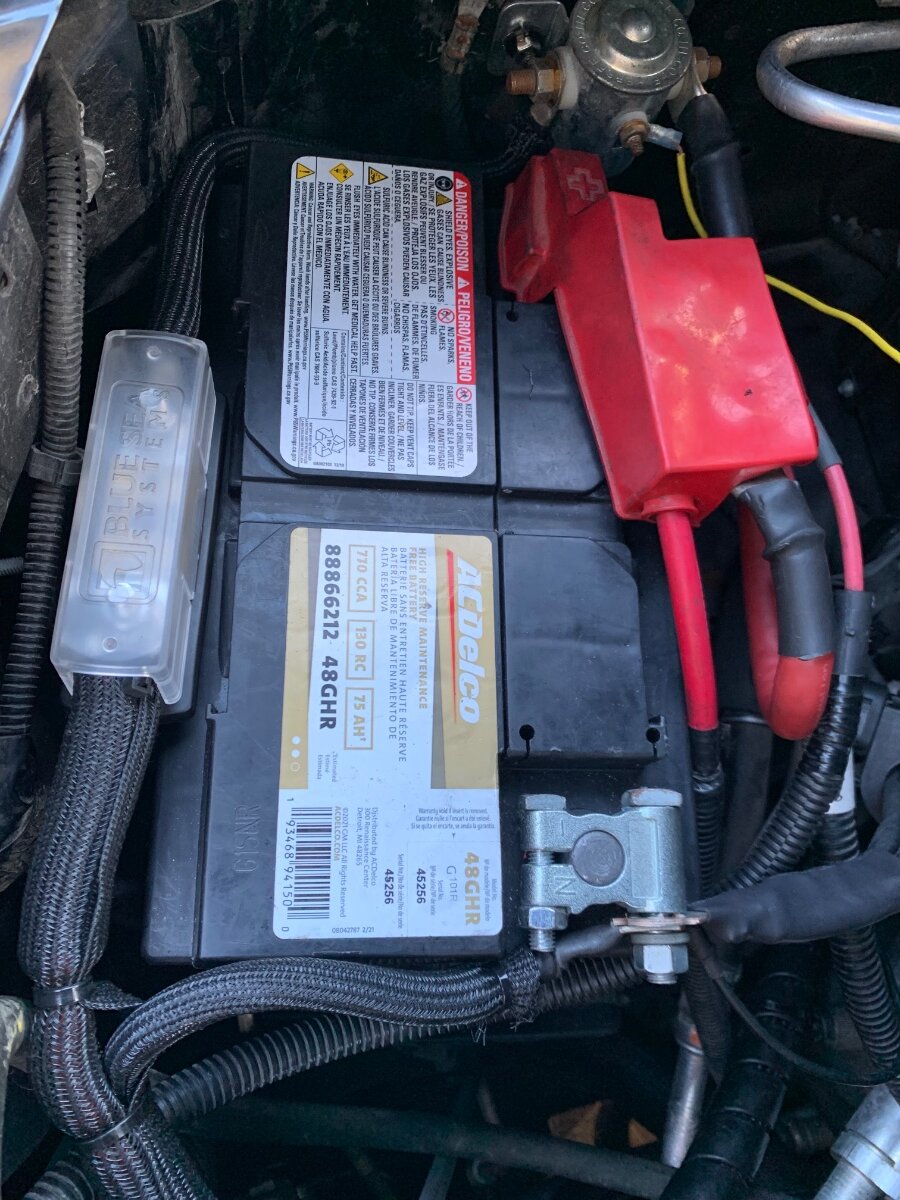
Initially I installed a ‘resettable’ fuse, but found at times it to trip due to excessive under hood temps during the hotter months of the year. I now use an ANL setup, specifically an ANL Blue Sea Systems 5005 fuse block with insulating cover and 60A fuse. Problem solved! Also, note the solenoid mounted next to the battery. I did not want current powering the DC-DC charger when the Anderson was connected and the TV motor was not running. I also opted to run a negative cable from the bumper-mounted Anderson to the TV B-, rather than a ground-to-frame. Yes, an added cost and measure, but to me the best alternative to ensure optimum performance of my DC-DC setup. I can also utilize this Anderson to power my VIAIR portable air compressor and Dometic dual zone refrigerator/freezer, as necessary. The dedicated DC-DC trailer cable’s Anderson must be connected to the corresponding connector on the TV to power the charger.
1 point
-
I just purchased this tool. Don't know how to test for accuracy, but it seems to work well. It's well made, small and easy to carry and use. Problem I see is you really need to know tongue weight divided by trailer weight to see if you are in the 10-15% range.1 point
-
Thanks, JD, I hooked the Andersens together and voila, the charger powered up and became discoverable. It detected zero charging as the truck was not running and after startup the charging parameters showed readings and then I put in the remote on/off link and all seems to be operational :) It was defaulted to lifepo4 batteries...yay!1 point
-
We were brought up with the Illinois Toll Road from the early 70s through the late 90s when we moved out of state. If you didn't have coins, you had to wait in the long line with cash. When our son was young he called it "money basketball." Don't miss! Had the Texas Tag for a decade and the Sun Pass for 4 years after that. We closed those accounts when we moved back to AZ! Have NONE today and much prefer it that way. Aren't we taxed enough?! We traveled from home to the Texas Rally traveling 90% off the Interstates, and no tollways. The backroads are better, state and county highways, while taking your time on your next Oliver trip!1 point
-
Beautiful truck will be here soon. Sounds awesome on paper but as you stated the range would be cut in half towing, from what I understand. Hybrid tech is enticing but personally will hold out for full electric with longer tow range. We will get there one day when there is a large enough battery bank on the TT for highway range assist. Power assist and brake regeneration if it has its own electric motors powering the wheels, as well. Then we can get out and park it with an app on the iPhone or better yet it will park itself using AI and cameras! Awesome specs: The Ramcharger has a 3.6L V6 engine and a 92-kilowatt-hour battery pack. Over 600 HP and torque. Tows 15k pounds! It also has a 130-kilowatt generator on board. The Ramcharger has a dual-motor, all-wheel-drive system. The Ramcharger has a payload capacity of 2,625 pounds. The Ramcharger has a 0-60 time of 4.4 seconds. The Ramcharger has a four-corner active leveling air suspension system. WOW! The RAM hybrid is awesome. The future is interesting and the truck is very cool but the range limitations and cost will have me sitting on the sideline watching. I have a 2016 Tundra with 145K miles on it and after 9 years of towing with it, it is still running like a sewing machine. Now that is value to me. Hope for 145K more. Took me this long to do all the upgrade to it. Ha1 point
-
We had a 2019 Ram 1500 Longhorn Laramie with 5.7 Gas E-torque engine. It had air suspension too. It had all the bells and whistles although we didn't use them all. The issue we had was payload with the 1/2 ton. We knew that we wanted to make longer trips and wanted to have our Weber Grill, then a Q1200, and stand, plus a small griddle someone gave us, plus generator, Clam quickset, and assorted other gear, plus my golf clubs. We wanted to have extra clothing for longer trips to be able to do seasonal changes. We only had 400lbs of payload after, my wife, myself, a forty pound dog, and a couple of back packs after connecting the Oliver LEII which had a tongue weight of about 700lbs. It really meant we had to keep too many items in the aisle that we had to transfer in and out of the Oliver before and after we traveled to the next campground. The E-torque was sweet and allowed us to have increased low end torque for pull outs onto the highway and starts from red lights and stop signs. We did love the Ram, so we eventually traded it for a 2021 Ram 2500 with 6.4L Gas engine. We have air suspension on this truck too. We have over 1300lbs of additional payload over and above what we had on the fully loaded Ram 1500. We love our current truck, but the 1500 with E-torque got better mileage and the engine would completely cycle off at long stops if we weren't towing and just traveling in and about town.1 point
-
Just in case, before you install an electric valve: If you disconnect the cable from the existing valve does the cable pull out of its sheath easily? If so, the resistance might be in the valve itself. That happened to us. Valve lubricant worked for a while but the valve eventually leaked and had to be replaced. Still cheaper than an electric valve and less to go wrong in the future. (Electric gate valves add a motor and wiring to a previously simple system.)1 point
-
@Al T from Alberta I missed this when originally posted. Beautiful wrap on the Oliver, and beautiful bikes! Are those Santana titanium? I tried for years to get Deb to ride a tandem, since we ride at such disparate speeds. She's a slow gawker, and I try to at least get my heart rate above couch mode. After getting the Oliver, we got a pair of Gazelle bikes, so now she at least keeps up with the folks walking trails... 🤣 The same applies when kayaking, but there's no way I'd get in the same boat with her, else the sobriquet "divorce boat" would definitely apply. That is, if we both made it to shore alive! 🤬1 point
-
Truck/trailer living up to their promises. Here's pics of our mounted bikes (test fitting carriers before paint), the vinyl wrap we dressed our trailer up with and our trailer at...the physical location captured on the wrap!
1 point
-
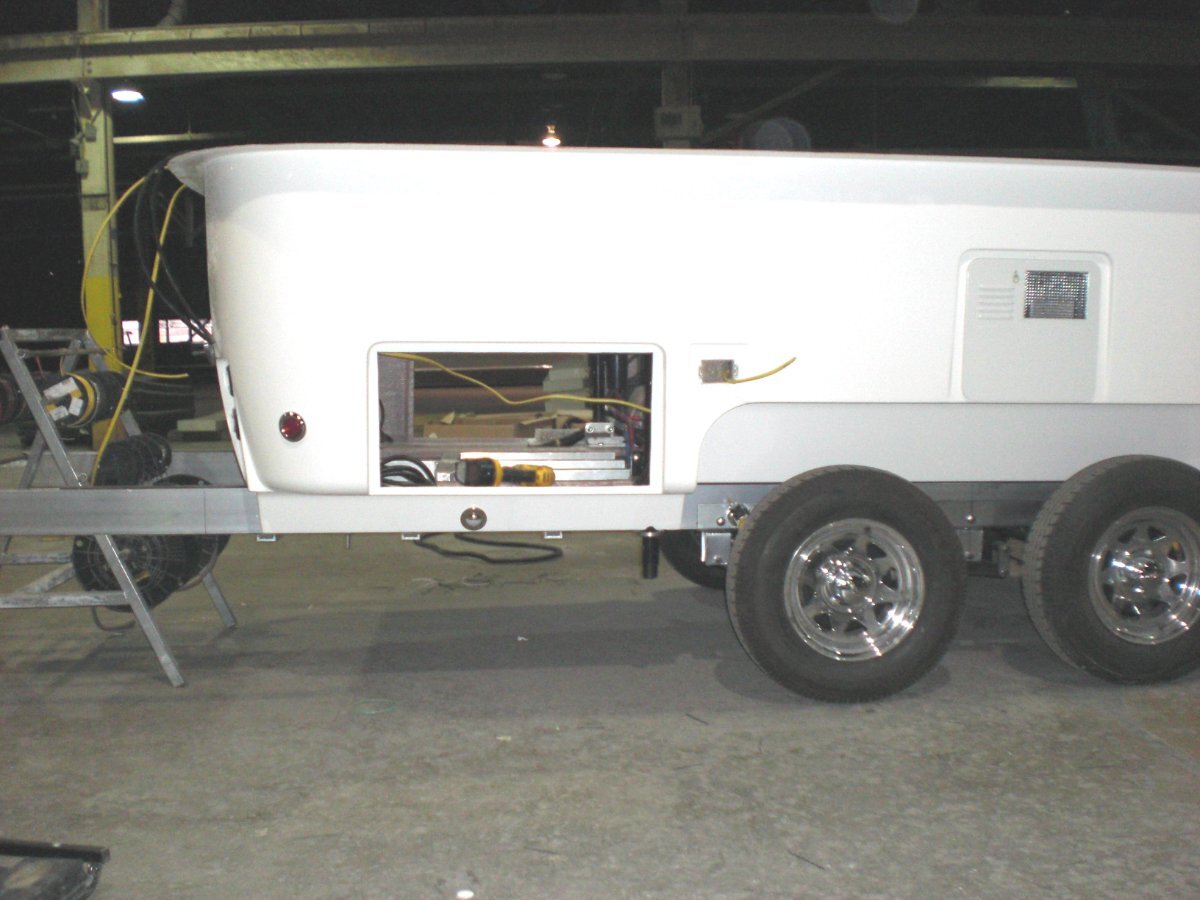
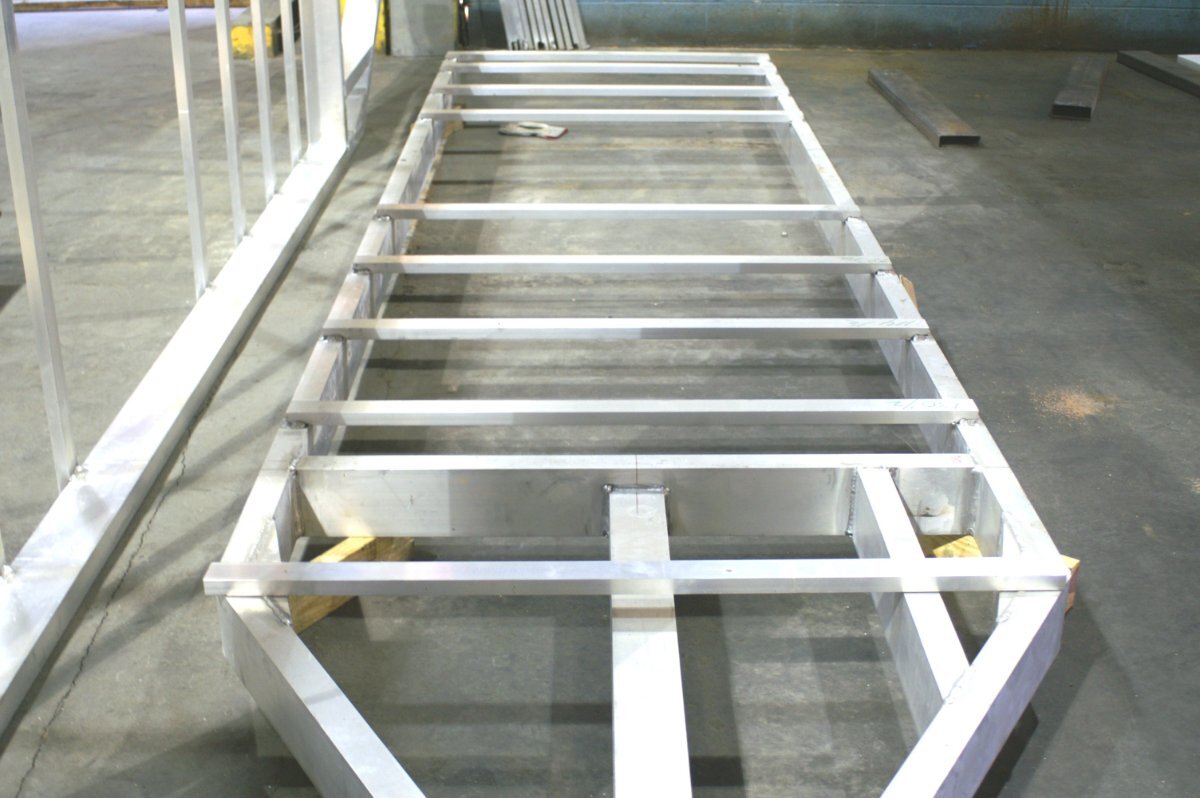
No, but originally there were only four. Like mine, the belly behind the axles started to sag and more were added. Yours was likely repaired prior to your acquisition. You are correct that the frame's were shorter and the bumpers were almost flush with the back of the hull when the first two 22 footers were built in 2008-2009. They were likely done this way because that's the way the 17 foot Elite rear storage area had been designed. In 2014, after the hiatus, the decision was made to lengthen the frame on both the models. This was done for looks and since there was no other fiberglass travel trailer this big it made for good marketing. The length of a travel trailer is defined by the distance from the tip of the hitch to the back of the bumper, so the 17 foot Elite became 18.5 feet long and the 22 footer became 23.5 feet long and was finally given an official name, becoming the Elite II. Even though the rear of the frame was lengthened by 1.5 feet the number of cross members remained the same as before. This 22 foot trailer were built during late 2008 and early 2009 although it was not sold right away. Another unit was built for Jim Oliver and it was completed. He named it "The beast". A third unit was planned but the company decided to shutter the trailer line and it was never started. Here are a few construction pictures taken during that time period. Some were taken by myself and some by Robert Partee, the sales manager at the time. Here you can plainly see the frame rails extending far beyond the rear of the body and the cross members welded below the belly.
1 point
-
"He" in the quote above, being Jim Oliver, is a great "new" frame of reference for the ruggedness factor (if there's such a thing) of our trailers. Thanks for mentioning that, Steve.1 point
-
And did Oliver account for an opposite force when we take our trailers to the southern hemisphere. A lot of us want to explore Australia with our trailers and we need to know how Oliver designed the frame. 😂🤣 John1 point
-
I agree Max all great points, Comparing visually just a few early model weld photos to my welds on XPLOR there is a vast difference in the appearance of the skill level of the welder and his craft. I really don’t see this being an issue with later model Oliver’s. I have not heard or read about any cracked welds on the newer Olivers. Oliver TT clearly recognized the need for higher quality welds early on and improved on this with a much better weld. Good on Oliver! All this said it is imperative that owners inspect and maintain ALL areas of their Oliver. Olivers are extremely well engineered and well built in my owner experience. Oliver has continued and will continue to make improvements through the years. If I ever end up with a cracked weld I will simply have it fixed. I know I still own the best TT made in the USA. 🇺🇸 With so few trailers impacted, I am not sure how much more we can beat this dead horse. 😄 Happy Camping!!
1 point
-
(Copied and pasted from the leaf spring thread): Regarding frame cross member welds - visually inspected all yesterday and photographed each weld to set a baseline for our records. All good. I'm suspecting that the broken welds reported could be caused by an inexperienced welder at the factory - an anomaly and not a design flaw. I also suspect that Oliver engineers designed the frame to withstand "normal" usage (that may be difficult to define, however). Like other owners, we routinely, yet carefully, travel over unpaved and unimproved roads with a full fresh (empty black/gray) tank without issue - I believe this practice is within the design limitations of the trailer. We'll definitely keep inspecting the cross members after such trips, however... Thoughts?1 point
-
Good point, thus far I have not contacted Oliver about this but your advice is well taken. I will add this in all fairness, we have owned this TT for 9 years, some 25K miles and driven many backroads in that time and this is the first time we experienced this failure. However I still stand behind my previous comment, this is a poor design for its intended use. Like you we also camp most of the time where fresh water is not available, and just as important its deep backcountry for our adventures which requires gravel backcountry roads. Thanks1 point
-
The first thing welder said was, "That wouldn't be an LP line, would it?" I said, "Yeah, the tanks are off and I released the gas in the line." and he proceeded without worry. There is a little kink in the line, as you can see front of the T, but it holds pressure, so I left it as-is. Yes John, good observation. The vertical line is right there, going up to the kitchen (edit: Furnace and HWH) which could have been damaged. We camped 3 days, just after fixing this and if there was an interior leak, I certainly would have smelled it. I would think it would be difficult to eyeball/follow that line along its entire length. No sag, no fiberglass damage visible. CRM and rideandfly, thanks for your comments. I'll bet there will be a couple hundred OTT owners getting under their frames this week!1 point
-
Bent / sagging crossbeams I have a related issue with some frame crossbeams. I have four and maybe more crossbeams that are sagging (have a belly in the middle). When putting a straight piece of bar stock across the bottom of the trailer's crossbeams, you can see about one inch +/- bow / belly in these crossbeams. Interesting that the beams that are bent are located in the front 1/3 of the trailer ( behind the bathroom and in front of the axles) and the back 1/3 (behind the axles and in front of for the cabinet between the twin beds. The bent crossbars have no apparent other damage other than the belly. I am a big guy, regardless these beams should not be bent. Does anyone have knowledge or experience with bent crossbeams?0 points
-
@rideandfly bummer but at least yours has not completely come apart… yet. Had a busy week and have not had the time to get mine repaired but did some research on aluminum welding. As you might guess opinions are all over the place from boat builders in Australia using adhesives instead of welding to TIG welding and other methods. There seems to be a lot of concern with aluminum welding weakening the material. I don't have an opinion yet but the Aussie who builds aluminum boats using adhesives really caught my attention. The big question now is, how many more of these broken welds are running around out there being unnoticed? Thanks and good luck with the repair.0 points


-
Recent Achievements
-


")