Leaderboard


Popular Content
Showing content with the highest reputation on 03/28/2025 in all areas
-
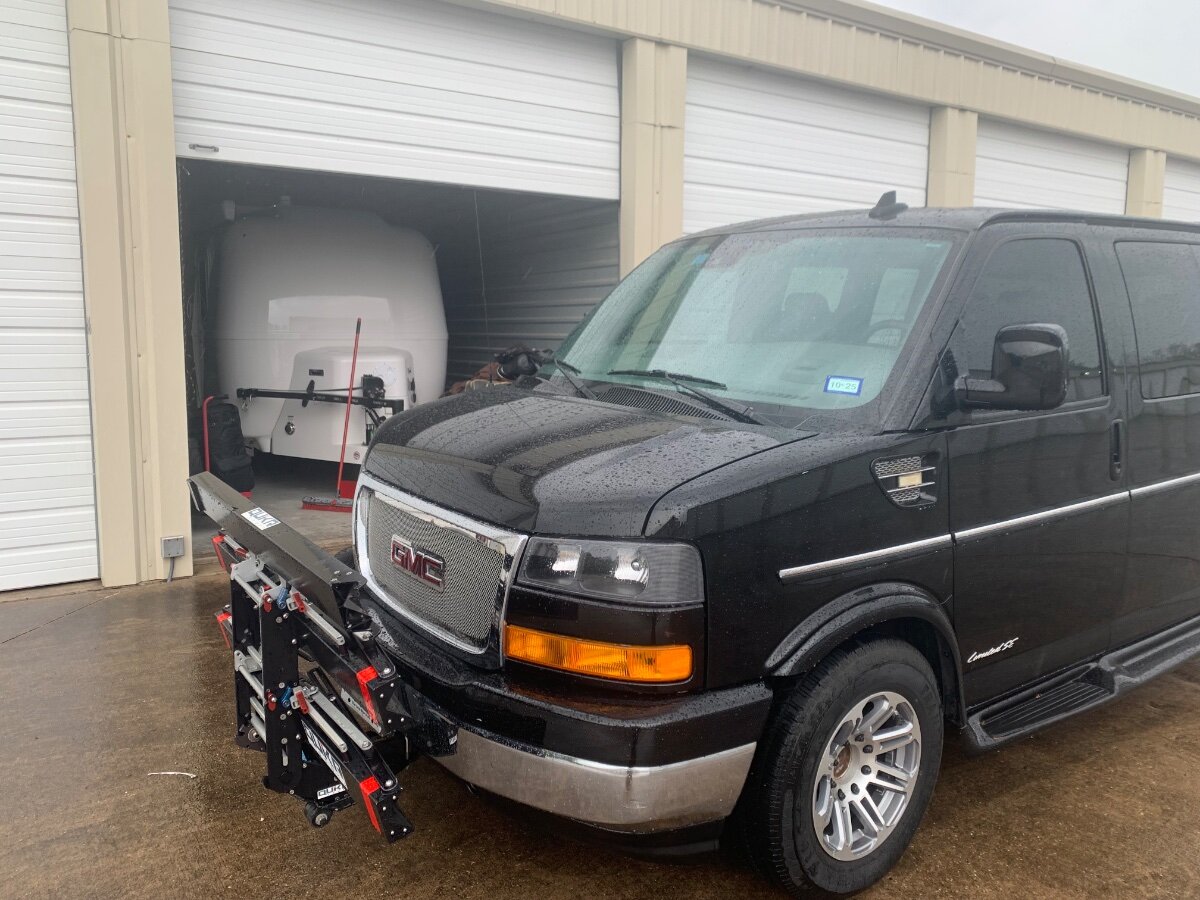
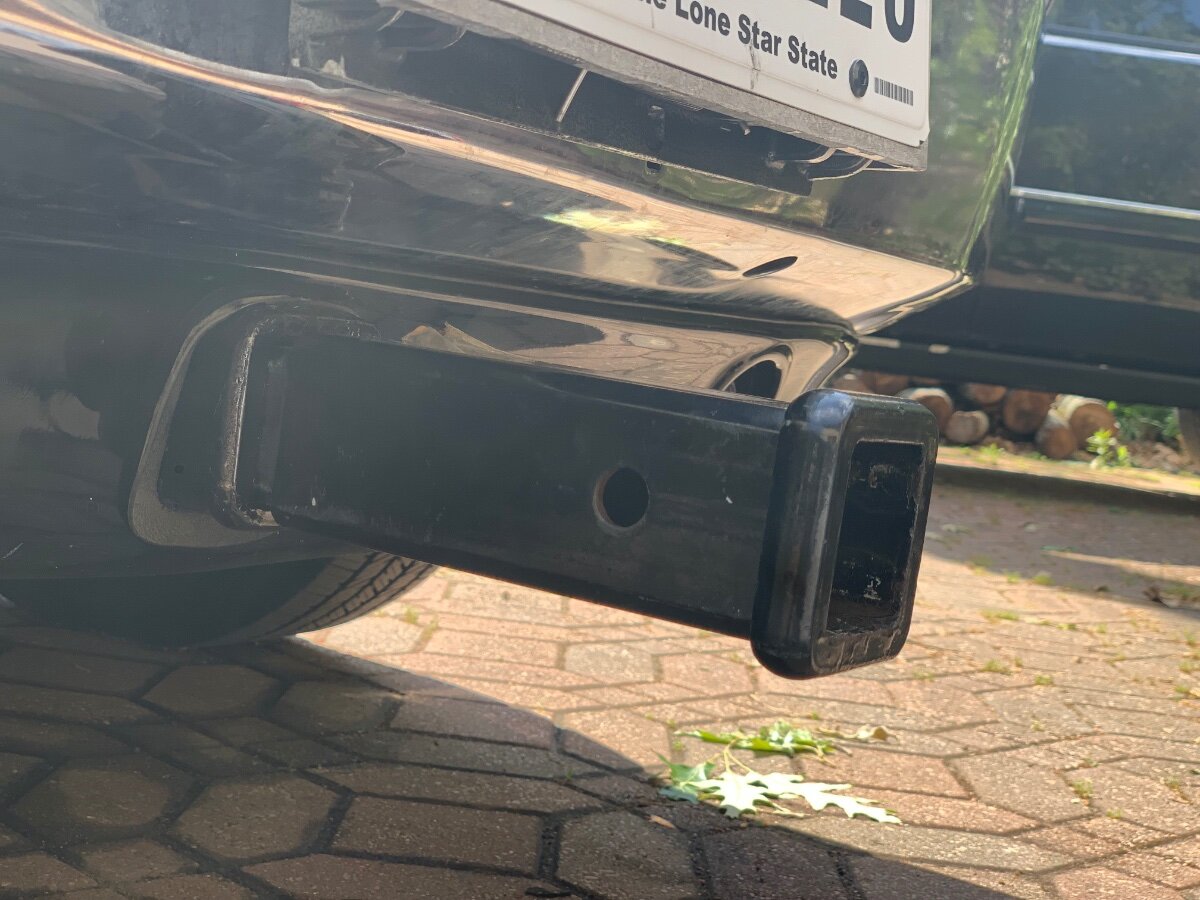
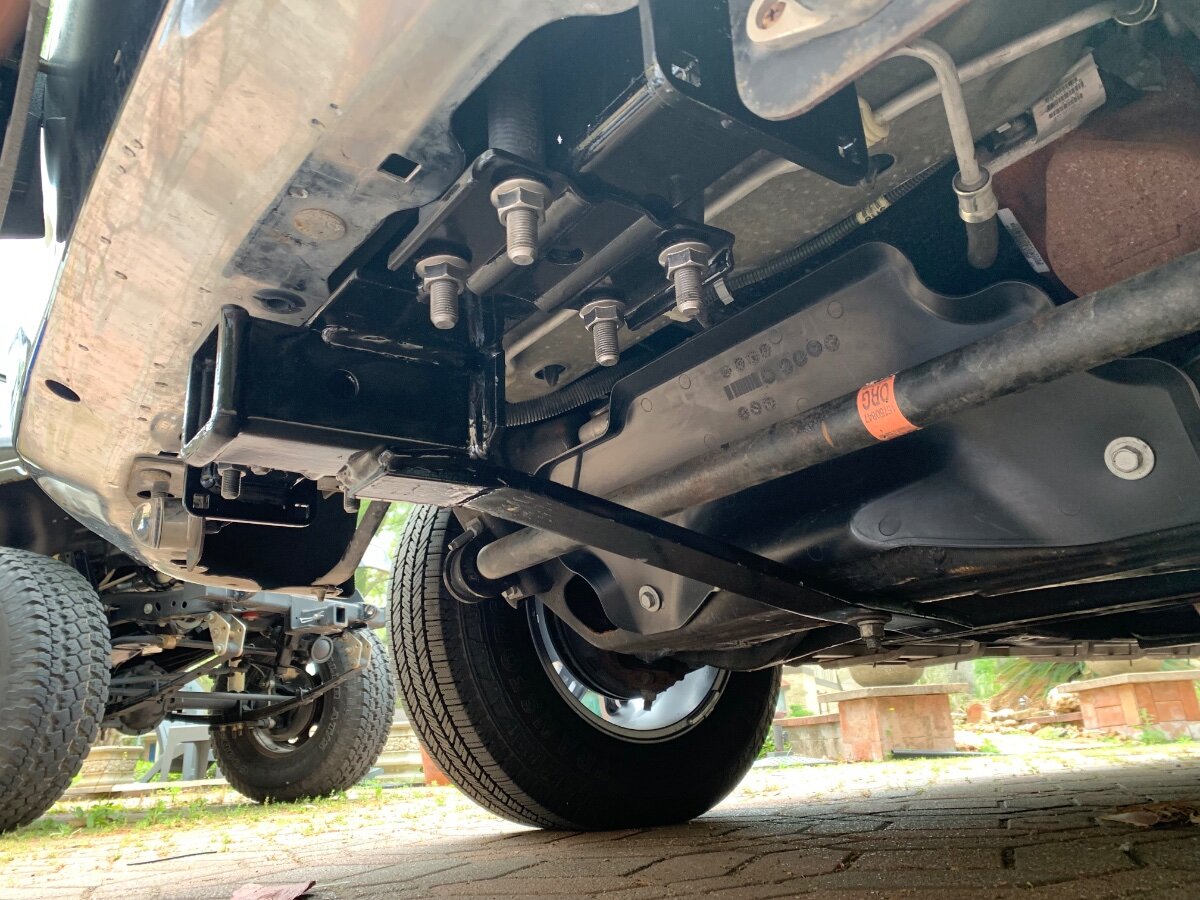
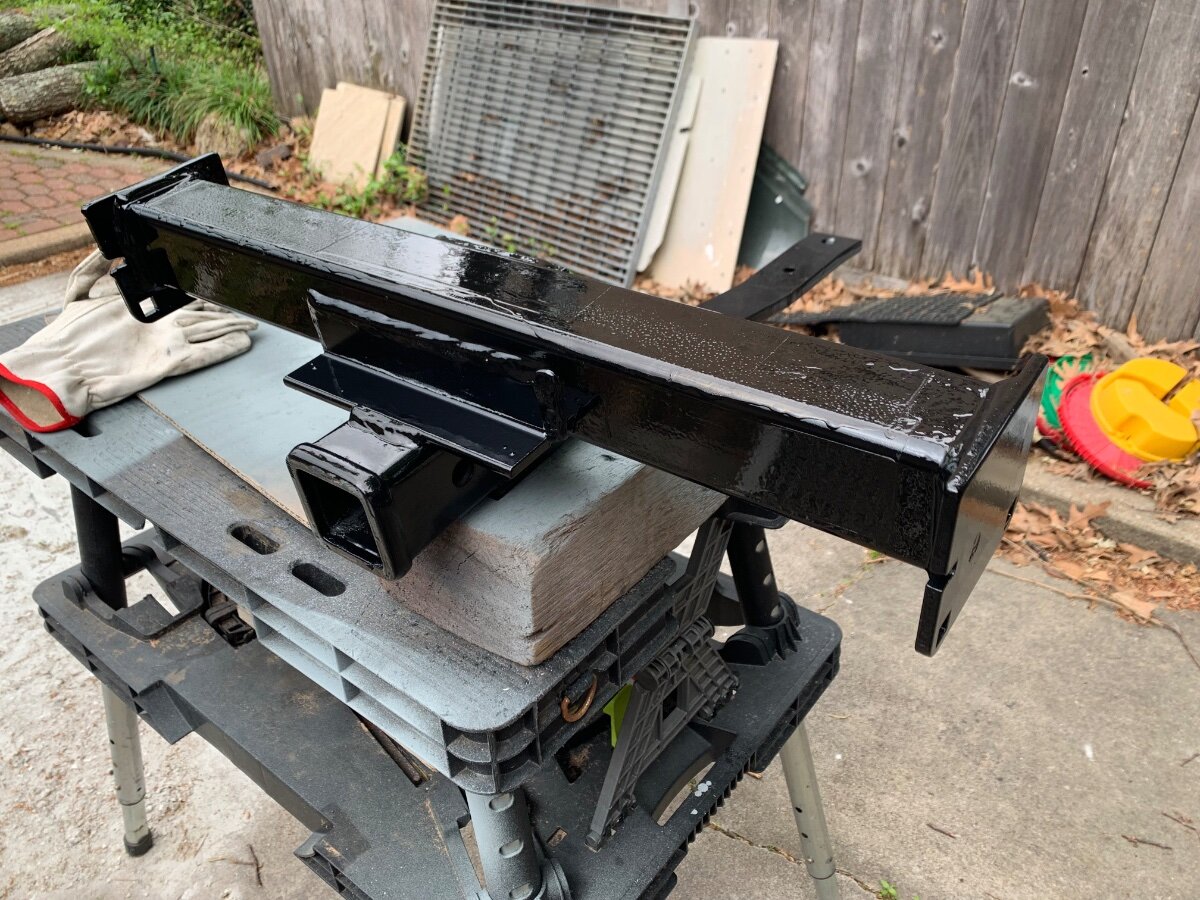
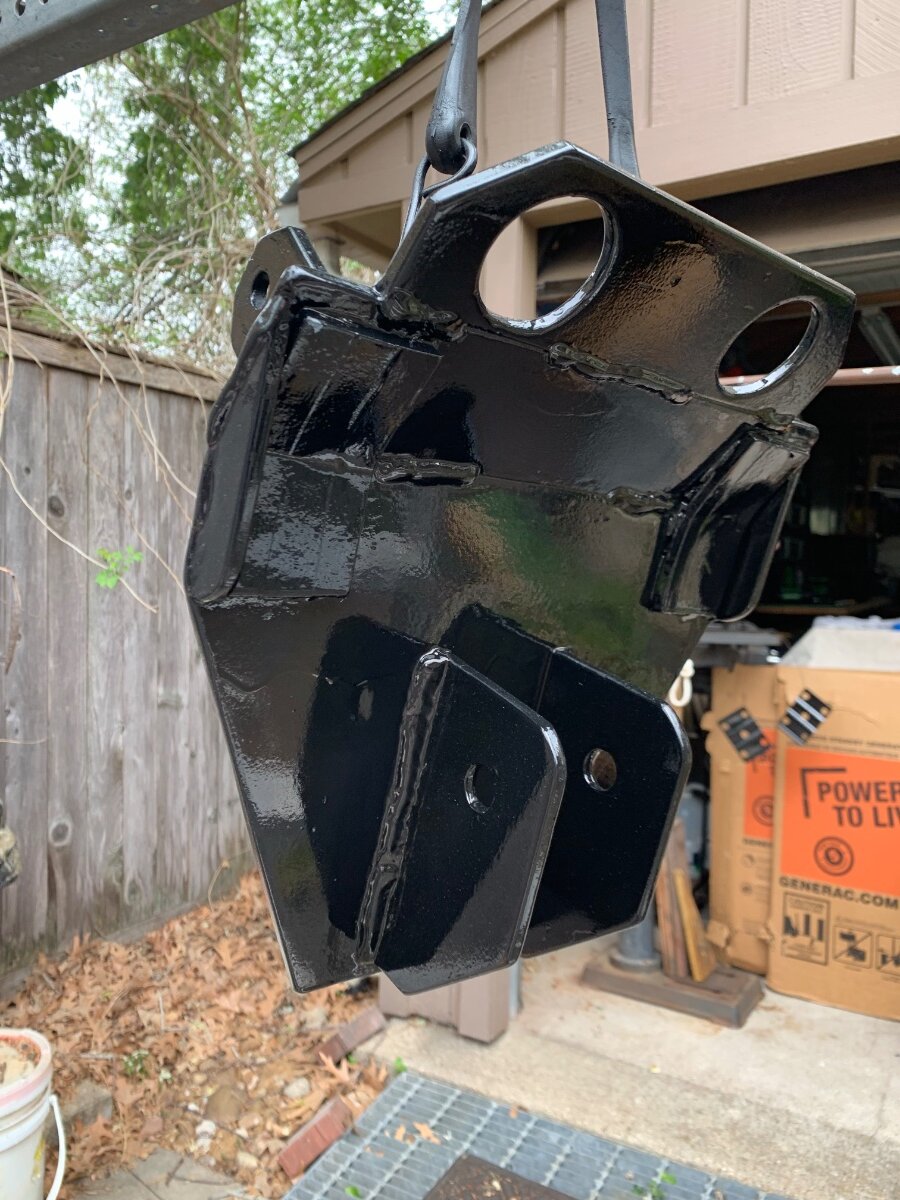
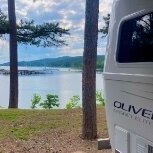
A few days ago I completed an installation of a front receiver hitch on the Savana. I previously installed same on the Silverado, specifically to carry a bike rack when underway for use with our folding ebikes once in camp, and liked its functionality. However, no such hitch was found available for the van and thus, removal and modification of the one that was on the former TV was in order. Once a mounting plan was devised for proper fitment and securement, necessary cutting, shaping, welding and painting was done. Modifications in progress. Hitch readied for install. U-bolt and plate securement. Front spoiler remounted with thru-hole, hitch extension installed. Formerly fabricated roller skid plate I made to protect the bike rack got new paint job. Savana sporting hitch/skid plate and QuikrStuff dual bike rack with ramp.
 2 points
 -
New Mexico camping New Mexico Free Camping I know this thread is rather old , But I wanted to share this I am planning a trip to New Mexico and I stumbled across this YouTuber that has quite a bit of New Mexico content the videos are not that spectacular but the information is detailed see you out there edit ( added New Mexico Free Camping )1 point
-
Just so I’m sure, if I get the 60amp, instead of the 120 amp Victron, it will take 2x as long to charge them. Thanks for clarifying this.1 point
-
Great advice, and the reason we travel with a sizable dual zone cooler; mostly intended for overflow, but on rare occasion as a backup!
1 point
-
In my experience, don't get complacent. Your 2017 probably has a dometic. The bang it/push method may last a few months, or a year. For us, off and on, one six month camping season. At this point, please consider what type of fridge you want as a replacement, and do the swap off season. Then again, you might just be lucky, and some erosion on the panel knocked off. Just be prepared. Coolers, at ready.1 point
-
And, there is the rub.1 point
-
another thread to read, recently. You are not alone. We just want everyone to he safe, and happy.1 point
-
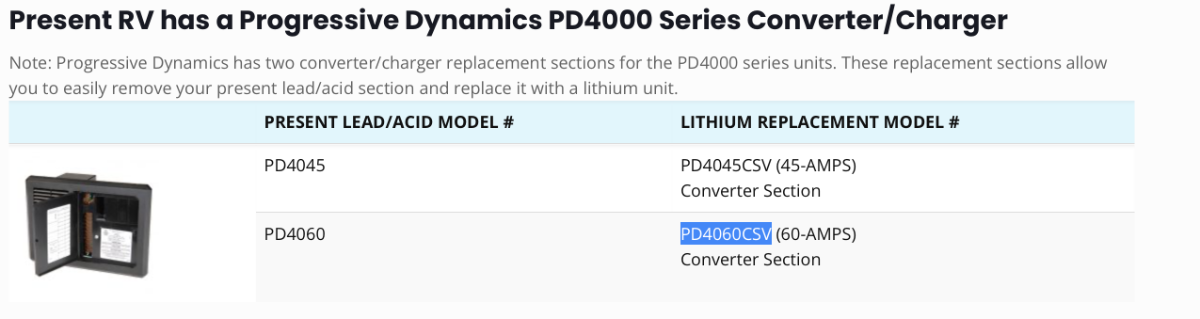
If your current PD4000 Charging board does not have the AGM/Lithium Jumper setting, the PD4000 Series Lithium converter upgrade board is available via E-Trailer. Please check which original converter board you have....60Amp or 45 Amp. (ours was 60Amp) To upgrade your trailer if you have a 45Amp board, stick with the 45AMP LI plug in...if you have 60Amp board, then use 60amp LI version. (Safety for wires is important.) This upgrade only takes about 30 minutes to complete. Here's the overview link to the Progressive dynamics site that shows the lithium replacement part number. https://www.progressivedyn.com/lithium-converter-replacement-units/ Snip from that page: E-Trailer has both boards available. 45 Amp Version https://www.etrailer.com/Accessories-and-Parts/Progressive-Dynamics/PD4045CSV.html?feed=npn&gad_source=1&gbraid=0AAAAAD_vMtnZsg_-Is9SAt6Ew5v33GB0V&gclid=EAIaIQobChMIpem7gN-qjAMVpiytBh3oeBfeEAQYASABEgLqC_D_BwE 60 Amp Version https://www.etrailer.com/Accessories-and-Parts/Progressive-Dynamics/PD4060CSV.html?feed=npn&gad_source=1&gbraid=0AAAAAD_vMtnZsg_-Is9SAt6Ew5v33GB0V&gclid=EAIaIQobChMIi-LJ9N-qjAMVY83CBB3qGQb2EAQYASABEgK0DvD_BwE One big difference between the bigger victron or xantrex charger/inverters is that they charge the batteries at >120Amp output...so faster charging. But you spend a lot more for functions you already have in your trailer. Often the simple path is often the best....with a simple plug in board upgrade and new LI batteries you'll be served for many years. Craig
1 point
-
First, I would say it would be easy to get help from friends at the rally for replacing batteries. A full inverter mod, the custom work of mounting the very LARGE Victron Multiplus II, stripping our all Xantrex parts (ATS and junction box) and related wiring changes may be a lot to accomplish at a campsite! I ran in and out of my garage/workshop 100 times while doing mine for tools and 4-5 trips to Depot or Lowes for hardware over a two-week period of time. If you study the mod threads, plan really well in purchasing parts, get very ready, have a lot of patience (new friends too), maybe, good luck! 🤣 You want the 12V inverter and do not need the UL-certified model (required by code for home installations only). I went with Inverter Supply for these parts for free shipping and no sales tax (see picture). You NEED the VE.bus to configure the Victron for charger/battery spec settings. There are two models (I purchased the USB-C model and there is also USB, depends on the laptop you would use to setup). You need an Ethernet cable also to connect the VE.bus to the Victron MP2. There are YouTube videos showing the configuration steps. You also posted pictures showing the Progressive Industries ATS (Automatic Transfer Switch) and the display which shows the readout of shore power stats. The ATS switches between the two shore power sources (side outlet and front outlet usually for generator in front basket). This will not change but the power coming out of the ATS, connecting to the 120VAC breaker panel has to be replaced with new 10-3 AWG cables to go to the inverter and back to the breaker panel (buy 15 ft to be safe, I used about 12 ft, it runs from streetside bed basement where our new inverter was installed up to the breaker panel under the rear dinette). The Victron MP2 has dual terminal bolts on both + and - sides. I ran the 4/0 battery cables, from batteries directly to the Victron MP2, removed from the 2KW Xantrex (I had the same older model) and all secondary 6 AWG cables that OTT had on the batteries, I also bolted to the Victron bus vs. out to the batteries. If you get this all done at the rally, that will be a great story! Take pictures and post...
1 point
-
Thank you SeaDawg and all. I agree and there are all kind of opportunity where replacing the batteries can go wrong. Like moving the batteries out etc. A lot to consider here. I will get an expert to do it.1 point
-
When you turn the agitator and the compost feels stiffer than when first used, add water a cup or so at a time. It needs to be moist, not soggy. YouTube has good videos on the topic.1 point
-
Why not just use the city water connection to flush all the lines? Then all the flush water will go into the gray tank. Also you don’t have to run your pump. Some folks (myself included) will sometimes overthink a simple issue. Oliver dropped the ball on this one.1 point
-
@Imelda, to begin with you only need 2 (or even one) 12v lifepo4 batteries to replace x4 6v batteries. Your 6v batteries were wired to create 12v power.(first in series, then parallel.) If you don't understand this, and many don't. , I'd highly suggest that you a) go to the rally, and enlist the help of the many who have volunteered above or b) hire a local rv tech to install new battery(ies) and create additional important wiring connections. Imo, there is no real thing that is a "drop in" lifepo4 battery. Especially in your case, wired for 4 x 6 v batteries. You have done so many great projects on your own. But, this is critical. Loose, or improperly sized, or small wire diameter can cause a fire. Improper settings, or incorrect charging equipment can shorten the life, or disable new batteries, at the most inconvenient time. We have a lot of people on the forum who have "done their own" with lithium, but they have some extensive study and engineering and/or electrical background, including us. I've never heard of the second battety you posted. Imo, battleborn is great, and highly overpriced, but great customer service.. Please take some time, and continue to discuss here.1 point
-
I have a tractor with a front loader bucket so I was thinking of sliding the old 6V batteries from the storage compartment onto the tractor bucket at the same height and getting the new ones on that way. If all else fails then get a neighbor.1 point
-
Just spoke with Truma Support, they suspected decalcification was needed.i did not receive the standard filter when I purchased from the original owner. To my knowledge the system has never been decalcified. The tech also mentioned that it could be propane related, but was more inclined to suspect calcification.1 point
-
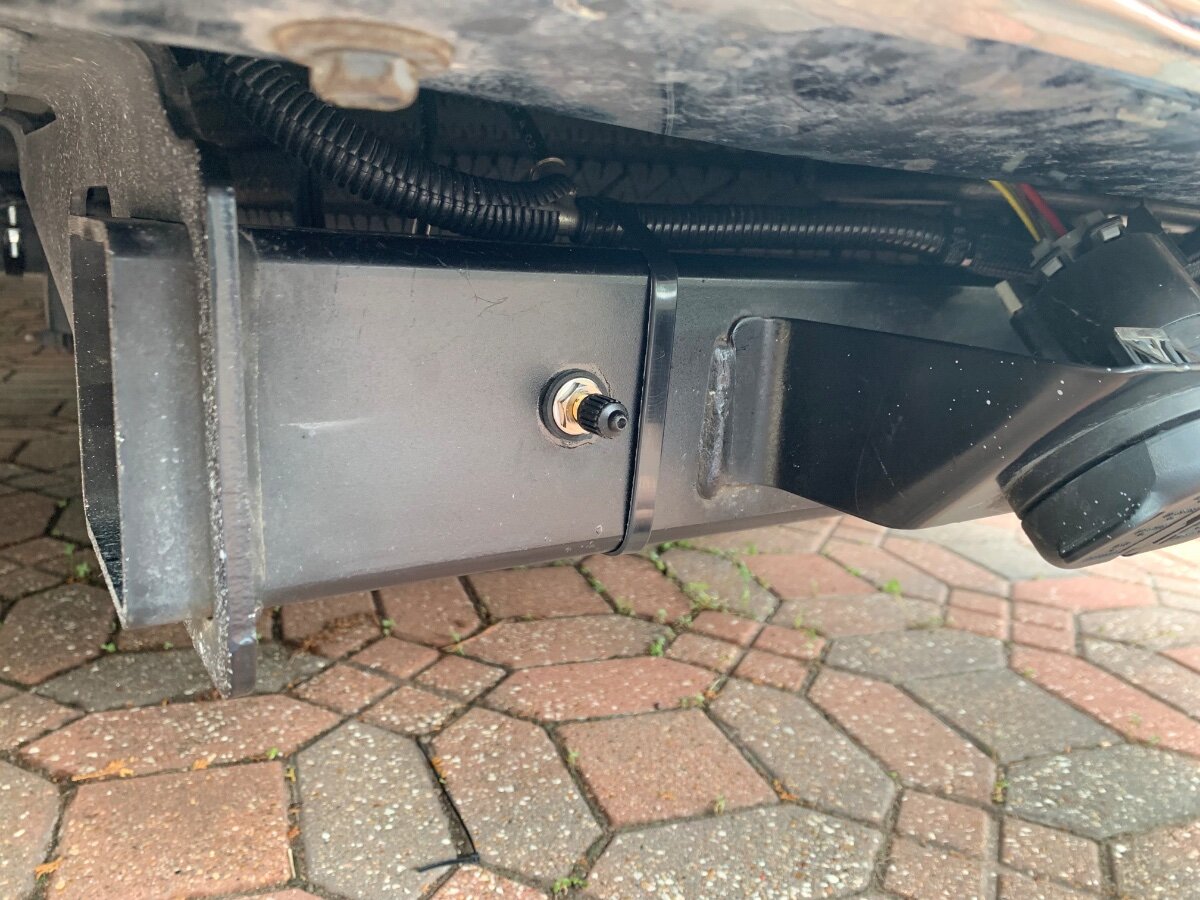
Flooded Lead Acid (FLA) starter batteries usually employ maintenance-free designs. But FLA deep cycle batteries require regular maintenance to each of their cells. The plug you are showing typically serves as a vent path. They are not intended for service, but on many battery's they can be removed for adding DI as you suggested. The question is does this vent provide a pathway that DI will flow equally to all the individual cells? Regardless, doing so can be very dangerous. A small droplet of sulfuric acid splashed out of the battery can easily blind and/or disfigure. Personally IF it were mine, I would not even consider trying to refill these batteries. Just not worth the risk. Especially since they are 5 years old. Bad news you need new batteries. Good news is you need new batteries, and it is a perfect time to upgrade to Lithium. See JD's and several other posts on DIY battery upgrades. Good luck, GJ1 point
-
The FWT drain is at best slow draining given the design constraints of the system. One issue that can make it much worse is when bits of plastic end up inside the tank from drilling the various holes and not meticulously cleaning it out before installing. I have had these bits bunch up at the tank outlet and at the drain valve. When I added my new water supply draw tube, I cleaned and vacuumed out the tank best I could, and cleaned out the drain valve while I was in there as well. Now, not really wanting to go through that all over again, if it seems plugged up, I'll take my air compressor and blow up the outflow tube (30psi is good) into the tank. This usually clears the occlusions long enough to let the tank drain more normally, which is still slower than I'd like. Hope that works for you. Dave1 point
-
Scott Oliver's design is amazingly effective in giving us a very safe towing trailer. Heavy, compact, non-swaying, a shape that reduces side loading of gusts, tandem axle, four shocks, EZ flex, the strongest frame of any trailer in this weight class, E-rated tires, and the Anderson Hitch transferring weight forward for those that need it and an extra long tongue. The amazing part is the design. Even more amazing is that it is Stock on all our trailers. GJ1 point
-
I wondered why there was water in the fresh tank if it was winterized also. I think the OP may be flushing the small amount of rv antifreeze out of the lines and freshwater tank when dewinterizing. I usually do with the fresh water drain open, and even if you fill the tank up a little bit, it takes a while to drain. That would also explain why the OP states it isn’t allowed at the campground. I usually don’t worry about the small amount of rv antifreeze draining onto the campsite. It’s mostly alcohol and just like breaking a good bottle of bourbon at the campsite wo the profanity.1 point
-
I now carry this instead of the low-profile aluminum floor jack; much safer, easier to handle and takes up less space!
1 point
-
Another reason I love this Forum. My Fridge would not light up. Tried pushing all the buttons. Saw someone used a butter knife and I got a Phillips and pushed all the buttons, many times. No luck. Looked at the fuses. (Why in the world does the door open the wrong way?) Then tried pushing the buttons again with the screw driver. No Luck. Then tried your “Smacked it” approach. All the lights came on and it started working. Will not tell my wife this, she might try it on me… Thanks1 point
-
We have had a 50L National Luna dual Fridge/Freezer since 2018. Never had an issue. They are a quality product.1 point
-
A Honda 2200 EUi has a continuous rating of 2,000 kW which means it is capable of putting at most 2 kilowatt hours (kWh) of energy into an EV battery if it runs for an hour. An EV pickup like the F150 lightening will travel from 2-2.5 miles on a kWh of battery power in normal driving. That means if you wanted to add driving range using an Honda 2200 EUi, you would need to run the generator for a full hour for every 2 miles of additional range you wanted. Level one chargers at home (120 volts) are limited to about the same charging rate as a 2200 EUi; a rate of about 2 kW (15 amps x 120 volts equals 1.8 kW charging rate). Level 2 home (240 volt) chargers can charge a vehicle up to a 16 kW rate (i.e., the F150 Lightening) depending on the specific vehicle. The charging rate using AC power from home is limited by the charging circuitry in the vehicle that converts AC power from the home plug to DC power into the batteries. These internal vehicle electronics limit the charging current (whether 120 volts or 240 volts) so charging the vehicle will not trip the circuit breaker in the home panel. The charging stations being built along freeways, et. are DC fast chargers. They supply DC power directly into the vehicle batteries and typically are capable of charging the vehicle at a rate of 150-250 kW rate which is why they can charge a vehicle like an F 150 lightening from zero to 80% charge in way under an hour. It would take a 2200 EUi over 50 hours of continuous charging to do the same. The good news is if you had an EV like the F150 lightening that is capable of bi-directional power flow, you wouldn't need much if any battery storage in the Oliver itself. When you set up camp, you plug the trailer into the F150 (with 130 kWh of battery), you have over 100 kWh hours of battery reserve for over a month of camping assuming you arrive at camp with close to a full charge in the vehicle. My son is a rural large animal veterinarian and has an F150 Lightening (11,000 lbs towing capacity) as his work vehicle. It gives him several hundred miles of range which is more than enough for a day of ranch calls and he can recharge it from empty to full overnight at home with his 16 kW level 2 charger. Last summer his batteries in his travel trailer were nearly shot but he didn't replace them. He just took his family camping and plugged in to the F150 when they got to their campsite. My son did keep his gas powered F150 for now for the rare times he needs to travel out of state or go on hunting trips more than several hundred miles from home.1 point
-
Yea after miles of dirt road the dust gets everywhere. We missed cleaning under the caps but I'm not concerned about it. To get the ethernet cable from the attic to the outdoor garage, you will need to remove the attic's street side wall panel, it's held in by two hex head screws. Also remove two screws to partially pull back the garage side panel. From both locations, you will see the clear poly drain tube for the air conditioner. The gap is wider here, and I was able to snake a fish rod along the side of the tube straight down to the garage without restriction or obstruction from the insulation. A cheap Amazon sectional fish-rod works well here. Always pull an extra string with the cable because it gets harder to get the rod through with each wire added, and you may want to add wires later for my "Turning On The Rear Camera Automatically" modification😁 https://a.co/d/fl9XvxS1 point
-
There are battery isolators for charging, but I've never seen one that would work for your purpose of using both sources at the same time to power your Mini. You would be essentially wiring the batteries in parallel, and it's also a no-no to mix lithium and lead acid. I'm sure you could rig up a diode affair, but that's not very realistic. I'd keep them separate with a "On - Off - On" toggle switch to feed the Mini from one source or the other . . . or off! The common terminal goes to the Mini, the others to the starter battery and tow harness trailer battery respectively. Ground to the chassis. You can get toggle switches up to 30 amps. A relay will work too, but overkill in this case. Just fuse it properly. 🤙1 point
-
We've left ours for nearly a year after only a few uses. So long as it is not near capacity and the fan is running without extreme humidity conditions it will dry out to be more adsorbent material for later use. Since we are in Florida we run a large dehumidifier which helps a lot. Never noticed a foul odor having done this many times. If near half capacity or the crank is tough to turn, then probably best to empty if not going to use it for a while.1 point
-
Storing for how long? Generally, we have no issues with leaving the compost as-is for a few weeks sometime even a month, between trips. If there are only two of you, one week should not be end of life for your compost. Depending on where you are and your climate, you may want to unplug your Natures Head exhaust fan so you do not over dry the compost between trips. We have found keeping the compost at the right moisture content is the most critical factor in having an odor free composting toilet.1 point
-
It’s really quite simple and well within the skill set of anybody who can change their engine oil or a set of spark plugs. You WILL need a couple of Torx wrenches. I forget the size, but both/all were included in a small Elkind folding set, I’d guess a T-10 is one of them. Two open end wrenches to remove the gas fitting. (I don’t think there’s room to use flare nut or “line” wrenches.) About 5/8 or 11/16” I think. Also the big wrench for the nut holding the gas line to the manifold. Other than having to ease it out and caress it back in is to pull out the black control box at the top right of the heater enclosure when you open the access door. Easier than removing the ignition and flame sensor leads and less likely to break them. DO take the picture as Galway Girl suggested to put the disconnected leads back in the right place. Turn off the LP first of course. Once you overcome any trepidation about working on an unfamiliar piece of equipment, it’s a pretty simple job. As others have pointed out - if you fiddle with it, you likely void your warranty.1 point
-
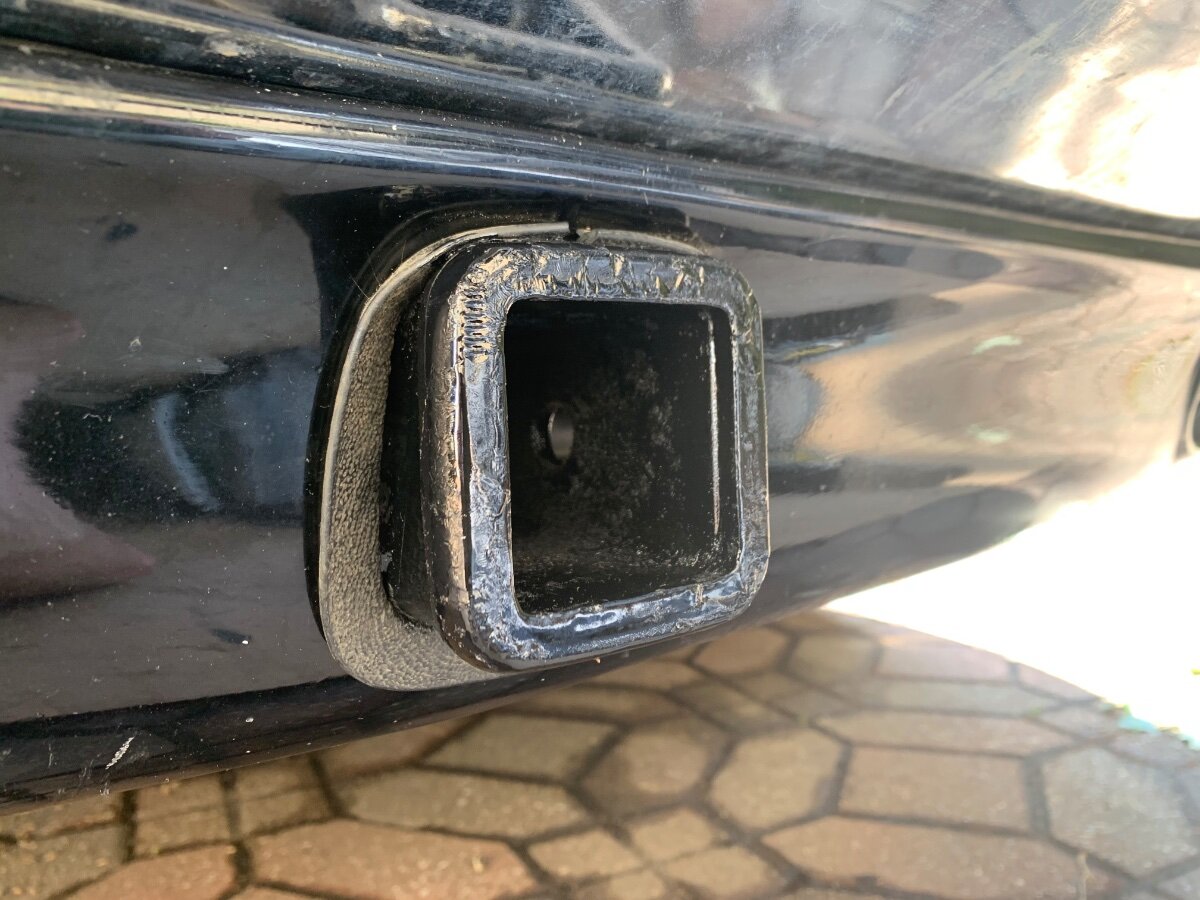
Alternate mounting of said ports from the aforementioned screenshot. Holes drilled (3/8” front, 5/16” rear) through the hitch receiver tube were made for adequate securement of these Schrader Valves once exposed metal was painted and allowed to cure.
1 point


-
Recent Achievements
-


")
")


")


")