Leaderboard


Popular Content
Showing content with the highest reputation on 09/01/2025 in all areas
-
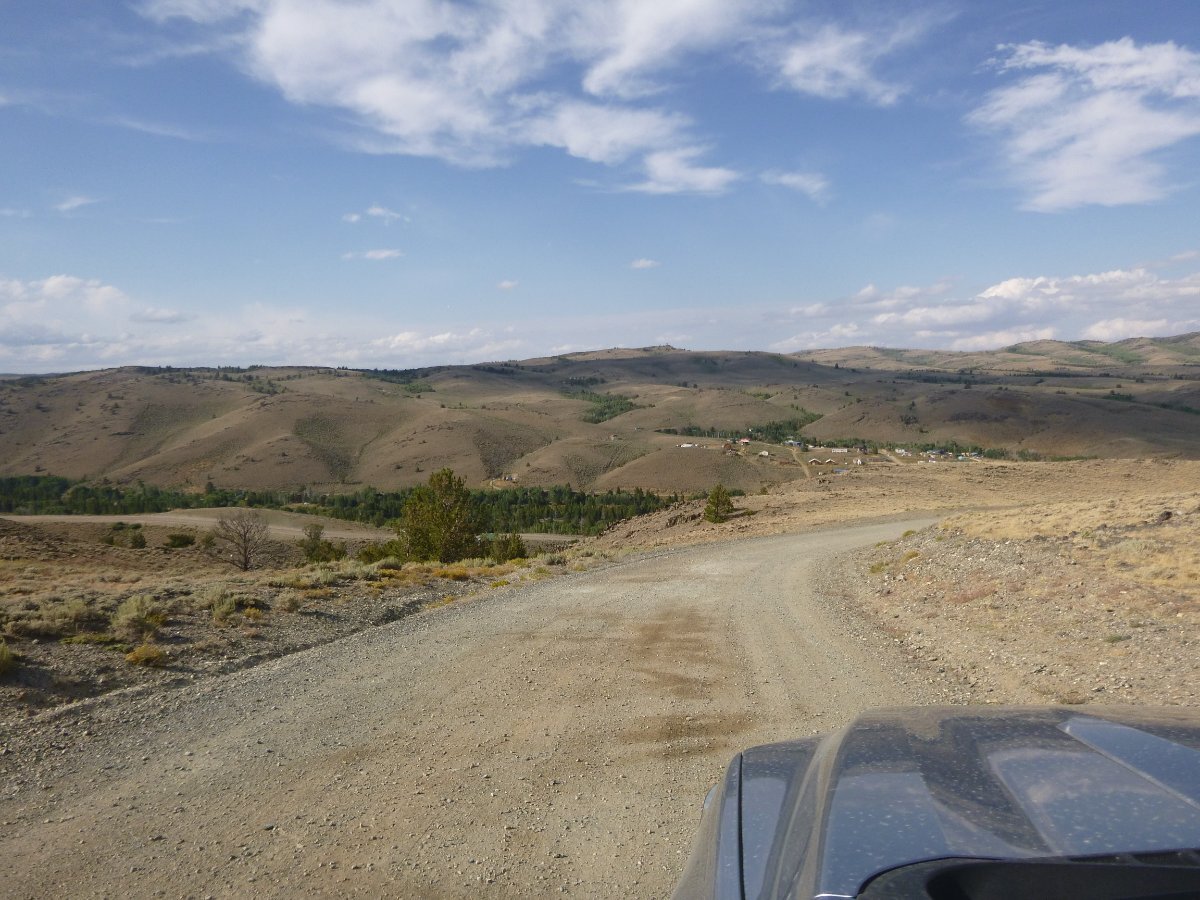
On BLM land near - Atlantic City, WYOMING
 6 points
 -
For anyone that has actually been to Atlantic City, New Jersey - Here is a picture of Atlantic City, WYOMING
4 points
-
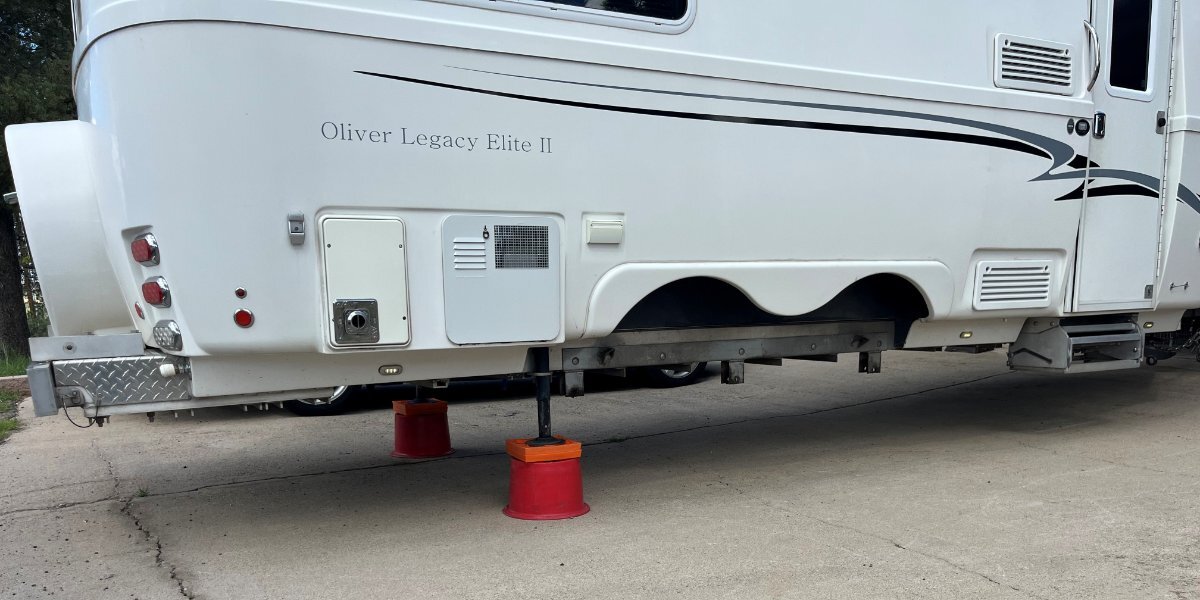
Thanks. I came up with this idea a couple days ago and purchased these. It allowed me to disassemble all without a helper and should work the same for the installation of the new axles and leaf springs after building the assemblies on our garage floor. https://www.amazon.com/dp/B0CWTW7TQY/3 points
-
Geoff, I thought some regulars here may notice! I did use jack stands at the fronts of the steel frame members, took them away for the picture! 🤣 I have the jack stands back under the Oliver overnight in the same front positions so the weight of the Oliver is spread over 5 points, sitting nice! With the Alcan leaf springs, I purchased everything new from them, HD shackles and new wet bolts. You may have to remove your wet bolts, the ones not accepting grease, and clean the dirt out of them. After removing ours today, they do get dirty inside! After 25K miles? It certainly could be time for new wet bolts and bushings. After 2 hours cleaning up our Dexter E-Z Flex equalizers, I found the main center bushings cock-eyed and heavily worn, the end bushings for the shackles also a bit worn. After cleaning, the center bolt sleeves just wobbled inside of the bronze bushings. I would not have known this without removing them and fully cleaning, disassembling and inspecting them. I need to replace them, but cannot wait for parts now with work in process. I have no idea total miles on our hull. Good to get a fresh start after 10 years. I've got a whole lot more to write about soon!
3 points
-
Watched a new video from around July 2025. It's an interesting comparison from an Airstream Basecamp guy who thoroughly praised the Oliver as the highest quality trailer he's seen. The video also shows some of newer equipment such as the Truma AC, and the interior equipment spaces including what appears to be a Victron 30 amp DC to DC charger installation. Actually a friend sent this and I couldn't help feeling proud! Cheers, Geoff2 points
-
Worth considering, but the wood interiors would deter us. The hypoallergenic nature of the "nearly" woodless Oliver (with double fiberglass hull, scupper holes, etc.) is a big deal to us, as my wife has a serious mold allergy.2 points
-
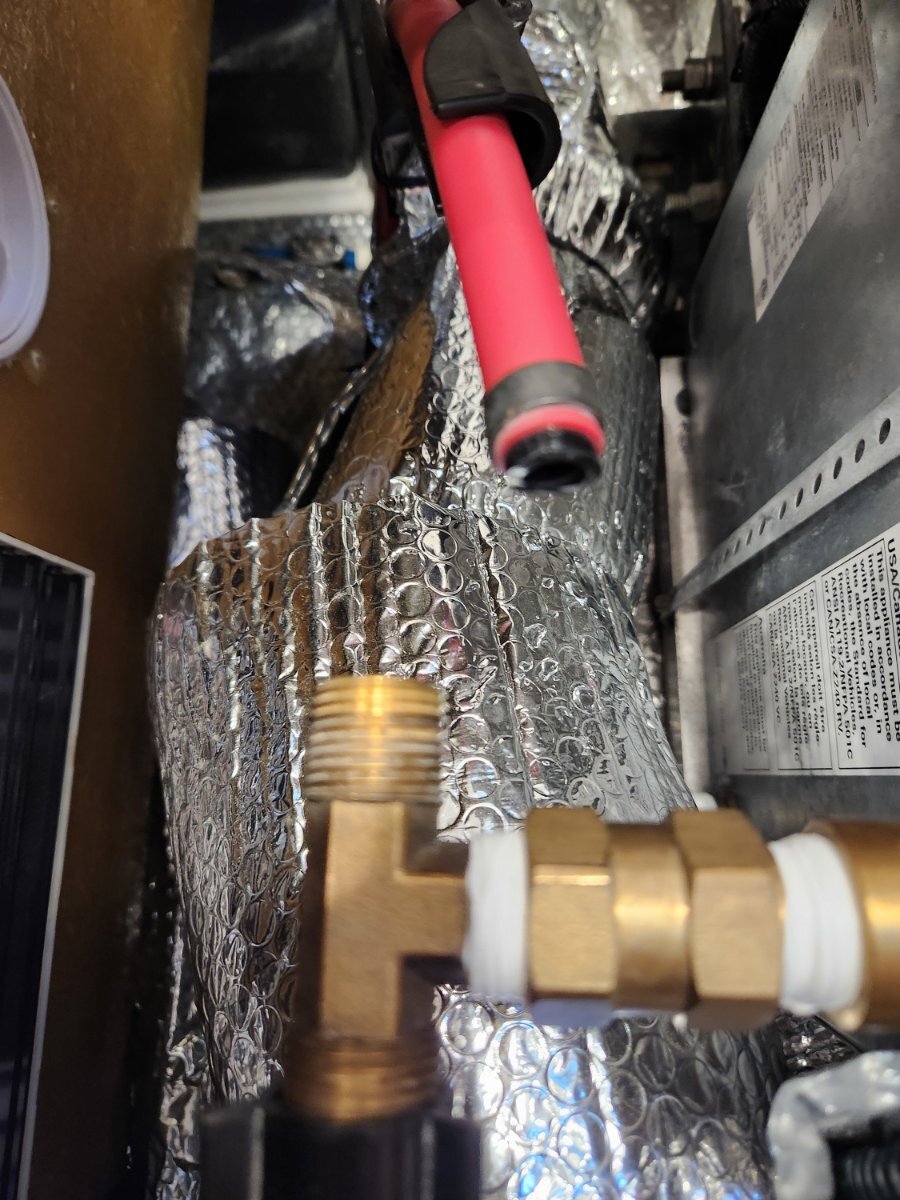
Ours broke after a rough dirt road in the Yukon. We happened to carry new brass shark bite fittings for that location. Trimmed it up and we're all fixed up in 15 minutes. I now carry an assortment of fittings and some short lengths of pex in the trailer.2 points
-
I like your moving casters to put the assembly in place.2 points
-
Also this is a "nice" reminder as to at least one of the reasons we sanitize the fresh water tank. Bill2 points
-
The fresh water pump in my 2022 Elite II, Hull #1091, would not pump water from a full fresh water tank after sitting through the winter. Several attempts, no water, just a whining sound, Before I tried John Davies "prime the pump" suggestion above, I removed the filter from the inlet side of the pump. It was full of brown slime! A thorough wash of the filter housing and mesh filter enabled the pump to then work as designed, pumping water from the fresh tank to the sinks and toilet. Lesson learned: check, and clean, the pump filter annually after de-winterizing.2 points
-
During the hot weather this summer, our Norcold refrigerator was also struggling to keep cold while on propane. The fridge fan could not remove enough heat for it to work properly, so it was time to install more cooling fans! I ordered the $75 Beech Lane fans based on the positive reviews, but there was no way they would fit in my Norcold’s lower vent area as intended. They could fit in the upper vent with modified mounting brackets and reversed air flow, but why pay for something that didn’t fit as designed. In addition to fitment issues, I didn’t like the control box being mounted outside behind the vent cover where the blue LEDs can be seen glowing. I wanted the ability to turn the fans off, but the control box didn’t remember the last setting when the power is switched off, and I didn’t want to be opening the vent cover to reset it. These are multi speed fans with 3 wires so switching the fan wire wasn’t a good option either. I returned the Beech Lane fans and bought 2 similar (water resistant) fans and a Normally Open 500c (1220f) thermo switch for lots cheaper. I made a rectangular frame of 1/2” aluminum angle bar for the fans, and installed them in the upper vent. Because the upper vent has an angled back, I used long deck screws with short PEX pipe standoffs on the bottom screws to keep the fans mounted vertically. The Beech Lane fans would have to be mounted the same way if I had kept them. The fans are powered from a new switch in the master panel and it’s in series with the thermo switch so they will only work when the switch is on, and the temperature is above 1220. I used a laser thermometer on the condenser fins when the refrigerator was operating on propane. The temperatures were significantly higher on the right side above the flame chamber, and they got progressively cooler towards the left side. So I hung the temperature switch between the condenser fins just right of center. It can easily be moved left to cooler fins if the fans are running too often. I installed a terminal block as a centralized connection point for all the wires, but they could be spliced together in any manner of ways. “Y” spade adapters worked well to connect to the refrigerators existing dc power terminal via a 5 amp fuse. The fans use less than 1 amp combined. The microwave was removed (six screws) to get wires up to the new switch on the switch panel. The tension jack to hold the microwave in place has to be loosened too, it’s accessed through the round marine hatch behind the switches. Just takes a couple of minutes to take it out. We have been testing the fans in 100 degree weather for the past week, and they've been working great! I hope someone finds this useful! Cheers! Geoff
1 point
-
Hope ya got a few of these:
1 point
-
I agree 100%. I had the same part fail, not a clean break but it cracked resulting in a steady drip of water. I also replaced the cracked part with a brass fitting. It would have sheered off soon, just like yours did. Mike1 point
-
We have had a significant water leak on our current stay in central NJ. After connecting to city water and finally sitting down after a long day we noticed a stream coming from the rear street side scupper. After some investigation we discovered that a plastic PEX-to-female NPT fitting had cracked and broken clean off. The fitting is located at the HW heater outlet and is subject to full (regulated) city water pressure. Needless to say this was like spraying a small garden hose into the engineering space, not good. We've succeeded in drying things out but we will add fans and dehumidifiers back at home. A bit of a scramble later I'd replaced the failed part with a brass fitting sourced from a (fortunately) nearby and very posh Airstream dealer. As it was 4:45 PM on Labor Day Saturday they were very quick to help me and see me out. IMO this part is a failure risk and should be proactively replaced. We aren't sure why it failed other than fatigue. In the pic the NPT part of the broken fitting is not shown. Hope this helps Tim
1 point
-
Doug, It’s certainly possible, but less efficient. There are power losses when inverting dc to ac, and when converting ac to dc, and you would be doing both. For example; say the inverter and charger were each 90% efficient, then you would have a collective 80% efficiency (actually somewhat less if you do the math). Your modern equipment is probably more efficient than that, but you get my point. I’d also check the Duty Cycle of the Ford’s inverter to assure it’s rated for continuous operation. Cheers! Geoff1 point
-
And all the piping as well!1 point
-
That is pretty much where we ended as well. Too much of a price bump for off-road capabilities we were not going to use.1 point
-
Your wish is my command! 🤣
1 point
-
Try THIS Thread for pics on the colored Olivers. Bill1 point
-
Yep. We saw it in Hohenwald awaiting pickup when we were there one time and it was white. I liked their hull number, too, thus the photo. 😁1 point
-
The red one is owned by a couple in San Antonio. They are forum members @jellybean.1 point
-
I took the Oliver tour at the factory in Tennessee last week from one of the Oliver sons. I asked if they ever offered other colors. They said only 2 other colors were ever made by Oliver, one in RED and one in Black. He doesn't recall if they were sold or kept back, nor where they are at the moment. But I thought that was an interesting tidbit! Tanya Austin, TX Hull #6441 point
-
No. I have thought of the possibility, but we drain the tank after each trip and sanitize once a year. John1 point
-
Well, it’s only been a few months, but so far they work great. I will say that the gauges appear to be much “beefier” than the tiny indicator on the manifold so my guess is that this will be a lasting solution. If not, I will repost any issues that I have. But for the minimal cost, I’m not too worried about it. Also, if one of them fails, I still have a backup.1 point
-
It’s been a great trip so far - this is our first 2 night stay. We have gone up to Glacier and then up to Coleman in Alberta at the base off Highway 40. Close to 100 miles of gravel and very dusty road. Then into Kananaskis Country and up to Banff, where everything is full-we got the last site in the 600 site RV park. The “long weekend” filled Lake Louise so you couldn’t even view the lake. We then connected with 93/95 and are down close to Kimberly in BC. As we entered Kananaskis Country the scenery changed dramatically! Massive mountains- folded and rising 6-7 thousand feet from the floor- more and more glaciers. A really different feel than our section of the Rockies in Colorado and Wyoming. Very “Individual” and massive.
1 point
-
Thanks for the nice words JD! Yes, one of the travelers is always hot, and the pump is grounded separately. My referenced sketch shows standard 3-way wiring for simplicity, with the (+) on one end of the circuit, and the switch leg (feed to pump) on the other. The Oliver is wired as a "dead end" 3-way switch, where both the hot (+) and the pump feed come to the main switch location, and bathroom is the dead end with the red point wire doubling back and being spliced to the pump feed at the main switch location. It doesn't matter how the travelers are connected, or if they are reversed. One or the other, or both, switches will always be in the physical On or Off position with the pump running. You may be curiously interested in how three or more switches (4-way switches) work in this 3-way circuit. The travelers will switched to run straight through, or they will be switched to Criss Cross each other. Clever! This is also illustrated in my referenced sketch! Cheers! Geoff1 point
-
Thank you Geoff. This is so nicely and concisely stated, now easy to understand! So if I truly do understand, when ON one of the 3-way switches is supplying power to the pump, by connecting 'hot' to the 'traveler' and the pump is grounded independent of the 3-way switches.1 point
-
This is what I used: https://a.co/d/cytULgu1 point
-
Dexter does not set the self-adjusters, as they come new very loose. I’ve heard this now from you and others with new axles. When I pulled a drum off a new axle it came off wobbling like the OD of the shoes was much smaller than ID of the drum. They must believe they will adjust soon enough. Not good when you drive off just installed and hit mountain roads! I’ll tighten mine up some, to the point I can just hear a light scraping sound, shoes on drum, before I mount the wheels. 😂 I just installed new rear shoes on our truck rear drum brakes. I overdid the adjustment! The brakes were so good, that the parking brake engaged with a 1” push on the pedal, and I found the rears were braking while coasting! 🤣 Understanding the issue, next day I lifted the rear of the truck and loosened the self-adjusters about 1 1/2 turns and my new brakes are now working perfectly, better than ever! 😂1 point
-
I agree, I always have my own tanks refilled, often at a Tractor Supply. I find AllStays to be a good app to find sources of propane when I am traveling, not to mention nearest Love's, Costco, etc.1 point
-
Good find @Boilermaker Chemist FWIW the main reason I bought a tank from Costco was due to arrive bad tank swap I received on a trip to Utah some time ago. The swap had a bad valve that leaked profusely but did not realize this until back in Montana. So now I am stuck with a full tank of propane I cannot use and no one will take the errant tank in as a trade or otherwise. Suffice it to say I will never do a tank swap again, and would suggest others to avoid as well.1 point
-
So sorry to hear about this. It is really frustrating.1 point
-
You and @Golfnut with LEI have this. Just got my new axles yesterday and they are rated the full 5200#. Must be an LEI thing likely limited to 5033# due to the springs. Good news, my axles are here! Bad news, Dexter packed them so poorly, they came badly damaged and going back. Alcan was the reseller on the axles. I special ordered the 50.00" axles from them. They got right on the phone with Dexter this morning, forward the many pictures I took showing the damage. Dexter will Rush Order my axles but rush means another 2 weeks plus shipping. Notice dinged Nev-R Lube cap and dented backing plate. So bashed in that the drum on the left will not turn. What a waste!
1 point
-
I think it would like much nicer if the grey was on the bottom and of a much lighter shade.1 point
-
This falls into the bucket of “Beauty is in the eye of the beholder”.
1 point
-
Correct! Who knows why Dexter makes a marketing slogan out of “Nev-R Adjust!” Drum brakes have had self-adjusters almost since the automobile industry invented drum brakes! 🤣1 point
-
Yes John, a good reminder! You can tell a lot lifting the tires off the ground, have a helper press the TV brake pedal gently then abruptly. Tighten the self-adjusters to the point where you just hear and feel the shoes rub, because we know they don’t always self-adjust as they should and the rears will be usually be looser than the fronts. Get them as so and you can be relatively confident all inside the drum is working as designed. I worked this service recently and found out brake controller was not working right. Replaced the controller and brake response was night and day. To do a full interior inspection with the Nev-R Lube bearings you’ll need a new set of 4 spindle nuts but on the positive side you won’t have to remove and repack the outer bearings (or both) as we have for decades with the old-style wheel bearings.1 point
-
I always have to laugh when I see 1/2” or even 3/4” copper pipe going to a (land based) bathroom or kitchen sink - and then the supply lines are 1/4” going through valves with tiny water passages. When we had the farm, I replaced every hose Bibb with a 3/4” ball valve a GH adapter. When I wanted water, I wanted it NOW! 😋Nobody wants to stand and wait while a 5-gallon bucket fills at less than the maximum possible flow rate.1 point
-
I believe Oliver's only have 1/2" PEX, but I’m not assuming anything. I only carry 1/2" spare parts and pipe. I carry a SharkBite 90*, coupling, tee, cap. I also carry a PEX pipe cutter and a SharkBite fitting removal tool. A word of caution about SharkBite fittings in general, some of their fittings are reusable and others are single use, so pay attention to which you purchase. Although I have complete confidence in SharkBite fittings, I have never had one fail while in service. I have had installation failures of my own making. So read all documentation available and follow the methods outlined within and all should be good. I do have PEX crimp rings and crimpers at home and they are very hard to use for repairs below decks. So I don’t have any problem leaving SharkBite fittings in service, that I installed in an emergency. The last bit of advice that I have is, buy a reusable SharkBite PEX fitting and some PEX pipe and get busy practicing. Mossey1 point
-
Pex tools used to be very expensive. Now for about the price of 3 or 4 shark bite fittings you can buy a complete set of tools and crimps from Amazon. https://a.co/d/fMcntAT1 point
-
Some years ago we had a discussion of this here on the Forum (I'm too lazy now to go look for it). In addition to what Patriot has above, a kit should include at least two shark bite 1/2 inch 90 degree elbows, two or three straight 1/2 inch shark bite connectors and one or two shark bite "plugs" to be used to cap off a water line. One might also include a small piece of 120 to 200 grit sandpaper for smoothing the exterior/interior edges of the pex. For those unfamiliar with shark bite fittings - these allow you to simply push them on (i.e. no clamping required). There was a whole discussion as to the appropriateness of shark bite fitting for RV travel. Even though I've never had to use my "emergency plumbing kit" it would be my intent to replace the shark bite fittings with something more permanent once I arrive back home. Bill p.s. I put all of the shark bite pieces, sandpaper, pipe cutter etc. in a plastic bag and then attached that bag to the lengths of pex with tape. Then I placed that "bundle" down in the area below the water pump.1 point
-
GJ, You bet! My kit is pretty basic and simple. Several shark bite fittings, a pex cutter from Harbor freight, two 3’ lengths of blue and red pex which I store in our Olivers closet. Naturally pex tubing can be picked up at Lowe’s, or most hardware stores in short 3’ lengths along with the below shark bite fittings and pex cutter. I just never like to be “flapping” if I can prep a little and fix it myself. Or even better, help someone else out. Two is one and one is none.👍🏻 Shark bite fittings https://www.amazon.com/s https://www.harborfreight.com/finger-release-ratcheting-pvc-pipe-cutter-62588. or here- https://www.amazon.com/Bates-Choice-Pro-pipe-cutters/dp/B09BVXZBLN/ref=sr1 point
-
@jd1923 Check ALL your white compression fittings. And like Mike said a blue paper towel is your friend and will really help identify the culprit. Before, after and even periodically while traveling I always make it a point to pull the hatches and check the compression fittings especially the ones that are in the very belly of the hull. Vibration is no friend to these compression fittings. Once in a while I will find that one or two not completely loose but do need snugging up by hand only. I also carry a shark bite and pex tubing repair kit. Good to hear that those stainless steel “scuppers” are doing their job allowing the water exit the belly of the beast.1 point
-
LoL. The world is your Oyster on that one. Hope you find it and its an easy fix. GJ1 point


.thumb.jpg.e34bf01ef7f7d5e99ad31856d45afbeb.jpg)


-
Recent Achievements
-


")


")


")

