Leaderboard


Popular Content
Showing content with the highest reputation on 10/15/2025 in all areas
-
Another option is to lower the front of the trailer, which makes it easier to leverage the tank out of the nose cone without resorting to a platform. The Wonder Egg was born with 30 pound tanks, even though lowering the font helped some, it was still a hassle. For the last 12 years, I've used 20 pounders and don't believe I'll go back. I have reliable pressure gauges and bluetooth monitoring systems to keep me informed on their status.2 points
-
I doubt that the "Company Store" will happen any time soon. Since the end of the Covid induced boom in RV sales, the RV market has not been anywhere near even what it was prior to Covid. This along with many economists predicting an economic downturn plus an unsettled political climate basically forced Oliver (along with much of the RV industry) to reduce staff. In turn, this reduction in staff has caused even fewer people to be available for what might be called "non-essential" activities. Please be reminded that Oliver is very sensitive to not only its own bottom line, but, also the well being of its employees. During the 2008 recession when Oliver stopped producing travel trailers, Oliver was the only company (that I know of) that never laid off any of its employees. Those employees that were involved with travel trailers were all offered comparable jobs in other areas of the overall company - like the walk-in tub line. Bill2 points
-
7/8 for both the U bolts and the shackle bolts. Both U bolts and shackle bolts are 9/16 diameter so the wrench size for this standard nut size is 7/8. You will need a deep well socket for the U bolt nuts. I have a deep well 7/8 socket for my truck wheels so this worked perfectly.2 points
-
Have you tried having someone physically pull out on the awning while you crank it? I Have a Fiamma also but when I had alignment issues it would not come out until I pulled out on it while cranking. Something might have been damaged or knocked out of adjustment when the wind got hold of it.1 point
-
Starlink mini is on sale. $299. FYI1 point
-
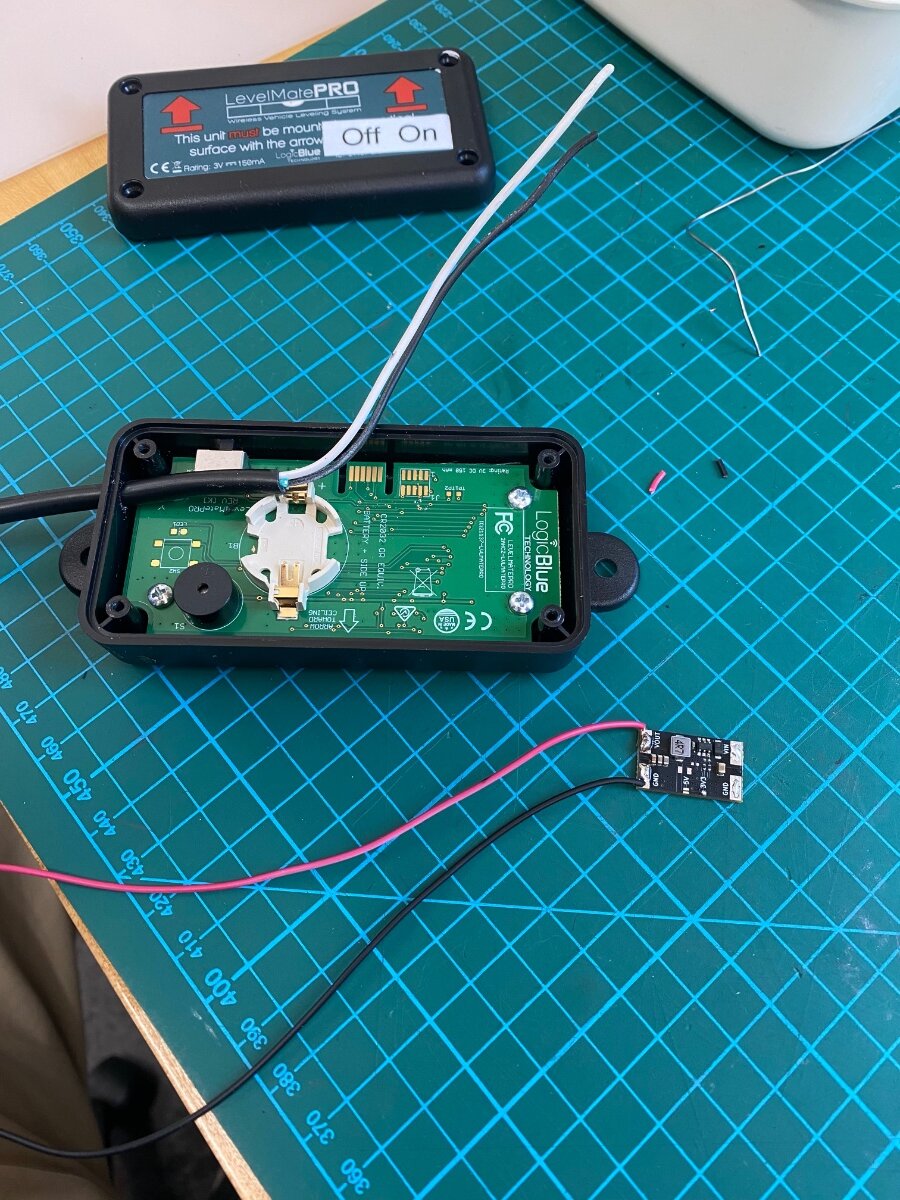
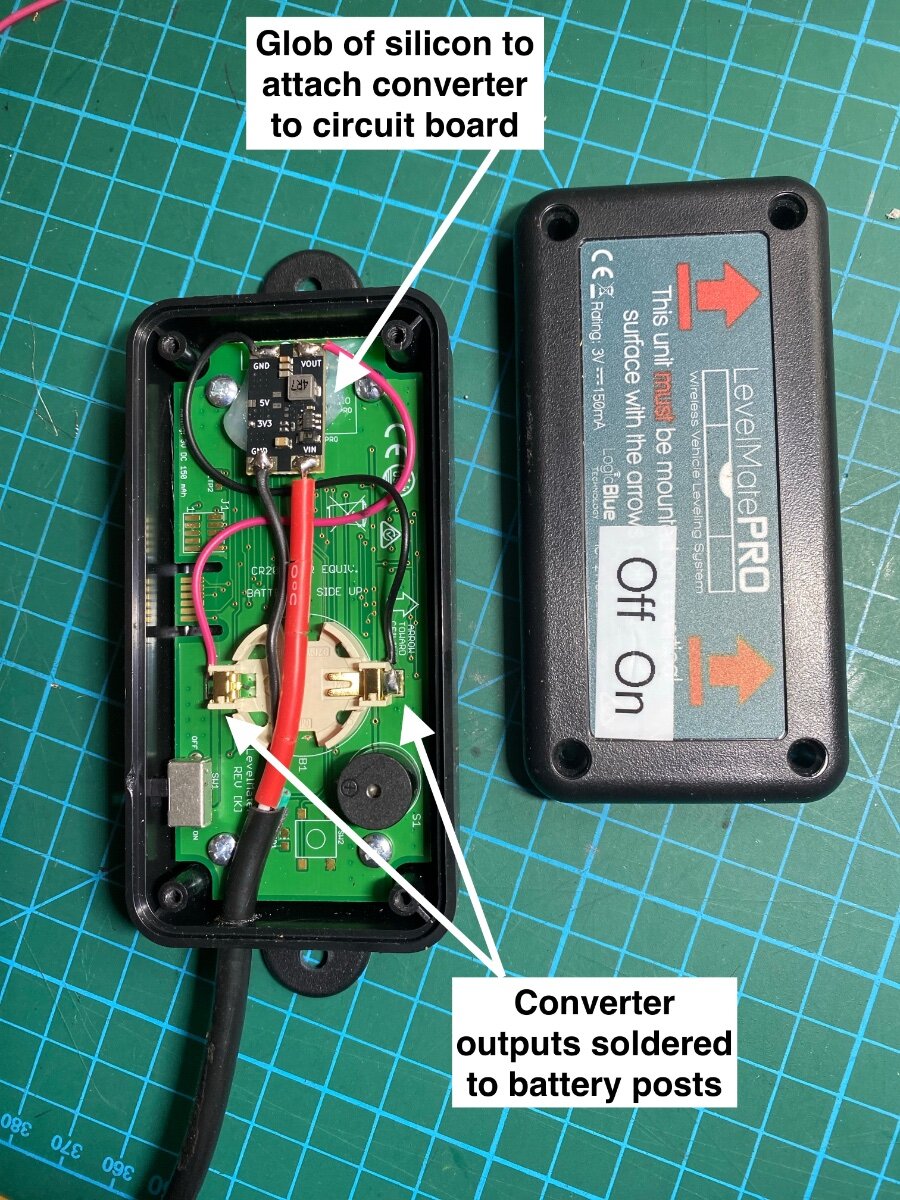
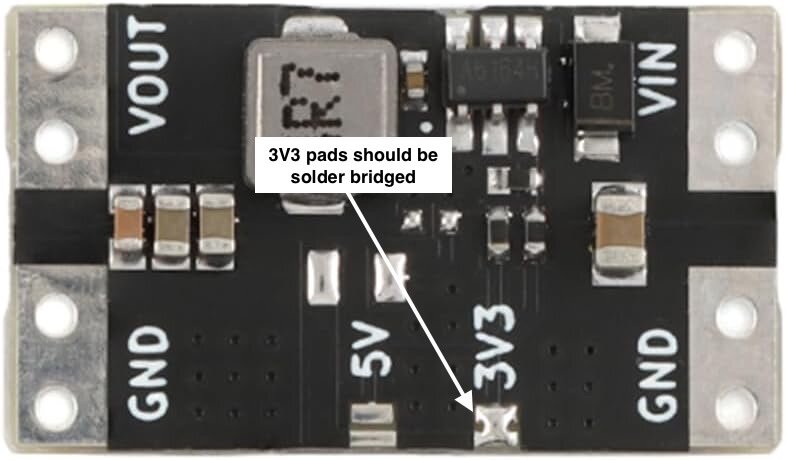
The LevelMate PRO is excellent for quickly leveling the trailer, and the battery is supposed to last six months. But I often forget to turn mine off and it always seems to be dead when I need it. In fact, it’s died so many times that I even kept extra batteries taped on the cover, quick release thumb knobs, and a screwdriver in my hook-up kit for changing the battery. Then on top of that, it has to be recalibrated for the slightest alignment changes when removed for battery replacement. I was fed up, and not willing to shell out another $150 for the USB powered LevelMate PRO+. So I spent $9 for a pack of ten voltage converters, and I hardwired the LevelMate to the trailer battery! The converters have an input voltage of up to 16VDC, and an output of 3.3vdc. They're small enough to mount inside the LevelMate case, the parasite drain is next to nothing, and the power switch will still remain operable. This is a simple modification requiring only basic electrical knowledge, some wire, a fuse, and a soldering iron! For the wire, I used an old charger cord. Hardware or auto parts stores will carry In-line fuses. Procedure: Open the LevelMate case and discard the battery Use a glob of silicon sealant to glue the converter on the LevelMate circuit board Drill appropriate sized hole for the power wire Verify the factory soldered a bridge across the Converters 3V3 pads to set output to 3.3vdc Solder jumper wire from converter GND to LevelMate battery pad marked “-” Solder jumper wire from converter VOUT to LevelMate battery pad marked “+” Solder Negative power wire to converter GND Solder Positive power wire to converter VIN Connect power wires to any negative and positive power source via a 2 amp fuse. My LevelMate is mounted in the garage space for optimum BlueTooth range close to the leveling switches. Power is available from the garage light, or you can pick it up from the “load side” of one of the breakers under the street side bed, or the dc power panel. Converter: https://a.co/d/7nvhv0A Note: This converter has a input of 4.5 to 16 vdc. Don’t be tempted by myriad of attractive looking 12vdc converters because they will not withstand the Oliver’s 14.5 vdc charging voltage. Now if I could only come up with ideas for the extra nine converters. . . Hope someone finds this useful! Cheers! Geoff
 1 point
 -
I just got around to doing this mod. Super easy since Geoff did all the design work and sourced the components. Thanks! I previously had the Level Mate attached just inside the door to make turning it on easy when we arrived at the camp site. However I was unwilling to drill into the beautiful fiberglass finish for mounting so I used Command strips. Just me touching the Level Mate to turn the switch on was enough to throw it out of calibration so it became useless. I wired it up, mounted it in the same location mentioned above and hopefully will never have to touch it again. Now I too have 9 remaining converters. If anyone is considering doing this mod, drop me a line and I'll happily drop one into an envelope for you. Thanks again for posting this mod.1 point
-
@johnwen, you are correct. A blue wire connects to the DC fuse box (12VDC positive) , then to the Wago connector. From the Wago another blue wire runs to the POE Injector. Also connecting to the Wago connector is a red wire which provides 12VDC positive to the auxiliary power outlet, providing power to the Starlink Router Mini. Apologies for the delayed response, we were traveling. Regards, Don1 point
-
You don't mess around. That's a nice piece of hardware. Very Well done!! We are already ladder rich and only needed the platform to create scaffolding .1 point
-
Sign of a good family-oriented company! (Motorola did the same during the Great Depression! They cut hours, not family members.) 😂1 point
-
Thanks Rivernerd. Looks like Oliver in now installing 2-wire alarm. The 3-wire version of your alarm (model RVCOLP-3) is also discontinued and not available anywhere.1 point
-
How many cupholders does it have?1 point
-
how about this .. tows 40,000 ponds and is small
1 point
-
Just learned from Lew that Oliver is testing 4 spring 2250lb rated springs for 2026 model year.1 point
-
We had the five leaf Alcan springs installed in Grand Junction last May. They're a bit stiff for the first 1000 miles or so judging by what fell onto the floor of the trailer, but after that, they work great. Lew at Alcan can maybe assure you of what to expect with them. We kept the tire pressure the same at about 50 psi before and after. He said the four leaf springs are designed to fail at the shear point about three inches from the eye. We now have about 2500 miles on these springs and it tows like it's on rails and is very stable. I have no regrets. John1 point
-
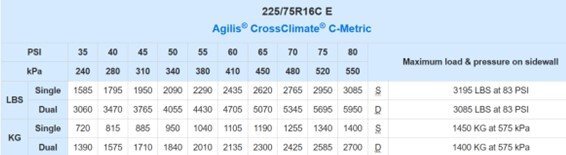
This has been discussed and posted many times (and 3rd time I posted this picture). Everybody should download a table like this for your tire make/model/load range (E) and size, however the numbers are basically the same across manufacturers, but vary greatly by tire Load Range (# tire ply) and SIZE. This table is for the tires we have on our Oliver, but should be good for any Load Range E size 225/75R16 tire. Running 4 tires at 60 PSI will safely support a trailer up to 9,740 lbs. Running as low as 40 PSI is enough for a 7K trailer (7,180 lbs). Before travel, I'll check pressure on all 4 trailer tires (the truck too of course). If the Oliver tires are all within 42-46 PSI, I'll level them off to the lowest common denominator (easier to let out air than to fill). Less than 42, more than 46, I'll make them all very close to 45 PSI, providing a 10% margin over the required PSI for the GTWR (more margin for reaction time to TPMS, not a good idea). The tandem-axle trailer design with the center equalizer of the EZ Flex system, allows the leaf springs, one axle at a time, to have a longer span length to absorb bumps, or shorter to absorb dips. Better to hit a speed bump, bridge seam, pothole with stiffer springs vs. higher PSI tires! The years that OTT recommended 80 PSI (65 or 55), I promise you "punished" the Oliver build much more than Alcan HD springs! 🤣
1 point
-
“Punishing” might be overstated, but somewhat over-sprung, I’d agree. We had other interior items go astray with the lame OEM under-sprung suspension. Much better now without the porpoising and waddling, the dozens of broken leaf springs reported by others fixed on roadside, one recent $1800 tow, etc. Personally, I’ll take better towing/handling on the road vs. worry about bounce in the trailer. But I’m A-typical in that my feeling is the Oliver is a trailer, a tool with a purpose, not a baby to care for in that way. By maintenance time next summer, I’ll report if there are any tru resulting issues. A slightly lighter gauge 5-leaf spring rated at 2200 vs. 2750 lbs would be great l, but not available! 4-leaf springs, not going there again, IMHO a failed design.1 point
-
Thanks to everyone for sharing their experiences, we are hopeful. We run the tires at 60 psi but will try lower pressures in the future. Thanks Tim1 point
-
Craig, besides the 7/8” deep socket Ken mentioned, a 13/16” socket might be needed to hold the front side of the shackle wet-bolts if they were to slip. A deep-well socket may be needed here too to fit over the Zerks. The other day, the bolt holding the equalizer to the center hanger was spinning on mine. Using 13/16” socket and short extension, the breaker bar hanging between the tires, I was then able to tighten/torque while the tire held the bar in front! 😎 (thought at first, I would need to ask Chris to hold the front side). Nice for Ken, 7/8” works for all! I need 15/16” for Dodge wheels and 3/4” for Oliver wheels. I bring all sizes from 1/2” to 15/16” in deep-well 1/2” drive impact sockets and the same sizes in short sockets 3/8” drive. Also have 1/2” to 3/8” and 3/8” to 1/2” drive adapters to use any socket in any ratchet, ratchets in all sizes, and a 1/2” breaker bar that fits into a 2 ft cheater bar! I want to be able to make repairs like replace a water pump/serpentine belt on the road, change Nev-R Lube bearings (see thread on that with tools listed), most auto repairs. That should do it! 🤣1 point
-
Mine was a night and day difference to the positive. When I purchased the Oli she would roll about 4-5" to each side going down a smooth interstate, and on some rough washboard roads the jouce was so bad it was hard to handle the truck. I had replaced shocks with bulldogs on the trailer and replaced the truck with High end Bilstein shocks all around and this made a some difference with side to side rolling and jouce about a year before doing the leaf upgrade . When this thread came out, I checked my leaf springs and the rears were completely straight. So they were probably bowing backwards when hitting road imperfections. As @Mountainman198 suggested, after my first 50 mile dry run on the new leafs, I decided to lower tire pressure from 55 to 45, which is actually the suggest PSI by the tire manufacture for the weight of the vehicle. i have put 8,500 miles on the Oli this year, and am happy with the upgrade. I did notice a difference in the ride softening after around 1,500 miles or so. I try to stay off the interstate highways when possible. I like going down the back roads at 55mph and see the sights along the way. This also means the roads will be a little rougher and less maintained in many cases. I'm also running a F250 Super duty XLT long box with WB 172" that weighs 1500 lbs. more than the Oliver trailer fully loaded going down the road which may help. Good luck,1 point
-
I certainly suffer from the same issue. There would be fewer ˋget up'ś and trips to the garage if the only tools I had were a rock and a sharp stick! Mossey1 point
-
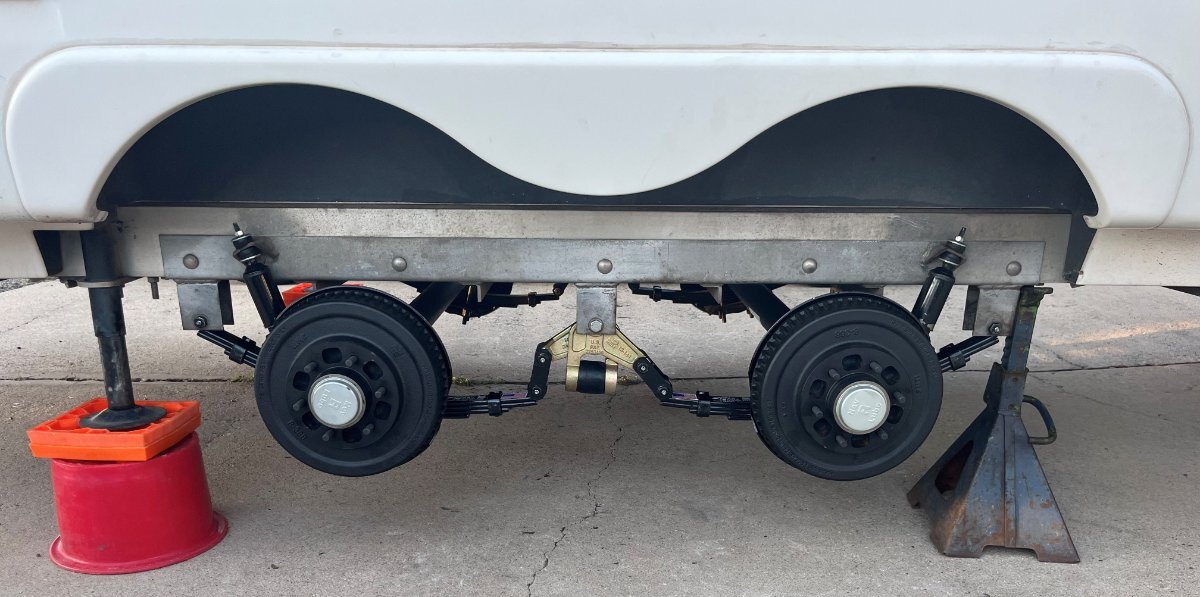
Finally done! Worked on this every-other-day this week. Looks great, doesn't she?! Alternate days are for Pickleball. My body can only take one kind of daily trauma! 🤣 Days on the court cannot be combined with hours climbing under truck or trailer! How many times did I get down on the driveway, sitting on a milk crate, craning my neck to fit under the Oliver fenders. or lying down on the ground, and then climbing back up? Way too many times, no matter how well I plan having parts and tools required! UPS came early yesterday allowing me to finish with new E-Z Flex equalizers from eTrailer (2-day ship only $6.50 extra, adding another $316 to the grand total)! You should check your equalizers. Some may have upgraded leaf springs without the equalizers being removed and cleaned up for inspection (it's the right time to do it). Details on this and other concerns soon. Look for a new thread on this subject. All that's left now is to torque and grease the wet bolts (our son Adam will power the torque wrench under the trailer and the DeWalt power grease gun makes this easy). Mount wheels & tires and test drive. I'll tow some miles on local highways and hilly/winding roads, then retorque the U-bolts upon return. Park the Oliver to free up my driveway again. Another trip to Southwestern Colorado is just 3 weeks away!
1 point
-
I thought about the mod many of you have gone with and decided to go with the standard configuration. The end bolts are easier forward facing and the shackle bolts are easy enough with an elbow fitting and power grease gun. Takes a bit of extra reach or climbing under when the Zerks are facing inwards. Half the time when lubing, I’ll likely have the wheels off anyway to check brakes, adjust the “self-adjusters”, check the tires thoroughly, pressure wash the backsides, and remove all the annoying gravel (when doing so, I’ve found countless nails and other metal objects in tire treads. BTW, pulling and replacing wet bolts is NOT easy, as the bolt alignment is not always there. 🤣1 point
-
I do love the collector cup edition. 🤣🤣🤣1 point
.thumb.jpg.e34bf01ef7f7d5e99ad31856d45afbeb.jpg)


-
Recent Achievements
-


")


")


