Leaderboard


Popular Content
Showing content with the highest reputation on 01/17/2026 in all areas
-
I might be ready to buy a used Oliver Elite II (older than 2022) twin bed by June or July. (Fingers crossed) I've been researching the Oliver for at least two years now. I had to do some other things first. Got my master's degree and started developing an online biology course for high schoolers (I'm a teacher). It's time to find an Oliver. I've owned campers before and love life in the outdoors. It sure would be nice to find one with special features for off-gridding. I will be networking to speak with anyone who wants to sell their Oliver come summer time. I'm not interested in going through a dealership, though.4 points
-
We found an extra brake backer plate nut loose inside one of our wheels. It would randomly get caught up in the brake assembly, emitting a terrible screech. Could be hard to notice because it would stick to the magnet.4 points
-
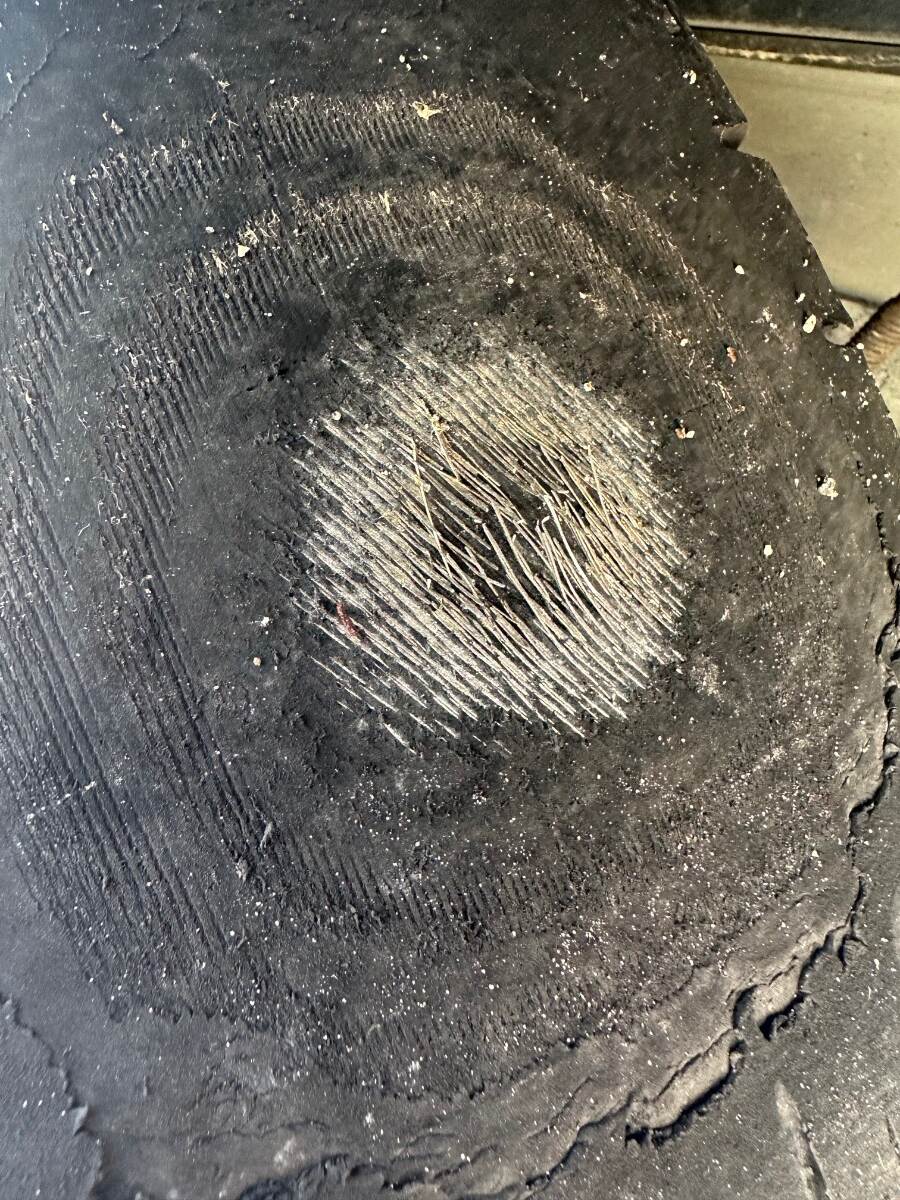
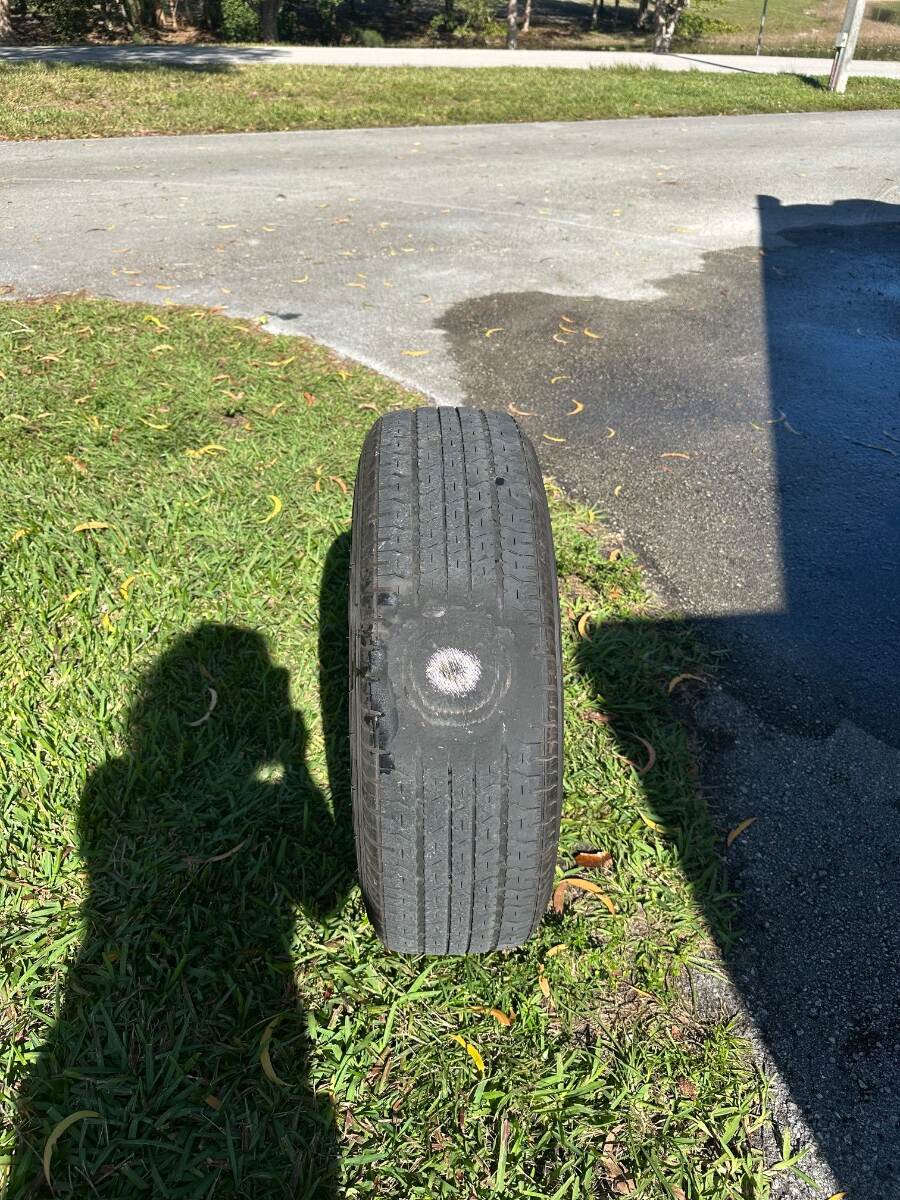
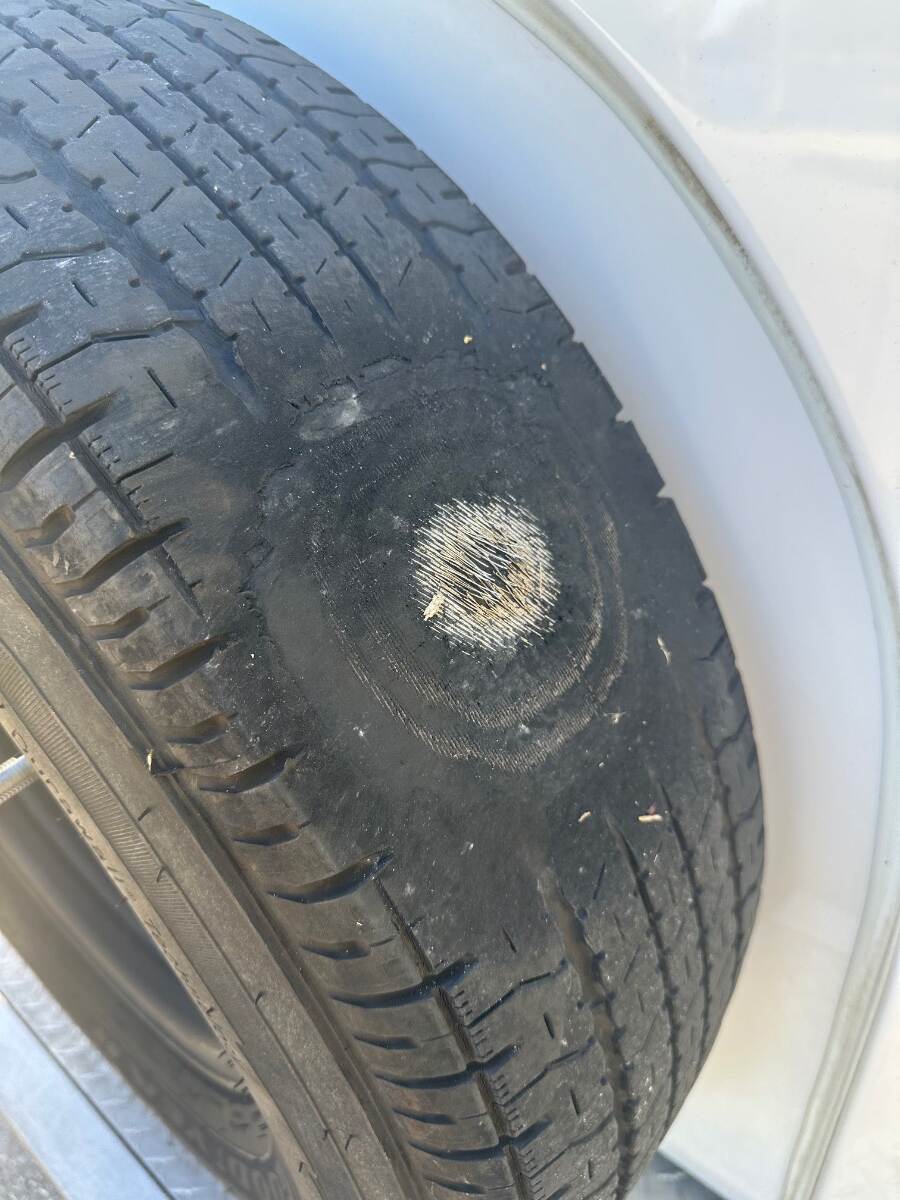
The only thing that I can think of is that something got jammed in the brakes which either made that single brake lock in the "on" position or that something was like a stone that jammed the brake very tight to the drum on that one brake. Then as you backed up the trailer - probably into the camping spot - whatever was jammed became released thus causing everything to return to normal. I assume that your mobile tech will check the brake wiring, the magnet and all other parts of the brake (at least on that wheel) plus the bearings, etc.. What pressure do you run in your tires? I ask because the worn spot is directly in the center of the tire as opposed to being spread out. This might indicate that your pressures are too high. Also, can you tell us what TPMS system you are using and what your "high" temperature limit is set at? I would have thought that the temps should have reached a high enough level to trigger the TPMS unless (of course) the wheel wasn't really "locked up" all that long. Bill p.s. glad that other than the cost of the tire and the mobile tech that everyone is OK.4 points
-
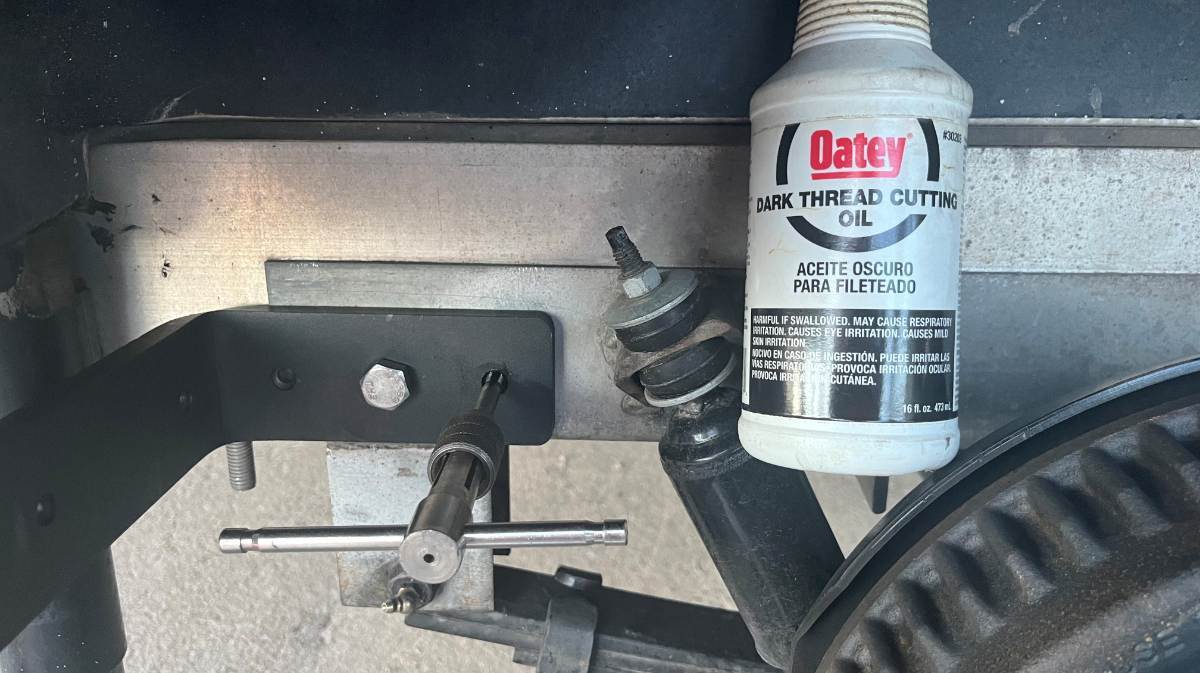
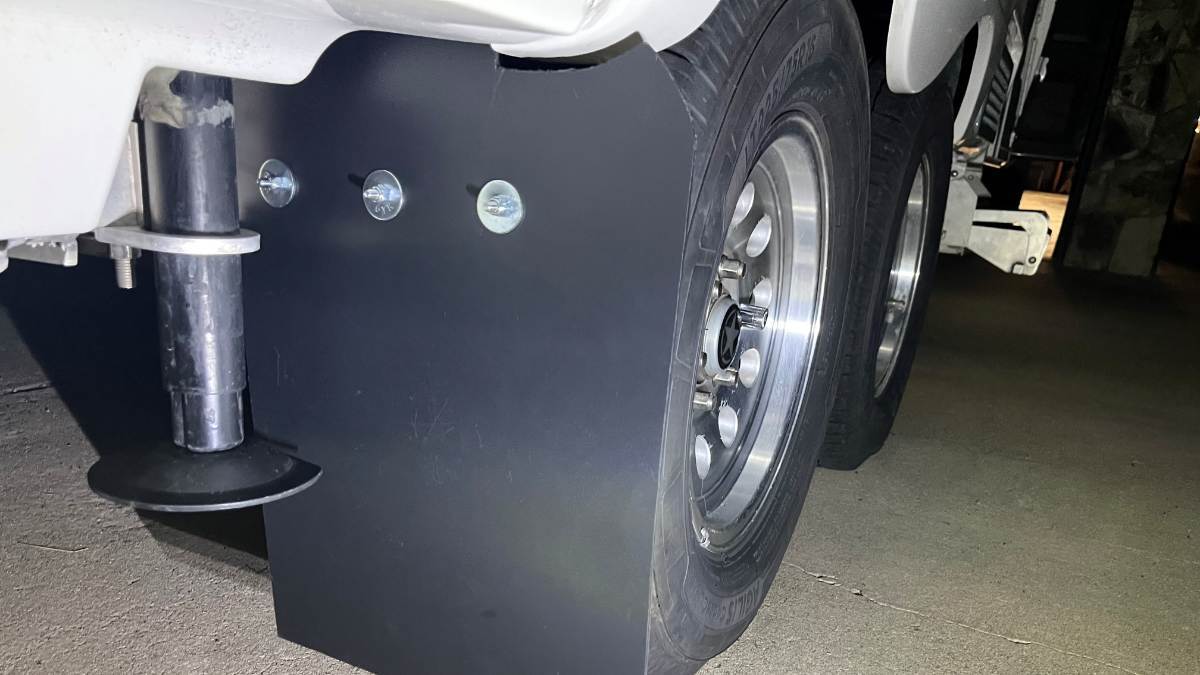
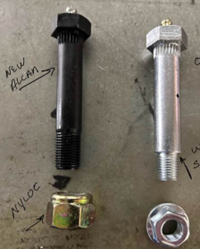
I understand most of you have good mud flaps on your TV, but on your Oliver? @John E Davies installed some on his Mouse back in 2018! Craig @Galway Girl did a similar installation more recently and maybe there are others. In the designs I've seen, the mud flaps were mounted behind stabilizer jacks where there is a frame cross-member, an easy place to bolt a horizontal mount. I was not happy with this design as it does not protect the full underbody behind the wheel, nor does it protect the stabilizer jacks from taking mud. My goal was to install a mud flap between the rear tire and the jack, but there’s only about 3-4" or space! I realized that with a fitting 90 bracket I could use a frame bolt for support. I removed the 3” carriage bolt that holds the rear of the steel suspension subassembly to the main aluminum frame. I purchased #5 ½” bolts, 3 ½” long to be a ½” longer allowing for the 0.4” depth the the HD counter bracket. After an hour and a half searching Amazon, I found these which turned out to be perfect! I got the 6x10” brackets, where the 10” length ends just inside the width of the wheels. https://www.amazon.com/dp/B095NRB6N4/?th=1 I used the stabilizer jack to get the rear axle up on a jack stand (placed under the plate centered between the leaf spring U-bolts). Then I removed the wheel and the base of the jack stand to allow for ample work space. Each side of the brackets has 3 predrilled bolt holes. On the 10” length, they’re perfect to mount the flap. On the 6” length, I got lucky! The center hole is just in the right spot to mount to the frame bolt. I drilled the center hole wider to ½” and bolted it in place tight enough to hold the angle. Then I used a digital caliper to get the bracket perfectly level to the frame. I used a 5/16” drill bit, the size of the existing holes, to scare a center, then switched to a ¼” drill bit which is the correct size for a 5/16”-18 tap. Drill through both the steel sub-assembly and the aluminum frame. I used a little cutting oil to make the drilling and tapping go easier. Then added Grade-8 5/16” bolts which I had on hand with blue thread-locker. The ½” bolt has a Nyloc nut. Torqued them down by feel with ratcheting wrenches and this HD bracket ain't going nowhere!
 3 points
 -
My wife and I had purchased a lightly used Jayco UDST pop-up with a single torsion axle. We completely rebuilt all the systems above the axle. We departed SLC for a month long tour along the west coast and northern tier border and back to SLC. As part of our rebuild, I had new tires and a pro inspected the torsion axle. Axle appeared good. Probem with torsion axles is they look good until they are not. Ours failed 100 miles from Reno NV on a Thursday before a 3 day holiday weekend. When they fail, they scruffed off our new tires the no time at all. No warning, on side of road, with 100 miles of nothing. No options but getting three replacement tires at a Super Walmart and scruffing them all to bare cords to get to an axle shop. Limped into Reno just before the axle shop was to close. Learned that a new torsion axle would be 7 days out. Saw they had lots of steel and welders so while waiting until Tuesday for the shop to reopen, I designed a replacement axle subframe to support an in stock Dexter 3500 axle. With annual bearing service, it is a lot easier to tell when a standard axle is going south and to leave you on the highway. Torsions....... not so easy. Hence my dislike for torsion axles. GJ3 points
-
John, I think there’s a little more to it than that. I’m happy with my truck and car but I enjoy reading about other brands and recent changes and innovations. Same with my tech (phone, tablet, watch, ring), happy with all but interested in trends. I like my banjos and guitars but read and watch reviews on other manufacturers and luthiers. Etc., Etc. So, I’m interested in the RV industry because I like to keep up on recent innovations, new technology, etc. No reflection on Oliver one way or the other. Just curiosity! Mike3 points
-
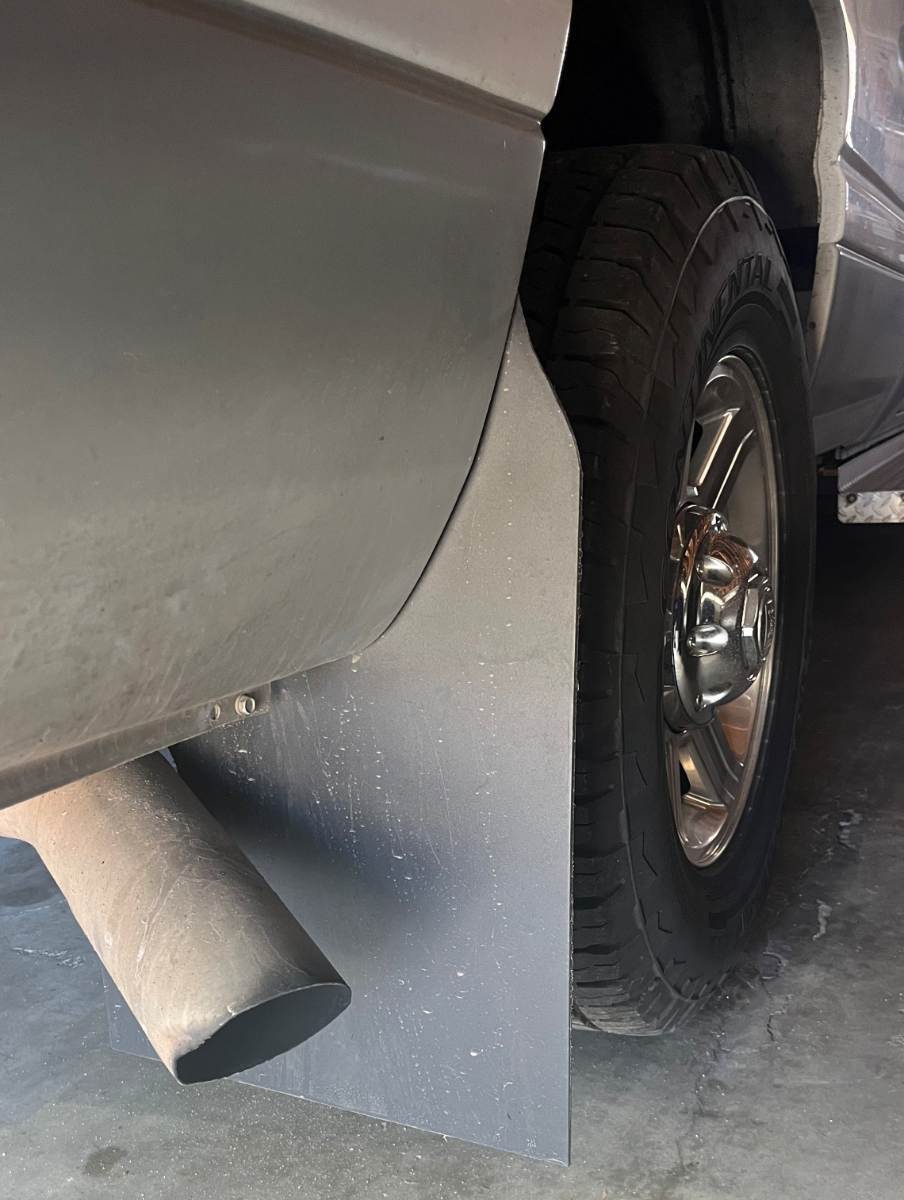
After spending considerable time and money to get our Oliver cleaned, stripped, buffed and ceramic coated, and all exterior trim painted or replaced, I figured is was time protect our major investment! Our TV had bolt-on 12x18" rubber mud flaps which were not nearly wide nor long enough to adequately protect the Oliver. On our camping trip last summer, we hit some mud in the grasslands of North Dakota and the entire lower front and rear bottom of the Oliver were packed with MUD! The TV is most important, to protect the Oliver front, so I started there. I looked for mud flaps that would fit and soon decided to get stock material that could be cut to size. I purchased this product. It's a poly non-rubber material 0.15" thick. It could be a little thicker but I like how it holds its shape and position, not flopping around like rubber. I purchased this huge 24x36" set made for semi-trucks so I had enough material to cut both TV and TT mud flaps! All for only $19! You could find better material but so far so good and now that I have worked this project, replacing the material in the future would be easy enough! 😎 https://www.amazon.com/dp/B06XRHB7GH/?th=1 I removed the original mud flaps, used them as a template and I added 3" in both length and width (1 1/2" wider inside and out). On the curbside, I had to make a large oval cut-out the the tailpipe. Because the new flaps are wider I cut a curve on top to blend the flap the the truck body (see pics).
2 points
-
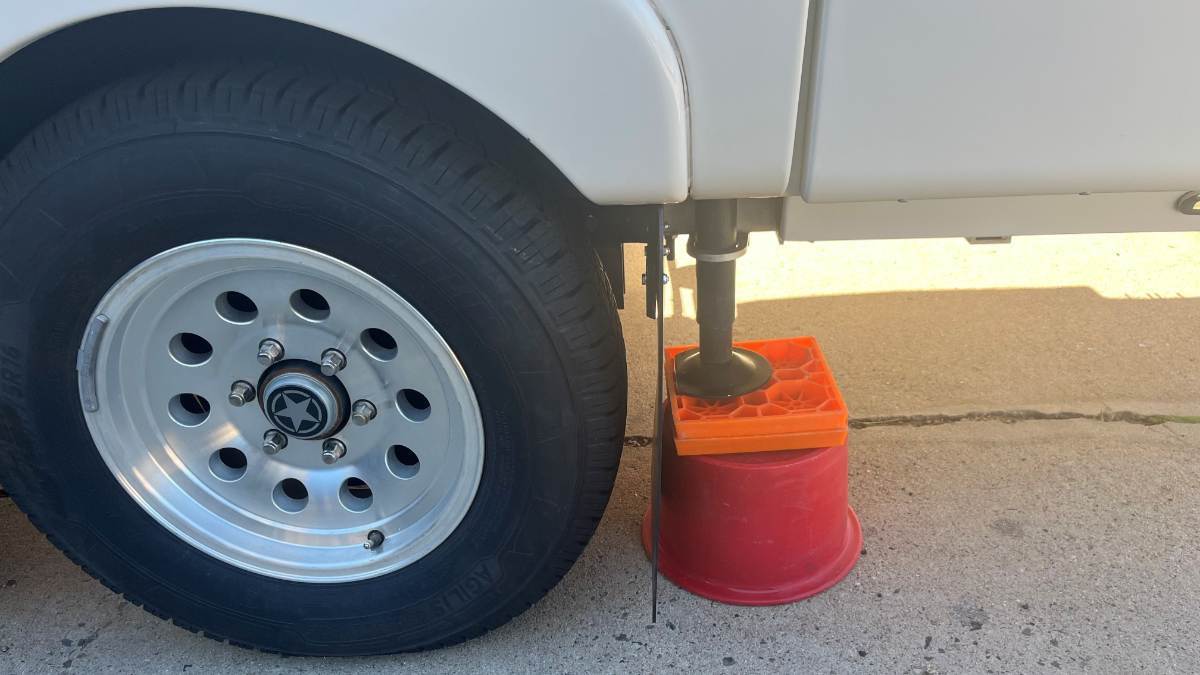
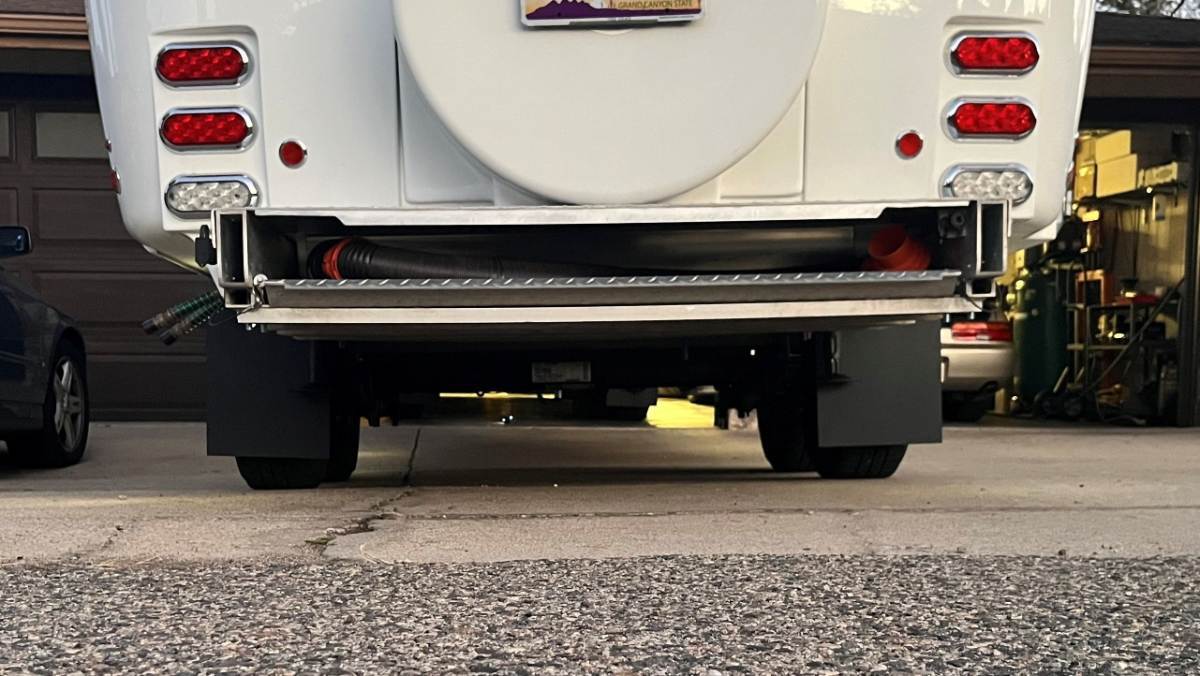
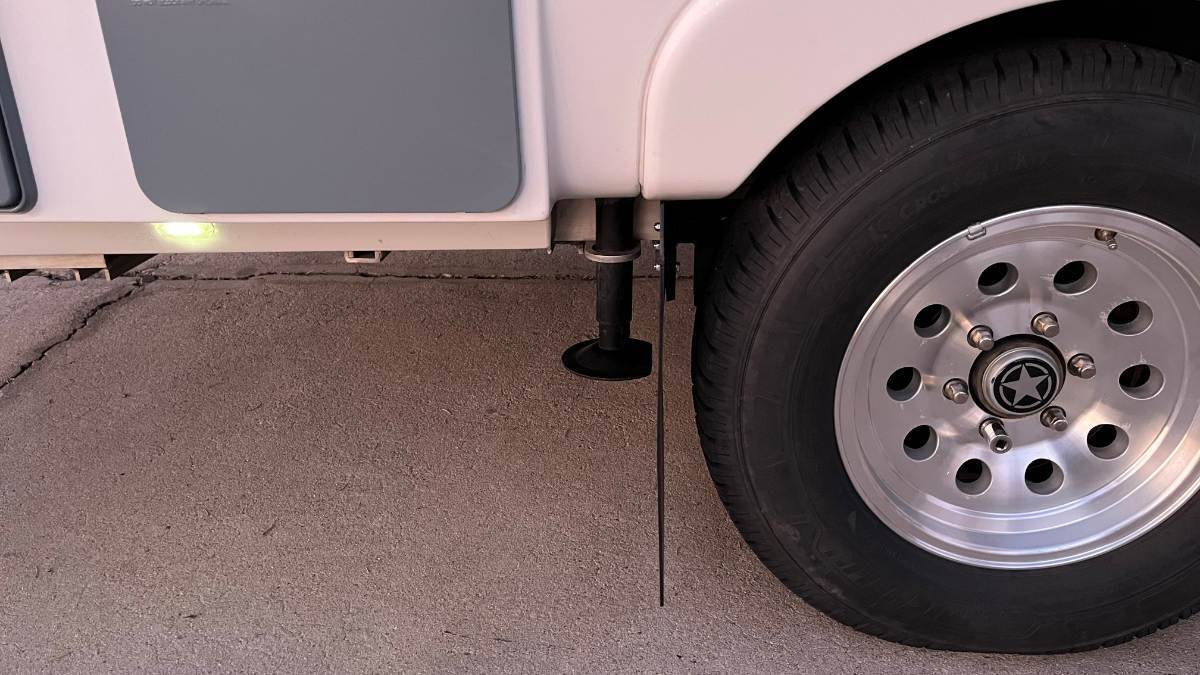
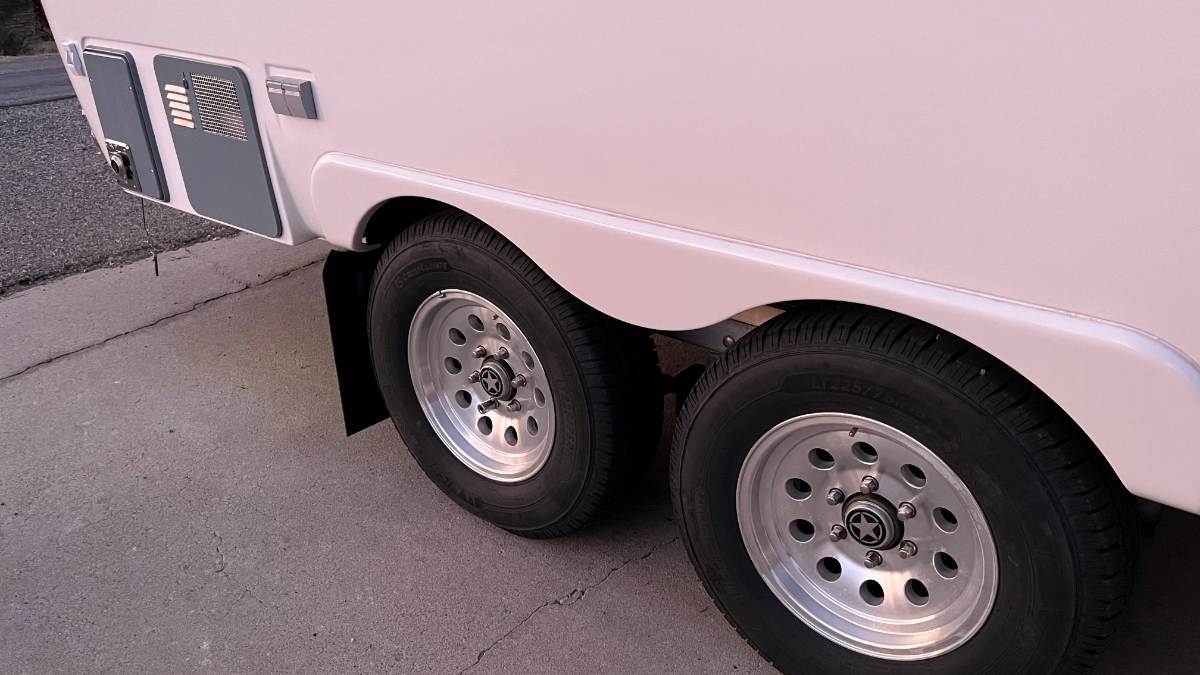
Time to repeat for the other side! Common thinking and my first thought was that I could turn the template upside and trace the mirrored view for the other side. Good thing I thought to measure twice. I positioned the cardboard stencil made for the right side and found I had to drill the holes about 5/16" lower for the left side. Who knows why except that only OTT could do so! Was a simple fix to adjust the drill hole placement, and otherwise the pattern flipped over was identical. Pictures show the streetside and how the jack fits with Andersen blocks, and the view from the rear showing both mud flaps (bumper off for polishing). Boy, I used to hate cleaning the road tar, grease and grime from under there! No more, just pressure wash the mud flaps! 😎
2 points
-
For what its worth - I'd lower this a bit - say down to 145 - certainly you can go lower but if you have that side of the trailer in the sun, are traveling on dark black asphalt roads and are traveling at speed - above 55 mph - you might have times when you will get a signal that things are getting too hot. While I'm sure that there will be some discussion here about the 65psi to start in the tires, if I'm planning on doing a fair amount of driving on the Interstate (i.e. speeds of above 60 mph) I'll start with a psi of 60. Having said this, I doubt that your 65 psi was so high as to be the only cause of that worn spot in the tire. I wouldn't be worried about the psi fluctuation you saw due to the ambient temperature drop. As things warm up I'd bet that your psi will return to close to what you originally set it. Interesting information on the storage of your Ollie - indeed, that salt air and lack of movement point to rust being a major suspect in the problem. Please let us know what the results are of the mobile tech taking a look at the situation. Bill2 points
-
Odd that's it's rolling fine now, after you jacked it up. Obviously at some point it was stuck in that one position. Brakes locking up must be it if the bearings are good, but why are they no longer locked up? Hope things work out for you quickly without anything major! Best wishes, JD2 points
-
I still watch all the new pop-up and hardside truck campers. The new technology amazes me. I do the same with the fiberglass trailers. The grass is always greener. I'm happy with our Oliver and hope we can stay healthy and enjoy another 4-5 years. As far as Morning Star, my issues are no pantry, their using Battleborn Batteries, television placement, lack of storage compared to our LE2, rear side entry, front bed, small closet limited to 4-5 hanging items and zero room for shelves, 650 lbs. +/- heavier than a loaded LE2, leaving little room for everything else. We like to travel with a full tank of water. Also the rear manual jacks are very "Cheesey" compared the the Oliver jacks. Also, the low clearance and their suspension maybe suspect.2 points
-
No more dirty Ollie!
1 point
-
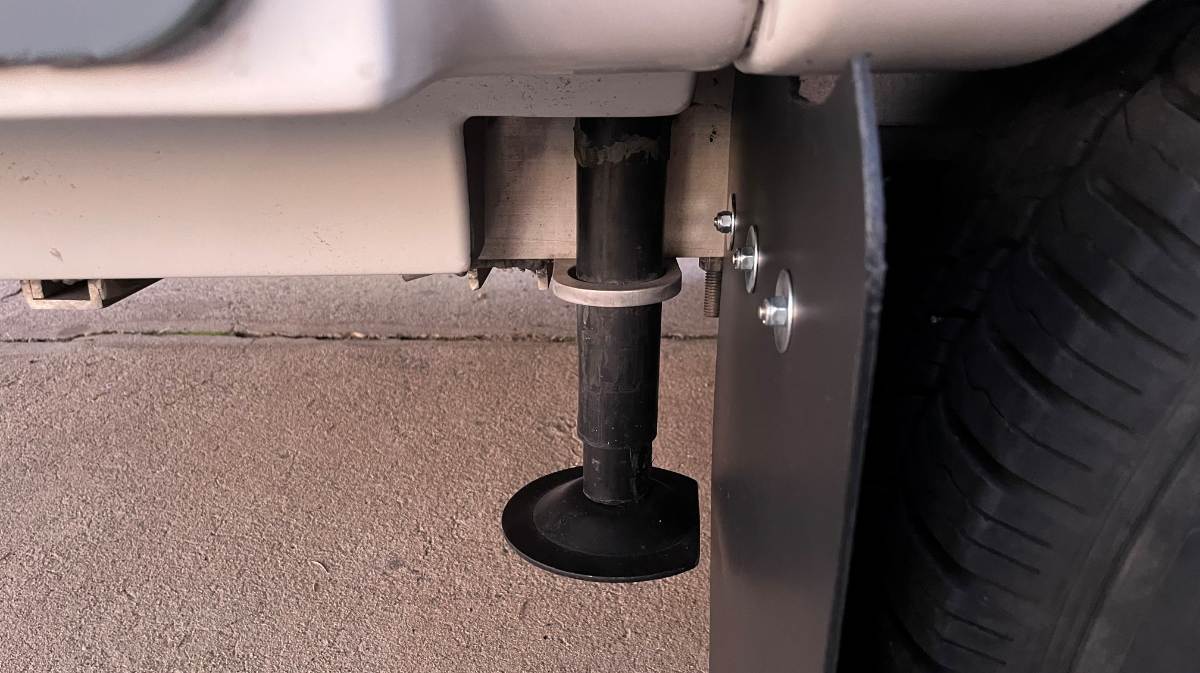
I cut the base of each rear stabilizer jack to have one flat edge. This allows more room for the flap to arc rearward while towing and so the flap material is not always hitting the same point on the arced edge. I don't believe the strength of the part was reduced much and these parts are readily available. I already have one spare! Use a 10" steel cutting blade on a chop saw and this is quite a strong piece of metal. By the time it cut through it had melted a ring into the plastic plate below. Filed the edges smooth on my bench grinder and steel brush. I may hit the open edge with spray paint later. So, the right side is done and I'm very happy with it! 😎 Several views to follow...
1 point
-
Glad you did not have a blow out or worse. If it were me I would immediately have a complete brake and wheel bearing inspection done on all four drums. It’s more than obvious in your photo that tire/brake was locked down. Safe Travels!1 point
-
@Geronimo John I have to agree with you. about using the Step wet bolts. When I was installing the Alcan springs in the Oli. I used the wet bolts from Alcan and found when Torqued down to the specs, I could not get grease through the sides on the Bushing. I finally measured the step bolts and the measured the springs and carriers. I found that the should bolt allowed just over .010 slop. This allowed grease to come out of the sides and allowed the shackles and springs to move freely. This allows the EZ-Flex to move freely, and do what it was designed for. All of the stress is on the bolt itself and is not on the threaded shoulder thus allowing a lower torque.1 point
-
Thanks all for the input. My tire monitor is a TST 507. Tire pressures are a little more difficult as the tires were inflated to 65 psi when the temp at home was 60ºF in anticipation of colder weather. When we left Louisville, the temp was thirty and pressures were down to about 57 psi. Last night on the way from a several day stopover in Charleston the ambient temp was 22ºF and pressure was down to 55 psi. Temp upper limit is the factory default of 158º. i also wonder how many miles it took to wear down the tire to that extent. They trailer had been sitting for several months before we left and maybe the brake mechanicals were rusted and stuck. The trailer has about 24k miles on it with some salt air exposure in Anastasia in St Augustine and Bahia Honda. I will be interested to see what the brakes look like when the mobile tech removes the drum. Hopefully the trip tomorrow to the keys goes smoothly!. We absolutely feel like we dodged a bullet today and have said our thanks.1 point
-
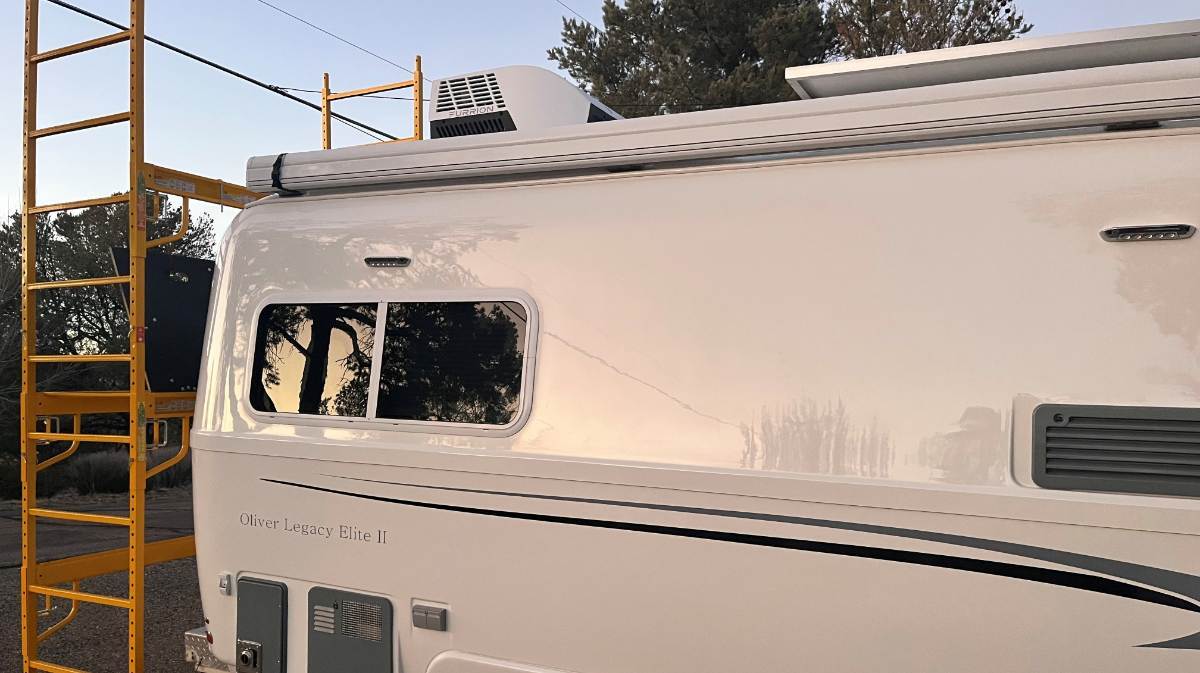
Thanks, Mike! Before I had the scaffolding we installed an A/C on our Bigfoot. Adam climbed up the ladder on the big Class-C. There was an old Dometic up top where the fan had jammed. I instructed him to heave the old unit off the side, hit the gravel drive and nothing else! 🤣 I had the new A/C still in the shipping box bottom, tied a strap around it sitting at the bottom of an extension ladder. He pulled the strap as I walked it up the ladder. Either way you need two people. I'm not walking on top the Oliver, so my scaffolding investment has been helpful. When not in use, the upper section is stored away but the bottom frame sits around the nose of a car parked in our garage. I use the shelf for shipments in and out and empty boxes, it's been a handy staging shelf. You can always use more counter space! https://www.homedepot.com/p/MetalTech-Safeclimb-6-ft-Baker-Scaffold-with-Platform-and-Included-Trap-Door-1250-lbs-Load-Capacity-I-CISCH1/302038304 Or you can rent if you do not want to purchase and make room for one. This rental page shows a double set and outriggers like I purchased, plus the upper safety surround: https://www.homedepot.com/p/rental/Interior-Scaffold-I-TCISCH1/316821794 I'm on my 3rd jar of Marine-Tex with all the holes I've filled. Simple to use and the color is very close to our hulls, at least the older ones. I can't easily see the large holes I filled from where the TV was mounted in the corner originally. https://www.amazon.com/dp/B0014419V0/ I have some ready but will wait 'til we return from camping in a few weeks to fill these eight small holes. I'll need to drill a recessed bevel first making a shallow wider opening to better take and level the fill. I have other work too that needs a second coat, where before I removed the rear camera, the bathroom gray valve handle (replaced with electric valve), and the door latch that was riveted bottom right of the entrance (don't need it after adding Lippert Friction Hinges)! You need a second coat after the first shrinks. She's getting cleaner all the time! 😎1 point
-
Hello to all! We are the new owners of a 2019 LEII, Hull 514, as of last week! We have owned travel trailers for about 20 years and started seriously looking at fiberglass trailers about 6 months ago. We are looking forward to our first trip in the next few weeks. We plan to do a lot of boon-docking in out-of-the way NFS campgrounds for trout fishing, hiking, etc. and our large toy hauler was NOT suitable for that. Hull 514 did not come with an inverter or any solar, so I am installing Lithium batteries and an inverter over the next few weeks and then will add some solar charging capabilities. I'll probably create a post about that project after I'm done in case it helps others who are in the same boat. I have already enjoyed and gathered great ideas reading about the various approaches others have taken on this forum. We will likely convert to the Twin layout eventually as well. I also plan to swap out to 30 lb Propane tanks and add my LevelMate Pro this weekend (both from my current camper). Anyway, just wanted to do a quick intro for this very active and informative group. Glad to be in the family!1 point
-
I just corrected the original post. JD1 point
-
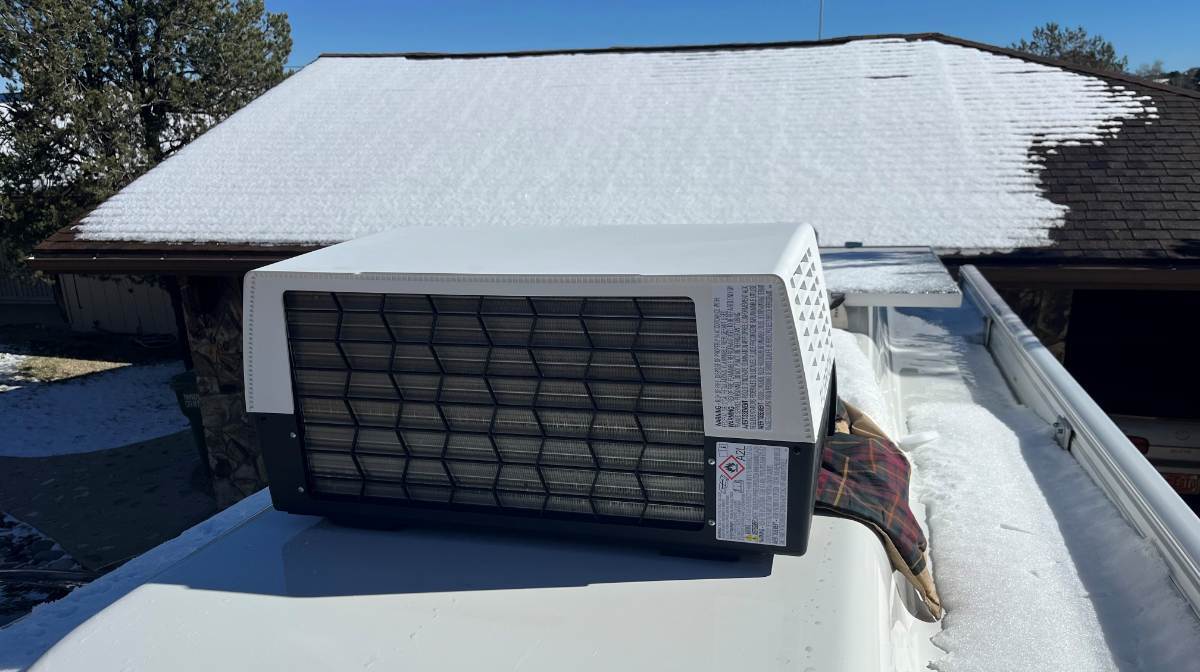
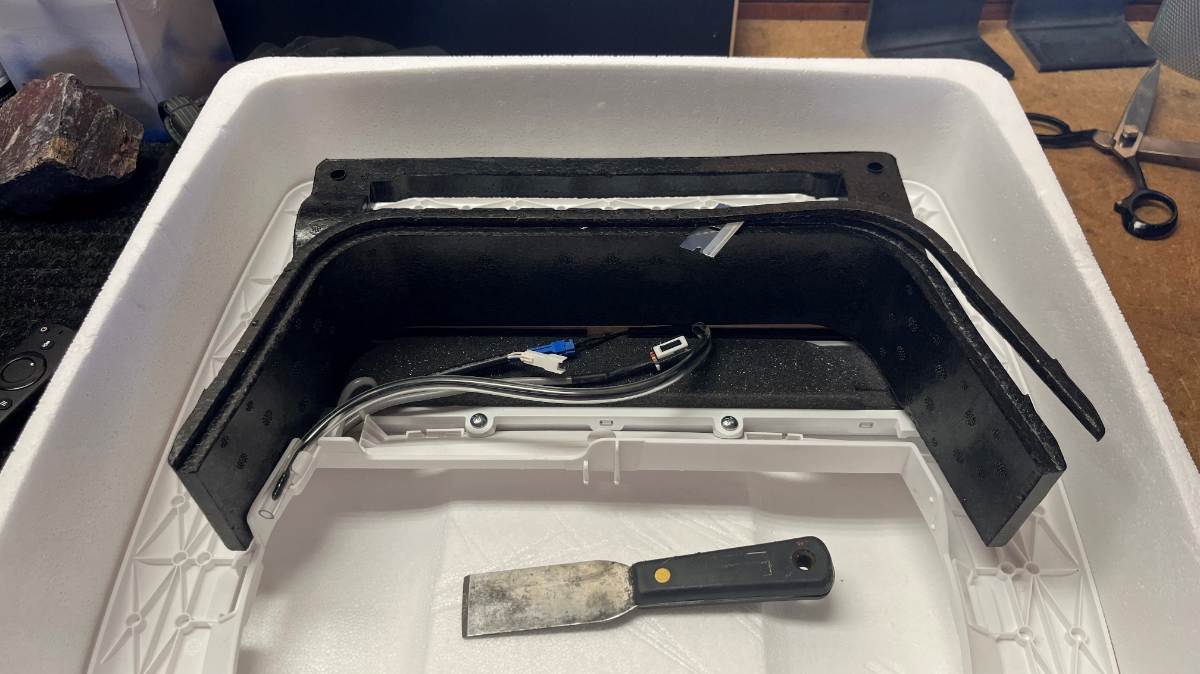
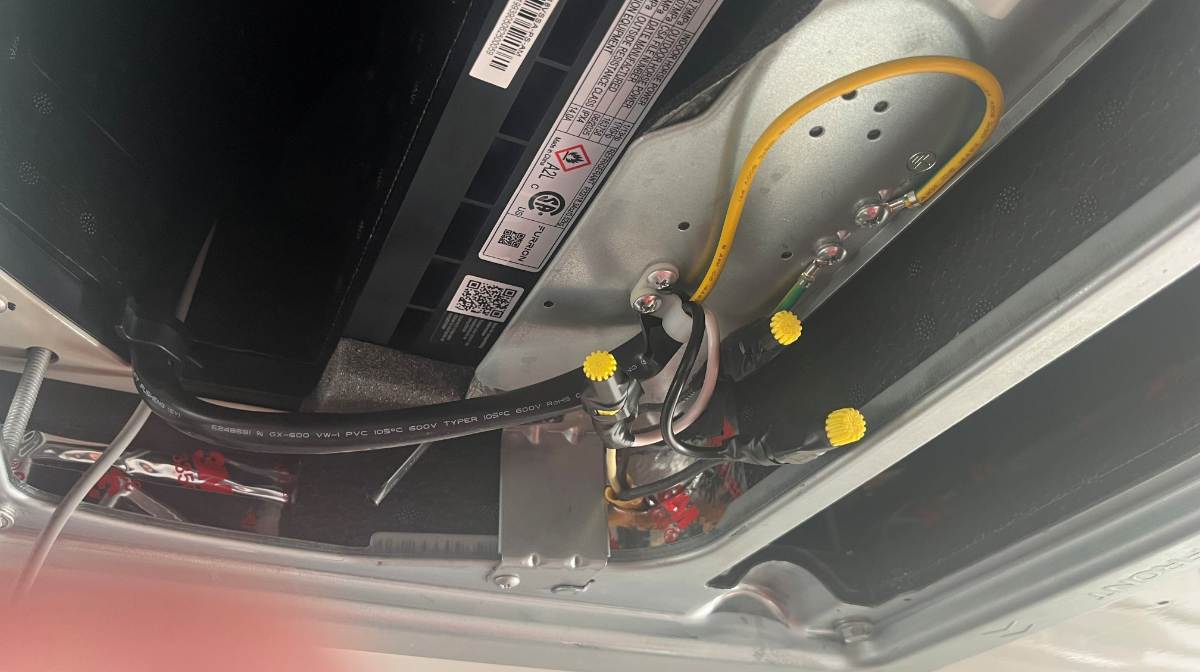
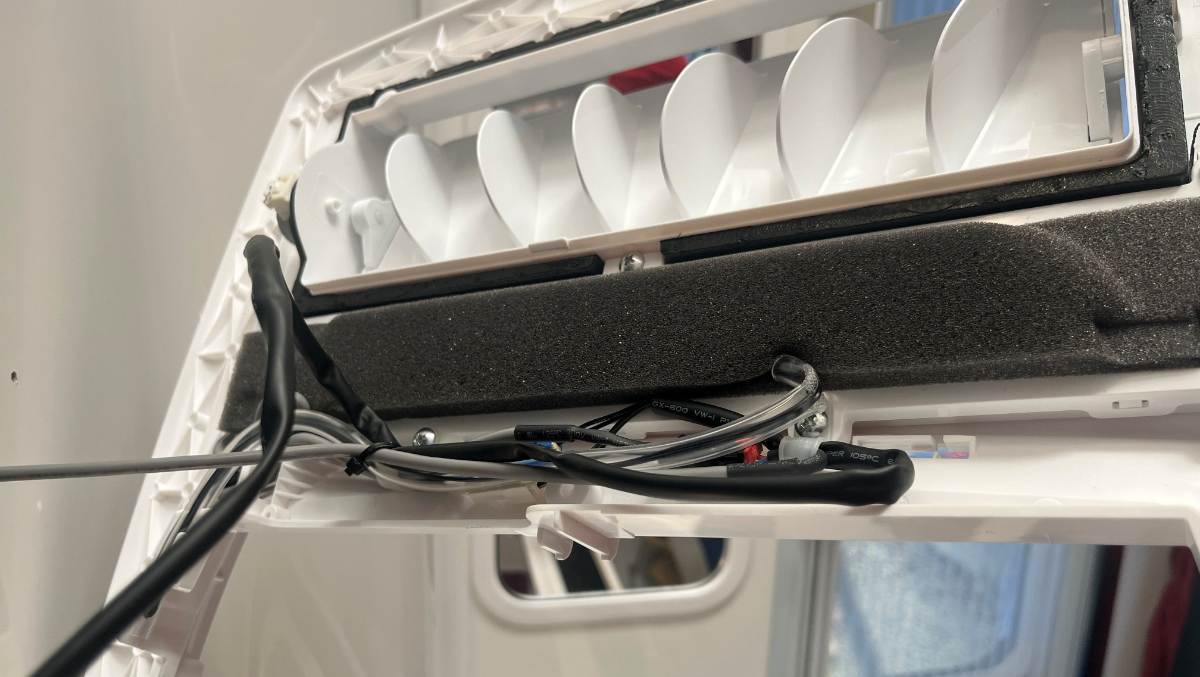
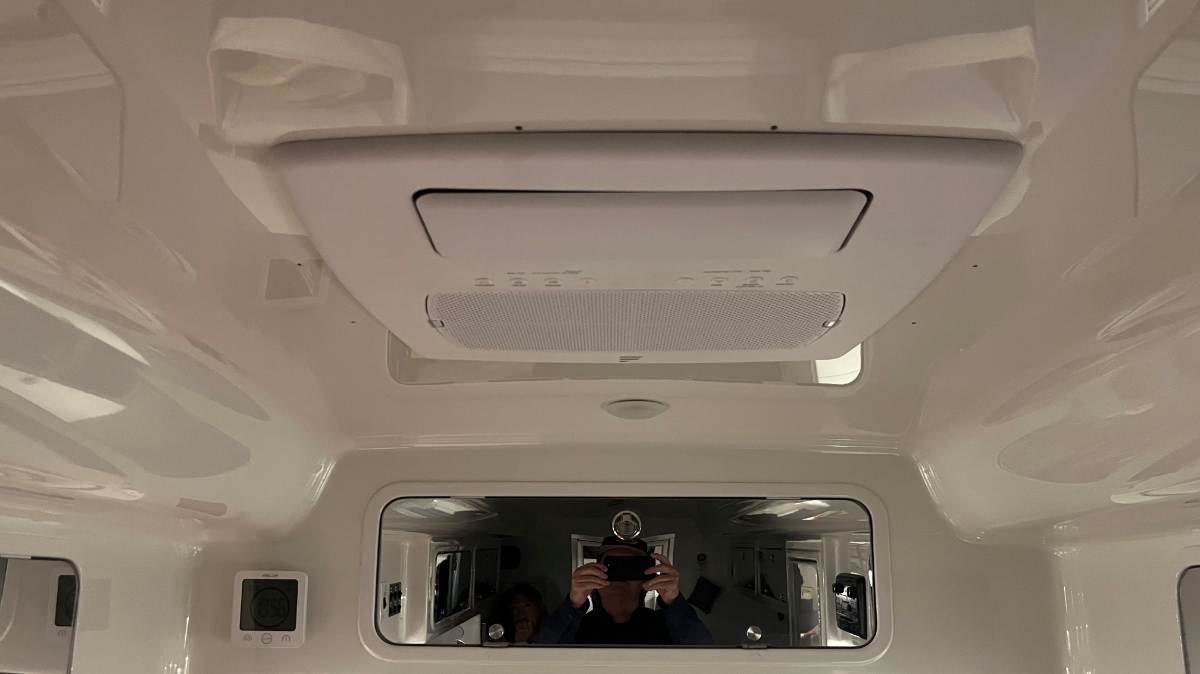
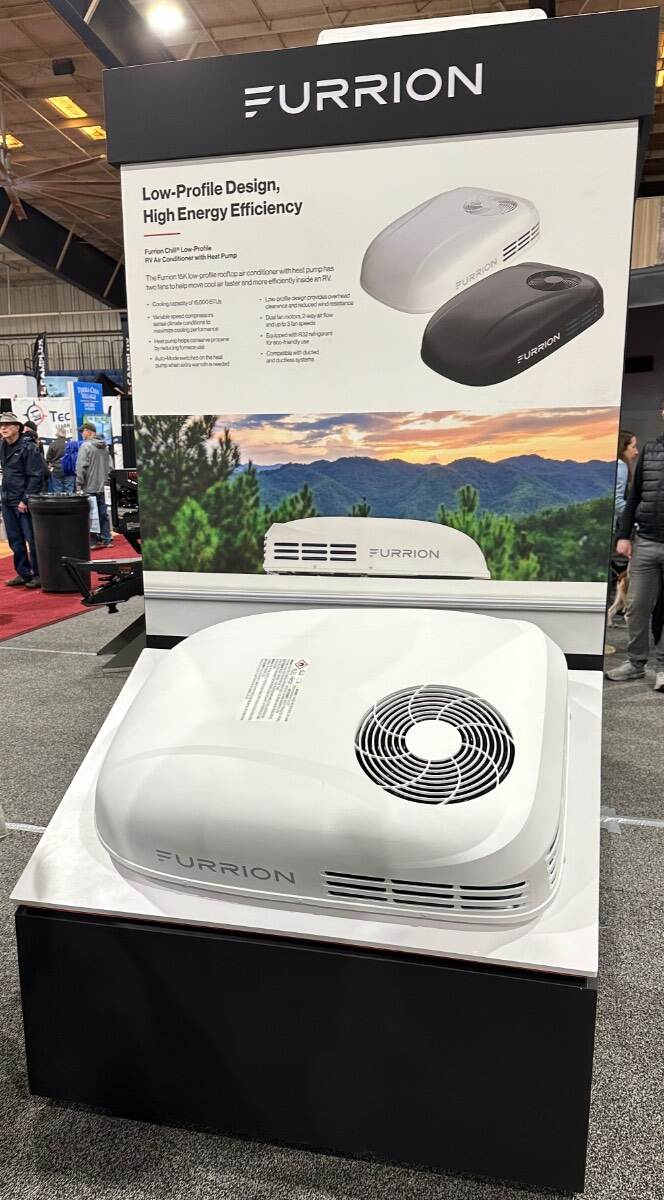
Adam and I got up on the scaffold to remove the defective (and refunded) Turbro unit. We set one scaffold cross beam and the same height as the roof so to have a place to rest the A/C on the way down. When we picked up the new Chill Cube, Adam said, “Wow, this one is light!” (Turbro weighs 88.2 LBS and the P2 was heavier, the Chill Cube is 72.4 LBS.) It’s also easier to maneuver with it’s tall square shape, foot-print about 60% of the others. I forget a bath towel like we used last time, so I took off my jacket to have something to help slide the top unit into place. Then inside, I pushed up on the A/C and pulled the jacket down through the opening. Screwed in the four corner bolts, to see and align the exterior unit over the opening. You don’t need the air baffle extension, and the primary hard foam baffle must be trimmed. I trimmed ours about 1/2". When you measure, realize the foam seal on the exterior unit once torqued should also be 1/2". If you trim too much (bad mistake) you will have a gap between the warm in and the cold air out! Better to error on trimming too little, but if it’s too tall it will be pushed up against a hard plate and could crush. I first cut only 1/4" off and it contacted the upper plate before the foam seal compressed at all. I then knew another 1/4" had to be trimmed. Better to do it twice, than to over cut! (many pics to follow) I was not able to use the 120VAC connector they supplied and used standard wire nuts instead. I also made a hole into the foam baffle to get the Romex into the center area. I moved the wire clamps to be usable based on the where the Romex was installed. Not easy to fit all the wires in the narrow center area. The extra length of some cables can be inserted into the junction box. The main thing is you have to feel the center mounting screw will seat without any wiring obstructing it. The instructions say to use the long screws for the plastic air handler, but they do not supply any! I used two long screws I had to get started, but once the plastic cover snapped into the metal frame all I needed was 5 of the supplied 1/2" screws. Mount the filter components and you’re done! (Notice the screw holes in last pic. I still need to patch the ceiling fiberglass.)
1 point
-
On second review, it's not a straight rebadge. Looks like they're using the same outside unit mechanicals as the Turbro, which is it's best feature, and redesigned the airbox and electronics, which are it's worst features... and you can either have a wall thermostat or manual controls. https://lci-support-doc.s3.amazonaws.com/furrion_specsheets/ccd-0006147.pdf https://lci-support-doc.s3.amazonaws.com/furrion documentation/air conditioning/aftermarket/ccd-0009380-en.pdf Best part for us Turbro owners is that the internal airbox parts as well as electronic controls are sold separately and will most likely be able to be used with the turbo.1 point
-
I saw the Furrion Chill Cube today at the RV Super Show in Tampa and it is indeed very impressive. And now the really good news, Furrion will introduce a low profile model in April according to the gentleman that gave me the demo. It is advertised as 15,000 BTU's and also has a heat pump. Mossey
1 point
-
Chris: Some thoughts about the standard wet bolts vs step bolts for trailer springs: Standard bolts generally used for light duty trailer shackles using a 9/16" diameter shackle bolts without a zirk fitting. Step Wet Bolts Bolts are used for heavy duty axles where the step is necessary for proper function with bronze bushings. I believe that all of the OTT trailers, and the most other heavy duty trailer spring shackle bolts are step bolts. Yet Alcon is using a standard bolts. This got me wondering about the topic. Wet bolts sandwich the springs between the subframe mounting "tabs". With the step, the step bolts mechanically limit the clamping of the springs. The result is that the bolt head is prevented from turning in the mounting tabs by two means. First, the splines. Secondly the friction on the tabs by the step and the nut itseld. As a result of the design, the spring always has some clearance allowing it to more freely rotate relative to the bolt center line. My concerns are: The Alcans could easily be over tightened thereby forcing the mounting tangs against the springs. This process would result in the spring binding in the tabs and facilitate the stripping of the bolt splines thus creating a "spun bolt". A spun bolt will act as a crude bearing causing the mounting tab holes to quickly wear. And the repair is rather difficult. Been there myself. Use of Nylock's in high torque situtations often results in the Nylock becoming impossible to remove with hand tools. To do so, one will likely want access to air tools or electric grinders to literally cut the nut off. Trying to do so with a hack saw and punch will be tedious, especially it appears that their bolts are very high quality grade 8. As such, failure of a wet bolt will complicate life a lot. The only way I would want standard bolts for a splined application is if the bolt head head was fixed using a Hex Capture Washer. After two years of working with OTT Jason, this approach ended up being the only acceptable long term repair for a spun bolt spline. DIY - Dexter EZ-Flex Center Bolt Spline Repair (20 APR 2024).docx What are your thoughts about Alcon not using step bolts on our springs? Thanks GJ
1 point
-
I have since updated the post. The 5" increase is from my Houghton A/C height. JD's remeasured and it is 3.25" higher than the Dometic Penguin II. In our case, there is no way I could back it into our storage area. Especially since there is a ramp at the entrance and that kicks the area behind Ollie's axles up even further. So if height of your storage areas is close, it would be wise to double check. GJ1 point
-
I've been using this local html document more lately. Man, I'm searching on things, but then finding so much more that I had missed over the years. I should call this page the Oliver Squirrel Search (OSS). Good stuff. I'd love any feedback, I might be able to add in more options, or "check boxes" to filter more!?1 point
-
Having remembered instructions included with a backpacking personal water filter I have, I asked "Google AI" the following question: "do camping water filters need anything between uses?" And the reply was: "Yes, camping water filters need cleaning and drying between uses to prevent bacteria and algae growth. After each trip, you should flush the filter with clean water and allow it to dry completely before storing it in a cool, dry place, preferably in a sealed bag. For long-term storage, some manufacturers recommend a more thorough cleaning with a diluted bleach solution or sanitization, and it's always best to follow the specific instructions for your filter model. " Certainly makes sense to me. Bill1 point
-
I agree completely with all of the above... however its important to note the difference between the Elite and the Elite II with respect to their tire and axle configurations. Ignoring for the moment the differences in tongue weights, the variability between lightly loaded and heavily loaded trailers and whatever safety margin you prefer to factor in, the Elite II GVWR of 7,000 lb / 4 tires = roughly 1750 lb/tire which must be supported, while the Elite GVWR of 5,000 lb / 2 tires = roughly 2500 lb /tire which must be supported. For this reason, for our Elite, we have settled on 55-60 psi with E rated tires for our loaded Elite at highway speeds on "normal" roads. On rougher paved roads we have to slow down some, and on rough backcountry roads we slow down even more and sometimes air-down a bit to help cushion the shocks. There are several prior threads that discuss the relationship between psi and a tire's weight carrying capability, which can be looked up / computed based upon tire manufacturer's data. Camp on!1 point
-
@TravelWell, welcome to the forum. The Oliver tires are fine for highway and off-road. We’re nearing the end of life on our second set of tires, Cooper AT’s and they have done well. We don’t run at 80 psi, 50 psi is plenty. Our first year or so we kept inflated to 80 psi because Oliver said so. Much too harsh and we aired down several years before Oliver decided 80 was too much. As far as bumpy dirt roads, I think a lot of us have quite a few miles of bumpy dirt roads under our belts on the standard tires so I wouldn’t worry. Good question! Mike1 point
-
Yep, but you are faster on the key board than I. 🙂1 point
-
It looks like @Geronimo John and I were thinking alike and writing at the same time! Great minds… 🤣1 point
-
TravelWell: This appears to be your first post, so welcome to our forum. For a 6,000 (loaded) trailer, the OEM use of an E-rated (80 PSI) tire is unusual. Oliver could easily have gone with less stout and lighter C or D rated. But true to the exceptional quality of OTT's, they went with the stronger and much thicker tires that are rated to carry WAY more load. The E-rated tires are much more resistant to road damage as our owners typically include boondocking and roads such as yours in our travels. There are penalties with going with an higher rated tires and they are weight, cost and ride as JD discusses above. That said, I have yet to hear of any OTT owner complain about having too good of a tire tire on their rig. On the other hand, going to an even heavier duty tire such as you proposed would gain little in endurance or failure resistance. But the weight and cost increase would be significant. The third consideration is the forces that high pressure tires transmit up into the trailer. Although our 80 PSI rated tires can handle this pressure, most of our owners are running their trailer tires at the 50 PSI or less on highway and 30 PSI or less off road. Doing so keeps stuff in the cabinets and cushions off the floor. Finally, I know of no OTT owners that use 110 psi rated tires on OTT's for all of the above reasons. GJ1 point
-
The simple answer is NO, and since when does an E-rated LT tire have thin sidewalls? Please do not take advice from Overlanders, Van-Life or or Rock-Crawler types! 🤣 The Oliver is simply a 7K LB rated trailer. Ours weighs in at 6500 LB and 40 PSI is enough according to pressure-weight tables, so I go with 45 PSI. Yes, OTT suggests even more pressure for legal reasons, since not everybody checks tire pressure each time out. https://tirepressure.org/lt-metric-tire-load-inflation-chart More pressure AND more plies in the tire construction makes the tire stiffer, the ride harsher, which is not helpful to Oliver trailer systems. Many owners have drawers and cabinets opening, which is a sign, but a stiff ride also causes real damage. You want a softer ride, in fact the E-rated tire is already too stiff. Most 7K trailers run on ST tires. Many Oliver owners have run the OEM tires at 80 PSI because that's what the label says on the side of our older hull and that's what OTT used to spec which was very wrong. Like you, we very often go, "down some bumpy dirt roads and truly off-gridding." There are more wash-board roads where we live and travel than most of you. You need strength in the drive tires on your tow vehicle, but the trailer should glide slowly over the rough terrain as much as possible. Think, why do off-road types air down when the terrain is rough? (to make them soft and flexible for better traction). And based on your location, cold weather also makes tires stiffer! We owned a class-C where a prior owner install G-rated 12-ply tires instead of the spec for Load Range-E. The ride was horrible. Every time the front tires hit grooves on the highway (almost everywhere) the front-end felt like it was being hit with a 100 LB hammer! Another example - we own a Lexus GX AWD truck. I added a 2-inch lift and suspension goodies. This truck comes OEM with P-rated tires (P for passenger). I wanted LT tires for our dirt roads. Everybody goes with an E-rated tire which makes sense if you are always pressuring down and crawling rocks but we are on city roads and highway 90% of the time. I purchased a Cooper AT tire because I could get the size I needed in a Load Range-C which is stronger than the P-rated tire but not stiff and harsh as E-rated. We run at only 32 PSI (not towing) and the truck glides down most roads. LOVE the ride and was so happy with this purchase decision! I will likely replace our Oliver tires with Range-C tires when the time comes, since it is all we need and the Oliver will ride more smoothly at lower pressures. We only need 45 PSI, not 80 and certainly not 110 PSI. BTW, welcome to the OTT Forum and congrats on your first post! I hope that my explanation helps! JD1 point
-
Yes, the tires that Oliver uses are rated for a max of 80 psi. a 10 ply tires is heavier then normal car tires. Oliver now recommends that the tires be inflated to 55 to 60 psi, which makes for a smoother less bouncie ride for the Ollie. A lot of owenrs use a little less air pressure0 If you use the Search bar for tire inflation, you will find a lot of discussion on the subject.. Also, a lot of owners when traveling off road on bumpy roads inflate less then what I have listed above.1 point
-
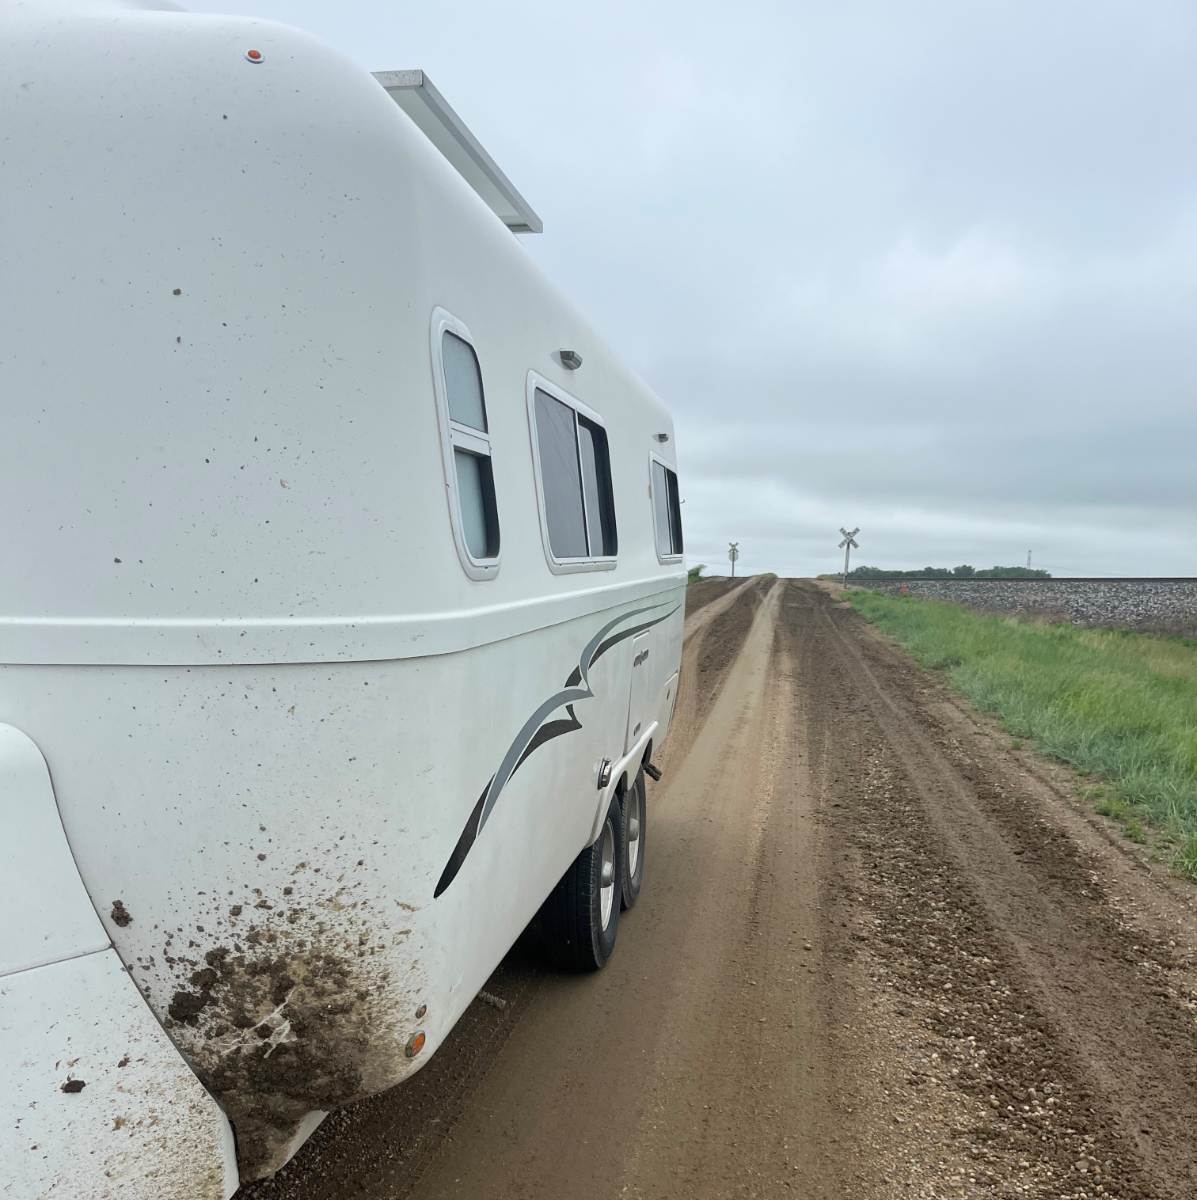
We arrived at Ft Lauderdale on the way to the Keys today and noted a severe flat spot on one tire worn into the steel plys. We have a TST tire monitor and never had a high temp warning and fortunately the tire is still holding pressure. Brakes didn’t feel hot and tire at arrival was same temp as all the others. Changed the tire, and brakes seem to work fine and no obvious bearing issues with hand rotation. We are getting a new tire in Marathon tomorrow and a mobile service tv tech is coming to look over the brakes on Wednesday. Trailer has about 27k miles on it. Any other suggestions on what happened and what to do next.
0 points


.thumb.jpg.e34bf01ef7f7d5e99ad31856d45afbeb.jpg)


-
Recent Achievements
-


")


")


