Leaderboard




Popular Content
Showing content with the highest reputation on 06/04/2026 in all areas
-
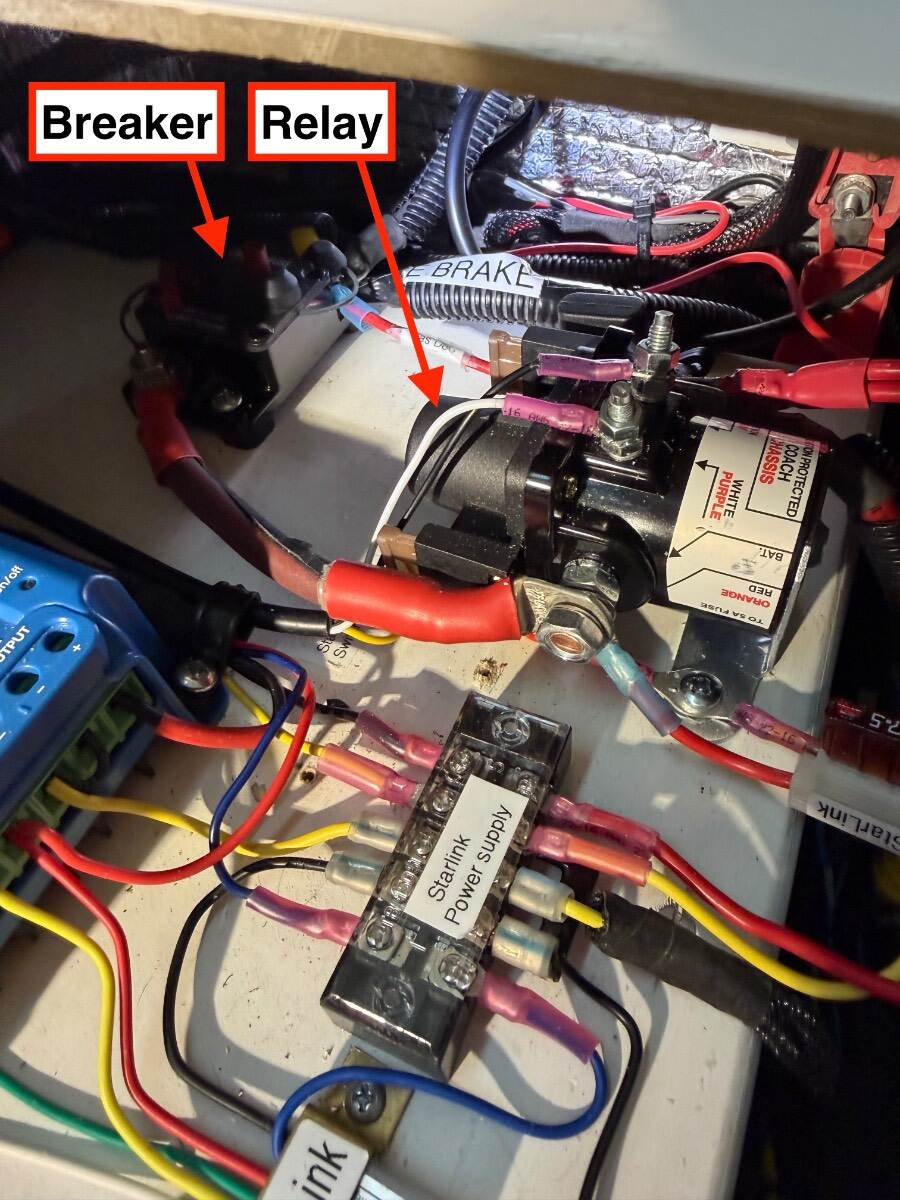
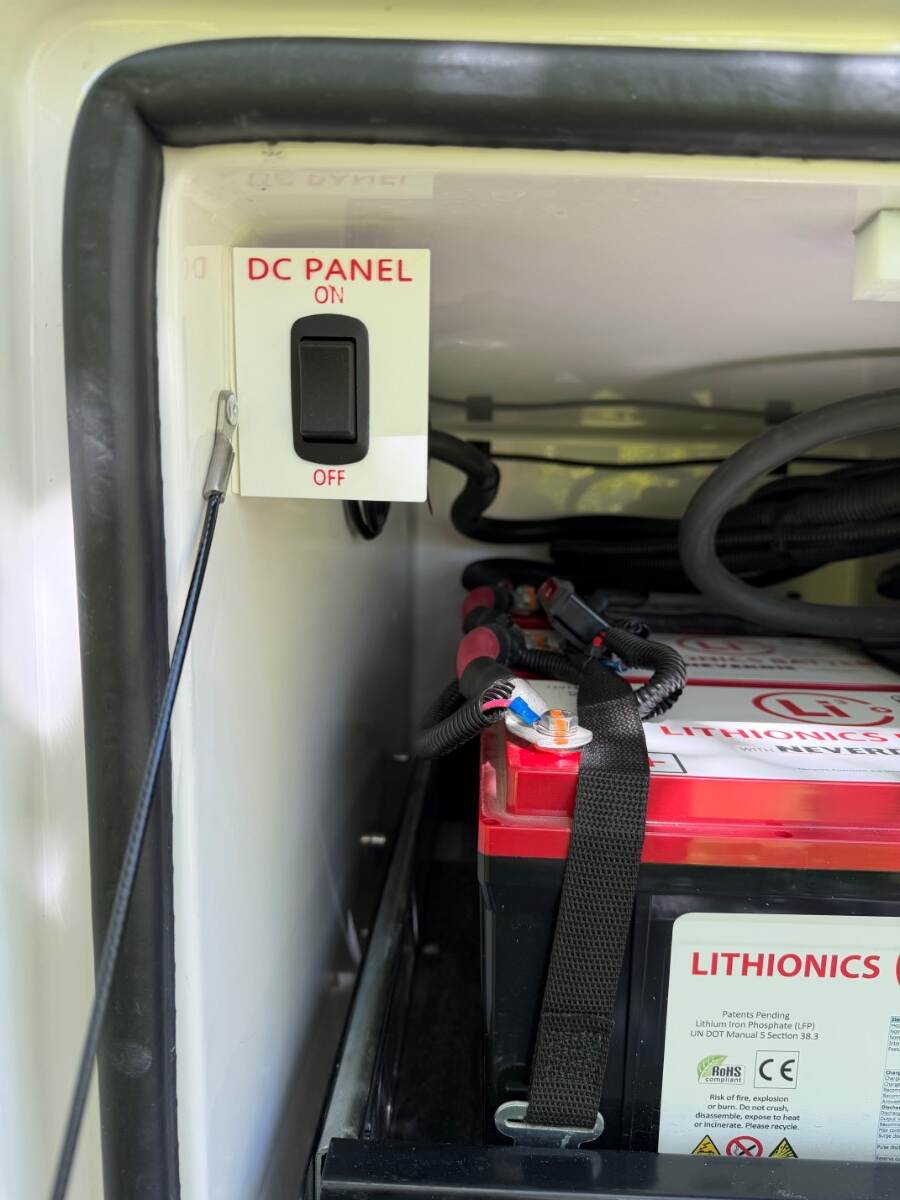
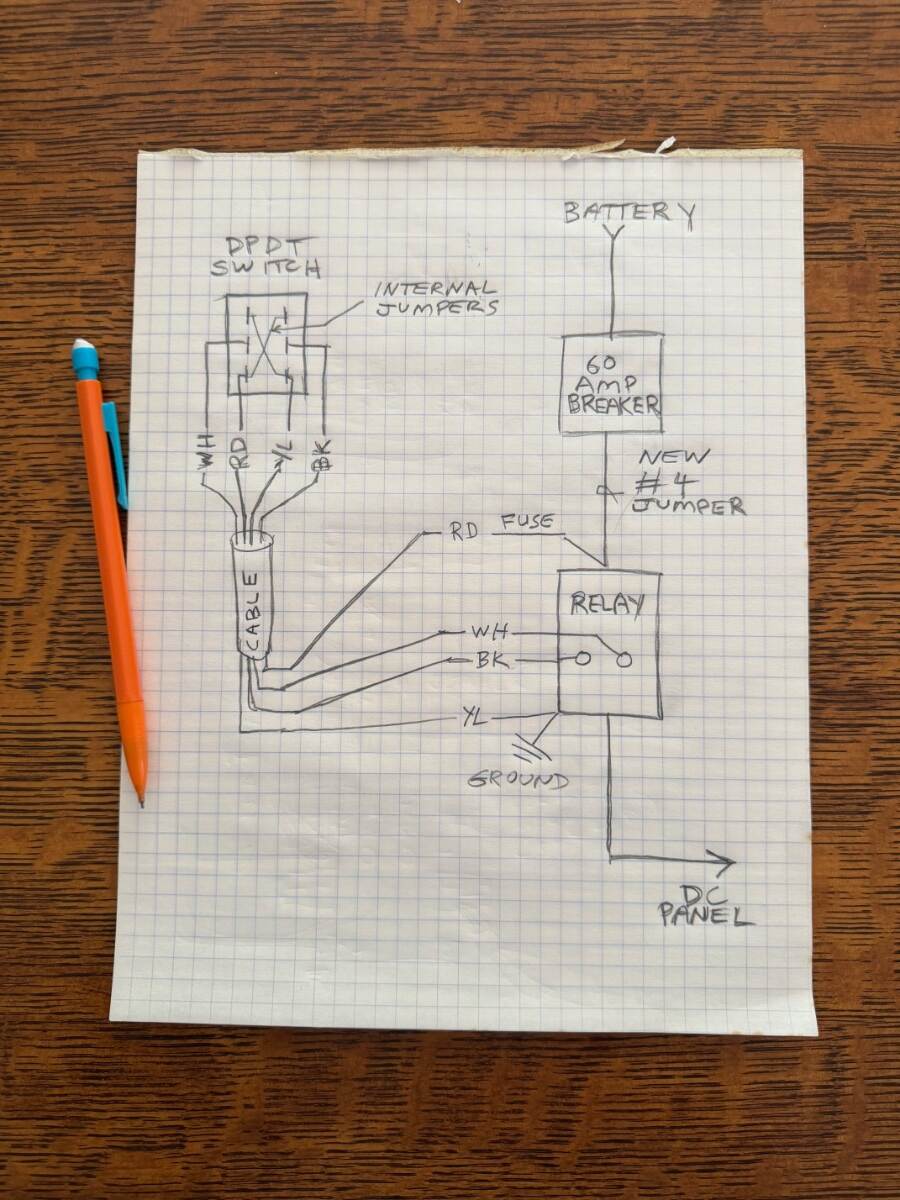
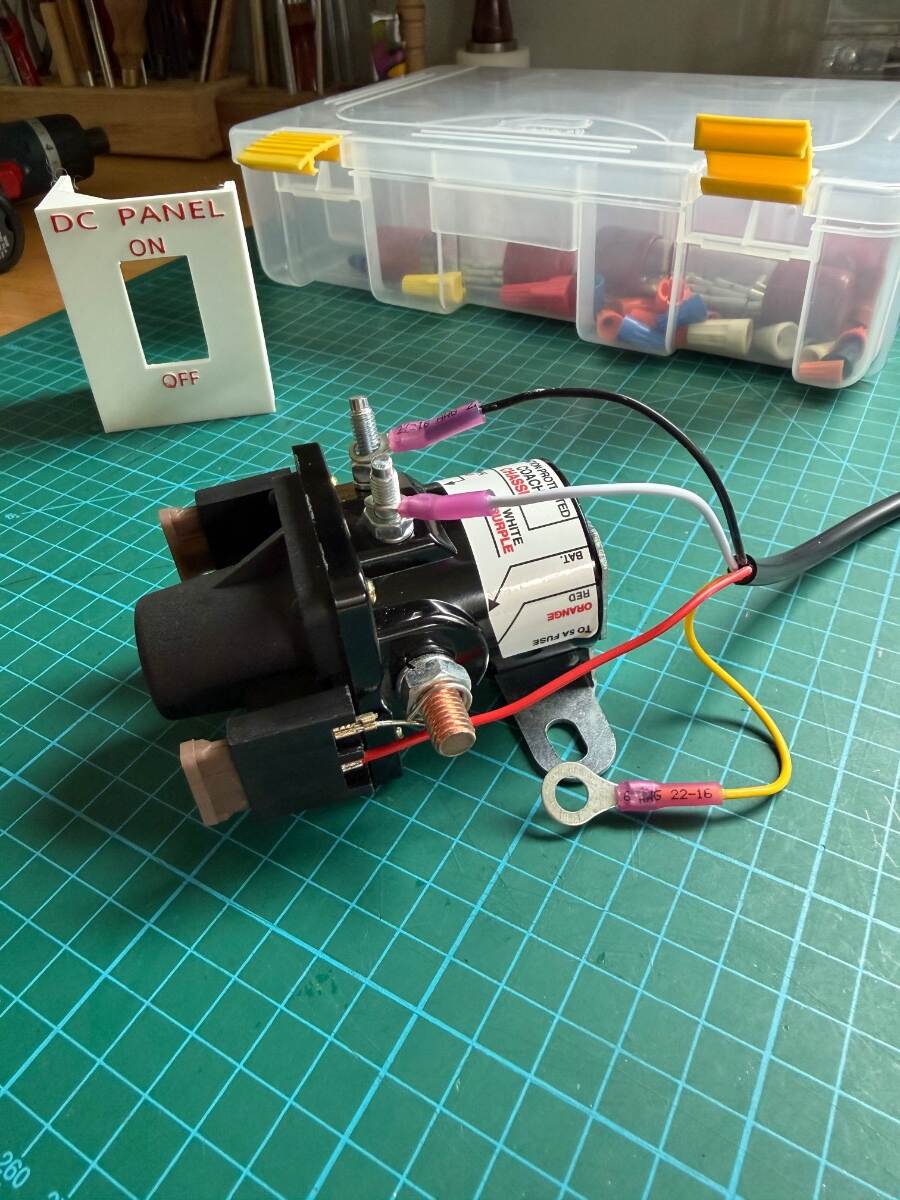
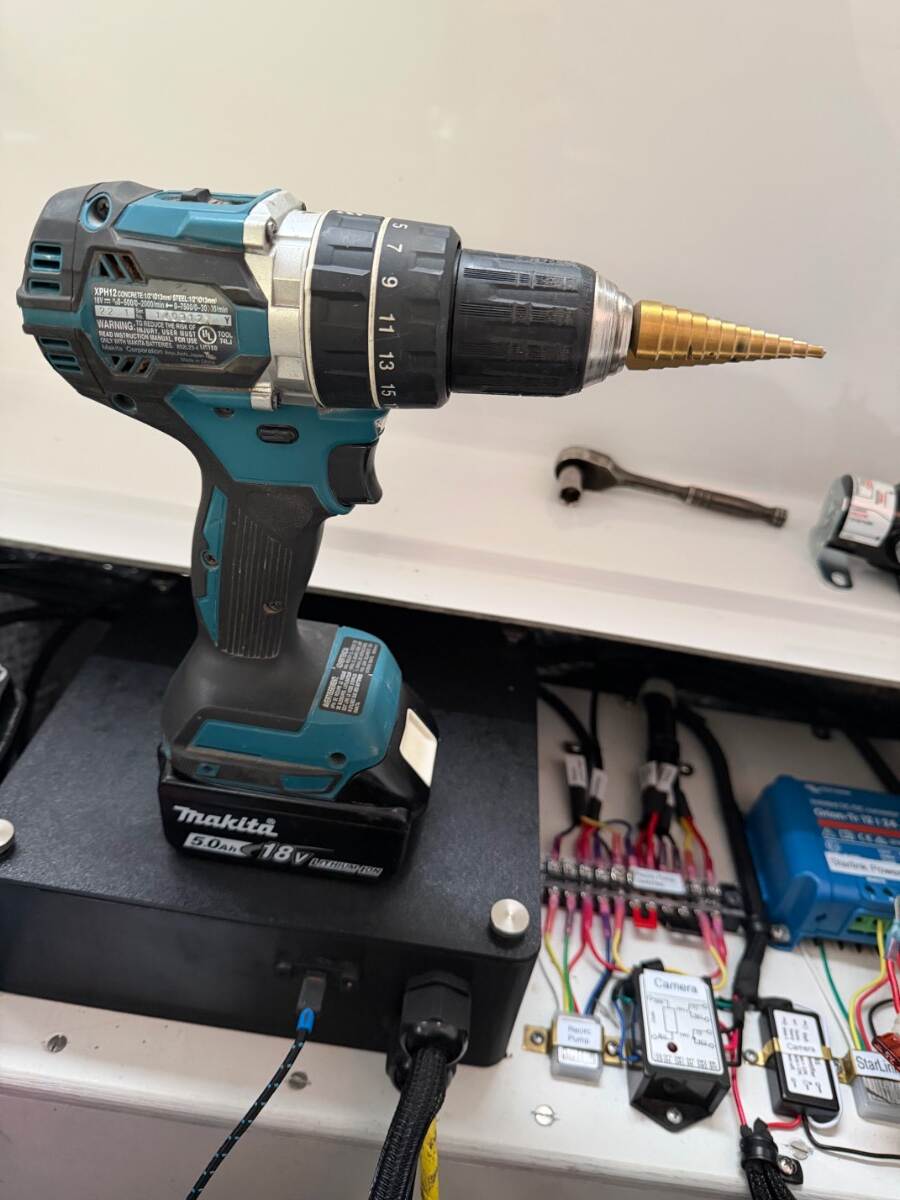
There are many great postings for installing a main battery switch. Folks like them for safety reasons, to kill parasite loads during storage, or for when working on the system. But I’m not a big fan because the safety benefits are more mythical than real, and 96% of parasite loads can be killed by shutting off the 60 amp DC panel breaker. I just don’t like introducing unnecessary resistance in the high current battery circuit. In rare cases when the main battery circuit needs to worked on, the battery can be disconnected, or the 300 amp breaker can be opened. Even with liability exposure, Oliver’s decision not to have a main battery switch was a deliberate and sound engineering choice in my opinion There may be some merit-worthy arguments for one, or perhaps a lingering perception that one is needed because it’s a requirement in the marine industry for different risks. In reality, the need to cut power in 12-volt RV systems during emergencies is rare and not normal practice. Besides, most firefighters are trained to cut battery cables before looking for a switch, or trusting it. There is no shock hazard from the battery, and breakers and fuses are more reliable protection against fire hazards, than relying on the right person being in the right place at the right time to find a switch. I've seen a number of battery switch installations that completely disconnect the battery. This can actually create more credible safety hazards than it prevents. A towed trailer with its battery switched off has no emergency breakaway brakes and no gas or CO detection, both of which should never be switched off. The solar and AC chargers are also disabled in that configuration. However, switching off parasite loads is definitely a good idea for storage, but it doesn’t require switching off the entire battery. In the example shown below, the DC panel carries 96% of the parasite load. The remaining 4% of parasitic load comes from the inverter/charger, solar charger, and LP/CO alarm which are all connected directly to the battery. I don't believe it's necessary or advisable to disconnect these circuits for normal off-season storage because those parasite loads are non-consequential. For unusually long storage periods, some additional battery maintenance would be needed regardless. The parasite load percentages below are based on precise measurements of my Oliver trailer with a 390 amp battery, your setup and amperage may vary. They include electronic standby currents from various LEDs, memories, displays, power supplies, and such. There is no singular large load, but they collectively add up: Circuit Draw DC Panel load 0.48 A 96% Inverter, Solar Charger, Gas/CO detector 0.02 A 4% Total measured from battery 0.50 A 100% DC panel breakdown: Fuse Circuit Draw 2 Various electronics 0.117 A 4 Furnace 0.012 A 5 Main lighting 0.003 A 6 Fans 0.016 A 7 Truma water heater 0.113 A 8 *Furrion Radio 0.204 A 9 USB outlets 0.007 A 10 USB outlets 0.009 A Total 0.481 A *My new IRV stereo is only 0.083 A Under ideal conditions, a 0.481-amp load from the DC panel would deplete a 390 amp-hour battery in roughly 34 days. Real-world depletion will be faster due to BMS overhead and temperature effects. The remaining 0.02-amp load from the non-DC Panel circuits would take approximately 2.2 years to deplete the battery. A lead acid battery system without inverter would have less parasite draw with the DC panel shut off. It would still last a 7 month storage season before depleting the batteries to a safe 50% discharge. I used to turn off the DC panel with its 60 amp breaker under the street-side bed. Although effective, it’s inconvenient to reach. This modification provides a more convenient way to turn it off with a latching solenoid relay controlled by a small switch. Latching means it holds position without any power draw, it only consumes current for the instant it switches, adding nothing to the parasite load. These relays are designed for exactly this purpose and are commonly used in boats and RVs. I used an Intellitech style RV latching relay rated for 100 amps. The relay mounts next to the 60-amp breaker. The existing DC panel feed wire is moved from the breaker output — to the relay output. A new #4 AWG jumper goes from the vacated breaker output — to the latching relay input. Premade made jumpers with ring terminals are readily available in 6” & 12” lengths. Note: The 60 amp breaker may also have other loads such as the electric jacks. The jacks do not have parasite loads, but turning them off is a form of anti-theft protection to prevent the trailer from being towed away with jacks deployed. If you choose to move these loads to the relay, then the ring terminals need to be enlarged from 1/4” to 5/16” stud size to fit the relay. Use a sheet metal step drill to enlarge the terminal ring lugs while holding them with pliers, otherwise a twist drill will grab and destroy it. Step drills are great for drilling chip free holes in fiberglass tool. The relay is controlled with a Double Pole Double Throw (DPDT) momentary switch with a spring return to center. This is the same type of polarity-swapping switch used for the electric jacks. The switch can be located in any accessible and convenient location. I put mine in the battery compartment and wired it with a jacketed 4-conductor 18-gauge cable. The cable fits snugly through a 5/16” hole drilled next to where the DC panel wire penetrates the battery compartment. I linked one option for a switch mounting bracket. However, I made my own 3-D printed bracket with a red label to identify it as the DC panel shutoff. The print STL file is available, or I have a few extras if anyone needs one. I mounted the switch bracket with high strength double-stick foam tape and stick-on zip-tie mounts for the wire. The DC panel can now be turned on/off with the switch, without disturbing the inverter/charger, solar charger, or safety circuits. Newer Olivers have a solar disconnect switch and it’s possible to use the latching relay to disconnect the solar too. However, there is limited space on the relay’s stud for circuits so a terminal block would be needed for that purpose. I couldn’t find decent wiring instructions for the relay, so I provided a sketch. The relay comes with two fuses, use the one connected to the V+ input to power the switch. The other fuse is for an optional switch indicator LED. The switch’s V+ wire connects directly to the fuse spade with a female spade terminal. BTW: As seen in the picture, my installation is way more congested than normal due to other modifications. I have a large piece of plywood for mounting all my gadgets, you may need to glue a small wood mounting block for the relay. Just trim the insulation and use a good construction glue or epoxy. Here are some Amazon links for parts: Latching 100 amp Relay https://a.co/d/09MjQYjx DPDT momentary return to center switch https://a.co/d/0hNXSZkO Switch bracket https://a.co/d/08qc1lvY 4-18 AWG cable https://a.co/d/05Zn0CF6 6” x #4 AWG Jumper https://a.co/d/049xhKq6 Zip tie mounts https://a.co/d/0iRWzLD2 3-piece step drill kit https://a.co/d/01TaDQmg Hope you find this useful. Cheers! Geoff
 9 points
 -
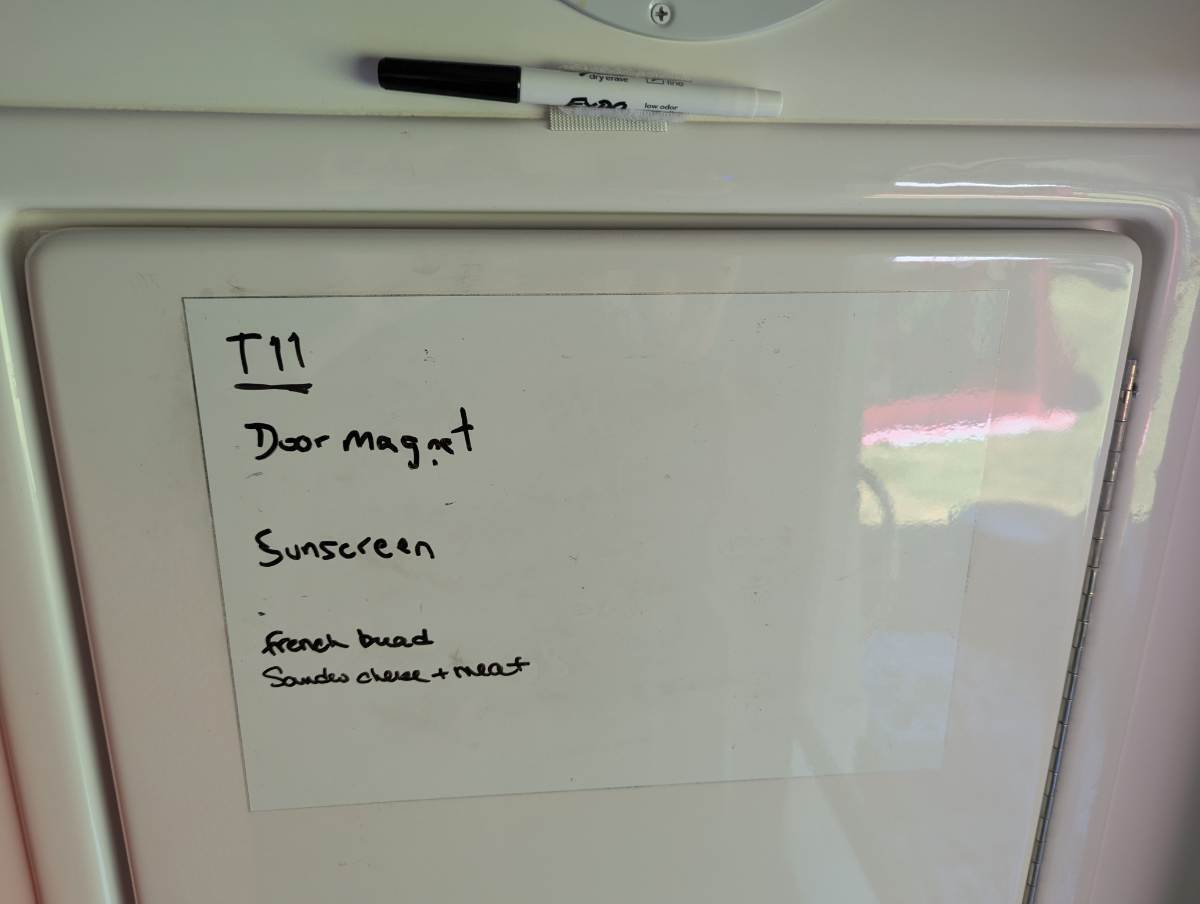
This simple mod makes our camping life easier to organize. It's just a piece of removable whiteboard decal on the closet door for shopping and to-do lists. We also put our campground address and site number there in case we have to call 911. The final touch was a whiteboard marker Velcroed above it. Amazon: https://a.co/d/08ma1cjD
6 points
-
If Geoff ever sells their Oliver, the buyer will have to be another EE! 😎5 points
-
You have all provided a lot of very interesting information. To be clear, some of it may be a bit beyond me. So a couple of info points. We have a 1 burner induction stove. It does have a separate breaker. When trying to turn the stove on, there is not any response. Possibly not wired through inverter. I have been working with a great OTT customer support person who has engaged the tech dept. Because were are in the middle of travels with the Oliver and are mostly boondocking, the customer support person is working on his end and we will reconnect when we return to home base. Staying in contact when WiFi and cell coverage is very spotty, makes it difficult to work on this issue. I’m also confident OTT will come through based on support so far and all of your responses. I’m not going to touch rewiring anything because 1) I’m limited to basic wiring 2) this unit came off the line in March (3 months ago) and is under warranty. Learning a lot. We really love this camper and what it brings to the table. But, we have to figure this out. For now, generator if we want to cook inside. Set up gas grill for outside (I don’t like to do this while we are in bear country). Eat out (had amazing Mexican meal in Cortez, CO yesterday). Eat out of the fridge (which works amazingly well). Coffee on the little propane burner. All doable. I’ll let you know when we get this resolved. Lamar3 points
-
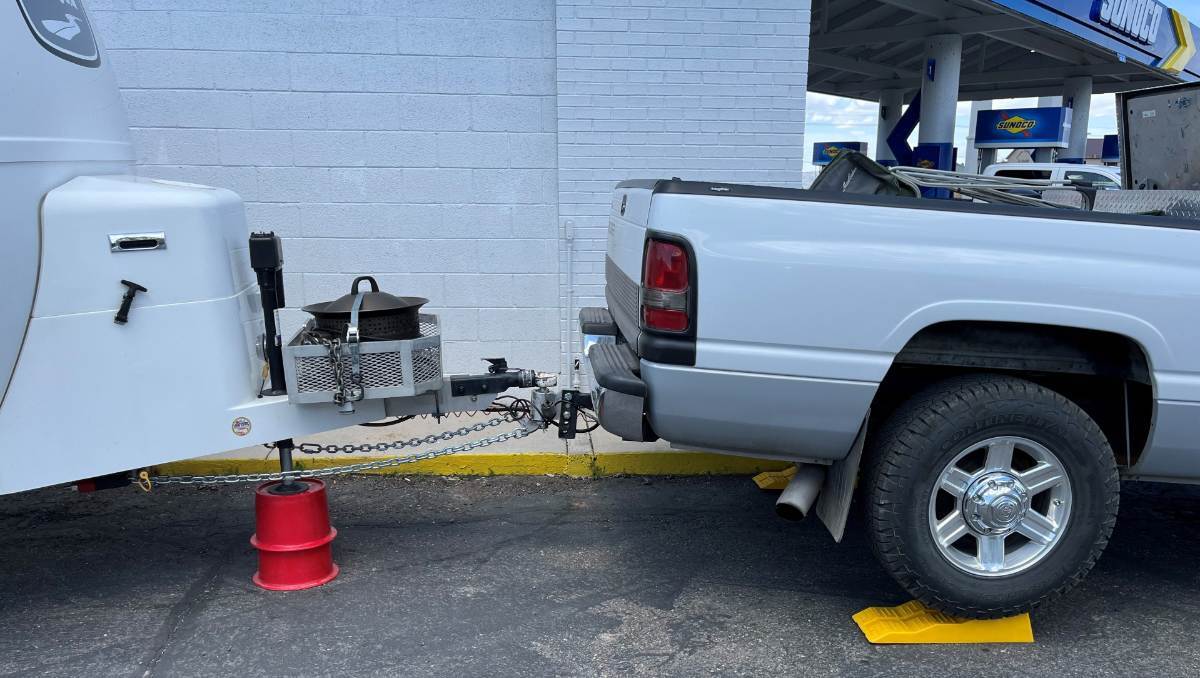
We don’t setup a waste line at campsites. We're never in one place for more than 5 nights and I don't deal with those fancy waste ladders which I associate with Class A RVers, who stay long with full hookups! 🤣 Instead we dump on arrival (often coming from boondocking) and on departure. When dumping, you must have the Oliver up in the front AND on the curbside. I use the LevelMate at the dump station to bring the front up a good +2" over level. Some may not know, the gray tank is on the curbside, with its outlet drain facing the streetside. If your Oliver is any lower on the curbside, your gray tank can be quite full after you thought you dumped tanks! I use an 8" Anderson block to lift the curbside jack so that it is at least +1" above level. Tanks are then fully emptied. This picture was taken at a dump station in Cedar City UT. I had to back in, so there was no other approach. You can see all what I had to do to lift the front! What's not pictured is the curbside jack is also lifted. Isn't RV life wonderful?! 😎
3 points
-
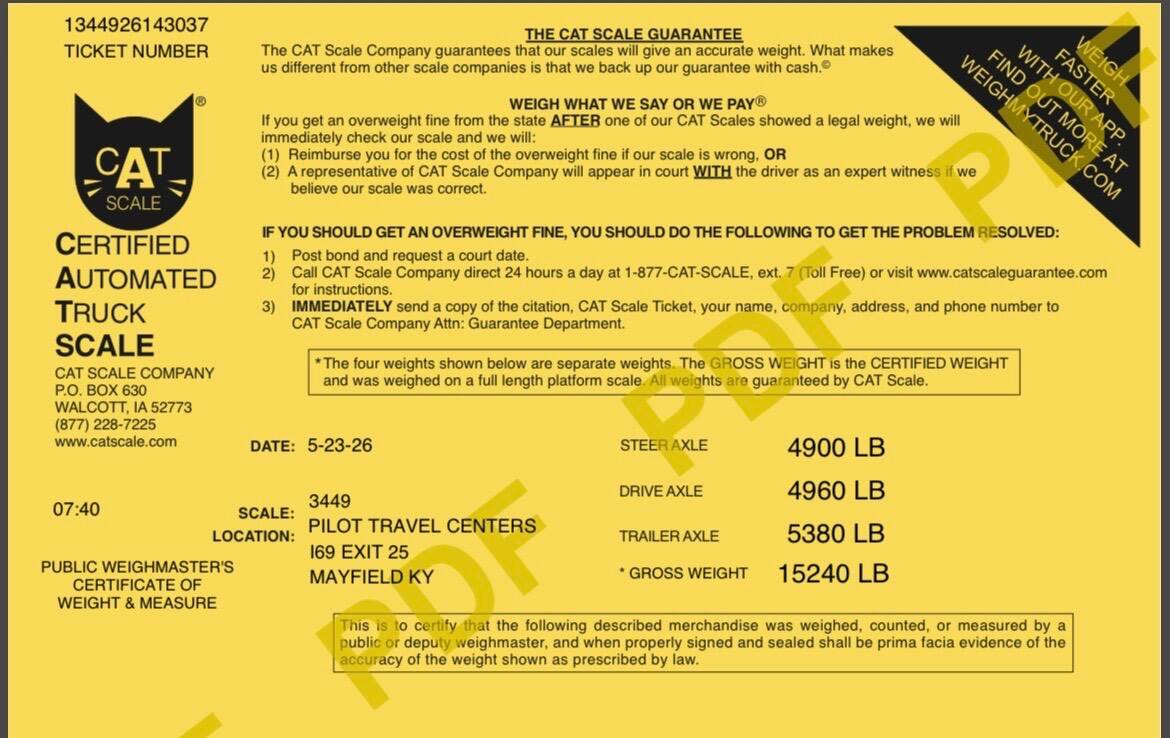
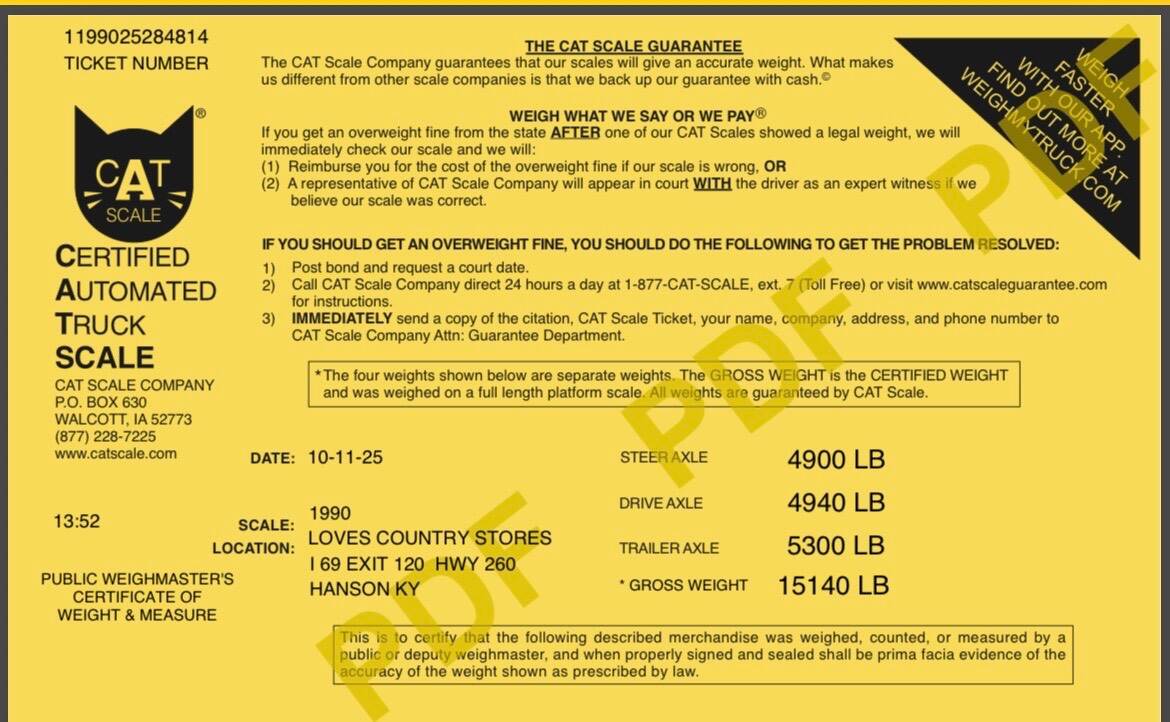
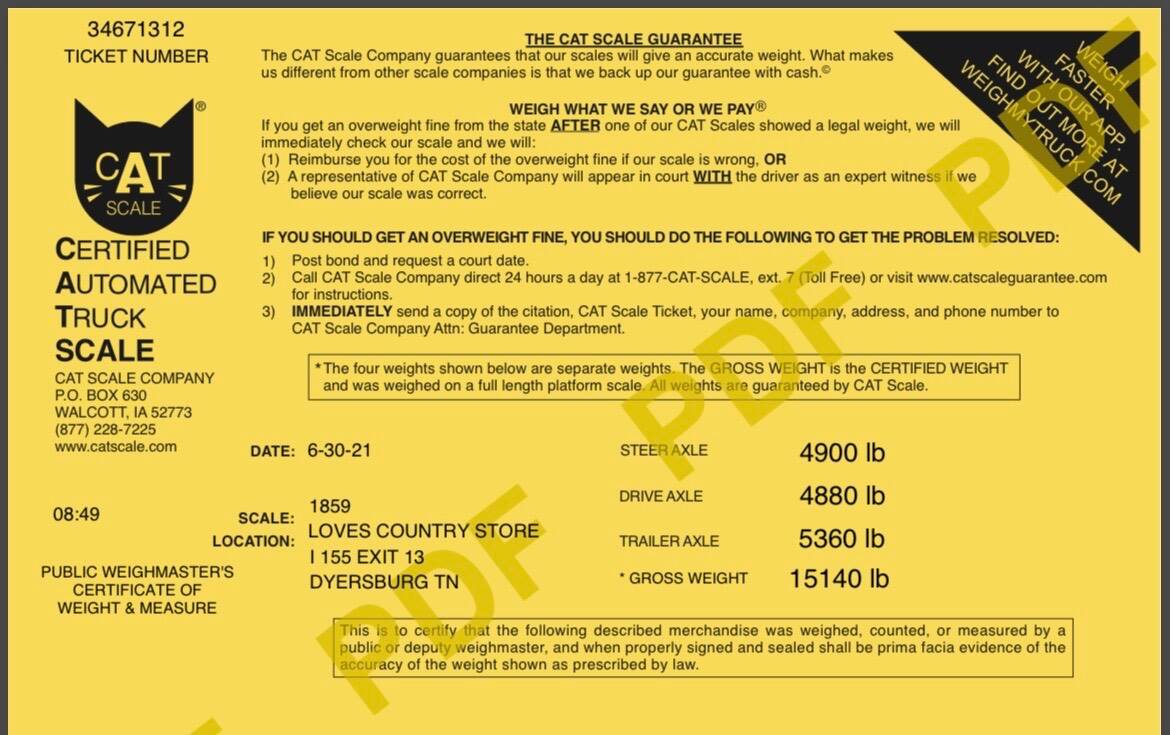
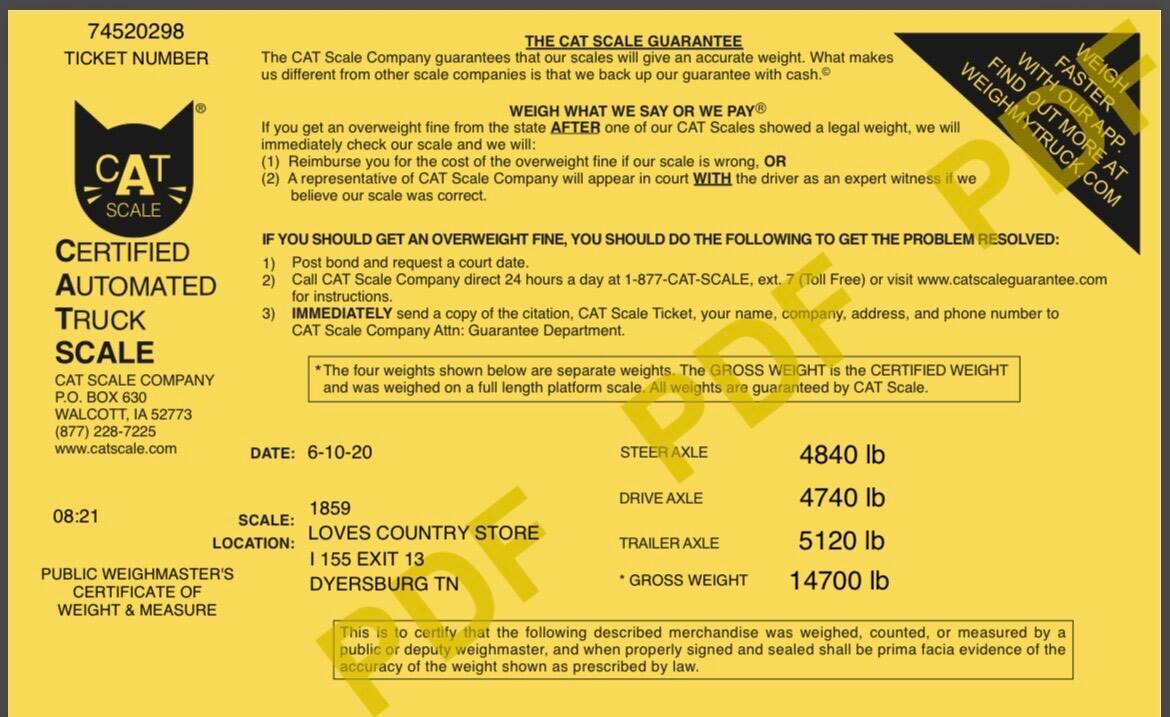
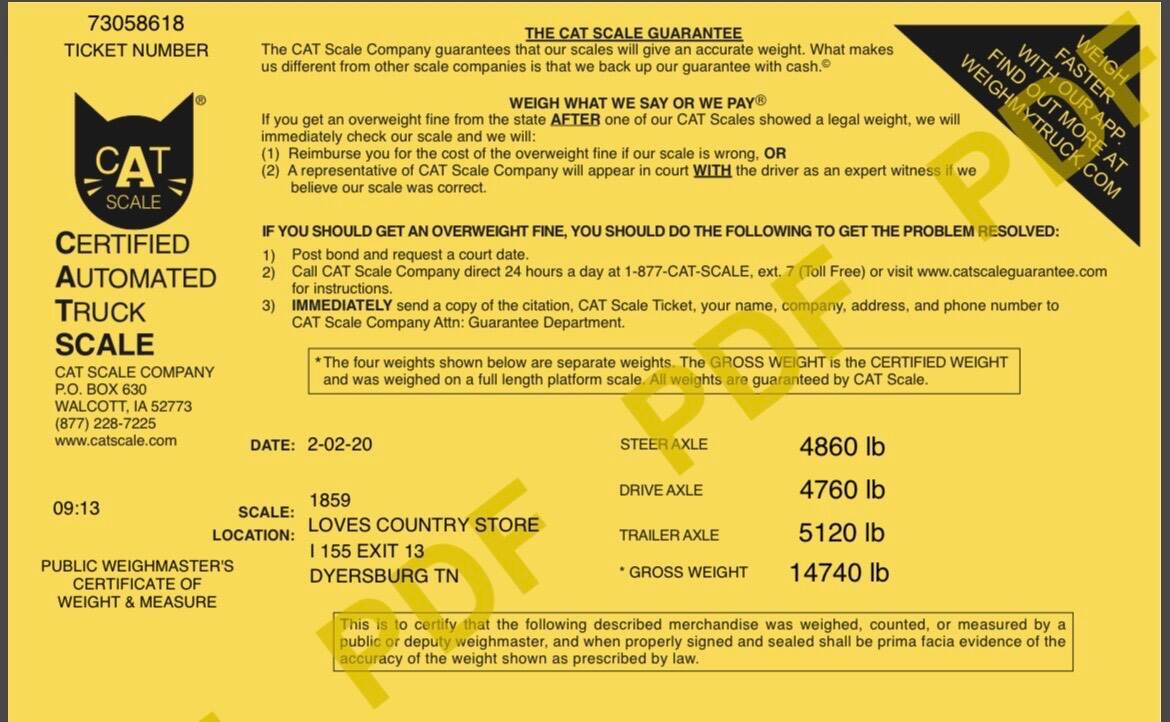
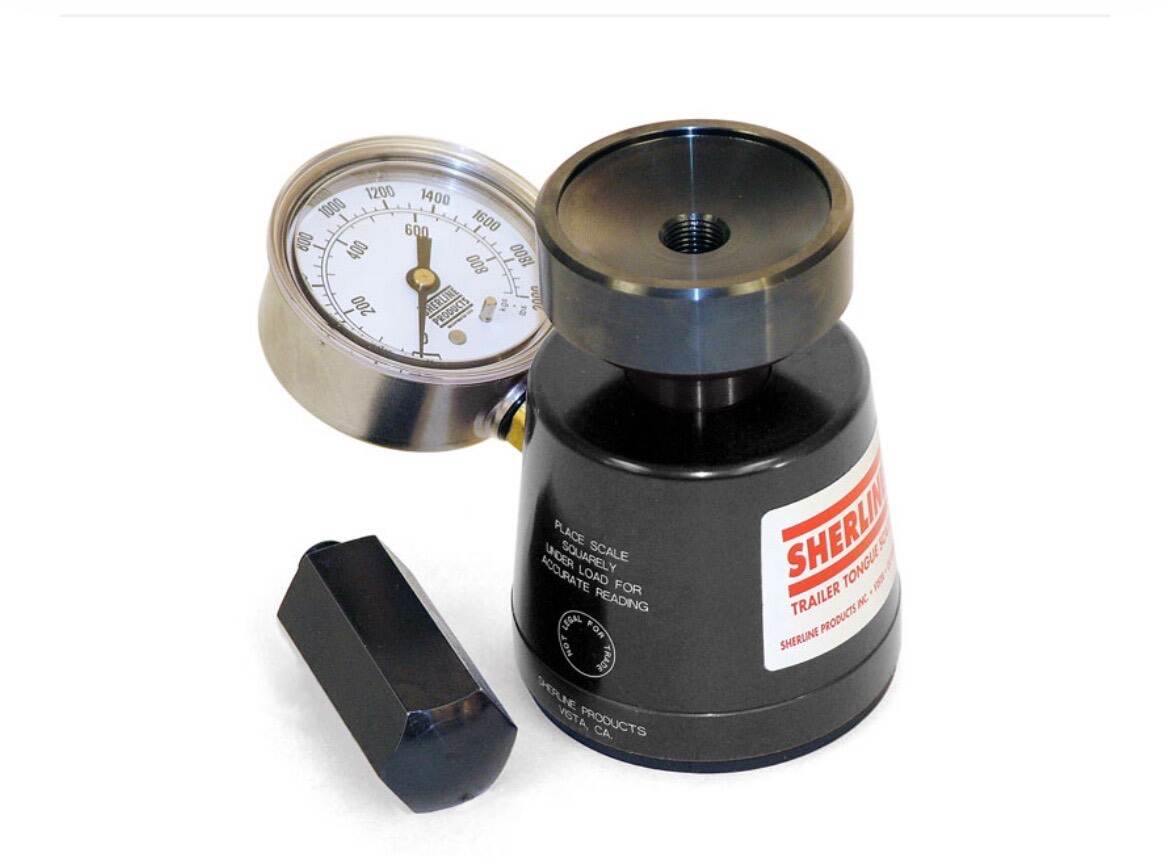
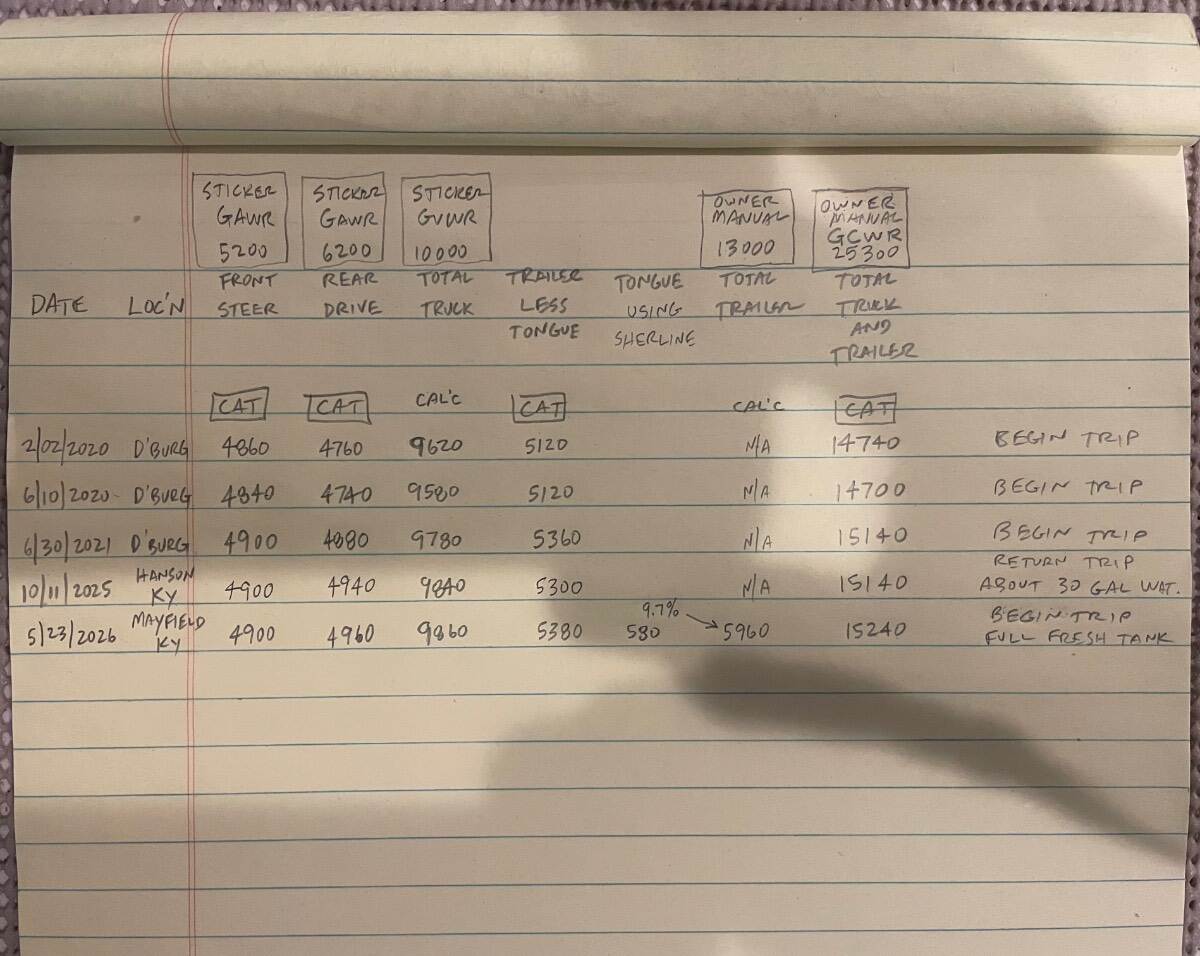
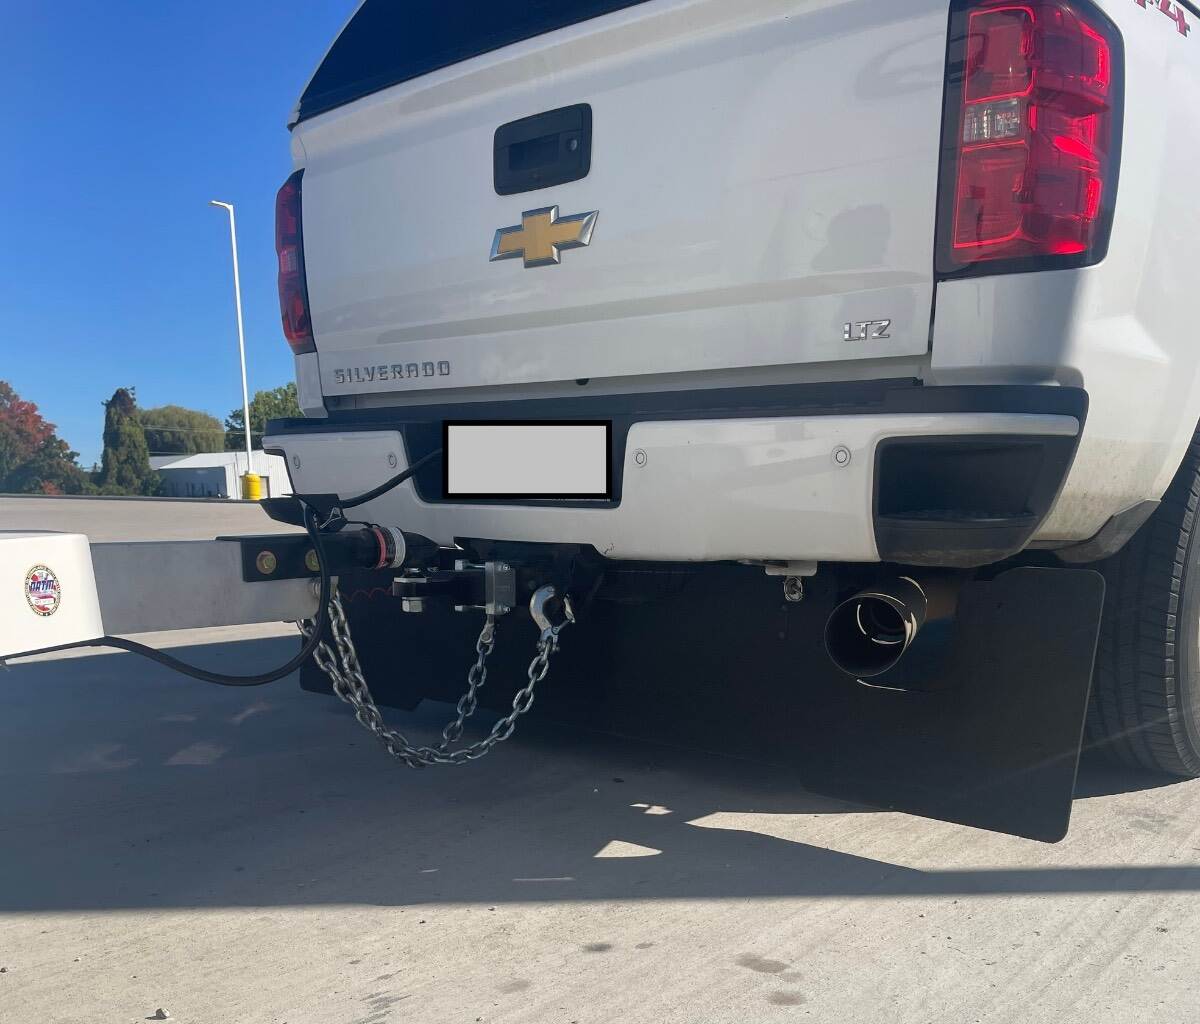
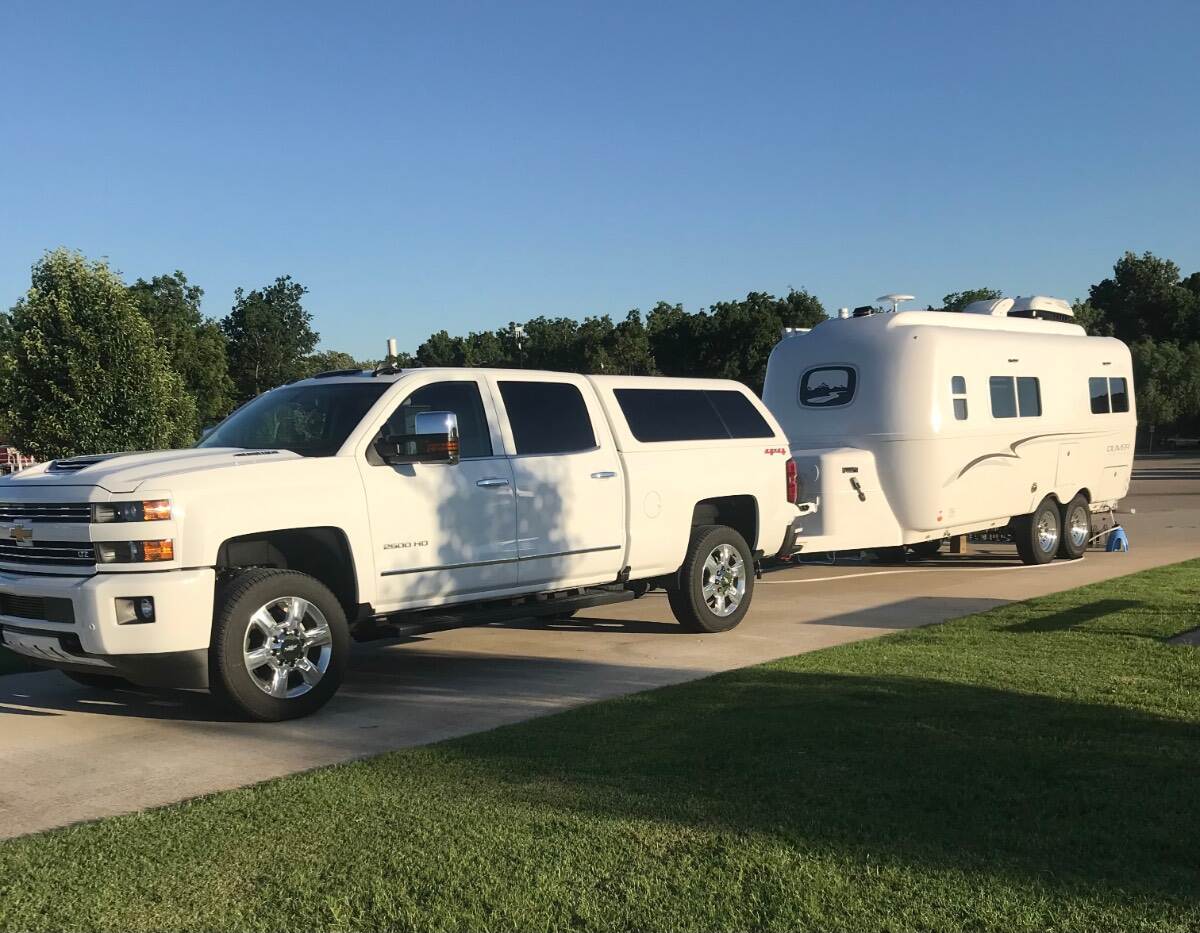
Here are my scale tickets since I have started using CAT scales. I tow with a 2019 Chevrolet Silverado LTX 2500HD with 6.6L Duramax and 6 Speed Allison automatic transmission. ARE bed topper with full bed. Both front seats occupied. Full width RockStar Commercial Tow Flap. Full diesel tank 36 gallons. Sticker FRT GAWR 5200 Sticker RR GAWR 6200 Sticker GVWR 10,000 Owners Manual Max trailer 13,000 Owners Manual GCWR 25,300 Just started using a Sherline Tongue Weight Scale Loaded tongue weight at the beginning of the current trip is 580 lbs. Full fresh water tank (30 gallons of water weigh 250 lbs). Empty black and gray tanks. Full 30 lb propane tanks (About 110 lbs). Full refrigerator. No tongue basket. No bumper attachments. Four AGM batteries. No solar. Here’s a spreadsheet that I scratched out this morning “CAT” is a weight off the CAT scale ticket. “CAL’C” is a calculated weight “Sticker” is a weight off of the vehicle placard. “Owners Manual” is a weight out of the owners manual for my truck. I tow without a weight distribution hitch. Trailer brake gain usually set on 4, bump up to 5 or 6 if raining and/or hilly. Front 60, rear 75, trailer 50 cold tire pressures. Tow/haul, exhaust braking, Cruise control on. Original brakes, I’ve installed new Timken or NTN bearings at 6,400 miles and 20,000 miles, and will install new bearings at about 32k. Just over 30,000 miles total on the trailer. Trailer stays in heated and air conditioned shop when at home. I am very pleased with how the truck and trailer operate together at these weights. I’ve posted this information for those who are interested in how other folks tow. Bill
2 points
-
UPDATE: As you can see from my first post, we experienced the issue captured in the video late on Saturday the 30th. After reading the information provided above, and doing a little more research, I called and opened a ticket using the forum link to the ticketing system, called Oliver customer support and left a voicemail, and lastly I sent the video in an email to support@olivertraveltrailers.com with a copy to one of the leadership team. Sunday AM: I received an email from Oliver asking for the model and serial number of the Truma, which I promptly sent. Monday AM (8:30ish) : I called customer support at Oliver and I barely got out my name when the tech said, "oh yes, you were the first topic at our team meeting this morning. You should expect a call from someone on the leadership team to help resolve this." An hour or so later, sure enough, I received a call, and the ball was rolling. A full explanation of the plan to get us back up and running with hot water was laid out. (Note: My Aquago was not in the range of serial numbers that were part of the recall, but the plan we were executing assumed that it was. More on that later.) I was in Pennsylvania the day the issue occurred. I was in Buffalo NY headed to Rochester, when I received the first call on Monday. Oliver gave me several options for where I could have the burner swapped out, and we chose an RV facility in Rochester since we planned to be there for 3 days. Oliver next day aired the part, worked with the RV store to schedule the repair, and the work was completed Wednesday, and we were on our way - WITH hot water. 🙂 For the record, my AquaGo is under warranty. Whether or not the issue is the same one addressed with the recall, I don't know. I will let Oliver and Truma work that out, but it appears to be a different issue. Bottom line, Oliver went above and beyond on this one. There was one individual who was in the driver's seat at Oliver, and she will have a thank-you card and a small gift on the way as soon as we get to a stop where we can make that happen. We are grateful for the response and count ourselves lucky to be part of the Oliver family. Bob P.S. It probably helped to provide a video of a fireball on the side of the trailer. 🙂 Nevertheless, good job, Oliver.2 points
-
Thanks Bill, I'm sure many of us are interested! 😎 No CAT Scales in our county (50 miles to the nearest Interstate), so I take advantage of the simple scale at our Prescott Solid Waste Division (the city dump). I did not get separate TV axle weights. I go one day with TV plus TT and weigh the truck wheels on the scale, then all, then Oliver only. The next day I go back, Oliver detached and I add 220 LBS for Chris and her front seat stuff and our 65 LB Springer! I also used a Sherline tongue scale and measured the same 580 LBS. Your TV is a bit heavier than ours. The Duramax and Allison are certainly heavier than our 5.9 Cummins and Dodge 47RE trans, but the real difference comes from the weight of your truck bed cap that we do not have. You can see how our weights have increased in a couple years, getting closer on TV GVWR. We always have 35+ gallons fresh water in the truck bed and have accumulated more tools and camping gear, even spare hubs for TT and TV! The increased weight comes some from more gear but mainly the many mods and additions I've made in the last 2 years. D52 Axles and Alcan Springs is a good portion of the net increase. I'm getting closer on TV GVWR and not concerned re Oliver GVWR since we now have a 10K suspension on Hull #113! Love your old-school spreadsheet! I cannot write a simple to-do list without my favorite app Excel! 🤣
2 points
-
Thanks for bringing this subject back up! From everything that I've been able to find out - The original graphics for virtually all Oliver's have been lost. When Matt Duncan left Oliver (he still does some work for Oliver from time to time on a consulting basis) and what one might call the Marketing Department was depleted of personnel, the computers and file backups were basically left unattended in the offices above the Sales floor. It appears as though the backup files were written over by "new" files and the "original graphic files" were also written over in much the same manner. More than likely all of this was done by personnel who were simply looking for access to a spare computer and had no idea of what these files represented. There still exits a small possibility that additional file copies exist but currently there is not the staff that is available to go look for them. Sorry! Bill2 points
-
Wow, well thought out and excellent quality work, too!2 points
-
Thanks for the great write up and details Bill. My black tank valve is in same the position yours is (now). I'll try your drill out mod and see how things improve. I'll also try to support the cable every two feet to keep the main run as straight as possible.2 points
-
O2R - Thank you so much for giving us the conclusion of your Service story. I am so happy that things worked out for you. I am often perplexed by the stories I hear in which what happens seems to be at the entire opposite end of the scale. I'm simply not sure what's the cause of this seemingly drastic difference between quick through responses that , "Oliver went above and beyond on this one" and the owners that report complete dissatisfaction with virtually anything done by anyone working at Oliver. Perhaps your story and how you handled the situation can serve as a "road map" for others to travel. Bill1 point
-
Ha! Ha! You beat me to it again. Well this should be interesting. Mike Sokol is doing his own testing, and doing a number of different tests. He just got 2 old Battleborn's to test them.1 point
-
Your answer is on page 2 of this thread.1 point
-
Both Jason and Matt have been sent PM's in this regard. Bill1 point
-
How many watts is the cooktop rated? The rating should assume full ON.1 point
-
Yah. I figured as much. Figured it doesn't hurt to offer. Back to #1, if folks are interested I can approach my local guy about working out a vector graphics from pictures. There's design time involved with that. However, if he knew that there were a number of people queued up on that then maybe he would waive or just roll it into price of orders etc. Y'all can let me know. Thx.1 point
-
Nathan - I will mention this to Matt Duncan and to Jason Walmsley (who handles most if not all things tech related for Oliver and used to work directly for Matt). However, I can tell you that Matt is very well versed in computer tech. He and I did discuss this very possibility when we initially sat down in his old office and were looking for the specific computers and memory stick backups. An additional "problem" at this point will be to identify which computers and which memory sticks might have been involved with these graphics. I'll let you know what Matt and/or Jason have to say on the subject. Bill p.s. Yes, I am a moderator. All of the Moderators of the Forum are NOT employees of Oliver Travel Trailers, and are not compensated in any way by Oliver for the work we do here on the Forum (i.e. we are volunteers). Yes, since most of the moderators have been around Oliver (for more years than we might like to admit), we tend to know a bit of history and the former and current employees that were/are involved with both the travel trailers and other parts of the overall Oliver businesses. Perhaps this is good news and bad news. Good news is that we tend to know "stuff". Bad news is that we also know that Oliver is a family owned business that does not have very much (if any) "fat". That is - they have a very lean staff with most of the staff holding down multiple jobs. Therefore, I'm guessing that it may take a fair amount of time to even get a start on the project you'd like to do.1 point
-
1. If there are people out there still interested in resolving this, please tag this comment with some sort of emoji as a confirmation. More on that later. And not necessarily related to #2 below. 2.@topgun2, I don't know how the forums work around here but I assume if you are a mod you are either an Ollie employee or at least know them somewhat ... In a previous life I did digital forensics work. That means recovering deleted/over-written files. It's not always possible but sometimes ... Can you let them know I might be able to help? I can walk them through the process of duplicating the drive on that machine in such a way that a copy could be sent to me either electronically or physically to see if I can recover anything. thx1 point
-
I heard that😁 But I'm no EE… just an uneducated and curious mind. The first priority in all my modifications — and frankly the cleverest aspect — was minimizing impact on the Oliver's stock functions and appearance. Most modifications can be removed without trace: no fiberglass damage, original functions intact. Everything is fully documented in a binder with detailed drawings any competent technician could follow. This should be a standard practice for every DIYer — and frankly, it's not something Oliver itself can boast based on all the speculation we see in this forum. Cheers!1 point
-
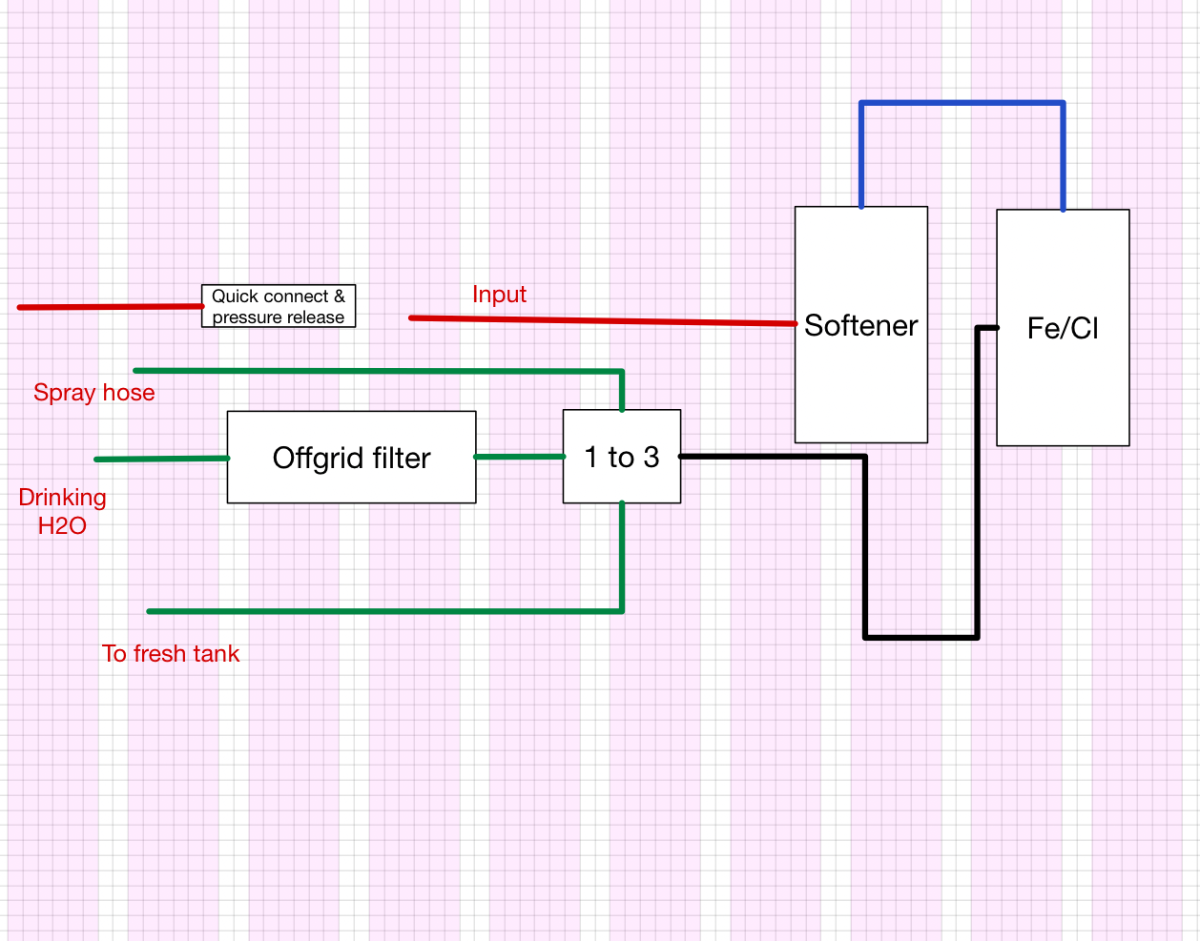
OK the filterification of the Oliver is done and tested. Just need a little padding/bracing, I think a foam pad between the tanks is all I need. It’s so tight in there they’re already pretty secure. Here’s a block diagram of what I ended up with The reasoning is that all this filtering greatly reduces water pressure and slows the fill basically. I don’t need the Offgrid Filter (down to .5 u paper filters + UV sterilize) for the fresh water tank, just the softening is sufficient. So I have a loose “To fresh tank” quick connect line when filling, just three easy connections for waterpoint and to tank, just using the softener/Fe I open the offgrid line and snake the hose into a 5 gallon drinking water tank to fill that up. Plus power - I need to get a 12V cig output into the basement The third is for spraying off the truck + trailer. Softened so that ideally it leaves no water spots I don’t know how this worked out but somehow, with the water tanks taking up that back space (leaving room to toss dirty clothes around them) I seem to have more storage overall. I’ll take it though
1 point
-
He seemed unsure about it when I pushed on the point. I think he was thinking about the difference between a true D35 and D52. It would be very unusual for Dexter to gimp the brakes specially I think as it would complicate inventory. Easier/cheaper to take a stock D52, ship it with the stock 1750’s and just print a new label. OK so with this new 2026 axels I’ve got, I’m having them just upgrade the springs, and I’m bringing Bulldogs with me to replace the stock shocks. They mentioned D rings, those will get replaced it sounds like, but the EZ flex and the rest of it will get reused as-is1 point
-
Not, something miscommunicated! Your D52 axles are labeled 3500 only due to the OEM installation of 1750 LB springs. They are the same D52 axles. With an Alcan upgrade you’ll have a 10K LB suspension, but 3500 axle labels and 7,000 GVWR legally per the DOT sticker on the body.1 point
-
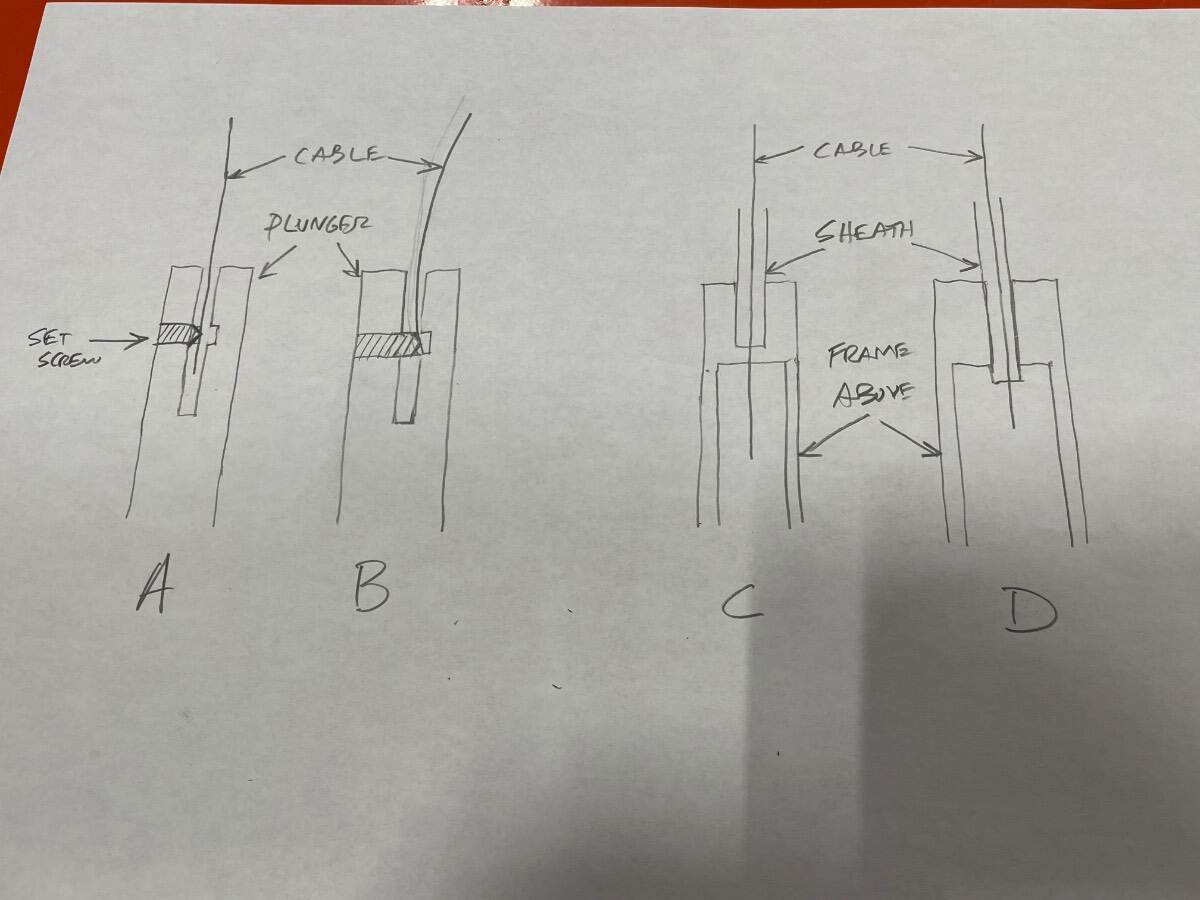
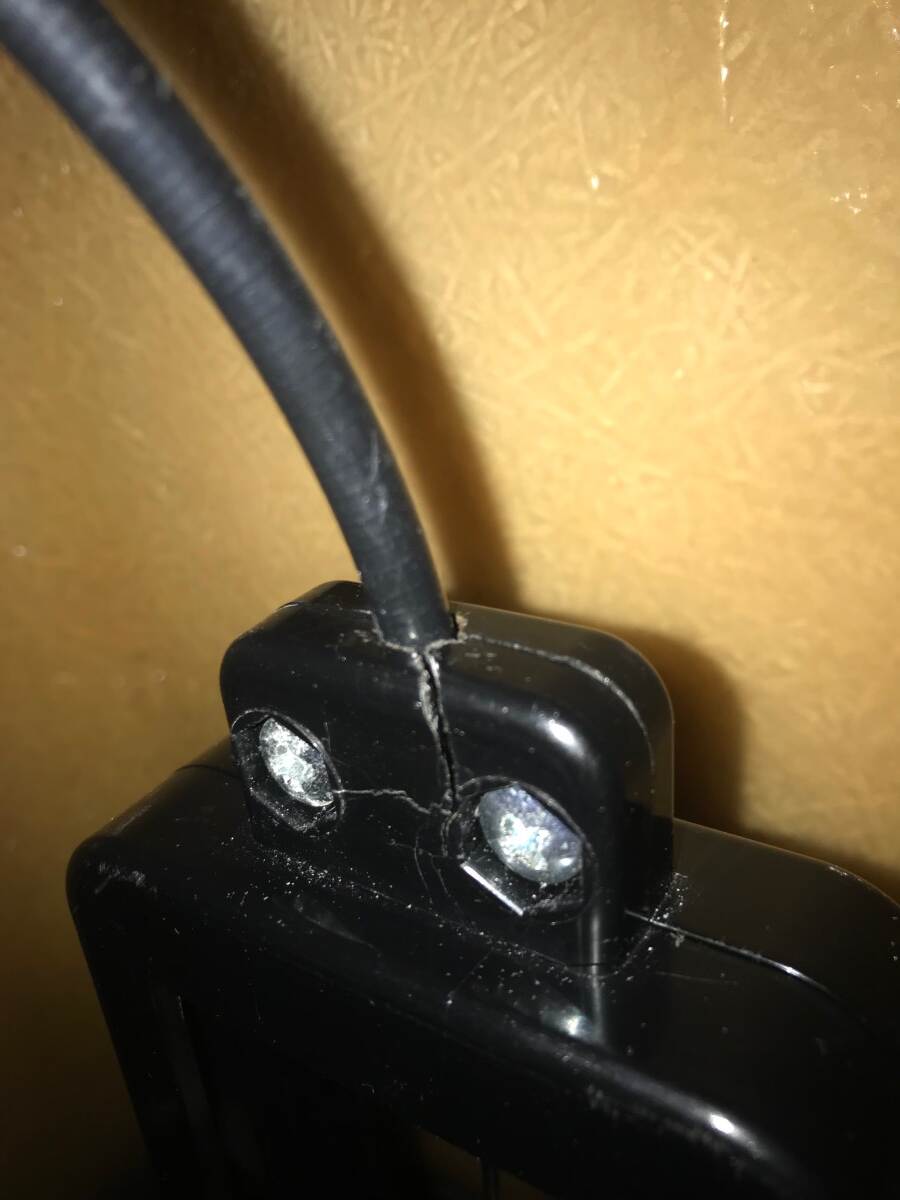
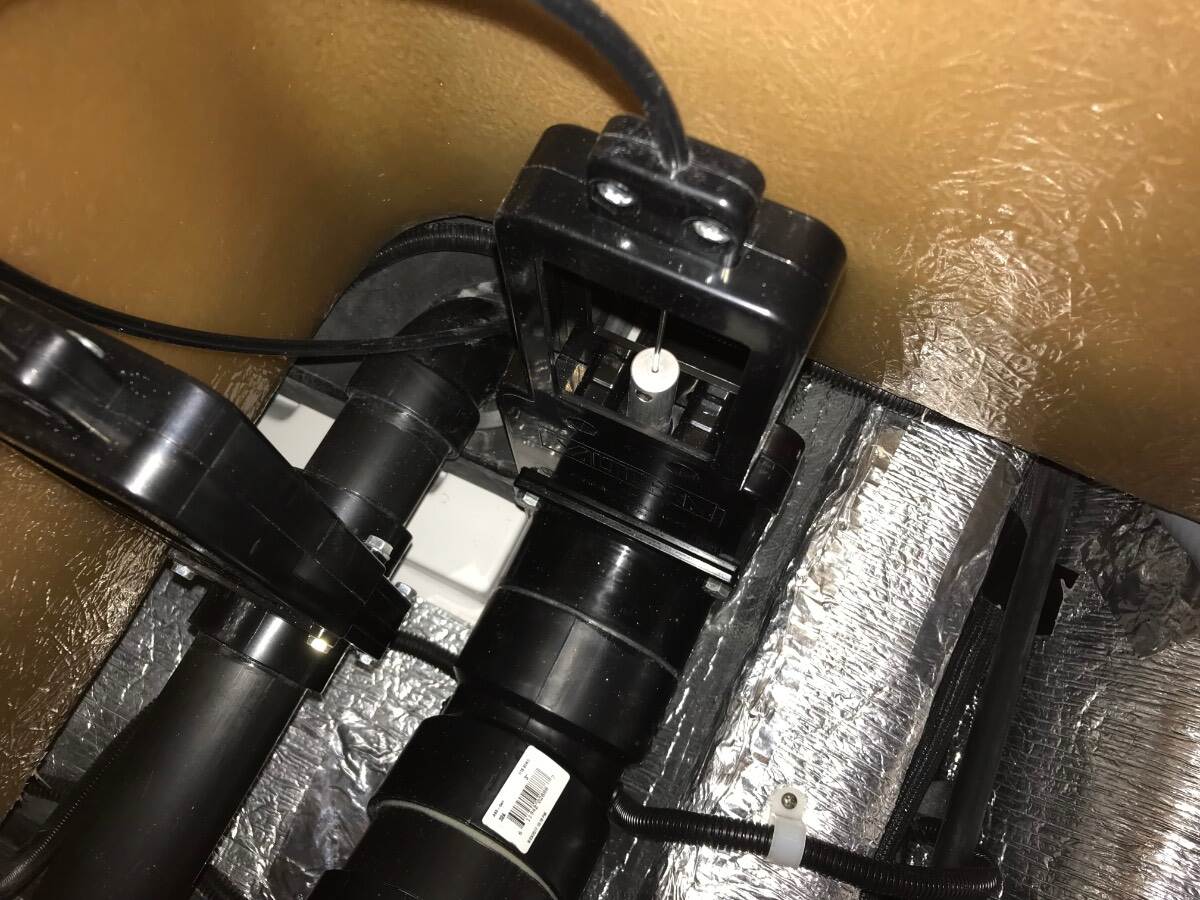
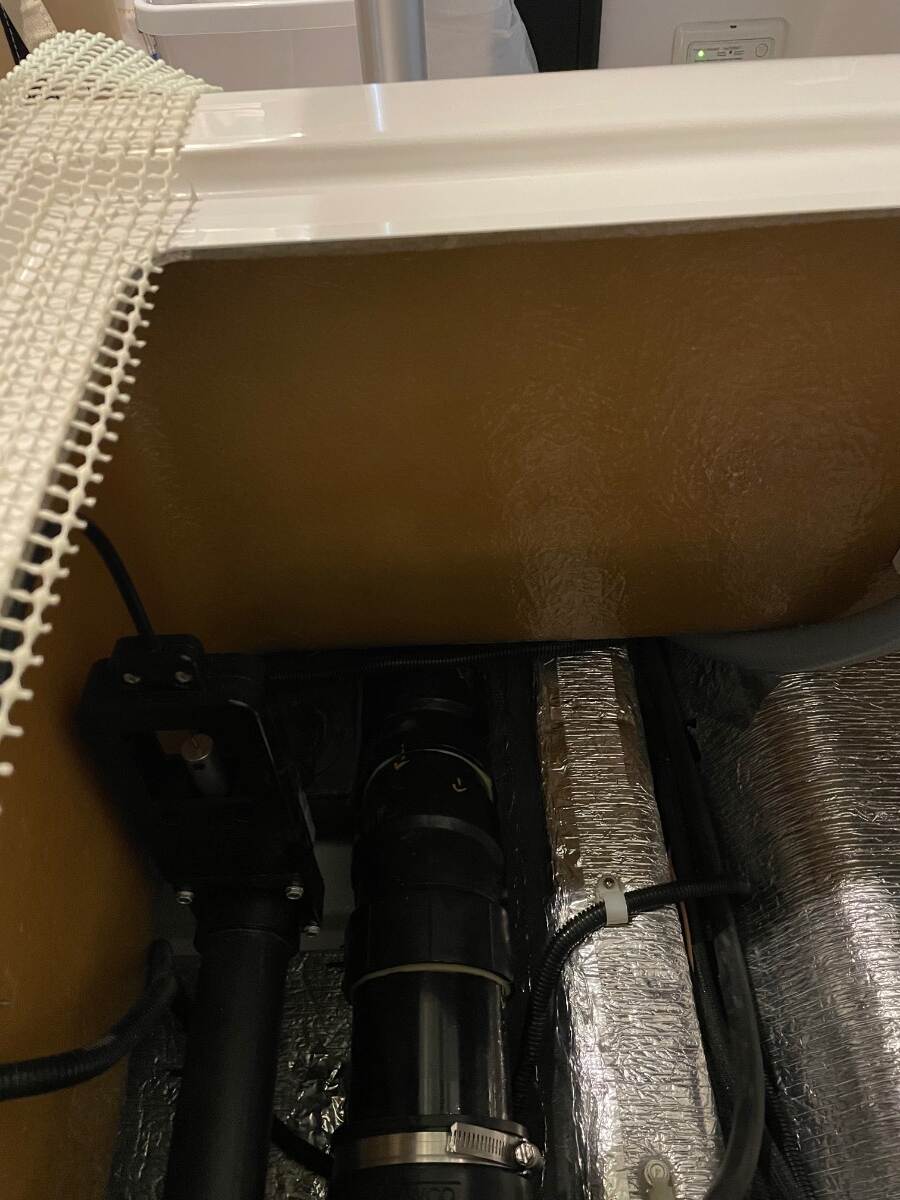
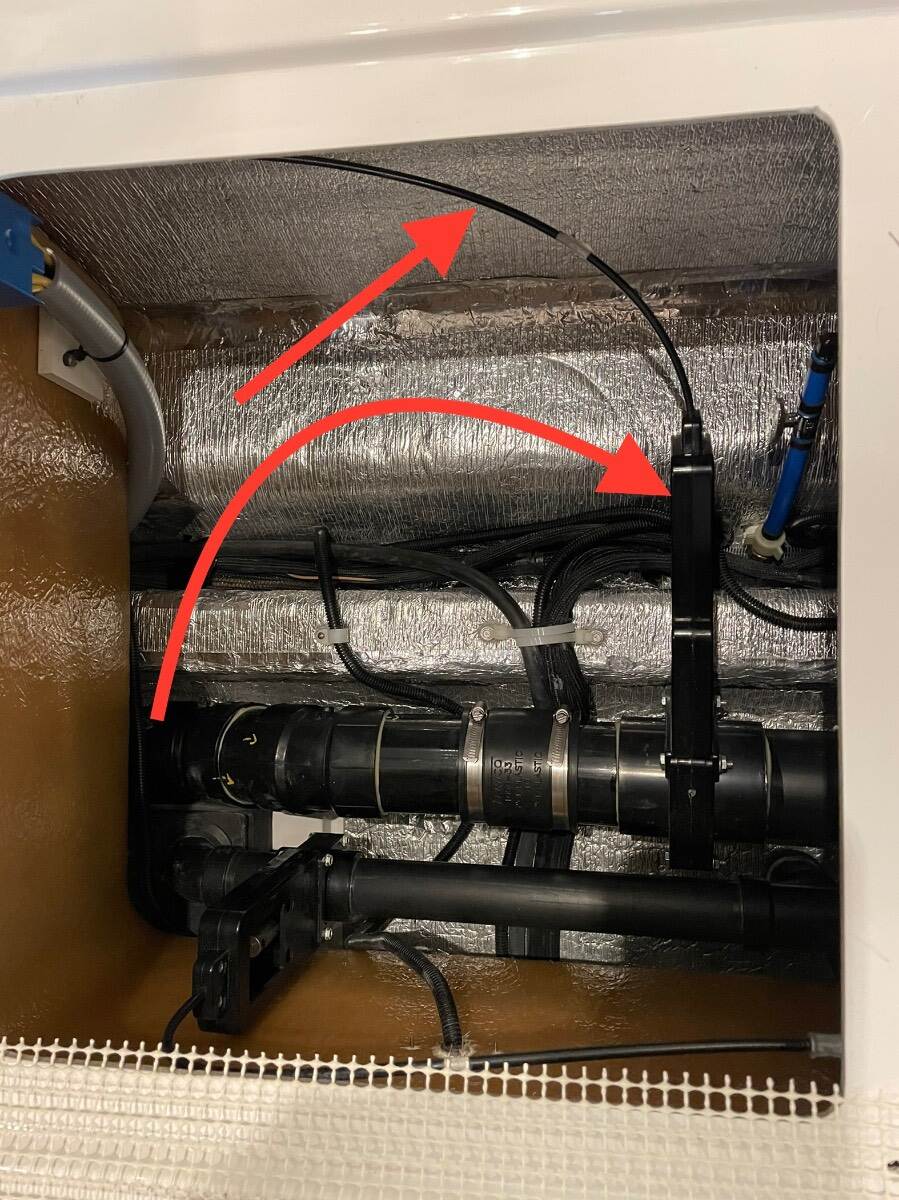
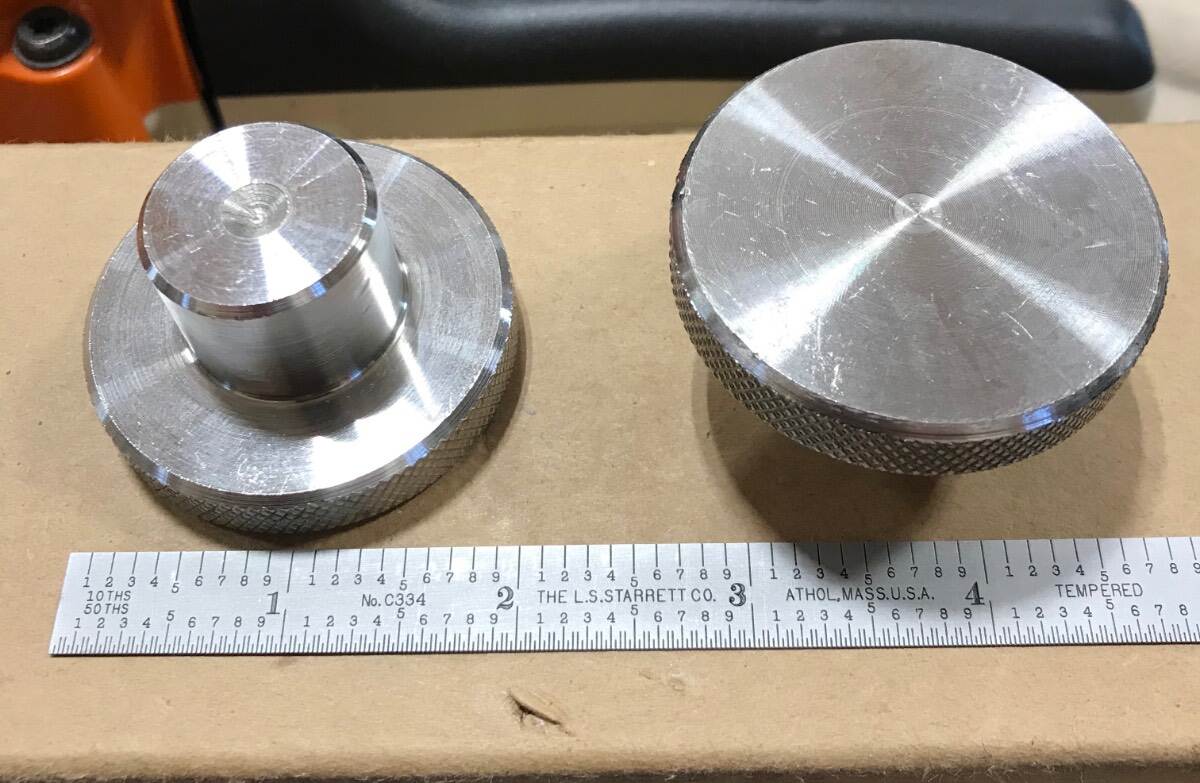
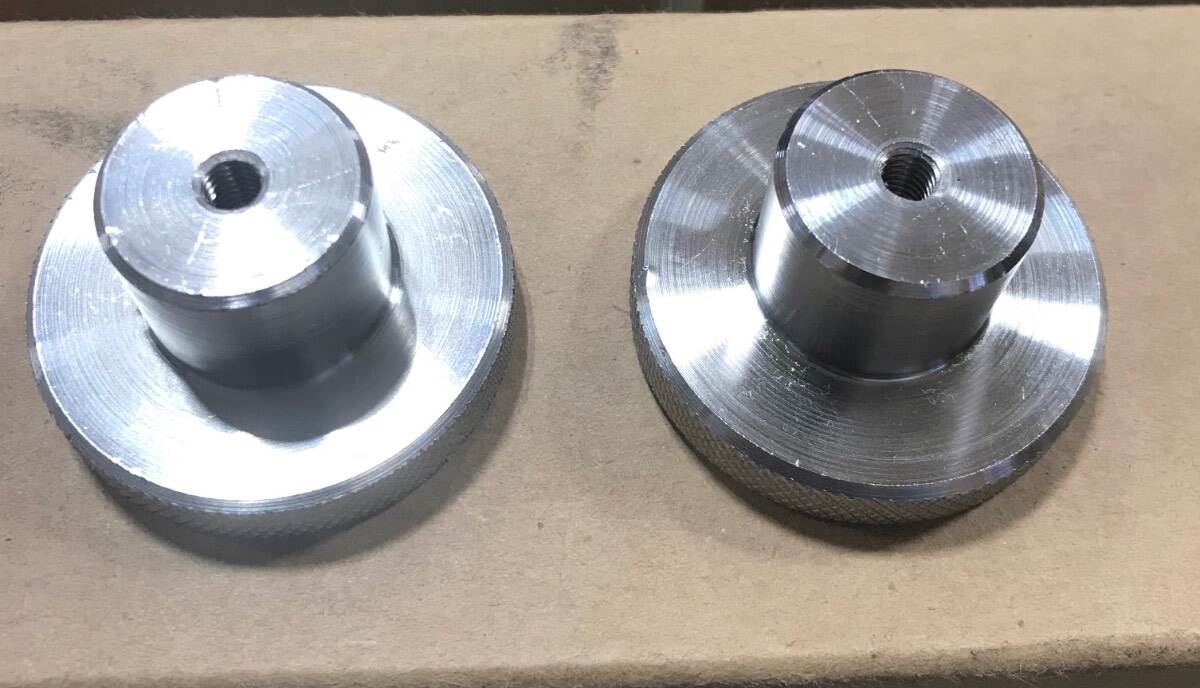
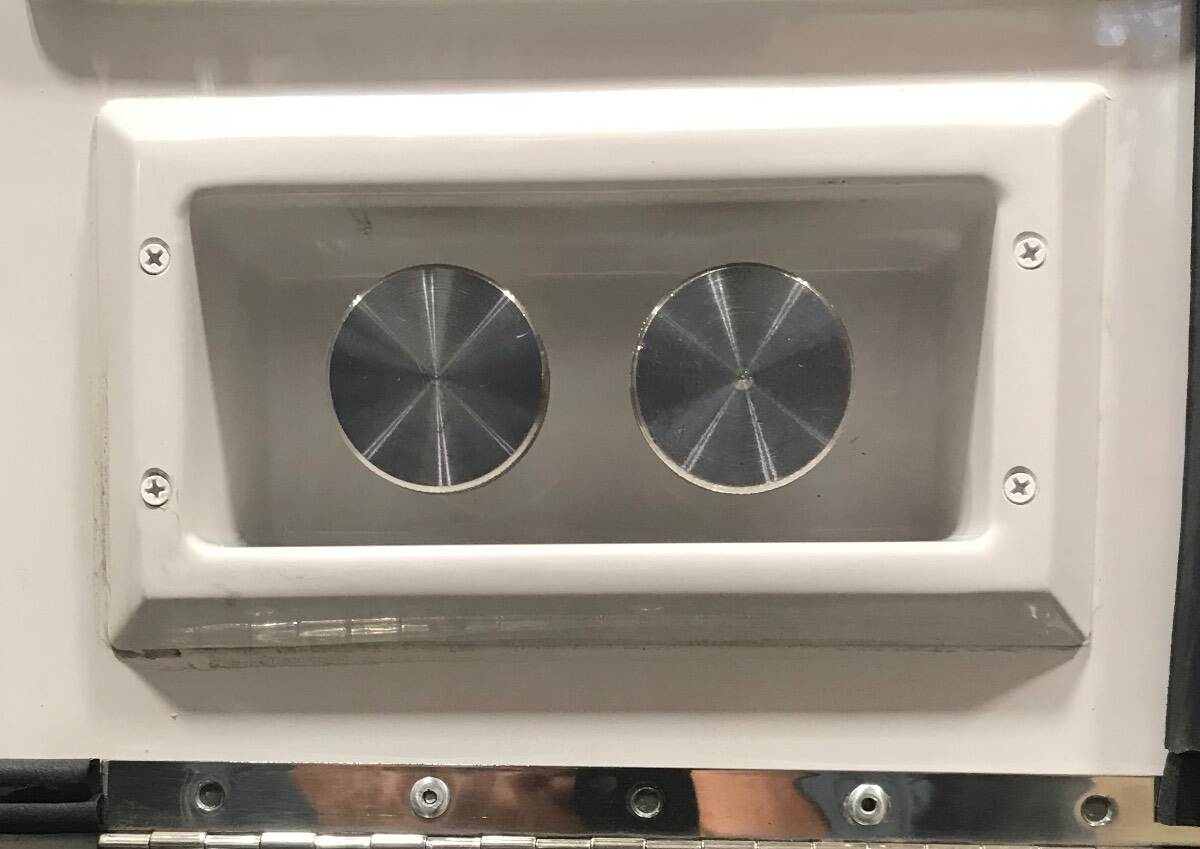
My black tank dump valve was hard to close from day 1, March 14, 2018. During the Summer of 2018 I found the installation instructions for the cable and valve and realized that it was at best a marginal install. I pulled the cable out and lubed it with a dry type lubricant and straightened the kink in the very end of the cable where the factory had screwed the set screw in and barely caught the end of the cable and bent it into the hole opposite the threaded set screw hole. This caused the cable to be slightly bowed which didn’t help the situation (See A and B below) and didn’t make valve closure any better. I also noticed that the clamp on the frame above the valve was broken and didn’t properly secure the cable sheath. I could get some clamping force but not enough to suit me. Given this and the fact that the cable/sheath/clamp length and position relationship weren’t going to permit full closure of the blade (if you have worked on bicycle brakes, throttle cables, choke cables you know what I mean) I decided to modify the clamp portion of the frame above the valve. I disassembled the frame and drilled the hole where the sheath is clamped through the bottom of the frame (See C and D below). I used a drill size that would create a tight fit of the sheath in the clamp hole. I reassembled everything, pushing the sheath lower in the frame (which also allowed me to push the end of the cable down past the set screw in the plunger) and this permitted the blade to completely close. Now with the valve closing completely I wasn’t having water in the sewer hose when I went to hook it up at a campsite but it was still difficult to open and close the valve due to the routing of the cable. Winter of 2020, I finally accepted that manual operation of the dump valve wasn’t going to be as smooth as I expected it to be so I ordered (2) stainless steel knobs from McMaster Carr, drilled and tapped them to fit on the opposite end of the cables, and installed them in place of the Valterra handles that came on the trailer. This made it easier to pull and push the cables without concern about breaking the handles. I think it was Spring 2021 when I talked to the service department about my findings and what I had done and that I still wasn’t pleased with the force required to operate the valve and that I thought it was due to the cable routing. They offered to relocate the black tank dump valve and since the sheath clamp part of the frame was broken I took them up on their offer. The service department relocated my black tank dump valve as shown below. This resulted in the valve assembly being tilted about 75 degrees from the vertical to the street side and the cable was rerouted from under the dinette seats to the street side of the dinette seat. This resulted in an improvement in valve operation, not perfect, but it is an improvement. Valve location before After, showing only the 1.5 inch sink/shower drain valve New location of the valve showing also the new routing of the cable I hope that this information is helpful to those trying to improve the operation of the black tank dump valve. I also hope my high school English teachers don’t read this. They would be appalled. Bill Very early 2018 Hull 313
1 point
-
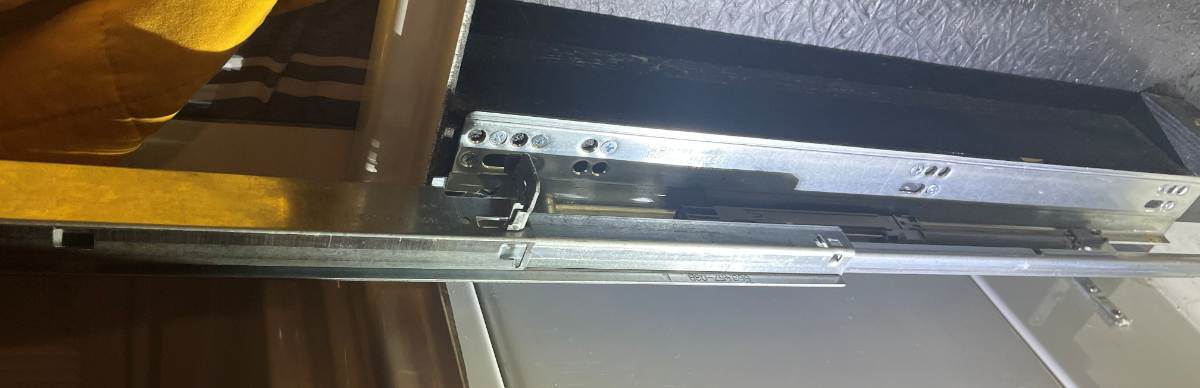
Just replaced the Blum slide on our nightstand drawer. This item is the OEM part replacement. Maybe I should have bought the 6-pack, LOL! The nightstand drawer and 5 kitchen drawers all use the 18" length, the short drawer uses the 12" Blum slide. https://www.amazon.com/dp/B0G7LQ3PQ4/?th=1 Lately, the drawer would open during travel so I suspected something was wrong. After removing the drawer (squeeze two orange levers underneath), I found the old slide was truly worn out. When fully extended the end would drop a couple inches. Not good! The new slide is in and now again it works great. But per the subject of this thread, OTT installed these slides with only three screws per slide! 😒 The slides are rated to carry 100 LBS, but three short #6 screws are certainly NOT! A couple year backs, working on a kitchen sink leak, I doubled all the screws on the kitchen drawers and went up one size. At the time, I forgot to do the nightstand drawer. The slides all wobbled a bit when unloaded with only 3 screws and I now contend it was the lazy installation that allowed this drawer to shake and eventually wear out the slides. These slides are substantial but need to be installed properly! BTW, Blum supplies 20 wood screws in these kits! 20 screws for 2 slides and 2 brackets not used for our application. I installed 8 screws on each slide! Why not? Blum certainly intends more than 3 should be used! I put 3 in the same holes to hold each slide in place and then drilled small pilot holes and screwed in 5 more (see pic)! Now this should last my lifetime. 😎 I suggest removing all your Oliver drawers, having at least 6 mounting screws per slide, 12 per drawer minimum.
1 point
-
Well, I had a feeling this was coming... I hope it backfires on them in the worst possible way. Will Prowse Sued by Dragonfly Energy Over Alleged False and Misleading Claims About Battle Born Batteries0 points








.thumb.jpg.e34bf01ef7f7d5e99ad31856d45afbeb.jpg)
-
Recent Achievements
-