Leaderboard


Popular Content
Showing content with the highest reputation on 07/27/2020 in all areas
-
From BHNCB: "If the EZ-Flex center bolt is not properly torqued to the 65-75 ft lb specification, the steel center bushing that is supposed to provide the lubricated pivot point for the two individual arms, will not be held stationary allowing it to rotate directly on the un-lubricated center bolt. The center bolt now becomes the pivot point for the entire equalizer assembly as a single unit. This un-lubricated bearing contact will tend to rotate the center bolt, which will in turn eventually loosen the prevailing torque locking nut." One additional technical input that I learned from Jason this morning: The Center Bolt flanks (not the threads) should have "Never-Seize" applied during re-installation. Doing so helps prevent the dry Center Bolt from becoming the pivot point vs. the (wet) steel center bushing" that BHNCB discusses above. Today I spoke at great length with Jason, and also Dexter (Nikki). She has sent up to the Dexter Senior Manager (Mr. Sean Cantzler) the failure of the center bolt locking nut not holding torque concern. From BHNCB, I think I understand that the EZ Flex center bolt and frame tabs form a simple crush connection. Since there is plenty of room on either side of the frame tabs for a longer bolt, why not change out their shackle bolt Center bolt with longer bolt (with Never Seize) that uses either double nuts, or better a castilated nut with a cotter pin? This would eliminate the single point of failure that at least four of us have had to deal with... fortunately by the Grace of God without injury to ourselves or family. Geronimo John4 points
-
One thought is to remove the screws and see. Another is that like the op, you’re probably better off just buying a stainless ring to go over it, so there’s no need to remove it. https://www.amazon.com/Oatey-42778-Grommets-4-Inch-Stainless/dp/B003FX6ED6/ref=mp_s_a_1_3?dchild=1&keywords=stainless+toilet+flange+ring&qid=1595854362&sr=8-3 A third thought is that adding a stainless ring might be a pretty good preventive maintenance measure. I’m surprised (no, not really) that Oliver uses a plastic flange that’s all but destined to break in an RV environment. I think I might be inclined to add a few spots of marine adhesive to the bottom of the toilet when you put it back.3 points
-
Everyone who has the EZ-Flex equalizer needs to read the following explanation I put together for this condition. I know from experience that there is a disconnect somewhere as to how this bolt should be torqued. If the EZ-Flex center bolt is not properly torqued to the 65-75 ft lb specification, the steel center bushing that is supposed to provide the lubricated pivot point for the two individual arms, will not be held stationary allowing it to rotate directly on the un-lubricated center bolt. The center bolt now becomes the pivot point for the entire equalizer assembly as a single unit. This un-lubricated bearing contact will tend to rotate the center bolt, which will in turn eventually loosen the prevailing torque locking nut. Hopefully the frame hanger will not have been destroyed by the rotating serrations of the center bolt. I would recommend removing the EZ-Flex and inspecting the hanger and steel bushing to see if either hole is out of round and/or enlarged. Then, if neither of these conditions exists, you may get by with just replacing the bolt and nut. Worst case could be replacement of the complete EZ-Flex and/or frame hanger repair or replacement. I don’t think Dexter will supply just the steel bushing as an individual part because replacement requires specialized shop equipment and tools. That would be the desirable alternative to replacing the whole equalizer though. GJ: Please keep us updated.3 points
-
The entire night stand top can be removed with 4 screws? It looks like it is part of the mold? I love your custom bracket by the way. I've had your post bookmarked for at least 2 years. 😃2 points
-
We took delivery June 16th, spent 6.5 hrs on our delivery day going over everything we had on our long pre delivery check list. It was a long list and a drinking from the fire hose day 😄😳. We live 7 hrs from Oliver and driving home was just not a safe option for us given how tired we were from delivery day. We spent an extra 3 nights at David Crockett which looking back we’re really glad we did. You are correct, skipping the overnight stay Is not prudent. As stated driving back to Atlanta tired, possible rush hour, and stormy weather is a bad combo. As Overland already wisely stated and I completely agree, I would not recommend skipping your overnight shakedown at David Crockett.2 points
-
If you’re concerned about lightning, then I understand, but personally I’d consider it a good opportunity to test the weather tightness of the trailer. Plus it’s hard to recommend skipping your shakedown. I only live three hours from the factory but it’s still a pain to go back. Not that I don’t enjoy my visits. 😜 I’d also second what Nancy just posted. If you aren’t used to towing, the first trip can be a little nervy, so planning to do it in the rain and rush hour might not be a good idea. If you’re a seasoned tower though, no big deal. I’d contact your salesperson and ask how long they usually schedule for PDI. I’d also ask how many others are picking up that day. If they’re busy, it might limit the amount of time you have to get used to the trailer before taking off.2 points
-
This is the best solution by far. A replacement ABS flange will most likely just break again at some point.2 points
-
Dumping Steve’s tools is not an option. We will all need them (and him) at some point!2 points
-
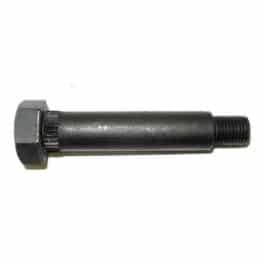
Here's a picture of the bolts I removed from 2018. I have to assume they are the original bolts Dexter provided with the kit that OLIVER installed when the chassis was built. Pinching the hanger against the equalizer bushing is precisely what you want. This longitudinal pressure on the ends of the steel center bushing, along with lateral pressure from the bolt shoulder shank resulting from the weight of the trailer, is the only thing that keeps this bushing from rotating. There is a paragraph 13 on page 3 in the attached Dexter installation instructions about the procedure. 059-867-00_ez_flex_complete.pdf
 2 points
 -
Horace - I carry a grease gun with me and give the equalizer zerks a shot any time I get over 3,000 miles. Since I've always got a tarp with me too there is never really any excuse not to lay the tarp down and take care of business. Besides, after all that hard work I deserve an adult beverage - as if an excuse is really needed. Bill2 points
-
I know I saw this before but could not find the thread. Anyways, I went to grease the Ollie and found the left bolt/nut that secures the equalizer to the frame hanging by a tread - literally. I tried to tighten it - but the bolt would not hold torque, Lucky me. We were heading out Sunday, so I called Oliver too see if they had one in stock. I will be there in the morning. Glad I'm within a couple hours drive. I know I did a visual during the last long trip, but apparently not on the return leg. From now on I'm doing a full inspection after the clean up each time I use the Ollie. RB1 point
-
Thanks Mainiac, looks like pretty standard stuff.. blowing out the lines is part of my routine as well, dealing with the water heater etc.. I don’t take any chances.. hadn’t thought about having anti freeze on hand while traveling to flush with though.. Good idea! i noticed in the owners manual for the toilet that they recommend disconnecting the waterline from the water valve.. ever do that? Thanks for the offer of coming for a visit and to check out your Oliver.. May take you up on that.. I’m looking for some floor dimensions, Deb is a rug hooker and wants to get started on one for the area between the beds, as far forward as dinette or so.. Thanks again!1 point
-
For screw holes that don't show a lot, I'd actually recommend marine tex epoxy. It's white. Might not be the same white, not shiny, but it will definitely seal the hole. And much less noticeable than a deep black hole. If you decide later that you don't like the color match, you will have to sand it to rough it up to get a secondary bond. Gelcoat is brittle. It doesn't like to bond to a lot of material, including marine tex. That said, if we have to fill old screw holes on the boat, epoxy if some kind ( often marine tex) is our go to, because it will seal and stay. You can buy gel coat repair kits, tinted or untinted. They're not cheap, and for deeper "wounds", require buildup of layers for proper repair. If you just glob it in to a deep hole or gash, it will likely just look good for awhile, and then part ways . If you buy untinted and colorant, you're really on your own, because the color is different wet than when it dries . We've had a few scratches in noticeable areas repaired at Oliver. They did a great job, and I can't see the difference. They did the buildup in layers, so it took a couple days. And did the proper wet sand and buffing. Where are your repairs needed? Noticeable areas?1 point
-
1. We can look up the connectors you need. Did they install the Zamp port? 2. You still need the solar controller on your panels. The inverter is a completely different piece of (important to some) equipment. You never want to send solar power directly to a battery, unregulated. That's what your controller does. The solar port takes that regulated power, through a fused line, to your battery. So, you get two protections for your battery. The existing solar controller, and an inline fuse.1 point
-
1 point
-
Ugh. Think I'll stick to trailers.1 point
-
Thank you Sherry and Overland! I know that I found this dross very useful and I’m glad I didn’t respond last night. It might have been perceived as snarky. Mossey1 point
-
That's actually really easy. Thanks, Overland. Our new software is so much more feature rich and intuitive than the old. Fun to discover new tools.1 point
-
I'm not sure about the length of the PDI since we haven't picked ours up yet, but some things to consider: Are you likely to also encounter the same storms on the road Wednesday? 5 hours in a car will be longer with the trailer. Will you be getting near Atlanta during rush hour? Hope all works out well for you!1 point
-
Hi "Neighbor" I have found it best to have at least 6 gallons of RV antifreeze on hand. During the season they can run out, or the price rises. Off season they don't carry it. I have found I use about 3 gallons every time. I thought that was a lot for such a small system, but the hand pump for the inlets used quite a bit. Also when sometimes I might want to head for warmer climes in early Spring (or Mudseason), I carry a couple of gallons in the closet. We use it to 'flush' with so that we don't have to de-winterize until south of the Mason/Dixion Line. We also blow out the lines twice before adding the antifreeze, so get an air valve/ hose fitting adapter. (I assume you have some type of air compressor and a socket to remove water heater drain if you are getting the standard water heater).Have been doing this for the last 20 years this way and never have had a problem. When working at a CG we used to do 40 some units. It may take an extra 15 to 20 minutes to do it this way, but that is less time than to replace a toilet valve or a piece of plumbing. Stop by if you want to talk about it, or just want to revisit an Oliver...1 point
-
I don't think my center bolt had splines either. But, I could be wrong. Since it is not a wet bolt and there are no shoulders on it to prevent over tightening, I'm not sure if it would matter if it could rotate. If you tighten this nut too tight it would pinch the hanger against the equalizer. What do you think?1 point
-
Unfortunately, Sligh, a tow capacity of 5000 pounds is not nearly enough for an Elite II. On average, they will weigh in at closer to 6000 pounds in full camping mode. It would actually be only marginal for the Elite as they will weigh in at 4000 pounds or better. I would want a little more lee way in towing capacity. There are a couple of other values you also have to take into consideration: 1 - Gross Vehicle Weight Rating (GVWR) which is the total the truck can safely weigh when it’s loaded. That includes the curb weight – the truck with nothing in it – plus whatever goes in, including passengers and cargo. It also includes tongue weight, which isn’t the weight of the trailer itself, but the downward force it exerts on the trailer hitch ball. 2 - Gross Combined Weight Rating (GCWR), which is the maximum of the truck and everything in it, plus the trailer and the weight of whatever’s in it. I was unable to find this information anywhere on the net with many Jeep Cherokee owners complaining about it not being posted on the vehicle (by law, it should be on a label stuck to the inside of the driver's door post.) In your case, I'm concerned that you would quickly run out of carrying capacity inside the Jeep trying to pull something as heavy as either of these trailers. I know these answers are not what you wanted to hear. But for safety's sake and to paraphrase Chief Martin Brody, 'You're gonna need a bigger truck.'1 point
-
Ok, I'm crying uncle. Anything but my tools. 😢1 point
-
And then, those of us with LCs will be there to tow home the pieces for you.1 point
-
My truck can beat up your truck with one wheel tied behind its tailgate. So there...1 point
-
That's what happens when you're on the forum too often like me. Every time someone mentions something they carry, I add it to the list.1 point
-
A couple of things I forgot about - along with the spare LP regulator, it's a good idea to have one or a pair of pigtails to go with it. The other is a set of Colby replacement tire stems - that's really for the truck, but they'd work on the trailer too.1 point
-
Here's what I carry - Plumbing: ½" brass pex fittings: elbows (2), tees (2), ½" NPT adapters (2), ½" NPT elbow adapters (2), ½" valve (1) #4 stainless hose clamps (8) ½" press-fit end cap (1) ½" pex tubing (6 feet) - a single long piece is easy to stuff in the hull and not get lost ½" flex hose (1) Male garden hose fitting (1) Female garden hose fitting (1) Garden hose splice (1) Garden hose washers (4) Garden hose screen washers (2) Spare water pump - yes, I carry a complete spare pump Kitchen faucet repair kit - this kit came with my kitchen faucet Silicone tape Press-fit removal tool Bolt cutters - to remove copper crimps Utility knife You'll note that I don't carry a lot of press-fit stuff or a crimper. For emergency repairs, I think it's more practical to carry the small brass fittings and use hose clamps. You can always swap them out for crimps later (though honestly the pipe clamps hold better). They're almost as easy to use as press-fit stuff and take up much less room. Plus there are places in my trailer that are too tight for press-fit fittings anyway, and it would be silly to carry two types. Electrical: 12 awg wire (15') 12/3 romex (3') Wire nuts (4) Wago lever nuts (assortment) Misc 12 volt fittings (assortment) Misc 12 volt fuses (assortment) Primary 400A fuse (1) Jack fuses (4) Spare GFCI outlet (1) - very important! Locking cigarette lighter plug (1) Refrigerator light bulbs (2) Lamp light bulbs (2) - for the lamp I installed on the nightstand Electrical tape Crimper/Stripper Misc Parts: Spare propane regulator (1) Spare awning clips (2) - these are the little orange clips on the Carefree awnings that are destined to break one day Misc Repair Items: 3M 4200 (1 3 oz tube) 3M 4000UV (1 3 oz tube) Silicone sealant (1 3 oz tube) Eternabond roof repair tape (1 roll) Awning repair tape (12") Screen repair tape (assortment) Clear tenacious tape (12") 1" Gorilla tape (1 roll) Bungee cords (various) Zip ties (various) Metal wire (1 roll) Velcro strips (various) 1" VHB tape (1 roll) WD-40 (1 3 oz can) Lithium grease (1 1.5 oz tube) That looks like a ton of stuff, but the majority of it fits in a 12" x 12" x 4" Blue Ridge tool bag that stuffs easily in the basement. A few of the larger spares are in a box that's secured between the hulls along with some other items like the romex and pex tube , small things that I'm more likely to use I keep in the utility drawer, and a few things are always in the truck.1 point
-
You are a lucky man.... the bolt has shallow splines close to the head that grip the steel of the hole in the spring mount. It is important to not turn the head, instead tighten the nut while holding the head motionless with a big wrench. If you let the head turn the splines will wallow out the hole, making a loose fit. It would be interesting to inspect the failed bolt, set it down beside the new one to see if there are any obvious flaws.... Check all the other nuts and also the ubolts holding on the axles. I bet there are others that need tightening. Please keep us updated. John Davies Spokane WA
1 point


-
Recent Achievements
-


")


")


