Leaderboard


Popular Content
Showing content with the highest reputation on 03/20/2021 in all areas
-
I don't really care for jazz but I love Brubeck and would have enjoyed seeing him for sure. You were fortunate Overland. I used to work in product development and worked closely with designers. There were many designers that were huge Radiohead fans. There's a lot of stuff people are uploading that I'm not familiar with but I'm giving all of it a try.3 points
-
So I am glad I got into 2021 as I see they made fiber granite standard and increased price. I am just not a fan of the look. I got standard interior and saved the $$ and working with Foy Sperring on custom dinette top to be the show piece of interior. Many like fiber granite though just not my taste. I was also convinced I wanted truma and composting toilet. I passed on both. I will never full time and after a lot of research truma just wasn’t needed to start. I also decided to try standard toilet first. One way or other you deal with waste and I just wasn’t sold on composting and it is expensive option to be on the fence about.2 points
-
I love Skating. As a kid, those brushed drums were every bit a sound of Christmas as any carol. Wrong season but that reminds me of this from Bowie and Bing. The only version of drummer boy worth listening to. Man, 1977. Bowie, Bing and Star Wars all in the same year. I was a spoiled kid. 🤣2 points
-
Bheki reminds me a bit of Guaraldi. I like him.2 points
-
I like that. Added to my library. Thank you. I’ve slowly evolved into liking jazz, and like you, wouldn’t have called myself a jazz lover not long ago. But that does seem to be where I’m headed. Both times I saw Brubeck were in very small venues, once when we were maybe ten feet away. It’s amazing to me to watch masters that close, no matter what it is they do. I mean, I could sit for hours and watch a skillful brick layer do his thing. I couldn’t articulate what I get from it but it’s meaningful to me regardless. Here’s another jazz artist you might like - Bheki Mseleku, from South Africa.2 points
-
So I had an old Bob Wills LP- and while looking for a video found this - never cease to be amazed ,,,2 points
-
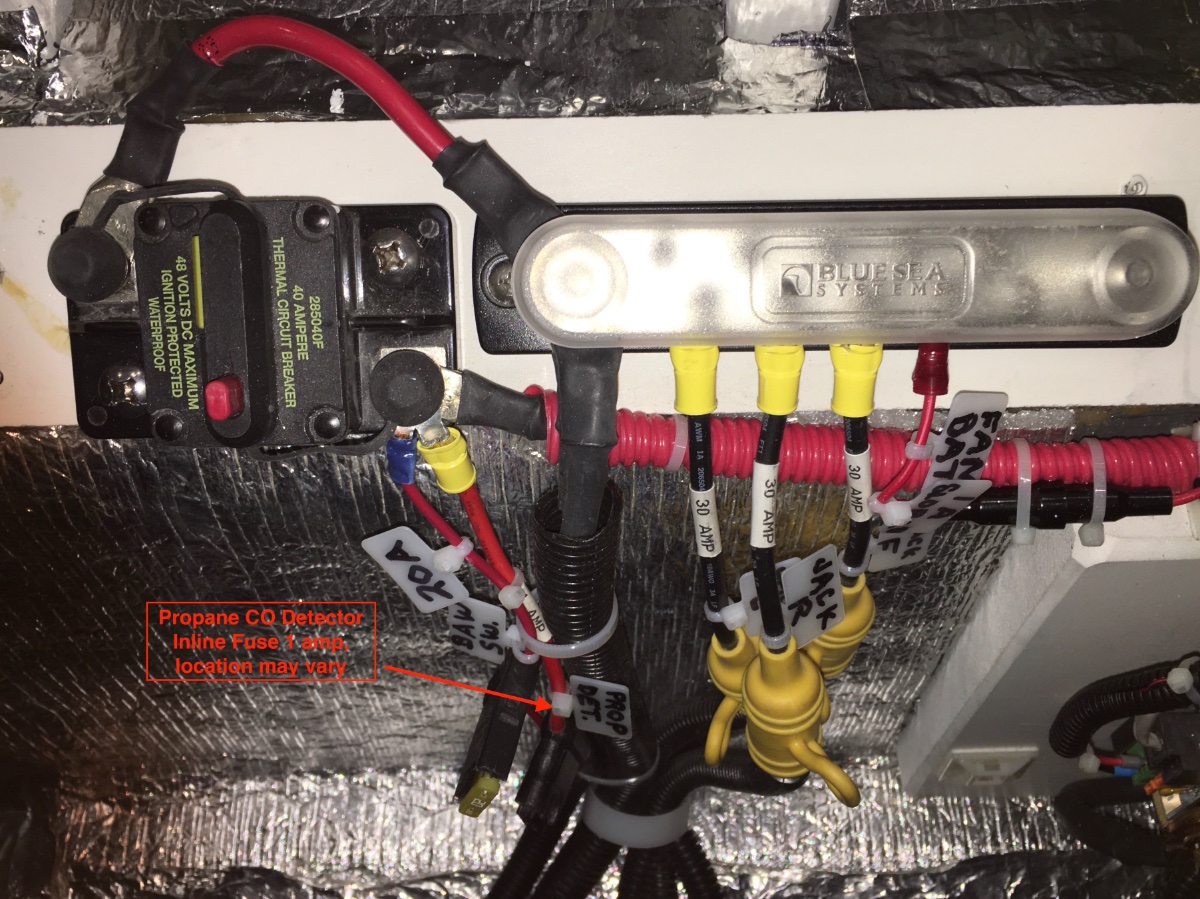
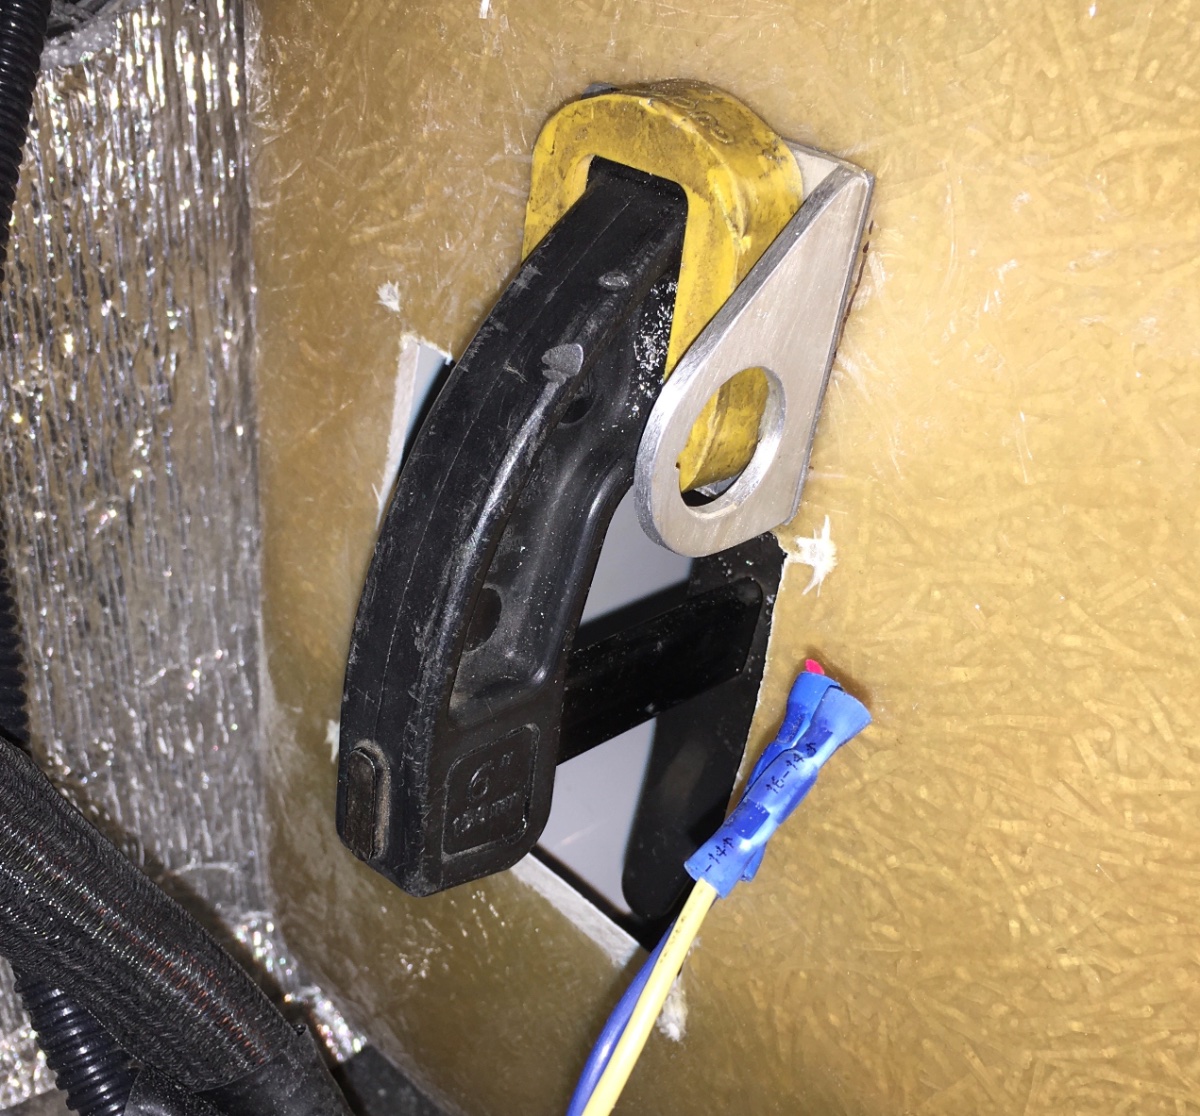
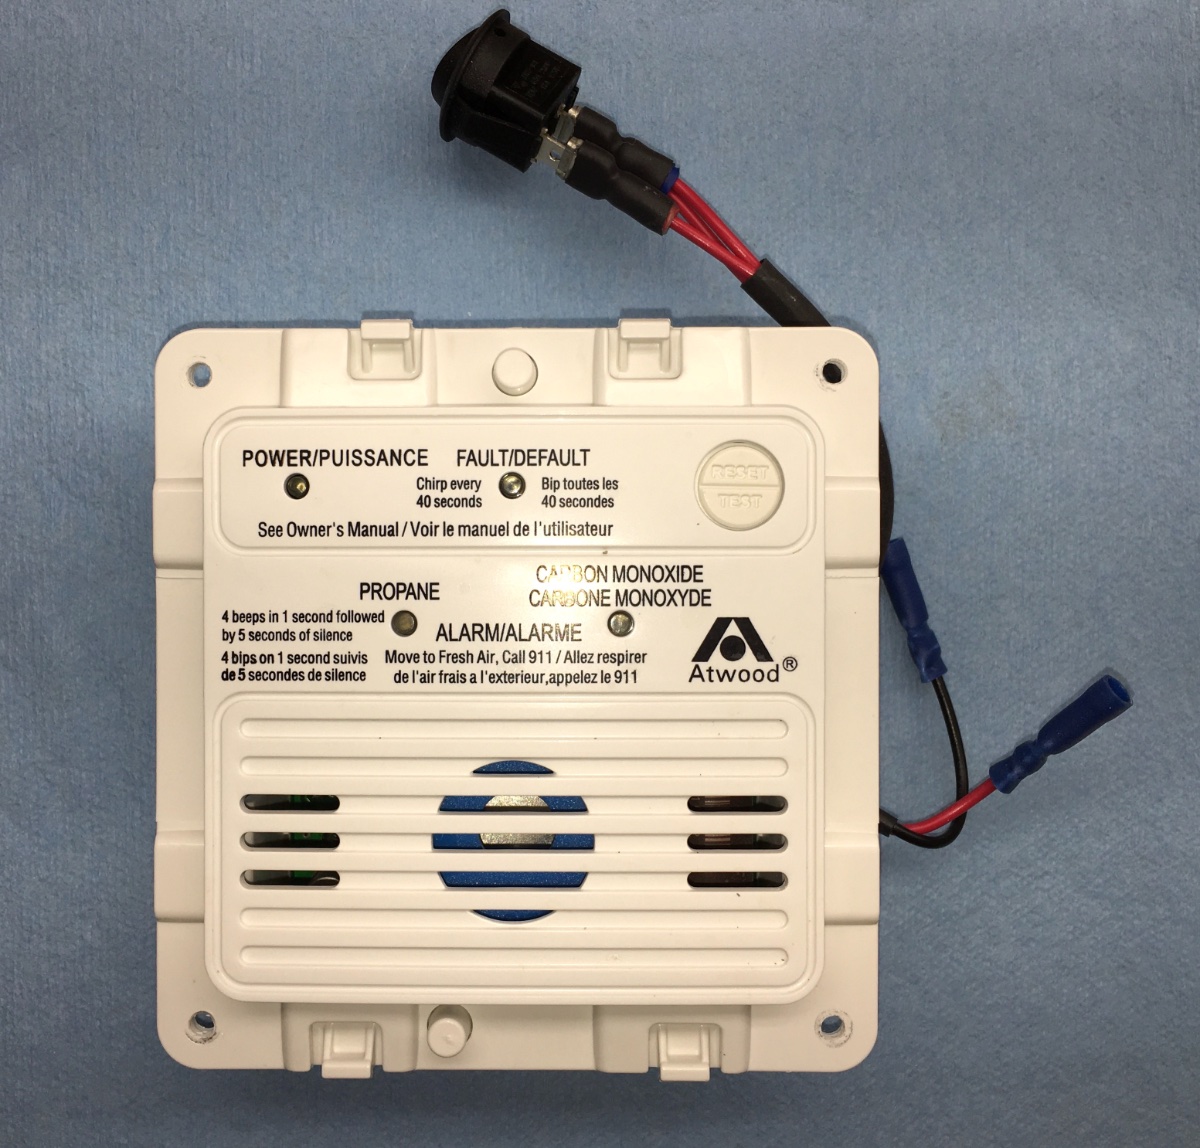
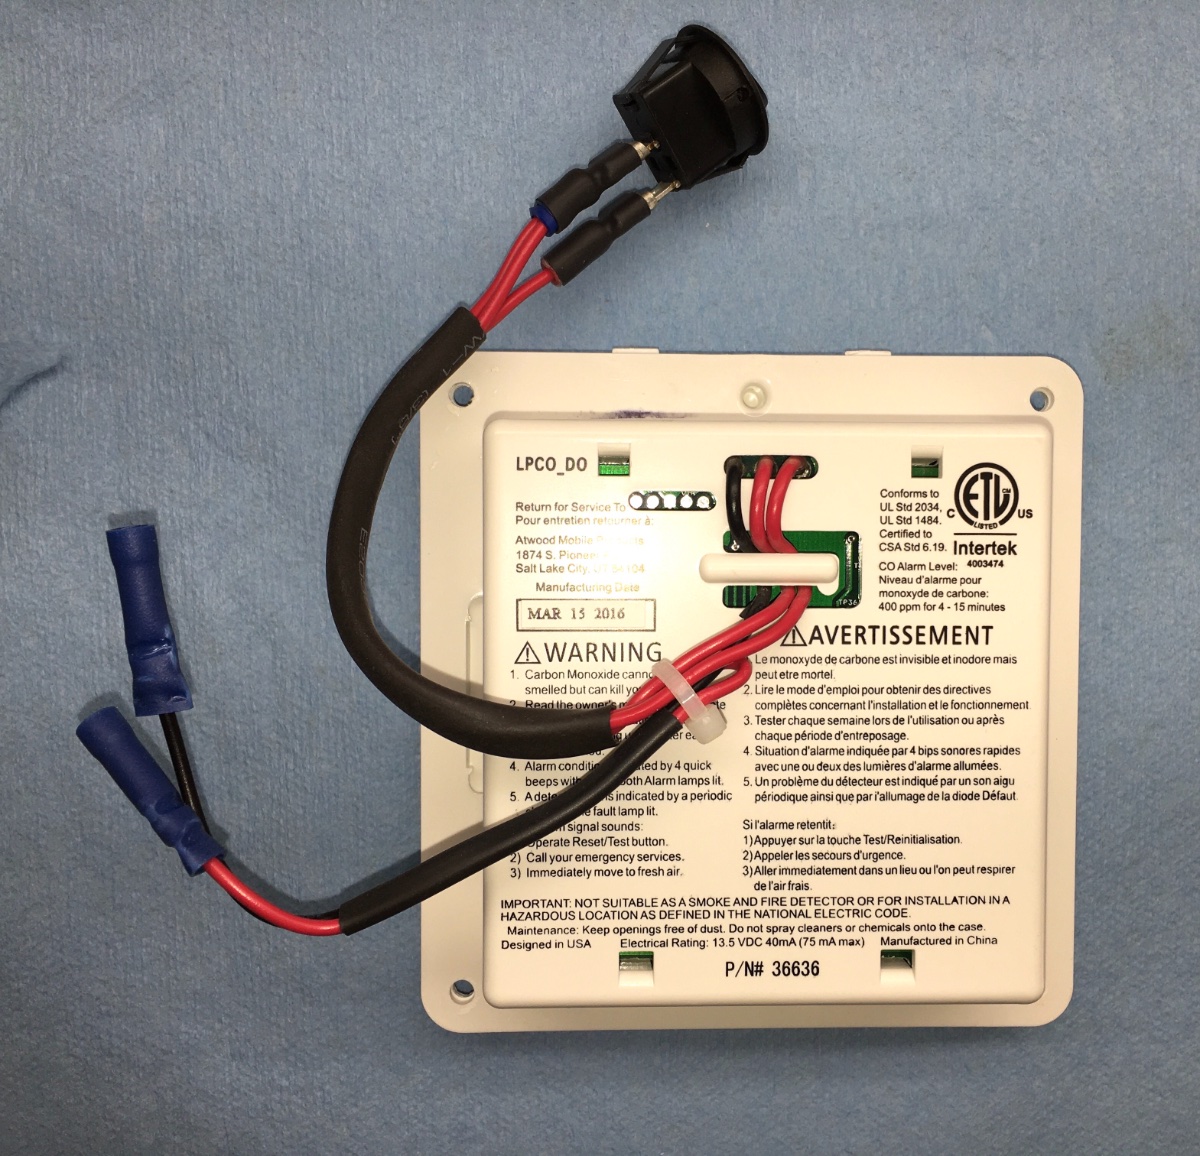
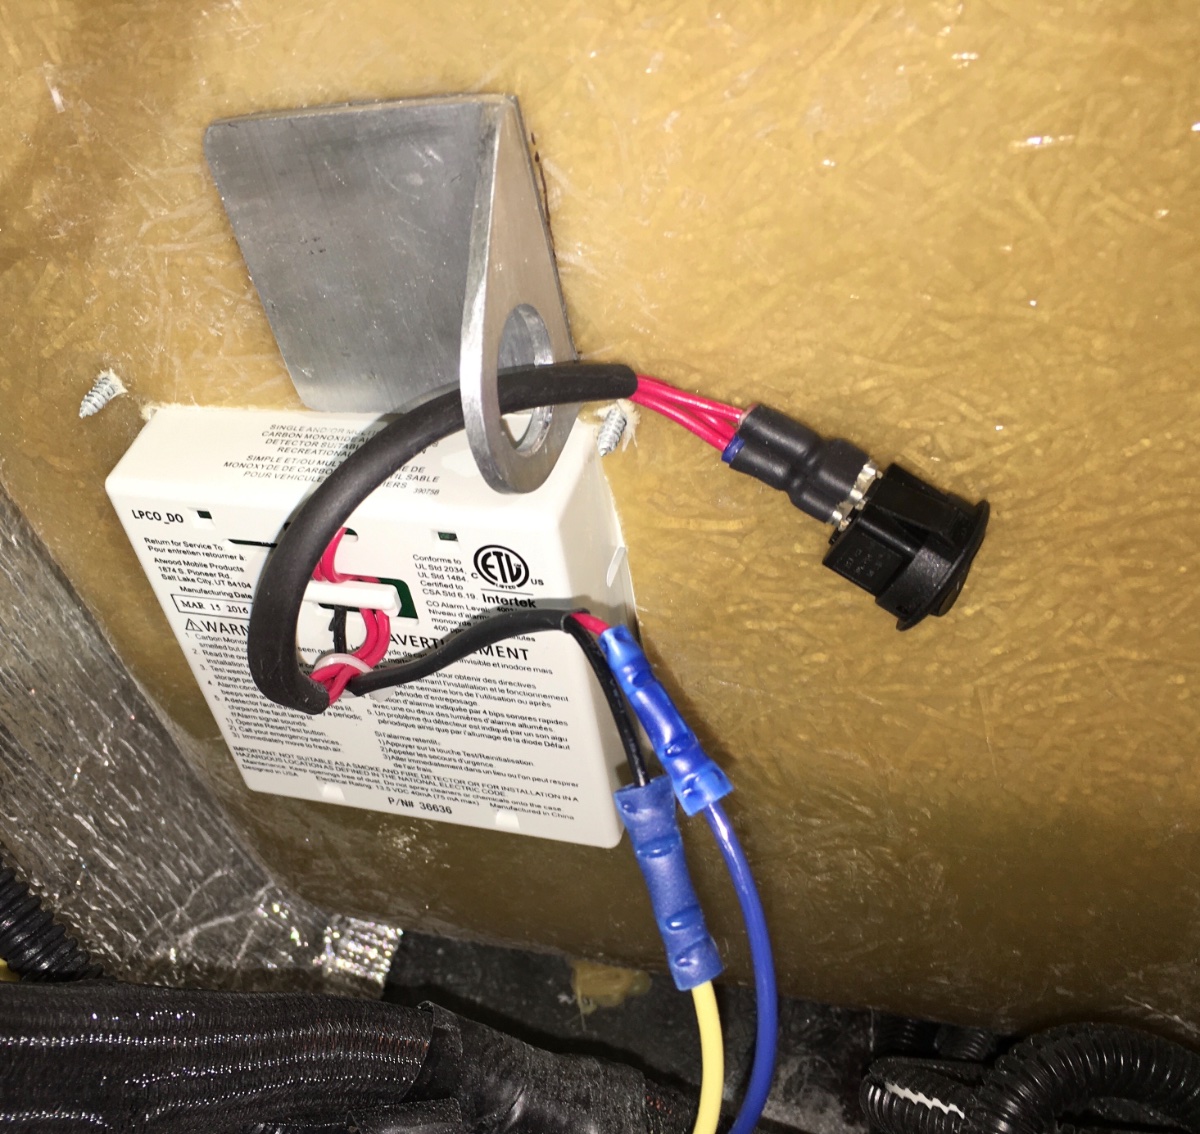
The detector uses a little bit of power, about 0.05 amps, even when everything else is turned off. Normally that isn't a worry, unless you want to keep the batteries connected long term and you are not plugged into shore power. A little drain over many months can flatten a battery bank. Plus it is nice to be able to silence a nuisance alarm or a failed unit by switching it off rather than locating and pulling its fuse (which is at the 12 volt DC bus under the rear street side bed). Here is mine, the location WILL vary because I moved mine to the back a foot, but the wire comes off the manual reset circuit breaker. I added the labels. The Oliver wire does have a factory installed label "1 amp" but it doesn't identify the purpose of the wire! Remove the fuse or disconnect the batteries! Remove the unit (4 screws) and cut the wires. Make a little bracket from 6061 T6 2" x 2" x 1/8" aluminum angle, and secure it to the compartment wall with 3M VHB (Very High Bond) tape. Epoxy would also work fine. The switch is a simple, non-LED On/Off SPST switch that matches the other Ollie switches. It requires a 0.800" hole, which can be made with a step drill AKA Uni-Bit. https://www.harborfreight.com/3-piece-titanium-nitride-coated-high-speed-steel-step-drills-91616.html Any type of switch will work because it is not normally visible. It is similar to this illuminated model: I used the existing Red for positive and Black for ground detector wires. The factory harness has a Blue positive and Yellow ground. Unplug the switch. Splice the new harness into the old one, working outside the compartment (under the table). I was able to discard two feet of extra wires. Install the detector body into its hole. Feed the switch wires through the round hole and mount the switch (it presses in with two retaining clips). Note that it has a little plastic "key" under the lip, that needs a matching notch in the hole, or else just file off the key entirely. Cover the wires with plastic split loom and secure them with cable ties so that they don't flop around. The switch could be located anywhere, but this spot makes it quite simple. A location on the outside of the compartment would work, but it would be possible to turn it off by mistake, which could be dangerous or fatal. Put it somewhere out of the normal traffic flow, and not in a storage compartment where loose gear could bump it! You still need to check the unit for proper operation before each trip and then weekly. Finally, adding a switch violates the RV build codes! Do this mod only if you fully understand its benefits and its potential risks. Because of my extensive mods, I added a BIG information placard under that access cover, it includes information on the Propane Detector switch. Something similar to the last paragraph might be prudent. John Davies Spokane WA
 1 point
 -
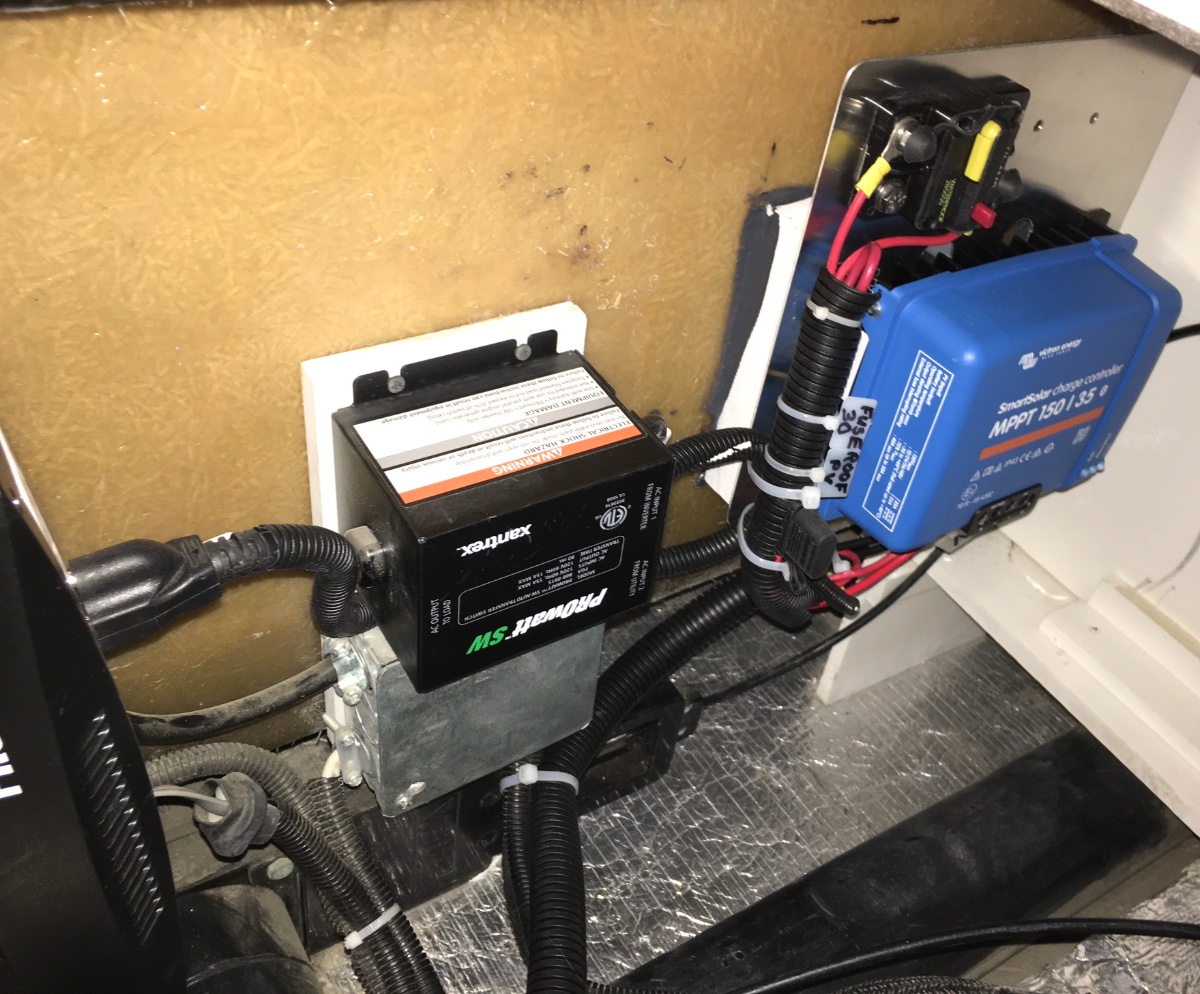
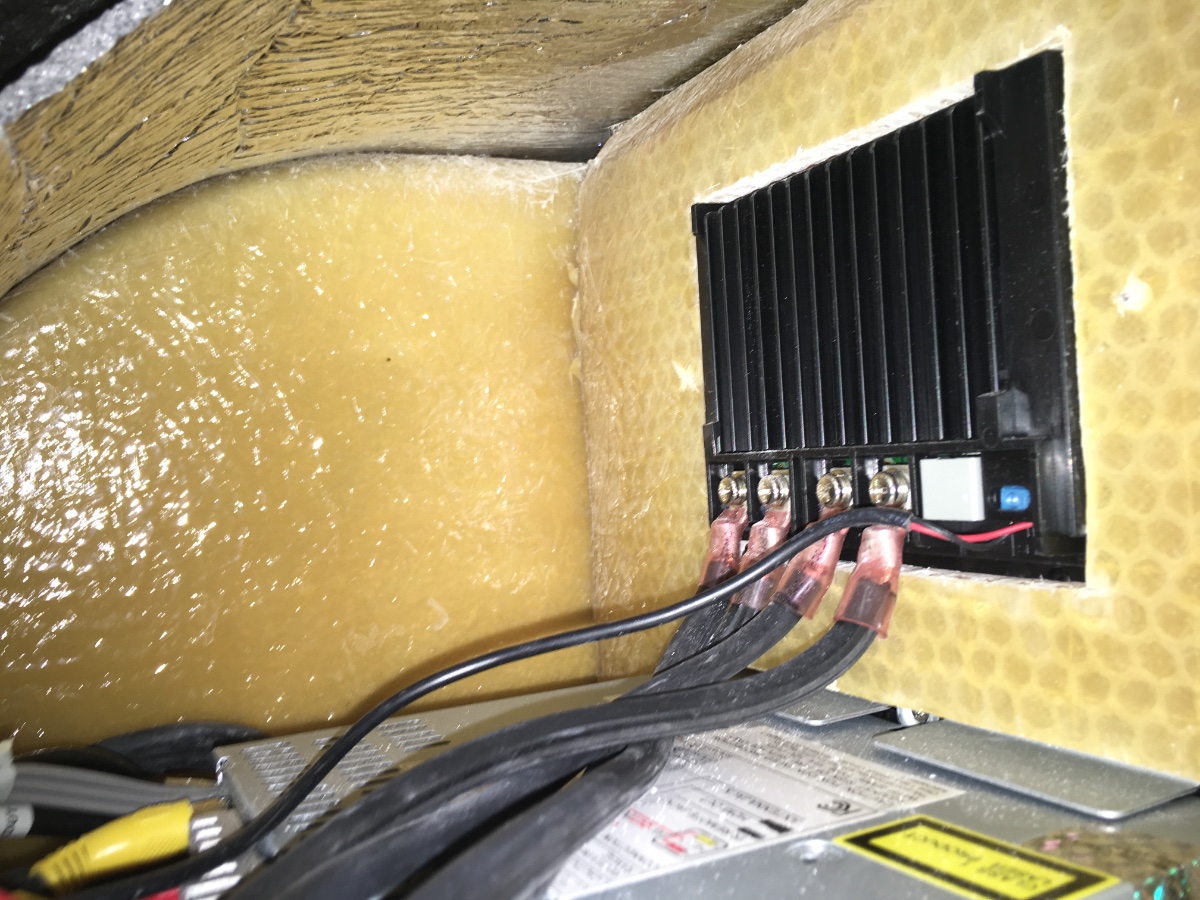
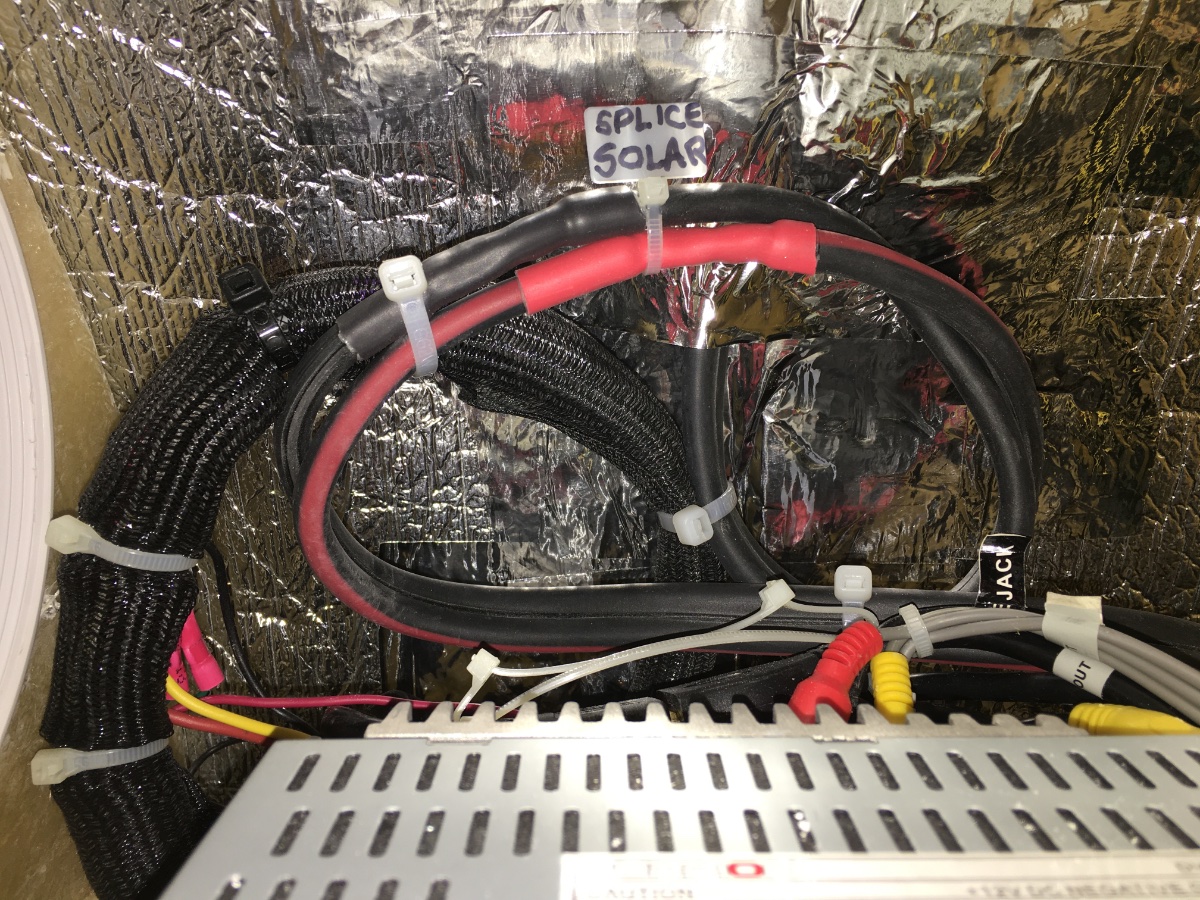
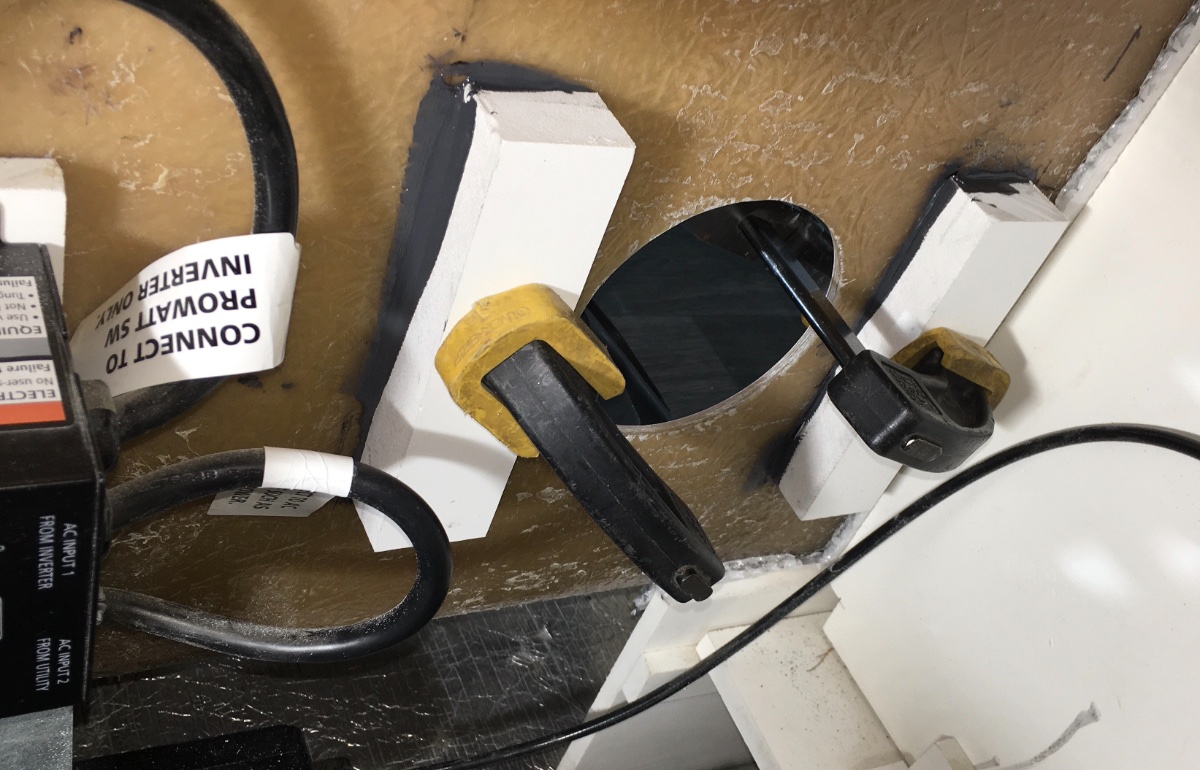
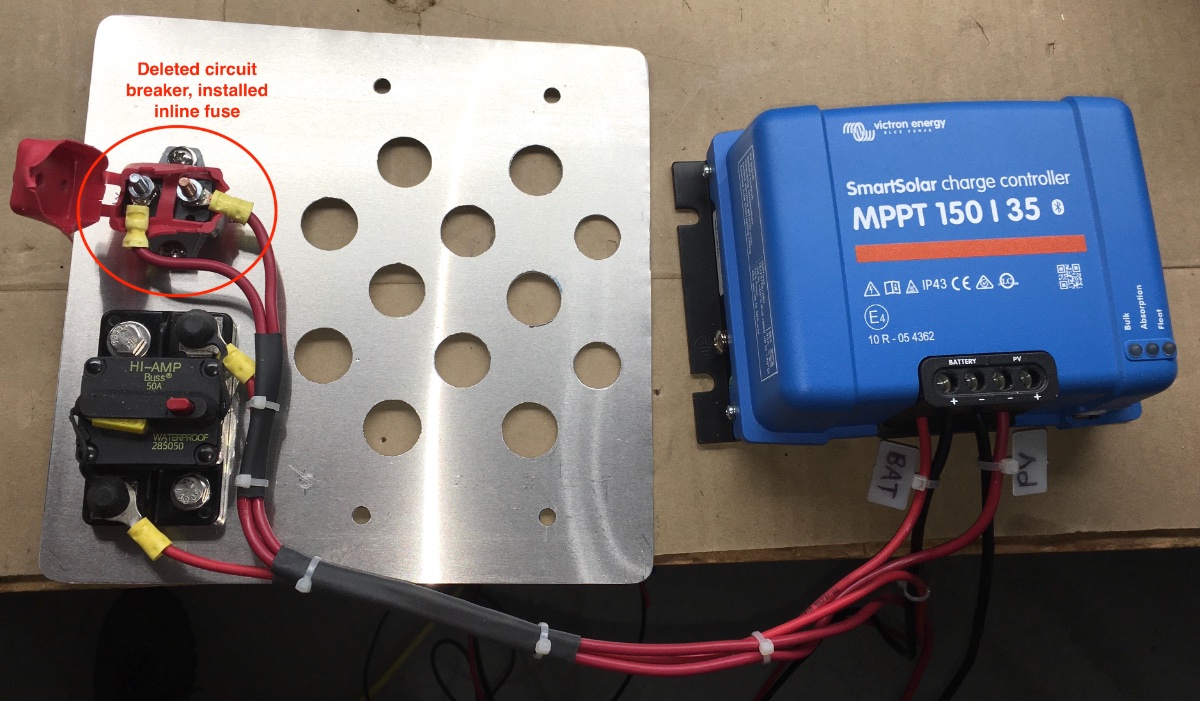
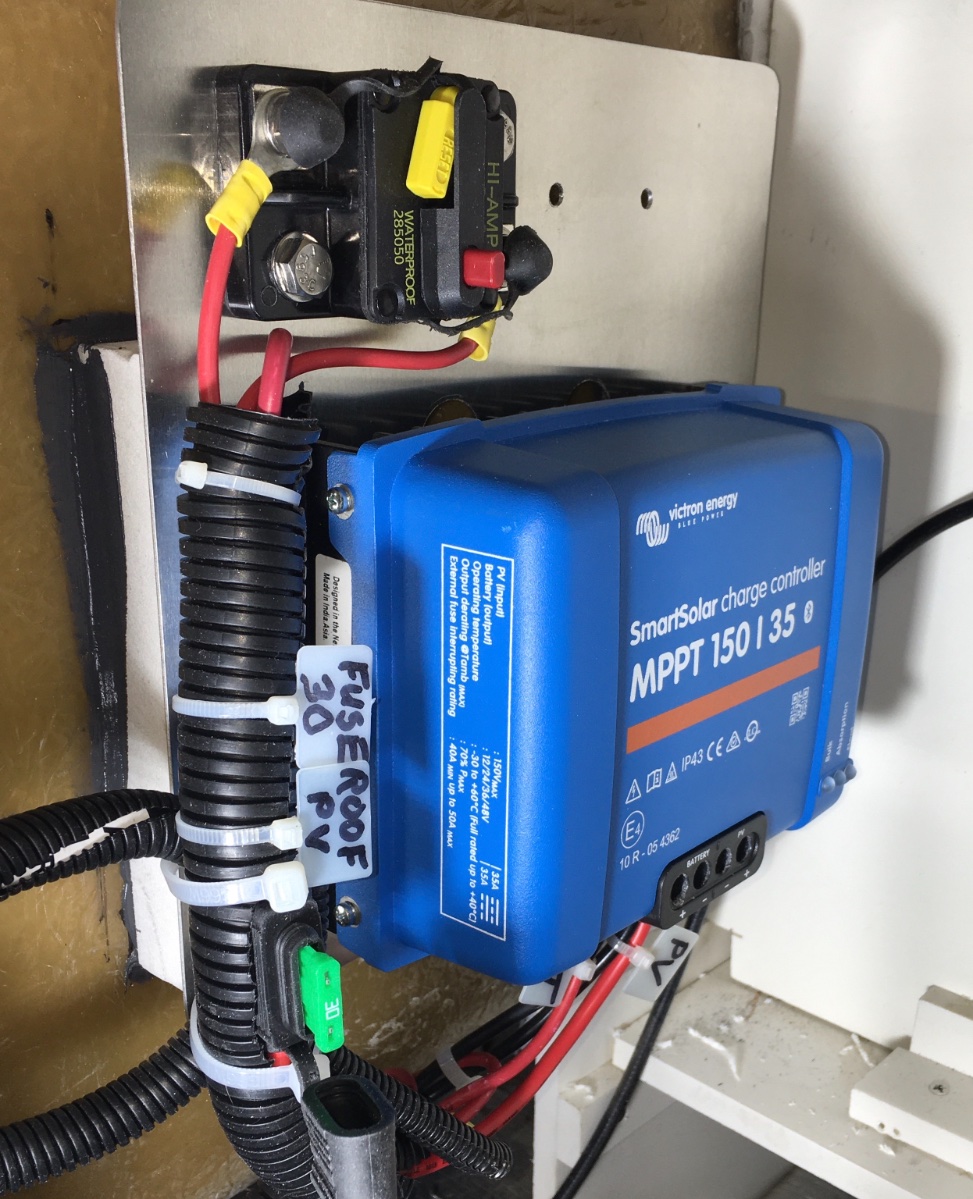
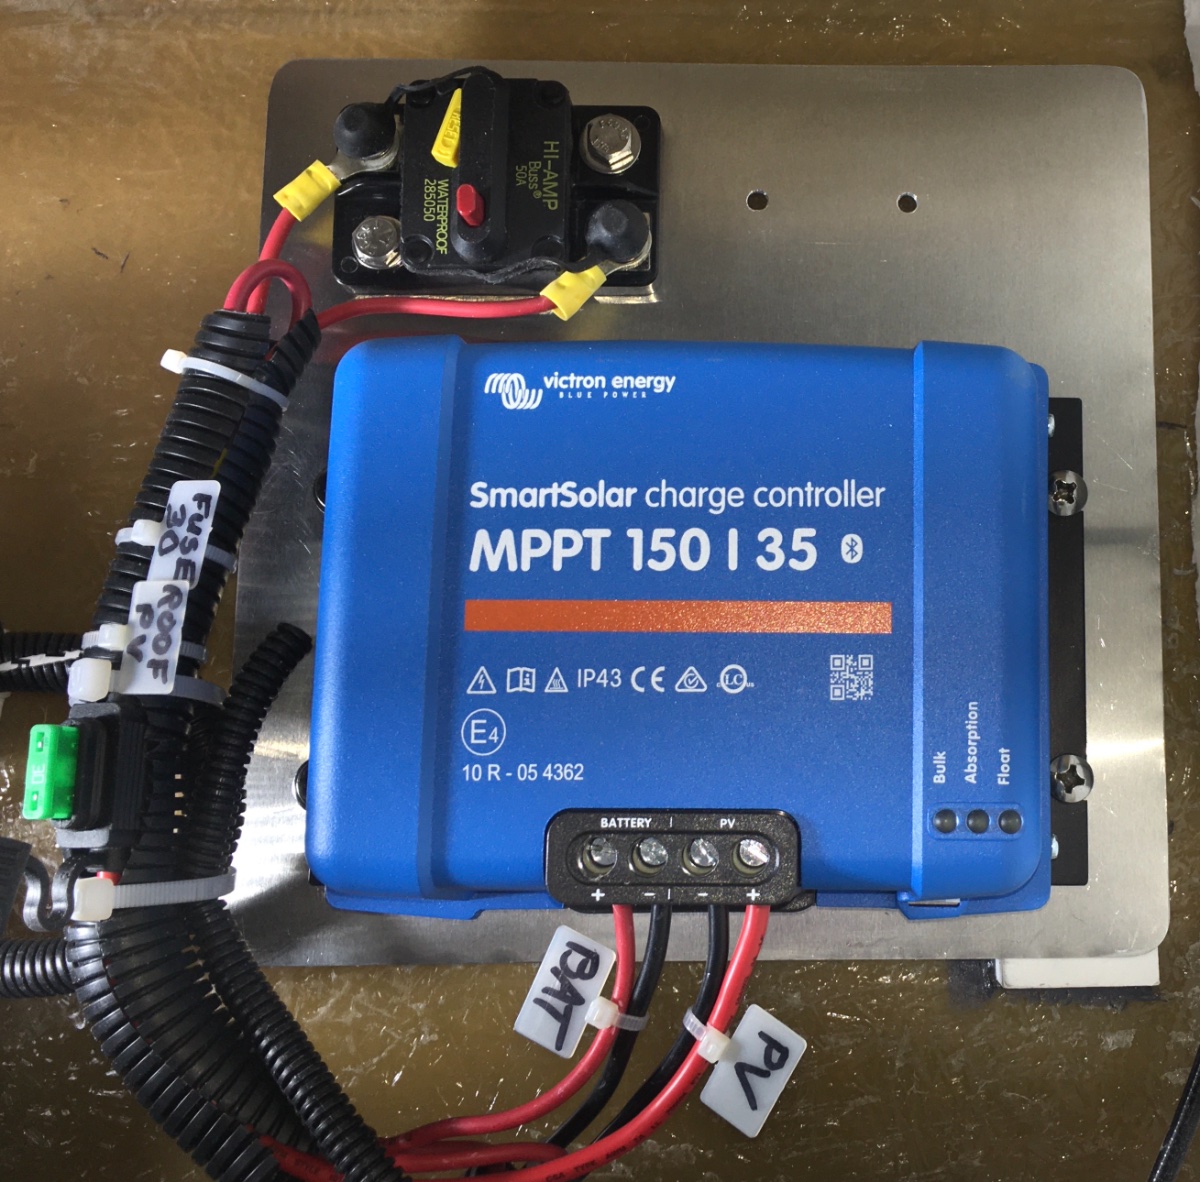
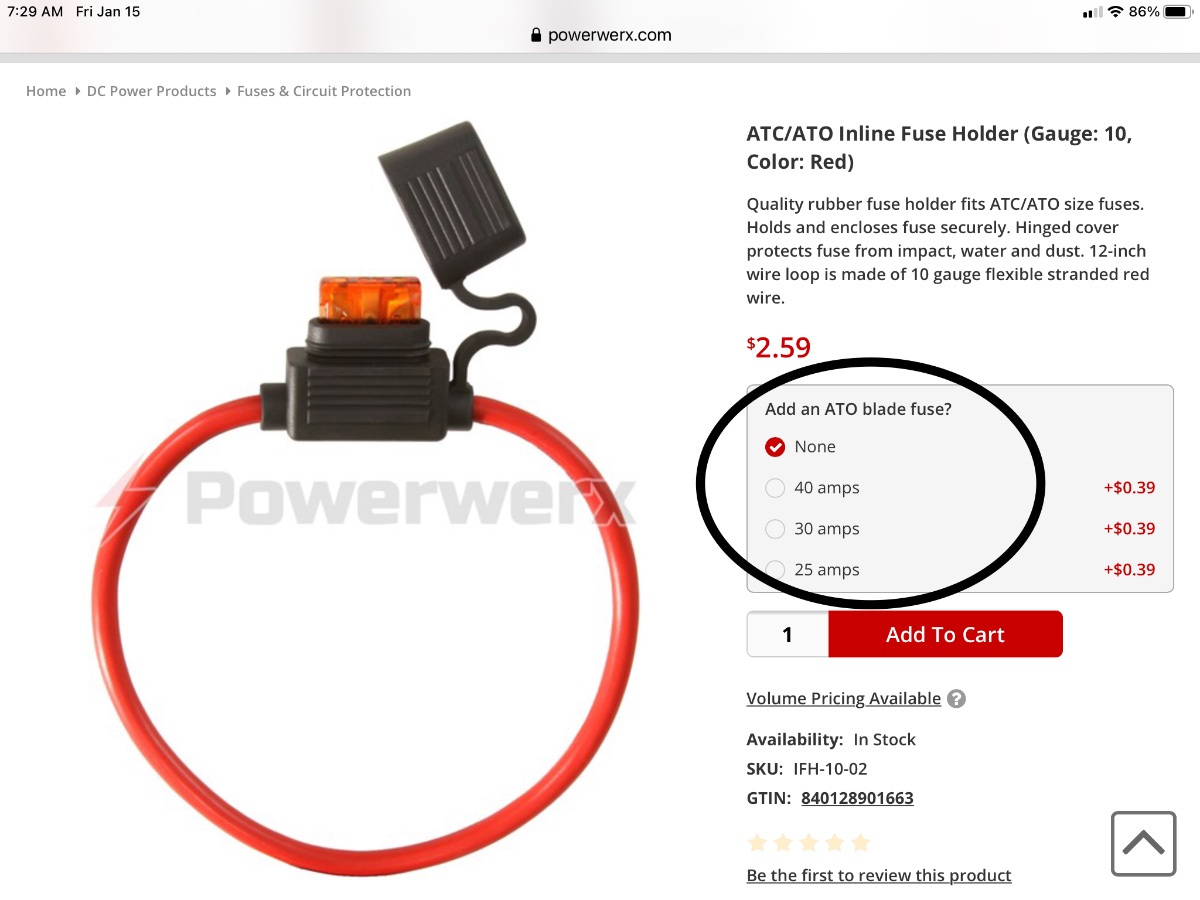
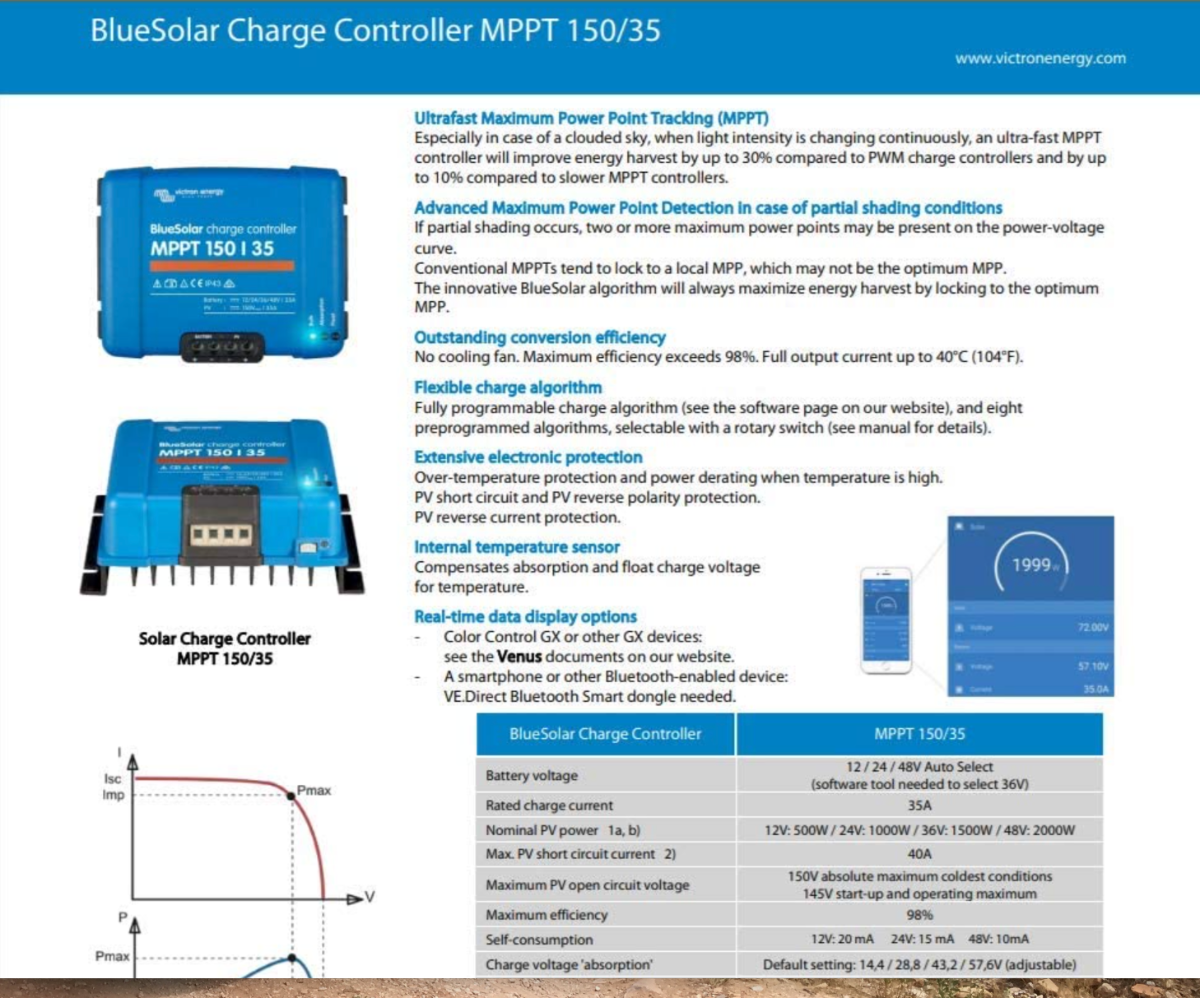
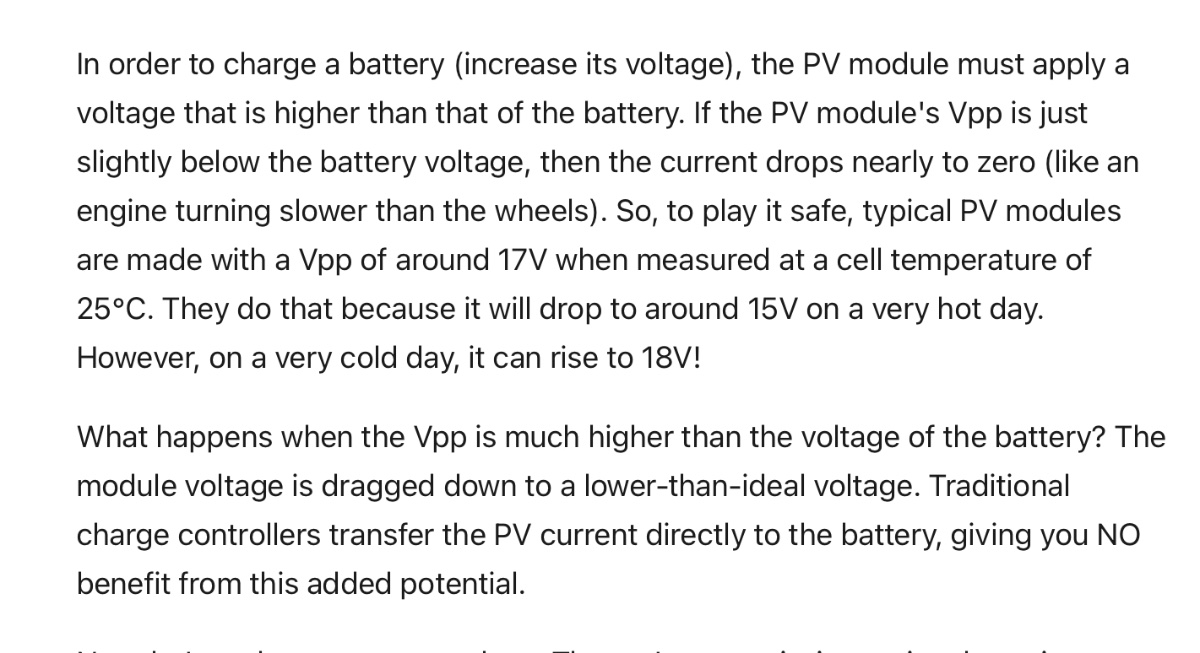
Remove the Zamp unit from over the stereo head - two input wires (from the roof), two output wires (to the battery) and the small temperature sense probe wires Cut off any excess length and then splice the two sets of cables together and secure them. This little cable tie is good for making I.D. labels. Drag the temp sense cable down into the lower compartment, you can sell it with the used Zamp controller. It has a value of about $35 new. Add extra aluminum tape if needed to seal and secure the wall insulation. The location I selected is a great spot for a big ventilation hole, an air intake for my Lithium Battery Box Powered Vent System , so I needed to add 1" thick HDPE spacers to let air pass through, using JB Weld epoxy, clamped overnight: I made a mounting plate from heavy sheet aluminum, drilling holes to allow air to get to the bottom of the control unit. I originally planned to use the Oliver installed self reseting circuit breaker, but decided that an inline fuse would be more reliable. The manual circuit breaker on the output wire is similar to the Oliver one installed across the gap on the DC bus. It allows you to disconnect the solar input by pressing the red button, and it is reset by closing the yellow arm back inwards:: This is the inline fuse, it is very nicely made and has heavy enough wire. It will handle up to a 40 amp fuse, I installed a 30 amp ATC one: Victron SmartSolar Charge Controller MPPT 150/35 brochur:e Victron Charge Controller 150:35.pdf This is pretty technical, it shows the Zamp roof panel charge curve, I added some data points showing where a lead acid and a lithium (LiFePO4) battery open cell voltage would appear. A lithium battery has a higher operating voltage, so a regular PWM controller is not as effective as a more sophisticated MPPT one that is able to alter both output voltage AND output current. A PWM unit is connected directly to the battery, and it simply switches on and off very rapidly to control the current. It is very crude, but inexpensive and reasonably effective under optimal conditions. I grabbed these descriptions from solar website, I cannot remember which. It and the following one offer some interesting comments: Temperature sensing charge control - the Battle Born batteries do not require (nor can they use) this function, it is built in to the batteries' onboard Battery Management Systems (BMS). However, by installing the optional battery temp probe that connects to my Victron BVM-712 Smart bus, the VictronConnect app will connect using its Bluetooth network with this compatible "smart" device. When I look at the app screen, the battery temperature is shown on both the Solar page and on the Batteries page. That temperature reading is very helpful in monitoring the health of the batteries. Settings: using the app you can alter a whole bunch of parameters. The important one is the charge absorption voltage. I set it to 14,.4 volts, a little lower than the Battle Born recommended 14.6 volts. I have read that a slightly lower voltage is healthier for those batteries, while not significantly affecting their actual capacity (percentage of charge). This is the same reason they recommend that they are not left continually "cooking" at 14.6 volts from shore power and a charger like my Progressive Dynamics one, it diminishes their life span. https://battlebornbatteries.com/programming-a-victron-smartsolar-charge-controller/ John Davies Spokane WA
1 point
-
OKAY - A couple more, but i really have to get back to whatever i was doing before this offramp. Sadly Brenda passed before we saw her. LSBM, we did see, in fact were invited back stage to meet them at a small college appearance on their first American tour. i guess they just wanted to talk to 3 pasty white Canadians and 1 Norwegian... you would have thought my in laws were meeting the HRH ER II... and finally, just to keep the folks up in North Dakota on their toes and wondering WITW is going on... Also great Road Music, Whilst sipping COFFEE and PULLING "SNY SD UP". "All Genre All the Time" Music the Language of the Universe...1 point
-
Thanks JD. You are a research machine and a wealth of information. We appreciate your input. If I am not happy with the clearance on my 2021 Elite I will see what it is like after installing the K71-358-00 kit. If that does not get me where I want to be, I will look at a drop axle. Good to know that option is out there. I did not know that they made such a thing.1 point
-
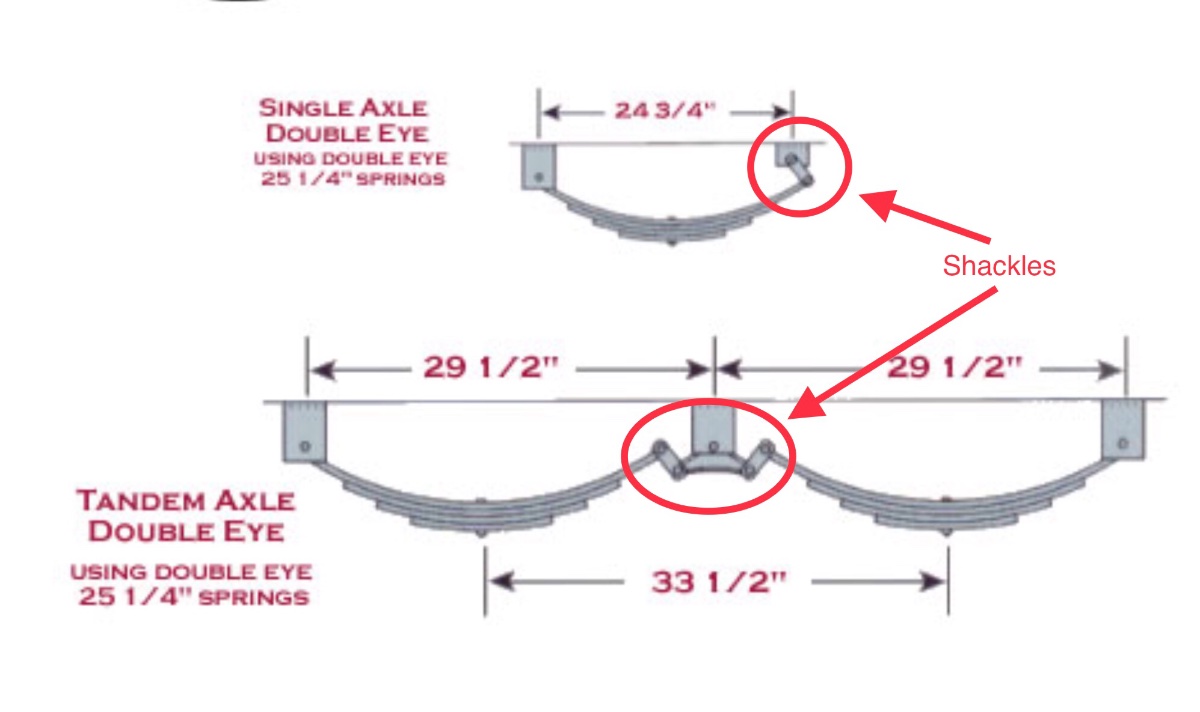
I thought I would post these pics to educate folks who don’t fully understand the suspension.... The shackles provide front to rear motion as the springs compress and extend (since their length changes). On a single axle setup there is one at the back, and it points down from its hanger (bracket). On a tandem setup there are two in the middle at the equalizer unit, and they point up. So on a single axle, if you install longer shackles it will lift the trailer frame up further away from the axle, increasing the clearance, but the opposite happens with the tandem, the clearance would actually be reduced. So it is really important to mention which model trailer you have when talking about this stuff. And this shows what a “spring over axle” conversion does.... The SOA mod provides around 5 “ of lift (using the original axles) and also a huge increase in frame clearance, so it is necessary to install rubber bump stops to protect the springs from damage from travelling too far. When you do the mod, if you instead buy new axles with a 2” or 4” offset upwards, you can decrease the lift without actually altering that wonderful gap at the tube. So you could end up with an Ollie that is lifted 1” or 3” over the stock height, with tall progressive bump stops. John Davies Spokane WA
1 point
-
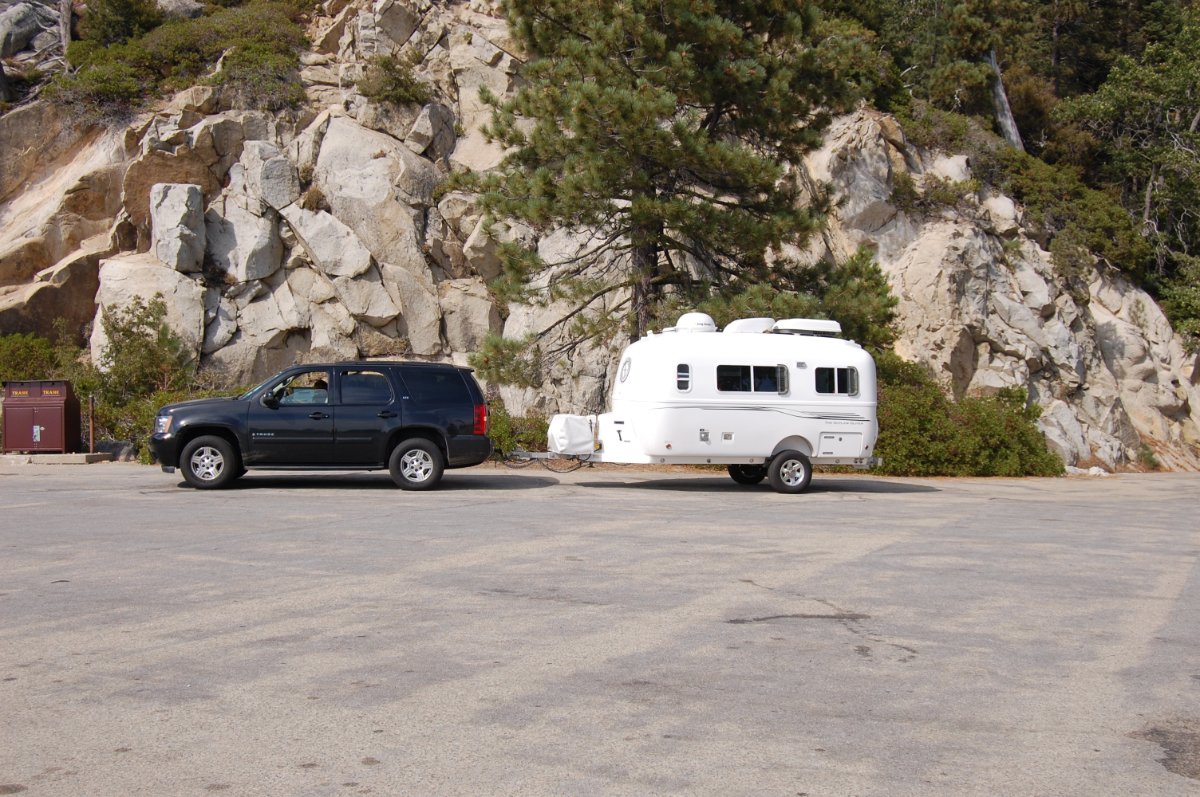
TxT - You certainly are one lucky fellow. There aren't many Ollie owners that are better equipped to show you one of these trailers. Have a great time! Bill1 point
-
Straange ... Very strange1 point
-
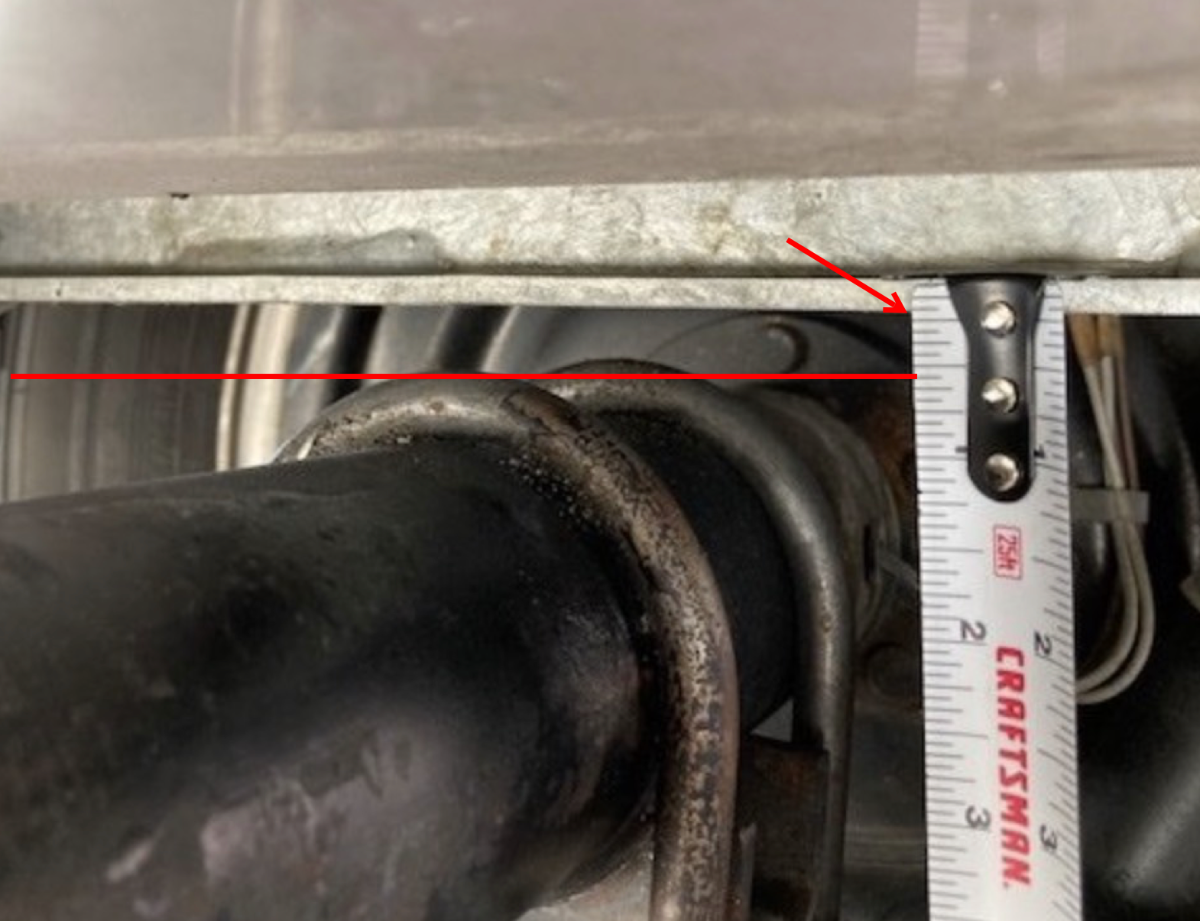
Thanks for the additional photos QM. It looks as if you have about 11/32" of clearance, 3/8" at best. I am curious to learn of what Jason says when he gets back to you. I just can't imagine that this is design intent.
1 point
-
Hi Nancy & Ray, just signed up on the forum. Looking forward to delivery of our Elite II in July! Thanks for offering help with our selections, will take you up on that soon.1 point
-
pink alley Kat1 point
-
Chased by a1 point
-
Hull 26 had a spring over axle configuration, correct? I agree that it is a too tall, but if it also had a 2” drop axle (with spindles offset upwards) it would be perfect. That is what the LE2 needs IMHO..... then there would be tons of room for soft stops..... Do you have a good pic of the underside that you can share? Thanks, John Davies Spokane WA1 point
-
My father used to raise Chukar's.1 point
-
This is our first Oliver, Hull #026. There was a heck of a lot of clearance on it. I was never carried away with the look. Our current Oliver, Hull #050 has 1-5/8" clearance from the top of the U-Bolts to the frame.
1 point
-
That looks like ¾" clearance at most. Seems...less than ideal. Originally, the little Ollies all had flipped axles. Or, unflipped, I guess, since they were first. Oliver flipped them for the Elite II and then at some point decided to flip them on the Elite 1's as well. But it looks to me like they did that without consideration of the clearance.1 point
-
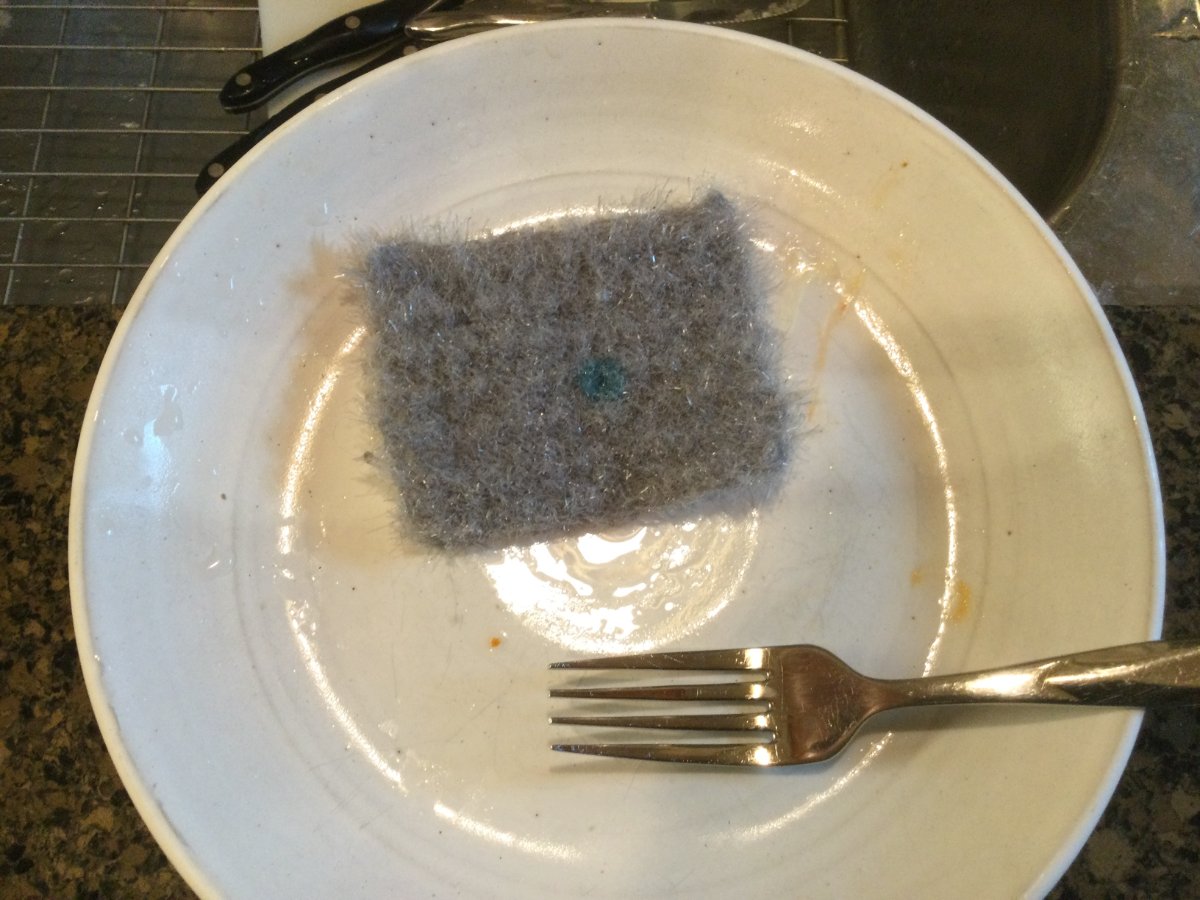
Ha! I finally get to contribute. I have no idea how much these cost as my sis-in-law makes these. But, I'm sure they are under the $20 limit by at least $19.50. The secret is the type of thread. I assume it's some type of polyester but it makes a great scrub pad. This scrub pad has become the center of my wife's dishwashing system. First, she goes for a walk. While she's gone, I use a paper towel to scrape any loose stuff off the dishes. Then, I simply put a dot of Dawn Liquid Soap on the pad as shown and scrub each dish. I scrub then sort/stack the soapy dishes in the sink by size; largest on the bottom silverware on top. As I'm washing, I frequently rinse the scrub pad and re-apply a dot of Dawn. Rinsing is done in groups over the other dishes and scrubbing with a clean pad. In other words, I rinse the silverware in one bundle of running water, the saucers, plates then any cookware last. This saves lots of water and of course uses very little soap. The pad is loosely woven and the "thread" doesn't hold water or food debris like a sponge. It washes clean with very little water. This was one of the first she did - she since added a loop at my request. I think they are crocheted? I'll try to get the name of the hairy thread material. My wife really enjoys this because when she gets back from her walk, the dishes are clean, dried and put away. Dave
1 point
-
Absolutely. Pleasant tune.1 point
-
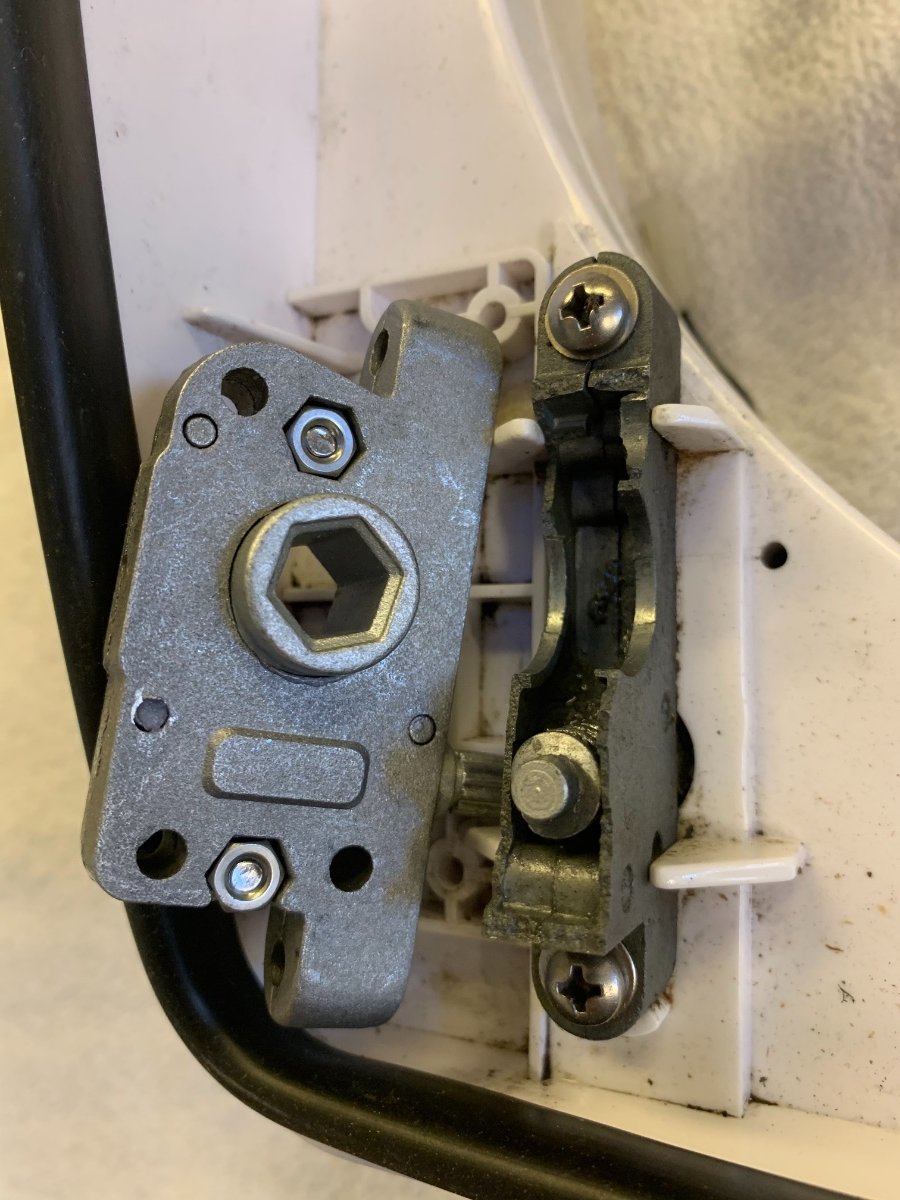
It’s not on John’s diagram. He shows the outside parts of the fan. There’s an inside assembly that attaches from the inside. You can see that in the parts diagram from Airxcel here. You can drop the inside assembly and the circuit board is on top of the control panel that is in the corner. I don’t know how hard it is to replace, but it easy to access. Mike1 point
-
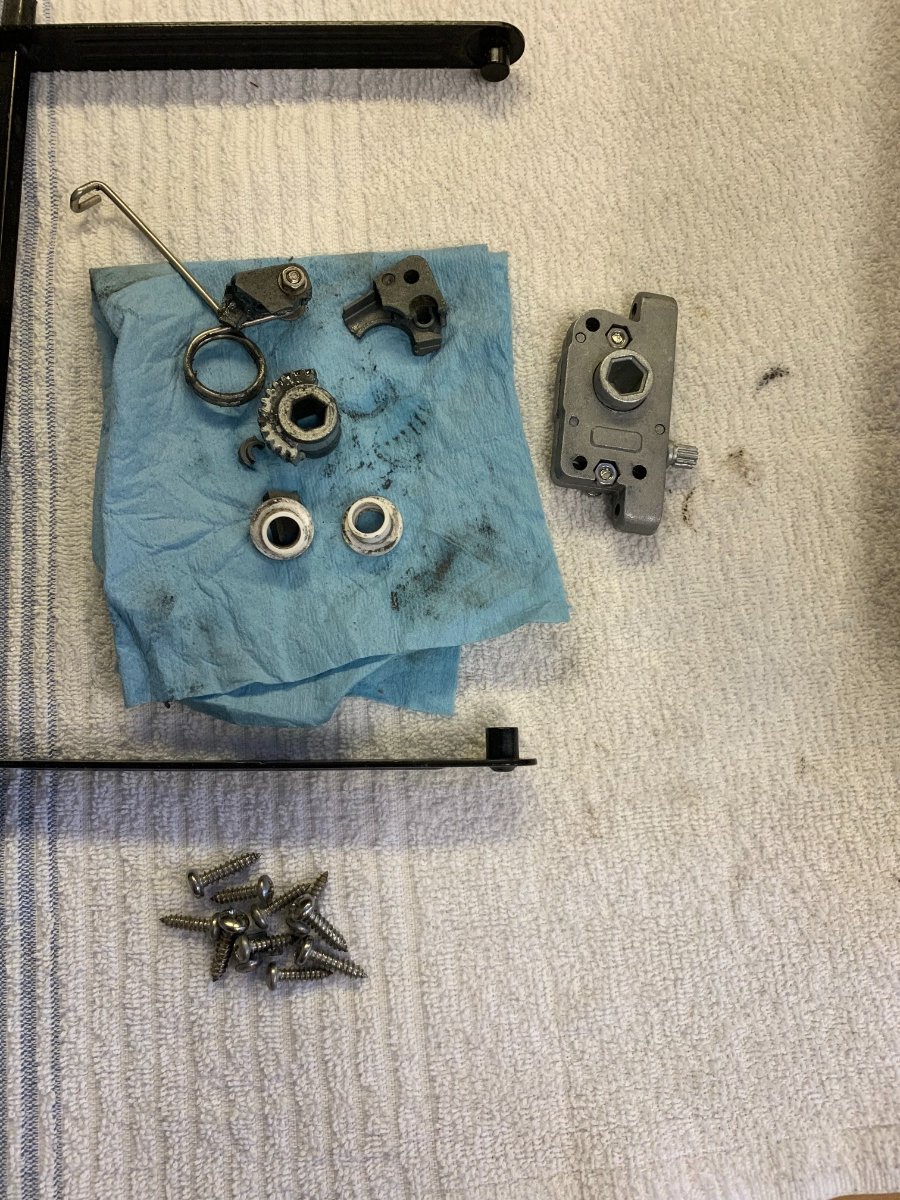
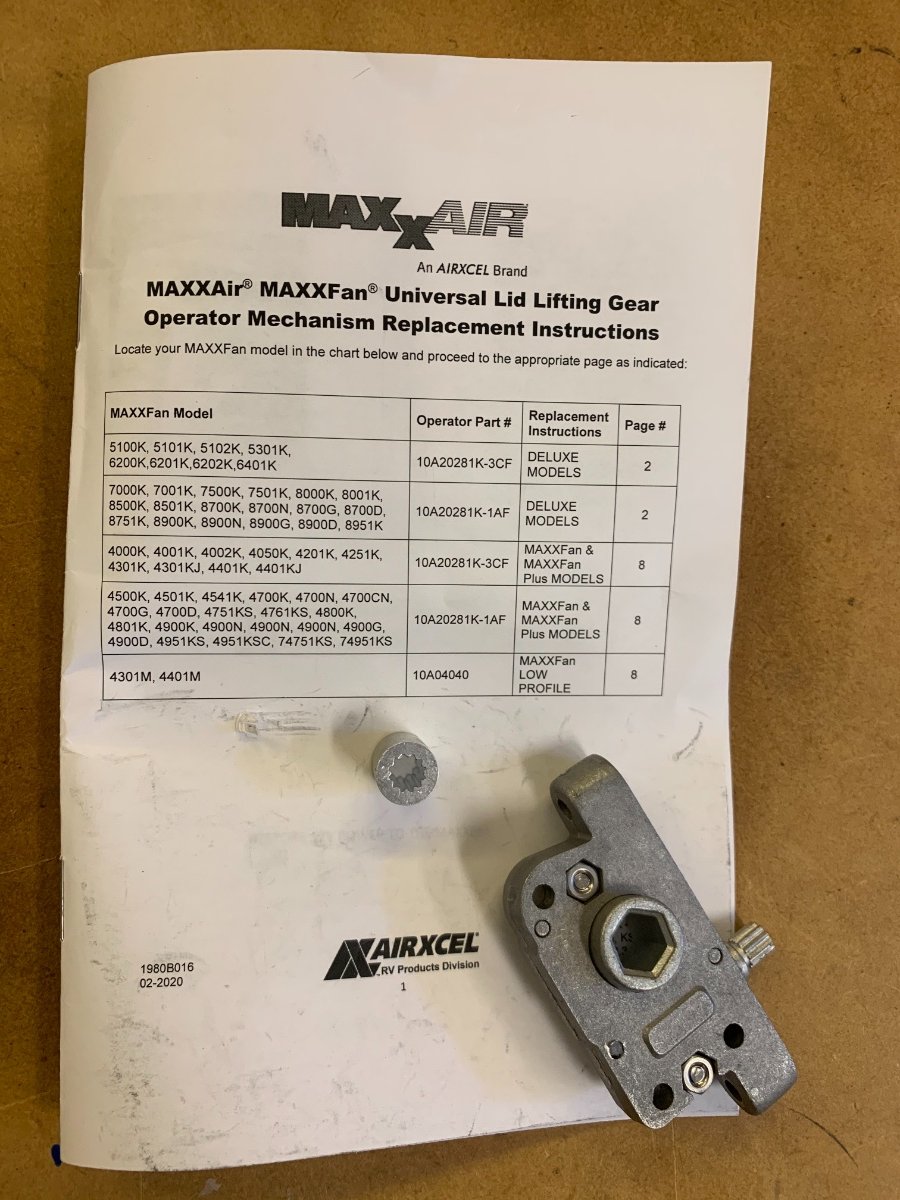
I just replaced the “Operator Mechanism” on my Maxxfan just as others have done. Mine shattered into a bunch of pieces. I got a new one directly from Airxcel, the manufacturer. It was on backorder for a week so that tells me it must be in demand. I had removed the fan and disassembled it to see what was going on and also to give it a good cleaning. To replace the operator mechanism you don’t have to remove the fan. You do have to get up on the roof. I didn’t open the new mechanism to see how it was lubricated. I spoke to a technical help guy at Airxcel and learned that the way it works is that when you hit open the lid lifts until enough resistance is felt then it shuts off. Closing is the same, it continues to close until enough resistance is felt then the motor is shut off. I think that pressure eventually takes a toll and the operator mechanism fails.
1 point
-
Given the quality of Oliver wiring at times, I think they'd be more worried about lawyers than competitors.1 point
-
I consider the x-chocks a theft deterrent. If they were to hook up & try to drive off, the trailer isn't going anywhere. Sure, they can undo them, if the have the wrench or socket or time, but hopefully the jerk has deemed my Ollie too much of a hassle & moved on.1 point
-
As well as better bikes . . . . . . and better bikes need better racks 😁1 point
-
I can easily overload my entire trailer, use a dangerous tow vehicle, fail to configure my brake controller, fail to inspect and maintain wheels, etc... Artificially limiting what we can use our receiver for is pretty silly given the already high level of potential danger involved in towing. Oliver should simply put a load sticker on it like everything else and give responsible owners a 2 inch receiver.1 point


-
Recent Achievements
-
")


")


")


