Leaderboard


Popular Content
Showing content with the highest reputation on 03/29/2021 in Posts
-
We have used Harvest Hosts on several occasions and in fact stayed at a couple of locations about 3-4 hours north of Hohenwald on the way to a from the factory. One was Tennessee Valley Winery which we liked enough to return a second time. It's literally only about 2 miles off of the interstate but secluded with a nice view of the Smokey Mountains. John, the proprietor, has a 120V plug and water if you want it (no charge). I think he'll also let you stay more than one night assuming he's got space. There is another vineyard close by which is very nice too. I forget the name right off hand though. HH sites are not intended for hookups or multiple night stays but each location is different so you may be offered some amenities for a small charge or for free. We've had both. We find the HH system to be quite useful and thus far, have had zero issues. Beats hanging out in a Walmart or Cracker Barrel parking lot. You are encouraged (expected) to support the host by supporting the business while there. Drinking wine or beer and having some good "eats" is not too much of a burden on us. I think as you head west, you will find fewer locations than on the east coast.4 points
-
We had a similar situation two years ago. We were traveling to Jalama Beach County Park campground (Nice Park!) in California for a family reunion. After that we planned to stay with friends who live in downtown San Luis Obispo. Although SLO is a small city, there are parking meters in front of their townhouse, making it impossible to park there with our trailer. We also wanted to disconnect the trailer so that we could take a day trip to Cambria, CA where my father-in-law grew up to visit some cousins there. I looked online and found one RV and Boat Storage place; however, they did not respond to any of my phone messages or emails. At that point I posted a message on the Fiberglass RV Forum explaining our problem and asking for suggestions. (I used the FGRV Forum because it has a much larger audience than the Oliver Forum.) In addition to a couple of suggestions on where to park, one kind person offered to allow us to store our Oliver for three nights at their house near Pismo Beach, which is about 12 miles from SLO. The Pismo Beach storage worked out well, and we were quite happy to provide a thank you gift to our hosts.3 points
-
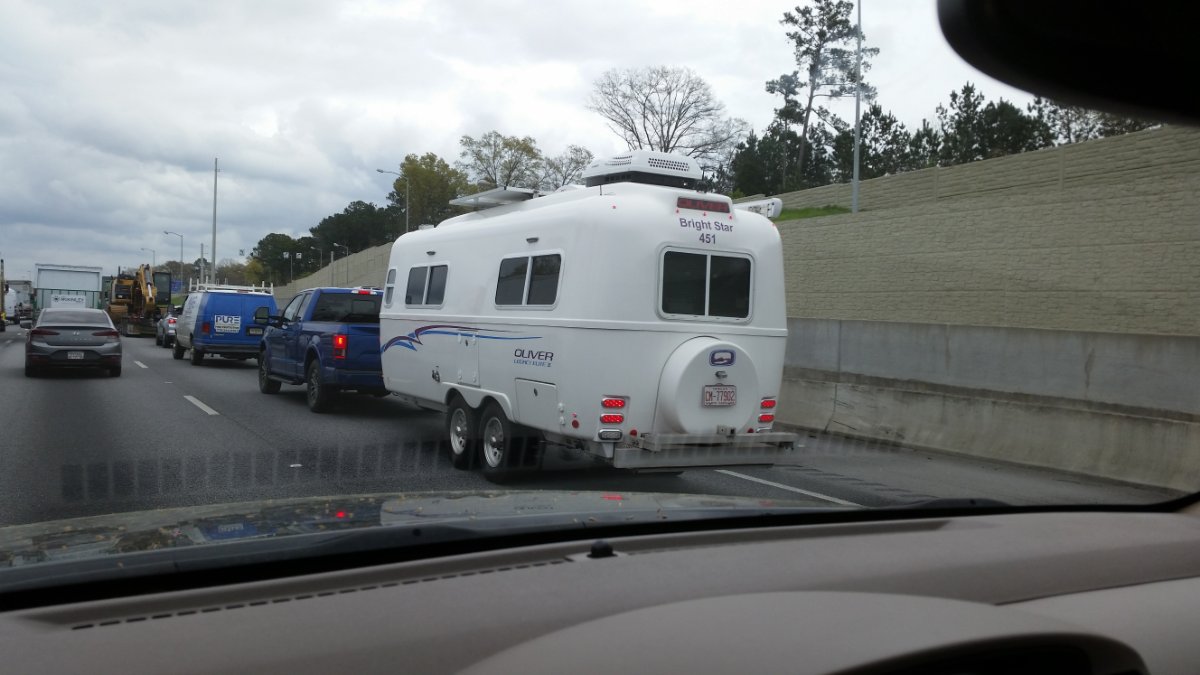
I spotted this OLIVER traveling on 285 near Decatur/Atlanta. Was excited to see my first Oliver rolling down a highway. Name and number on back was "Bright Star" #451.....wonder if it belongs to a forum member?? Happy Trails....
 2 points
 -
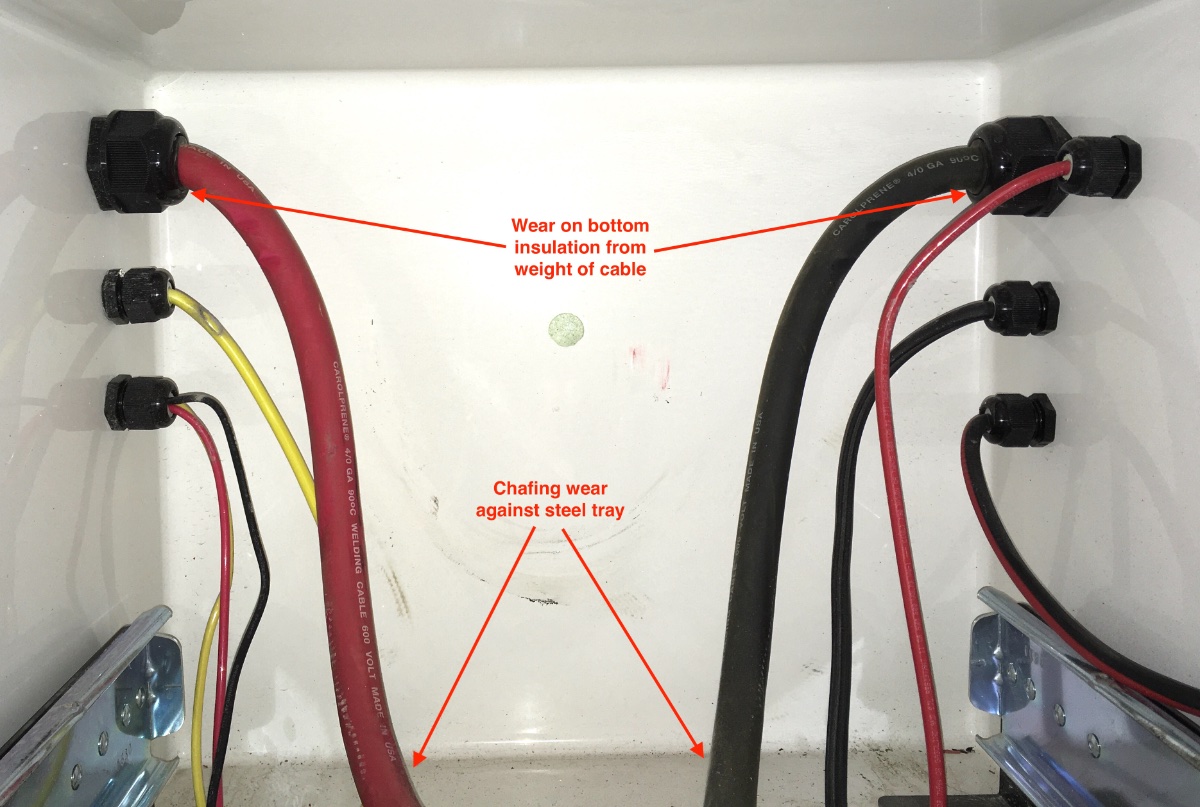
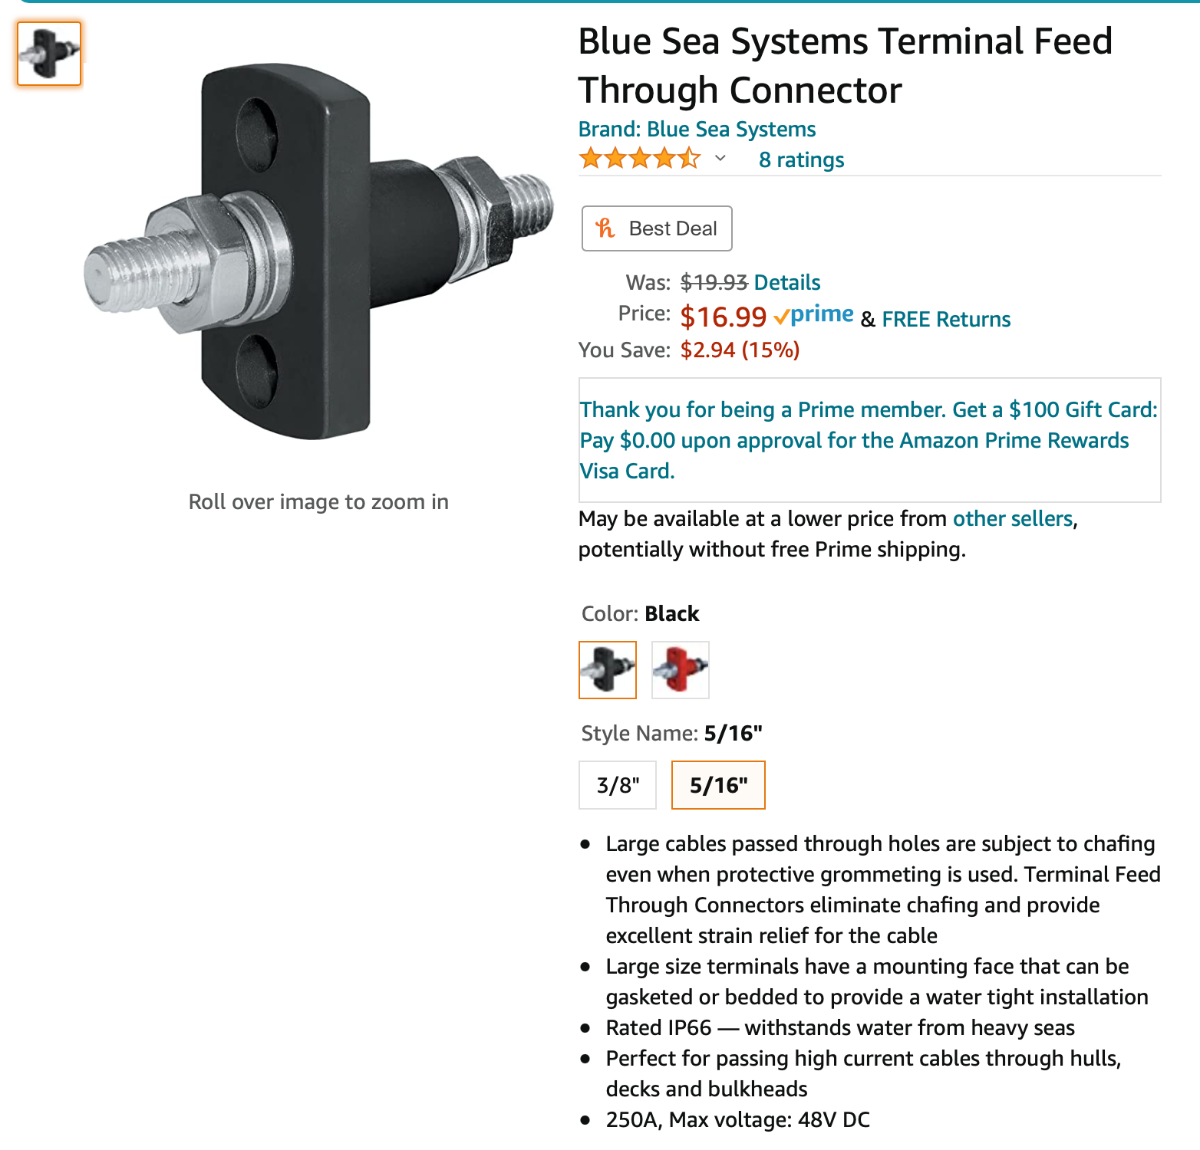
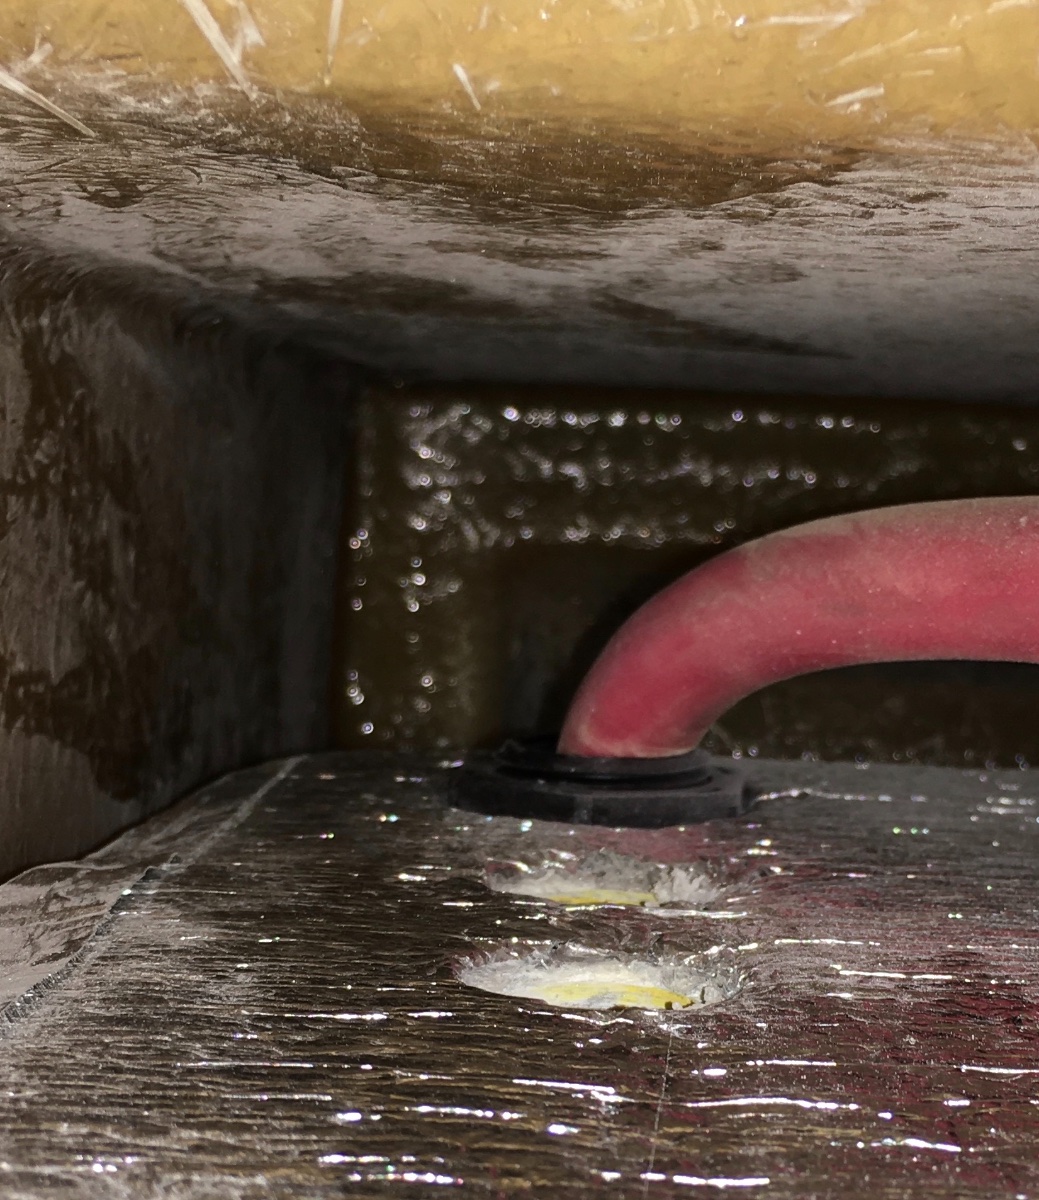
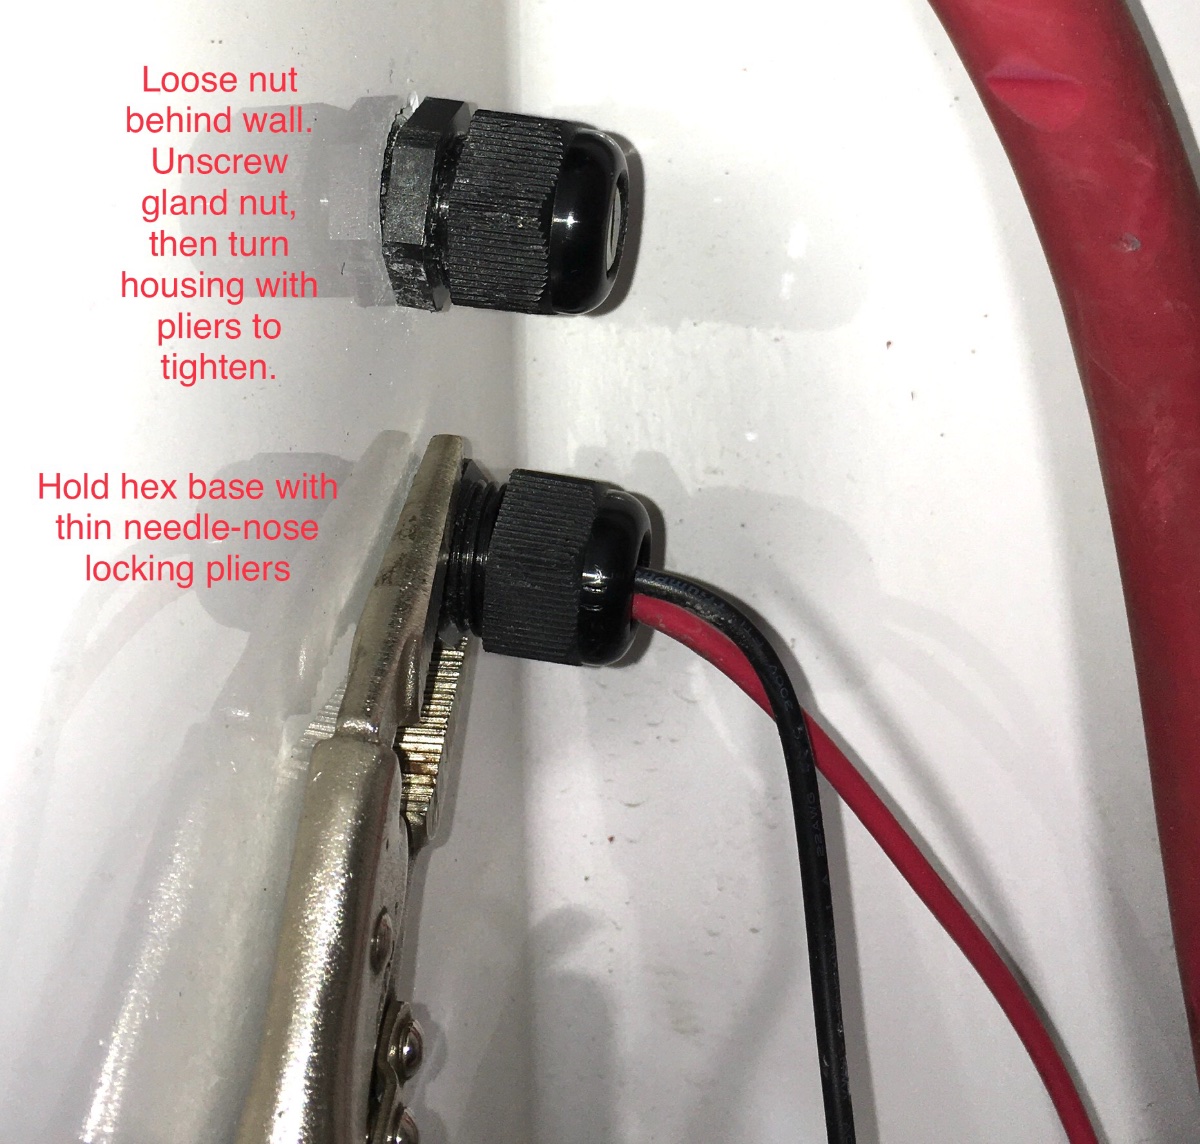
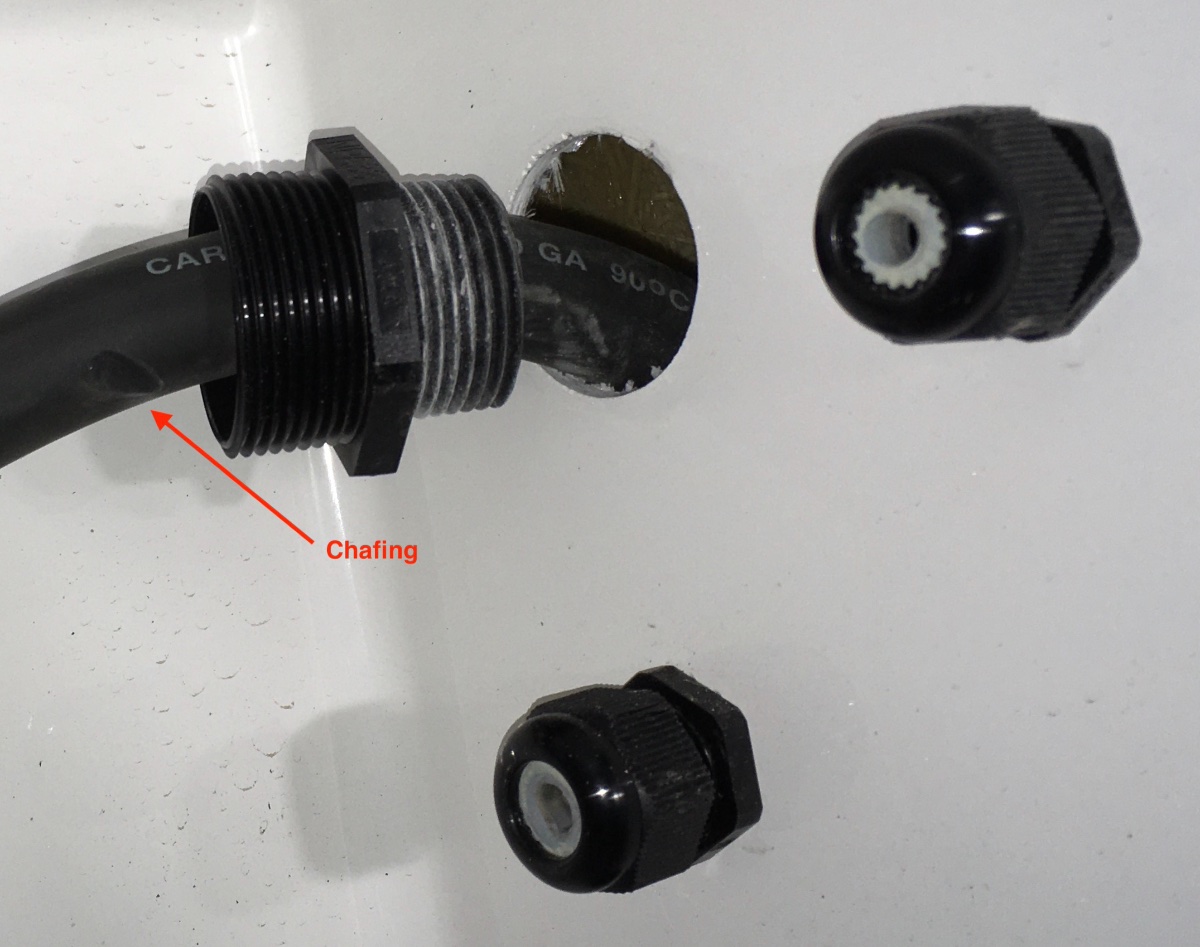
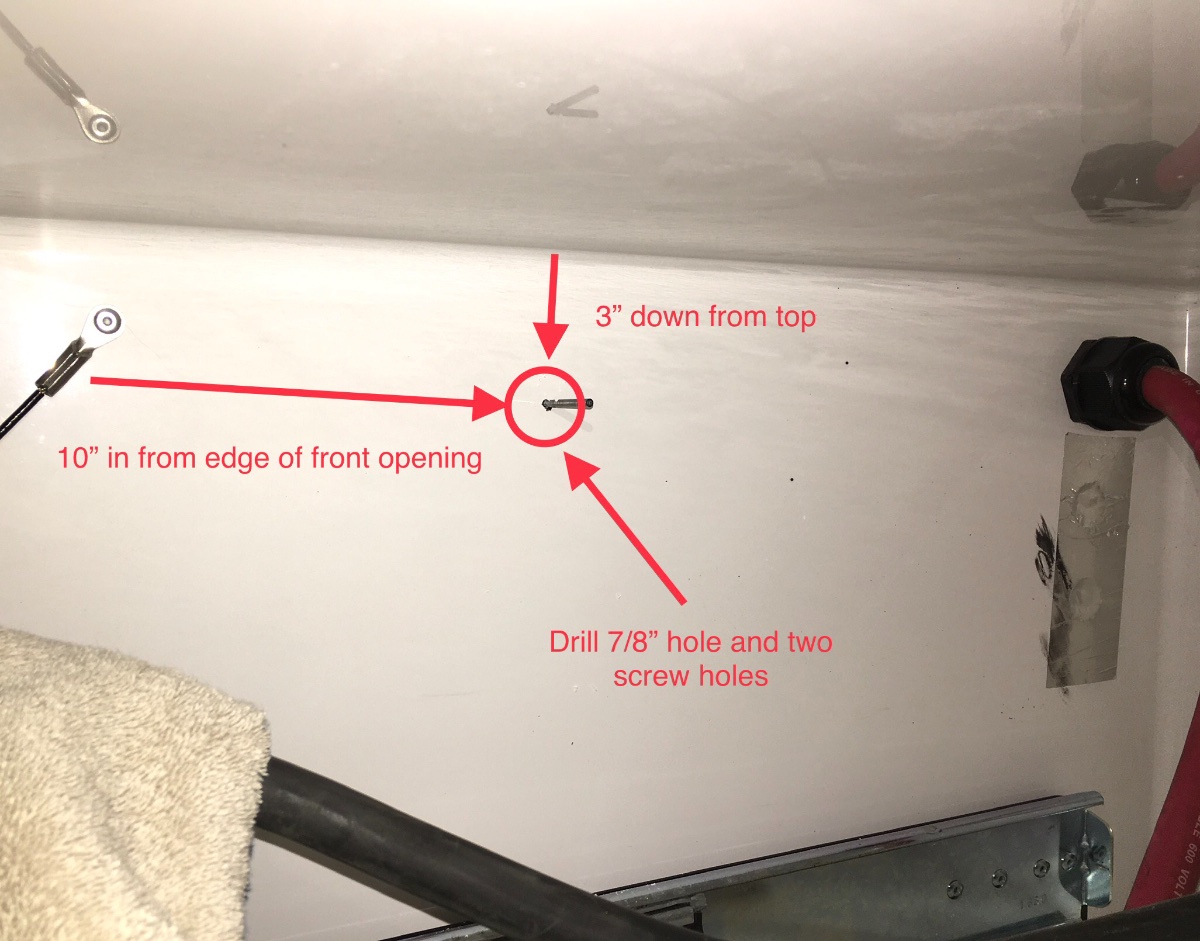
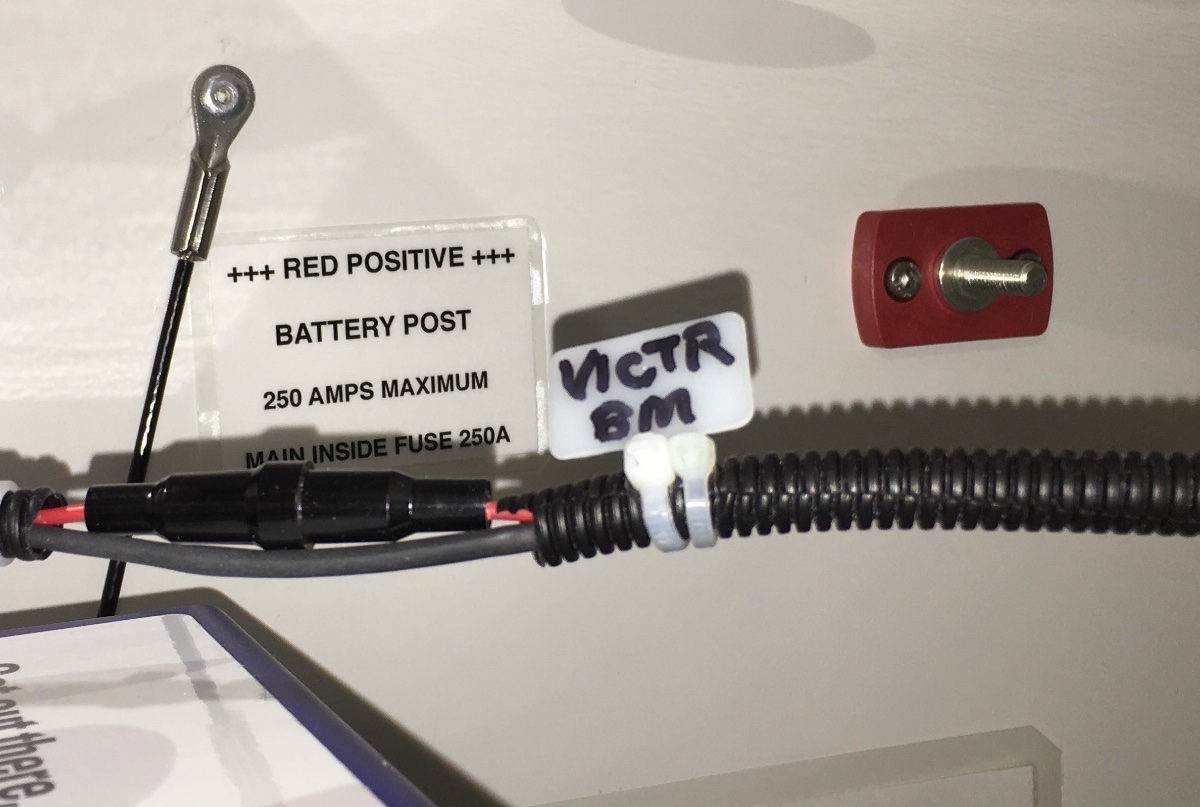
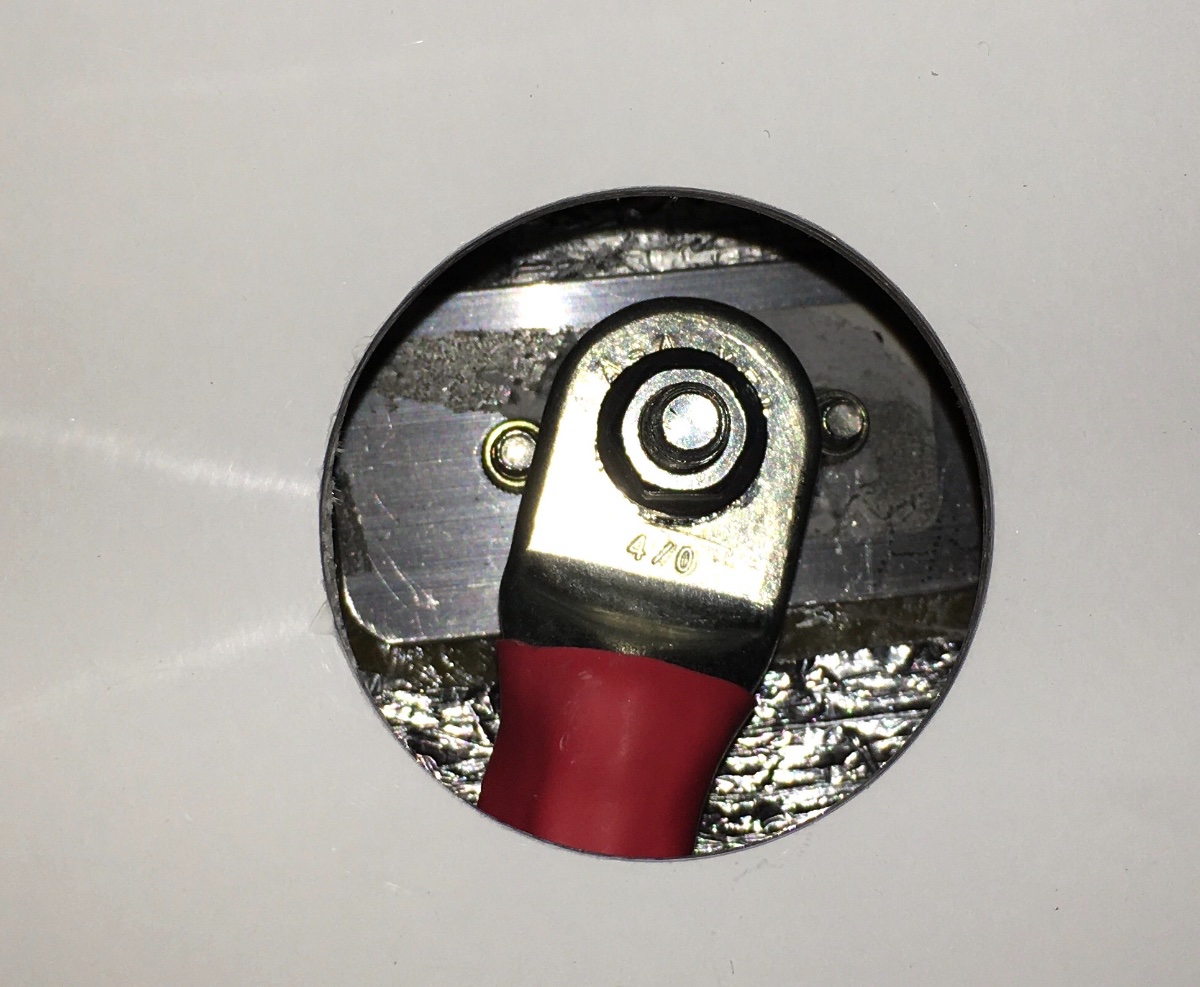
This is a thread I was very hesitant to start, it is pretty complicated, it fundamentally changes the factory design, and it is not for the faint of heart, it involves drilling big holes and reworking a lot of cables. But a couple of members have expressed interest, so I will post my pics and comments, with this caution: don't attempt this if your trailer is still under the initial 1 year warranty. And definitely don't attempt this if you are not comfortable making high quality cables. PLEASE UNDERSTAND: This mod is designed for the standard 2000 watt inverter (with 250 amp main fuse), a larger one will possibly draw too much current, especially if you run the air conditioning!!! This will work for up to three Battle Born 100 AH lithiums, I have no idea if it will be OK with other brands or models. Before doing this mod, I relocated all my small positive and negative cables inside to common bus bars. Here is the original factory wiring on my Hull 218 (2000 watt inverter and four AGM batteries). A little messy: Here is my new lithium battery setup: Each battery has its own 175 amp terminal fuse block and two short, equal length 00 gauge cables that connect to Blue Sea Terminal Feed Through Connectors, rated for 250 amps each. Access to the posts is very easy with a full sized ratchet handle and socket, simply remove two nuts, pop off the cables and slide out the tray. There is room for a third battery, and the cables for it will be identical. You need one of each color, with the 5/16" terminal stud. This matches the other terminal eyes in the wiring and batteries. prices vary wildly, shop around! Holes on the flange are sized for 5 mm screws, I used stainless socket head ones from Amazon, there are lots of sources. First you need to get out all the old cables, that might be a little tricky, since the access is very limited in the "slots" between the battery box and the surrounding inner cabin wall. You can get one arm up there, but it is really awkward and itchy from the fiberglass dust. You can do this from inside the box: Remove all the cables, you can leave one of the small wire glands in place if you need to run an extra wire there, such as a temperature sensor or a power wire for a battery monitor smart shunt. Cover the open holes with aluminum tape if you like, or leave them as-is for some ventilation (lithium batteries ONLY) More.... John Davies Spokane WA
2 points
-
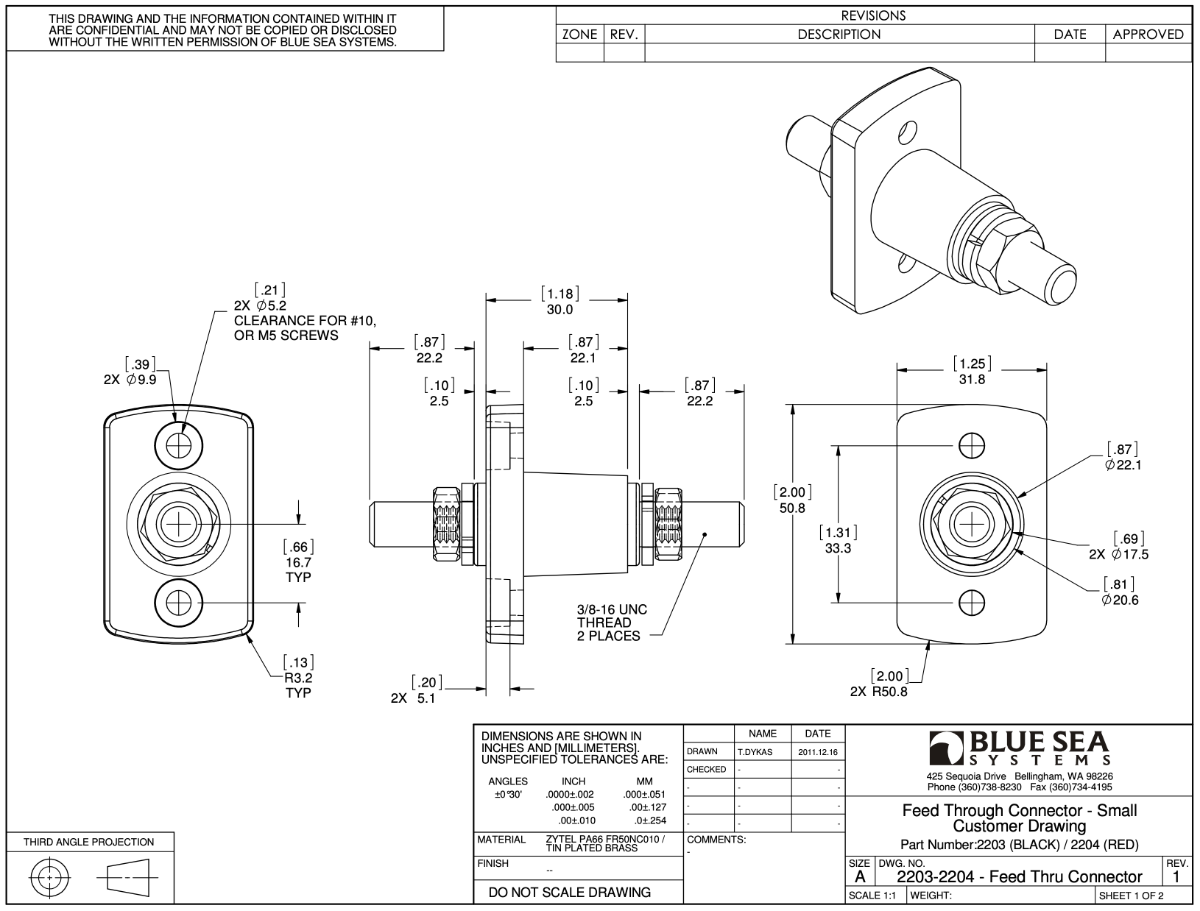
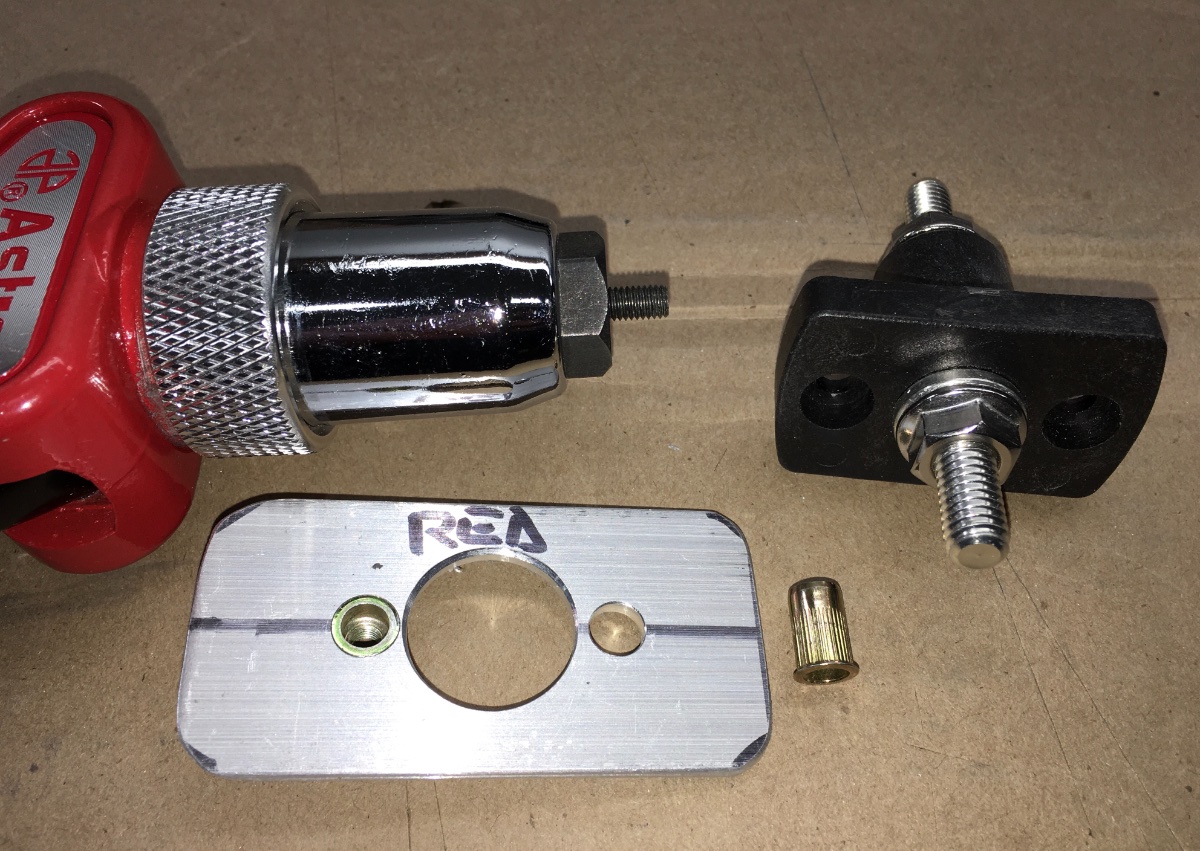
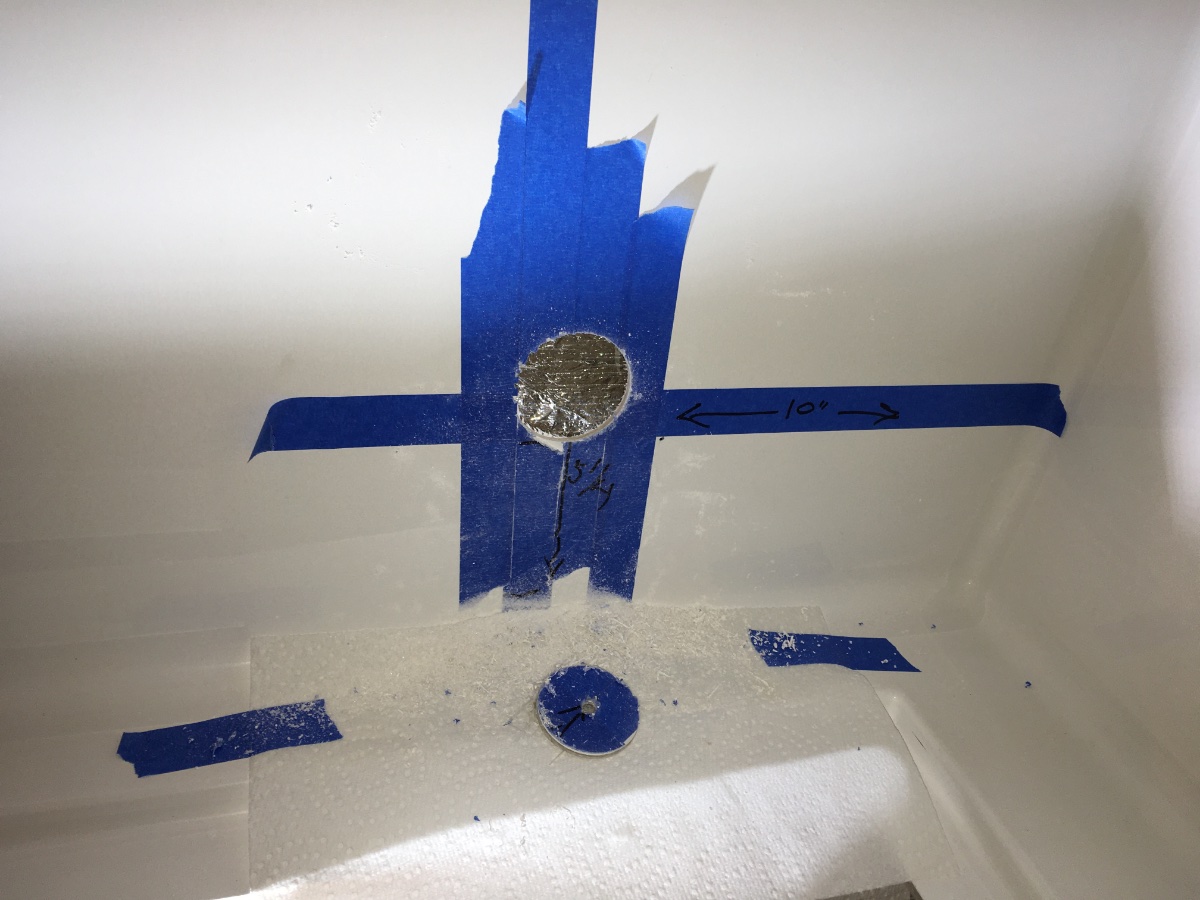
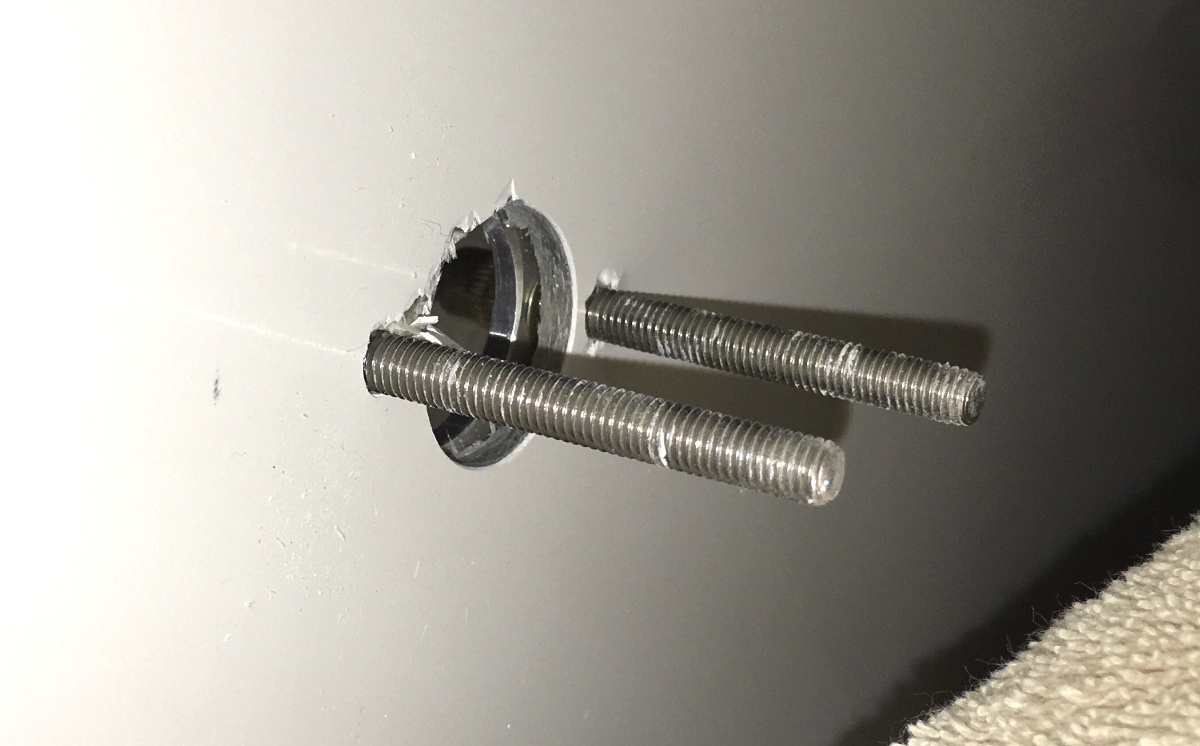
Since access is difficult, I chose to make two backing plates from aluminum 6061 T6 with 5 mm threaded inserts. That allowed me to install the posts by myself; if you have a helper, you can use self locking nuts and flat washers instead. Locate the post positions as shown. Using a long bit (6" or more) drill the center pilot hole, it has to go all the way through the two walls and that big gap between them. Drill the two screw holes in the battery compartment wall only! Then drill the middle hole to 7/8". Inside the cabin, tape off the area around the pilot hole and drill a 2" hole . This hole is scary, since it will show with the seat cushions placed against the outside wall. It will be covered with a white plastic plug after finishing. Use a razor knife to cut and peel away the foil bubble insulation, do NOT leave it in place.The silver foil is conductive, so it should not be close to the positive cable. Sand the 2" hole smooth with coarse sandpaper (80 grit). If you are using nuts, get your helper and slide in the post from the battery box with the short post facing you, and secure it with screws. There should only be one or two threads extending past the nuts, or they will interfere with the cable terminal end. If you made backing plates, cut off a couple of long screws, thread them into the inserts and place it into the box. Place the post over them and then remove one. The other will serve as a grab handle so you can hold it while you get the other screw started. Repeat these steps for the other post. Shorten the big cables as needed and attach them inside the big gaps, access is easy: Cover the holes with plugs. These work OK, but they have to be glued in place with clear silicone or they will fall out: ... 2" White Plastic Hole Plugs If you are anal, make warning placards for the posts. FYI I did not use any epoxy to bed the flanges, it could be added carefully, but I don't think it is needed. It would certainly strengthen the connection. John Davies Spokane WA
2 points
-
I made some code changes setting max height of signatures image to 400 pixels and width to auto. Should help.2 points
-
An induction cooktop was in fact a brief option at one time though I don’t know if anyone ever ordered it. This was before lithium batteries and of course the larger inverter. We considered it but ultimately decided that the combination of a gas cooktop plus a portable induction burner was the better option. However at the time, we were turned off by the quality of the more affordable portable units and opted to wait for the price of the better ones to come down. Still waiting. But while we were waiting we realized that with the larger propane tanks, we can go for weeks even in mid winter running the furnace. We also learned just how much of a battery suck our toaster oven is, and I assume an induction burner would be the same. So induction isn’t really something on our list anymore, except that they’re just cool and I’d like to have one for the house at some point, just to have. Heres a thread from way back then discussing the benefits of induction -2 points
-
Those boards are glued to the hull with a very strong epoxy that should take a team of elephants to pull loose. Impossible within the confines of the trailer. I’d say that it’s definitely an installation error and frankly I think it’s one that Oliver should see gets fixed at no cost to you. I’d call them and see if they can give you the specs on the adhesive and also a recommendation on where to have the repair made. Having said that, I’ve had good luck securing things to the hull using 3M marine adhesive, probably the 5200 for something like this. I don’t quite follow about the shelf under the bed, but I’m curious. What exactly are you thinking about doing?2 points
-
I am going to take the minimum stance. Oliver supplies you with a decent starter "kit" to get operating. Sheets, dishes, and all the other stuff - is very subjective. Every one of us has stuff we purchased - and don't use (if ever). Take a very minimum starter set of the "other" and pick up what you find you need as you go. One is very seldom far from a store that has the basics. Look at all the suggestions - and evaluate as you gain experience. Chocks, leveling blocks, etc.., just depends on what you like - I have found the Anderson stuff very useful, along with some home made 6x6 blocks. But you may find other to your liking. Just ignore this post if you have excess $$ and like to buy stuff that looks needy - but is in fact - not. Enjoy the process Supersize Life - a blog that has some tried and true examples. https://supersizelife.com/ RB2 points
-
When I was using a Toyota Sequoia as my TV, I needed all seven threads on the Anderson chains to level things out. During year two, I approached a parts store entrance where there was a significant grade change from the road. At less than 5 MPH, when my TV went nose higher, I heard noise from the trailer that caused me to stop. I saw that the Anderson chains were really really really tight. I gave them the 245 pound bounce test, they did not move at all. I backed out of the driveway, and loosened the Anderson chain nuts 4 threads and tried again. I stopped at the same place and did another bounce test. This time they could be moved just a bit. To get into the driveway, I had to loosen them to full slack. Point is that a quick grade change will increase or decrease your Anderson chain tension. If your chains are set real tight, and you add to their load a grade change, it can be enough to damage your quick link(s).2 points
-
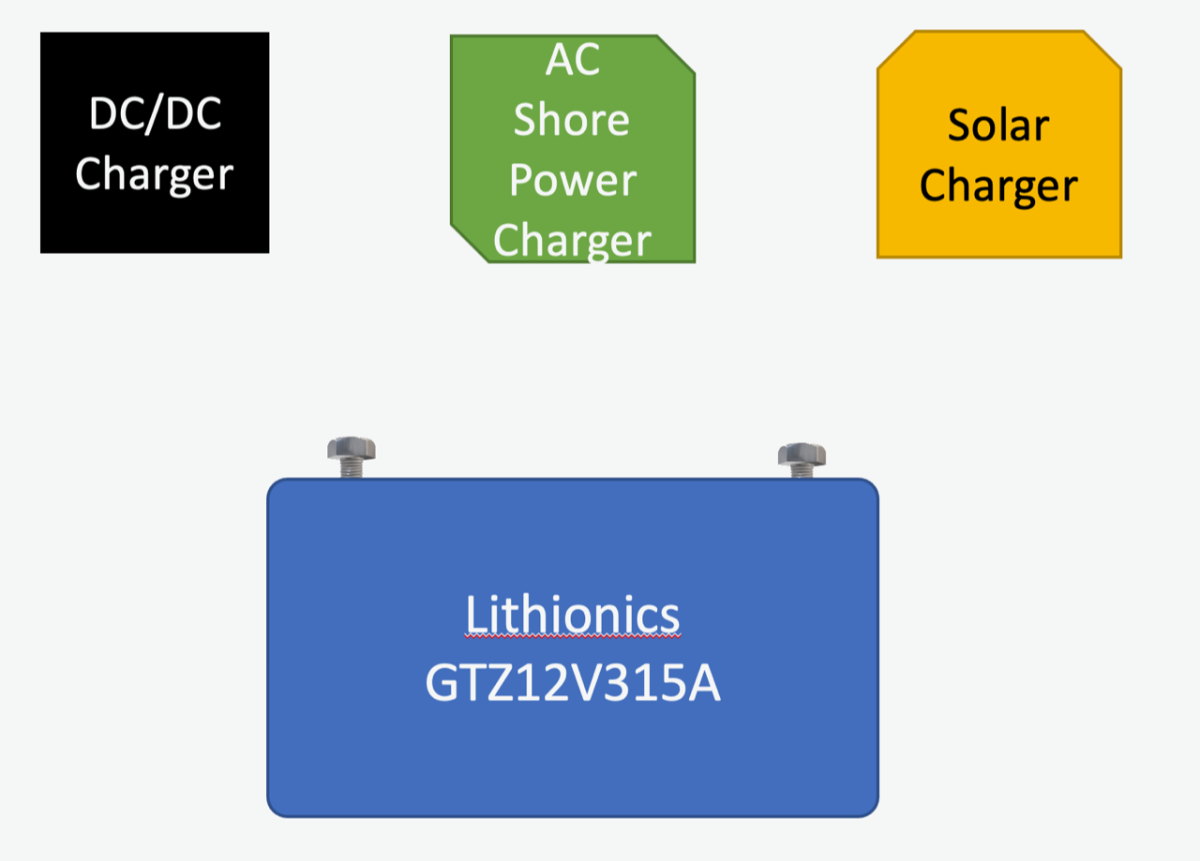
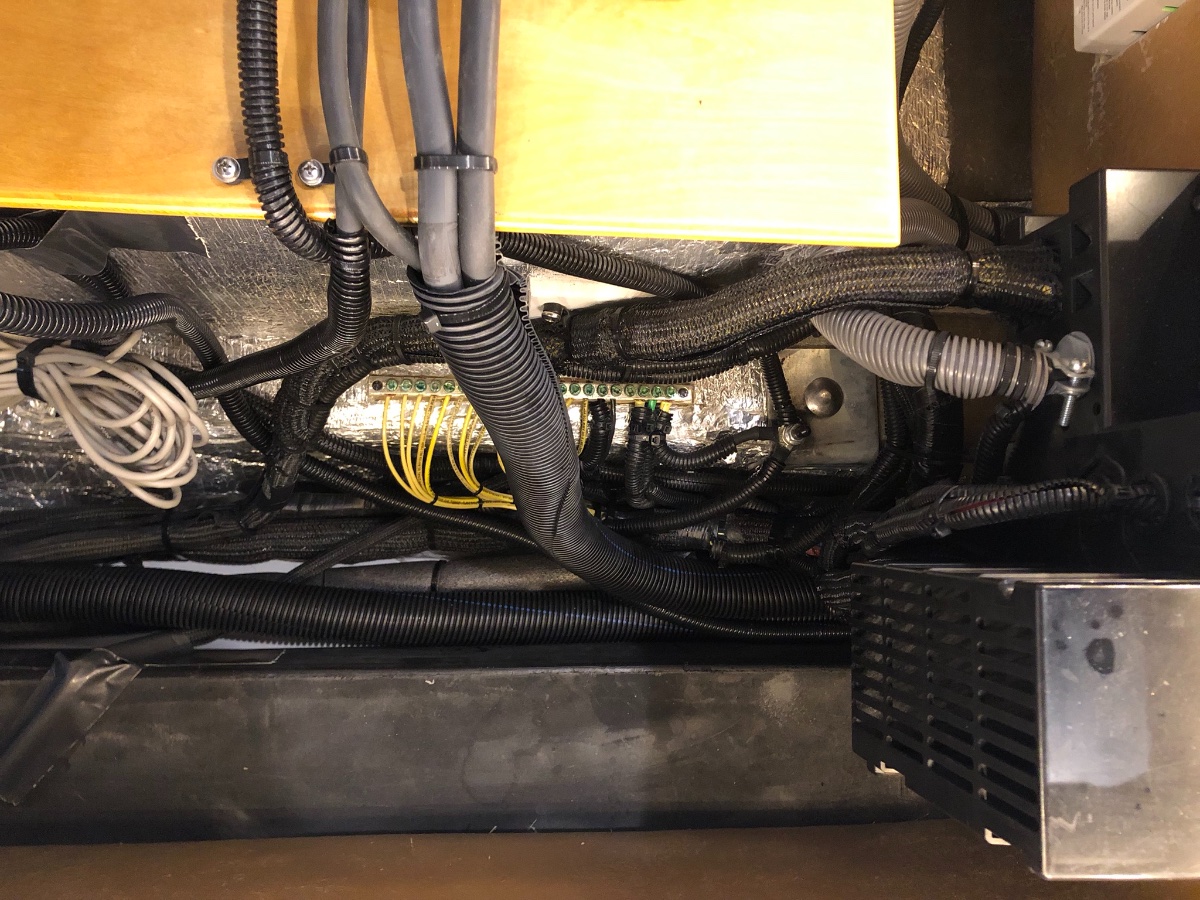
I'm starting a Lithium upgrade on a 2019 Elite II Hull 505 - I've reviewed many other posts and projects (thanks for your postings) and decided to start this one to document my project to install new Lithionics batteries. Comments from those of you with experience very welcome: Overview: Lithium Upgrade Project: Reason I'm upgrading: My 4 AGM's finally died this spring. I've got some time now to do this project now before a 9 month road trip later this year. There are three ways that batteries get charged in hull 505: 1) From Alternator/7PIN 2) From AC Shore Power 3) From Solar: 1) Alternator or DC/DC CHARGING: Our Oliver's batteries get charged through the 7 pin connector while driving. This is considered Alternator Charging or DC/DC charging. For Lead Acid Chemistry this charging method works fine as the amount of current drawn by AGM's or WET Lead Acid's is relatively low because they have higher internal resistance. Many of you know that you can't rely on that 7 pin connection to fully re-charge your batteries but they can keep them from declining. Hull 505 was built with a 20A breaker in this 7 Pin line to protect the wiring and Tow Vehicle alternator. For Lithium batteries with very low internal impedance this current draw can be many time higher, and result in overloading the tow vehicle alternator or cause wiring overloads. To make charging more consistent and protect the alternator a DC/DC charger is the preferred choice for LI batteries. My Plan: I will be adding a Victron DC/DC 30A Charger on board the Oliver. Installation Research and feedback from Oliver Service says that I need to: Carefully inspect the existing 7 pin wiring and do load calculations. Worst case I'll be running a new pair of dedicated 6 AWB charging wires from engine bay of Truck all the way back to the DC/DC charger. Figure out my location to mount for the Victron DC/DC charger. Must be near the batteries and have some cooling space and dissipation plate under the charger. Run new 6AWG wires from my Truck Engine Bay all the way back to an Anderson Connector on the Rear Bumper of my truck. On the Oliver, run 6AWG wires back into the same bay as the DC/DC charger. 2) AC Shore Power Charging - Upgrade to Xantrex XC 2000 Pro Inverter/Charger - provides 100A Battery Charging In my specific hull 505 I have a Progressive Dynamics 4000 load center. This houses the AC Breakers, DC Fuses and a converter section for battery charging. In my PD4000 there is a PD 4065 Converter section (65A) with Lithium Jumper for Battery Charging. In normal operation that charger is set to WIZ (or Lead Acid) position and it follows a profile that's perfect for lead acid batteries and AGM's. If I move the switch (or jumper) to the LI position, it now has a constant output at 14.6V which is OK for Lithium but not optimum for the Lithionics batteries. Lithionics prefers that I use another charger with a programmable LI profile. My Plan: I'm upgrading my current PD converter charger and separate Prosine 2000W inverter to an integrate Xantrex XC2000 Pro Charger/Inverter. Note: I don't plan on running my AC off the batteries so the 2000W inverter is plenty for my needs. In the Platinum Package Oliver installs the XC3000. Installation Research and feedback from Oliver Service says that I need to Disconnect the existing PD4065 converter charging leads that go to the batteries and tape them up. Leave the charger block in the PD4000 load center cage - just in case I need to downgrade later back to AGM's. Remove the existing 2000W Inverter and Auto Transfer switch. (The load and AC wires go back into the new XC2000 along with the 4/0 B+ and GND leads) Mounting issue: I'll need to figure out how to attach the new inverter to the same spot under the street side bed. 3) Solar Charging - No Change at this time In my Hull 505, I have a Zamp 30A PWM Solar Controller. This controller isn't as efficient as an MPPT controller, but it is already installed and works. In keeping this first install simple, I'm leaving that in place. My Plan: I'll be leaving Zamp 30A Charger in place for now, and will upgrade to a higher power MPPT controller in the future along with more solar panels. Installation Research and feedback from Lithionics says that I need to: Install a breaker on the solar + line so I can Isolate from batteries. 4) Decluttering the battery box - It looks like many of you have moved all the loads and negatives to common bus bars as a way to declutter the battery box area. I want to do the same...I've read the posts so far but wonder what's been the most difficult part of those change overs? I plan to wire in a cutoff switche for the main B+ power (Big Red Knob) and a breaker for the Solar Inputs so I can cut all power for winter LI battery storage. Comments welcome before I get to the start line. Craig Hull 505
1 point
-
Wow! Another great project and post John. This has all given me a lot of ideas if/when I eventually upgrade to the BattleBorn lithium batteries. And at what point does Oliver just start sending all production trailers to you as an unfinished hull to have you finish the job for all customers to this high level of quality? 🙂1 point
-
Thanks for the work JD - appreciate the effort - I may never go here - but I can always learn something - for the future needs. RB1 point
-
Do like the forum. Tremendous amount of info on the Ollie. I believe the mount is hope. I have contacted service and am awaiting a reply.1 point
-
When we were doing my lithium upgrade and rewiring we noticed the mounting board for my inverter had come lose at the bottom. Epoxied and braced, now all is well. Mike1 point
-
The white material is PVC foam board and it should have been attached with two part marine epoxy. If done correctly, it should not be able to be removed. If you want to repair it yourself; lightly sand the area and PVC board, clean both with isopropyl alcohol, apply the epoxy and brace for the entire cure time listed on the epoxy packaging. Andrew1 point
-
I would consider it for the Ollie. We also have an induction range at home for daily use. It took a little practice, but we really like it. It cools down so fast. It also boils water very fast. I know induction is becoming more common in the marine industry including sail boats. One of the sailing YouTube channels, SV Delos changed to induction and run it mostly from solar and lithium batteries. They do have a back up generator.1 point
-
We have a portable single "burner" induction cooktop that I use at home that we plan to use in the Oliver. With our Lithium pro pkg and a generator, this is entirely possible. However, I would not want to give up the propane cooktop as I like having as many options as possible, especially when it comes to cooking. Examples: we generally carry a small portable LP tank, a Jet Boil Genesis Base Camp two burner stove, and a portable gas grill - appliances we have accumulated for various camping situations. It's nice to be able to cook outdoors, especially in warmer weather. We chose the no microwave option for our Elite II; instead we have a Breville Mini Smart toaster oven, which serves as an oven and can be used in an outdoor kitchen setup. We have yet to camp in warm enough climate to cook outside and have not experienced a moisture problem cooking inside with the propane cooktop. Ventilation is key and the Maxair fan is more than sufficient to remove any moisture resulting from cooking indoors. It is an improvement over the Fantastic rain-sensor Fan in our Leisure Travel Van. It was not reversible so only pulled air in, and the rain sensing function was annoying. We are very happy with our Oliver as outfitted. I wouldn't anticipate Oliver adding many new options as they streamline production during high demand so as not to compromise quality and customer service. Perhaps when the pandemic subsides and the RV market returns to "normal" upgrades such as induction cooktops and compressor fridges will be offered. Edit: I'd like to add that even on shore power, you have to be aware of how many high wattage appliances you use concurrently. Sometimes this can be tricky.1 point
-
You may want to read through this related old thread.1 point
-
towards ground squirrels1 point
-
The non rally rally is really a rally?1 point
-
A simple click modern technology love it . It’s back. Thank you1 point
-
As a reminder, please be considerate and do not choose a map size larger than medium. Actually, because so many people view the site from their phone, the smallest size is preferable, and is perfectly viewable. Some of the maps I'm seeing lately are literally the size of an 8 1/2 x 11 sheet of paper on my monitor. We all like seeing where you've been, but no one is *that* interested. The pull down menu to choose your map size is located right above the button to create your map.
1 point
-
wilderness fly fishing1 point
-
I doubt if any of the front marker lights would be connected to the attic bus bar in the back. I think JRK is referring specifically to the big “Oliver” light on the back of the trailer. More likely the light that you’re having trouble with is hooked to the main bus under the pantry/dinette. That’s a ~6” long aluminum bus bar on the very bottom under the dinette seat with a ton of yellow wires attached: I’d check those connections but also there should be a round access hatch in the closet to access that light, so check the connection there too. Should be noted that you can overtighten the screws on those bus bars, cutting the wires; so don’t go crazy tightening all the screws. Just snug enough that the wire doesn’t pull out.
1 point
-
Welcome PMG, this site link will get your started on linens and fitted sheets, blankets etc for your new Ollie. We have had excellent results with their products and above and beyond professional customer service. I highly recommend them. Give them a call if you have questions, https://www.ablifestyles.net Congrats on your delivery day, it will be here before you know it!1 point
-
@Landrover I’m pretty sure that this is going to be a problem with the Member+ group, but we’ll see once Jason checks it. I think when he created that group, all of the settings didn’t get duplicated - there were earlier, more obvious issues when he first set it up, but this one is more subtle. Thanks for bringing it up and hopefully Jason can get it corrected shortly.1 point
-
THANK YOU ALL! We had another practice camping and followed your advice. No more adding gates or extra valves etc...just leaving it hooked together. (sometimes we look at each other do a face palm and say, "Thank goodness for the forum"). We are also pleased to have practiced tank flushing, getting a setting up and taking down routine and mastering the whale tail. So looking forward to May and the NOTT. Zef and 00na1 point
-
Galway girl has a really extensive list. It's a good thing to look through, but I'm sure they'd agree, not everyone needs all that stuff. Everything depends on your camping style, and how you can use what you already have. I encourage people to get the minimum, camp a few times, and then add to the collection. As they go.1 point
-
Us Oliver owners with the Lithium Pro Pkg who are less informed about power management (like us!) would benefit from instruction, be it from Oliver or Xantrex. Has anyone found a good source for such?1 point
-
I thought one difference is how the Batteries get charged and what "unit" in the Oliver is doing the charging: In our case: 2019 EII Hull 505 2019 EII has a 2000 W inverter....but that inverter doesn't have a DC charging output. DC Battery charging is taken care of by the Progressive Dynamics, PD4000 Energy Center embedded DC Charger. (It's a 45Amp DC charger for both AGM or Lithium, with a jumper to set it to either "Lead Acid" or "Lithium" chemistries which will be good when I upgrade from AGM to Li. When in the LI setting, the DC charger outputs 14.6V for Lithium.) Newer Olivers with factory installed Lithium Packages are using the XC Pro 3000 inverter which ALSO has a much heftier "DC Charging Unit inside". (In other words, they aren't using the DC charger within the PD energy center, instead they use the DC Charger within the XC Pro 3000.) See the table below excerpted from the XC Pro Spec Sheets - 150 Amps will help charge a Lithium Battery much faster. Also the programmable voltage level will help users set it specific to the Li battery installed. ELECTRICAL SPECS - BATTERY CHARGER FREEDOM XC PRO 2000 FREEDOM XC PRO 3000 Min Battery Voltage for Charging 0.0 Vdc 0.0 Vdc Max DC Output Voltage 18.0 Vdc (custom battery type) 18.0 Vdc (custom battery type) Selectable DC Output Current User Selectable: 5 - 100 A User Selectable: 5 - 150 A Full Load Max AC Input Current 24 Arms 25 Arms Max DC Charge Current 100A 150A1 point
-
I agree with Frank on this. The only dribble I can see would be if you unhooked your hose after you dump. There is no need to do that - just leave it connected and cap it. The next time you use it just hold the hose up so any remaining fluid doesn’t dribble out. Put your elbow on and lower it over the dump hole. Mike1 point
-
We always forget the opposite. We forget to open it when we set up at a campground, then we use the bathroom sink and suddenly realize our feet are standing in a puddle.1 point
-
I have an extension like what is mentioned above. I find it takes too much space in the bumper area and since we never disconnect our hose from the trailer it doesn’t make sense for us. I do have a clear elbow that came with my Valterra hose that works well. I have a backup Rhinoflex hose that attaches to the Valterra, they seem to use the universal connections.1 point
-
I’m not sure the sensors on the tanks are all that accurate.. or consistent for that matter. Usually our gray tank will get to zero, but sometimes it reads 6%... even though it’s empty. Next time yours is “stuck” on 15%, raise the front of the camper.. see if more water comes out.. if not, 15% is actually zero. Try lowering the front end as well.. as counter intuitive as that may sound, it may help “burp” the system....1 point
-
Empty the black tank first, then the gray. This will allow the gray water to somewhat clean the hose after the black water has gone through it.1 point
-
We left Hohenwald with our LEII n the 21st, by the time we got to Lubbock, TX we noticed one of the quick links was stretched just like this. Being rookies we headed to the nearby Camping World to see if they could help us, they did not have the same size quick link available, but we found some at Home Depot. Our guess is that the link was not screwed together properly when we picked up. When we called Oliver that morning they said they had never heard of that happening before...hmmmm...0 points


.thumb.JPG.c11094a6a8c73946473572dfe3e34685.JPG)


-
Recent Achievements
-


")


")


